Introduction
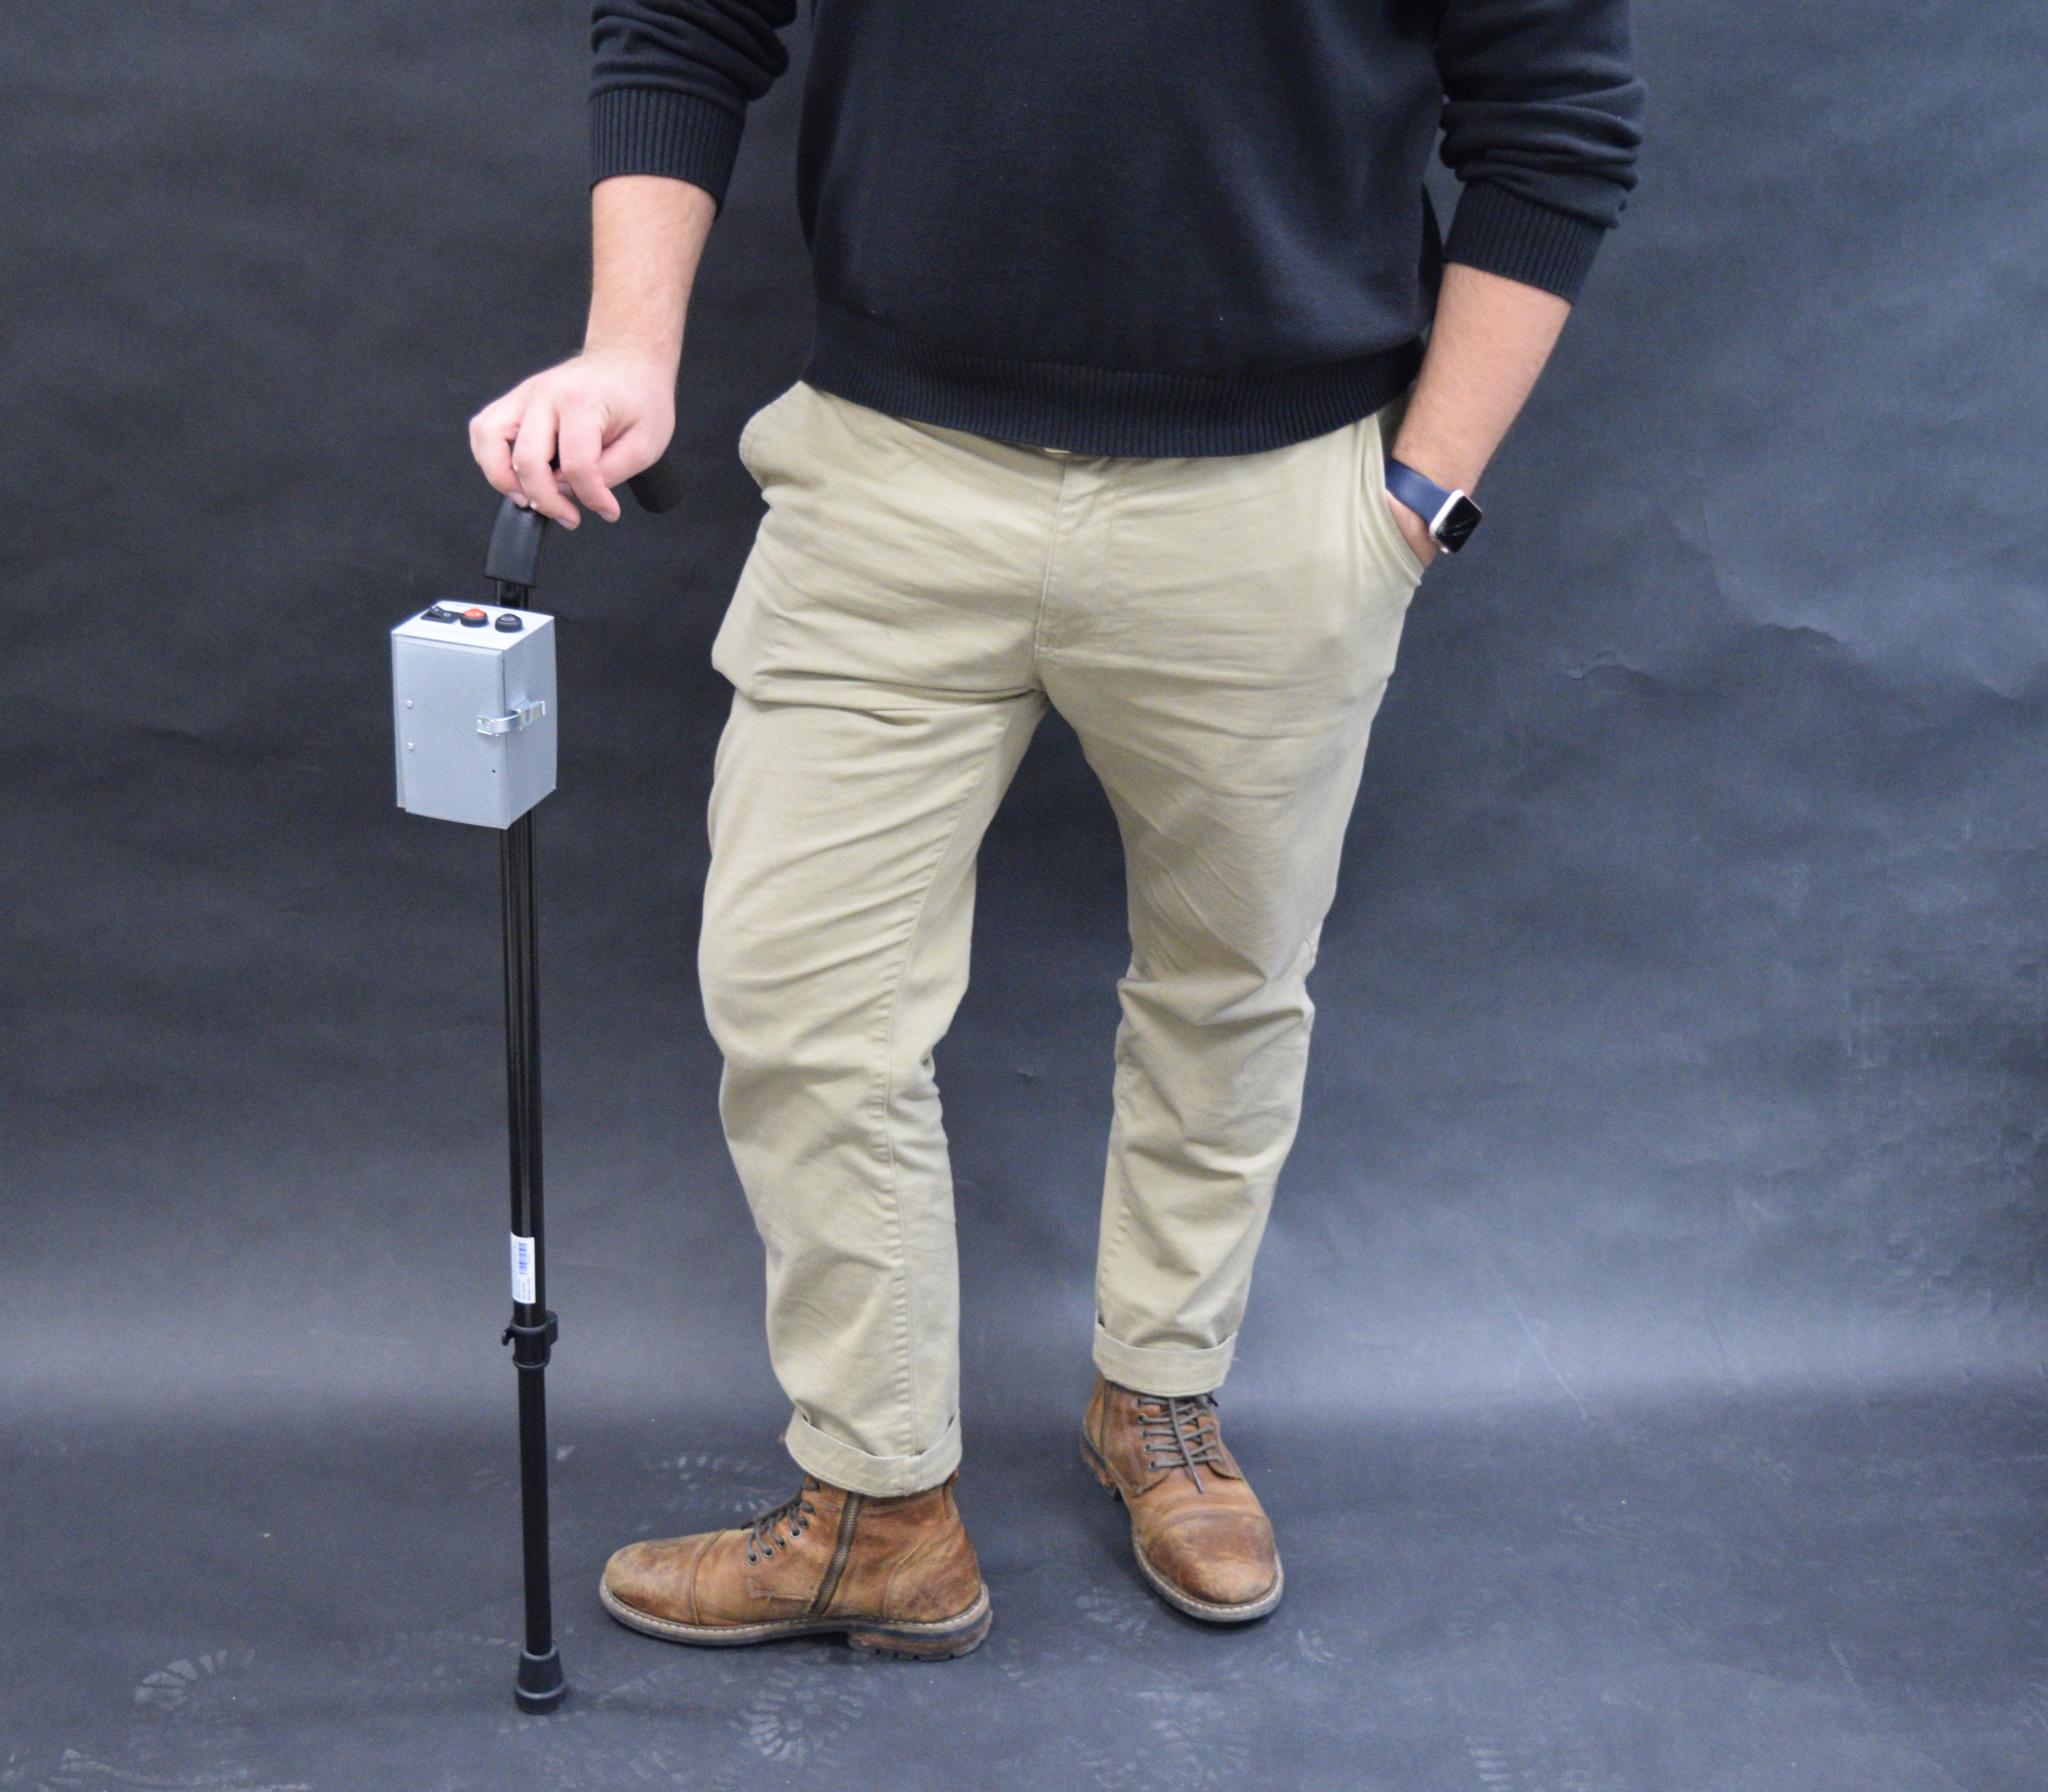
For our final project, our team worked with Joseph, a semi-retired attorney and a Parkinson’s patient, in a collaborative effort to design and develop an assistive device that would be useful to him every day. Over the past several weeks, Team Joseph created a detachable cane assist that focused on mitigating some of Joseph’s freezing episodes, which are involuntary and temporary blocks of movement that can limit his everyday mobility. Typically, Joseph experiences freezing episodes when he is due for his next dose of medication. This accessory will be useful to him during this time when he may be more vulnerable to freezing.
For more information about our process, please read our prototyping documentation and our meeting documentation with Joseph.
What we built
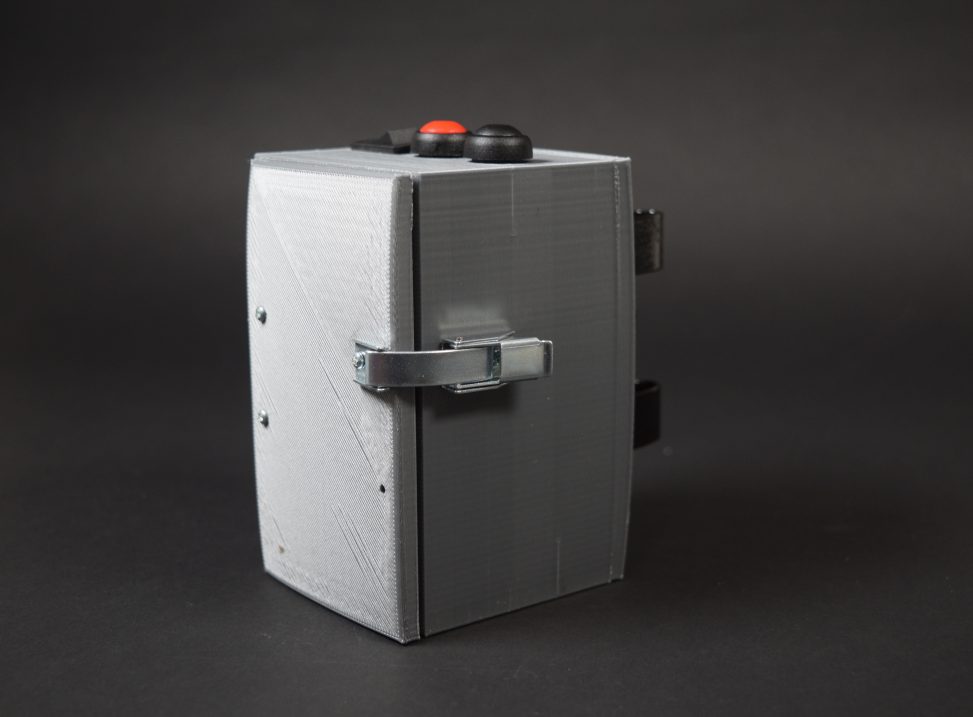
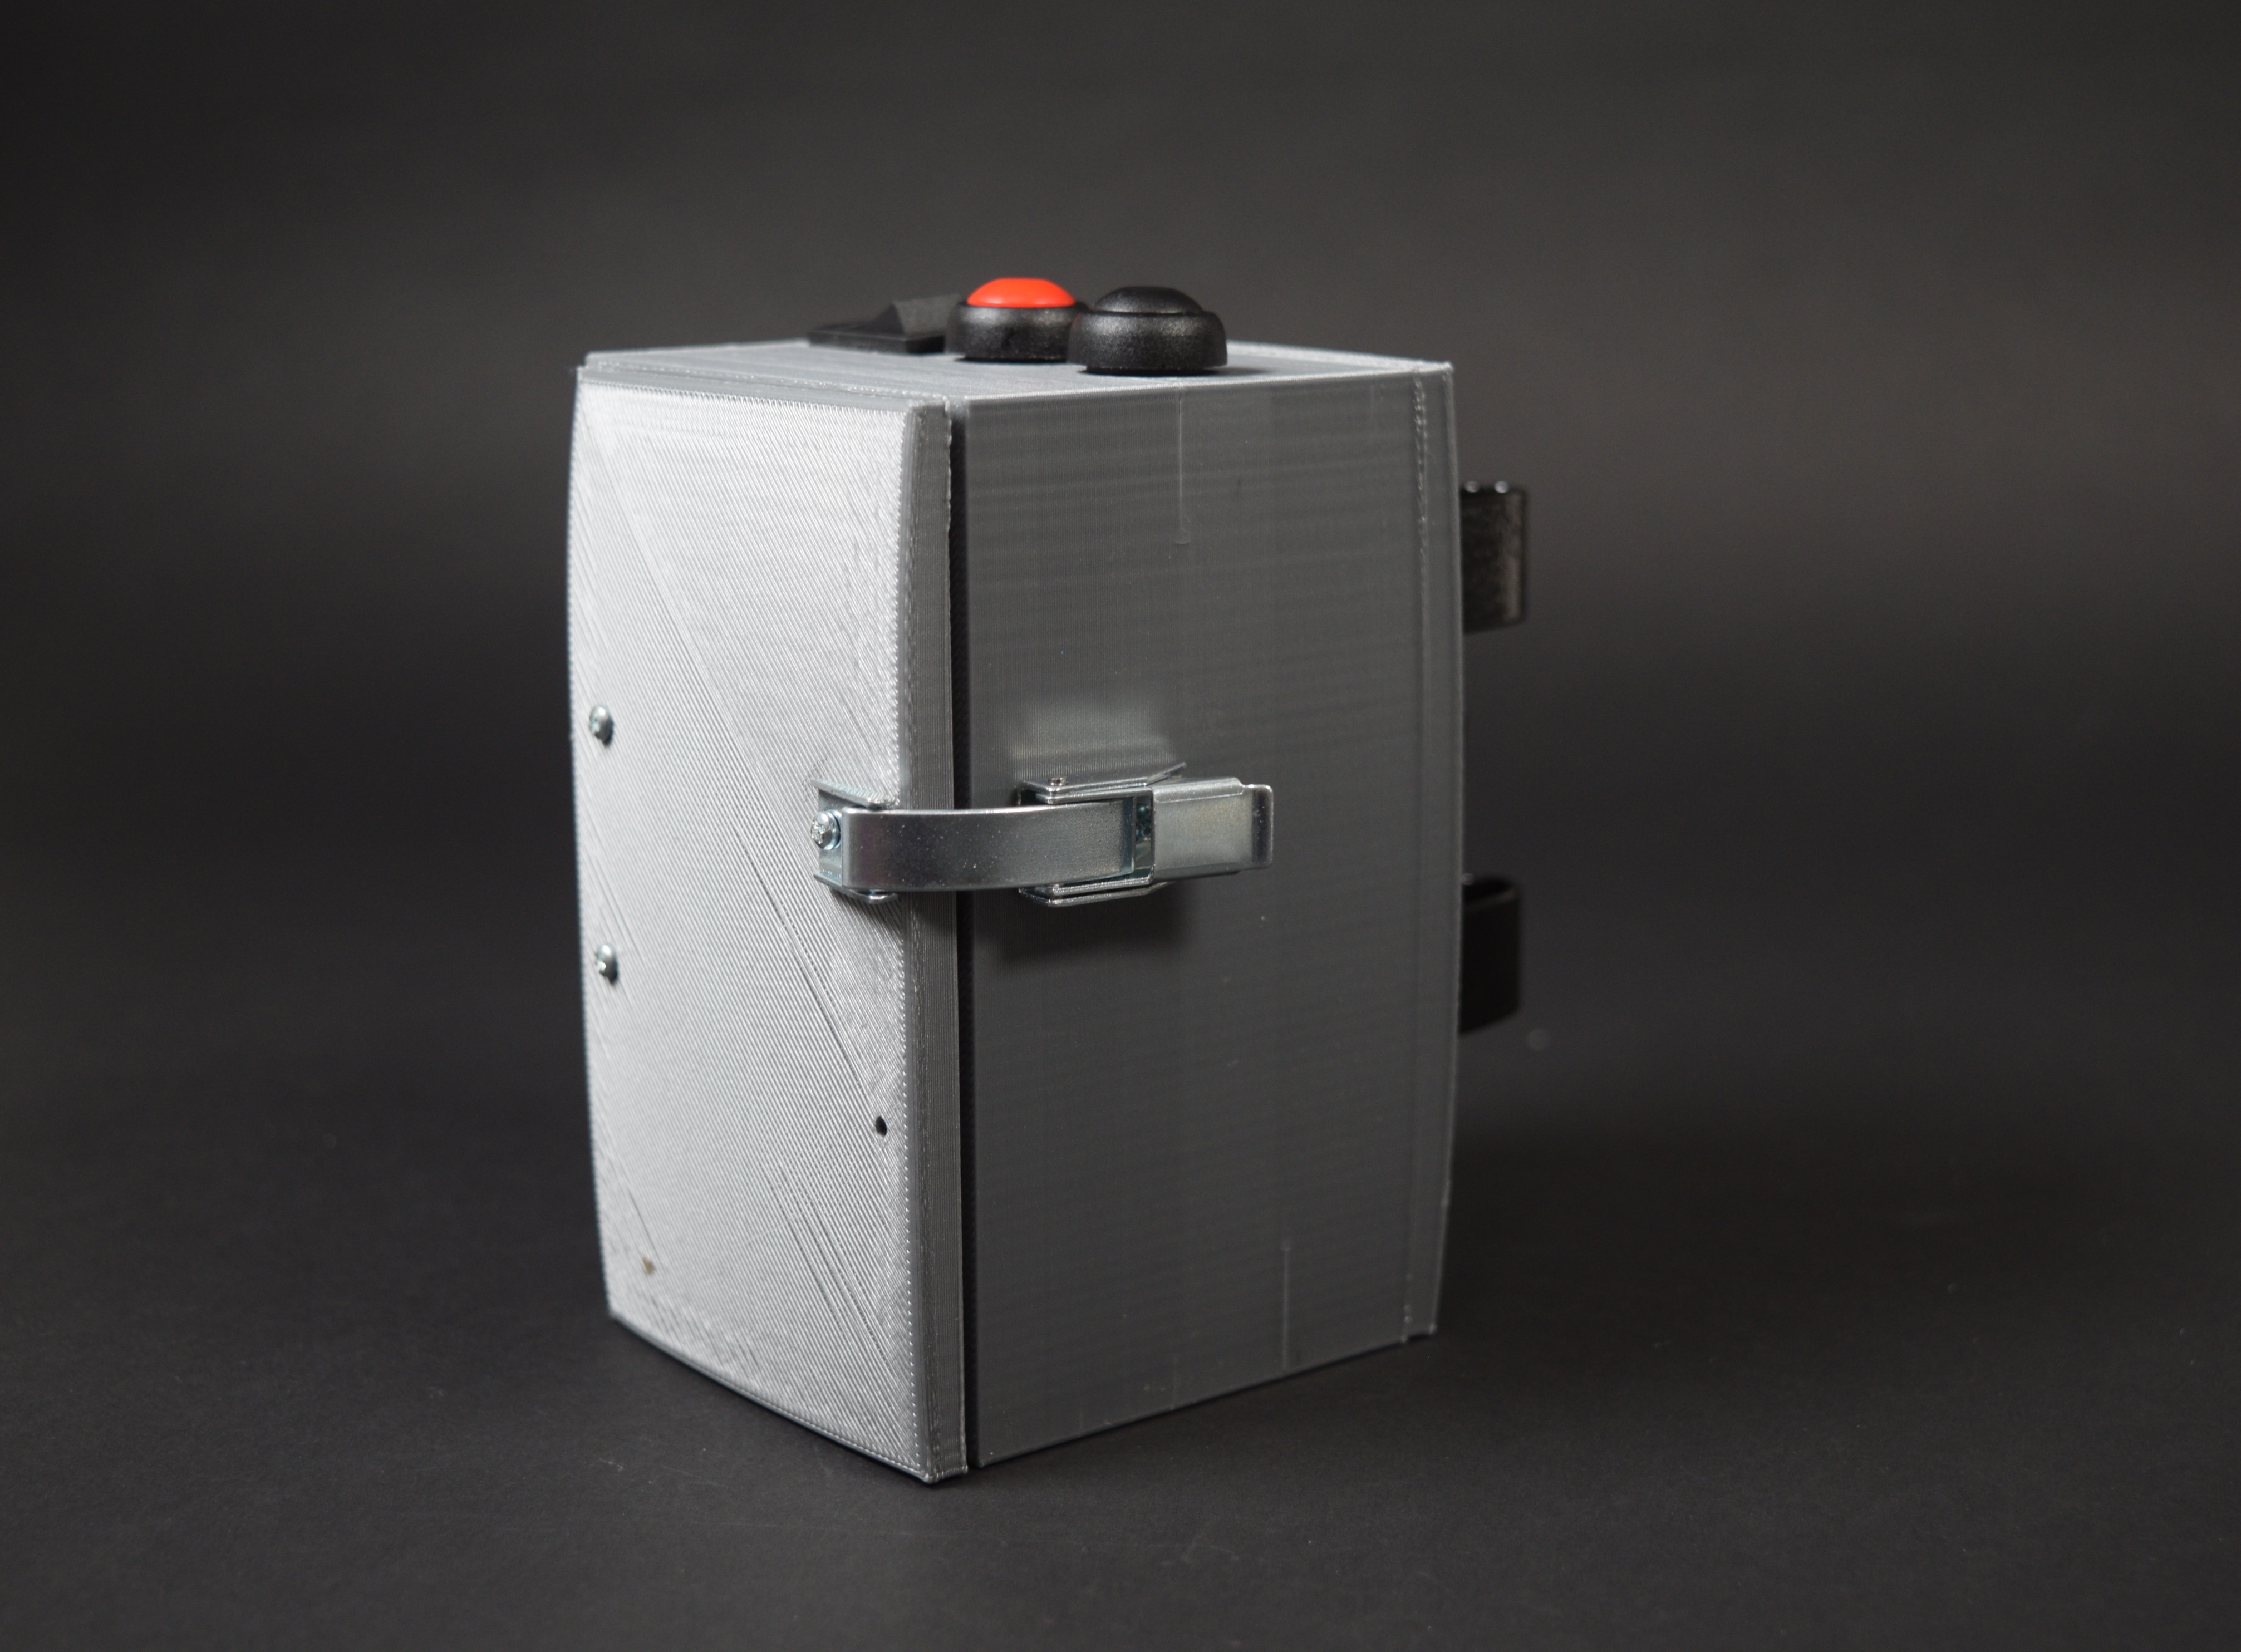
This detachable cane accessory provides a visual cue (a red laser on the ground) and a haptic cue (vibrating disks). Both of these cues gives Joseph a specific target to focus on, which can help him move past a freezing episode. The cane accessory is a 3-D printed box that has buttons at the top to control the power (on/off switch), the visual cue (laser), and haptic cue (vibrating disks). In case Joseph needs to change the rechargeable batteries, we implemented a hinge and a latch that can open the box. As Joseph travels frequently to visit family across the country, we ensured that the batteries were TSA-safe.
We 3D printed a custom box that can attach to any of Joseph’s many canes. Joseph likes to buy new canes for different needs (e.g. a cane for snowy/slippery weather, a cane for walking on inclines, a cane for collapsible travel purposes, etc.)
Luckily, we were able to find a spare cane in the Phys Comp lab. This helped us decide early on that we wanted a detachable feature, rather than built in directly to one of Joseph’s canes.
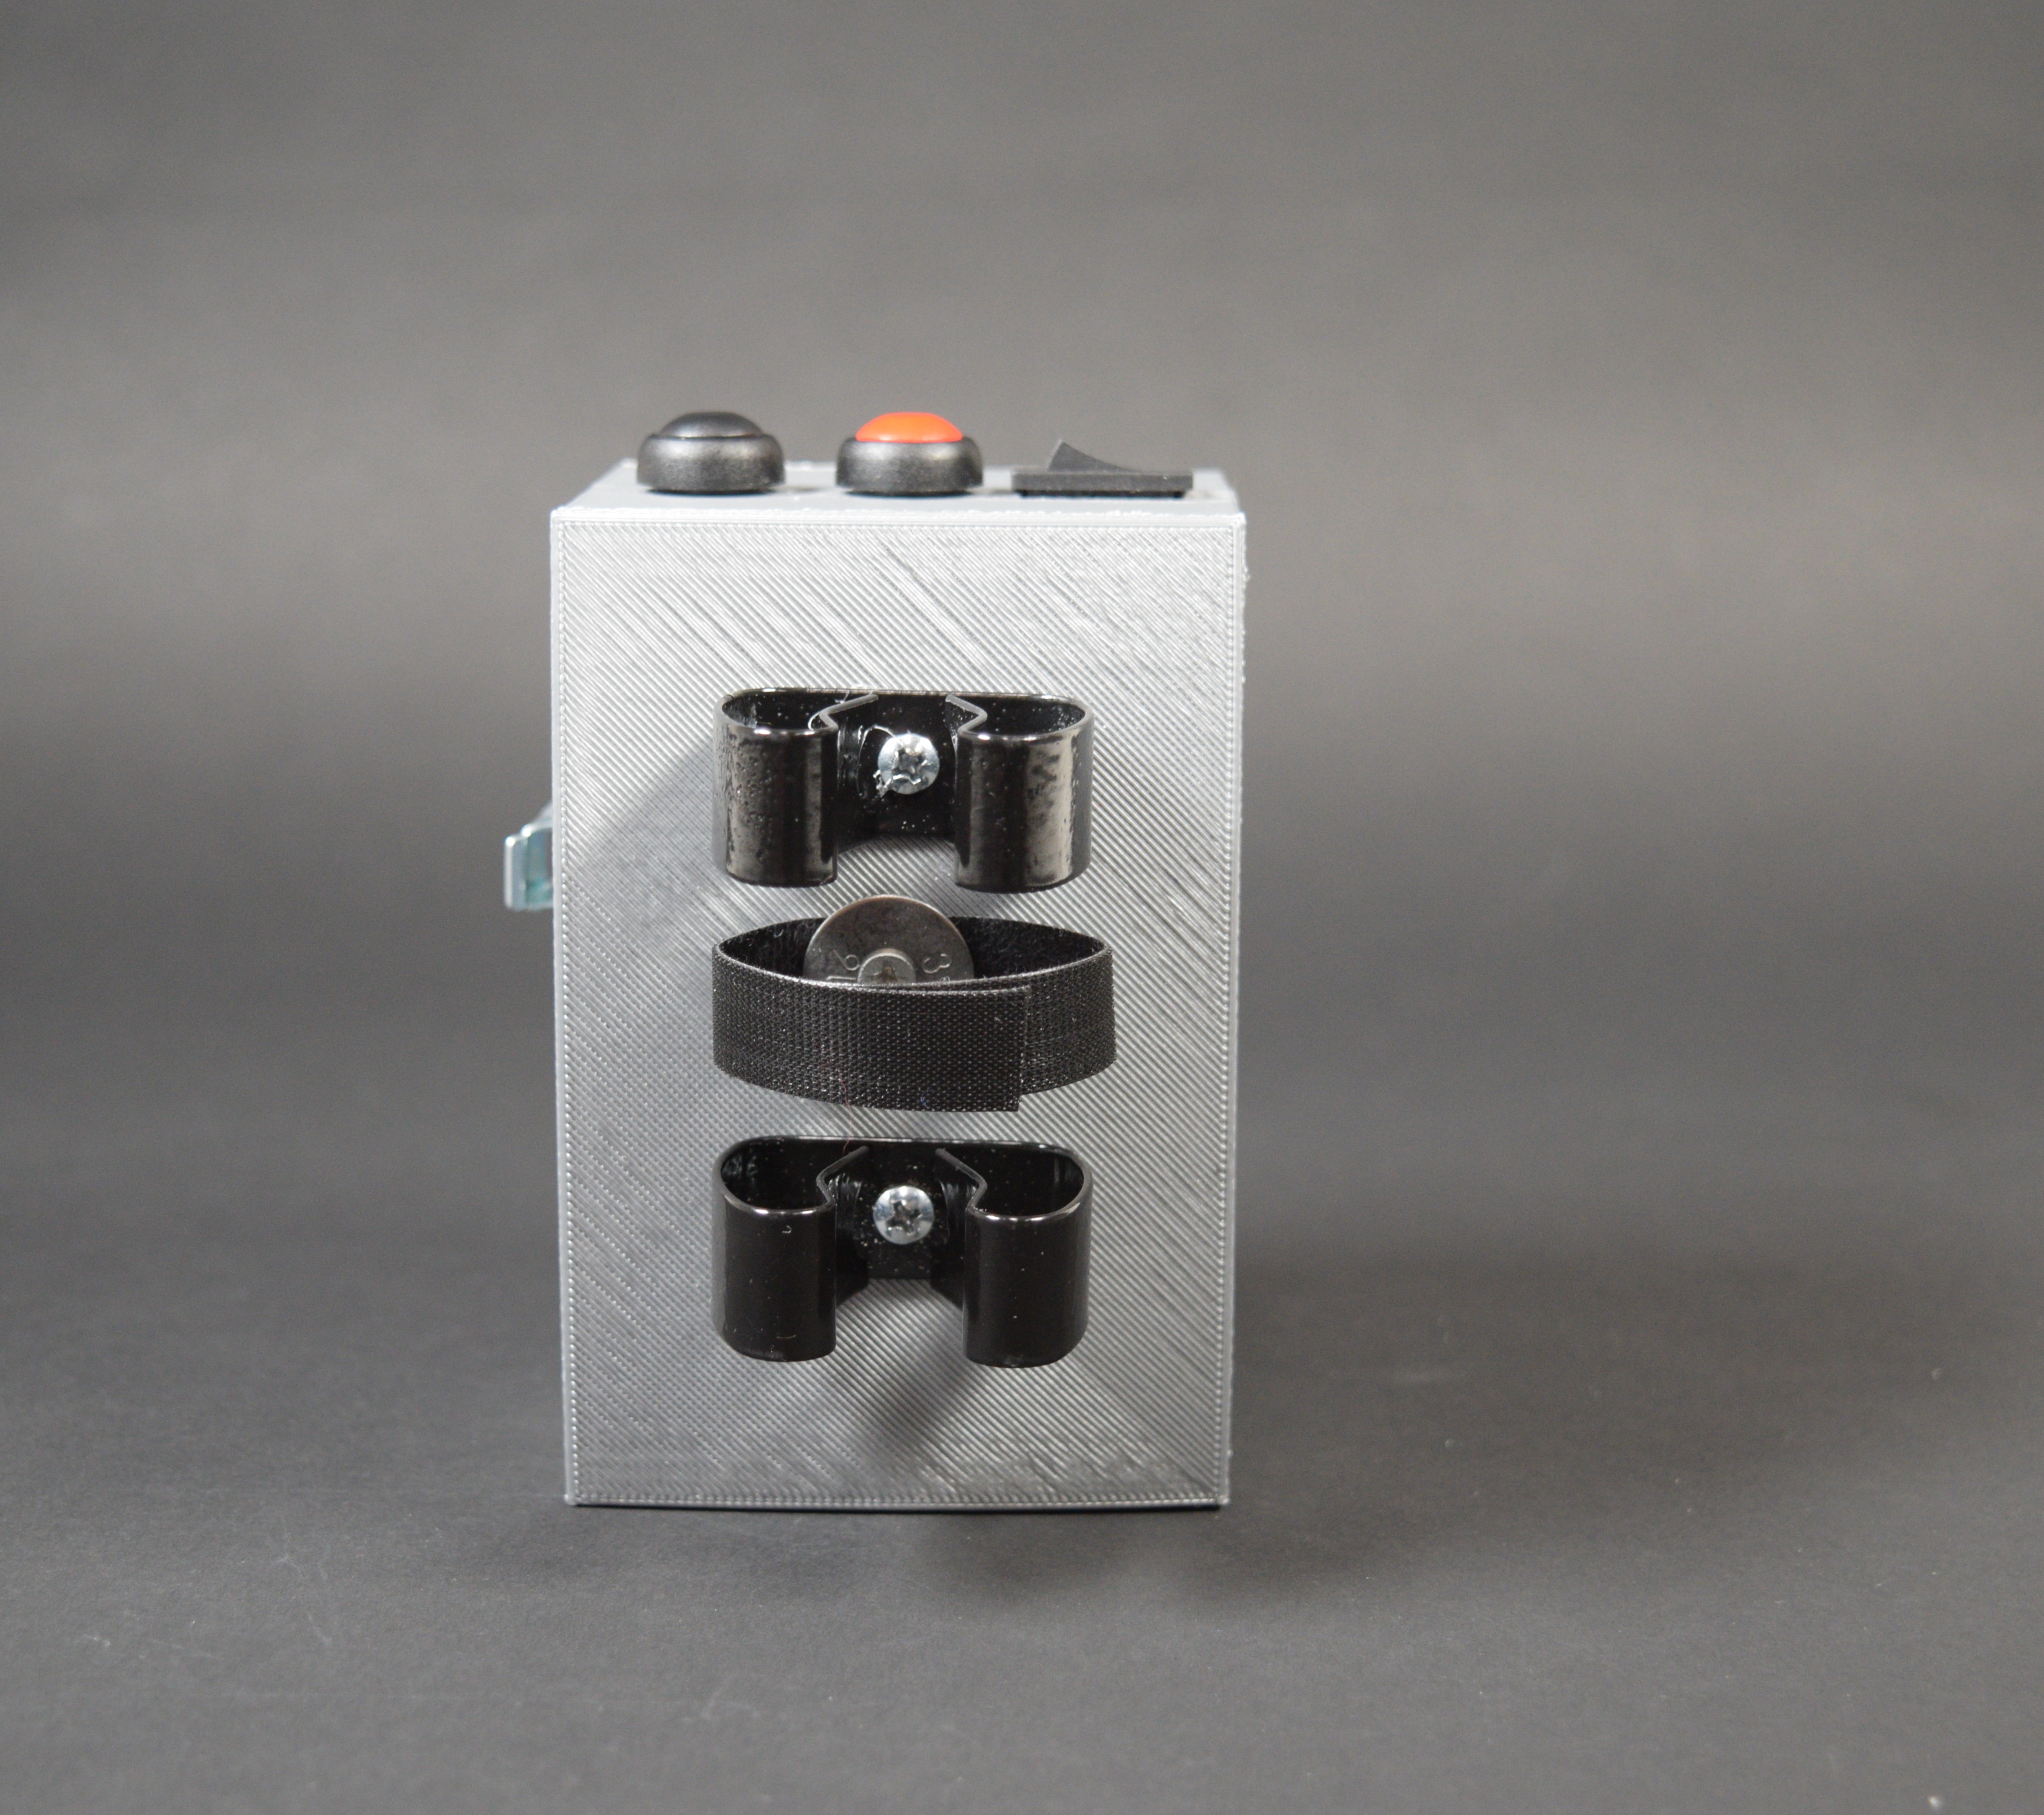
We ordered spring clips online. However, one roadblock that we ran into was that the clips were slightly too large for the cane we had at hand. Since this was a standardized size (and the next size up/down would not be appropriate), we decided to implement a velcro band that can attach to the cane as well, and keep it from falling off forward, which was an incident that we had during one of our demos.
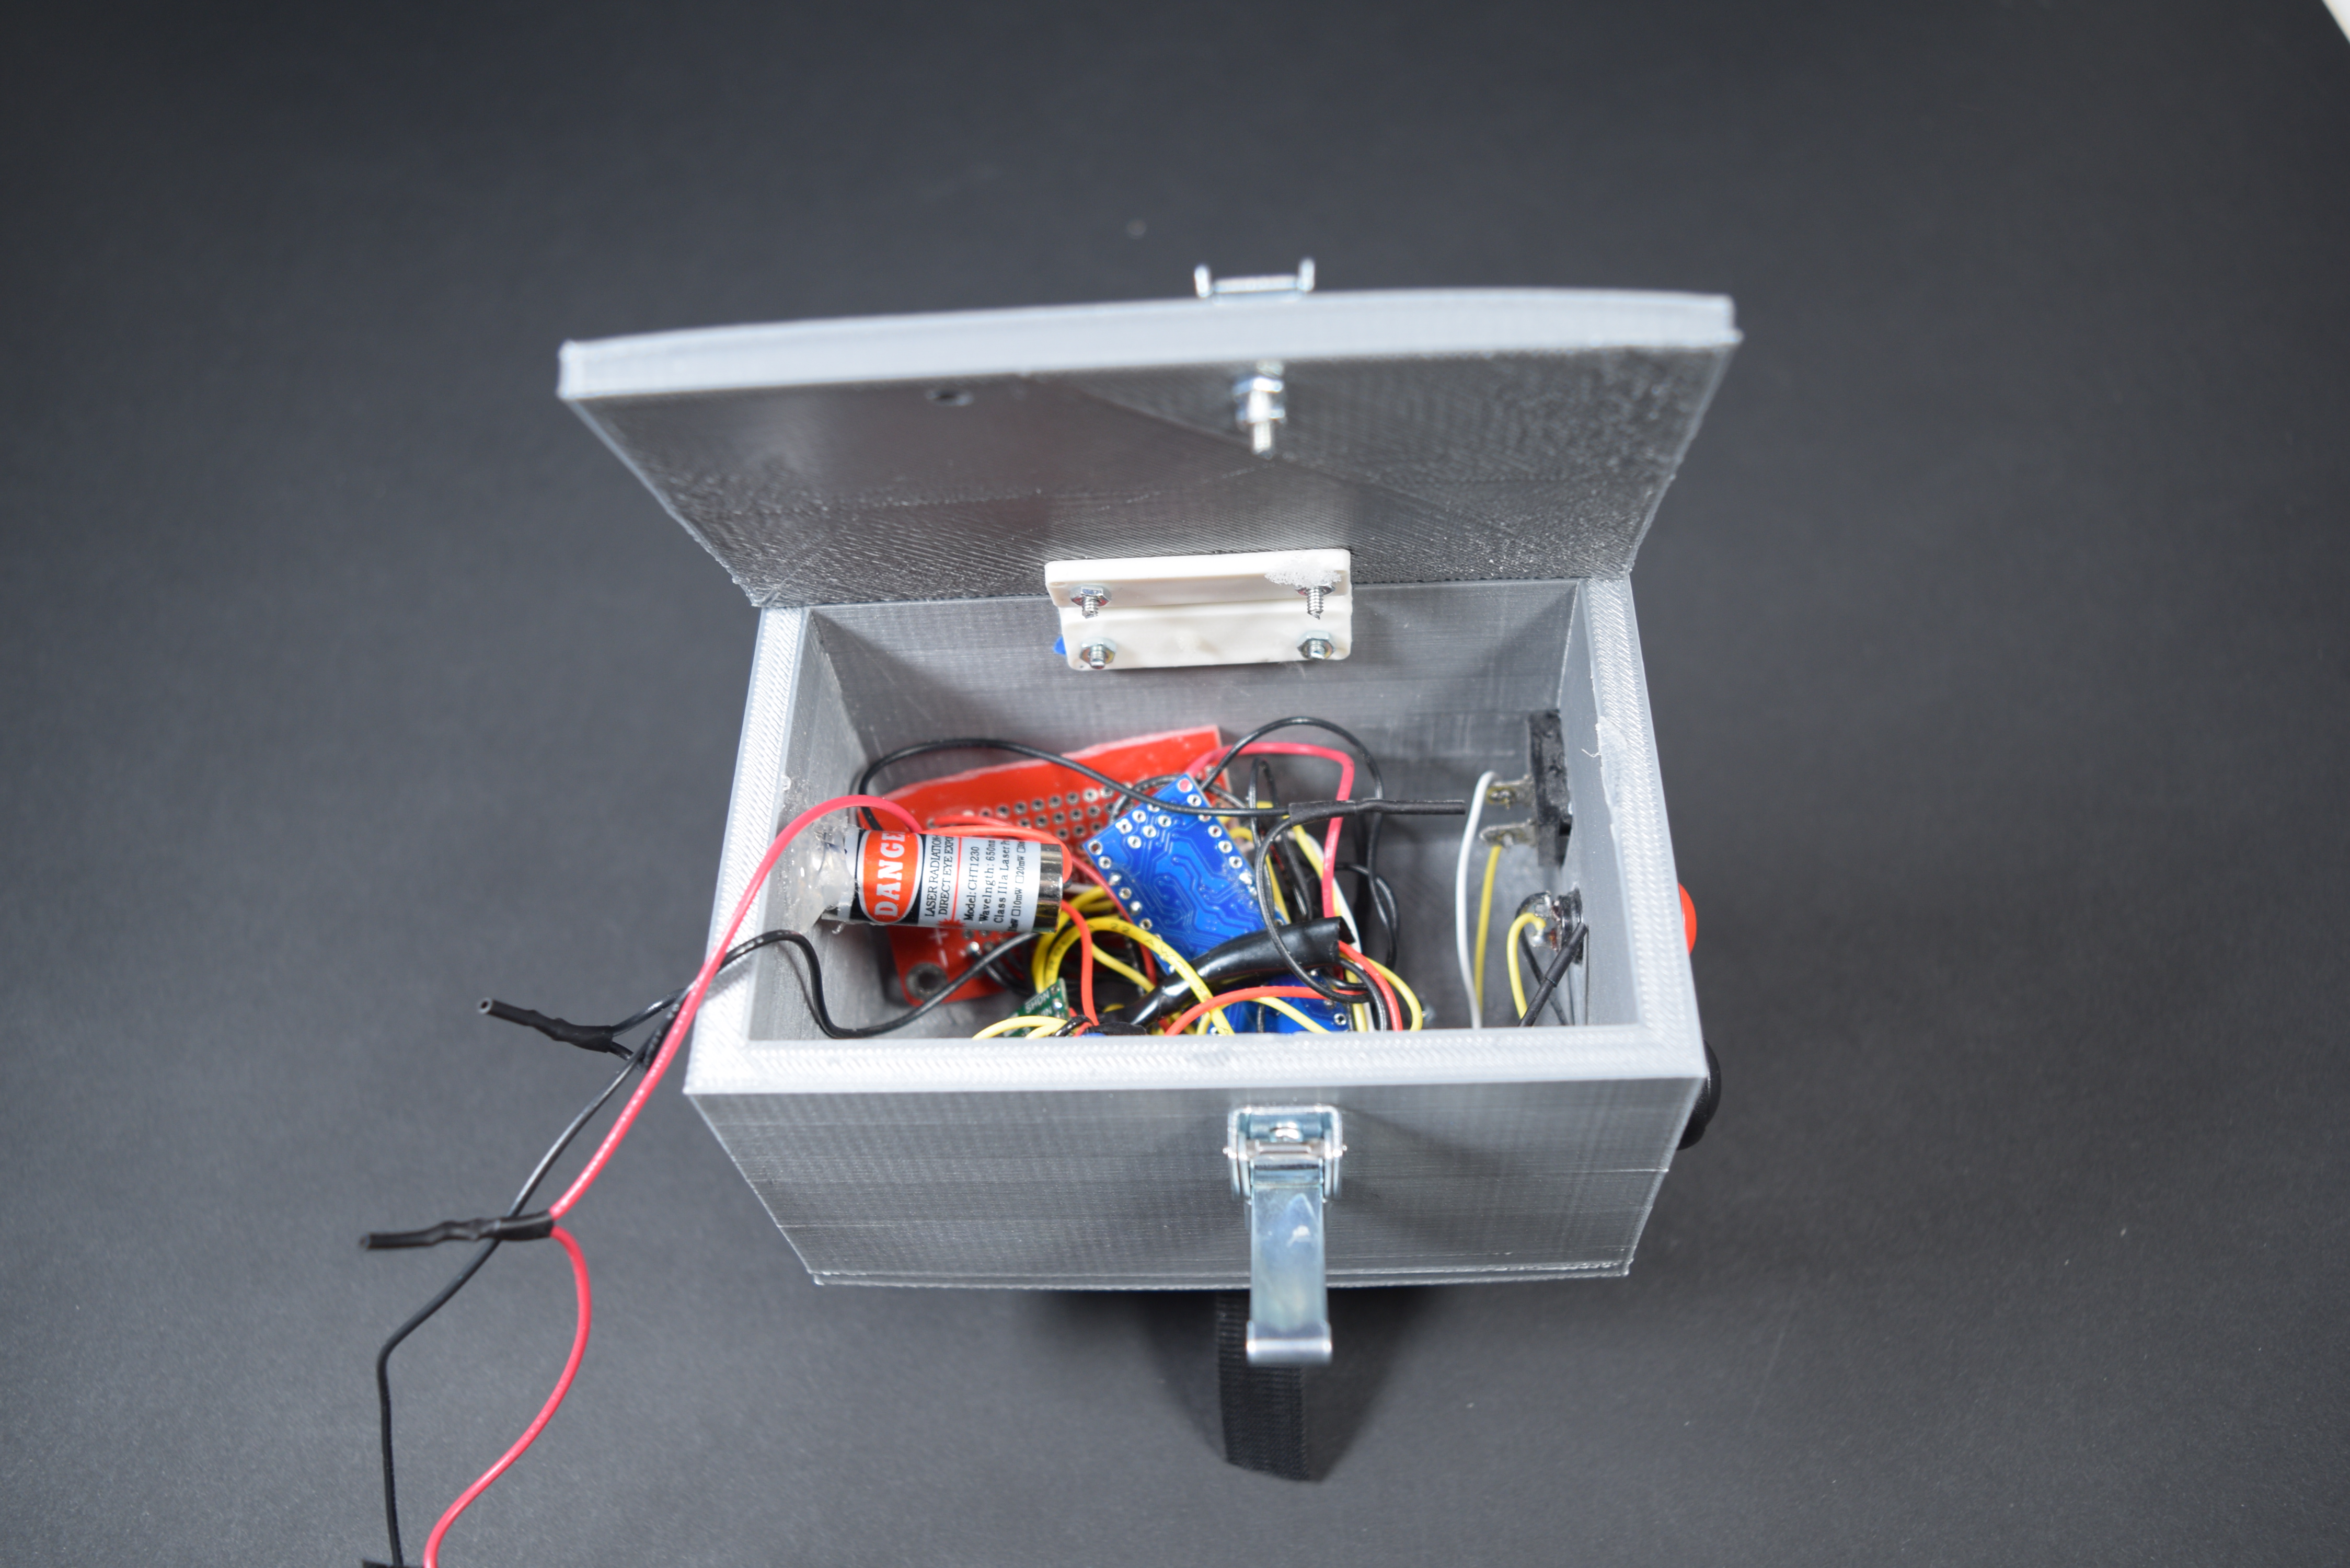
The very bottom contents of our box. This contains our soldered wirings to a protoboard to increase the box’s durability in the case that the cane is dropped. It also contains an Arduino Nano (power source not pictured).

The next layer of contents in our box. We used a scrap piece of thin 3D printer material to separate the backend wirings from the rest of the box. Pictured is the laser that is positioned at an angle to provide a visual cue that Joseph can follow and step over.
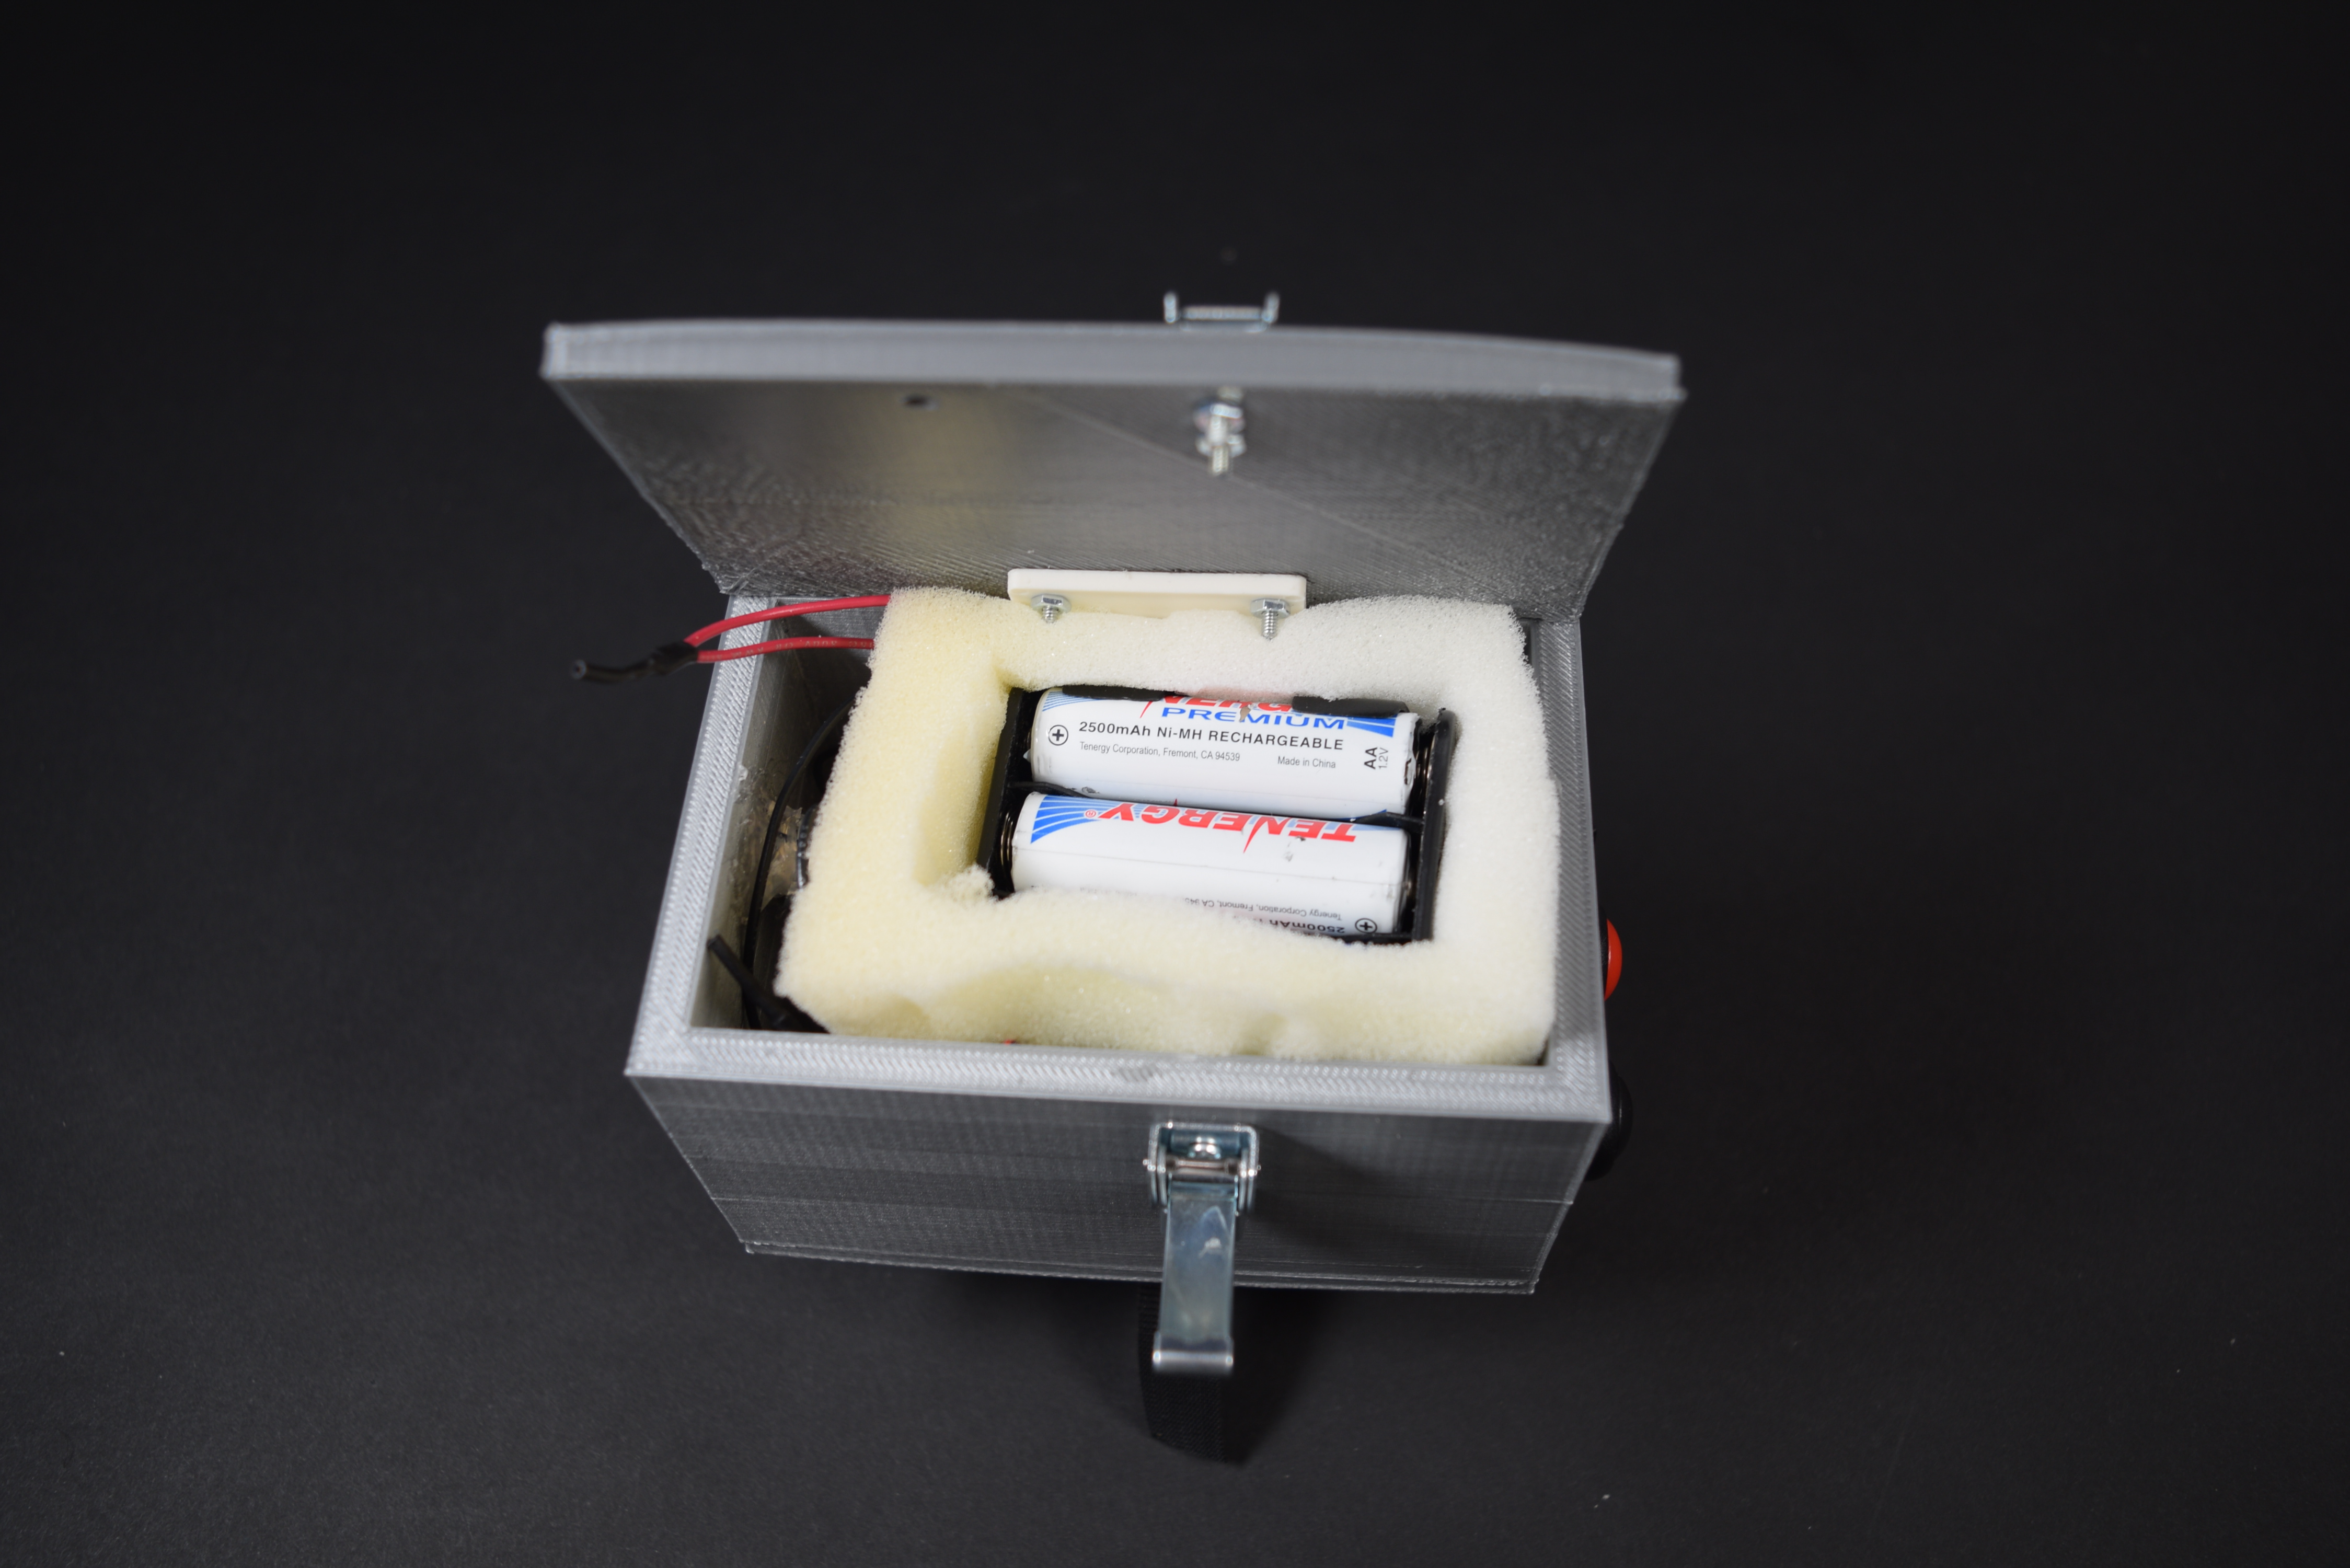
Top layer of contents in our box. We have a 3×2 battery pack powered by rechargeable dry-cell batteries that are TSA-approved. To keep the battery from jiggling around in the box, we cut a piece of foam to secure all of the box’s contents in place. We placed the battery at the top of the box for ease of reach once Joseph needs to change the batteries.
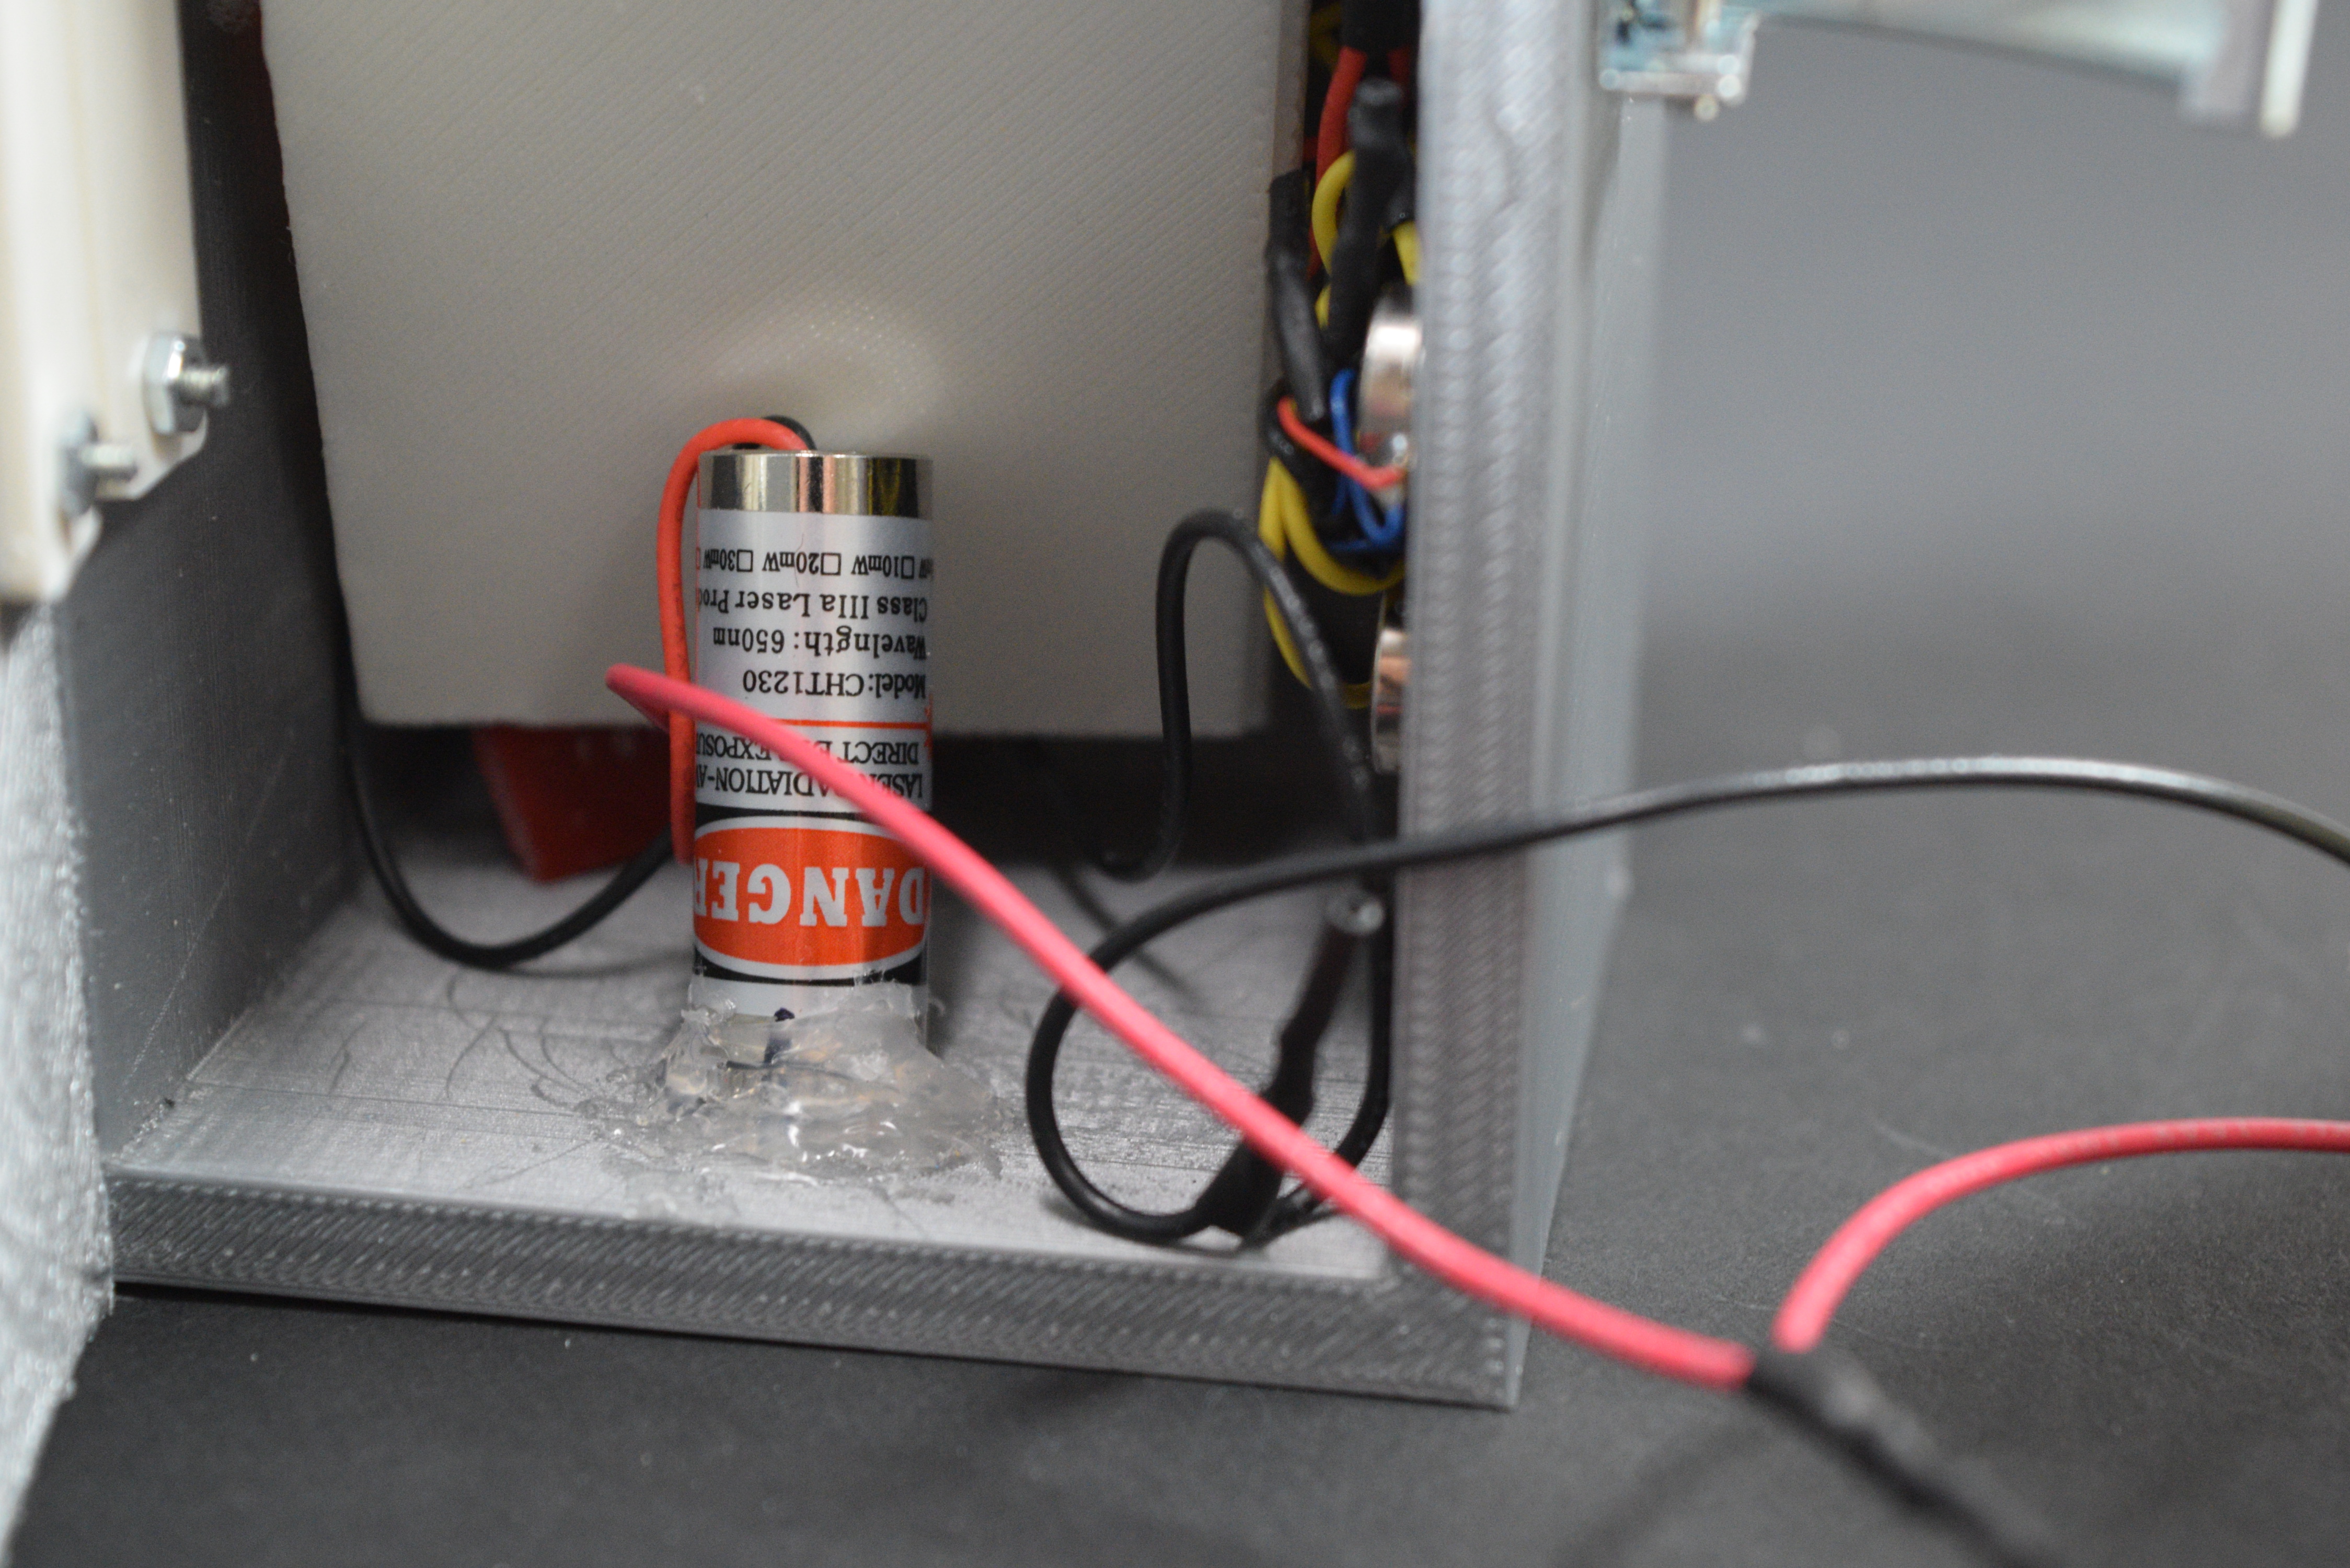
A close-up view of the laser that we embedded into the box. We used a hot glue gun to secure its position in case of a fall. On the inside right part of the box, we also glued 5 vibrating disks that will vibrate the box and the handle to provide Joseph a haptic cue. We tested the vibrations on Joseph to ensure that they were strong enough.
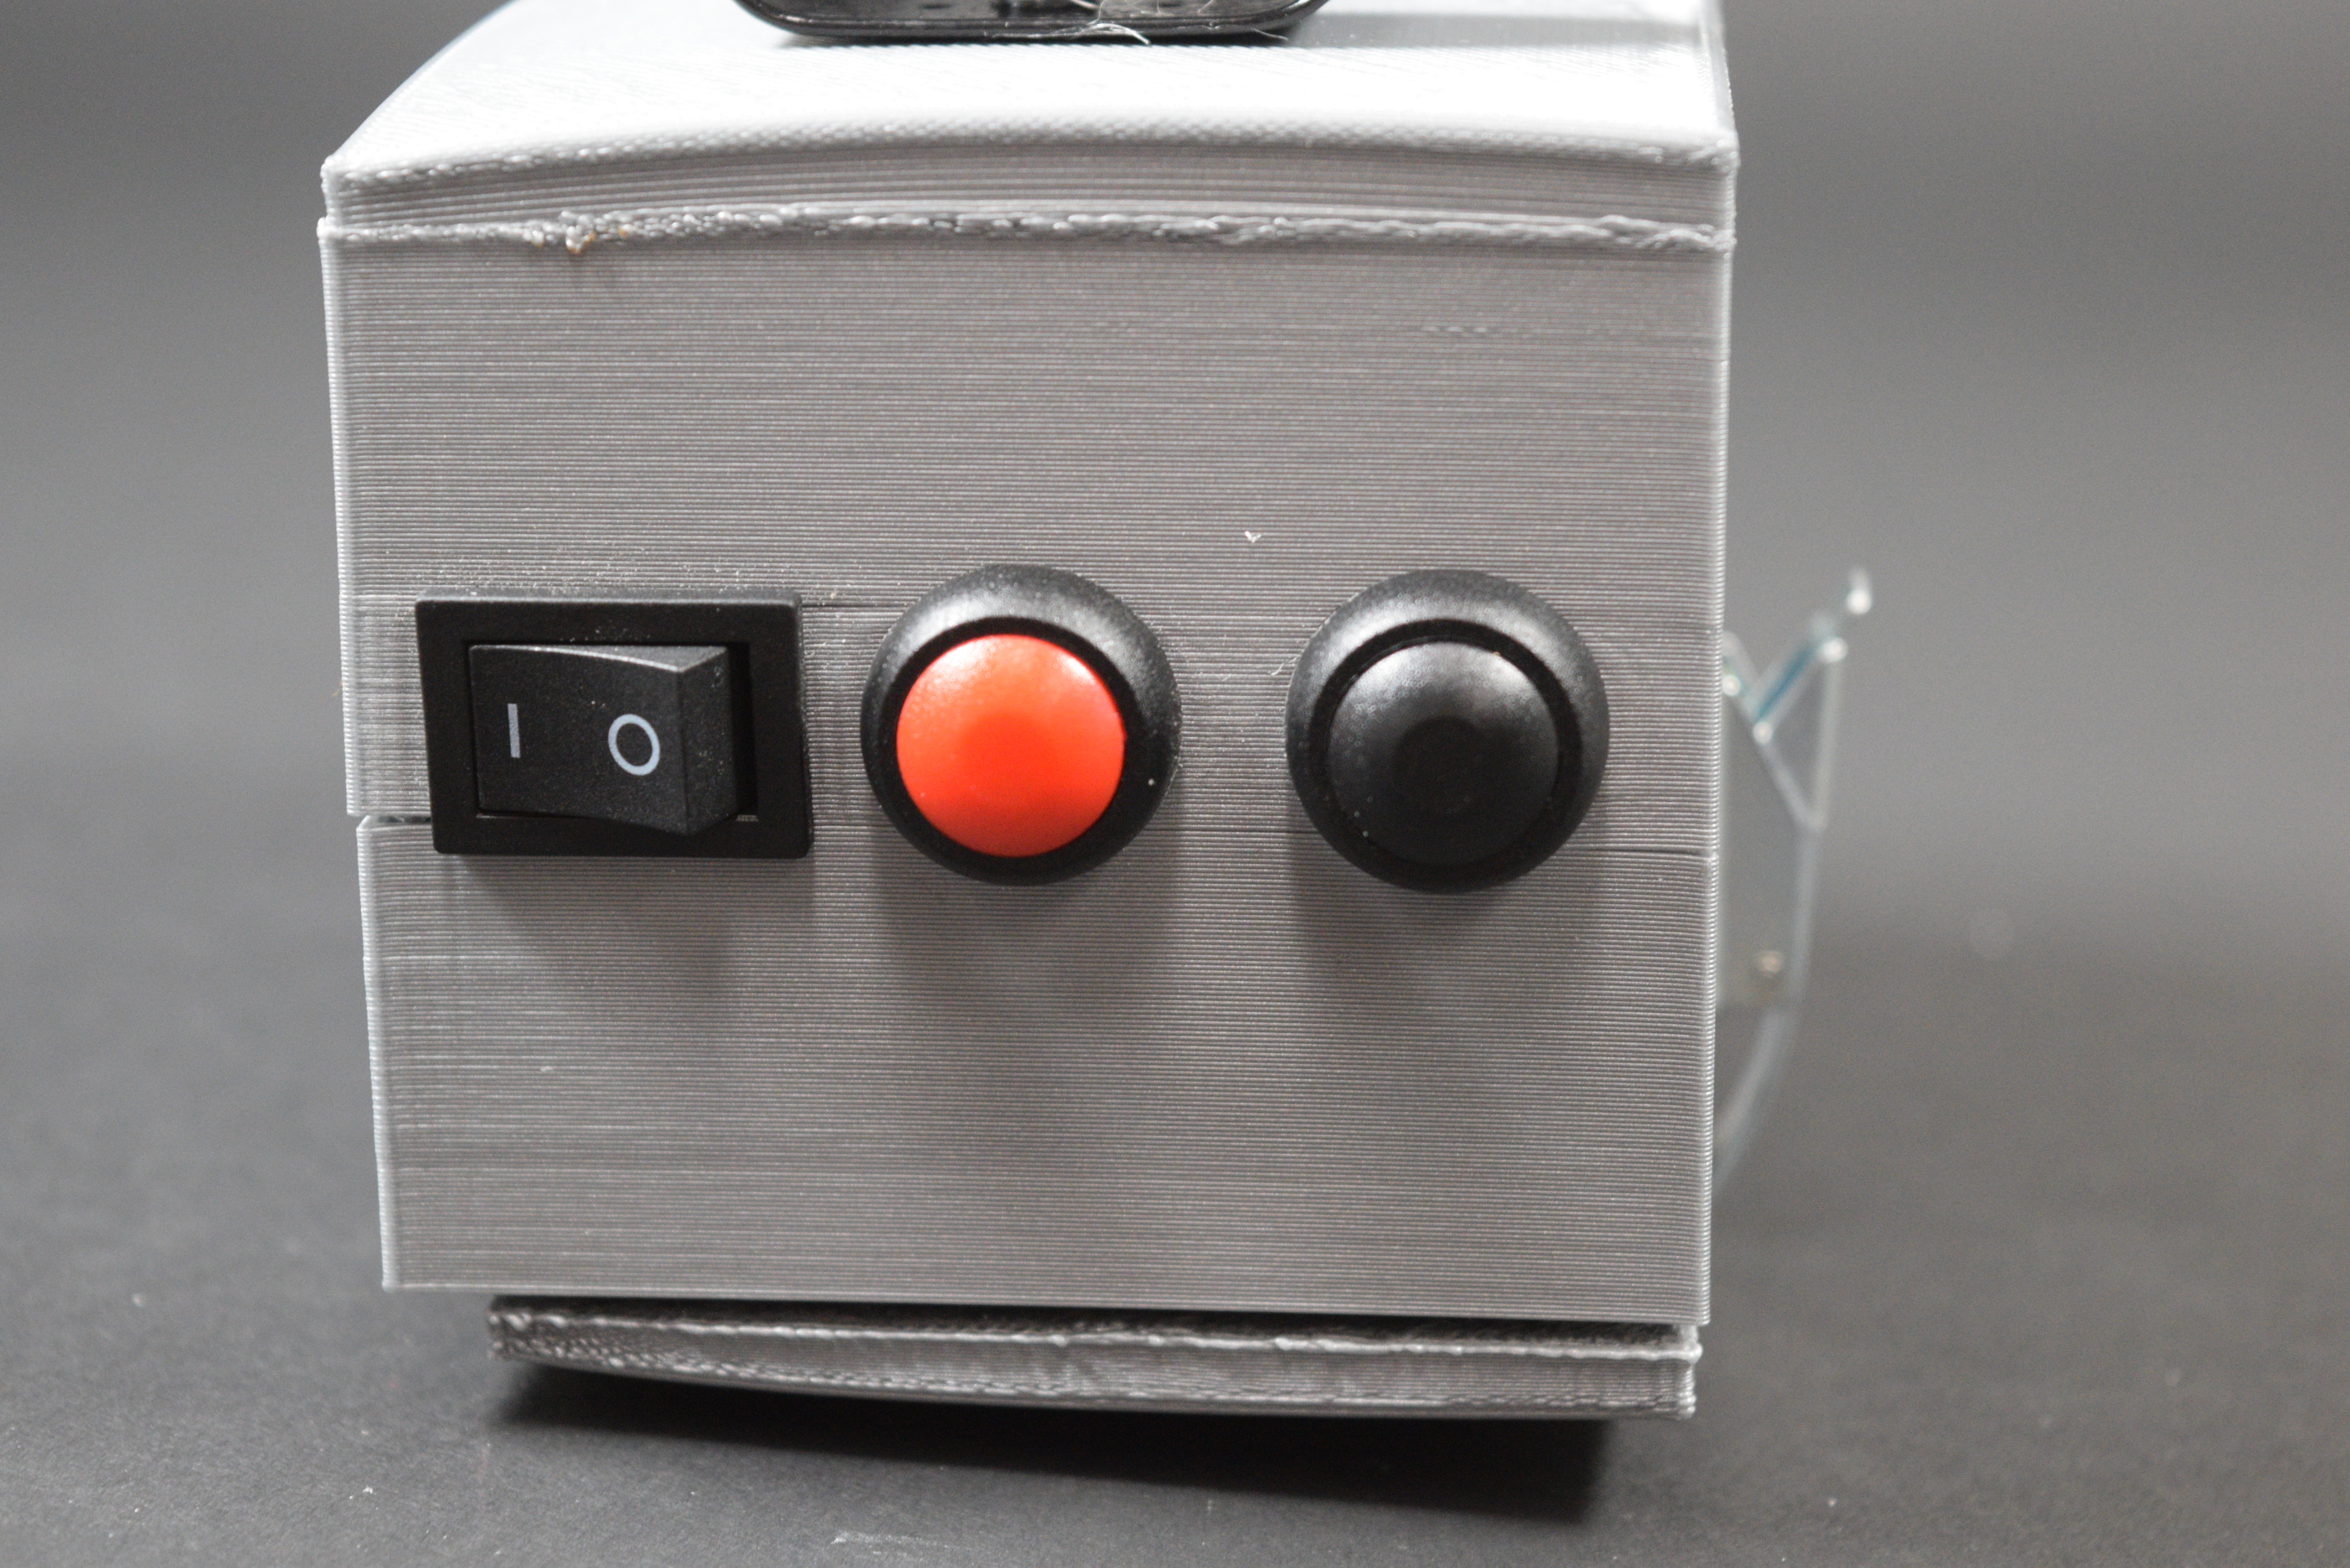
The top of the box contains three input buttons and switches. The switch turns the assistive device on/off; the off option allows us to save battery when Joseph does not need the assistance. The red button turns on the laser, and the black button turns on the vibrations. We made these cues independent of another per Joseph’s suggestion.
The above video shows how each of the buttons work. We designed the buttons to sit on top of the box so that Joseph could reach them with minimal movement (we confirmed with him that while he was in a freezing episode, he was able to move his fingers to reach these buttons).
Despite being a Parkinson’s patient, Joseph is still very active and travels frequently to visit his family in San Francisco. When Joseph goes to the airport, he brings a different cane with him — a collapsible one that will fit in his carry-on bag. Joseph also brings his detachable Cane Assist that can attach onto any one of his canes flexibly. He goes through TSA successfully.
In the latter half of the day, Joseph’s symptoms tend to worsen. Before his dopamine medication is due, he is more prone to freezing episodes. When he is navigating the airport, Joseph experiences a freezing episode, where he struggles to coordinate where to move next. He turns on the Cane Assist and pushes the laser button, as well as the vibrator button, which provides him both visual and haptic cues to stimulate his brain and help direct his next steps. With the Cane Assist’s help, Joseph is able to move past the episode. He remembers to take his medication and successfully reaches his destination.
How we got here
Along the journey of building Joseph’s Cane Assist, we made mistakes, discoveries, and pivots.
One big challenge that our team faced was figuring out how to build a custom box for Joseph. Since none of us had experience with 3D fabrication, we had to obtain outside help (thank you to one of Catherine’s friends).
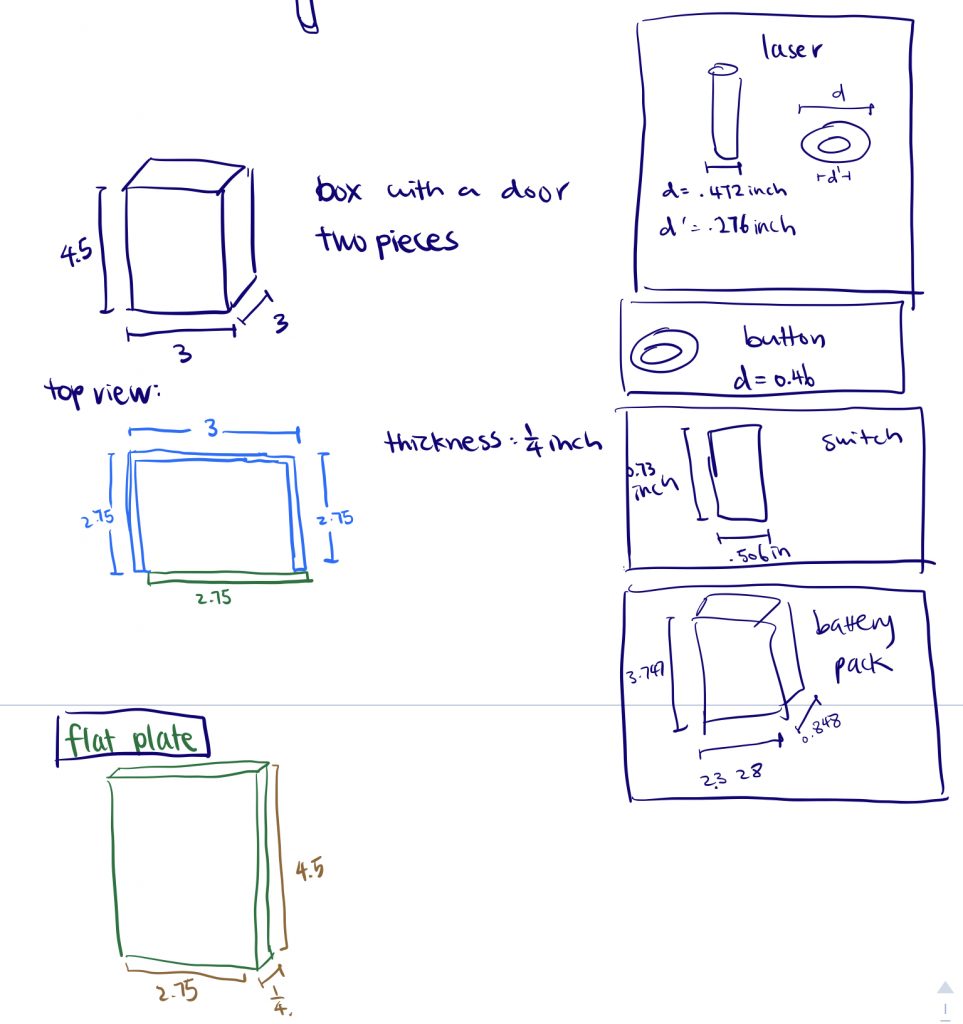
parts measurement
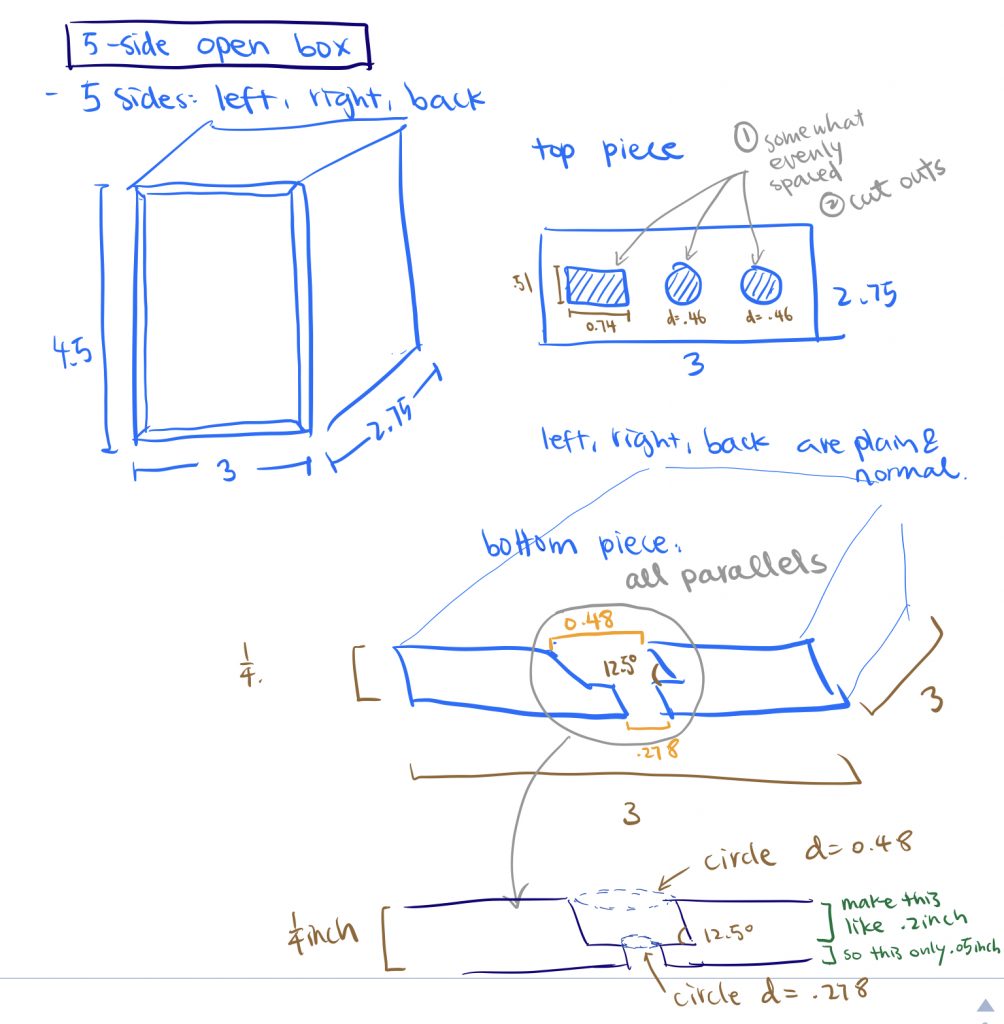
box design details
We faced several 3D printing mishaps, like the printer jamming overnight, so in the meantime we built an acrylic backup prototype.
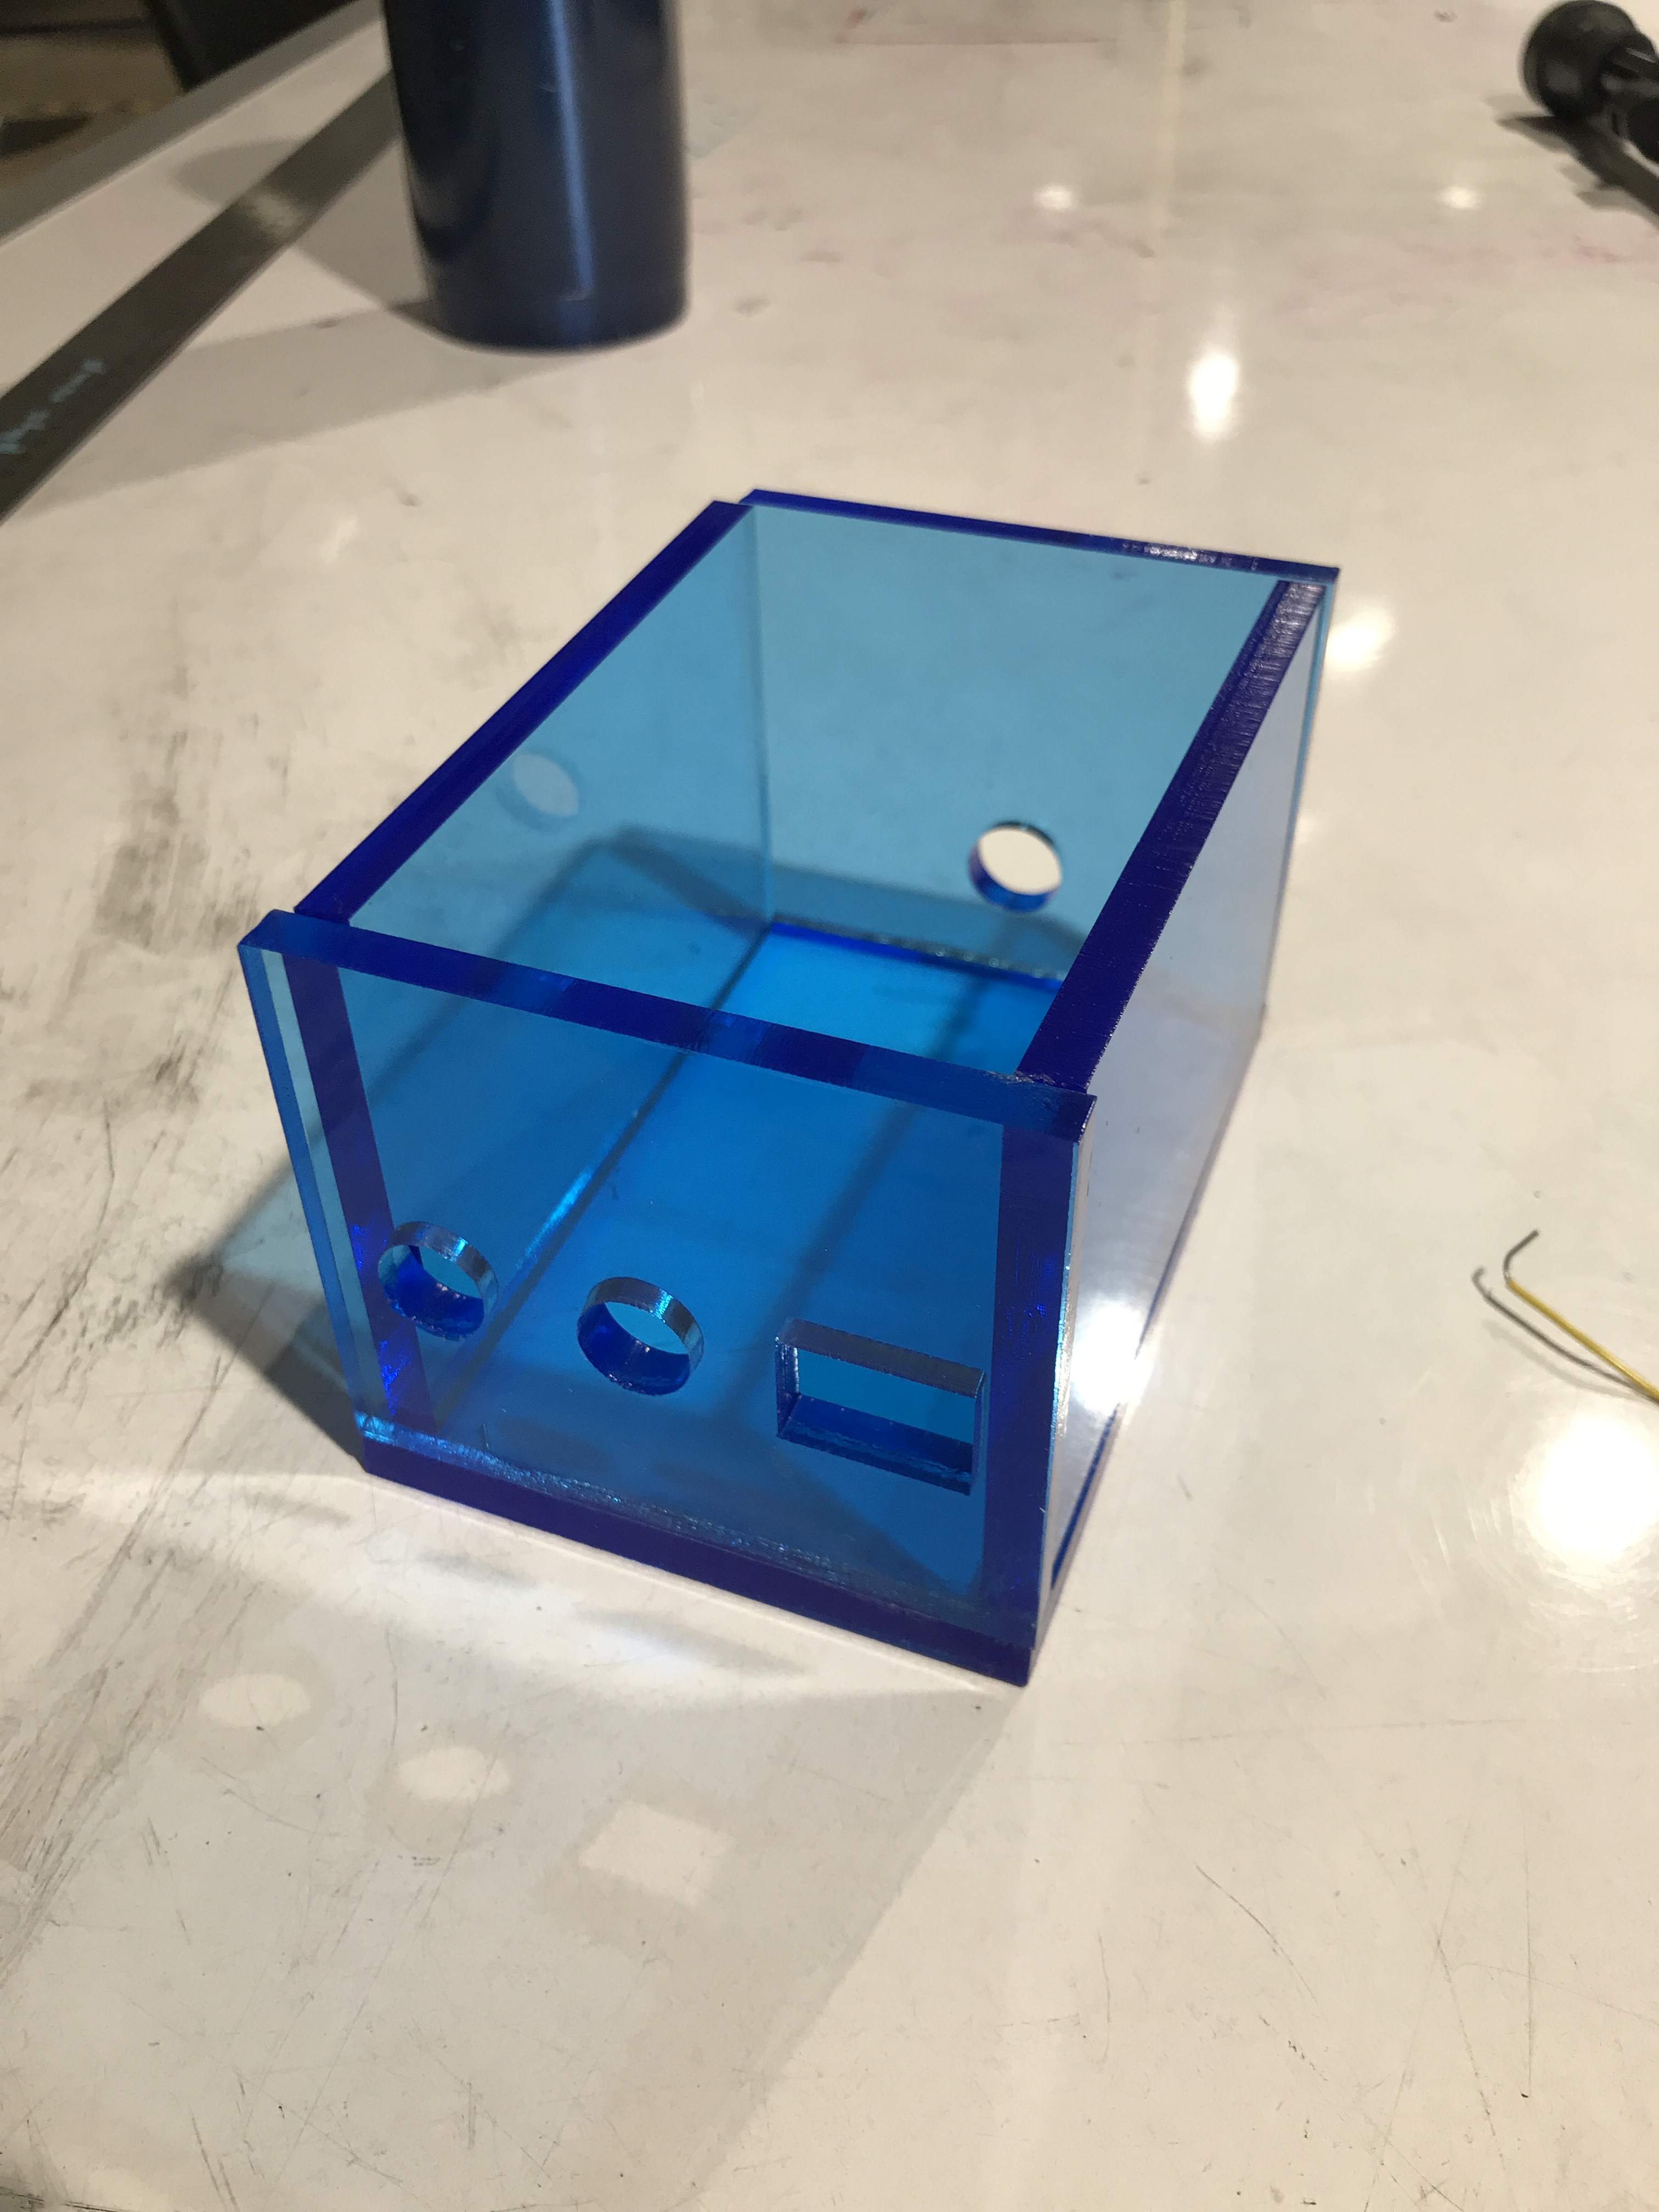
As a backup, we laser cut an acrylic box to fit all of our hardware. We wanted it to be a closed-box solution.
However, after laser cutting the pieces and gluing them together, we realized that the acrylic box (although visually appealing) was extremely heavy and would add significant weight to the cane. Consequently we reinvested our efforts into 3D printing our box. Luckily, one of our classmates, Roly, offered to print our box for us with his at-home 3D printer (shoutout to Roly — thank you!).
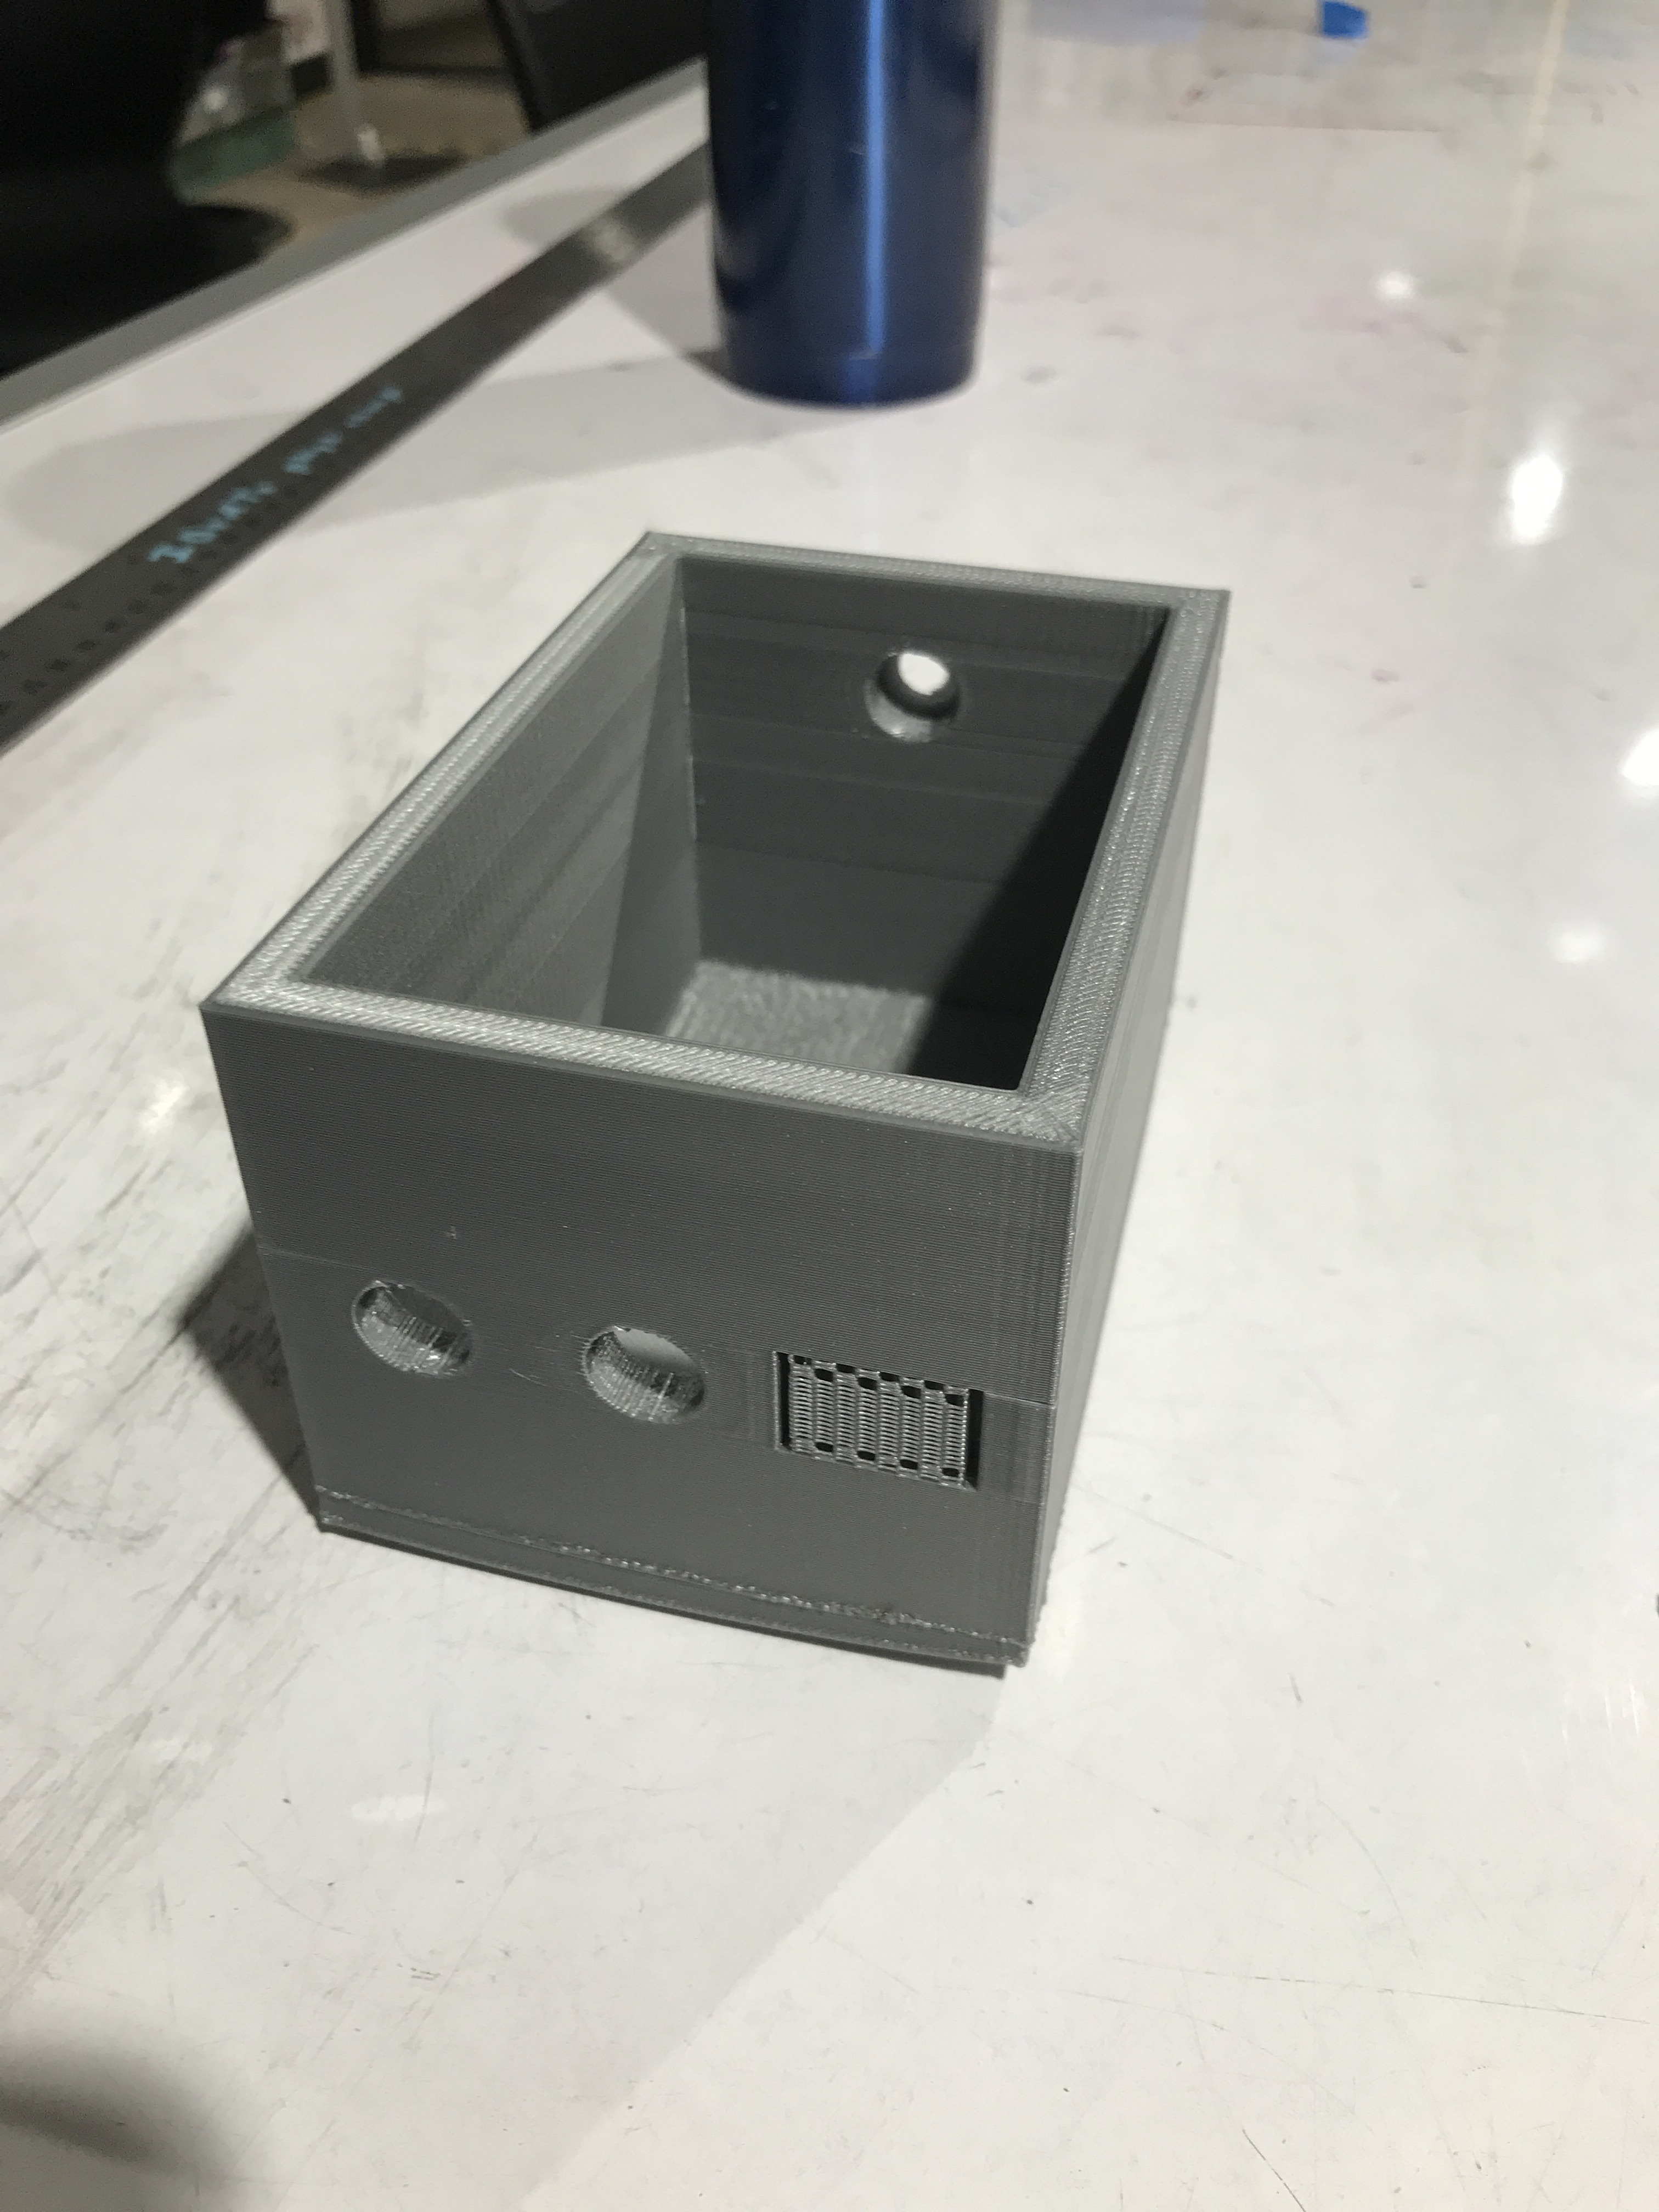
Our 3D printed box (at last) with Roly’s printing help. This material was much lighter and didn’t add noticeable weight to the cane.
The 3D printed box that Roly helped us print out was lightweight and much better suited to our needs, especially considering that we needed to add in a battery pack (significant weight) and other hardware components. However, finding a suitable hardware solution was not the last of our worries.
Another significant challenge we faced was finding a suitable battery pack. Because of our electrical components (laser, vibrators) we needed at least 6 batteries, or 7.2 volts. In the classroom, we were able to find some spare battery holders, which were either 6 in a line, or in a 3×2 configuration. Some of these holders were faulty and/or had physical gaps in the electrical connection.
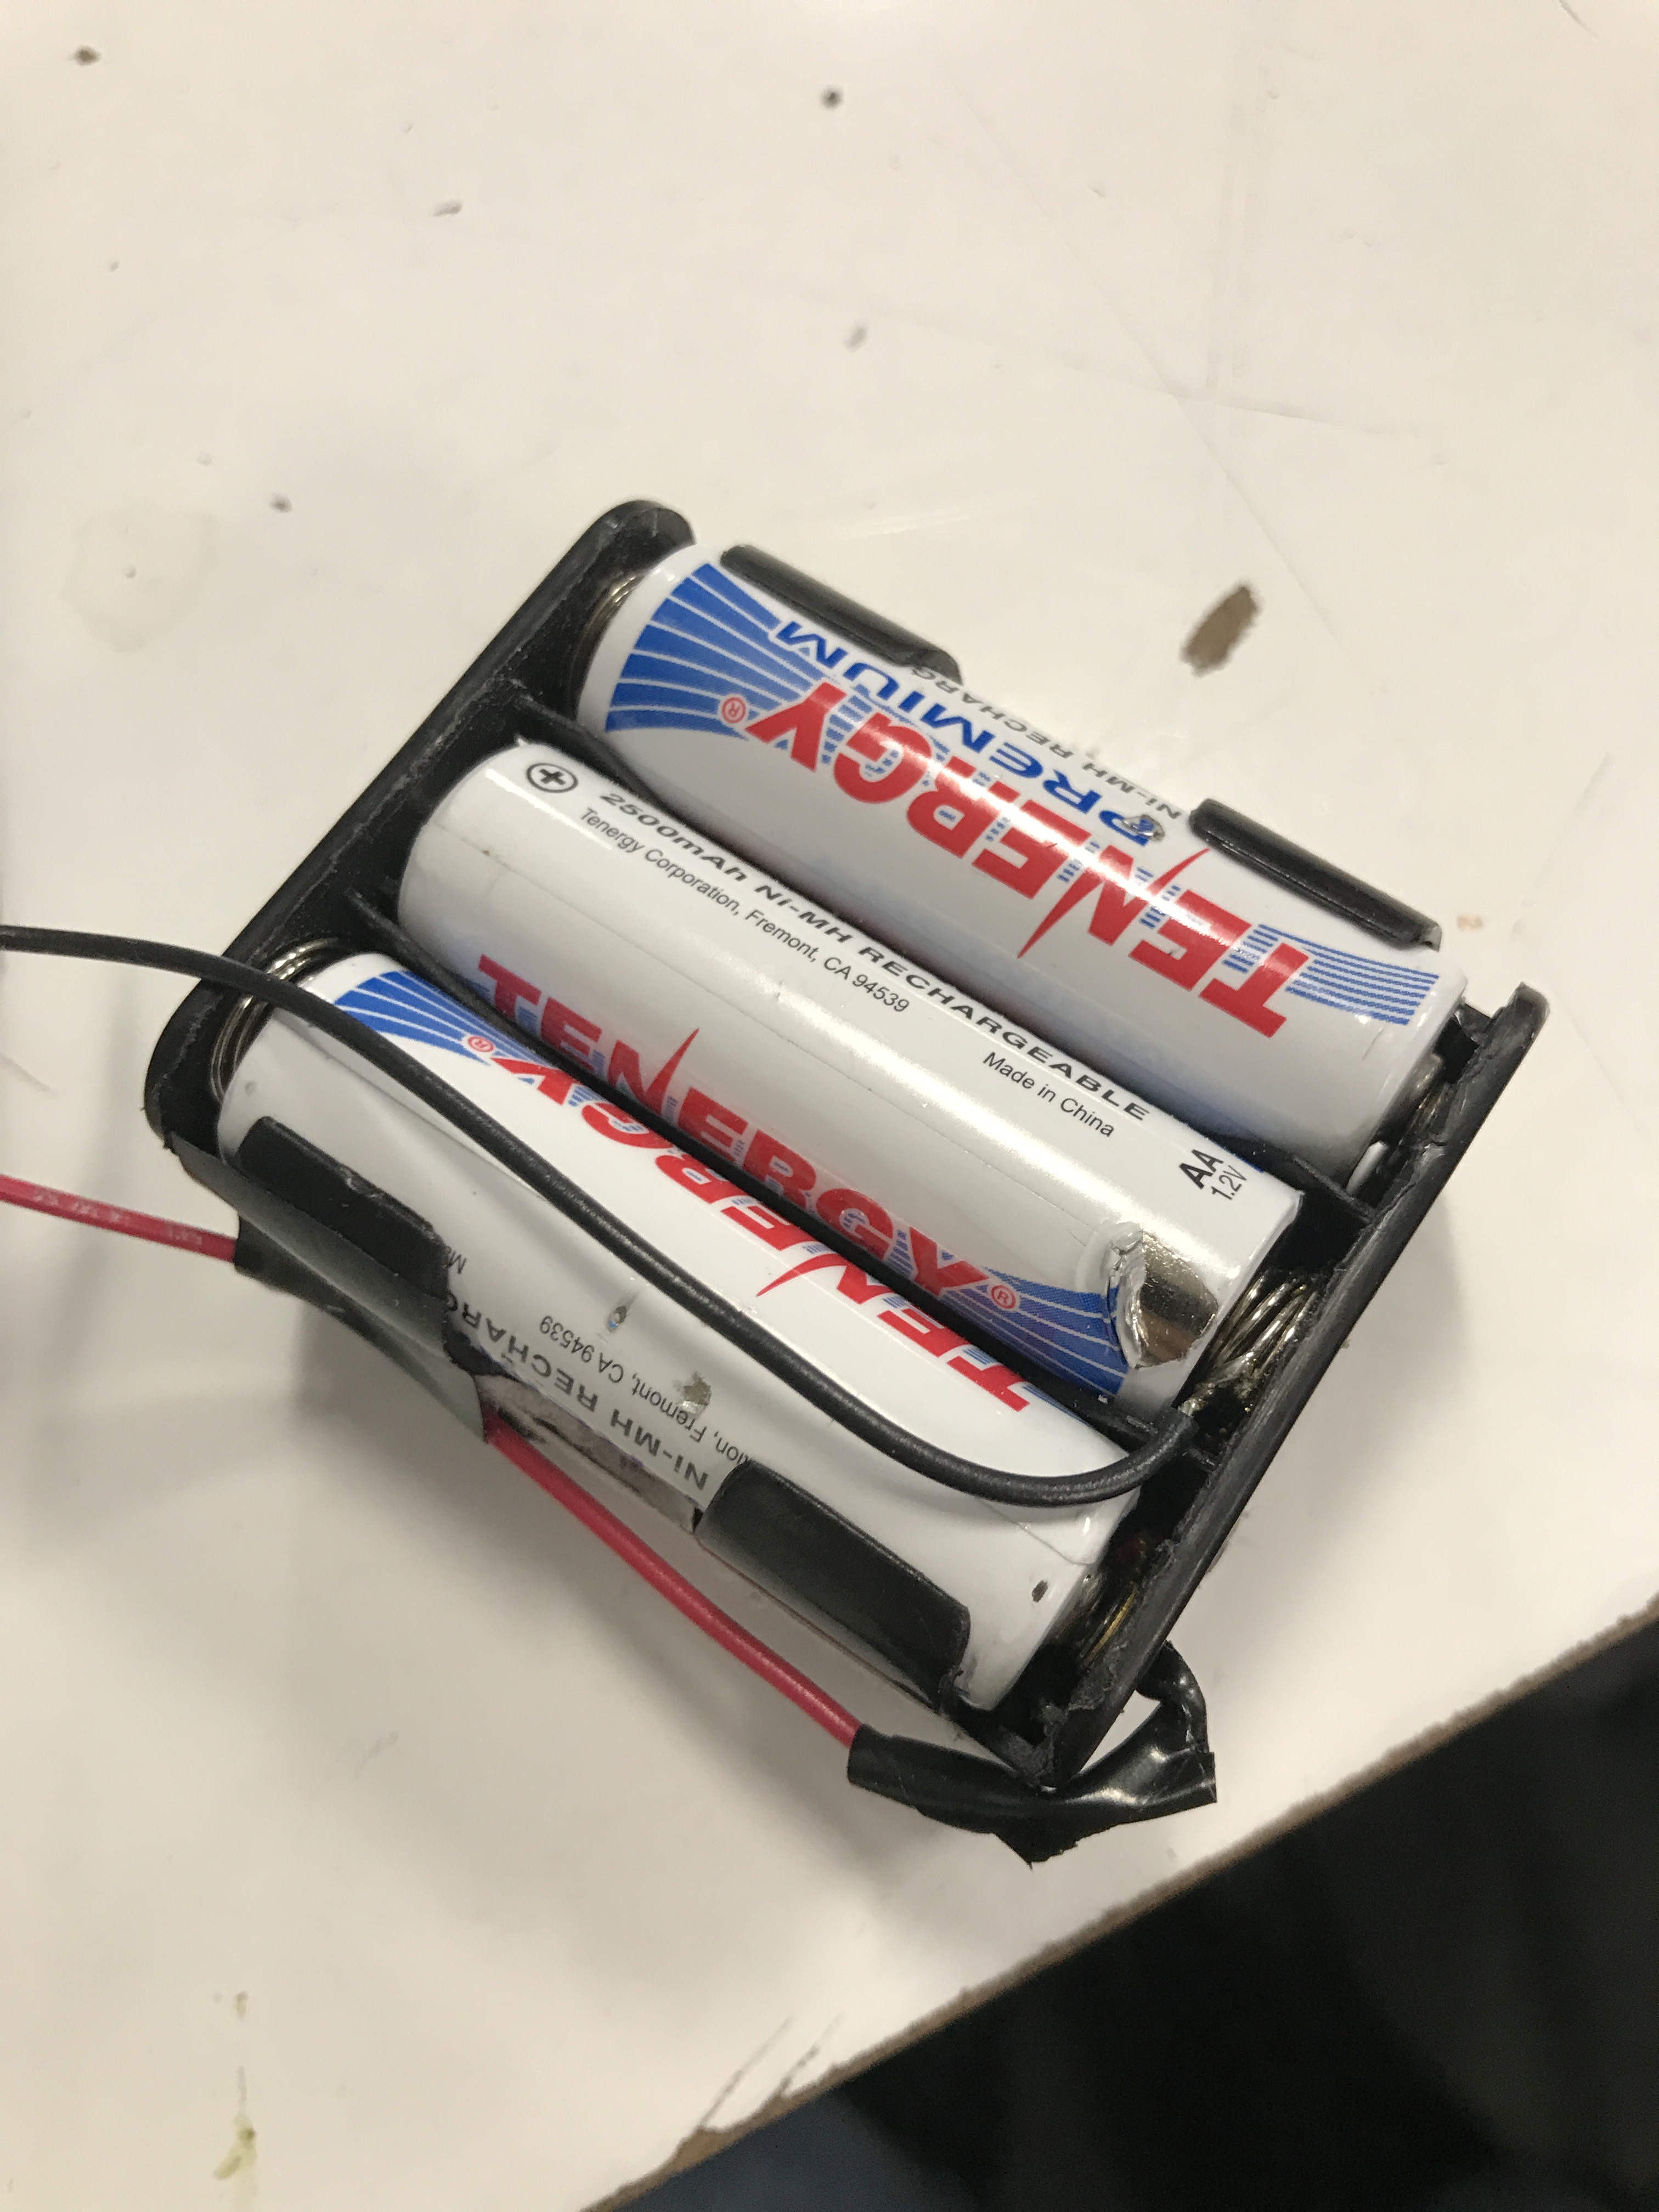
This was our 3×2 battery pack that had a missing electrical connection. Zach kindly helped us solder our wire directly onto an electrical connection to get it working. However, during a demo, our box was dropped and knocked some things astray in our battery holder.
Zach helped us solder a wire to correct some strange electrical disconnections in this battery holder. During our first client presentation, our Cane Assist was dropped and we determined that the battery pack was an issue again. We had to last-minute re-order a new battery pack in this 3×2 configuration (due to space constraints in our box). We also worked on ensuring that our box would not fall during usage again.
To remedy this problem, our team found some spare foam and cut a hole in the middle to fit out battery pack. This foam would act as a physical cushion that would hopefully absorb impact in case the cane assist was dropped. The foam would also prevent the battery from making unnecessarily loud vibrating sounds when the vibrator button was turned on.

We added foam stuffing to prevent the battery from moving around inside the box and making excessive noise when the vibrating button was turned on.
We also realized that the cane assist had fallen during the demo because the spring clamps that we ordered did not perfectly fit the cane that we had at hand. Since these sizes were standardized, we were unable to find a size that was a closer fit to the cane diameter. Instead, we installed a velcro strap at the back of the box that would act as a third flexible clamp to hold the box securely to the cane.
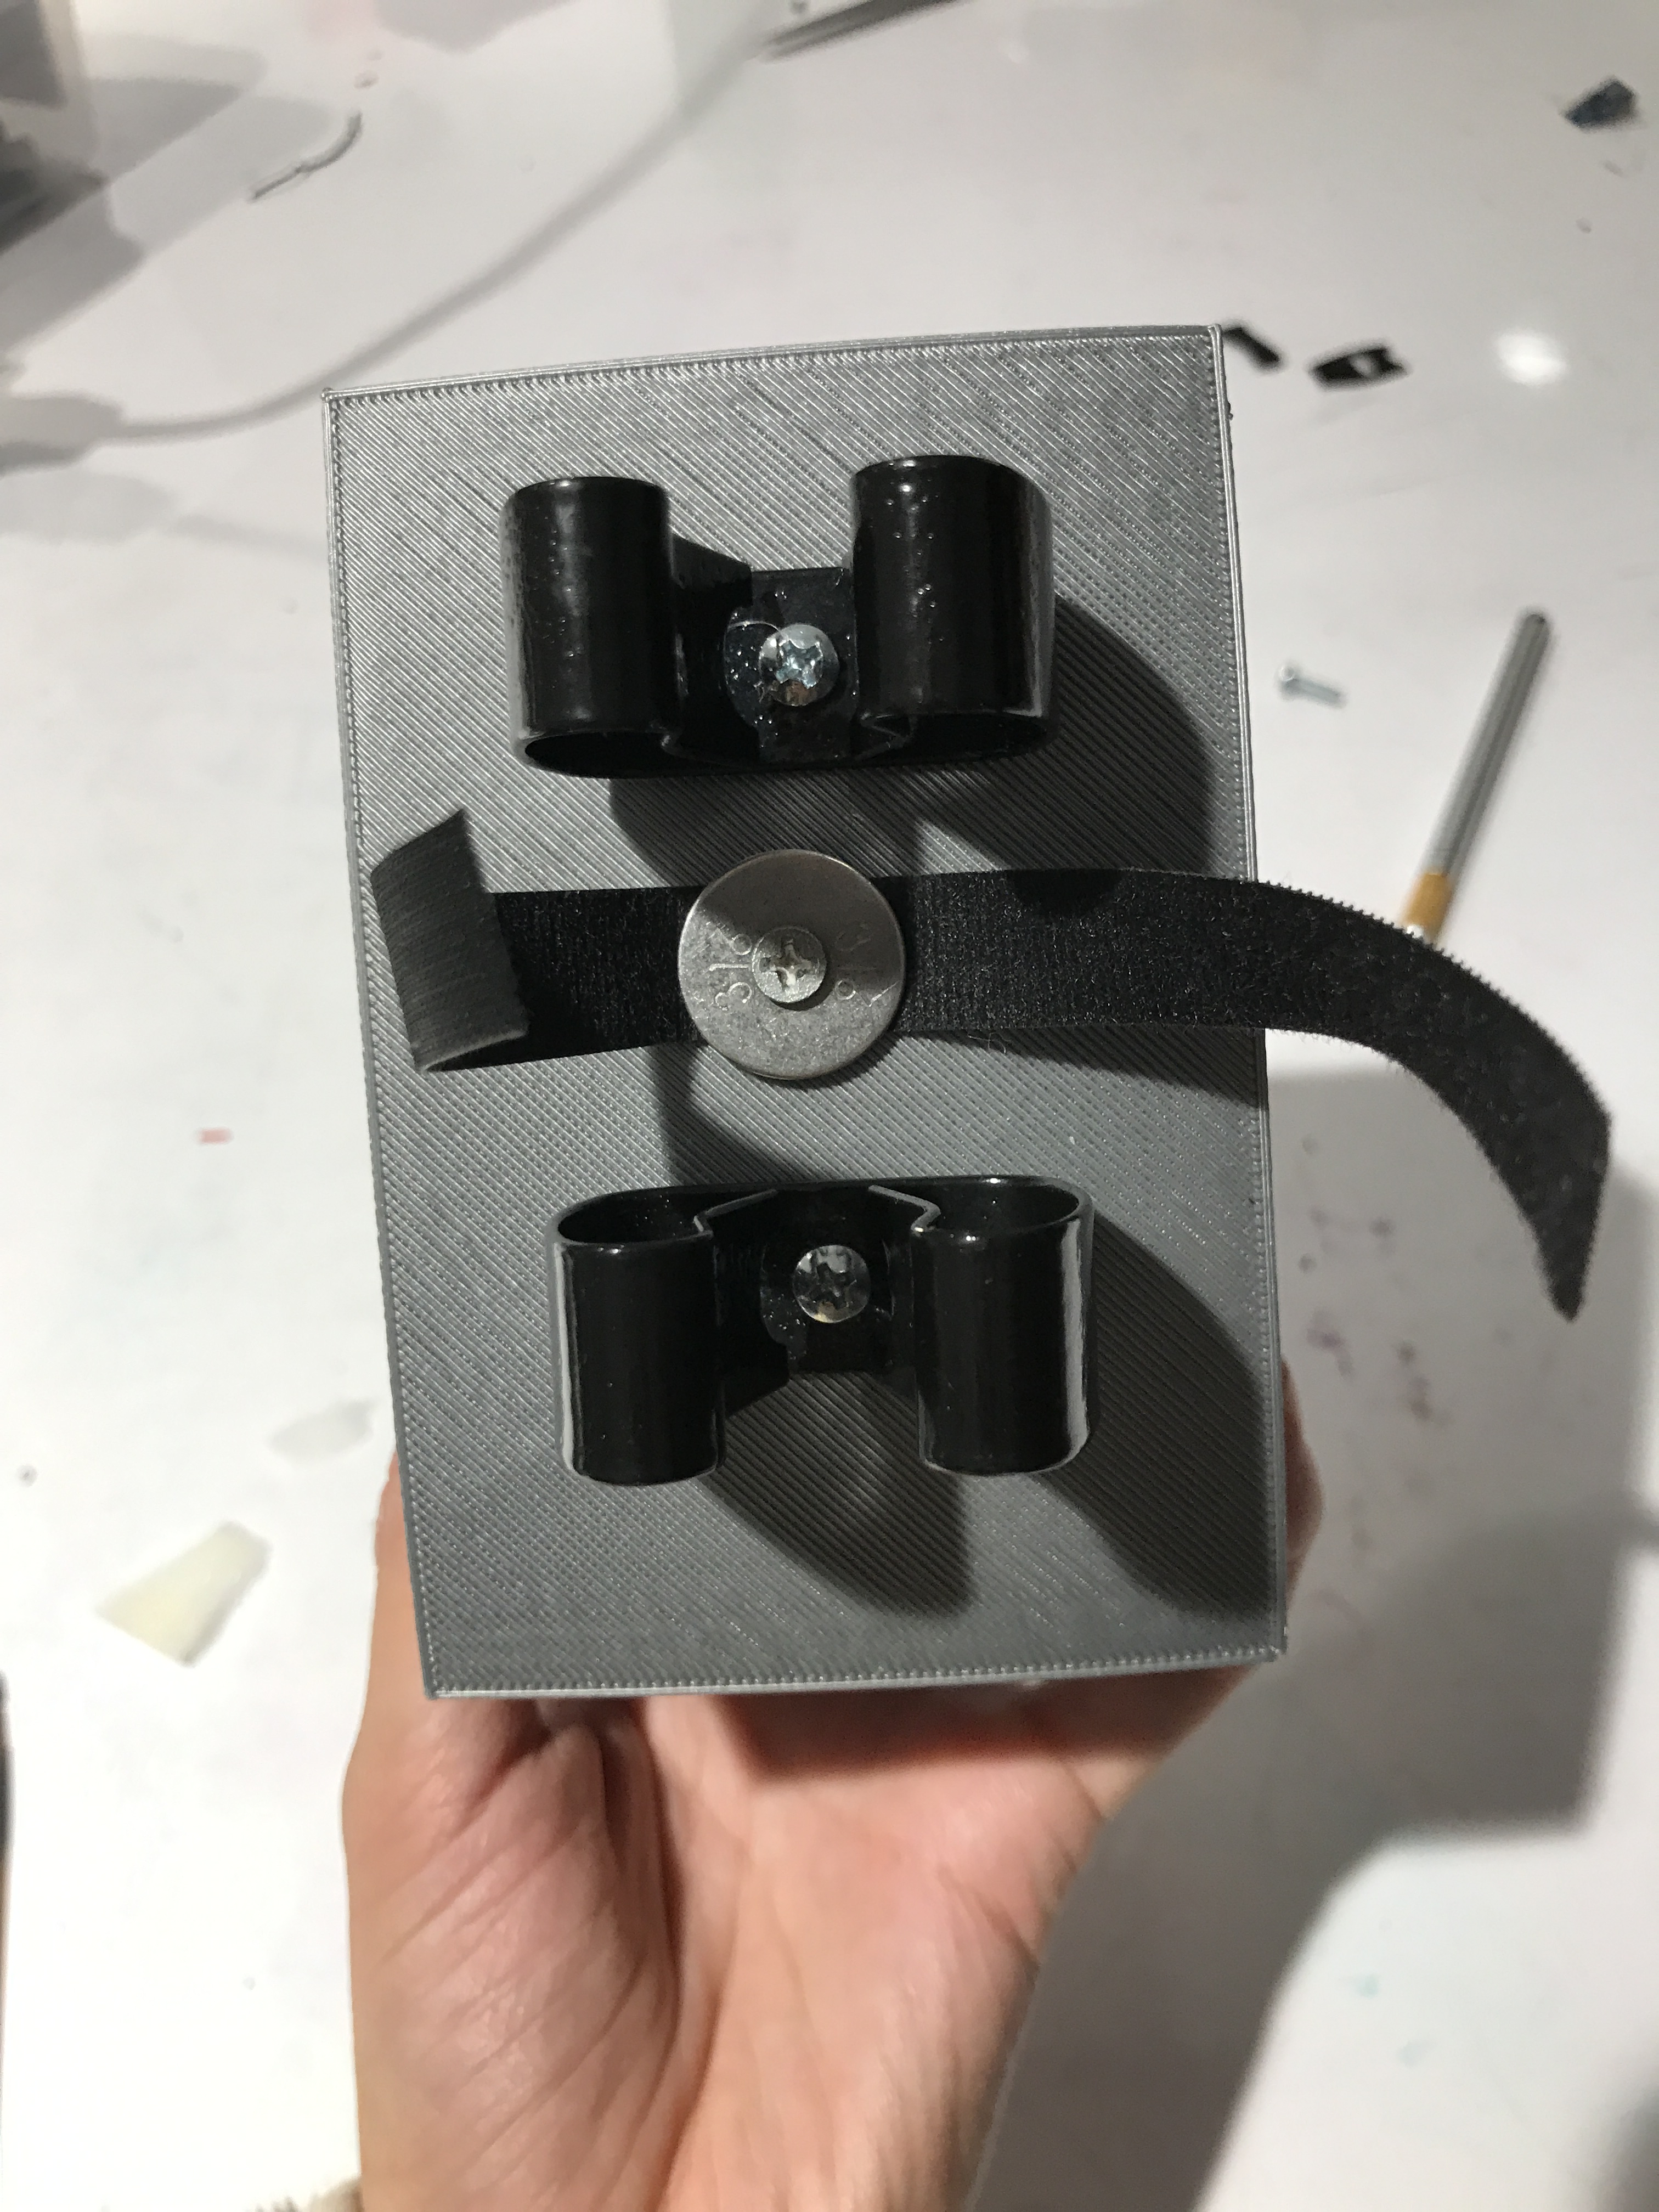
We installed a velcro strap to the back of the box to more securely fasten it to any cane.
We thought adding a velcro strap would be the best solution, because cane diameters cane vary, and it would not be possible to find a single clamp that fits all the different sizes of Joseph’s many different canes.
Since this cane assist is a detachable solution that would be carried around, we wanted our batteries to be rechargeable. We purchased dry-cell rechargeable batteries on Amazon that were TSA-friendly. However, another challenge was designing the 3D-printed box such that it could be opened and closed, since Joseph would need to replace the batteries from time to time.
Per Zach’s suggestion, we devised a hinge-and-latch solution, where the front wall of the box would have a hinge that could allow the wall the swing open. There would be an additional latch at the outside of the box’s front that would keep the “door” shut.
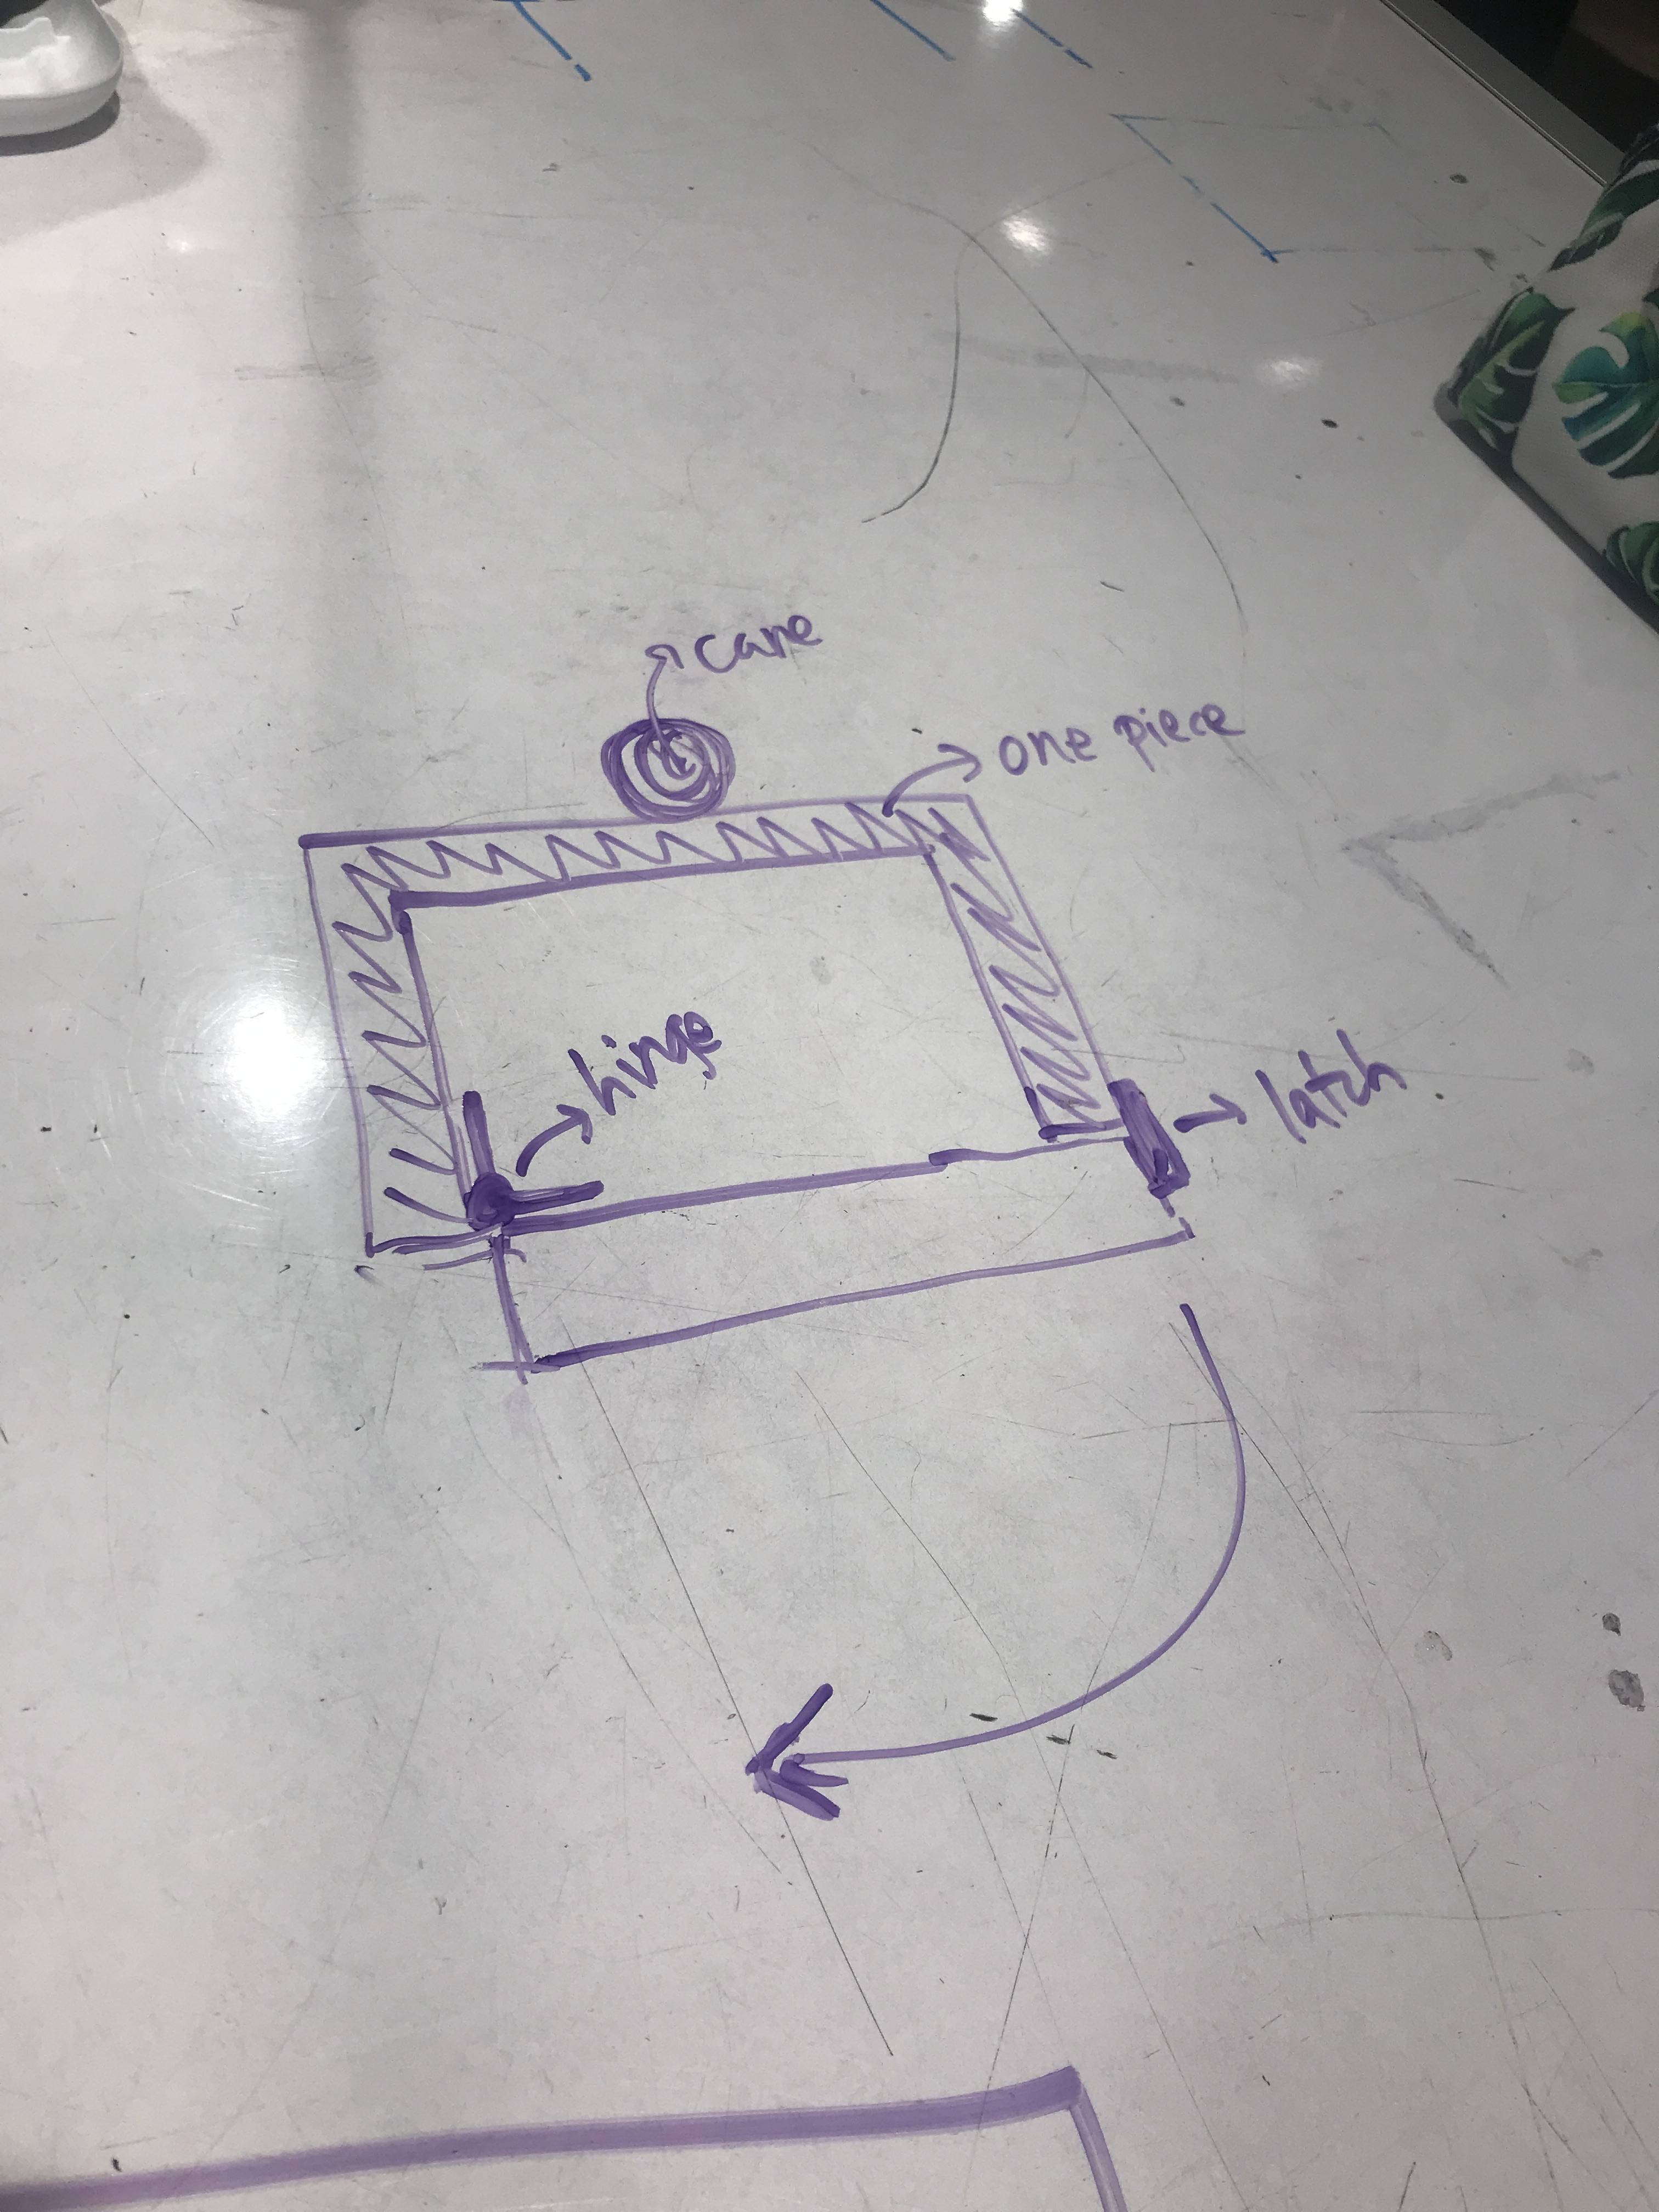
Our sketch of the hinge-and-latch solution to make our box accessible, so that Joseph can replace the batteries when needed.

We had some extra help on this part. 🙂 (Thanks Zach)
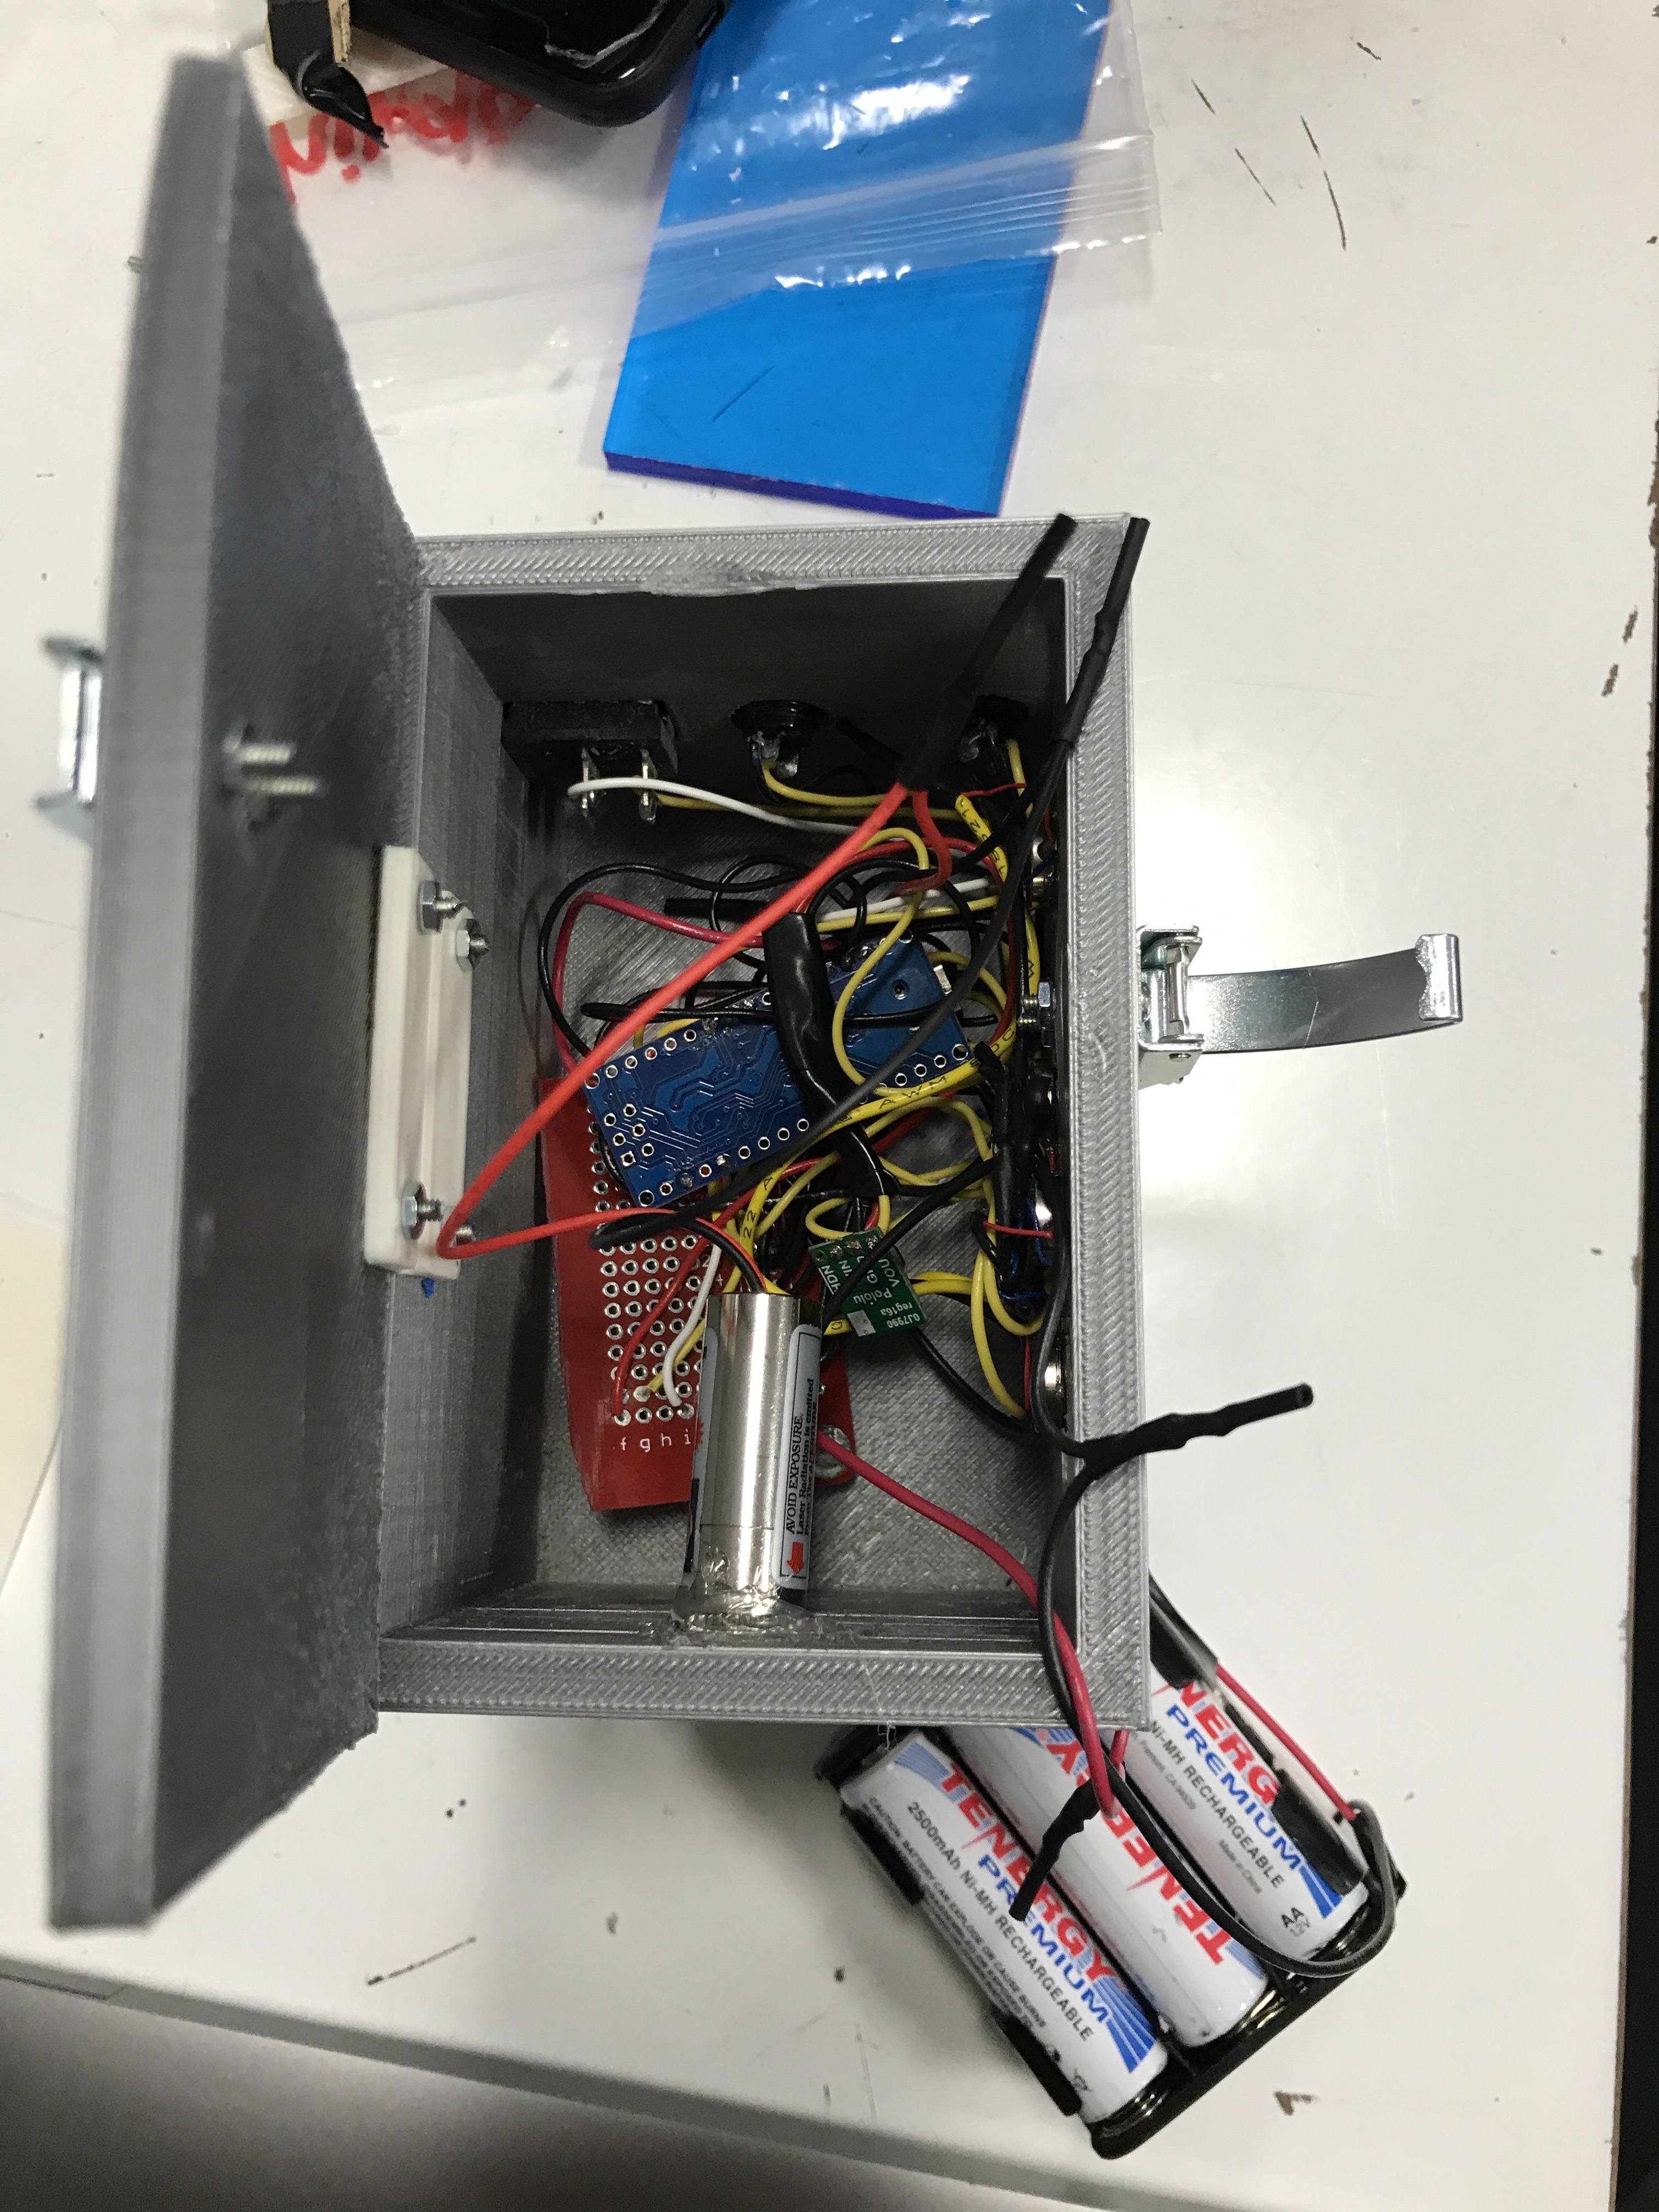
The finished hinge-and-latch solution.
We decided to purchase a pinless plastic hinge to reduce mechanical complexity. Combined with the latch, installed at the top of the door and the box’s side, the hinge-and-latch mechanism worked fluidly and easily, without popping open and keeping all the contents of the box in place.
Lastly, another challenge that we had was getting the laser to position correctly inside our box. If the laser was installing pointing straight down, it would not give sufficient distance from the cane to be a walking cue that Joseph could use to “step” over.
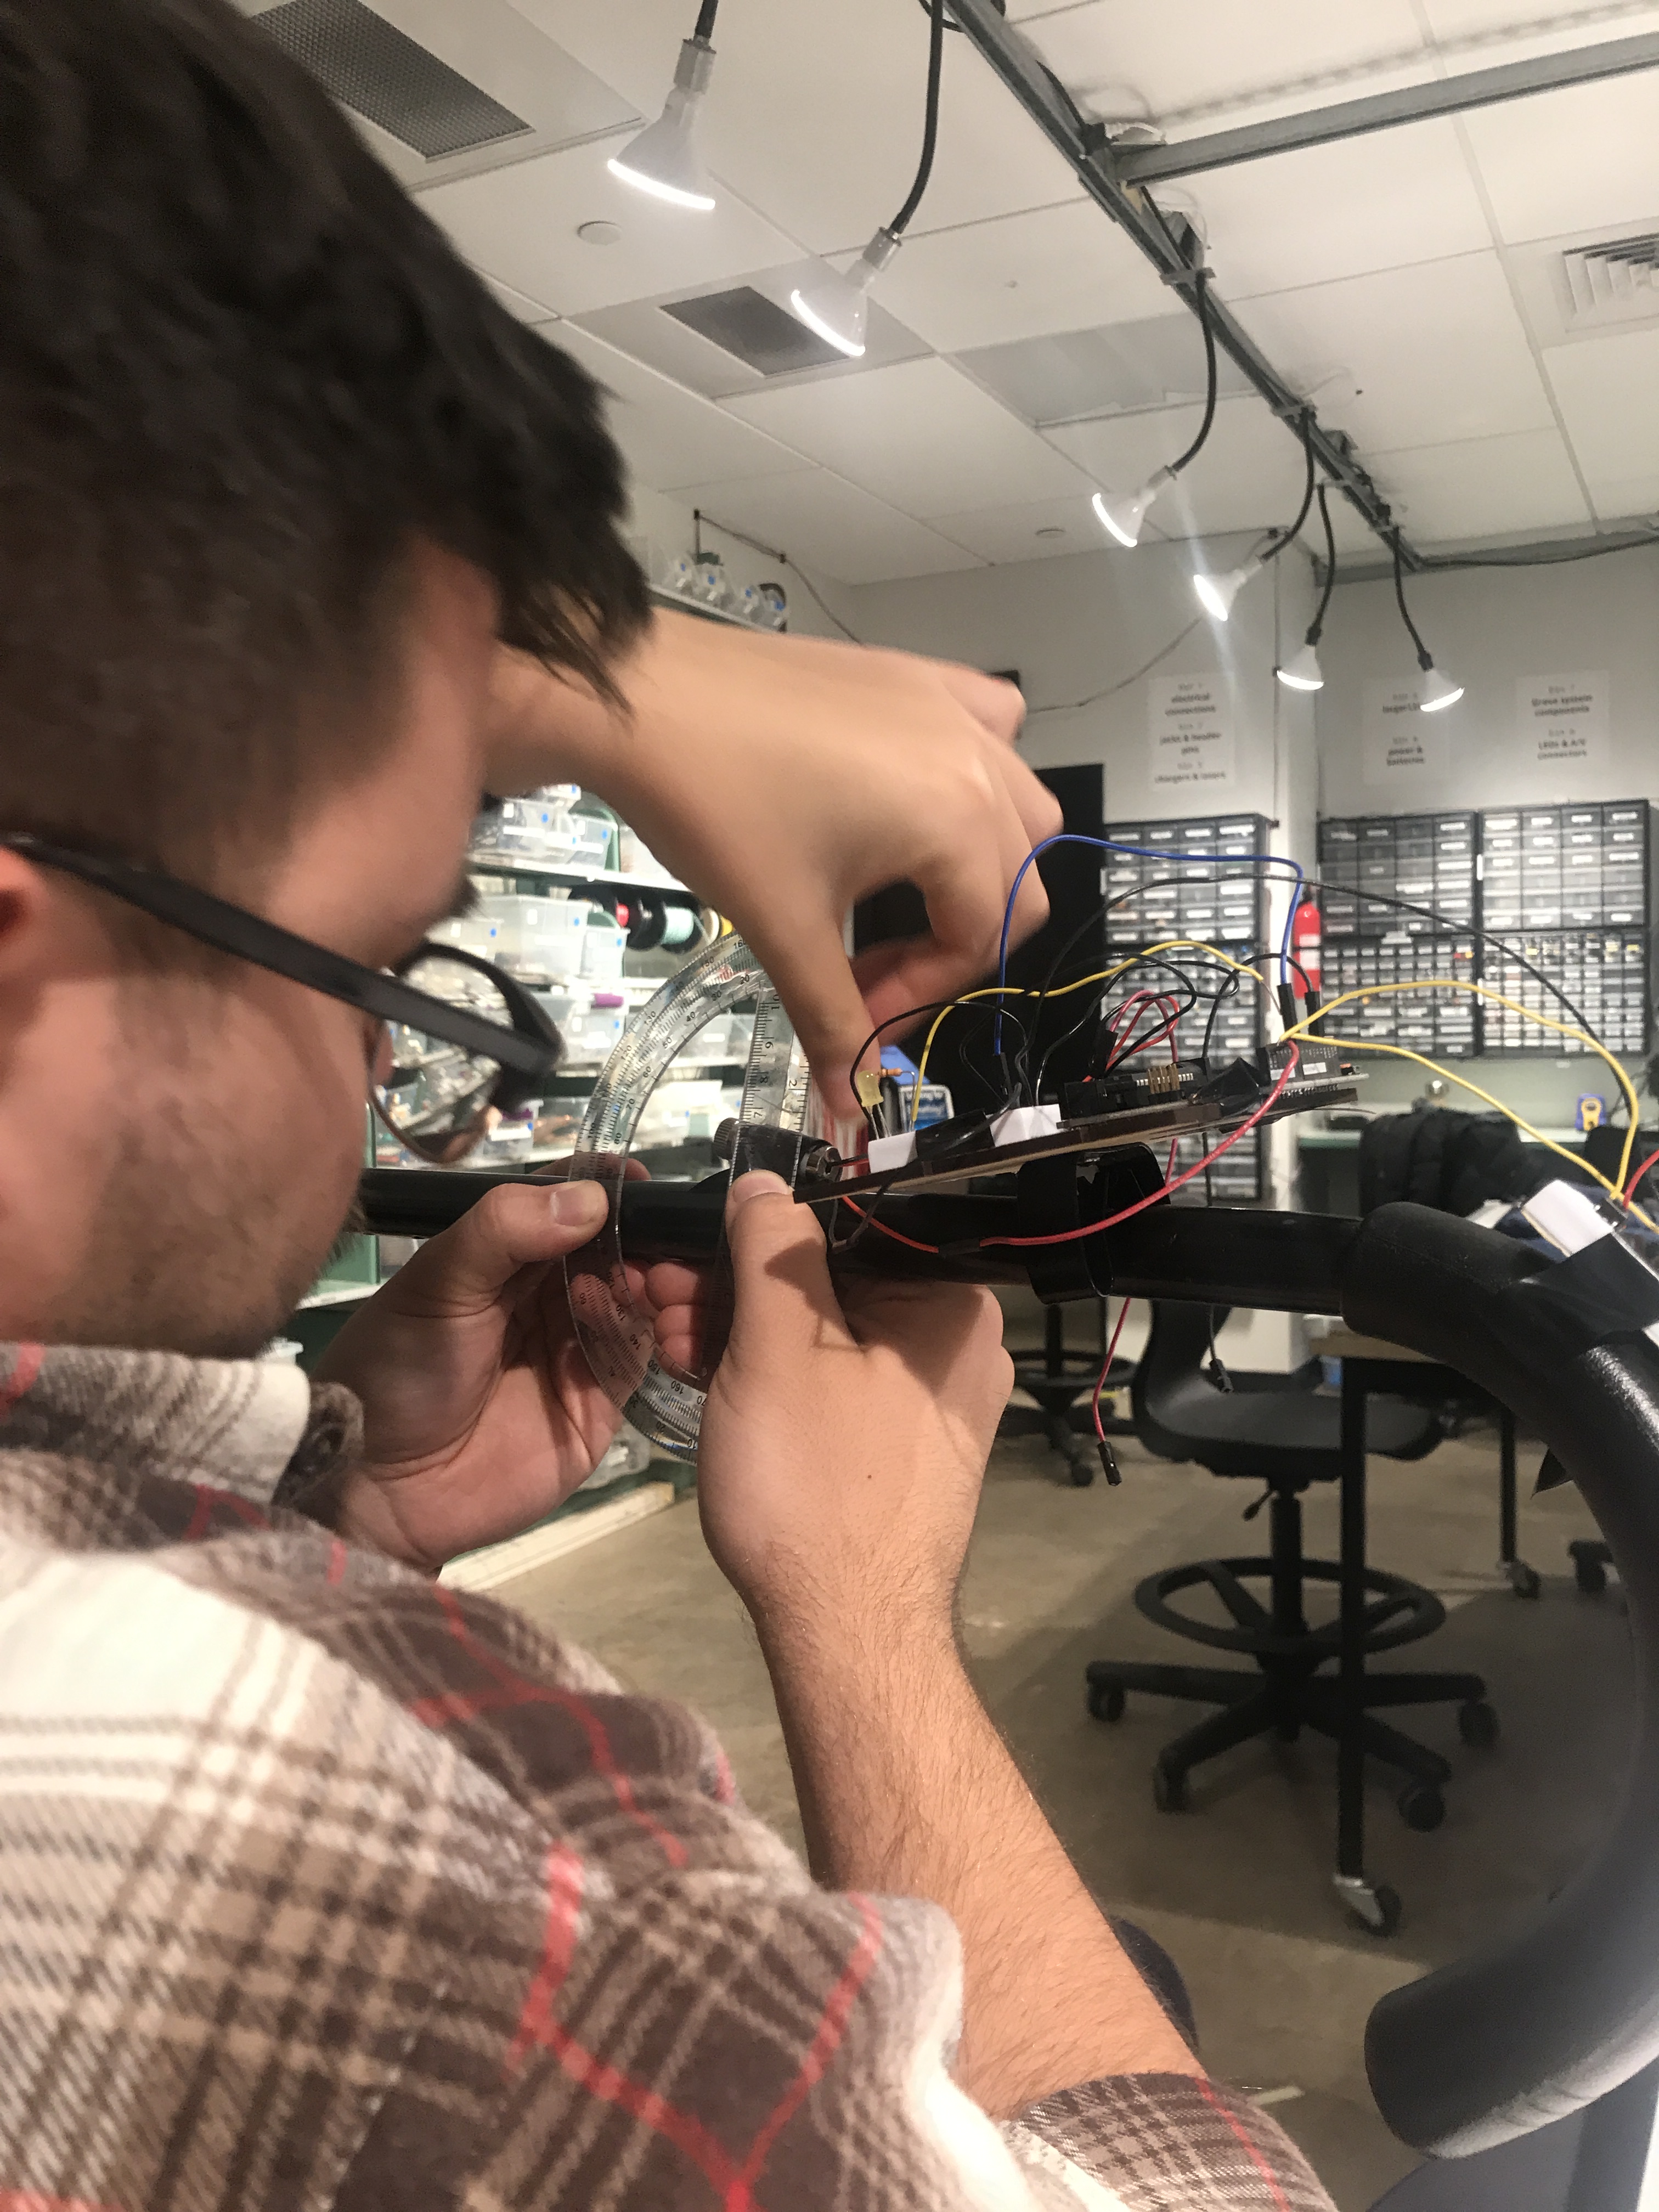
Using some complex measuring tools (a protractor), we tried to measure at what angle the laser should be pointing to give sufficient distance from the cane and be a walking target.
Despite our best measuring efforts, it was difficult to build out a model in our 3D modeling software that would allow a sufficient angle. Previously, we had a separate part that would help anchor the angling component, but this ended up being too large and taking up valuable space inside our cane assist box. As an alternative solution, we filed the hole for the laser to be slightly larger, and used a hot glue gun to properly anchor the laser at the right angle.
Conclusion and lessons learned
For most of us, this was our first client project. From this project, we learned that the initial client meeting is an incredibly important meeting. Our first meeting with Joseph lasted well over two hours, and while we didn’t stick to a script, perhaps in the future we would better outline the structure of client meetings, so that it’s clear for both sides what information needs to be exchanged. Joseph came into the meeting very prepared, with printouts of design ideas he already had and suggestions/solutions for cane accessories that we could build. During the meeting, it felt like we had a lot of ideas that we could potentially build; however, afterwards, we realized that many of these were mechanical solutions, and that it would be difficult to incorporate an electrical component. Therefore, for initial client meetings, we learned that it’s important to direct the conversation to learn about the client’s problems rather than solutions right away; this means understanding his background, habits, and pain points. Honing specifically in on understanding these points would have better helped expand the breadth of potential design solutions we could have worked on.
Prior to the initial meeting, it also would have been helpful for us to have thoroughly researched the symptoms of Parkinson’s disease beforehand. We had been mostly focused on gathering interview questions for Joseph, but hadn’t known what kinds of problems that the client had (perhaps it’s a good idea to give a brief background of each client prior to the initial meeting for future Phys Comp students). With some research beforehand, we believe we could have also helped expand the breadth of design ideas by asking Joseph how he experiences some specific symptoms associated with Parkinson’s.
During our final crit, we received mostly positive feedback. Some people mentioned that this idea is one that could potentially be monetized or purchased by a medical device company, which was encouraging to hear. We also received some concerns about weatherproofing — while one of our initial goals was to keep the box weather proof, we realized that it would not be possible after we devised the latch-and-hinge mechanism (the box would not be watertight with a door). For future iterations of the project, we would look into designing a custom box that would be resistant to Pittsburgh’s random weather. Additionally, we would add more custom functionality to the pacing of the vibrations, perhaps with a potentiometer, such that Joseph can tune the rhythm to his liking.
Overall, we really enjoyed working on this project, and we’re excited to hand-off the project to Joseph so he is able to use it as an everyday assistive device.
Technical details
/*
 * Project Title: Cool Cane
 * Name: Catherine Yu, Linda Xia, Joey Santillo
 * Description: There are two buttons. One controls on/off the haptic cue(vibrator) and
 * the other controls on/off of the visual cue(laser).
 */


//PIN ASSIGNMENTS
const int LASERPIN = 5;
const int VIBRATORPIN1 = 8;
const int VIBRATORPIN2 = 9;
const int VIBRATORPIN3 = 10;
const int VIBRATORPIN4 = 11;
const int VIBRATORBUTTON = 4;
const int LASERBUTTON = 3;

//CUSTOMIZABLE VARIABLES
const int vibrateInterval = 1000;
const int debounceDelay = 10;

//VARIABLES NEEDED FOR LATER
bool LASERNeeded = false;
unsigned long lastLASERTime = 0;
int lastLASERState = HIGH;
bool VIBRATENeeded = false;
bool vibrating = false;
unsigned long lastCUETime = 0;
int lastCUEState = HIGH;
unsigned long currTime = 0;

void changeVibrate(){
  if (currTime-lastLASERTime>=vibrateInterval){
    if (vibrating){
      digitalWrite(VIBRATORPIN1, LOW);
      digitalWrite(VIBRATORPIN2, LOW);
      digitalWrite(VIBRATORPIN3, LOW);
      digitalWrite(VIBRATORPIN4, LOW);
      vibrating = false;
    }
    else{
      digitalWrite(VIBRATORPIN1, HIGH);
      digitalWrite(VIBRATORPIN2, HIGH);
      digitalWrite(VIBRATORPIN3, HIGH);
      digitalWrite(VIBRATORPIN4, HIGH);
      vibrating = true;
    }
    lastLASERTime = currTime;
  }
  else{
    if(vibrating){
      digitalWrite(VIBRATORPIN1, HIGH);
      digitalWrite(VIBRATORPIN2, HIGH);
      digitalWrite(VIBRATORPIN3, HIGH);
      digitalWrite(VIBRATORPIN4, HIGH);
    }
    else{
      digitalWrite(VIBRATORPIN1, LOW);
      digitalWrite(VIBRATORPIN2, LOW);
      digitalWrite(VIBRATORPIN3, LOW);
      digitalWrite(VIBRATORPIN4, LOW);
    }
  }
}

bool checkDebounce(String indicator, int state){
   //returns true if needs an update
   //false otherwise
  if (indicator == "LASER"){
    if (currTime-lastLASERTime>=debounceDelay && state != lastLASERState){
      lastLASERState = state;
      lastLASERTime = currTime;
      return true;
    }
    return false;
  }
  else{
    if (currTime-lastCUETime>=debounceDelay && state != lastCUEState){
      lastCUEState = state;
      lastCUETime = currTime;
      return true;
    }
    return false;
  }
}

void setup() {
  Serial.begin(9600);
  pinMode(LASERPIN,OUTPUT);
  pinMode(VIBRATORPIN1,OUTPUT);
  pinMode(VIBRATORPIN2,OUTPUT);
  pinMode(VIBRATORPIN3,OUTPUT);
  pinMode(VIBRATORPIN4,OUTPUT);
  pinMode(VIBRATORBUTTON,INPUT_PULLUP);
  pinMode(LASERBUTTON,INPUT_PULLUP);
}

void loop() {
  currTime = millis();
  if(LASERNeeded){
    digitalWrite(LASERPIN, HIGH);
  }
  else{
    digitalWrite(LASERPIN, LOW);
  }
  if(VIBRATENeeded){
    changeVibrate();
  }
  else{
    digitalWrite(VIBRATORPIN1, LOW);
    digitalWrite(VIBRATORPIN2, LOW);
    digitalWrite(VIBRATORPIN3, LOW);
    digitalWrite(VIBRATORPIN4, LOW);
  }
  if (checkDebounce("LASER", digitalRead(LASERBUTTON)) && digitalRead(LASERBUTTON)==LOW ){
    if (!LASERNeeded){
      LASERNeeded = true;
    }
    else{
      LASERNeeded = false;
    }
  }
  if (checkDebounce("VIBTRATOR",digitalRead(VIBRATORBUTTON)) && digitalRead(VIBRATORBUTTON)==LOW){
    if (!VIBRATENeeded){
      VIBRATENeeded = true;
    }
    else{
      VIBRATENeeded = false;
    }
  }
}
Schematic

You can view the Google drive link to our 3D models (STL files) here.
Thank you, Joseph!
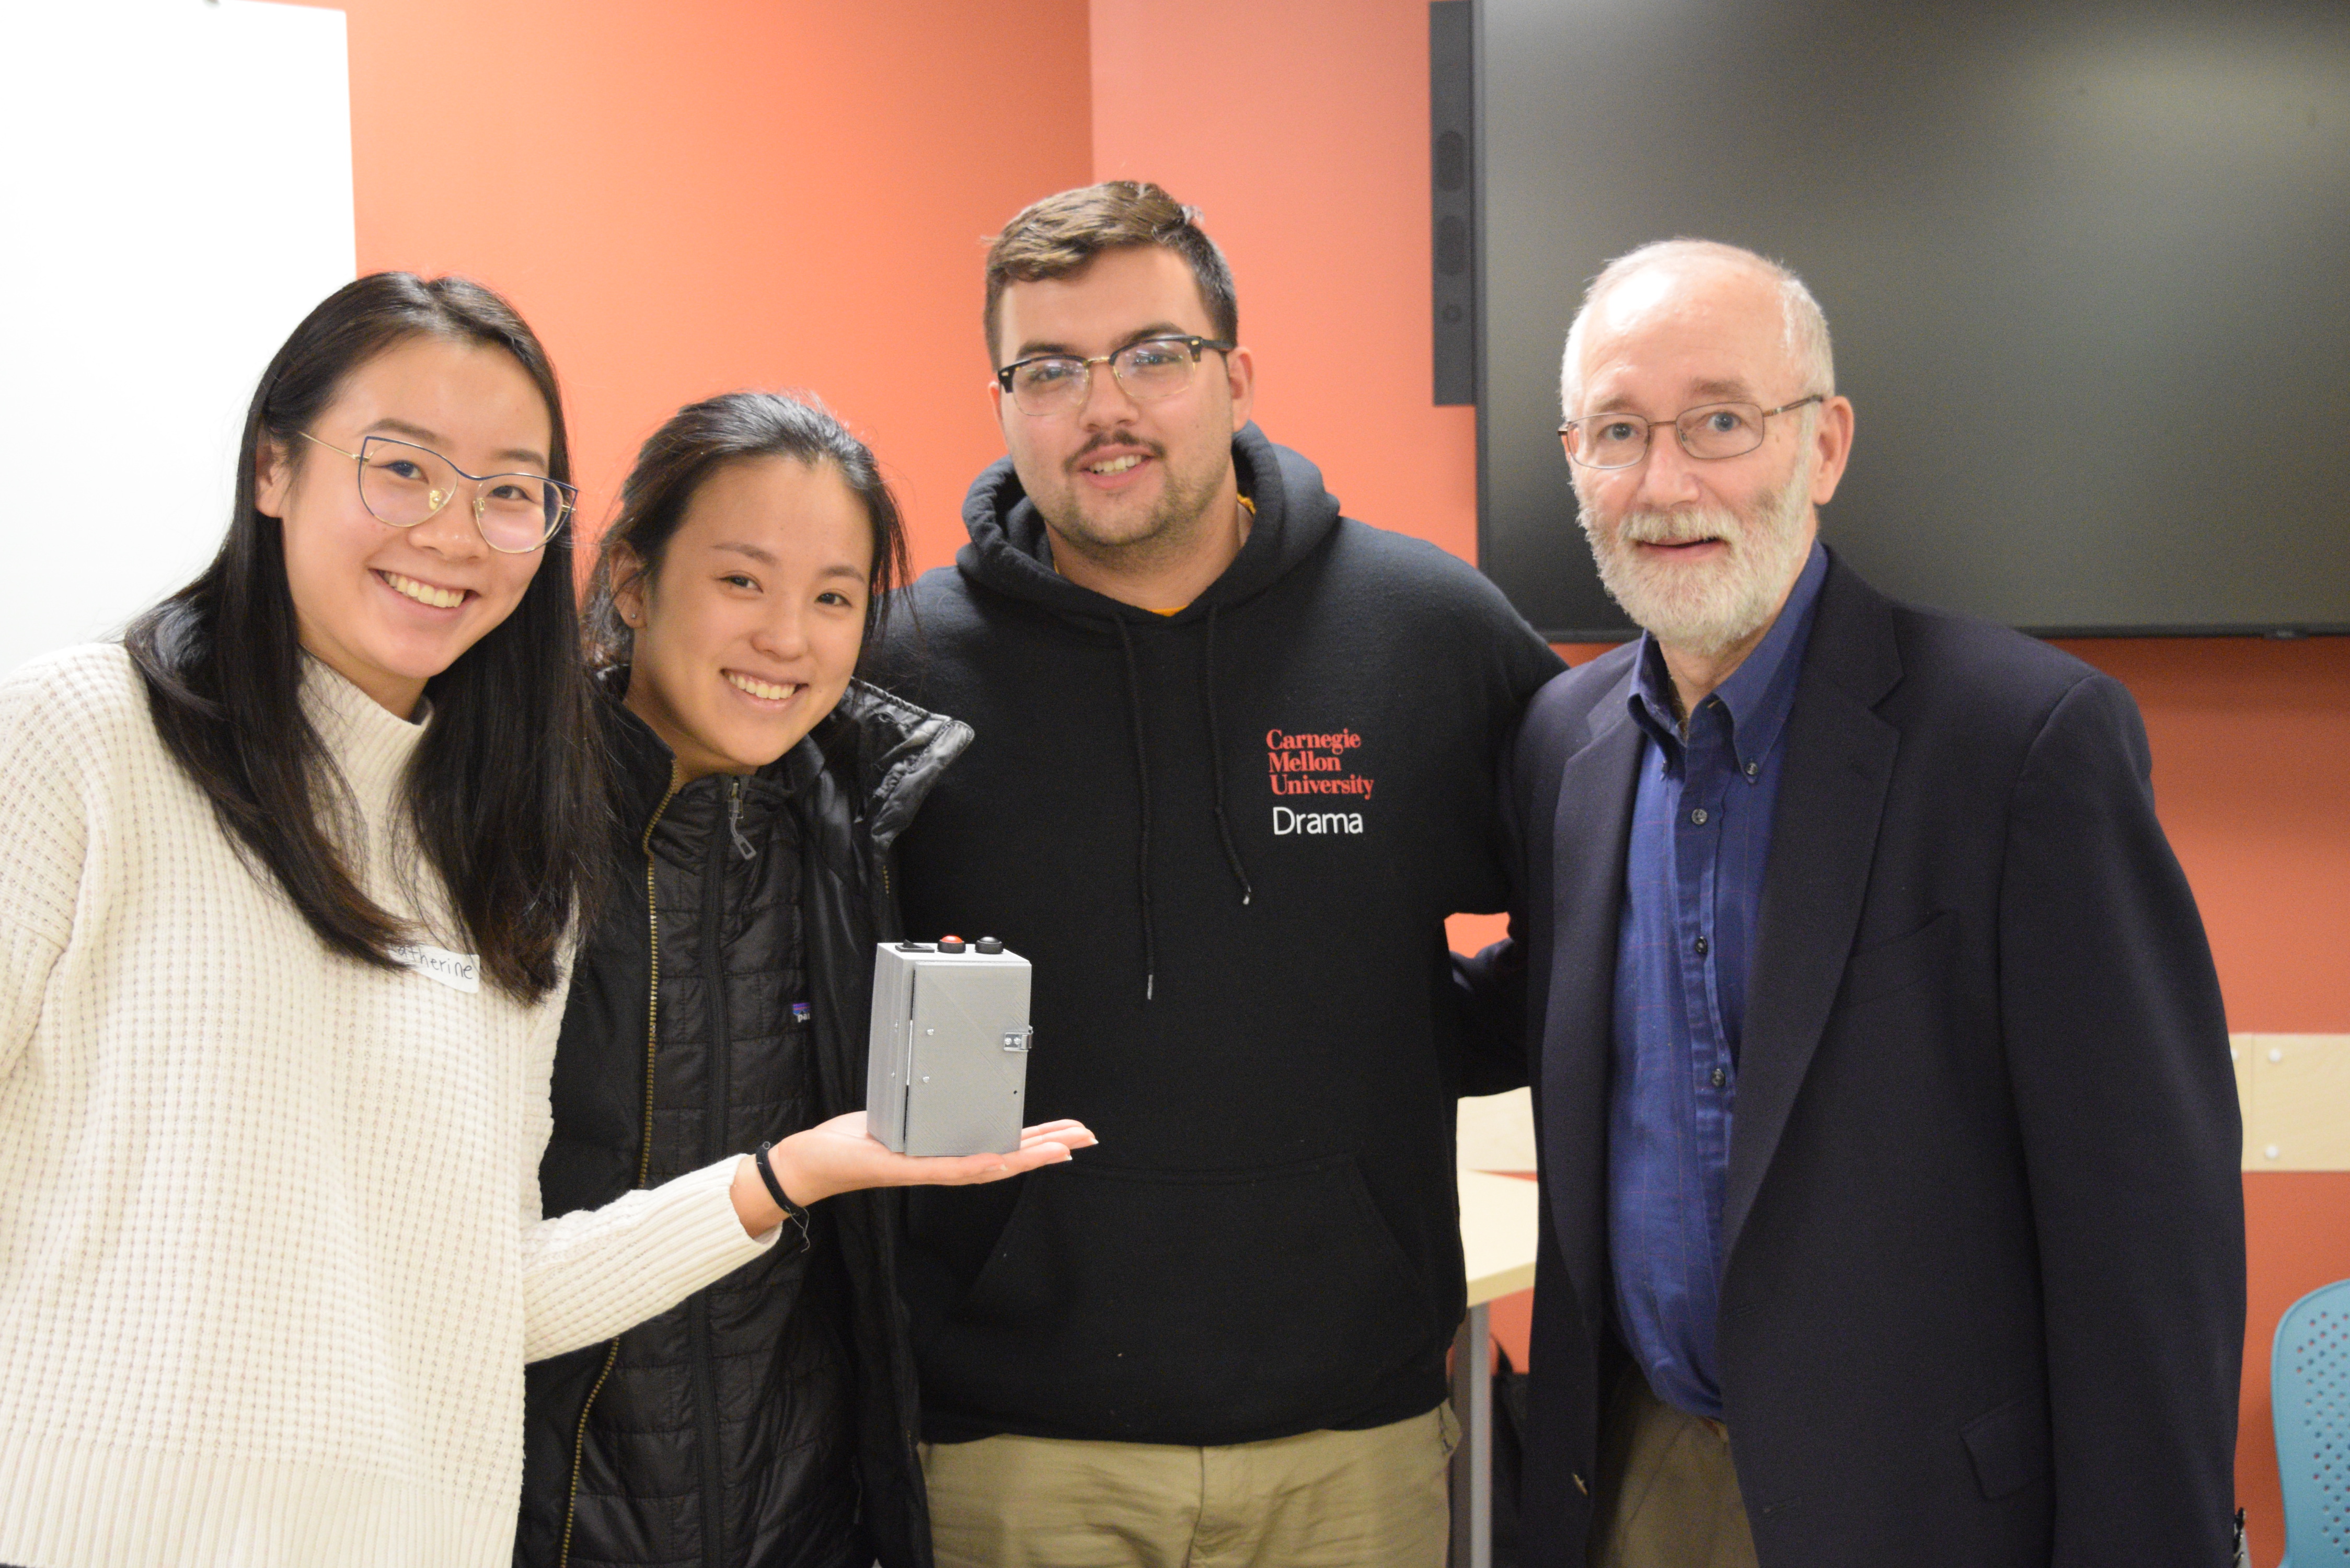
Our team had a wonderful time working with Joseph on this cane assist. 🙂
Leave a Reply
You must be logged in to post a comment.