Overview:
Description: A device for opening a door using only a combination of knocks by a user on the outside.
Images:
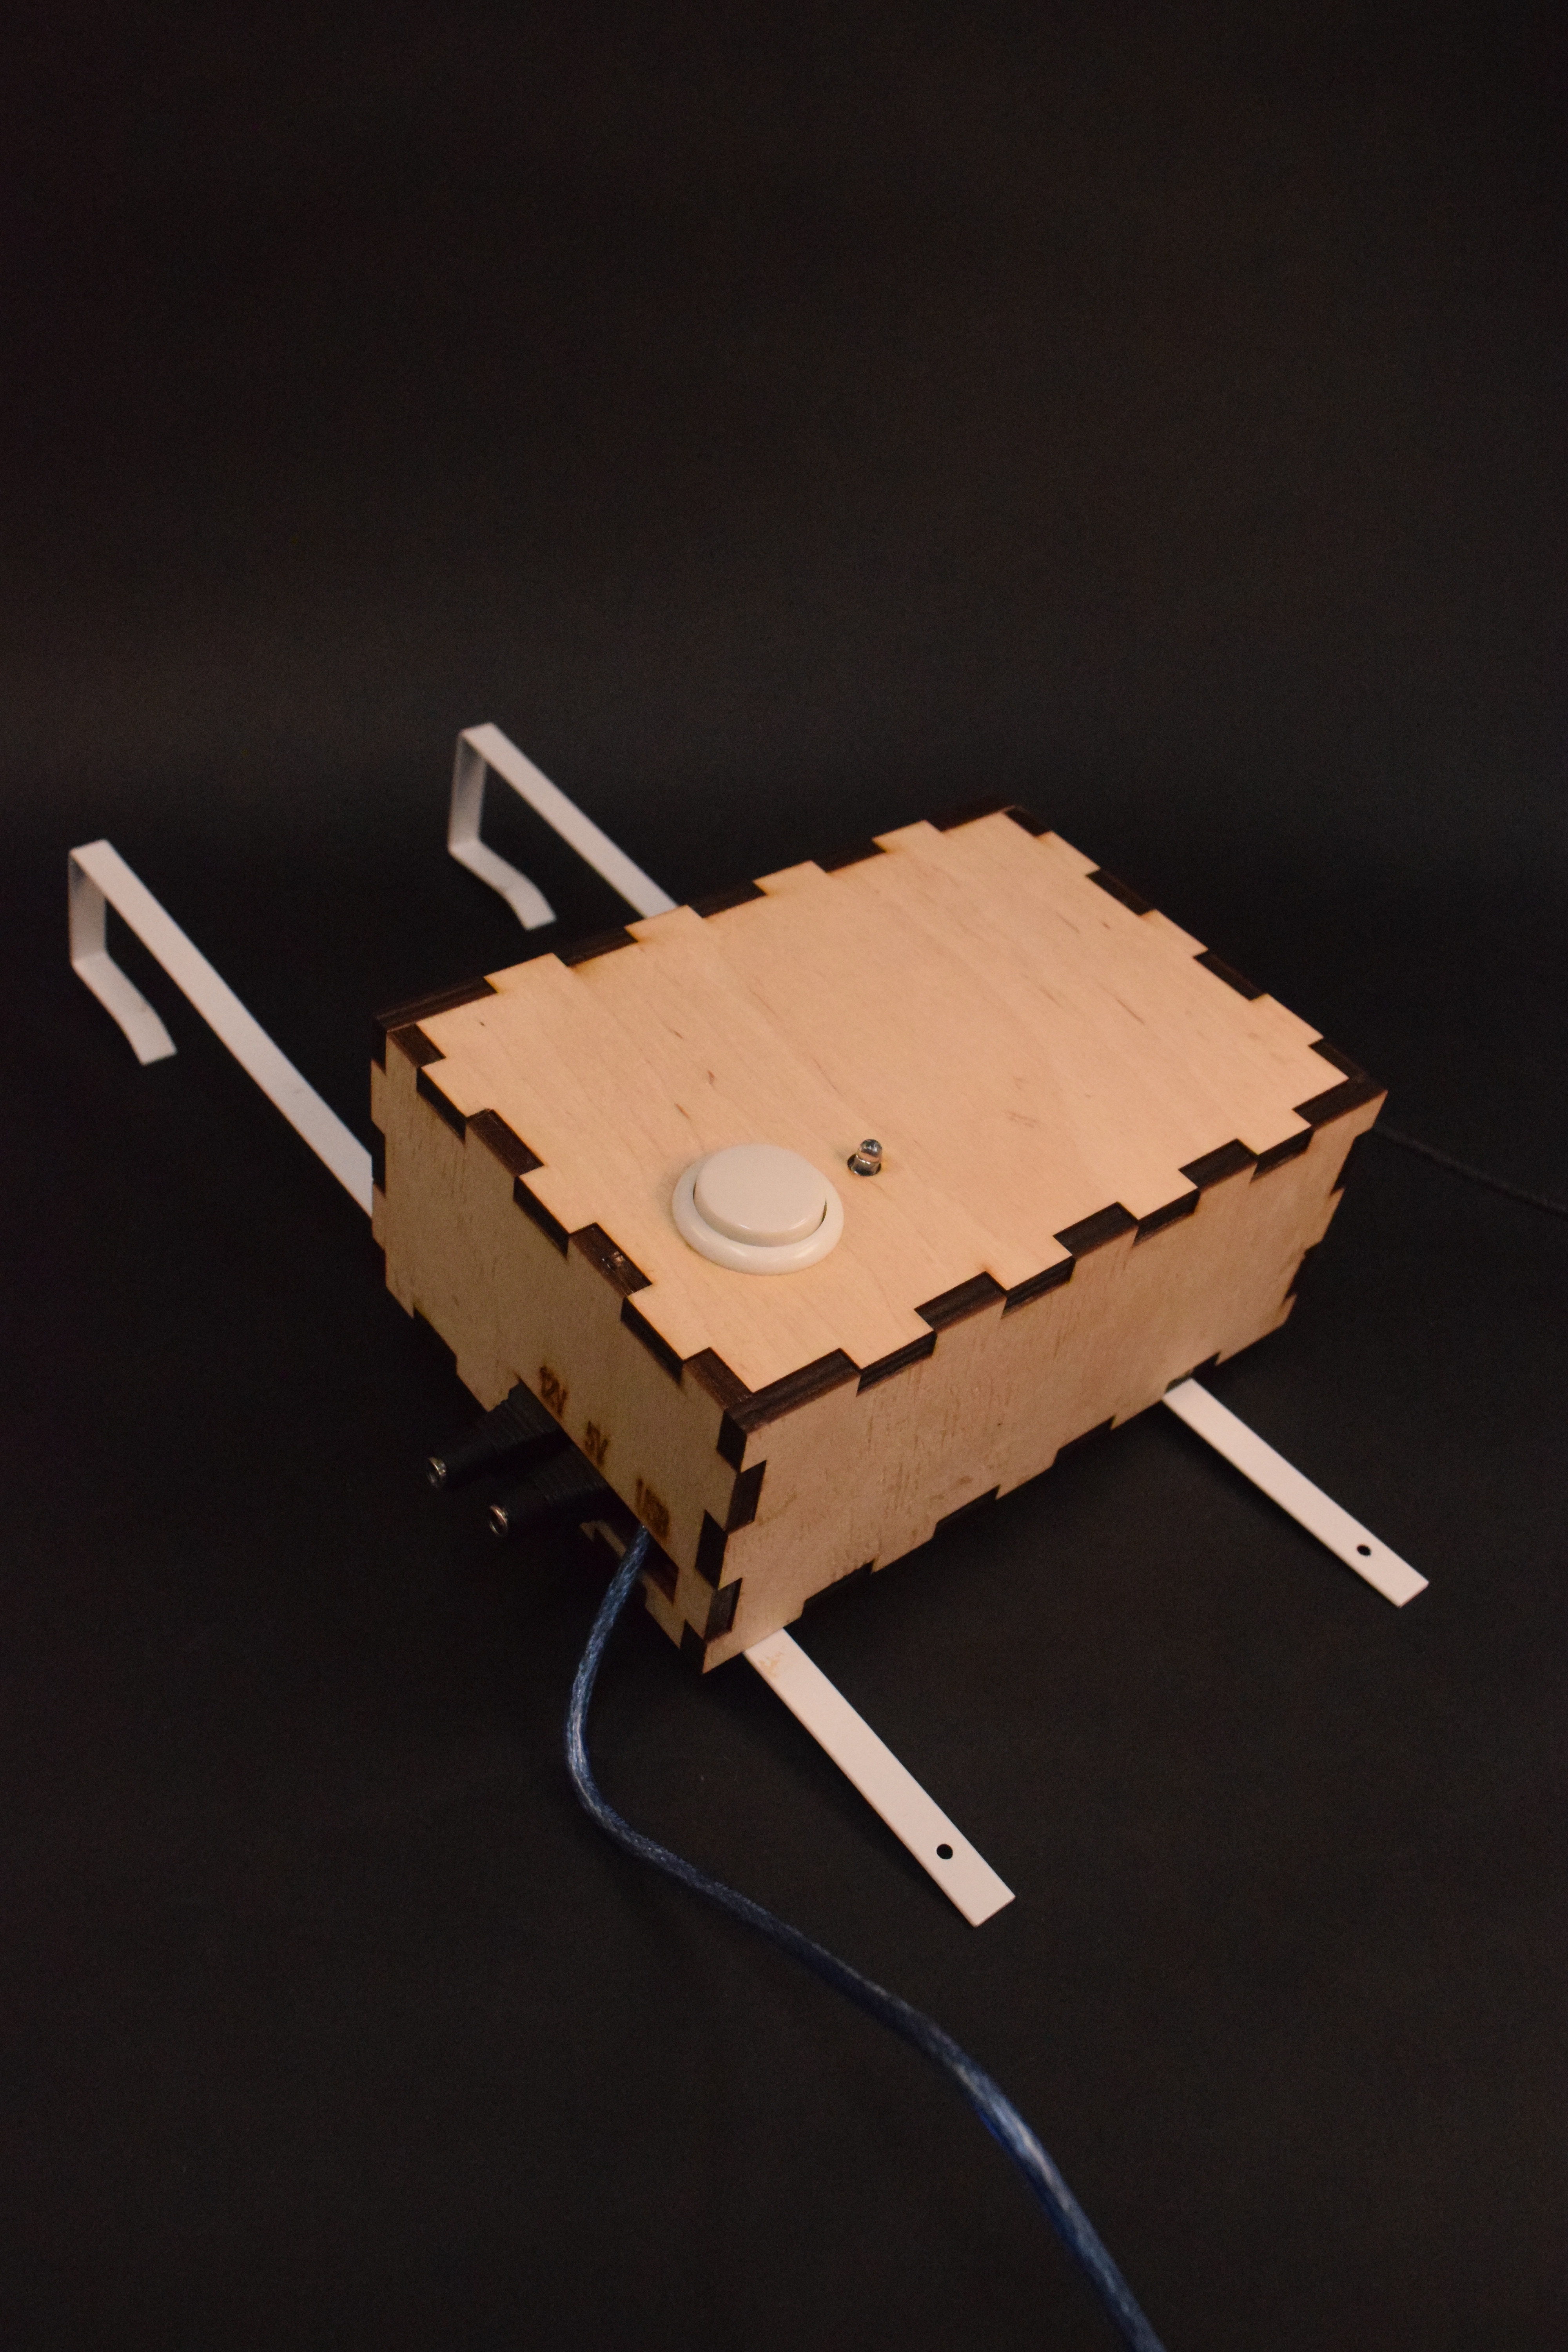
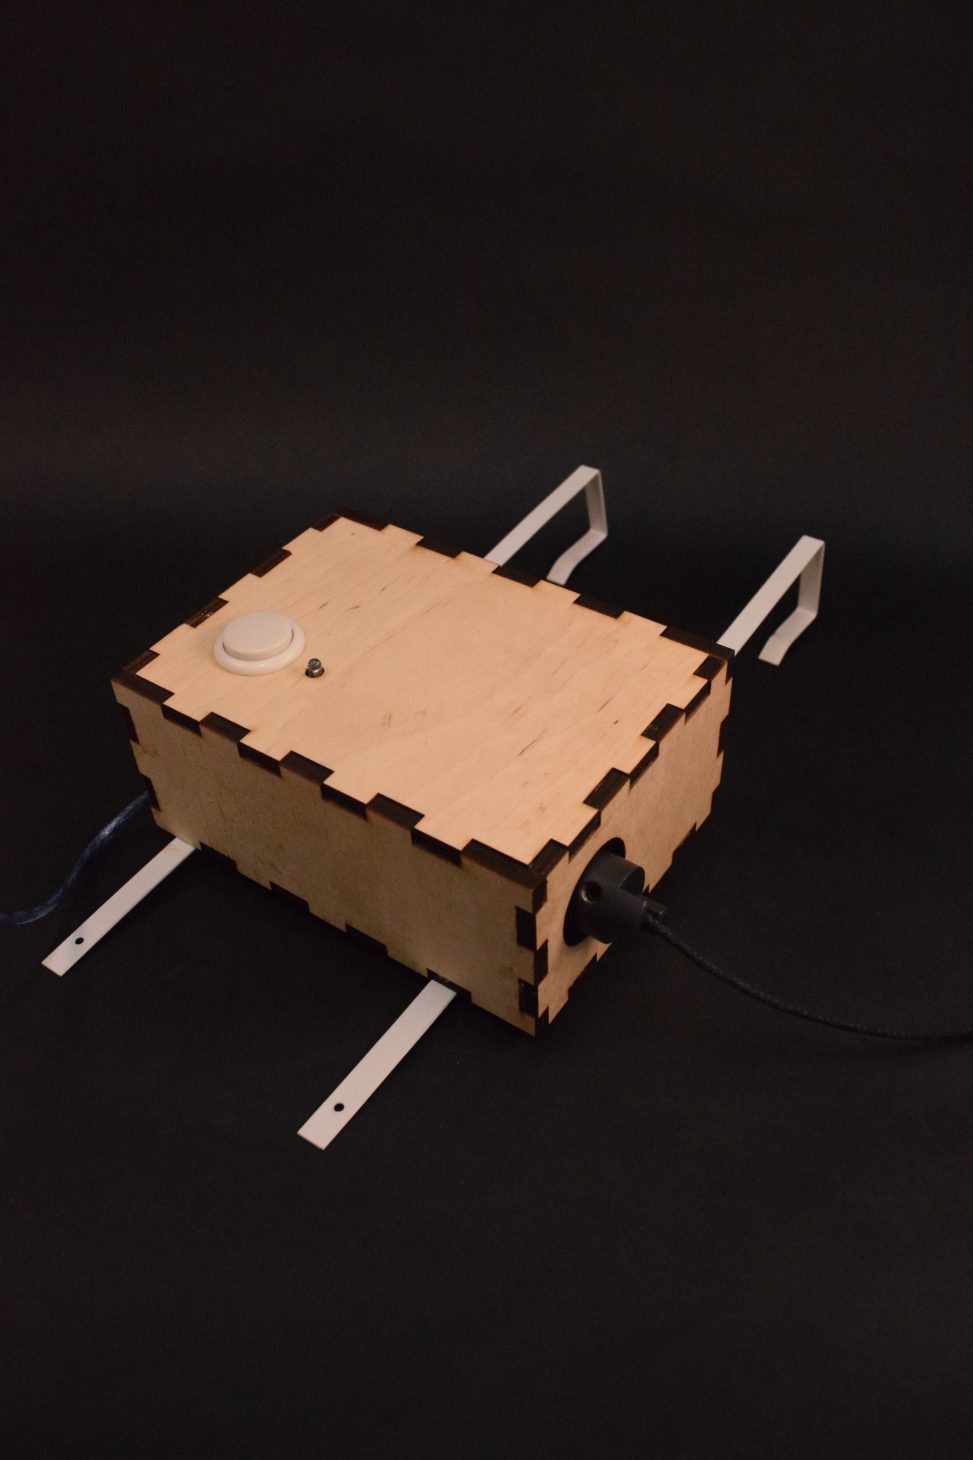
The entire box is about 7″x10″x3″ and easily hangable on most door frames.
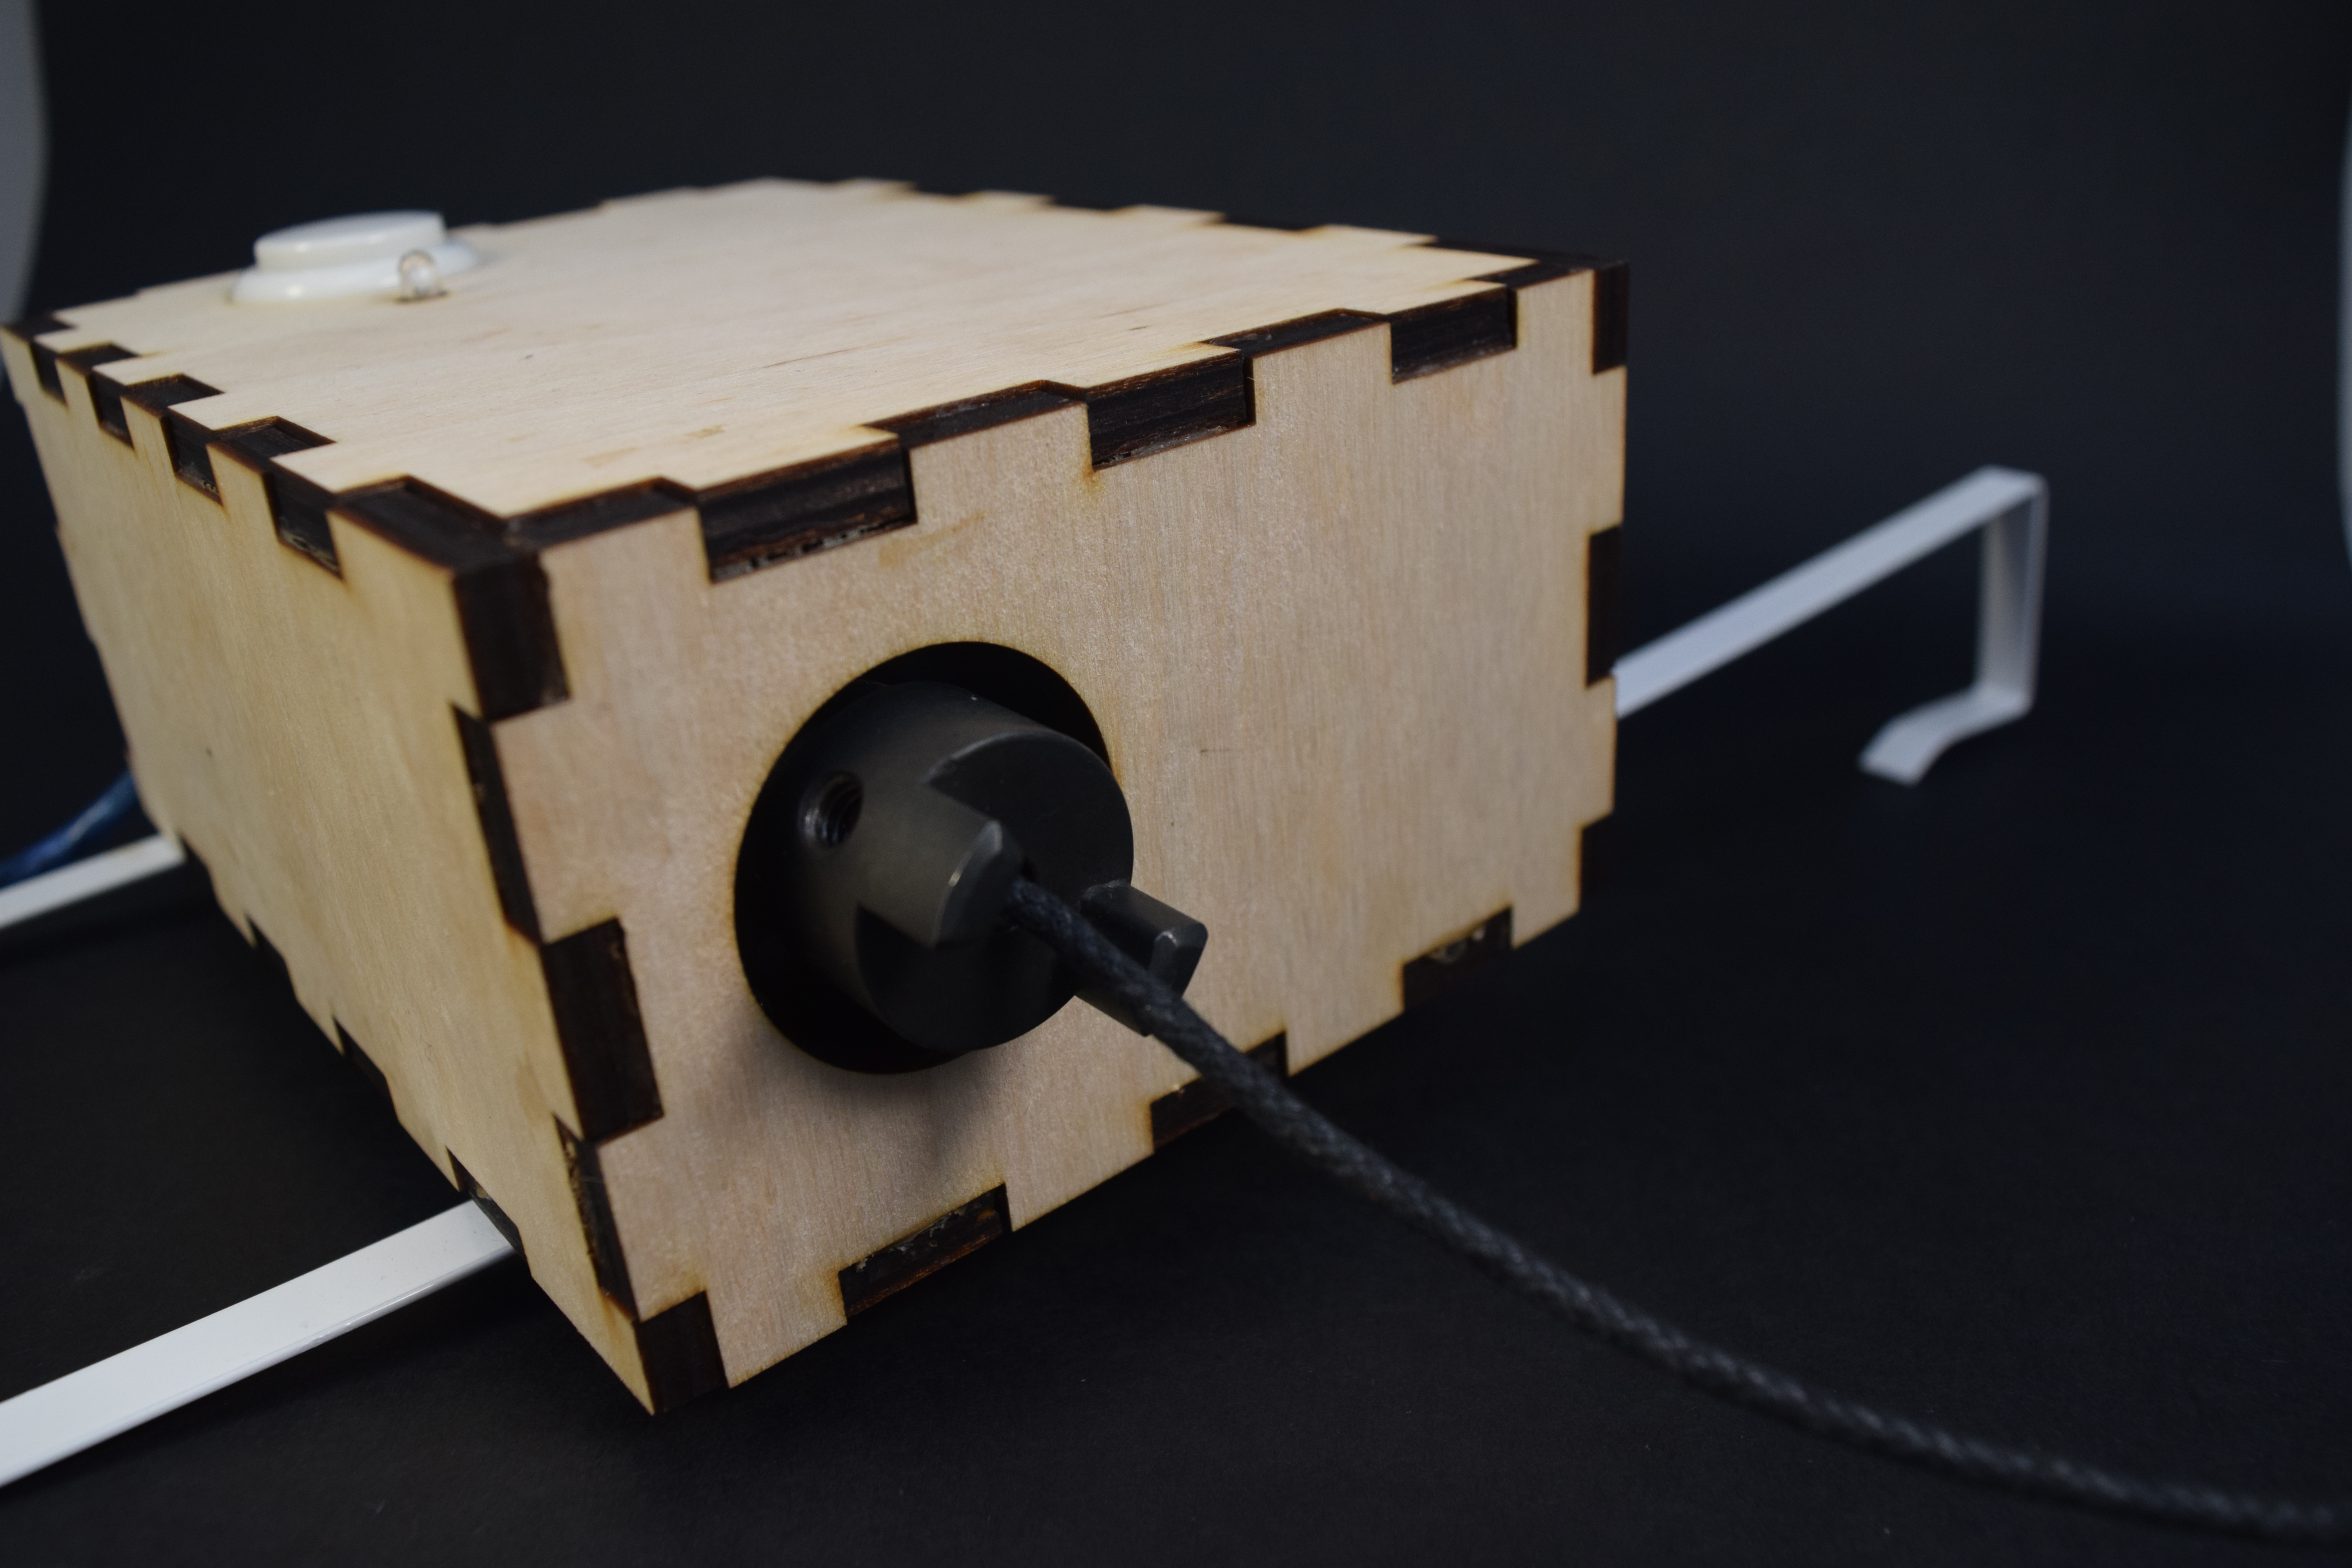
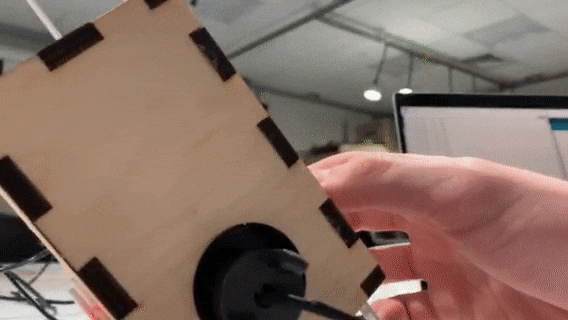
The stepper motor’s shaft protrudes from the box where the rope that will attach to the handle is clamped onto the shaft with one half of a shaft connector.
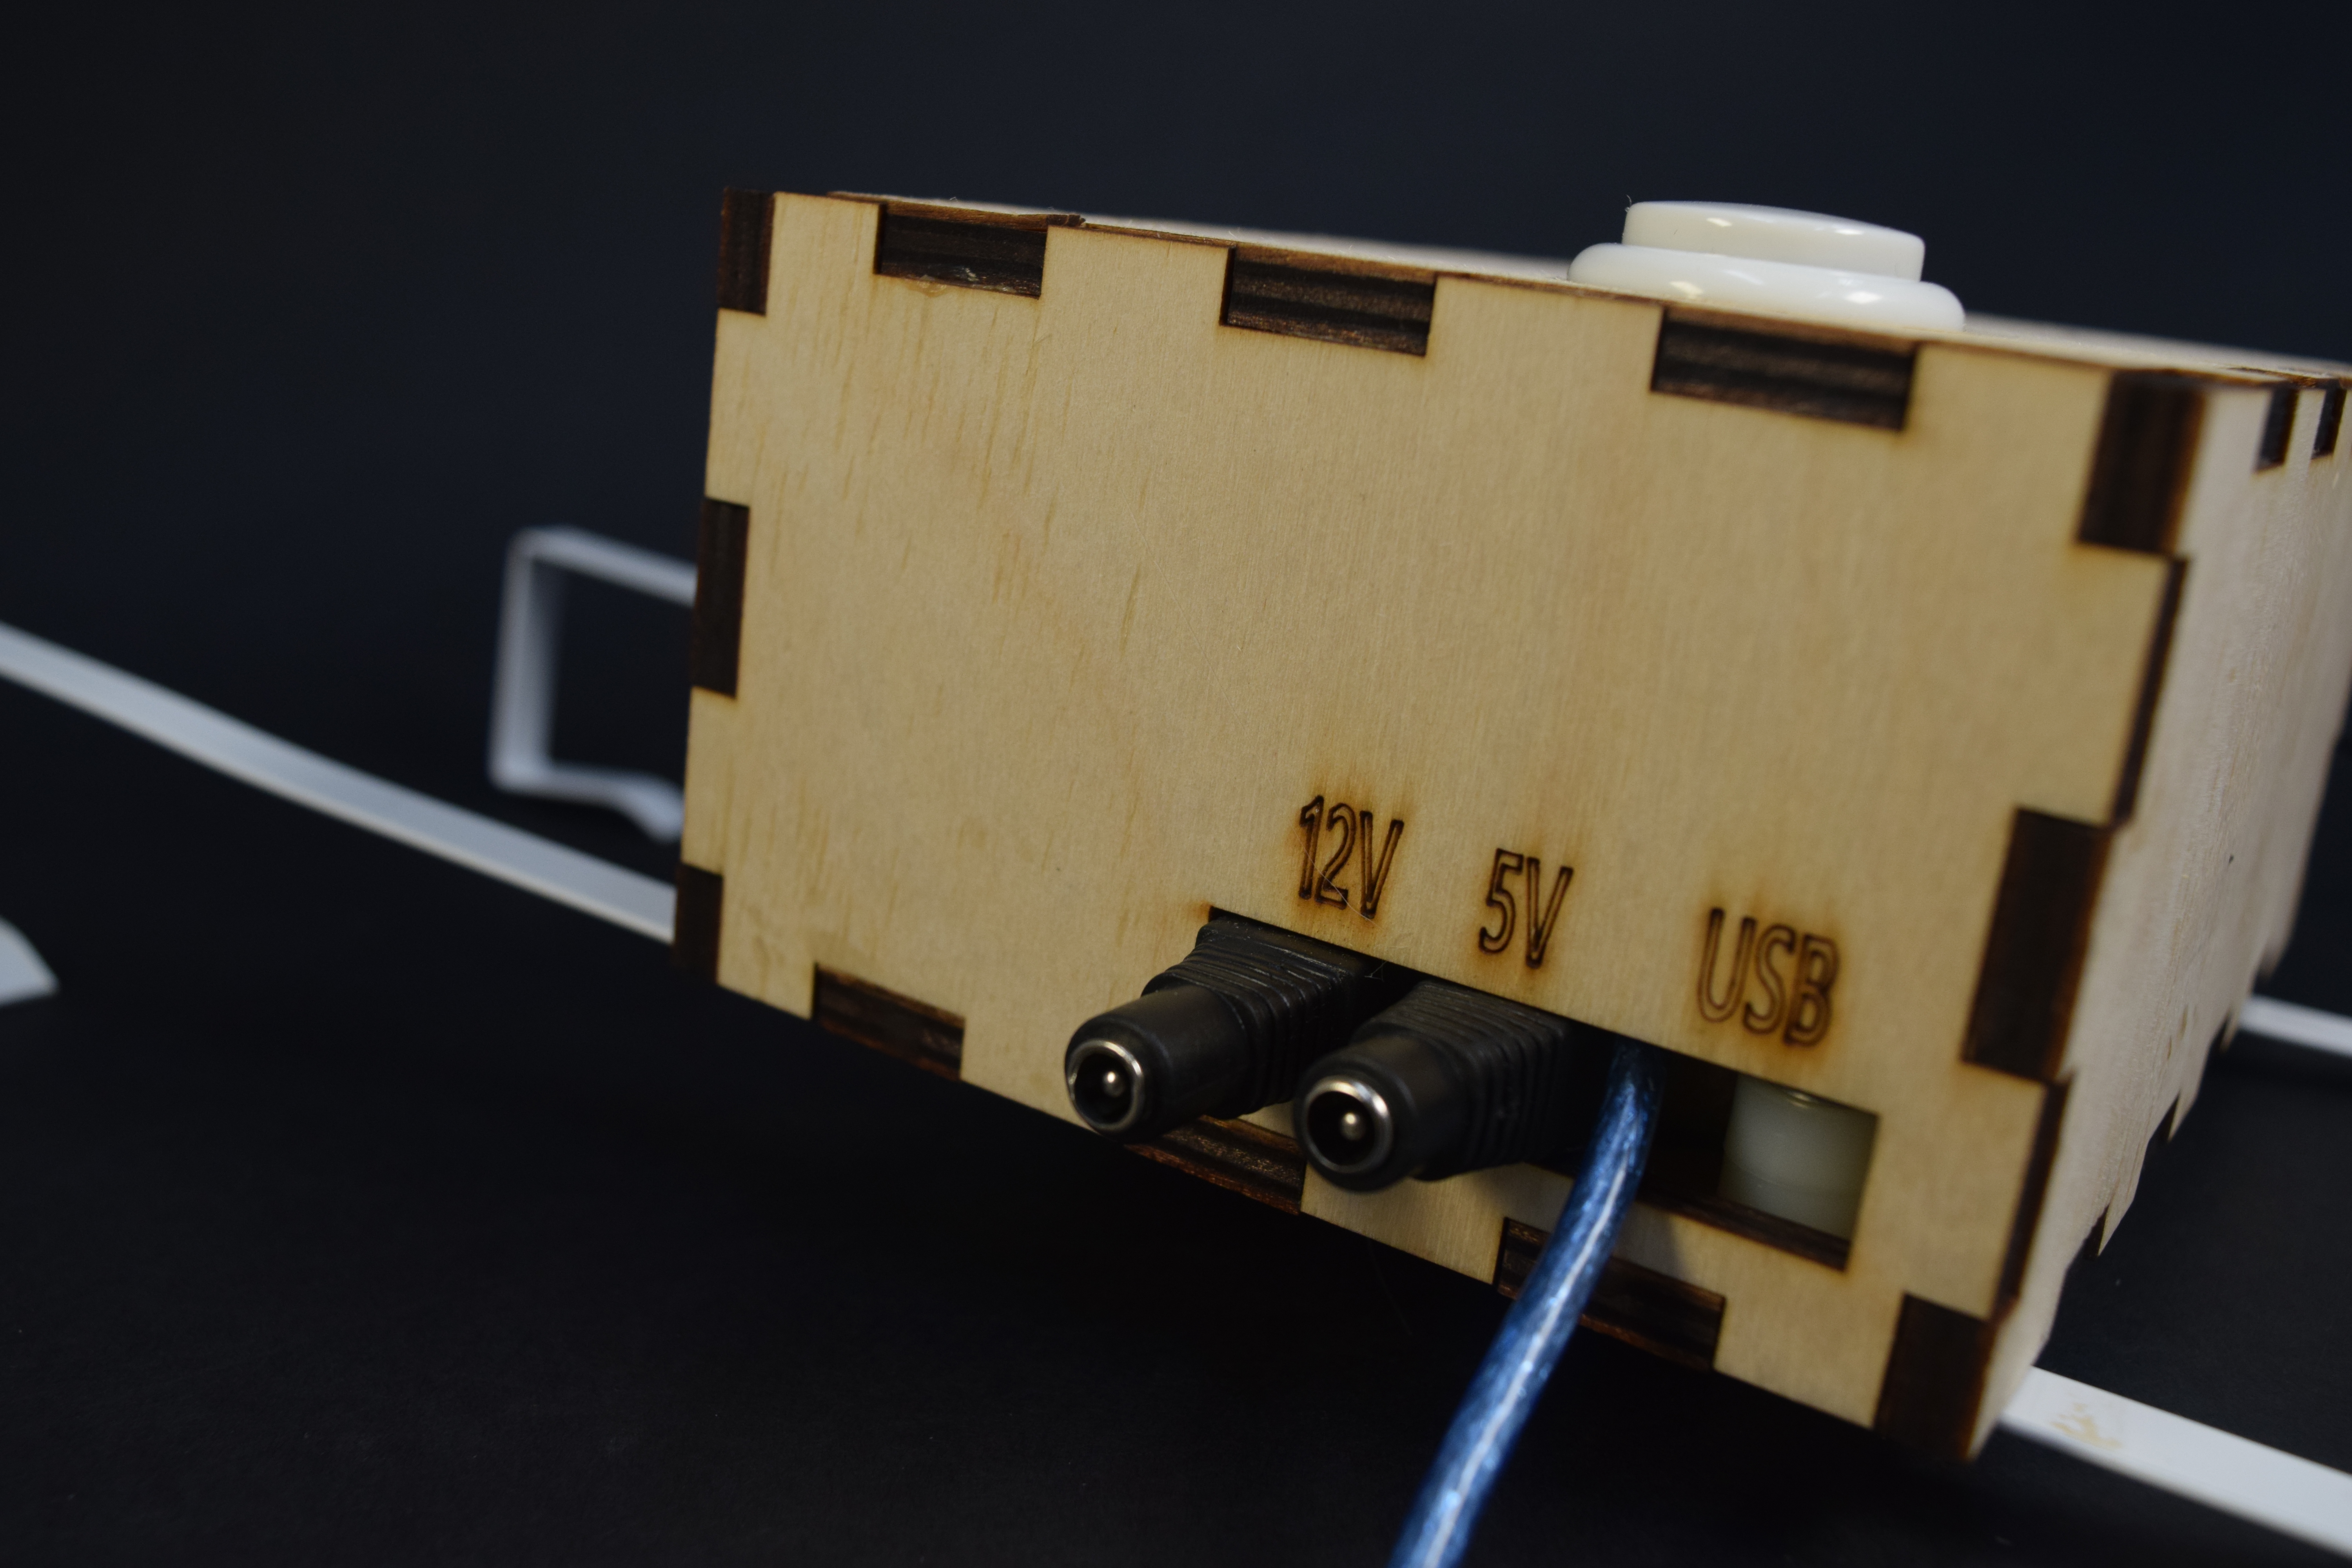
The lock requires both a 12v and 5v power supply. It also features a built-in USB cable for updating the password of the device.
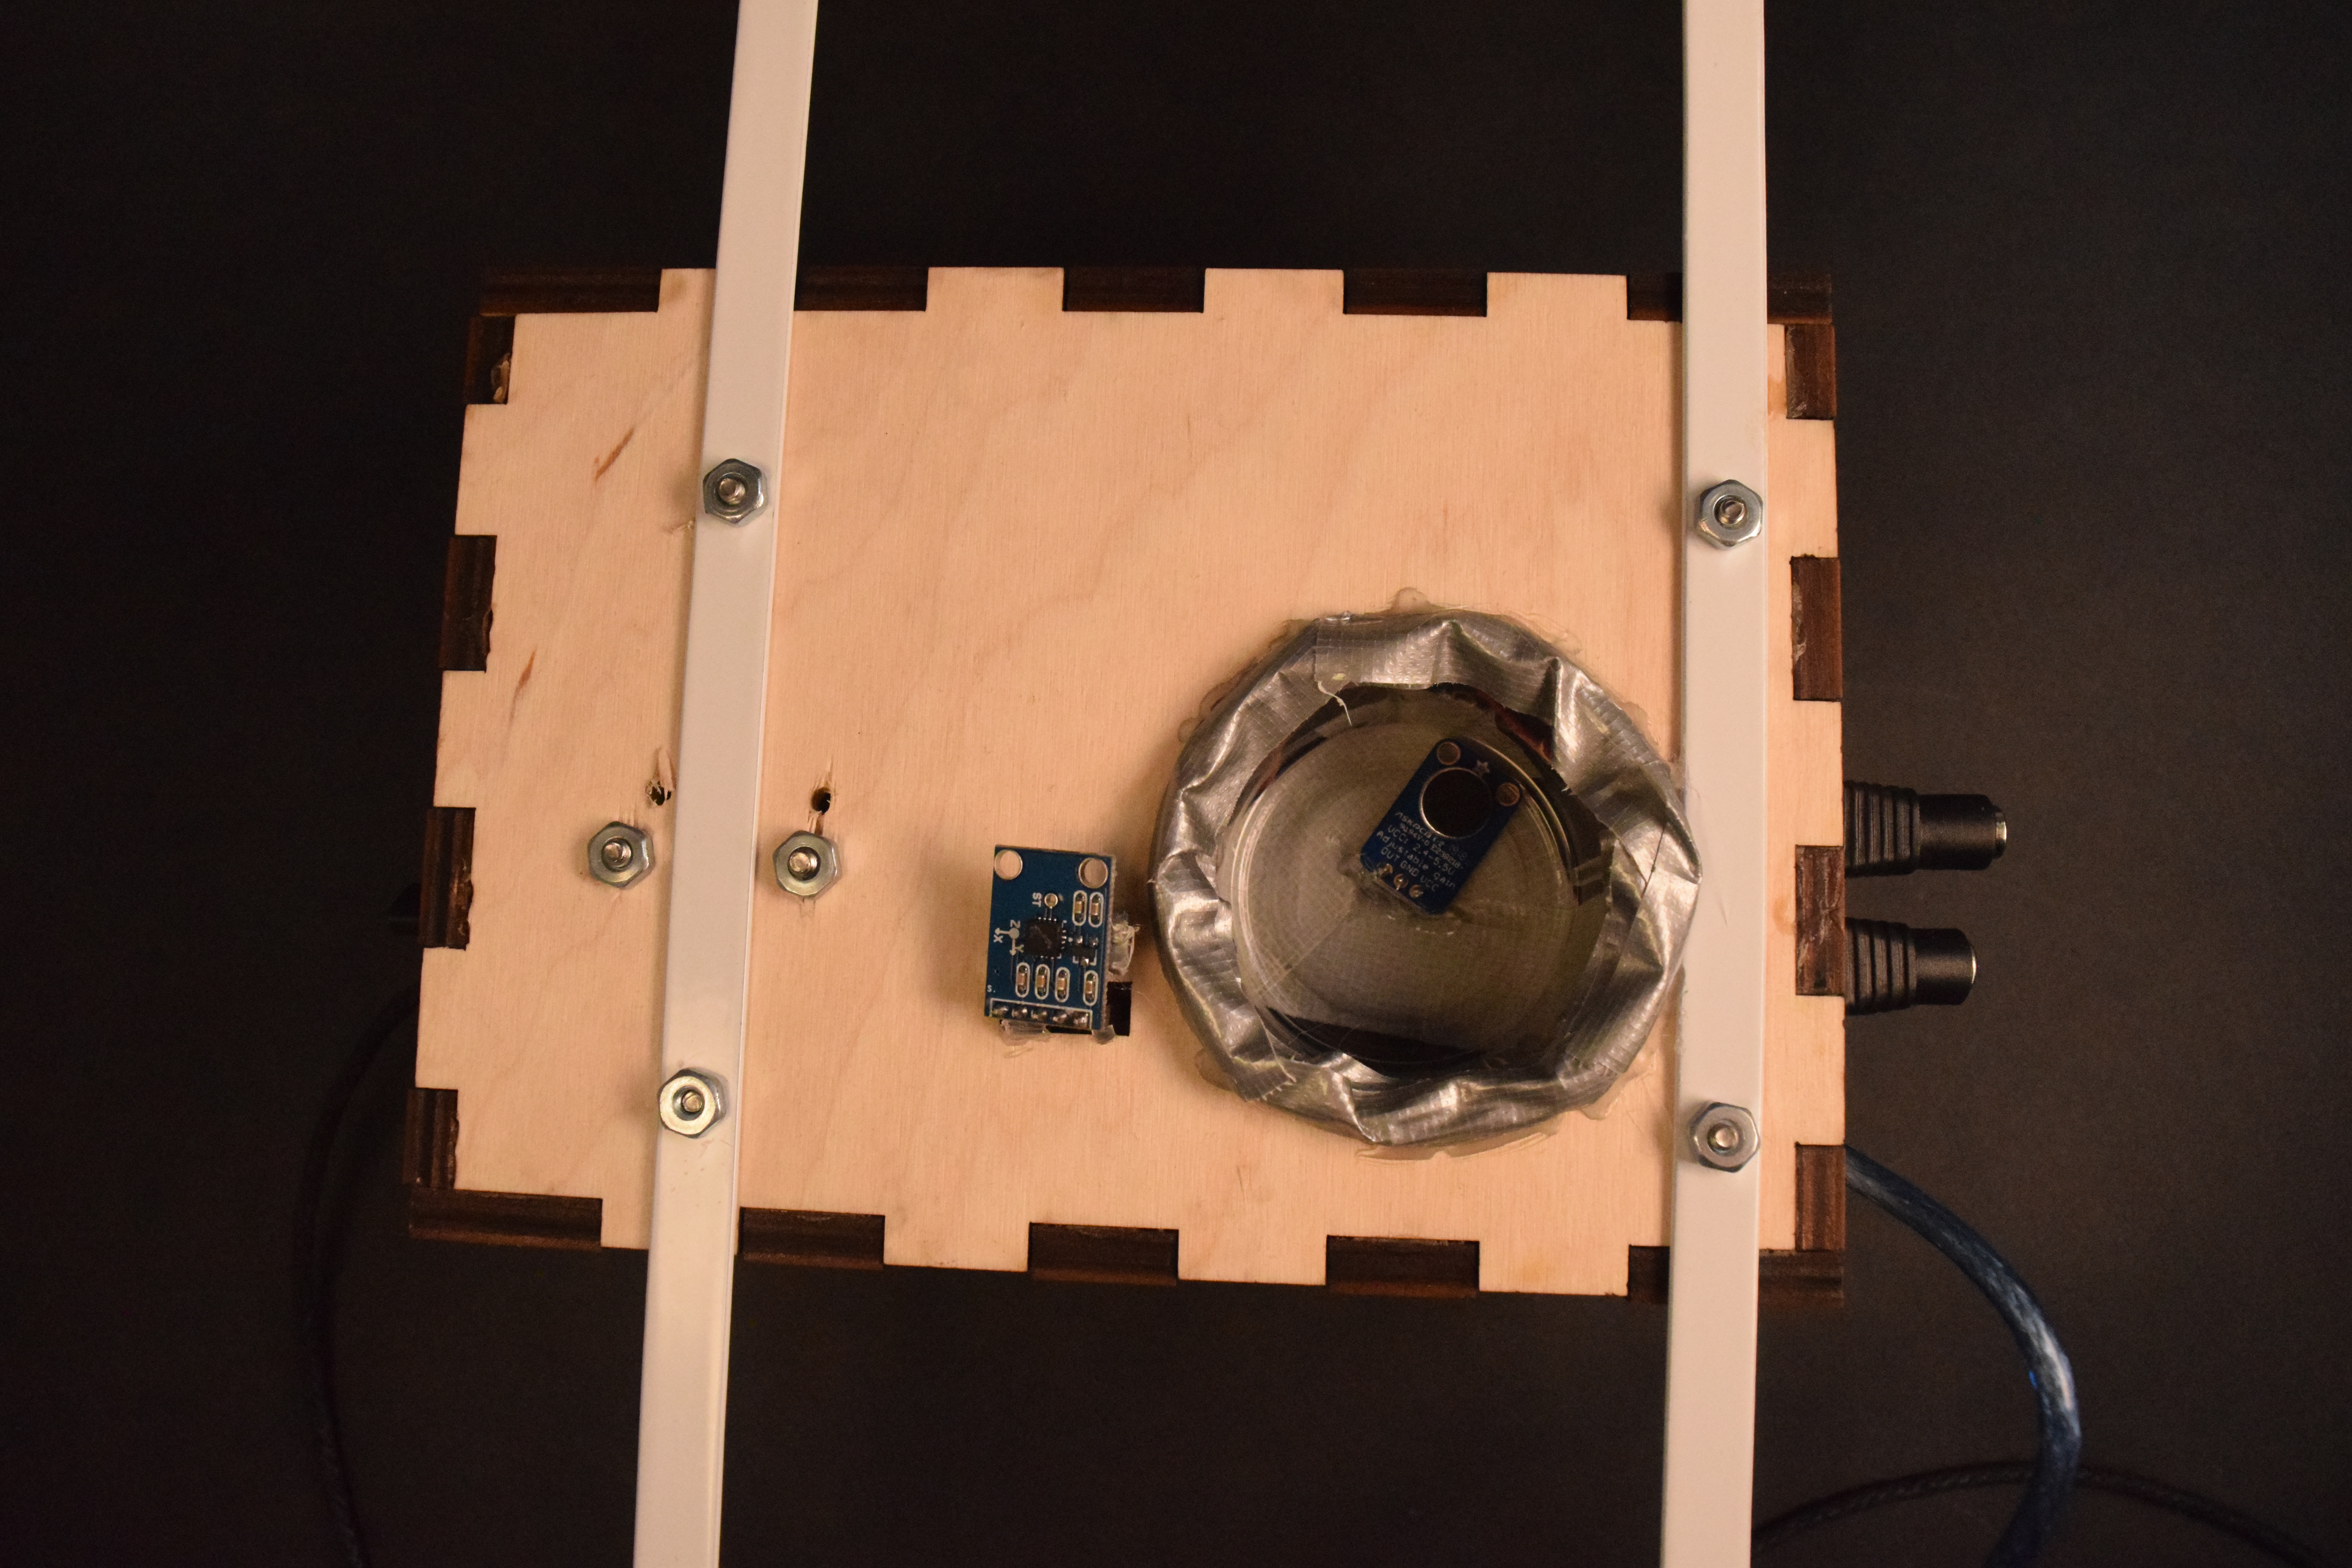
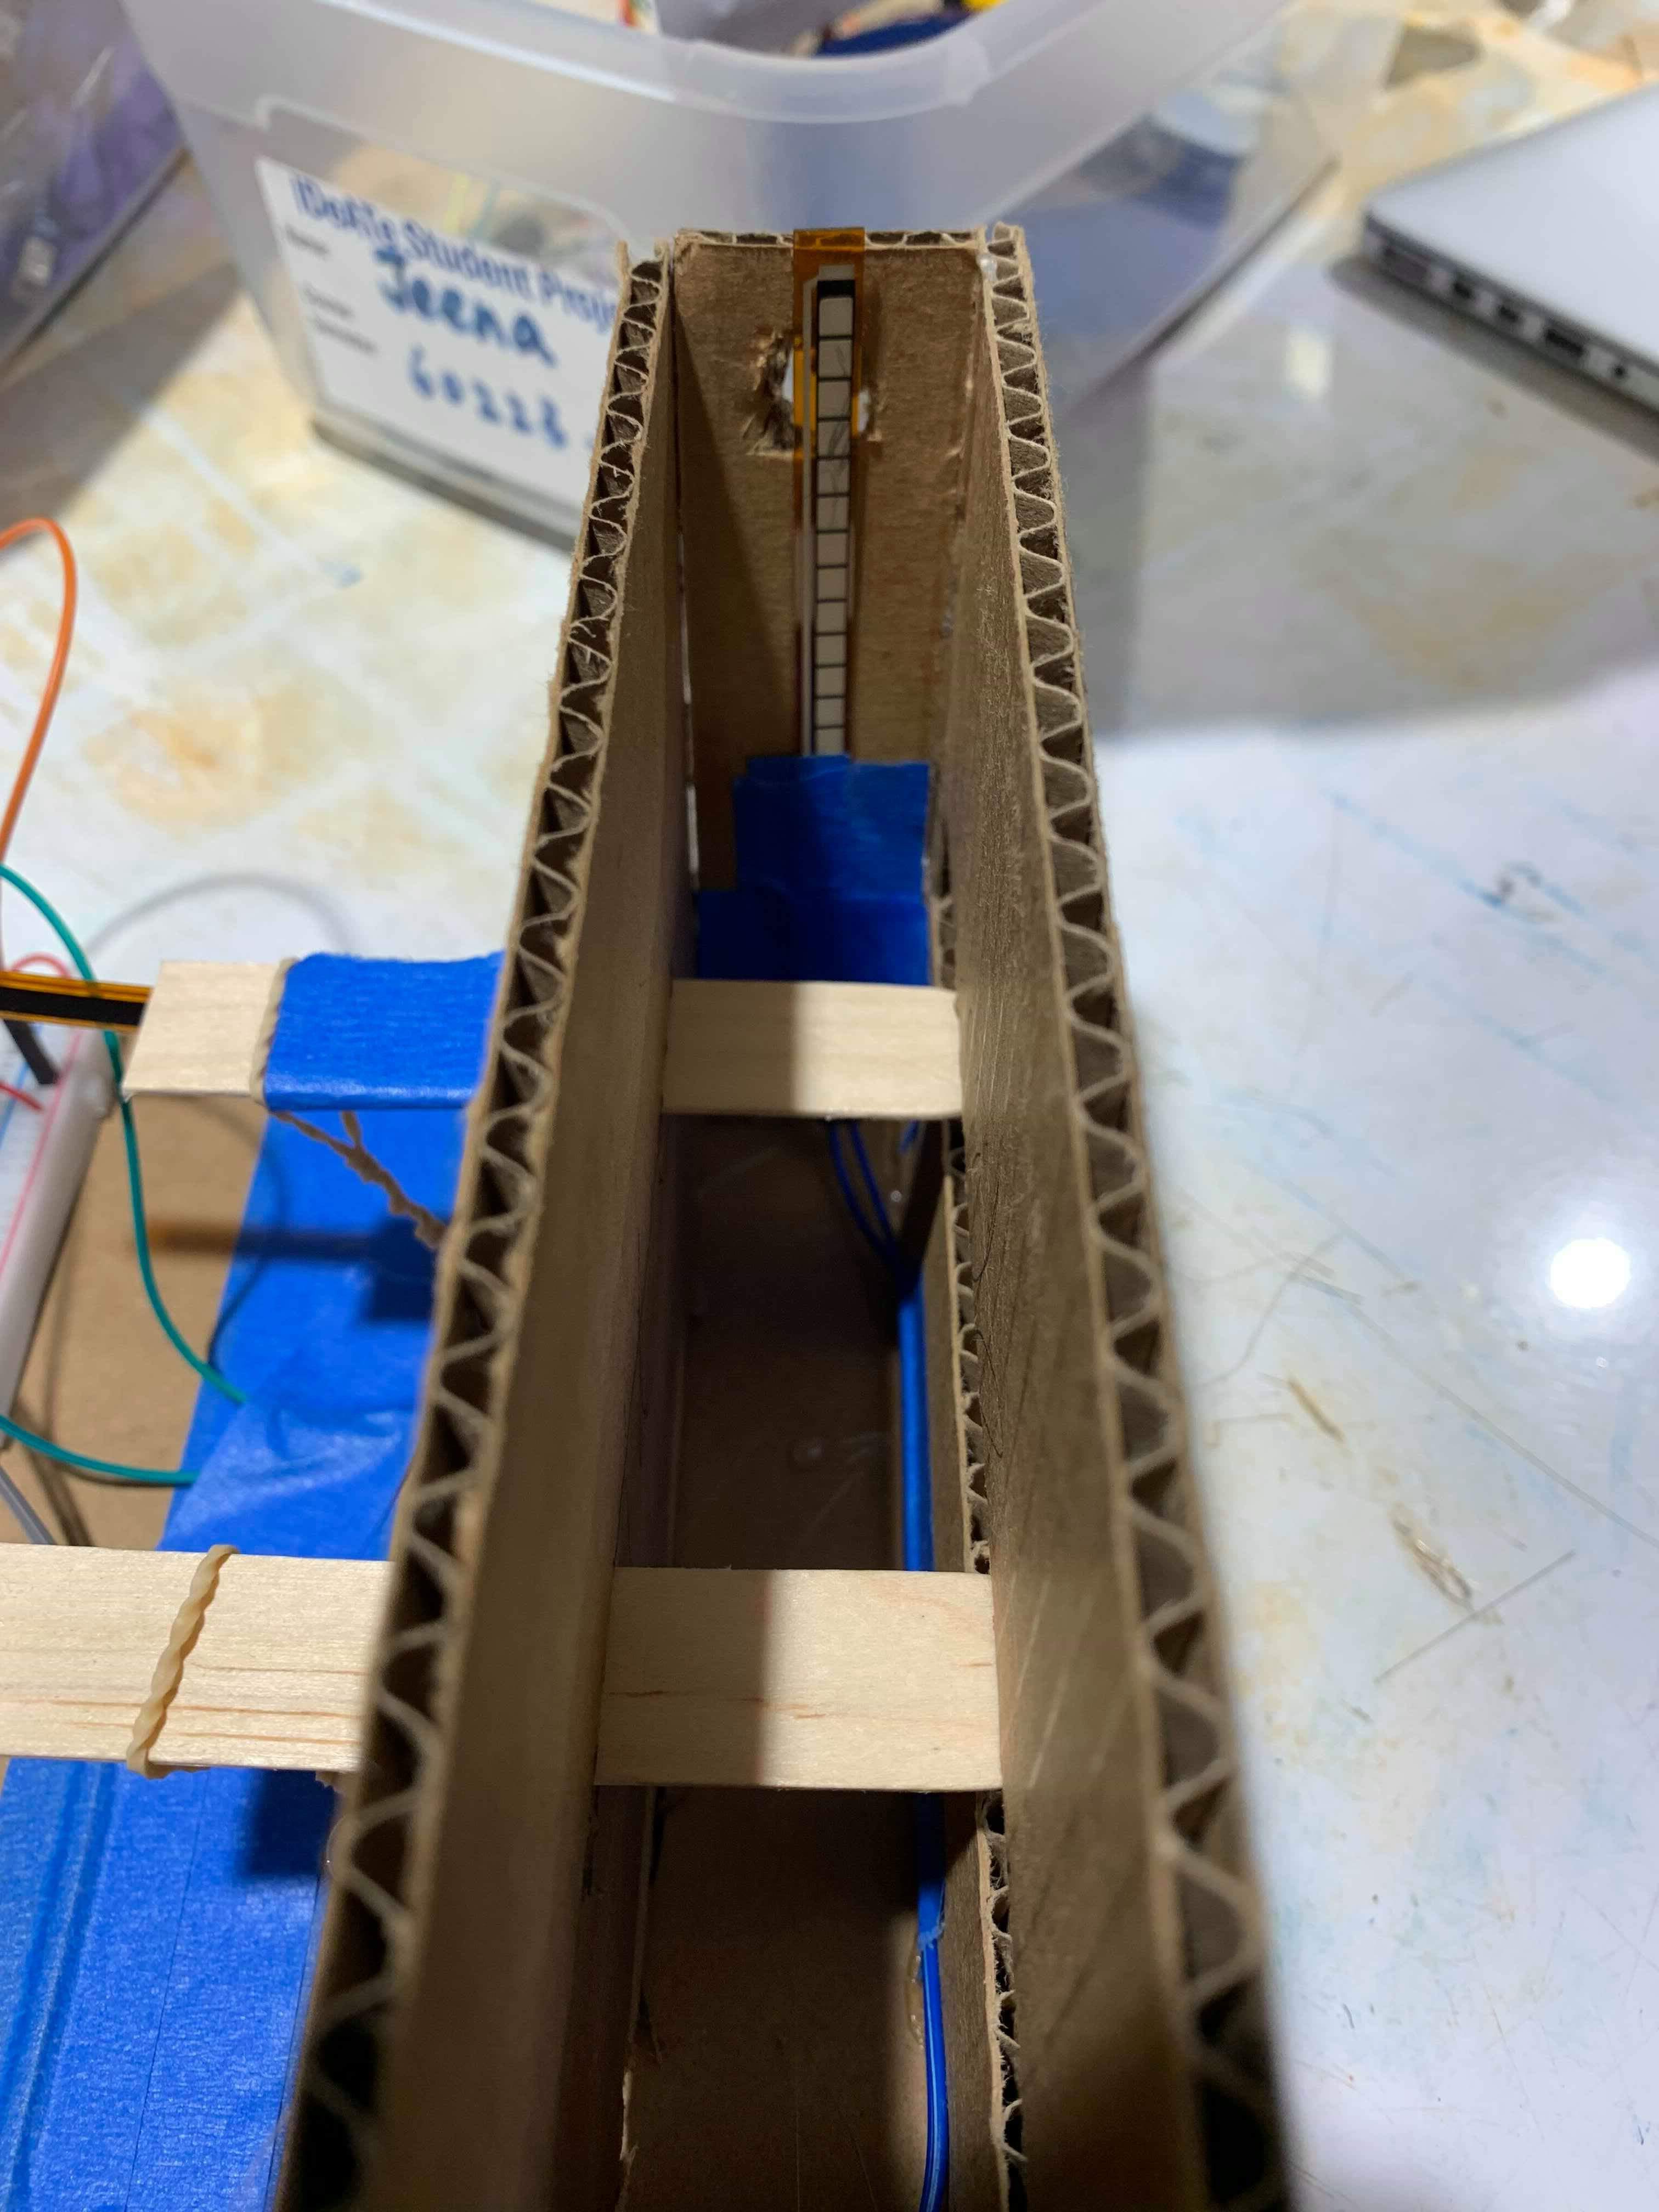
On the back, two metal brackets are used to hang the lock. The stepper motor is directly attached to the left motor to remove any stress on the box while opening the door. On the right, the accelerometer is loosely attached next to a cup for the microphone.
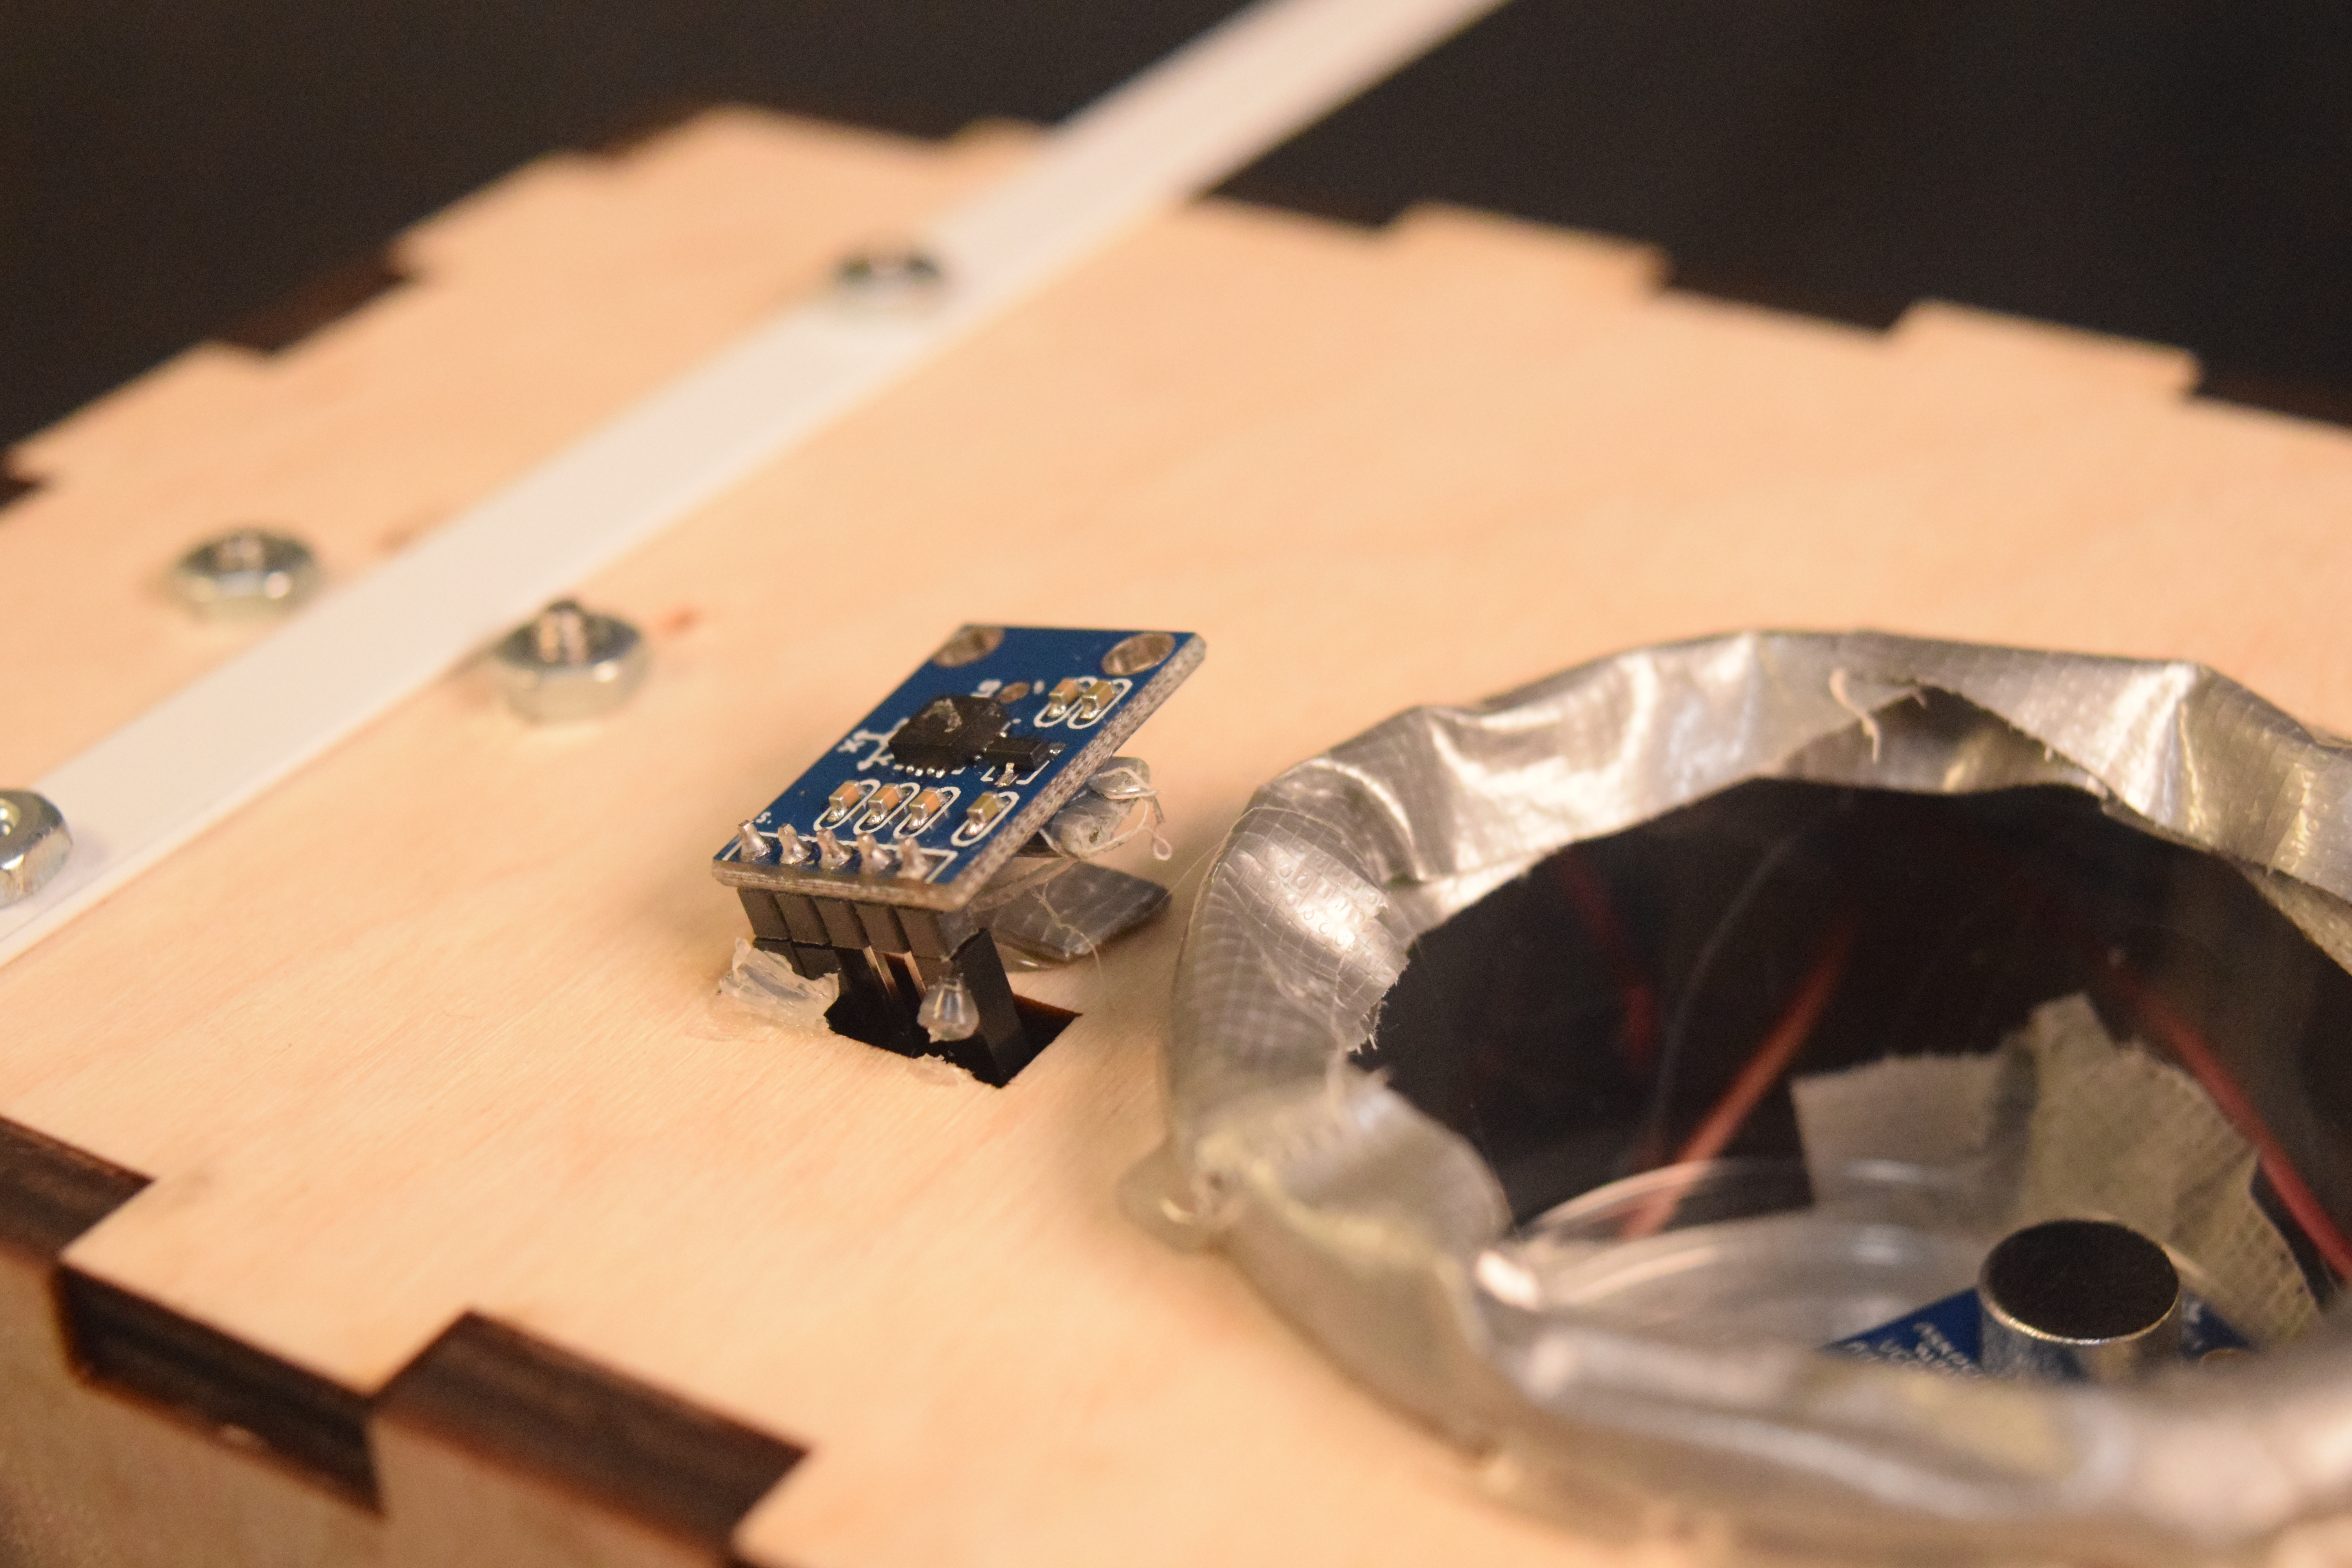
The accelerometer is allowed some freedom in hopes of capturing greater vibrations. The microphone is surrounded by a cup meant to direct surface vibrations from the door directly into the microphone.
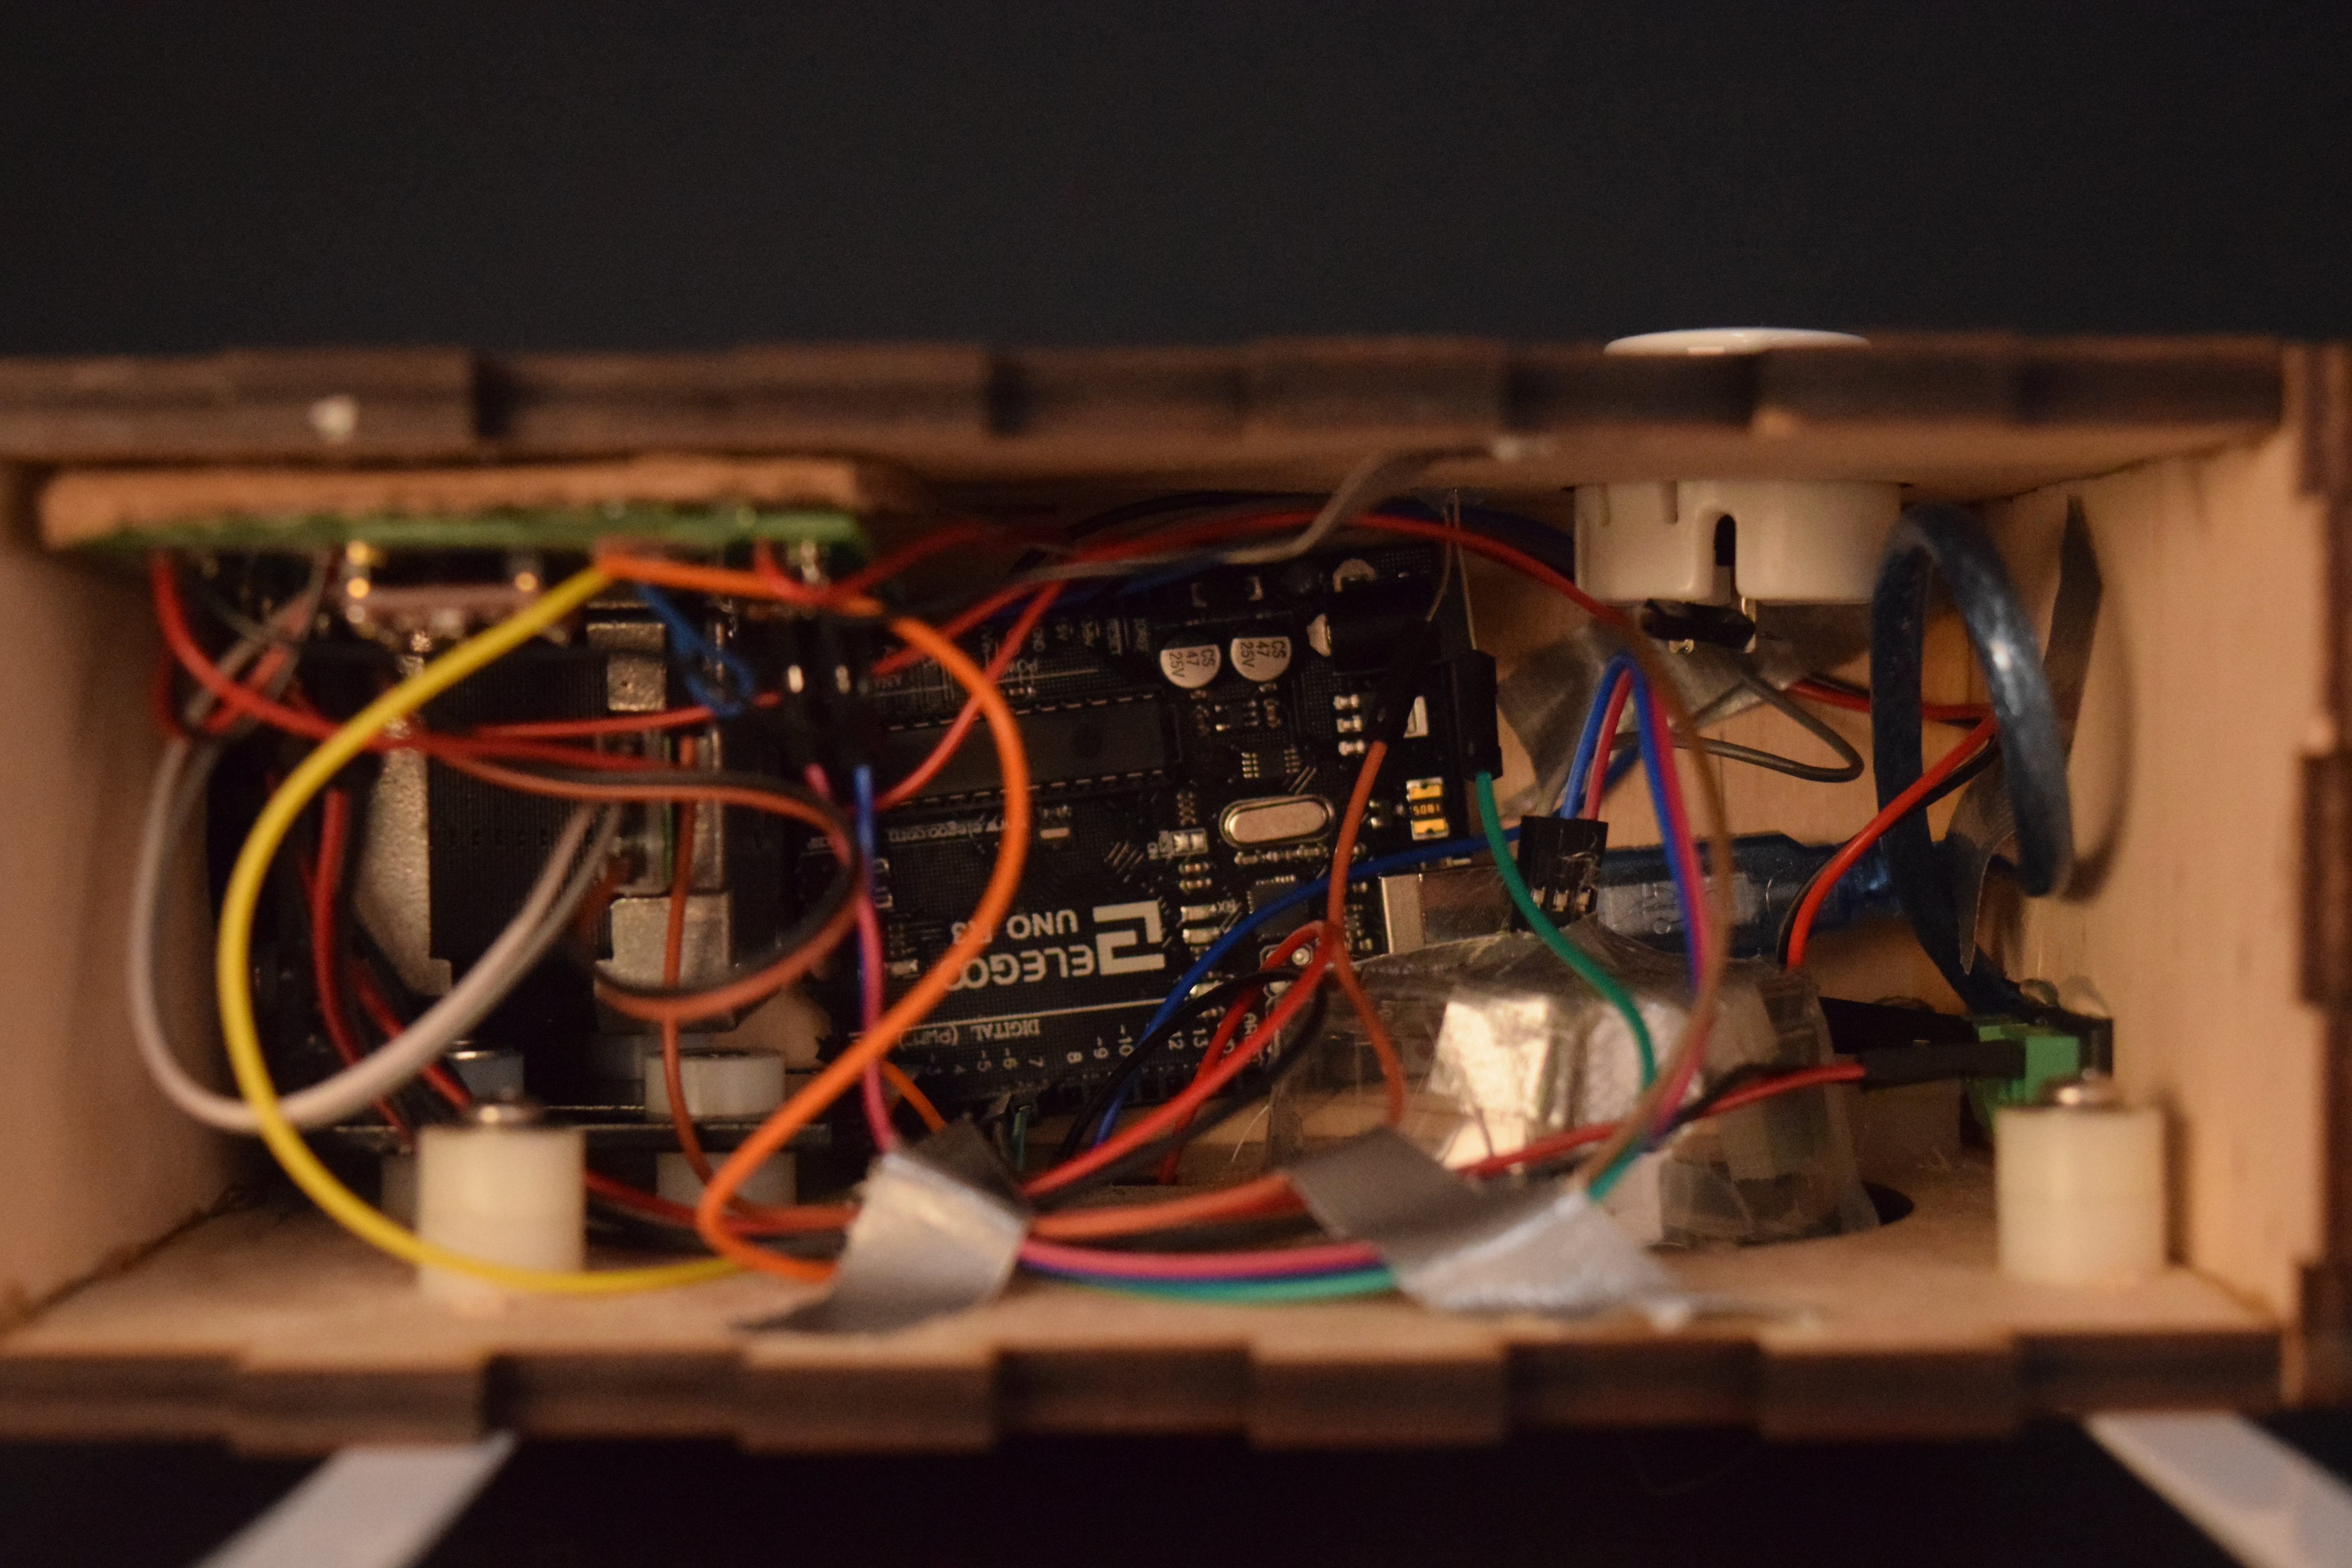
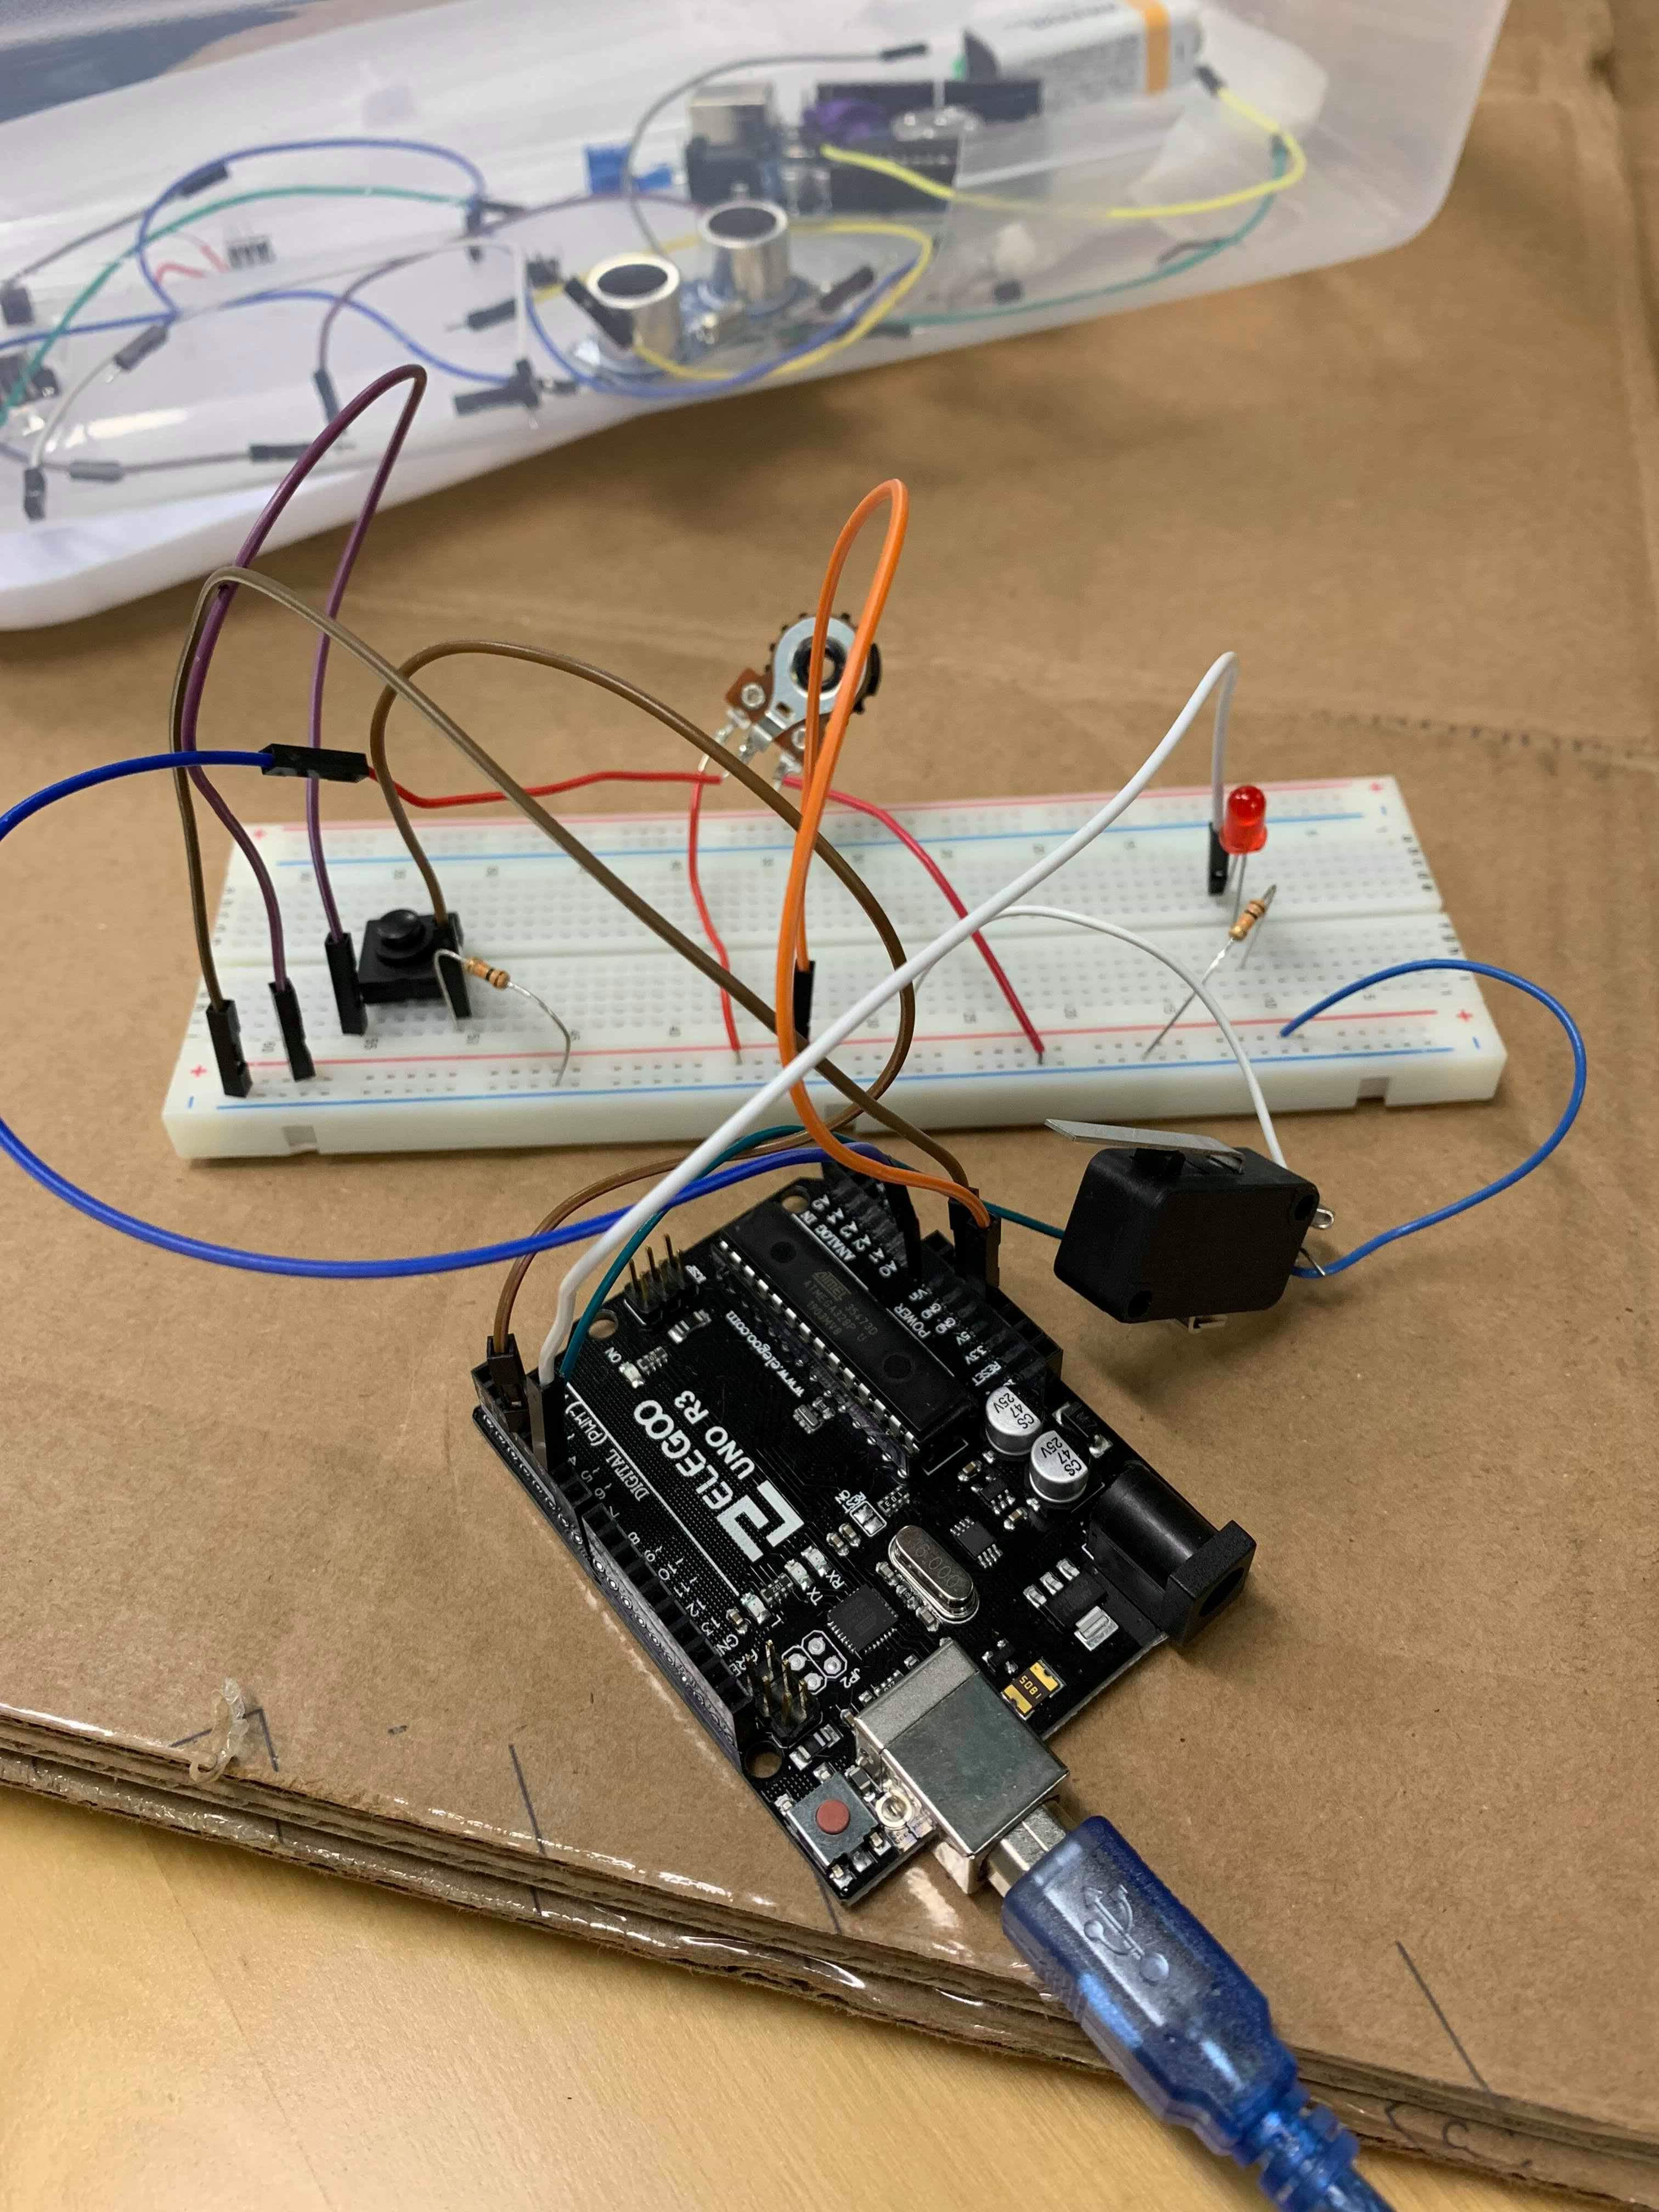
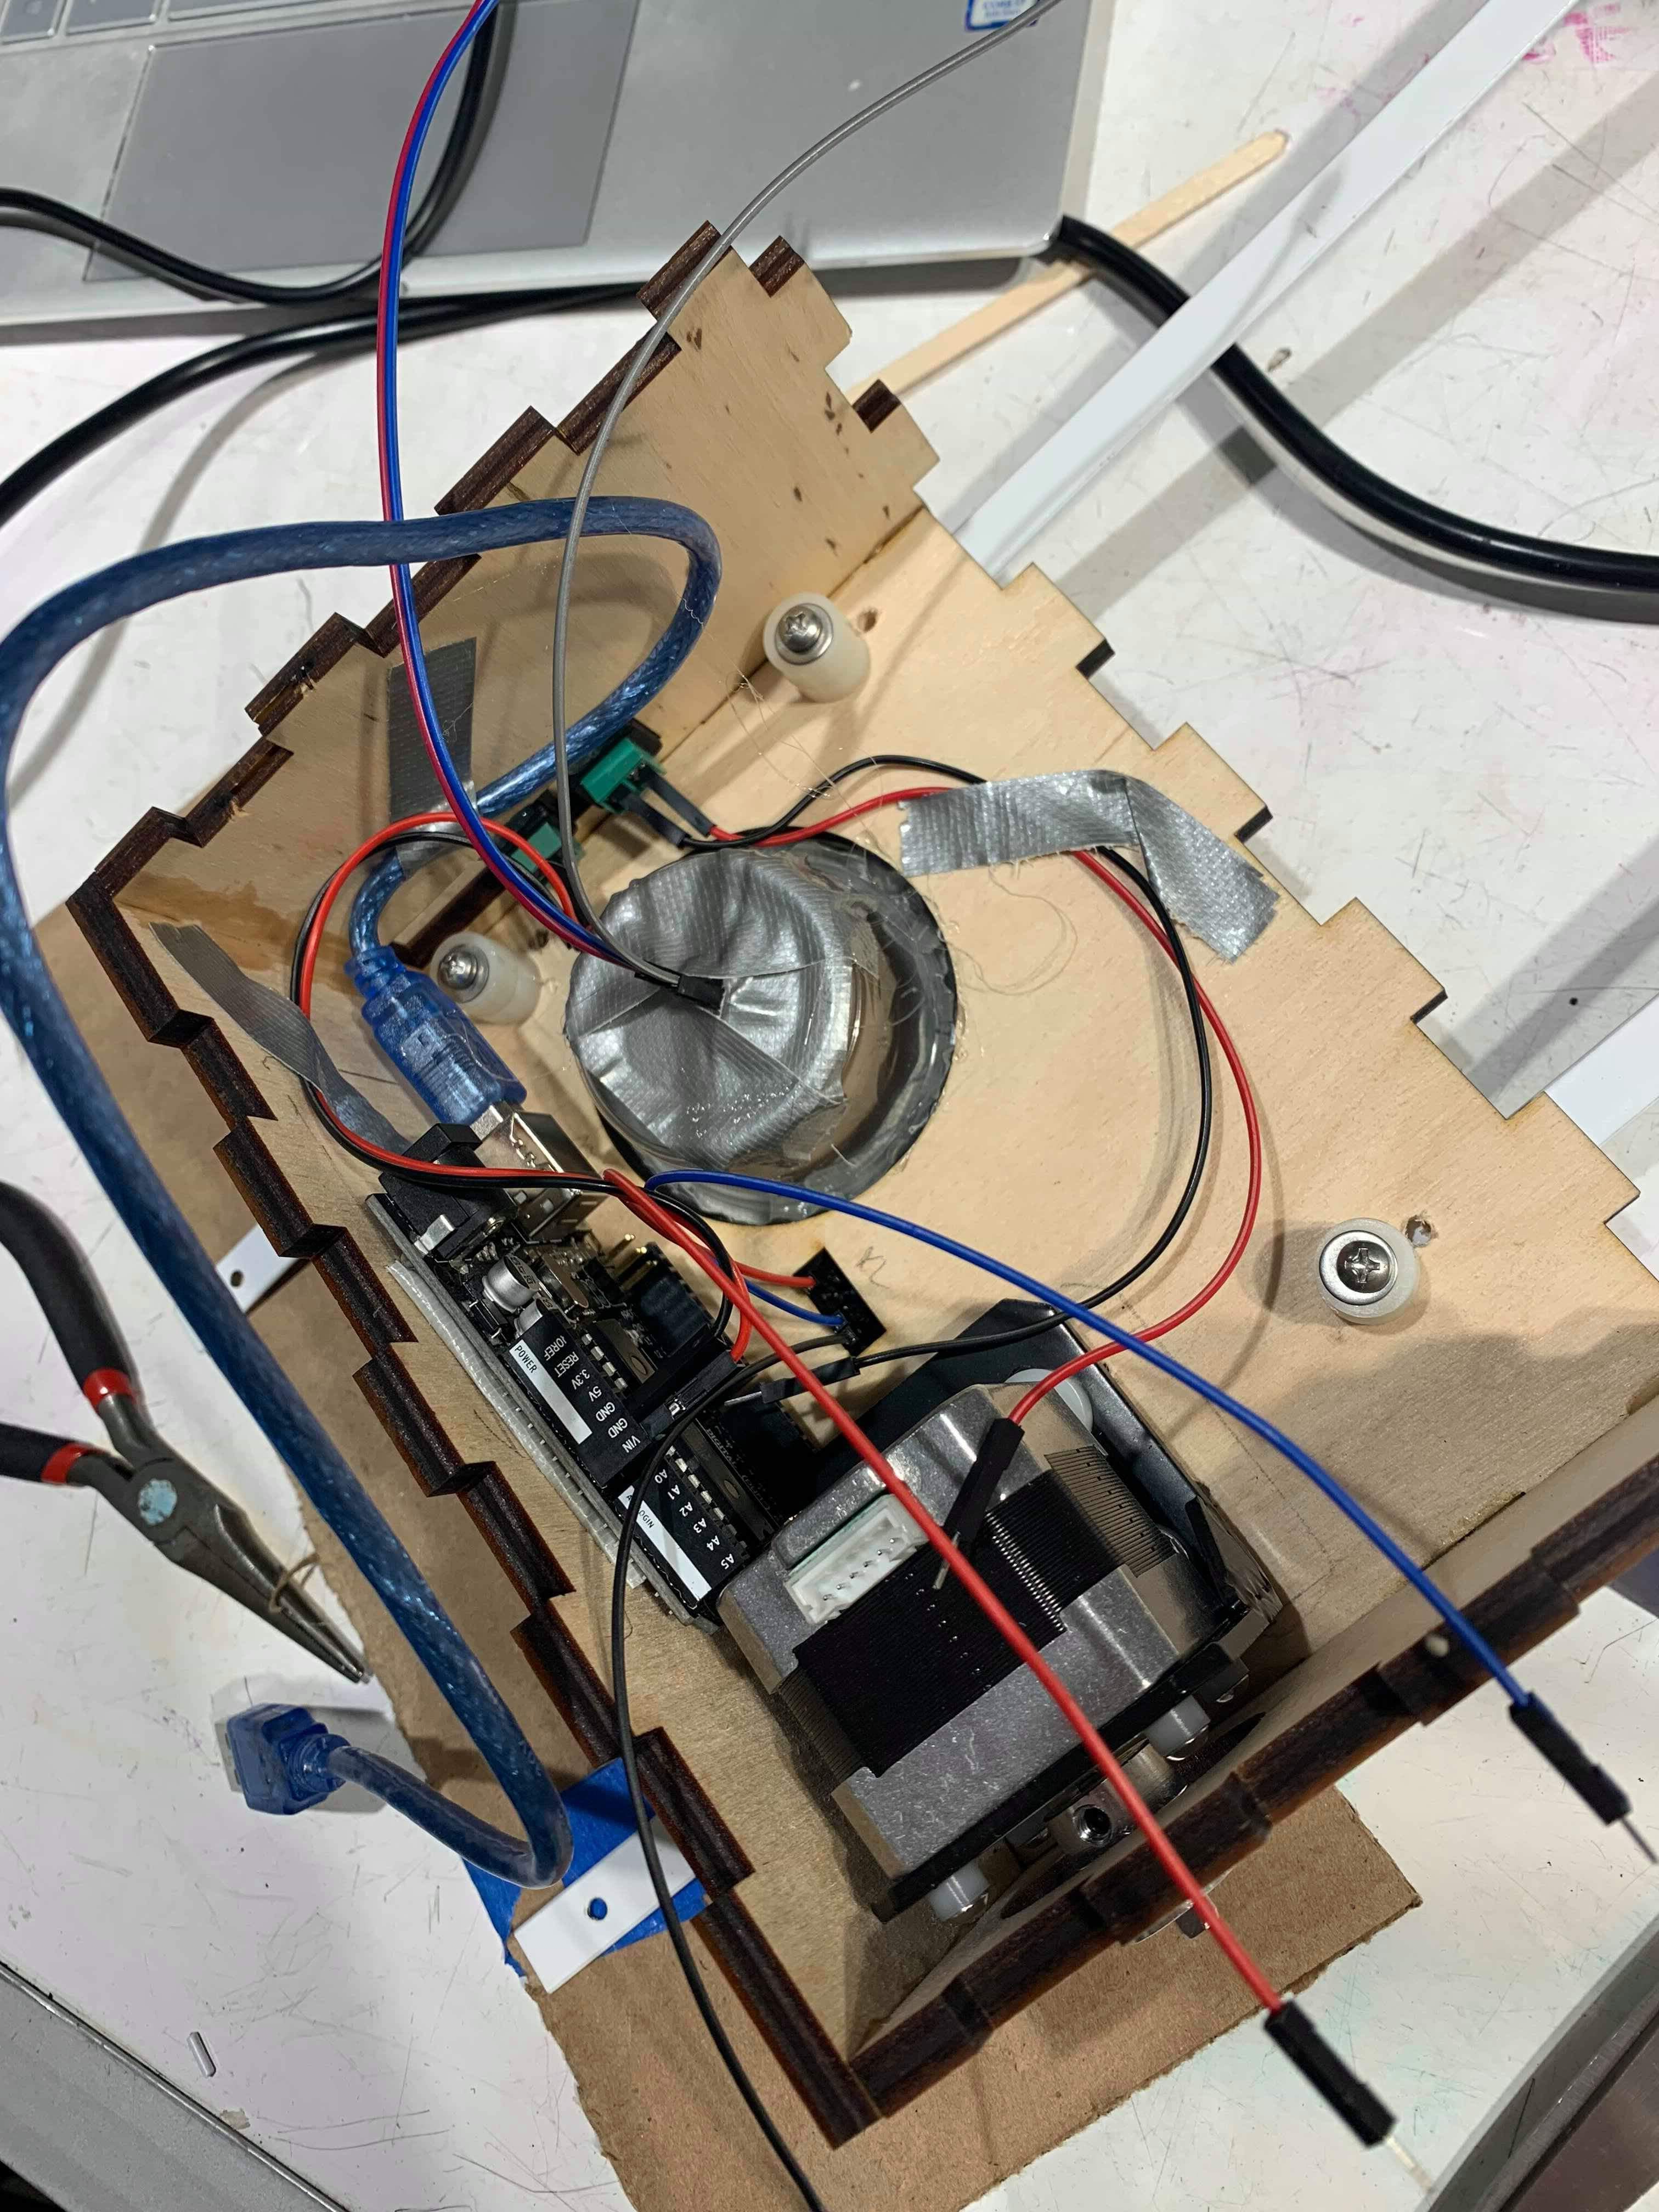
Inside the case, a the reset button and wire are on the right with a with the stepper motor on the left and the sensors on the back (bottom). These all run through a protoboard on the top left and then through the Arduino Uno.
Function:
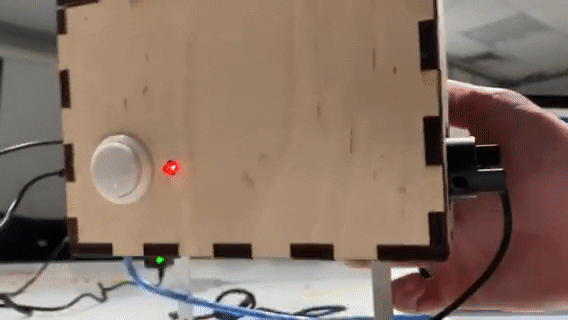
Lock blinks red upon detecting an incorrect combination.
When entering a correct combination (in this case 1,1,2,1), the led goes solid red and then waits for a reset from the white button. This is when a functional stepper motor would open the door.
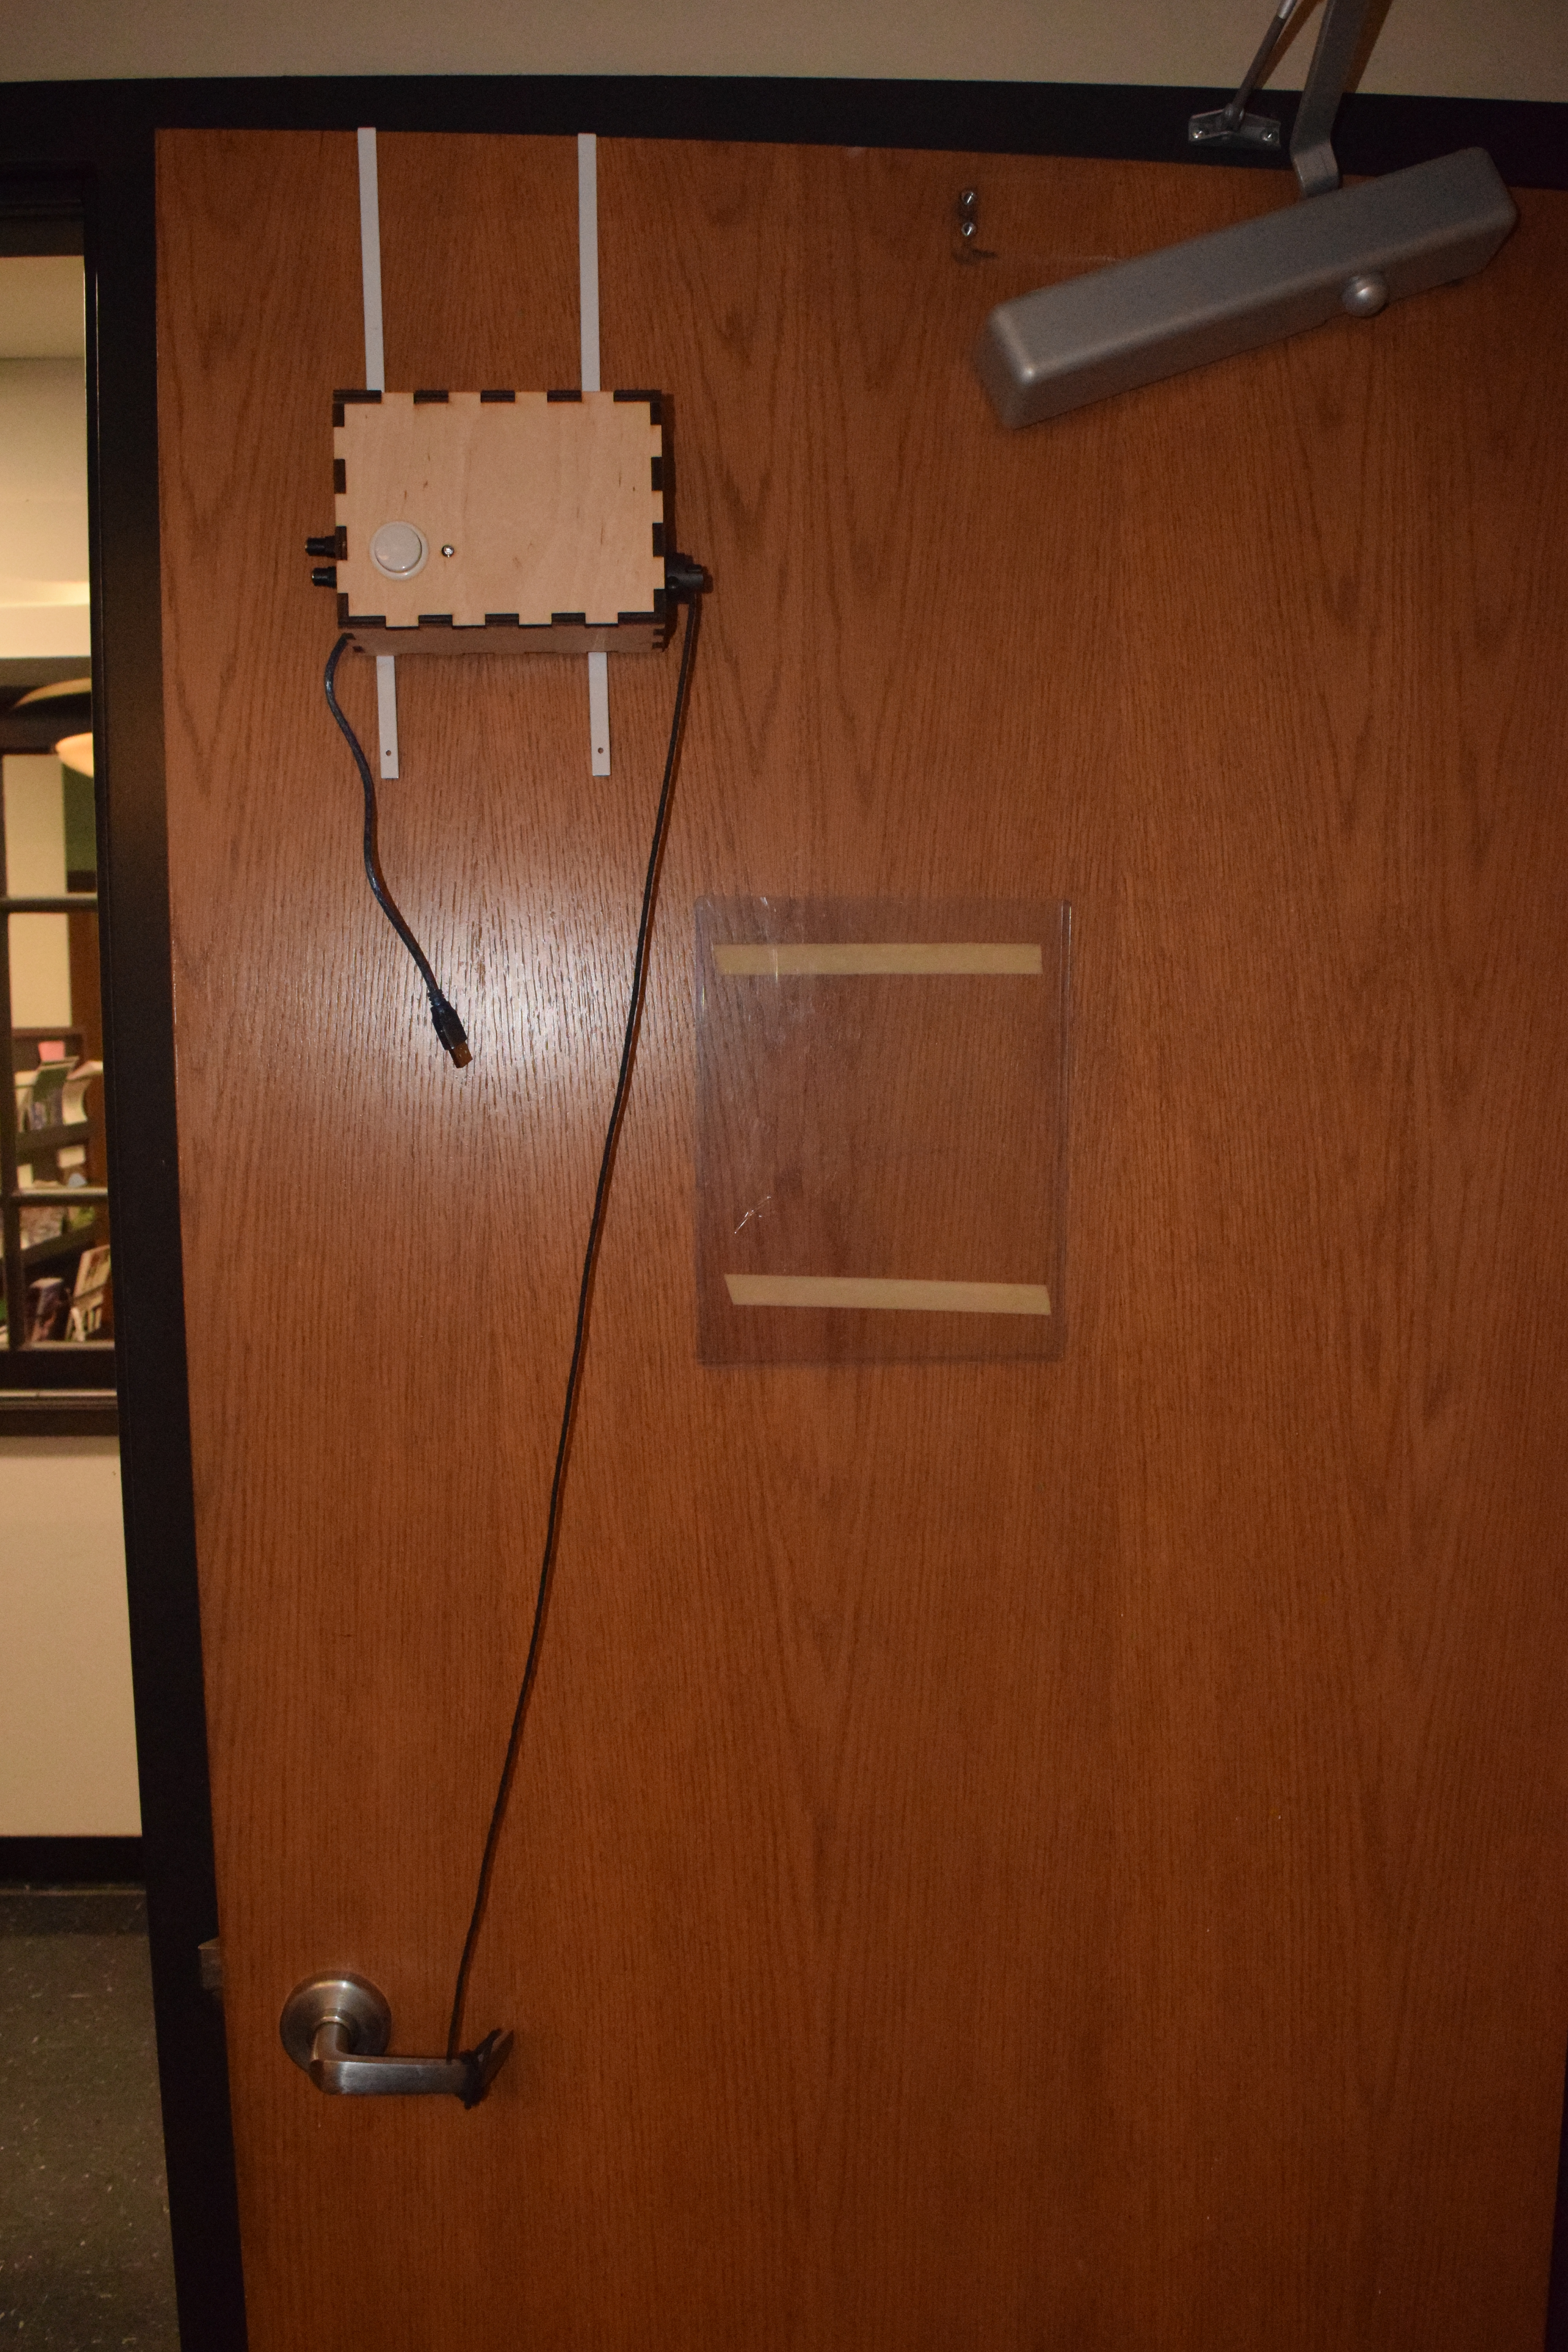
The lock hangs off the doorframe with a rope attached to the handle to pull it up when necessary. The reset button will release the rope once the user has entered. The white brackets are wide enough to fit most door frames with almost no installation time.
Process:
Changing Ideas:
The original idea for my project was a smart pencil case that would keep track of the number of pencils currently in use and remind/warn me about leaving before putting them back.
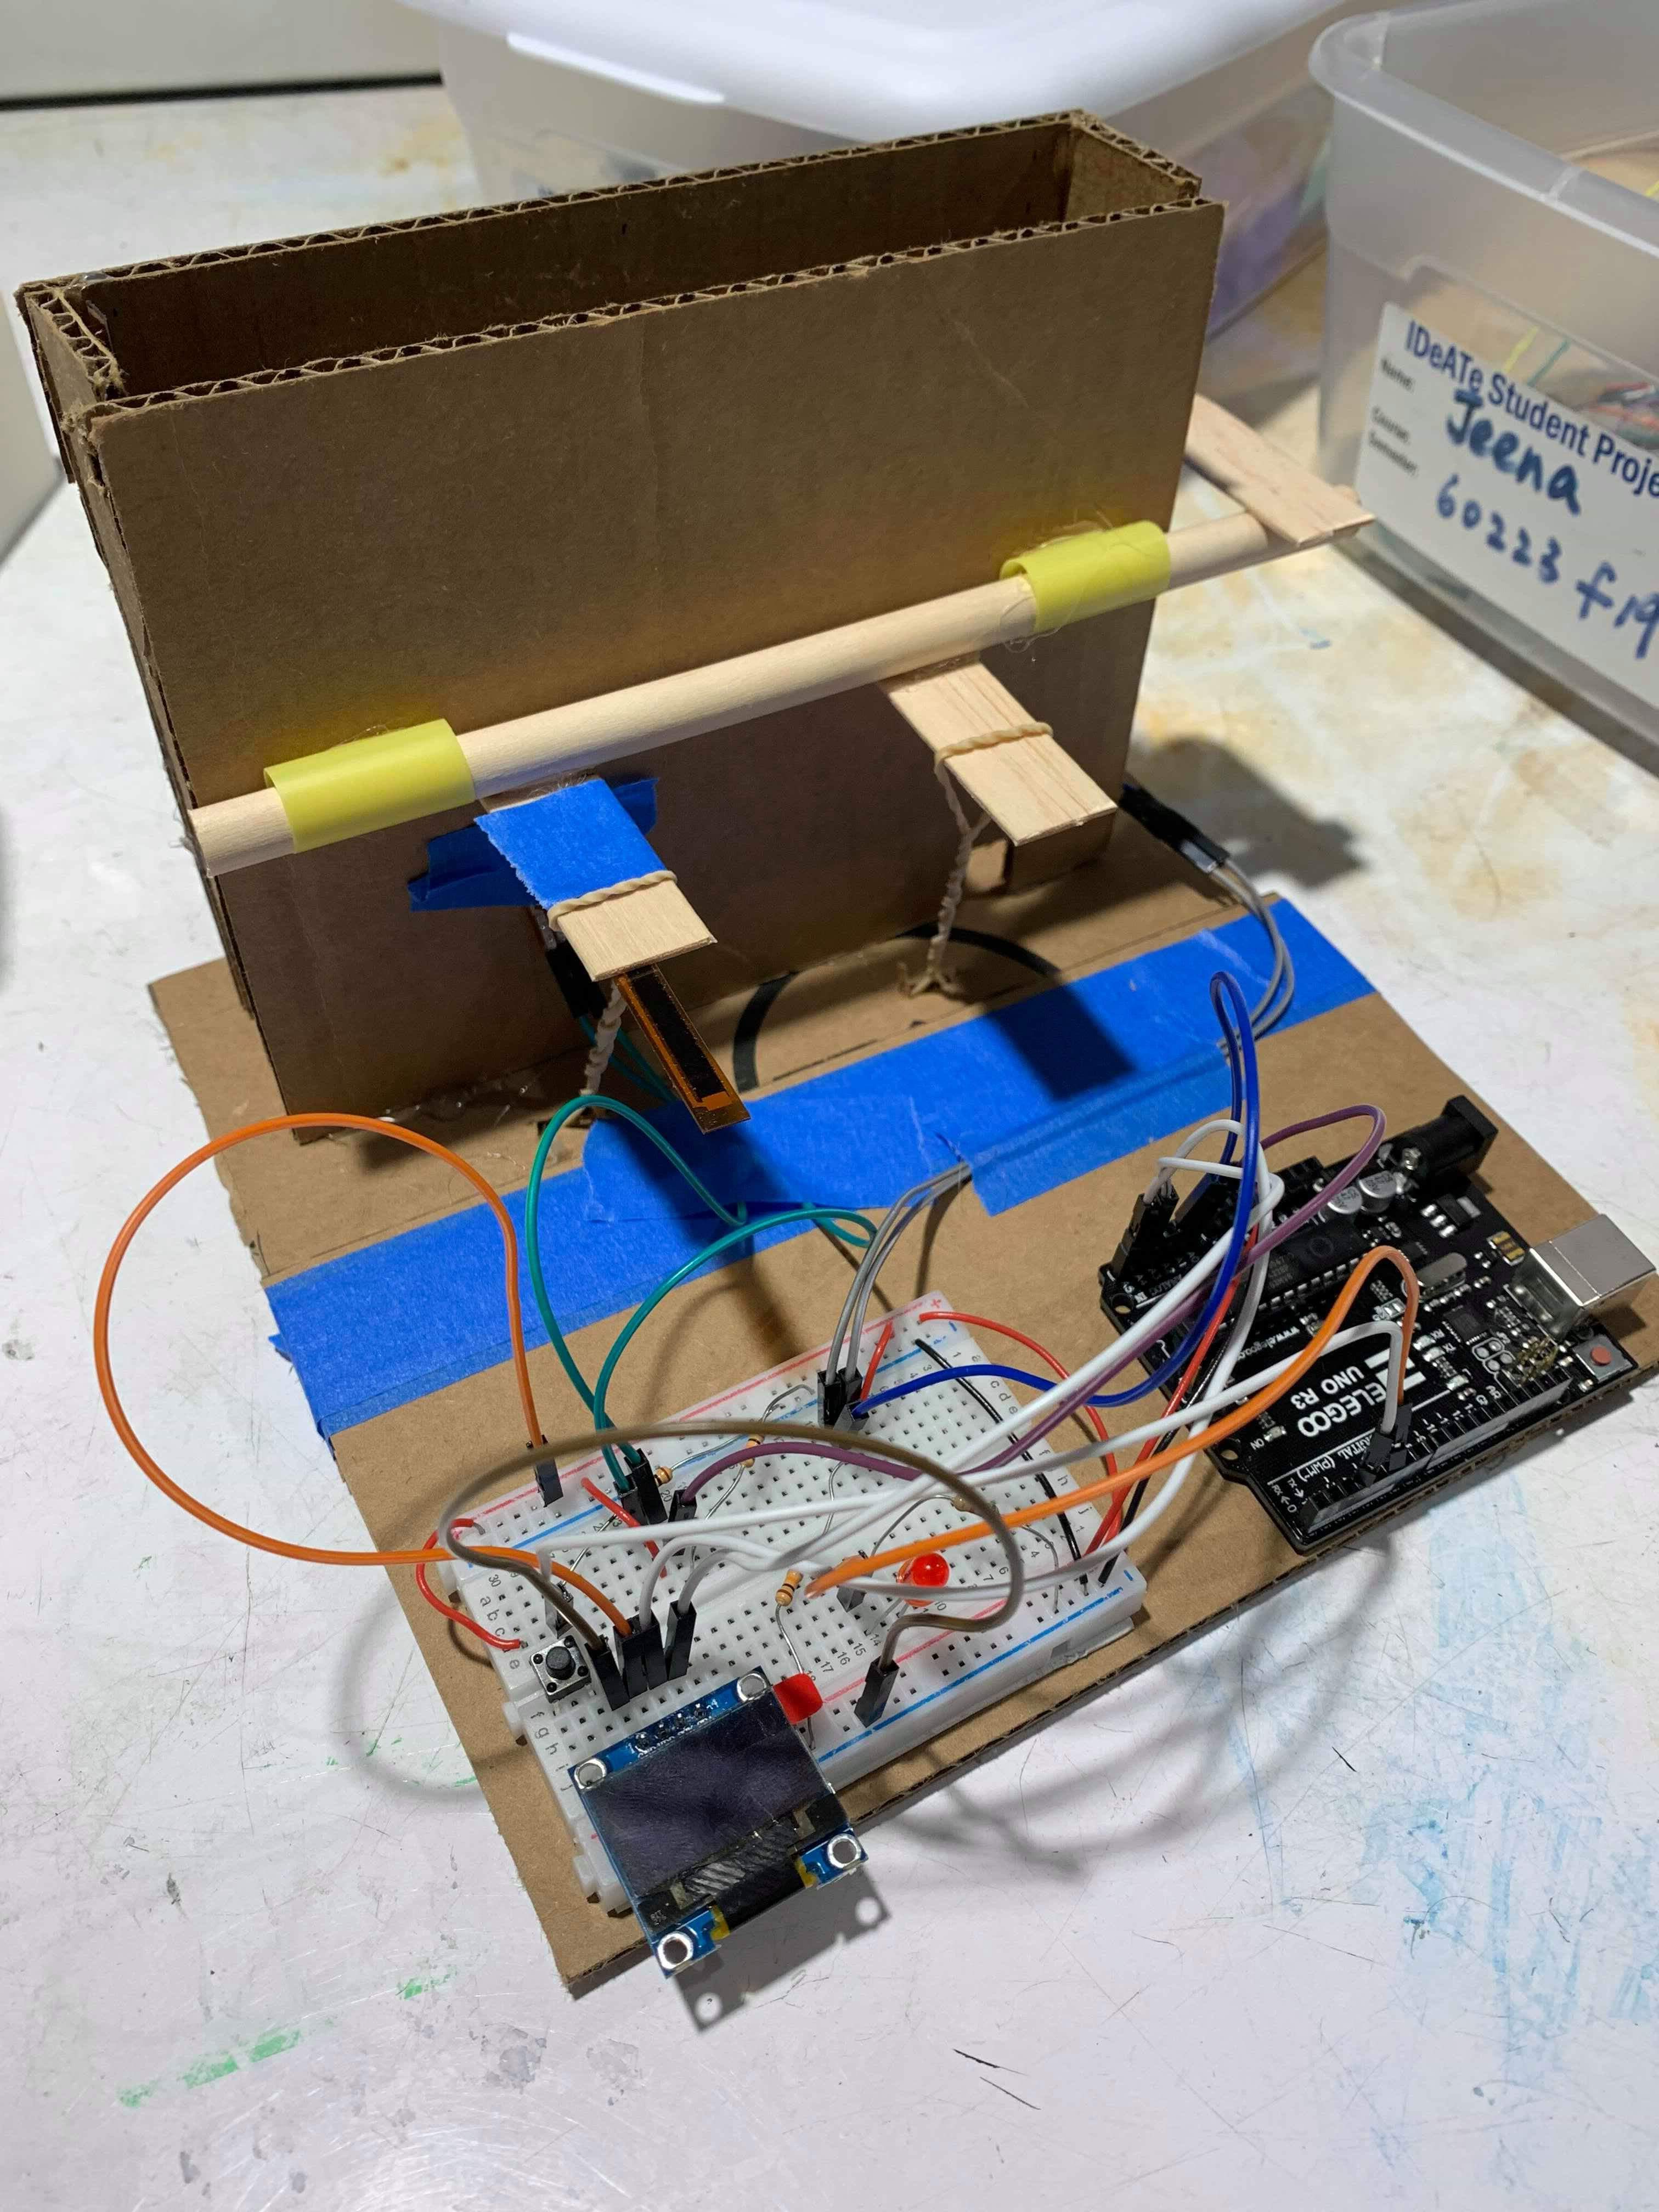
I took the first week of this project just working on building up a wood and carboard prototype which worked well but was unable to fully replicate the most challenging parts about this project.
The biggest problem in finishing this idea would have been the design and creation of the dispensing mechanism which would likely have been 3D printed and would have been mechanically very difficult to design reliably or comparably to the types of professional dispensers out there right now.
Building the Microphone Casing:
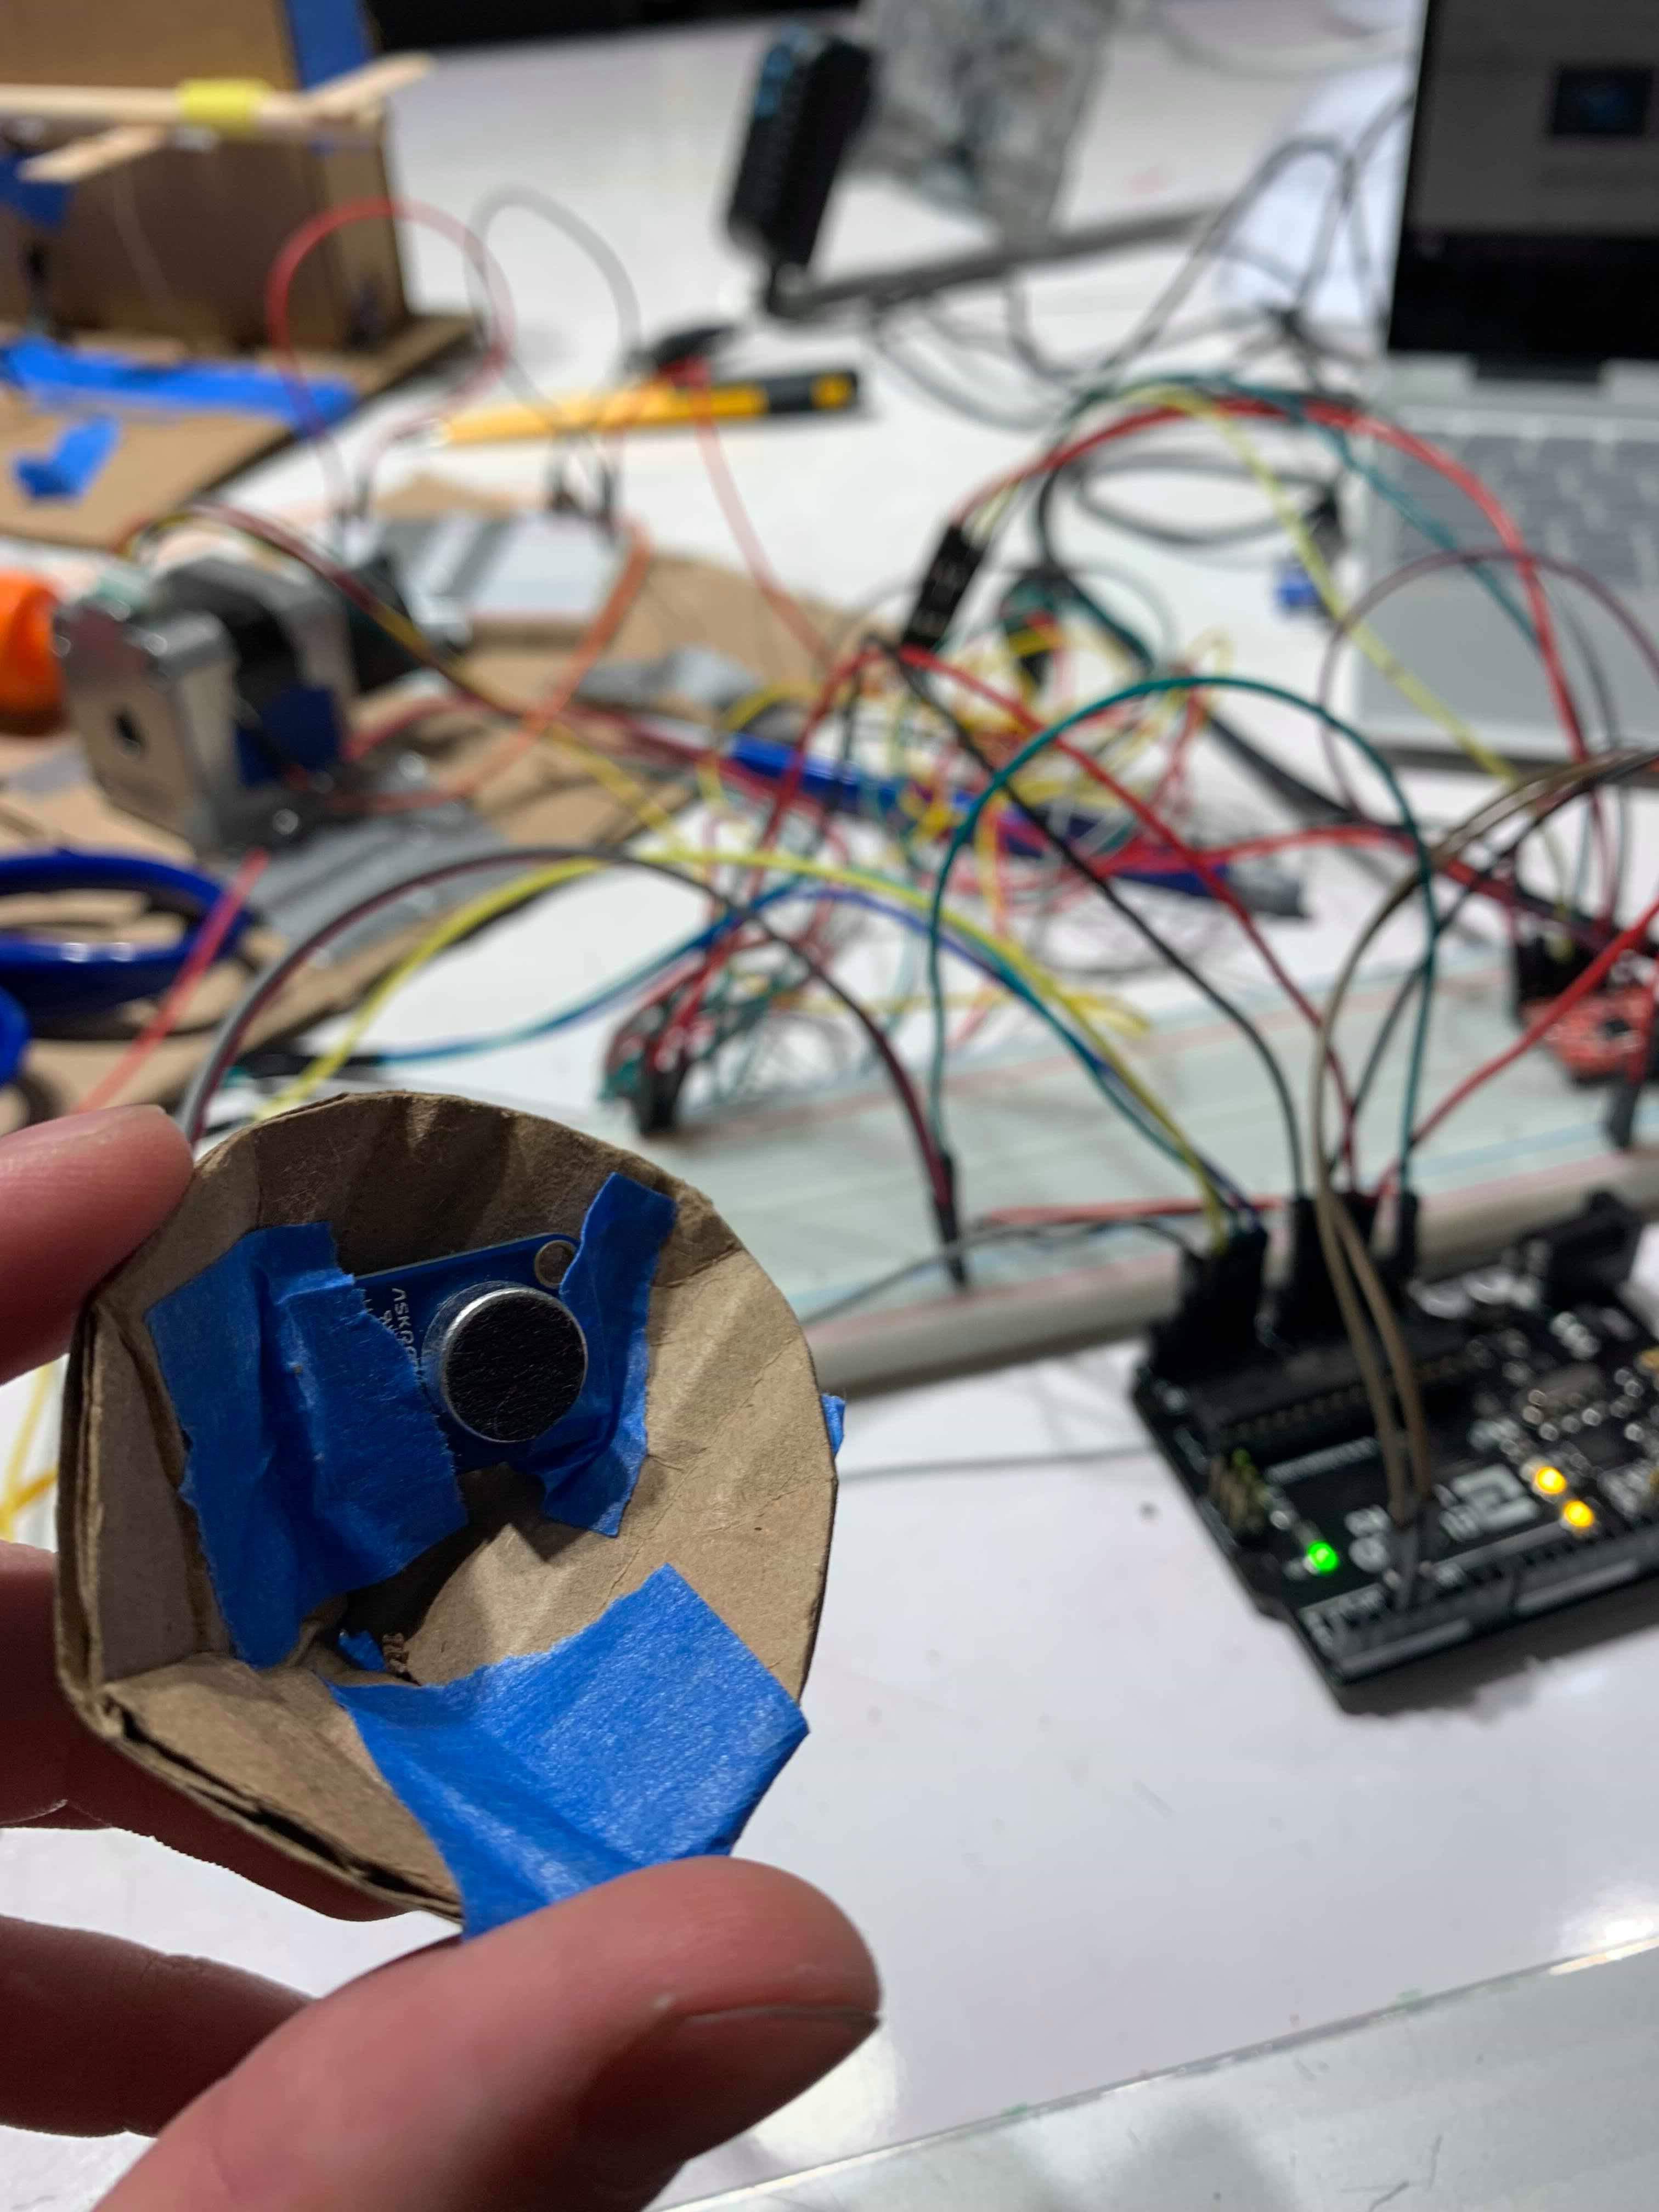
I had a rough idea of how to redirect the sound to the microphone. I started with a basic prototype of cardboard.
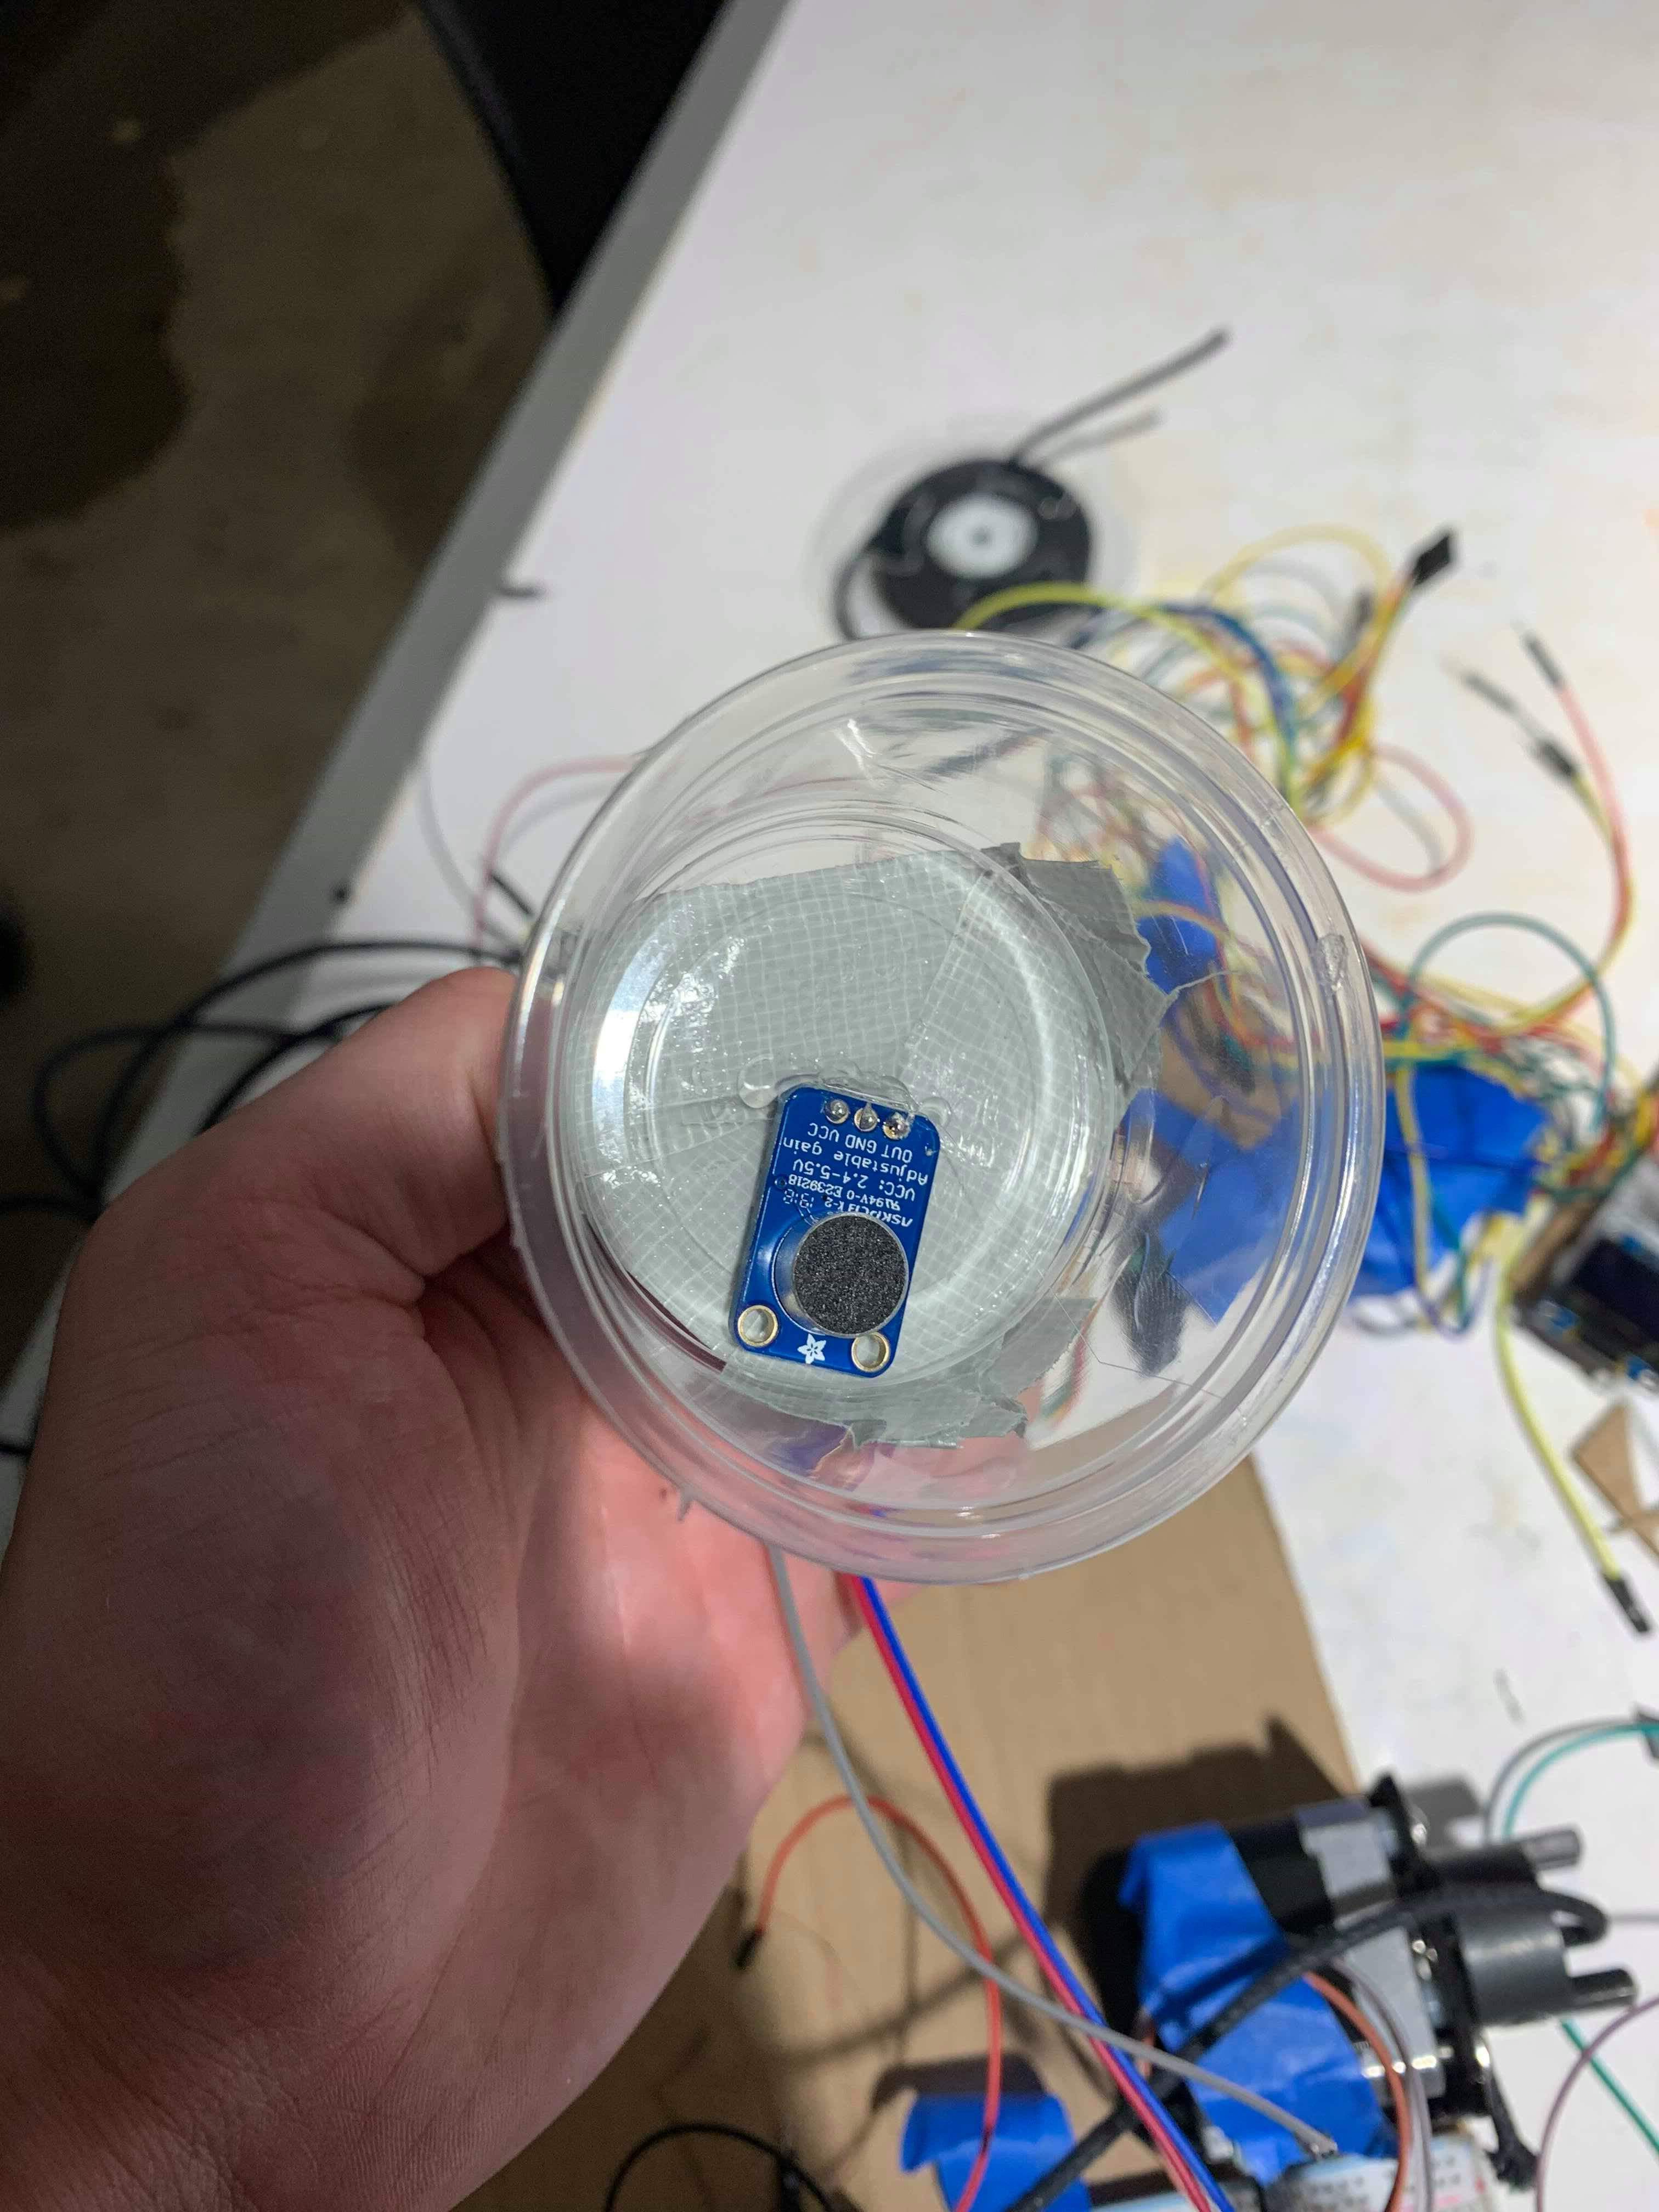
I then decided to upgrade using a condiments contains which i new would allow for a better seal against the door with more durability.
I then cut a whole and integrated the microphone into the back of my box, surrounding it with tape to insulate it.
Some Highlights:
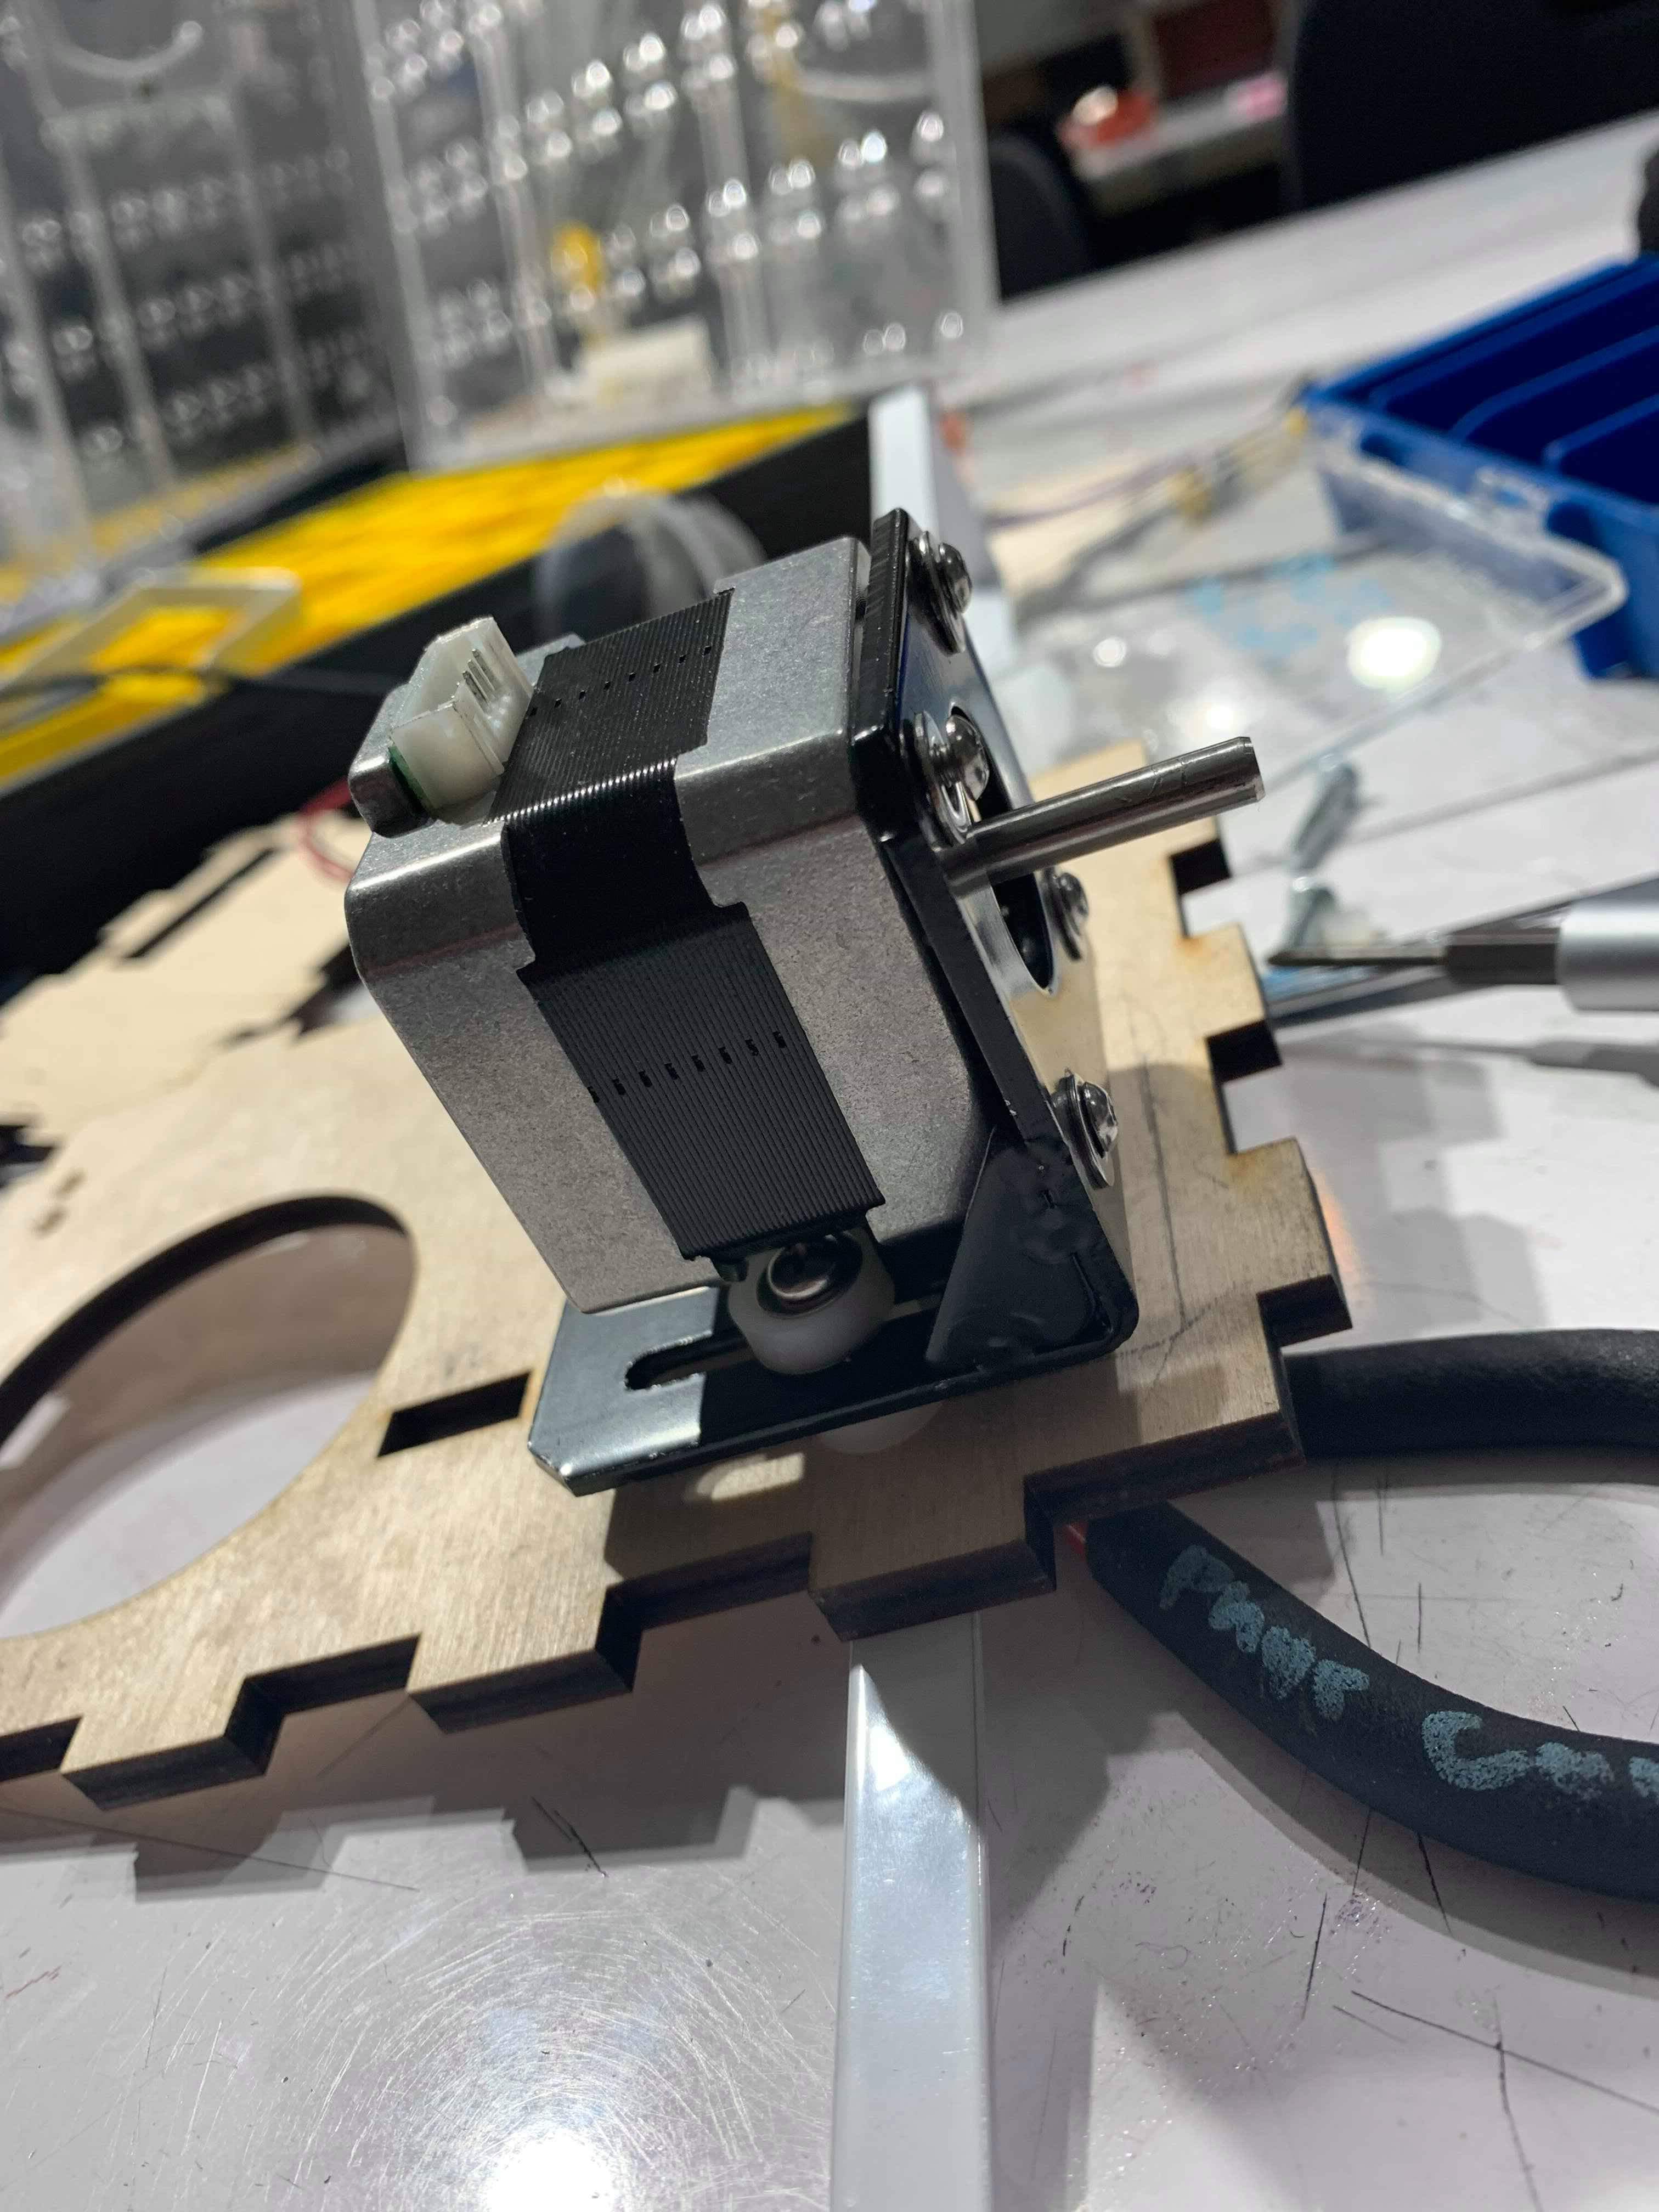
Mounting the motor properly proved to be a bit of a challenge as it required both finding the right spacers to properly align the motor shaft with the output whole while also drilling the hole correclty so that the motor could screw directly into the metal brackets as opposed to the surrounding wood.
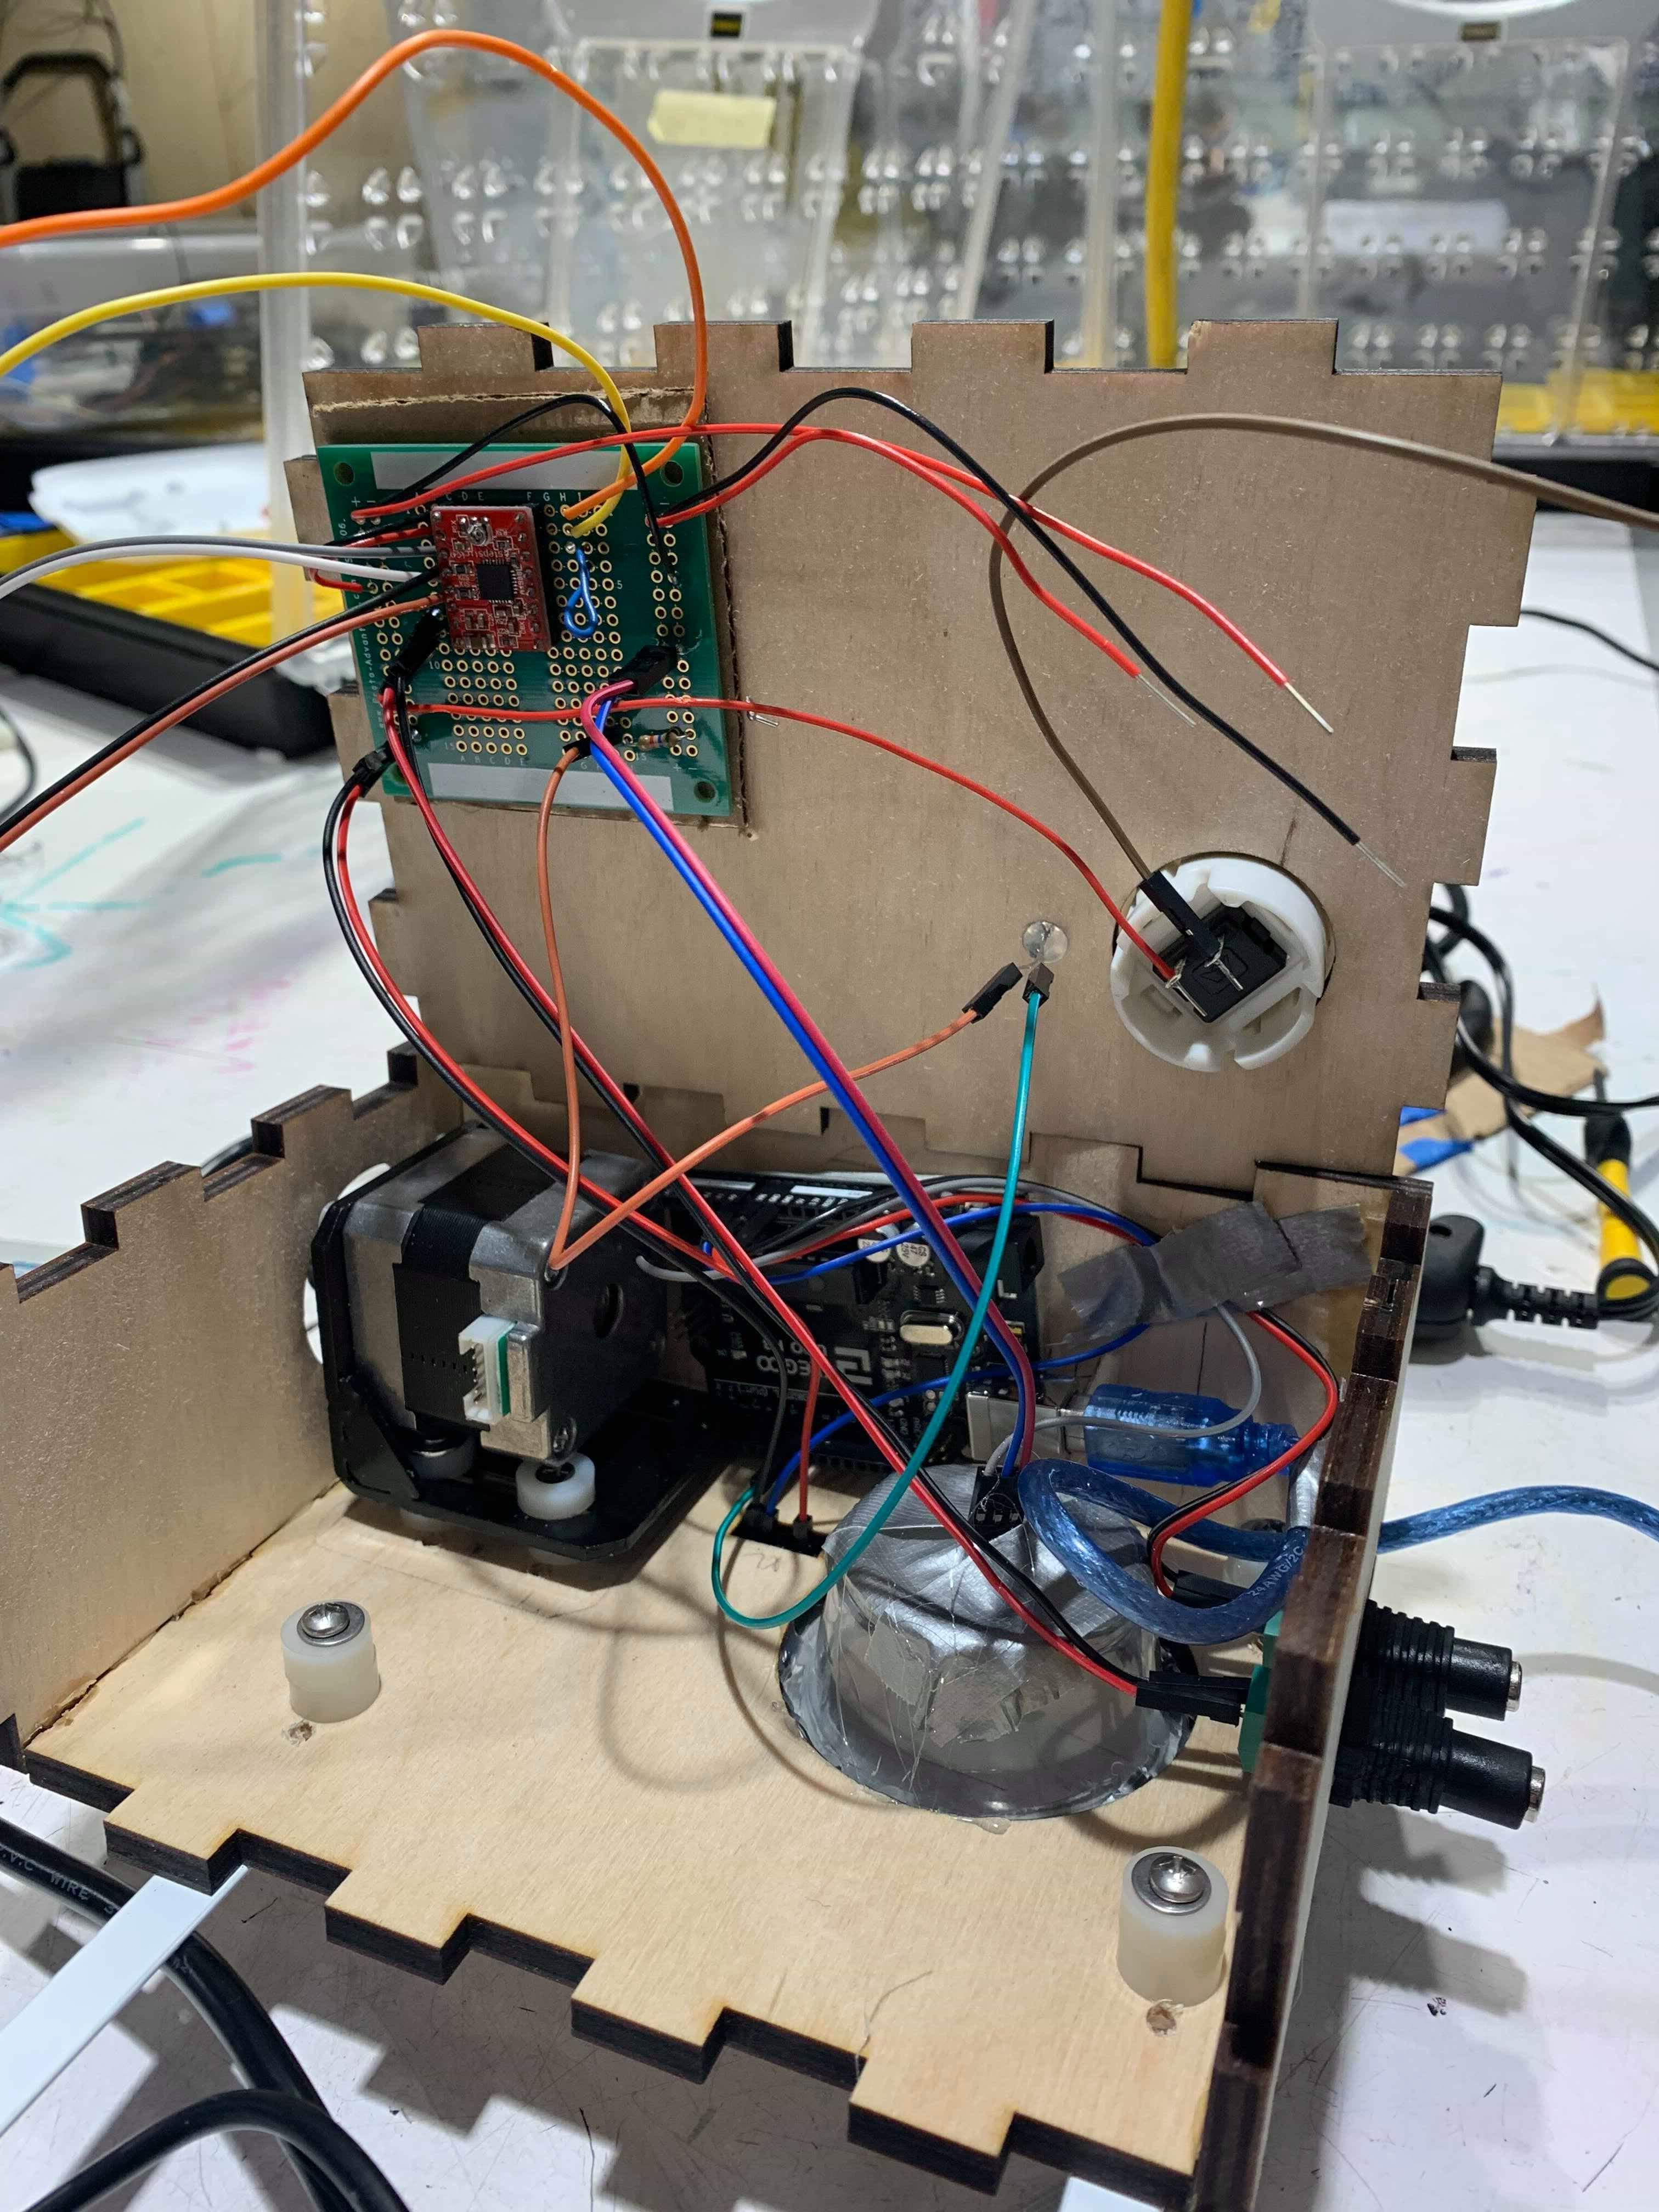
Assembling the entire project into a small box was both one of the most challenging as well as the most rewarding parts of the project. Trying to make the components space efficient and slowly assembling it all piece by piece was really an interesting process. Here the protoboard, LED, sensors, and button are already mounted before the box is assembled.
Discussion:
This was a tumultuous project to say the least. Entering the two week work period, I thought I had an idea of what my final product would be, how I would implement it, and what challenges I would encounter along the way. Of course, most of this thinking was quickly overturned when I decided to pivot to a completely different idea after having spent a week working on my first prototype. After I having spoken with Robert about my initial idea (which was at best contrived to begin with), I came to agree with his assessment that I had underestimated the complexity of designing and 3D printing a mechanical system for vending pencils one at a time from a pencil box. So I began a search for something new.
Looking ahead towards the deadline of this project, knowing I only had a week to create a final prototype, I was pretty sure I wouldn’t. Although I rarely get tripped with up with the technical details of implementing projects like this, there is something especially terrifying about prospect of polishing and packaging my work into something presentable and useful to an audience other than myself. So after having decided on creating a device that would allow me to open a door from the outside without a key, I’m proud to say that for once I didn’t just dive into the coding and circuitry, but instead decided to consider how my device would look physically and what space in the door/entranceway environment it would occupy. This felt like a big step to me and I was quite happy with the solution I came up with to hang the lock from the top of the door. It seemed relatively minimalist with the added advantage of being mechanically suited to the tricky problem of creating enough stable tension to lift a heavy door handle while still listening for and sensing the vibrations on the door. Barring the disappointment I felt with a last-minute malfunctioning stepper motor (and believe I me I was frustrated), I was both pleased and surprised to see a final product that by my normal standards seemed quite refined, compact and cleverly designed. For once I had actually taken the time to focus on the physical implementation first which actually made the rest of the process more of a joy and less stressful. With just a little more time to debug and iterate, I could have improved my current project to be more robust and useful. That being said, I do agree with many of my classmates about what I could have done better in developing The Knock Lock.
There were several critiques that seemed to follow my own line of thinking about my project. To begin with, I absolutely agree that the reliability of a project like this would be a major concern. The sensor I used were not especially sensitive and although I did take some particular care to try and minimize the error and noise of each sensor’s readings, they weren’t perfect implementations yet and the accelerometer especially probably should have been mounted directly to the door instead of relying on the weight of the lock to provide a good contact with the door. If I wanted to keep the lock entirely modular and immediately portable, it wouldn’t have been a bad idea to instead have the lock function by me flicking or sliding the brackets along the top of the door in a certain pattern. It’s not a bad idea, but obviously different from the implementation I was going for here. Further tuning of the lock as well as adding some potentiometers for manual tuning of the tap thresholds of the user would probably help solve this problem. I’m glad that everybody seemed to agree that the redundancy of two type of sensors would help improve the reliability of the lock. They also had similar ideas about where to take the lock from here. Making the microphone/accelerometer package more modular and separate from the control box would allow me to put several of them at different places around the door. This could make opening the door significantly more complicated as the pattern would not take on different options for double and single taps as well as the location of those taps on the outside of the door. This could be a very fun and interesting way to expand the complexity and usefulness of a project like this and I was glad to see that some of the inherent weaknesses of the hardware (low range for tap detection), could be used to create more complex code and project.
In many ways, I think the time crunch for this project was a bit of a blessing. I was not only required to quickly start iterating and implementing on my new idea, but also to think of creative but reasonable ways to deliver a usable product. Looking back, I know now that I should have spent more time during ideation not only thinking about general ideas, but also about the one or two difficult challenges associated with each. Afterwards, I could have done a quick sweep of my ideas to check for their feasibility given the time constraints and expectations of the project. But I was happy with the way I was able to bounce back and create something physical and possibly useable when I was unsure of my ability to make more aesthetically pleasing projects. Figuring out how to implement something as finicky as tap detection with relatively simple components also turned out to be a fun challenge that forced me to go beyond the simple I/O skills associated with Arduino, and with more time, I know I could have made something even better and more easily tunable to the individual cases of the user.
Although I don’t plan on creating any new version of my project, there are some clear improvements that could be made to enhance its performance and usability. To start, it would be better to find a way to attach the accelerometer directly to the to and secure it firmly so it moves as little as possible with reference to the vibration of the door. Moreover, it would be helpful to find a better way of attaching my rope to the stepper motor. Printing a small plastic wheel to attach to the stepper shaft would ensure management of the rope and prevent jamming (an idea I had the intention of completing, but could not before I ran out of time). It would also be helpful to find a way of making The Knock Lock compatible with a wider variety of doors, not just those who’s handles turn upwards. This would probably entail creating a clever attachment (similar to the pully or wheel attached to the stepper), that would fit around the base of the handle and redirect the string around and under the handle, so as the stepper pulls upwards the handle is pulled downwards. One problem with this setup is that is could require a greater torque on the part of the stepper, so careful steps would have to be taken to ensure the radius of the wheel around the handle would be large enough to minimize the force needed to pull the handle. And finally, of course, I would take greater care to continually check the functionality of my components throughout the assembly process so that I am not surprised to find that a single component has broken or been replaced somewhere along the way and hopefully have a less stressful and more enjoyable experience.
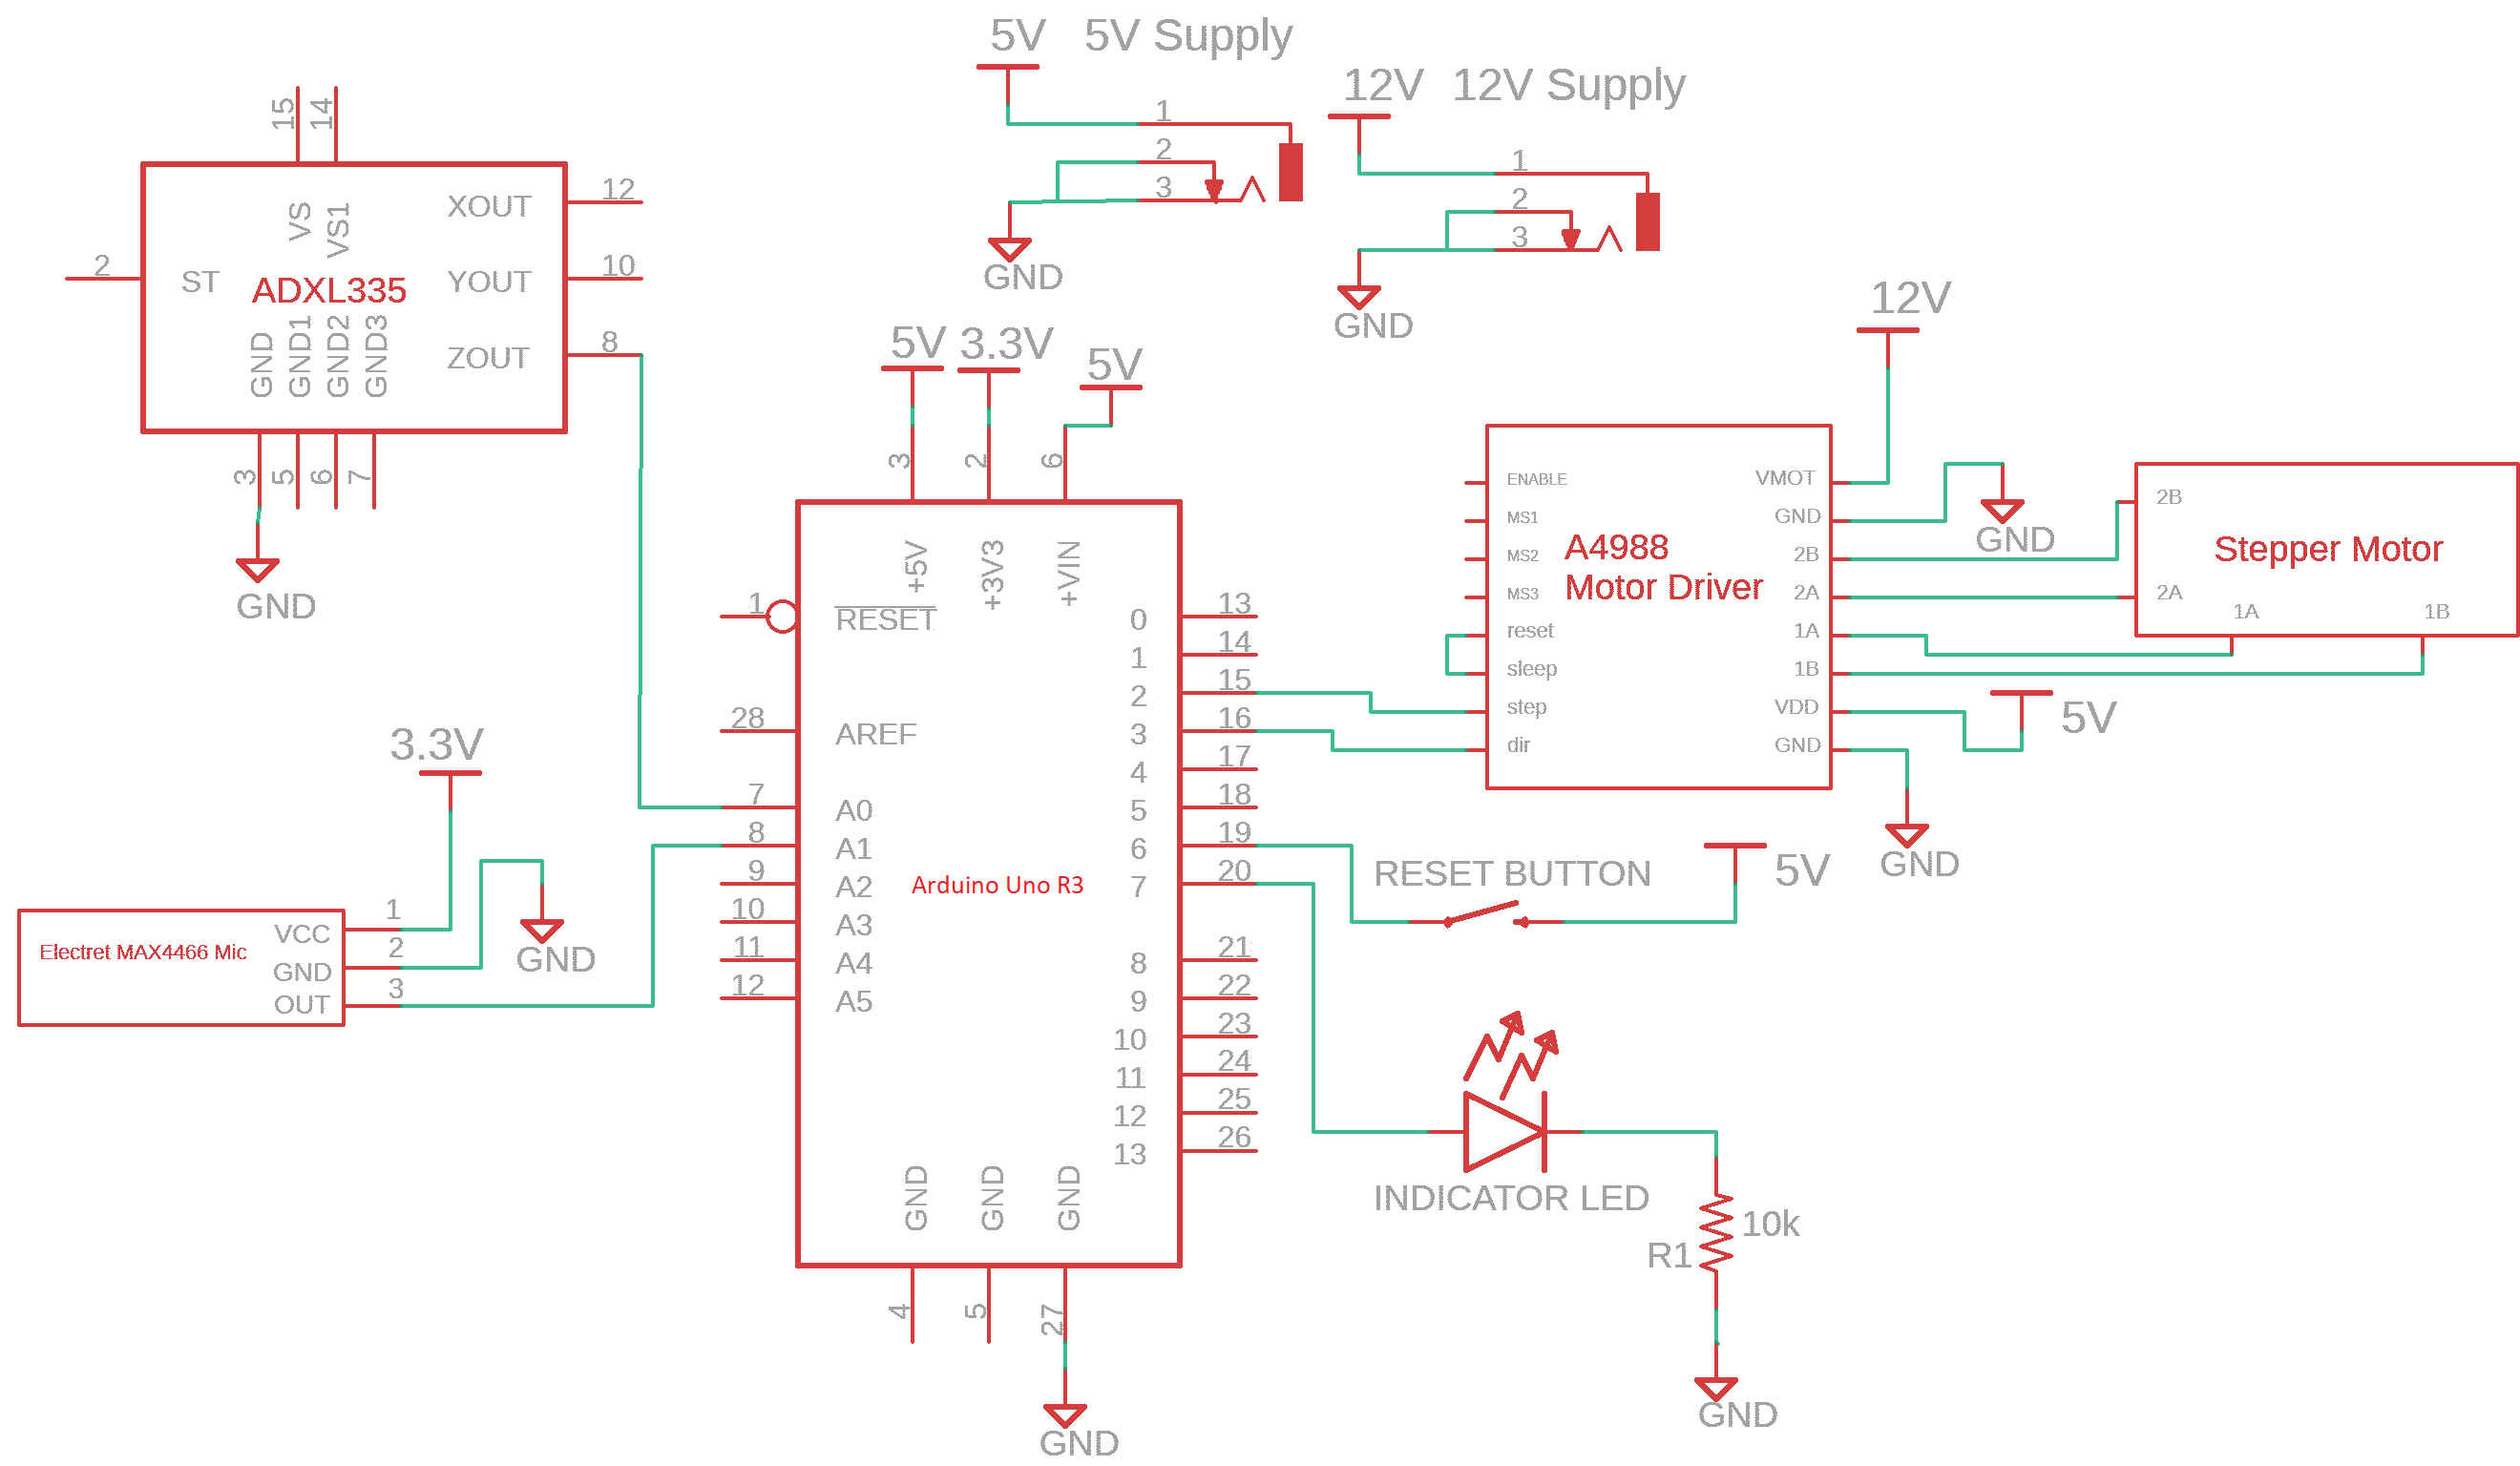
Schematic:
Code:
- <span class="com">/*The Knock Lock
- * Author: Nicholas Toldalagi
- *
- * Acknowledgements: This code uses the AccelStepper library whos trademark is owned
- * by AirSpayce Pty Ltd. and Copyright Mike McCauley.
- *
- * Summary: This code is written to run on an Arduino UNO interfacing with an
- * accelerometer and microphone to listen for and detect single and double knocks
- * on the outside of a door to which they are all attached. Upon detecting a specific
- * sequence of single and double knocks, a stepper engages, opening the door handle
- * from aboves.
- *
- * Inputs:
- * Arduino pin / input
- * A0 Z-axis XL input (Z_PIN)
- * A1 Microphone analog output (MIC_PIN)
- * 6 Reset Button (RESET_PIN)
- *
- * OutputsL
- * Arduino pin / output:
- * 2 Step pin for stepper motor driver (STEP_PIN)
- * 3 Direction pin for stepper motor driver (DIR_PIN)
- * 7 Led indicator pin (LED_PIN)
- */</span><span class="pln">
- </span><span class="com">#include</span><span class="pln"> </span><span class="str"><AccelStepper.h></span><span class="pln">
- </span><span class="com">//Output Pins: </span><span class="pln">
- </span><span class="kwd">const</span><span class="pln"> </span><span class="kwd">int</span><span class="pln"> STEP_PIN </span><span class="pun">=</span><span class="pln"> </span><span class="lit">2</span><span class="pun">;</span><span class="pln">
- </span><span class="kwd">const</span><span class="pln"> </span><span class="kwd">int</span><span class="pln"> DIR_PIN </span><span class="pun">=</span><span class="pln"> </span><span class="lit">3</span><span class="pun">;</span><span class="pln">
- </span><span class="kwd">const</span><span class="pln"> </span><span class="kwd">int</span><span class="pln"> Z_PIN </span><span class="pun">=</span><span class="pln"> A0</span><span class="pun">;</span><span class="pln">
- </span><span class="com">//Input Pins: </span><span class="pln">
- </span><span class="kwd">const</span><span class="pln"> </span><span class="kwd">int</span><span class="pln"> MIC_PIN </span><span class="pun">=</span><span class="pln"> A1</span><span class="pun">;</span><span class="pln">
- </span><span class="kwd">const</span><span class="pln"> </span><span class="kwd">int</span><span class="pln"> LED_PIN </span><span class="pun">=</span><span class="pln"> </span><span class="lit">7</span><span class="pun">;</span><span class="pln">
- </span><span class="kwd">const</span><span class="pln"> </span><span class="kwd">int</span><span class="pln"> RESET_PIN </span><span class="pun">=</span><span class="pln"> </span><span class="lit">6</span><span class="pun">;</span><span class="pln">
- </span><span class="com">//Programming Constants</span><span class="pln">
- </span><span class="kwd">const</span><span class="pln"> </span><span class="kwd">int</span><span class="pln"> DTAP_COOLDOWN </span><span class="pun">=</span><span class="pln"> </span><span class="lit">115</span><span class="pun">;</span><span class="pln"> </span><span class="com">//Number of loop cycles idle after single tap detection until second tap detection begins.</span><span class="pln">
- </span><span class="kwd">const</span><span class="pln"> </span><span class="kwd">int</span><span class="pln"> CODE_LENGTH </span><span class="pun">=</span><span class="pln"> </span><span class="lit">4</span><span class="pun">;</span><span class="pln"> </span><span class="com">//Length of door code</span><span class="pln">
- </span><span class="kwd">const</span><span class="pln"> </span><span class="kwd">int</span><span class="pln"> CODE</span><span class="pun">[</span><span class="pln">CODE_LENGTH</span><span class="pun">]</span><span class="pln"> </span><span class="pun">=</span><span class="pln"> </span><span class="pun">{</span><span class="lit">1</span><span class="pun">,</span><span class="pln"> </span><span class="lit">1</span><span class="pun">,</span><span class="pln"> </span><span class="lit">2</span><span class="pun">,</span><span class="pln"> </span><span class="lit">1</span><span class="pun">};</span><span class="pln"> </span><span class="com">// 1 Indicates single tap, 2 indicates double tap, First knock is left digit</span><span class="pln">
- </span><span class="kwd">const</span><span class="pln"> </span><span class="kwd">int</span><span class="pln"> DTAP_SAMPLING_PERIOD </span><span class="pun">=</span><span class="pln"> </span><span class="lit">1200</span><span class="pun">;</span><span class="pln"> </span><span class="com">//Period after a first tap detected in which a second one could be registered, roughly measured in clock cycles (#of loops)</span><span class="pln">
- </span><span class="kwd">const</span><span class="pln"> </span><span class="kwd">int</span><span class="pln"> MIC_THRESH_OFFSET </span><span class="pun">=</span><span class="pln"> </span><span class="lit">50</span><span class="pun">;</span><span class="pln"> </span><span class="com">//Relative thresholds to offset bias above or below which a knock is registered (in LSB)</span><span class="pln">
- </span><span class="kwd">const</span><span class="pln"> </span><span class="kwd">int</span><span class="pln"> XL_THRESH_OFFSET </span><span class="pun">=</span><span class="pln"> </span><span class="lit">4</span><span class="pun">;</span><span class="pln">
- </span><span class="com">//Global Variables</span><span class="pln">
- </span><span class="typ">AccelStepper</span><span class="pln"> motor</span><span class="pun">(</span><span class="lit">1</span><span class="pun">,</span><span class="pln"> STEP_PIN</span><span class="pun">,</span><span class="pln"> DIR_PIN</span><span class="pun">);</span><span class="pln">
- </span><span class="kwd">int</span><span class="pln"> mic_min </span><span class="pun">=</span><span class="pln"> </span><span class="pun">-</span><span class="lit">1</span><span class="pun">;</span><span class="pln">
- </span><span class="kwd">int</span><span class="pln"> mic_max </span><span class="pun">=</span><span class="pln"> </span><span class="pun">-</span><span class="lit">1</span><span class="pun">;</span><span class="pln">
- </span><span class="kwd">int</span><span class="pln"> xl_min </span><span class="pun">=</span><span class="pln"> </span><span class="pun">-</span><span class="lit">1</span><span class="pun">;</span><span class="pln">
- </span><span class="kwd">int</span><span class="pln"> xl_max </span><span class="pun">=</span><span class="pln"> </span><span class="pun">-</span><span class="lit">1</span><span class="pun">;</span><span class="pln">
- </span><span class="kwd">int</span><span class="pln"> codeIndex </span><span class="pun">=</span><span class="pln"> </span><span class="lit">0</span><span class="pun">;</span><span class="pln">
- </span><span class="kwd">void</span><span class="pln"> setup</span><span class="pun">()</span><span class="pln"> </span><span class="pun">{</span><span class="pln">
- </span><span class="com">//Setting up all sensor pins:</span><span class="pln">
- pinMode</span><span class="pun">(</span><span class="pln">Z_PIN</span><span class="pun">,</span><span class="pln"> INPUT</span><span class="pun">);</span><span class="pln">
- pinMode</span><span class="pun">(</span><span class="pln">MIC_PIN</span><span class="pun">,</span><span class="pln"> INPUT</span><span class="pun">);</span><span class="pln">
- pinMode</span><span class="pun">(</span><span class="pln">LED_PIN</span><span class="pun">,</span><span class="pln"> OUTPUT</span><span class="pun">);</span><span class="pln">
- pinMode</span><span class="pun">(</span><span class="pln">RESET_PIN</span><span class="pun">,</span><span class="pln"> INPUT</span><span class="pun">);</span><span class="pln">
- digitalWrite</span><span class="pun">(</span><span class="pln">RESET_PIN</span><span class="pun">,</span><span class="pln"> LOW</span><span class="pun">);</span><span class="pln"> </span><span class="com">//Internal Pull-down resistor used</span><span class="pln">
- motor</span><span class="pun">.</span><span class="pln">setMaxSpeed</span><span class="pun">(</span><span class="lit">600</span><span class="pun">);</span><span class="pln">
- motor</span><span class="pun">.</span><span class="pln">setAcceleration</span><span class="pun">(</span><span class="lit">300</span><span class="pun">);</span><span class="pln">
- motor</span><span class="pun">.</span><span class="pln">setCurrentPosition</span><span class="pun">(</span><span class="lit">0</span><span class="pun">);</span><span class="pln">
- motor</span><span class="pun">.</span><span class="pln">moveTo</span><span class="pun">(</span><span class="lit">0</span><span class="pun">);</span><span class="pln">
- </span><span class="kwd">while</span><span class="pun">(</span><span class="pln">motor</span><span class="pun">.</span><span class="pln">distanceToGo</span><span class="pun">()</span><span class="pln"> </span><span class="pun">!=</span><span class="pln"> </span><span class="lit">0</span><span class="pun">){</span><span class="pln">
- motor</span><span class="pun">.</span><span class="pln">run</span><span class="pun">();</span><span class="pln">
- </span><span class="pun">}</span><span class="pln">
- </span><span class="typ">Serial</span><span class="pun">.</span><span class="kwd">begin</span><span class="pun">(</span><span class="lit">9600</span><span class="pun">);</span><span class="pln">
- calibrateSensors</span><span class="pun">();</span><span class="pln"> </span><span class="com">//Sets Mic and XL Bias, need absolute silence and no vibration for this. Takes about 2 seconds</span><span class="pln">
- </span><span class="pun">}</span><span class="pln">
- </span><span class="kwd">void</span><span class="pln"> loop</span><span class="pun">()</span><span class="pln"> </span><span class="pun">{</span><span class="pln"> </span><span class="com">//Begins continuous listen for correct input combination</span><span class="pln">
- </span><span class="kwd">int</span><span class="pln"> xl_val </span><span class="pun">=</span><span class="pln"> analogRead</span><span class="pun">(</span><span class="pln">Z_PIN</span><span class="pun">);</span><span class="pln">
- </span><span class="kwd">int</span><span class="pln"> mic_val </span><span class="pun">=</span><span class="pln"> analogRead</span><span class="pun">(</span><span class="pln">MIC_PIN</span><span class="pun">);</span><span class="pln">
- </span><span class="kwd">bool</span><span class="pln"> xl_tap </span><span class="pun">=</span><span class="pln"> xl_min </span><span class="pun">></span><span class="pln"> xl_val </span><span class="pun">||</span><span class="pln"> xl_max </span><span class="pun"><</span><span class="pln"> xl_val</span><span class="pun">;</span><span class="pln">
- </span><span class="kwd">bool</span><span class="pln"> mic_tap </span><span class="pun">=</span><span class="pln"> mic_min </span><span class="pun">></span><span class="pln"> mic_val </span><span class="pun">||</span><span class="pln"> mic_max </span><span class="pun"><</span><span class="pln"> mic_val</span><span class="pun">;</span><span class="pln">
- </span><span class="kwd">if</span><span class="pun">(</span><span class="pln">xl_tap </span><span class="pun">&&</span><span class="pln"> mic_tap</span><span class="pun">)</span><span class="pln"> </span><span class="pun">{</span><span class="pln"> </span><span class="com">//Needs to be both</span><span class="pln">
- xl_tap </span><span class="pun">=</span><span class="pln"> </span><span class="lit">0</span><span class="pun">;</span><span class="pln">
- mic_tap </span><span class="pun">=</span><span class="pln"> </span><span class="lit">0</span><span class="pun">;</span><span class="pln">
- </span><span class="kwd">int</span><span class="pln"> dtap </span><span class="pun">=</span><span class="pln"> doubleTap</span><span class="pun">();</span><span class="pln">
- </span><span class="kwd">if</span><span class="pun">(</span><span class="pln">CODE</span><span class="pun">[</span><span class="pln">codeIndex</span><span class="pun">]</span><span class="pln"> </span><span class="pun">==</span><span class="pln"> dtap</span><span class="pun">)</span><span class="pln"> </span><span class="pun">{</span><span class="pln"> </span><span class="com">//Checks registered taps against code</span><span class="pln">
- codeIndex</span><span class="pun">++;</span><span class="pln">
- </span><span class="kwd">if</span><span class="pun">(</span><span class="pln">codeIndex </span><span class="pun">>=</span><span class="pln"> CODE_LENGTH</span><span class="pun">)</span><span class="pln"> </span><span class="pun">{</span><span class="pln"> </span><span class="com">//Reaches the end of the combination, time to open</span><span class="pln">
- openProcedure</span><span class="pun">();</span><span class="pln">
- delay</span><span class="pun">(</span><span class="lit">10000</span><span class="pun">);</span><span class="pln">
- codeIndex </span><span class="pun">=</span><span class="pln"> </span><span class="lit">0</span><span class="pun">;</span><span class="pln">
- </span><span class="pun">}</span><span class="pln">
- </span><span class="pun">}</span><span class="pln"> </span><span class="kwd">else</span><span class="pln"> </span><span class="pun">{</span><span class="pln"> </span><span class="com">//Wrong code value</span><span class="pln">
- codeIndex </span><span class="pun">=</span><span class="pln"> </span><span class="lit">0</span><span class="pun">;</span><span class="pln"> </span><span class="com">//Reset index for another try</span><span class="pln">
- digitalWrite</span><span class="pun">(</span><span class="pln">LED_PIN</span><span class="pun">,</span><span class="pln"> HIGH</span><span class="pun">);</span><span class="pln">
- delay</span><span class="pun">(</span><span class="lit">500</span><span class="pun">);</span><span class="pln">
- digitalWrite</span><span class="pun">(</span><span class="pln">LED_PIN</span><span class="pun">,</span><span class="pln"> LOW</span><span class="pun">);</span><span class="pln"> </span><span class="com">//Cooldown time for another try</span><span class="pln">
- </span><span class="pun">}</span><span class="pln">
- </span><span class="pun">}</span><span class="pln">
- </span><span class="pun">}</span><span class="pln">
- </span><span class="kwd">void</span><span class="pln"> calibrateSensors</span><span class="pun">()</span><span class="pln"> </span><span class="pun">{</span><span class="pln">
- digitalWrite</span><span class="pun">(</span><span class="pln">LED_PIN</span><span class="pun">,</span><span class="pln"> HIGH</span><span class="pun">);</span><span class="pln">
- </span><span class="typ">Serial</span><span class="pun">.</span><span class="pln">println</span><span class="pun">(</span><span class="str">"Begining Calibration, wait 2 seconds..."</span><span class="pun">);</span><span class="pln">
- </span><span class="kwd">int</span><span class="pln"> avgXL </span><span class="pun">=</span><span class="pln"> </span><span class="lit">0</span><span class="pun">;</span><span class="pln">
- </span><span class="kwd">int</span><span class="pln"> avgMic </span><span class="pun">=</span><span class="pln"> </span><span class="lit">0</span><span class="pun">;</span><span class="pln">
- </span><span class="kwd">for</span><span class="pun">(</span><span class="kwd">int</span><span class="pln"> i </span><span class="pun">=</span><span class="pln"> </span><span class="lit">0</span><span class="pun">;</span><span class="pln"> i </span><span class="pun"><</span><span class="pln"> </span><span class="lit">20</span><span class="pun">;</span><span class="pln"> i</span><span class="pun">++){</span><span class="pln"> </span><span class="com">//Takes average of both sensors when still to figure out the sensor bias offsets</span><span class="pln">
- avgXL </span><span class="pun">+=</span><span class="pln"> analogRead</span><span class="pun">(</span><span class="pln">Z_PIN</span><span class="pun">);</span><span class="pln">
- avgMic </span><span class="pun">+=</span><span class="pln"> analogRead</span><span class="pun">(</span><span class="pln">MIC_PIN</span><span class="pun">);</span><span class="pln">
- delay</span><span class="pun">(</span><span class="lit">100</span><span class="pun">);</span><span class="pln">
- </span><span class="pun">}</span><span class="pln">
- avgXL </span><span class="pun">=</span><span class="pln"> avgXL</span><span class="pun">/</span><span class="lit">20</span><span class="pun">;</span><span class="pln">
- avgMic </span><span class="pun">=</span><span class="pln"> avgMic</span><span class="pun">/</span><span class="lit">20</span><span class="pun">;</span><span class="pln">
- mic_min </span><span class="pun">=</span><span class="pln"> avgMic </span><span class="pun">-</span><span class="pln"> MIC_THRESH_OFFSET</span><span class="pun">;</span><span class="pln"> </span><span class="com">//Calculates range for each sensor</span><span class="pln">
- mic_max </span><span class="pun">=</span><span class="pln"> avgMic </span><span class="pun">+</span><span class="pln"> MIC_THRESH_OFFSET</span><span class="pun">;</span><span class="pln">
- xl_min </span><span class="pun">=</span><span class="pln"> avgXL </span><span class="pun">-</span><span class="pln"> XL_THRESH_OFFSET</span><span class="pun">;</span><span class="pln">
- xl_max </span><span class="pun">=</span><span class="pln"> avgXL </span><span class="pun">+</span><span class="pln"> XL_THRESH_OFFSET</span><span class="pun">;</span><span class="pln">
- digitalWrite</span><span class="pun">(</span><span class="pln">LED_PIN</span><span class="pun">,</span><span class="pln"> LOW</span><span class="pun">);</span><span class="pln">
- </span><span class="pun">}</span><span class="pln">
- </span><span class="kwd">int</span><span class="pln"> doubleTap</span><span class="pun">()</span><span class="pln"> </span><span class="pun">{</span><span class="pln"> </span><span class="com">//Listens for double tap, if double returns 2, if single returns 1</span><span class="pln">
- delay</span><span class="pun">(</span><span class="pln">DTAP_COOLDOWN</span><span class="pun">);</span><span class="pln"> </span><span class="com">//No detection allowed</span><span class="pln">
- </span><span class="kwd">for</span><span class="pun">(</span><span class="kwd">int</span><span class="pln"> i </span><span class="pun">=</span><span class="pln"> </span><span class="lit">0</span><span class="pun">;</span><span class="pln"> i </span><span class="pun"><</span><span class="pln"> DTAP_SAMPLING_PERIOD</span><span class="pun">;</span><span class="pln"> i</span><span class="pun">++)</span><span class="pln"> </span><span class="pun">{</span><span class="pln"> </span><span class="com">//Detection begins</span><span class="pln">
- </span><span class="kwd">int</span><span class="pln"> xl_val </span><span class="pun">=</span><span class="pln"> analogRead</span><span class="pun">(</span><span class="pln">Z_PIN</span><span class="pun">);</span><span class="pln">
- </span><span class="kwd">int</span><span class="pln"> mic_val </span><span class="pun">=</span><span class="pln"> analogRead</span><span class="pun">(</span><span class="pln">MIC_PIN</span><span class="pun">);</span><span class="pln">
- </span><span class="kwd">bool</span><span class="pln"> micTap </span><span class="pun">=</span><span class="pln"> mic_min </span><span class="pun">></span><span class="pln"> mic_val </span><span class="pun">||</span><span class="pln"> mic_max </span><span class="pun"><</span><span class="pln"> mic_val</span><span class="pun">;</span><span class="pln">
- </span><span class="kwd">bool</span><span class="pln"> xlTap </span><span class="pun">=</span><span class="pln"> xl_min </span><span class="pun">></span><span class="pln"> xl_val </span><span class="pun">||</span><span class="pln"> xl_max </span><span class="pun"><</span><span class="pln"> xl_val</span><span class="pun">;</span><span class="pln">
- </span><span class="kwd">if</span><span class="pun">(</span><span class="pln">xlTap </span><span class="pun">&&</span><span class="pln"> micTap</span><span class="pun">)</span><span class="pln"> </span><span class="pun">{</span><span class="pln"> </span><span class="com">//Need both to register a tap to prevent false positive. </span><span class="pln">
- delay</span><span class="pun">(</span><span class="pln">DTAP_COOLDOWN</span><span class="pun">);</span><span class="pln">
- </span><span class="kwd">return</span><span class="pln"> </span><span class="lit">2</span><span class="pun">;</span><span class="pln">
- </span><span class="pun">}</span><span class="pln">
- </span><span class="pun">}</span><span class="pln">
- </span><span class="kwd">return</span><span class="pln"> </span><span class="lit">1</span><span class="pun">;</span><span class="pln">
- </span><span class="pun">}</span><span class="pln">
- </span><span class="kwd">void</span><span class="pln"> openProcedure</span><span class="pun">()</span><span class="pln"> </span><span class="pun">{</span><span class="pln"> </span><span class="com">//Opens and waits to close door until user input on reset button</span><span class="pln">
- digitalWrite</span><span class="pun">(</span><span class="pln">LED_PIN</span><span class="pun">,</span><span class="pln"> HIGH</span><span class="pun">);</span><span class="pln">
- openDoor</span><span class="pun">();</span><span class="pln">
- </span><span class="kwd">while</span><span class="pun">(!</span><span class="pln">digitalRead</span><span class="pun">(</span><span class="pln">RESET_PIN</span><span class="pun">)){</span><span class="pln">
- </span><span class="pun">}</span><span class="pln">
- digitalWrite</span><span class="pun">(</span><span class="pln">LED_PIN</span><span class="pun">,</span><span class="pln"> LOW</span><span class="pun">);</span><span class="pln">
- releaseDoor</span><span class="pun">();</span><span class="pln">
- </span><span class="pun">}</span><span class="pln">
- </span><span class="kwd">void</span><span class="pln"> openDoor</span><span class="pun">()</span><span class="pln"> </span><span class="pun">{</span><span class="pln"> </span><span class="com">//Opens the door</span><span class="pln">
- motor</span><span class="pun">.</span><span class="pln">moveTo</span><span class="pun">(</span><span class="lit">600</span><span class="pun">);</span><span class="pln">
- </span><span class="kwd">while</span><span class="pun">(</span><span class="pln">motor</span><span class="pun">.</span><span class="pln">distanceToGo</span><span class="pun">()</span><span class="pln"> </span><span class="pun">!=</span><span class="pln"> </span><span class="lit">0</span><span class="pun">){</span><span class="pln">
- motor</span><span class="pun">.</span><span class="pln">run</span><span class="pun">();</span><span class="pln">
- </span><span class="pun">}</span><span class="pln">
- </span><span class="pun">}</span><span class="pln">
- </span><span class="kwd">void</span><span class="pln"> releaseDoor</span><span class="pun">()</span><span class="pln"> </span><span class="pun">{</span><span class="pln"> </span><span class="com">//Releases the door </span><span class="pln">
- motor</span><span class="pun">.</span><span class="pln">moveTo</span><span class="pun">(</span><span class="lit">0</span><span class="pun">);</span><span class="pln">
- </span><span class="kwd">while</span><span class="pun">(</span><span class="pln">motor</span><span class="pun">.</span><span class="pln">distanceToGo</span><span class="pun">()</span><span class="pln"> </span><span class="pun">!=</span><span class="pln"> </span><span class="lit">0</span><span class="pun">)</span><span class="pln"> </span><span class="pun">{</span><span class="pln">
- motor</span><span class="pun">.</span><span class="pln">run</span><span class="pun">();</span><span class="pln">
- </span><span class="pun">}</span><span class="pln">
- </span><span class="pun">}</span>
Comments are closed.