Project Recap and Prototype Introduction
For the final class project our group, Team Amy, is working towards creating an art enabling device to help our client, Amy, draw on a canvas with greater ease and independence. After our initial interview with Amy – which you can read about here – we discovered this project opportunity revolving around art when she mentioned how uncomfortable her current method of painting or drawing is due to her needing to employ the use of a mouthstick. We came up with a few concept iteration sketches to explore how we may enable Amy to make art more comfortably and then had a subsequent meeting with her to discuss which ideas she believed would be the most useful to her and how we could optimize that concept to suit her level of mobility.
Based on this, our group decided to work towards an assistive device that allows you to draw through the use of a mechanical rig and arm-mounted controller device. When Amy moves her arm, the controller reads the changing position and then sends the position data to the rig, which then moves the position of the drawing utensil accordingly.
This post works as documentation for our prototype milestone, where we worked towards answering some key questions that we had in regards to this device’s functionality and overall user interactions. As each of our team members have a fairly different skill set, we decided to each answer a different question to cover more ground, as this is a fairly ambitious project concept, and play to our strengths. Dani, an industrial designer, decided to explore the controller’s ergonomics, as the controller would be the user’s primary interface with the device. Evan, an electrical-computer engineer, worked on the driving code which would provide the interface between the controller and the mechanical rig. Finally, Daniel, a mechanical engineer, explored how the mechanical rig itself would function to allow for drawing to occur.
The Prototypes
Prototype 1 – Controller Interaction
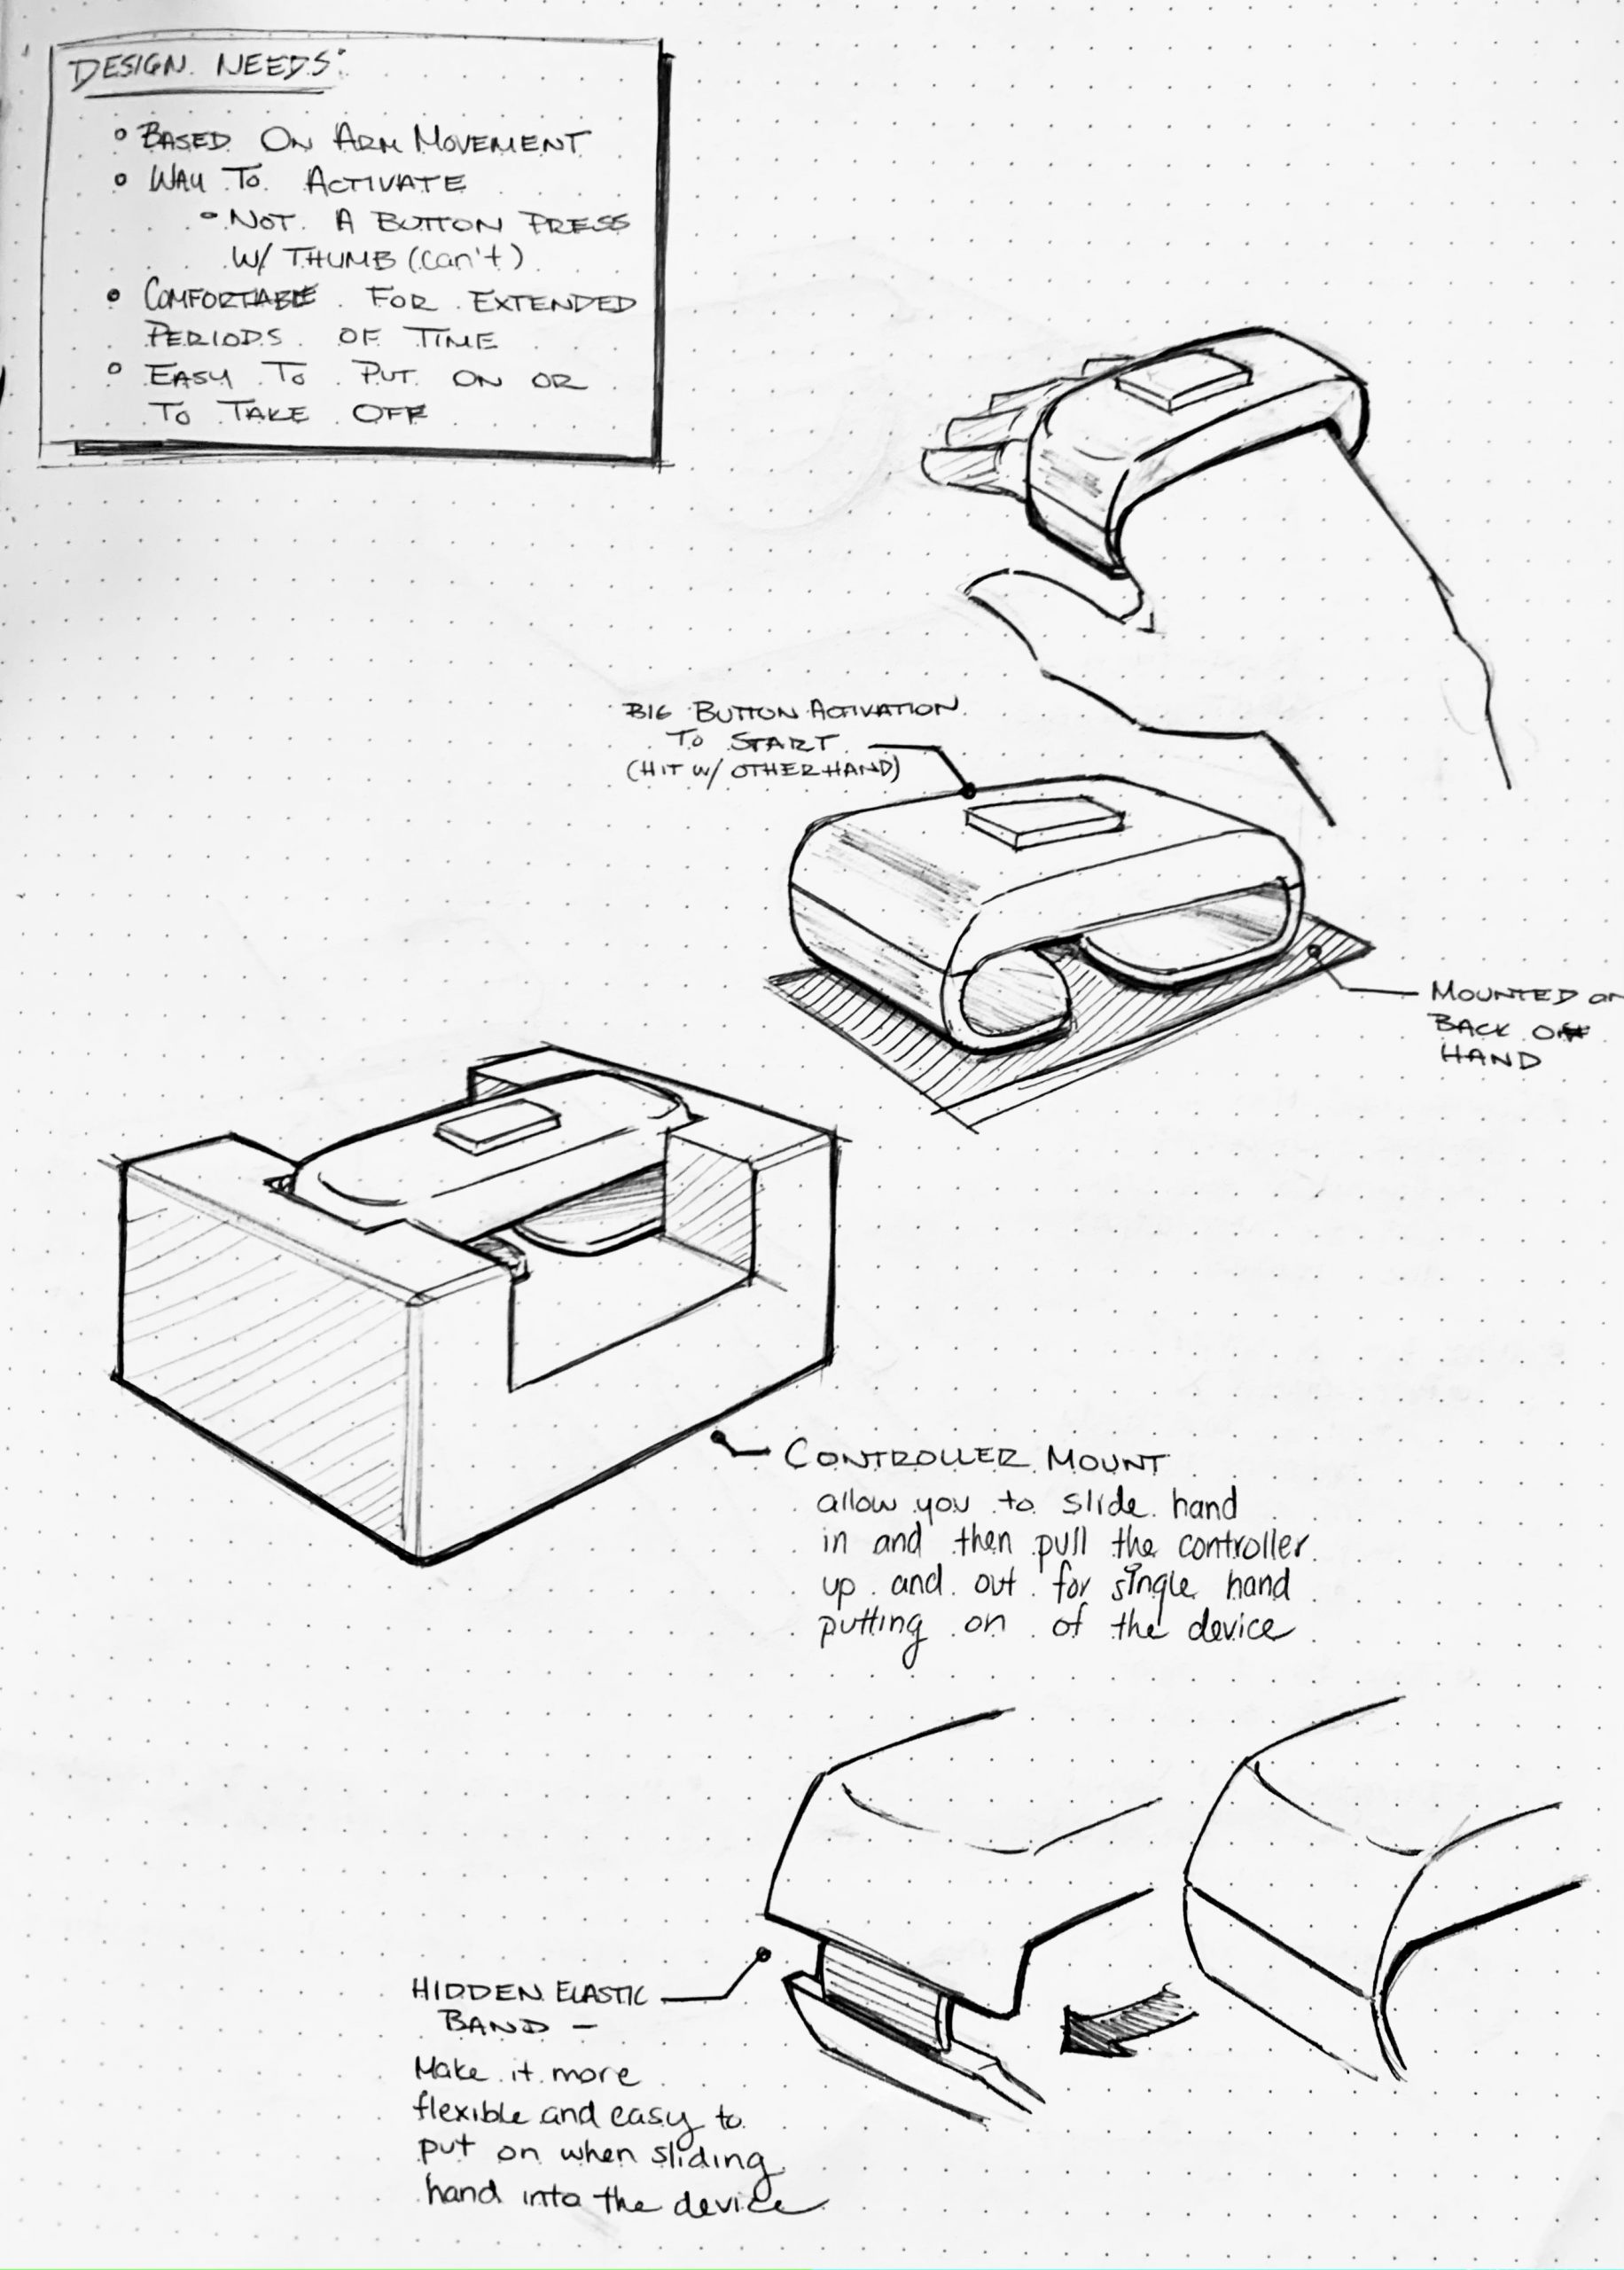
This prototype was meant to answer the question of: How might we create an arm-mounted controller that is simple to put on, secure, and comfortable to wear for a long period of time?
This particular prototype focused on the interactions that Amy would have to contend with to operate the drawing enabler device. This was done by creating an idealized “looks like” and “feels like” model of the controller out of light-weight, high-density foam and elastic along with a model of the mount the controller would rest upon when the device is not in use. I wanted to explore what proportions for the device would be comfortable to use for an extended period of time, the form factors the controller would have so that the direction you should hold it in is intuitive, and the ways in which Amy could put on this arm-mounted controller without employing the help of others.
Sketches of the prototype concept to think through the different components.
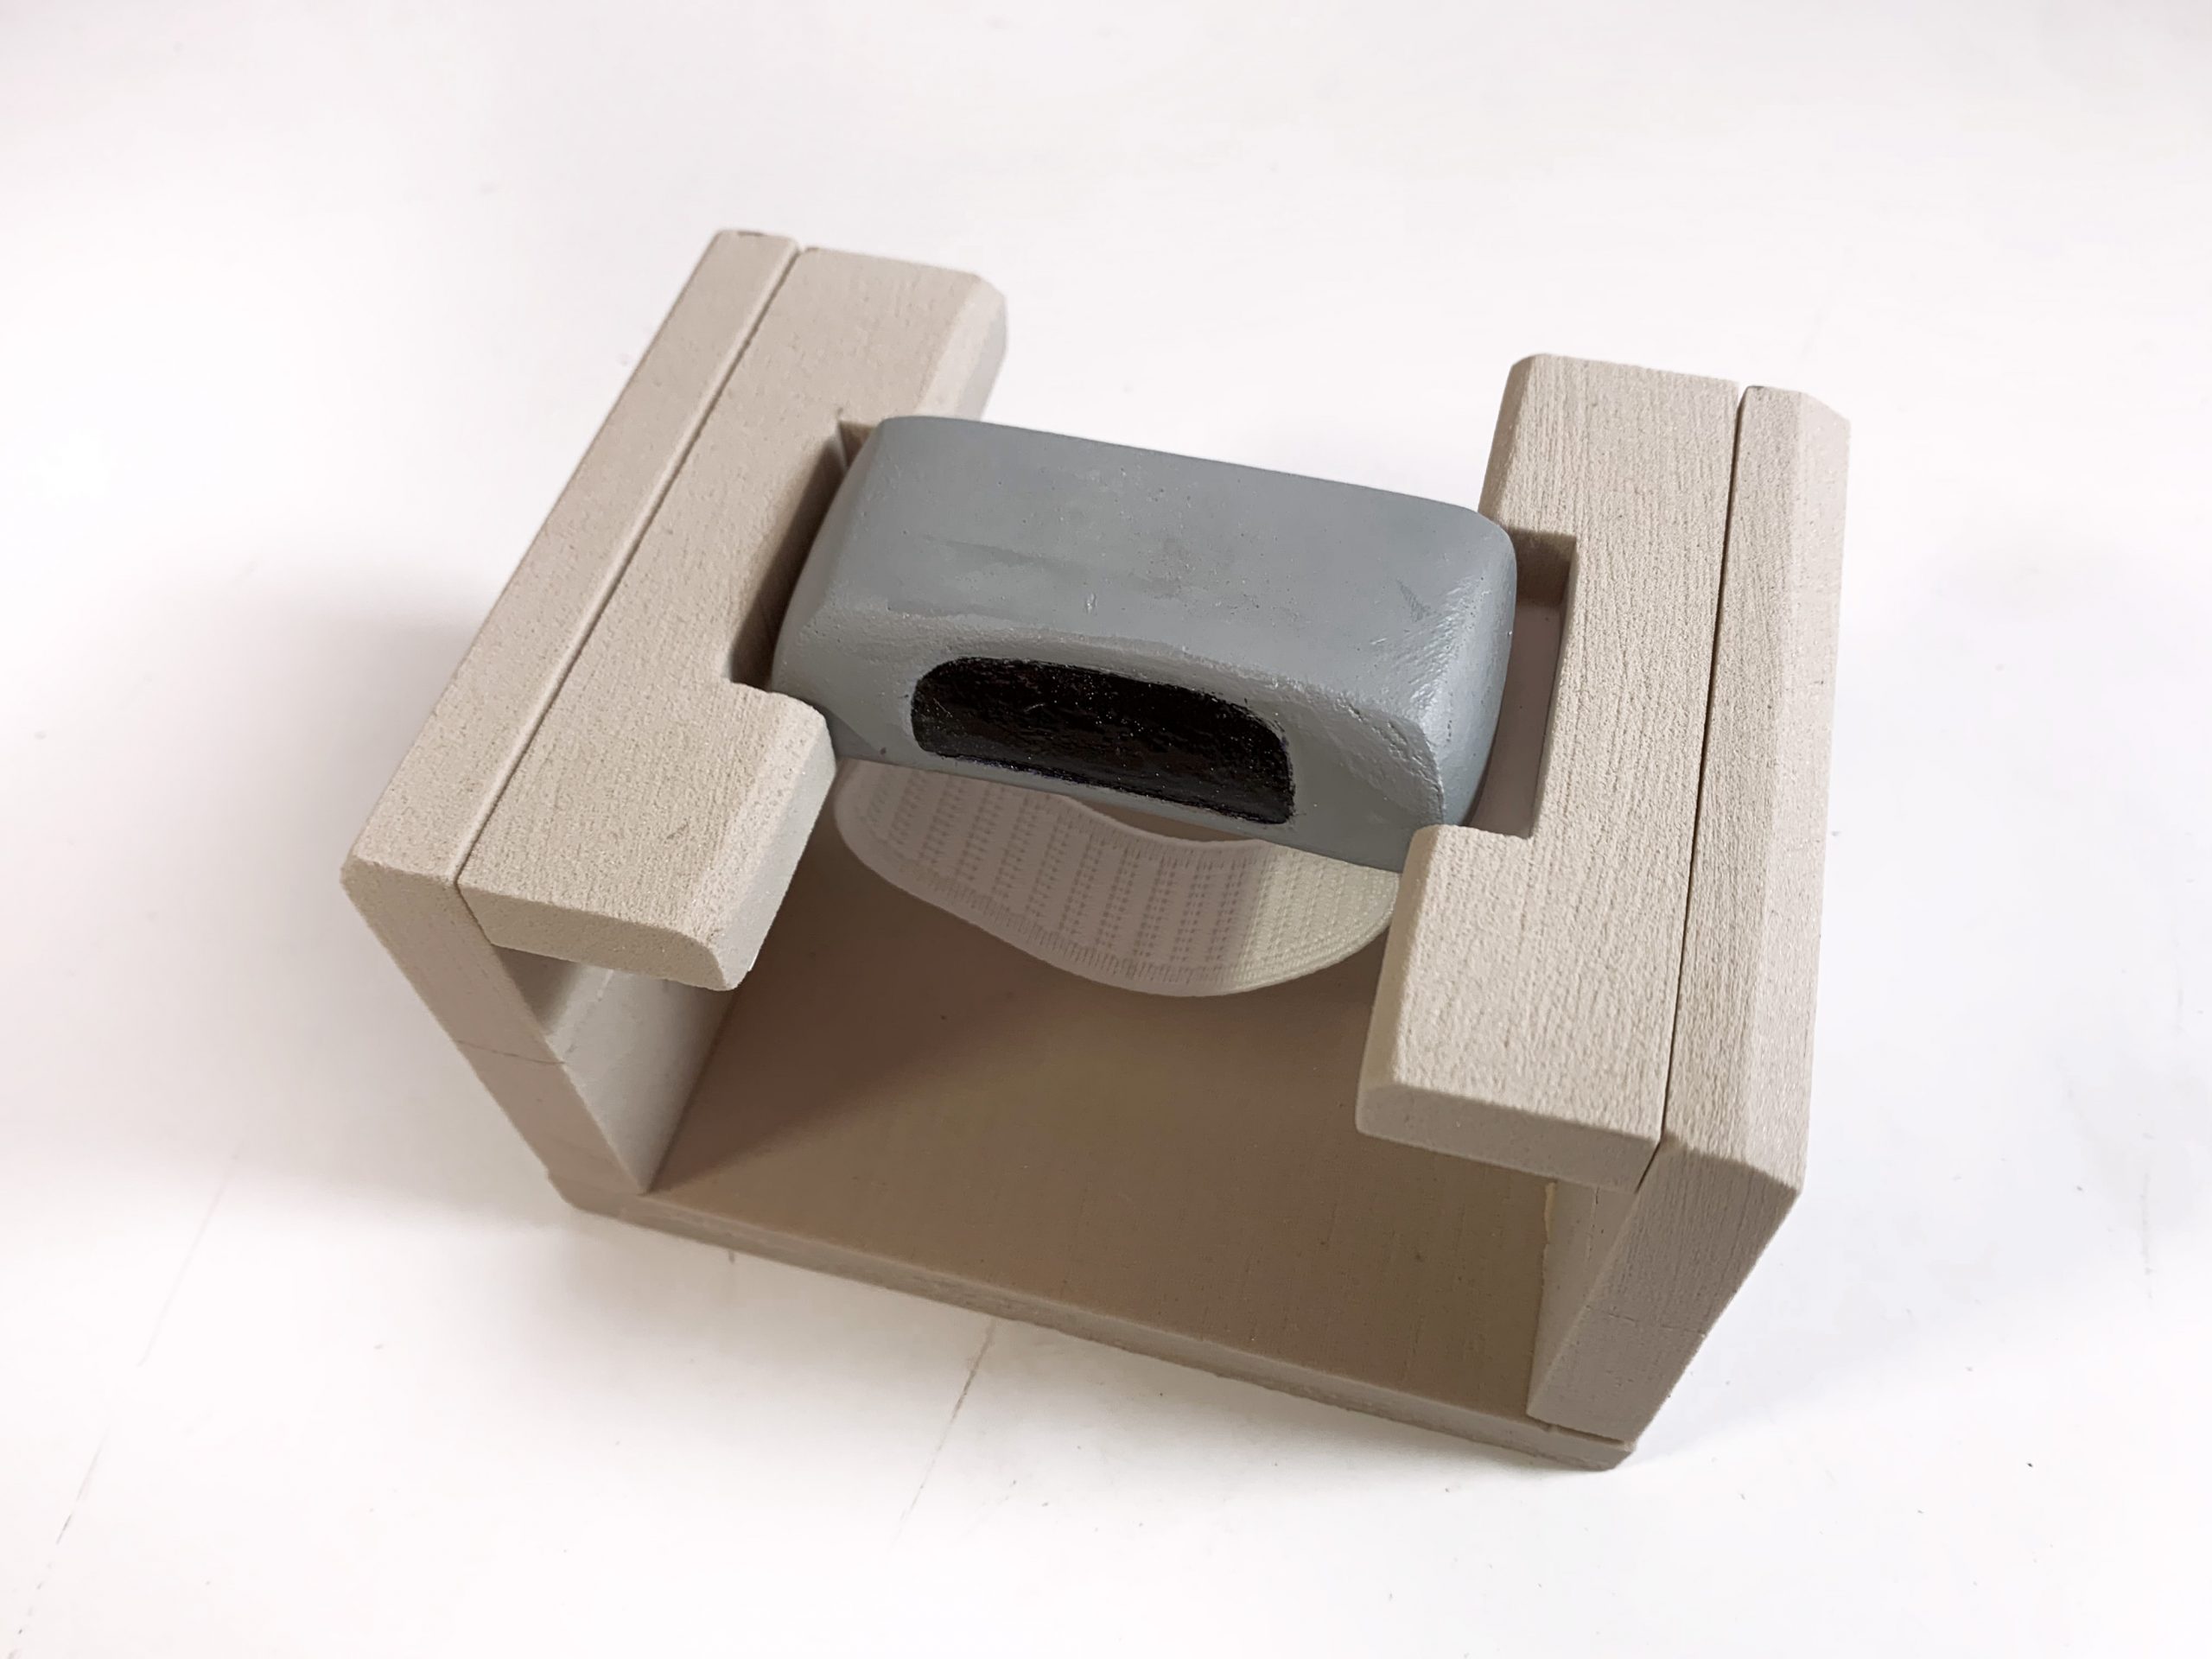
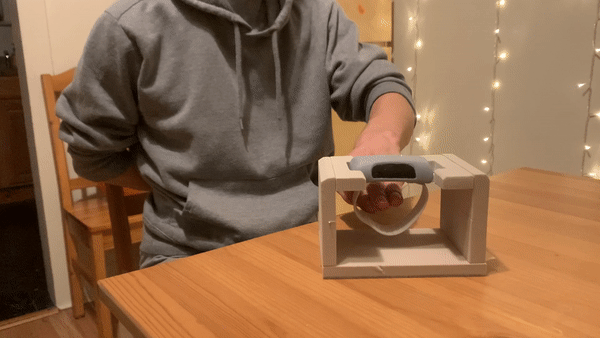
The arm-held controller in its controller mount
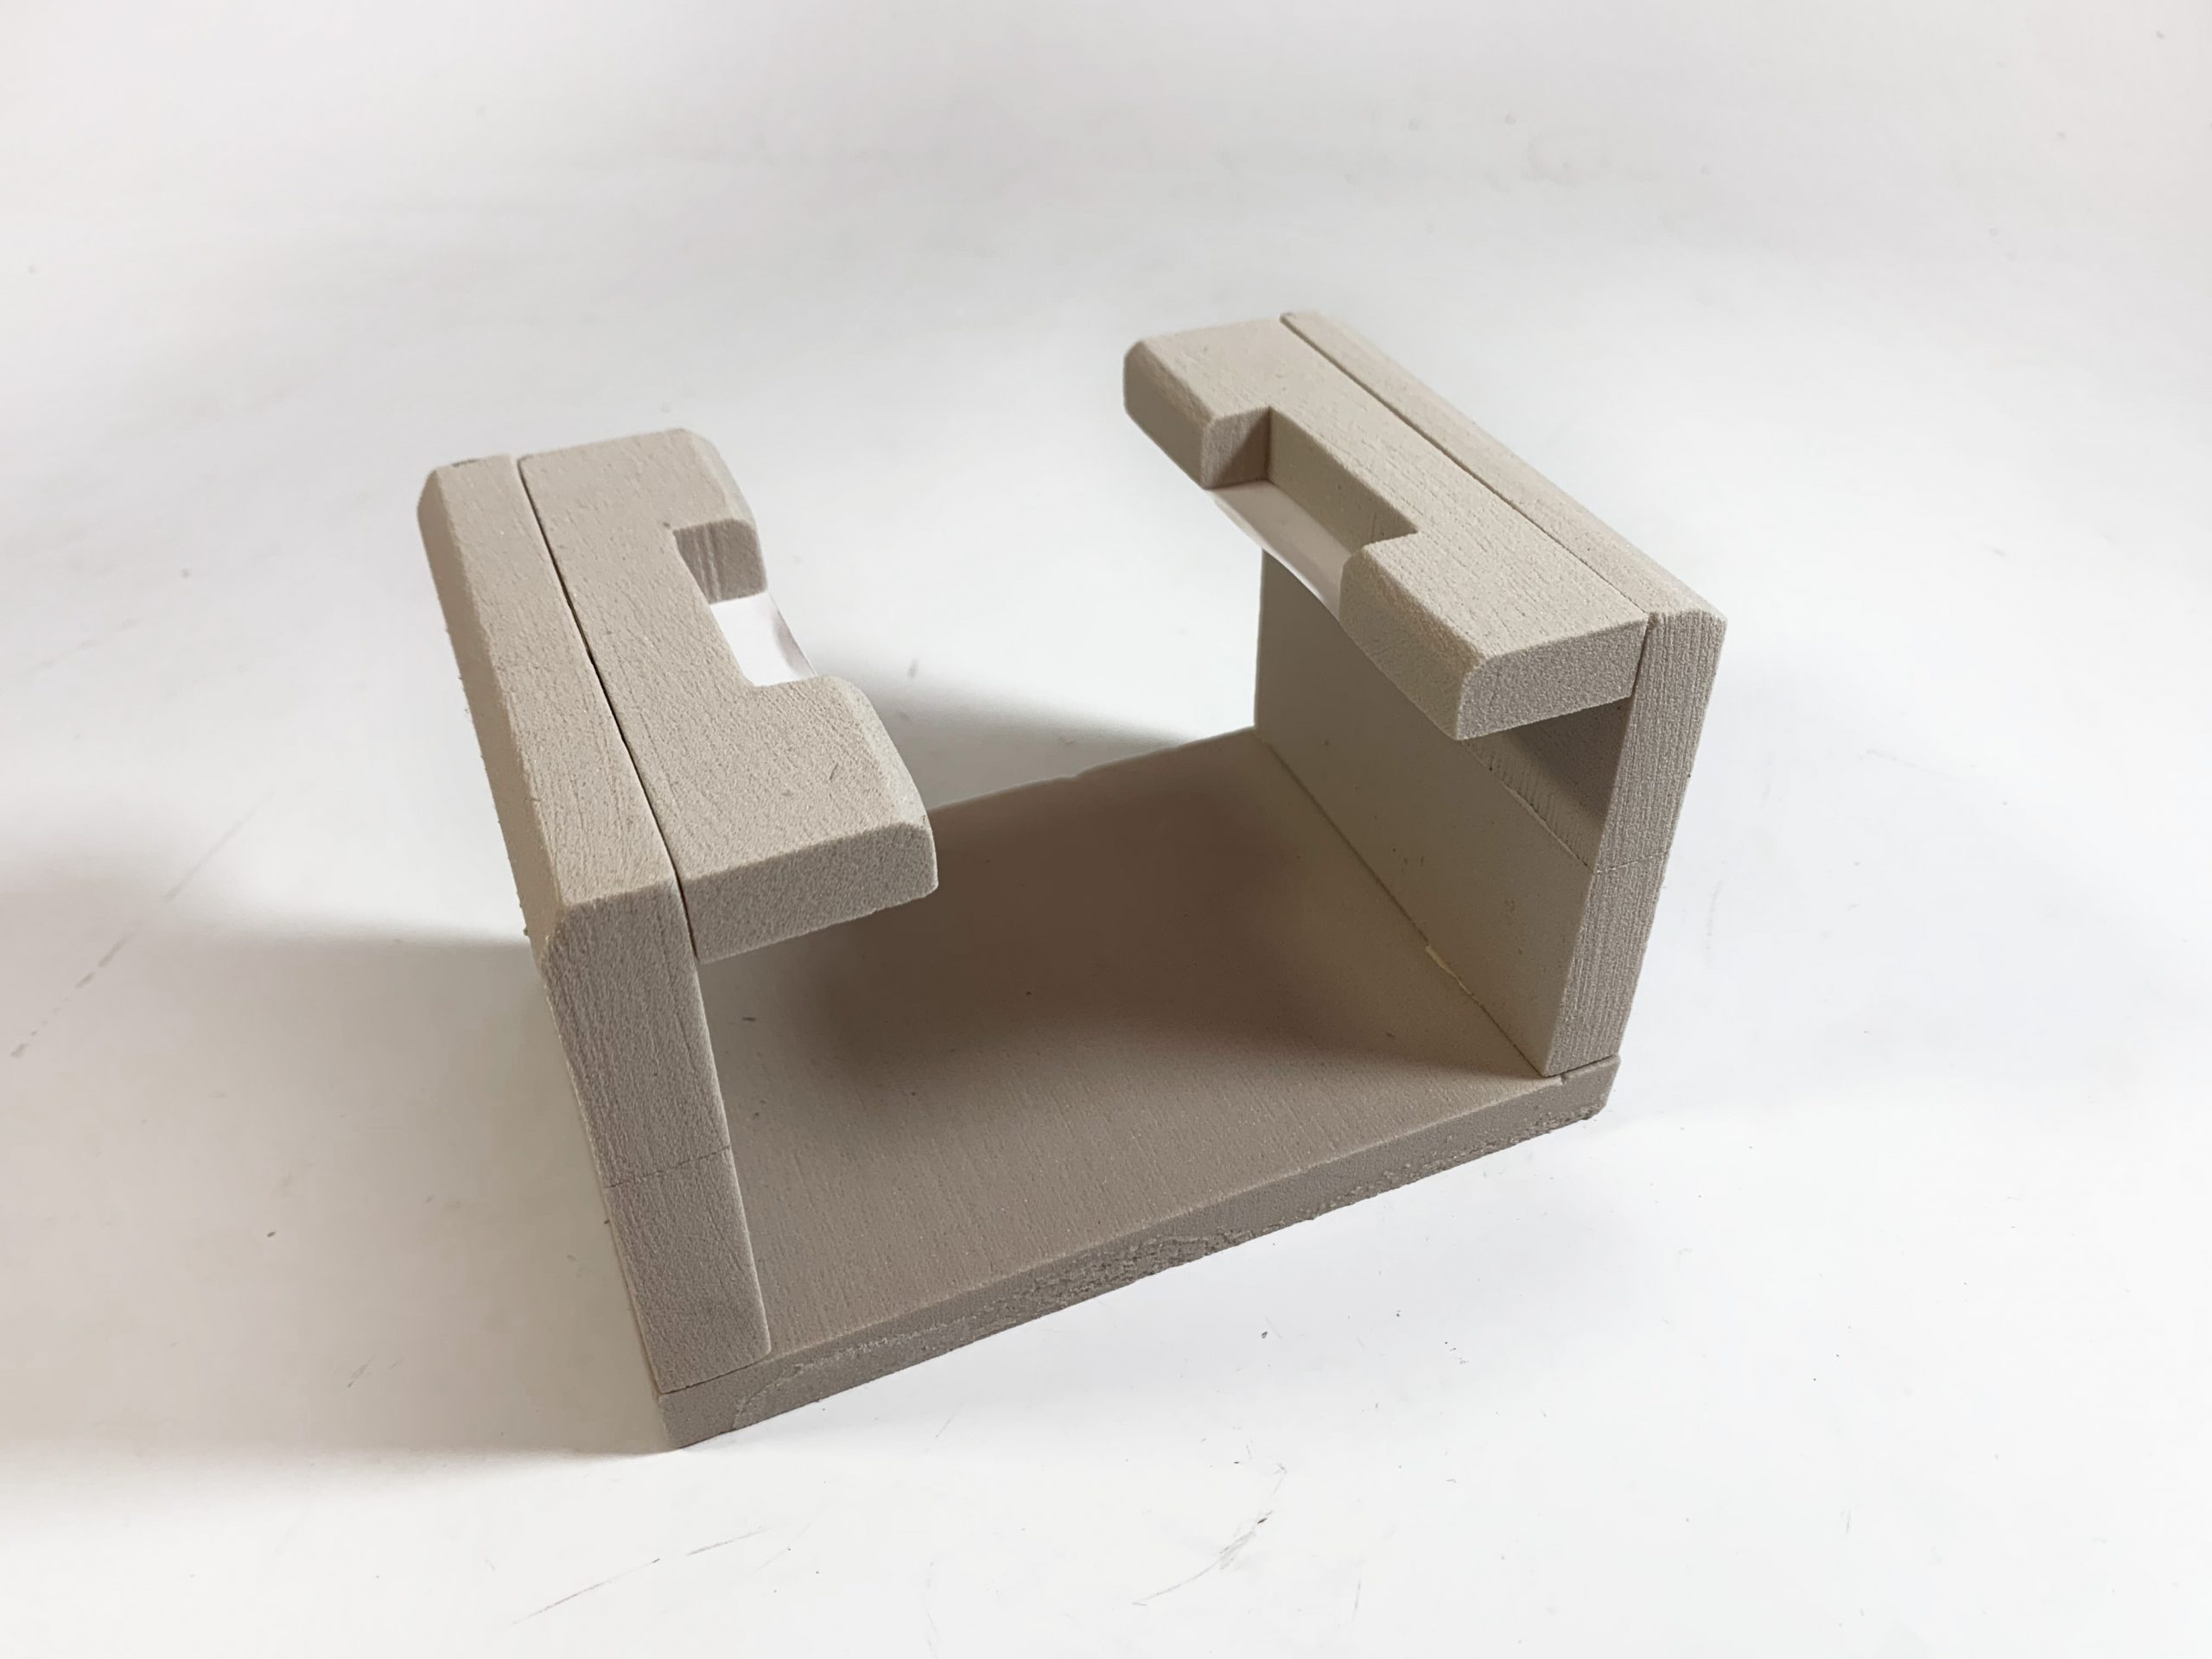
Controller mount by itself – has space to put your hand into and cut-outs to hold the controller in place
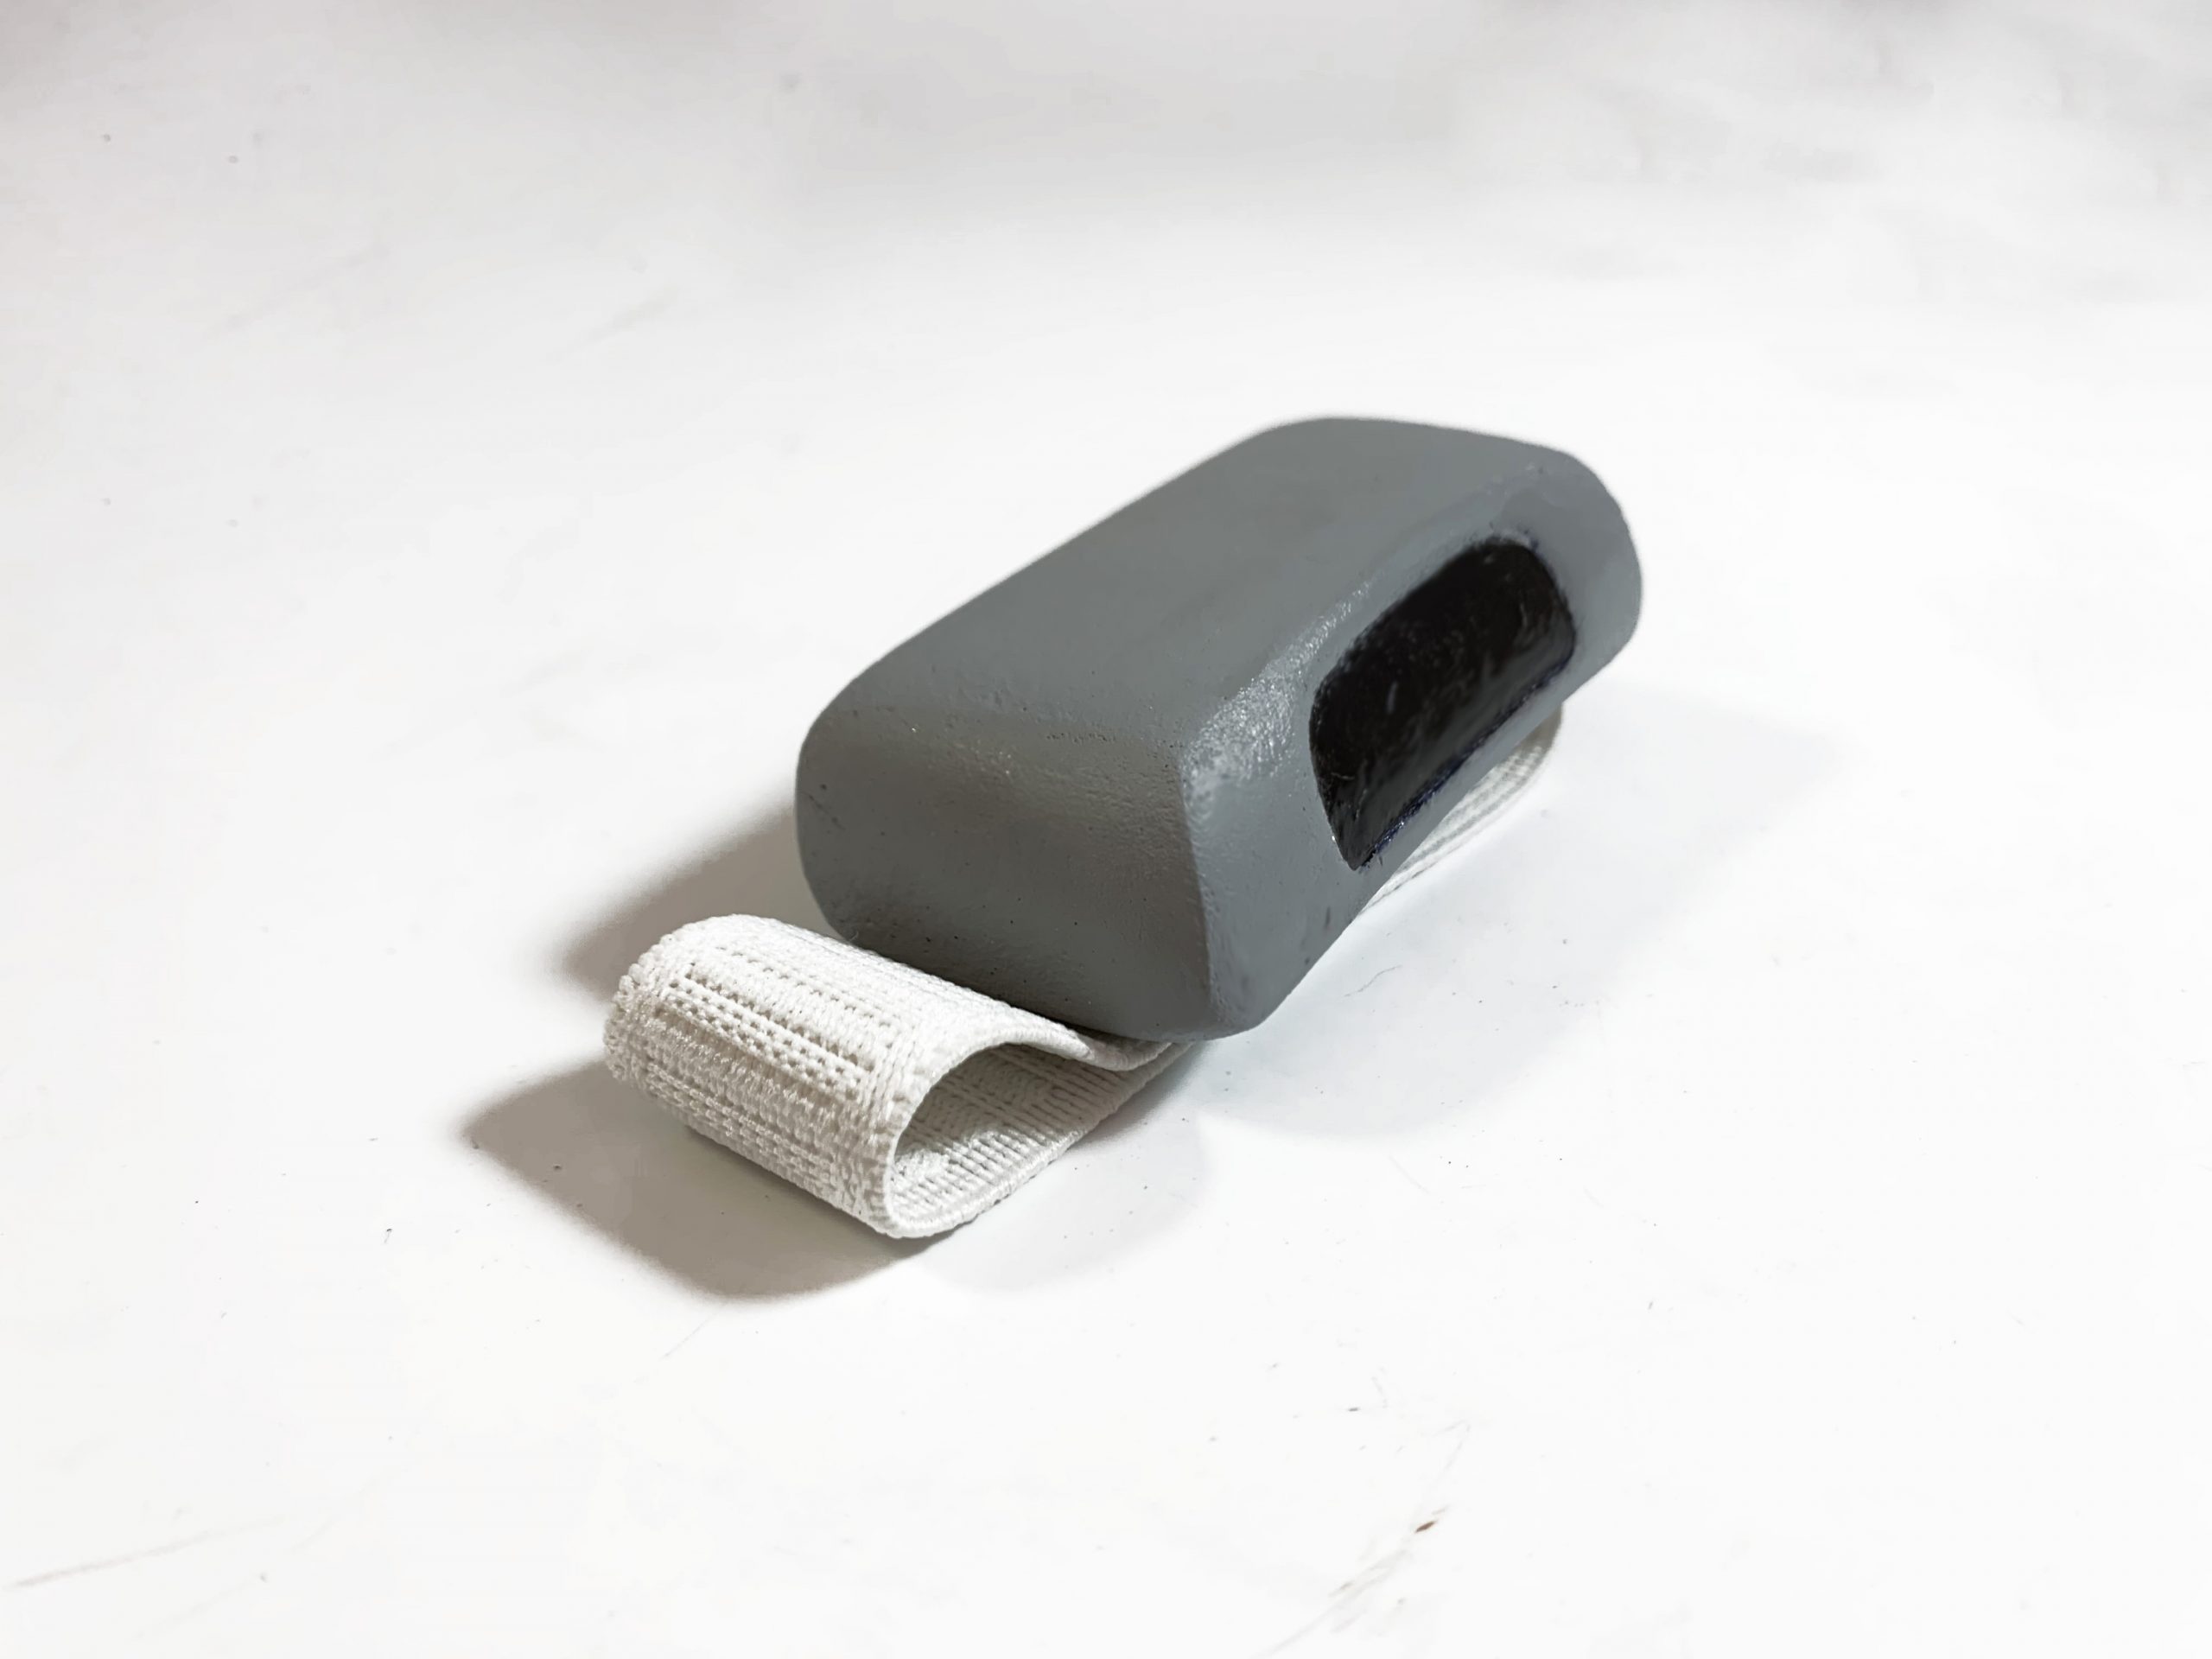
Controller by itself. The armband is a piece of soft elastic to make it comfortable and lightweight
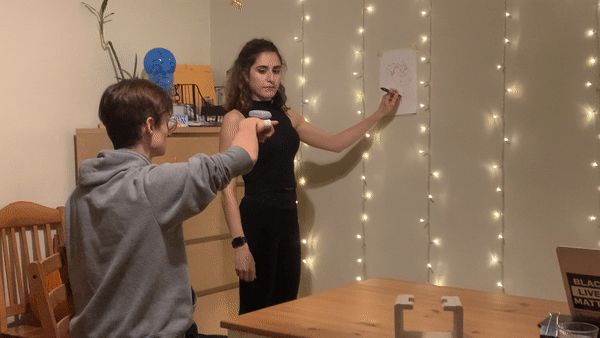
“Wizard-of-OZing” the controller interaction
As demonstrated above, when the user is wearing the controller, their arm movements would dictate the position of the rig, which would then drag the drawing utensil across the canvas allowing the user to draw.
I tested out this device’s interactions by presenting the rig on the controller to friends and asking them “how would you put on this controller by only using one hand?” and then seeing what they did. Through this process, I discovered that while people understood the overall interaction that I was hoping they would (where they stick their hand into the controller’s band and then lift up to release it from the mount), the interaction was a bit awkward as the holder was too narrow to comfortably allow for all hand sizes to lift out.
A prototype test leading to an awkward interaction
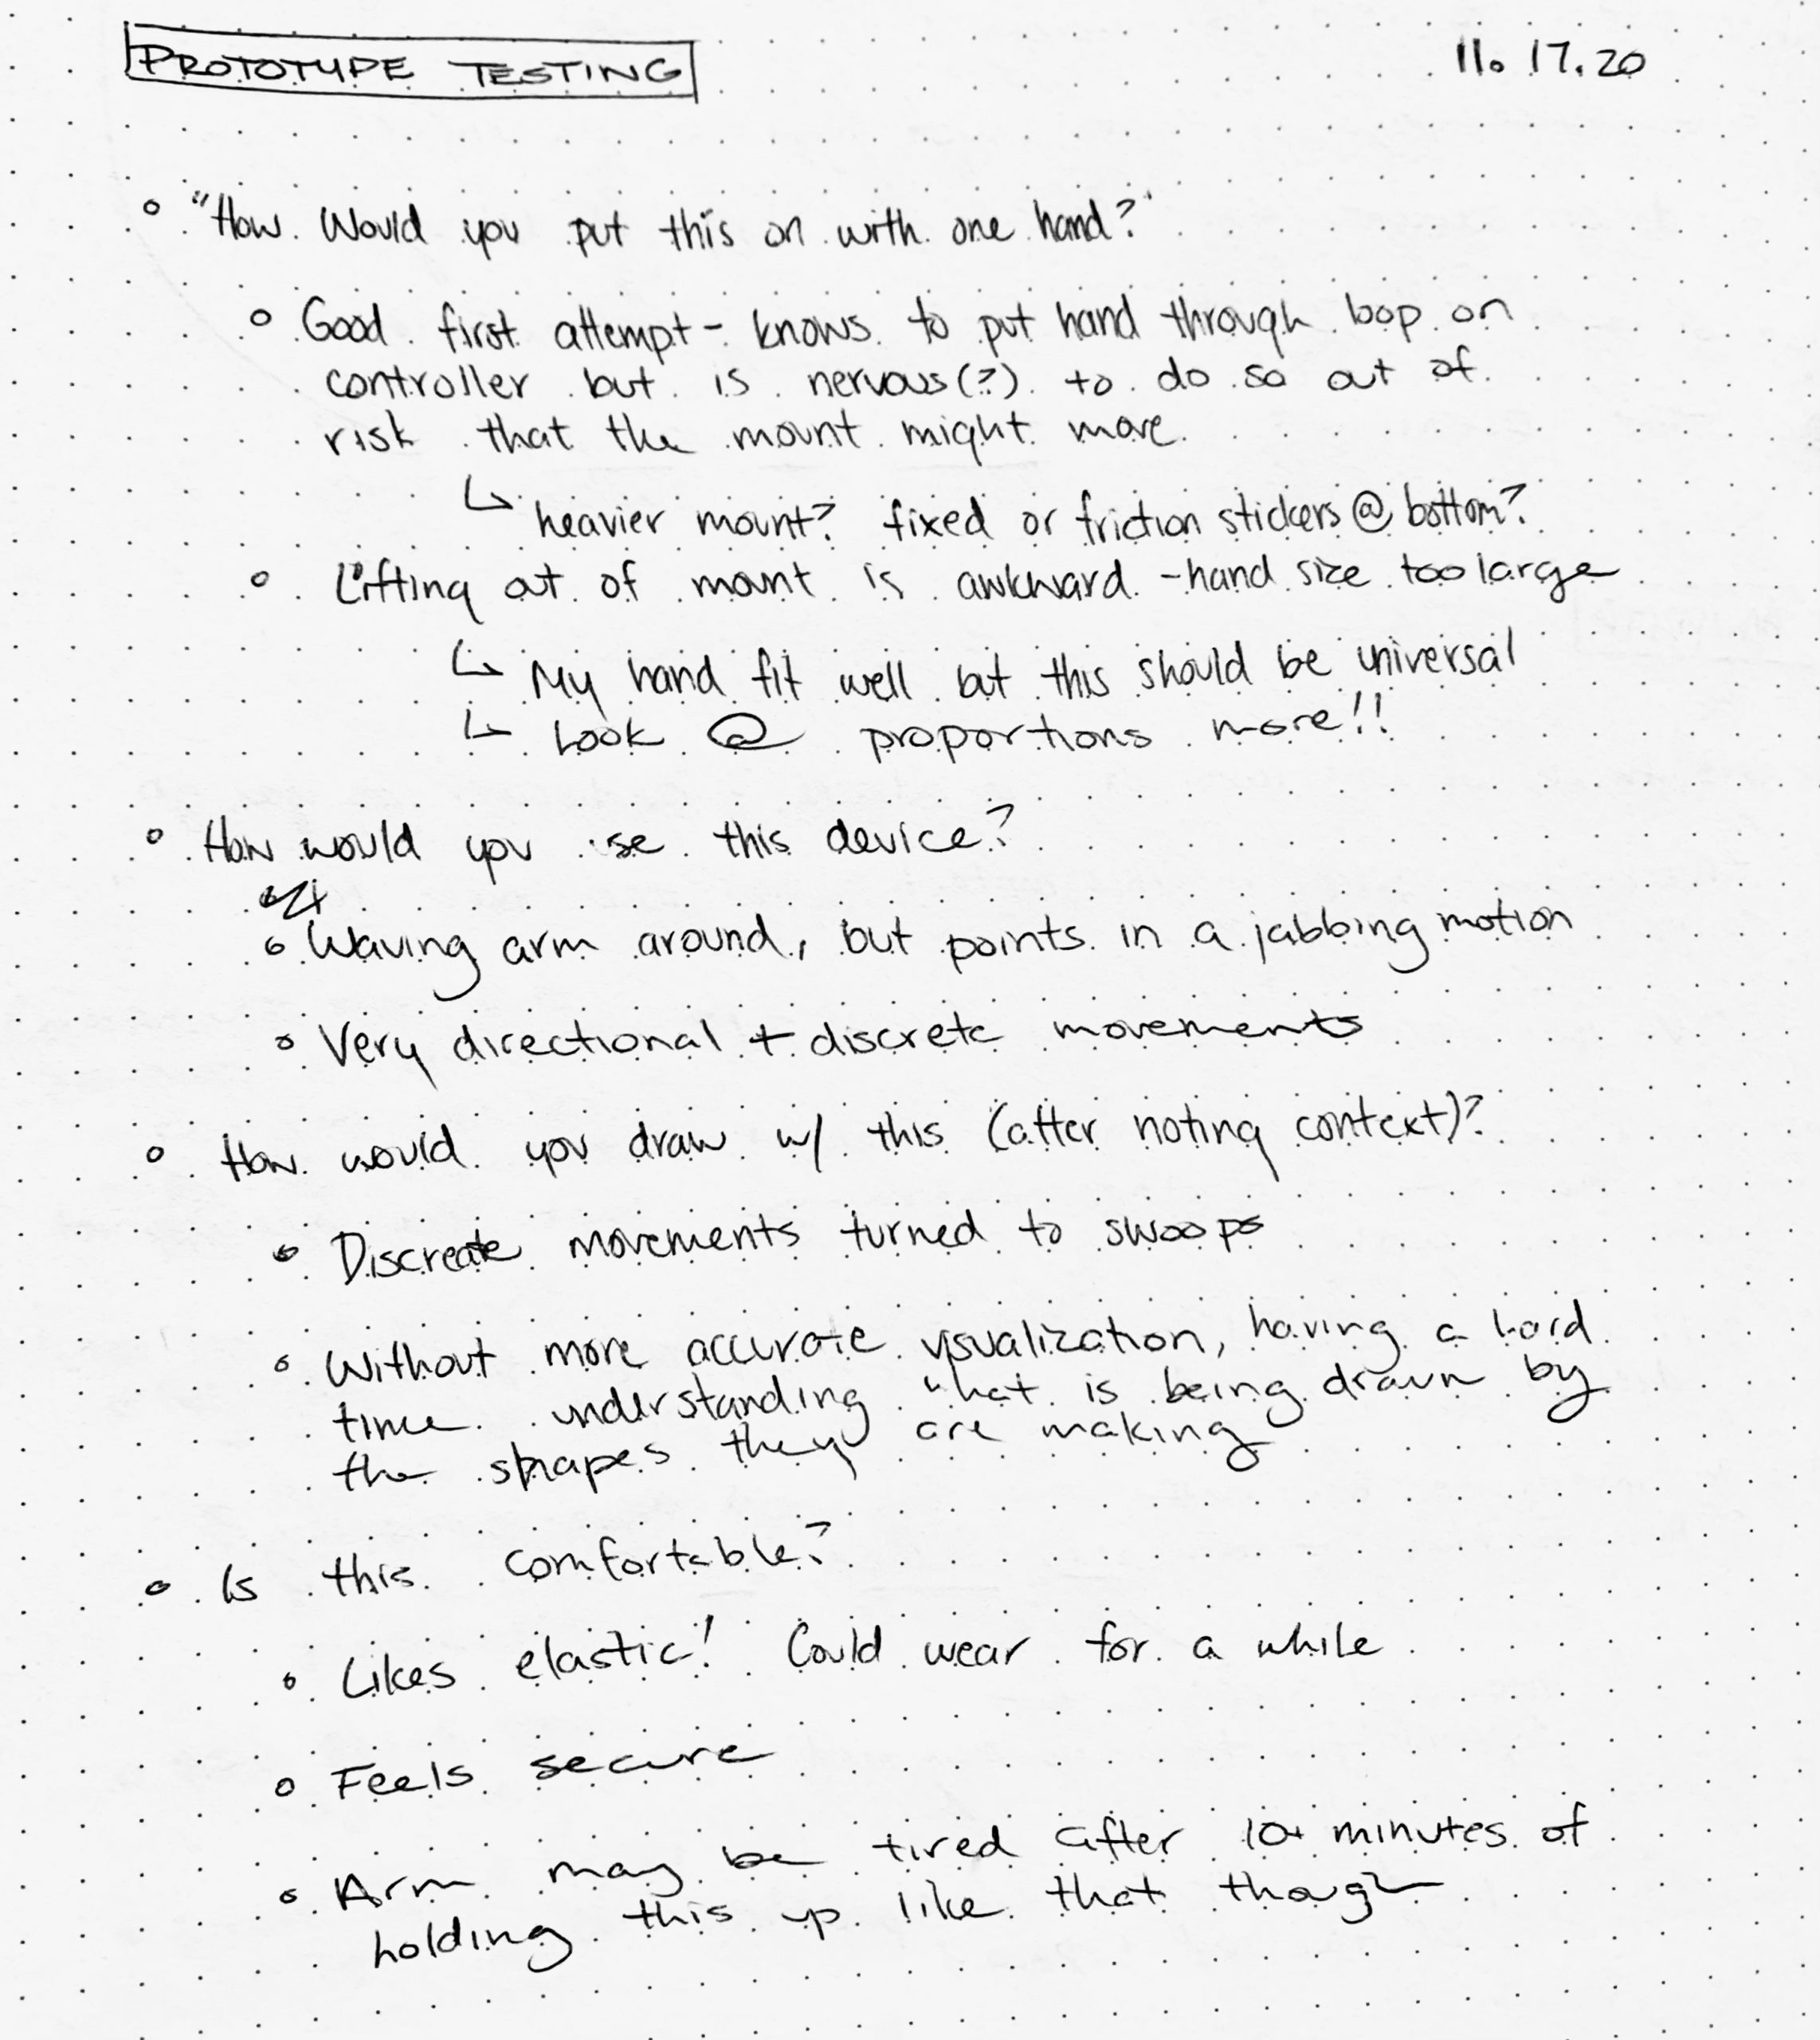
Notes from prototype session
Through the creation of this prototype, I learned that while people understood the overall interactions they would have with the device, some of the particular dimensions were a bit awkward and hard to transition into. Furthermore, through the testing, I learned that while the controller itself had a comfortable design that people noted to be suitable for its purpose, the action of holding your hand out for so long without any support may grow to be tiring very quickly – especially for Amy who is still working on building up her arm muscle strength. This is a design flaw that we, as a team, later discussed and are currently working on reconsidering (more on this particular note, however, will be in the next steps section of this documentation).
Furthermore, this current prototype works under the assumption that we can achieve a similar controller-to-rig communication as a Wii remote by employing the use of two MEMS accelerometers and an infrared sensor for position triangulation but this will most likely not be the case. We are currently working through alternative sensor options to make this controller-to-rig communication more accurate, which in turn implies a redesign of the general controller interactions based on the inputs the new sensors would require. Overall, while this prototype did work towards answering the question ” How might we create an arm-mounted controller that is simple to put on, secure, and comfortable to wear for a long period of time? “, as it showed that people did understand how to put on the controller and then use it, there are still further edits to be made to the design to ensure proper functionality and a comfortable, non-tiring experience for arm-controlled interactions.
Prototype 2 – Mechanical Brush Holder
Different from the previous prototype, this prototype was meant to answer the question of: How can we give free 3D-movement on the brush by using motors?
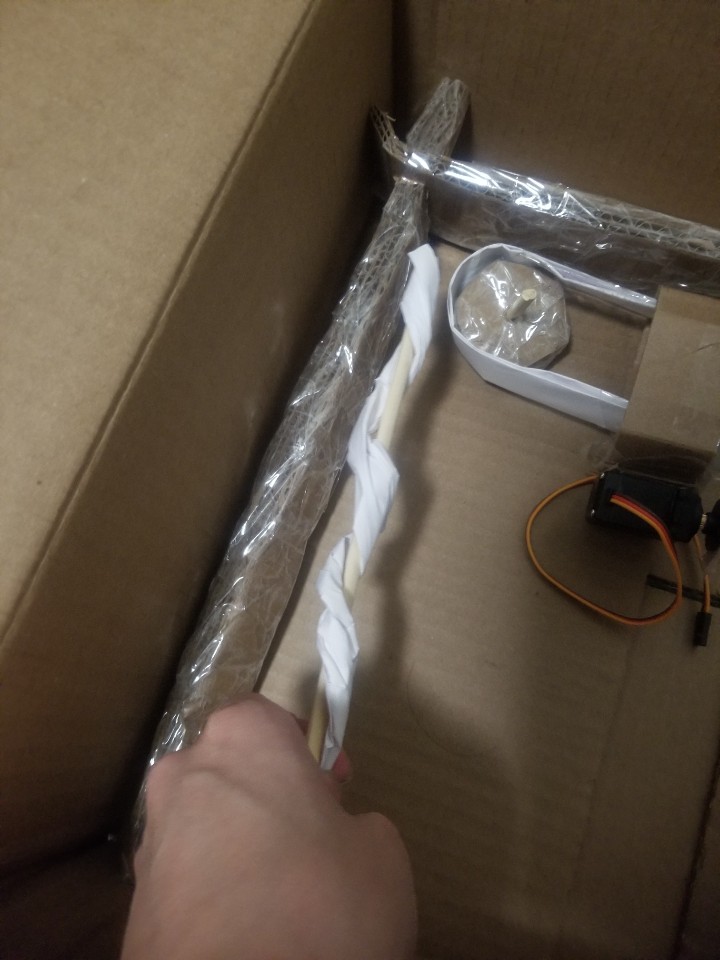
This particular prototype focused on the physical movement of the brush that Amy would like to move. The basic idea was brought from the 3D printer’s structural model. Since there were limitations with the materials for this prototype, I used cardboards to demonstrate how the structural parts will move in order to achieve the free x,y, and z-direction movements.
General Overview of Mechanical Rig Prototype
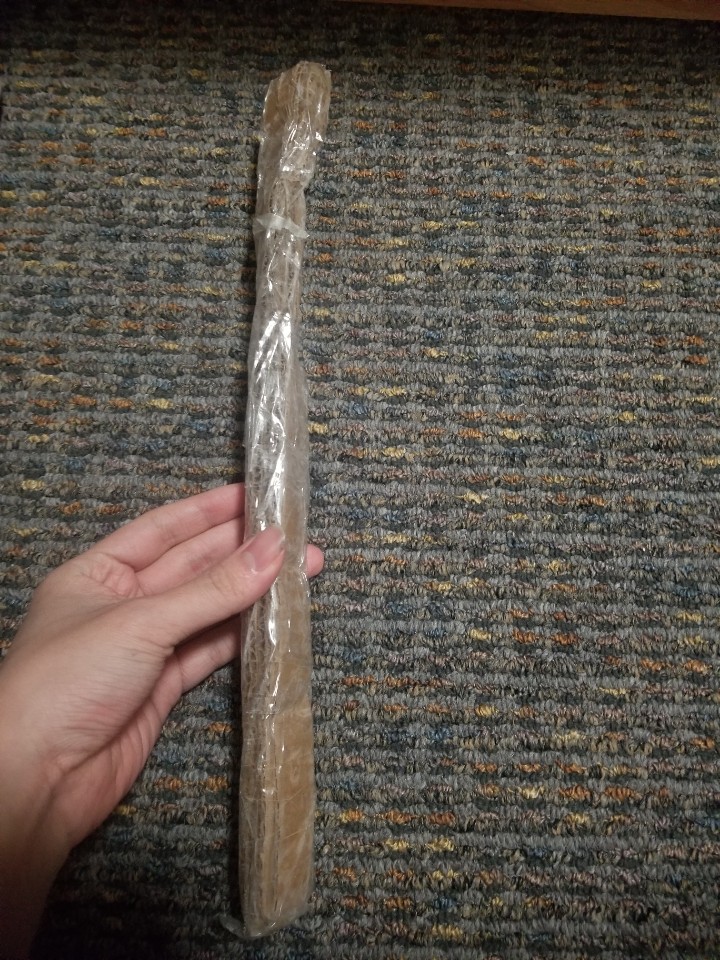
The threaded bar section of the prototype. (This will control the y-axis movement of the machine)
Since the top general picture will be hard to understand, here is a part I may use for this section of the prototype.
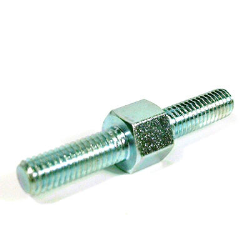
Threaded Rod From google
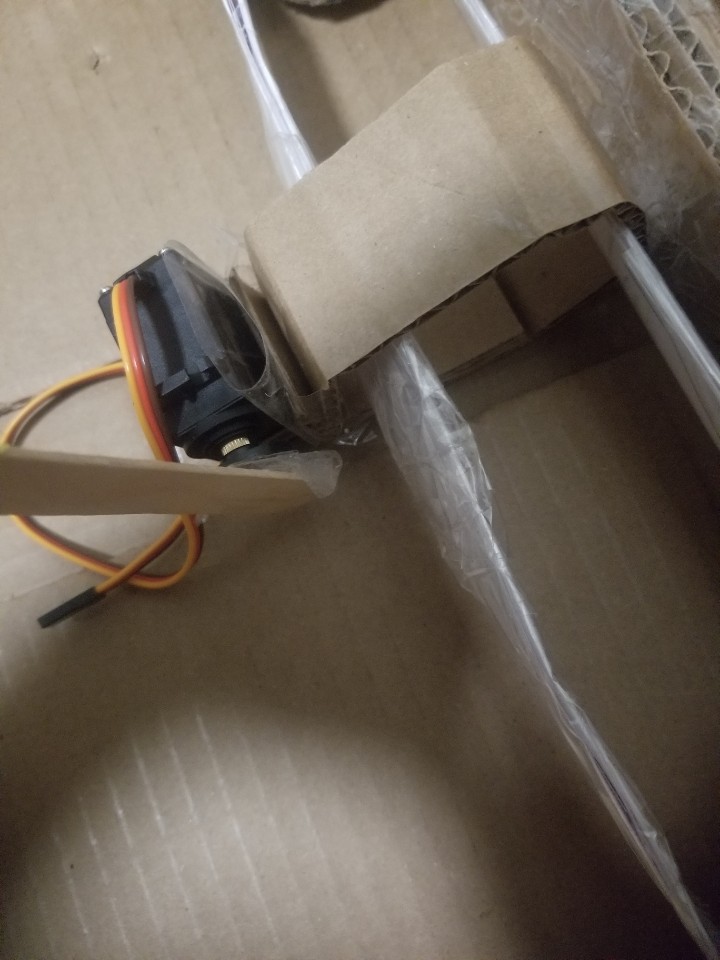
The Servo motor will control the z-direction of paint brush motion.
Basic Idea of how the machine will work. (Since the prototype is made with cardboard, it breaks easily.)
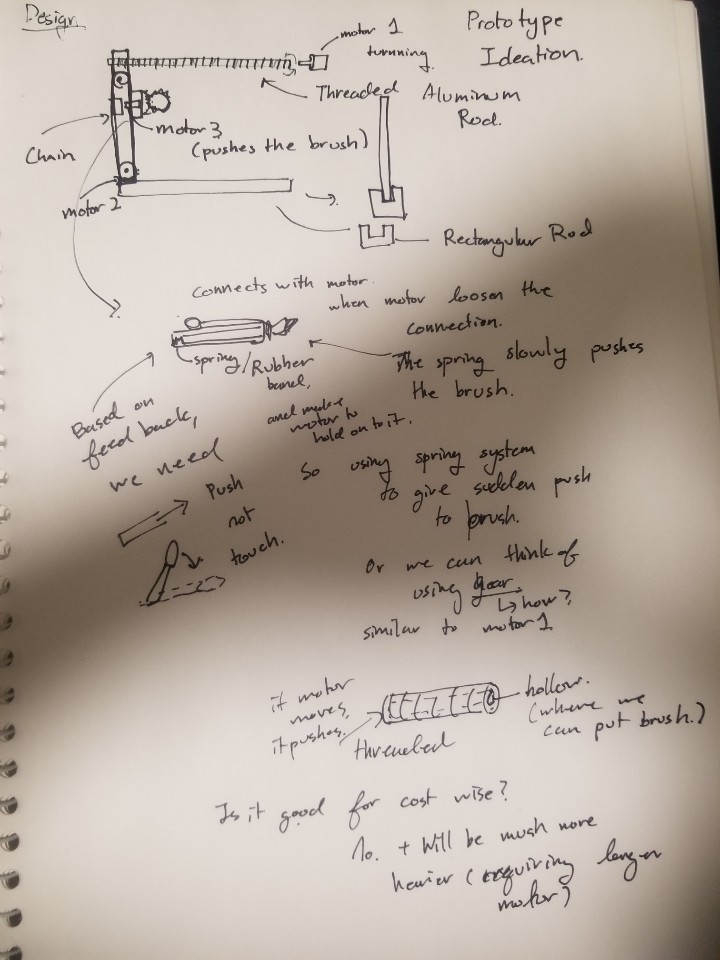
Ideation of Prototype and detailed plannings for each Mechanical Sections
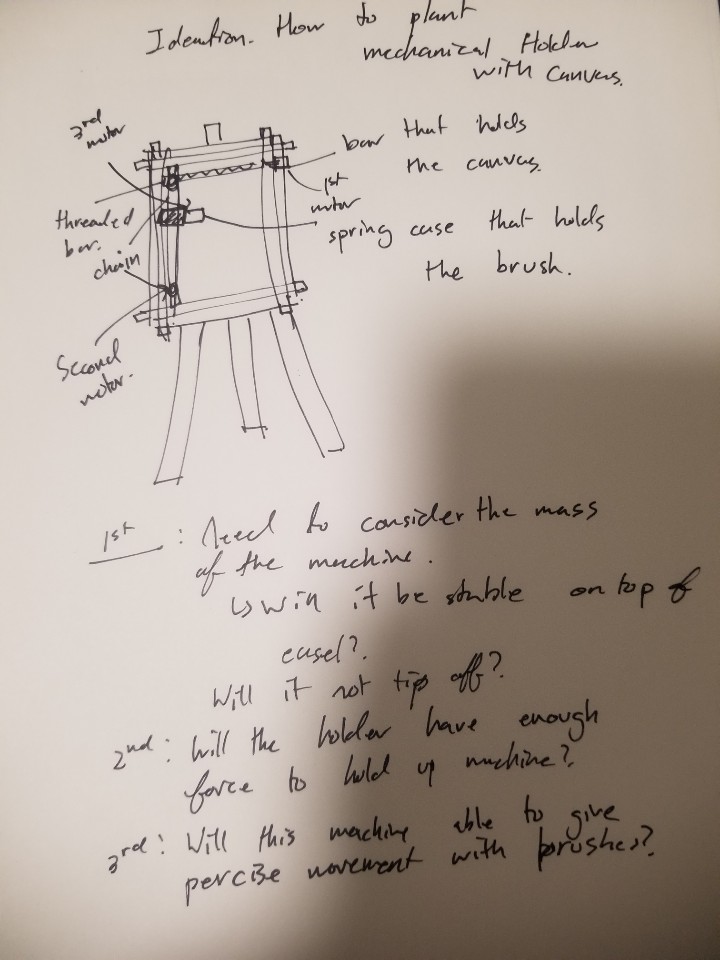
Ideation how to plant the Prototype ideation into Actual use. Brainstormed some limitations that might come while I am building this.
Failed Prototype for motor 1 Mechanical Section. (Tried to demonstrated threaded Rod by twisting the cardboard but it failed because it did not have enough force to handle that twisted shape. If we see carefully, we can see the twisted shape on the cardboard.)
So instead of just making a threaded rod, I brought an image from google to give a better understanding of how my parts would be shown.
During this prototyping process, I was surprised that the free x,y,z movement rig requires a lot of custom parts. At first, I thought it would be easy since there are many samples like 3D printers or robot arms that can rotate freely around the 3D space. However, after deciding to draw and plan the prototype for this mechanical movement rig, I realized that most sections require specific parts such as chain and threaded rod to give rotational motion around the rig. As a result, I was not able to get most of my parts before the prototyping since most of the parts need to be precisely custom made based on the planned model.
Also, during the presentation, I got feedback about the z-direction movement of the brush for this prototype. In the prototype, I used a servo-motor to give a slight touch of the brush on canvas. However, after the meeting with Amy, she told me that she needs to control the brushstroke by changing the pushing force of the brush. As a result, I might need a slight change with the idea for z-direction movement.
Prototype 3 – Driver Code/Smoothing
The goal of this prototype was to test some code to smooth the movement output by the arduino regardless of the input. That is, it was meant to ask the question “how do we account for errors in measurement and extra unintended motion to allow for a smooth stylus experience even without as fine motor coordination for the task?”
This prototype focused on the functionality side of the project and is rather simple to boot. It is not intended as a prototype for anything but the software, hence the fully simulated input and output. It’s merely a joystick wired to an arduino. From there, the arduino merely sends a message to unity which is then parsed and turned into a position. The final version would instead rout the output to electrical signals to control the motors.
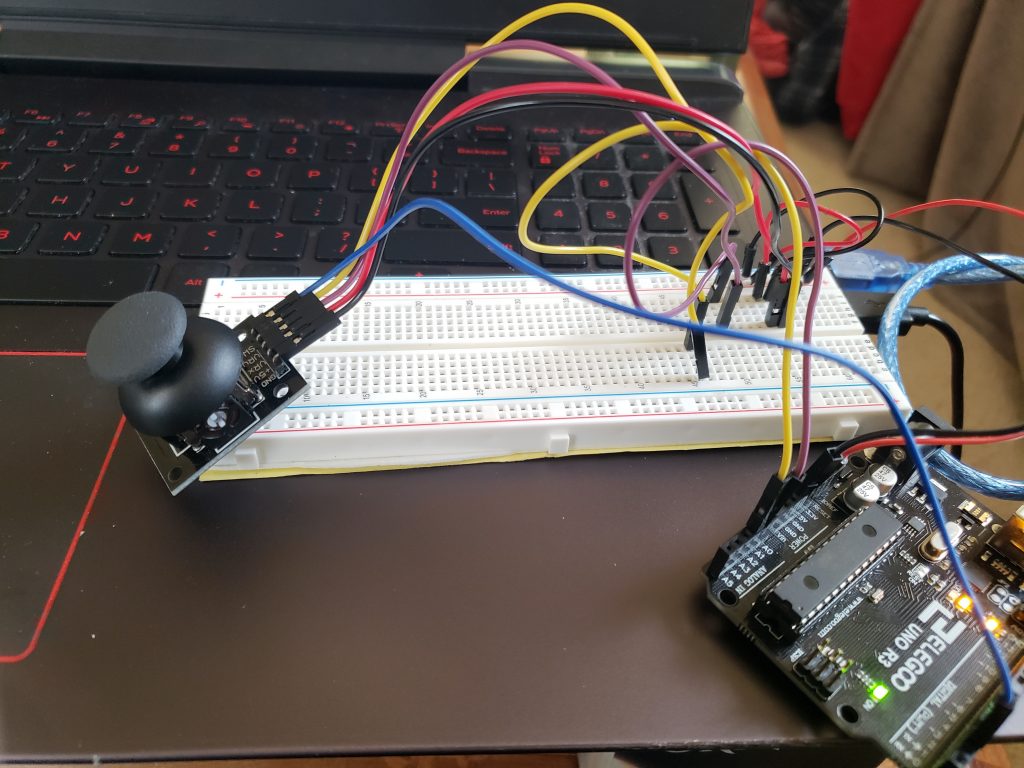
The full prototype wiring setup – nothing very fancy.
Video demonstrating prototype in action. The olive green dot is the cursor (I couldn’t get the color to improve sadly, as I think I was using the wrong render settings).

The thumbstick component up close
My findings in prototyping was that the smoothing had a mild effect on the motion, but otherwise wasn’t super noticeable. In general, the prototype really failed to answer many useful questions as it really only simulated the input and output, and poorly at that. Without the finalized input, its effectively impossible to expect any trend in the motion – there might be noise that’s unique to the control apparats. Additionally, the output, which is a mechanical rig that receives the input after smoothing, could have its own share of mechanical difficulties that can’t be easily accounted for, like perhaps max safe movement speed.
Other than the rather exciting revelation that unity can talk to arduino, I suppose I was a little surprised to learn just how little you can learn about the utility of control software without actually having accurate, or even mild approximation of inputs. In simulating, it was found that there isn’t a noticeable difference between the smoothed motion and the unsmoothed motion, and that could be for a whole variety of reasons that could vanish once the software sits between hardware components operating in a real space.
Without seeing how something like a brush or a pencil is controlled by the rig and software, its a hard call to say that the prototype’s findings could be useful.
MOVING FORWARD
Our team learned a lot about what we want to make through the prototyping process, both through the answering of our initial questions and the raising of new ones. After the prototype presentations, we were able to talk about where we were to Amy and discuss her questions and concerns. Based on this conversation, we realized that there are many nuances to the painting or drawing experience that we had not yet considered such as: how do you switch drawing utensils easily? can you adjust the pressure of the utensil? is there a way for the user to change the scale of their movement to the output of the rig? With these questions in mind, we decided to simply where needed (perhaps a pivot towards a “drawing machine” rather than a “painting machine” as that requires less changing of paint colors and wetting the brush) and potentially add an additional switch box device which can let the user control the scale of their movement to output and the pressure of their utensil (low, medium, or high). We are currently working towards finding what is a proper level of ambition in these added components and what we should consider being out of our project scope.
We also experienced some of the challenges that can come with remote collaboration – it can be hard to coordinate schedules between the team and with our client so meetings to discuss progress and work have been a bit difficult to set up. Nevertheless, working through the process of these prototypes has taught us to make sure to plan our meetings well enough that we can hit all of our action items fairly succinctly during the meetings once we are able to find some overlapping time. The creation of our final work plan has also really helped in establishing deadlines and overall team alignment on the project schedule.
Overall, our prototypes have helped us to better understand aspects of our project that we had not even considered and establish new questions that we are working towards answering. With this, we can begin to work more concretely towards our final project and are excited to see how it all turns out when the different aspects of it all come together!