Project 2: An assistive device for someone you know very well
This class’s final project is to build assistive devices for people with disabilities which can be helpful to them in their lives.
The Project 2 assignment is to make an assistive device for yourself. It should actually function in its intended role and be something that makes some task, practice, or aspect of your daily life easier, simpler, more comfortable, or in some meaningful way better for you; however, it is perfectly acceptable for the device to be something that is more fanciful and less practical. While your device may have major mechanical components, you are expected to build in at least some electronic logic as well using the Arduino or another microcontroller. The final product should be reasonably polished; unlike Project 1, aesthetic care is defined as part of the criteria for success.
Jump to sections:
Project schedule
| date | activity or due date |
|---|---|
| Thursday, Sep. 30th | assignment introduction |
| Tuesday, Oct. 5th | due: Brainstorming sketches and notes for discussion |
| Thursday, Oct. 7th | prototype build day |
| Tuesday, Oct. 12th | due: Prototype for quick presentations and feedback |
| Tues Oct. 19th & Thurs, Oct. 21st | work days for final project build |
| Tuesday, Oct. 26th | Final project critique |
| Tuesday, Nov. 2nd | due: Final documentation |
The meaning of an assistive device
The traditional notion is that “assistive devices” are things that look like this:
 (image from Udo Schröter via Wikimedia Commons)
People often think of assistive devices as things that are used exclusively by people with physical disabilities. In fact, the top of the Wikipedia entry for “Assistive technology” reads “Assistive technology is an umbrella term that includes assistive, adaptive, and rehabilitative devices for people with disabilities and also includes the process used in selecting, locating, and using them.” (Emphasis mine.)
Artist / educator / deep thinker Sara Hendren, in an essay entitled All Techology is Assistive, responds to this sort of thinking:
Instead of labeling some technologies and not others as assistive, let’s start like this: We’re all getting all kinds of help from the things we make. All kinds of help, all the time, for our many material and social and educational and political needs. Private needs and public ones. No one is exempt.
An assistive device, for our purposes, is fundamentally any piece of technology which makes any task or practice easier for any person. A cane is an assistive device: it helps somebody walk more easily. A pair of reading glasses is an assistive device: it helps someone read. A bicycle is an assistive device: it helps someone move quickly from one place to another. A pen is an assistive device: it helps someone make clear, narrow marks on a page.
There are a huge variety of creative and interesting assistive devices which look very little like the classic pink-plastic device shown above, and which serve all sorts of purposes.
Some examples
Squeeze chairs
Noted researcher Temple Grandin worked with Prof. Wendy Jacob to produce “squeeze chairs”: pieces of furniture with inflatable elements designed to provide deep pressure, a sensation which is known to significantly calm and comfort some people on the autistic spectrum:
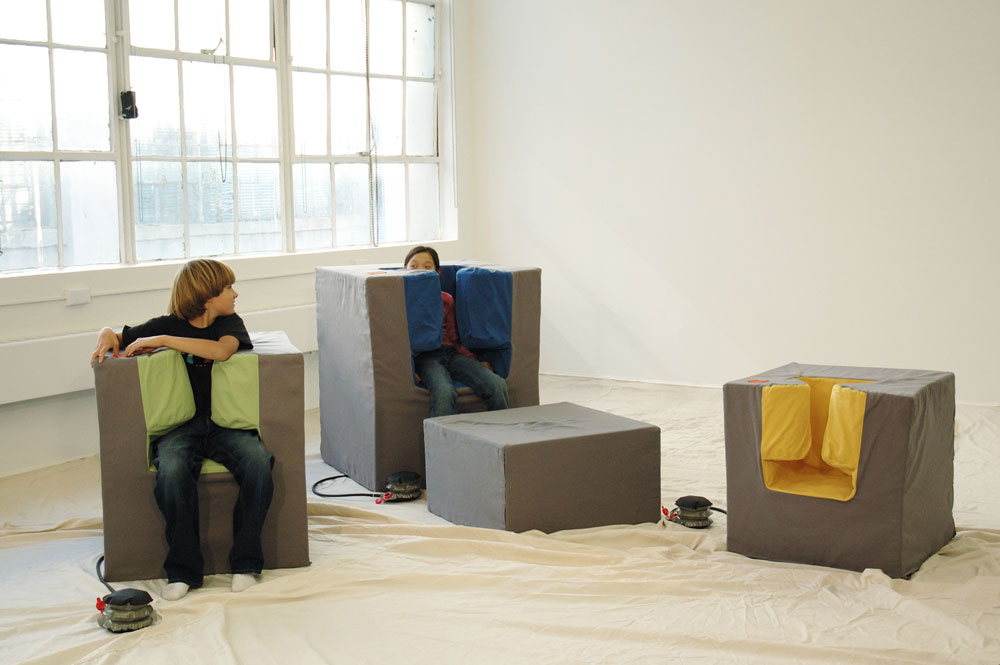 (Squeeze Chair image from Sara Hendren’s Abler blog)
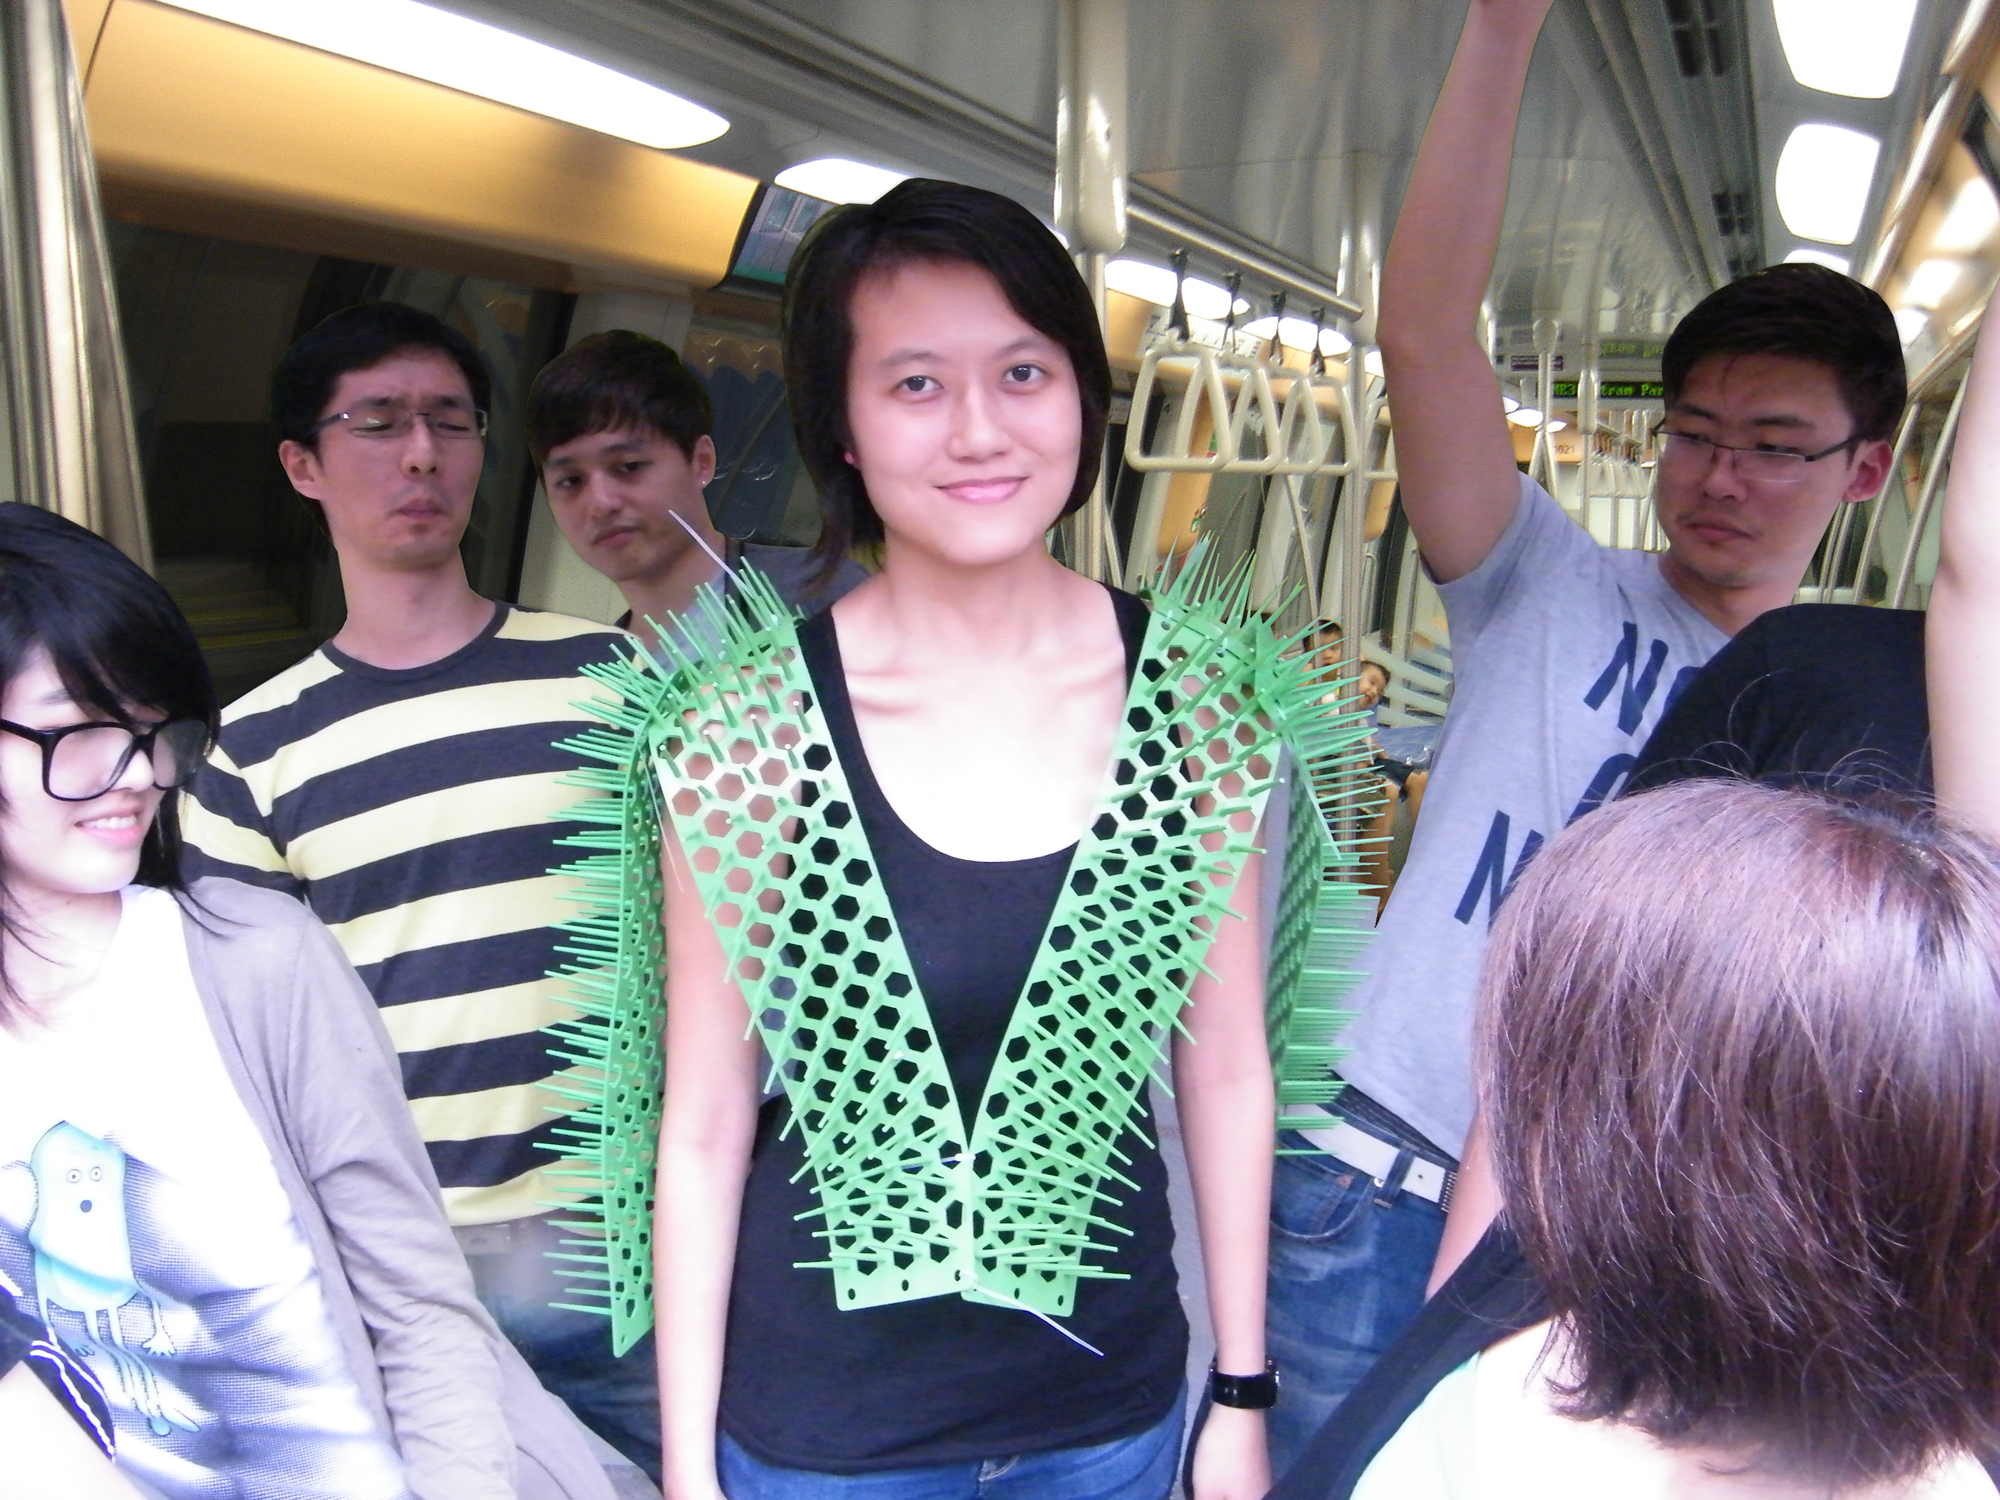
Spike Away
Industrial designer Siew Ming Cheng wanted the people near her on the subway to maintain a healthy distance, so she built “Spike Away” in a two-day workshop:
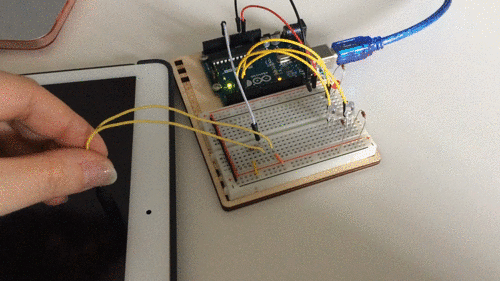
Phone notifier
Recent CMU design alum Mackenzie Cherban made a really strong project to help her grandmother, who has limited hearing, know when her cell phone is ringing from the next room over. It consists of a photosensor positioned to face into the screen of a smart device (phone, tablet, etc.). An Arduino reads the photosensor’s values, and when it detects a light level over a certain threshold, it triggers two large bright LEDs on a breadboard to blink. The idea is that these indicator lights could be the next room over from the phone/tablet, and alert the user to the fact that the phone has a notification.
Prior Student projects from this course
Screen Distance Repellant
Get too close to the screen and you get blasted with compressed air. A very good way to quickly change a bad habit!

Laptop light extension
A device to help the designer remember to take a break from using her laptop after long intervals. It uses a piece of bent clear acrylic which transmits lights from an LED strip mounted on the back of the laptop. When the laptop lid is open (which the device detects with an accelerometer), the lights turn green.
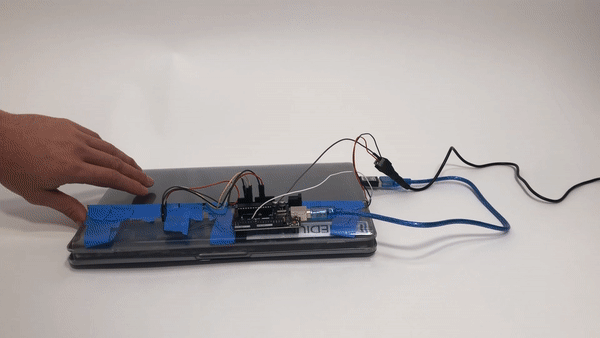
After the screen has been continuously open for some specified time (say, 30 minutes), the lights will turn red instead of green—an unmissable visual signal that it’s time for the user to take a break.
Walk the Walk
A device to help the user walk with greater attention and care to the positioning of her feet.
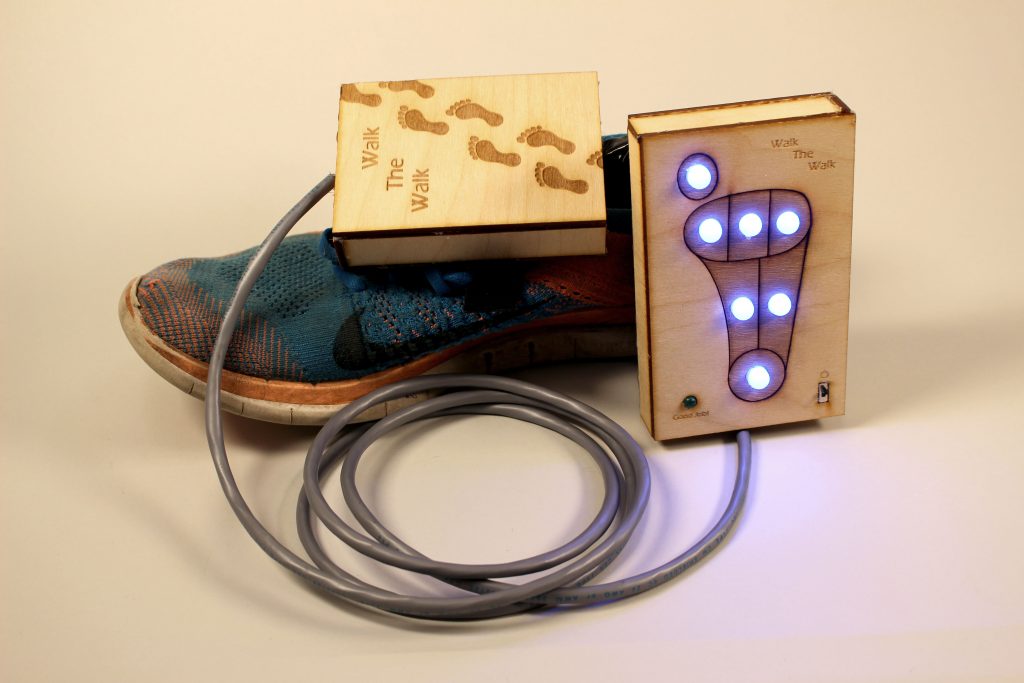
In the designer’s words:
I am someone who has very bad walking habits. Ever since I was a kid, I knew I had wrong pressure distribution when walking, which caused my knees to grow at a wrong angle. To fix that, I need to constantly remind myself to fix the way I walk. This device is designed to help me do that. It visually displays the pressure distribution, plus tells me when I am putting the right amount of pressure.
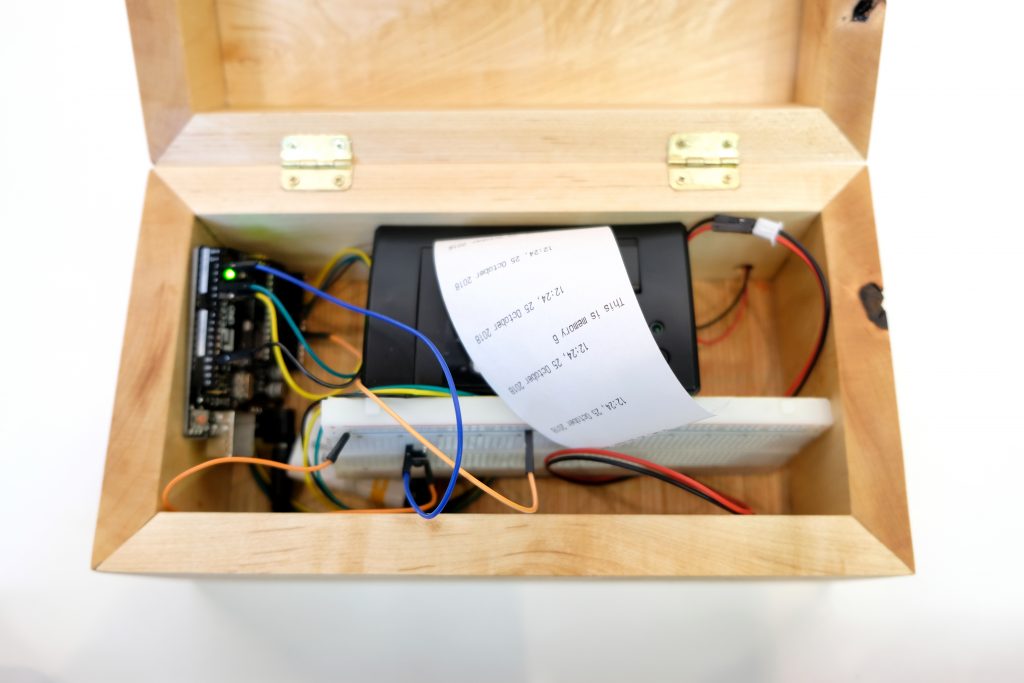
Interactive Memory Box
A device to help the user focus on particularly meaningful memories before sleep.
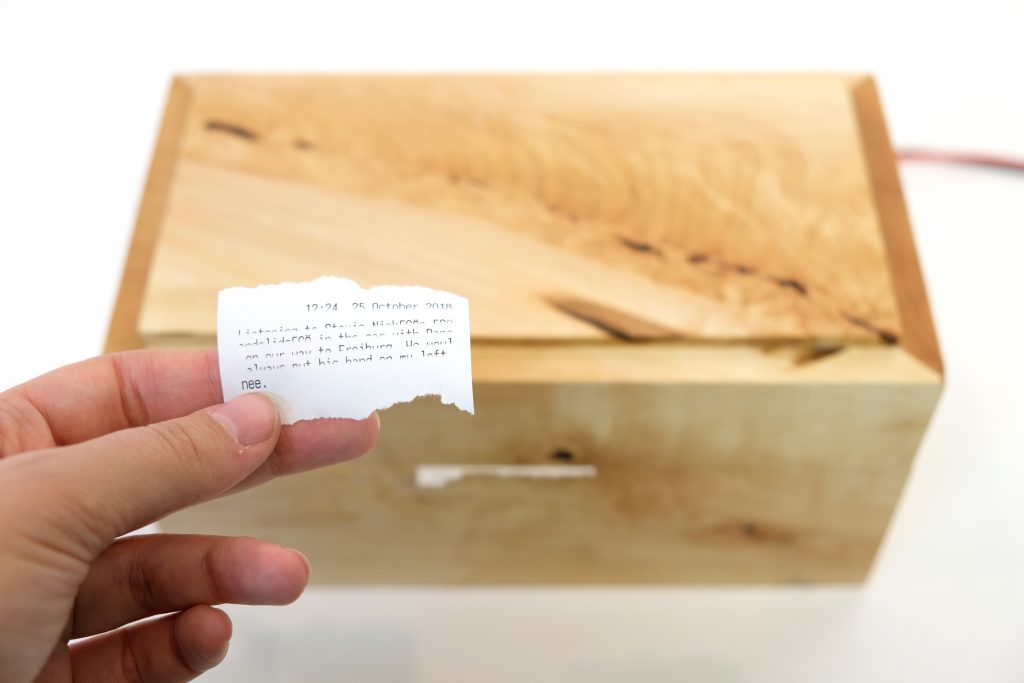
From the designer:
This project is a concept work which draws upon neuroscientific findings regarding the lasting effects of memory books on progressive memory loss. It works by systematically reminding you of certain memories by physically printing them on paper right before going to sleep, which causes a strengthening of neural pathways. This is thought to improve memory and protect it from potential neural damage.
Inside the box, which the designer took great care to craft manually in a campus wood shop, is a thermal receipt printer.
A Ring for Retinal Degeneration
A piece of ring-sized electronics which is designed to work as a visual aide for the designer, whose retinal degenerative disease leaves her prone to irreversible damage if she does not have sufficient lighting for focused tasks.
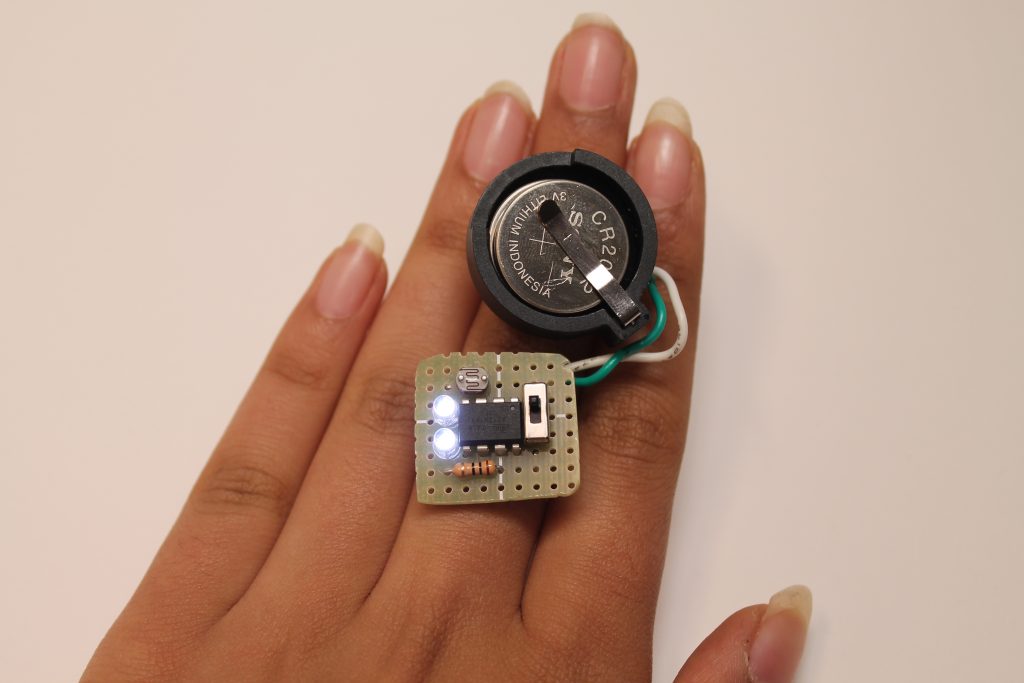
From the designer:
To combat one of the most important causes (at least in my case) of retinal degeneration—eye strain due to lack of lighting—I decided to make myself an LED ring that serves as a reminder to turn on the lights when a room is too dark to work in.
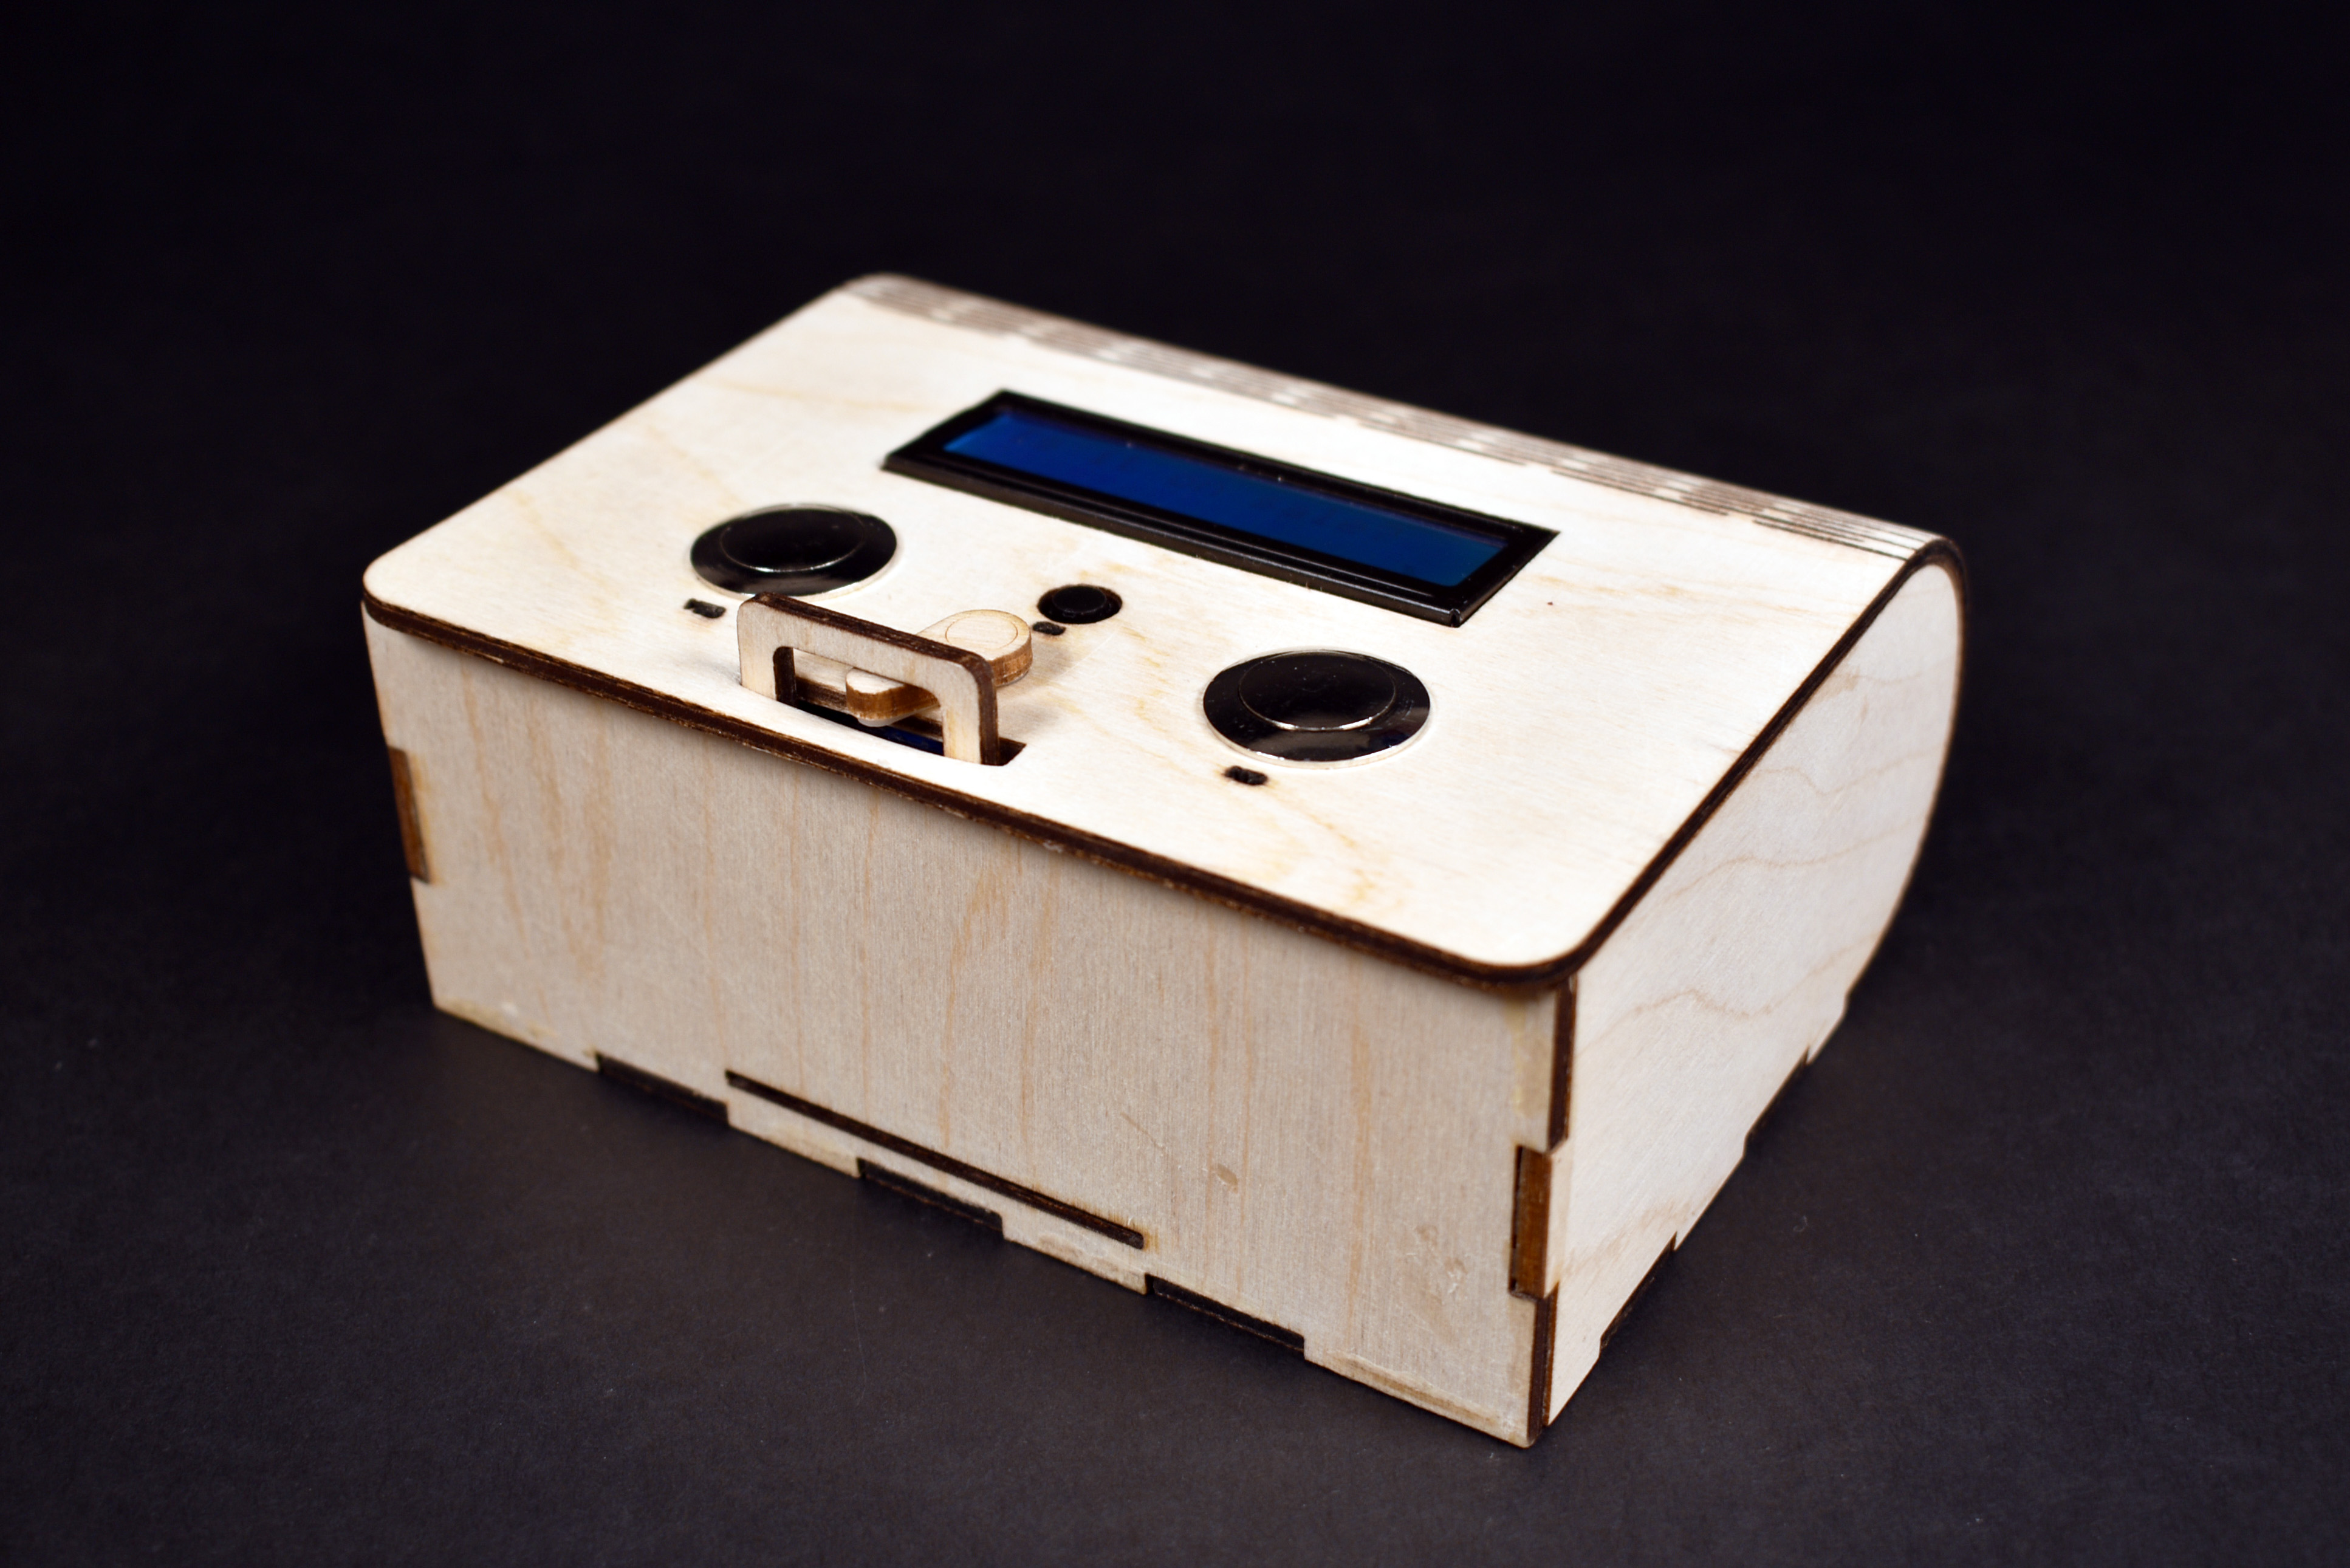
A Reluctant Wallet
A student didn’t want to keep spending too much money. A clever solution:
In an effort to save money, I created a difficult wallet to bombard you with guilt-inducing questions and will only unlock if you’ve proven your desperation and need.
The user pushes buttons to answer questions before this wallet will agree to open up.
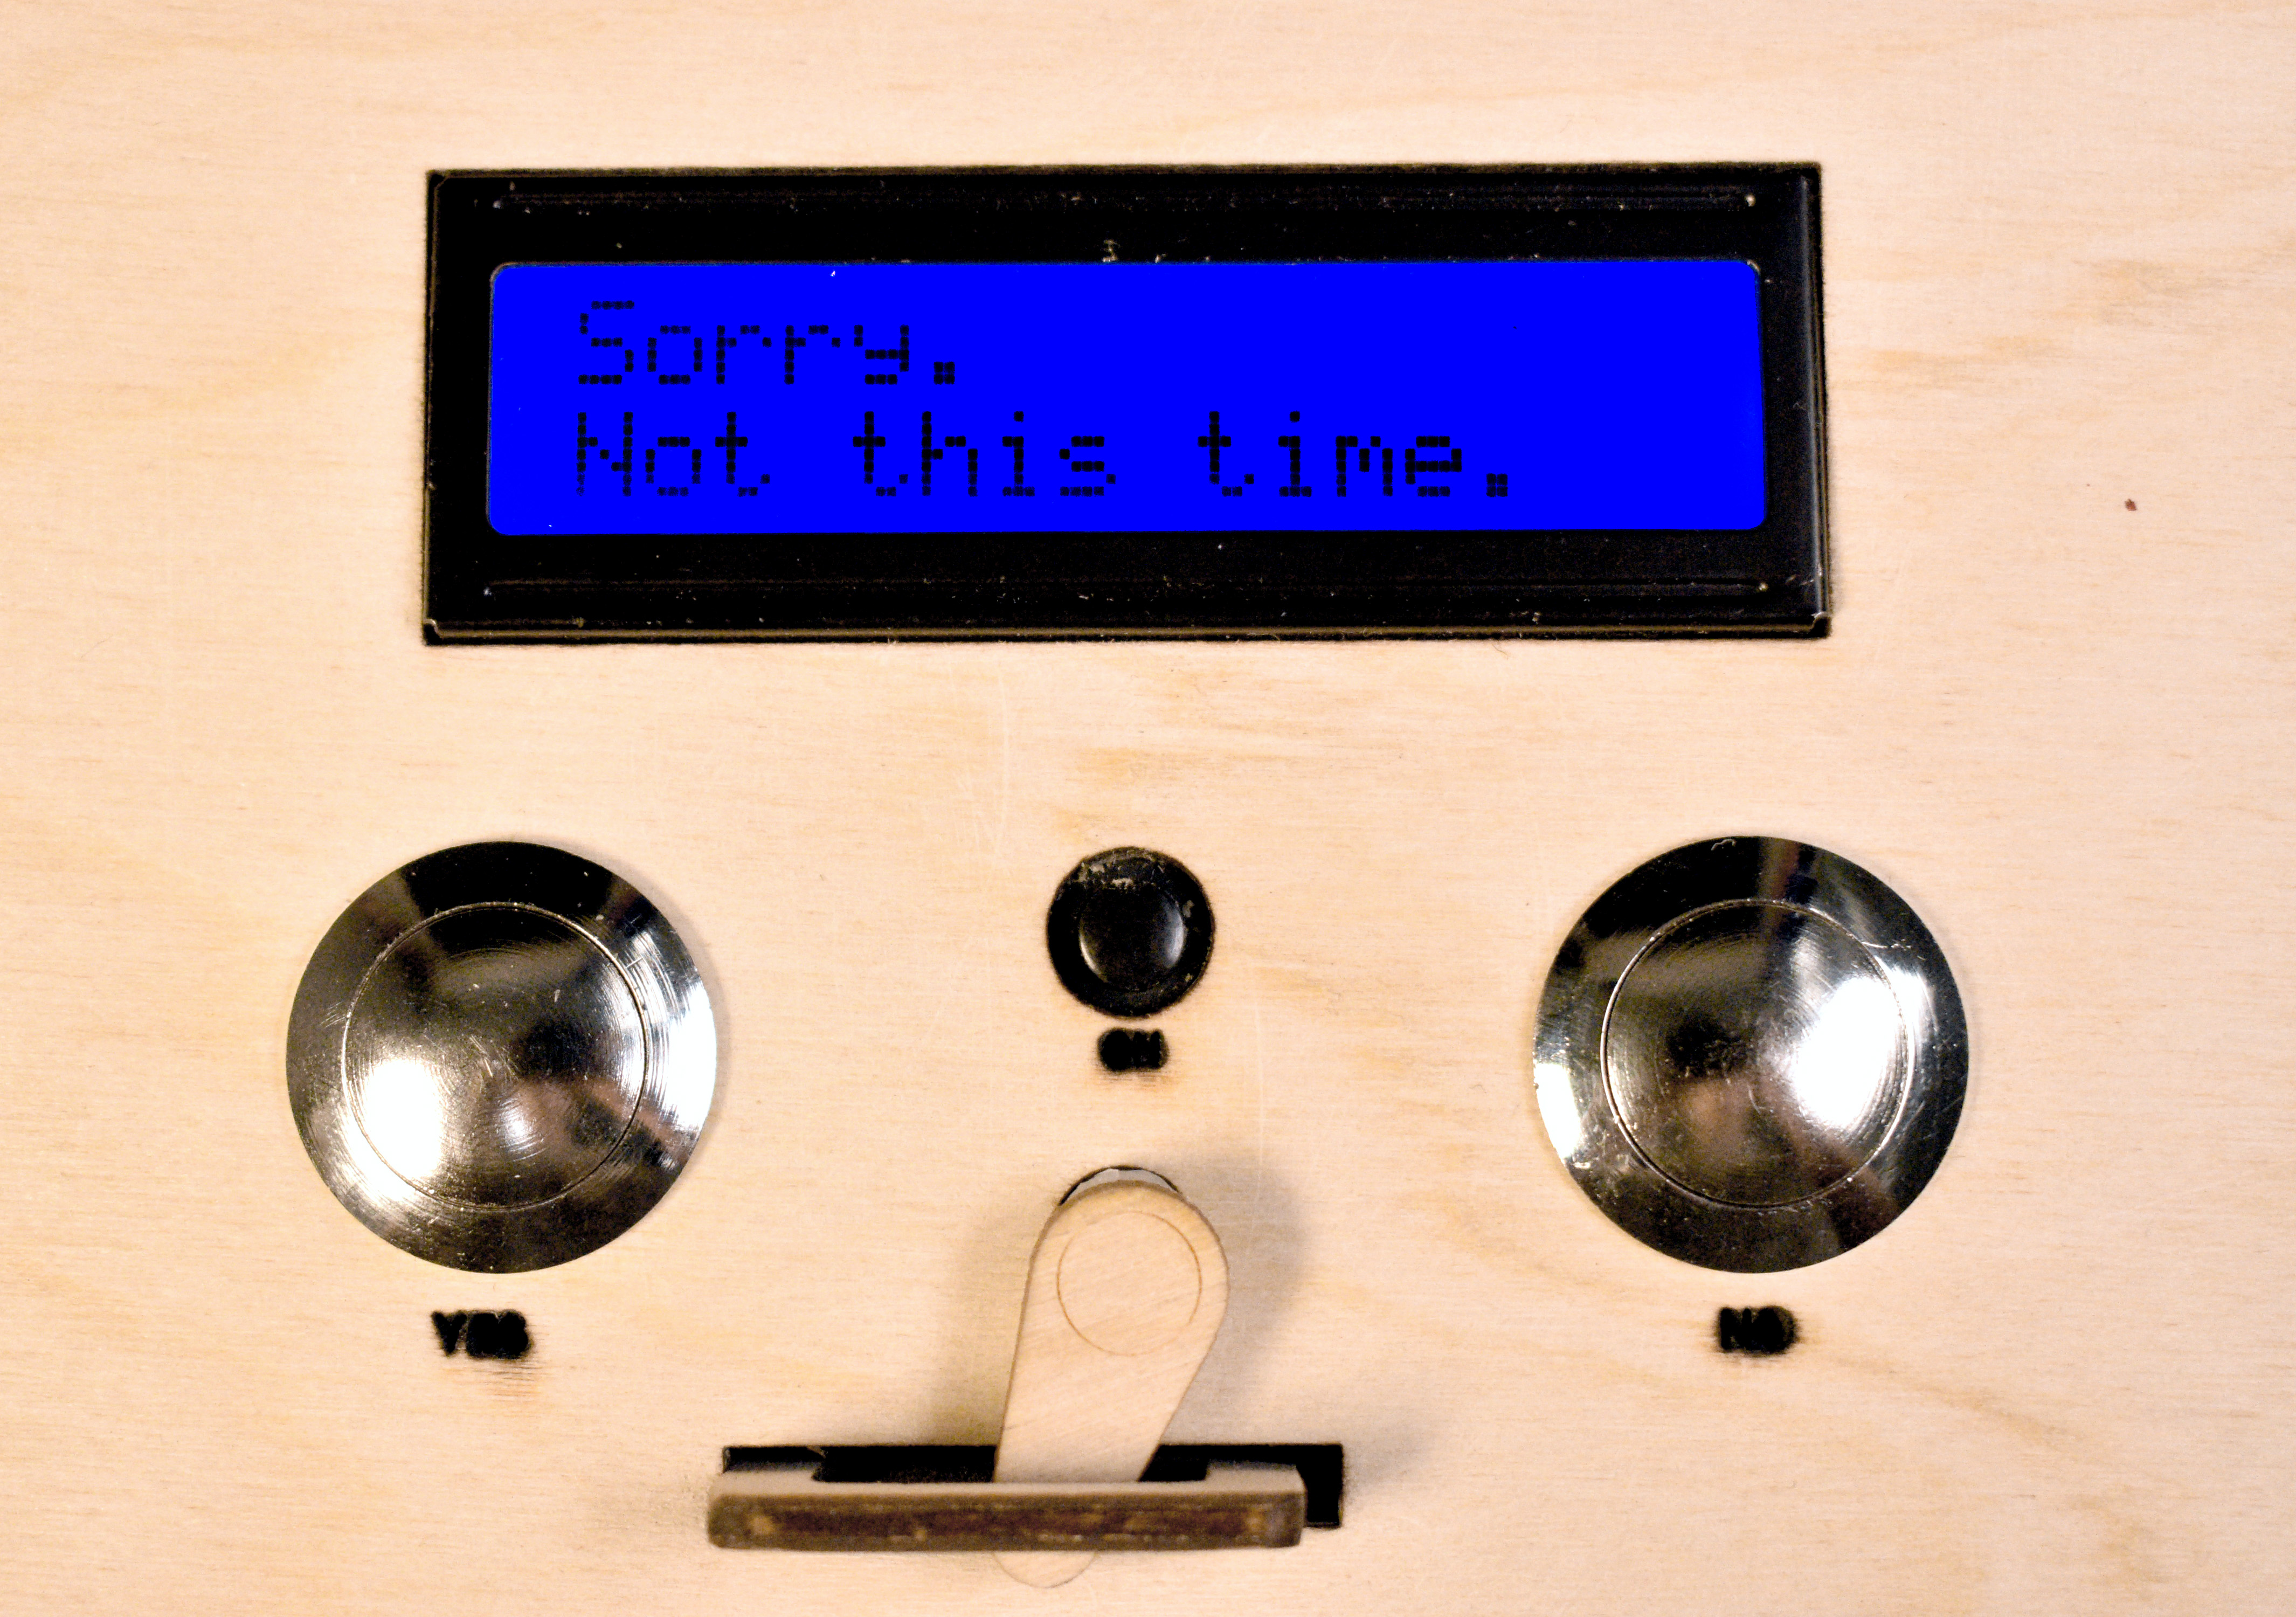
The “wallet” itself was a wooden box with a living hinge.
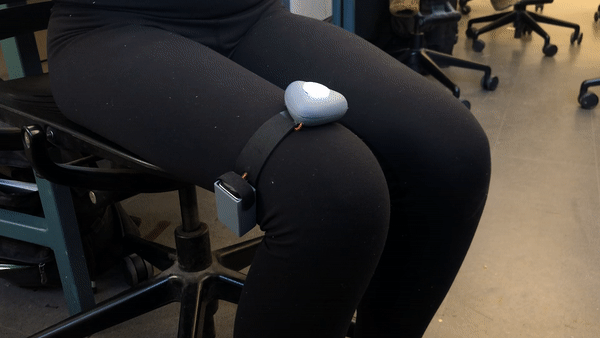
A Thrombosis Reminder
A device which vibrates and blinks when the user has been sitting for too long. It’s worn above the knee.
Scooter Turn Signal
A student who scoots around campus wants pedestrians to know which way she’s planning to steer. This single-purpose device is a turn signal for her scooter, which she triggers with a large weatherproof toggle switch affixed to the top.
All of these disparate examples are meant to show that:
- “assistive technology” is actually a very broad category,
- low-tech answers can be very good answers, and
- the potential range of inventive ideas to address various problems is enormous.
(One note on #2 above is that this project assignment requires that you build some electronic logic of some sort into your assistive device. But perhaps you will not need to begin with the electronics, which may, for instance, provide additional useful affordances to a device that is primarily physical.)
Deliverables and deadlines
Begin by brainstorming: written ideas/doodles/sketches and notes
due Tuesday, Oct. 5th; 7% of final project grade
(submit .pdf or .jpg via Canvas assignment)
You are expected to spend a few hours over the next five days drawing ideas and writing. At this stage, volume is more important than quality. This culminates in at least three dated pages of handwritten notes and drawings which illustrate your brainstorming about various problems you’ve observed in your own life and potentially some proposed solutions to them. Each idea should have:
- a few different sketches (exert reasonable effort—take at least three minutes to work on each drawing and wherever you get is fine),
- a functional block diagram of the device you’d propose to build solve that problem (hand-drawn is fine), and
- some short sentences of description.
Don’t try to do all this the night before our meeting. You must write the date on each page, and I expect to see that you worked on different ideas on different days during the course of this week. If you do ~20 minute brainstorming sessions on at least three different days, you should easily satisfy this assignment.
Your level of art/drawing skill is not a factor in grading.
At the ideation stage of this project, take note of your daily life, trying to use a critical eye on yourself as much as you’re able. Are there any tasks that you regularly do (or don’t do) that are difficult or frustrating for you?
- Are there things that are difficult to reach, hold, or manipulate?
- Do you fall asleep in an uncomfortable pose, or fail to go to sleep or wake up at the right time?
- Do you have poor posture sometimes?
- Do you have discomfort in your body that some well-designed tool could help with?
- Are there important things you forget regularly?
- Do you drink enough water?
- Do you wish you would do a better job of brushing your teeth or talking with strangers on the bus or washing your hands regularly?
- Do you sit for too long at a stretch?
- Could some gentle reminder at the right moment help to keep you on track?
- Would some gadget help your hands keep busy so your mind was more free to wander?
These are just some prompts to get you thinking but not at all an exhaustive listing of the sorts of things you could consider.
Brief rubric for this deliverable:
| Grade range | Brainstorming document |
|---|---|
| 6–7 | At least three dated handwritten pages of notes and drawings, with a variety of ideas presented. Each idea has multiple sketches, a functional block diagram, and a brief description. |
| 3–5 | One or two dated handwritten pages of notes and drawings that are complete as described above, or three or more pages of dated notes but with at least some required elements incomplete. |
| 0–2 | Undated handwritten pages, or dated handwritten pages, but with many required elements incomplete or missing. |
Create a prototype
due Tuesday, Oct. 12th at the start of class; 13% of final project grade
You will present some sort of prototype in class. It need not be high-fidelity. There is a lot of different thinking in the design world about what “prototyping” means. Designer and academic Graham Pullin, in his excellent Design Meets Disability (2011), helpfully outlines a few different approaches:
- feels-like prototype: an ergonomic prototype for physical feeling in hands, etc.
- looks-like prototype: an appearance model for form, color, materials, etc.
- works-like prototype: an engineering prototype for electronics and electromechanical build, etc.
- behaves-like prototype: an experience prototype for interactions. It may have tethers instead of being wireless, or be built larger than the proposed final size, but the fundamental user interactions are well-modeled. (p. 138)
You do not need to explicitly state what kind of prototype you are showing—but you must have something that shows clear progress towards your final goal. It may be the same physical thing that will become your final project, or it may be a version that you’re using to test out some possibilities. It is expected that you will allocate your time on the prototype as you feel makes the most sense: if you know the electronics of your project are simple, then use this due date as an opportunity to focus on the ergonomic or appearance aspects of the project. On the contrary, if the electronics or interaction will be hard, then focus on that and put the prototype in a cardboard box (or no box at all).
In class, we will briefly critique the prototypes. This deadline is meant to help you prepare to deliver a finished project two weeks later.
Brief rubric for this deliverable:
| Grade range | Prototype |
|---|---|
| 10–13 | Well-considered, effective prototype (of any type(s) as enumerated above) which shows significant progress towards exploring the design and/or function of the final device. Evidence of significant effort. |
| 6–9 | Somewhat effective prototype (of any type(s) enumerated above) which is at least somewhat helpful towards exploring the design and/or function of the final device. Evidence of some effort. |
| 0–5 | Simple, basic, or otherwise underdeveloped prototype (of any type(s) enumerated above), betraying little evidence of effort. |
Final critique
Tuesday, Oct. 26th in class; 30% of final project grade
The final project presentations are an opportunity for you to show the work you’ve done, share your successes and challenges, and get feedback from your classmates as well as invited guest critiquers. The class will be divided into two presentation groups so that each student will have about 10 minutes to present their work and get a meaningful measure of feedback.
Half of the critique grade (i.e. 15% of the final project grade) is for “successful technical performance,” and the other half of the critique grade is for “aesthetic, design, and ergonomic considerations.”
Brief rubric outlining the expectations around each of these:
| Grade range | Successful technical performance | Aesthetic, design, and ergonomic considerations |
|---|---|---|
| 12–15 | Device works flawlessly or nearly flawlessly, as intended by the designer. | Appearance and design are both very well conceptualized and very well executed. The device appears to be pleasant and easy to use for the intended audience. |
| 8-11 | Device has some errors or flaws in its operation, but mostly functions. | Appearance and design are at least somewhat well conceptualized and executed. |
| 4–7 | Device does not function well, but it appears it would have worked with moderate further effort. | Appearance and design are addressed only marginally. |
| 0–3 | Device does not function at all and it appears that it could not function without much more effort. | Appearance and design are not addressed at all (e.g. device resembles an engineering prototype). |
Documentation content requirements
due Tuesday, Nov. 2nd before the start of class; 50% of final project grade
If you have any questions about the submissions requirements, or run into technical problems, be sure to contact me before the due date.
Your documentation is submitted in the form of a post on the course WordPress site. Use the label “Project 2” for the post. In order from top to bottom, the documentation should include:
Overview
(15 points total)
-
A “featured image” that is a good overall view of the project. This image will show up above the title of your project in the overview page. This image should be one of the “well-shot” images described below, or a cropped subset of one of them. Select the featured image by clicking on “set featured image” in the right column of the post editing page.
-
The project title. Do not include the words “Assistive Device” in the title—just use the name of your project, like “Insistent Alarm Clock” or whatever its title is.
-
A one-sentence explanation of the project. This should be short and sweet.
-
Decent images of the final projects. If it’s possible for you to take higher-quality image, like using a DSLR (here’s the class DSLR photography guide), that’s fine; but camera phone pictures are ok, too if they’re carefully shot and good quality.
At least four images:- Moving image, uploaded as a
.gifor short.mp4file (do not merely link to an outside hosting service like YouTube and do not embed a YouTube or other video service frame into your page). A quick movie illustrating motion is worth quite a few static pictures! This can be as short as a second or two. You can film this on a camera phone, or use a DSLR for greater control of the image. You can usually convert whatever movie format you have to.mp4using a command-line program likeffmpeg, another piece of software, or a web service. - Overall photo for proportion and scale
- Detail photo of any part that you’d like to highlight (up to 3)
- Images showing the use of the thing (up to 3)
- Moving image, uploaded as a
To add an
.mp4video to your post, upload the file to the Media Library, and under the “Attachment Display Settings” dropdown, select “Embed Media Player” before clicking “Insert into post.” This will ensure that the video itself, rather than a link to the file, appears in your documentation.
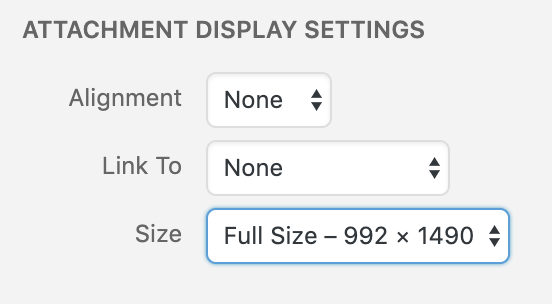
When uploading images, in the “Add Media” window, select “Full Size” under the “Attachment Display Settings” header, as shown below. (If you choose a smaller size, your images will be downsampled, potentially with very ugly and destructive results.)
Each image should be captioned. (To add captions in WordPress: click on an image, click on the pencil icon to edit it, write a caption, and click “update.”) The captions serve to explain both what the viewer is looking at, as well as elucidating some of the operating details of the object. Four captioned images as described above is the minimum; use more of them if you want to tell a deeper story about the project.
Process images and review
(10 points total)
Identify two decision points in your process, when you made a choice that significantly affected the outcome of the project. Perhaps you decided some technical goal was too difficult to achieve and instead opted for a simpler alternative. Perhaps you changed project goals and “pivoted” because of a surprise finding. This section is meant to give your readers some insight into your process.
-
To the extent possible, provide captioned images illustrating these decision points. Sometimes you have a decision point that only shows up in retrospect; in this case you may not have an image available and you’ll need to rely on a verbal description of the decision.
-
Include at least three images that simply illustrate any aspect of your process you’d like to highlight. For instance, if you made a sketch of a thing, and then you built that thing, include an image of the sketch as well as the thing you made (images from your initial ideation sketching are a good fit here). If you had a moment when you could not solve a software issue, include a screengrab of the offending software and explain how you resolved the problem.
Discussion
(15 points total)
Address all of the prompts below. It is best to address all of these topics in a natural piece of prose. However, if you prefer, you may write four disjoint paragraphs, each of which is addressing a prompt. (The first way is better.) In total, this section should be ~250–400 words.
-
Response to comments gathered during the in-class crit. Quote (verbatim) from at least two written critiques that you received (positive, negative, or otherwise) from the in-class crit, and respond to them. (You may agree or disagree—in either case, explain your position.)
-
Self critique pertaining to the project. Are you happy with how the project came out? Did it satisfy your own goals? This should not simply be a recital of your process, but rather a meaningful reflection.
-
What you learned about your own abilities and/or limitations through the process of working on this project. These could be technical in nature (i.e. “I found that coding this particular behavior was surprisingly difficult”), or not (i.e. “I enjoyed making cardboard forms very much, and I think it will be a useful prototyping medium for me in the future”). What would you do differently next time? What would your advice to your past self be? Did you get hung up at a particular point in progress, or fail to see an easy workaround to a problem? Did you find a creative spark you didn’t anticipate? Etc.?
-
Next steps. Do you expect to build another iteration of this project? If so, describe what you’re planning to do. If not, describe what you would do if you were to build another iteration, based on the experience you had with this first one.
Technical information
(5 points each for schematic/block diagram and code)
-
Schematic and block diagrams, drawn in draw.io, and exported as separate high-resolution
.jpgimages. The block diagram should legibly show all inputs, computational steps, and outputs of your project. The schematic should be done so that a competent person, reading your drawing and with the appropriate parts, could recreate the electrical system of the project. For both schematics and block diagrams, follow all of the standards described on the course schematics guidance page. -
Code submission, embedded into the project page, and optionally also with a Github or other version control service public-facing link. Your code should be reasonably commented throughout so that people other than you (the author) can better understand it. You don’t need to explain every single line—that would be overkill—but leave useful notes in a reasonable measure. Write a comment block at the top of the code including:
- the project title,
- (optionally) your name,
- a description (short or long) of what the code does,
- any description of pin mapping that would be useful to somebody else trying to recreate your work,
- appropriate credit to any other person’s/project’s code that you incorporated into your project, and
- (optionally) a license notice (i.e. copyright, CC BY-SA 4.0, the MIT License, release it to the public domain, or just follow your heart). If you have written code that you wish to keep strictly proprietary for any reason, please speak with the instructor about an exception to this documentation requirement.
Make sure that your final code as it appears on the public-facing post is correct and will compile!
To embed the code properly: on the WordPress “Edit Post” page, move your cursor to where the code should be inserted in your post. Click the “Code Insert” button in the toolbar above the post (it is marked {...}). For Language, select C. Paste the code—properly indented!!—into the window, and click OK.
Feedback allocations
Credit is allocated as follows:
- 7% ideation sketching
- 13% prototype
- 30% final product
- 15% successful technical performance
- 15% aesthetic, design, and ergonomic considerations
- 50% documentation
- 15% final product images and explanation
- 10% process images and review
- 15% discussion
- 5% schematic
- 5% code
See relevant sections on this page for grading rubrics specific to those deliverables.
