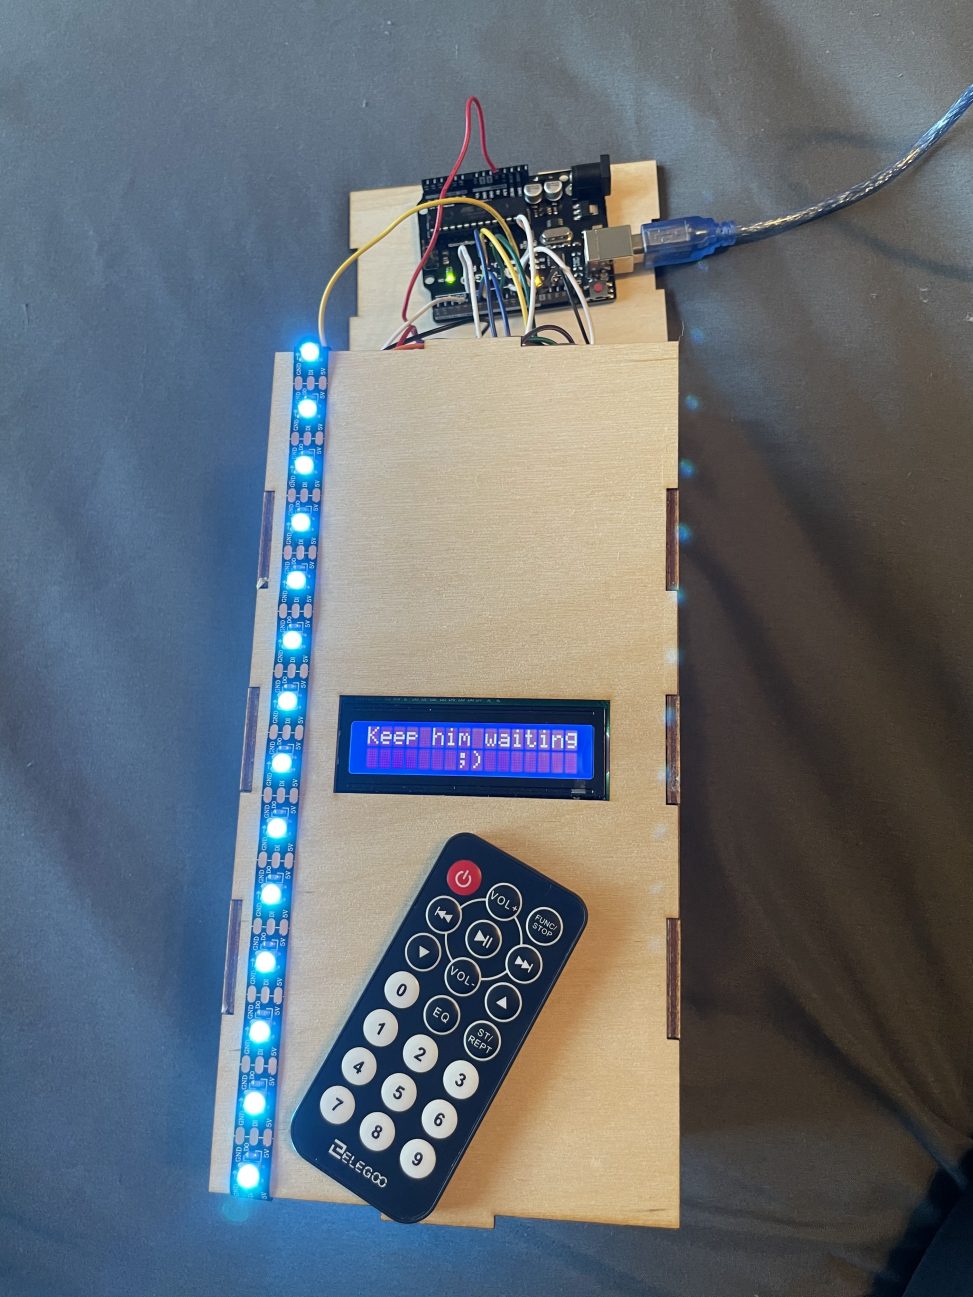
This device indicates when the user should reply to messages by taking in the respondent’s average response time and the user’s desired pettiness level, ensuring the user does not reply too quick by prohibiting them from using their phone for that set period of time.
Final Project Images and Videos:

When the user hits send and begins the device’s calculations, it looks like this!
Video:
A quick video showing how the mean messages are displayed while the timer has been set, as someone “reaches for their phone” to reply to messages and the colors change accordingly. Prior to this, the start and stop buttons had been pressed to indicate the time. The messages are randomized each time.
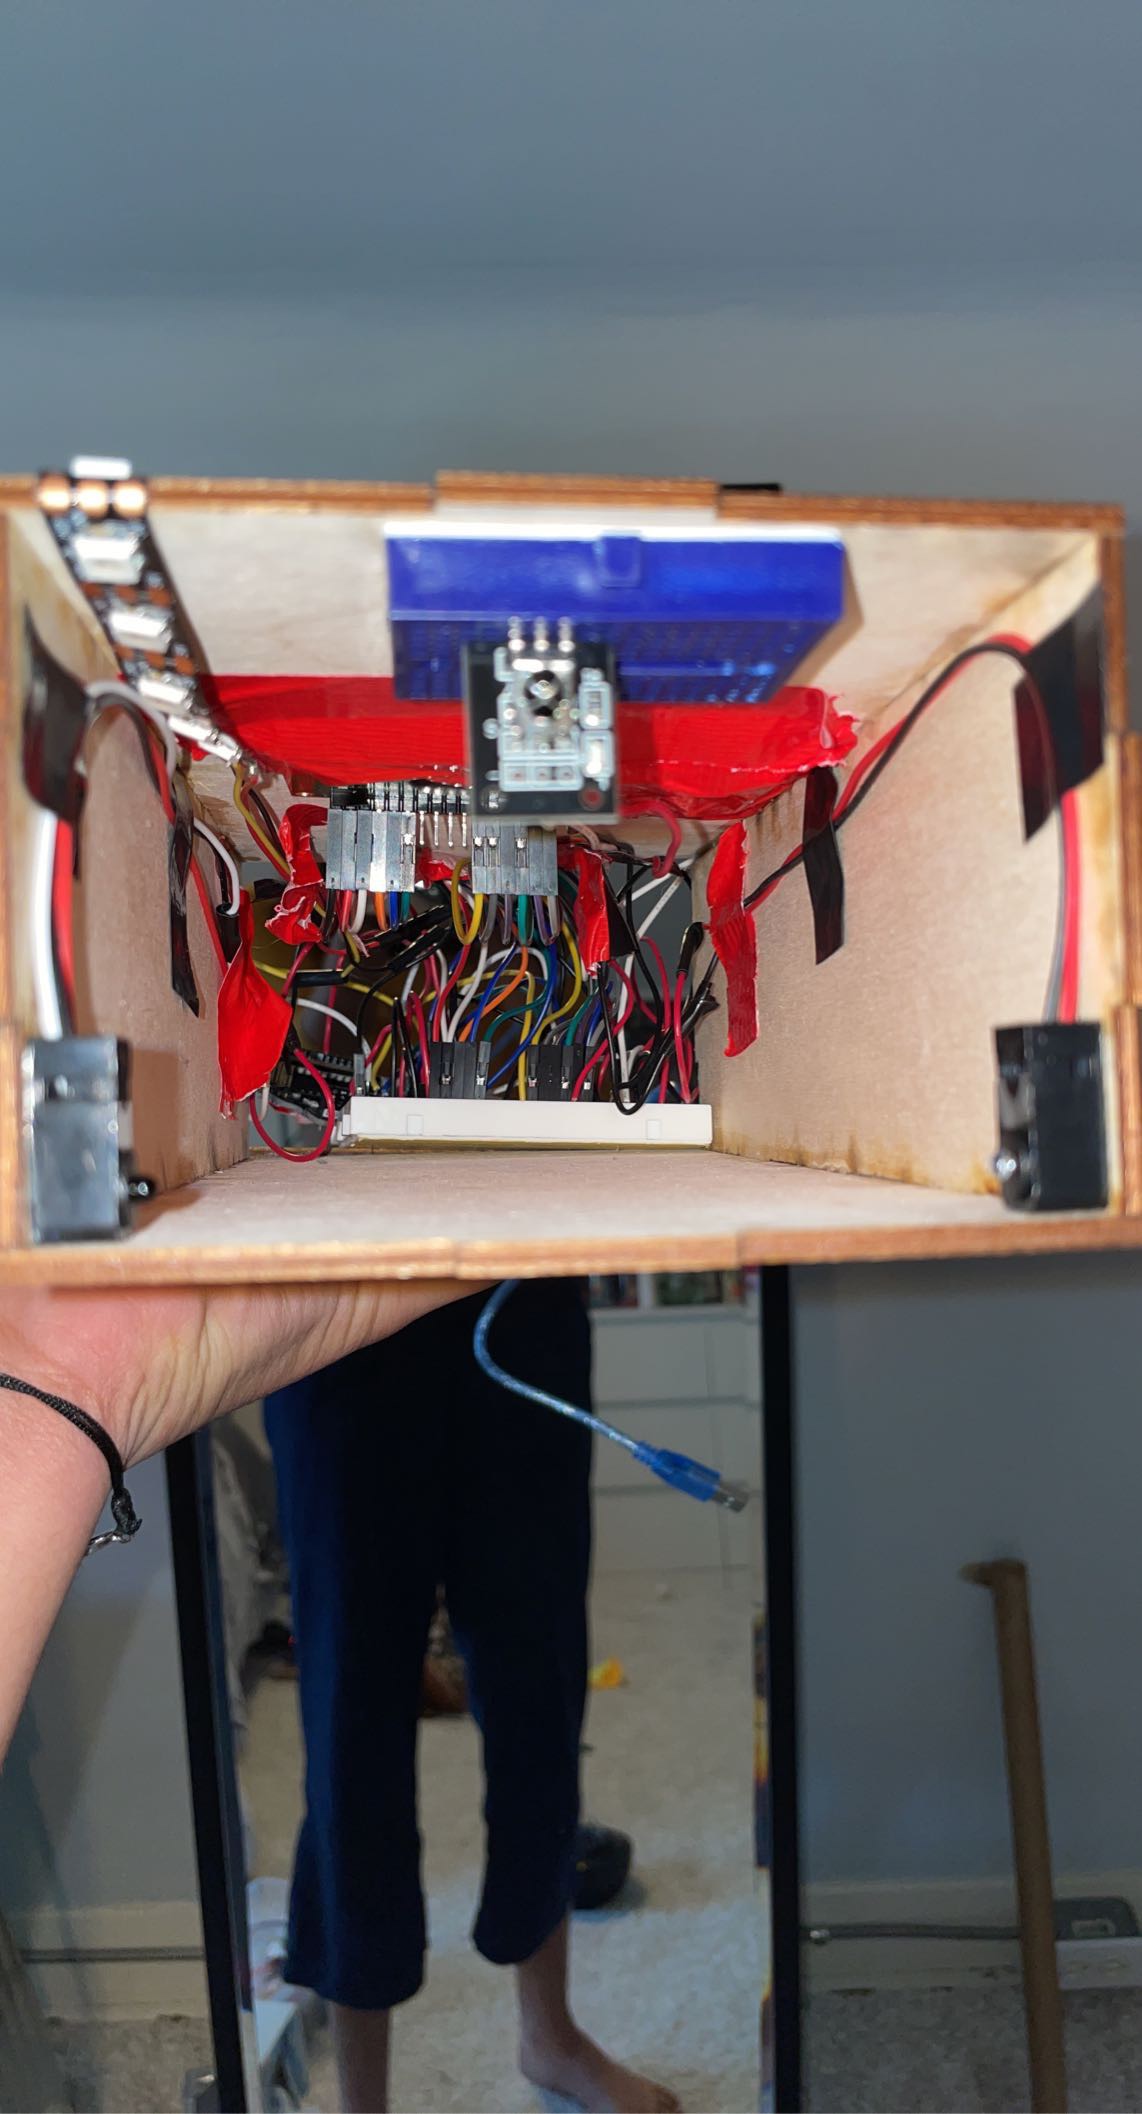
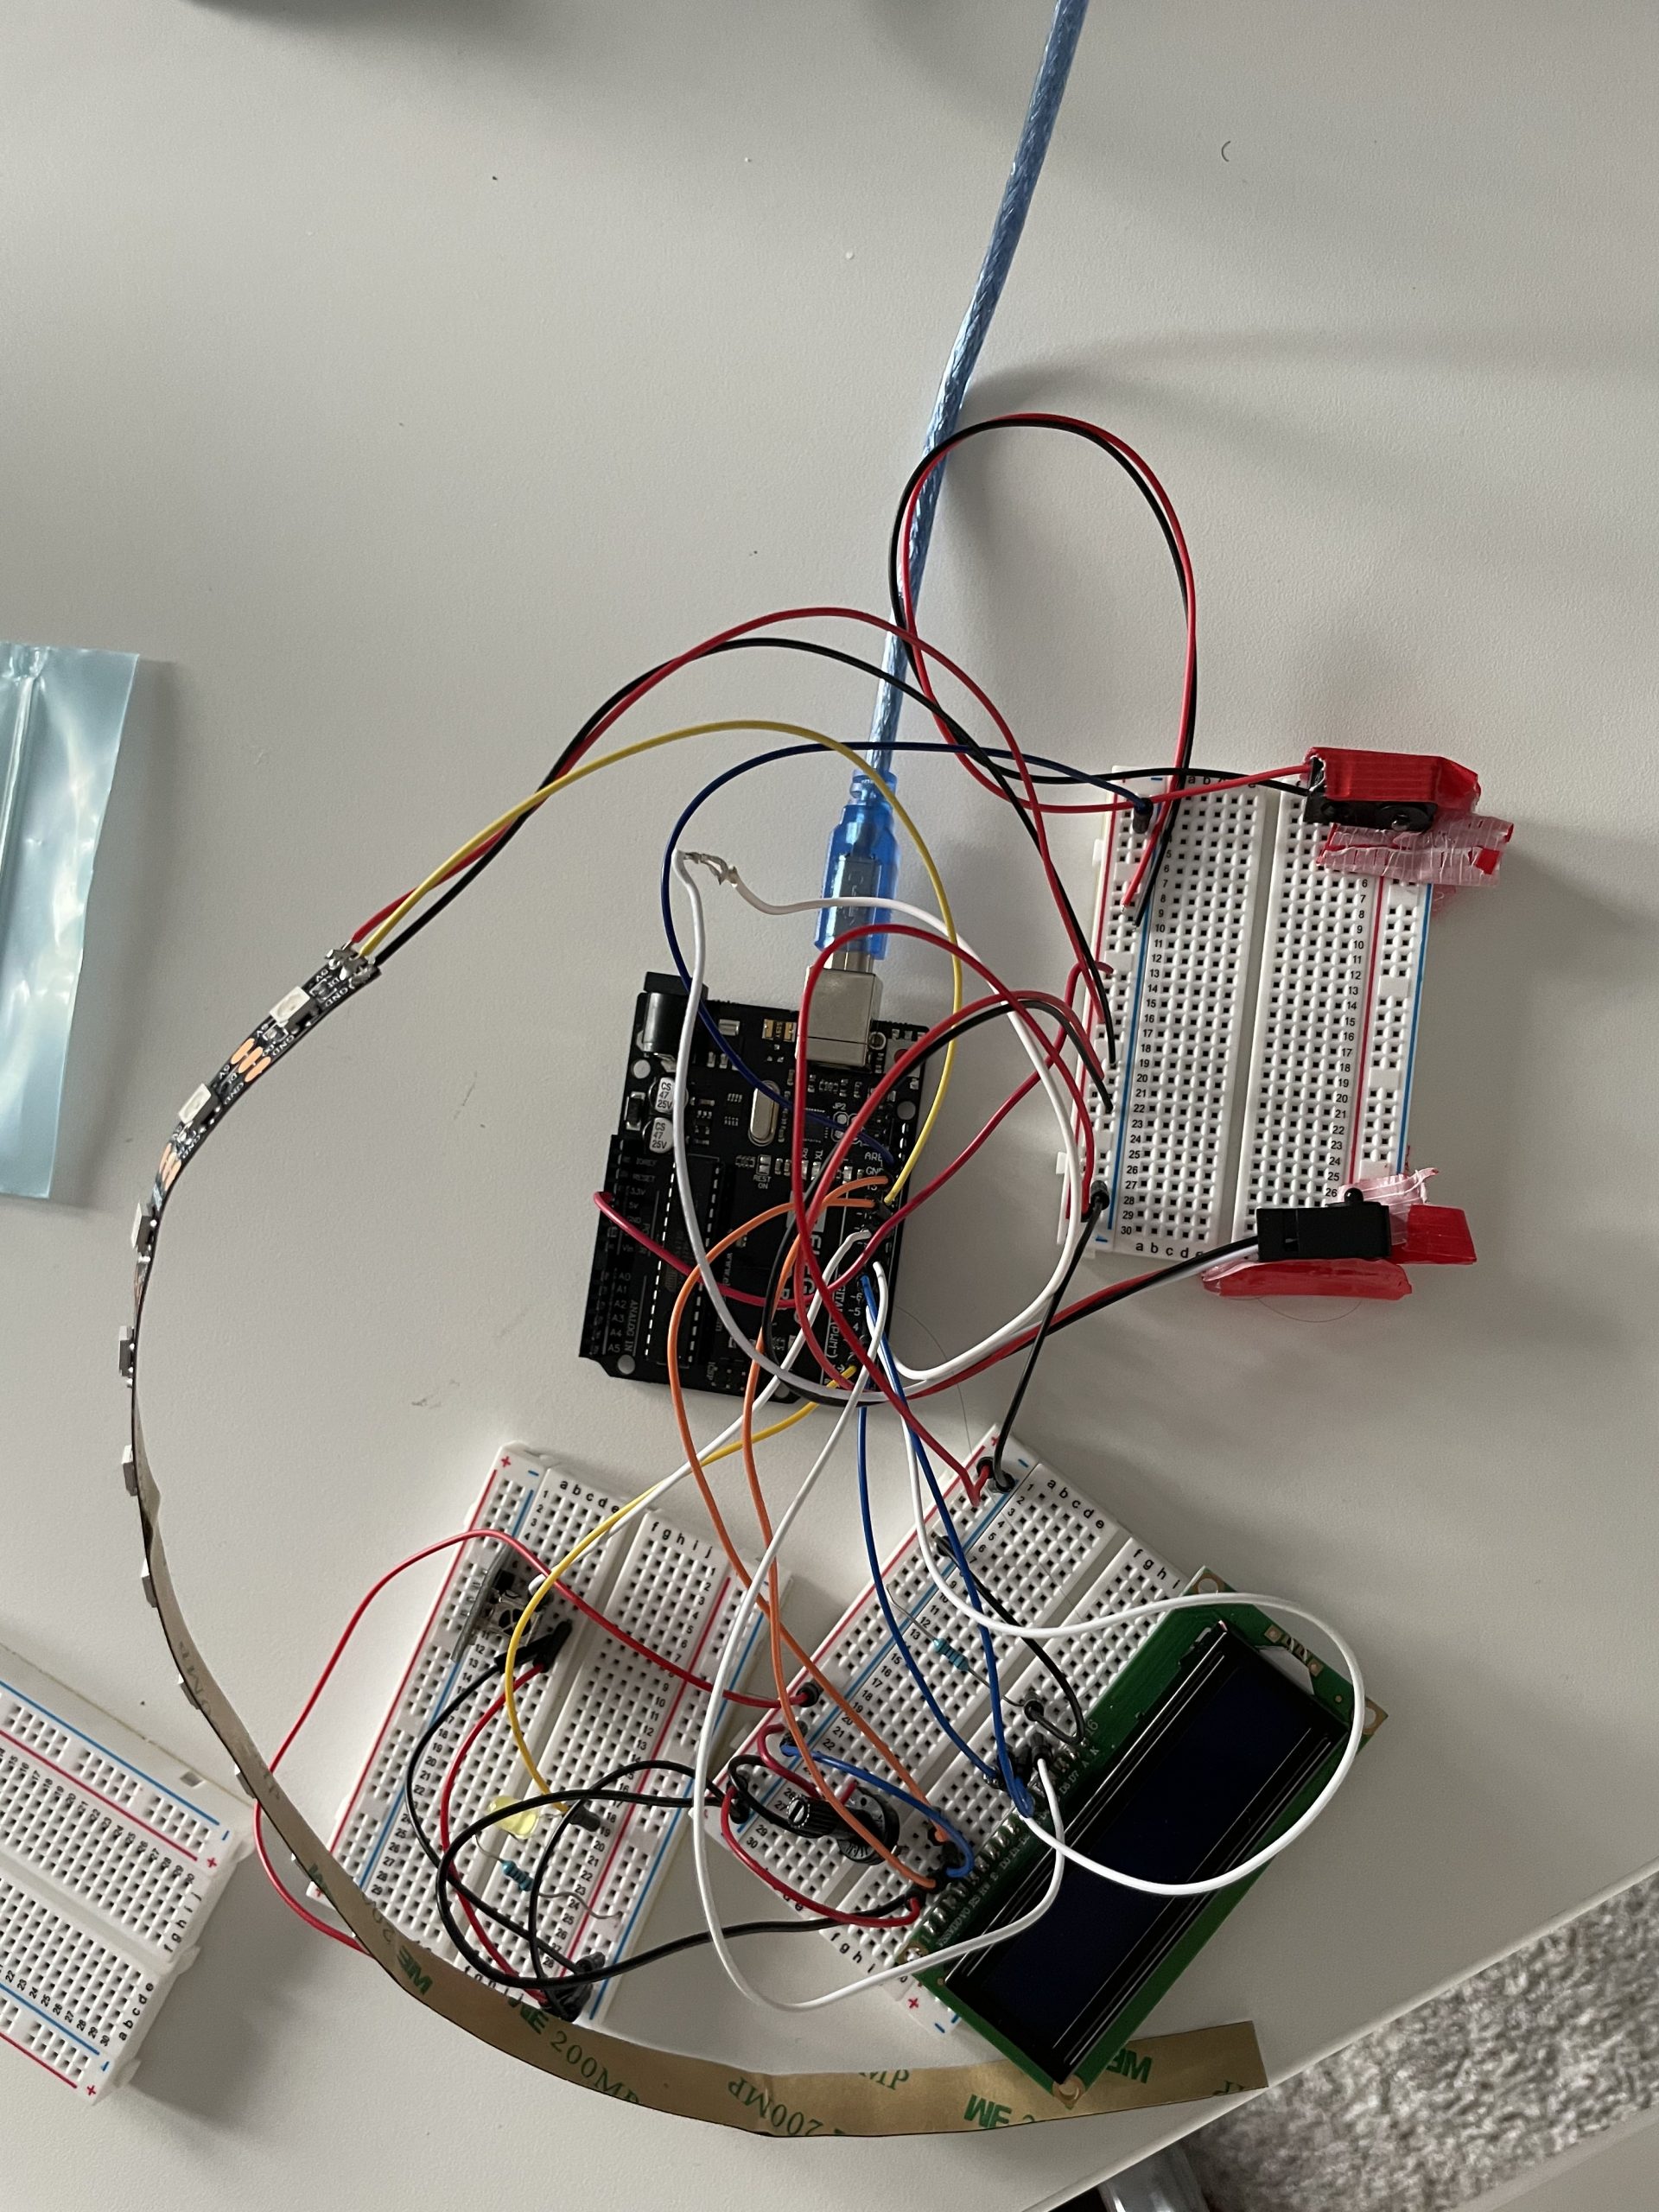
Showing the inside wiring of the box. If I didn’t have to reuse parts, I would have soldered in the wires instead of using a breadboard that sticks to the bottom of the box, so the wires wouldn’t keep coming out and it would take up less space. The Arduino would be on the back panel, vertically stuck.
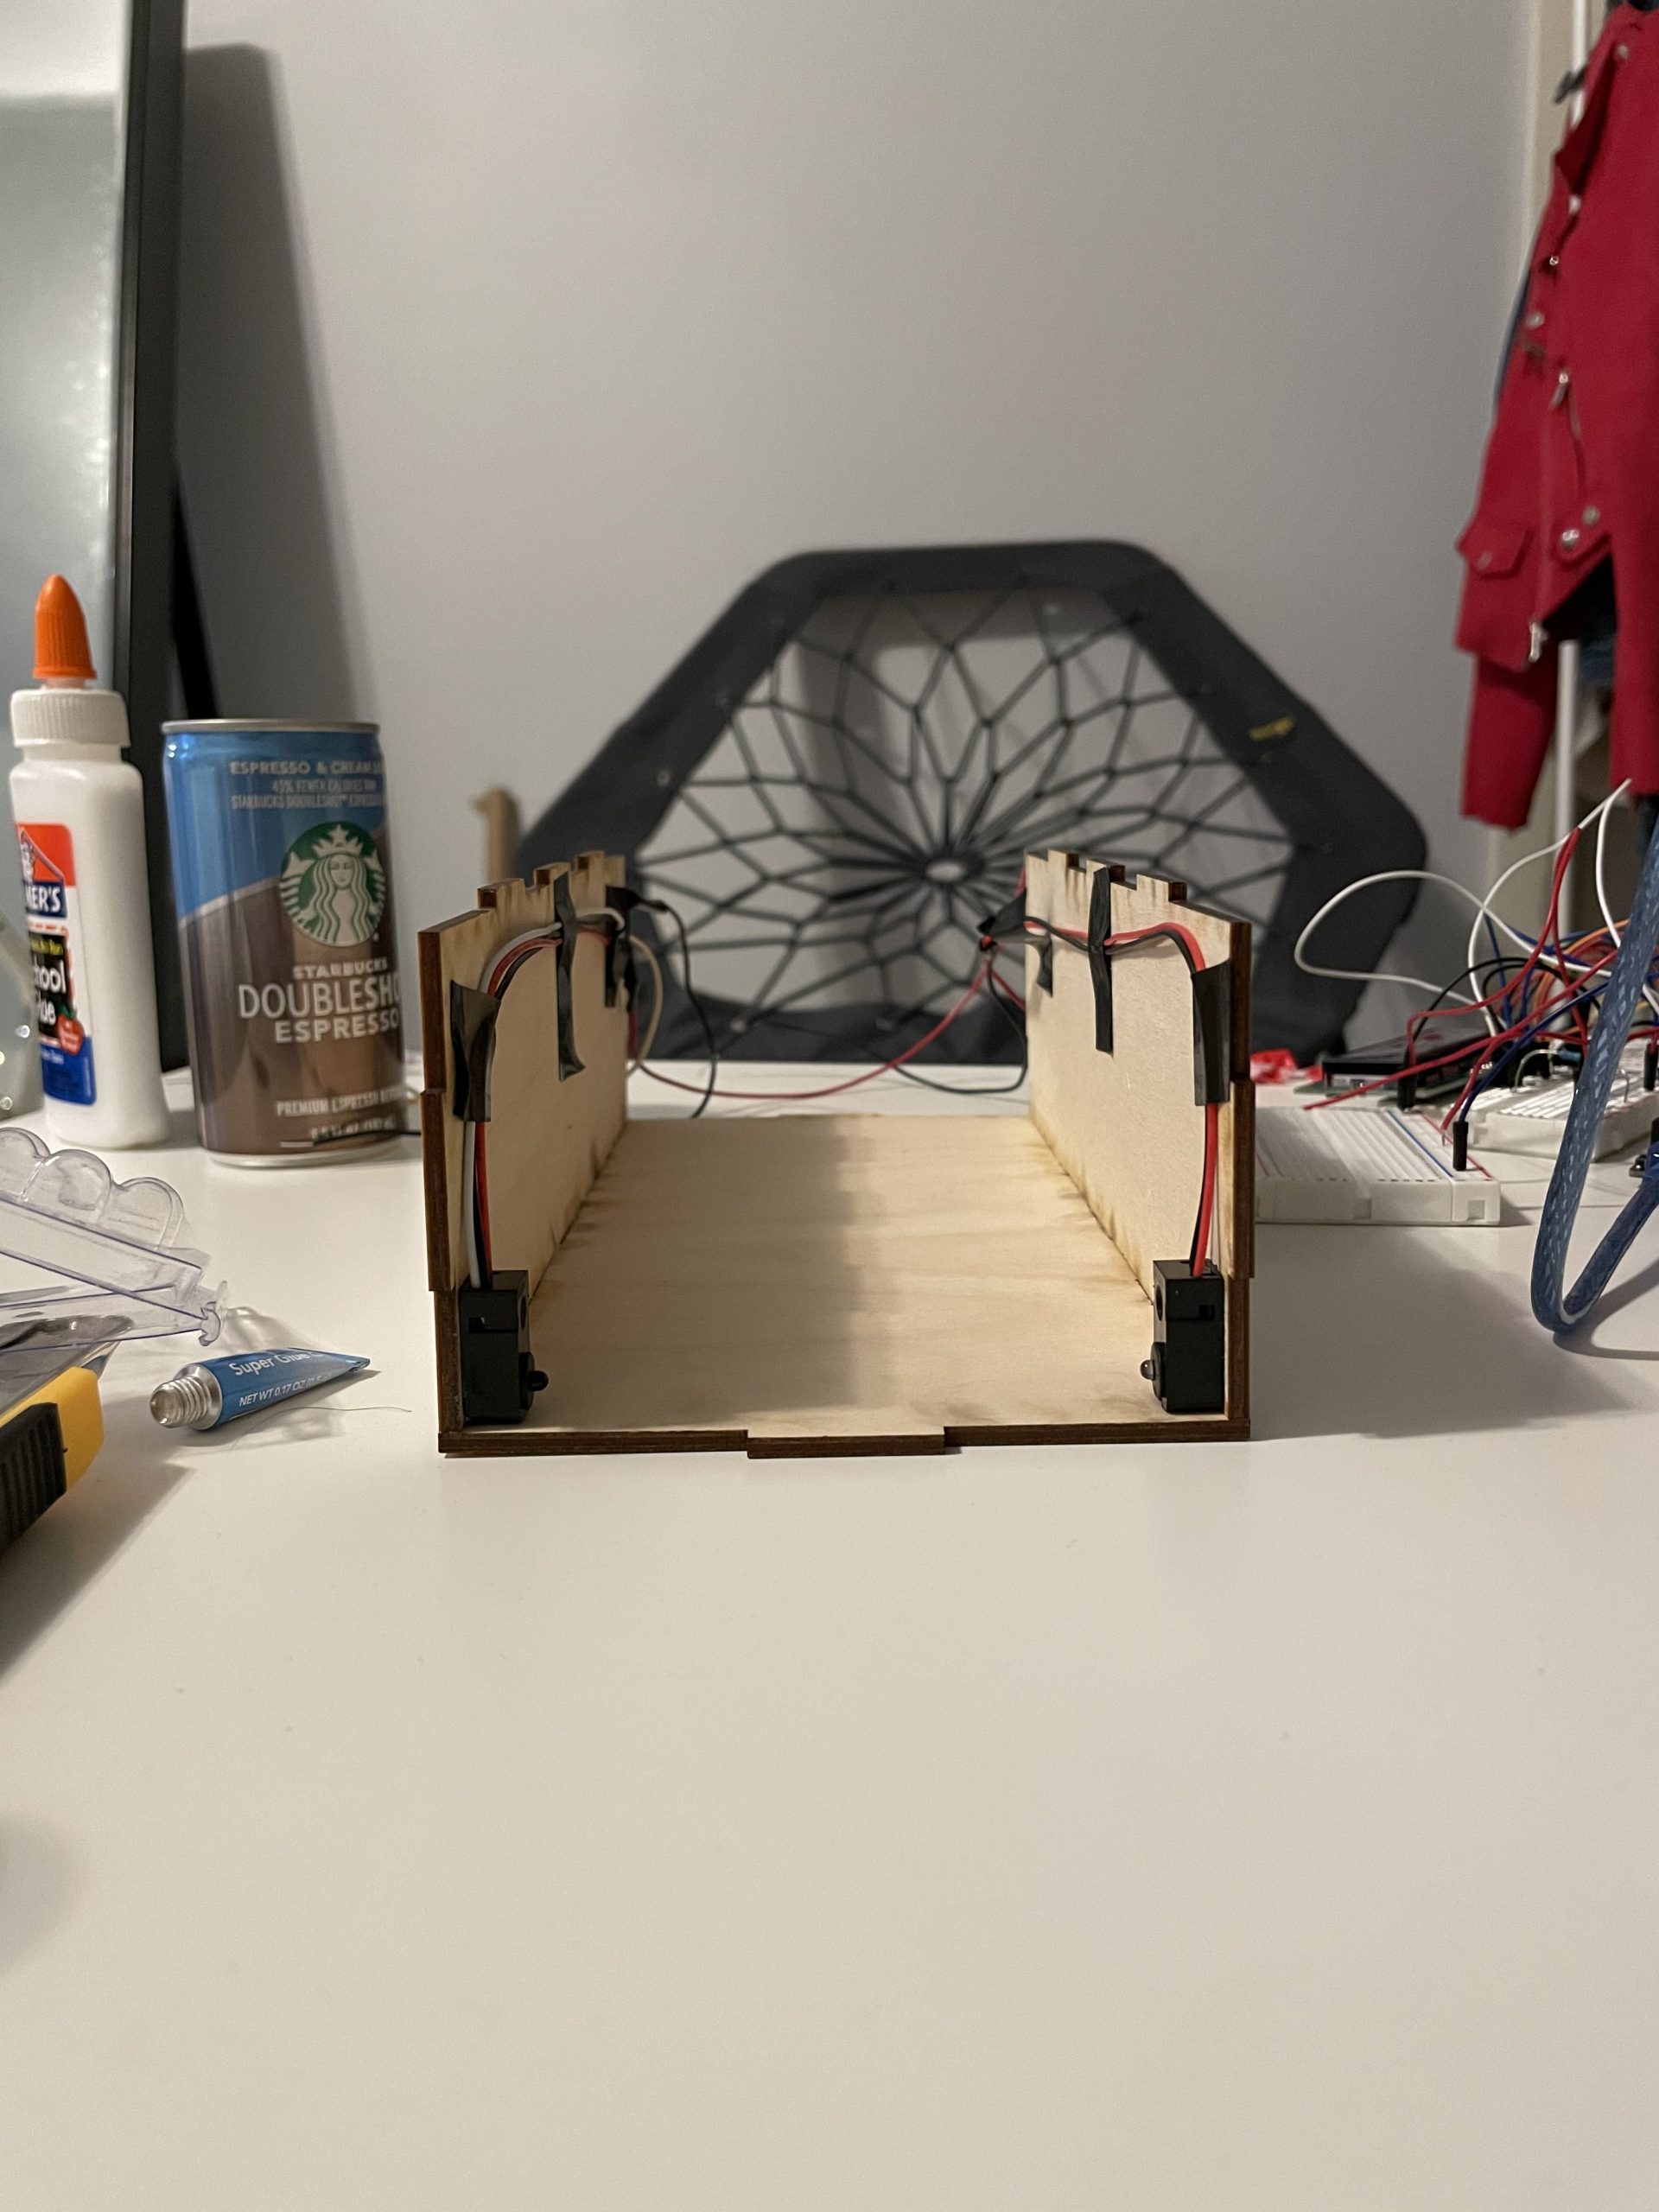
The break beam sensors were placed in such a way that anyone trying to reach for their phone in the box will set off the alarm. Even if their fingers can go over the sensor, the height of the box is such that when they pull the phone out they won’t be able to lift it, and sliding the phone out will also set off the sensor.
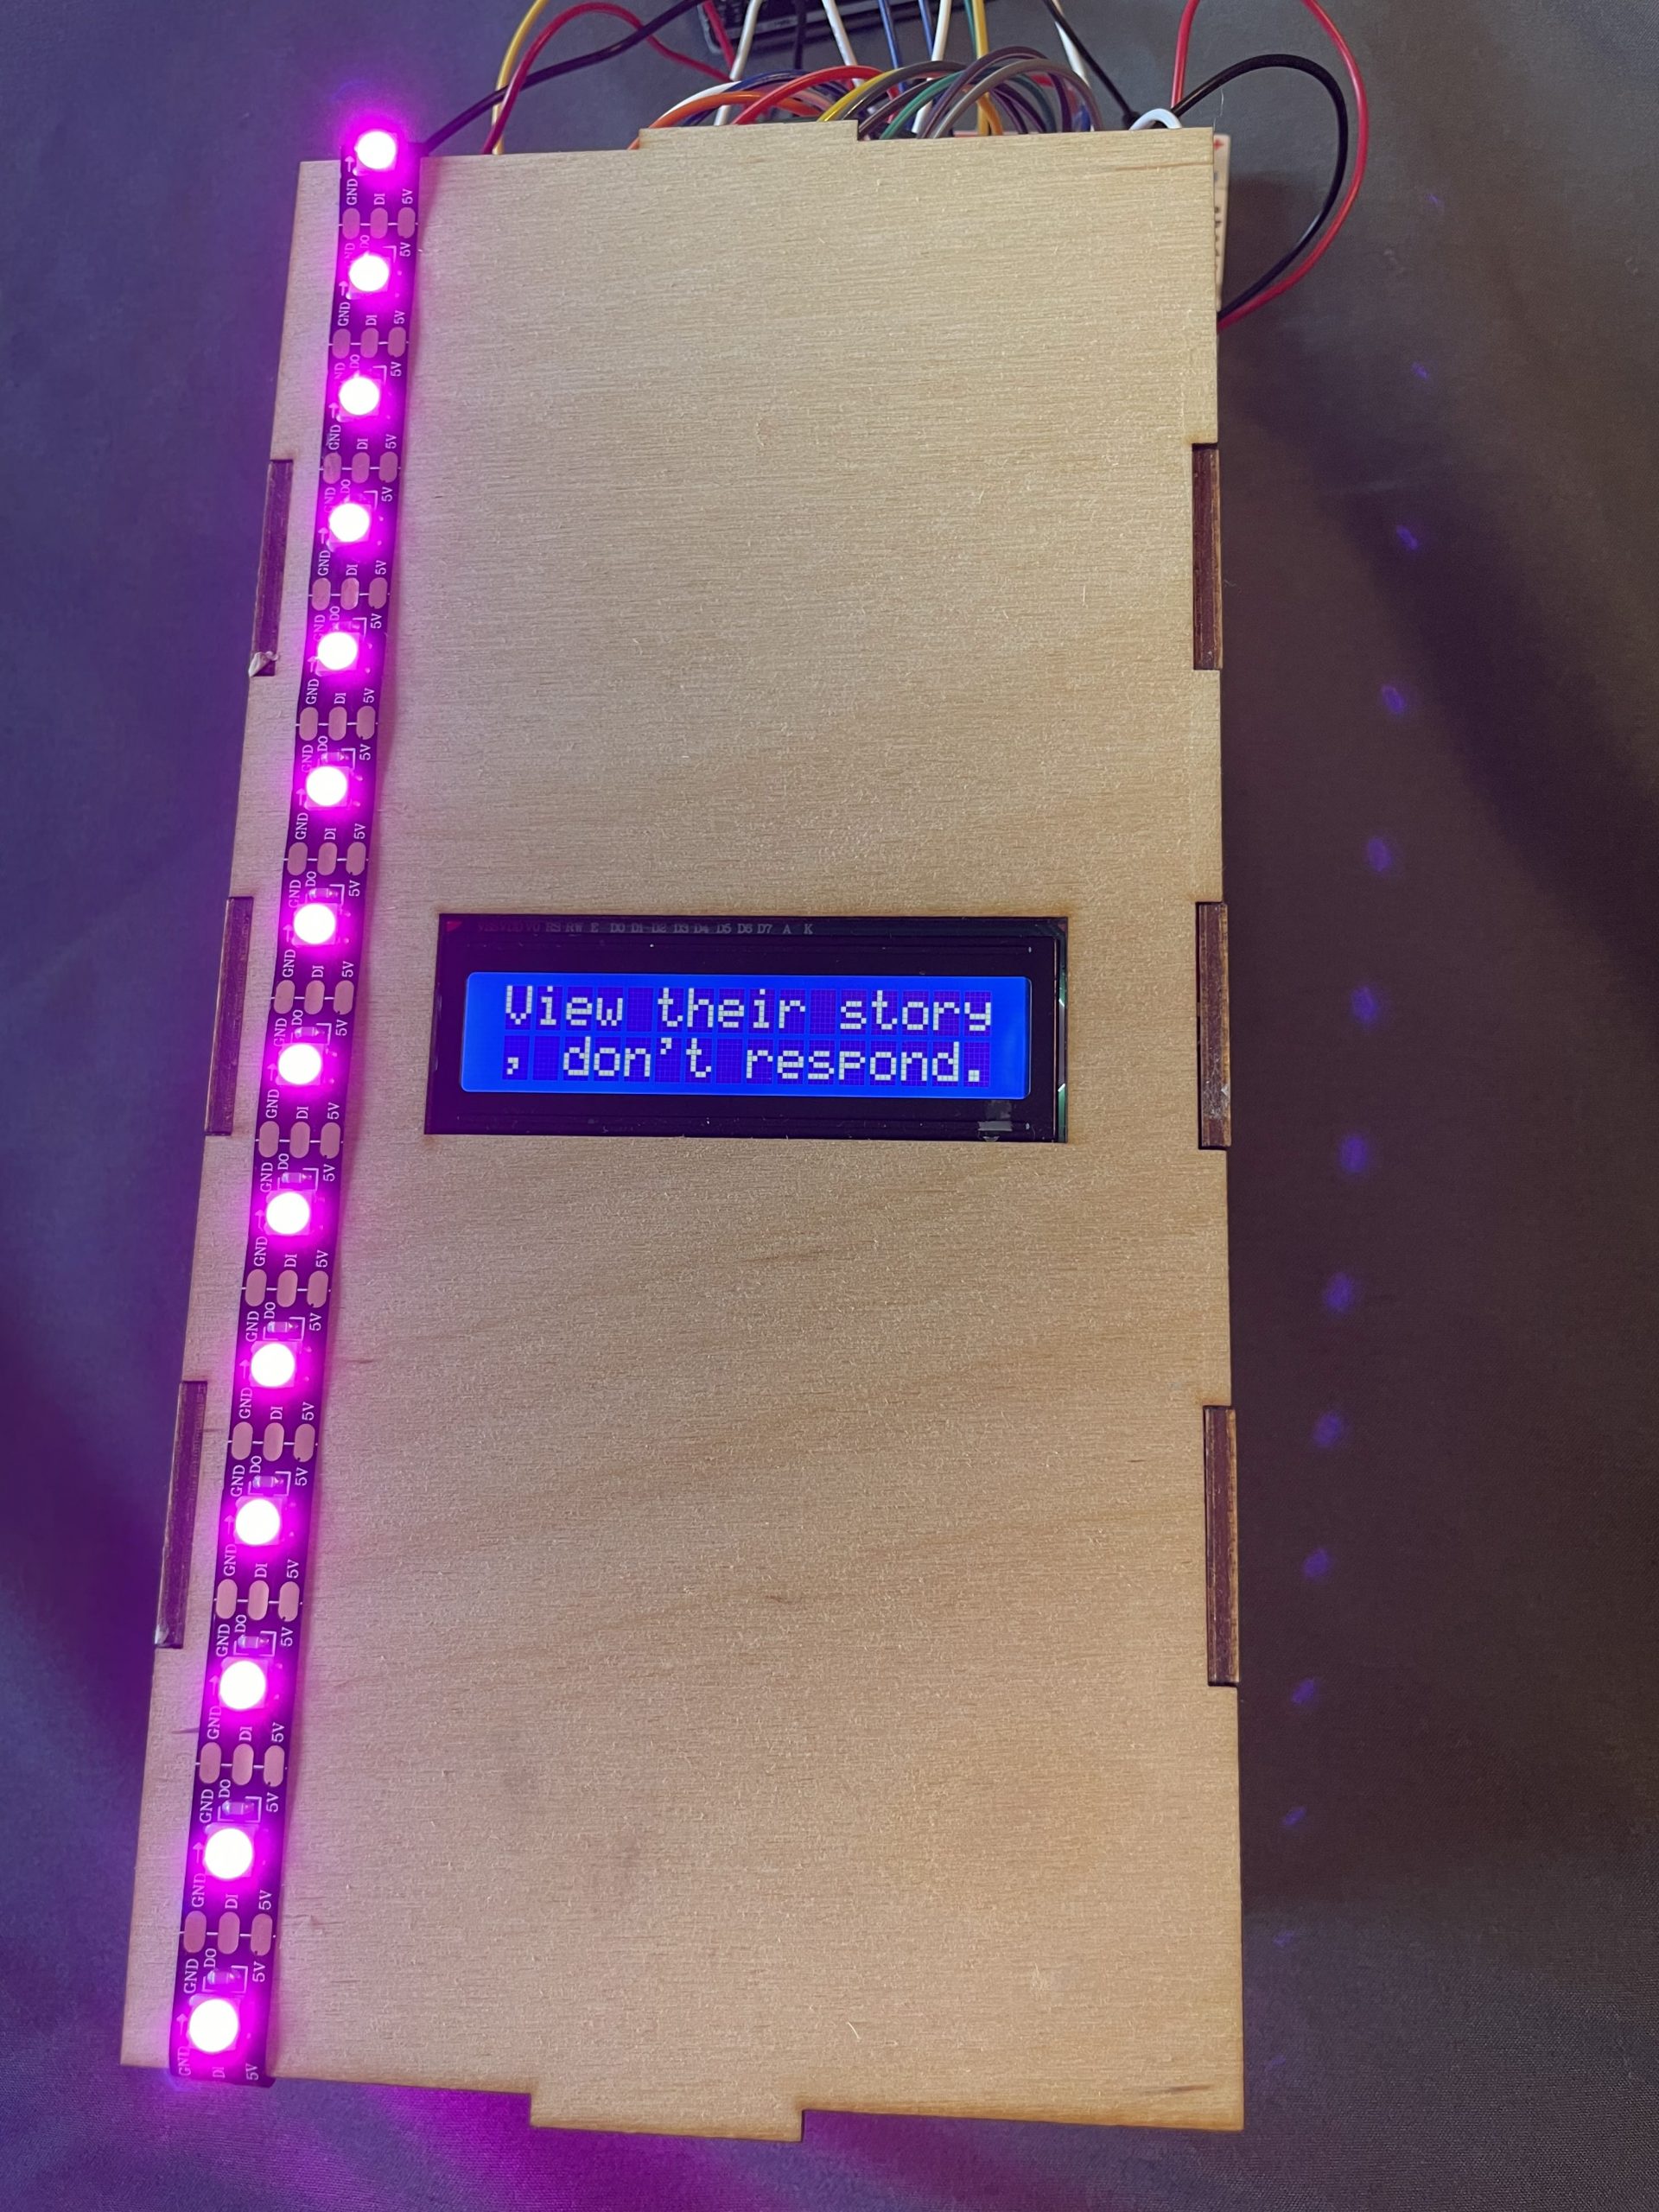
Images of the Device Working:
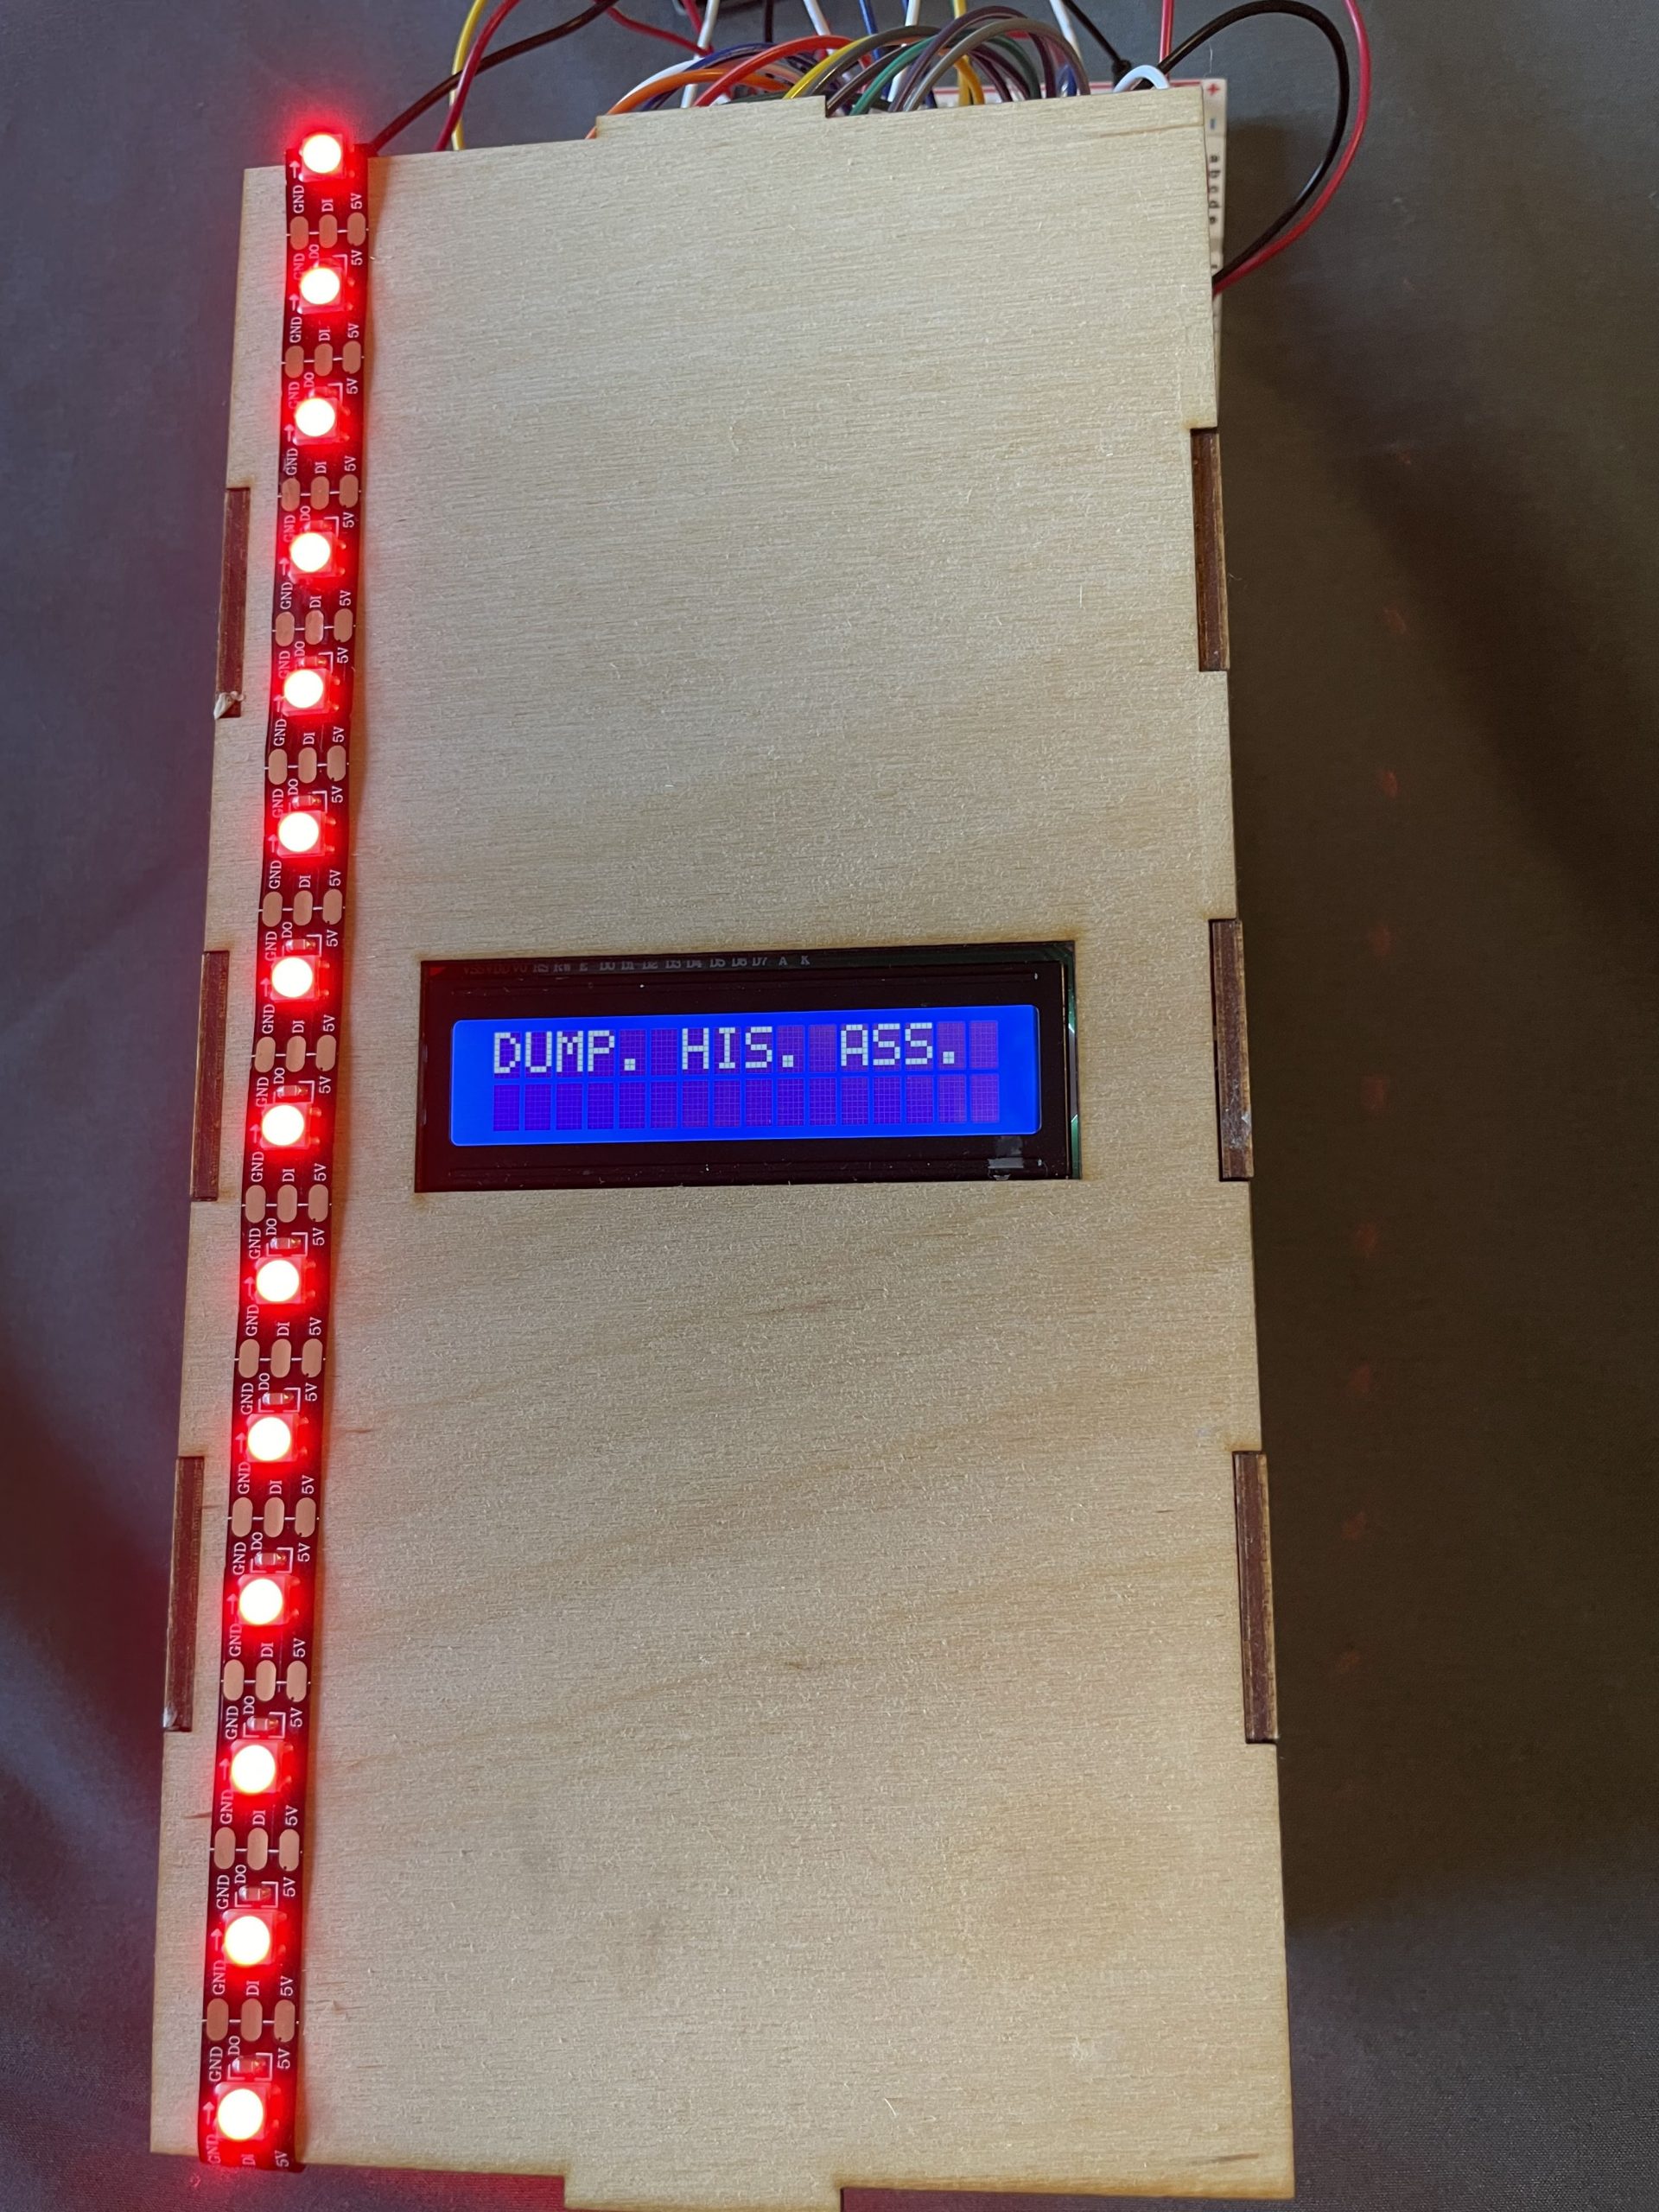
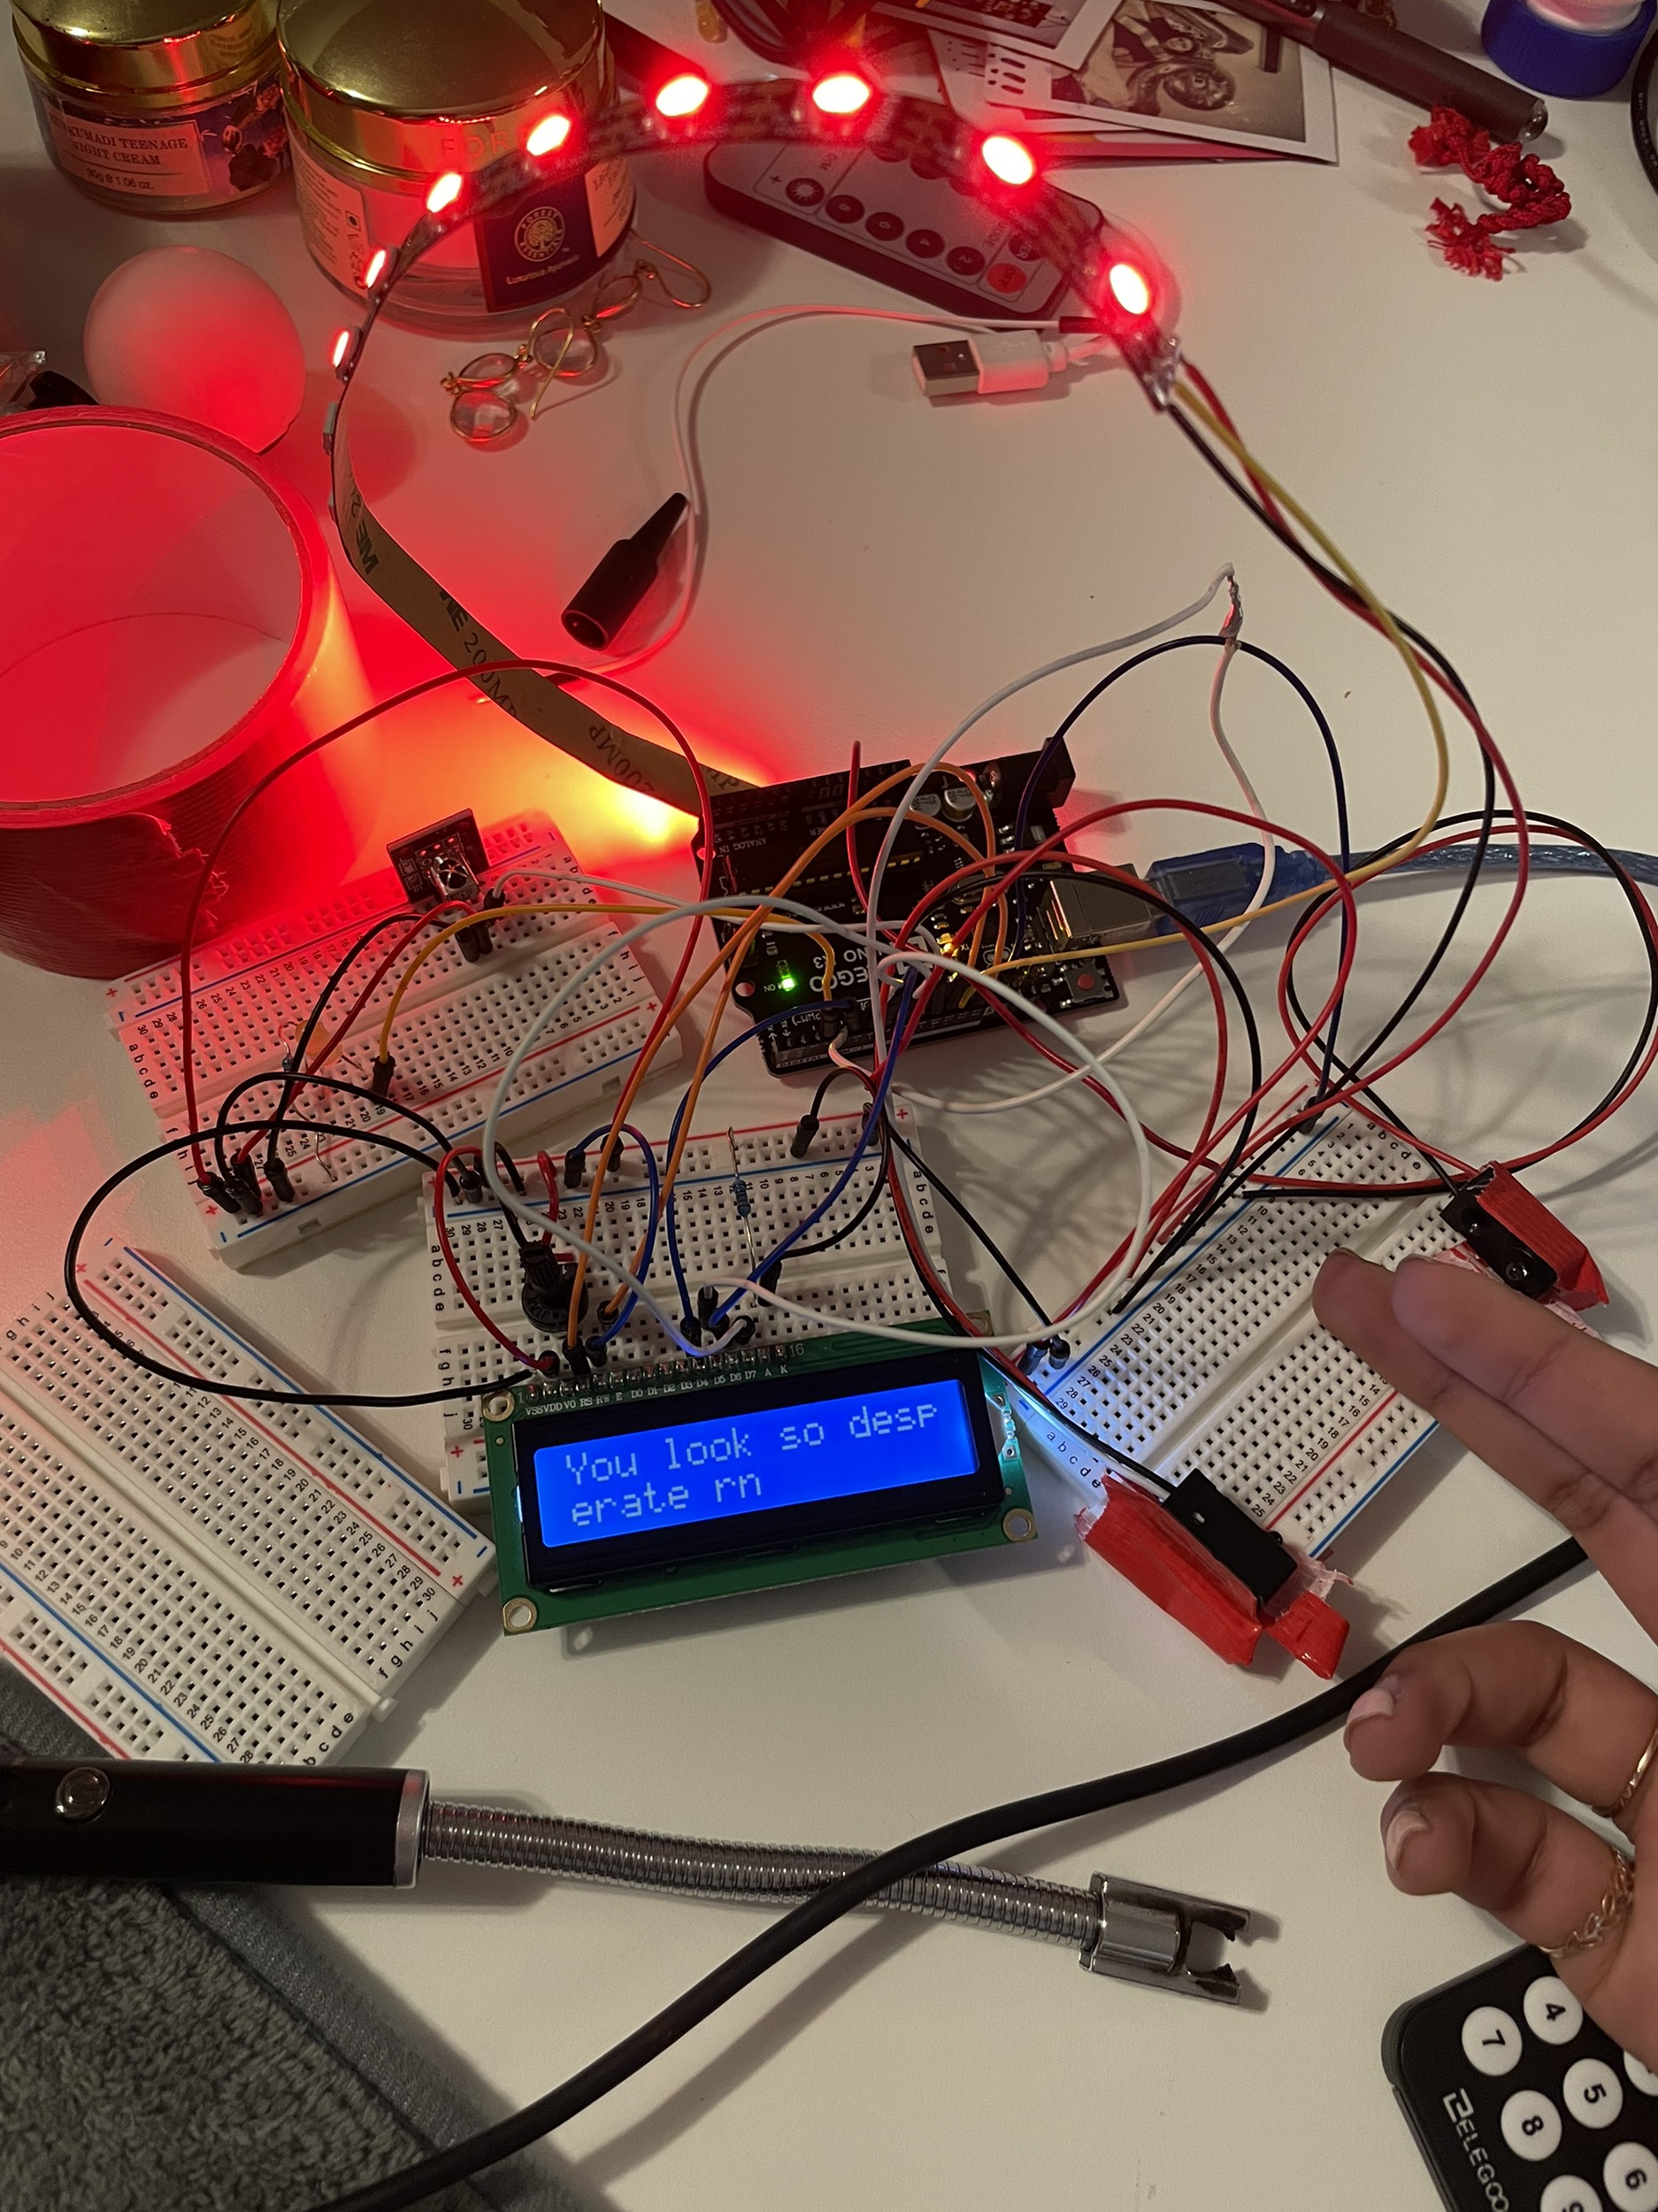
When the ‘stop’ button is pressed to indicate a response has been received, it looks like the starting screen but with orange lights. When ODR (fast forward) is pressed, to signal that the user has been left on read (!!), the following is displayed:
During Level 5 pettiness, the following will also be displayed as the timer is running:
Process Images and Review
The first decision that I changed involved choosing to take out the voice messages. Initially, I wanted voice recordings of my friends saying the mean messages to play out loud, instead of just being displayed on the LCD screen. The idea was to emulate how my friends respond to me when I call them complaining about how I want to reply to someone and they yell at me to not or I’ll look desperate. However, while putting together my prototype, I noticed that there were already a lot of components that I had to get to work together (demonstrated by the picture below), which got more complicated as more timings got involved. I had built and tested each individually and then put them together, and realized that the work to get them to run together would be difficult enough without adding in the extra challenge of getting my friends to send me recordings of their voices, compiling them together, and then randomizing the message to play at the right time. Therefore, I took out the voice messages and simply wrote out the messages on the LCD screen, but in the future I would like to play around with how to add in the sound component.
Each component was on a mini-breadboard according, with one mini representing what goes inside the box (at the time I anticipated having the box separate from the receiver), and another for the receiver and LCD.
Another important decision I made during this process was to add in the pettiness levels. Although managing the timing to receive and send the signal to reply and several sensors was complicated, once I figured it out at the prototype stage, there really wasn’t much left to do except put it inside the box. I had already figured out how to calculate the moving average, but I felt that simply multiplying the average by a certain amount was not really hitting the point I wanted the box to serve. This box had been borne of my own experiences and needs, and if I feel like being petty after a long time of replying instantly, I don’t just leave the other person on delivered (after all, I hate trying to choose how long to wait! It stressed me out 🙁 ).I’m a woman of extremes, so I will not only leave them on read, but I will also ensure that they see me active on every social media platform so they understand I am actively ignoring them. Therefore, I wanted to allow for a desired level of pettiness to be taken into account. At level 1, the reply could be instant. After all, why play games if there’s no need to? Level 3 and 4 take my friends’ advice, and multiply the computed average by either 1/2 or 1.5 to dictate response time. Level 5 represents myself, and instructs the user, while waiting to be allowed to reply, when to post on their story and when to view the other person’s story but not respond. There is a little bit of fault in this logic, as in order to post/view stories but not respond, the person would need to go on social media on their laptop since their phone is still in the box, but the premise stands.
More Progress Images/Videos:
This is my prototype displaying messages on the LCD screen as the whole system works together.

The inside of the top of the box, with duct tape holding in place the LCD and all wires coming out the back. A mini breadboard was using to hold the IR receiver in a position that could receive the signal without the user having to twist their arm in weird positions.

A big challenge I faced was that when displaying mean messages, the randomizer would display everything as it scrolls through, and if a shorter message was displayed after a longer message, the letters from the longer message at the end would stay on the screen and make for very weird notes/symbols on the screen. Therefore, I put in a 2 second delay when a message has been chosen from the randomizer, and put in white space after each line of the message to ensure that previous letters were cleared out/written over. Also, I split up each message into a top and bottom line of 16 characters each, so nothing would run off screen (which happened when I tried to put all 32 characters in one line, as the LCD didn’t format it by itself). In my code, you’ll also see functions that specifically write to the top or bottom of the LCD.
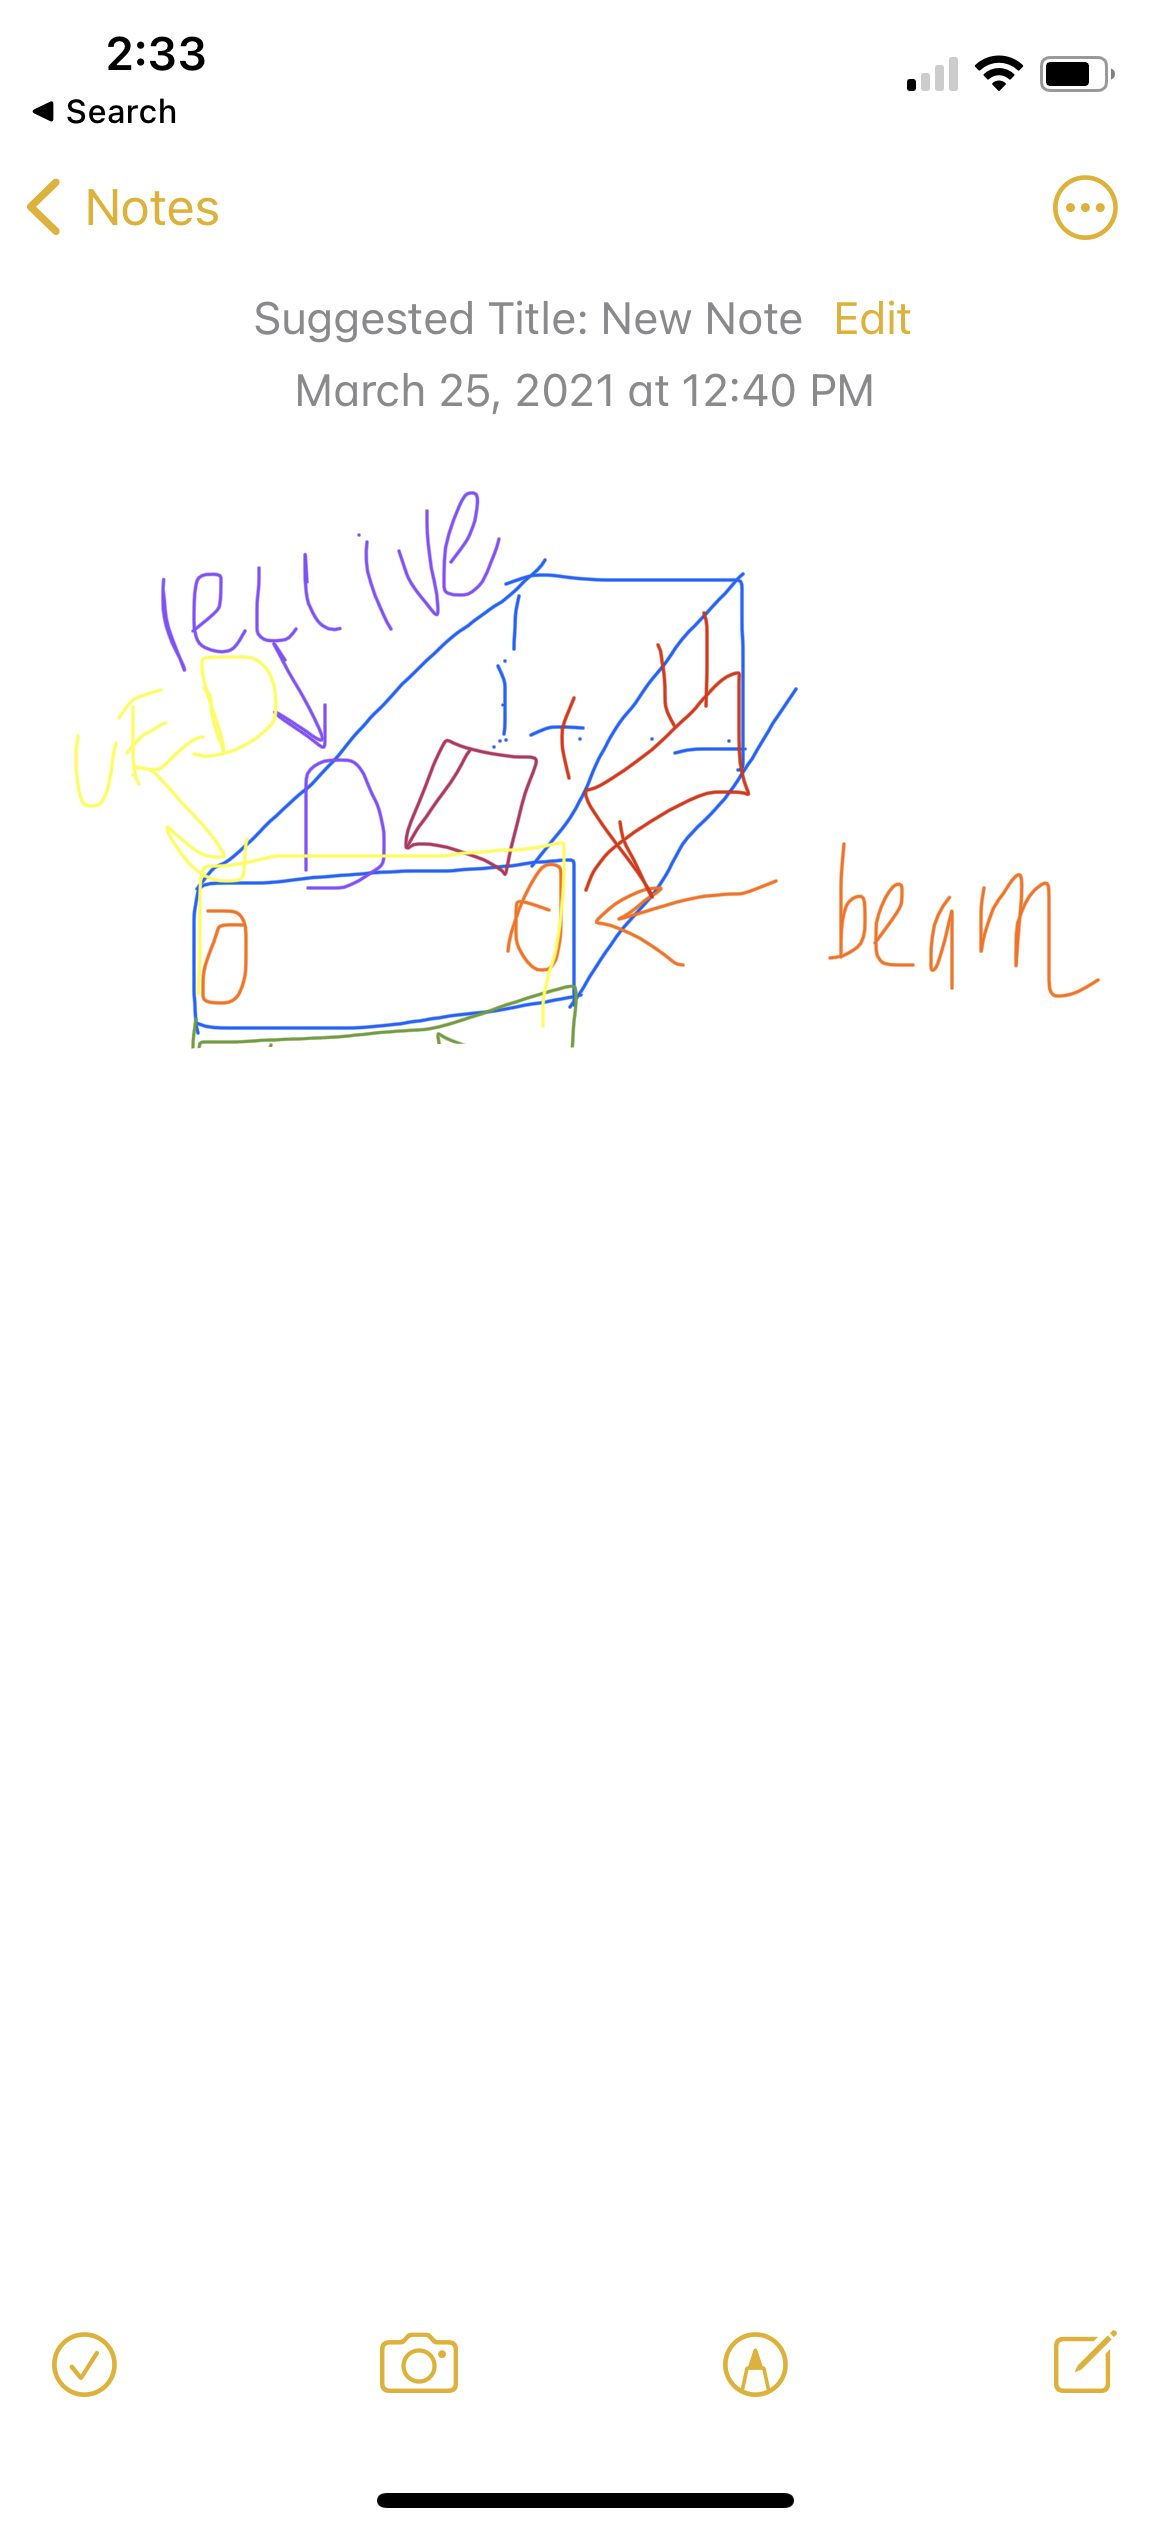
A very fantastic sketch as I tried to visualize how all the components would fit into the final box.
Learning how to use the IR remote and receiver by programming the Arduino to flash an LED when a certain button is pressed.
Response to Comments:
There seemed to be an overall positive response to my project during the final critique. Particularly, the class seemed to think that the premise and execution of the mean messages was funny and an interesting project that was not mechanical but rather played to a “higher order need.” I chose to take one of the pieces of advice and rename the device the Anti-Simp System rather than Anti-Simp Machine, as the former as a certain ring to it that I absolutely love. I also received several pieces of feedback stating that the LED brightness might be something that should be dealt with. Particularly, one person commented, “The light is *really* bright, it might give you a headache if you leave it on for too long, maybe tune the brightness a bit more to make it dimmer.” Since I imagined the device would sit on someone’s desk, it would be extremely difficult to not get 1) distracted by the lights while working, and 2) a headache, as the lights are really intense. Some suggestions were that I put the lights on the inside of the box instead, which is a possibility, or use some kind of paper to diffuse the intensity. I’d also like to explore if the LED strip could control the brightness itself, like the RGB LED I used in Project 1 could control for lux.
Another student also commented further applications of this device in order to achieve its goal. Currently, in order to take in response times, the user must indicate when they have sent a message and when they have received a message by pressing a button a remote. However, this means that if the user sees the message too late, or forgets to log to the time altogether, the whole average might be messed up for a while and cause the user to be so petty that the other person ends up losing interest. This is not the goal. This student wrote: “ I wonder if you could write a script that goes into your IG and handles the messaging for you? Including leaving people on read, posting on your story etc etc.” Although another student commented on privacy issues while trying to link up to Instagram, this premise would be interesting to explore, to see if data could be sent directly from your phone to the Arduino that’s keeping track of the time, or if there’s a future version in which your phone could run the entire system and directly control the box while keeping track of when messages are going in and out from a certain number/account.
As a side note, it was also interesting to have to explain the premise specifically to the people of an older generation watching our group. While most people my age immediately understood the reason for the project, I had to explain several of the steps and context to others, including 1) what a simp is, 2) why you don’t want to be one at a certain stage of a talking to someone you’re interested in, 3) why the time it takes to respond to messages is such a big deal, and 4) the goal for the machine to strike a balance between looking desperate and keeping them interested. Furthermore, I feel like I could have done a better job explaining that my motivation for the machine is somewhat ironic because I hate having to judge and think about how long I need to wait to reply. If it was left up to me, I would just reply when I’m on my phone, but apparently that freaks some people on who do think you should follow certain rules about how fast to reply. Hence, the need for a device to tell me what to do.
Self-critique and What I Learned:
Overall, I’m quite happy with how the product turns out. I do wish that it could look a little neater, but I know it’s inevitable for it to look somewhat wonky considering that I couldn’t solder in many of my materials as they needed to be reused, or glue in my Arduino to the box so I could close it (especially since the 9 volt battery wasn’t able to power the Arduino, so the USB connector still needed to be outside and able to plug-in to my laptop. Apart from that, I’m pretty impressed that I pulled off a decent looking physical device, where the wires are about as neat as they could be while still being on a breadboard, and taped in so the lines are neat, considering that I usually give up on the physical appearance of my project and don’t bother about any of it. The project went beyond my goals in most aspects. I initially only planned to simply multiply the average by different numbers depending on the pettiness level (actually, the pettiness levels themselves weren’t a feature I initially planned on), but I ended up making essentially three different scenarios: a standard response time that keeps track of the average for future use but disregards it for the current response-time, a multiplication of the average by a certain value, and my favorite: the dynamic indicator, which splits up the waiting time into intervals with different, very petty instructions popping up on the message screen.
Although I do wish I could have implemented the system with voice messages from my friends playing, I feel that the electronic complexity of the components I did have still is significant. Instead of putting it altogether at the end, I really had to break down my components and get each of them to individually work, then build them together. For example, I individually ran the break beam sensor, LED strip, LCD display, and IR remote/receiver systems with their own code to experiment with their capabilities, then linked the IR remote and LED on one side and the LCD/break beam system in the code, and only in the end put them together, where I then had to add in timing components. In contast, for most of my other projects I’ve simply started from the conceptual idea, built the whole thing, and then tested it altogether, which made debugging difficult. I knew debugging this, considering the amount of wires and devices/sensors, would be horrible, so I made sure to break it down from the beginning, and then keep the code to individually test portions as I continue on even when they are all linked together. At certain points, I had about 7 Arduino scripts open on one screen while I made sure each component was still intact and working.
The timing components were definitely the greatest challenge of this piece, as I needed to keep track of the time it takes for the user to get a response, then how long they should wait, and in the case of level 5 pettiness, each individual component needed to be timed and split up as well. I ended up having to add in dedicated variables and wait times for each situation, which works, but I feel like there might be a more efficient and readable way to execute this.
Next Steps:
My housemates would like me to sell my device to Hasbro, but I personally do not feel like it is quite at that stage. Further, this is simply not a toy, but a real assistive device to aid many hopeless souls like myself. Many of my friends have also requested that I make and send them versions of this box with even meaner messages. If I do, I’d probably try and add in the voice-recorded messages to play alongside the LCD display, or have the LCD display the waiting time while the voices play the mean messages/ instructions on how to be more petty. Also, I would add in more levels of pettiness in the middle and higher end, with not only more instructions and intervals, but also different values to multiply the average by. I’m also proud of the modularity of this device. Since this was a combination of two of my initial devices (a response-time indicator and a box you put your phone in), the code could easily be modified such that the user uses the remote to set a certain amount of time they don’t want to touch their phone, and the LEDs flash/turn red if you try and take your phone out before the time ends. The mean messages could also be modified to pertain more to studying and self-discipline, and it could also keep track of how many times you tried to take your phone out of the box in the time you said you wouldn’t do it. This would actually be really helpful to a phone addict like myself, and I might in fact just reprogram the box to do this so I can use it in my daily life.
Code
Schematic:
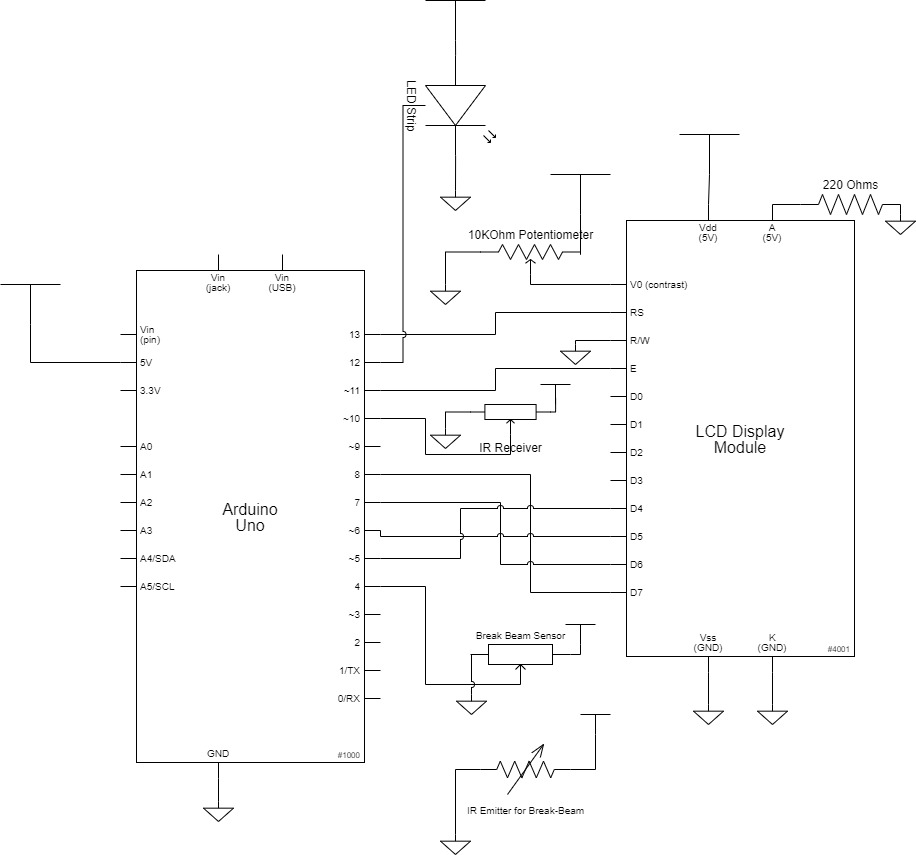
Note: IR Receivers used the same symbol, but no circuit component was directly available in draw.io, so I used a box that typically represents a resistor
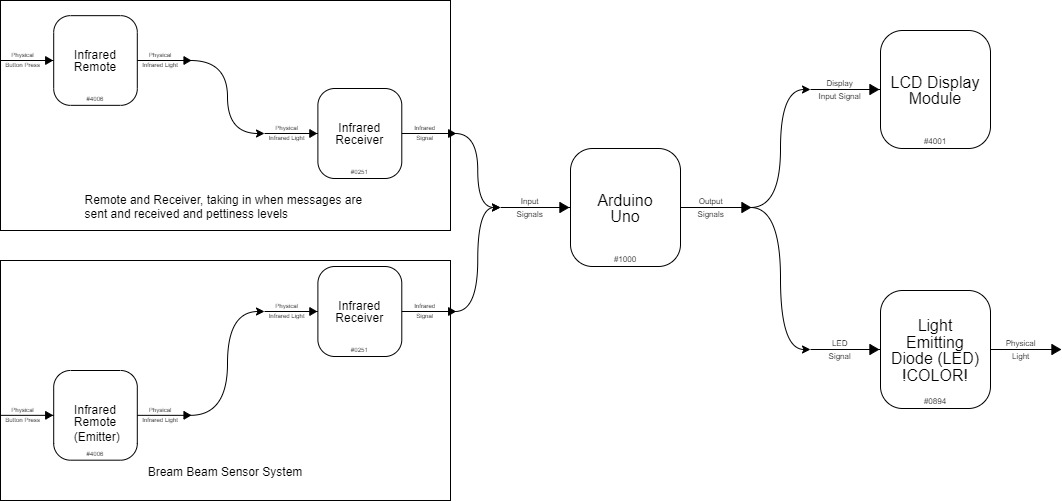
Block Diagram
/*
 * Anti-Simp System
 * by Anisha Nilakantan (anilakan)
 *
 * This code takes in a "sent" and "received" signal to measure how long it
 *  took someone to respond to the user, stores it in an array of the last
 *  five responses, calulates an average, then cases on the user's pettiness
 *  levels to set a timer for how long the user must wait to respond, changing
 *  the LED colors to indicate what stage of waiting they are in. While the
 *  timer is set, the user may not touch their phone, else risk setting off
 *  the break beam sensors and getting a randomized mean message displayed on
 *  the LCD screen, as well as the LEDs going red while the break beam sensor
 *  senses the user's hand in the box.
 *
 *
 *  Some code based on these sources:
 *      LED: Arduino Examples for Pololu LED Strip
 *      IR transmitter and receiver: https: //create.arduino.cc/projecthub/electr
 *                                   opeak/use-an-ir-remote-transmitter-and-receiv
 *                                   er-with-arduino-1e6bc8
 *
  Pin Table:
  pin     |     mode    |   description
  --------------------------------------
  4           input         break beam sensor
  5           output        d4 LCD
  6           output        d5 LCD
  7           output        d6 LCD
  8           output        d7 LCD
  10          output        IR receiver
  11          output        EN LCD
  12          output        LED strip
  13          output        RS LCD

*/

#include <IRremote.h>
#define RECEIVER 10
#define Send_Button 0xFF02FD // you send a message (play/pause)
#define Receive_Button 0xFFE21D // you receive a message (func/stop button)
#define Odr 0xFFC23D // you're left on read (skip forward button)

// 3 pettiness levels
#define Button_1 0xFF30CF
#define Button_2 0xFF18E7
#define Button_3 0xFF7A85
#define Button_4 0xFF10EF
#define Button_5 0xFF38C7

unsigned long send_time;
unsigned long response_time[] = {0, 0, 0, 0, 0};
unsigned long res_average;
unsigned long wait_time;
unsigned long response_time_stamp;
unsigned long petty_wait;
unsigned long petty_start;
unsigned long start;
unsigned long wait;
int case5p1 = 0;
int petty = 1; // default is level 1 pettiness
int index_r_time;
int current_i;
uint32_t Previous;
IRrecv irrecv(RECEIVER);
decode_results results;

#include <PololuLedStrip.h>
PololuLedStrip<12> ledStrip;
#define LED_COUNT 57
rgb_color colors[LED_COUNT];
#define BEAMPIN 4
int beamState = 0;
int beamLastState = 0;
int on_or_off = 0;
int redState = 0;

#include <Wire.h>
#include <LiquidCrystal.h>
const int d4 = 5, d5 = 6, d6 = 7, d7 = 8, rs = 13, en = 11;
LiquidCrystal lcd(rs, en, d4, d5, d6, d7);
String meanMessages[] = {"Stop simping    ", "                ", "You can do so mu", "ch better       ", "Put. It. Down.  ", "                ",
                         "Not very hot gir", "l summer :(     ", "Have some self r", "espect.         ", "You look so desp", "erate rn.       ",
                         "He's literally u", "gly stop        ", "He's not thinkin", "g about you     ", "He looks like he", "can't swim.     ",
                         "He was hotter   ", "online          "
                        }; // each message is two lines (top then bottom to be printed)


// Helper Functions:

// writes to the top line of the LCD
void lcdWrite(String s) {
  lcd.setCursor(0, 0);
  lcd.print(s);
}

// writes to the bottom line of the LCD
void lcdWriteBottom(String s) {
  lcd.setCursor(0, 1);
  lcd.print(s);
}

//sets the LED color for the entire strip
void LEDColorSet(int R, int G, int B) {
  rgb_color color;
  color.red = R;
  color.green = G;
  color.blue = B;

  for (uint16_t i = 0; i < LED_COUNT; i++) {
    colors[i] = color;
  }
  ledStrip.write(colors, LED_COUNT);

  Serial.print("Showing color: ");
  Serial.print(color.red);
  Serial.print(",");
  Serial.print(color.green);
  Serial.print(",");
  Serial.println(color.blue);
}

//display
void LCDMeanMessage() {
  // randomize a number
  // select that from an array of strings
  // print that to the LCD
  int index = random(0, 999); // randomizing between 0 to 999 and then mapping to 0-9
  index = index / 100;        // still not quite sure why this was better randomized than
                              //  just randomizing between 0 and 9?

  Serial.println(index, DEC);
  lcd.setCursor(0, 0);
  lcdWrite(meanMessages[index * 2]); // prints top line of message
  lcdWriteBottom(meanMessages[index * 2 + 1]); // prints bottom line of message
  delay(2000); // try to get rid of this
}

// calculates how long the user should wait based on the last 5 response times (stored in array)
//  and pettiness level
unsigned long how_long_to_wait(unsigned long response_time[], int petty) {
  // taking the average of the response time, can make it more petty later
  // can add in function from button to gauge how petty you're feeling, take in this parameter to go to one of three cases
  unsigned long sum = 0;
  for (int j = 0; j < 5; j++) {
    sum += response_time[j];
  }
  unsigned long average = sum / 5;
  Serial.print("Petty: ");
  Serial.println(petty, DEC);

  wait_time = 0;
  switch (petty) {
    case 1:
      wait_time = 20000; // reply when you want
      break;
    case 2:
      wait_time = 300000; // wait five minutes
      break;
    case 3:
      wait_time = average; // wait the same time they have
      break;
    case 4:
      wait_time = average * 2; // wait double the time
      break;
    case 5:
      wait_time = average * 2.5; //wait 2.5x the time
      // set on_or_off off??
      case5p1 = 1;
      break;
    default:
      wait_time = 10000;
      break;
  }
  res_average = average;
  return wait_time;
}

void setup() {
  // put your setup code here, to run once:
  Serial.begin(9600);
  lcd.begin(16, 2);
  irrecv.enableIRIn();
  pinMode(BEAMPIN, INPUT);
  digitalWrite(BEAMPIN, HIGH);
}

void loop() {

  // take in what button is being pressed
  if (irrecv.decode(&results)) {

    Serial.println(results.value, HEX);


    switch (results.value) {
      case Send_Button:
        send_time = millis();

        lcdWrite("Keep him waiting");
        lcdWriteBottom("      ;)        ");
        LEDColorSet(0, 102, 102);
        break;
      case Receive_Button:
        index_r_time++; // increase r-time by 1
        current_i = index_r_time % 5;
        response_time_stamp = millis();
        response_time[current_i] = millis() - send_time;
        //Serial.print("Response time: "); Serial.println(response_time[current_i], DEC);
        LEDColorSet(0xFF, 0x73, 0x00);
        wait_time = how_long_to_wait(response_time, petty);
        //Serial.print("Wait time "); Serial.println(wait_time, DEC);
        lcdWrite("Keep him waiting");
        lcdWriteBottom("      ;)        ");
        on_or_off = 1;
        break;
      case Odr: // ODR stands for "Opened, Didn't Respond."
        LEDColorSet(255, 0, 0);
        lcdWrite("DUMP. HIS. ASS. ");
        lcdWriteBottom("                ");
        // still runs the loop right now
        break;
      case Button_1:
        petty = 1;
        break;
      case Button_2:
        petty = 2;
        break;
      case Button_3:
        petty = 3;
        break;
      case Button_4:
        petty = 4;
        break;
      case Button_5:
        petty = 5;
        break;
      default:
        break;
    }
    irrecv.resume();
  }


  beamState = digitalRead(BEAMPIN);

  // if the timer is running, then this code runs
  if (on_or_off) {

    // beam has been broken, hand is in the box
    if (beamState == LOW && millis() - response_time_stamp < wait_time) {
      LEDColorSet(255, 0, 0); // eventually make this a flash?
      LCDMeanMessage();
      redState = 1;
      lcd.clear(); // want to make messages stay on for longer !
    }
    // return back to orange (the waiting time color)
    if ((redState == 1) && (beamState == HIGH)) {
      LEDColorSet(0xFF, 0x73, 0X00);
      redState = 0;
    }
    // turns off the timer if the correct time has elapsed
    if (millis() - response_time_stamp >= wait_time) {
      Serial.print("different "); Serial.println(millis() - response_time_stamp, DEC);

      LEDColorSet(0, 255, 00);
      send_time = 0;
      lcdWrite("U can now reply!");
      lcdWriteBottom("                ");
      if (petty = 5) {
        case5p1 = 0;   // note that you can't really change the value in the middle
      }
      Serial.print("Send time: "); Serial.println(send_time, DEC);
      redState = 0;
      on_or_off = 0;

      // response time is time since send was hit to response was hit
      // if elapsed time SINCE THEN is greater than wait time
      // millis() - response_time_stamp which is the actual millis() it was hit
    }
  }

  // Level 5 pettiness instructions
  switch (petty) {
    case 5:
      // set the LED to purple
      if (case5p1 == 1) {
        LEDColorSet(128, 128, 0);
        // wait for petty_wait / 2
        petty_start = millis();
        petty_wait = res_average / 2;
        if (millis() - petty_start > petty_wait) {
          LEDColorSet(0, 0, 128);
          lcdWrite("Post on your sto");
          lcdWriteBottom("ry!             ");
          case5p1 = 2;
        }
      }
      if (case5p1 == 2) {
        start = millis();
        wait = res_average / 5;
        if (millis() - start > wait) {
          case5p1 = 3;
        }
      }
      if (case5p1 == 3) {
        petty_wait = res_average * 3 / 4;
        petty_start = millis();
        if (millis() - petty_start > petty_wait) {
          LEDColorSet(230, 0, 126);
          lcdWrite("View their story");
          lcdWriteBottom(", don't respond.");
        }
        case5p1 = 4;
      }
      if (case5p1 == 3) {
        start = millis();
        wait = res_average / 5;
        if (millis() - start > wait) {
          case5p1 = 5;
        }
      }
      break;
    default:
      break;
  }
}