
Overview

I created a device that turns a light on and off whenever it hears you clap or snap, so I can turn off my light remotely.

GIF
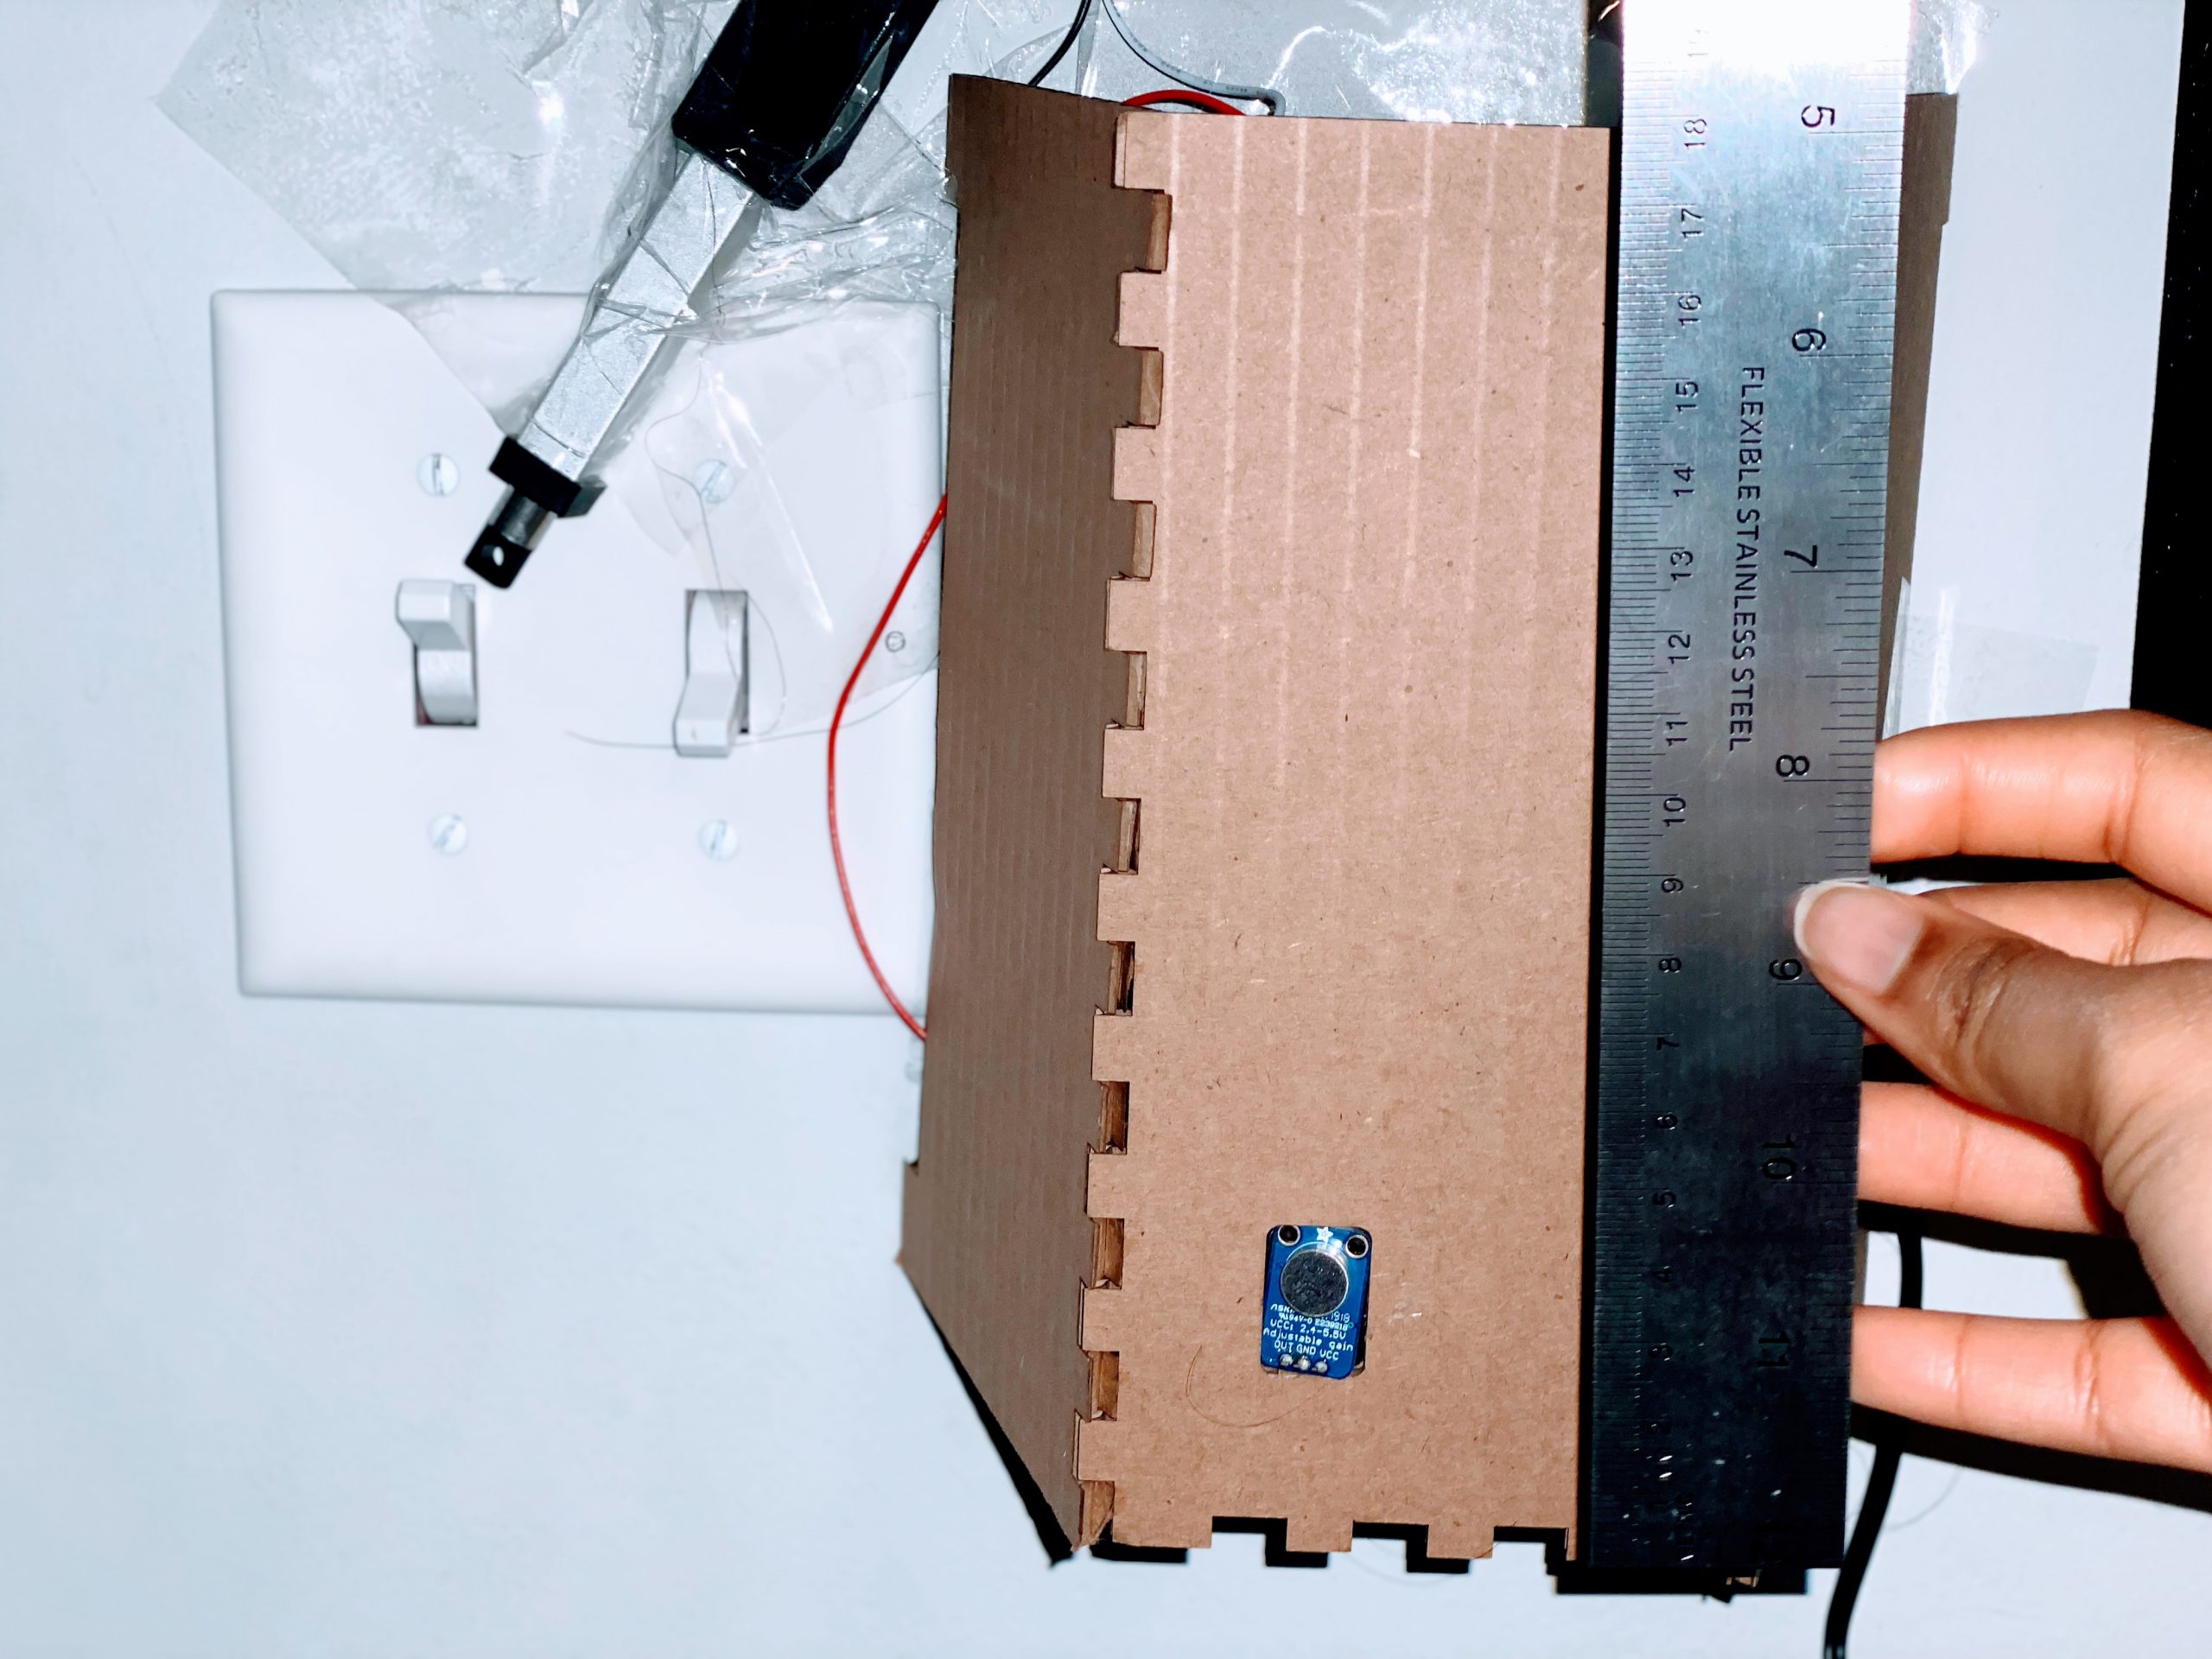
Overall photo for proportion and scale
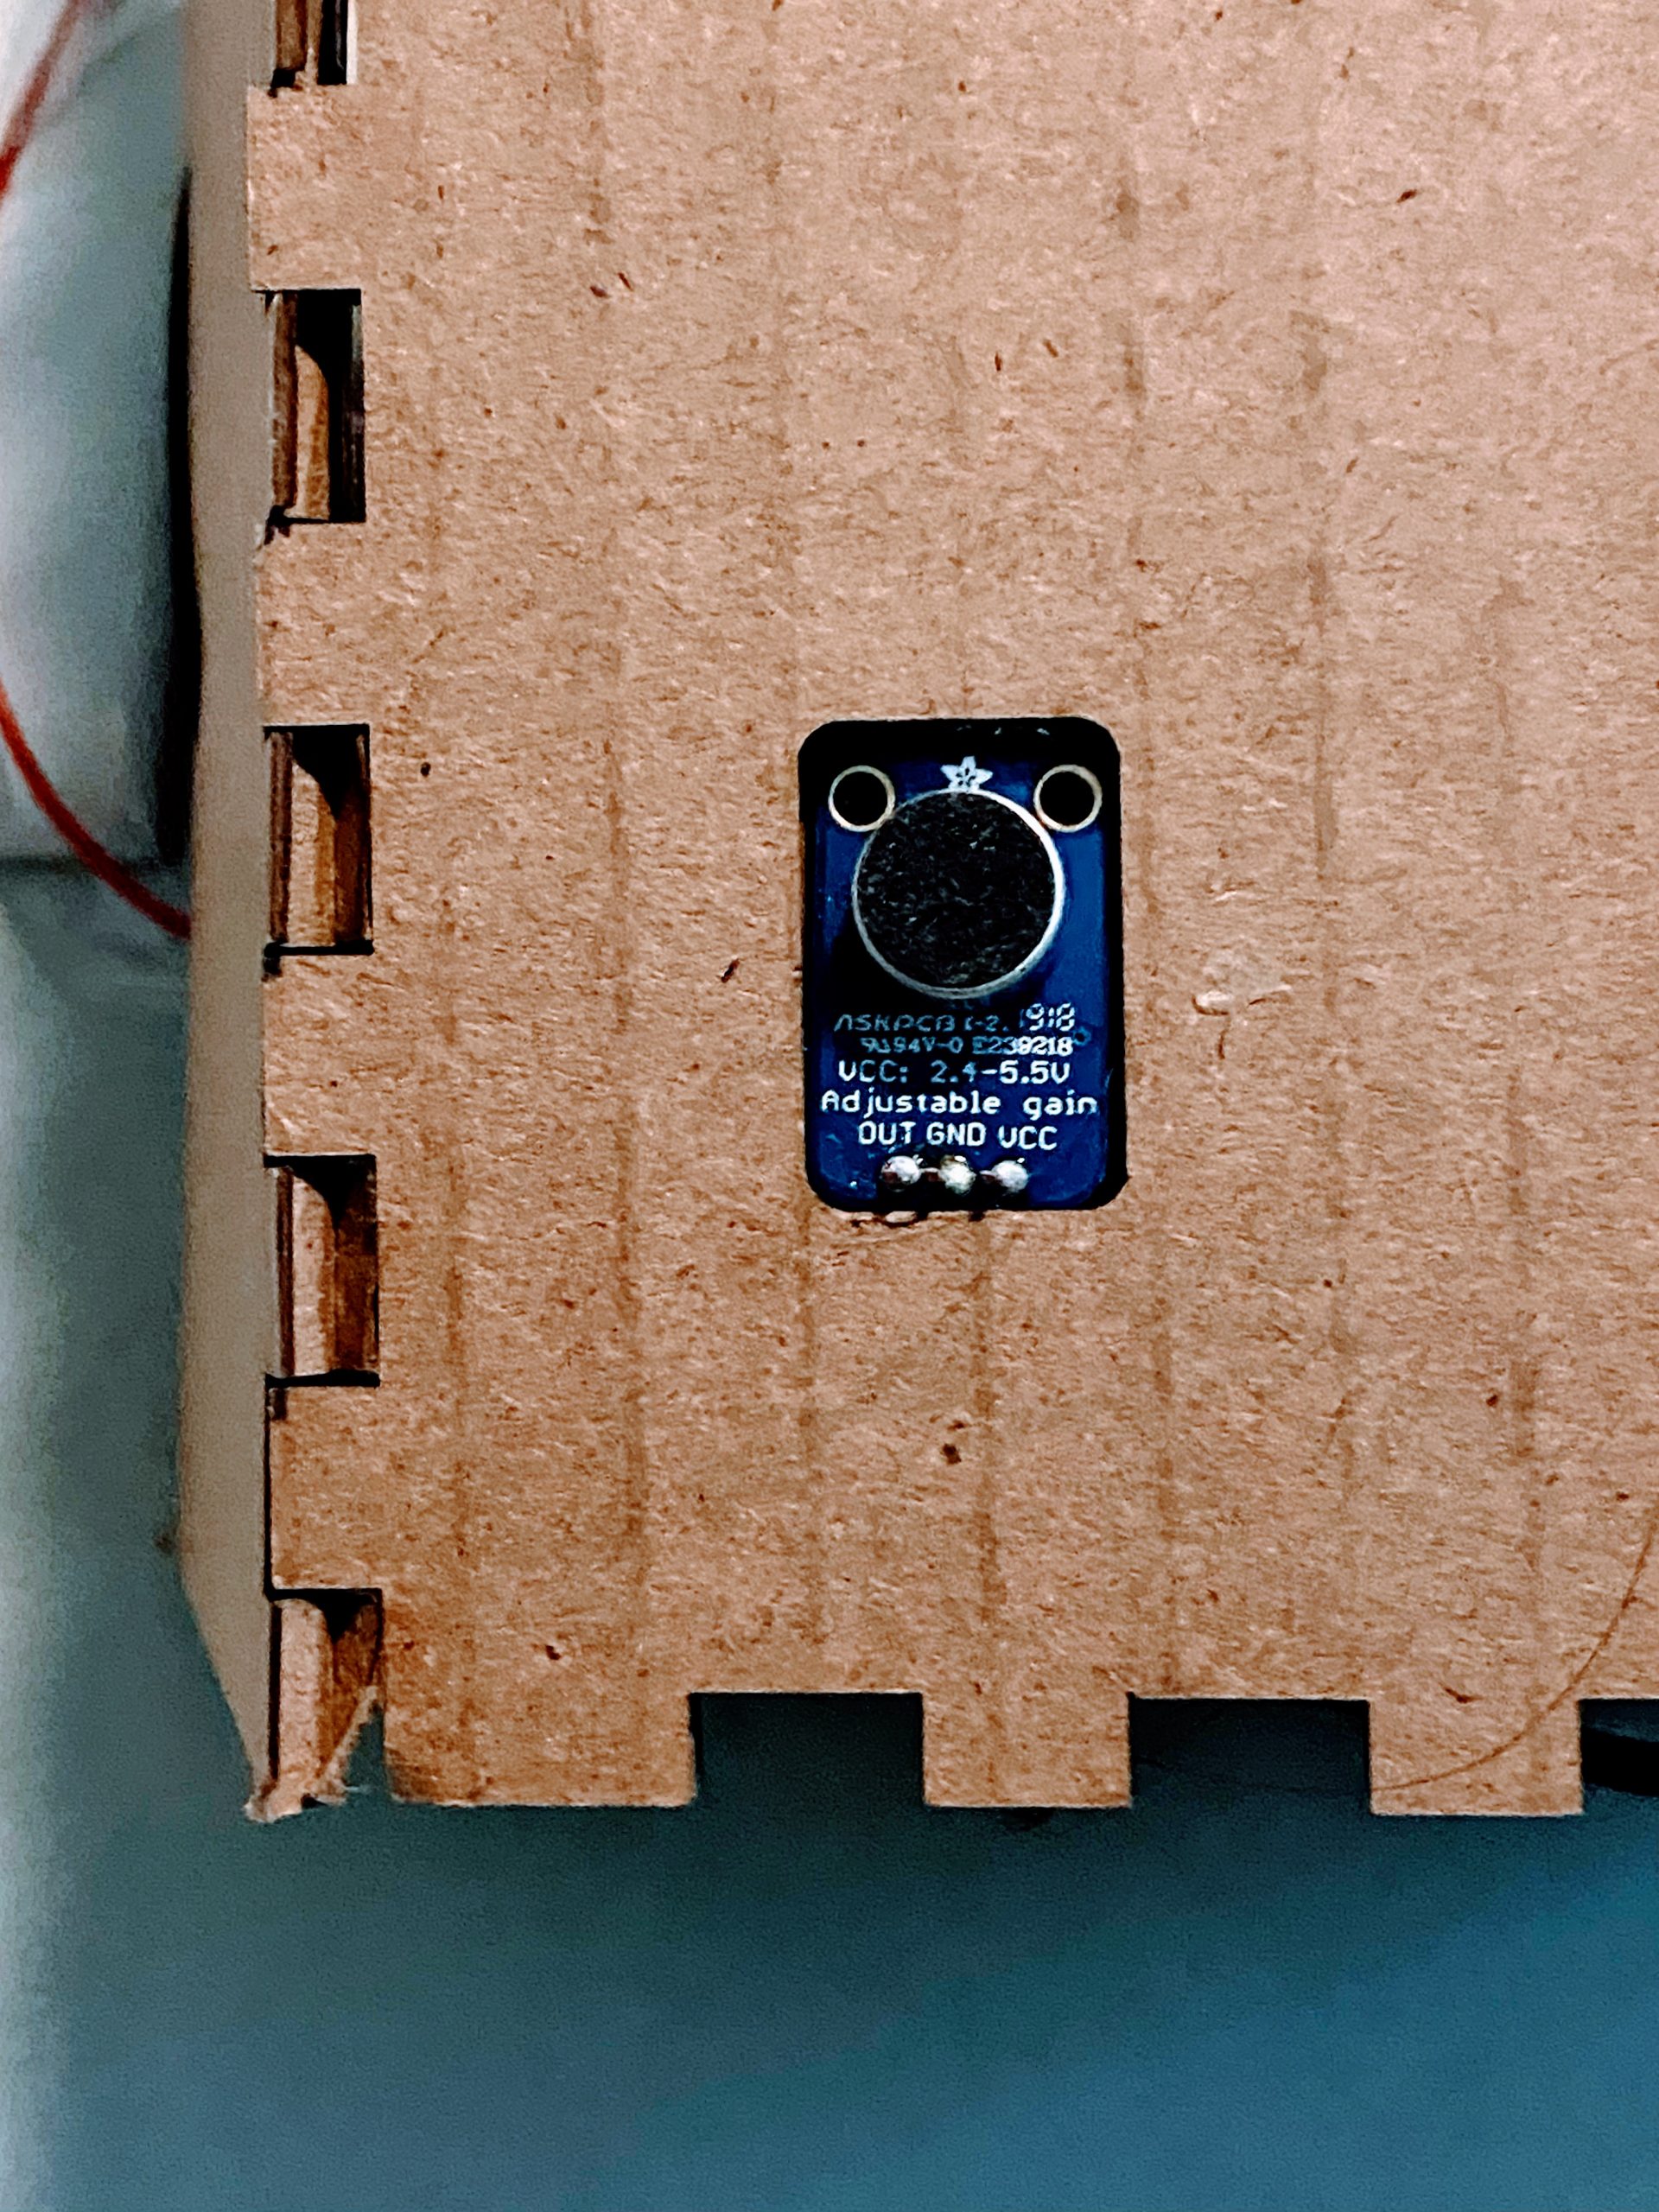
Detail photo of the electret microphone installment soldered to an internal breadboard
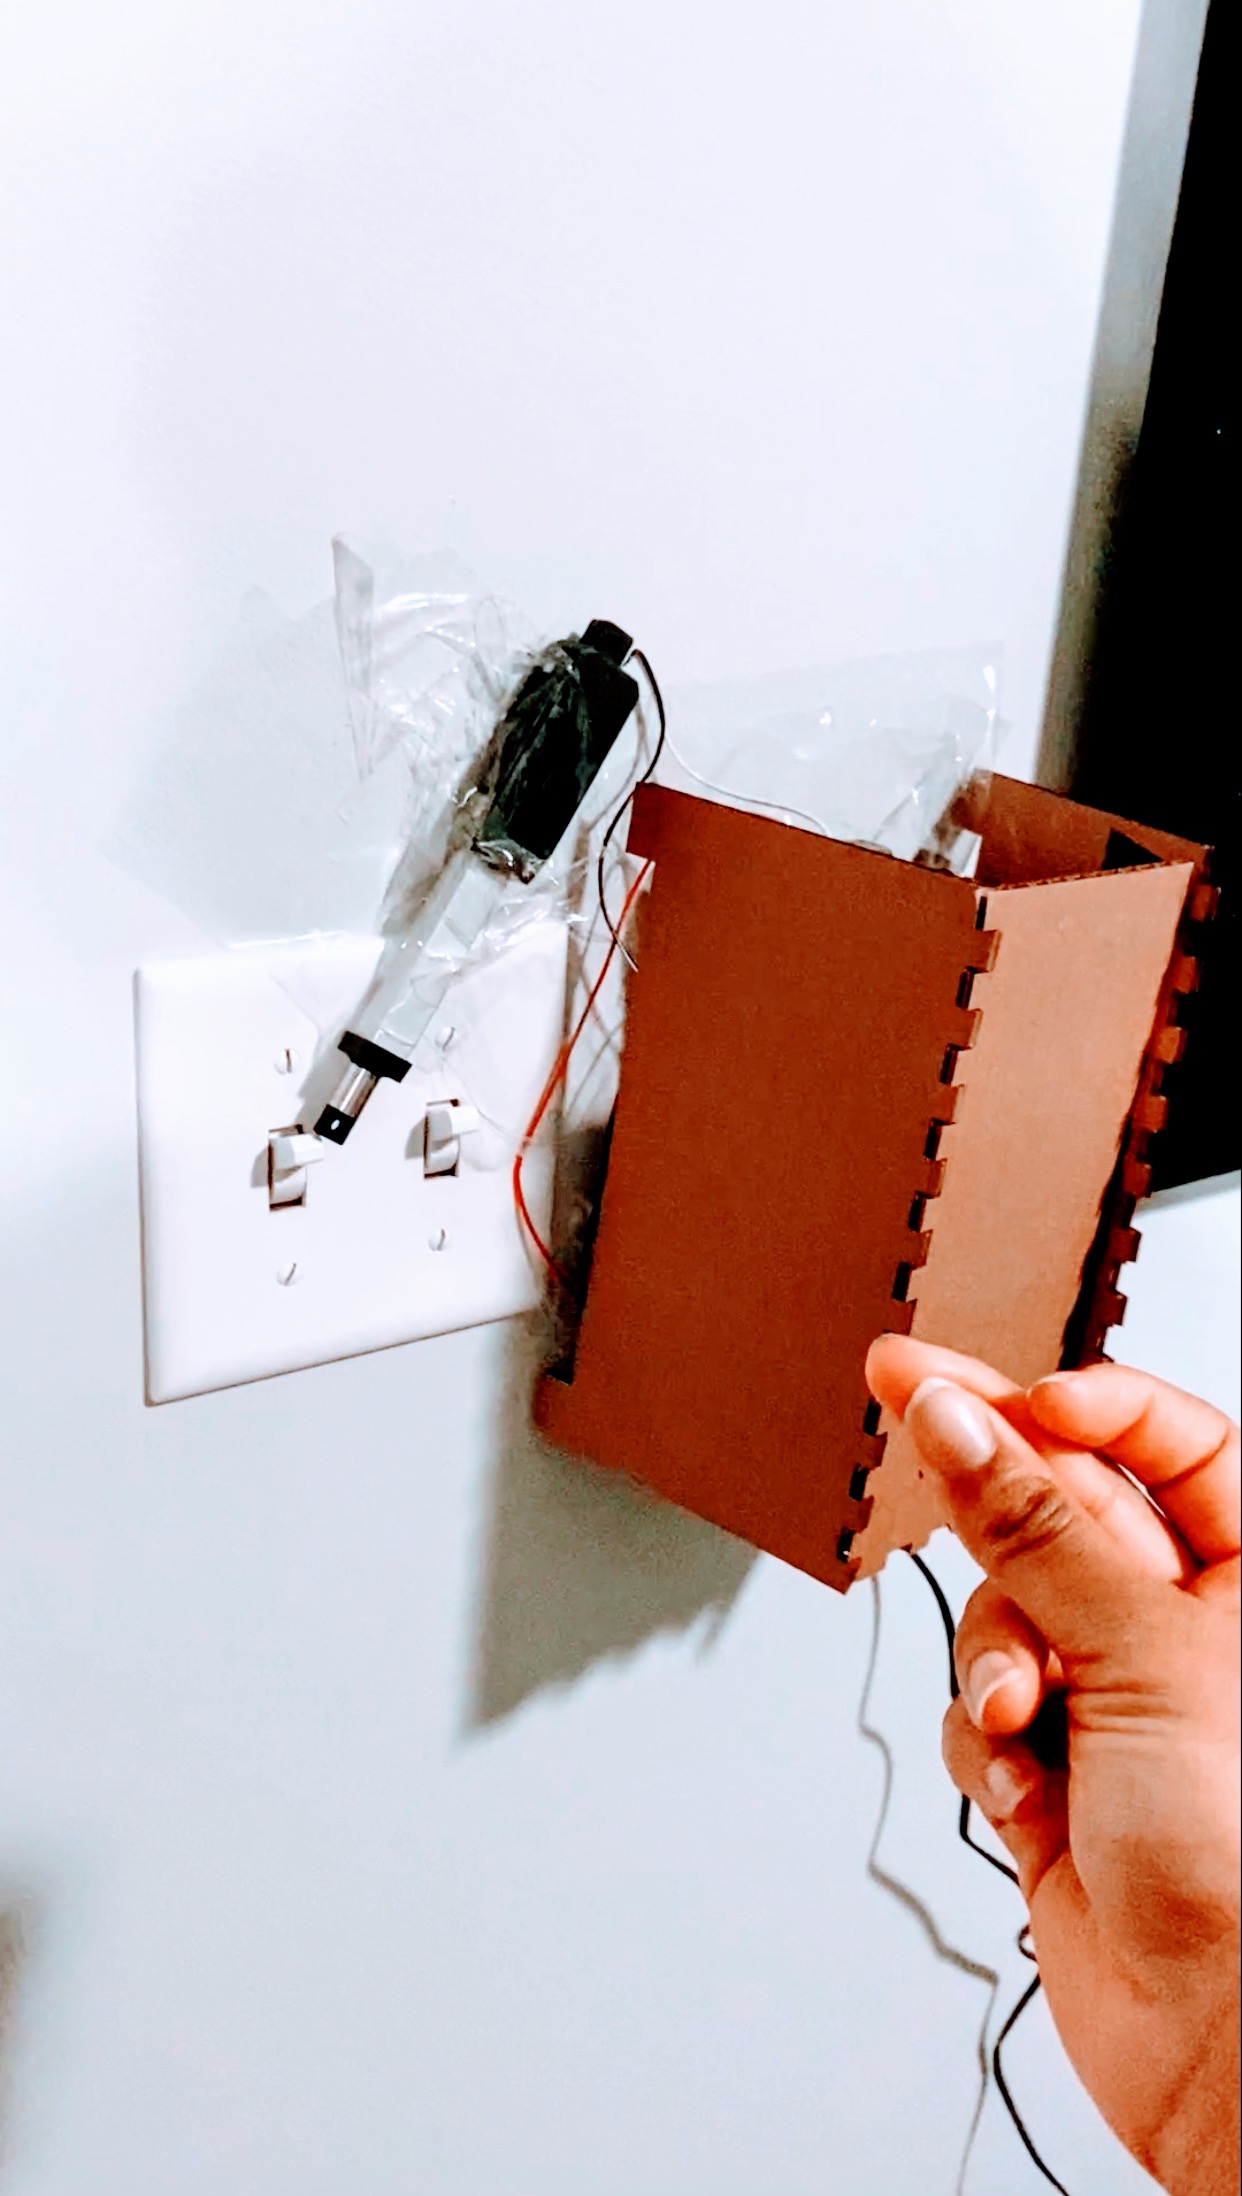
Image showing the use of my device. Once I snap or clap, it’s picked up by a small microphone and moves a motor.
Process images and review
Below are some images of my pivot points. The first big issue I had to tackle was figuring out the mechanical setup o f my device. I knew I needed an actuator that moved linearly in some way so I could turn the switch on the wall off and on. After I knew the exact linear actuator I was ordering, I made some hypotheses. At first, I thought I needed to fashion a squarish attachment that would do the moving. You can see the sketch of it in my sketchbook, and next to it is the refined version that I ideated when I realized it I didn’t want to code the extra step of having the actuator return to neutral position after pushing the switch.
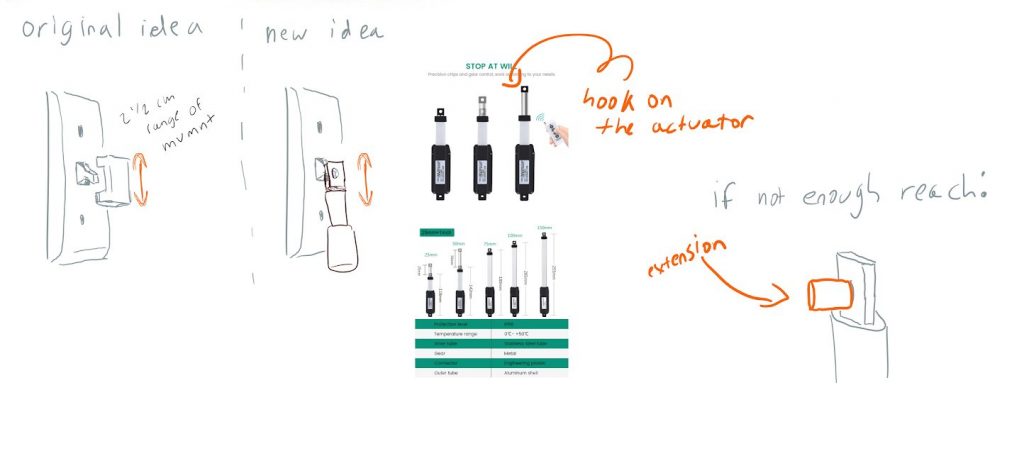
My beginning thoughts on how I would get my linear actuator to do what I wanted

The cardboard cutout I made to test out my original idea
After that, I measured out all the physical components I would need for my device, sketched it out to see how big of a box I would need to fit everything, then built a 3D model in Fusion 360.
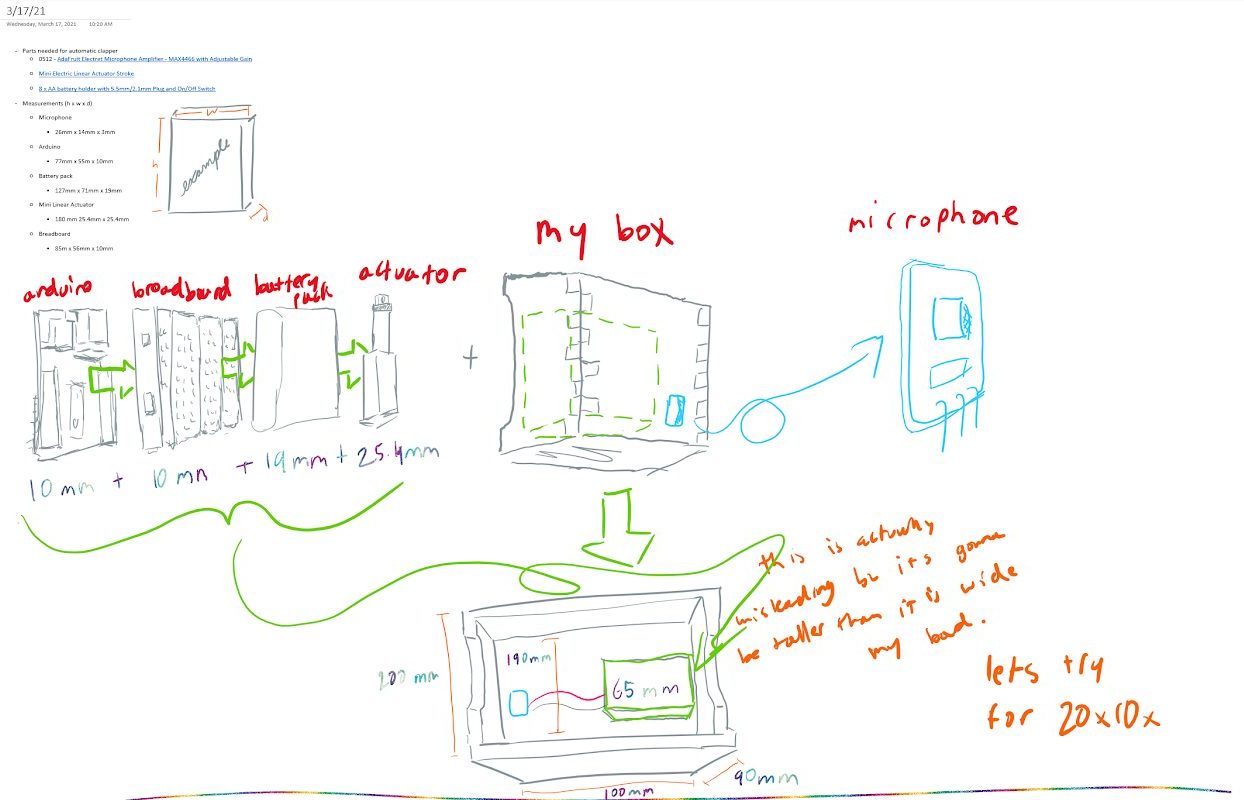
measurement sketches
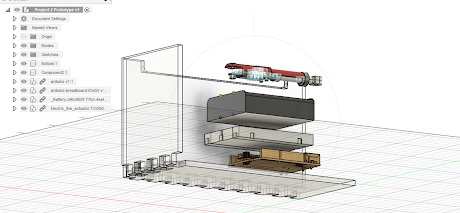
my Fusion 360 model
When I started actually building the model, I realized I drastically overestimate the size of the hole in the actuator arm. It would not be able to hook the switch, so I just made it push the switch, measuring carefully in my Arduino Sketch the amount it needed to press down.
Discussion
Response
During the crits, no had many critiques, but they asked good questions that I needed to consider:
- How does the linear actuator work?
- At the time, I thought I had a pretty good idea, but I really didn’t. I figured that it works like a servo and I can just write to it to move to a certain position. I also thought it would be easy to wire, like one wire to power in and one to power out. Luckily, I got help from the course professor, Zach, who knew how that works. An L293D motor driver was key in the process.
- How will the device pick up sound?
- The render I showed them in my crit actually had no microphone, so I’m glad they pointed that out so I could explain the concept more clearly.
parts were loose because I cut out 0.2mm of space that I did not need to cut out
Self critique
I was satisfied that my device at least worked, but I did not have time to make it look as nice as i would had hoped. I wanted everything to be neatly encased in clear acrylic including the actuator.
What you learned
I learned a lot about Fusion. I taught myself how to make finger joints, though I’m sure I used a method that could have been a lot easier. I learned how to prepare a 3D drawing for laser cutting. I learned how to bevel out the edges that I wanted to be curved as well. I realized that my panels would not fit together the way I designed them in Fusion, thanks to my laser-cut cardboard model.
Next steps
A clap-activated light switch would actually be super useful to me, so I would like to iterate again. But the device would be right next to my door which I slam sometimes and that triggers the switch, so that would get annoying. If I were to iterate, I would make then enclosing fit together nicer and make it out of more long-lasting material. I would also attach a hook to the actuator to make it actually switch the light on and of all the way. Finally, I would fit everything in the enclosing so it can attach directly over the light switch, use adhesive so tape isn’t sticking out everywhere, and switch to a battery to power my Arduino so no wires are plugged into the wall. I actually had to unplug my Xbox for the device, so that is not ideal at all.
Technical information
Schematic and block diagrams
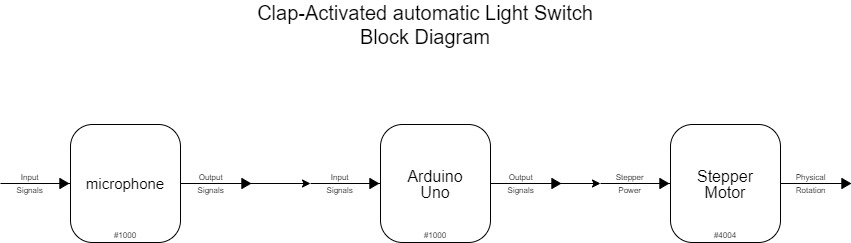
block diagram
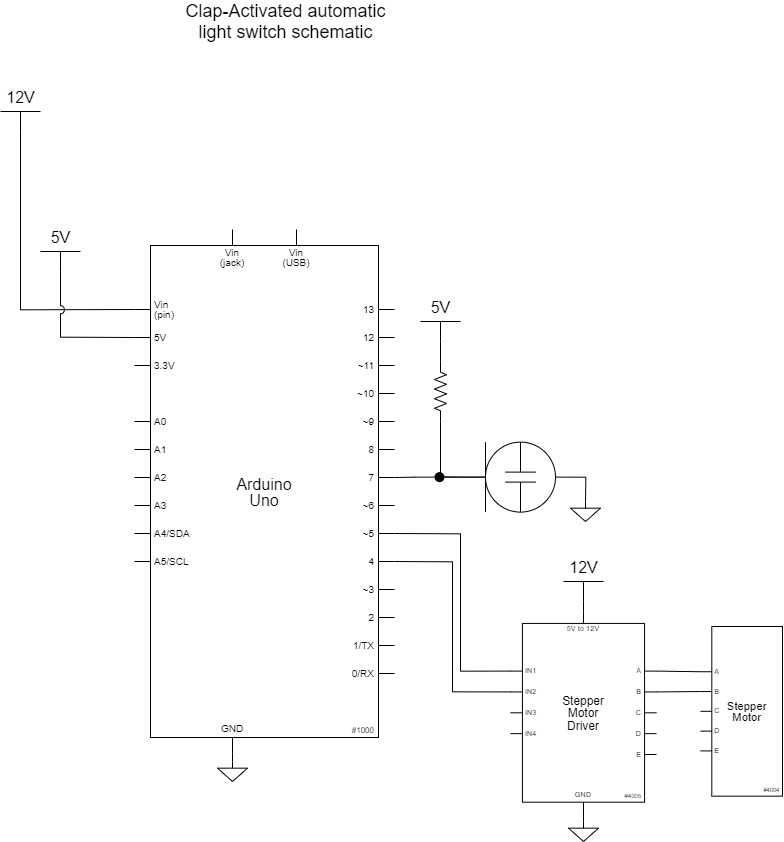
schematic
Code submission
/****************************************
 * Clap-Activated Light Switch Sketch
 * Dominique Aruede
 *
 * Description:
 * This sketch moves an actuator to turn a light on and off whenever it hears
 * you clap or snap, so you can turn off your light remotely.

  Pin mapping:
  Arduino pin | type   | description
  ------------|--------|-------------
  A3           output   linear actuator
  A4           output   linear actuator
  A1            input   electret microphone

  Collaboration and sources:
  Example Sound Level Sketch for the
  Adafruit Microphone Amplifier
****************************************/

const int LINEARARMPIN1 = A3;
const int LINEARARMPIN2 = A4;
const int MICPIN = A1;
const int WAIT = 1000;
unsigned long timerVariable = 0;
const int sampleWindow = 50; // Sample window width in mS (50 mS = 20Hz)
unsigned int sample;
boolean toggle = 1;

int micState = 0;
int armState = HIGH;

void setup()
{
  Serial.begin(9600);
  pinMode(MICPIN, INPUT);
  pinMode(LINEARARMPIN1, OUTPUT);
  pinMode(LINEARARMPIN2, OUTPUT);
}


void loop()
{
  unsigned long startMillis = millis(); // Start of sample window
  unsigned int peakToPeak = 0;   // peak-to-peak level
  micState = peakToPeak;
  armState = analogRead(LINEARARMPIN1);
  timerVariable = millis();

  unsigned int signalMax = 0;
  unsigned int signalMin = 1024;

  // collect data for 50 mS
  while (millis() - startMillis < sampleWindow)
  {
    sample = analogRead(MICPIN);
    if (sample < 1024)  // toss out spurious readings
    {
      if (sample > signalMax)
      {
        signalMax = sample;  // save just the max levels
      }
      else if (sample < signalMin)
      {
        signalMin = sample;  // save just the min levels
      }
    }
  }
  peakToPeak = signalMax - signalMin;  // max - min = peak-peak amplitude
  double micState = (peakToPeak * 5.0) / 1024;  // convert to volts

// if mic hears sound, move up or down depending on position of switch
   if (micState > 2 && toggle == 0){
    Serial.println("hey");

    while (millis() - timerVariable < WAIT) {
      digitalWrite(LINEARARMPIN1, HIGH);
      digitalWrite(LINEARARMPIN2, LOW);
      delay(1000);
      toggle = !toggle;
    }
  }
  if (micState > 3 && toggle == 1) {
    Serial.println("whats up");

    while (millis() - timerVariable < WAIT) {
      digitalWrite(LINEARARMPIN1, LOW);
      digitalWrite(LINEARARMPIN2, HIGH);
      delay(1000);
      toggle = !toggle;
    }
  }
  //  Serial.println(timerVariable);
  digitalWrite(LINEARARMPIN1, LOW);
  digitalWrite(LINEARARMPIN2, LOW);
  if (millis() - timerVariable > sampleWindow) {
    Serial.print("mic state: ");
    Serial.println(micState);
    Serial.print("arm position: ");
    Serial.println(armState);
    timerVariable = millis();
  }

}