Introduction:
Our client Mark lives with a visual impairment and mild memory loss due to a traumatic brain injury. From our conversation with Mark and his caretaker Bill, we learned that Mark’s day-to-day life can be improved if he had a device that helped remind him of his daily schedule in a way that integrates seamlessly into his existing habits. We met with Mark over the course of the project, twice in person and once over the phone. During these meetings, Mark gave us crucial feedback to fine-tune this project to his needs.
What We Built:
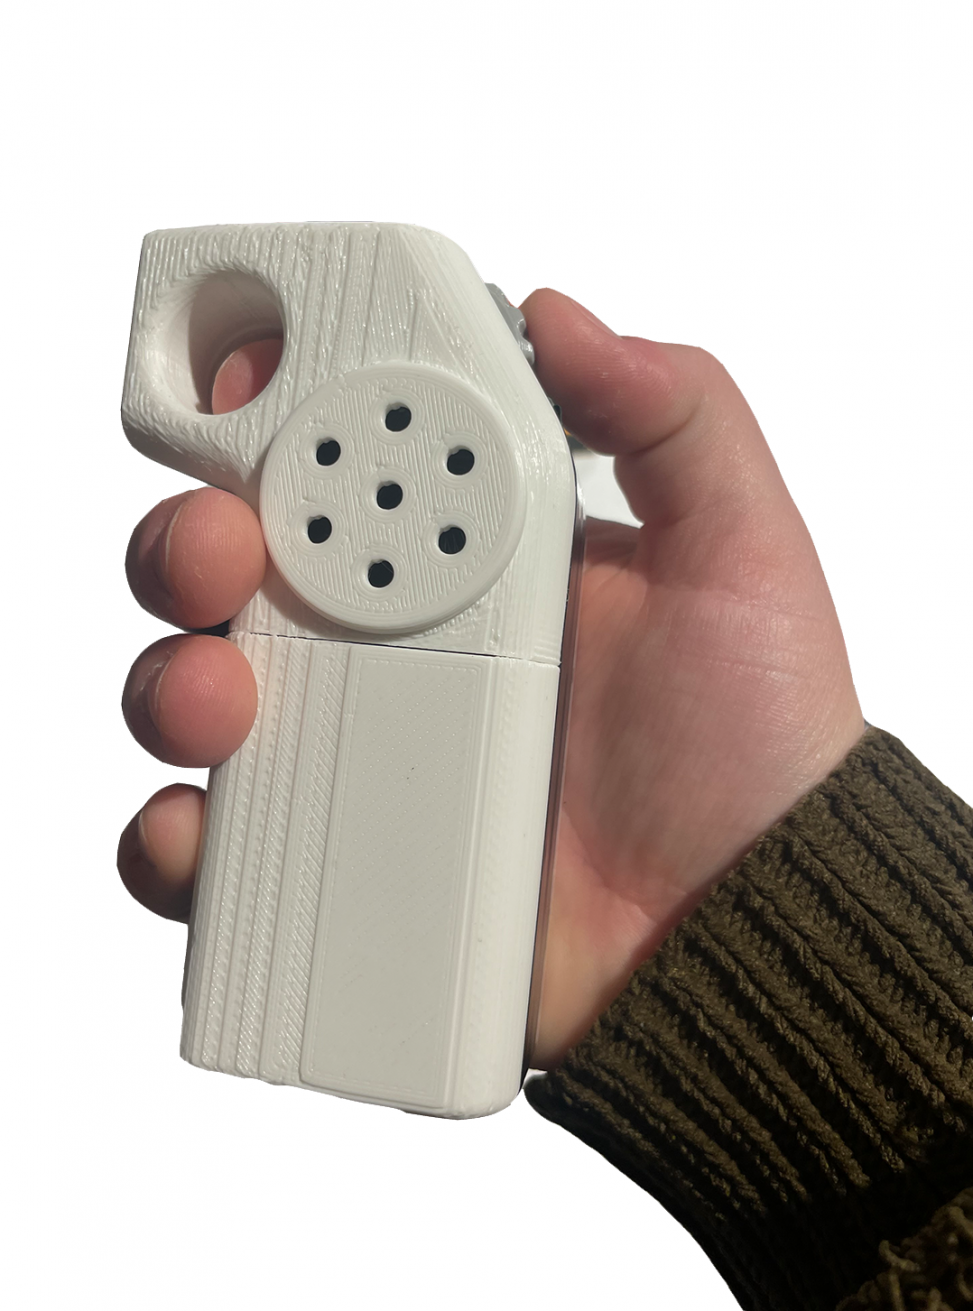
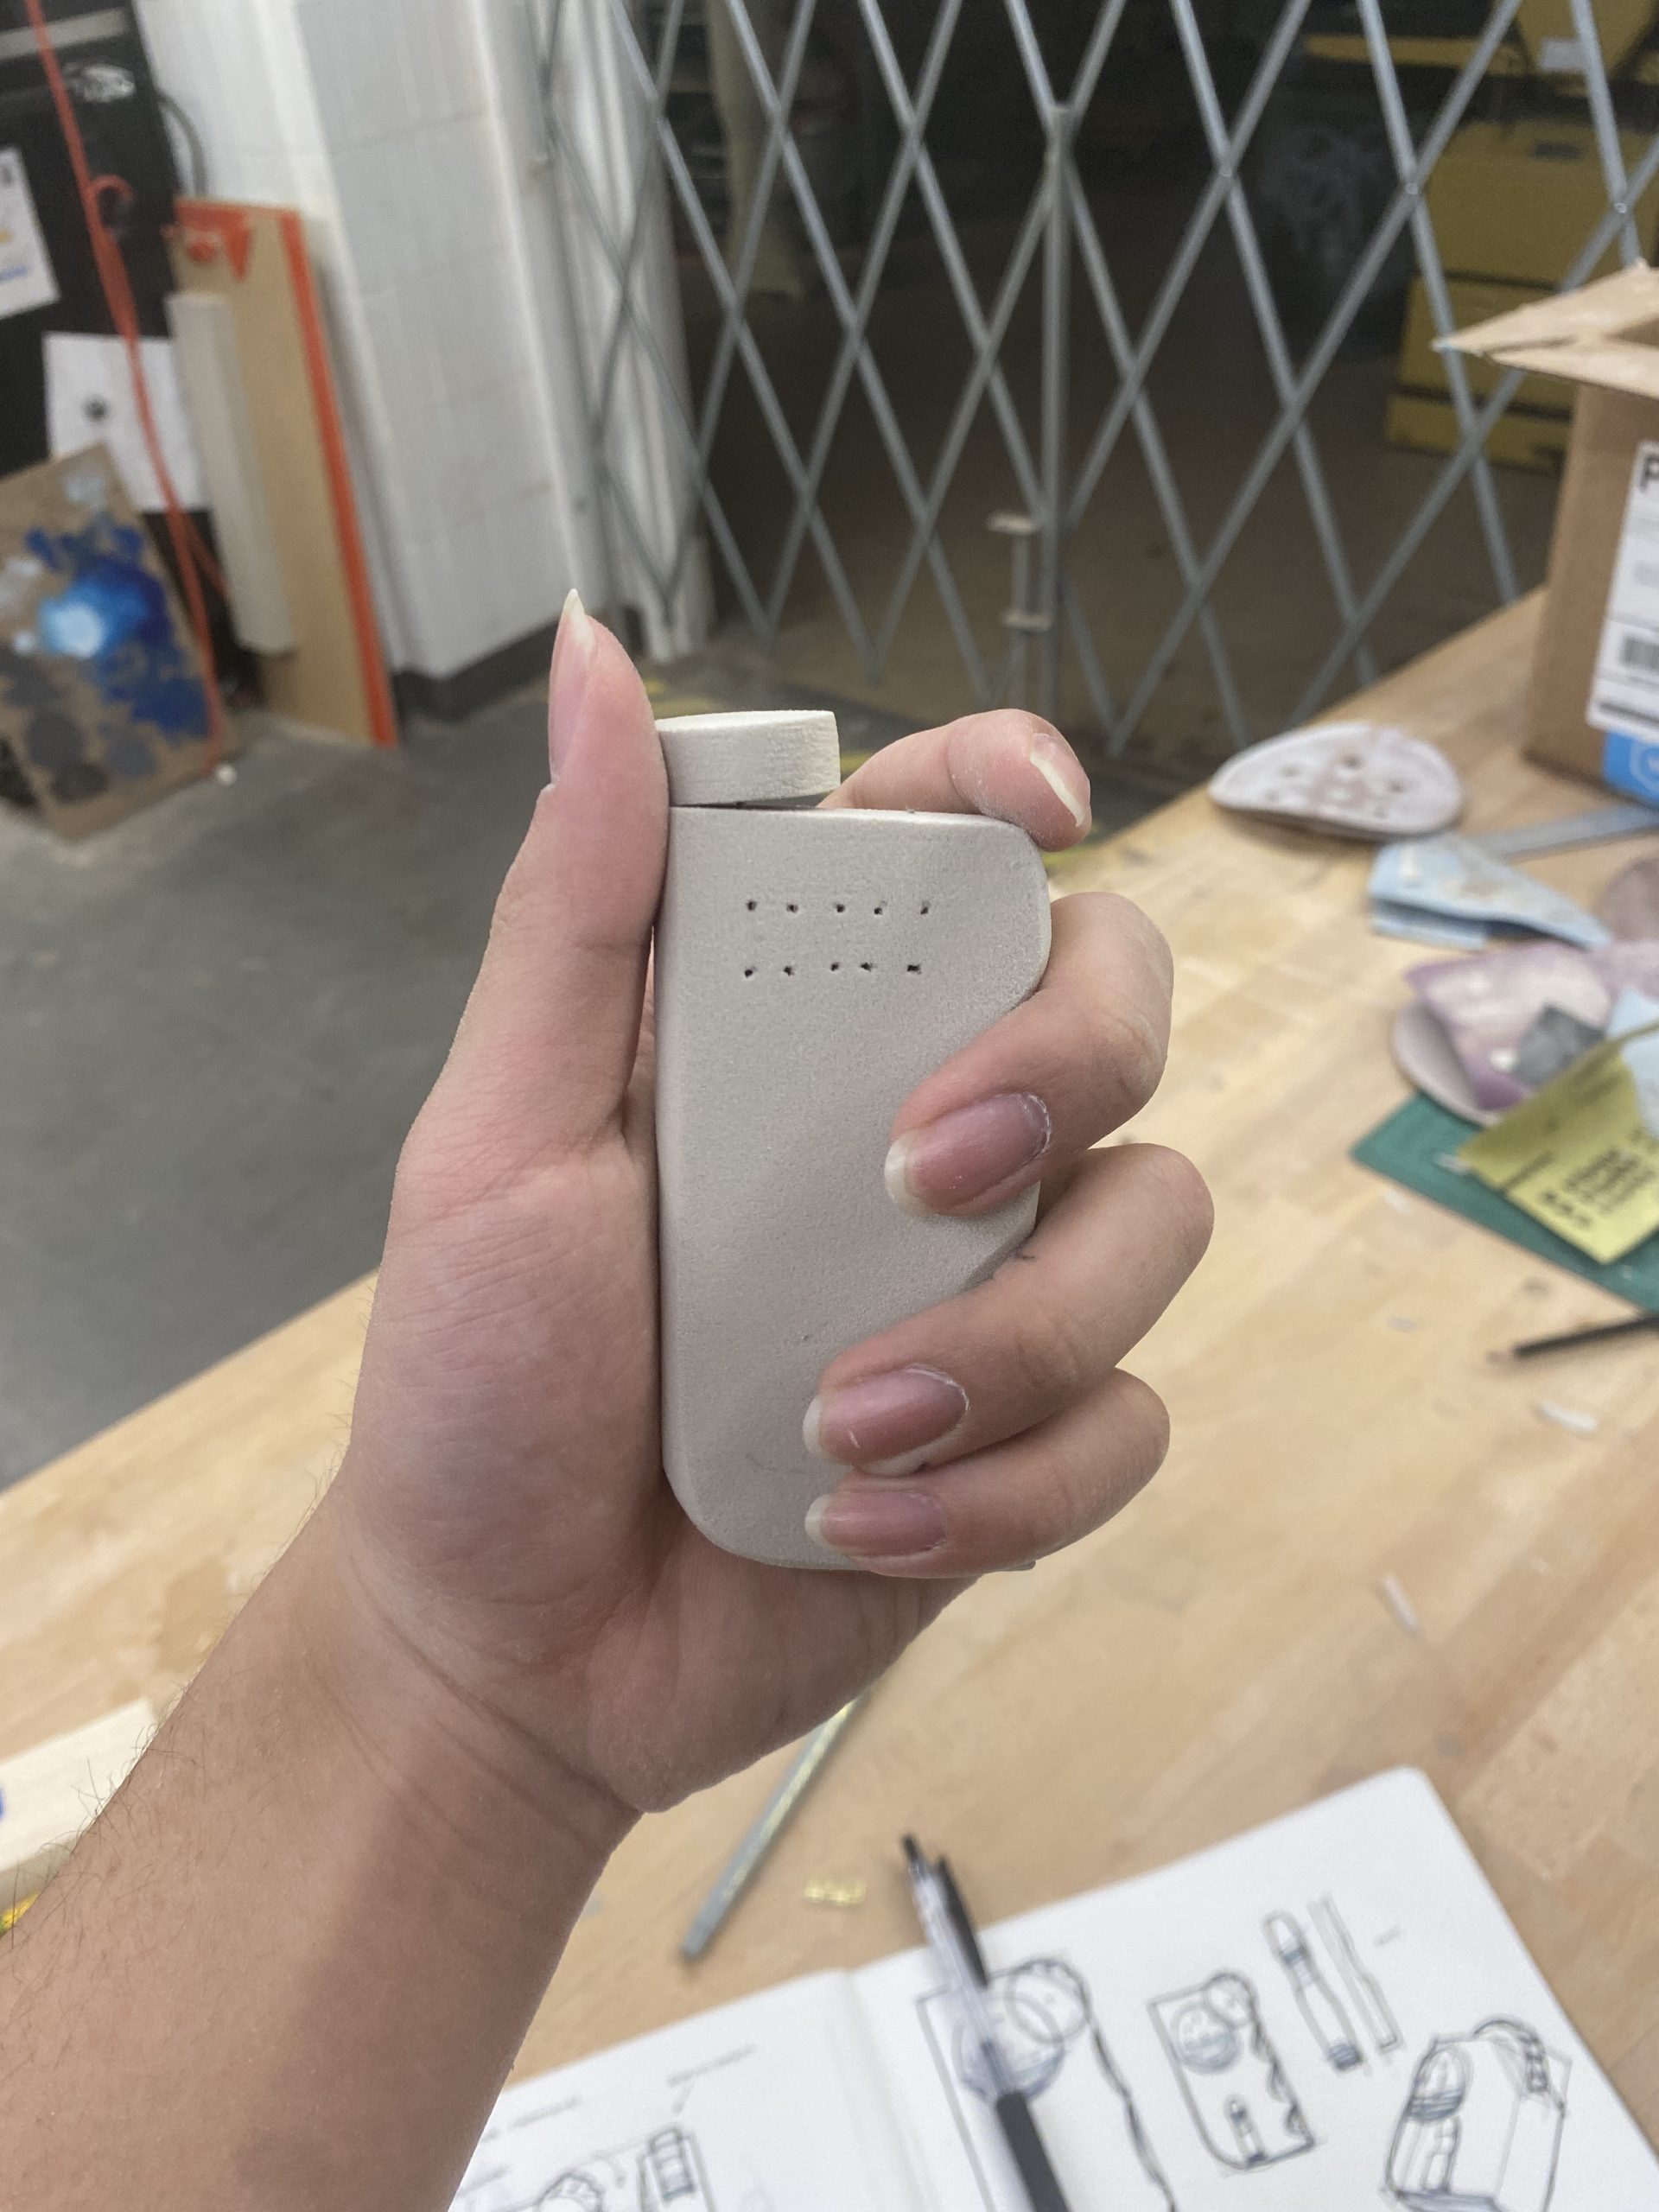
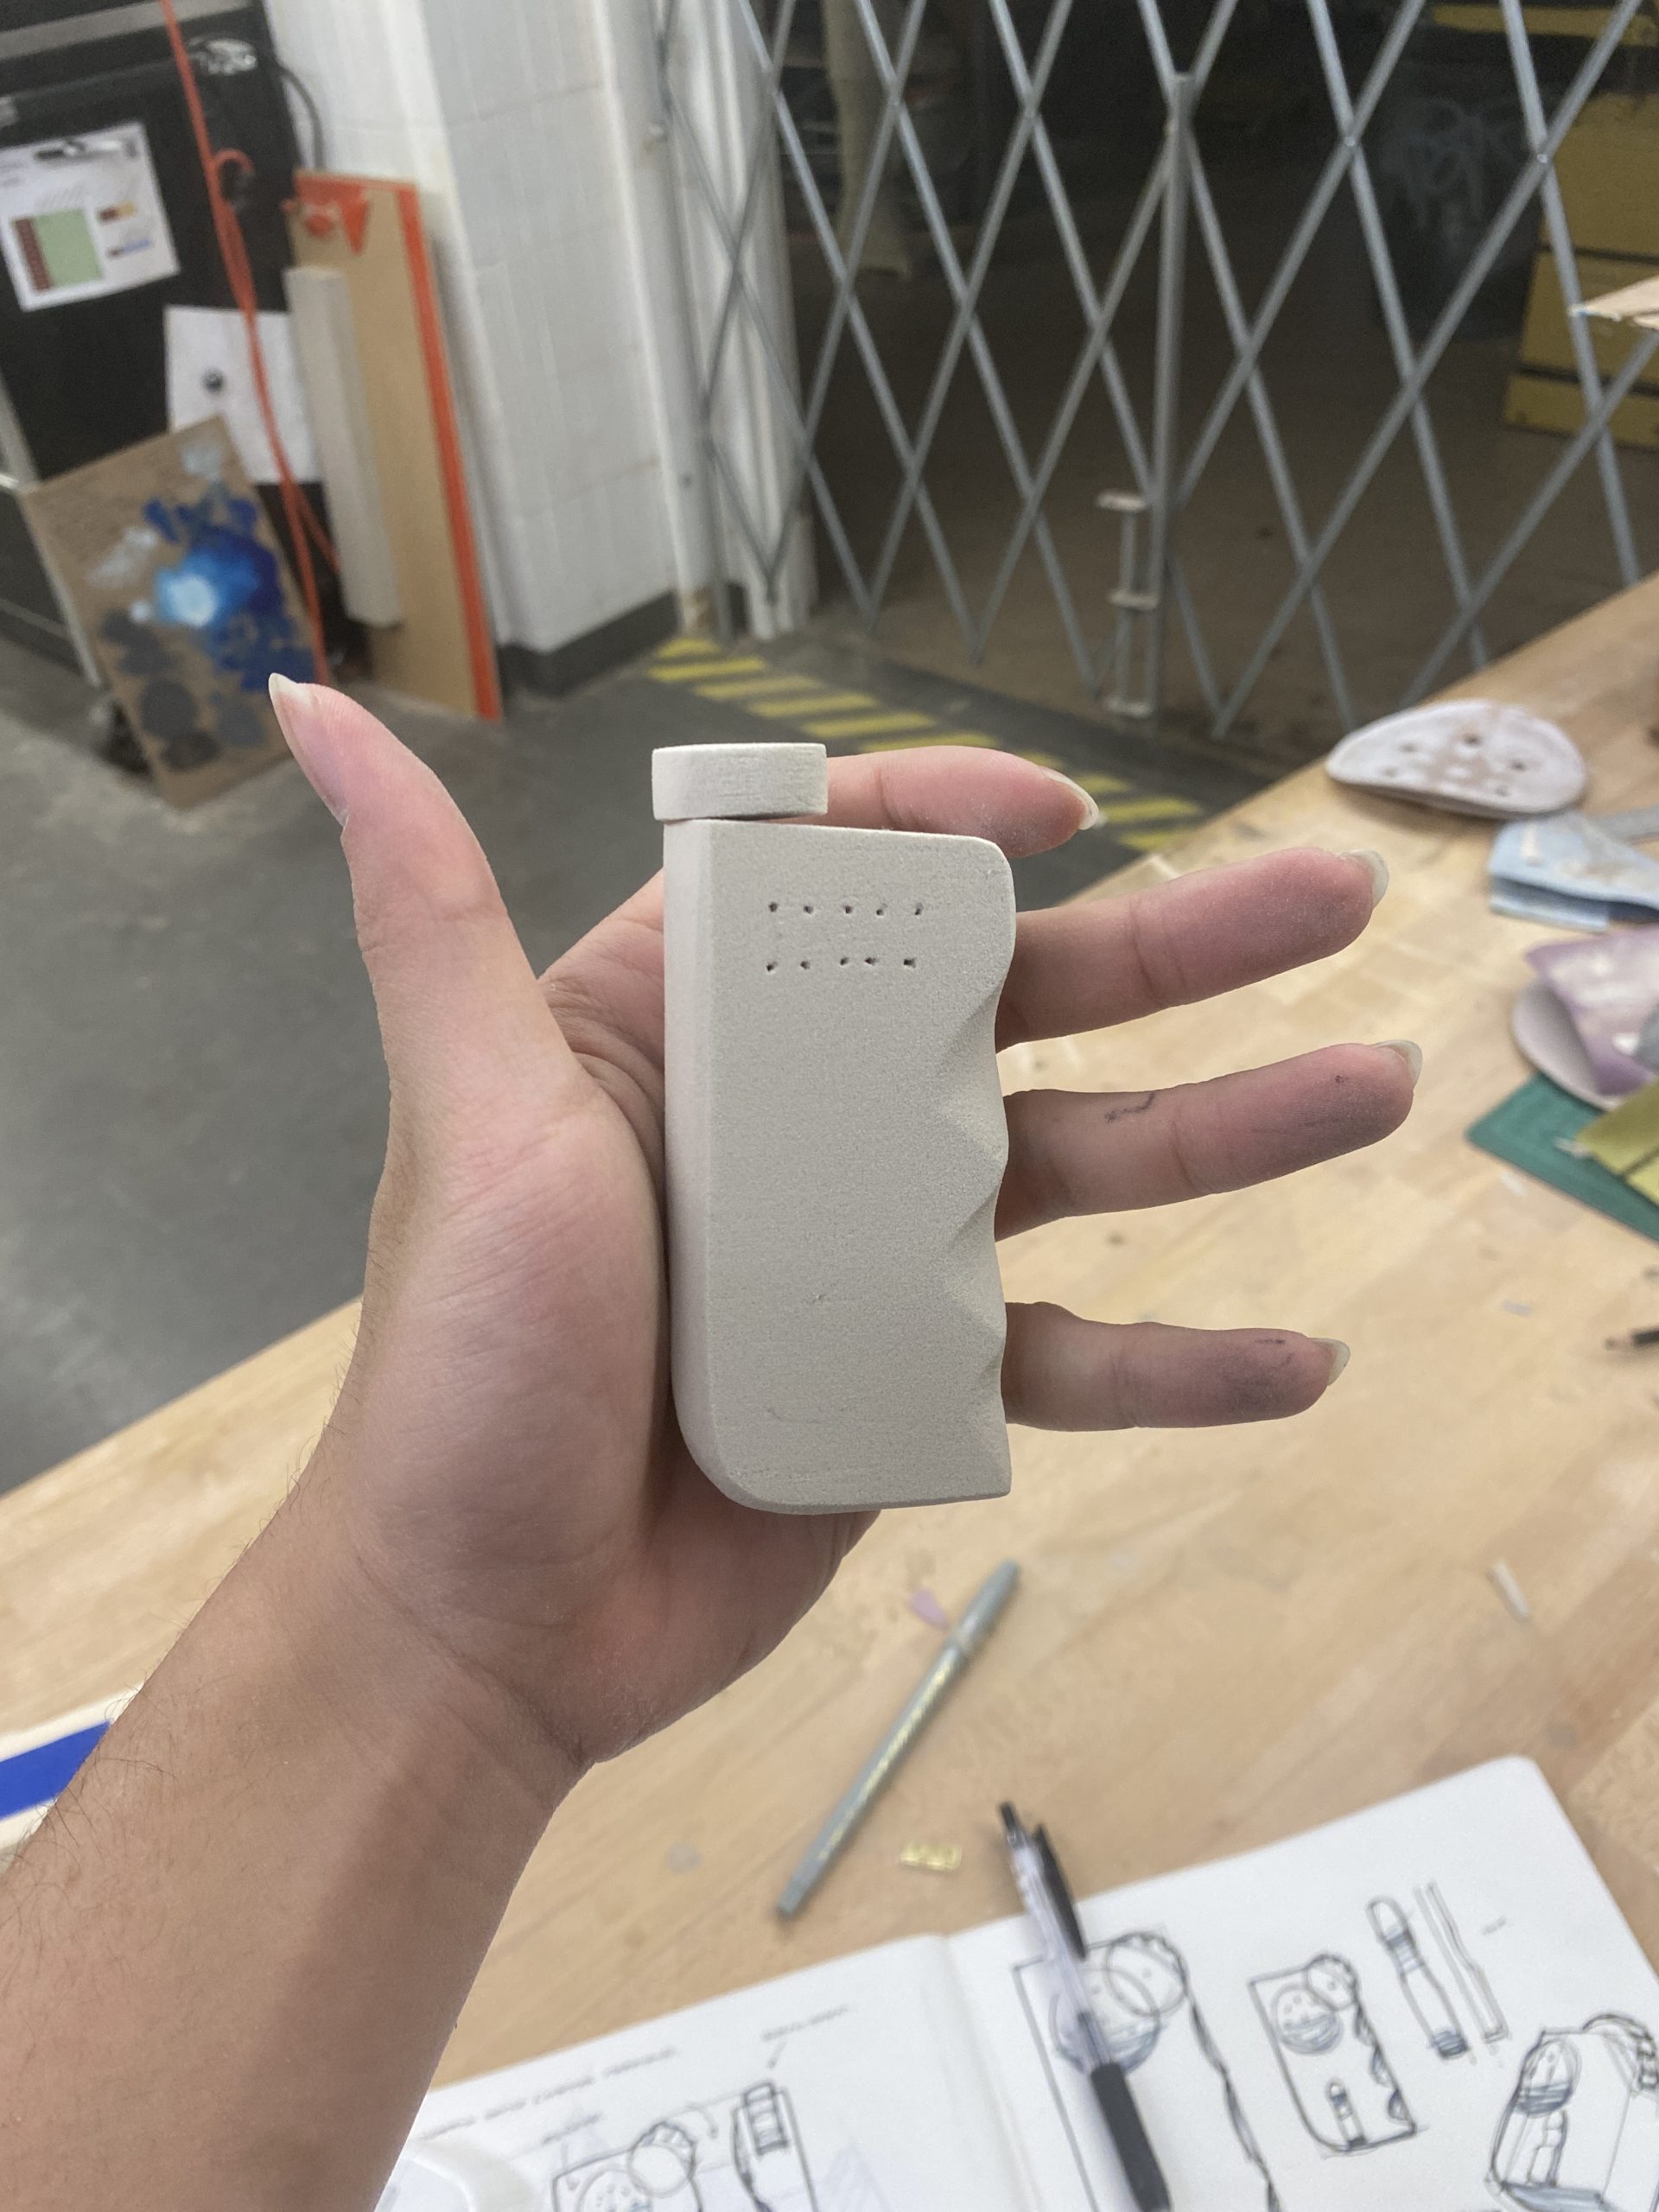
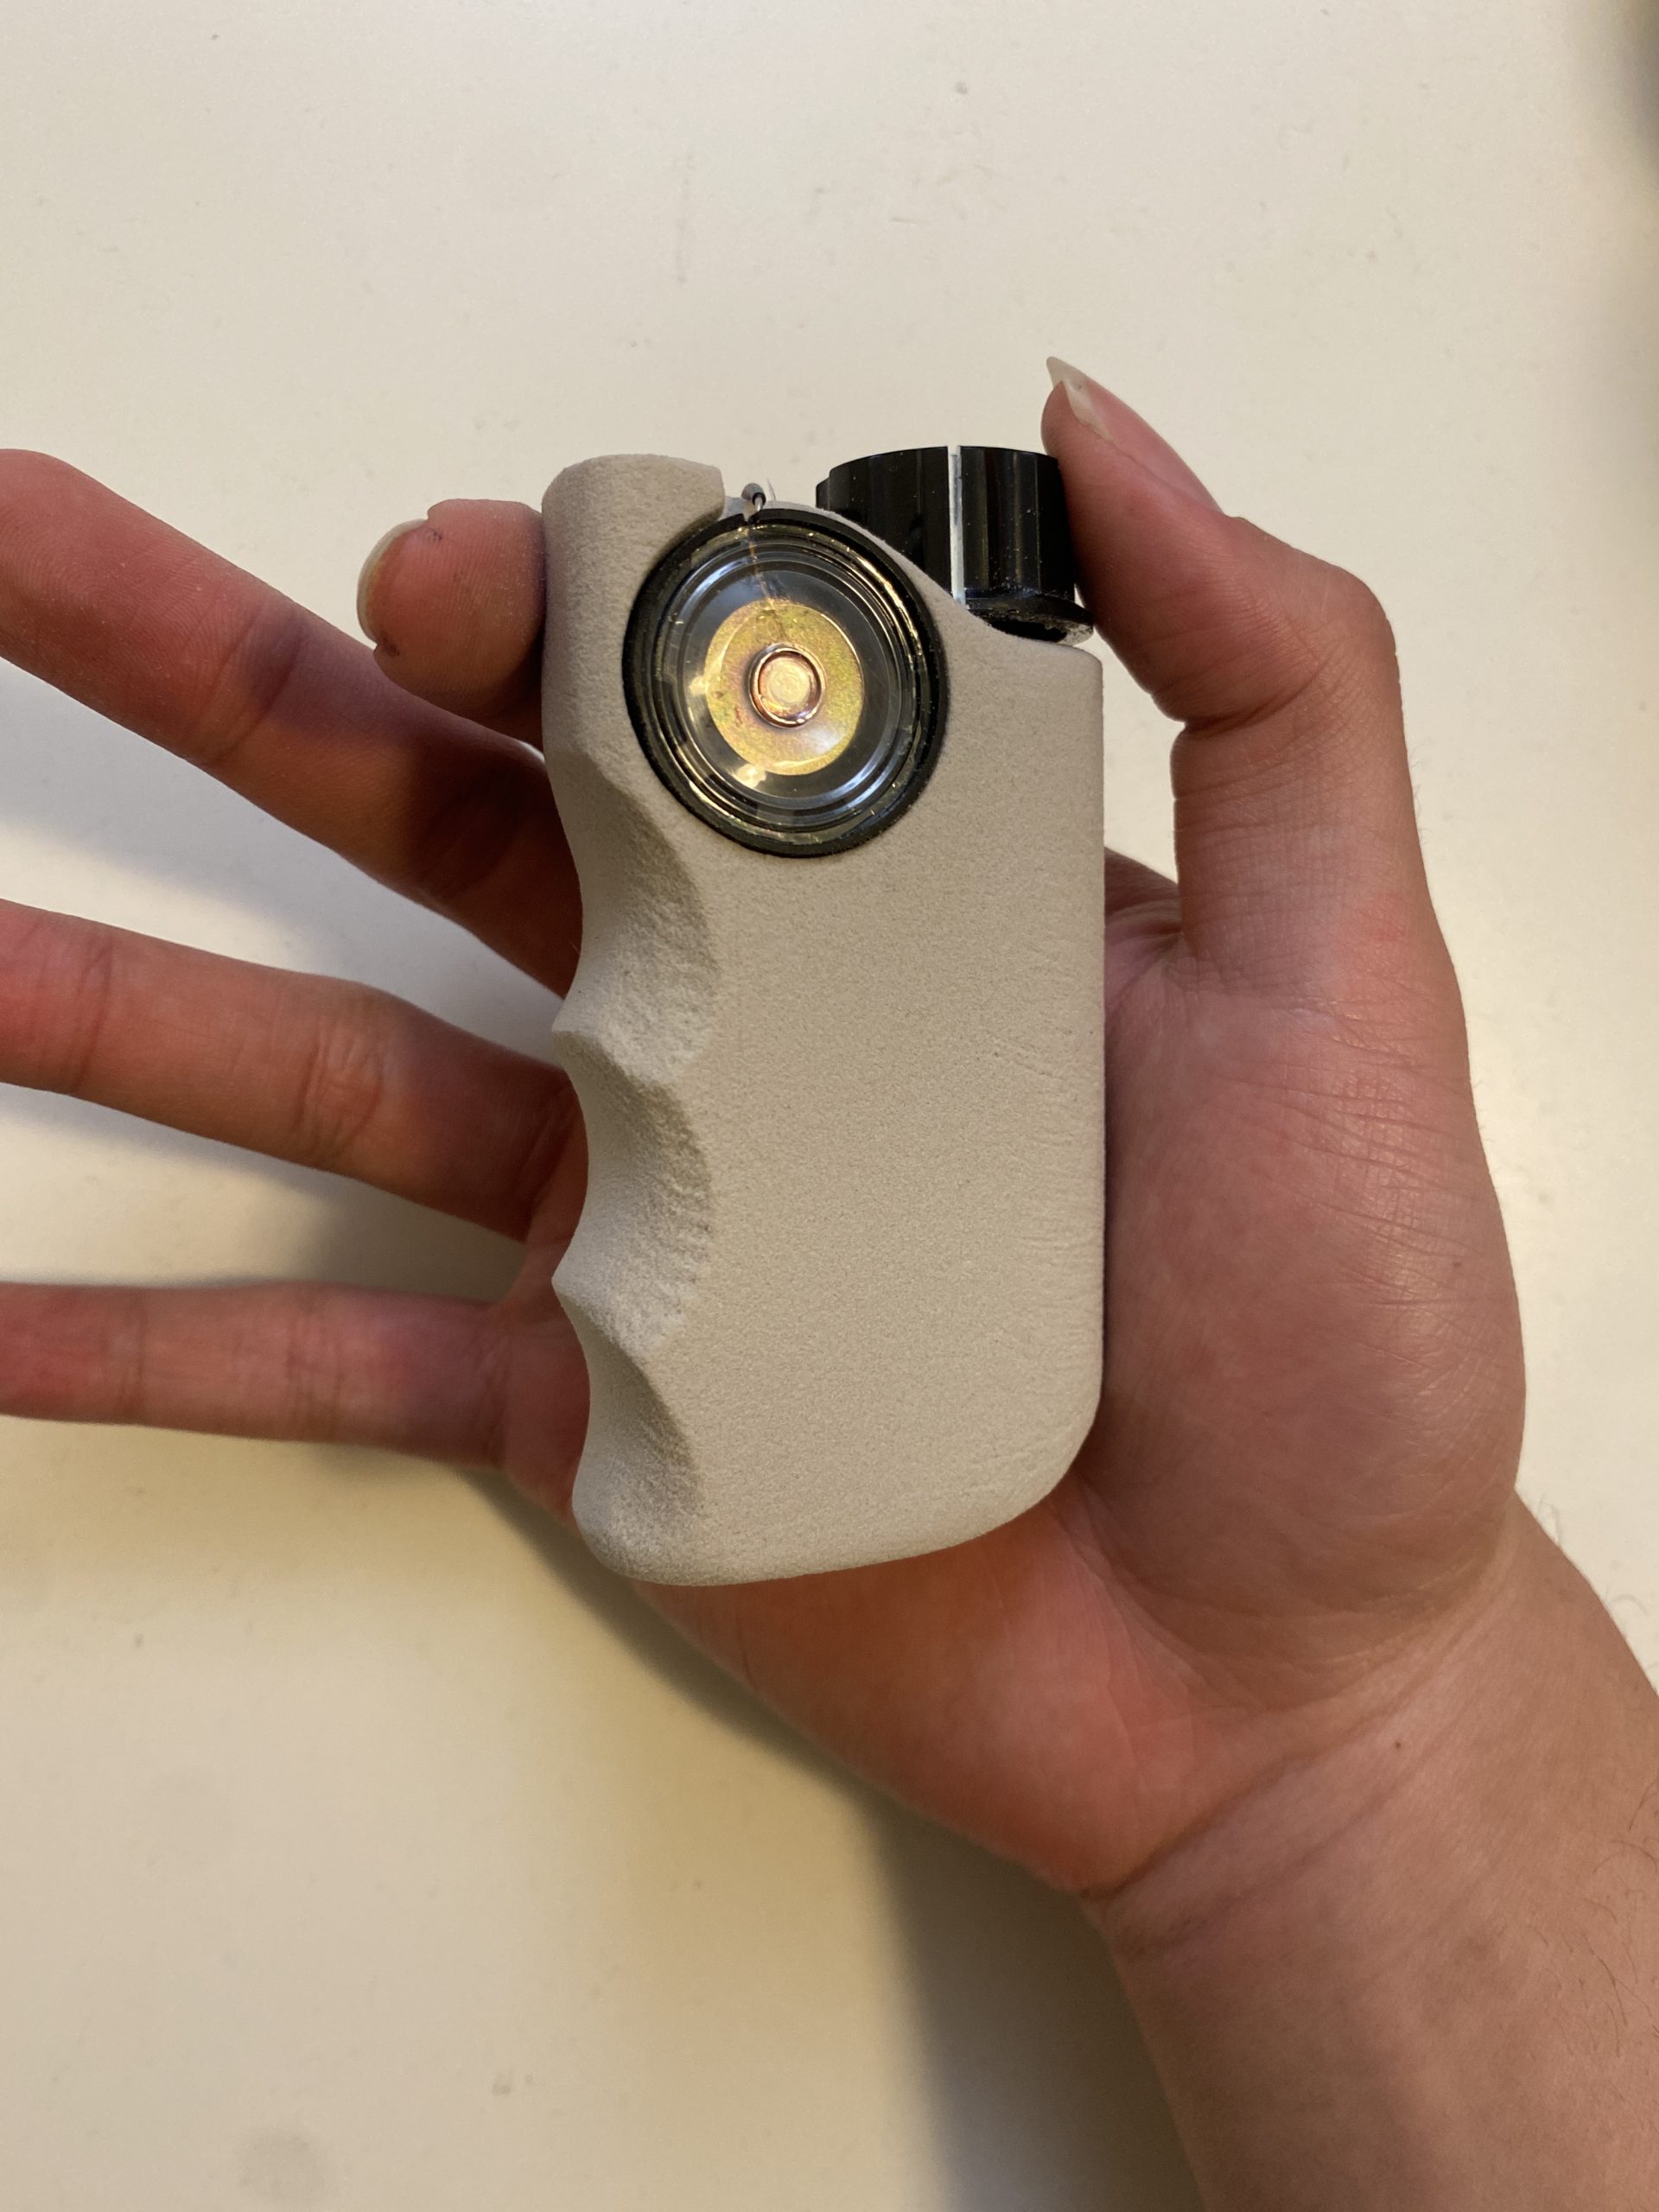
We created a handheld playback device that stores and plays pre-recorded audio messages. Each message is assigned to a specific hour of the day. When Mark picks up the device and holds it up to his ear, the device plays the message corresponding to the current hour. If Mark wants to hear reminders scheduled for other hours of the day, there is a dial located near the user’s thumb that allows for scrolling forwards or backwards through all 24 hours of the day. The device is designed so the user can comfortably scroll the dial whilst holding the device to the ear to listen for audio cues rather than a visual display to navigate through the hours. The housing is specifically formed to Mark’s hands and uses ergonomic touch-points (areas of the device that come in contact with the user) to comfortably and intuitively use the device.
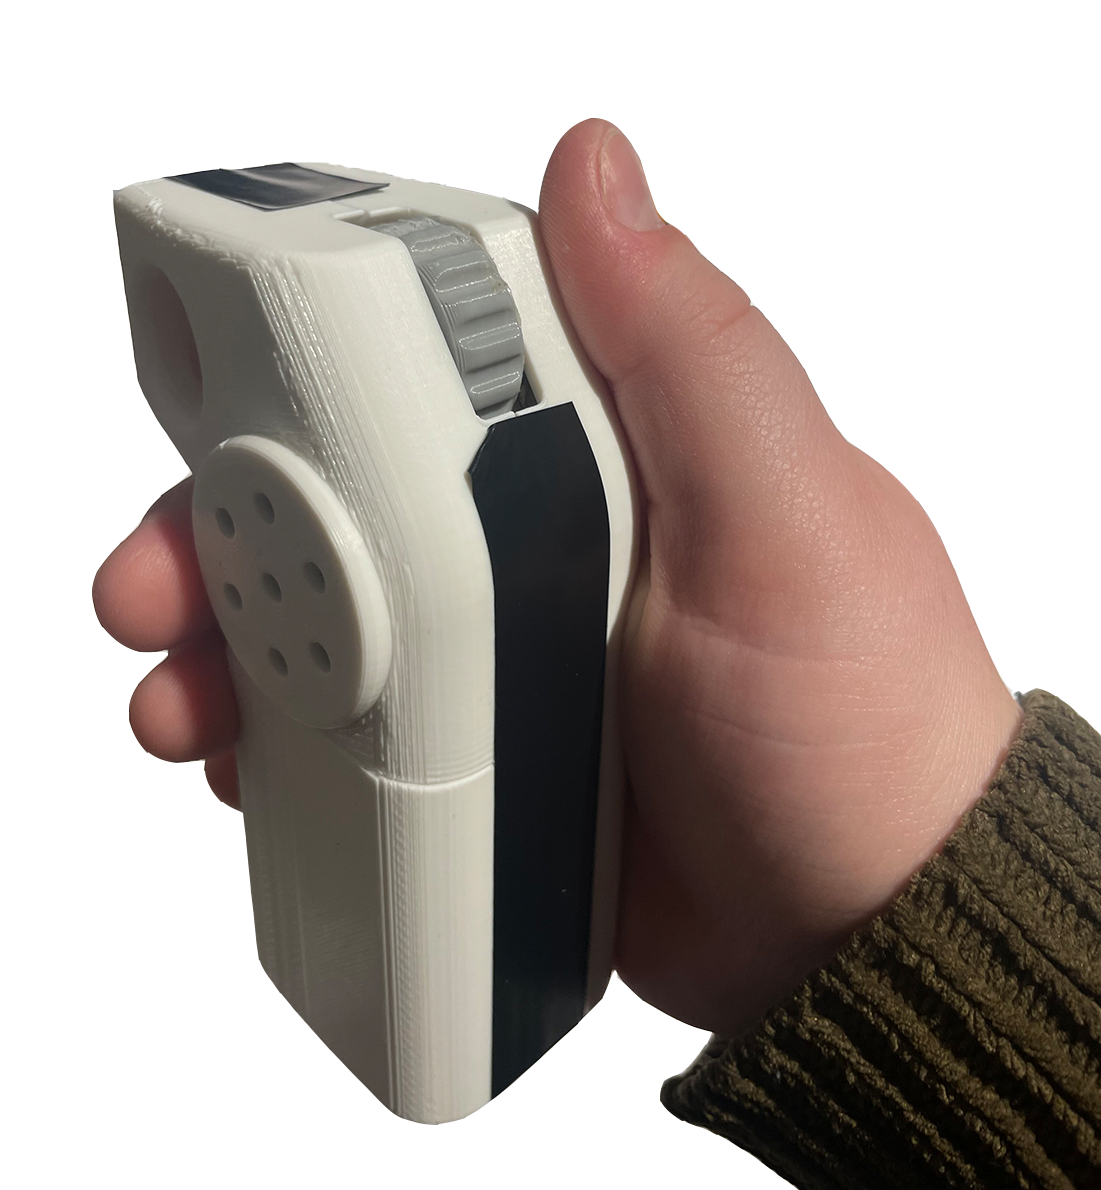
Image of the final product being held. (1)

Image of the final product being held. (2)
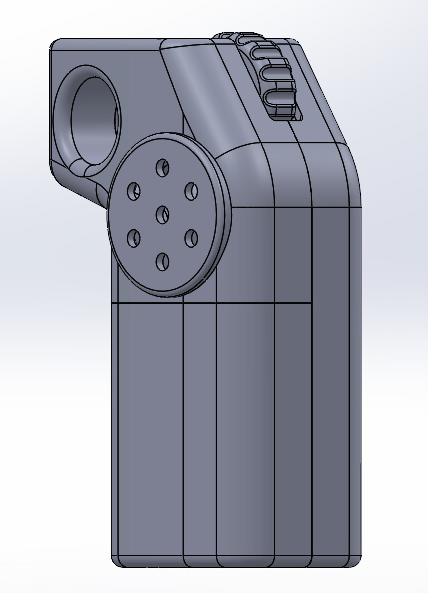
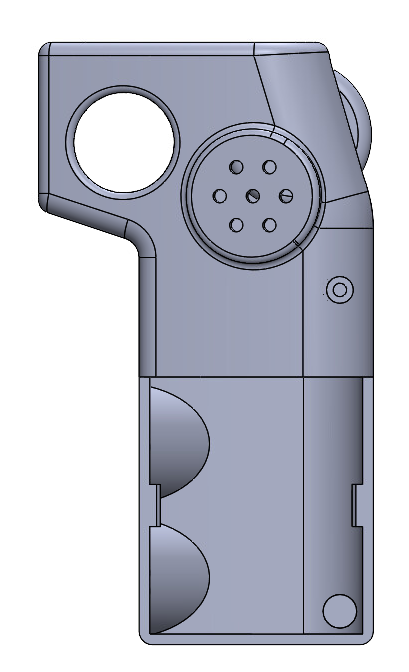
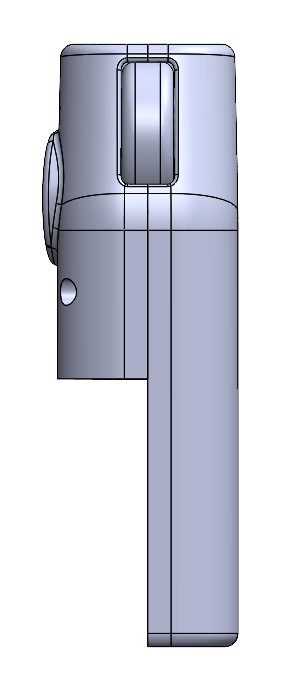
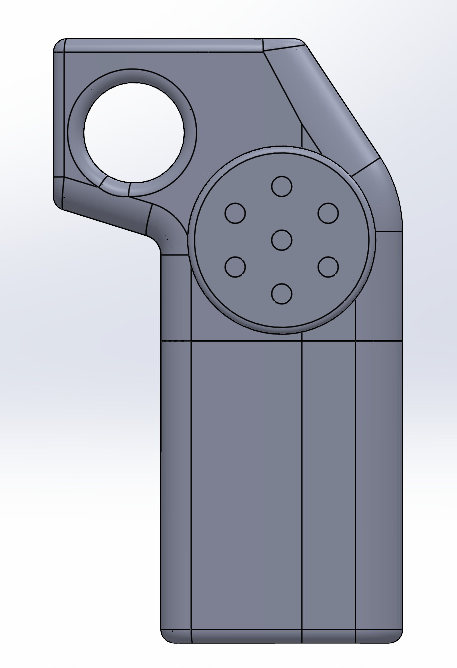
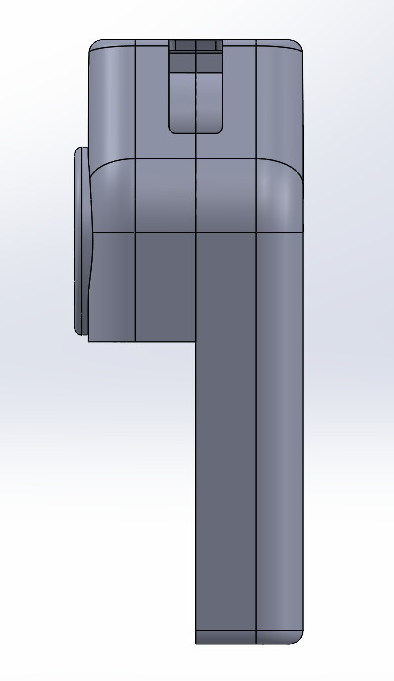
Final CAD model of the playback device (including finger loop, speaker & thumb wheel) (3)
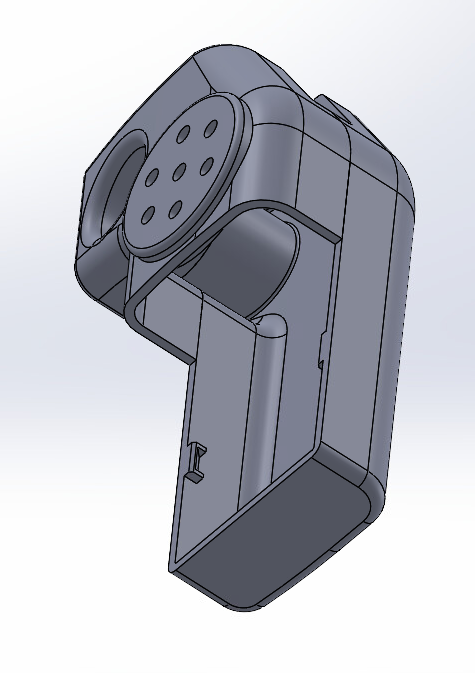
Final CAD model with cover removed to reveal interior (4)
Quick tour of the SolidWorks file (5)
Narrative:
BEEP BEEP BEEP! Mark’s 8AM alarm goes off. Mark lets out a large yawn, grabs his Portable Schedule Playback Device, and raises it to his ear.
“8AM: Good morning! Remember to grab breakfast with Paul at Starbucks.”
Ah that’s right! As he is gets ready, he starts to wonder what he has in store for the rest of the day. He puts the device to his ear and dials the device forward to 1 pm.
“1 PM: Remember to grab groceries.”
Oh yes, I need to buy cabbages for my homemade Korean kimchi recipe. He puts the device away in his pocket. “Wait, what restaurant am I meeting Paul at again?” He raises the device to his ear once more:
“8AM: Good morning! Remember to grab breakfast with Paul at Starbucks.”
Starbucks! That’s right. I think I’ll try their new Unicorn Galactic Frappuccino Supreme.
How We Got Here:
Prototypes & Processes:
We developed our first prototype to answer a question we all had on our minds: for someone with limited vision, what is a shape that is easy for them to distinguish, handle and interact with?
With that question in mind, we set a few goals that we thought were important to the overall functionality and concept of the device.
- Mark should be able to pick up the device from wherever it’s stored/held (in his pocket, on his belt, on his cane…), raise it up to his ear and hear the message instantly without any fumbling around/trying to figure out the device’s orientation, where the dial is, where the speaker is, etc.
- Mark should be able to line up the speaker to his ear quickly and comfortably so that he is able to hear the audio message with no time wasted.
- The size and weight of the device shouldn’t add too much burden to Mark’s existing everyday carry that it discourages him to bring and use the device on a daily basis.
What that, our first prototypes were ergonomic mockups of the device. They all follow the idea that Mark would raise the device to his ear and hear the audio message corresponding with the current hour. He can also scroll forward or backwards in the day to hear his previous/future schedule. Initial prototypes looked like this:
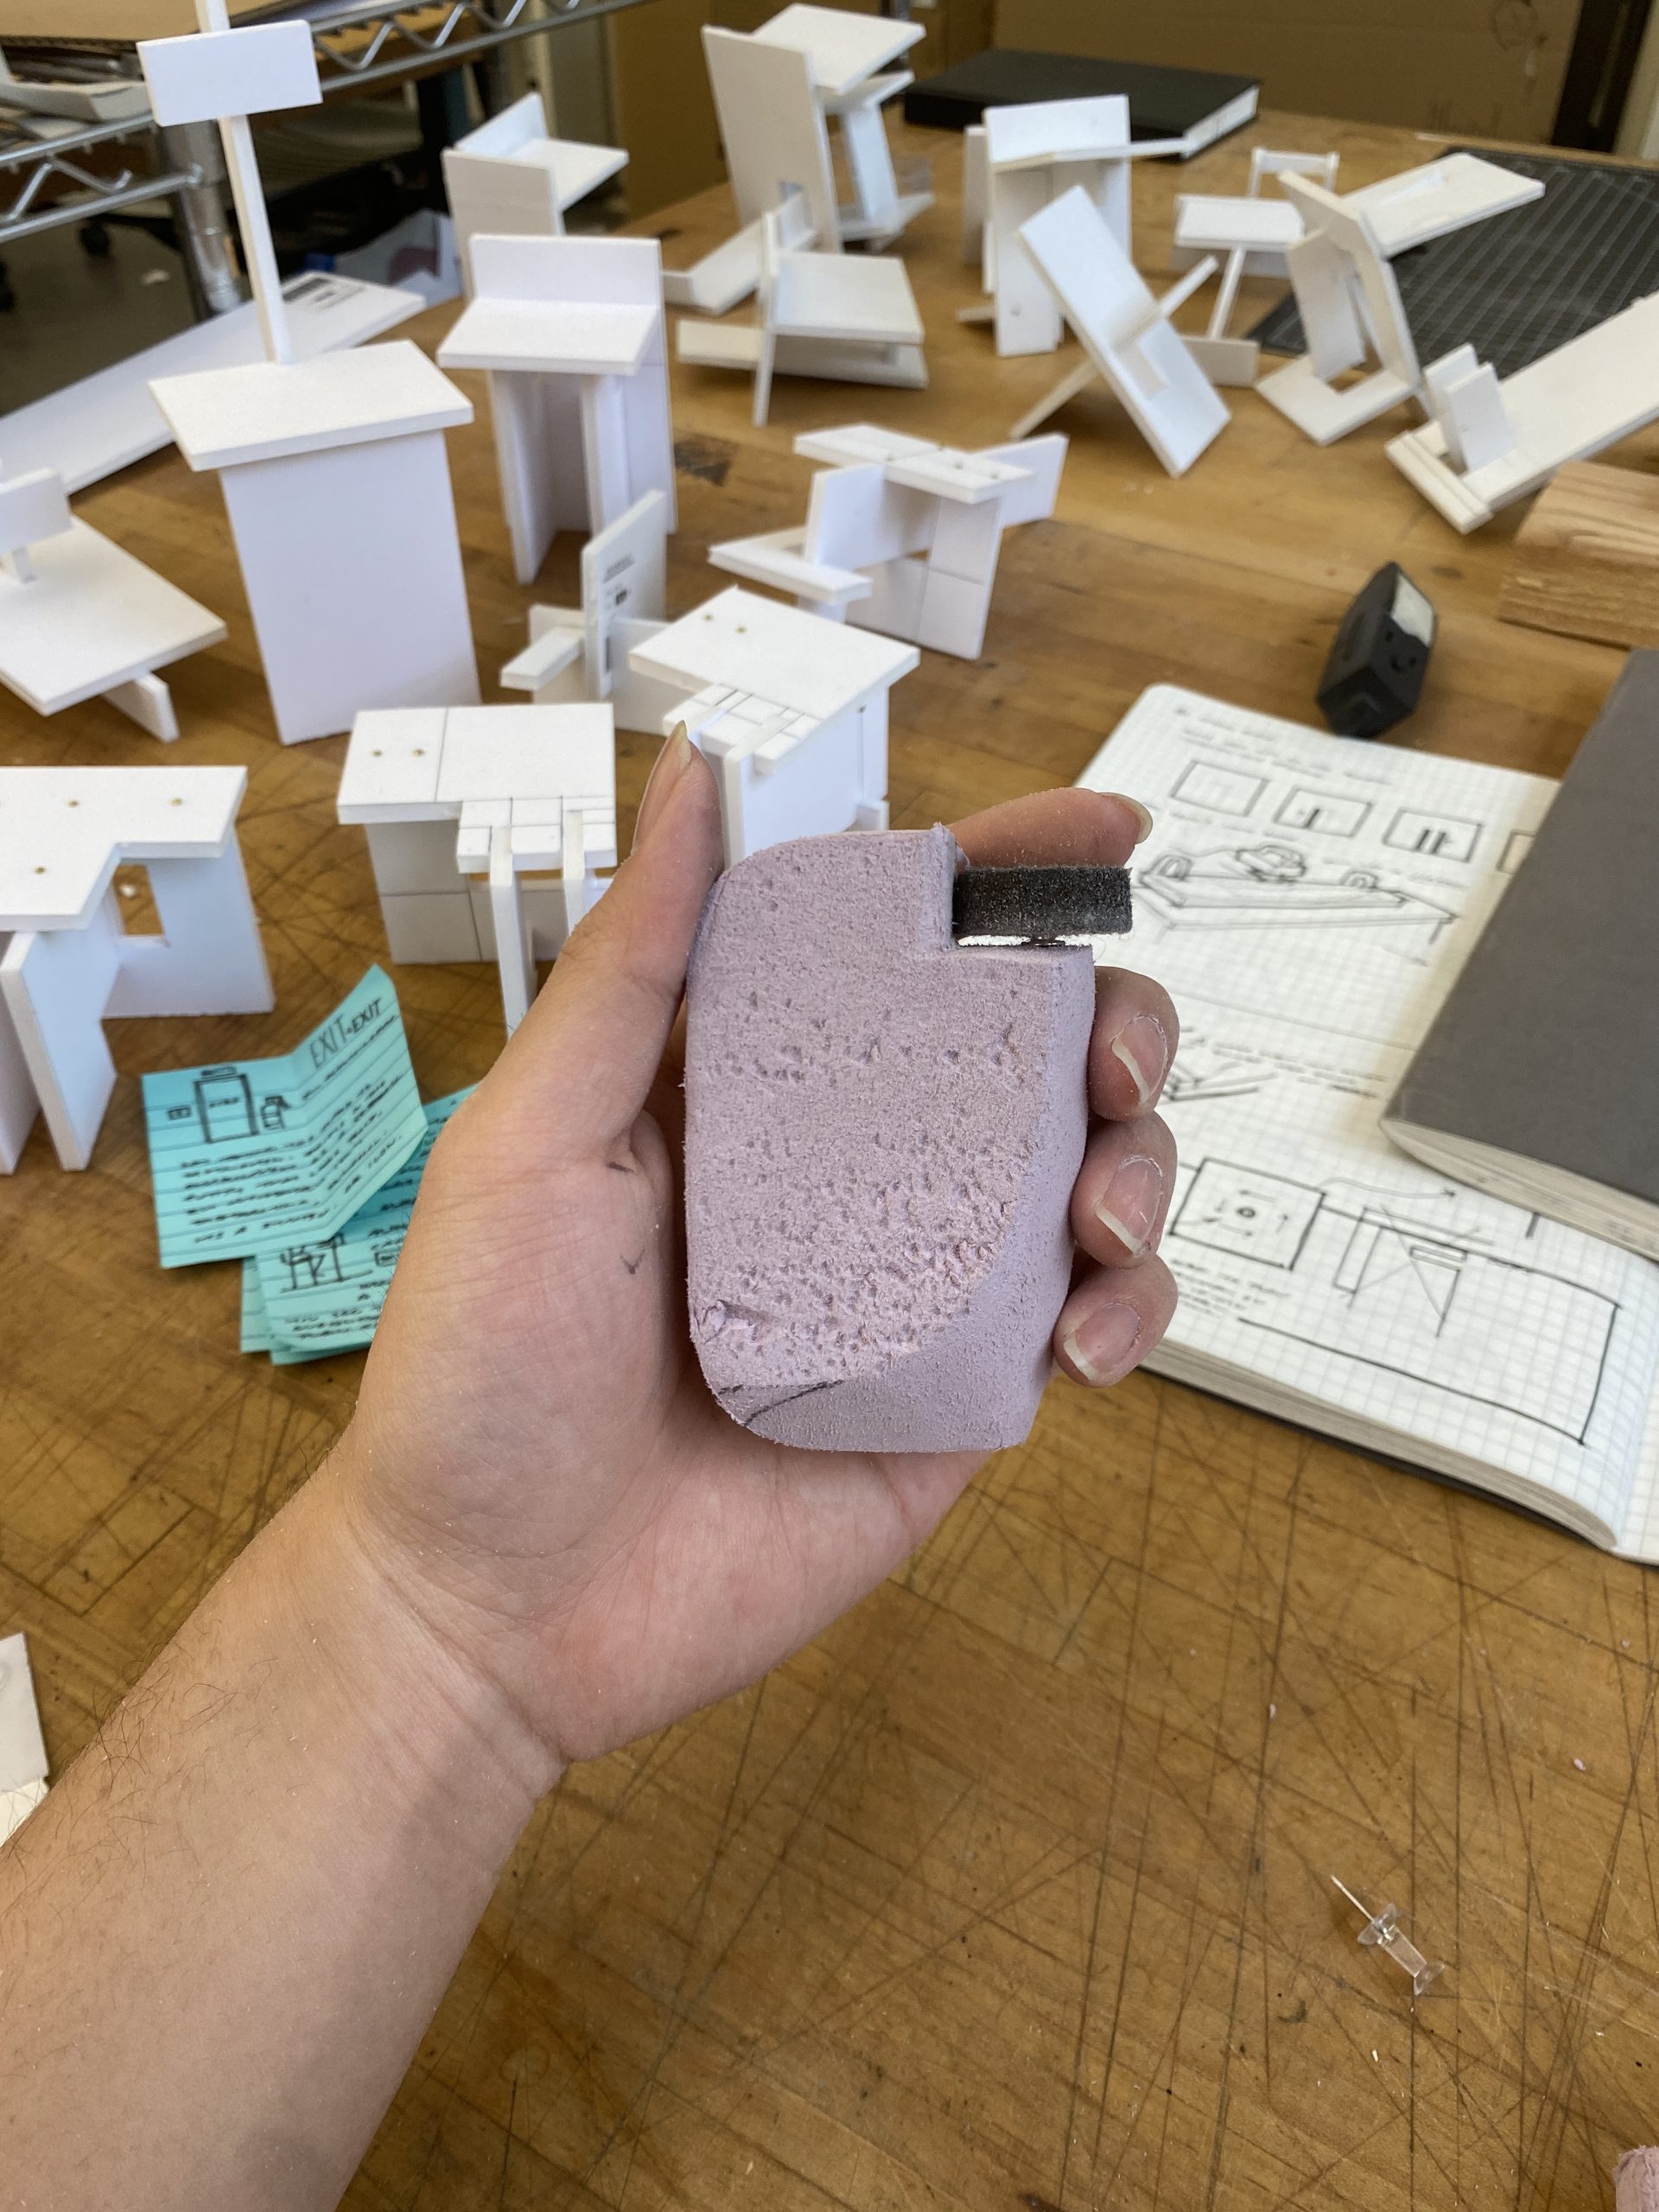
Side-profile of ergonomic prototype #1 made of foam. This design intends for the index finger to use the scroll wheel and navigate to the right recording.
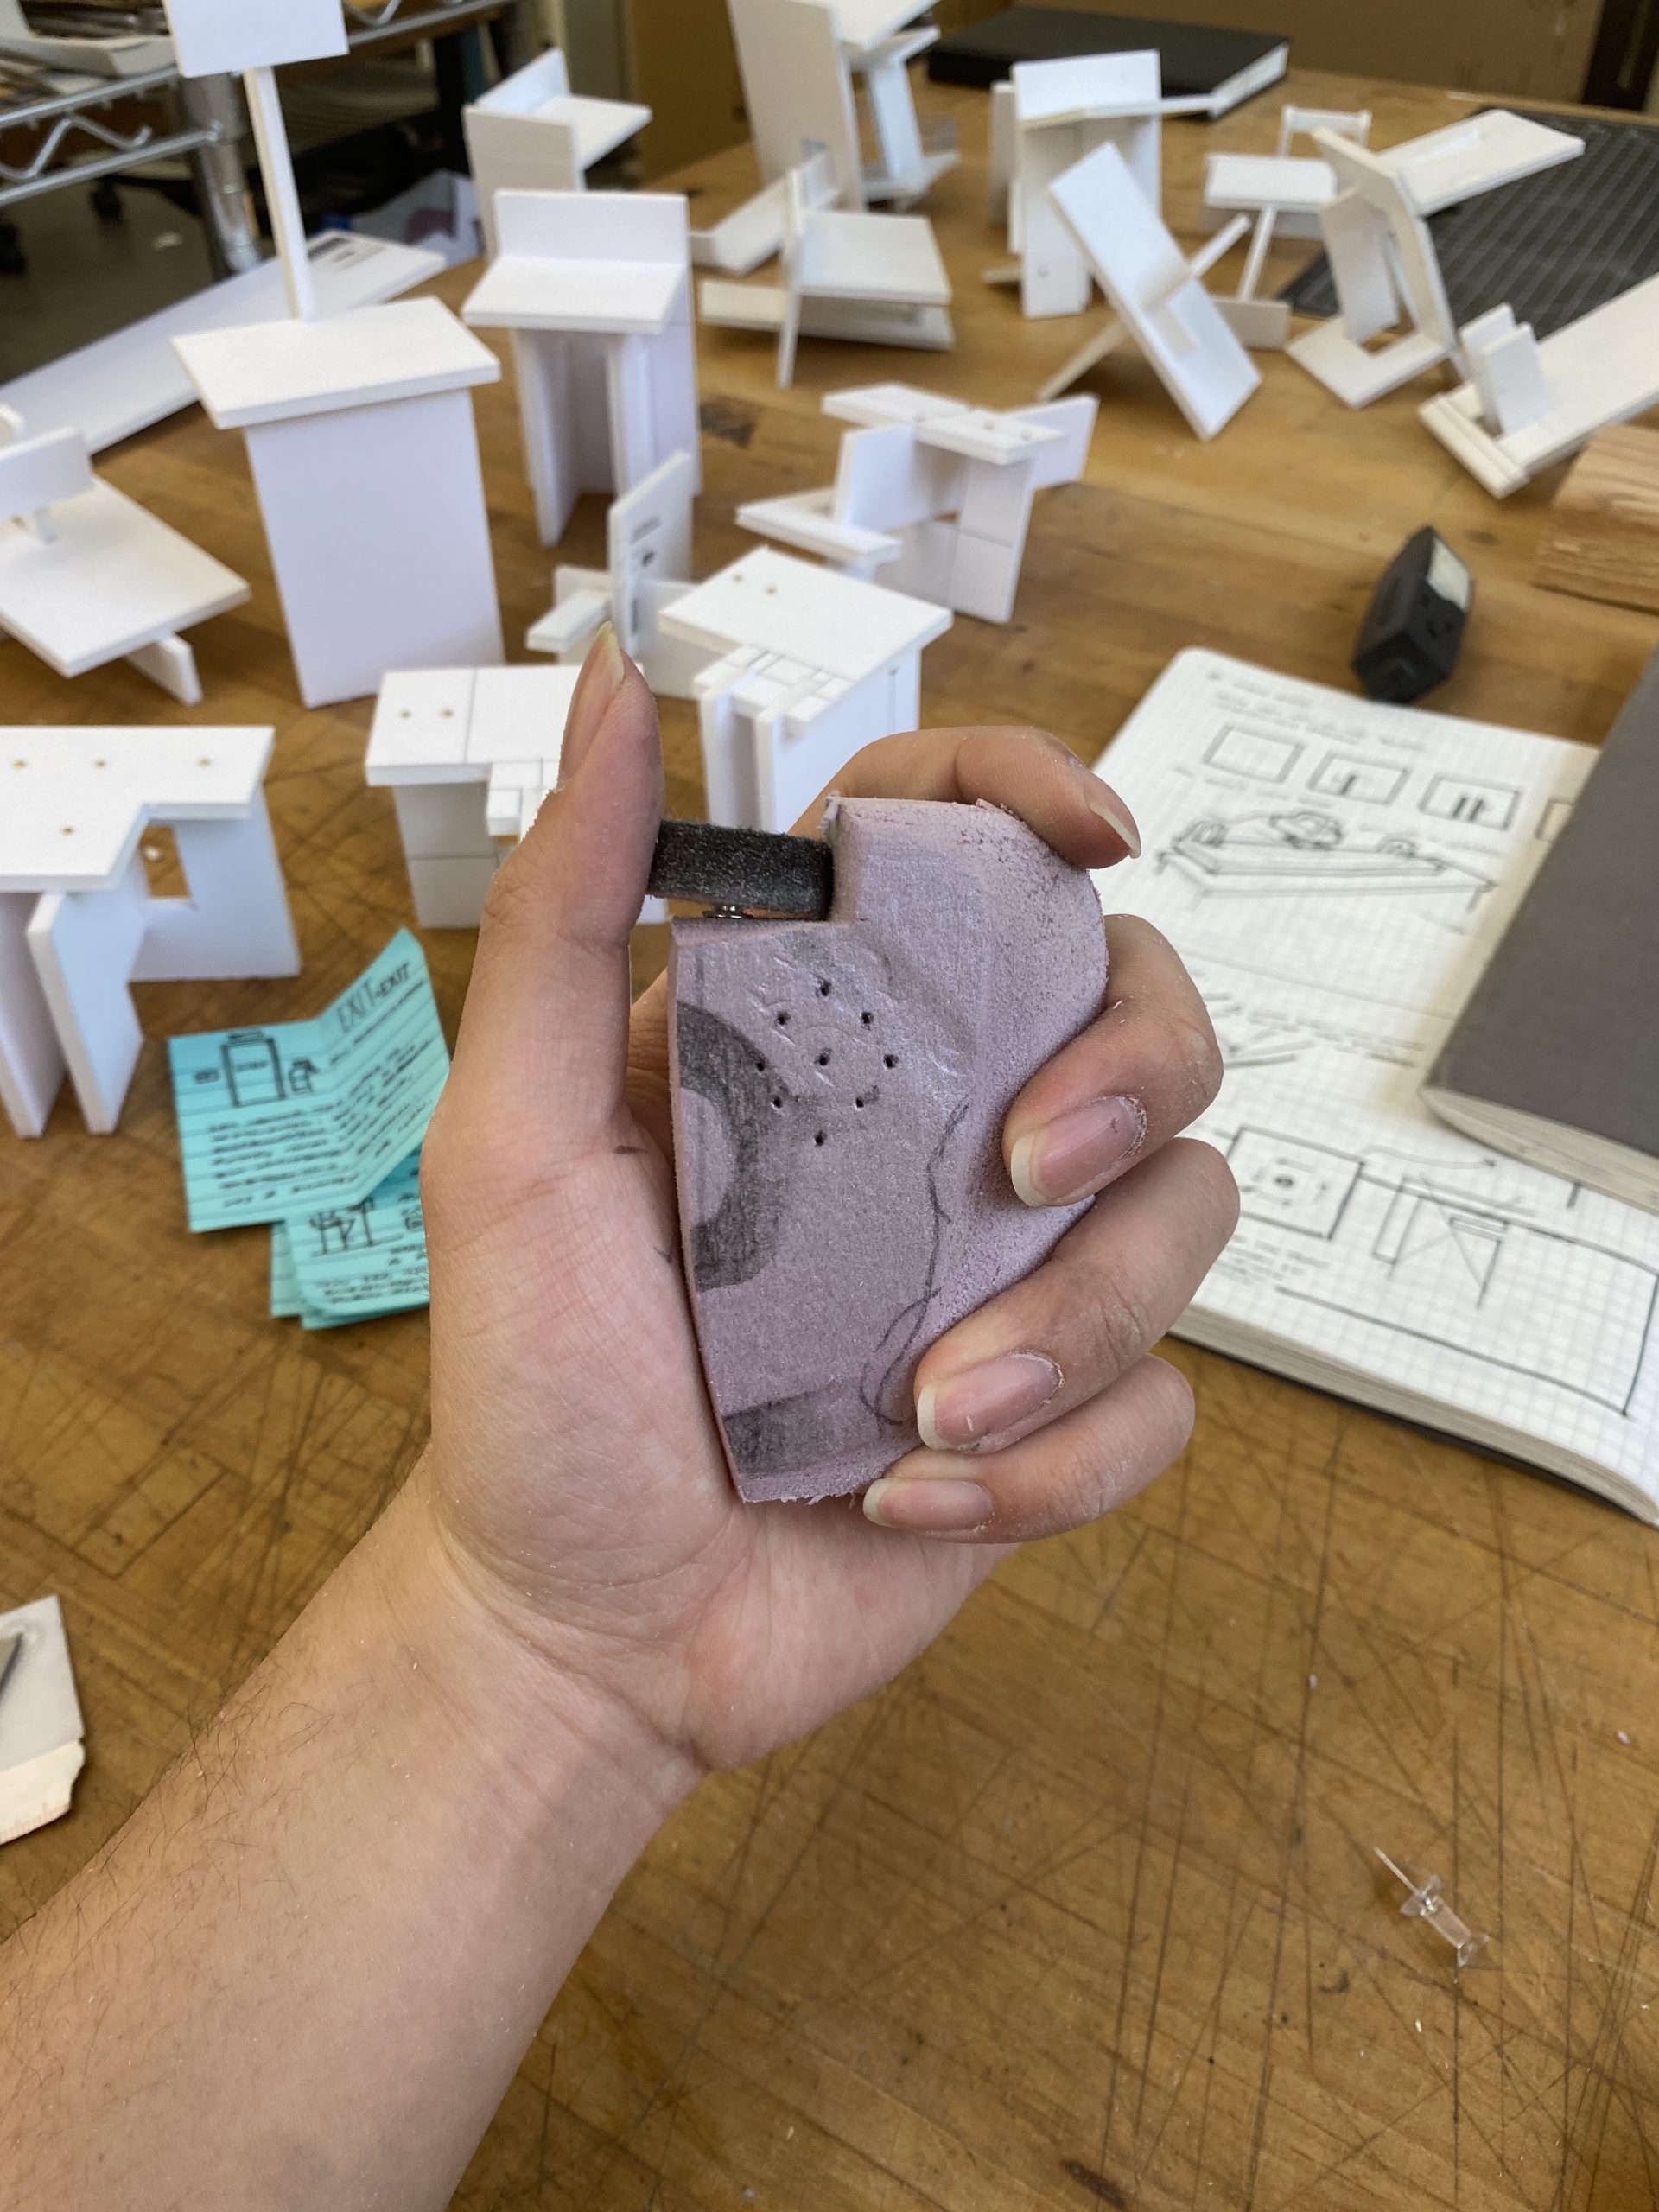
Side-profile of ergonomic prototype #2 made of foam. This design intends for the thumb to use the scroll wheel and navigate to the right recording.
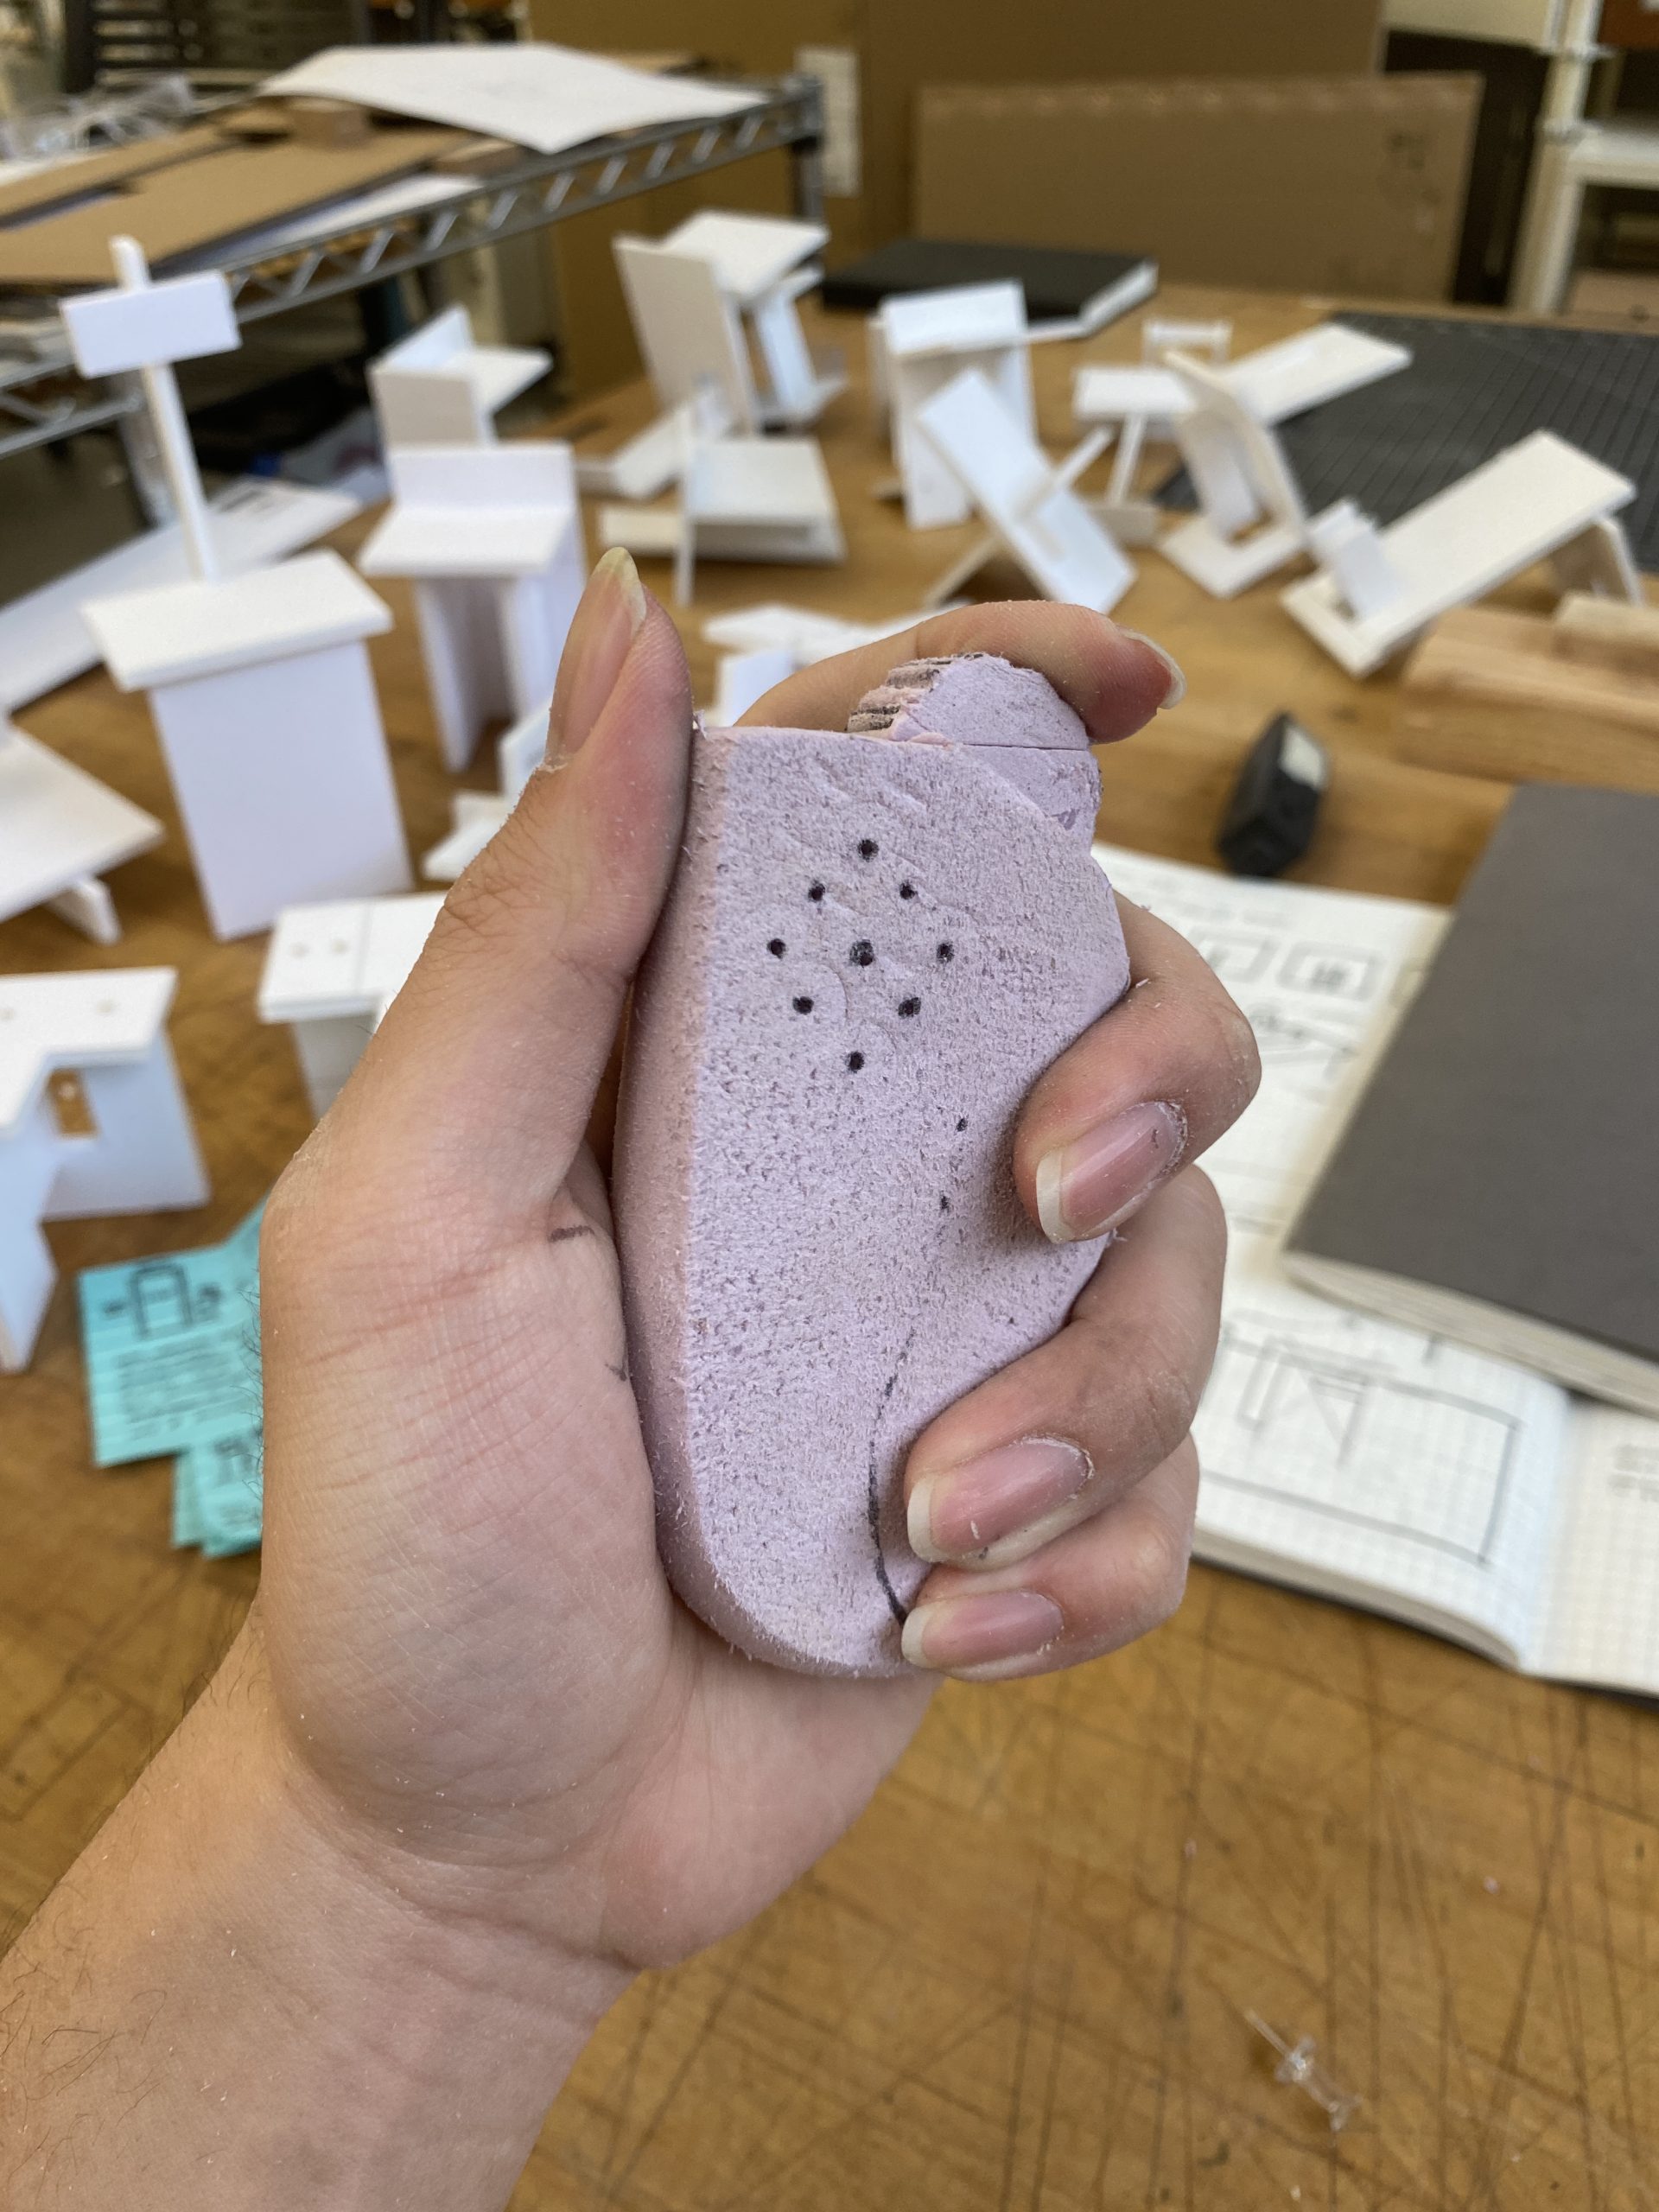
Side-profile of ergonomic prototype #3 made of foam. This design intends for the index finger to use the scroll wheel (now vertical) and navigate to the right recording.
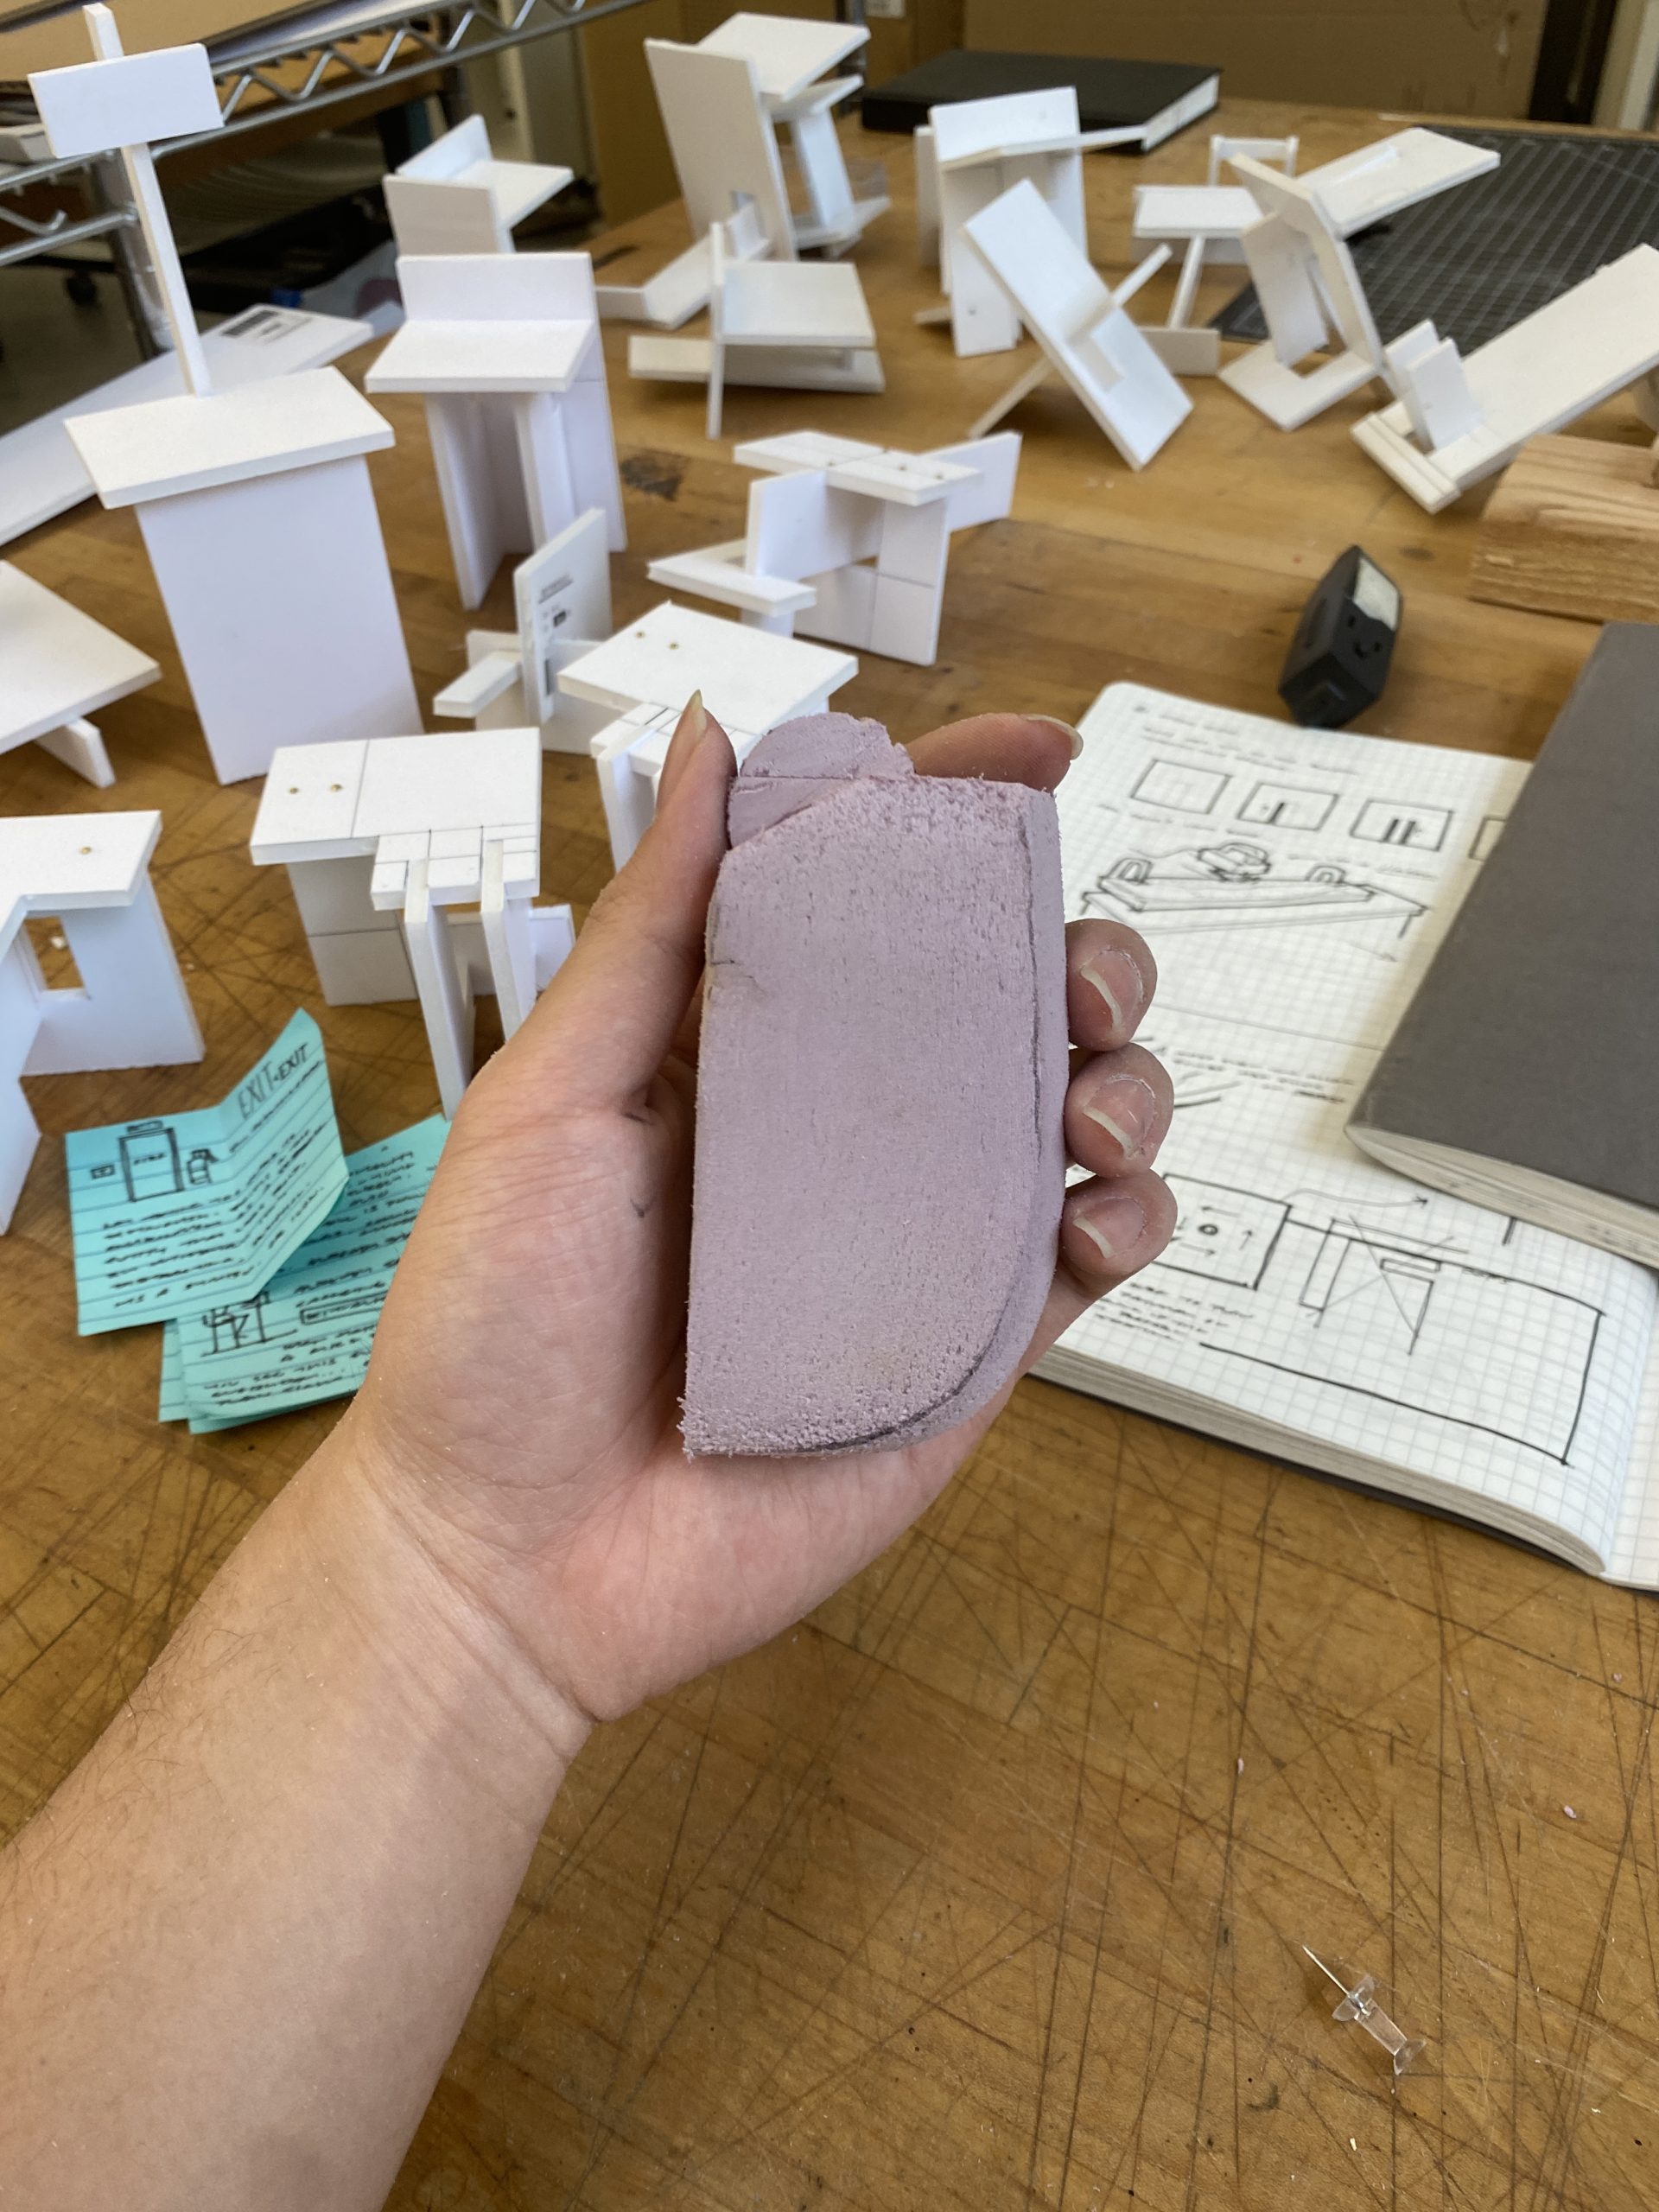
Side-profile of ergonomic prototype #4 made of foam. This design intends for the thumb to use the scroll wheel (now vertical) and navigate to the right recording. This ended up being the closest to the final design of the device.
From these prototypes, we were able to make some decisions on the overall shape of the device, as well as some bigger aspects such as the placement of the dial (if it would be used by the thumb or the index finger). From there, we moved towards some more high-fidelity models. Some criteria that we set for ourselves were that the dial should be used by the thumb, and finger grooves should be implemented for better grip and to help Mark quickly identify the orientation of the device and make corrections.
High-fidelity ergonomic model (without working speaker) with horizontal thumb scroll. Gripped to show fit in hand.
High-fidelity ergonomic model (without working speaker) with horizontal thumb scroll. Open hand to show ergonomics.
Prototype that we presented to Mark to hold and play with.
Getting closer… the shapes of these prototype lends a bit more space for components on the inside and has finger grooves pronounced enough that it helps the user find a good grip on it. In the prototype directly above, we implemented a speaker unit and rotary encoder dial to get ourselves a bit closer to the look and feel of the final product – as well as starting to think about the placing of components. At this point, we were advised that the housing is just too small to house anything, if we were to keep to this form factor moving forwards. At this point, we also got an Arduino UNO to read file on an SD card and play audio files stored within, so we integrated that into the foam prototype.
Speaker demonstrating playback of a pre-recorded audio file.
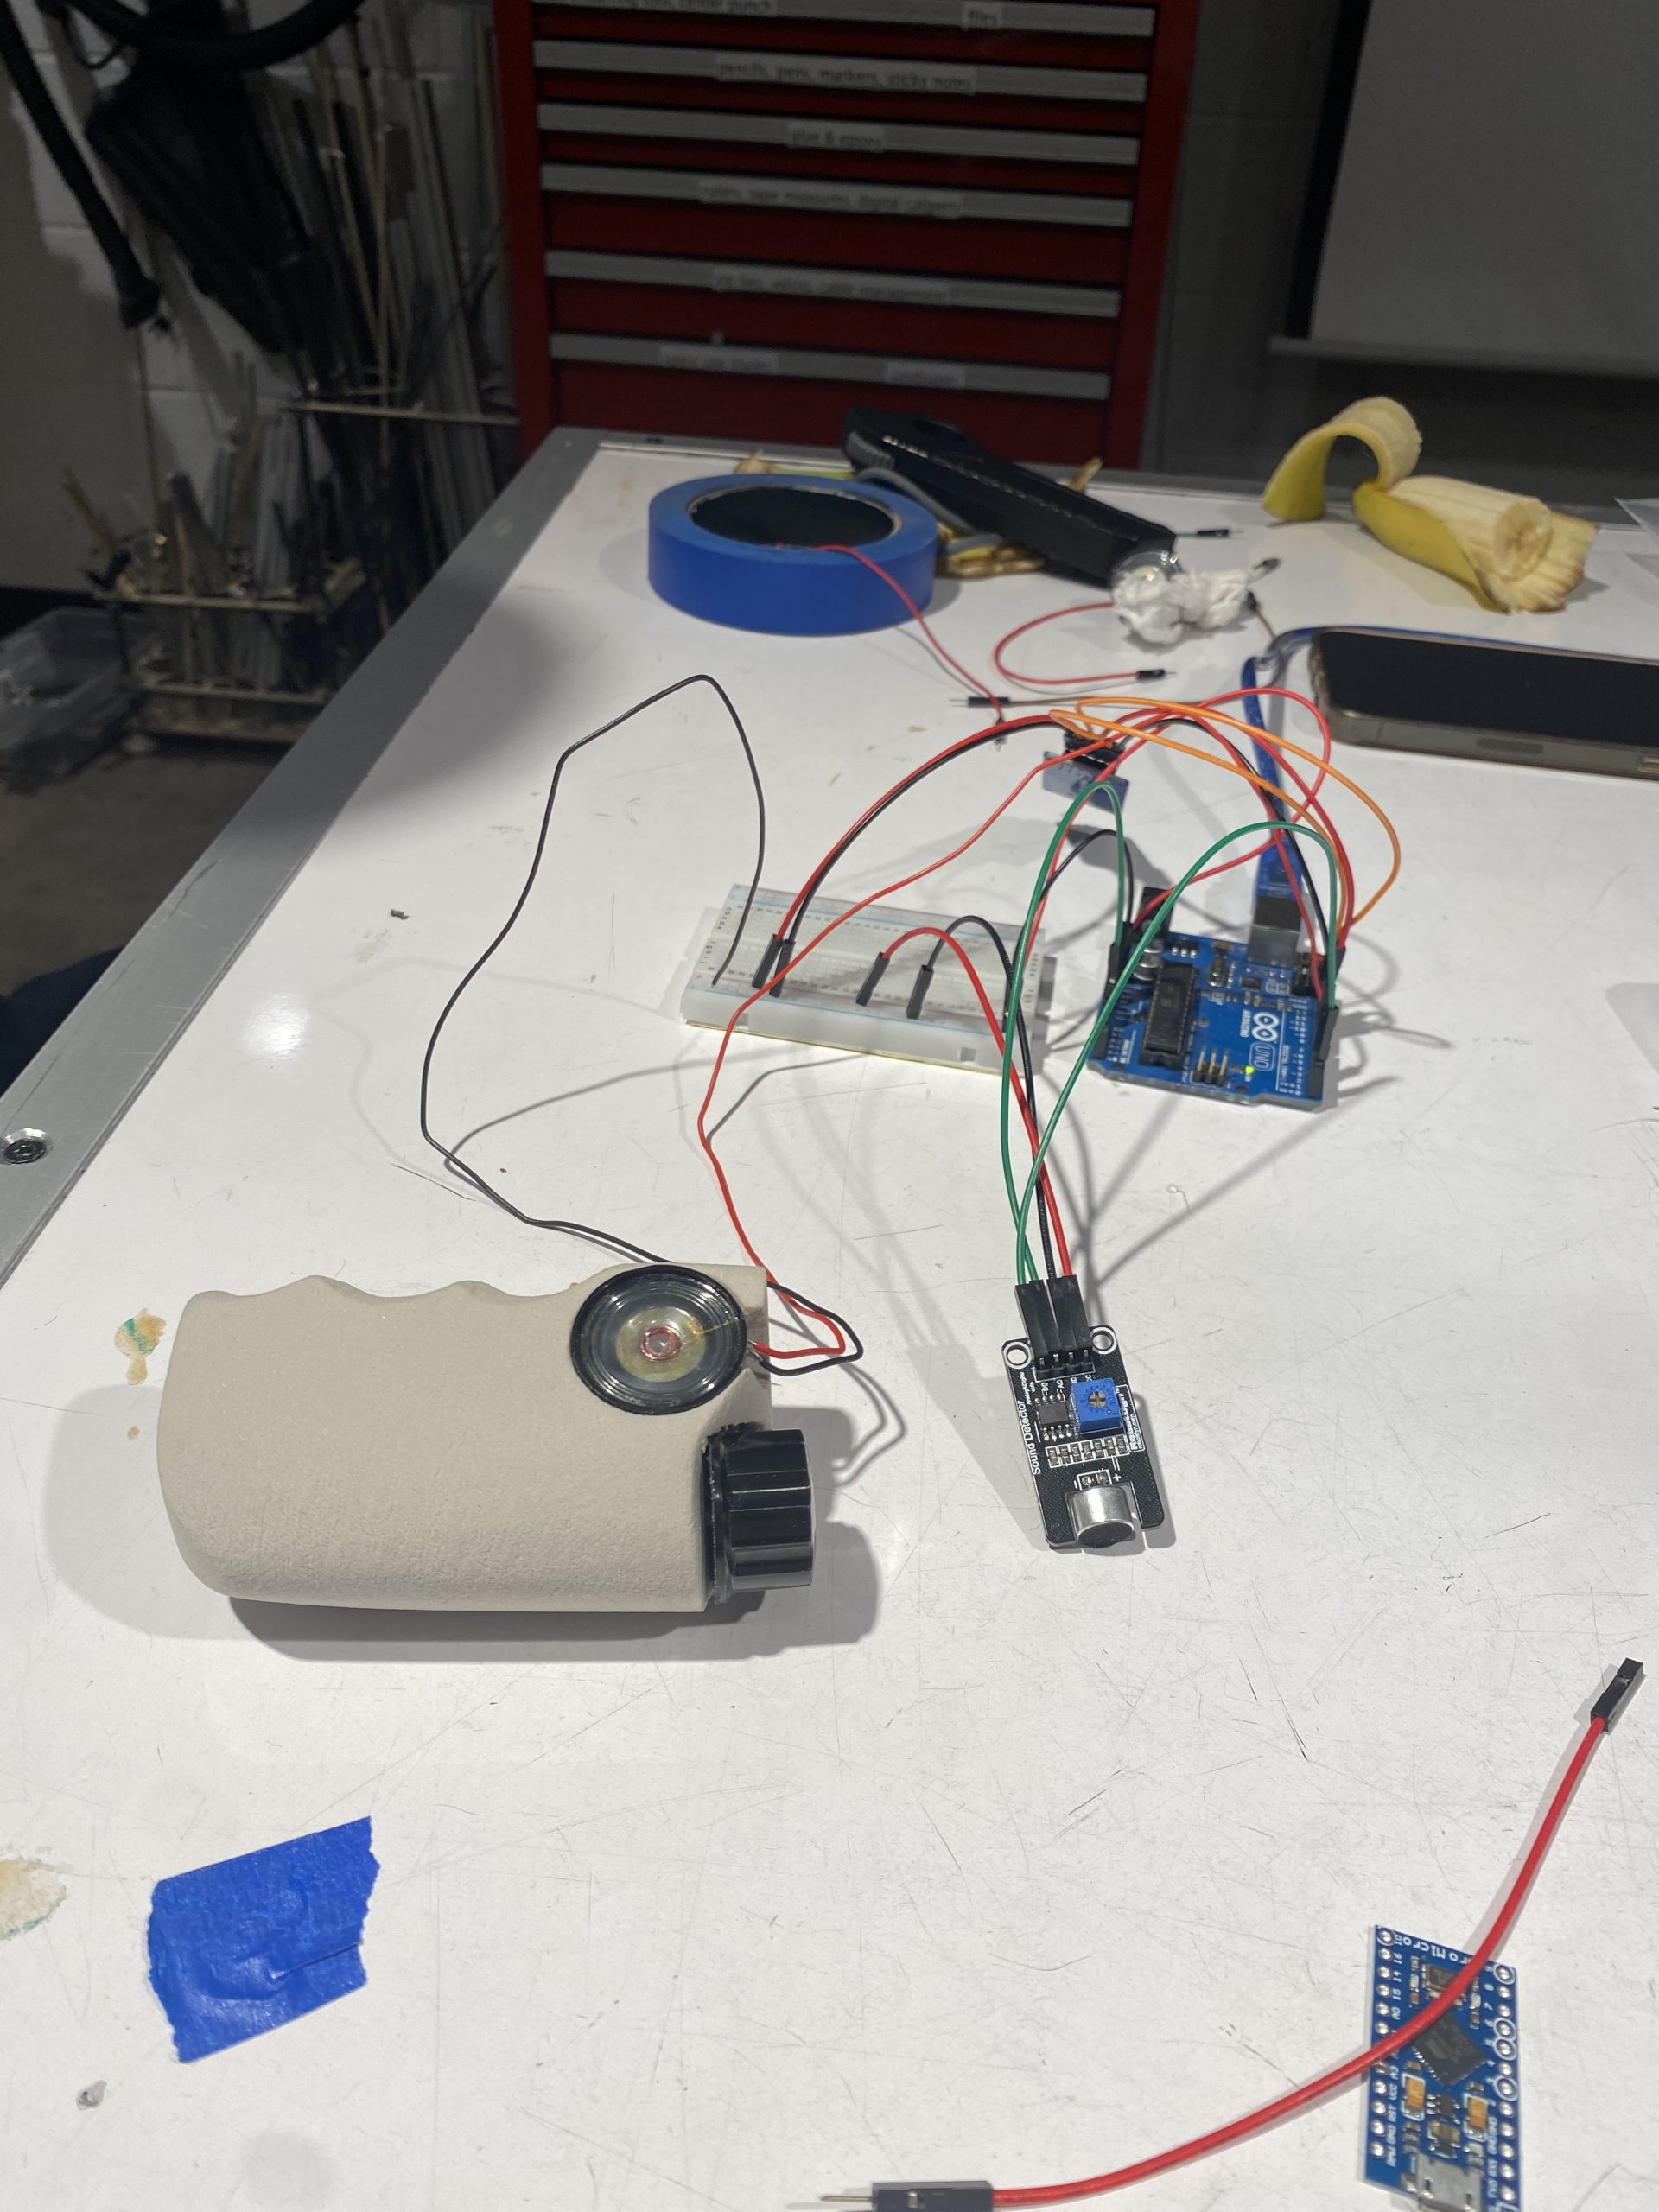
Final prototype given to Mark to test with working speaker to get a sense of the volume adjustments, etc.
This ended up being the prototype that we showed Mark to get feedback on.
Overall, Mark was happy with how the device felt and our planned user process. In particular, Mark enjoyed the size and form factor, the finger grooves, and the placement of the thumb dial. Upon explaining our proposed user scenario, we also learned that Mark actually owns a cassette player at home, which his staff uses to relay their planned schedule on to him. We explained to him specifically the function of the device and how it’s able to keep track of time, how it’s able to keep a record of Mark’s schedule for the whole day, and how Mark is able to hear his current activity by raising the device to his ear or scrolling the dial. Cameron also brought with him his skateboard controller for Mark to try out, since we had it on us. He ended up really enjoying how it felt in the hands – especially the placement and orientation of the dial which spun vertically, and a hole/ring for the index finger to hook onto. With the proposed user process, Mark noted that the skateboard controller feels more appropriate for that interaction, especially because of how easy it is to scroll the dial on the skateboard controller.
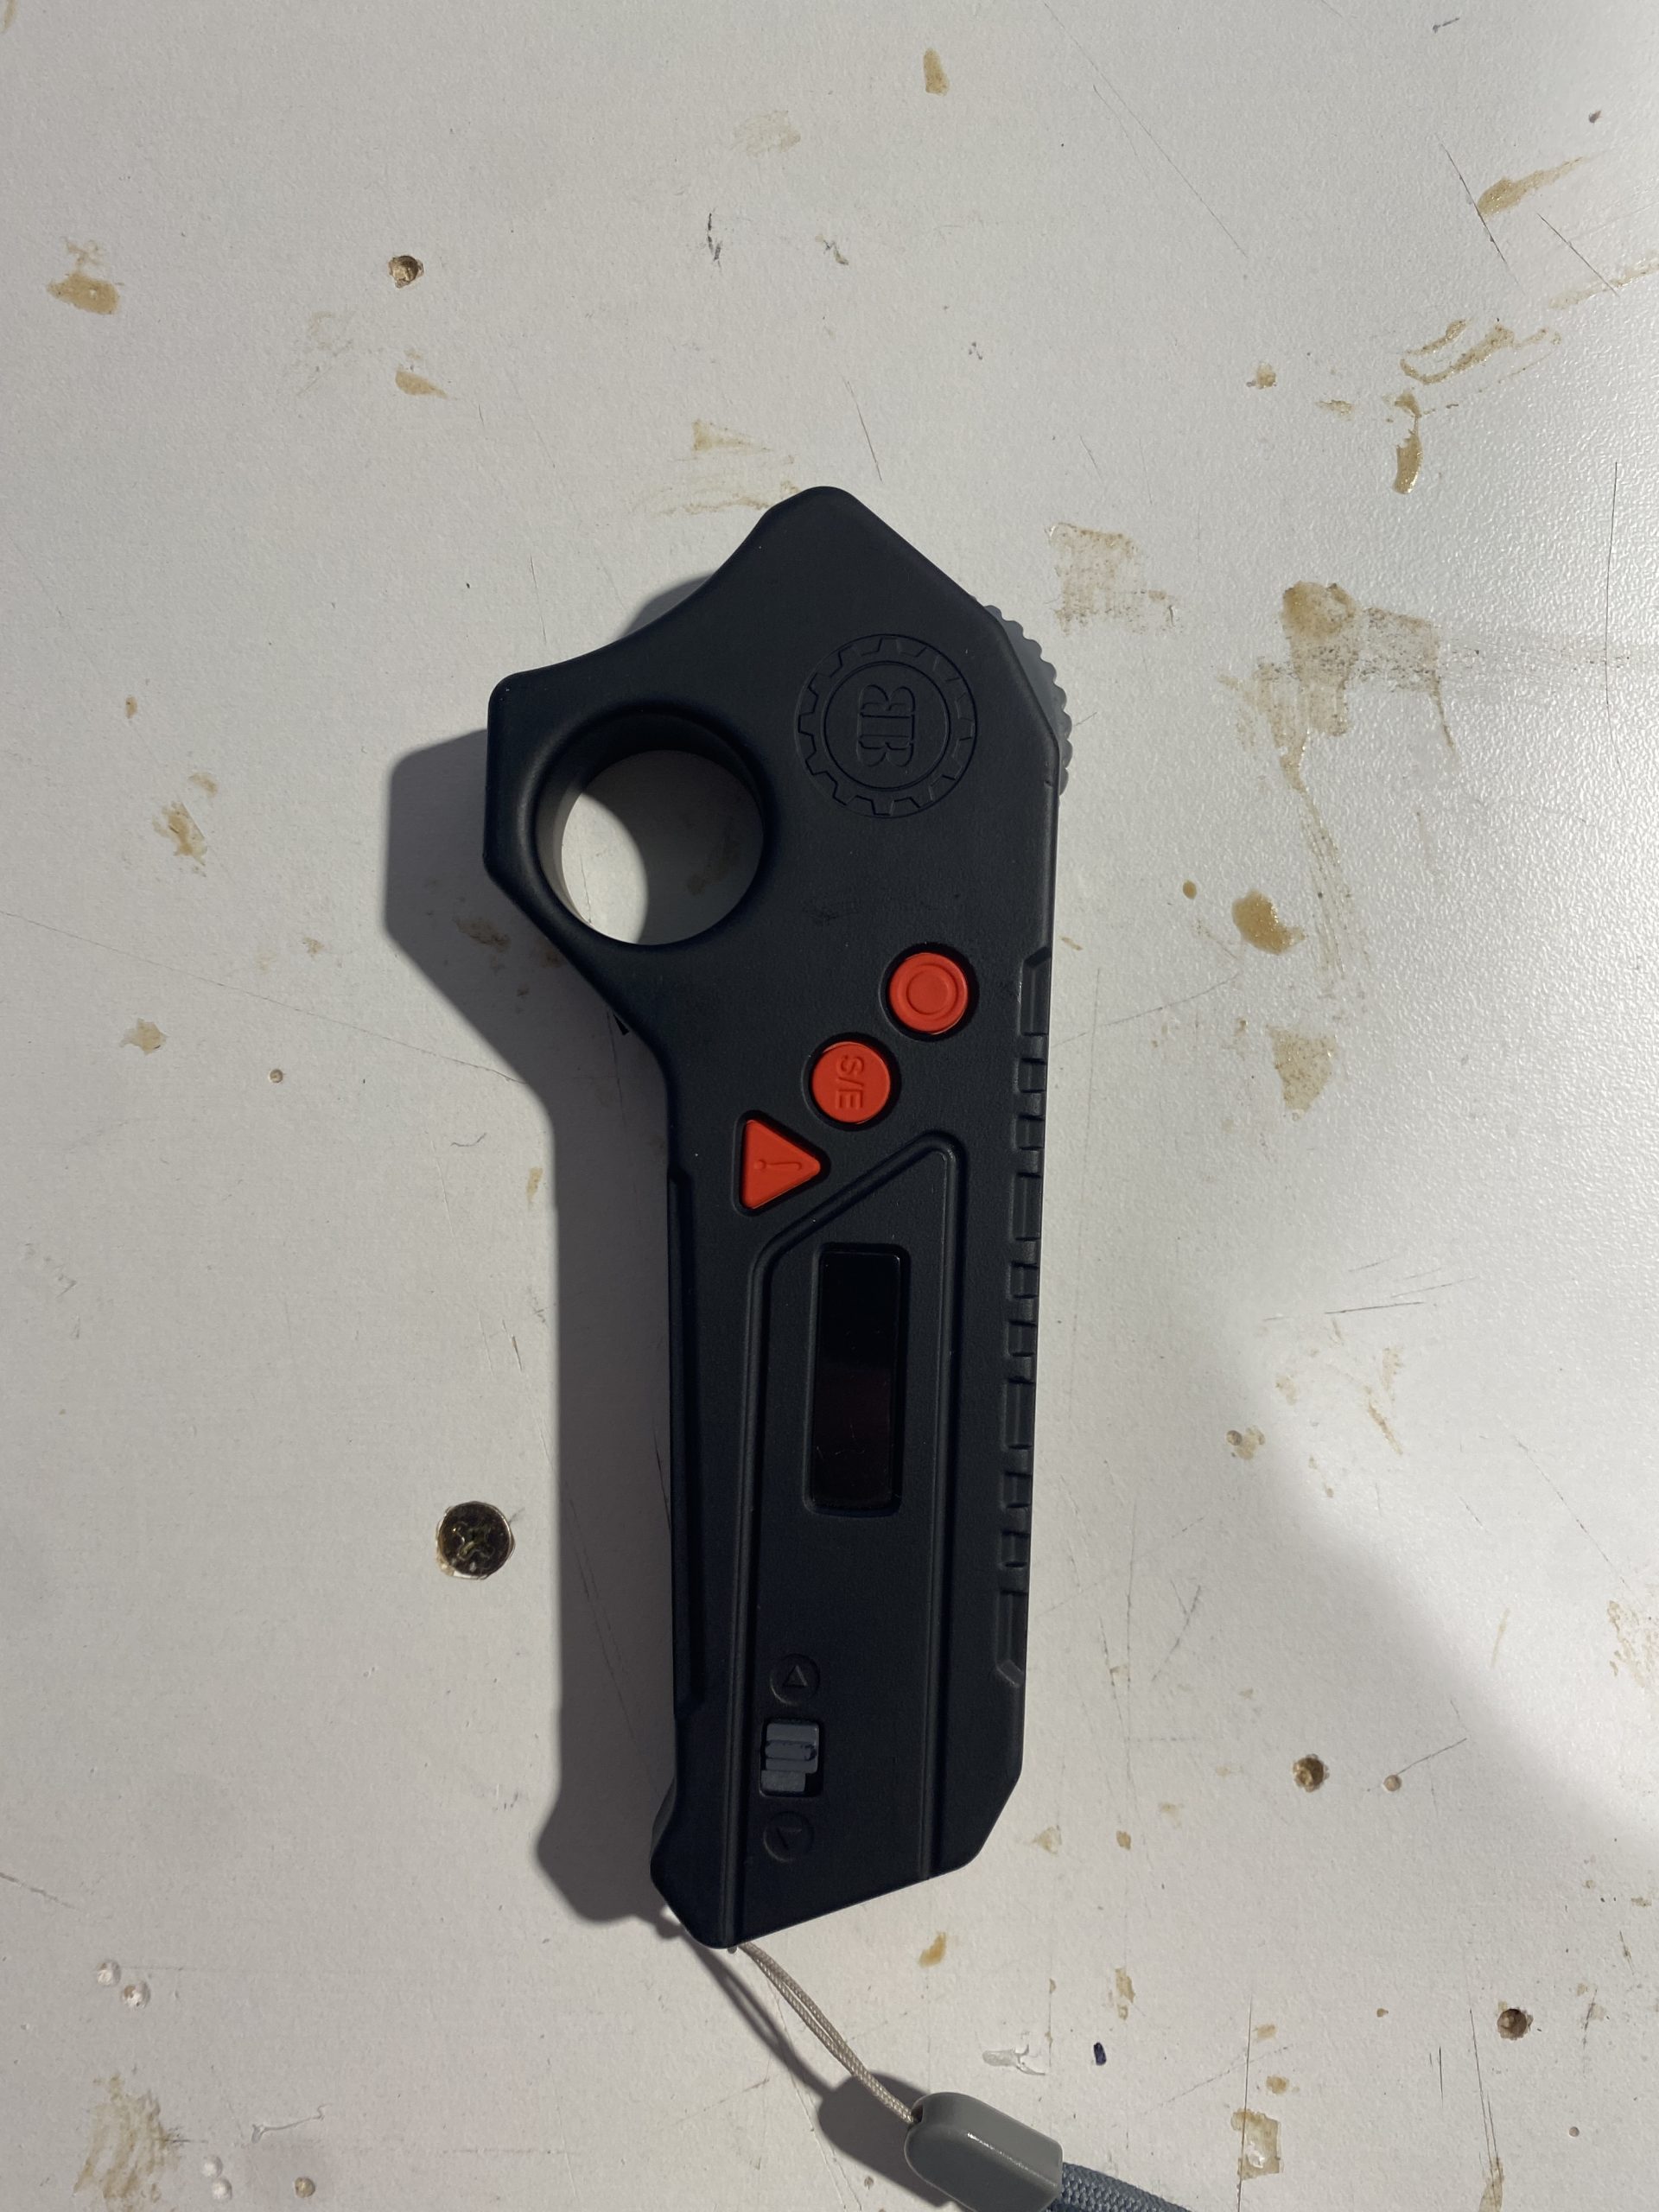
Cameron’s skateboard controller that Mark ended up liking more than our foam prototypes!
Hearing Mark’s feedback was incredibly helpful, especially because we were able to ask him what he specifically enjoys about these different proposed shapes. In the end, the shape of the skateboard controller set the tone for what future iterations of the housing would look like. As said before, we were advised that the size and number of components we had to integrate would become a problem if we kept the same form factor, so we made sure to start working on a formal audit of all the parts we would include, their size, number of pins, etc. Generally, the prototype feedback session went exactly how we wished it would, and it was very helpful to get Mark’s approval and say on the ergonomics of the device, as well as the proposed user process. Moving forwards, we began to modify the shape of the device through some really quick prototyping, whilst trying to reserve as much space as possible for the internals.
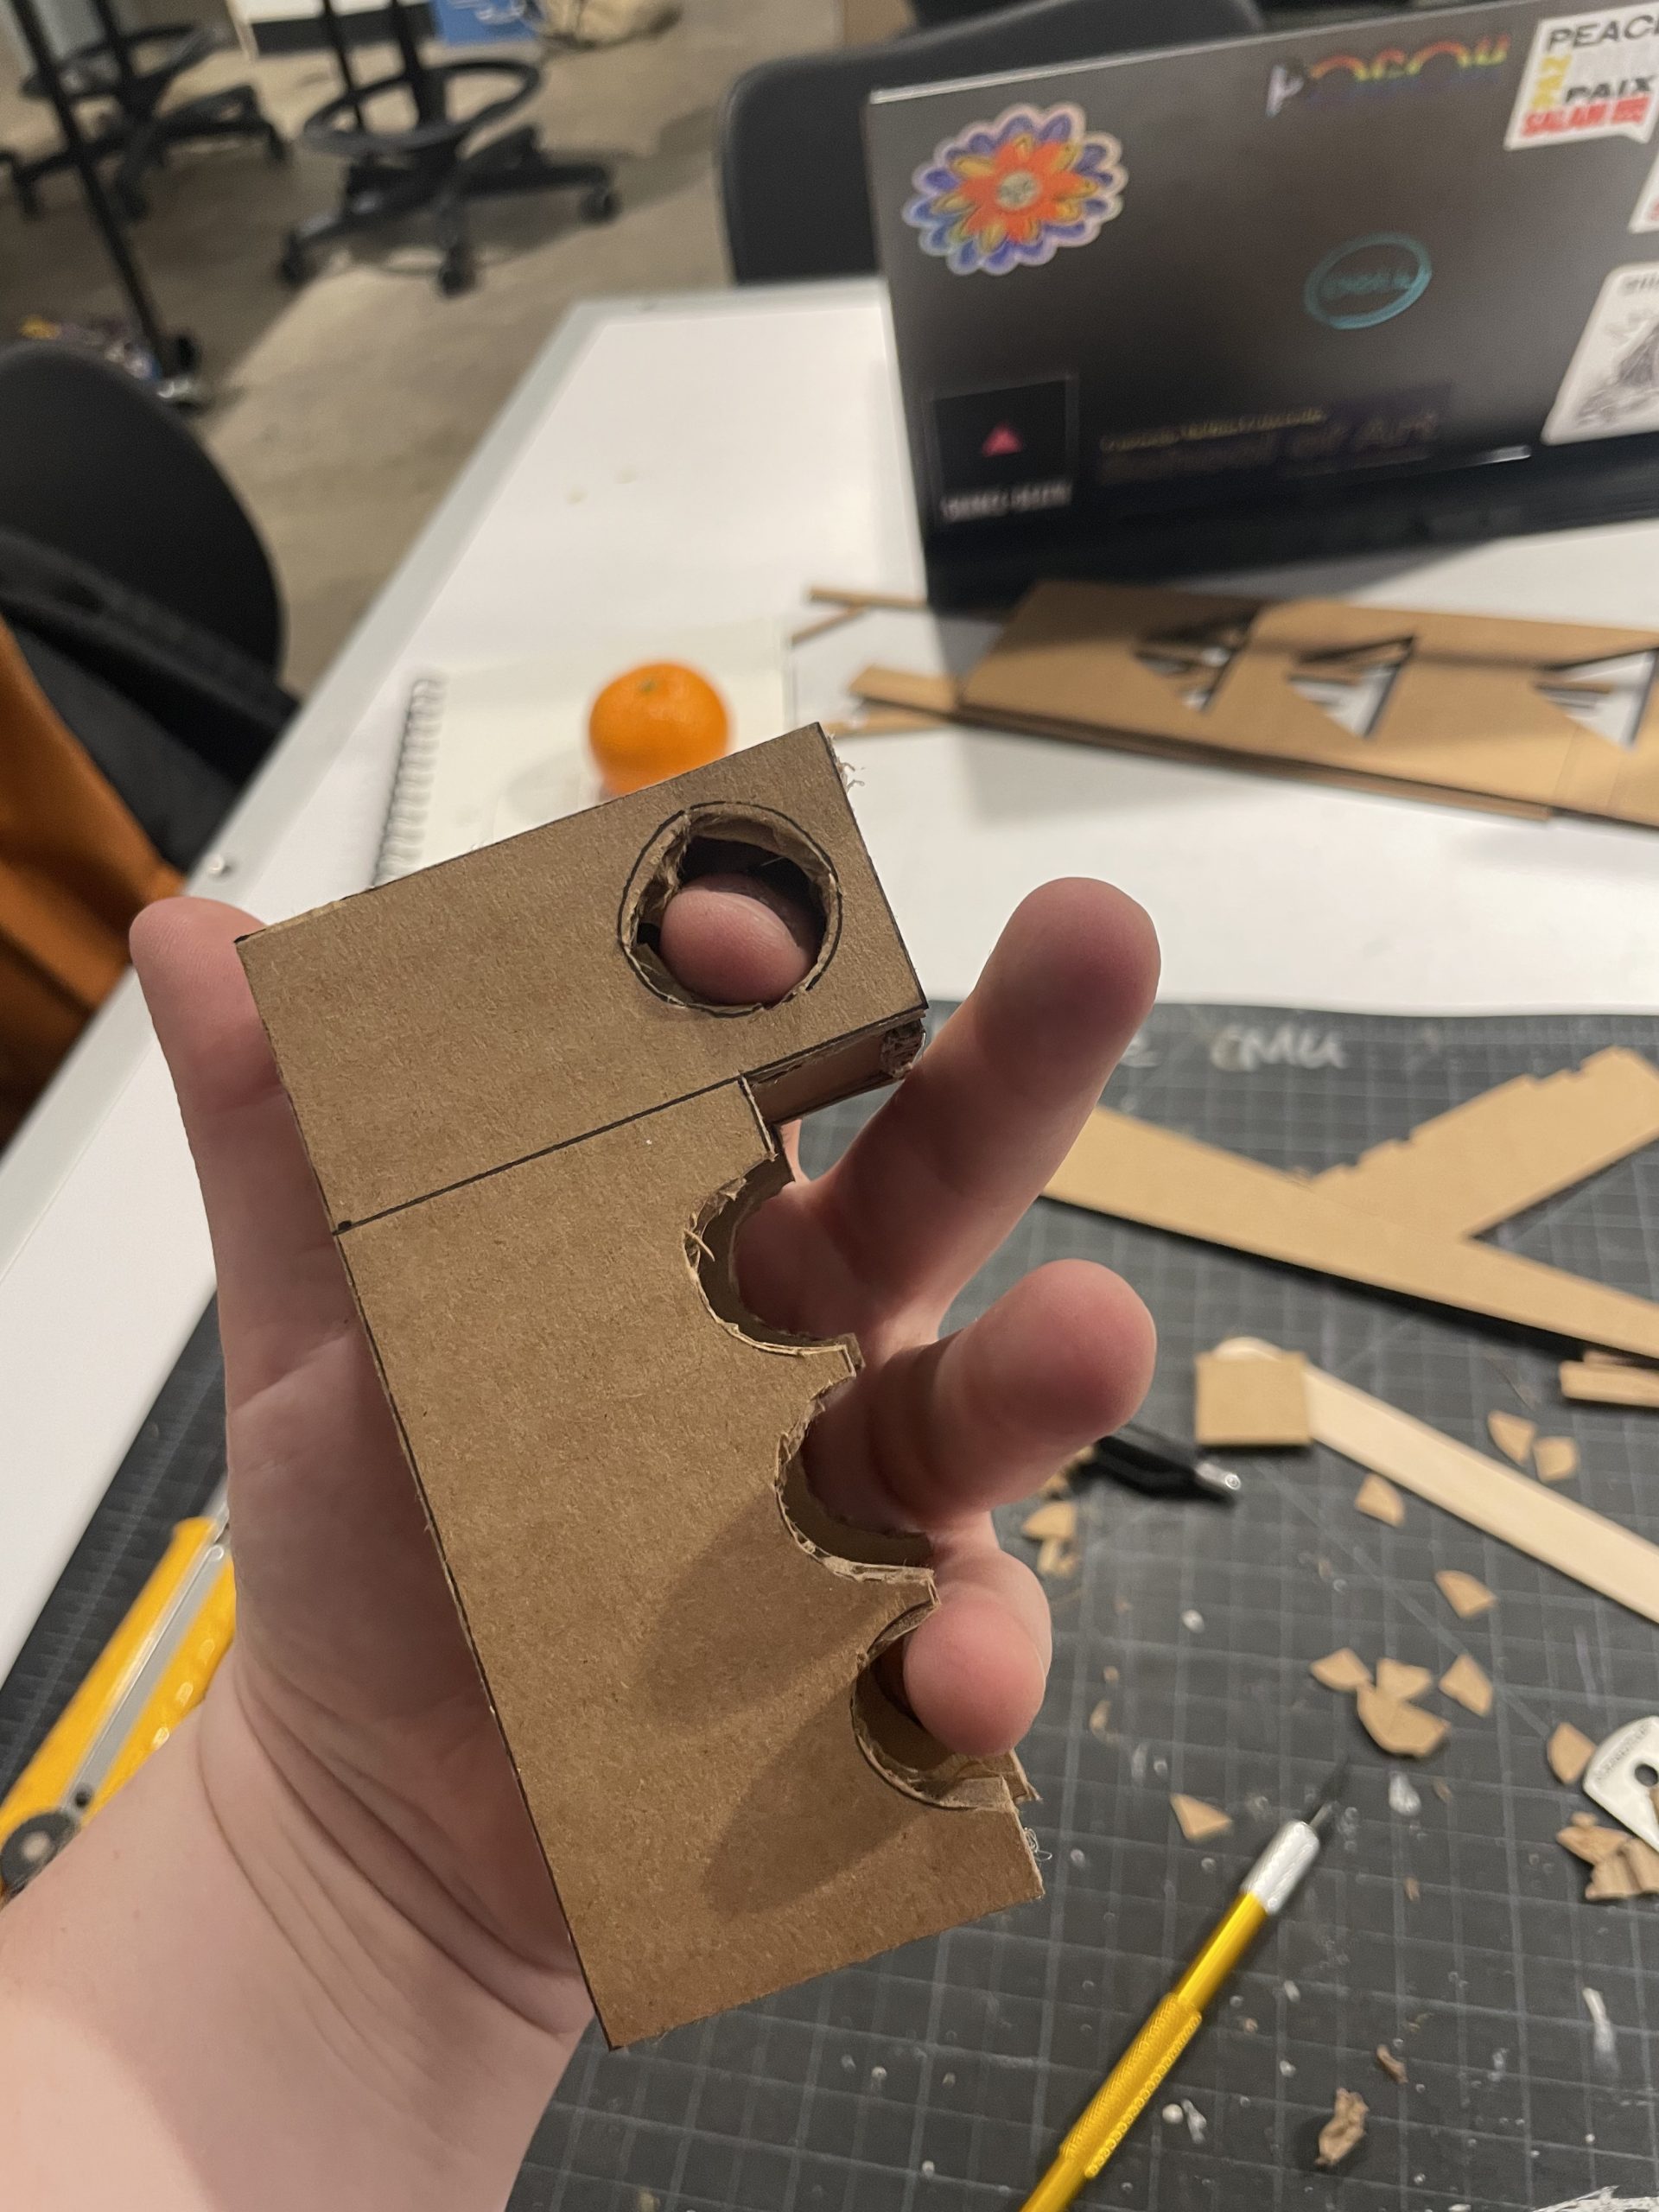
Cardboard cutout of the final housing. It is thicker than the skateboard to accommodate for all the internal components.
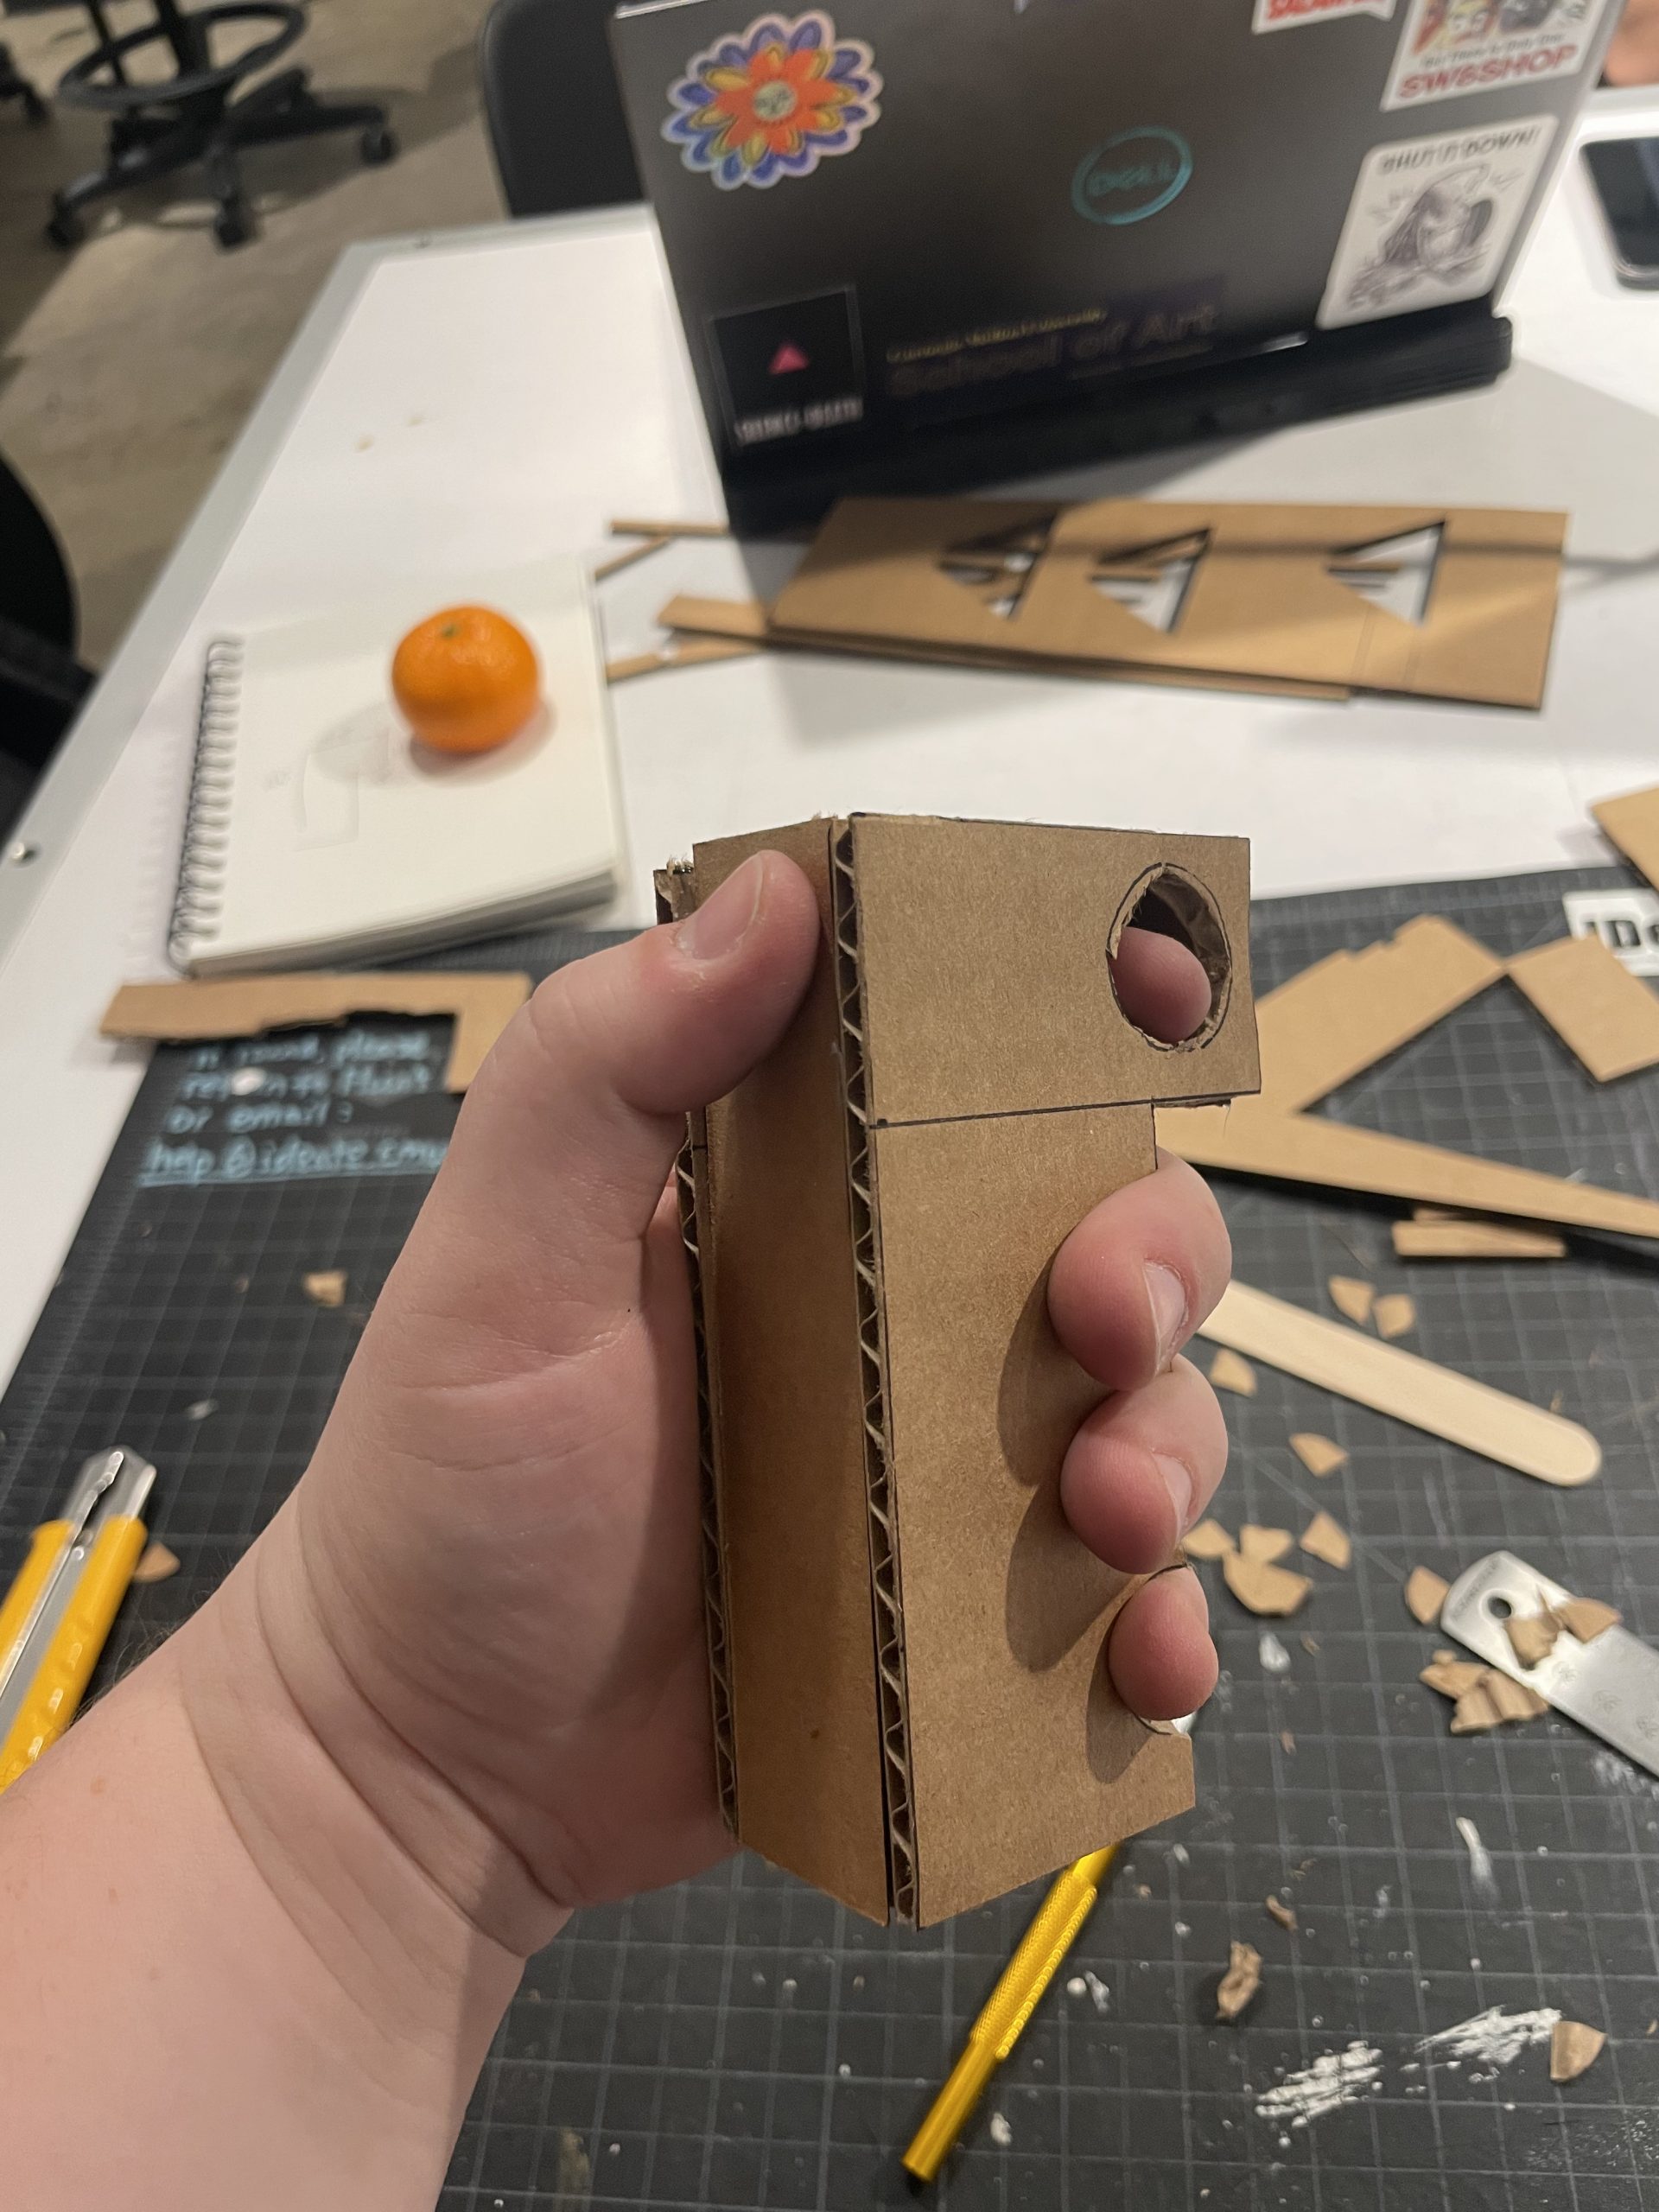
Another angle of the cardboard prototype of the final housing for the device.
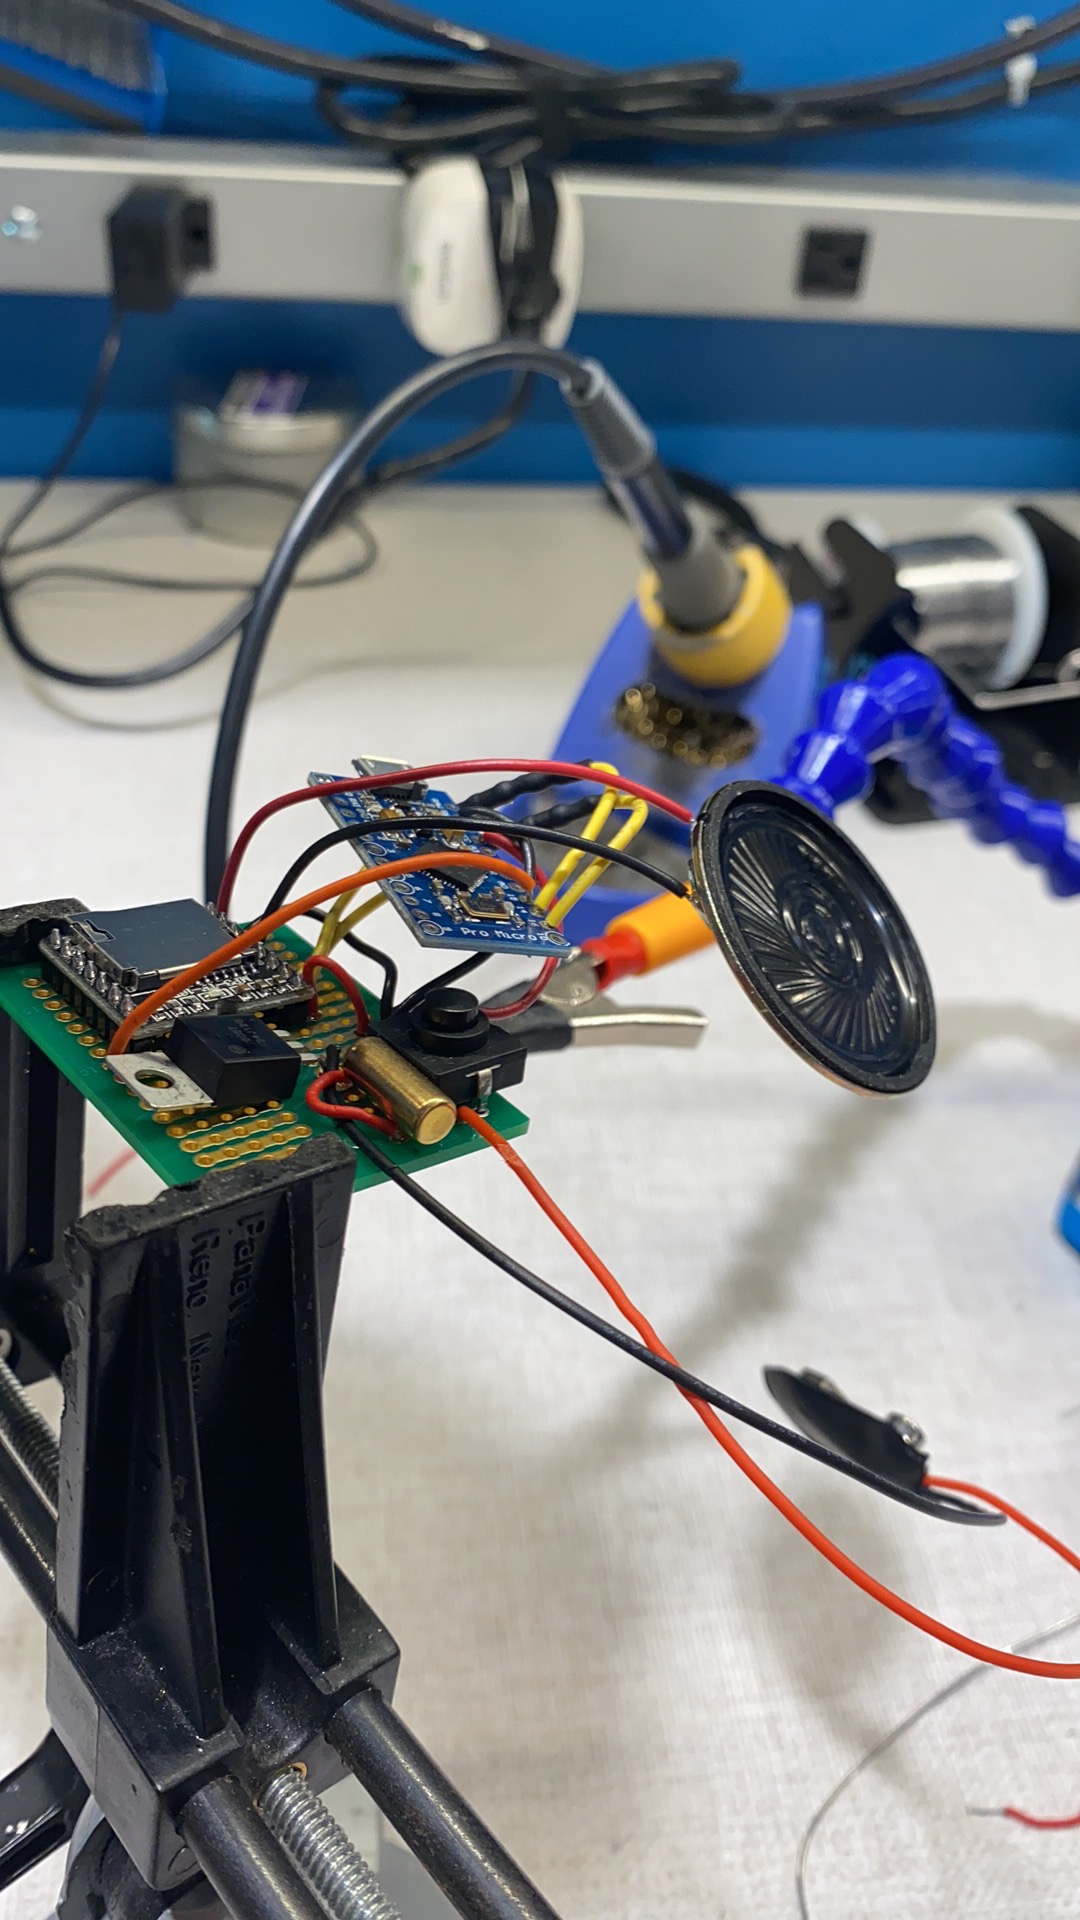
Moving forward, we split up figuring out the components between each person. Stanley worked on the tilt switch and IR sensor, both of which are responsible for getting the device to play an audio message as soon as Mark lifts up the device to his ear, as well as ordering and figuring out a rotary encoder we had ordered, Lily worked on a charging module so that we could get a charging lithium ion battery instead of having to replace an alkaline battery constantly as well as a RTC module so that the device can keep track of the current hour, and Cameron worked on the microphone, speaker and a music-maker shield so that we could record audio, separate it, and play it.
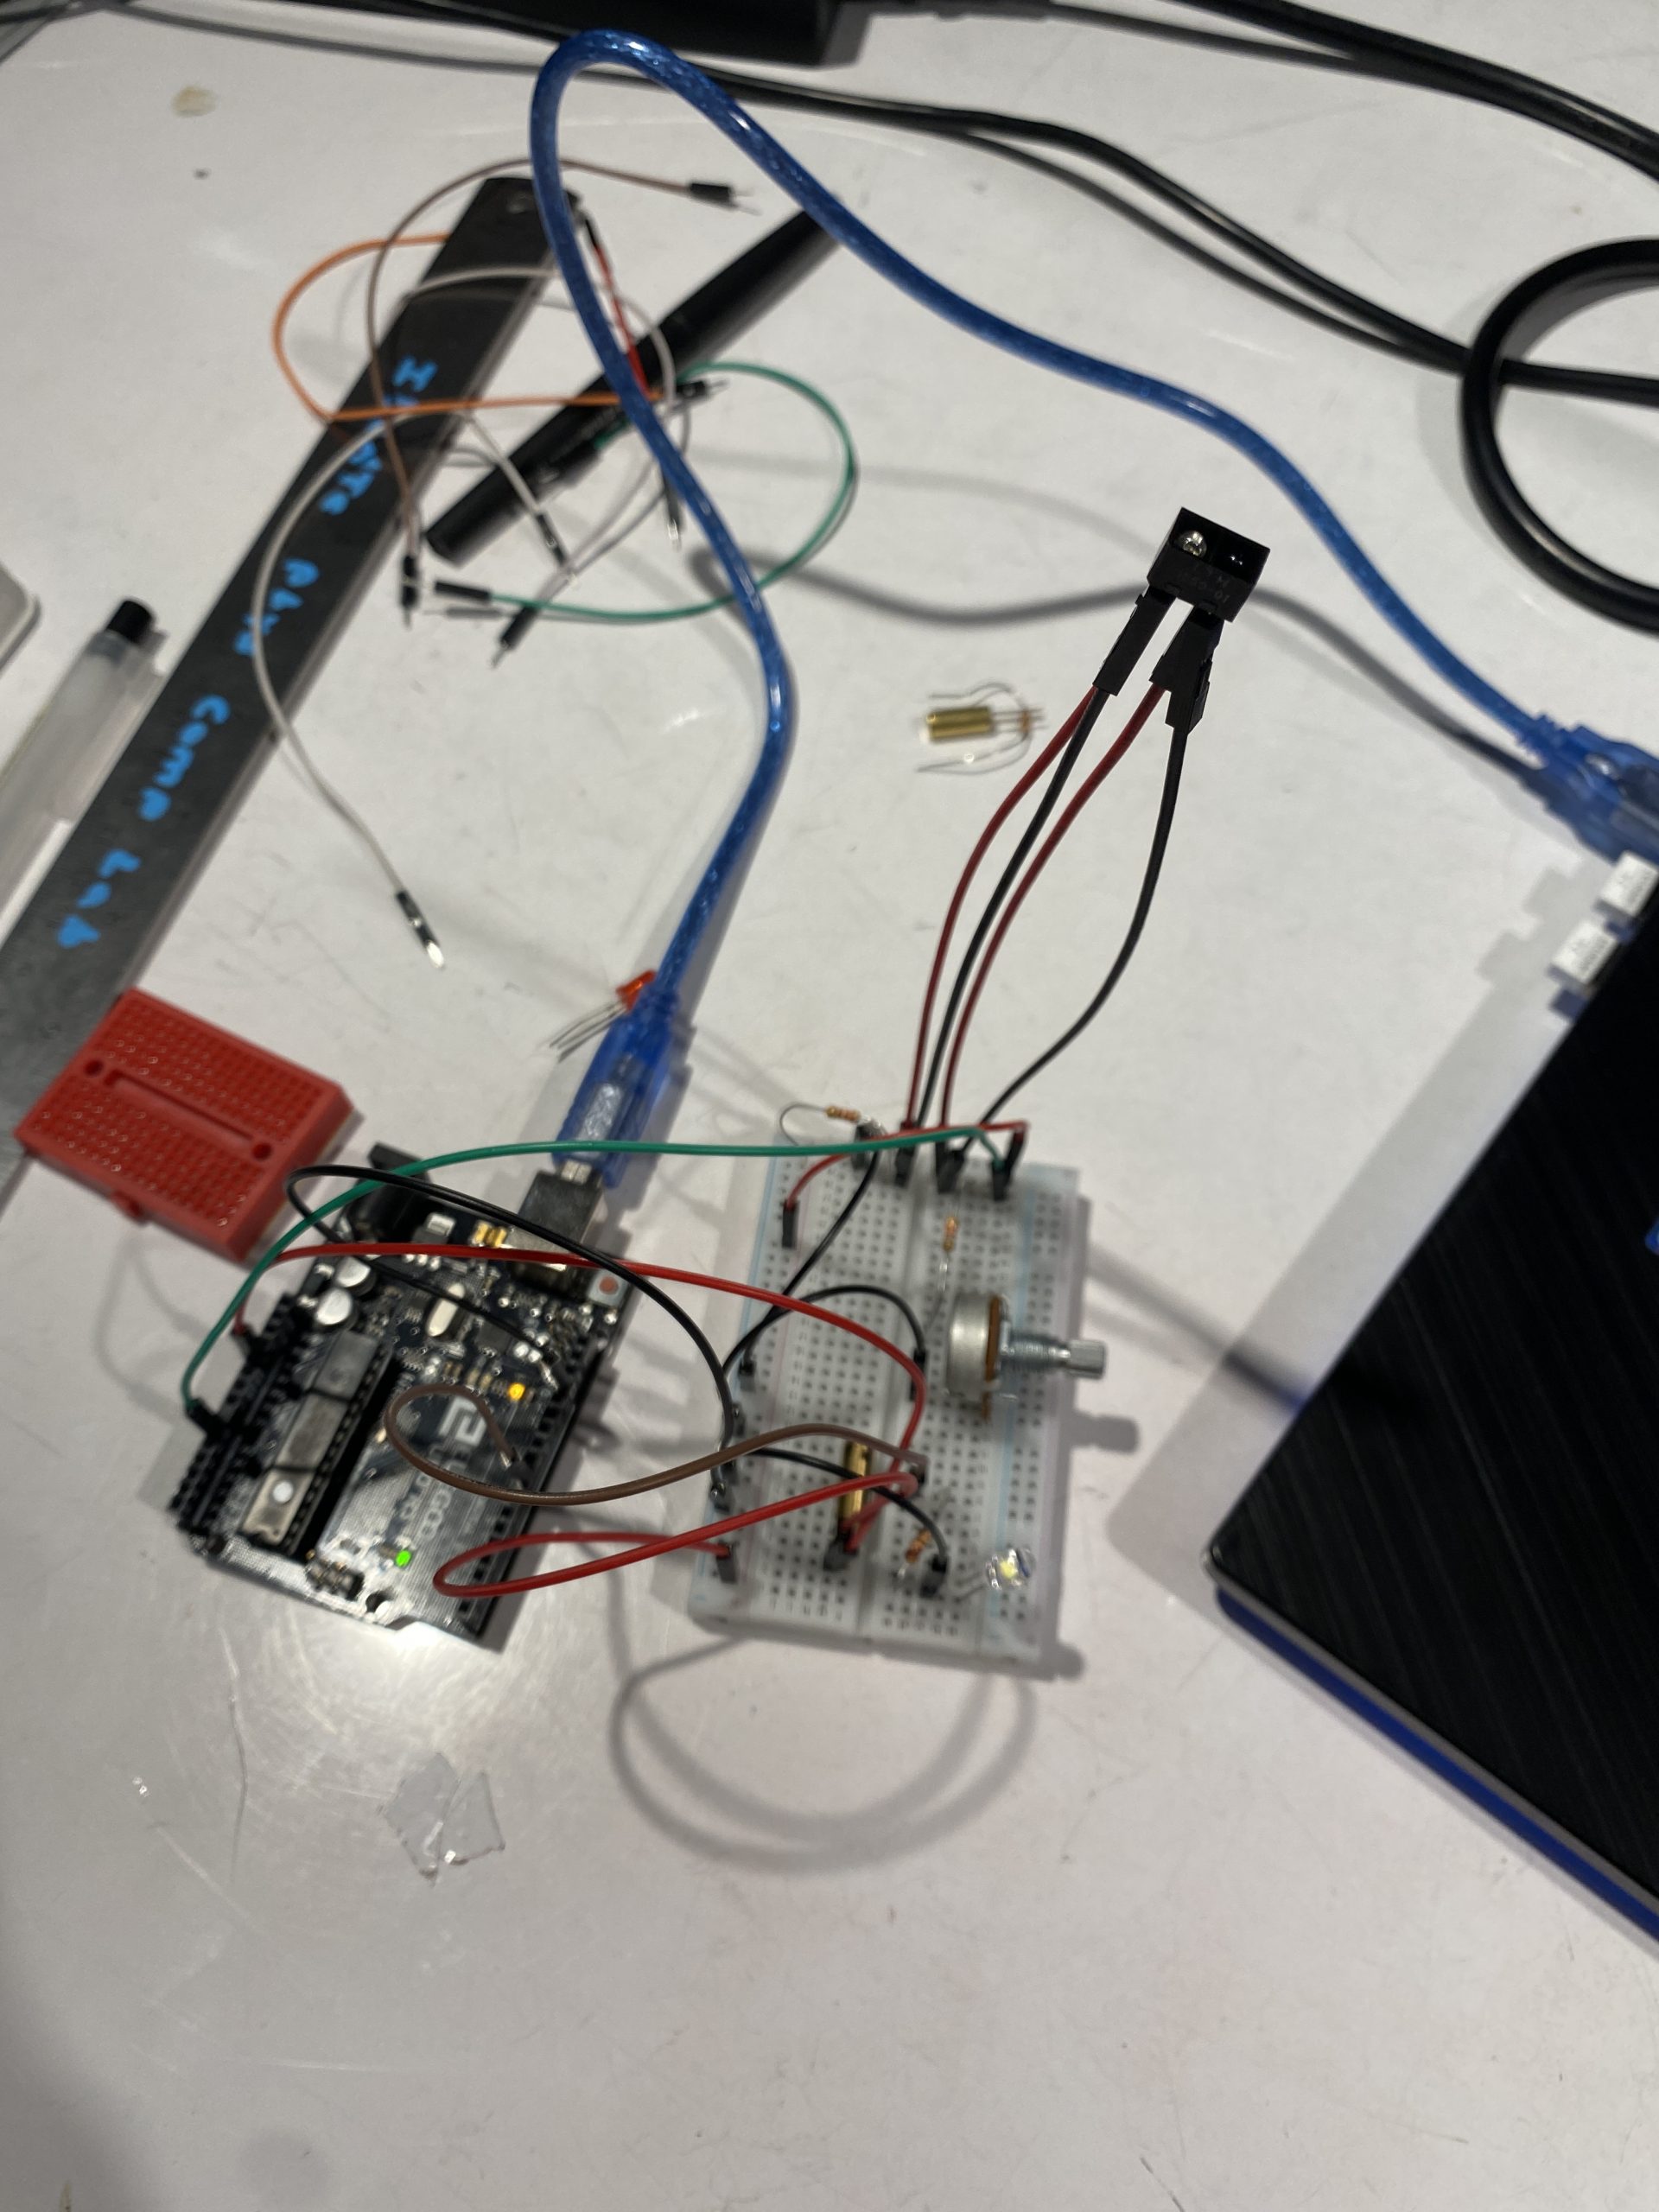
Breadboarded wiring of IR sensor and tilt switch for initial “hold-up-to-ear-and-listen” mechanism.
Here’s the first attempt at getting the IR sensor to work with the tilt switch to mockup the put-up-to-ear-to-listen interaction. In this example, the tilt switch, when activated, provides all power for the components on the breadboard. The tilt switch was surprisingly responsive and consistent, that we didn’t have to do any additional work to make it so that as soon as the device was put up to the ear, the IR sensor would start reading and send a signal to cause an output (which in this case was turning on a white LED).
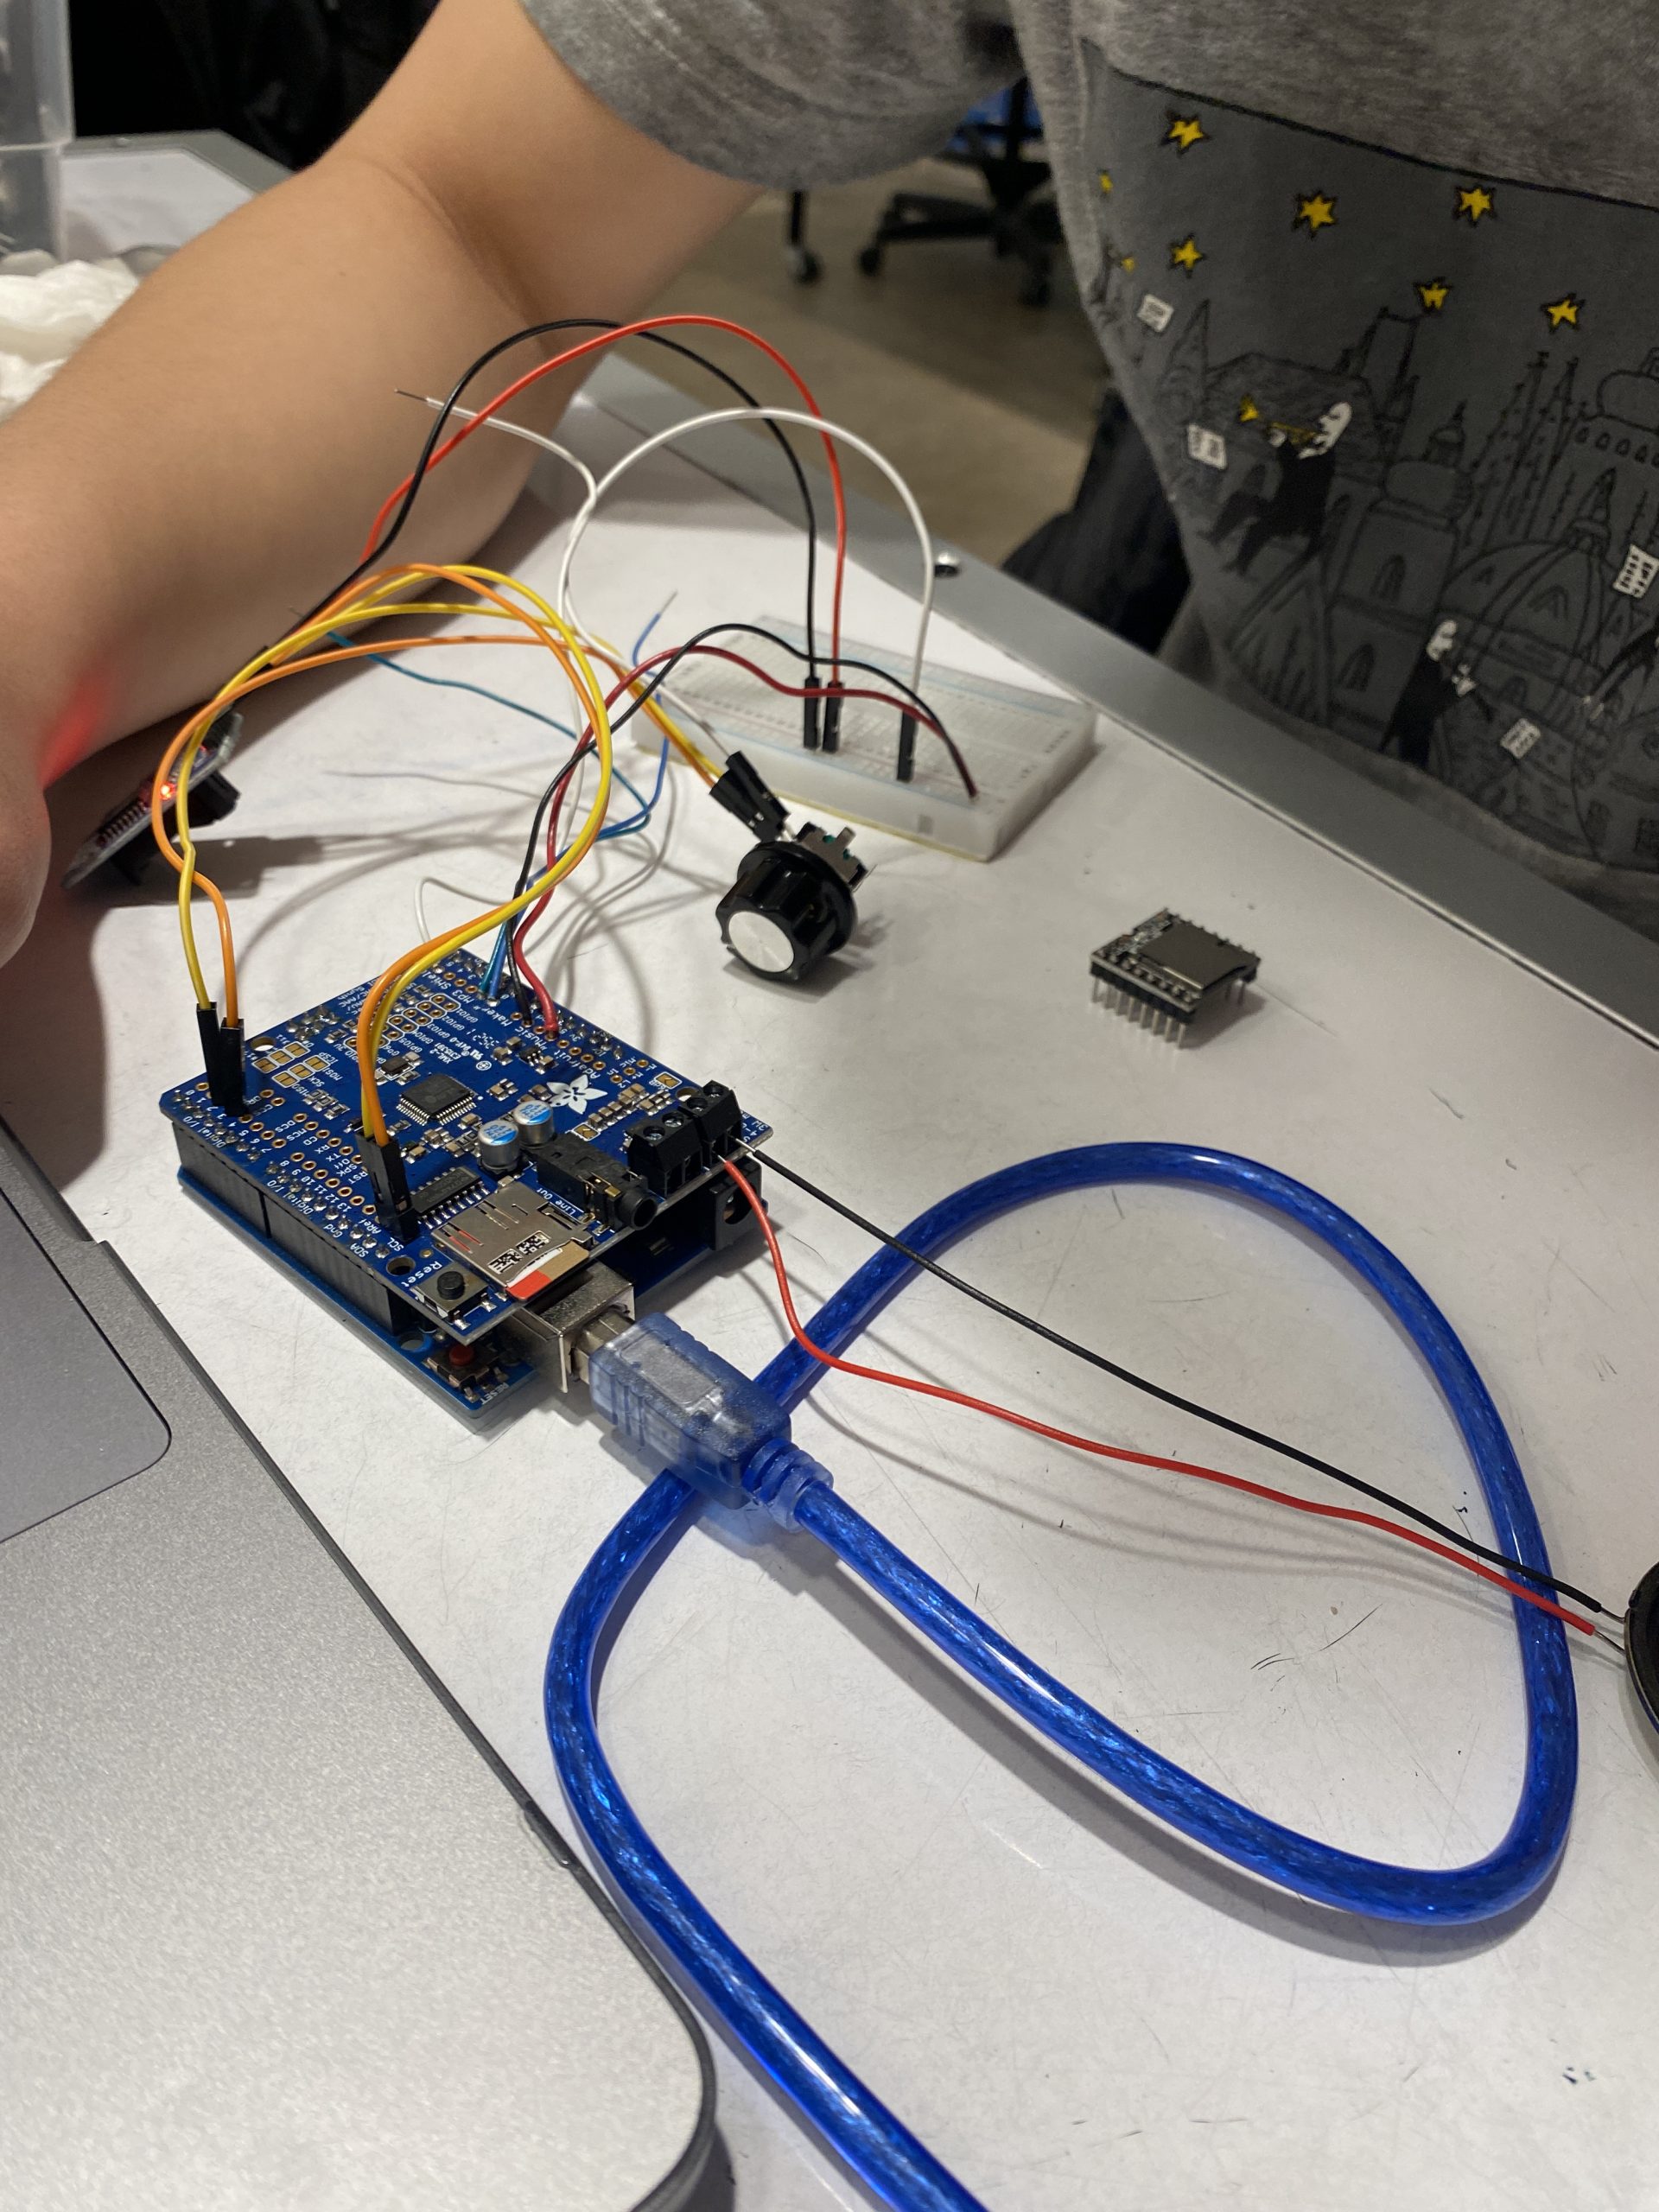
Breadboarded wiring of music maker shield (deprecated) and detented rotary encoder for “scroll-and-browse” mechanism.
Here’s Cameron’s first time getting the rotary encoder to work with a speaker. Each detent corresponds with 1 hour difference. Spinning upwards scrolls forward in the day, and spinning downwards scrolls backwards in the day. At this point, all audio files are pre-recorded and stored in an SD card. At the beginning of each message, a robot voice reads out the hour that has been reached, followed by the corresponding voice message. If nothing is played, the user can scroll past, which overrides the current message being played instantly. At this point, we were able to 3D print a quick test housing to get a better idea of size and scale, ergonomics, and feasibility in terms of stuffing in electronics.
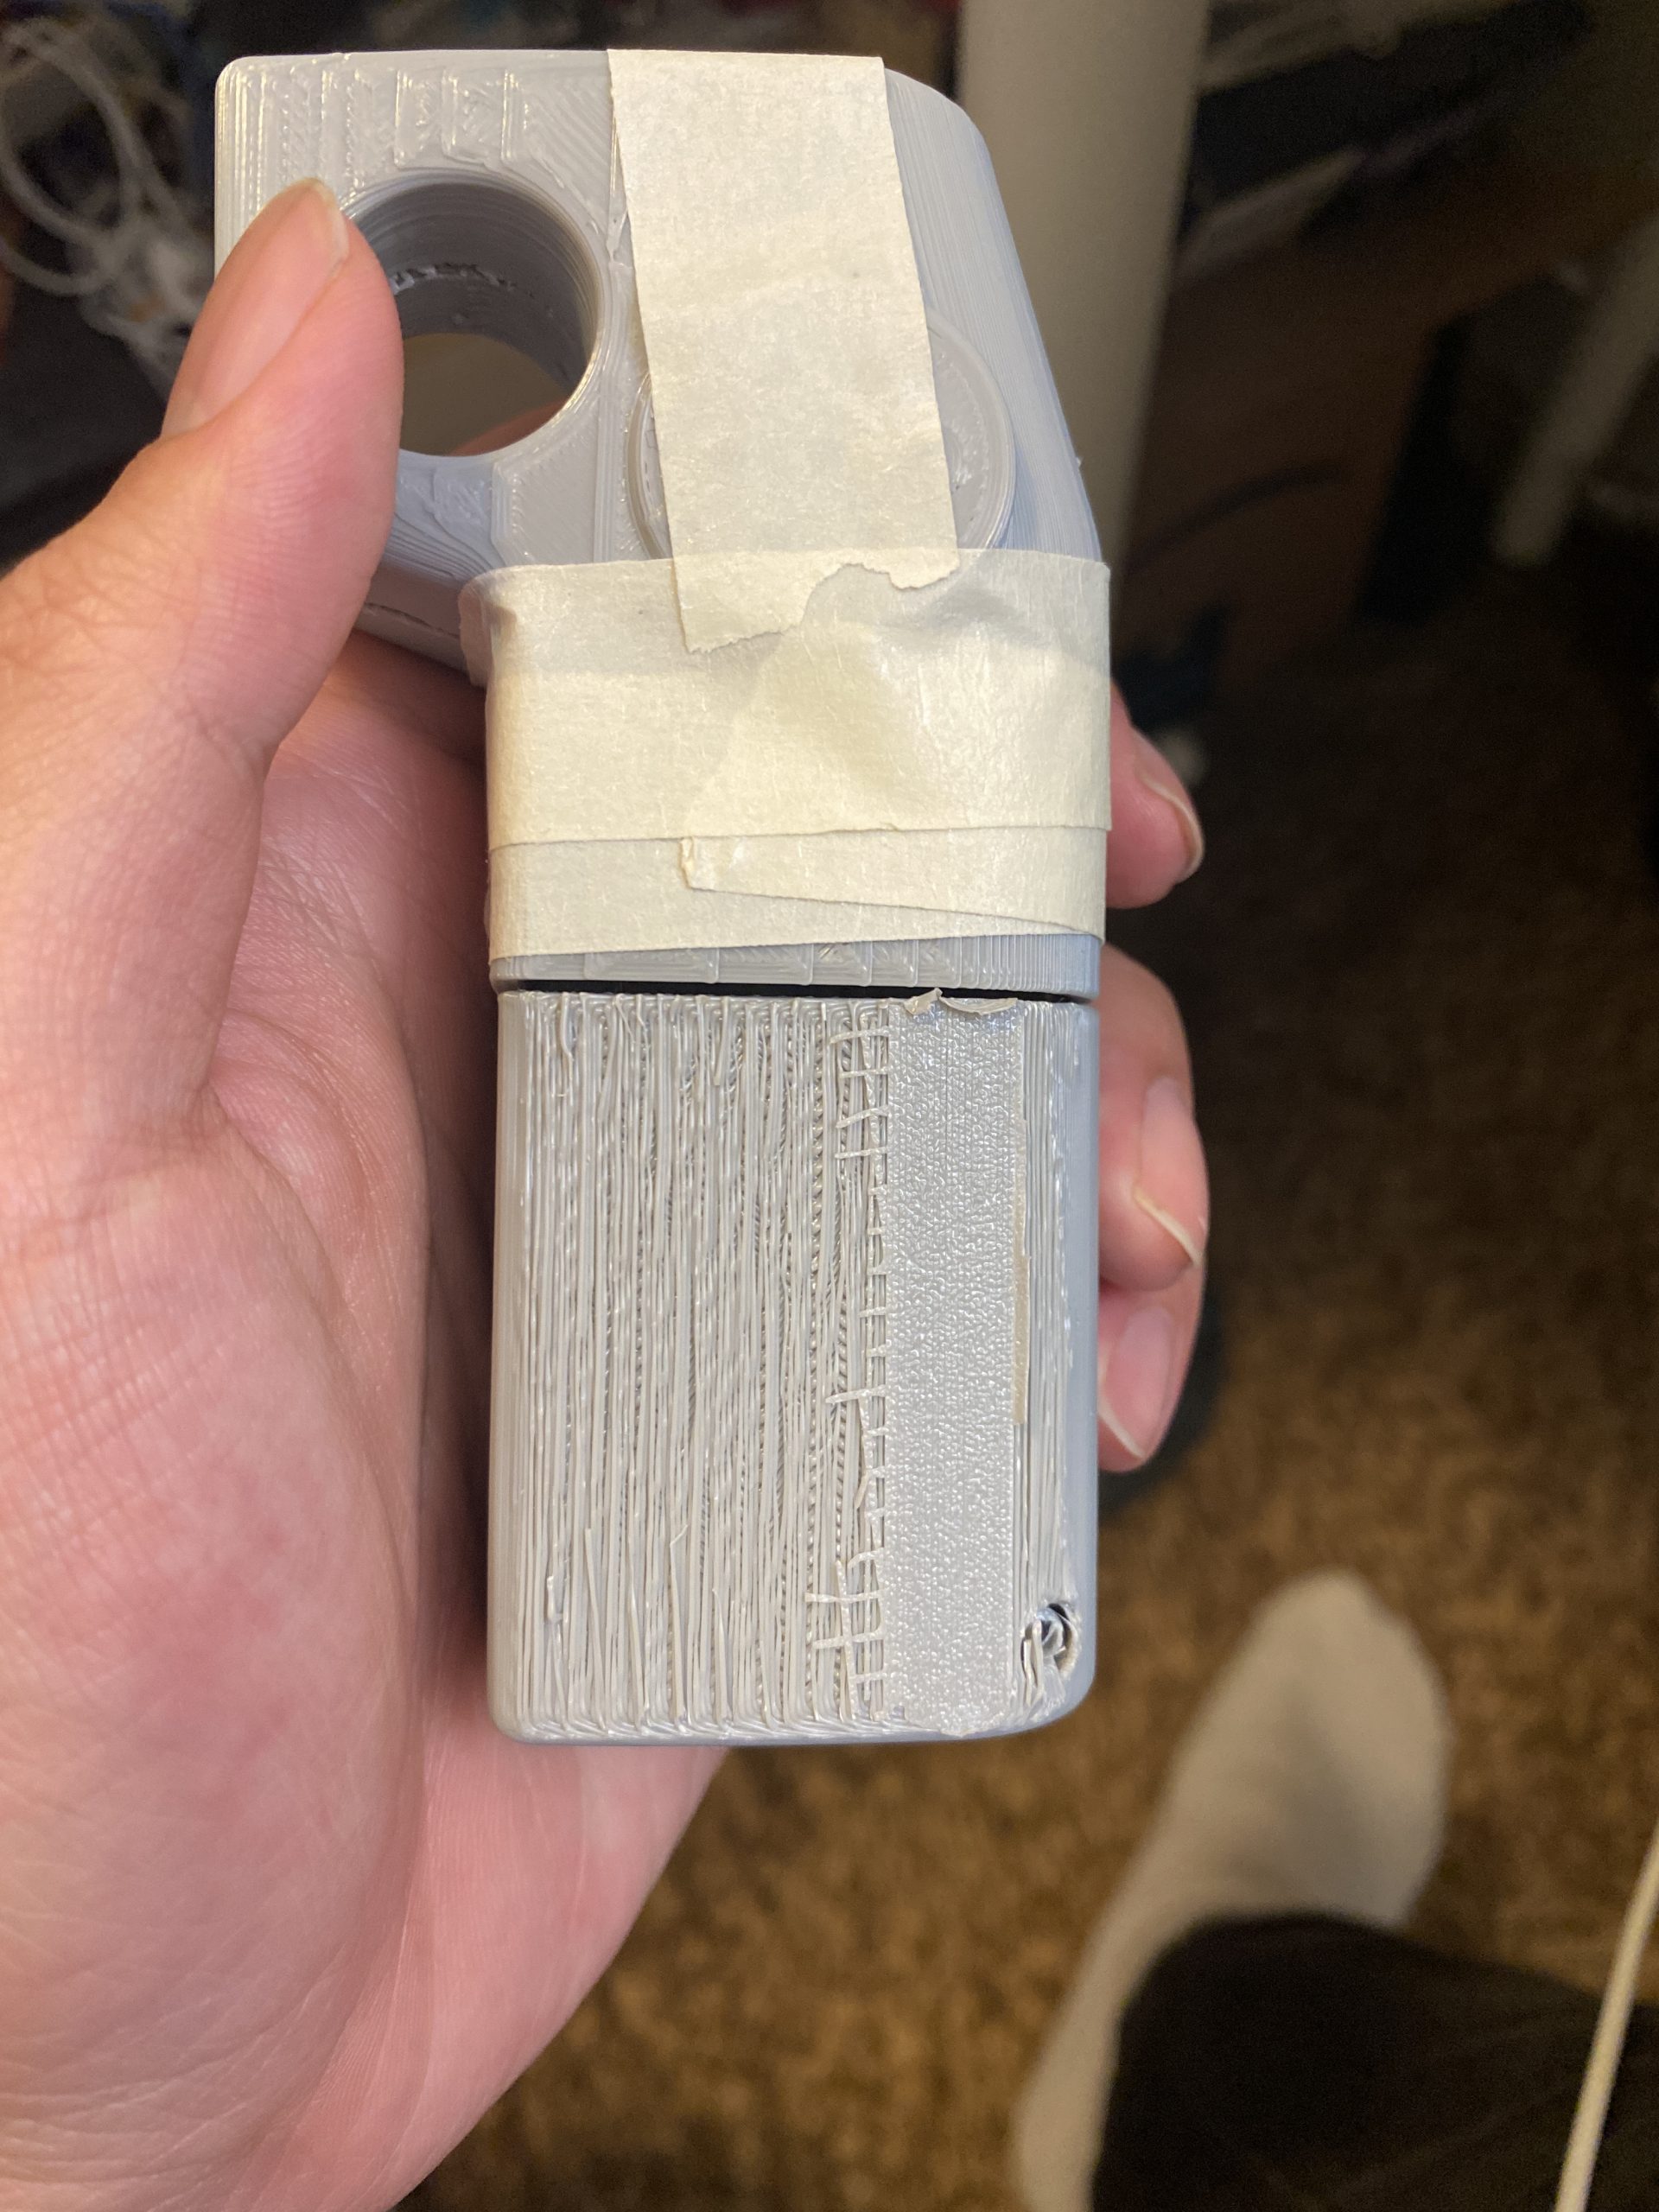
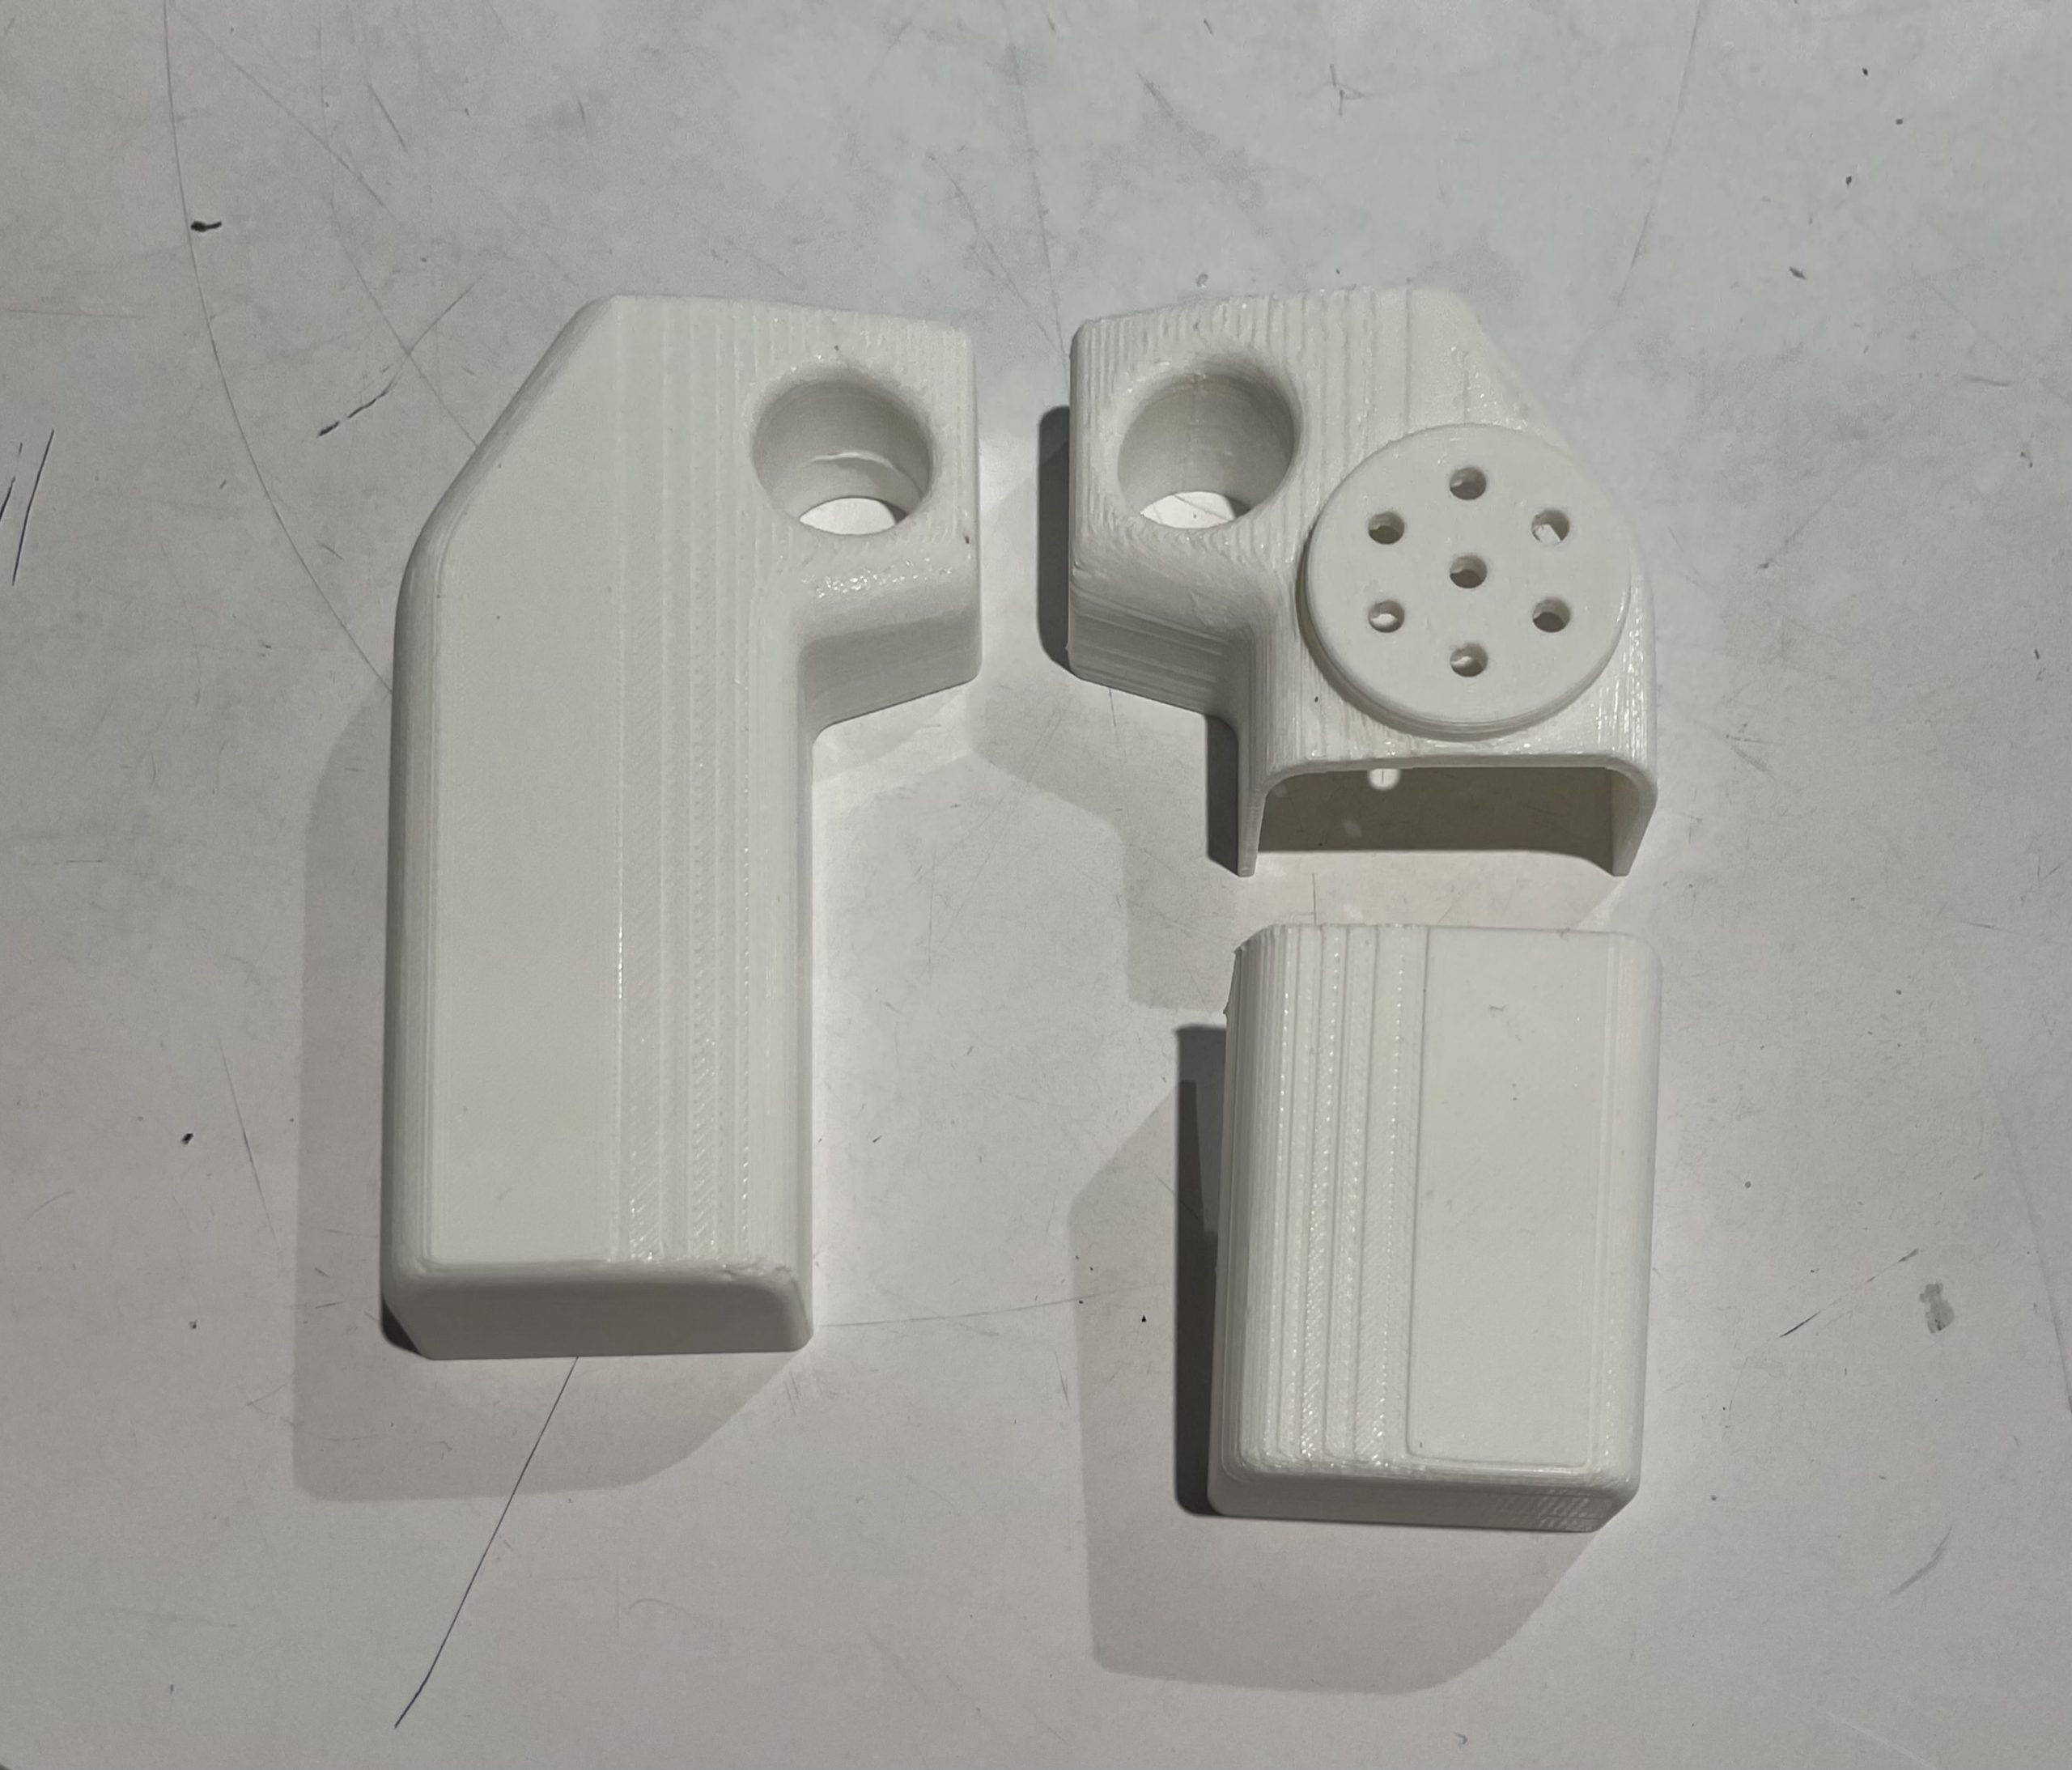
Initial print of our final housing. Notice that it closely resembles the skateboard remote.
It’s rough, but the bottom half of the body can actually be held in place without any external mechanical fasteners, and can be popped open to access the inside. This enclosure turned out to be too small, especially because of how deep the finger grooves were.
At this point, we were very short on time due to external factors that made it difficult to work consistently. So we went ahead and modeled and printed a second iteration that was a little larger in size, and had shallower finger grooves and fillets to afford more space in the interior. This ended up being the final housing that we worked with.
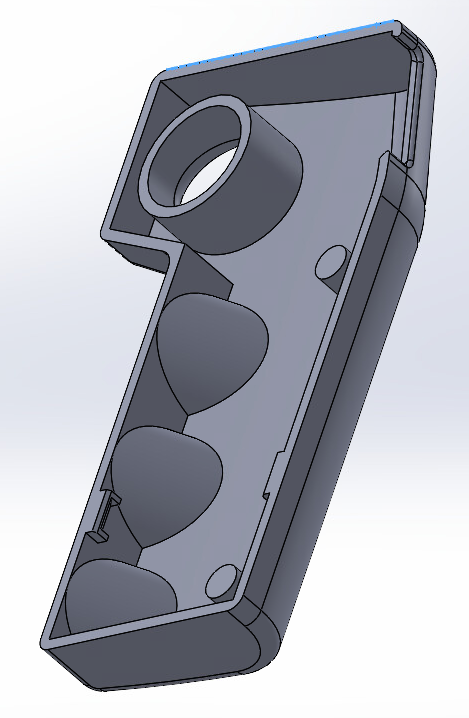
Note how the finger grooves cuts into the interior of the playback device significantly
Final CAD models of the previous iteration
 A comparison between the past and most recent iteration of Mark’s playback device. Note the difference in size and proportions.
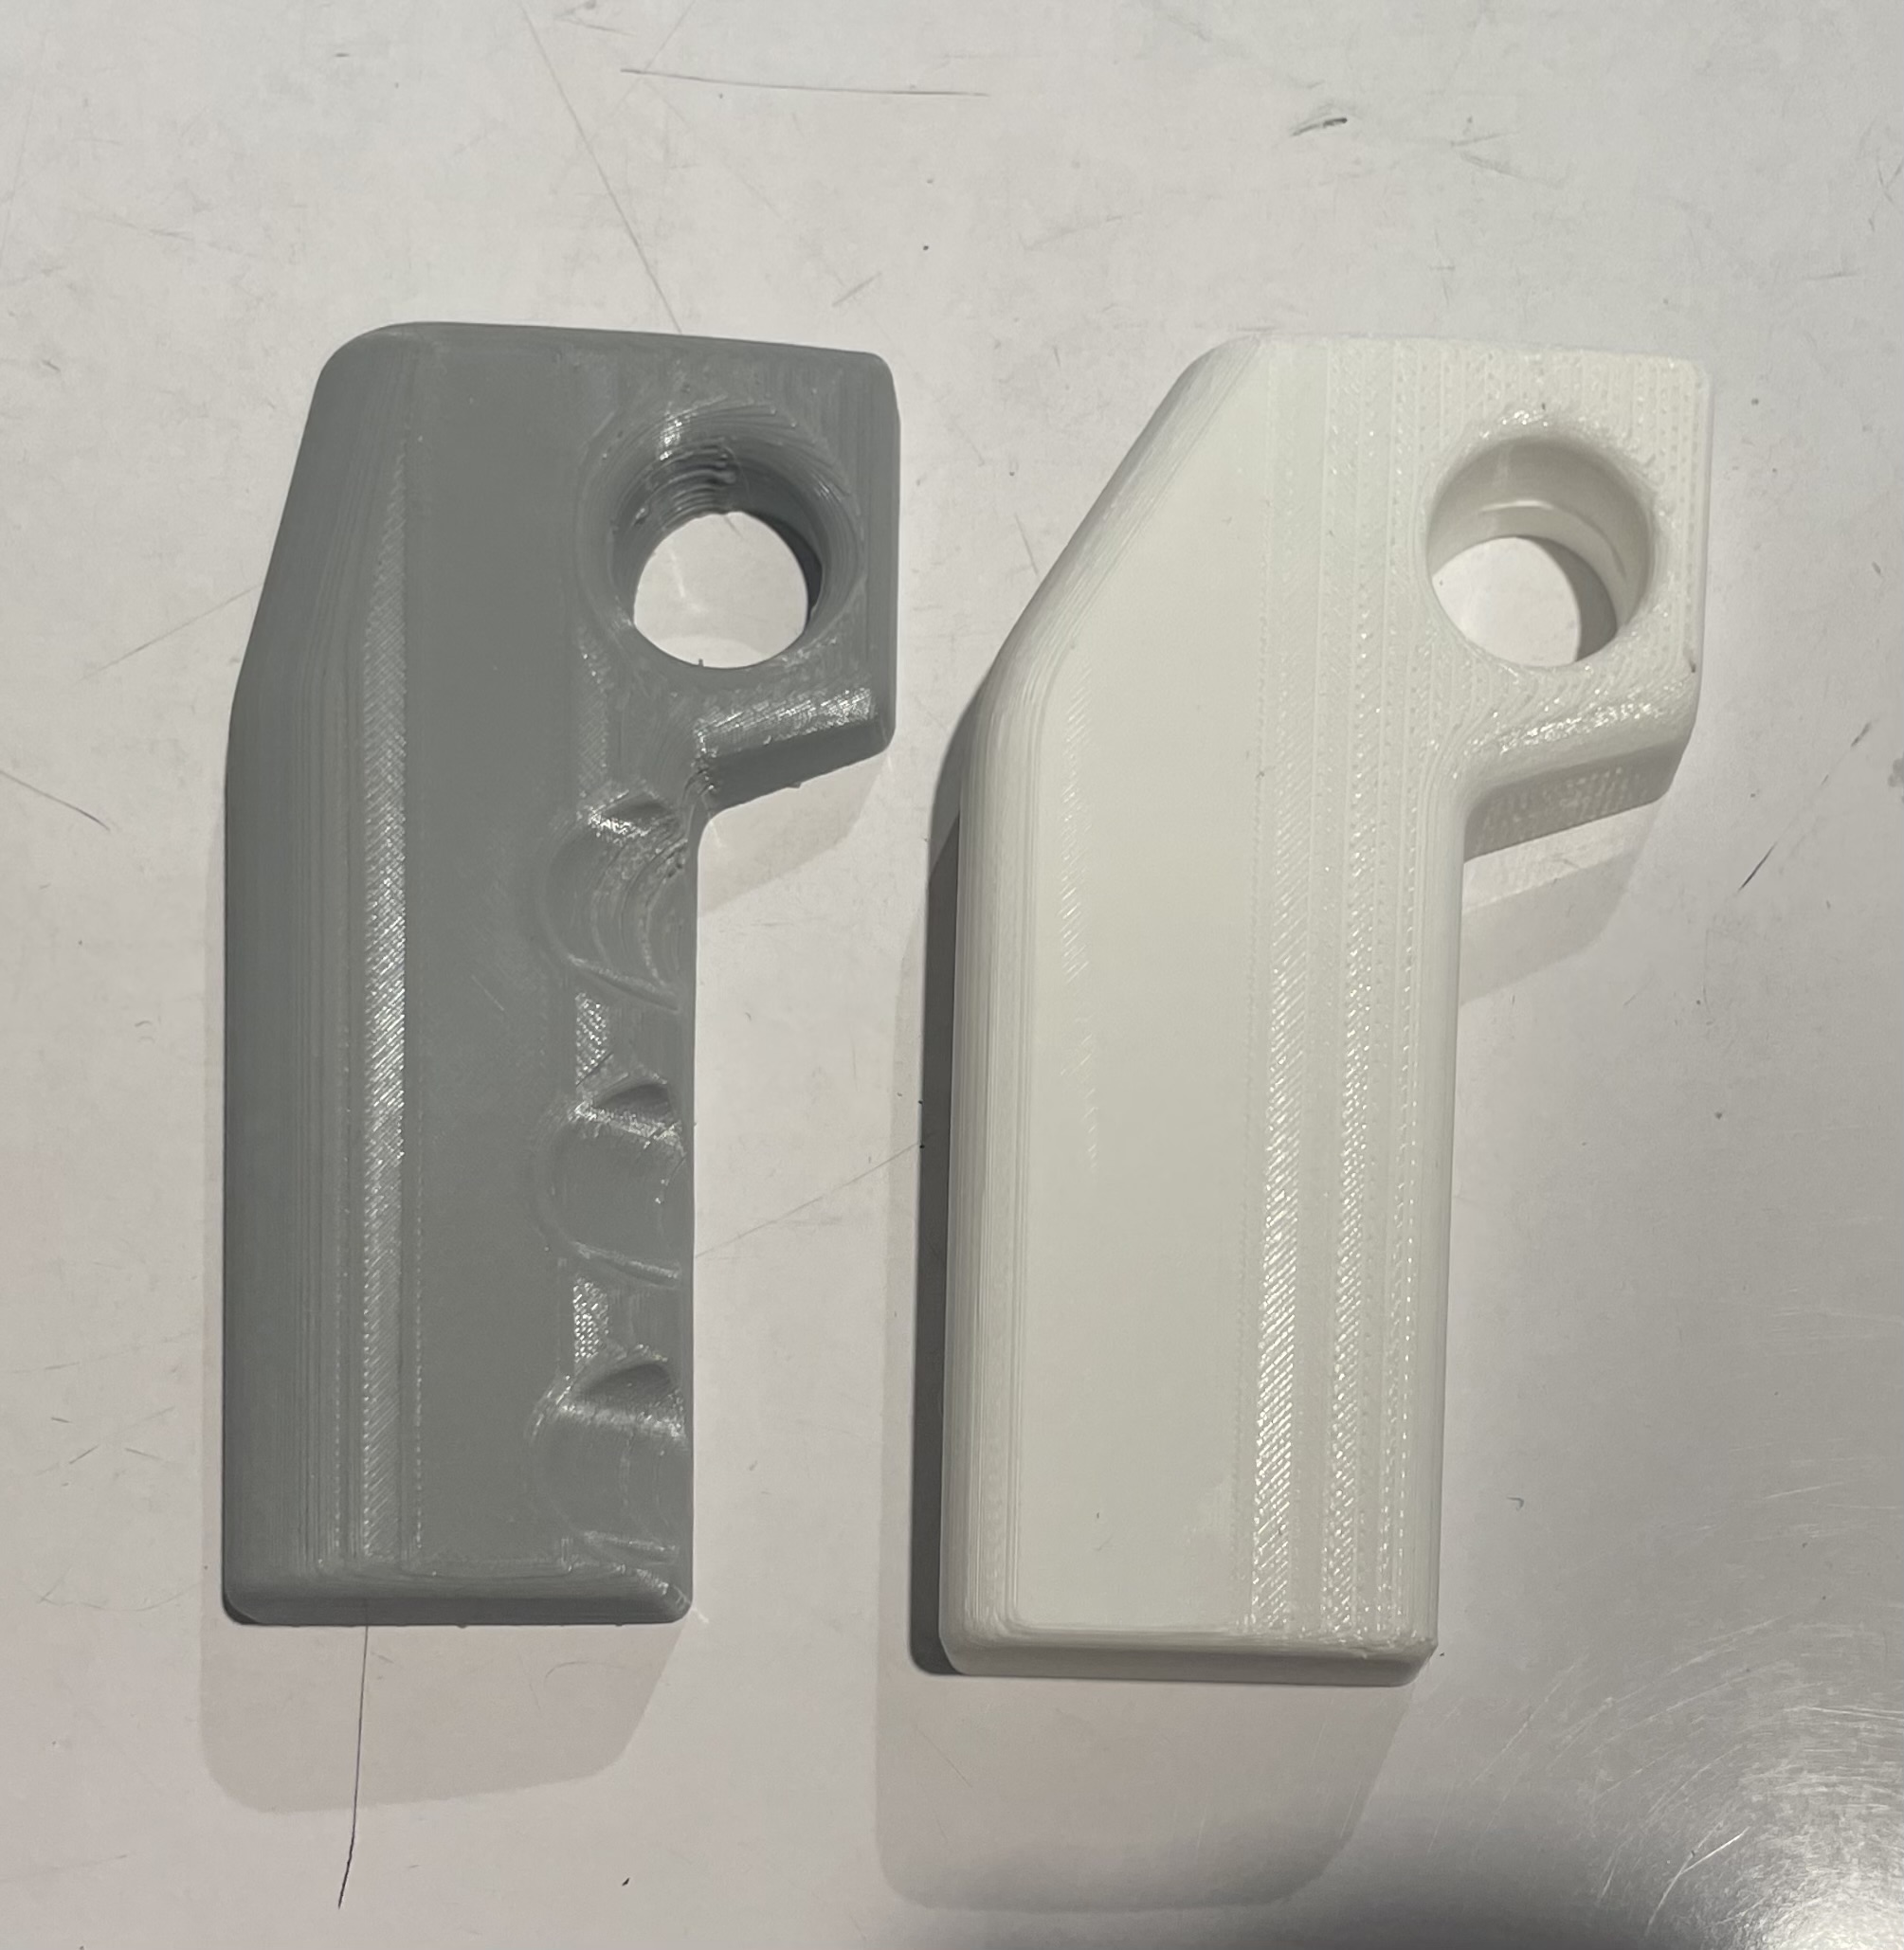
Second higher quality prints of the final housing.
Final prints of the device.
Again, since we were short on time, we decided to work in parallel, where some of us began to work on the final construction of the internal components (soldering everything to an internal power supply and Arduino Pro Micro), and others on the code and main functionality. We decided to scrap the microphone recorder function. The only way we could record audio and separate it was through a shield, which was simply way too big to fit in the device. Other components we found had other caveats, such as only being able to record 10s of audio, which we didn’t even know if we could separate and assign to different hours. Instead, we switched to an MP3 player that could read MP3 files (as opposed to the SD card reader which could only read WAV files that had to be encoded in a specific way via third-party software). We did this in hopes that this couldn’t compromise the recording portion of the device too much… on the assumption that Mark’s staff could be trained to use their portable devices to record MP3 audio into an SD card. It’s really not ideal, but it’s what we had to do with the amount of time we have available. Here’s how soldering went:
Final soldering of Arduino Micro, tilt switch, IR sensor, battery, MP3 player, and speaker.
Soldering process part 1: tilt switch, latching switch, voltage regulator, battery cap, MP3 SD card reader, speaker unit
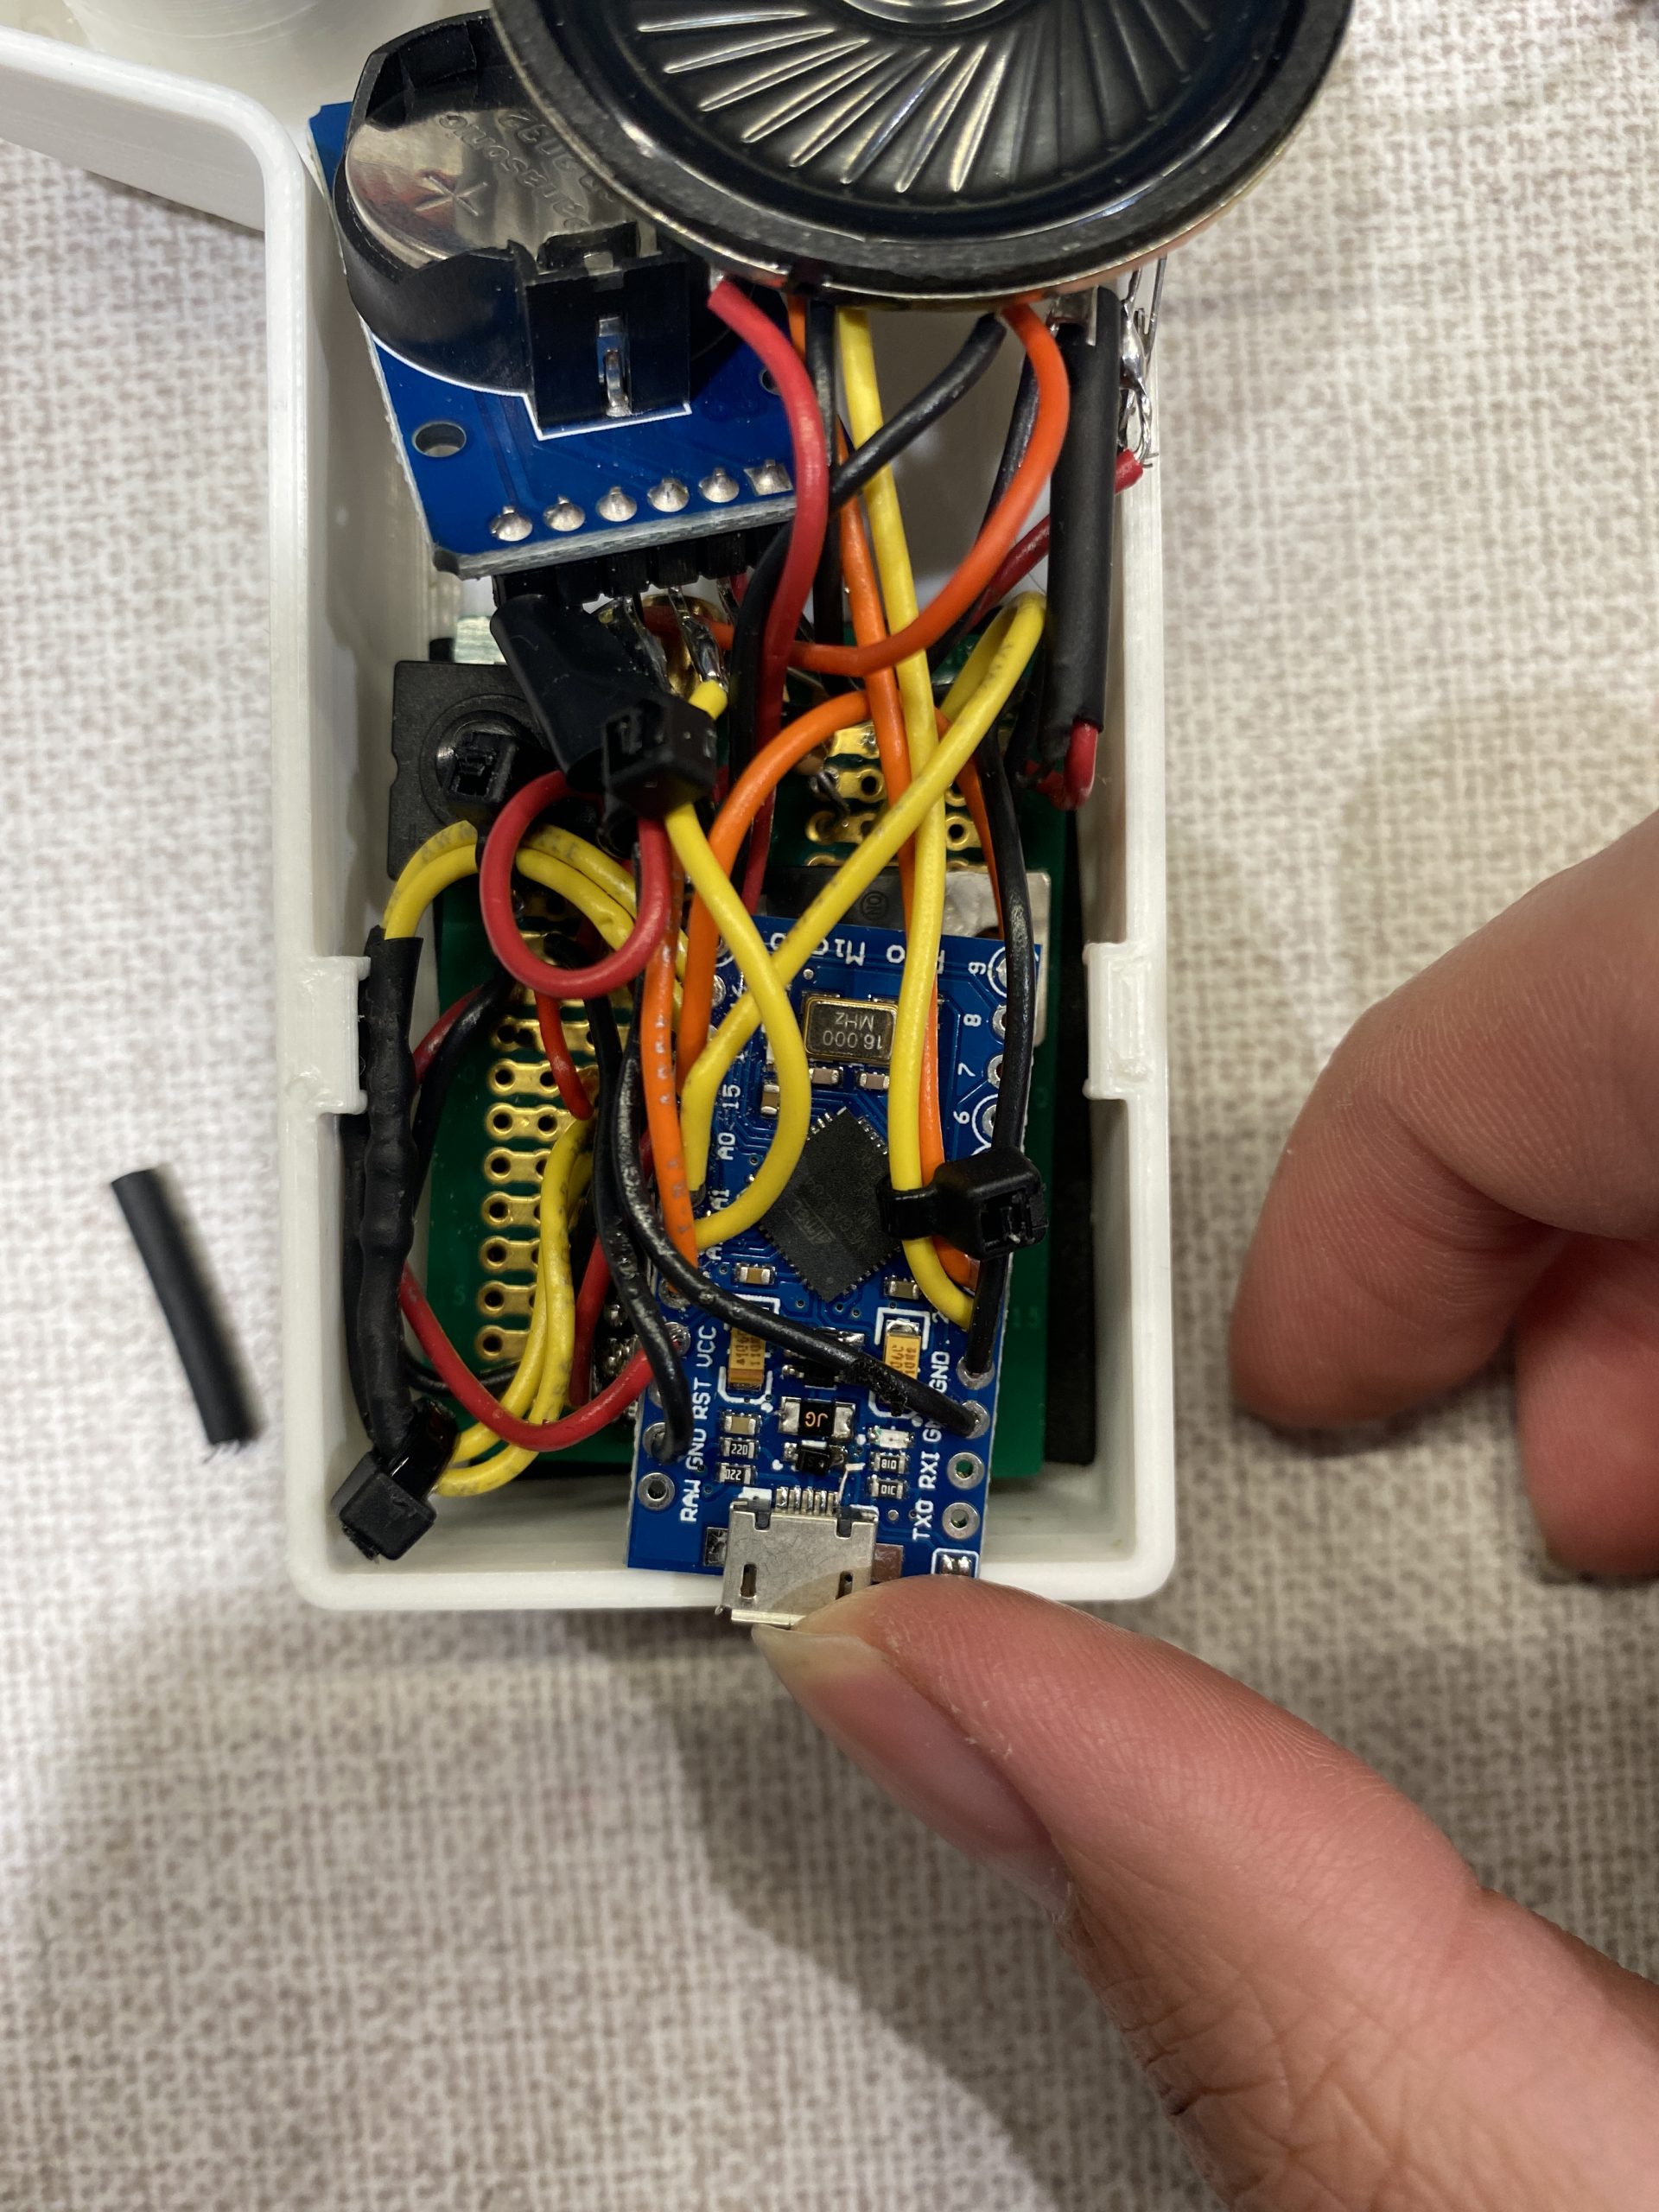
Soldering process part 2: RTC module and rotary encoder (hidden behind), and test fitting into the housing.
Conclusions
In the end, we did not have a working prototype to demonstrate. Although each component was soldered and in the right place, the transition from Arduino Uno to Arduino Micro brought unforeseen behavior and hardware failures beyond our control. The transition was an inevitable bottleneck of the process and perhaps too much faith was put into the swiftness of such a transition. That said, our progress still evidenced lots of hard work and intention, and we were able to still receive great feedback about the concept and fabrication of the device.
Overall, our final product was well received. A few people noted that the housing had good ergonomics in reference to the overall ‘hold’ of the device, as well as the placement of the thumb dial and index finger loop. Here is what one student said, “The device is actually very comfortable! I have relatively small hands and found the size and feel of the turning dial to be really comfortable to use.” We came a long way from the foam prototypes that we showed Mark. Even though we ultimately adopted a design derived from Cameron’s skateboard controller, the final size, shape, and feel came from many considerations and incessant iterating. To our delight, most people interacted with the device the way we intended. Each person seemed to instantly recognize the important touch-points that made the device effective. They held the device as intended, scrolled the wheel with their thumb, and raised the device to their ear in exactly the spot that it was designed for. We were also told that the tangible aspect of the whole housing was much appreciated, and that they could see how our focus on designing around user interaction played a large role in the conceptualization, design, and fabrication of the project as a whole.
When we handed the device to Mark, we saw that he had a bit of trouble holding it correctly at first, which was most likely due to a tradeoff we had to make in order to save space–removing the finger grooves. This was perhaps the biggest drawback in our final design, since the finger grooves were so well-received by Mark in our initial prototype presentation. Unfortunately, the breadboard was ever-so-slightly too wide and took up the entire width of the housing, requiring us to pivot the design. Since day one, space consideration was always an obstacle we were aware about with this project. We spent a lot of time planning for this and ultimately theorized that all the components could fit. Even though the size of the housing did inflate a bit from original design and we had to get rid of the finger grooves, we believe the final design and shape of the device trumped the slightly bulky feel and discomfort.
We also received positive responses in terms of the concept of the device, and how we streamlined the device to not add extra burden to Mark’s existing everyday-carry, habits, and muscle memory. Here were some features that were applauded: having the device play audio as soon as it’s raised and put up to the ear, the ability for the user to scroll forwards and backwards throughout the day, and the hatch to access the internals and replace the battery. Overall, our biggest goal was to design a device that (A) worked, and (B) added minimal training and cognitive load to use the device. In hindsight it would also have been nice to experiment with different textures to distinguish different parts of the device, since after all this device is meant to be used without the need for sight. Of course, it is difficult to test out just how successful our device would be without a finalized working product (which is a point that came up in all of our critiques and we fully acknowledge). However, since each design aspect for this device was made with evidence-based backing and consideration, I think the purpose and ultimate integration in Mark’s life was transparent.
From this project, we were able to experience the hard yet humbling feeling of putting in hours and hours of work and not getting a working product at the end. One of the biggest obstacles we had was deciding on the best method for audio recording and playback. There are so many projects online with this feature, but only so many work with our space constraints. Recording audio ended up being infinitely harder than playing audio, which we realized (a bit too late) can only be done by a handful of hardware components that we didn’t have. There were many obstacles and thus considerations we had to make throughout this project, but the brick wall that slammed in our faces at the tail of the project was transitioning from an Arduino Uno to Arduino Pro Micro. Code, designed specifically for the Micro, failed to upload due to the device unrecognizable by any of our computers. As soon as we pressed “Upload,” the Pro Micro would disconnect. We tried four different Micros, checked and resoldered all our connections, and refactored our code twice, yet still the device refused to connect. We were unaware of the extreme unreliability of the Pro Micro and had no time to change our design, hence our ultimate failure. Our mistake was not having a secondary “all-organs-out” version of our circuit so that we could at least show the functionality of our device. This failure hit us all pretty heavily, but ultimately it was a good lesson learned.
Technical Details
Block Diagram:

Circuit Diagram:

Code:
// Title: Portable Schedule Playback Device by Apples Group
// Author: Lily, Stan, Cameron
// Date: 5/05/23
// Description: This code handles the logic for playing back the appropriate pre-recorded
// recording stored in the microSD card depending on what hour of the day the dial is set to.
// When the code boots for the first time, the rotary encoder is set to the current hour of the
// day (read from the RTC) and thus this is the first recording that is played back. Each
// recording is prefaced with a voice telling the time of the day. The code handles interruptions
// at any point in the recording/preface so the user can quickly browse to the desired recording.
//
//
//                   -------------------------------------------------
//                   |   Role      |   Variable Name   | Arduino Pin |
//                   -------------------------------------------------
//  Rotary Encoder   |  Right Pin  |   encoderPinA     |      2      | https://www.nobleusa.com/pdf/xre.pdf
//                   |  Left Pin   |   encoderPinB     |      3      |
//                   -------------------------------------------------
//    MP3 Playback   |  RX Pin     |   pinDfpRX        |      10     | https://markus-wobisch.blogspot.com/search?q=DFPlayer
//                   |  TX Pin     |   pinDfpTX        |      11     |
//                   |  Busy Pin   |   pinDfpBusy      |      12     |
//                   -------------------------------------------------
//             RTC   |  SCL Pin    |   pinSCL          |      A5     |
//                   |  SDA Pin    |   pinSDA          |      A4     |
//                   -------------------------------------------------

the project title,
(optionally) your names,
a description (short or long) of what the code does,
any description of pin mapping that would be useful to somebody else trying to recreate your work,
appropriate credit to any code source that you incorporated into your project, and

//


                  /* GLOBALS */

// Rotary Encoder Globals //
#include <Keyboard.h>
enum PinAssignments {
  encoderPinA = 2,   // right
  encoderPinB = 3,   // left
};

volatile unsigned int encoderPos = 0;  // a counter for the dial
unsigned int lastReportedPos = 1;   // change management
static boolean rotating = false;    // debounce management
volatile int rotationDelt;
boolean A_set = false;
boolean B_set = false;
boolean clicked = false;
volatile int rotationPos = 1;

// MP3 Playback Globals //
#include "SoftwareSerial.h"
const byte pinDfpRX = 10;
const byte pinDfpTX = 11;
const byte pinDfpBusy = 12;
const byte dfpVolume = 0x11; // set volume of DFPLayer - in range: 0x00-0x30 - default=0x30
SoftwareSerial mySerial(pinDfpRX, pinDfpTX);
# define Start_Byte 0x7E
# define Version_Byte 0xFF
# define Command_Length 0x06
# define End_Byte 0xEF
# define Acknowledge 0x00 //Returns info with command 0x41 [0x01: info, 0x00: no info]

// RTC Globals //
const byte pinSCL = A5;
const byte pinSDA = A4;
#include <RTClib.h>
RTC_DS3231 rtc;


// Other Globals //
bool start = true;
bool startRot = true;
const byte nfiles = 6;     // number of mp3 files on SD card
static byte ifile = 0;      // number of file played next
unsigned long tellTimeDelay = 800;
bool playMemo = false;
unsigned long memoDelayTimeStamp = 0;
static byte nextFile = 0;


                  /* FUNCTIONS */

// MP3 Playback Functions //
//plays a file named Par2 from folder Par1
void dfpExecute(byte CMD, byte Par1, byte Par2) {
  # define Start_Byte   0x7E
  # define Version_Byte  0xFF
  # define Command_Length 0x06
  # define Acknowledge  0x00
  # define End_Byte    0xEF
  // Calculate the checksum (2 bytes)
  uint16_t checksum = -(Version_Byte + Command_Length + CMD + Acknowledge + Par1 + Par2);
  // Build the command line
  uint8_t Command_line[10] = { Start_Byte, Version_Byte, Command_Length, CMD, Acknowledge,
         Par1, Par2, highByte(checksum), lowByte(checksum), End_Byte};

  // Send the command line to DFPlayer
  for (byte i=0; i<10; i++) mySerial.write( Command_line[i]);
}


// Rotary Encoder Functions //
// Interrupt on A changing state
void doEncoderA() {
  // debounce
  if ( rotating ) delay (1);  // wait a little until the bouncing is done

  // Test transition, did things really change?
  if ( digitalRead(encoderPinA) != A_set ) { // debounce once more
    A_set = !A_set;

    // adjust counter + if A leads B
    if ( A_set && !B_set )
      // encoderPos += 1;
      rotationDelt = 1;

    rotating = false;  // no more debouncing until loop() hits again
  }
}

// Interrupt on B changing state, same as A above
void doEncoderB() {
  if ( rotating ) delay (1);
  if ( digitalRead(encoderPinB) != B_set ) {
    B_set = !B_set;
    //  adjust counter - 1 if B leads A
    if ( B_set && !A_set )
      //encoderPos -= 1;
      rotationDelt = -1;

    rotating = false;
  }
}


// Print Debugging //
// formats and prints the time of the day (AM/PM)
void printTime(byte ifile){
  if(ifile == 12){
    Serial.print(ifile);
  }
  else{
    Serial.print(ifile % 12);
  }

  if(ifile >= 12){
    Serial.println("PM");
  }
  else{
    Serial.println("AM");
  }

}


void setup() {
  // Rotary Encoder Setup
  pinMode(encoderPinA, INPUT);
  pinMode(encoderPinB, INPUT);
  // turn on pullup resistors
  digitalWrite(encoderPinA, HIGH);
  digitalWrite(encoderPinB, HIGH);
  // encoder pin on interrupt 0 (pin 2)
  attachInterrupt(0, doEncoderA, CHANGE);
  // encoder pin on interrupt 1 (pin 3)
  attachInterrupt(1, doEncoderB, CHANGE);
  Keyboard.begin();
  // set the encoder position to the current
  // hour of the day
  rotationPos = rtc.now().hour();

  //RTC Setup
  pinMode(pinSCL, OUTPUT);
  pinMode(pinSDA, INPUT);
  rtc.begin();       // initialize rtc


  Serial.println("\n\n\n\n\n\n\n---------------------\n\n");
  Serial.print("The hour of the day is ");
  printTime(rtc.now().hour());


  //MP3 Player
  mySerial.begin(9600);
  pinMode(pinDfpBusy, INPUT);   // init Busy pin from DFPlayer (lo: file is playing / hi: no file playing)
  dfpExecute(0x3F, 0x00, 0x00);  // Send request for initialization parameters
  delay(5000);
  dfpExecute(0x06,0x00,dfpVolume); // set volume DL=0x00-0x30, default=0x30
  delay(30);            // have >20ms delays between commands

}


void loop() {
  unsigned long currTime = millis();

  // speaker plays the MEMO (after tellTimeDelay milliseconds have passed)
  if(playMemo && (currTime - memoDelayTimeStamp) > tellTimeDelay){
    Serial.print("Playing memo for ");
    printTime(ifile);
    dfpExecute(0x0F,0x02, nextFile);
    playMemo = false;
  }

  rotating = true;  // reset the debouncer

  // register a left turn
  if(rotationDelt == -1) {
    Keyboard.press(KEY_LEFT_ARROW);
    rotationPos -= 1;
    if(rotationPos < 1){
      rotationPos = 24; // we wrap around to 24 when we go below 1
    }
  }

  // register a right turn
  else if(rotationDelt == 1) {
    Keyboard.press(KEY_RIGHT_ARROW);

    if(rotationPos > 24){
      rotationPos = 1; // we wrap around to 1 when we go over 24
    }
  }


  // if the encoder changed position...
  if(startRot || rotationDelt != 0) {

    Serial.println(rotationPos);
    startRot = false;

    ifile = rotationPos;
    Serial.print("Telling time for ");
    printTime(ifile);

    // ...speaker tells the TIME
    dfpExecute(0x0F,0x01,ifile);
    playMemo = true;
    nextFile = ifile;
    memoDelayTimeStamp = currTime;
  }

  Keyboard.releaseAll();
  rotationDelt = 0;

}
CAD Files: