DSLR photography
A DSLR (digital single-lens reflex) camera, used the right way, will produce really excellent images. (Used the wrong way it will make fuzzy garbage far worse than your phone would shoot.)
You can spend a lifetime learning how to take good photos, but for our documentation requirements, we’ll focus on getting the basics right so you can take clear, attractive images to show what you’ve built.
This tutorial refers specifically to the Nikon D3300 (available in the IDeATe Lending booth), but the underlying ideas are common to all DSLR cameras.
- The most important part of the camera
- The three basics
- Other important variables
- Video
- Other equipment
The most important part of the camera
…is the person standing behind it. A photographer who knows how to frame things well and choose reasonable camera settings will take far better pictures with a bad camera than a total novice using an excellent camera in automatic mode. Don’t fret too much about the camera—fret about your skills!
The three basics
To take a picture of the world, the camera peers through its lens for a certain amount of time and records what it sees. The trick to photography is controlling how much light gets through, and for how long, as well as juggling a few other parameters that change the outcome of the photo. We’ll walk through the basics here.
The three big factors you can most easily modify are the shutter, aperture, and film sensitivity.
| quality | measurement unit | a higher value makes the picture |
| shutter | seconds (1/20s, 1/100s, 1.2s, etc.) | lighter |
| aperture | f-numbers (ƒ/1.4, ƒ/5.6, ƒ/22, etc.) | darker |
| “film” sensitivity | ISO (100, 400, 1,600, etc.) | lighter |
Shutter (exposure time)
The “shutter” is a thing that physically opens to allow light to go through the lens and hit the camera’s sensor. It is normally closed, and the light instead goes through the lens up to the viewfinder, so you can see what the camera sees. When you push the button to tell the camera to take a picture (the button is also called a shutter, confusingly), it opens the shutter for a certain amount of time, which is also conveniently called the “shutter.” We can refer to it as the “exposure time” for clarity.
If you leave the shutter open for a long time (say, half of a second), then lots of light pours into the camera and hits the sensor—the captured image appears brighter. If you leave the shutter open only briefly (say, 1/500 of a second), then the picture will be darker than it otherwise would’ve been.
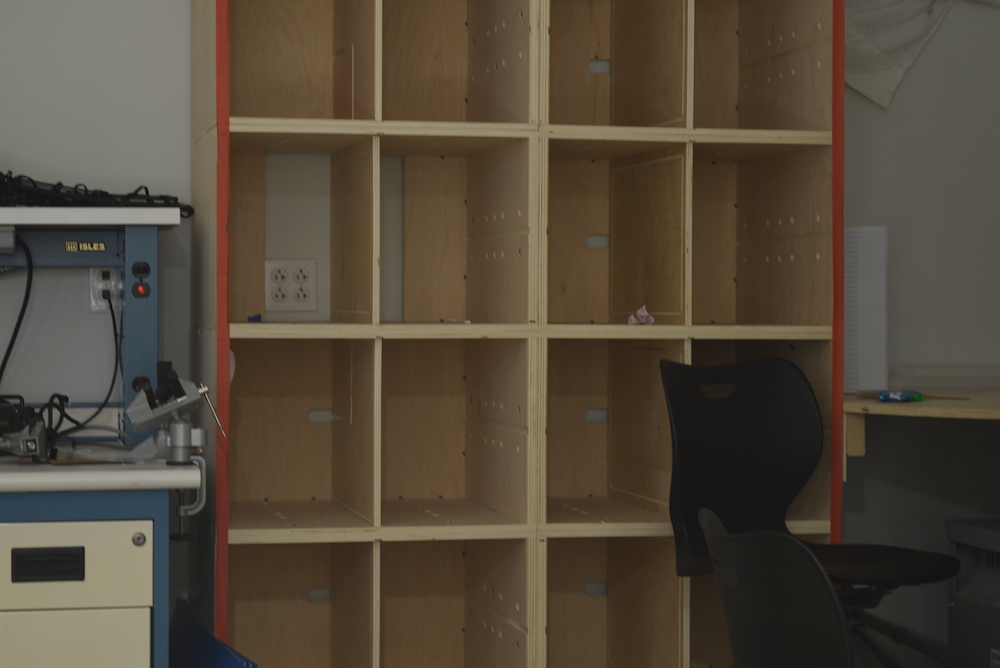
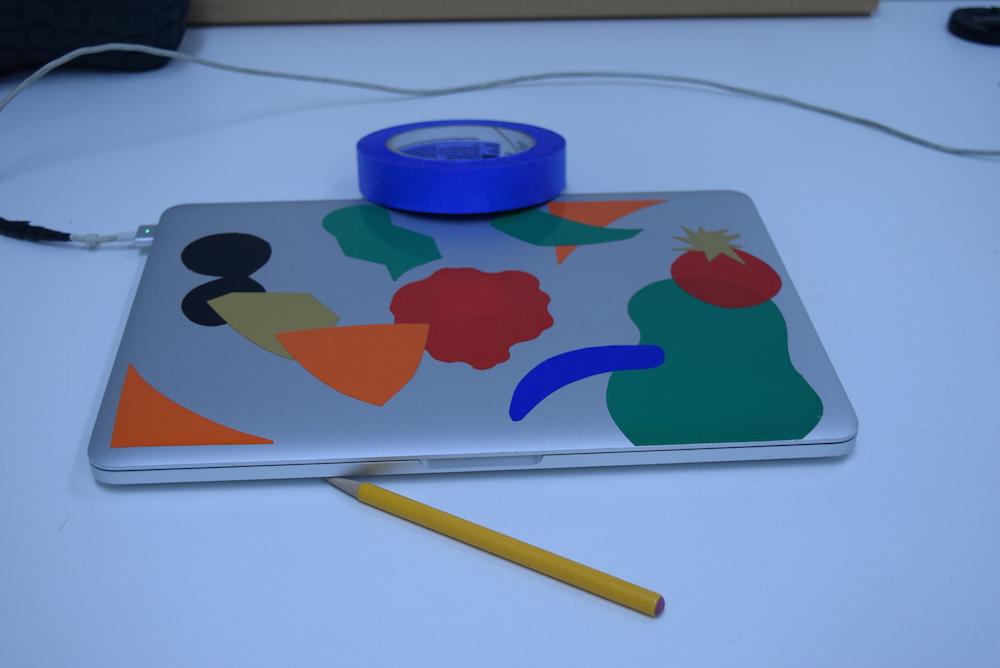
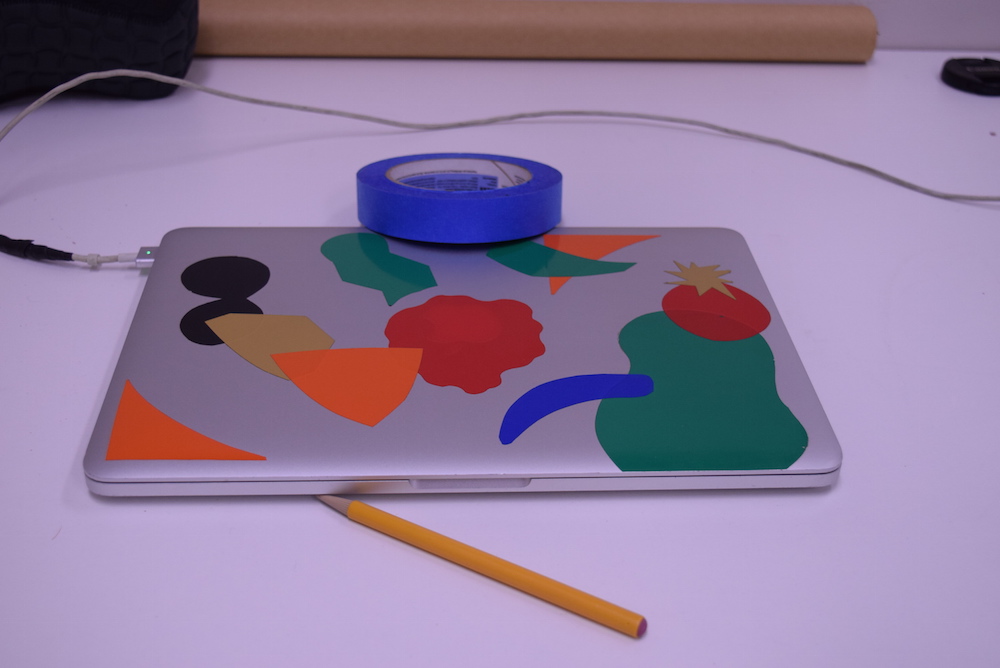
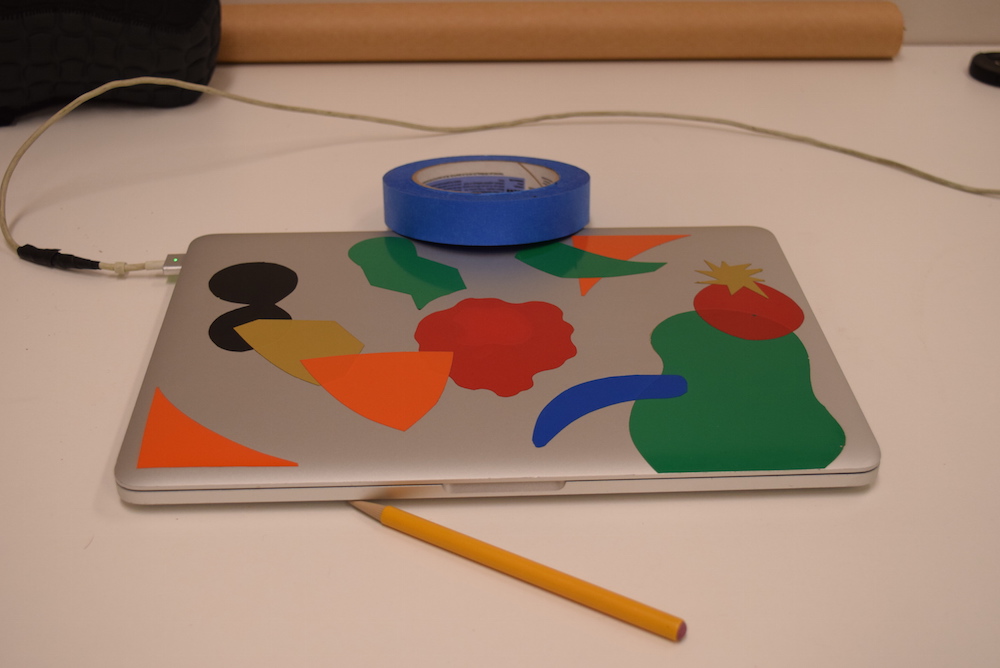
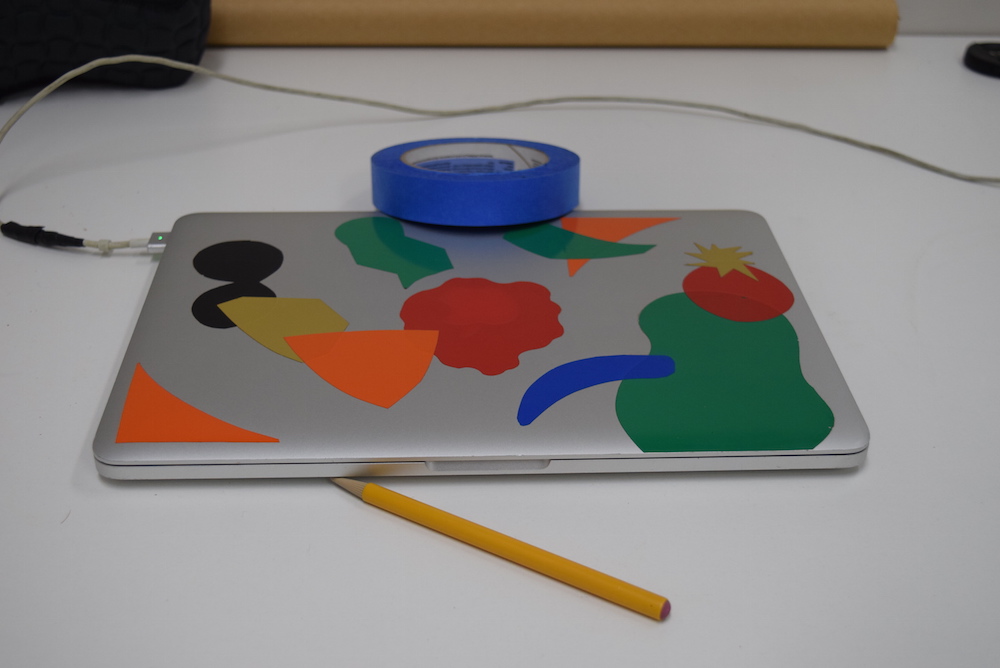
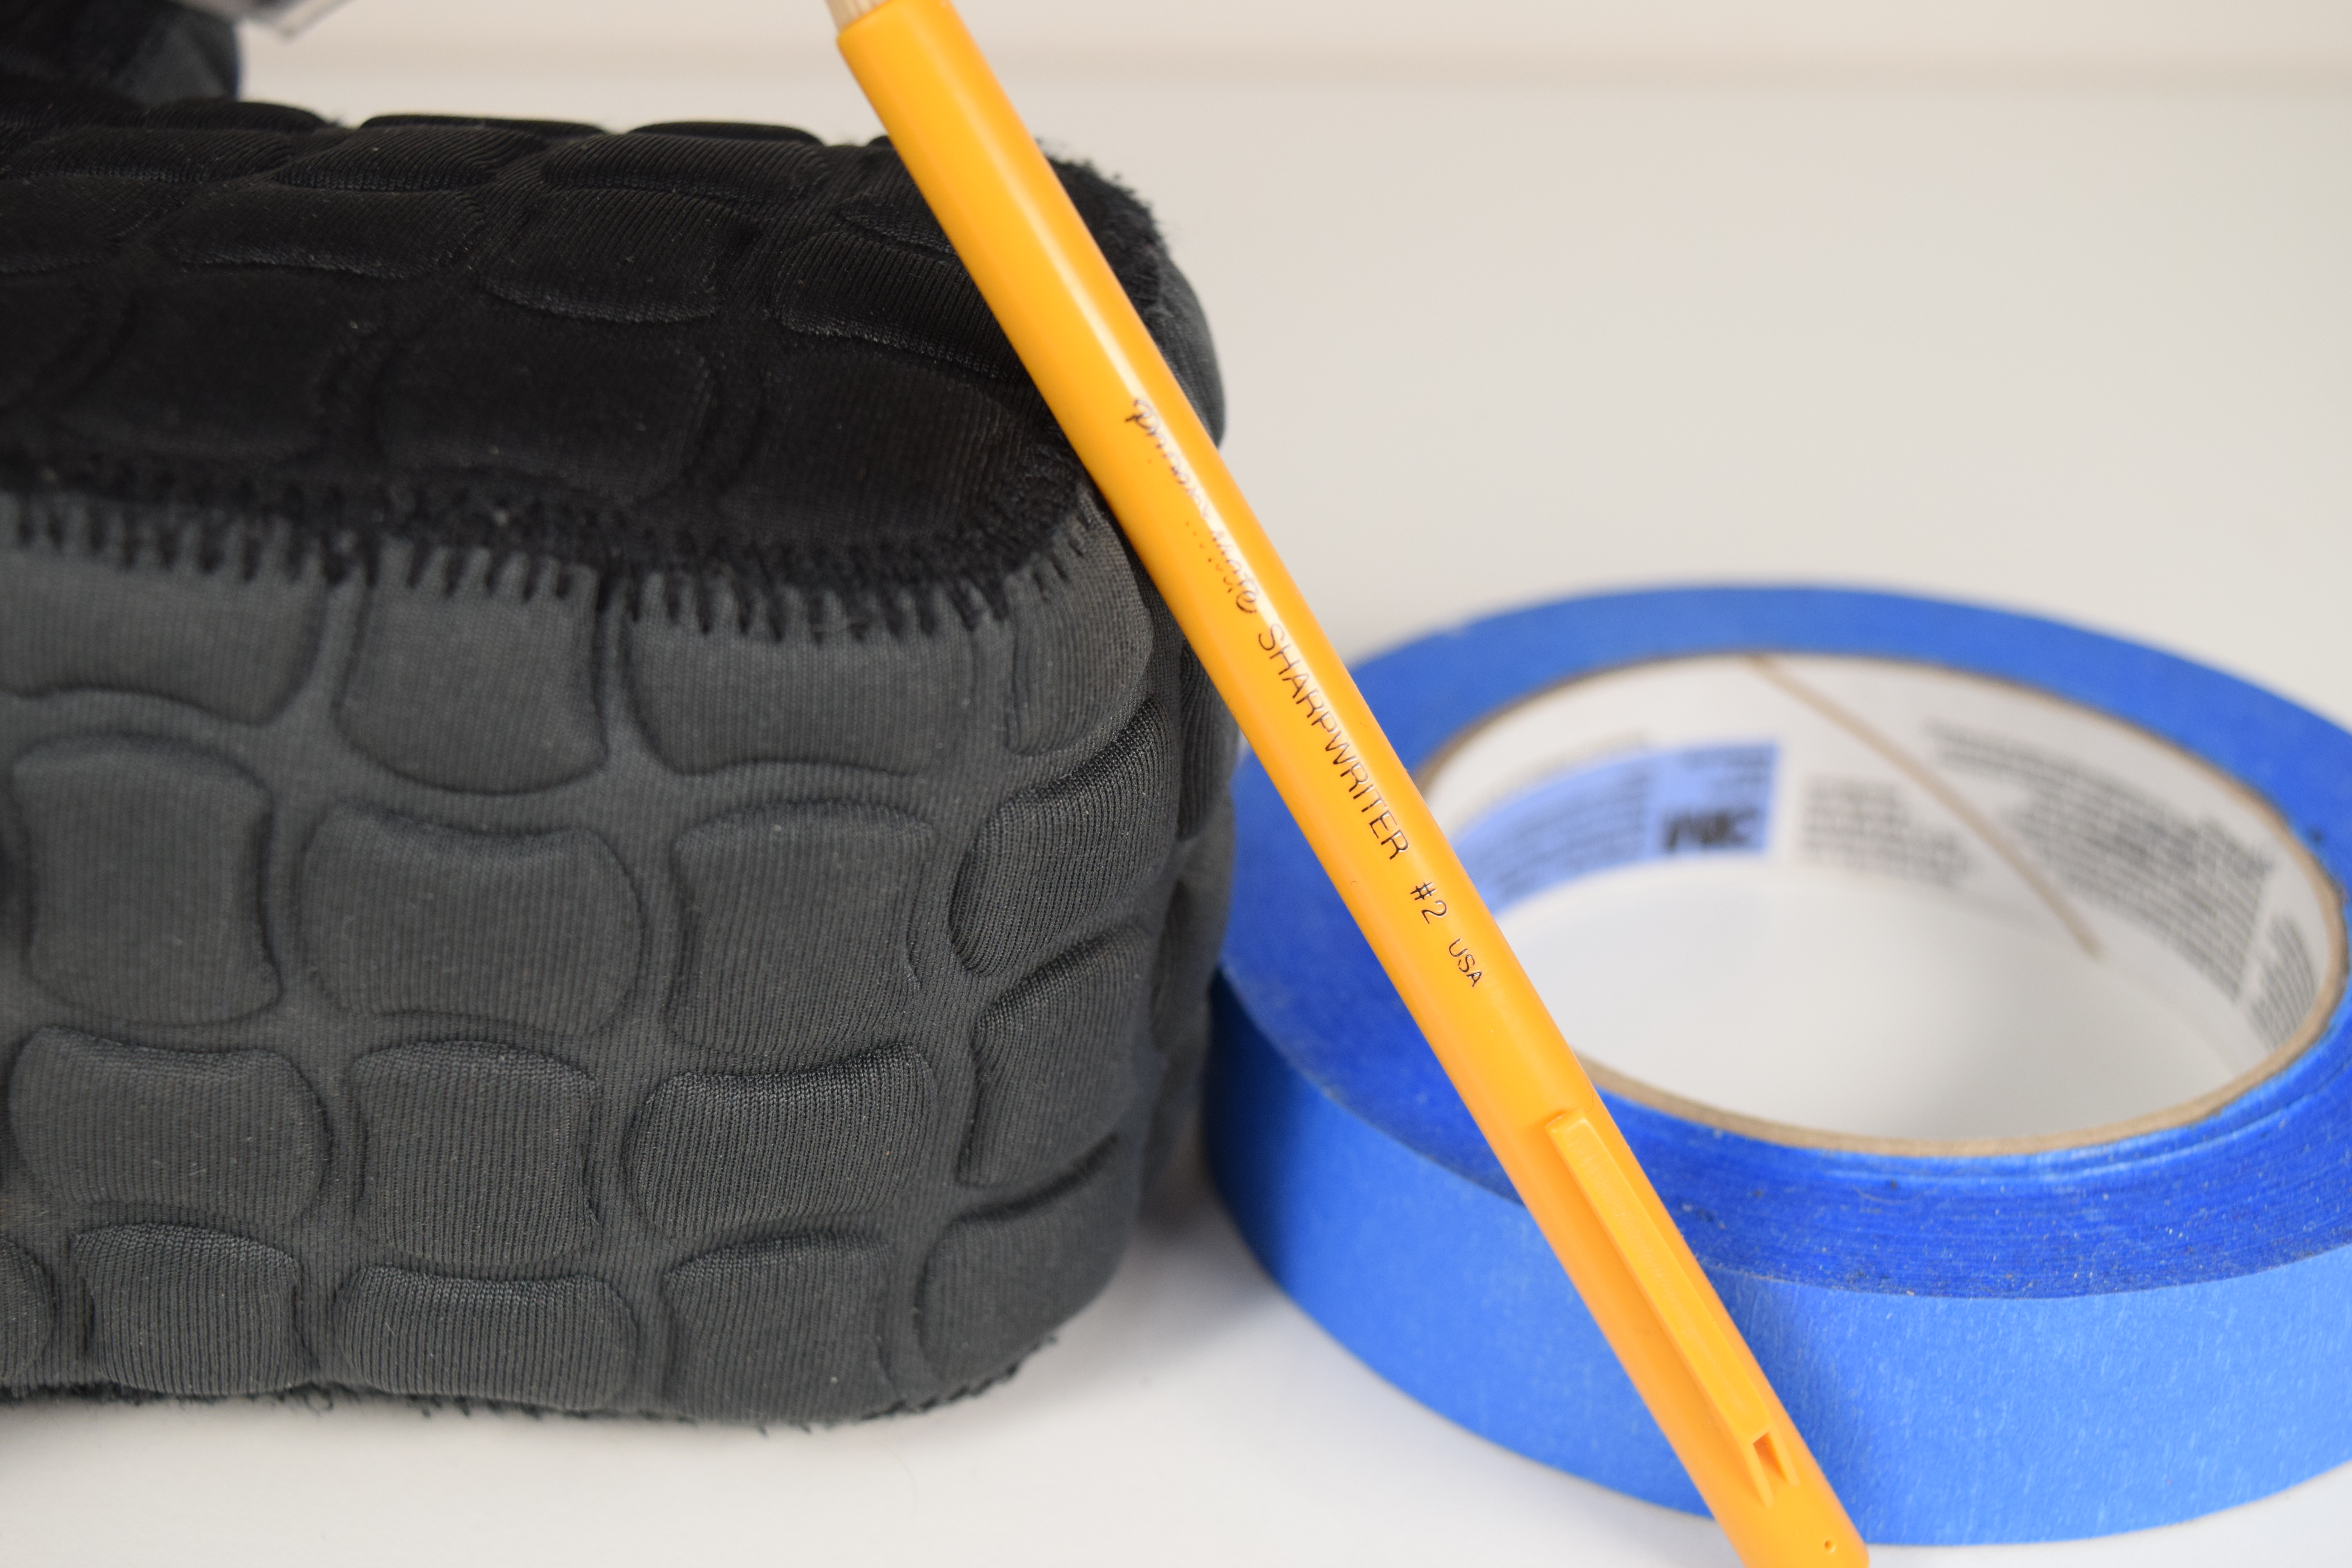
There’s another effect that the shutter has: motion blur. Here is a picture taken with a shutter speed of 1/320s:
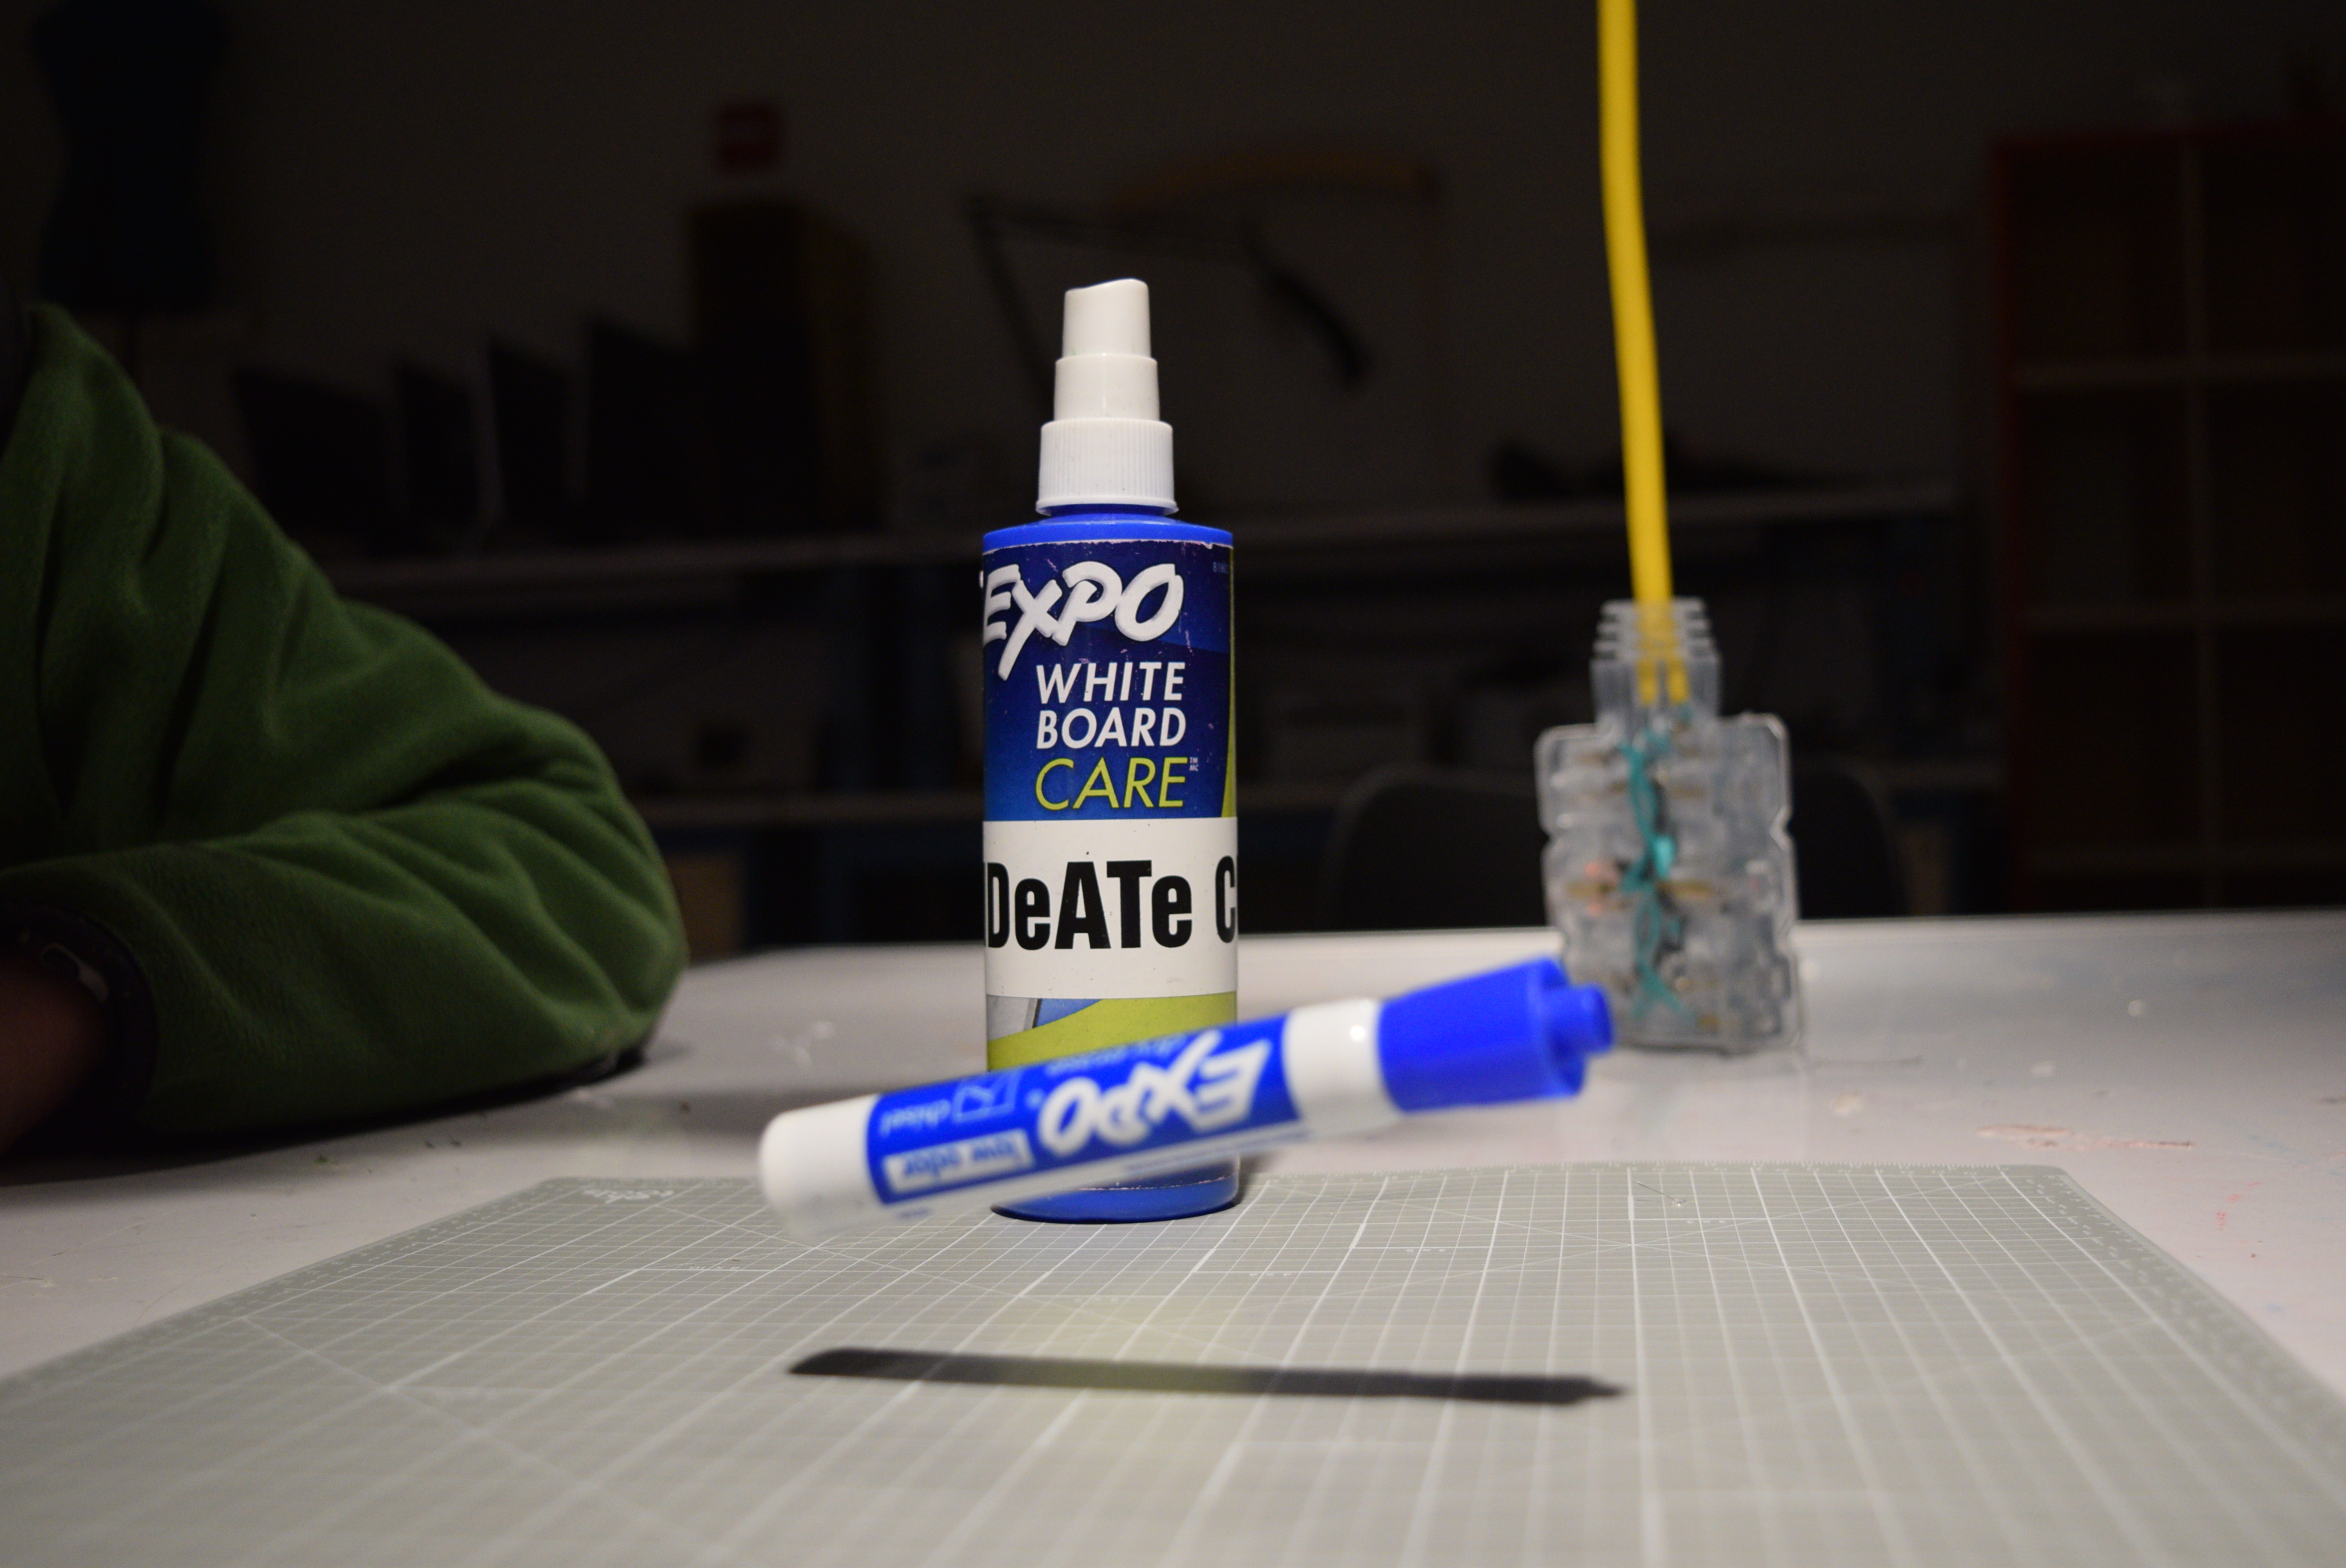
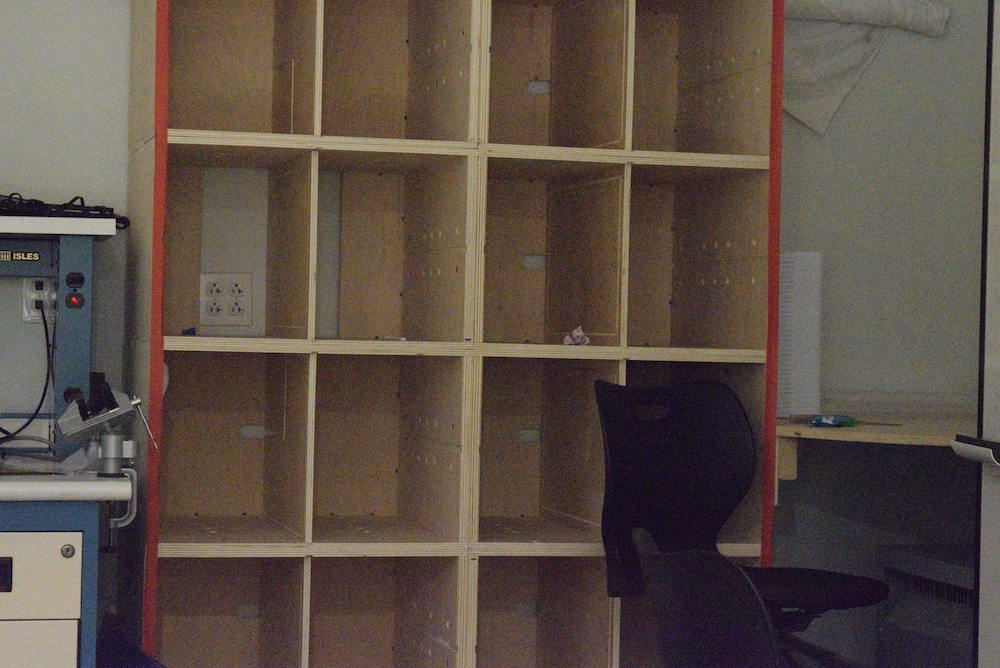
And a similar picture taken with a shutter of 1/30s, i.e. about 10 times as long:
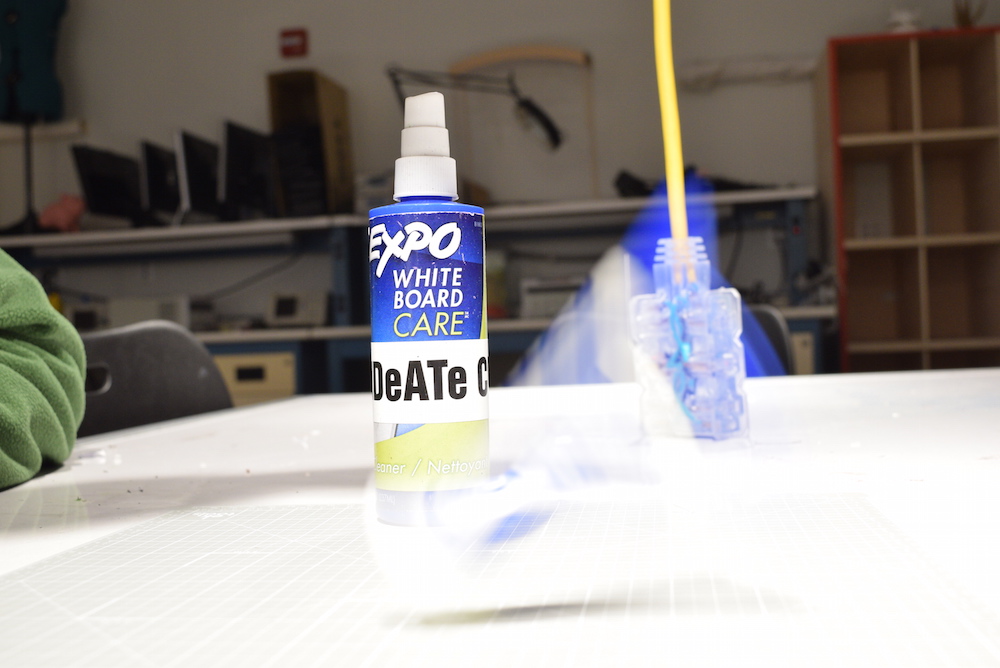
In the second image, you’re seeing the marker’s movement over 1/30s, which, it turns out, was a lot of movement.
To tell the camera what shutter speed to use, use the mode selector wheel on the top to either put it into S mode (“shutter priority”), or M mode (manual), and turn the thumbwheel to change the exposure time.
To conclude:
| shutter setting | amount of light that hits sensor | effect on motion |
| fast (1/100s) | relatively less | tends to “freeze” motion |
| slow (1/10s) | relatively more | tends to blur motion |
A common rule of thumb is that if you’re handholding the camera, you don’t want to take a picture any longer than 1/60s, because then the motion caused by your hands will make the whole image blurry. (Of course if you steady the camera on a tripod, Magic Arm, etc., then you can take a very long picture without that blur.)
Aperture
The aperture refers to the size of the hole in the lens. There is a mechanism in the lens called an “iris,” which functions much like the iris in your eyes: it can narrow so as to let less light through, or widen to let more through.
The mechanism of the iris is quite beautiful:

If you are shooting a very bright scene (daylight, for instance), then you will have lots of extra light and can “afford” to make the aperture smaller if you’d like. If you are shooting something dark, on the other hand, you will want to make the aperture larger so as to allow more light in.
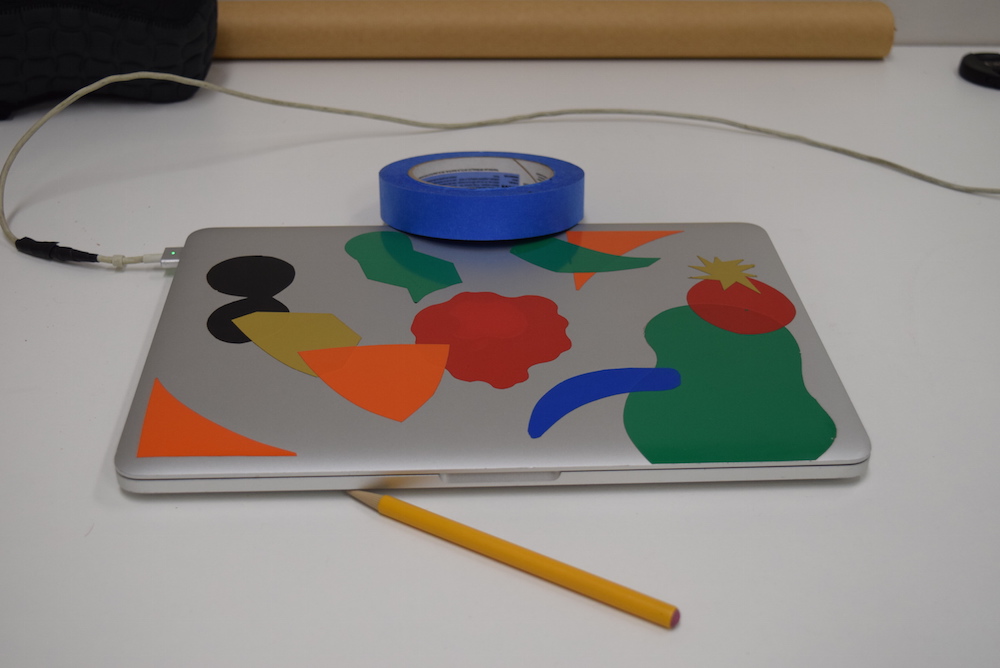
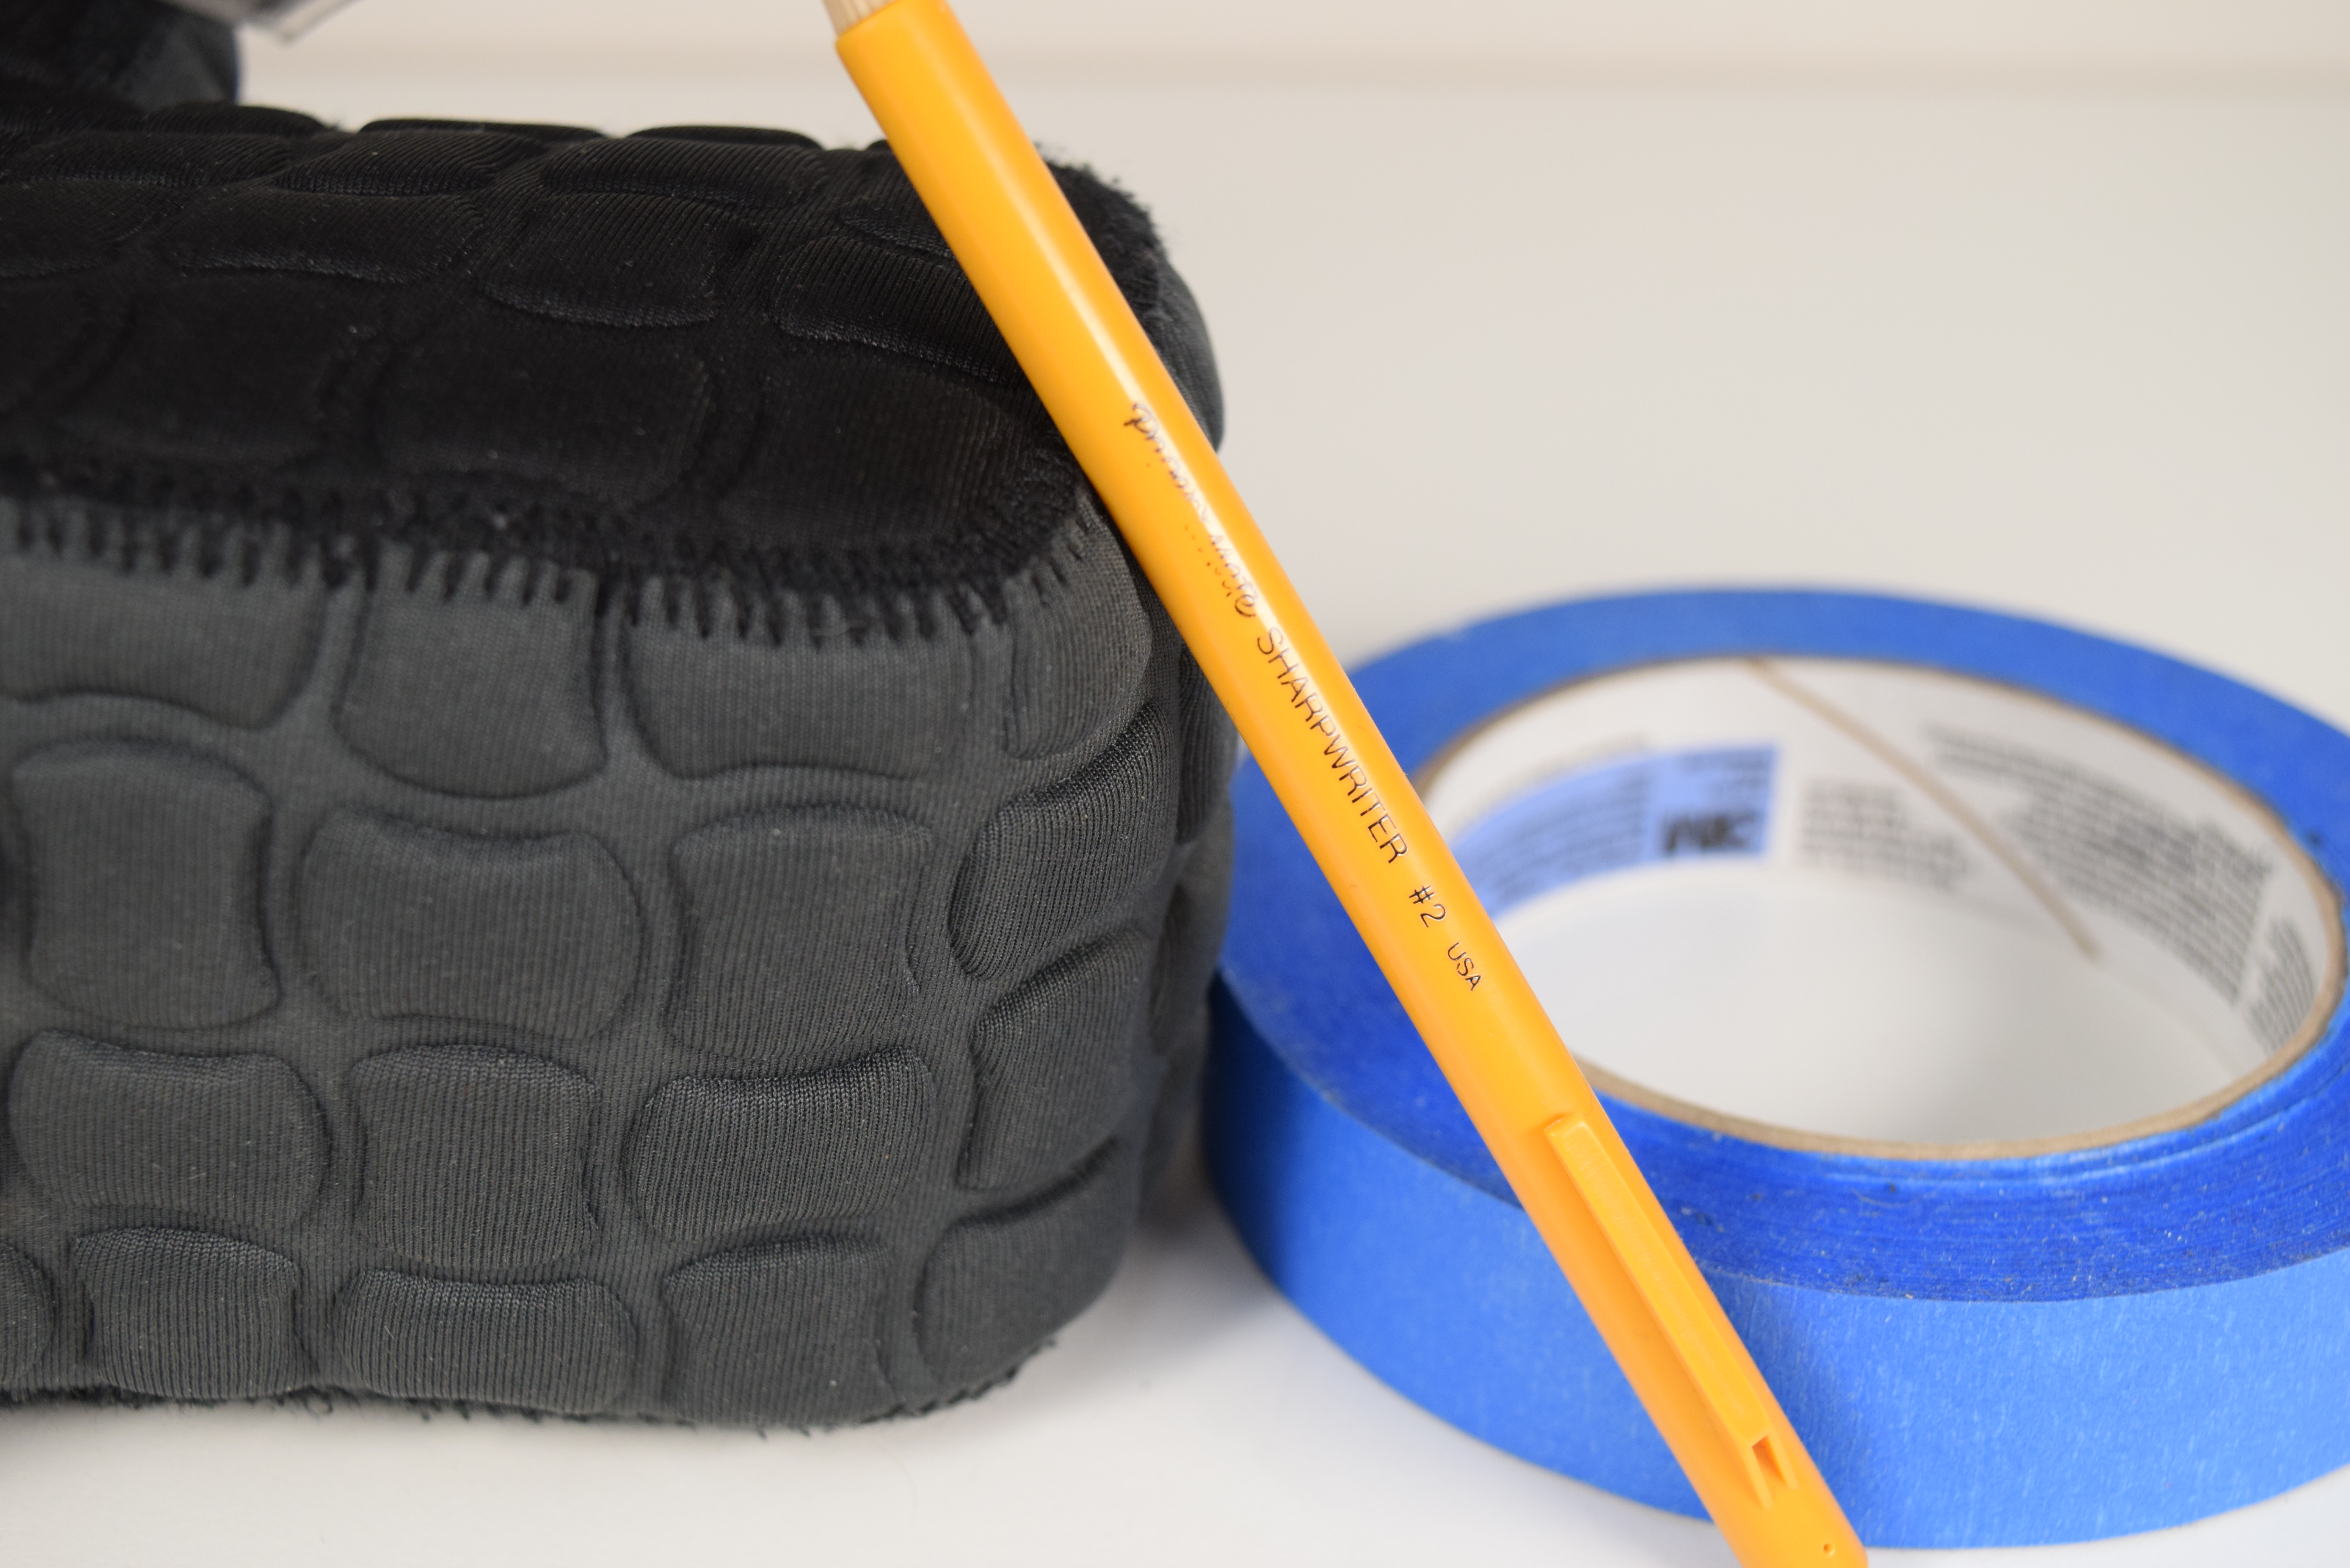
Just as changing the shutter changed the amount of motion blur in an image, changing the aperture will also change another quality of the image. Look at the difference between the two photos below. The first has a relatively large aperture, ƒ/3.5:
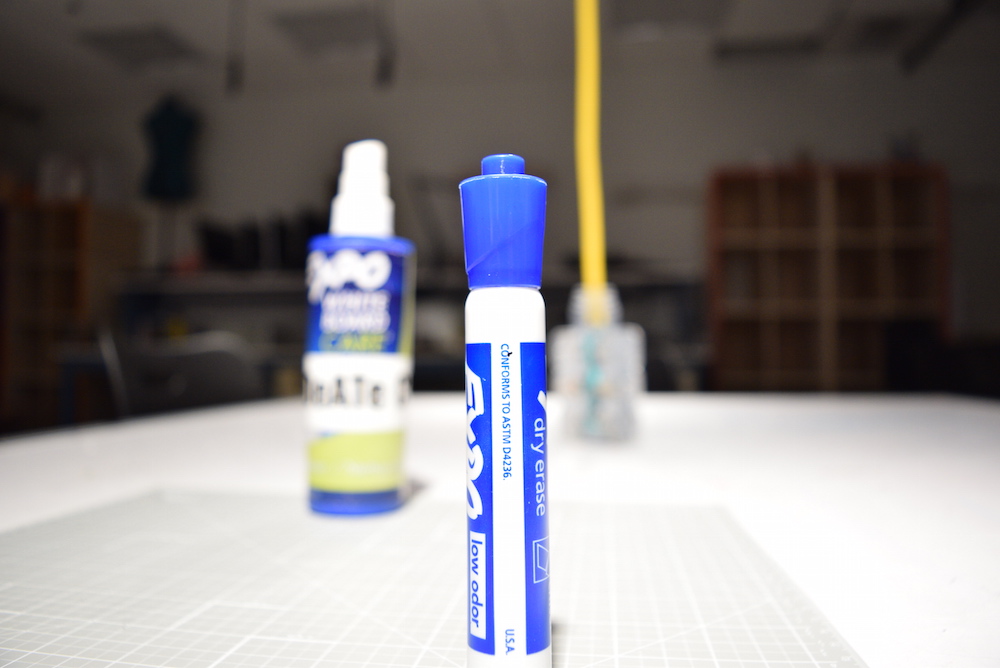
In contrast, this image has a relatively small aperture, ƒ/22:
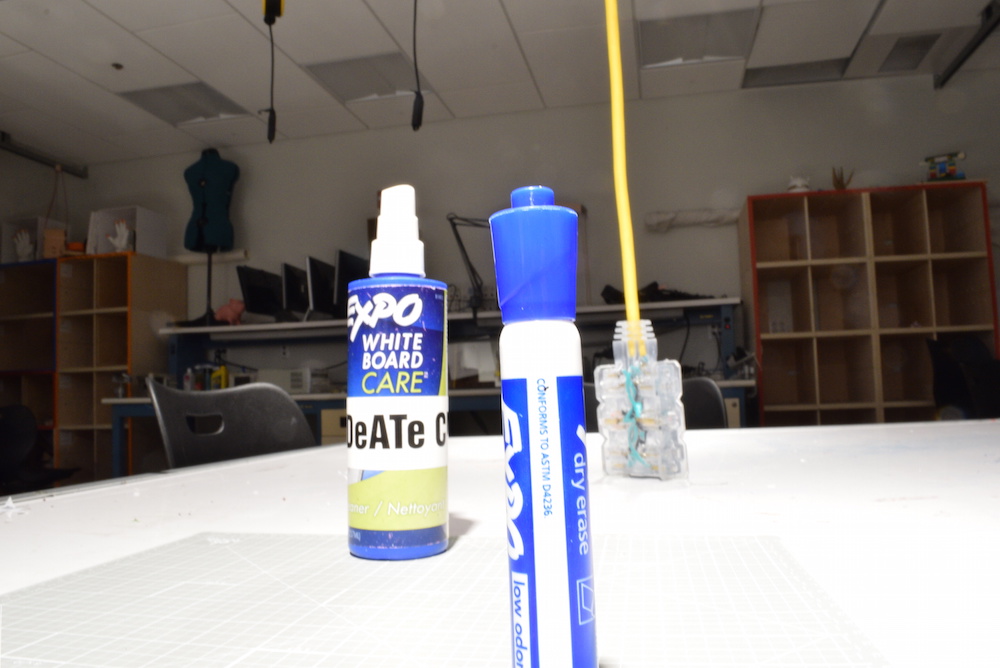
Depth of field, often abbreviated DOF, refers to how much of the image’s subject is in focus. A larger (deeper) depth of field means that many things, including near and far things, can be in focus at the same time. A smaller (narrower) depth of field means that only things at a particular distance from the camera will be in focus, and the rest will be blurry. The technical term for this blur is bokeh, and it can be a desirable feature of an image since the viewer’s attention will be drawn to whatever is in focus. (In the first picture above, the viewer will pay primary attention to the marker; in the second, you’ve got less guarantee where their eye will go.)
A note on the confusing nomenclature for aperture sizes: they are measured using f-numbers; bigger f-numbers refer to smaller apertures. For instance, on the lens that comes with the Nikon D3300 camera (an 18-55mm zoom lens), the maximum aperture size is ƒ/3.5 and the minimum aperture size is ƒ/36.
To tell the camera what aperture you want to use, use the mode selector wheel on the top to put it into A (“aperture priority” mode), or M (manual mode), and turn the thumbwheel to change the aperture.
To conclude:
| aperture setting | amount of light that hits sensor | effect on depth of field |
| large (ƒ/3.5) | relatively more | narrower depth of field |
| small (ƒ/22) | relatively less | farther depth of field |
Film speed
The term “film speed” is a holdover from the not-so-distant past when cameras used film to record images. Film was sold in a variety of “speeds,” referring to different sensitivities to light. A “higher speed” film was more sensitive to light, and “lower speed” less sensitive.
The D in DSLR means that we have the ability to change “film speed” just as we can change the shutter and aperture settings. In reality, we are changing the sensitivity of the digital image sensor.
Given the choice, why not simply crank up the sensitivity all the way? Because there is a tradeoff we have to consider. Below is a picture taken in a relatively dark environment, using the low sensitivity setting of ISO 100.
Here is another image of the same scene, shot with a very high “speed” of ISO 25,600.
All of that speckling around the image is digital “noise,” caused by telling the sensor to be extremely sensitive. Many pixels are essentially sending false positive data back.
To change the “film speed,” either push the Menu button on the back of the camera, navigate to the Shooting menu, and choose a film speed; or push the 𝑖 button on the back of the camera, select “ISO” in the menu, and choose the speed you want.
A good general purpose speed to use, which will let you take relatively fast pictures without noticeable digital noise, is ISO 800.
To conclude:
| film speed setting | brightness of captured image | noise in captured image |
| low (ISO 100) | relatively low | basically none |
| high (ISO 3,200) | relatively high | lots |
Camera mode summary
The top of the camera has a selector wheel featuring a bunch of preset settings like outdoor photography, portrait photography, etc., which we don’t care about, and then four ones we do care about: S, A, P, and M. To summarize their roles:
| mode symbol | mode name | you set the | based on its meter, the camera sets the |
S |
shutter priority | shutter speed | aperture |
A |
aperture priority | aperture | shutter speed |
P |
program | choice between a range of shutter/aperture recommendations | range of recommendations |
M |
manual | aperture and shutter speed | the camera makes no settings of its own |
Other important variables
Zoom
The lens on the Nikon D3300 cameras in IDeATe Lending is an 18–55mm “zoom lens.” Lenses without zoom are called prime lenses, and in exchange for not zooming they usually offer much bigger apertures (lower f-numbers).
Manipulating zoom effectively can be a subtle thing to get right. Generally, the more zoomed in the lens is, the more “flat” all the things in the image will appear, whereas the more zoomed out, the more warped the world will appear.
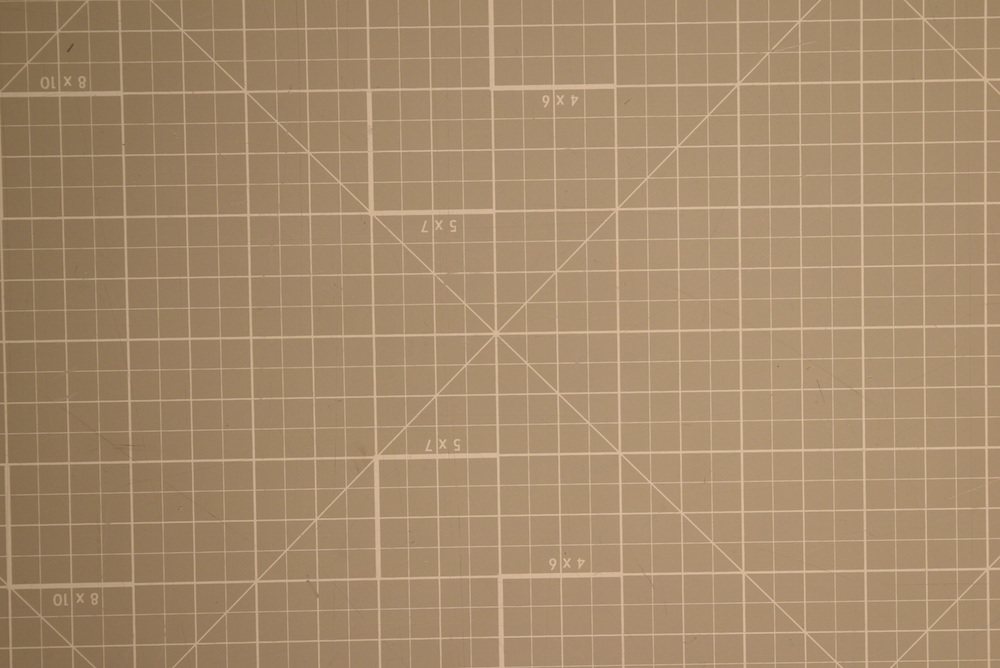
To compare that warp, here’s a image of a grid pattern with the lens at maximum (55mm) zoom:
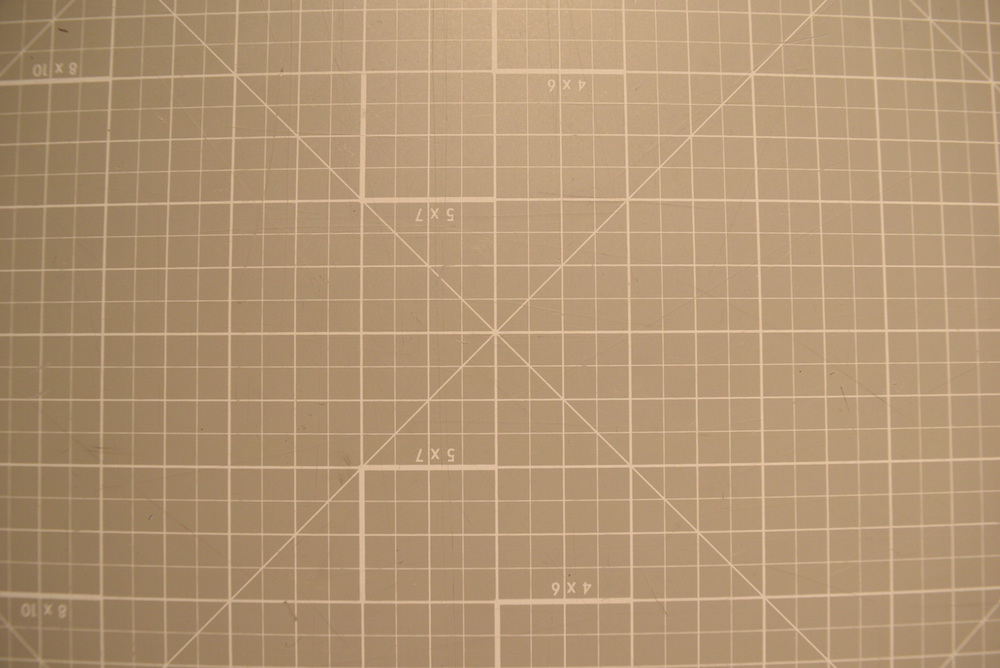
Below is a shot of the same pattern, taken with the camera much closer to the subject but zoomed out all the way (18mm zoom setting). Note the warping, “fisheye” effect, which increases towards the edges of the image.
You can manipulate zoom to emphasize the relative size of things in your image. When you’re zoomed all the way out but close to something in the foreground, that something will appear very larger relative to everything else; meanwhile, when you’re zoomed all the way in but shooting from farther away, things are closer to their true proportional size with respect to each other.
Alfred Hitchcock famously took advantage of this effect when shooting the movie Vertigo. It’s difficult to get the effect right while shooting video, but regardless it can make a big difference while shooting stills. Below is a sequence of images in which the zoom is being reduced while the camera is moving closer to the subject. Note how the marker stays the same size in each frame, but appears bigger and bigger in comparison to the things behind it.
One additional tradeoff to be aware of: because of the way the lens’s optics work, when you are more zoomed out, you will have a greater possible maximum aperture, and vice versa. In the case of the 18–55mm lens that comes with the IDeATe Nikon camera, the maximum aperture available at 18mm zoom is ƒ/3.5, while the maximum available at 55mm zoom is ƒ/5.6.
To conclude:
| zoom | objects in foreground are | distortion | maximum aperture available |
| zoomed “out” (18mm) | relatively larger | noticeable | larger (ƒ/3.5) |
| zoomed “in” (55mm) | proportional to others | none | smaller (ƒ/5.6) |
Exposure compensation
When it’s in P (program), S (shutter priority), or A (aperture priority) modes, the camera uses its built-in meter to try to adjust the aperture/shutter settings to keep the lighting at the appropriate levels. For instance, if in S (shutter priority) mode you tell the camera to use a shutter of 1/100s, then it will make the aperture bigger or smaller to get the right amount of light for the scene you’re shooting.
But how much is the “right” amount of light? The camera will guess based on what it’s seeing, and the important thing to know is that it is going to aim to make as much of the image as possible grey. If you’re shooting a picture with a big white background, it will try to make the whole background grey, so anything on top of the background will be quite dark looking. If you’re shooting on a big dark background, it will make the whole background grey, and so anything on top of it will be very bright looking.
You can (and should) tell the camera to aim for brighter and darker images, based on what you’re photographing. A small object on a well-lit white paper background will not look very good unless you “overexpose” the image, i.e. tell the camera to shoot a brighter image than it otherwise would.
You adjust the “exposure” value by holding the + - button on the top of the camera close to the shutter release while moving the thumbwheel to the right or left. The adjustment is done in one-third “steps”, with a middle point of 0, a maximum of 5, and minimum of –5. Here is the same scene shot on 11 different exposure values to show the camera’s entire range. It runs from way too dark to way too light.
When you turn up the exposure value, you are said to be “overexposing” the image, and likewise, when you turn it down, you’re “underexposing” it. In reality, you’re exposing it however you think it should be exposed! You know better than the camera what the picture is supposed to look like, so changing the exposure compensation is something should expect to do all the time to get a picture you’re happy with.
White balance
You might have a good idea of what “white” looks like, but it turns out that there is a continuum of possible definitions. For instance, imagine looking at a white sheet of paper under candlelight versus sunlight; the paper is white in both cases, but the light shining on it has a very different “color temperature.” If you were a camera, the white paper would look quite different under candlelight versus sunlight, and so you need to tell the camera exactly which “white” you want it to set as its own internal “white.”
This setting is called the “white balance,” and it is found in Menu -> Shooting Menu -> White balance. For most circumstances, it’s perfectly fine to leave the camera’s white balance setting on “Auto,” and it will do a reasonably good job of judging. You can also set the camera to a variety of preset values including “Incandescent,” “Fluorescent,” and “Direct sunlight.” Finally, if you want to define precisely what “white” means, you can select “Preset manual,” then go into a sub-menu of that setting and choose “Measure.” The camera will instruct you to take a picture of any white or grey neutral surface, and then it will use that to define “white.”
Here’s the same scene shot with different white balances, to see what difference that setting makes. The scene was actually lit with ambient fluorescent lights in the hallway.
First, an image with the “tungsten” white balance setting, which is designed for very warm light that comes from an incandescent bulb. Because the actual light in the scene is much colder than that preset is made for, it has a distinctly blue cast:
The same scene shot with the “fluorescent” white balance setting, which should work better, but it’s still got a blueish/purpleish cast:
The same scene shot with “Direct sunlight” setting. Now the image is a bit pinkish or warm (i.e. it is an overcorrection from the problem we saw above):
Using the “preset manual” setting, and taking a picture of the table as neutral surface, leads to a well-balanced white which has no noticeable color cast:
Finally, the “auto” setting produces an image that’s nearly indiscernible from the “preset manual” one, which demonstrates that “auto” does a good job of choosing a good white balance value:
In conclusion: the “auto” white balance setting on these cameras generally works well, and unless you are seeing a warm or cold color tint in your images, you probably can leave it on auto.
Image size
The camera sensor can capture an image up to 6,000 pixels wide by 4,000 pixels tall (24 million pixels in total). This is a lot of pixels! You can also choose to capture fewer pixels if you want. The resolution options are:
| menu label | width x height | number of pixels | sample output JPEG file size |
| small | 2992 x 2000 px | 6 million | 2.2 MB |
| medium | 4496 x 3000 px | 13.5 million | 3.9 MB |
| large | 6000 x 4000 px | 24 million | 6.7 MB |
You might think, “I need to take the highest-resolution photos I can, so I will have the clearest images.” That’s a fine thing to think. But let’s take a look. Here is the same picture taken at three different resolutions, presented here at pixels of width when this page loaded.
Large:

Medium:
Small:
As you can see, the large image (on top) looks clearer than the medium, which looks clearer than the small. Right?
Guess what? I lied. The lowest-res image is on top, then medium in the middle, then large on the bottom. Don’t believe me? Look at the original image files, linked here directly: small, medium, large.
Why did I lie? To show that using highest-possible-resolution images, for simple product pictures like these which will live on the internet, is just a waste of pixels and storage space, with no actual gain in the final appearance. This is why I recommend shooting “small” images. Six million is plenty of pixels.
Just to be fair though, let’s look closely at all three images. When we zoom waaaaay in, we see a meaningful difference:
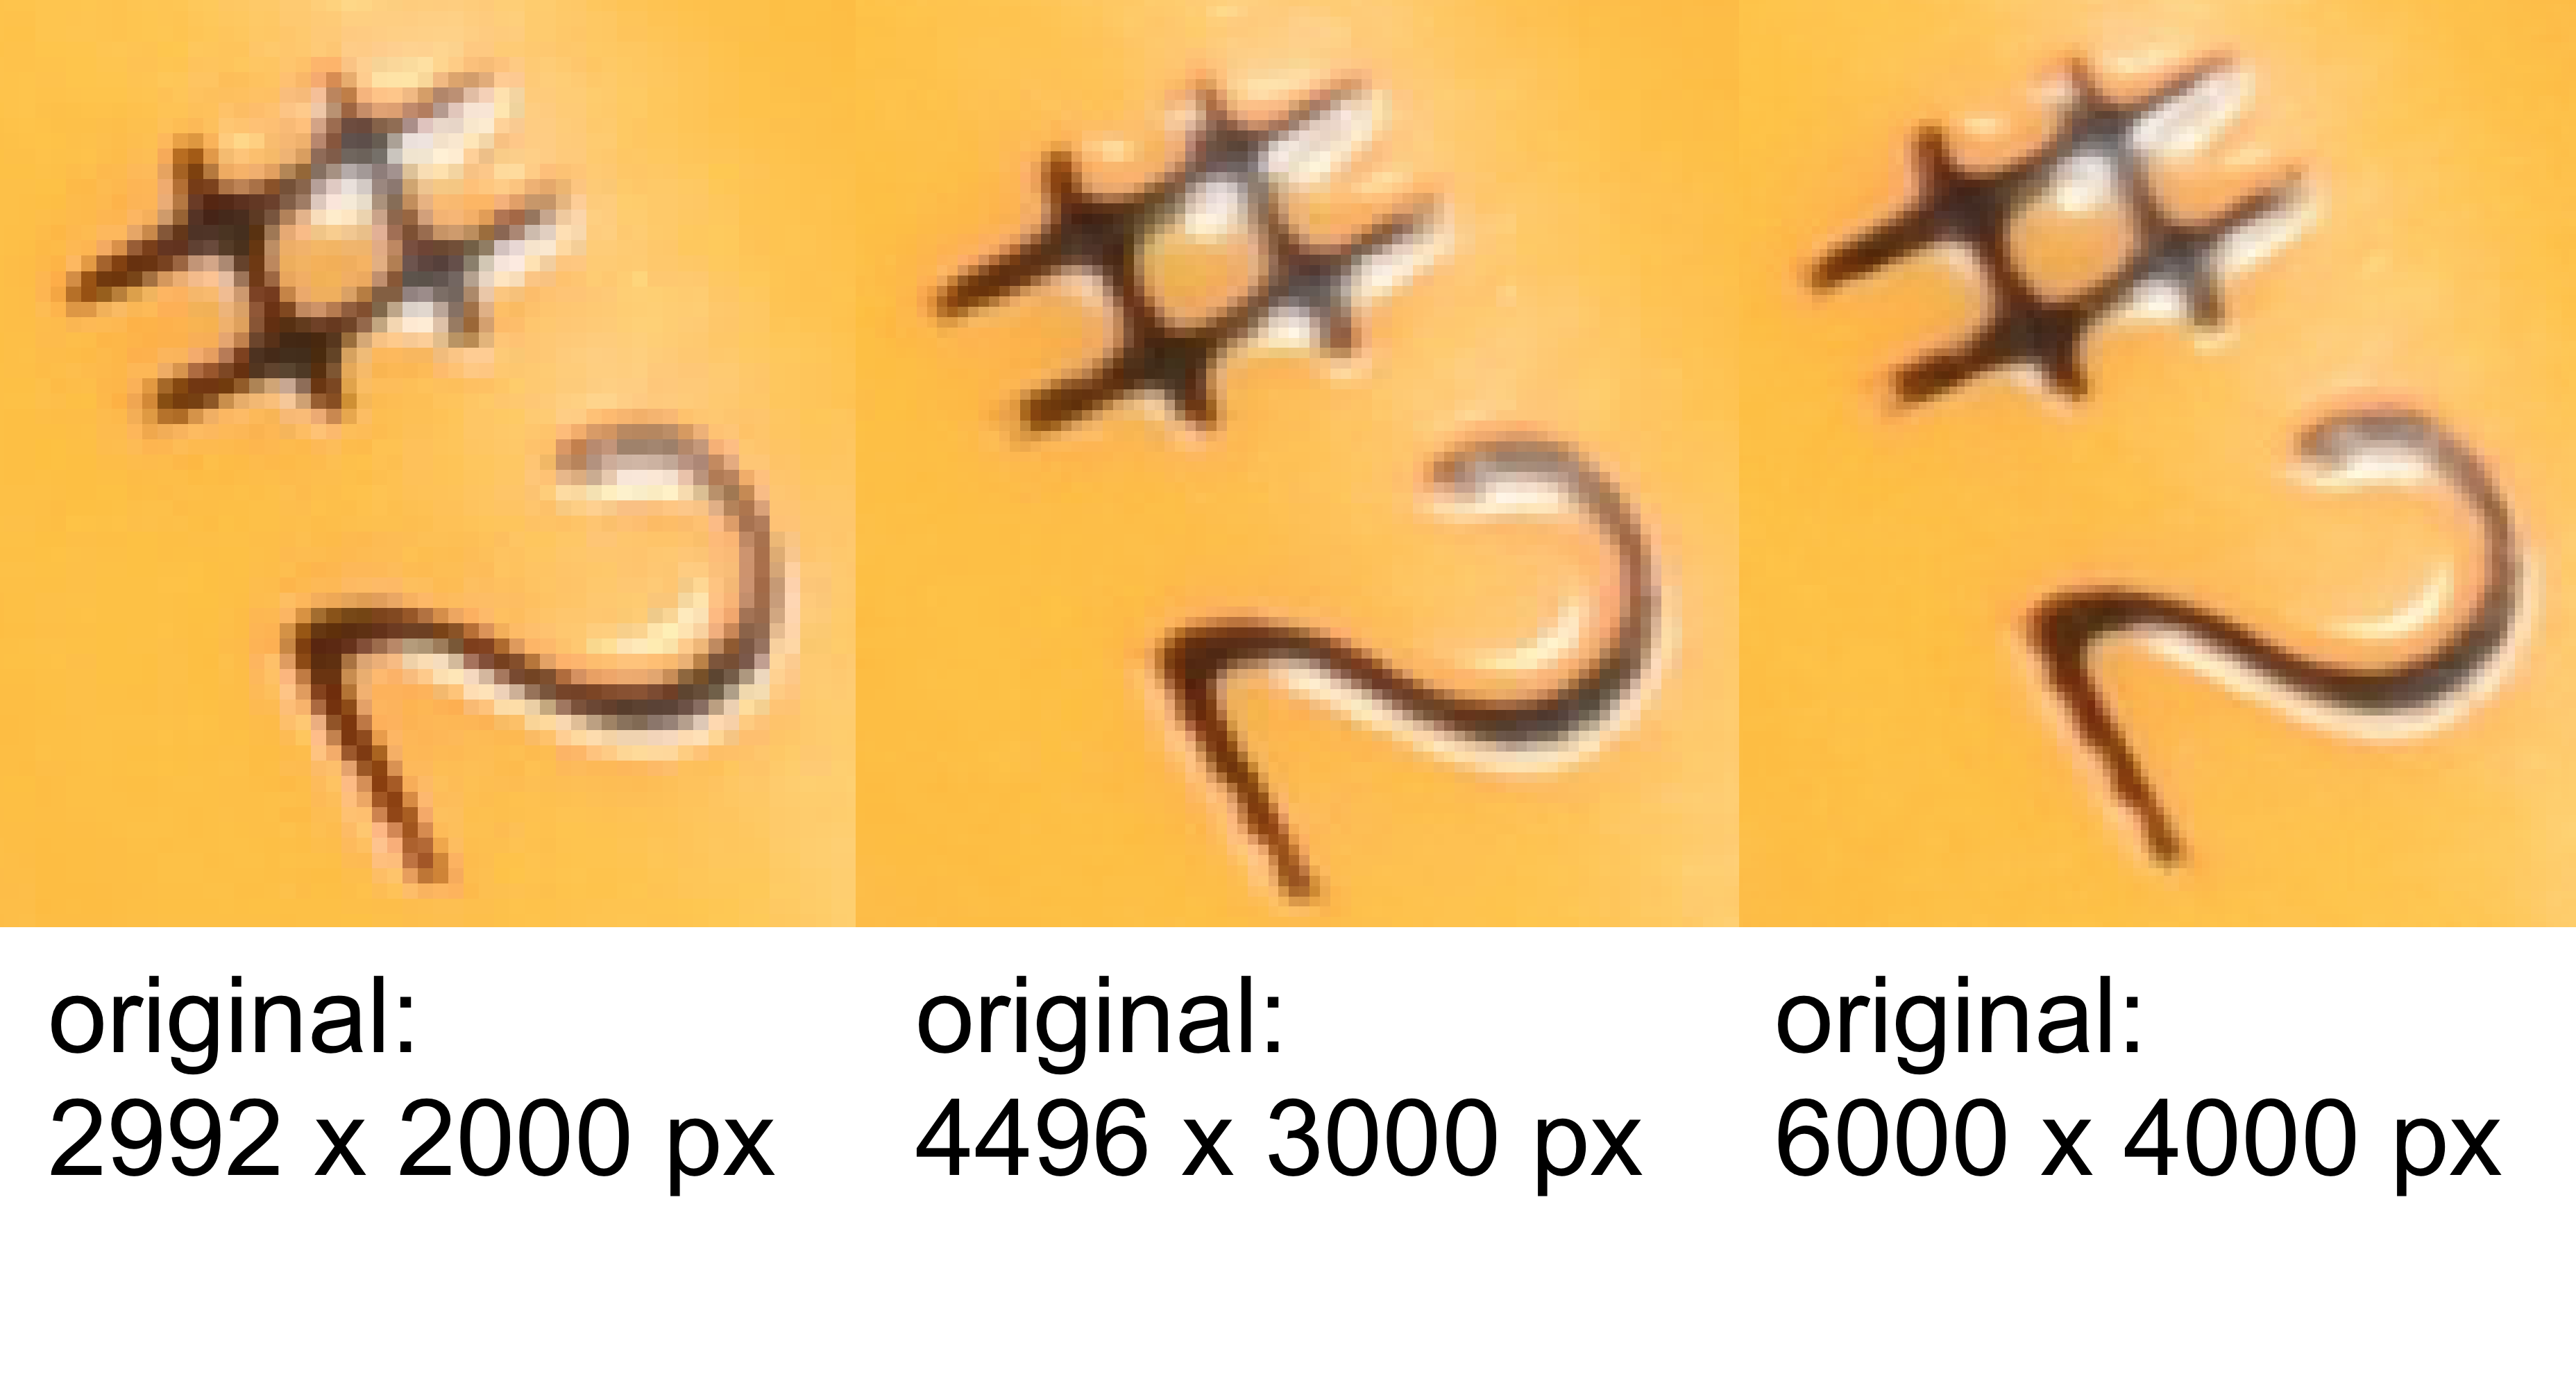
In conclusion: unless you’re planning to crop just a very small portion of your images, or to print them out at high resolution and large sizes on paper, shooting at “small” image size should be perfectly sufficient.
Video
The DSLR was designed as a still camera, but it can also be used to shoot video. If you are shooting video where you will not need to change focus during the shot, it should do just fine. (The camera’s autofocus mechanism becomes far worse and slower while filming.)
There are resolution and framerate options when shooting video; access these through Menu -> Shooting menu -> Movie settings -> Frame size/frame rate. The resolution choices are straightforward; the framerate refers to the number of still images that will be captured each second. Hollywood movies are traditionally filmed at 24 frames per second; television around 30 frames per second; and 60 frames per second is best for capturing fast-moving things that you want to play back in slow motion. You can shooat at 24 frames per second for a more cinematic feel or 30 frames per second to match most digital devices like phone cameras. When editing together a video, it will often be easier if all the footage you’re using is shot at the same resolution and frame rate.
The camera has a built-in microphone to record audio alongside the video, but the quality is not very high. If you’re filming something with a small or quiet movement, for instance, and you want to capture the sound to increase its aesthetic appeal to the audience, you should use a separate high-quality mic to record sound. These can be borrowed from Hunt Library’s Technology Lending on the first floor of the library.
To start recording, first make whatever changes to camera settings you wish, then push the Lv (“live view”) button on the back of the camera. It will show a live image on the display screen. To begin recording video, push the red dot button near the shutter release button on the top of the camera; push it again to stop. Depending on your settings, you may record many gigabytes of data fairly quickly, so beware that you may fill up a memory card unexpectedly (at which point recording will automatically stop).
Other equipment
IDeATe Photo Zone
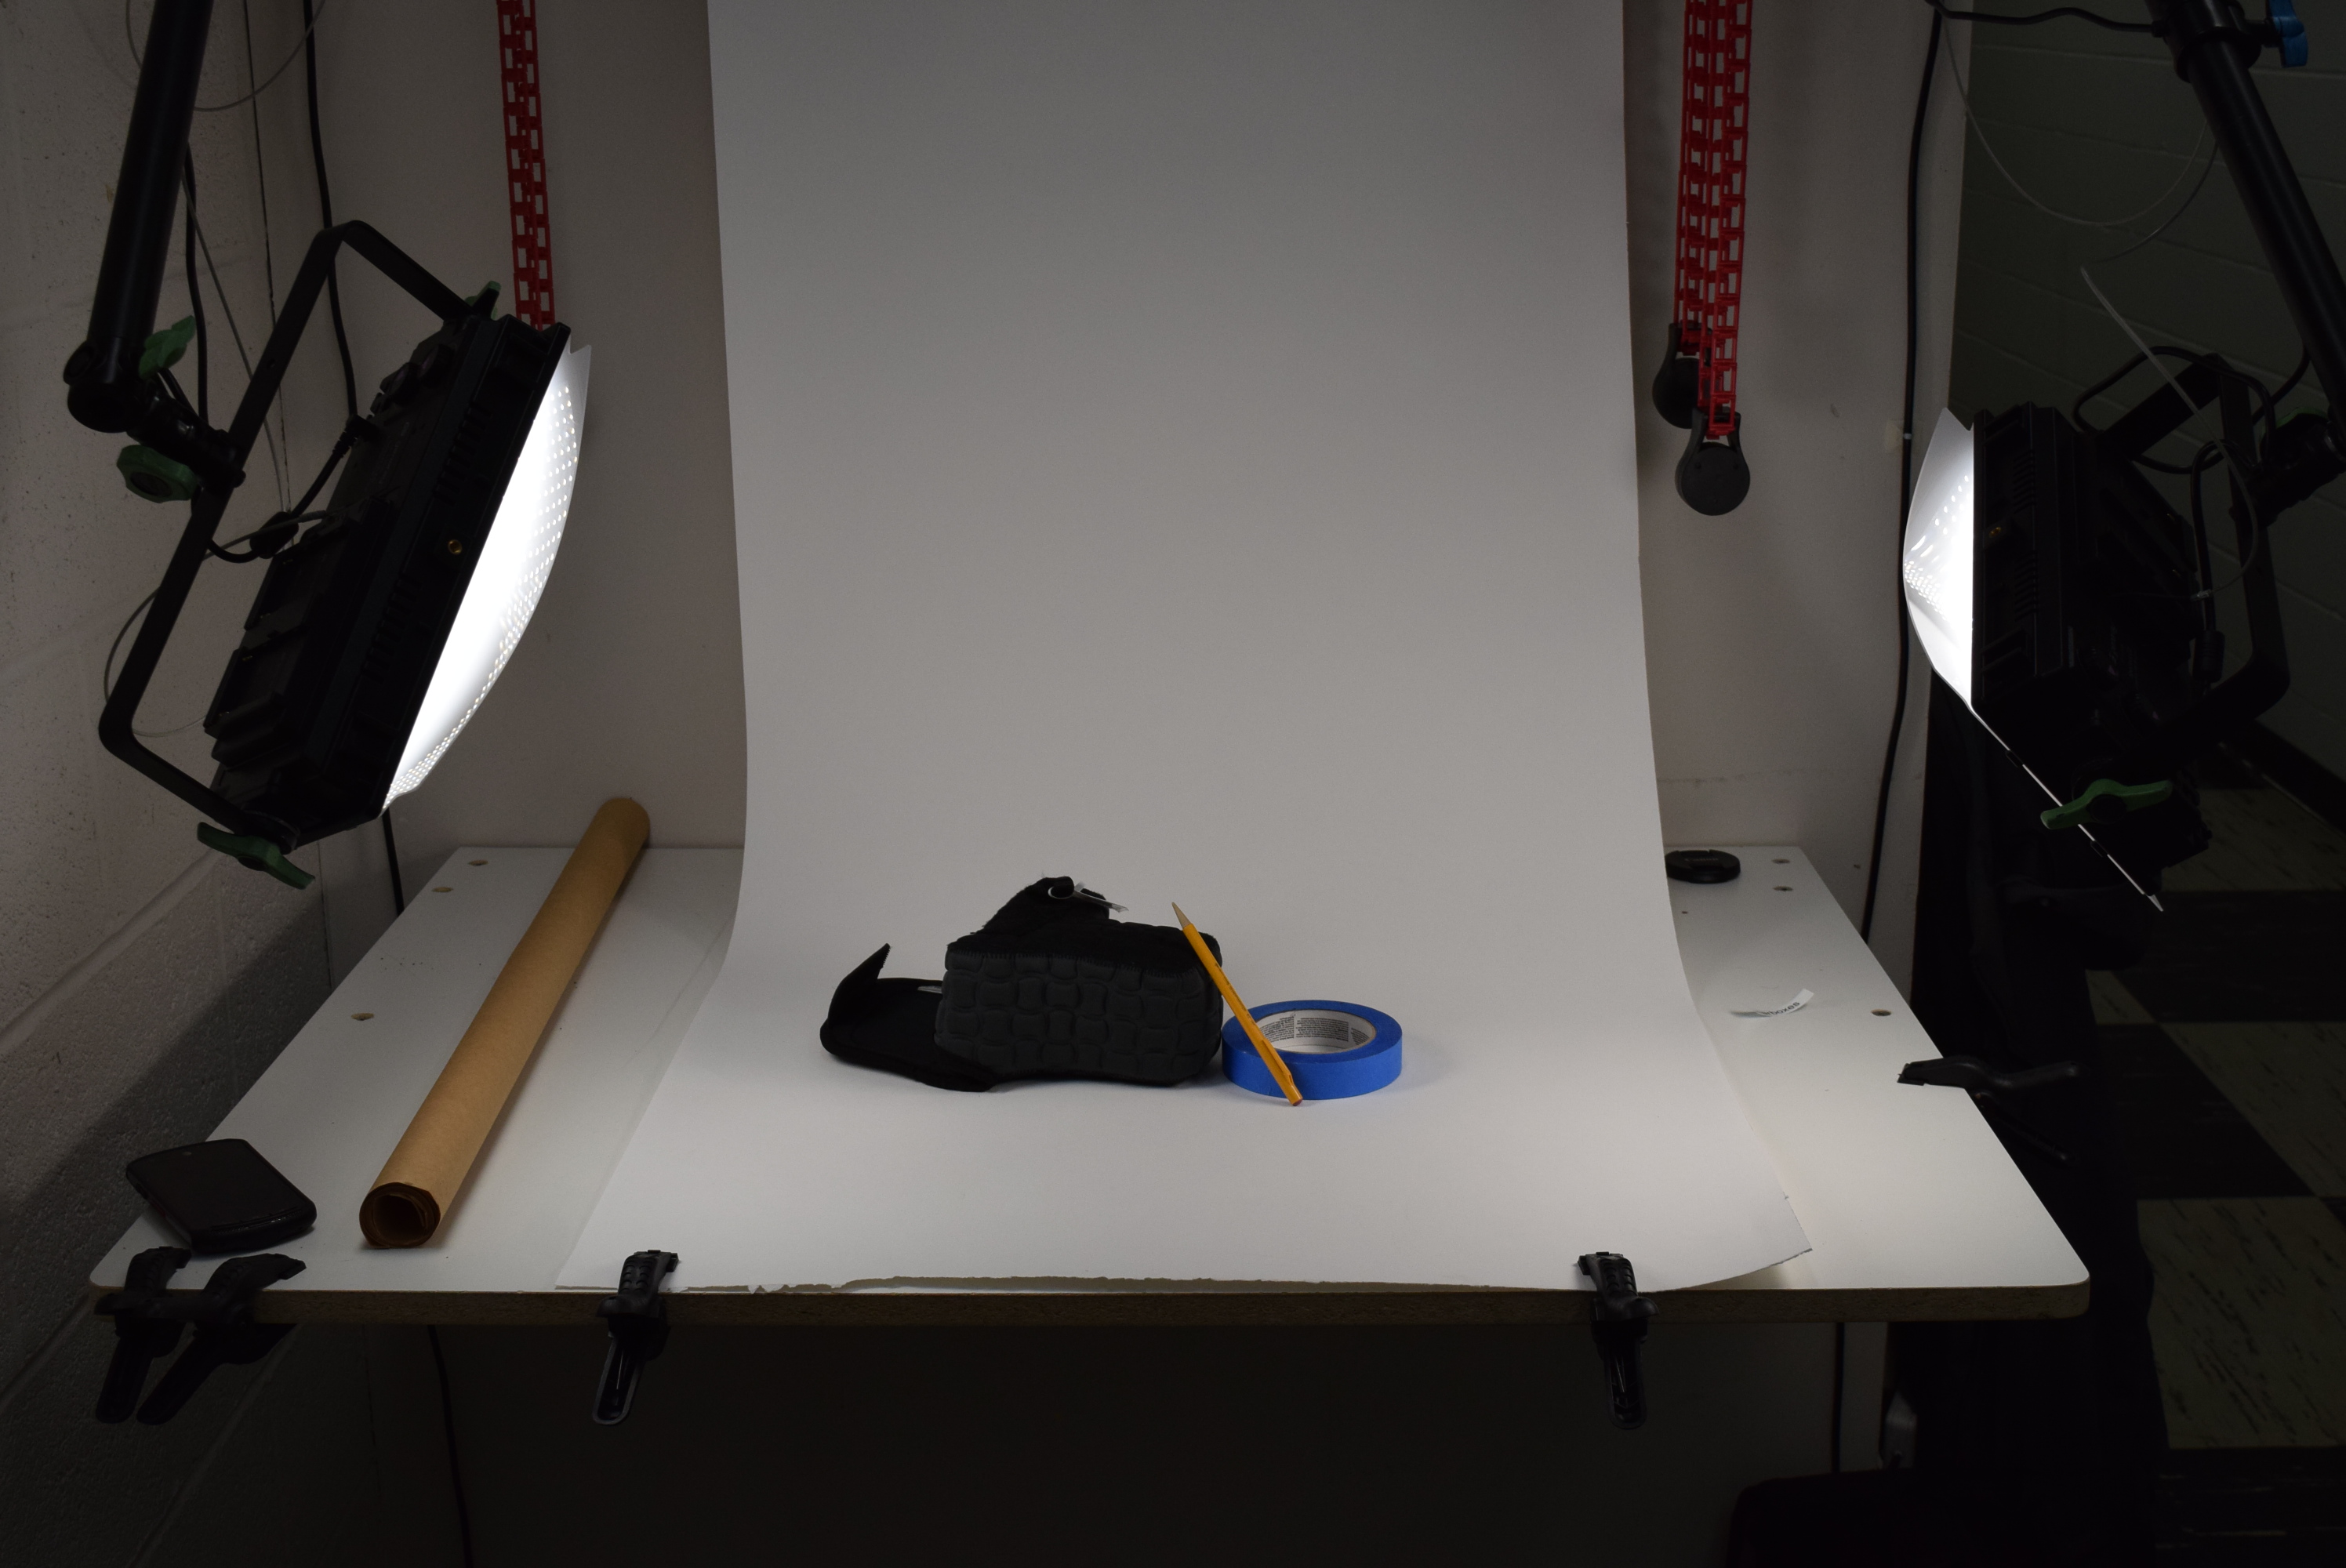
Down the hallway from Phys Comp, in the opposite direction of the main stairway (i.e. west), there is a photo setup designed to make it easy for you to take high-quality photos of objects. A folding table with two permanently installed photo lights has three rolls of paper (black, grey, and white), which you can roll down and clamp to the table to serve as a smooth and clean backdrop for your work. Please leave the Photo Zone table in good shape when you’re finished using it.
The Photo Zone area does not need to be reserved and is accessible any time the library is open.
Sample Photo Zone setup, ready to take a picture:
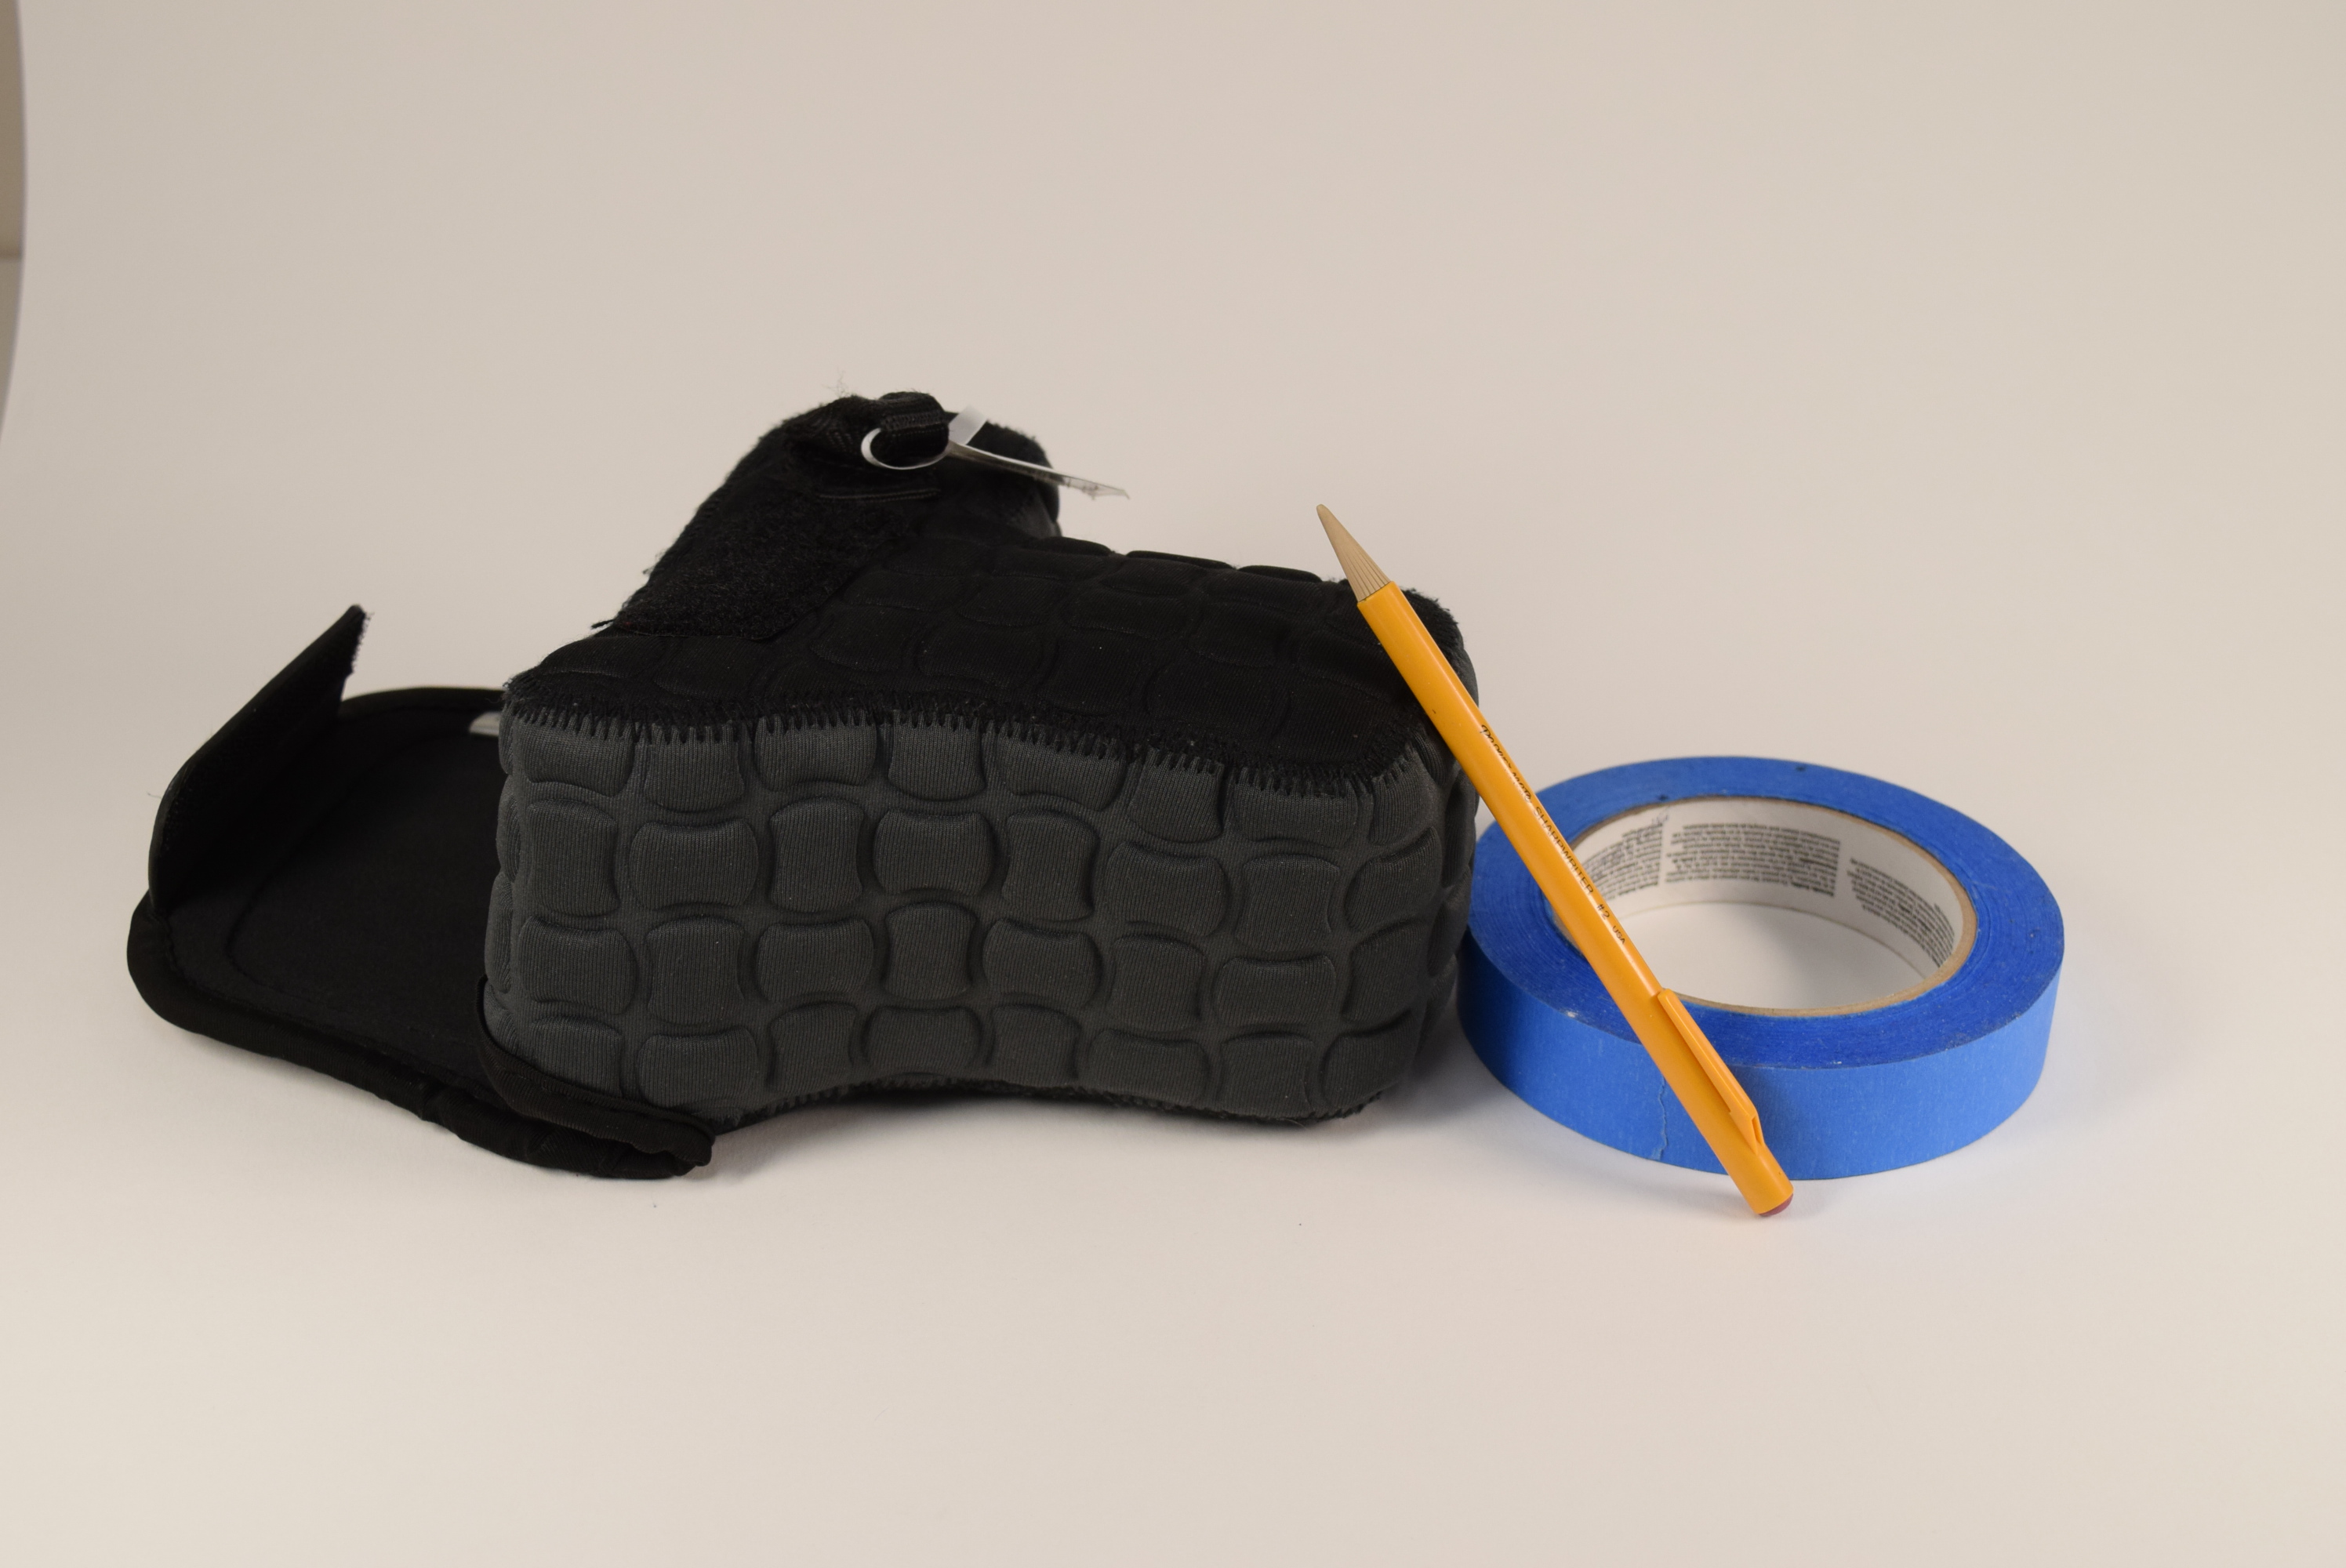
A picture taken in that setup with a handheld camera:
Magic Arm
Manfrotto, an Italian photography equipment manufacturer, makes a product called a Magic Arm which is very useful for holding a camera steady. It is in the form of an adjustable elbow joint joining two arms that are about 1’ long each. The end of each arm has a ball-and-socket joint terminating in a metal post. When the large wheel at elbow joint is tightened, then all three joints in the Magic Arm (the elbow joint as well as the ball-and-socket joints) become rigidly tightened.
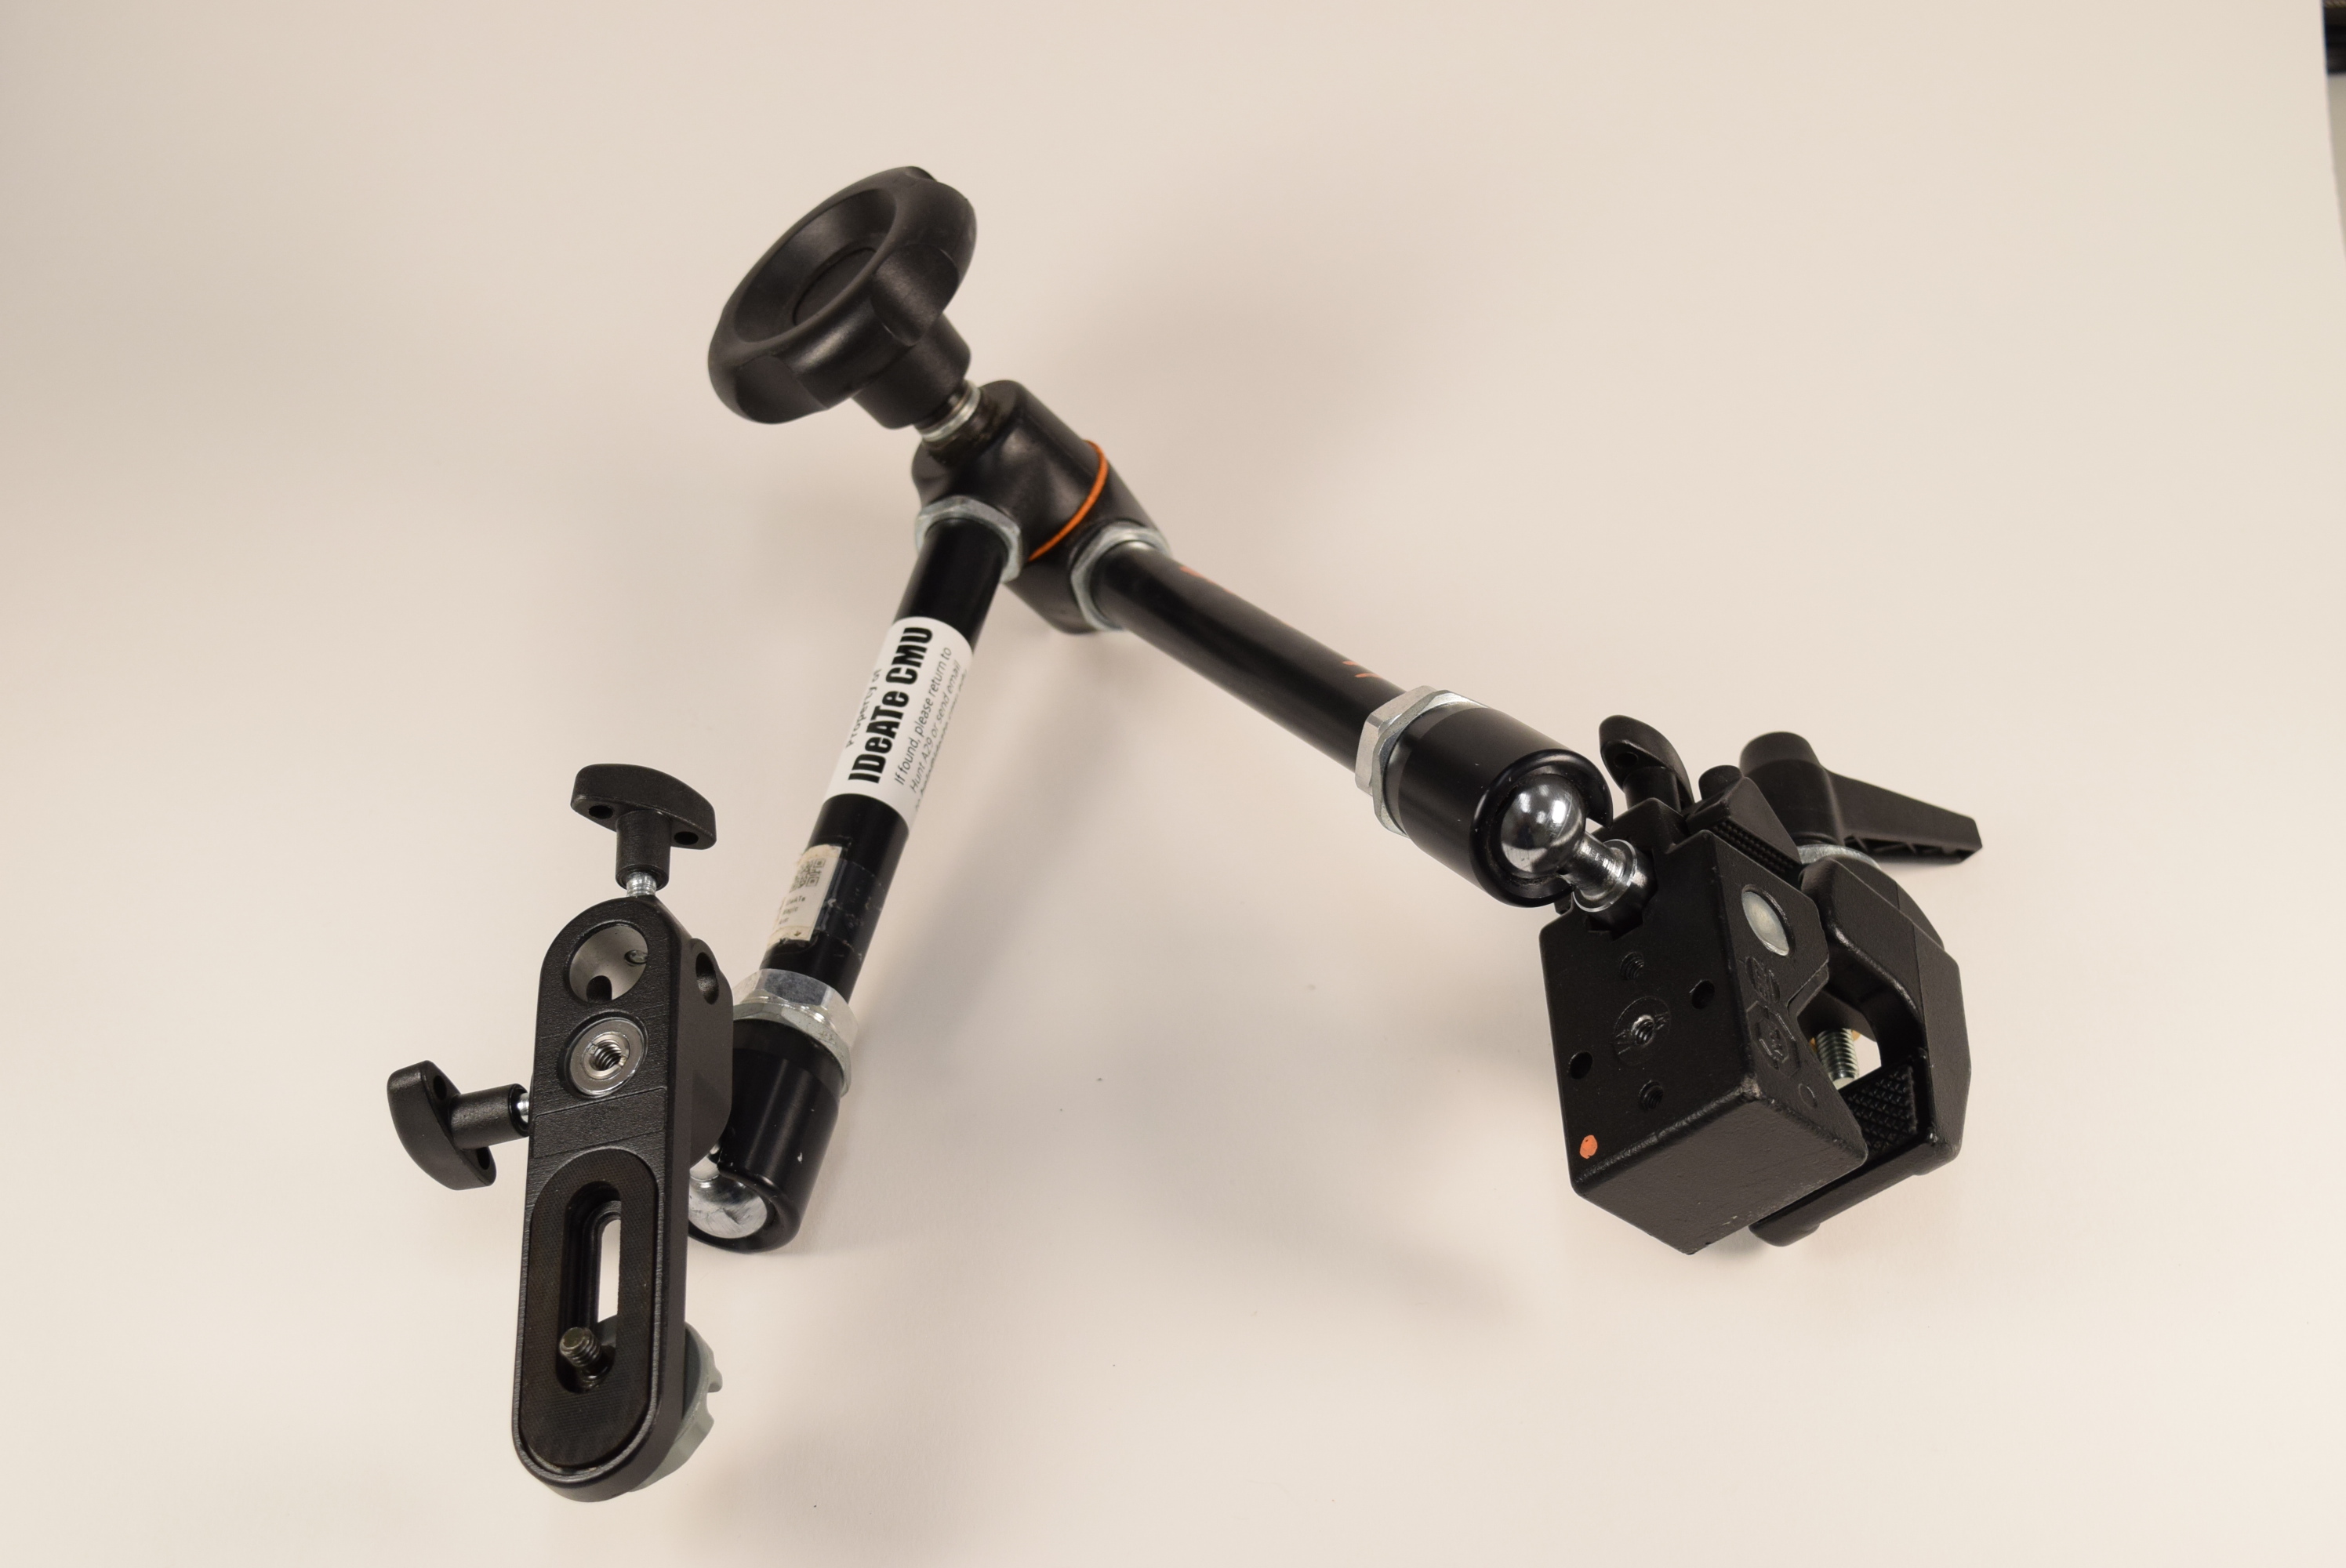
To use the Magic Arm, use the large clamping end (shown on the right in the above image) to grab onto a table edge or any other stationary surface. Mount the camera to the camera mount end (on the left in the above image). Loosen the main wheel adjuster and put the arm into whatever position you need, then tighten the adjuster; it should stay exactly in that position.
