Code bites
- Blink without blocking
- Grouping logical routines together in functions
- A locally scoped variable that remembers its last value
- Windowed moving average filter
- Exponential moving average filter
Blink without blocking
The “Blink” sketch is fine if you only ever want your Arduino just to blink a light. But odds are good you want it to do some other things as well, like read a button, or run some other outputs.
The trick is to get rid of any long delay() statement, because during delay() the Arduino generally can’t read inputs or change outputs. (There’s an exception: a special thing called an interrupt can run even during a delay, but it’s a bit tricky to implement and not recommended for beginners.)
/*
 * Blink Without Blocking
 *
 * Demonstrates how to use an event loop timer to avoid unnecessary delays in code.
 * This sort of form allows you to juggle multiple inputs and outputs more easily.
 *
 * Robert Zacharias, 2/2017
 * released to the public domain by the author
 */

// "global" variables in this section can be used by any function in the whole sketch
int WAIT = 250; // this variable, of type integer, is the number of milliseconds we'll wait between blinks
long timer = 0; // this variable, of type "long," will help keep track of passing time
bool light = LOW; // this varialbe, of type boolean, will keep track of the current LED state

void setup() {
  pinMode(LED_BUILTIN, OUTPUT); // LED_BUILTIN is a handy shortcut for the pin connected to the on-board LED
}

void loop(){
  blink(); // just a shortcut to go to the blink() function
  digitalWrite(LED_BUILTIN, light); // tells the LED to either go on or off, depending on the value of "light"
}

// here's where we define what the blink() function does
void blink(){
  // if it has been more than "wait" amount of time since the light changed
  if ( (millis() - timer) >= WAIT ) { // millis() is always the number of milliseconds since the Arduino powered up
    light = !light; // this will "toggle" the value of "light" to its opposite
    timer = millis(); // reset the timer
  }
  // if it has *not* been long enough, the control will just go past the if statement and exit the blink() function
}
Grouping logical routines together in functions
Perhaps you have a variety of sections of your code.
There’s a section that checks whether a light should be on or off, based on a switch’s state:
int switchState = digitalRead(SWITCHPIN);
digitalWrite(LEDPIN, switchState);
And then a different section that changes a motor’s speed based on the temperature:
int tempRead = analogRead(TEMPPIN);
int tempMapped = map(tempRead, 0, 1023, 0, 255);
analogWrite(MOTORPIN, tempMapped);
These two different small pieces of code could be grouped into functions for your own legibility and convenience. To do that, below the loop(), you can define a new function and put anything you’d like into it, like so:
void adjustLight(){
    int switchState = digitalRead(SWITCHPIN);
    digitalWrite(LEDPIN, switchState);
}
Once you’ve written the adjustLight() function, you can call it at any time by simply putting the line adjustLight(); into your code. The Arduino will run whatever instructions are inside the brackets of the function.
Just to complete the example, here is how a sketch could be made a bit more legible through the use of functions used to group routines together:
const int SWITCHPIN = 3;
const int LEDPIN = 6;
const int TEMPPIN = A2;
const int MOTORPIN = 5;

void setup(){
    pinMode(SWITCHPIN, INPUT);
    pinMode(LEDPIN, OUTPUT);
    pinMode(TEMPPIN, INPUT);
    pinMode(MOTORPIN, OUTPUT);
}

void loop(){
    adjustLight(); // this simply calls the adjustLight() function below
    adjustMotor(); // calls the adjustMotor() function below
    delay(10);
}

void adjustLight(){
    int switchState = digitalRead(SWITCHPIN);
    digitalWrite(LEDPIN, switchState);
}

void adjustMotor(){
    int tempRead = analogRead(TEMPPIN);
    int tempMapped = map(tempRead, 0, 1023, 0, 255);
    analogWrite(MOTORPIN, tempMapped);
}
Did you notice that the functions you wrote resemble the two functions we’ve always included in our sketches, namely void loop() and void setup()? That’s because loop() and setup() are actually just functions themselves—they have special “reserved” names which the software interprets to know when, and in what order, they should be run.
A locally scoped variable that remembers its last value
As C is a scoped language, variables only are accessible from inside the scope (which you can think of as brackets) in which they were created, or any sub-scope.
If you initialize a variable in the loop(), then it’s going to keep getting reset to that initial value every time the loop() runs. For instance, in:
void loop(){
    int x = 0;
    x++;
}
You might think that x is going to keep getting bigger as the loop runs, but it will never get bigger than 1. (It will start as 0, then increment to 1, and then get reset to 0 next time the loop restarts.)
There is a way around this, though: using the keyword static. This will essentially initialize the variable in the scope you want only once, and from there on out it will remember its value. Returning to the boring example from above, we can still keep x’s scope inside the loop() and add the keyword when declaring the variable, like so:
void loop(){
    static int x = 0;
    x++;
}
Because it’s static, that x is going to keep incrementing over and over, reaching tragically for the stars. (Tragic because once it hits 32,767 on an Arduino Uno all its little dreams will be shattered.1)
Who cares? Well, it’s a very good habit to limit variables to the smallest possible scope. for loops are most usually written like this:
for (int i = 0; i++; i<10)
Note that i is being initialized inside of for. You could also achieve the same result like this:
int i = 0;
for (i; i++; i<10)
And it would probably work just fine. But! If some other math at some point touched that i and changed its value, it could screw up your for loop. To avoid that uncertainty, it’s best to make variables with the smallest possible scope.
Windowed moving average filter
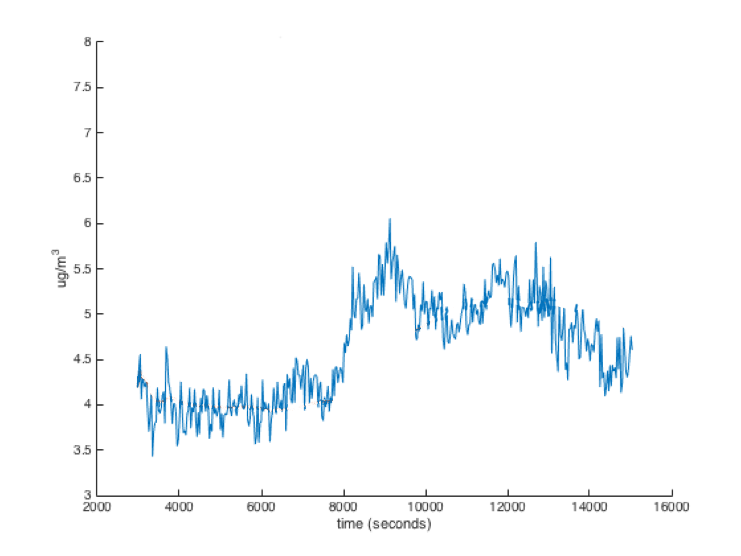
Often you will wire up a sensor to your Arduino and find that the readings you get seem noisy. The individual values change from reading to reading, but they are all in the same ballpark. As you can see in the data below, there is a general trend, but the individual readings don’t follow that trend perfectly. In this case you might want to filter your data so that you can determine what the data’s general trend is.
One of the easiest filters is the windowed moving average filter. This filter simply remembers the last few sensor readings (the readings in the “window”) and averages them to get the filtered value.
The size of the window has a large effect on how the filter performs. The larger the window, the more readings will be averaged, and thus the smoother the filtered value will be. However, a larger window will also make the filtered value respond to changes in the data slower. You can see the results of a moving average filter on a dataset in the four images below (Red is the moving average, Blue is the raw data):


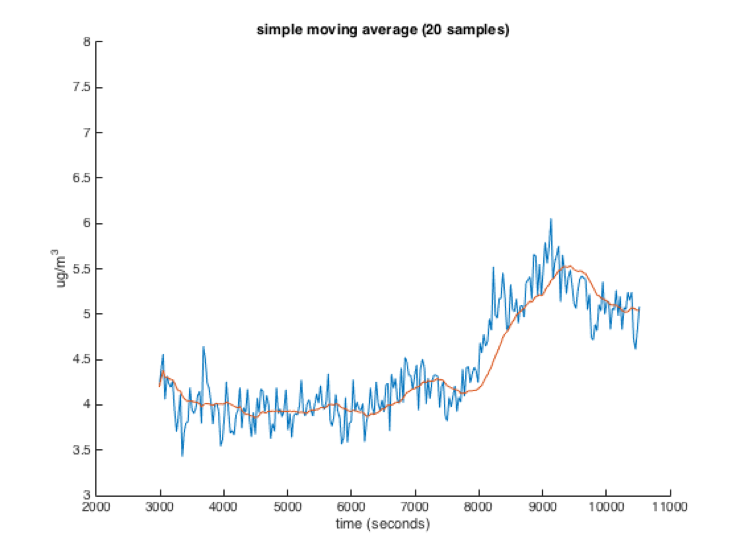

An important thing to keep in mind when using windowed moving average filters is that a sensor reading only affects the average while it is in the filters window. As it leaves the window, its influence drops from 1/numSamples to 0 immediately. If that sensor reading is a very high or low outlier, your average may suddenly change when that sensor reading drops out of the window.
/*
  Smoothing

  Reads repeatedly from an analog input, calculating a running average and
  printing it to the computer. Keeps ten readings in an array and continually
  averages them.

  The circuit:
  - analog sensor (potentiometer will do) attached to analog input 0

  created 22 Apr 2007
  by David A. Mellis  <dam@mellis.org>
  modified 9 Apr 2012
  by Tom Igoe
  modified 21 Jan 2018
  by Joseph Paetz

  This example code is in the public domain.

  http://www.arduino.cc/en/Tutorial/Smoothing
*/

/*
 * Global variables in this section can be used by any function in the whole sketch
 */
// Define the number of samples to keep track of. The higher the number, the
// more the readings will be smoothed, but the slower the output will respond to
// the input. Using a constant rather than a normal variable lets us use this
// value to determine the size of the readings array.
const int NUM_READINGS = 10;

// the readings from the analog input. This is an array of type int (essentially a list of integers)
// The number of integers the array can hold is between the square brackets, in this case NUM_READINGS
int readings[NUM_READINGS];

// the index of the current reading (The location in the readings array where we will write the next reading
// (remember that the first element in an array is actually at index 0)
int readIndex = 0;
int total = 0;                  // the running total of all readings in the readings array
int average = 0;                // the average
const int SENSOR_PIN = A0;              // the sensor's pin

void setup() {
  // Setup the Serial port at a speed of 9600 baud (bits per second)
  Serial.begin(9600);

  pinMode(SENSOR_PIN, INPUT);

  // initialize all the integers in the readings array to 0, since values in an array
  // may not be 0 at the start of the sketch.
  // Since the array will be all zeros at the start of the loop, the filtered value will
  // be influenced by these zeros (and likely innacurate as a result) until we get enough
  // sensor readings to fill the array with actual values.
  for (int thisReading = 0; thisReading < NUM_READINGS; thisReading++) {
    readings[thisReading] = 0;
  }
}

void loop() {
  // subtract the last reading which is at the current readIndex, and which
  // we are about to overwrite:
  total = total - readings[readIndex];

  // read from the sensor:
  readings[readIndex] = analogRead(SENSOR_PIN);

  // add the reading to the total
  // If you have more readings, this may cause total to overflow
  total = total + readings[readIndex];

  // advance to the next position in the array:
  readIndex = readIndex + 1;

  // if we're at the end of the array (aka readIndex is too large to refer to a position in the readings array)
  if (readIndex >= NUM_READINGS) {
    // wrap around to the beginning:
    readIndex = 0;
  }

  // calculate the average
  //Since we are dividing two variables with int data types, this will truncate any decimal part of the average
  //in order to leave us with an integer result
  average = total / NUM_READINGS;

  // send it to the computer as ASCII digits
  Serial.println(average);
  delay(50);        // delay in between reads for stability
}
Exponential moving average filter
Another way to implement a moving average filter is the exponential moving average. This filter is simpler to implement, but has slightly different behavior than the windowed moving average.
The exponential moving average is kind of like the average of the new sensor reading with the previously calculated average. The exact equation is:
new_average = (previous_average * x) + (sensor_reading * (1 - x))
x in the equation above is a weighting factor that is usually used to weight the previous average more than the sensor reading. The following graphs show raw data (blue) and the data filtered with an exponential moving average (red). The number in parentheses at the top of each graph is the value of x for each of the filters. As you can see, a higher value for x is somewhat like a larger window for the windowed moving average. The filtered value is smoother but responds slower to changes in the data.
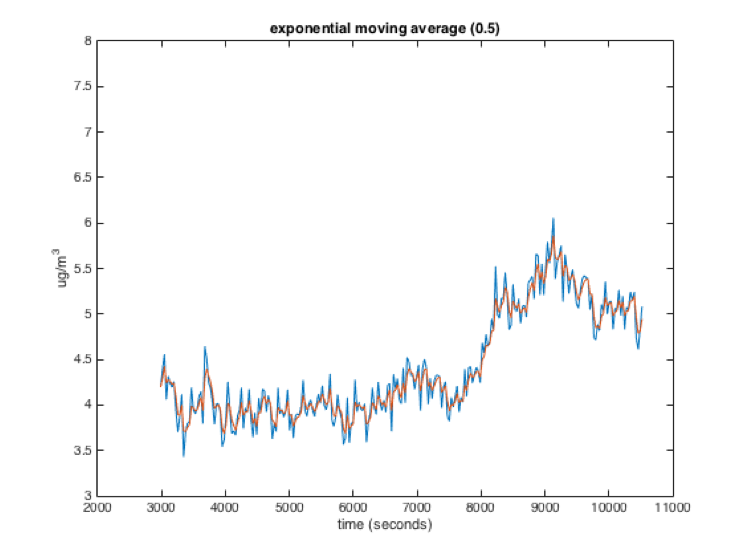
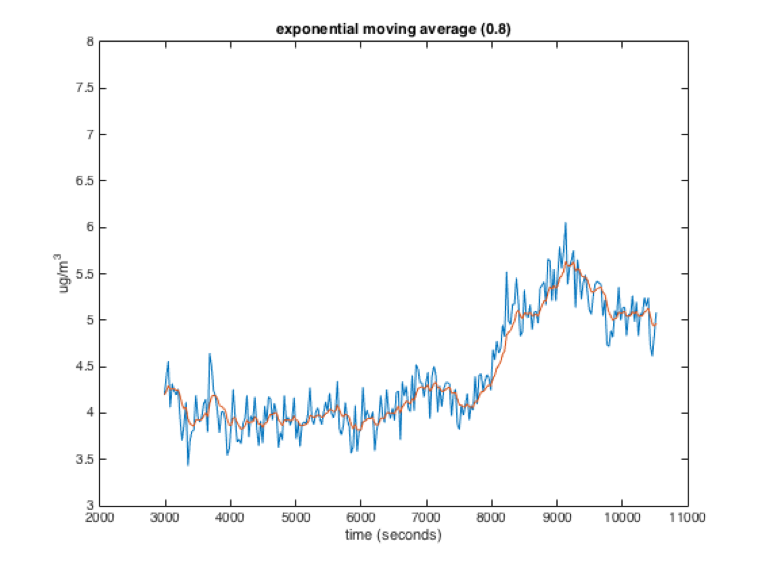
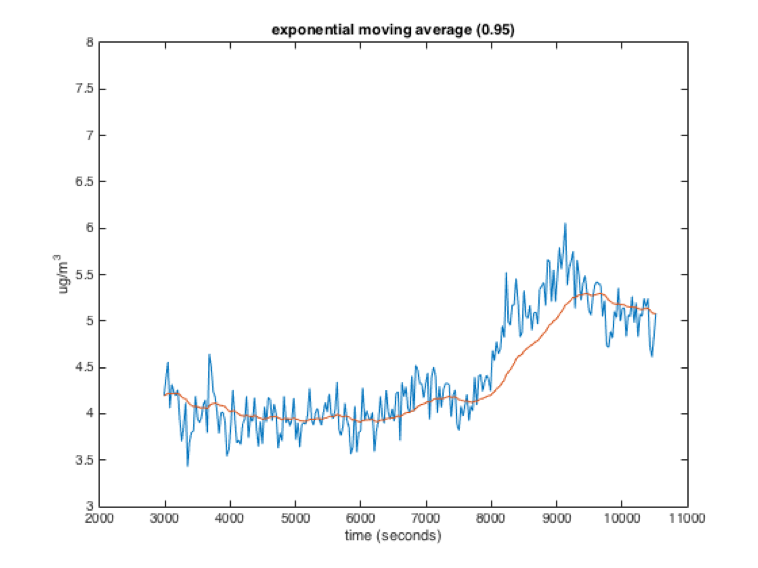
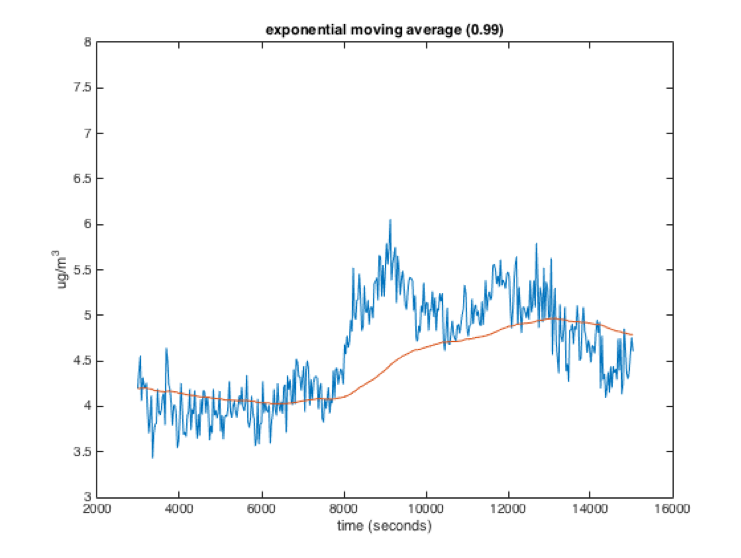
While the exponential and windowed moving averages behave similarly, they have different characteristics. Importantly, in an exponential moving average, a sensor value will theoretically influence the average forever, with its influence getting smaller each loop. This is different from the windowed moving average where the influence of a sensor reading stays constant while it is in the window and then drops to 0.
/*
 * Exponential Decay Filter
 *
 * Demonstrates how to implement an exponential decay filter.
 * In this example, analog readings from pin A0 will be filtered.
 *
 * The circuit:
 *  - analog sensor (potentiometer will do) attached to analog input 0
 *
 * Joseph Paetz 1/2018
 * released to the public domain by the author
 */

// "global" variables in this section can be used by any function in the whole sketch
float filtered_val = 0;  // this variable, of type float (decimal), holds the filtered sensor value
const float PREV_WEIGHT = 0.8; // this variable, of type float (decimal), determines the previously filtered value's weight.
const float CUR_WEIGHT = 1 - PREV_WEIGHT; // this variable, of type float (decimal), determines the current sample's weight.
const int SENSOR_PIN = A0; // this variable, of type int, determines the sensor's pin.

void setup() {
  // Setup the Serial port at a speed of 9600 baud (bits per second)
  Serial.begin(9600);

  pinMode(SENSOR_PIN, INPUT);

  // We want to initialize the filtered value with an actual reading (instead of zero)
  // so the filtered value does not need to "ramp up" from zero to the average reading.
  // We could not do this above since code can only be executed within functions.
  filtered_val = analogRead(SENSOR_PIN);

  // Print the intial value so we can see it
  Serial.print("initial filtered value: ");
  Serial.println(filtered_val);
}

void loop() {
  // This local variable of type float will store the current sensor reading.
  // We use a float because we will be multiplying it by a float later.
  float cur_reading;

  // We can convert the integer value returned by analogRead to a float by casting it
  cur_reading = (float)analogRead(SENSOR_PIN);

  // Calculate the next filtered value
  filtered_val = filtered_val * PREV_WEIGHT + cur_reading * CUR_WEIGHT;

  // Print the filtered value so we can see it
  Serial.print("filtered value: ");
  Serial.println(filtered_val);

  // Delay a little bit so we are not reading the sensor quite so fast
  delay(50);
}
One subtlety to keep in mind: you may want (or not want) to run the smoothing function at a different rate than the data acquisition happens. In the above code, each time a new data point is recorded by cur_reading = (float)analogRead(SENSOR_PIN);, the smoothing runs once: filtered_val = filtered_val * PREV_WEIGHT + cur_reading * CUR_WEIGHT;. This is because they’re both in the same functional loop, right on top of each other. But it would be possible to set the filtering function to run independently from the data acquisition, for instance by using the Blink without blocking paradigm to trigger one or the other action. If you filtered much faster than acquired data, then the filter would smooth much more, acting as if the incoming data was itself smooth (because it would keep reusing the last reported datum). On the other hand, if you let two data points in a row come in before running the filter, the older one would be totally ignored since this algorithm cares only about the most recent datum. In practice the easiest way to avoid either of these cases is to do data acquisition and filtering sequentially, as the example above does.
Footnotes
-
That number, 32,767, is the largest value of type
intthat an Arduino Uno is able to store. If you ask the Arduino Uno to solve the seemingly simple math problem 32767 + 1, it will answer –32768; this is because you’re causing it to “roll over” from the largest-possibleintto the smallest-possible one. This Wikipedia article explains what’s going on. ↩
