4.4.6. Exercise: Python and Arduino
4.4.6.1. Objective
Communicate data between Python and an Arduino using the USB serial bus.
The Arduino IDE and Python solve different problems well. The Arduino has easy direct access to its hardware interface, and can create and respond to electrical signals with very low latency. Python is well-suited to interactive programming, but the latency is considerable higher than on a microcontroller, and on a laptop lacks access to hardware interfaces. This exercise will demonstrate one way of coordinating Python and the Arduino to take advantage of the best features of each by linking them using a simple ASCII message protocol over the USB serial bus.
The serial communication does introduce significant latency between the Arduino and Python so this approach is strongest for systems in which Python is used for tasks such as the GUI, visual display, sequencing, and overall event control. It would not be suitable for high-bandwidth tasks such as cycling individual digital outputs to create a stepper motor waveform. However, the extensibility of the protocol means that you can add those low-level hardware behaviors to the Arduino server program and invoke them via messages.
Setting up the exercise requires a couple of preparatory steps:
- Compiling and loading the OneInOneOutASCII Arduino sketch onto an Arduino Uno.
- Determining the exact name of the serial port offered by the Arduino over USB.
- Running the OneInOneOutGUI module in Python on a laptop.
- Verifying or setting the serial port name in the interface.
The OneInOneOutASCII sketch is provided in the course distribution in the OneInOneOutASCII folder. The source code of the sketch provides details of the messaging scheme.
The Python GUI is also available in the course distribution in the OneInOneOutGUI folder. Because of the number of files involved, it is highly recommended that you download OneInOneOutGUI.zip and unpack it on your laptop.
N.B. the cluster laptops include a MacPorts installation of Python which already includes the following required libraries: py27-numpy, py27-pyqt4, py27-pyqwt, and py27-serial.
4.4.6.2. Steps and observations
- Upload the OneInOneOutASCII sketch onto an Arduino Uno.
- Open the Serial Monitor, set the baud rate to 115200 and the line ending to Newline. You should see data messages start to stream by.
- Enter ‘poll 1000’ in the input box and press enter. The message rate should slow.
- Enter ‘led 0’ in the input box and press enter. The LED marked L should go off.
- Enter ‘led 1’ in the input box and press enter. The LED marked L should go on again.
- Note the exact serial port name from the Tools/Port menu in the Arduino IDE.
- Exit the Arduino IDE.
- The easiest way to run the Python GUI client from OS X is to
double-click on the
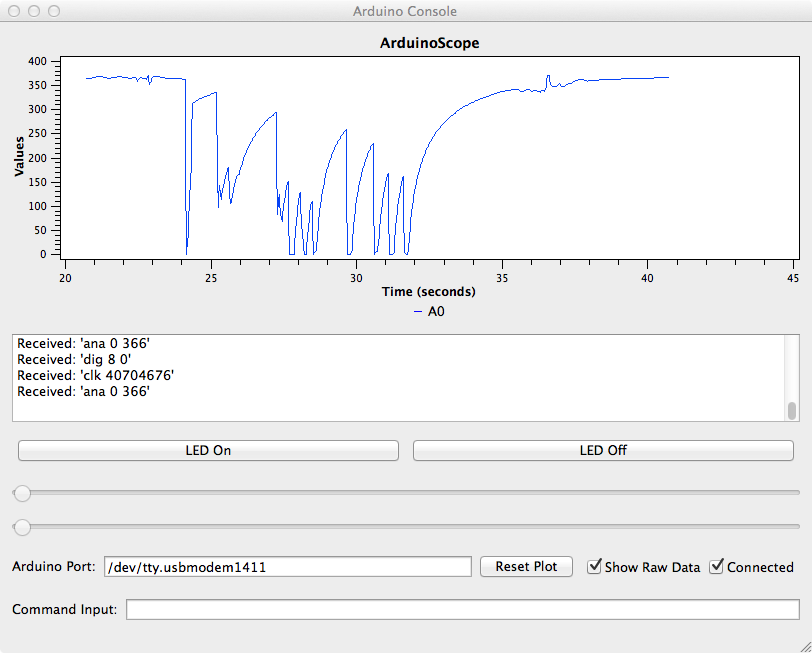
run_gui.commandscript found within the OneInOneOutGUI folder. However, in the long run it is more versatile to run it from the command line (or necessary if you are using Windows or a Raspberry Pi). If you are using a cluster Mac the command ispython2.7 run_gui.py. This will use our MacPorts installation of Python which includes the required libraries instead of the system-provided Python. On a Raspberry Pi usepython run_gui.py. On Windows the exact command will depend on which Python distribution you are using. - Near the bottom of the panel is a text field labeled Arduino Port. If that doesn’t match the name of the serial device you noted before, please correct it. Then toggle the Connected button to open the Arduino serial port. If you toggle the Show Raw Data button, you should see a stream of messages in the text area similar to those you saw before from the Arduino IDE.
- Try the LED On and LED Off buttons and observe the Arduino LED. On each press you should also see the RX LED flash briefly as the message is received on the Arduino.
- The plot at the top labeled ArduinoScope shows the stream of readings from the A0 analog input. If the input is disconnected, this will just be electrical noise. Try touching the A0 pin from the back of the Arduino board; you should see a change in the plot from the electrical noise conducted by your skin.
- The Command Input text field allows manually sending commands much as you did with the Arduino IDE.
4.4.6.3. Comments
If you are comfortable running Python scripts from the command line, you may also explore a non-graphical example in OneInOneOutConsole Example.
For a challenge, examine the source code for both the sketch and the GUI and work out how to add additional message types.
4.4.6.4. Arduino and Python Code
- Documentation: OneInOneOutASCII Arduino Sketch
- Documentation: OneInOneOutGUI Example
- Documentation: OneInOneOutConsole Example
- Sketch Folder: OneInOneOutASCII
- Python Client: OneInOneOutGUI
- Python Client: OneInOneOutConsole