We plan to create an earthquake simulator as an addition to the Children’s Museum Makeshop to give visitors to opportunity to design their own buildings and put them to the test. The buildings will be constructed out of a variety of tubes and connectors and will illuminate as they are attached. The visitors can then place their buildings onto the earthquake table and start the simulator, with a seismometer indicating the strength of the quake. We hope to see visitors enjoying themselves as they create ever more elaborate buildings and watch as their creations respond to the earthquake waves and eventually topple.
Technical Overview
Our earthquake simulator will comprise of two major components: the table and the building blocks.
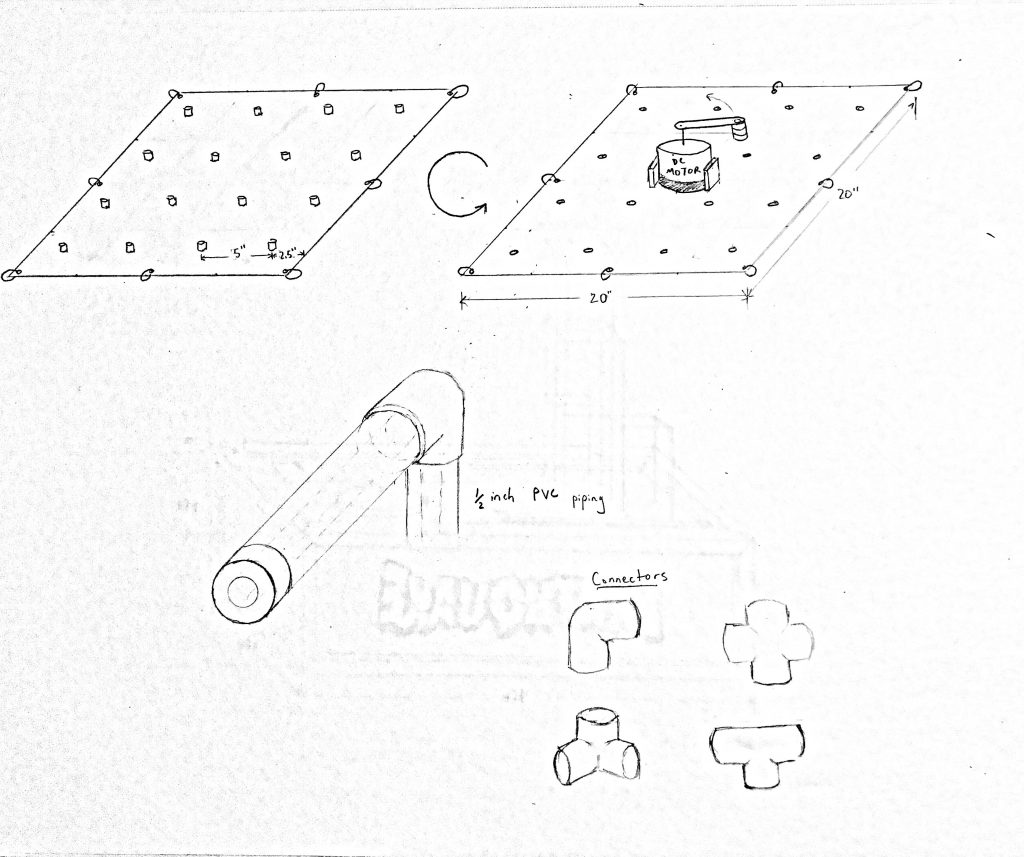
The table will be constructed primarily out of 1x2s and 1/8th inch plywood. It will feature a 2ft x 2ft upon which the visitor’s building can be mounted. The plate have a DC motor attached to the underside that will cause it to shake. We will also include a wheel to control the magnitude of the earthquake and a seismometer that takes input from an accelerometer and displays the earthquake’s strength.
The building blocks will be a series of transparent tubes and connectors. The tubes will made from 1/2 inch transparent PVC piping. These tubes will have enough space inside to contain LEDs, wiring, and a vibration sensor.
Our main challenge will be to fabricate blocks and connections that are durable and safe for children, and to design them in such a way that they flex and disconnect in the face of an earthquake.
Project Management
For the proof-of-concept demonstration, we plan to have a working small scale earthquake table and a few prototype building blocks. This will allow us to fine tune the table’s motion and examine how much shaking is necessary to flex and disconnect the tubes from the connectors.
During the first on-site test, we will have a full scale earthquake table complete, as well a variety of different building blocks, enough for at least one person to user test at a time. We will use this test to see how successful the blocks are and see if we need to modify the height of the table to be more suitable for the children.
Individual responsibilities:
James: Coding and Table Construction
Rachel: Circuitry and Block Construction
Budget Outline
1/2″ transparent PVC piping (~ 10 ft = ~$17)
1/2″ PVC connectors (~5 sets = ~$16)
1/8″ Plywood (~1 sheet = ~$10)
1″ x 2″ Wood (~30 ft = ~$30)
Total: $73
Out of pocket spending will be split evenly between group members.
Timeline
10/23: Project Proposal done. Begin construction of small-scale table
10/25: Continue construction of small-scale table.
10/30: Proof-of-Concept
11/01: Full-scale table constructed
11/06: Blocks designed and construction started
11/08: Blocks constructed
11/11: First On-site Test
11/13: Progress Report and Revision Plan
11/29: Table and blocks completed
12/02: Project displayed at Children’s Museum
12/06: Project documentation
Sketches

Leave a Reply
You must be logged in to post a comment.