Bryan Yan and John Schuman
Morse Code is a method of communicating text information as a series of on-off tones, lights, and clicks that can be translated. Used by radio operators and traffic controllers for navigational aids, Morse code is a highly useful and simple alternative to synthesized speech since it is comprehensible to those who live without the ability to hear as well as those without a decoding machine.
We plan on inspiring children to open their eyes to a new concept, a new language. We will introduce a positive experience to both children and their parents in how to speak without using their mouths, but rather in a physical, interactive way to produce the Morse Code language. For our project, we plan on making a Morse Code Teacher which allows children to create words in Morse code and be treated with a light show and a letter when they type certain letters. We hope to see the children interested in the aspect of making words and perhaps learning a new language while they’re at it. The proposed site for this project is in the Nursery area or right outside the Garage area (where the spinning wheel to draw a picture exhibit is) of the museum. We felt that this was the most appropriate area since those areas were the most interactive with their pre-existing exhibits.
Our main goal with this project was to create something that would be educational and interactive at the same time. We noticed that at the Children’s Museum and the Children’s School, the kids loved playing with things but had really short attention spans. They had the most fun when interacting with the exhibits and activities for enjoyment/entertainment purposes rather than sitting there for long periods of time to learn something. To combat this, we wanted to create a project that was highly interactive yet in some form educational as well. We hope that the kids will find the different Morse Code <-> text translations captivating and will learn some Morse code along the way.
Technical Overview
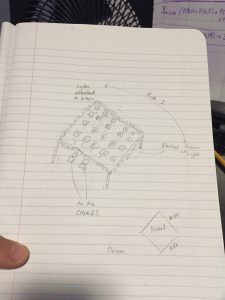
Our current thought process is that there will be a switch or button that the kids will be able to press and interact with. We will process their input and find some mapping between the dots and dashes to a letter. There will be a lenient tempo tolerance in order for there to be a guaranteed output no matter the input. We would then have different servos which triggered when a letter was played. We would have a box with many holes in which the Arduino and different parts are located, and after receiving the input, the card displaying the letter will be raised through usage of a simple mechanical arm (fixed ball joint). If a letter or word was typed successfully lights around the box will flash green.
Project Management
For this project, Bryan will be doing most of the coding as well as the circuitry. John will be in charge of more of the mechanical design, and together we will work on the construction of the project using the different components.
For the proof of concept demonstration, we hope to have a base for our display as well as a working sound and chime system. It should be able to take in and process input with some mechanical response.
For the first on site test, we plan to have a fully developed and enhanced Morse Code device specifically designed to be fun and involve learning. The input should be processed cleanly with a proper and accurate mechanical response from our laminated cards.
Budget Outline
Glockenspeil (tentative idea) ~ $15 – $100
Laminated Cards or Blocks – $10
Sound Sensors – $5
Speaker – $5
LEDs – $10
Timeline
Week of 10/22-10/28 : Project Proposal done. Design custom materials and purchase materials needed to begin construction of various parts.
Week of 10/29 – 11/4: Complete fabrication of custom parts and have proof of concept completed. Code should be written and construction of full scale physical component begun.
Week of 11/4 – 11/11: Complete assembly of project with electric circuitry.
11/11: Phase 1 test at Children’s museum and initial documentation.
11/13: Progress report with revision plan complete.
11/20: Revised prototype based on phase 1 test and revision plan.
11/29: Fully completed, next few days for small revisions/checks and tests
12/02: Final project displayed at Children’s Museum
12/06: Final project documentation
Sketches

Leave a Reply
You must be logged in to post a comment.