SPACE INSTRUMENT
An interactive instrument/sound space that is played using the motion of your body by pulling on ribbons, and moving around in the space.
Summary:
Our installation is a space instrument, meaning as you move through a space, different sounds start to play. There are two components: a distance measuring part that plays different sounds depending on how close/far you are from a sensor –this is the ambient sound of the instrument. And then there are ribbons that as you pull on them different sounds play — this is the controlled part of the instrument.
A combination of the two systems creates an interesting overlap, because people can still interact with instrument by just existing in and moving through the space. This can be useful for smaller kids that haven’t developed the motor skills needed to pull on a string. As for the String aspect, each string would play a different sound, which for older kids can be a great opportunity to create their own sounds and gives them a sense of industry. A combination of the two sounds together builds to create an interesting soundscape.
Preferred installation location in museum:
Hanging installation, so in place with available supports. If we are adding the lighting element for phase two, the lighting (darkness) of the installation space (possibly similar to the space with the thunder cloud installation?)
Technical outline:
For our first draft technical solution, we will concentrate on getting the ribbon mechanism and the space sensing mechanism down. Later, in phase 2, we are thinking of possibly including light to help guide people to play certain ribbons that create certain sounds/songs.
We are constraining ourselves to building the installation all on a flat “table” and organizing the table in an efficient way to fit the ribbon system and the space sensing system. This way, it can make it easier for it to be suspended and for people to move under it freely. Plus, suspending it conserves structural materials.
Ribbon System: the ribbons are attached to a switch, and as the ribbons are pulled on, that triggers a certain sound to be played. We are using MSP/Max for the sounds. For the first phase we are just having 5 ribbons/sounds aligned in a straight line. But we are thinking of adding ribbons in a 3D grid for Phase 2.
The sound will be played through a laptop or speaker. Having more than one sound output is another element that we could look into for phase two, to establish more depth to the space.
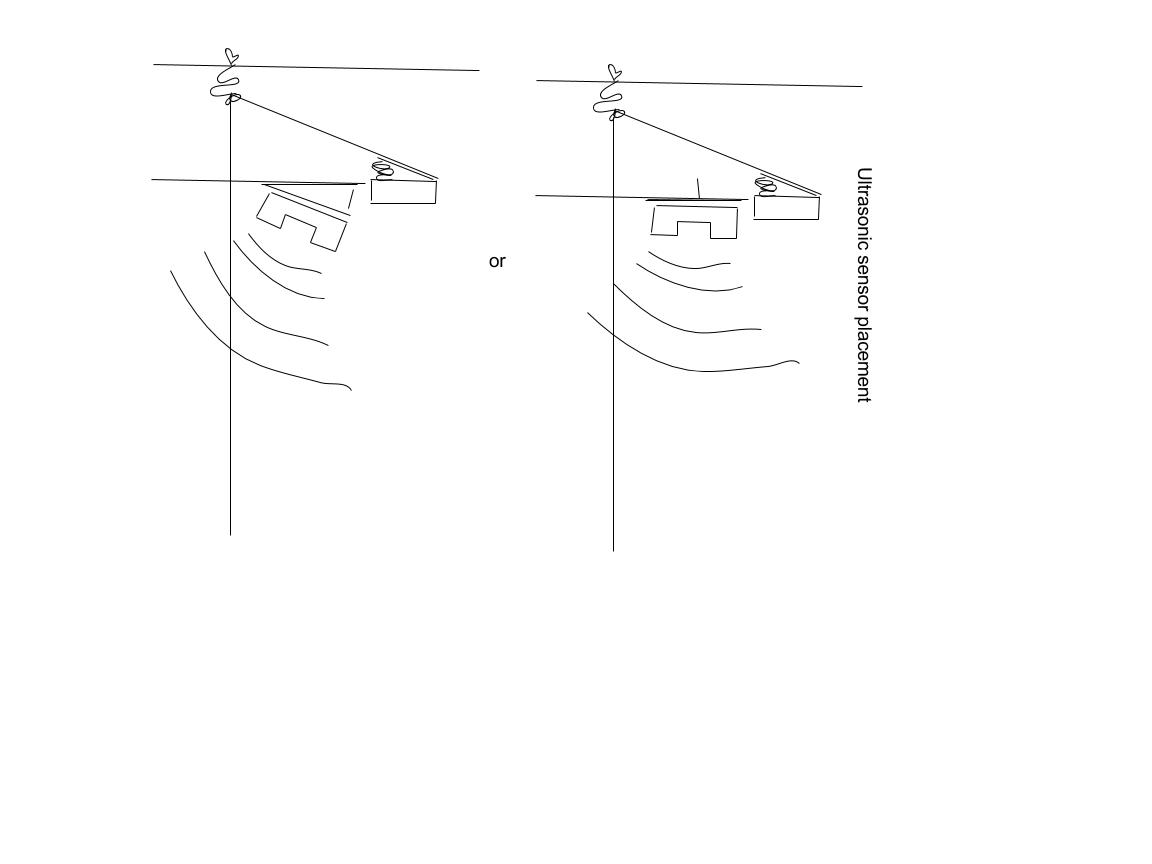
Space Sensing System: on the table, there will be ultrasound devices that measures people’s distances and plays sounds based on the distance (i.e. the closer you get, the higher the pitch gets). This sound is more faint and is supposed to act as an ambient noise. For Phase 1, we are having 2 ultrasound sensors, but are thinking of potentially adding more for the next phase, to add depth to the number of sounds being created in the soundscape.
What are the key technical challenges?
- Making sure the structure doesn’t collapse when someone pulls on the ribbon.
- The ultrasounds we have may not be able to detect that far of a distance, so we might need to figure out a way for the ultrasound to measure something closer but still be based on human movement (i.e. potentially measuring the ribbons’ movement, which move when people touch them or walk through them).
- Making sure that the ribbon pulley system is stable enough to last multiple sharp pulls.
- Learning how to use MSP/Max for soundscapes
Budget outline.
Materials we will need include:
- Materials to build the hanging structure:
- Heavy duty wires to hang it with:
- Ex: ⅜ x 100 ft diamond poly rope (Home depot) holds 244lbs : 9.98 each
- Wood beams for structure(?)
- Note: for this, because we will most likely need to have holes etc in the structure to fit the various sensors, wires and pulley systems, we could do an overlapping grid of laser cut beams?
- A very sturdy system for stabilizing the hanging structure- metal clasps (similar to what used in rock climbing?)
- Bolts, screws, wires, rope
- Glue
- Heavy duty wires to hang it with:
- Ultrasonic sensors
- Switches
- Metal bands to extend switches
- Small springs to hold switches in an open position with the additional weight of the band and ribbon ~$10
- Ribbon (100 yard strands of a single color for ~$4, or mixed for ~$11)
- Additional rope to support ribbon ties
- Speakers for sound system
- Laptop
Bill of materials:
- Our main cost elements will most likely come from the speakers and “table” hanging structure itself, because of its scale. Next the supporting rope system that it will be hung from. Following this, the ultrasonic sensors, ribbon, and switches
- Rope: this will depend on the height of the hanging beams, but 100ft would be a starting estimate:
- $10
Timeline
Order of Events:
PHASE I: Proof of Concept (by Oct 30)
- Learning how to work with max msp
- Connecting MaxMSP with arduino
- Connecting systems to switch
- Connecting system to ultrasonic sensor
- Making sure that both of these elements are working in tandem to create desired effect
- Working with switch and extension elements
- Working with depth and positioning (determining what the ultrasonic sensor is sensing)
- Creating a solid structure for the ribbon pulley system
- Attaching structure to input switch
Phase II: Prototype (by Nov 11)
- Check to make sure that everything is still working!!
- Set up this single ribbon on a hanging structure
- Decide what type of sounds we want the interactions to be producing
- Proof of concept done
- Establish a system/order for the soundscape
- Add an additional 4 ribbon switches to this system, and 2 ultrasonic sensors
- Make sure program is running for all and working
- Create a larger hanging system to fit five ribbons and sensors
- Figure out how to stabilize on a hanging system
- On site testing
Phase III: FINAL PUSH (by Dec 02)
- Observe and make any necessary adjustments
- Multiply the scale of this project by creating x many more ribbon systems
- Create the full hanging structure
- Assemble ultrasonic sensors
- Make sure everything is working !!
- Determine support system
- Assemble structure
- Play with the cool space instrument you just made!
Design of custom part:
The designing of custom parts should be completed for the proof of concepts test, and adjusted rapidly if they they need to to be following this test.
Establishing how each element will be designed will happen in this first week, initially using everything available in physical computing and beginning to order any additional parts.
Purchasing of special materials or parts:
Special materials and parts will include all of the mentioned above, not available in the Physical Computing lab/Ideate.
Special materials will most likely be purchased online through amazon. Bulk ordering (if necessary) done once the single proof of concept model has been made.
Programming:
We will be using Arduino in communication with MaxMSP for working with the music element and input signals. For the Proof of concept test we will have one sound element and input element working for the ribbon pull and ultrasonic sensor.
SKETCHES
plan view:

axonometric view:

Ribbon System: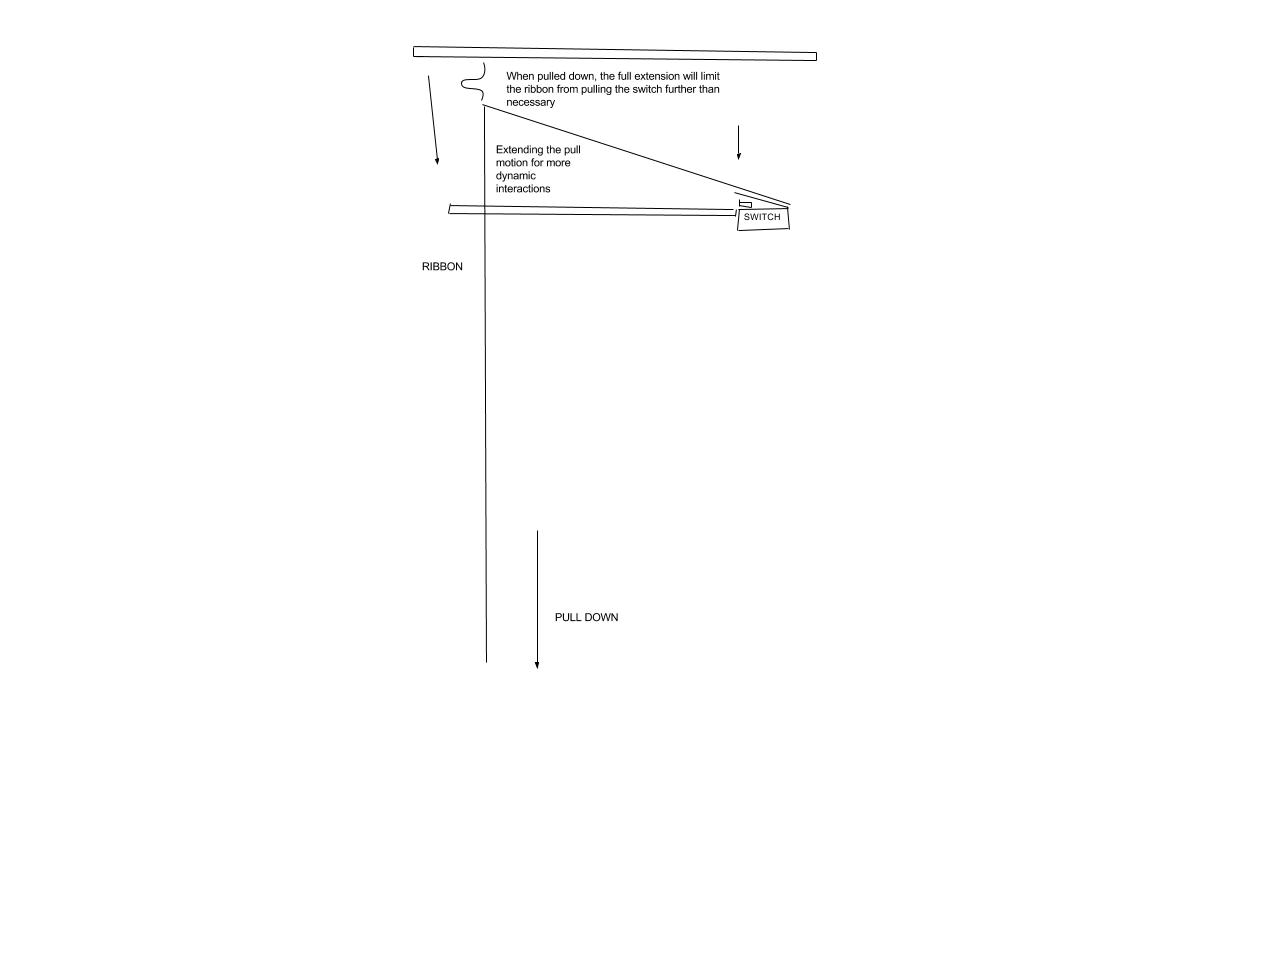
Space Sensing System:
Leave a Reply
You must be logged in to post a comment.