NeoPixel LED Examples - Raspberry Pi Pico
The following short Python programs will demonstrate essential operation of the
Raspberry Pi Pico board. These assume one or more binary input or output circuits are
externally attached. Each can be run by copying the program into code.py on
the CIRCUITPY drive offered by the board. The text can be pasted directly from
this page, or each file can be downloaded from the CircuitPython sample code
folder on this site.
Related Pages
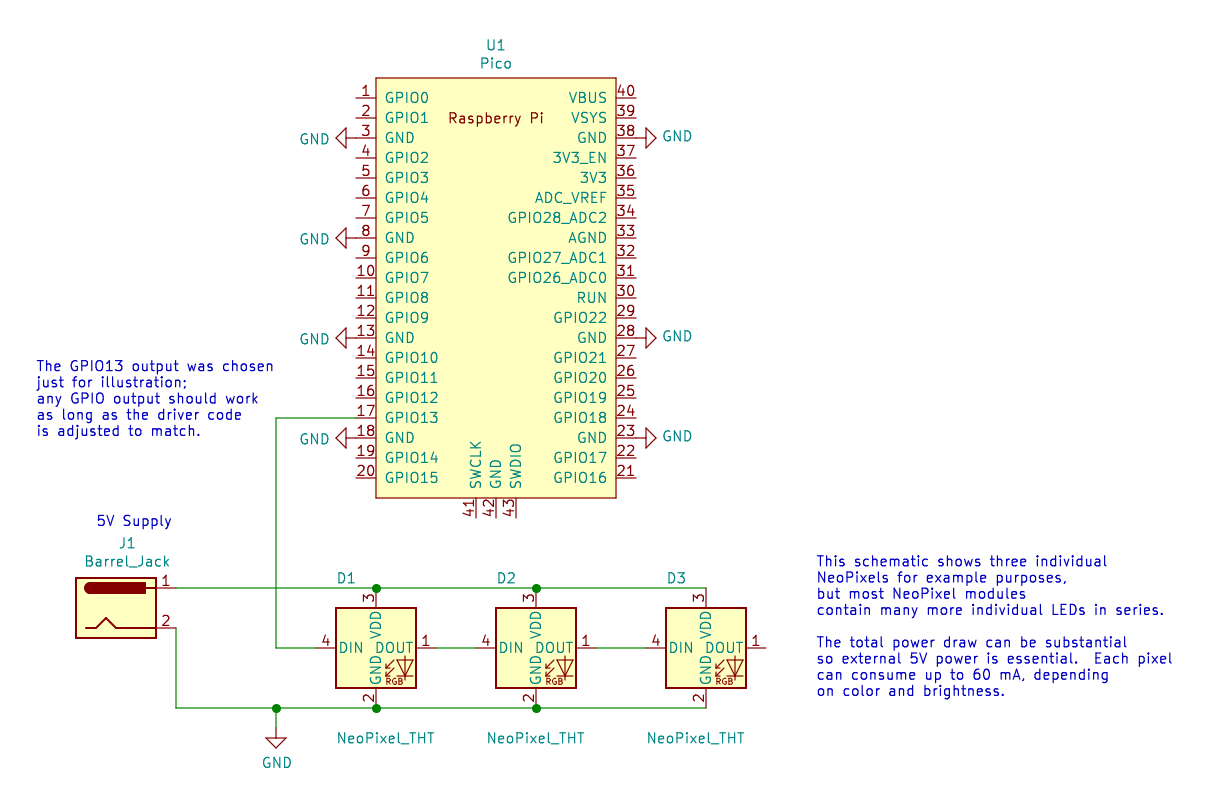
Sample NeoPixel Circuit

Sample NeoPixel circuit. Any GPIO pins may be used to send data to the LEDs. Please note that an LED array of even modest size will generally need a separate 5V power supply.
Neopixel Demo
Direct download: neopixel_demo.py.
 1# neopixel_demo.py
 2
 3# Raspberry Pi Pico - NeoPixel LED array demo
 4
 5# Write an animated pattern to a strand of NeoPixel LEDS, using only the
 6# low-level neopixel_write module.
 7
 8################################################################
 9# CircuitPython module documentation:
10# time       https://circuitpython.readthedocs.io/en/latest/shared-bindings/time/index.html
11# board      https://circuitpython.readthedocs.io/en/latest/shared-bindings/board/index.html
12# digitalio  https://circuitpython.readthedocs.io/en/latest/shared-bindings/digitalio/index.html
13# neopixel_write  https://circuitpython.readthedocs.io/en/latest/shared-bindings/neopixel_write/index.html
14#
15
16################################################################################
17# load standard Python modules
18import time
19
20# load the CircuitPython hardware definition module for pin definitions
21import board
22
23# load the CircuitPython GPIO support
24import digitalio
25
26# load the CircuitPython NeoPixel output support
27import neopixel_write
28
29#---------------------------------------------------------------
30# The NeoPixel strand uses one GPIO output.  Note that in general it will need
31# separate 5V power, only the smallest arrays can use USB power.
32pixels = digitalio.DigitalInOut(board.GP13)
33pixels.direction = digitalio.Direction.OUTPUT
34
35# The number of NeoPixels must be specified, as they cannot be detected.  This
36# demo can support hundreds of NeoPixels: at 200 pixels, the frame rate is still
37# 30 Hz, at 400 pixels that drops to 17 Hz.  This could be improved: the data
38# rate is 800 kHz, so with a 30Hz frame rate the strand can theoretically be
39# 1100 pixels.
40num_pixels = 12
41
42# Create a buffer for storing a complete linear image.  The color order and
43# depth depends upon the specific devices, but are typically 3 bytes (24 bits)
44# per pixel in BGR order.  The first pixel data will apply to the first device
45# in the chain, the second to the next, etc.  Excess data will have no effect.
46# If less than a full frame is sent, the last pixels will not change.
47frame_buffer = bytearray(3*num_pixels)
48
49#---------------------------------------------------------------
50# Run the main loop to generate a sequence of frames as fast as possible.
51
52while True:
53
54    # generate the next frame based on the real-time clock value
55    now = time.monotonic_ns() / 1000
56
57    # generate a temporal color sequence with each component out of phase
58    red = int((now//11000) % 256)
59    grn = int((now//33000) % 256)
60    blu = int((now//55000) % 256)
61
62    # print(f"{red}, {grn}, {blu}")
63
64    # update the entire frame buffer including an additional position-dependent term
65    # to create spatial variation
66    for p in range(num_pixels):
67        frame_buffer[3*p]   = (grn + 12*p) % 256
68        frame_buffer[3*p+1] = (red + 12*p) % 256
69        frame_buffer[3*p+2] = (blu + 12*p) % 256
70
71    # transfer the new frame to the NeoPixel LED strand
72    neopixel_write.neopixel_write(pixels, frame_buffer)