Day 2: (Wed Aug 31, Week 1) Hobby Servo Motion
Notes for 2022-08-31.
New Assignments
New assignment, due Wed Sep 7: Exercise: Servo Motion with the Pico
Before the next class, please arrange access to SolidWorks 2022-2023 (the version now in the clusters). Here are several options:
by installing on your personal Windows laptop (notes)
by installing in personal Windows virtual machine (on any platform)
via the https://virtual.andrew.cmu.edu/ Engineering cluster
by borrowing an IDeATe Windows laptop
If you are new to SolidWorks 3D modeling, I highly recommend you go through the beginner tutorial available via CMU LinkedIn Learning (formerly Lynda). (Note that it does appear possible to use this without a LinkedIn account.) Here’s a starting point: Learning SOLIDWORKS. (two hours).
Administrative
Please note that Monday September 5 is Labor Day, no class.
Please test your ID card on the door lock and let me know if it doesn’t work.
Reminder: please stay on top of laser cutter qualification.
Agenda
Quick show of your Pico blink patterns.
Introduce the assignment.
Quick WordPress tour.
Precedent work.
Introduction to hobby servos.
Programming movement trajectories.
Discussion of functional program design.
Short break.
Introduction to ‘course kit’.
Soldering tutorial.
Hands-on experimentation.
Figures
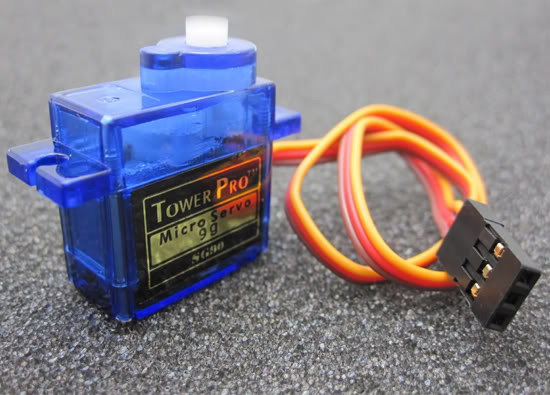
Micro-size hobby servo, a feedback-controlled device with integral driver.
Lecture code samples
See also Hobby Servo Examples - Raspberry Pi Pico.
 1# servo_step.py
 2#
 3# Raspberry Pi Pico - hobby servo motion demo
 4#
 5# Demonstrates stepping a hobby servo back and forth.
 6#
 7# This assumes a tiny 9G servo has been wired up to the Pico as follows:
 8#   Pico pin 40 (VBUS)  -> servo red   (+5V)
 9#   Pico pin 38 (GND)   -> servo brown (GND)
10#   Pico pin 1  (GP0)   -> servo orange (SIG)
11
12# links to CircuitPython module documentation:
13# time    https://circuitpython.readthedocs.io/en/latest/shared-bindings/time/index.html
14# math    https://circuitpython.readthedocs.io/en/latest/shared-bindings/math/index.html
15# board   https://circuitpython.readthedocs.io/en/latest/shared-bindings/board/index.html
16# pwmio   https://circuitpython.readthedocs.io/en/latest/shared-bindings/pwmio/index.html
17
18################################################################################
19# load standard Python modules
20import math, time
21
22# load the CircuitPython hardware definition module for pin definitions
23import board
24
25# load the CircuitPython pulse-width-modulation module for driving hardware
26import pwmio
27
28#--------------------------------------------------------------------------------
29# Define a function to issue a servo command by updating the PWM signal output.
30# This function maps an angle specified in degrees between 0 and 180 to a servo
31# command pulse width between 1 and 2 milliseconds, and then to the
32# corresponding duty cycle fraction, specified as a 16-bit fixed-point integer.
33# The optional pulse_rate argument specifies the pulse repetition rate in Hz
34# (pulses per second).
35
36def servo_write(servo, angle, pulse_rate=50, debug=False):
37    # calculate the desired pulse width in units of seconds
38    pulse_width  = 0.001 + angle * (0.001 / 180.0)
39
40    # calculate the duration in seconds of a single pulse cycle
41    cycle_period = 1.0 / pulse_rate
42
43    # calculate the desired ratio of pulse ON time to cycle duration
44    duty_cycle   = pulse_width / cycle_period
45
46    # convert the ratio into a 16-bit fixed point integer
47    duty_fixed   = int(2**16 * duty_cycle)
48
49    # limit the ratio range and apply to the hardware driver
50    servo.duty_cycle = min(max(duty_fixed, 0), 65535)
51
52    # print some diagnostics to the console
53    if debug:
54        print(f"Driving servo to angle {angle}")
55        print(f" Pulse width {pulse_width} seconds")
56        print(f" Duty cycle {duty_cycle}")
57        print(f" Command value {servo.duty_cycle}\n")
58
59#--------------------------------------------------------------------------------
60# Create a PWMOut object on Pin GP0 to drive the servo.
61servo = pwmio.PWMOut(board.GP0, duty_cycle=0, frequency=50)
62
63# Begin the main processing loop.
64while True:
65    servo_write(servo, 0.0, debug=True)
66    time.sleep(2.0)
67
68    servo_write(servo, 180.0, debug=True)
69    time.sleep(2.0)
  1# servo_sweep.py
  2#
  3# Raspberry Pi Pico - hobby servo motion demo
  4#
  5# Demonstrates smoothly moving a hobby servo back and forth.
  6#
  7# This assumes a tiny 9G servo has been wired up to the Pico as follows:
  8#   Pico pin 40 (VBUS)  -> servo red   (+5V)
  9#   Pico pin 38 (GND)   -> servo brown (GND)
 10#   Pico pin 1  (GP0)   -> servo orange (SIG)
 11
 12# links to CircuitPython module documentation:
 13# time    https://circuitpython.readthedocs.io/en/latest/shared-bindings/time/index.html
 14# math    https://circuitpython.readthedocs.io/en/latest/shared-bindings/math/index.html
 15# board   https://circuitpython.readthedocs.io/en/latest/shared-bindings/board/index.html
 16# pwmio   https://circuitpython.readthedocs.io/en/latest/shared-bindings/pwmio/index.html
 17
 18################################################################################
 19# print a banner as reminder of what code is loaded
 20print("Starting servo_sweep script.")
 21
 22# load standard Python modules
 23import math, time
 24
 25# load the CircuitPython hardware definition module for pin definitions
 26import board
 27
 28# load the CircuitPython pulse-width-modulation module for driving hardware
 29import pwmio
 30
 31#--------------------------------------------------------------------------------
 32# Class to represent a single hardware hobby servo.  This wraps up all the
 33# configuration information and current state into a single object.  The
 34# creation of the object also initializes the physical pin hardware.
 35
 36class Servo():
 37    def __init__(self, pin, pulse_rate=50):
 38        # Create a PWMOut object on the desired pin to drive the servo.
 39        # Note that the initial duty cycle of zero generates no pulses, which
 40        # for many servos will present as a quiescent low-power state.
 41        self.pwm = pwmio.PWMOut(board.GP0, duty_cycle=0, frequency=pulse_rate)
 42
 43        # Save the initialization arguments within the object for later reference.
 44        self.pin = pin
 45        self.pulse_rate = pulse_rate
 46
 47        # Initialize the other state variables.
 48        self.target = None    # target angle; None indicates the "OFF" state
 49        self.debug = False    # flag to control print output
 50
 51    def write(self, angle):
 52        # Object method to issue a servo command by updating the PWM signal
 53        # output.  This function maps an angle specified in degrees between 0
 54        # and 180 to a servo command pulse width between 1 and 2 milliseconds,
 55        # and then to the corresponding duty cycle fraction, specified as a
 56        # 16-bit fixed-point integer.  As a special case, an angle value of None
 57        # will turn off the output; many servos will then become backdrivable.
 58
 59        # calculate the desired pulse width in units of seconds
 60        if angle is None:
 61            pulse_width = 0.0
 62        else:
 63            pulse_width  = 0.001 + angle * (0.001 / 180.0)
 64
 65        # calculate the duration in seconds of a single pulse cycle
 66        cycle_period = 1.0 / self.pulse_rate
 67
 68        # calculate the desired ratio of pulse ON time to cycle duration
 69        duty_cycle   = pulse_width / cycle_period
 70
 71        # convert the ratio into a 16-bit fixed point integer
 72        duty_fixed   = int(2**16 * duty_cycle)
 73
 74        # limit the ratio range and apply to the hardware driver
 75        self.pwm.duty_cycle = min(max(duty_fixed, 0), 65535)
 76
 77        # save the target value in the object attribute (i.e. variable)
 78        self.target = angle
 79
 80        # if requested, print some diagnostics to the console
 81        if self.debug:
 82            print(f"Driving servo to angle {angle}")
 83            print(f" Pulse width {pulse_width} seconds")
 84            print(f" Duty cycle {duty_cycle}")
 85            print(f" Command value {self.pwm.duty_cycle}\n")
 86
 87#--------------------------------------------------------------------------------
 88# Movement primitive to smoothly move from a start to end angle at a constant rate.
 89# It does not return until the movement is complete.
 90# The angles are specified in degrees, the speed in degrees/second.
 91
 92def linear_move(servo, start, end, speed=60, update_rate=50):
 93    # Calculate the number of seconds to wait between target updates to allow
 94    # the motor to move.
 95    # Units:  seconds = 1.0 / (cycles/second)
 96    interval = 1.0 / update_rate
 97
 98    # Compute the size of each step in degrees.
 99    # Units:  degrees = (degrees/second) * second
100    step = speed * interval
101
102    # Output the start angle once before beginning the loop.  This guarantees at
103    # least one angle will be output even if the start and end are equal.
104    angle = start
105    servo.write(angle)
106
107    # Loop once for each incremental angle change.
108    while angle != end:
109        time.sleep(interval)            # pause for the sampling interval
110
111        # Update the target angle.  The positive and negative movement directions
112        # are treated separately.
113        if end >= start:
114            angle += step;              # movement in the positive direction
115            if angle > end:
116                angle = end             # end at an exact position
117        else:
118            angle -= step               # movement in the negative direction
119            if angle < end:
120                angle = end             # end at an exact position
121
122        servo.write(angle)              # update the hardware
123
124#--------------------------------------------------------------------------------
125# Movement primitive to generate a smooth oscillating movement by simulating a
126# spring-mass-damper system.  It does not return until the movement is complete.
127# This is an example of simple harmonic motion and uses a differential equation
128# to specify a motion implicitly.
129
130# The q_d parameter specifies the center angle of the oscillation, conceptually
131# is the angle of the simulated spring anchor point.
132
133# The default parameters were selected as follows:
134#   q    = 0.0          initial position
135#   qd   = 0.0          initial velocity
136#   k    = 4*pi*pi      spring constant for 1 Hz: freq = (1/2*pi) * sqrt(k/m); k = (freq*2*pi)^2
137#   b    = 2.0          damping constant
138
139def ringing_move(servo, q_d, q=0.0, qd=0.0, k=4*math.pi*math.pi, b=2.0,
140                 update_rate=50, duration=2.0, debug=False):
141    # Calculate the number of seconds to wait between target updates to allow
142    # the motor to move.
143    # Units:  seconds = 1.0 / (cycles/second)
144    interval = 1.0 / update_rate
145
146    while duration > 0.0:
147        # Calculate the acceleration.
148        #   qdd         acceleration in angles/sec^2
149        #   k           spring constant relating the acceleration to the angular displacement
150        #   b           damping constant relating the acceleration to velocity
151        qdd = k * (q_d - q) - b * qd
152
153        # integrate one time step using forward Euler integration
154        q  += qd  * interval    # position changes in proportion to velocity
155        qd += qdd * interval    # velocity changes in proportion to acceleration
156
157        # update the servo command with the new angle
158        servo.write(q)
159
160        # print the output for plotting if requested
161        if debug:
162            print(q)
163
164        # Delay to control timing.  This is an inexact strategy, since it doesn't account for
165        # any execution time of this function.
166        time.sleep(interval)
167
168        duration -= interval
169
170#--------------------------------------------------------------------------------
171
172# Create an object to represent a servo on the given hardware pin.
173print("Creating servo object.")
174servo = Servo(board.GP0)
175
176# Enable (voluminous) debugging output.
177# servo.debug = True
178
179# Begin the main processing loop.  This is structured as a looping script, since
180# each movement primitive 'blocks', i.e. doesn't return until the action is
181# finished.
182
183print("Starting main script.")
184while True:
185    # initial pause
186    time.sleep(2.0)
187
188    # begin the movement sequence, starting with some slow sweeps
189    print("Starting linear motions.")
190    linear_move(servo, 0.0, 180.0, speed=45)
191    linear_move(servo, 180.0, 0.0, speed=22.5)
192
193    # brief pause; stillness is the counterpoint
194    time.sleep(1.0)
195
196    # start bouncy oscillation movements
197    print("Starting ringing motions.")
198    ringing_move(servo, 90.0, duration=1.5)
199    ringing_move(servo, 45.0, duration=1.5)
200    ringing_move(servo, 90.0, duration=1.5)
201
202    # Final oscillation into a a grand pause at the end, but never actually
203    # stopping; stillness isn't necessarily stationary.  This also initializes
204    # the generator to begin the movement at the target angle, but with positive
205    # velocity.
206    print("Starting final ringing motion.")
207    ringing_move(servo, 90.0, q=90.0, qd=400, b=1.0, duration=12.0)