Abstract:
One of the core goals of our project was to explore how children would respond to the ‘indirect’ method of control we were presenting them with and also design our project to make it easier for the children to adapt to the idea of interacting with the box purely through marbles. Overall our box ended up highlighting ‘indirect’ experiences – the magnet mechanism, movable ramps, and toggling spinner all created an extra step between the children’s actions and the marble’s movement which we discovered was both a source of frustration and satisfaction for the children.
We observed that the children were either very receptive to our project, or got frustrated quickly. The older children tended to be more on the receptive side and seemed to enjoy the challenge of isolating their marble, going down difficult ramps, discovering each of the elements, and building their own structures.
How our project evolved:
Ideation:
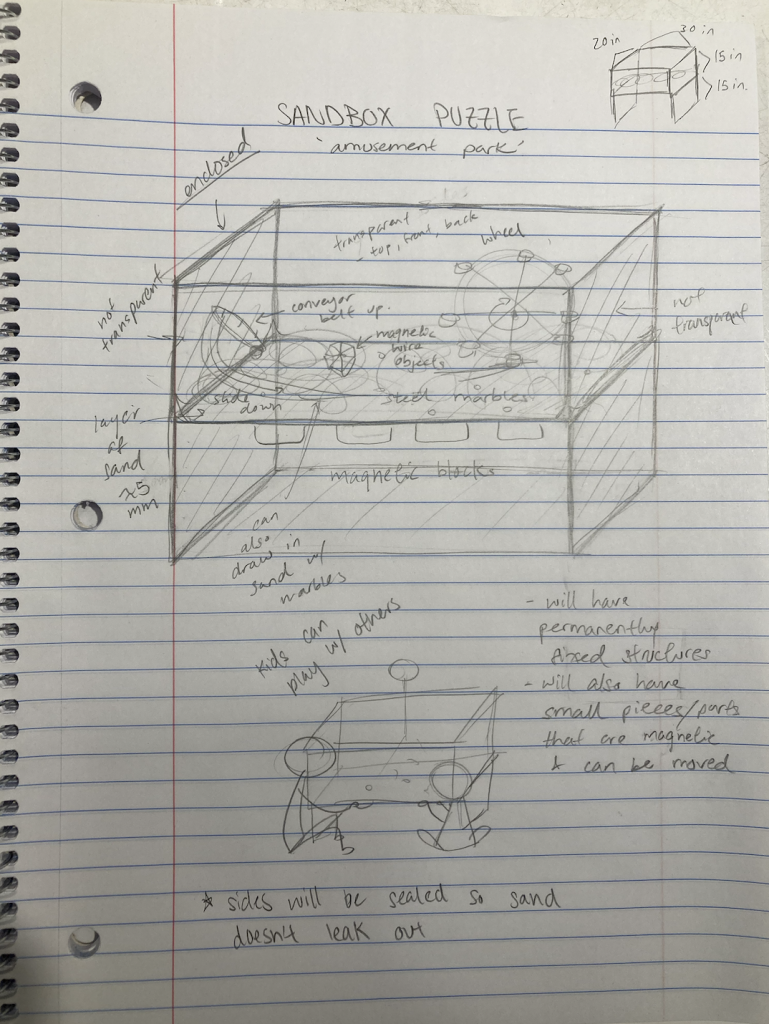
- a enclosed sandbox with components inside that can move marbles around
- magnetic blocks will be used to move the marbles
- one front view that’s the main interactive side, sides were initially not considered to be an interactive part

Reflections:
One major thing we did not consider during the ideation phase was how the marble’s movement up and into structures would be limited. For example, going up even extremely shallow ramps and being ‘scooped’ up were much more difficult to accomplish than we had anticipated. Thus, we ended up adjusting the contents of our box to take advantage of the wall space to move the marbles around.
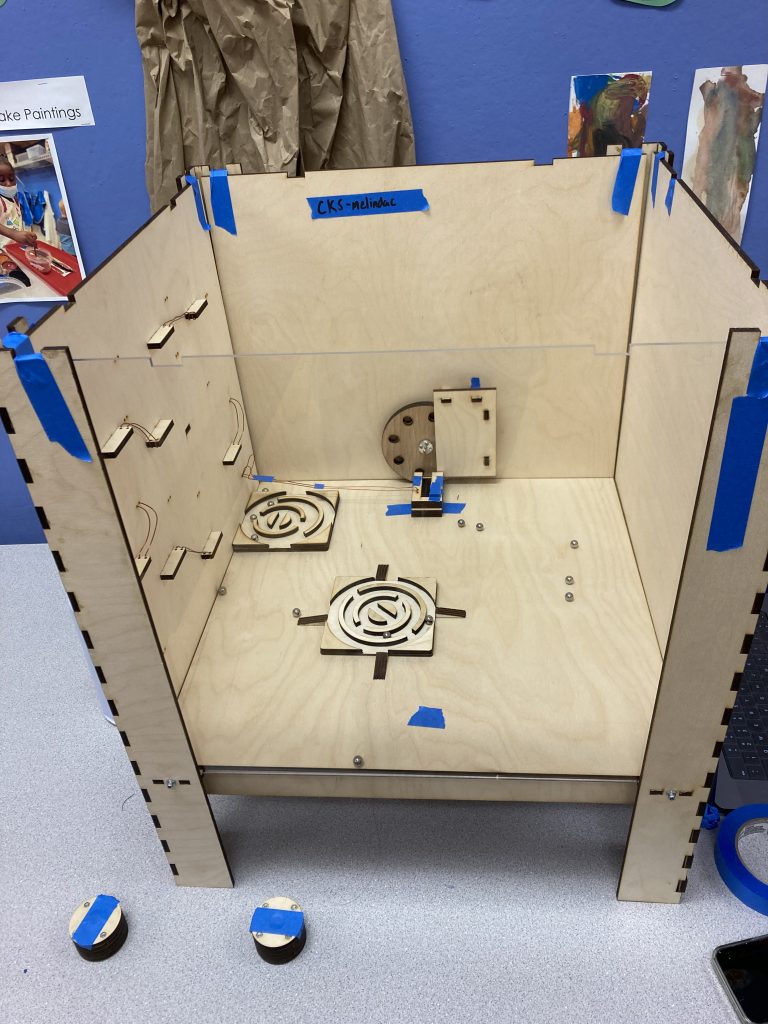
First Prototype:
- All made from plywood except one acrylic front side (cheaper to make)
- Children had trouble seeing where their magnets, which made it harder for them to control the marbles
- A square shape (cramped)
- 6mm plywood was thick and hard for magnets to hold a strong attraction to marbles
- Marbles could not get up ramps on the floor
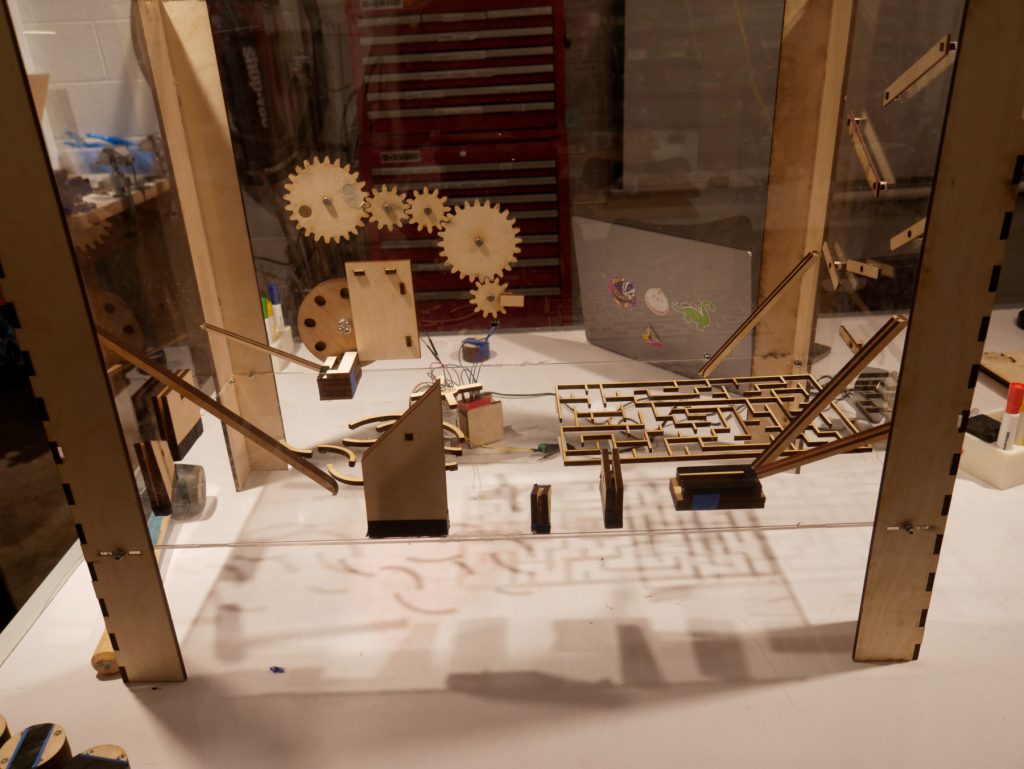
Final Prototype:
- 3mm acrylic sides and floor (easy visibility and thinner material so magnet are stronger at attracting marbles)
- Bigger in size and rectangular (less cramped, longer in length so more room for kids to play together, shorter in width so kids can actually reach more of the back of the box)


User-focused Goals of our Magnetic Marble Box Components:
- Children can learn how magnets work
- Children practice expressing their own creative freedom in maneuvering block pieces inside the box
- Children can explore different possibilities with how they can move the marbles around inside the box (up the walls, clumping them together, flinging the marbles across the box )
- Box is something that many kids can play with at the same time
Technical-focused Goals of our Magnetic Marble Box Components:
- Box is structurally sound and sturdy but does not interfere significantly with the user’s ability to navigate the floors and walls
- Some components should be motorized and capable of taking in user input
Implementation:
- Box Size:
- We wanted to make the box more rectangular than our first implementation so that
- Multiple kids can play at once
- Kids can actually reach to the back of the box from the front
- We wanted to make the box more rectangular than our first implementation so that
- Box Material:
- We realized that having the box mostly transparent helped the kids a lot by letting them see where their magnet is and where the marbles are. Kids are less likely to get discouraged from not being able to move the marbles
- We also removed the bottom supporting frame so that there’s no obstacle for kids to access the floor of the box
- We kept the material to 3mm acrylic
- Much cheaper
- Allows for stronger attraction between the magnet and the marbles
- Motorized Elements:
- The motorized wheel was created using two ‘Ferris wheel-esque’ pieces of plywood, one with circles for the marble to rest in (inner face), and the other with an ellipsoid shape (outer face). The outside edges of the ellipsoids and circles align such that as the wheel spins, a step emerges. Different thicknesses of plywood were chosen specifically such that the center of gravity of the marble would be past the step, forcing it to roll out of the wheel. This mechanism combined with a plywood shield on the rising edge resulted in a fairly reliable lifting and dropping motion.
- The photosensor controlled spinner embedded in the bottom of the box was created in response to the fact that marbles would often clump on a single magnet. The purpose of this component was to allow children to quickly disperse marbles from their magnet. The overall design of this component was quite simple – a 4-armed spinner attached to a motor and a photosensor embedded in the box’s wall. The main complexity of this component came from the magnet-actuated gear train which allowed users to turn on and off the motor inside from a relatively ‘remote’ location.
Outcomes:
- 3 and 4 year olds
- Most showed little interest after playing with the box for a few minutes
- There were a few outlier cases who seemed very interested in the underlying mechanisms of the box – however, even these individuals ran into issues with the components that needed higher levels of dexterity to operate
- Kindergarteners
- A higher retention rate, kids played with the box for longer and seemed more engaged and determined in accomplishing a certain goal (getting the marble through the maze, getting the marble into the ramp, etc.)
- Also more exploratory, kids were trying new things out in the box (building the ramps with the blocks, trying different things with the wheel on the floor)
- Examples of interesting/unexpected behaviors we saw:
- Attempting to put the marbles onto the gear train itself and either use the marbles to move the gears, or get the marbles to the end of the gear train
- ‘Capturing’ all available marbles with a single magnet
- Moving a marble/magnet pair to the very edge of the spinner in the base, causing the marble to be briefly pushed away before snapping back to the magnet (creating an almost-periodic response)
- Creating chains of marbles to lead through the maze
Future Works:
- Creating a unified theme or goal for the box to allow users to have an overall feeling of satisfaction after exploring every element
- Currently, the box is made up of separate components that work well individually but lack connection to other components in the box, ideally there would be an overall theme to the box in terms of marbles and magnets.
- Adding a wider spread of difficulty levels for the components – currently, the components either feel quite trivial or difficult to solve, so creating more ‘medium’ level exploratory opportunities would be helpful.
- Replacing some parts of the box with metallic (but non-magnetic) strips to reduce the chances of components clumping together
- Making better use of the airspace within the box, maybe adding trapeze-like components that can send a marble from one wall to another
Contibutions:
Jiatong: Ramp systems (both in-plane and perpendicular), movable ramp structures
Thanh: Box frame, magnet handles, maze
Melinda: Motorized wheel lift, gear train w/photosensor and base-embedded spinner
All: Overall ideation, research, and project assembly
Citations:
All references for code, technical documentation, and material concerns came from the CKS and Ideate websites
Similar artifacts include things like magnetically controlled tabletop games like the one linked below:
Supplementary Files:
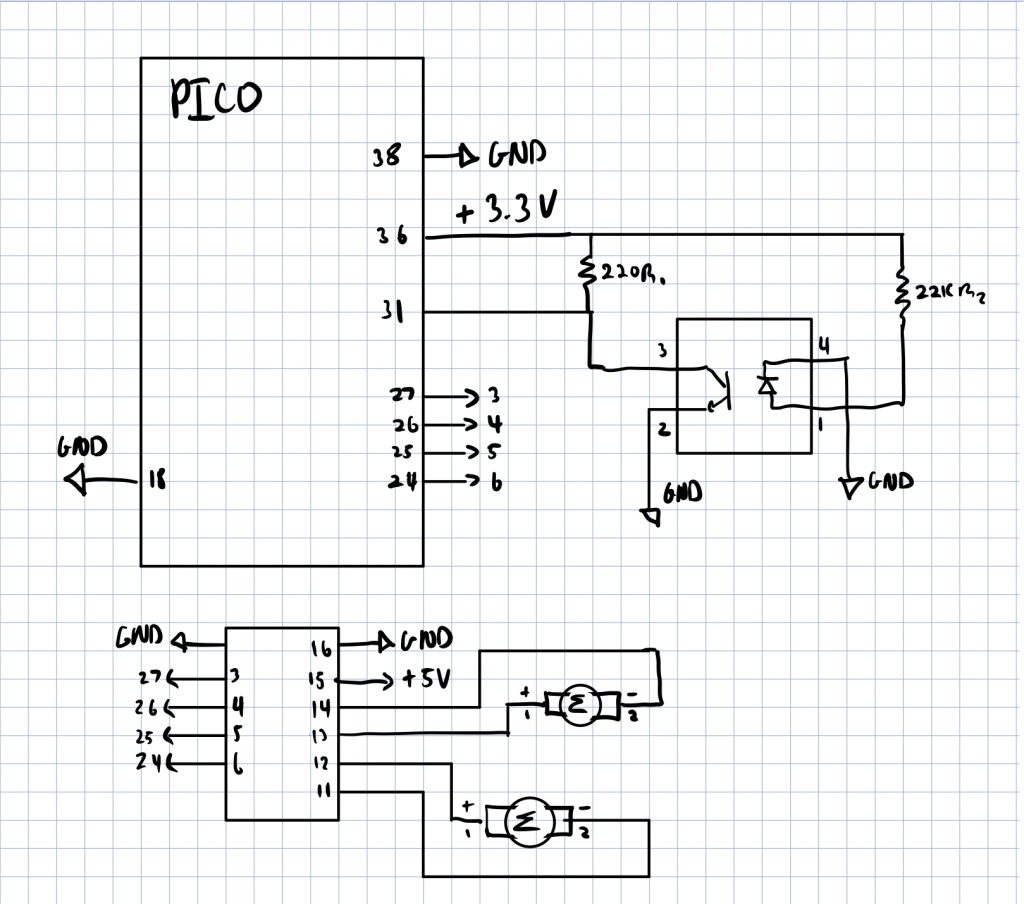
# Source Code:

# Driver Object
driver = DRV8833()
# Wall wheel spins continously
driver.write(1,-0.65)
# Sensor Object
sensor = analogio.AnalogIn(board.A0)

def getAmbientLighting():
    pool = 0
    for i in range(10):
        pool += sensor.value
        time.sleep(0.5)
    return (pool/10)

ambient = getAmbientLighting()

while True:
    sensor_level = sensor.value
    if sensor_level > ambient + 500:
        driver.write(0, 0.8)
    else:
        driver.write(0,0)
Leave a Reply
You must be logged in to post a comment.