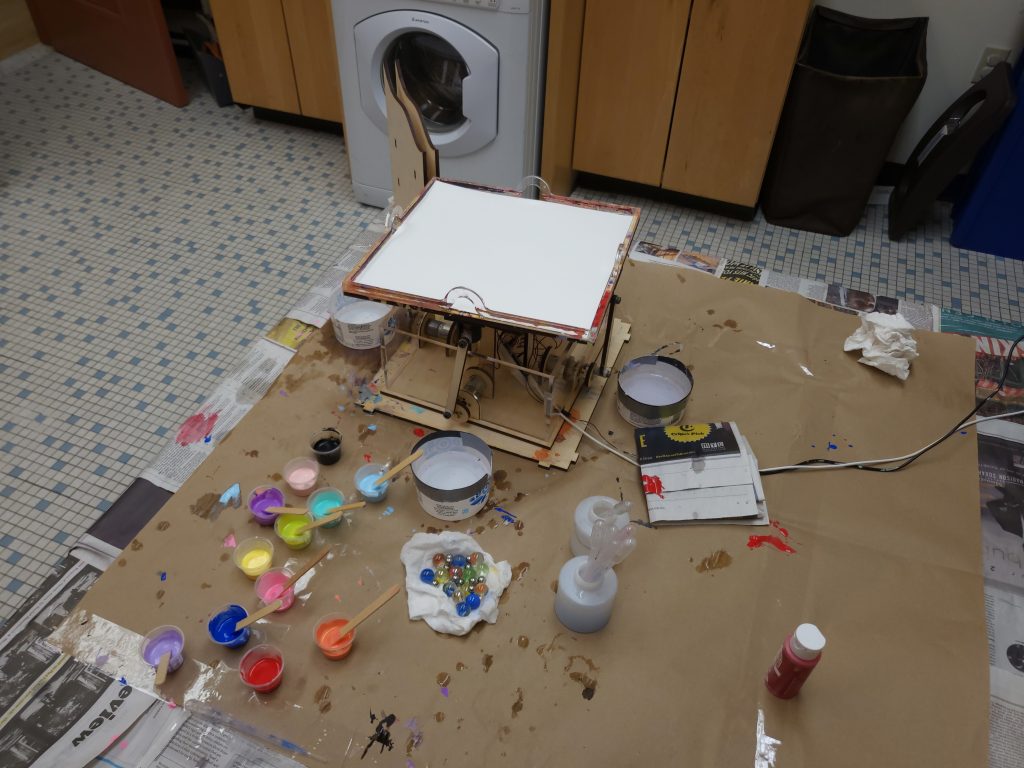
Marble Paint is a machine that allows you to paint with marbles using canvas movement. The whole machine consists of a canvas connected to 4 crank motion mechanisms moving in succession.
Objectives
- Create an interactive painting machine
- Allow the children to have artistic freedom
- Make the project easy to interact with
- Able to produce variety of paintings (paintings are not structured)
Implemntation and Outcome (from 1st visit)
The main part of our project consisted of 4 motors moving in crank motion, which would ultimately lift and lower the canvas in certain points. This allowed us to create a table tilt motion as well as have full control of the x and y axis tilt motions. To add additional support in the center, we supported the canvas on a universal joint which was connected to the canvas and the support beam. This prevented the spining of the canvas allowing it to be balanced while moving.

The children were able to actively interact with our project. There are some steps that are required to build up towards the moment of discovery for the children. We had to tell them the steps to get our project set up for them. Once they started to play with the marbles, the children found different ways to interact with the paint as well. We observed some children wanting to mix multiple colors of paint to color the canvas where some kids wanted to push the marble with their hands while it was on the canvas.

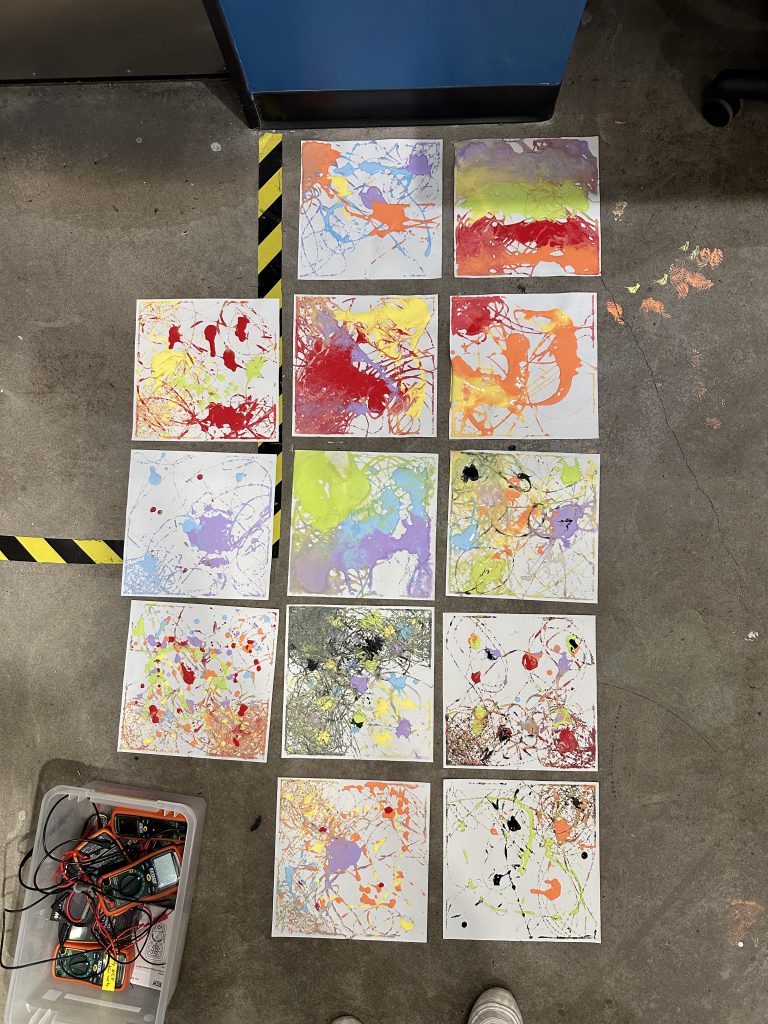
The pieces that the children created were really amazing but there was some difference between the preschoolers (3~4 year olds) and the kindergarten group. The older children were able to interact with the marble more in different ways causing the paintings to be more dynamic and have more lines and streaks.
Originally, we expected to have marble runs where the children would pour the paint and marbles onto the canvas. However, having the children pour their own paint and directly interact with the marbles allowed us to have more unique pieces. So we decided that we would keep the marble runs only to help the children drop the marbles onto the canvas. The children would ultimately pour the paint themselves and would drop the marbles using their hand or the marble runs.

Implementation and Outcome (from 2nd visit)
The 4-year-old children and kindergarteners were excited to see different strokes and color mixing whereas 3-year-old children enjoyed adding a lot of paint and marbles on the canvas.
Major additions to our project
- Pipets to put paint on canvas
- Barrier with 4 exit holes
- Water containers below the barrier’s exit holes
- A marble track
- Acryllic Shields for electronics

Pipets: A first, the kindergarteners were not as excited to use pipets to put paint on canvas because they had to wait for us to fill them with paint. When they got tired of waiting, they would grab pipets filled with water and put water on canvas. As a result, one of the groups created a puddle of mixed paint on canvas. Thus, we sped up the process of filling and washing pipets and handing them the marbles. We allowed them to keep adding color of their choice so they don’t get bored, which worked out. Over time, they started using pipets to put paint on different areas.

Barrier: We added a barrier so that the marbles stay on the canvas for a longer period of time. This worked but the kids’ level of patience would drop over time. They would eventually grab marbles from the canvas. Adding exit holes on the corners would have improved our project because that’s where marbles get stuck the most.
Water Containers: Most of the kids enjoyed watching the marbles fall into the water containers and grabbing marbles from the them. One of the kids didn’t like getting their hands wet, so we handed them the washed marbles.
Marble Track: We also introduced them to a track that they can use to create a different stroke of paint. They liked dropping and moving the marbles with their hands more than using this track. This could have been different if we had multiple tracks.
after 3 groups

Future Work
- Variety of motions
- Different ways of input: more marble tracks
- Smoothen the motion of the canvas
- Allow for more exit holes
- Larger scale/canvas
Code and Files from Project
# drv8833.py
#
# Raspberry Pi Pico - dual H-bridge motor driver support
#
# This module provides a class for controlling a DRV8833 dual H-bridge DC motor driver.
# This device can drive two low-power DC motor bidirectionally with variable speed.
#
# A typical usage requires four digital outputs.  The defaults assumes a Pololu
# DRV8833 dual motor driver has been wired up to the Pico as follows:
#   Pico pin 24, GPIO18   -> AIN1
#   Pico pin 25, GPIO19   -> AIN2
#   Pico pin 26, GPIO20   -> BIN2
#   Pico pin 27, GPIO21   -> BIN1
#   any Pico GND          -> GND

# DRV8833 carrier board: https://www.pololu.com/product/2130

################################################################
# CircuitPython module documentation:
# time    https://circuitpython.readthedocs.io/en/latest/shared-bindings/time/index.html
# math    https://circuitpython.readthedocs.io/en/latest/shared-bindings/math/index.html
# board   https://circuitpython.readthedocs.io/en/latest/shared-bindings/board/index.html
# pwmio   https://circuitpython.readthedocs.io/en/latest/shared-bindings/pwmio/index.html
#
# Driver lifecycle documentation:
# https://circuitpython.readthedocs.io/en/latest/docs/design_guide.html#lifetime-and-contextmanagers
#
################################################################################
# load standard Python modules
import math, time

# load the CircuitPython hardware definition module for pin definitions
import board

# load the CircuitPython pulse-width-modulation module for driving hardware
import pwmio

#--------------------------------------------------------------------------------
class DRV8833:
    def __init__(self,
                 AIN1=board.GP18, AIN2=board.GP19,  # control pins for motors 1,2
                 BIN2=board.GP20, BIN1=board.GP21,  # control pins for motors 3,4
                 pwm_rate=20000):
        """This class represents a single dual H-bridge driver.  It configures four pins
        for PWM output and can be used to control two DC motors bidirectionally
        at variable speed.

        N.B. this does not implement any other timing process, it simply sets
        motor PWM levels but does not apply feedback, duration, or trajectory.
        """
        self.ain1 = pwmio.PWMOut(AIN1, duty_cycle=0, frequency=pwm_rate)
        self.ain2 = pwmio.PWMOut(AIN2, duty_cycle=0, frequency=pwm_rate)

        self.bin1 = pwmio.PWMOut(BIN1, duty_cycle=0, frequency=pwm_rate)
        self.bin2 = pwmio.PWMOut(BIN2, duty_cycle=0, frequency=pwm_rate)

    def tilt_table(self, channel, rate):
        """Set the speed and direction on a single motor channel.

        :param int channel:  0 for motor A, 1 for motor B
        :param float rate: modulation value between -1.0 and 1.0, full reverse to full forward."""

        # convert the rate into a 16-bit fixed point integer
        pwm1 = min(max(int(2**16 * abs(rate)), 0), 52000)
        pwm2 = min(max(int(2**16 * abs(rate)), 0), 52000)


        if channel == 0:
            self.ain1.duty_cycle = 0
            self.ain2.duty_cycle = pwm1
            self.bin1.duty_cycle = 0
            self.bin2.duty_cycle = pwm2

    def roll_x(self, channel, rate):
        """Set the speed and direction on a single motor channel.

        :param int channel:  0 for motor A, 1 for motor B
        :param float rate: modulation value between -1.0 and 1.0, full reverse to full forward."""

        # convert the rate into a 16-bit fixed point integer
        pwm = min(max(int(2**16 * abs(rate)), 0), 52000)


        if channel == 0:
            self.ain1.duty_cycle = 0
            self.ain2.duty_cycle = pwm
            self.bin1.duty_cycle = 0
            self.bin2.duty_cycle = 0

    def roll_y(self, channel, rate):
        """Set the speed and direction on a single motor channel.

        :param int channel:  0 for motor A, 1 for motor B
        :param float rate: modulation value between -1.0 and 1.0, full reverse to full forward."""

        # convert the rate into a 16-bit fixed point integer
        pwm = min(max(int(2**16 * abs(rate)), 0), 52000)


        if channel == 0:
            self.ain1.duty_cycle = 0
            self.ain2.duty_cycle = 0
            self.bin1.duty_cycle = 0
            self.bin2.duty_cycle = pwm


    def deinit(self):
        """Manage resource release as part of object lifecycle."""
        self.ain1.deinit()
        self.ain2.deinit()
        self.bin1.deinit()
        self.bin2.deinit()
        self.ain1 = None
        self.ain2 = None
        self.bin1 = None
        self.bin2 = None

    def __enter__(self):
        return self

    def __exit__(self):
        # Automatically deinitializes the hardware when exiting a context.
        self.deinit()
# photomotor.py
#
# Raspberry Pi Pico - photointerrupter and DC motordemo
#
# Demonstrates operating a DC motors driven by a DRV8833 based
# on a photointerrupter signal.
#
# This assumes a photointerrupter circuit is wired to analog input 0.
#
# This assumes a Pololu DRV8833 dual motor driver has been wired up to the Pico as follows:
#   Pico pin 24, GPIO18   -> AIN1
#   Pico pin 25, GPIO19   -> AIN2
#   Pico pin 26, GPIO20   -> BIN2
#   Pico pin 27, GPIO21   -> BIN1
#   any Pico GND          -> GND
# DRV8833 carrier board: https://www.pololu.com/product/2130

################################################################
# CircuitPython module documentation:
# time    https://circuitpython.readthedocs.io/en/latest/shared-bindings/time/index.html
# math    https://circuitpython.readthedocs.io/en/latest/shared-bindings/math/index.html
# board   https://circuitpython.readthedocs.io/en/latest/shared-bindings/board/index.html
# pwmio   https://circuitpython.readthedocs.io/en/latest/shared-bindings/pwmio/index.html

################################################################################
# print a banner as reminder of what code is loaded
print("Starting photomotor script.")

# load standard Python modules
import math, time

# load the CircuitPython hardware definition module for pin definitions
import board

# load the CircuitPython interface to the analog-to-digital converter
import analogio

# load the CircuitPython pulse-width-modulation module for driving hardware
import pwmio

# load the drv8833.py module, which should be copied to the top-level of CIRCUITPY
from drv8833 import DRV8833

#--------------------------------------------------------------------------------
# Create an object to represent a dual motor driver.
print("Creating driver object.")
driver = DRV8833()

# Create an object to represent the ADC0 input, which is physically pin 31.
# E.g., this may be attached to photocell or photointerrupter with associated pullup resistor.
sensor = analogio.AnalogIn(board.A0)


#--------------------------------------------------------------------------------
# Begin the main processing loop.  This is structured as a looping script, since
# each movement primitive 'blocks', i.e. doesn't return until the action is
# finished.

print("Starting main script.")
while True:

    # Set the motor speed.

    driver.tilt_table(0, 1)
    time.sleep(4.3)
    driver.roll_x(0, 1)
    time.sleep(3.0)
    driver.tilt_table(0, 1)
    time.sleep(4.7)
    driver.roll_y(0, 1)
    time.sleep(3.0)
Pictures and Videos from Showcase


Leave a Reply
You must be logged in to post a comment.