Exercise: Sensors Duo
For this exercise, students will work in pairs to create a simulated performance in which two machines interact by using sensor information to create reactive behaviors. The machines should have identical physical form but may use different control strategies to create personality and implicit dialogue.
The creative objective is an understanding that we perceive the inner state of humans, animals, and machines by observing what they do and how they react. Adding even a single sensor to a robot creates opportunities for its behavior to change in response to an environment which can include other robots and people. A pair of robots communicating physicallya can also create opportunities for human interaction by safely interposing the human between the robots.
Following are some suggested starting points:
create movements with a sense of individual identity
embody empathy and communication in movement
portray the locus of attention via gesture and pose
illustrate a process of turn-taking
imply a dialogue
express a relationship
More inspirations:
Contents
Background
The technical objective of this exercise is an exploration of sensors and feedback. We will use both proprioceptive sensing that measures the internal state of a robot and exterioceptive sensors which measure a property of the environment.
Control theory is a vast body of work concerned with stabilizing dynamic systems. Familiar applications range from a home thermostat regulating temperature to a rocket nozzle actuator stabilizing and steering a launch.
In general, a system (also called a plant or process) is stabilized by adding sensing, actuation, and a control system with either analog or digital computation. The general idea is that an unstable system can be stabilized by adding a control loop to create a composite system with new dynamics. The control system is parameterized with gains to allow tuning the controlled dynamics.
Most common definitions of robot include some element of sensing and responding to the world. In many actual robots, this sensing is purely internal in the form of control feedback which regulates movement to achieve a specified position goal, target velocity, or trajectory. This feedback uses proprioceptive sensors to measure joint positions, applies a control model to compute appropriate actuator commands for a known physical system, and then applies force via the actuators. If it works, the mechanism moves closer to the goal state and errors are reduced. If the disturbances are too great, the process can fail to achieve the target or become unstable.
The ideas behind feedback predate robotics: a classic example is the flyball governor, invented in 1788 to regulate steam engine speed. The ideas have been generalized broadly beyond mechanical systems in the study of cybernetics.
A controller ‘closes the loop’ by creating a cyclical energetic and informational pathway including both a process and a representation of that process in the controller. In this view, cause and effect is not well-defined: if the mechanism encounters a disturbance, then the controller will respond with increased torque. Likewise, if the program chooses a new position target, the controller will respond with torque. In equilibrium, both disturbances and goals affect the balance of the system, with the intent of converging in a stable way toward an objective. But the resulting behavior is the composite of both ‘intent’ and ‘reaction’.
One outcome is that even simple feedback-controlled devices can be easily interpreted as ‘alive’ or having ‘purpose’ in the right context, and this effect is what this exercise is intended to explore.
Relevant terms: proportional control, PID control, degree of freedom (DOF), closed-loop control, position target, goal, disturbance, error signal, stability, bandwidth, lag, set point.
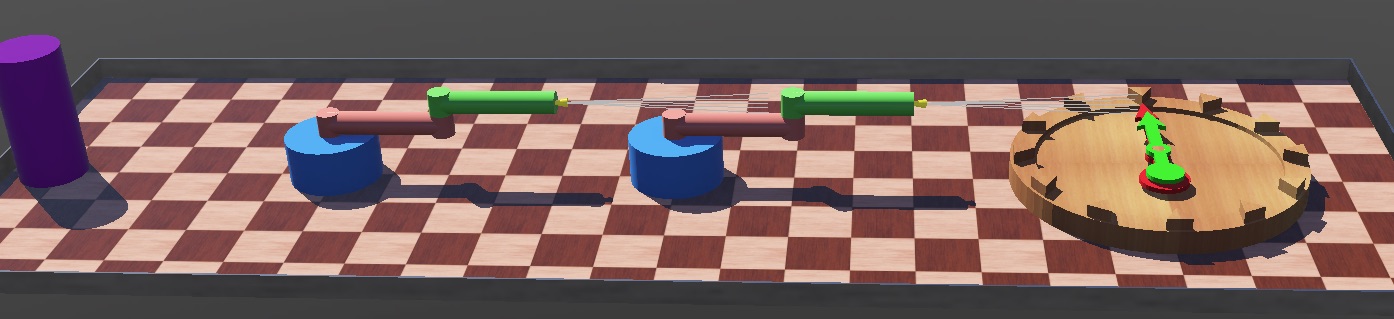
Screenshot of sample Webots project including several two-link arms and a clock. All robots are shown in the neutral pose.
Objectives
After this exercise, you should be able to:
Tune the gains of a single-axis PD servo.
Attach a simulated external range sensor to a simulated robot.
Formulate a set of single-axis control functions to produce reactive behavior.
Formulate a two-agent narrative as a choreographic concept which can be translated into behaviors.
Implement feedback control in simulation.
Reference Guides
Please review the following reference guides as needed:
Documentation on the sample robots:
Resources
The sample Webots world is included in the reference project Webots.zip described under Webots Robot Simulator Examples.
The sample model is documented in Two-Link Robot Model.
Webots/worlds/controls-demo.wbt: sample world file, opening it should launch the simulatorWebots/controllers/clock/clock.py: Python script demonstrating single-axis controlWebots/controllers/two_link/two_link.py: placeholder Python script implementing a passive motionWebots/controllers/two_link_sensor/two_link_sensor.py: sample Python script implementing a reactive behavior
Warmup: Setting Clock Gains
Low-level motor control is not an emphasis of this course, but it is worth a little time to explore the effects of adjusting controller gains. The objective of this warm-up is to experiment with a single-axis controller and discover the relationship between proportional and derivative gains. This isn’t meant to take more than a few minutes.
Please follow these steps:
Open the controls-demo.wbt world file.
Focus your attention on the clock. Please note you can right-click it and select “Move Viewpoint to Object.”
Run the simulation once: you should see the hands slowly converge to the current wall clock time after a lot of oscillation.
Open the controller code. Please note you may right-click on the clock in the scene tree and select “Edit Controller Code.”
Find the initialization of the P_gain and D_gain variables.
Try a damping (D_gain) of 0.05, restarting the simulator to observe the start-up transient.
Experiment a bit with both P and D gains to see the outcome, restarting the simulator each time. E.g., what happens with a negative D_gain?
What P and D would you choose, and for what effect?
Preparation: Adding a Sensor and Environment
The objective is instrument a robot model for a chosen task and implement a switching or linear controller. You may either use the provided models or add instrumentation to your own. Please keep the overall interaction goal in mind; the robots will need to be able to sense some moving part of each other.
Please follow these steps to start:
Open the controls-demo.wbt world file.
Examine the left two-link robot in the scene tree. It was generated using the two-link.proto file, so the structure is not shown, just the user-accessible parameters.
Try right-clicking the robot and selecting ‘Convert to Base Node(s)’. The robot should be expanded into a full node tree.
Locate the DistanceSensor node. It is one of the children of the link2 Solid node, as it is attached to the link2 body; you’ll need to walk out through kinematics tree to find it.
The yellow cone representing the sensor is a Shape node that is a child of the DistanceSensor node.
The maximum range of the sensor is expressed via its lookupTable property.
If you wish to add a sensor to your own robot, the simplest way would be to copy and paste this DistanceSensor node as a child of a Solid in your own model.
After setting up the sensor, if you wish you may add additional Solid nodes at top level to represent other props. With top-level solids, if the boundingObject is set but not the physics, it will be immovable but still participate in collisions.
Choreography: Implementing Reactive Behavior Dialogue
The objective is to set up a pair of control processes which respond to external robots and props via distance sensor readings as a means of creating a generative performance which expresses a non-verbal dialogue.
To start, I suggest a focus on switching functions rather than linear feedback. The essential idea is that different states of the robot and outside world are mapped to different discrete control outputs. These solutions can be hard to treat analytically and are prone to defects such as instability or getting stuck, but can be intuitive to formulate and suited for empirical development.
The two_link_sensor.py script in the sample world contains one such controller. It implements a heuristic switching controller which locates nearby obstacles for short intervals. It has a ‘hunt’ mode in which it scans for range readings, and a ‘track’ mode where it attempts to oscillate around a local minimum of the distance function.
Deliverables
Each pair should post a brief report as a post on the RCP project site with the following:
A brief description of the clock control gains you picked for the warmup and why you liked the result.
A paragraph briefly describing your performance objectives and outcomes.
Short video clip (under one minute) of simulated behavior. The course site can directly host MP4 videos up to 16 MB. Larger files should be hosted using a streaming service.
Zip file of your Webots project. For uploaded files, please add your preferred names as a prefix on the filename to help me keep them straight.