When I first saw this video, I was shocked that there was 45 minutes worth of content just on different ways to connect wires. I kind of agree with a lot of his thoughts on the usefulness of the different types of connectors, specifically the “chocolate bar” connector. It just seems very bulky and hard to use compared to other connectors like the ones with “springy bits”. In my experience, screw terminals don’t hold wires very well so my favorite connector by far was the one where you stick the screw driver in but the wire in and then take the screw driver out and the springy bit clamps onto the wire. I thought the waterproof clamp was cool too given how easy it looks to connect for the protection it provides.
Author: jkyle1@andrew.cmu.edu
Assignment 4 – James Kyle
Automatic Blinds Adjuster:
Description:
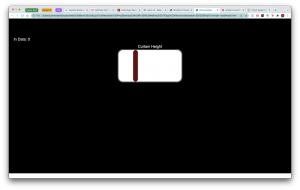
The device I decided to make is an automatic blinds adjuster for people who may have a hard time maneuvering to a window to adjust their blinds. The user can either use a theoretical slider on a wall somewhere that would change the slide position on the webpage or they could use the webpage to adjust the blinds height.
I had some trouble integrating both ways into one script so I have split the Arduino to p5.js and p5.js to Arduino parts for the purpose of this post.
Arduino to p5.js:
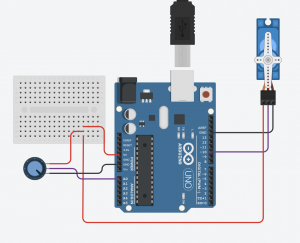
The user can adjust the slider on the webpage with a theoretical slider represented by a potentiometer.
Video Demo:
p5.js Code:
var serial;   // variable to hold an instance of the serialport library

// for macos and *nix, you'll do something like this:
//var portName = '/dev/cu.usbserial-DN01DW79';    // fill in your serial port name here

// for windows, just the COM port you're using
var portName = '/dev/tty.usbmodem14101';

var inData = 0;   // variable to hold the input data from Arduino

var minWidth = 600;   //set min width and height for canvas
var minHeight = 400;
var width, height;    // actual width and height for the sketch

var sliderWidth = 30;
var sliderHeight = 200;
var slideLength = 400;
var outlineWeight = 10;
var sliderStartX;
var sliderX;
var sliderY = 200;
var sliderClicked = 0;


function setup() {
  // set the canvas to match the window size
  if (window.innerWidth > minWidth){
    width = window.innerWidth;
  } else {
    width = minWidth;
  }
  if (window.innerHeight > minHeight) {
    height = window.innerHeight;
  } else {
    height = minHeight;
  }

  sliderStartX = width/2 - slideLength/2;
  sliderX = sliderStartX;

  //set up canvas
  createCanvas(width, height);
  noStroke();

  //set up communication port
  serial = new p5.SerialPort();       // make a new instance of the serialport library
  serial.on('list', printList);  // set a callback function for the serialport list event
  serial.on('connected', serverConnected); // callback for connecting to the server
  serial.on('open', portOpen);        // callback for the port opening
  serial.on('data', serialEvent);     // callback for when new data arrives
  serial.on('error', serialError);    // callback for errors
  serial.on('close', portClose);      // callback for the port closing

  serial.list();                      // list the serial ports
  serial.open(portName);              // open a serial port
}

function draw() {
  // set background to black
  background(0);
  fill(255);
  textSize(24);
  textAlign(CENTER, BOTTOM);
  text("Curtain Height", sliderStartX + slideLength/2, sliderY - outlineWeight);


  //-----Draw Slider-----//
  updateSlider();

}

// Following functions print the serial communication status to the console for debugging purposes

function printList(portList) {
 // portList is an array of serial port names
 for (var i = 0; i < portList.length; i++) {
 // Display the list the console:
 print(i + " " + portList[i]);
 }
}

function serverConnected() {
  print('connected to server.');
}

function portOpen() {
  print('the serial port opened.')
}

function serialEvent() {
    // on the arduino we are using Serial.write to send an inteer
    // so we have to use Number() to convert it to a number.
    // otherwise it would be a string
    inData = serial.readLine();
    //  if you do this, the inData value will be a string, not a number
    //
    //inData = serial.read();
    //
    // in arduino terms it's
    // int inData = 1;
    // vs
    // String inData = "1';

}

function serialError(err) {
  print('Something went wrong with the serial port. ' + err);
}

function portClose() {
  print('The serial port closed.');
}

function updateSlider() {

  serial.write(parseInt(map(sliderX, sliderStartX, sliderStartX+slideLength-sliderWidth, 0, 1023)));
  text("Value: " + parseInt(map(sliderX, sliderStartX, sliderStartX+slideLength-sliderWidth, 0, 1023)), sliderStartX + slideLength/2, 70);


  //This section is commented out for the p5.js to arduino configuration

  // if (!sliderClicked && inData != sliderX){
  //   sliderX = map(inData, 0, 180, sliderStartX, sliderStartX+slideLength);
  // }

  //Background
  fill(100);
  rect(sliderStartX - outlineWeight/2, sliderY - outlineWeight/2, slideLength + outlineWeight, sliderHeight + outlineWeight,30);
  fill(255);
  rect(sliderStartX, sliderY, slideLength, sliderHeight,30);

  //Slider
  fill(100, 10, 10);
  rect(sliderX, sliderY, sliderWidth, sliderHeight,30);

}


function mousePressed() {

  sliderClicked = isInRectangle(mouseX, mouseY, sliderY, (sliderY + sliderHeight), sliderX, (sliderX + sliderWidth));

  if (sliderClicked) {
    if (inBounds(mouseX, sliderStartX, sliderStartX + slideLength - sliderWidth)){
      sliderX = mouseX;
    }
  }

}


function mouseDragged() {

  if (sliderClicked) {
    if (inBounds(mouseX, sliderStartX, sliderStartX + slideLength - sliderWidth)){
      sliderX = mouseX;
    }
  }
}


function inBounds(value, lowerBound, upperBound) {
  if ((value > lowerBound) && (value < upperBound)) {
    return 1;
  } else {
    return 0;
  }
}


function isInRectangle(x, y, topBound, bottomBound, leftBound, rightBound) {

  let xInRect = inBounds(x, leftBound, rightBound);
  let yInRect = inBounds(y, topBound, bottomBound);

  if (xInRect && yInRect) {

    return 1;

  } else {

    return 0;
  }

}
Arduino Code:
#include <Servo.h>

const int POT_PIN = A0;
const int SERVO_PIN = 10;

int incomingData = 0;
int potVal;
int newHeight;
int prevHeight = 0;

Servo curtainHeight;


void setup() {
  Serial.begin(9600);

  pinMode(LED_PIN, OUTPUT);
  pinMode(POT_PIN, INPUT);

  curtainHeight.attach(SERVO_PIN);


}

void loop() {
  // this sends the sensorValue as a raw int

  //LED state changes
  if (Serial.available() > 0) {
    incomingData = Serial.parseInt();
    newHeight = map(incomingData, 0, 1023, 0, 180);
    curtainHeight.write(newHeight);

  } else {
    newHeight = map(analogRead(POT_PIN), 0, 1023, 0, 180);
    if (abs(prevHeight - newHeight) > 2) {
      curtainHeight.write(newHeight);
      Serial.println(newHeight);
      prevHeight = newHeight;
    }
  }

}
p5.js to Arduino:
The user can also use the slider on the interface to adjust the blind height from a potential website. I was not able to get this part to work as I was having a little trouble figuring out how to read data from p5.js in Arduino. The code and setup are the same as for the Arduino to p5.js case.
Fun With Interrupts – James Kyle
How it works:
I played around with buttons switches and potentiometers to change light blinking patterns and came up with this circuit. The switch has an interrupt which changes whether all lights blink at the same time or different times (a blink mode). The button changes which light blinks in the event that they are not blinking at the same time. The potentiometer changes the speed at which the lights blink.
I had some trouble with getting the switch interrupt to work more than once and I ended up having to place it before the button interrupt which I assume prioritizes it.
Code:
int toggle_color = 3;
int GREEN_LED = 7;
int YELLOW_LED = 6;
int RED_LED = 5;
int POT = A0;
int blink_rate = 250;
int toggle_blinkMode = 2;


//LED blinking variables
volatile int LED_pin = 5;
volatile bool individual_blink;


//Debounce variables
volatile unsigned long last_press = 0;
int wait_time = 50;


void setup() {

  Serial.begin(9600);

  //Initializing Pins
  pinMode(GREEN_LED, OUTPUT);
  pinMode(YELLOW_LED, OUTPUT);
  pinMode(RED_LED, OUTPUT);

  pinMode(toggle_color, INPUT_PULLUP);
  pinMode(POT, INPUT);


  //Interrupt initialization
  attachInterrupt(digitalPinToInterrupt(toggle_blinkMode), blinkMode, CHANGE);
  attachInterrupt(digitalPinToInterrupt(toggle_color), switchLED, CHANGE);


}

void switchLED() {

  //Turn off previous light
  digitalWrite(LED_pin, LOW);

  //Debounce
  if ((millis() - last_press) >= wait_time) {
    LED_pin++;
    last_press = millis();
  }

  //Go back to first light
  if (LED_pin > 7) {
    LED_pin = 5;
  }


}

void blinkMode() {

  if (individual_blink) {
    individual_blink = 0;
  } else {
    individual_blink = 1;
  }

}

void loop() {

  blink_rate = map(analogRead(POT), 0, 255, 100, 500);

  if (individual_blink) {
    digitalWrite(LED_pin, HIGH);
    delay(blink_rate);
    digitalWrite(LED_pin, LOW);
    delay(blink_rate);
  } else {
    digitalWrite(RED_LED, HIGH);
    digitalWrite(GREEN_LED, HIGH);
    digitalWrite(YELLOW_LED, HIGH);
    delay(blink_rate);
    digitalWrite(RED_LED, LOW);
    digitalWrite(GREEN_LED, LOW);
    digitalWrite(YELLOW_LED, LOW);
    delay(blink_rate);
  }

  bool value = individual_blink;
  Serial.println(value);


}
Assignment 2 – James Kyle
Some interrupts in daily life:
-
- The urge to drink water
- The sunset – indicates it’s time to go home
- A notification on your phone (quite literally an interrupt)
- Gas light in your car – tells you it’s time to fill up
Thoughts on Make it So:
The reading talks a lot about how science fiction and design are symbiotic in nature because of the way that they both influence each other. I thought this cat and mouse description of the way designers and science fiction writers interact was interesting because they are in competition to push the future to customers but it’s not necessarily clear whether the fiction or the design comes first. I also liked the way they explained how design frequently follows science fiction because it is a way of determining what products will succeed. If a work of fiction does well, i.e. Star Trek, then maybe products from that universe will also do well. I think the idea of using what already exists is a powerful tool because I feel like as an engineer myself I often get caught up in trying to design a solution from end to end (which is quite inefficient and not very successful) instead of leveraging what has already created to actually make something new.
I also liked the note about feedback and time delay when they talk about minimizing the time between a users action and the systems reaction. The field of haptics relies on this minimization of interaction and system reaction in order to convey realism from electromechanical systems so it makes sense that the same rule applies in visual mediums as well.
Assignment 1 – James Kyle
Design for Dreaming:
In Design for Dreaming, there is a large focus on technology that will make our lives more luxurious and efficient like cars and smart kitchens. The MCU focuses on efficiency as well but more so in the sense of militaristic efficiency. A lot of the advancements that drive the storylines like Iron Man’s suit and the super soldier technology from Captain America were created to make fighting battles easier, not to make baking a cake less of a hassle. Another major difference I noticed was that the machines from Design for Dreaming were a lot more practical than what is presented in the MCU. A car or kitchen gadget sounds a lot more realistic than a hammer that is sentient enough to tell if you’re worthy of holding it. Some of the futuristic things that Marvel presents are more fantastical than science fiction.
Useful interaction:
Thinking about what a smarter doorbell could look like beyond just having a camera, I came upon the idea for a doorbell that acts kind of like a doorman or front desk at an apartment complex. I think having a doorbell that communicates with anyone who stops at a door and relays their purpose to whoever they are there to see would be really useful, especially to the visually impaired who might have a harder time navigating to the doorbell (let alone the right one if there are multiple buttons for different tenants).
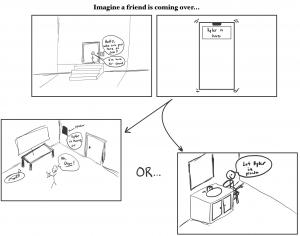
This design requires arduinos capable of connecting to the internet, a proximity sensor, some speakers, a microphone, and a display.
When the person approaches the door and waits there, the proximity sensor wakes up the device and produces a sound to ask the person who they are there to see. The device would record the name and both send it to the resident as a text and relay the name through speakers in the house. The resident can let the person in remotely or physically go to the door to open it.