When I first saw this video, I was shocked that there was 45 minutes worth of content just on different ways to connect wires. I kind of agree with a lot of his thoughts on the usefulness of the different types of connectors, specifically the “chocolate bar” connector. It just seems very bulky and hard to use compared to other connectors like the ones with “springy bits”. In my experience, screw terminals don’t hold wires very well so my favorite connector by far was the one where you stick the screw driver in but the wire in and then take the screw driver out and the springy bit clamps onto the wire. I thought the waterproof clamp was cool too given how easy it looks to connect for the protection it provides.
Month: February 2022
Photocopier How It Works
Watching the video I had a rough idea of how copiers worked in the modern era with sensors that sense the image and convert it into a file which it can then print multiple times. This was completely different to how photocopiers actually ran in the past which was very interesting to me. The way that one would photocopy something in the past would use a fine layer of powder deposited onto the piece of paper through a series of electrode wires and rollers. The paper would then run past a heater which would melt the toner onto the paper resulting in the final product. While watching him describe this process, the fact that papers came out warm from printers made so much more sense. The complex mechanical processes behind these printers was also very interesting to look at and learn about. I never realized how mechanically intensive the printing process used to be up until very recently. Finally, I thought the process of using electrons to transfer the negative an image was very interesting because it made for some movie magic like videos. For instance, when he would transfer the image onto the selenium, there would be nothing visible until he poured the powder on top and only where the charge remained would the powder stick. I thought this process was very cool.
Class Notes, 15 Feb, 2022
Note: Office hours on Tuesday, no Thursday
Intro to Electricity and Power
Start with example using light and power
100w incandescent bulb
23w LED bulb
120v 20a electrical circuit
wattage — what does it really mean? Is a 100W incandescent bulb brighter than a 23W LED?
Compute amps based on wattage and 120v power.
Same brightness but different amounts of power, meaning LEDs are more efficient:
100W incandescent bulb ~1A
24W LED bulb ~0.2A
How things move
Think about power in the physical world:
voltage => weight
amps => speed
I weigh 85 kilos, how “dangerous” am I if I bump in to you while I’m walking? While I’m running?
Is voltage dangerous or is amperage dangerous?
Bicycles vs. cars. Hit by a car or a bike at 10mph, which is worse? Is it really voltage or amps?
Handheld 50 KW stun gun. 500 times as strong as strong as a 100W light bulb. Why doesn’t it kill people?
Think about volts vs. amps. Where does the power come from?
Mine uses two 9V batteries, the ones you use in consumer electronics. 50KW is more like 50KV at 1 Amp, or 100Kv at 0.5 Amps.
Where we get power
A/C wall power to drive power supplies (PSUs).
DC power from a PSU, from 5V to 12V, we use 6V in class.
USB power converted by Arduinos or other devices
Arduino pins only have a tiny amount of power: 5V at 20 mA (milliamp).
How motors work
How to determine power requirements
How to drive servos vs. DC motors
Spring-loaded solenoids that require constant power to stay open/closed
How do you lock a motor and prevent it from turning?
What happens if you spin a DC motor? It’s now a DC generator and could fry your Arduino. We “fix” this using diodes in the circuits.
For moving things, use basic physics
- gears — FAQ on 3d printing gears
- levers — drive a lever with a solenoid, transfer short movement to long
- pulleys – drive with DC motors or stepper
A great guide for animated mechanisms: http://507movements.com/index02.html
Reading/Watching Assignment
“The Secret Life of” was a British TV series by Tim Hunkin. He now has a Youtube channel and a new series, “The Secret Life of Components“. Each of the eight episodes is about 45 minutes long. Pick the one you know the least about, watch it, and post comments here or in Looking Outward
Assignment 5 – Jud
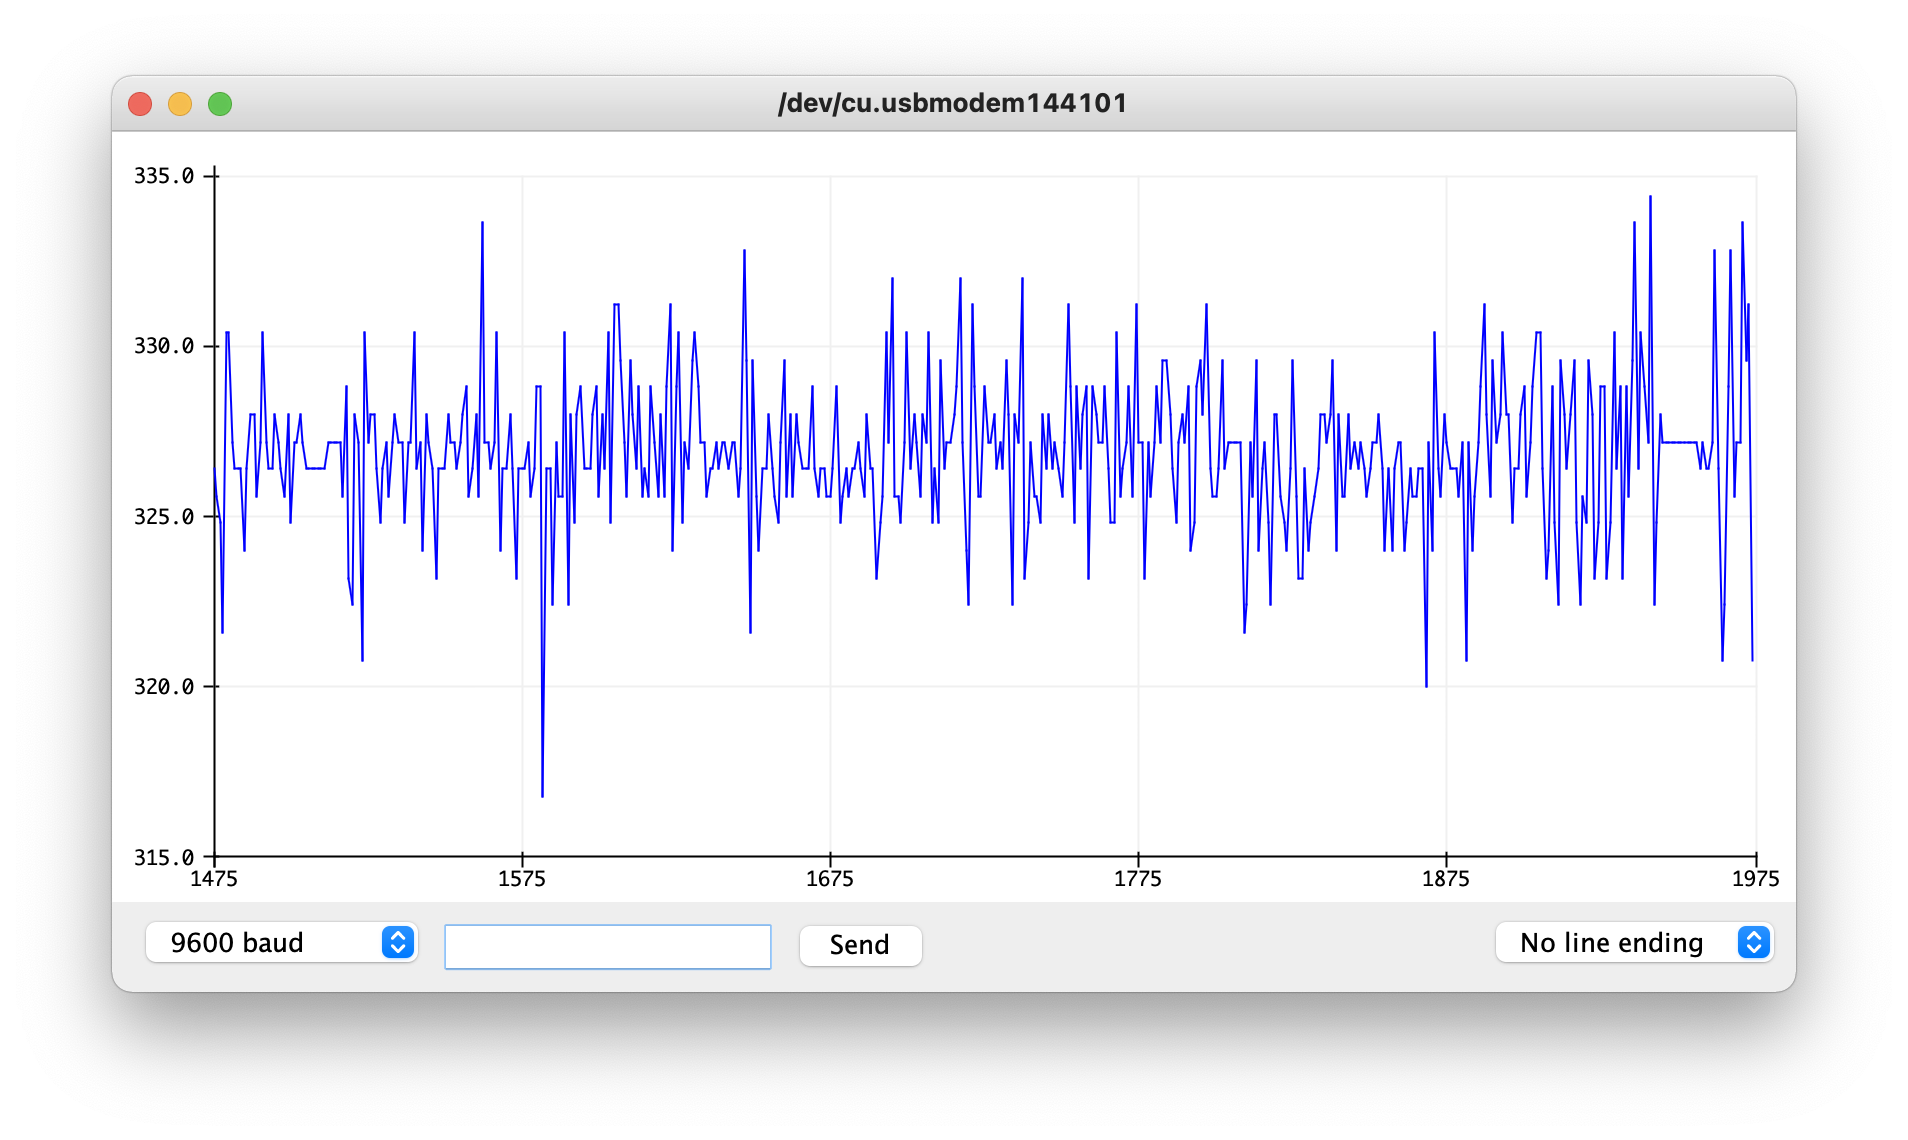
The idea for this sensor reading is to read the noise level in a room and detect whether it would be damaging to someone’s hearing. For the average human ear, a sustained noise level over 70dB or a burst of sound over 120dB can cause harm to the human ear. In order to counteract this, I used a speaker sensor connected to an Arduino to read the noise level in a room and decide whether either of these conditions have been met. If they have then an LED would turn on. So far I have gotten the speaker to read data but I haven’t been able to translate this data into decibels at the moment. The sensor I am currently using measures the noise level in its output by varying the signal to a degree relative to the amount of noise being detected. So if there is a high noise level, the sensor gives data that looks like the following:
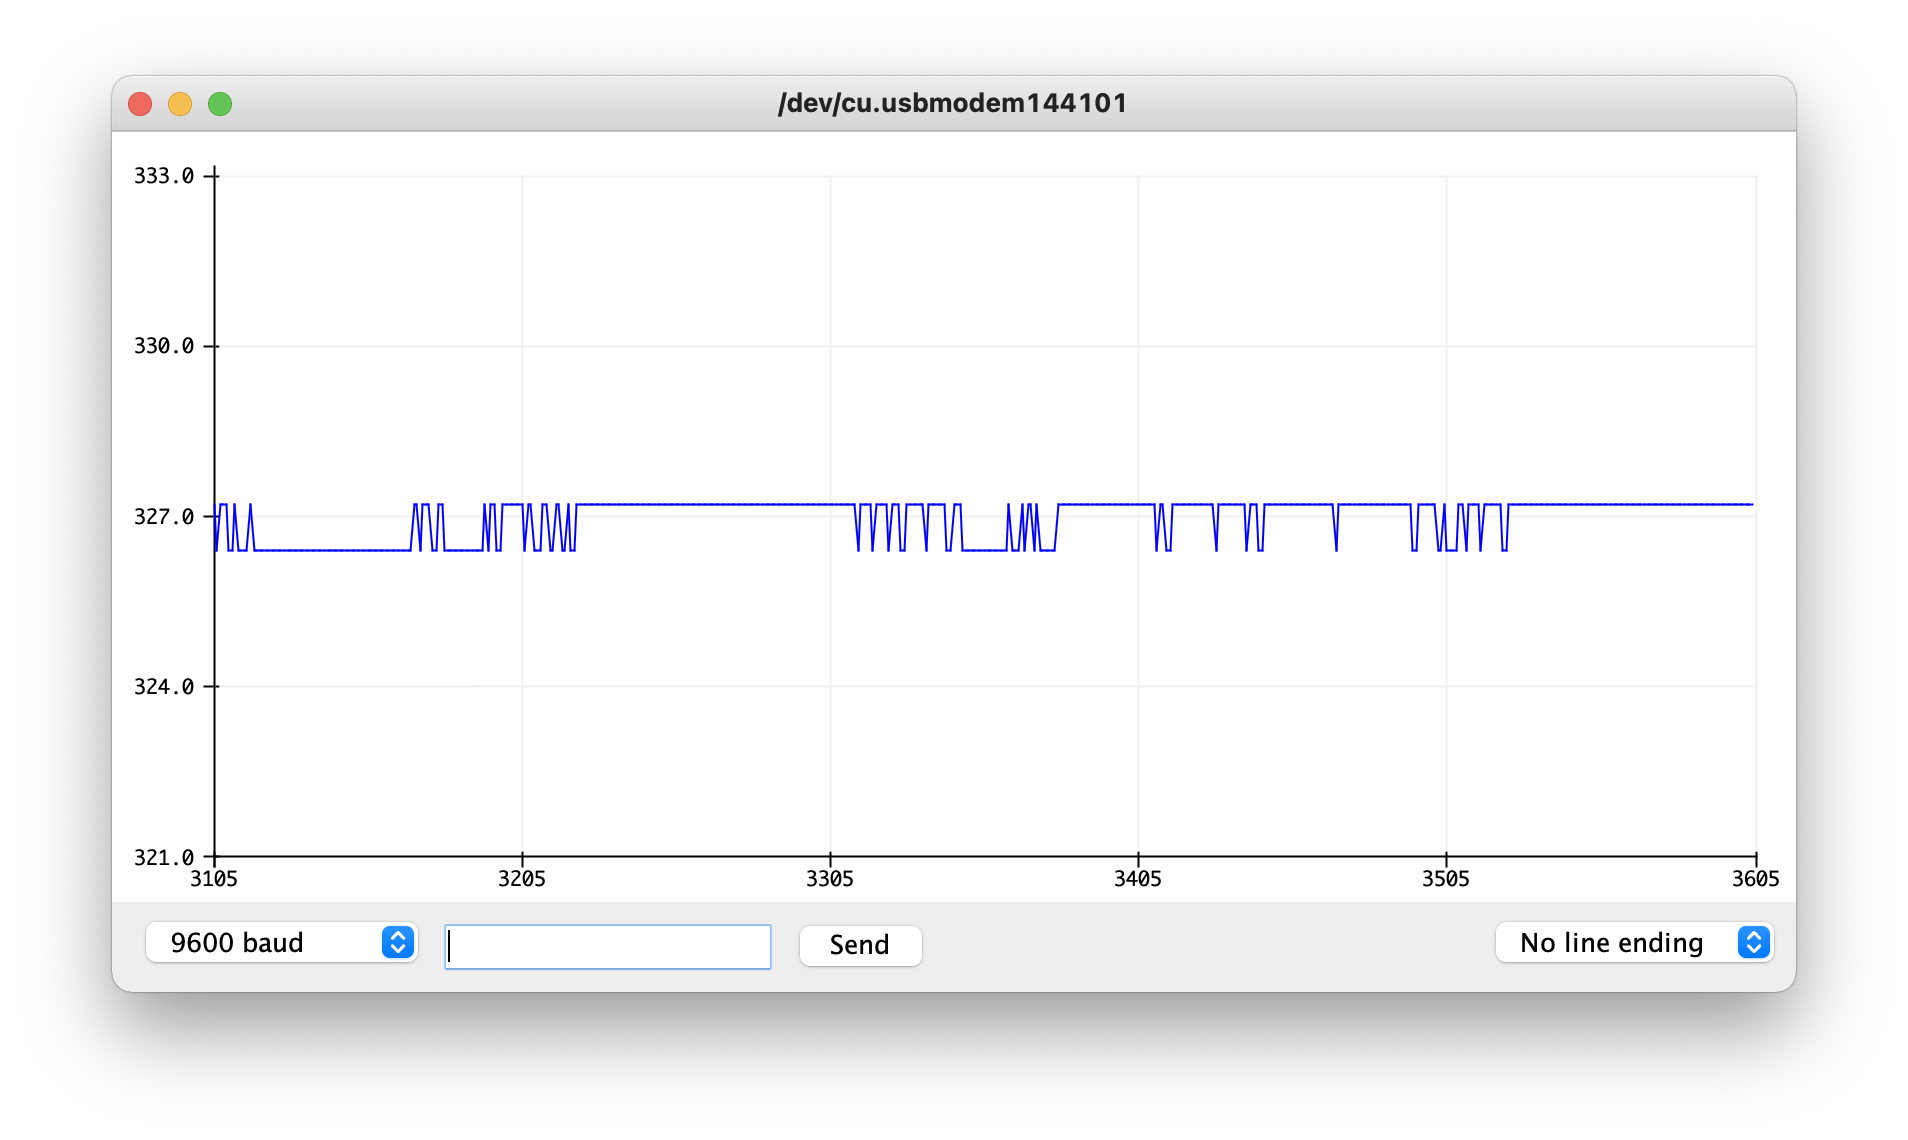
If there is a low noise output, the data looks more uniform like a straight line.
I attempted to write a script that would look at the change in this data and use a filter to smooth the delta calculation but this didn’t work very well when I tried it out. My next idea would be to take a moving average of the data over time and then take the max and min of that range as the magnitude of the noise level. With this magnitude, it could then be converted into decibels through tuning of an equation.
//Define Accelerometer Variables for pins
#define MICROPHONE   A0

double speakerLevel = 0;
double prevSpeakerLevel = 0;
double delta = 0;
double prevDelta = 0;

double alpha = 0.8;


void setup() {
  //Setup pins as inputs

  pinMode(MICROPHONE, INPUT);

  Serial.begin(9600);

}

void loop() {

  speakerLevel = analogRead(MICROPHONE);
  delta = abs(speakerLevel - prevSpeakerLevel);

  speakerLevel = alpha*speakerLevel + (1-alpha)*prevSpeakerLevel;

  delta = alpha*delta + (1-alpha)*prevDelta;

  prevDelta = delta;

  Serial.println(speakerLevel);
//  Serial.println(delta);

}
Motion-Sensor(?) Split Flap
I was staying at this hotel for work and I was convinced this was a motion-sensor split flap, since it never seemed to turn on until I rounded the corner into the elevator bank. The flaps make a very satisfying noise- a homage to the train station boards. There is a link to a video that I took below. According to the article posted below, it’s on a timer, not a motion sensor, but at the time, I thought it was a cool use of a motion sensor.
Assignment 5: Smoothing Sensor Data
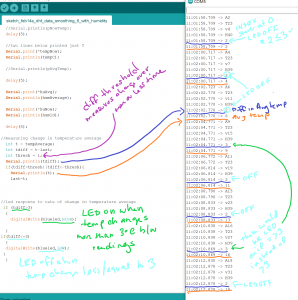
For assignment 5, I sampled temperature and humidity data points from the DHT22 sensor to create average temperature and humidity values. I used the serial monitor within Arduino IDE to follow changes in values and added characters to distinguish visually between temperature, temperature average, humidity, and humidity averages within the serial monitor.
Then I used the values from the average temperature (with an average of 10 data points) to calculate a temperature change over a period of values. If the temperature change was greater than 3 degrees within the specified sampling period, the ‘alarm’ (an LED light) would turn on. It would turn off again when the temperature change fell below 3 degrees.
The limitations of this method are that slow and steady change in one direction to an average may not be detected. The data smoothing is desirable to avoid ‘blips’ from occurring, but it may be preferable for environmental alarms (temperature, smoke, etc) to compare their average sampling to a constant value that reflects the preferred conditions – not only a rapid change in values. As observed in the paragraph above, when using this technique, the ‘alarm’ turns off if the temperature change falls back below the threshold of acceptable change. This may or may not be desirable, depending on the response needed.
Final Code:
#include <DHT.h>
#include <DHT_U.h>
#define DHTPIN 2        // sensor DHT22 data connected to Arduino pin 2
#define DHTTYPE DHT22  // using sensor DHT22


DHT dht(DHTPIN, DHTTYPE);  //dht library
int chk;
int humid; //stores humidity
int tempC; //stores temperature
int tempF; //stores temp in F


//data smoothing
//based on https://docs.arduino.cc/built-in-examples/analog/Smoothing
//include dht library
//note this tutorial is for analog sensors not digital like the dht22

const int numReadings = 10;
int tempReadings [numReadings];
int tempReadIndex = 0;
int tempTotal = 0;
int tempAverage = 0;


int humReadings [numReadings];
int humReadIndex=0;
int humTotal = 0;
int humAverage = 0;


int inputPin= 2; //put sensor pin here

//const char tNow="Temperature: ";
//const char tAvg="Average Temperature: ";

//4 lines below only print T, A, H, and v
const char*tempNow="Temperature: ";
const char*tempAvg="Average Temperature: ";
const char *huNow="Humidity: ";
const char *huAvg="verage Humidity: ";

//detecting sensor change
int last;

//response to sensor change
int blueled=10;

void setup() {

  // put your setup code here, to run once:
  Serial.begin(9600);
  dht.begin();

  //for response to sensor change
  pinMode(blueled,OUTPUT);

  for (int thisReading = 0; thisReading < numReadings; thisReading++) {
    tempReadings[thisReading]= 0;
    humReadings[thisReading]=0;
    //placing humreadings below temp readings does not appear to work
    //humReadings[thisReading]=0;
  //for (int hThisReading = 0; hThisReading < numReadings; hThisReading++) {
    //humReadings[hThisReading]= 0;

  }

}

void loop() {
  // put your main code here, to run repeatedly:

humid=dht.readHumidity();
tempC=dht.readTemperature();
//tempF=(tempC*1.8)+32;
//Serial.write(tempC);
delay(2000);
//delay needed for p5js to recieve 2 values separately
//Serial.write(humid);
//delay(1000);

  tempTotal = tempTotal - tempReadings[tempReadIndex];
  //need 2 reads start with one use temp
  tempReadings[tempReadIndex] = tempC;
  tempTotal = tempTotal + tempReadings [tempReadIndex];
  tempReadIndex = tempReadIndex + 1;

  if (tempReadIndex >= numReadings) {
    tempReadIndex = 0;

  }

  tempAverage = tempTotal / numReadings;

  humTotal = humTotal - humReadings[humReadIndex];
  humReadings[humReadIndex] = humid;
  humTotal = humTotal + humReadings [humReadIndex];
  humReadIndex = humReadIndex + 1;


  if (humReadIndex >= numReadings) {
    humReadIndex=0;
  }

  humAverage = humTotal / numReadings;


//printing to serial monitor

  //const char* pNowTemp = tNow + tempC;
  //const char* pAvgTemp = tAvg + tempAverage;
  //setDisplayToString(pNowTemp);
  //tempAverage.setDisplayToString(pAvgTemp);
  //Serial.print(f'Avg: ');

  //one line below printed just A
  Serial.print(*tempAvg);
  Serial.println(tempAverage);

  //Serial.print(F('Average temperature {tempAverage}'));
  //Serial.print(F('Average temperature:'));
  //Serial.println(tempAverage);

  //Serial.println(pNowTemp);
  delay(5);

  //two lines below printed just T
  Serial.print(*tempNow);
  Serial.println(tempC);

  //Serial.println(pAvgTemp);

  delay(5);

  Serial.print(*huAvg);
  Serial.println(humAverage);

  Serial.print(*huNow);
  Serial.println(humid);

  delay(5);

//measuring change in temperature average
  int t = tempAverage;
  int tdiff = t-last;
  int thresh = 1;
  Serial.println(tdiff);
  //this statement could be simplified, need to do it for all tdiff values
  if(tdiff>thresh||tdiff<=thresh){
    Serial.println(t);
    last=t;


//led response to rate of change in temperature average
 if (tdiff>=3)
  {
    digitalWrite(blueled,HIGH);

  }
if(tdiff<3)
  {
  digitalWrite(blueled,LOW);
 }
  }


}
Process Notes:
Identifying Change in Average Temperature Value
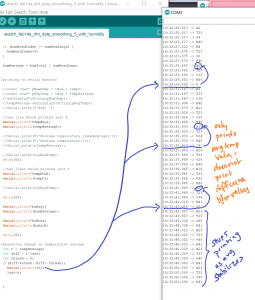
Printing Change in Average Temperature Value
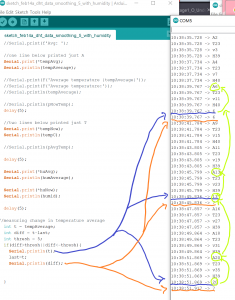
LED on/off with Changes in Average Temperature Value
LED doesn’t turn off when Change in Average Temperature = 0
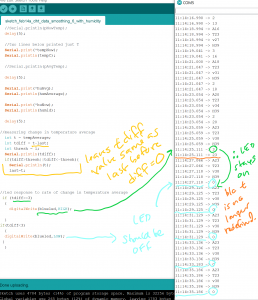
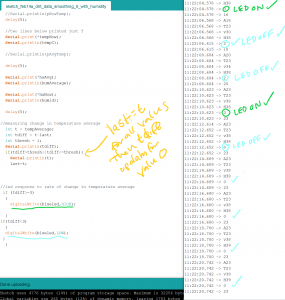
Solution: Turning Off LED when Change = 0
Assignment 5: smooth and parse data then display a result
Take physical input over time from sensor(s), smooth and parse the data in way to make it usable/accessible.
You can “fake” sensors for safety. If you want to make a “smoke detector” detect the relative humidity and note significant changes (like from taking a shower) as if they were dangerous levels of smoke.
Interaction has emotional meaning. Can you create an emotional data feed? An emotional output?
Due by midnight, Monday, 14 Feb, 2022
Class Notes, 10 Feb 2022
Class 8: 10 Feb
Going forward, verify that your camera is not set to “HD” in Zoom. I disabled this tonight and things went much better than expected.
Correction for previous lecture! You do use Serial.print() and Serial.write() to send info to p5.js. When you’re doing this, you can’t use Serial methods for “printf debugging”.
Types of Input
Using sound / music as an example:
- monophonic: wind instruments, voice. Easy to detect pitch/volume.
polyphonic: keyboards, pianos, organs, stringed instruments. Hard to detect pitch/volume of a single note, but easy to detect volume of a collection of instruments.
Anthropomorphic inputs
respond to human state/condition: blood pressure, galvanic skin response, breath rate, pulse rate.
Visual interpretation of secondary movements: eye twitch, touching your face, blinking
Tracking “rapid eye movement” when eyes are closed, like REM when you’re asleep is used in PTSD therapy EMDR. https://en.wikipedia.org/wiki/Eye_movement_desensitization_and_reprocessing. This is a recently developed form of therapy and treatment for PTSD and requires trained human therapists.
Alternatively, you can make art out it: http://www.flong.com/archive/projects/optoisolator/index.html
SparkFun’s biometric sensors: https://www.sparkfun.com/categories/146
More kinetic output
There is a lot of work in this area to provide accessibility for people with limited vision or blind people. Please watch all of these, we didn’t have time to show them all in class.
- tactile maps for the blind
- presentation of research data on tactile map comparison
- tactile graphics using “swell paper”
- 3d printing reference objects for the blind — what does a snowflake look like? A butterfly? A sailboat?
Accessibility and HCI
In 1968, Doug Englebart demonstrated the first “workstation”. It’s a long watch but I think at least the first half will give you a lot of ideas on how to pitch a novel technological concept. The important bit about accessibility starts about 30 minutes in when they show the interface. https://www.youtube.com/watch?v=yJDv-zdhzMY
Using this workstation requires sight, hearing, and functioning hands/fingers/feet.
Accessibility vs. Inclusion
What makes something accessible? Is Universal Design also accessibility?
Inclusion ==> inviting, making someone want to participate. How do you invite someone to provide input / direction?
Are 30mm arcade buttons are accessible? Interrupt or constant? Convex or concave? If you want to use Universal Design, how do you decide how big the button should be and where it’s located?
There’s a wide variety of arcade push buttons. Are controls like buttons the wrong answer? Is a better way to collect input?
Physical interaction with temperature
There are some serious things to consider when working with temperature. Basically, “what happens if this breaks, has bugs, or completely fails?” Can someone be injured?
Maybe you need temperature control in your project? Adam Savage made 2001:Space Odyssey suits for Comic-Con that required a costume cooling vest. He actually made two, the other was for Astronaut Chris Hadfield(!) who provides good feedback. This is another one to watch all the way through, there’s a lot of design/fabrication skills shown off.
There’s also a commercial alternative for performers.
Coaching vs. grading
Think about coaching, providing good feedback and encouragement to take a positive action.
Example: sports trainer that monitors your HR, BP, breathing rate, and hydration and knows your training course. It encourages you to do better instead of punishing you for not doing enough.
Example: music “coach” that helps you learn to perform music. Watches your body and helps you correct form/posture. Reminds you that you are always performing, even when you’re just practicing a scale or an etude.
Alice Miller’s “For Your Own Good“, a criticism arguing that we replace the pedagogy of punishment with support for learning, using the German pedagogy that gave rise to support of fascism as one study
Assignment 5 has requirements in its own post.
Class Notes, 8 Feb 2022
Class recording check your email for the pass code.
Kinetics Introduction
When we’re working with kinetics it’s important to remember:
- size of physical control vs. input
- size of physical control vs. output
Tactile controls are great for fine control, refinement, or when we need detailed feedback. They an also be used for coarse controls: on/off switches, radio buttons.
Controls can be stylistic or skeumorphic. Why does a Starfleet vessel have touchscreens (LCARS) everywhere but the warp engines are driven by a 20th century ship’s throttle?
Mix mechanical and virtual controls where appropriate
Mechanical controls are better for some uses, though they can’t as easily serve multiple functions. Non-mechanical controls, like touch-screen buttons, are easier to change into other controls but don’t offer the same kind of haptic feedback, making them impossible to identify without looking at them and creating questions about whether they’ve been actuated. Design interfaces with an appropriate combination that best fits the various uses and characteristics.
Types of kinetic output
- vibration
- thumps, pokes
- can we use temperature? something like peltier boards?
- symbols: Braille, history of Braille and printed shapes of letters for the blind in early books
- Braille readers today
Inputs for kinetic
One of the problems with kinetic inputs is errors/noise in the data.
One tool is basic stats, looking at the standard deviation helps us filter data. If you have a temperature sensor for your office that occasionally returns temps below freezing or above boiling, what do you do with that data?
Another tool is smoothing and filtering incoming data
We’re talking about data over time, that gets in to the idea of languages:
- signal encodings like Morse code. People have “accents” in how they generate Morse code by hand, WWI and WWII radio monitors learned who they were listening to. “That’s Hans, he always radios from western German between midnight and 4 am.”
- pattern recognition: what does walk feel like? Run? What do crying and laughing sound like relative to speech?
- earthquake pattern recognition
- meaning generated by content that changes over time, poetry
Haptic/touch vs. objects moving in space
How is touching a person different than moving an object?
Person presses a button vs. wind from a heating vent spinning a fan sensor?
Touch can be wrapped in a robotic device to convey emotion: Paro (wiki) trade show demo.
Mini exercise for Looking Out
Find some examples of data over time to use in accessibility. No weather, no stock prices, will explain why on Thu.
Making An Open Window More Accessible
Making An Open Window More Accessible
Description:
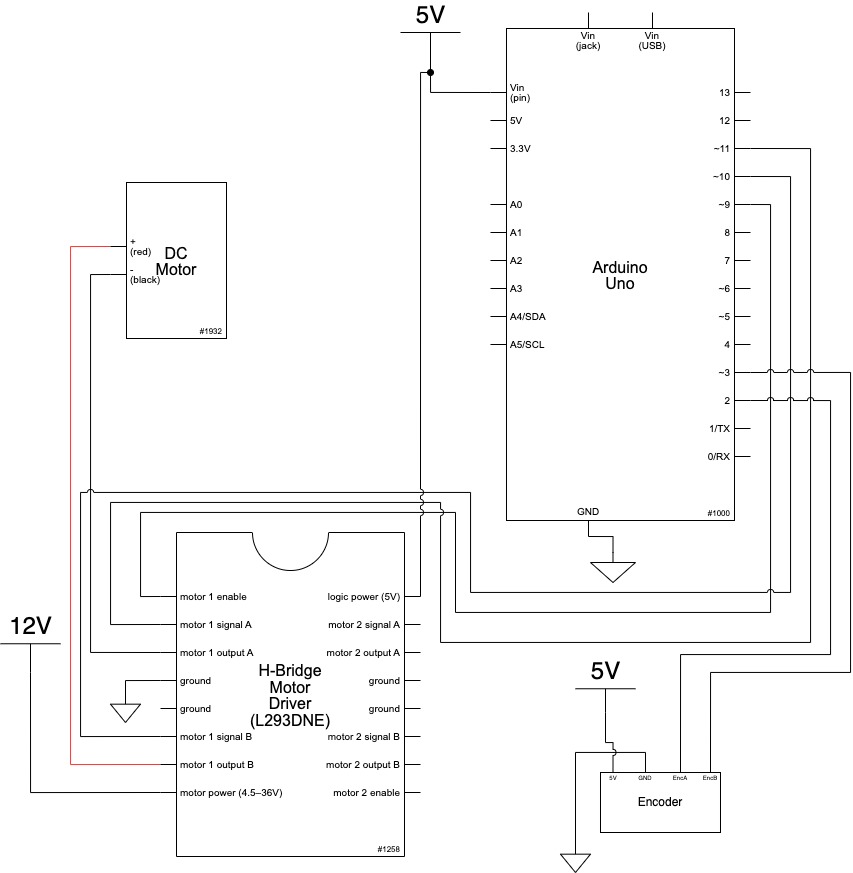
The idea behind these two sketches is to have the ability to open a window via a slider on some interface. In place of a fully working window opening mechanism is a motor with an encoder wired up to an Arduino. This Arduino then uses serial communication to relay its current position back to a p5.js sketch and retrieve its goal position from that sketch as well. The goal position is determined by an on screen slider that moves around then the user clicks and drags the slider.
While I was able to get the motor moving to a specific degree based off of serial input through the Arduino serial command, I was not able to get the p5 sketch to communicate in such a way that the Arduino could read it and then interpret it into an actionable item. I was also not able to send data from the Arduino to the p5 sketch but instead was only able to communicate with the p5 serial application shown in the demo below. Despite all this non-functional code, however, I was able to code a working slider into the p5 sketch and convert the x position of the slider into a percent of 100 as it is dragged across the screen.
Demo:
Schematic:
Code:
*
  Making Things Interactive
  Assignment 4
  Judson Kyle (judsonk)
  02/07/2022

  Collaboration and sources:
  - Encoder_Interrupts functions copied from 24-354 Gadgetry lab code

*/

// Pin Variables

#define encoderPinA   2
#define encoderPinB   3
#define motorPin1     10
#define motorPin2     11
#define motorPWM      9

int encoderCount = 12 * 98; //12 encoder counts per revolution with 1:98 gear ratio
int incomingByte = 0;

// https://www.pololu.com/product/4824
float gearRatio = (22.0*20.0*22.0*22.0*23.0)/(12.0*12.0*10.0*10.0*10.0);

bool motorSpinning = false;

// Motor distance measuring variables
volatile long currentEncoder_pos_f = 0, prevEncoder_pos = 0, revs = 0;
float motorCurPos = 0;

//PID Variables
float ep = 0; //Proportional error
float ei = 0; //Integral error
float ed = 0; //Derivative error
float prev_ep = 0;
double curTime = 0;
double prevTime = 0;

int pwmCmd = 0;

float motorGoalPos = 0; // desired angle [radians]
float kp = 50; // P gain
float ki = 0; // I gain
float kd = 0; // D gain

void setup() {

  //Initialize serial communication:
  Serial.begin(9600);

  //Initialize motor control pins
  pinMode(motorPin1, OUTPUT);
  pinMode(motorPin2, OUTPUT);
  pinMode(motorPWM, OUTPUT);

  //Initialize interrupts
  attachInterrupt(digitalPinToInterrupt(encoderPinA), encoderA, CHANGE);
  attachInterrupt(digitalPinToInterrupt(encoderPinB), encoderB, CHANGE);
}

void loop() {
  if (Serial.available() > 0){
    incomingByte = Serial.parseInt();
    if (incomingByte > 0 && incomingByte != motorGoalPos) {
       motorGoalPos = (float)incomingByte/100;
    }
  }

  //Update motorActualPos variable to reflect actual motor position in radians
  motorCurPos = (((float) currentEncoder_pos_f) / (4 * ((float) encoderCount))) * 3.14159*gearRatio/8; // Convert encoder counts to distance travelled

  Serial.println(motorCurPos);
  //PID controller to get motor to position
  // ----------------------- CONTROLLER CODE --------------
  // PID Controller
  curTime = millis();
  ep = (motorGoalPos - motorCurPos); // error in position (p)
  ei = ei + ep; // integral error in position (i)
  ed = (ep - prev_ep) / (curTime - prevTime); // derivative error in position (d)

  prev_ep = ep;
  prevTime = curTime;

  pwmCmd = (ep*kp + ei*ki + ed*kd);

  // switch directions if pass set point
  if(ep < 0) {
    // Turn on motor A & B
    digitalWrite(motorPin1, LOW);
    digitalWrite(motorPin2, HIGH);
  }
  else {
    // Turn on motor A & B
    digitalWrite(motorPin1, HIGH);
    digitalWrite(motorPin2, LOW);
  }

  pwmCmd = abs(pwmCmd);
  if (pwmCmd > 255) {
    pwmCmd = 255;
  }
  analogWrite(motorPWM, pwmCmd);

//  Serial.print("Motor Position: ");
  //Serial.println(motorCurPos, 7);
}

void encoderA(){
  // look for a low-to-high on channel A
  if (digitalRead(encoderPinA) == HIGH) {
    // check channel B to see which way encoder is turning
    if (digitalRead(encoderPinB) == LOW) {

        currentEncoder_pos_f = currentEncoder_pos_f + 1;         // CW
    }
    else {
        currentEncoder_pos_f = currentEncoder_pos_f - 1;        // CCW
    }
  }
  else   // must be a high-to-low edge on channel A
  {
    // check channel B to see which way encoder is turning
    if (digitalRead(encoderPinB) == HIGH) {

        currentEncoder_pos_f = currentEncoder_pos_f + 1;          // CW
    }
    else {
        currentEncoder_pos_f = currentEncoder_pos_f - 1;          // CCW
    }
  }
}

void encoderB(){

  // look for a low-to-high on channel B
  if (digitalRead(encoderPinB) == HIGH) {
   // check channel A to see which way encoder is turning
    if (digitalRead(encoderPinA) == HIGH) {

        currentEncoder_pos_f = currentEncoder_pos_f + 1;         // CW
    }
    else {
        currentEncoder_pos_f = currentEncoder_pos_f - 1;         // CCW
    }
  }
  // Look for a high-to-low on channel B
  else {
    // check channel B to see which way encoder is turning
    if (digitalRead(encoderPinA) == LOW) {
        currentEncoder_pos_f = currentEncoder_pos_f + 1;          // CW
    }
    else {
        currentEncoder_pos_f = currentEncoder_pos_f - 1;         // CCW
    }
  }
}
var serial;   // variable to hold an instance of the serialport library

// for macos and *nix, you'll do something like this:
//var portName = '/dev/cu.usbserial-DN01DW79';    // fill in your serial port name here

// for windows, just the COM port you're using
var portName = '/dev/tty.usbmodem144101';

var inData;   // variable to hold the input data from Arduino

var minWidth = 600;   //set min width and height for canvas
var minHeight = 400;
var width, height;    // actual width and height for the sketch
var squareWidth = 100;

var sliderLength = 200;
var sliderHeight = 100;
var sliderBackgroundStrokeWeight = 4;
var sliderBackgroundSideOffset = 100;
var sliderOffset = sliderBackgroundSideOffset + (sliderBackgroundStrokeWeight + sliderLength)/2;
var sliderX = sliderBackgroundSideOffset + sliderBackgroundStrokeWeight + sliderLength/2;
var sliderY;
var collision = false;
var windowActualPos = 0;
var windowGoalPos = 0;

var i = 0;

function setup() {
  // set the canvas to match the window size
  if (window.innerWidth > minWidth){
    width = window.innerWidth;
  } else {
    width = minWidth;
  }
  if (window.innerHeight > minHeight) {
    height = window.innerHeight;
  } else {
    height = minHeight;
  }

  sliderX = sliderOffset + sliderLength/2;
  sliderY = height/2;

  //set up canvas
  createCanvas(width, height);
  noStroke();

  //set up communication port
  serial = new p5.SerialPort();       // make a new instance of the serialport library
  serial.on('list', printList);  // set a callback function for the serialport list event
  serial.on('connected', serverConnected); // callback for connecting to the server
  serial.on('open', portOpen);        // callback for the port opening
  serial.on('data', serialEvent);     // callback for when new data arrives
  serial.on('error', serialError);    // callback for errors
  serial.on('close', portClose);      // callback for the port closing

  serial.list();                      // list the serial ports
  serial.open(portName);              // open a serial port
}

function draw() {
  drawBackgroundCanvas();

  //Draw slider background
  strokeWeight(sliderBackgroundStrokeWeight);
  stroke('grey');
  fill('white');
  rect(sliderBackgroundSideOffset, sliderY/2 - sliderHeight/2 - sliderBackgroundStrokeWeight, width - 2*sliderBackgroundSideOffset, sliderHeight + 2*sliderBackgroundStrokeWeight);

  //Draw actual slider
  strokeWeight(4);
  stroke('black');
  fill('grey');
  rect(sliderX - sliderLength/2, sliderY/2 - sliderHeight/2, sliderLength, sliderHeight);
}

//Initialize drawing canvas
function drawBackgroundCanvas() {
  // set background to black
  background(0);
    fill(255);
  textSize(30);
  textAlign(CENTER);
  text("Window Opener", width/2, 80);
  textSize(16);
  text("Degree open: " + Number(serial.read()), width/2, 100);    // displaying the input

  //Draw playing canvas
  strokeWeight(4);
  stroke('white');
  fill('black');
  noStroke();
}

function updateSliderPosition() {
  if (mouseX <= sliderOffset) {
    sliderX = sliderOffset;
  }
  else if (mouseX >= width - sliderOffset) {
    sliderX = width - sliderOffset;
  }
  else {
    sliderX = mouseX;
  }
  windowGoalPos = (sliderX - sliderOffset)/(width - 2*sliderOffset);
  windowGoalPos = (windowGoalPos);
  serial.write(windowGoalPos);
}

// Following functions print the serial communication status to the console for debugging purposes

function printList(portList) {
 // portList is an array of serial port names
 for (var i = 0; i < portList.length; i++) {
 // Display the list the console:
 print(i + " " + portList[i]);
 }
}

function mousePressed() {
  updateSliderPosition();
}

function mouseDragged() {
  updateSliderPosition();
}

function serverConnected() {
  print('connected to server.');
}

function portOpen() {
  print('the serial port opened.')
}

function serialEvent() {
    // on the arduino we are using Serial.write to send an integer
    // so we have to use Number() to convert it to a number.
    // otherwise it would be a string
    inData = Number(serial.read());
    motorActualPos = inData;
    //  if you do this, the inData value will be a string, not a number
    //
    //inData = serial.read();
    //
    // in arduino terms it's
    // int inData = 1;
    // vs
    // String inData = "1';
}

function serialError(err) {
  print('Something went wrong with the serial port. ' + err);
}

function portClose() {
  print('The serial port closed.');
}