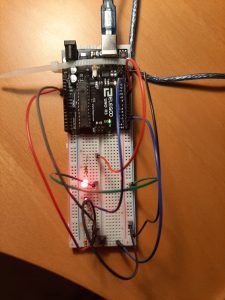
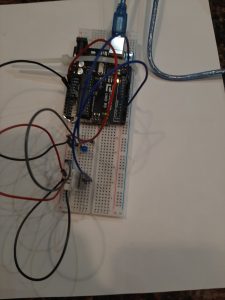
Before adding p5js to the operation, I set up a first iteration of input and output in Arduino.
The intention of the project is to measure environmental conditions and cue an alert when environmental conditions exceed a desired limit (too hot or too cold). This could have applications as a monitoring device during excessive heat waves. Based on temperature input from the sensor, the arduino turns on a blinking warming light at a set temperature limit. For those seeking to use air-conditioning to a bare minimum (and save $), this system could act as a gauge that advises on serious conditions. Especially if someone is reliant on a window unit A/C instead of central air-conditions, it may encourage someone to seek a cooler environment and avoid risk of heat stroke.
I used the sensor to capture temperature data in warm and cold spots in my apartment. At the time measured, there was about a 7 degree F difference between the kitchen (~72 degrees F) and the bedroom (~65 degrees F). Since this was the temperature differential currently present in my apartment, I used tempF>= 70 to test the code, moving between rooms. In the kitchen, the LED light blinked, indicating the temperature was equal to or greater than 70 degrees F (I also used the Arduino serial monitor to check readings as I moved around).
^DHT 22 Temperature and Humidity Sensor and LED
//

#include "DHT.h"   //adafruit dht library
#define DHTPIN 2        // sensor DHT22 data connected to Arduino pin 2
#define DHTTYPE DHT22  // using sensor DHT22

DHT dht(DHTPIN, DHTTYPE);  //dht library
int chk;
float humid; //stores humidity
float tempC; //stores temperature
float tempF; //stores temp in F
int blueled=10;


void setup() {
  pinMode(blueled, OUTPUT);
  Serial.begin(9600);
  dht.begin();


}

void loop() {
  //read dht22 data and store to variables humid and temp
  if (isnan(humid) || isnan(tempC) ||isnan(tempF)){
    Serial.println(F("Failed to read from DHT sensor"));
    delay(10000);
    return;
  }
// troubleshooting issues with getting nan reading from dht22
  humid=dht.readHumidity();
  tempC=dht.readTemperature();
//converting to fahrenheit
  tempF=(tempC*1.8)+32;
//printing temp and humid values to serial monitor
  Serial.print("Humidity: ");
  Serial.print(humid);
  Serial.print(" %, Temp: ");
  Serial.print(tempF);
  Serial.println("Fahrenheit");
  delay(2000);
  if (tempF >= 70){
    digitalWrite(blueled,HIGH);
    delay(150);
    digitalWrite(blueled,LOW);
    delay(75);
  }
 delay(2000);


}
Arduino was a success. The LED light blinked on and off when temperature was above 70, and stayed off when temperature was less than 70.
—
When I connected the p5.serial control, the console was printing out the serial print that had been set up on the arduino:

^first, I thought I would break out the second part of the arduino code (the control of the LED light) as data sent to arduino via p5. serial control. The library for DHT22 is all C++ and not clear to me initially how to modify. So as a first step, I tried to print sensor data on p5js.
Reviewed two arduino/potentiometer/P5js tutorials (https://medium.com/@yyyyyyyuan/tutorial-serial-communication-with-arduino-and-p5-js-cd39b3ac10ce, https://itp.nyu.edu/physcomp/labs/labs-serial-communication/lab-serial-input-to-the-p5-js-ide/#Draw_a_Graph_With_the_Sensor_Values). I thought it would be interesting to use the information from the sensor to draw a graph, which would highlight changes in temperature or humidity. There was a lot that needed to be done to set up serial port, not sure if this is where everything went wrong, and my final result was undefined. I am wondering if this has to do with the DHT22 library being all C++ or if DHT 22 values need to be mapped to 0 to 255 before this information is read by P5 serial.
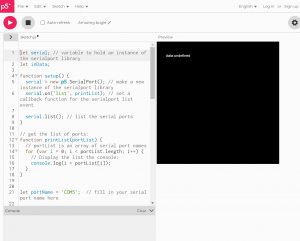
let serial; // variable to hold an instance of the serialport library
let inData;

function setup() {
  serial = new p5.SerialPort(); // make a new instance of the serialport library
  serial.on('list', printList); // set a callback function for the serialport list event

  serial.list(); // list the serial ports
}

// get the list of ports:
function printList(portList) {
  // portList is an array of serial port names
  for (var i = 0; i < portList.length; i++) {
    // Display the list the console:
    console.log(i + portList[i]);
  }
}


let portName = 'COM5';  // fill in your serial port name here

function setup() {
  serial = new p5.SerialPort();       // make a new instance of the serialport library
  serial.on('list', printList);  // set a callback function for the serialport list event
  serial.on('connected', serverConnected); // callback for connecting to the server
  serial.on('open', portOpen);        // callback for the port opening
  serial.on('data', serialEvent);     // callback for when new data arrives
  serial.on('error', serialError);    // callback for errors
  serial.on('close', portClose);      // callback for the port closing

  serial.list();                      // list the serial ports
  serial.open(portName);              // open a serial port
}

function serverConnected() {
  console.log('connected to server.');
}

function portOpen() {
  console.log('the serial port opened.')
}

function serialEvent() {
  inData=Number(serial.read());

}

function serialError(err) {
  console.log('Something went wrong with the serial port. ' + err);
}

function portClose() {
  console.log('The serial port closed.');
}

function setup() {
  createCanvas(400, 400);
}


function draw() {
  background(0);
  fill(255);
  text("data:"+ inData, 30, 50)
}
My references include:
https://www.arduino.cc/reference/en/libraries/dht-sensor-library/
https://stackoverflow.com/questions/40874880/getting-nan-readings-from-dht-11-sensor
https://create.arduino.cc/projecthub/mafzal/temperature-monitoring-with-dht22-arduino-15b013
https://www.instructables.com/How-to-use-DHT-22-sensor-Arduino-Tutorial/
https://itp.nyu.edu/physcomp/videos/videos-serial-communication/#Serial_to_p5js_in_binary
Notes-
When looking for DHT22 and p5js, this project came up: https://github.com/TTurbo0824/pcom_final/blob/master/test_led_hum_serial.ino
^has a note for incorporating p5js but this just looks like what got uploaded to arduino, not additional p5js data sent
** 2/08/2022 Update:
Serial port appears now to be connected to P5JS. I was able to use the test sketch from last week to check that the values for temperature (in C) came through, then both values for temperature and for humidity.
HOWEVER, while running the sketch in the browser editor, the data from the serial port is not registering.
New P5JS sketch:
let serial; // variable to hold an instance of the serialport library
let portName = 'COM5'
let inData;

function setup() {
  createCanvas(400,300);
  background('rgba(0,255,0, 0.15)');


}

  serial = new p5.SerialPort(); // make a new instance of the serialport library
  serial.on('list', printList); // set a callback function for the serialport list event

  serial.list(); // list the serial ports


// get the list of ports:
function printList(portList) {
  // portList is an array of serial port names
  for (var i = 0; i < portList.length; i++) {
    // Display the list the console:
    console.log(i + portList[i]);
    serial.on('list',printList);
    serial.on('connected', serverConnected); // callback for connecting to the server
  serial.on('open', portOpen);        // callback for the port opening
  serial.on('data', serialEvent);     // callback for when new data arrives
  serial.on('error', serialError);    // callback for errors
  serial.on('close', portClose);      // callback for the port closing


serial.open(portName);
    // open a serial port

  function serverConnected() {
  console.log('connected to server.');
}

function portOpen() {
  console.log('the serial port opened.')
}

function serialEvent() {
  inData = Number(serial.read());

}

function serialError(err) {
  console.log('Something went wrong with the serial port. ' + err);
}

function portClose() {
  console.log('The serial port closed.');
}


  }


  function graphData(newData) {
  var yPos=map(newData,0,255,0,height)
  stroke(0xA8,0xD9,0xA7);
  line(xPos,height,xPos,height - YPos);
  if (xPos>=width) {
    xPos=0;
    background(0x08, 0x16, 0x40);
  } else {
    xPos++;
  }
  }
 function draw() {
  graphData(inData);
  text("temperature in Celsius:" + inData, 1, 50);

}

}