Today we took a look at the Scene Manager, which allows us to make the jump out of our scene and into new ones. This introduces some challenges when we want to retain information or objects between these scenes, and so we look at how we can use the singleton pattern to help us manage this process.
Part 1 – Scenes
In the early days of gaming, developers would divide a game up into small chunks called “levels”. While they were useful for players to measure their progress, their real purpose was to minimize the amount of data a game had to hold in memory in order to be playable. Even today, as games allow us to explore cities, countries, worlds, galaxies… the “level” is commonly used as a way to divide up content. It would be silly to hold the final boss battle of a game in active memory when a player is hours away from encountering it. Each draw call would have to consider every polygon in the entire game, every object and behavior would have to be set just so. In short, it would be chaos. Computationally expensive chaos. Why spend all of those cycles considering things that are hours away from use?
So instead we break up our game into smaller chunks and these load into memory when they are needed, hence the “loading” screen that so many games have. (You may be thinking “but what about sandbox games?” Well, those are divided into smaller areas as well – and not just areas, even objects inside those areas have various levels of detail that can be called up. The loading of that content happens in the background, and will swap places with a lower quality model when ready, usually fading between the two so as to disguise the effect and not distract the eye. Most often this happens in the distance, and the game is using predictive algorithms to determine which content you are most likely to need yet and start to load it.)
When Unity was first created, they also included a level system, which became known as Scenes. You will recognize this today as the format that we save our files in. Scenes have evolved to be much much more than just game levels, and are frequently seen used for other cases such as UI screens/menus, code and asset loading, and animated cutscenes. Sometimes entire games will be saved as scenes. Projects (the things we open when we launch Unity, and where our Assets and such are stored) can contain multiple scenes, and when we build our game we will designate which of the scenes we create will be included in the build. (This is particularly useful when you’re working on branches or variations of your game – you can simply swap one out for another if you need to!)
For our in-class demo, we changed the name of our main game scene from the Unity default “SampleScene” to “Level01”. We also created a new scene (“StartMenu”) to house our UI, and a quick small game scene we named “Tutorial”.
NOTE – Don’t worry too much today about the buttons, we will take a deeper dive into the UI system in the next class.
Part 2 – Setting up Buttons
Unity’s UI buttons are easy to generate by going to Create > UI > Button or in the top menu GameObject > UI > Button. This will create a new button object as a child of the Canvas object (which will also be created if you don’t already have one). Buttons consist of two parts, the Button object, and a child Text object. The Button object has two Components to note – the “Image (Script)” component where you define the look of your button, and the “Button (Script)” component where you can define the behaviors and transitions of the buttons. The default button transition is a color tint, but If you have pre-made images for your button states, you can use the “Sprite Swap” transition to show them. The child text object is optional.
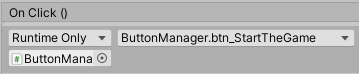
Now for the complicated part – adding an action to your button. Buttons have an “OnClick()” message that they send when a user clicks them but accessing them is not as simple as accessing collider messages. At the bottom of the “Button (Script)” component you will see an “OnClick()” panel that is empty. If you click the “+” button it will create a new action. This action requires an object to be associated with it in order to access its scripted functions. You can add a script to the Button object, but then you will have to self-associate the button with itself. NOTE: The object HAS to be an object currently in the hierarchy. Linking to a prefab does not work.
In class, I created an empty game object (“LevelManager”) and added a script (also called “LevelManager”) which contained a single function that we would use to move to the next scene (“btn_StarTheGame”). In the OnClick( ) menu I associate the script object and select a function from the dropdown on the right by going to the specific component “LevelManager” and selecting the function I want to use.
NOTE: Any function that will be accessed by a Button must be PUBLIC, and VOID. It can only take up to one (1) parameter, that parameter can only be a Float, Int, String, or Object.
Part 3 – Scene Manager
Now that we have a button in place, let’s connect some scenes. I’m going to make a “LevelManager” script handle our first scene jump.
First, I have to add a new library to the code, so I start the file by adding this line:
using UnityEngine.SceneManagement;
Now we can access the scene management commands. I can create a button command, so looking at our button example above to make us jump to the Level01 scene, I create the following in button script.
public void btn_StartTheGame()
{
    SceneManager.LoadScene("TutorialLevel");
}
Again, please note that this must public and void for the editor to see it. Here, ours takes no arguments. And the command itself is rather simple – we run the LoadScene( ) function and pass in the string name of our level. We can also pass in an integer that corresponds with the scene index. Speaking of…
Part 4 – Adding Scenes to the Build
In order to load scenes, Unity has to have those scenes associated with the build. You can do this by going to File > Build Settings, and dragging the scenes you will be using from the Asset panel into the scene list in Build Settings. Notice that when you add a scene, it also assigns it an indexed location.
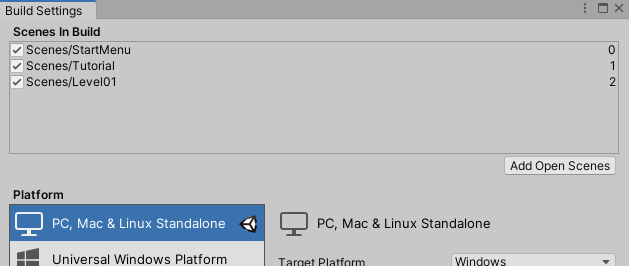
Once you have associated the scenes, you can close the window. (There is no save button to worry about, your changes are automatically registered.)
Part 5 – Staying Alive (DontDestroyMeBro!)
If we are making a game, chances are we want to do things like keep track of the score, or the number of lives remaining. A GameManager script seems like the best candidate for this. We created an empty object, assigned it a GameManager script which sets up a singleton, and converted it into a prefab. We made sure to include this prefab in both of our platform game scenes, as we will need it to handle our logic for events like player deaths, inventory, and of course, the score.
We edited our Level Manager to also be a singleton (so that we can automatically access it within a scene) and added a public string to hold the name of the next scene we should visit upon successful completion of the level.
If our player successfully reaches the end of a level, we reward them by sending them to the next one. To support this, we set a trigger at the end of the level, and tagged it with a “EndOfLevel” tag. If the Player object enters the trigger with that tag, it calls the NextLevel( ) command from the LevelManager and that sends the player to the appropriate scene.
private void OnTriggerEnter2D(Collider2D collision)
{
    if (collision.gameObject.tag == "EndOfLevel")
    {
        LevelManager.S.NextLevel();
    }
}
In our GameManager script, we define our scene jump like so:
public void NextLevel()
{
    SceneManager.LoadScene(nextScene);
}
But now we have a problem. GameManager only exists in the scene that I created it in. As soon as I jump to a new scene, it gets destroyed just like everything else in its host scene and THAT scene’s GameManager instance appears. I spent all that time collecting those coins, and now they’re gone!
If I want to hold onto things like my score, remaining lives, and inventory, I need to make GameManager persist across the transition from one scene to the next.
To accomplish this, we spare GameManager from an untimely deletion by adding the following line to the Start ( ) function in the GameManager script.
DontDestroyOnLoad (this);
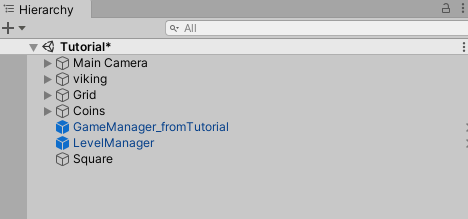
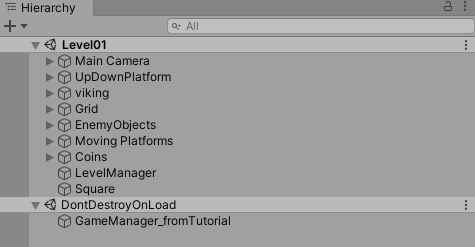
DontDestroyOnLoad ( ) preserves a game object across transitions. It actually creates a little side scene in the Hierarchy and moves the object into it during runtime, as seen below:
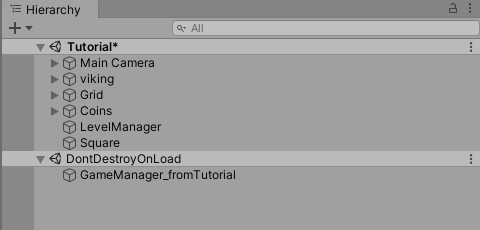
Now when we jump scenes, this object remains, and our score persists as we play through.
But… (you knew there would be one, didn’t you?)
For our game to run correctly, we need to have GameManager running in every scene. This means that either we would ALWAYS have to start our game from the very beginning in the scene where we first instantiate it and play all the way through – not fun, especially when we just want to test one tiny thing in level 5 – OR we have to find a way to include it in EVERY scene. This is why we chose to make our Game Manager a prefab, and drop an instance of it into every level.
But… if we are not destroying our Game Manager and we load a scene with another instance of Game Manager, won’t there be two Game Managers?
Yes there will, and that is a problem. Because now not only do we have two game managers, the new one has just declared itself the singleton (S = this) and overwritten the old one, meaning the new object’s score is the one we display and that’s not what we want at all, is it? And if we move scenes again, since both of these now live within the DontDestroyOnLoad section, we will be adding a third Game Manager and overwritting our Singleton yet again and this seems bad.
So to avoid this situation, we create a small workaround. We build in a check in our Game Manager start script that checks to see if any instance of the singleton exists. If none exists, great – we’re first to the party and we set up shop. But if there is already a singleton defined, we kill this instance of the manager as it is not needed. The script for that looks like this:
private void Awake()
{
    if (S)
    {
        Destroy(this.gameObject);
        // Singleton already exists, remove this instance
    } else {
        S = this;  // Singleton Definition
    }
}
Here we check for the existence of another version of GameManager. If none exists, GameManager.S will return “null”. If not null, someone is already here. We destroy this new version, and we submit a “return” command, which exits our script rather than continuing on.
Once we’ve passed our null-check, the script is still executing so we know we must be the one true game manager. We assign Singleton status and then in the Start( ) method we declare our intention to live forever.
Part 6 – I’m Ready to Go Now
What about when we DO want something to disappear? In the case of our game flow, how do we reset a game if we reach a win or lose state? How to do we go from zero lives remaining back to three, to full health, to an empty inventory? We could write an elaborate script to reset our conditions internally, but the easier method would be to simply let the GameManager die, return to the Title Screen, and let the next GameManager that comes along start the process all over again.
It turns out that the answer to this is quite simple – we Destroy( ) the Game Manager from within itself. DontDestroyOnLoad only preserves objects across transitions – it does not make them immortal.
In this example, we are returning to the title screen (for whatever reason) and we remove the GameManager object.
private void OnTriggerEnter2D(Collider2D collision)
{
    if (collision.gameObject.tag == "EndOfLevel")
    {
        LevelManager.S.NextLevel();
    } else if (collision.gameObject.tag == "EndOfGame")
    {
        Debug.Log("EndOfGame Reached");
        // tell the level manager to go back to the start menu
        LevelManager.S.GoToStartMenu();
    }
}
Part 7 – Restarting a Level
My favorite method for managing death and respawning in a platform game is to simply restart the level by reloading it. This means that all objects in the scene will be destroyed and re-instantiated.
Here is a sample script of how you could handle this, by checking for lives remaining. (NOTE: this is not what we implemented in class today)
public void PlayerDied()
{
    livesRemaining--;
    Debug.Log("Lives Remaining = " + livesRemaining);

    if (livesRemaining <= 0)
    {
        LevelManager.S.GoToStartMenu();

    } else
    {
        LevelManager.S.RestartLevel();
    }
}
Here, if my Player dies but I still have lives left, my GameManager script calls RestartLevel( ) which simply loads the same scene by passing it the name of the current active scene. It is a simple and clean solution, if you don’t need to preserve the state of objects or items within the level.
public void RestartLevel()
{
    SceneManager.LoadScene(SceneManager.GetActiveScene().name);
}
If you DO need to preserve states or items , you can store this information in your undestroyed game manager and when the level restarts, have the objects check for relevant data. For instance, if you were building checkpoints into your game you could store a “checkpoint” value with a unique ID for where to place the player.
Better yet, you could make a Level Manager which would store the states of the objects in the level itself, but which would destroy itself when your script moved on to the next level. Then you have a GameManager that lives across the game, and a LevelManager that lives across attempts at a level.
GameManager.cs
In class, the GameManager was not properly destroying itself. This is due to a missing “else” statement on line 22. This has been corrected for the code below.
using System.Collections;
using System.Collections.Generic;
using UnityEngine;
using TMPro;

public class GameManager : MonoBehaviour
{
    public string gameManagerName;

    private int score = 0;
    public TextMeshProUGUI scoreText;

    public static GameManager S; // singleton


    private int livesRemaining = 3;

    private void Awake()
    {
        if (S) {
            Destroy(this.gameObject);
        } else
        {
            S = this; // singleton definition
        }
    }

    // Start is called before the first frame update
    void Start()
    {
       DontDestroyOnLoad(this);
    }

    // Update is called once per frame
    void Update()
    {
        scoreText.text = "Score: " + score;
    }

    public void AddScore(int scoreValue)
    {
        score += scoreValue;
    }

    public void PlayerDied()
    {
        livesRemaining--;
        Debug.Log("Lives Remaining = " + livesRemaining);

        if (livesRemaining <= 0)
        {
            LevelManager.S.GoToStartMenu();

        } else
        {
            LevelManager.S.RestartLevel();
        }
    }
}
LevelManager.cs
using System.Collections;
using System.Collections.Generic;
using UnityEngine;
using UnityEngine.SceneManagement;

public class LevelManager : MonoBehaviour
{
    public static LevelManager S; // singleton

    public string levelName;

    public string nextSceneName;


    private void Awake()
    {
        S = this;
    }

    // Start is called before the first frame update
    void Start()
    {

    }

    // Update is called once per frame
    void Update()
    {

    }

    public void btn_StartTheGame()
    {
        SceneManager.LoadScene("TutorialLevel");

    }

    public void NextLevel()
    {
        SceneManager.LoadScene(nextSceneName);
    }

    public void GoToStartMenu()
    {
        SceneManager.LoadScene(0);
        Destroy(GameManager.S.gameObject);
    }

    public void RestartLevel()
    {
        SceneManager.LoadScene(SceneManager.GetActiveScene().name);
    }

}
PlayerMovement.cs
using System.Collections;
using System.Collections.Generic;
using UnityEngine;

public class PlayerMovement : MonoBehaviour
{
    private CharacterController2D controller;
    public float speed;

    private float horizontalMove = 0.0f;
    private bool jump = false;

    private Animator animator;

    // Start is called before the first frame update
    void Start()
    {
        controller = GetComponent<CharacterController2D>();
        animator = GetComponent<Animator>();
    }

    // Update is called once per frame
    void Update()
    {
        horizontalMove = Input.GetAxis("Horizontal") * speed;

        if (Input.GetButtonDown("Jump"))
        {
            jump = true;
            // set the jump
            animator.SetBool("isOnGround", false);
        }

        // set the animator speed
        float ourSpeed = Input.GetAxis("Horizontal");
        animator.SetFloat("speed", Mathf.Abs(ourSpeed));

    }

    private void FixedUpdate()
    {
        controller.Move(horizontalMove * Time.fixedDeltaTime, false, jump);
        jump = false;
    }

    public void PlayerLanded()
    {
        // land the player
        animator.SetBool("isOnGround", true);
    }

    private void OnCollisionEnter2D(Collision2D collision)
    {
        if (collision.gameObject.tag == "Enemy")
        {
            // player has died
            GetComponent<Rigidbody2D>().isKinematic = true;
            animator.SetTrigger("Death");

        }
    }

    private void OnTriggerEnter2D(Collider2D collision)
    {
        if (collision.gameObject.tag == "EndOfLevel")
        {
            LevelManager.S.NextLevel();
        } else if (collision.gameObject.tag == "EndOfGame")
        {
            Debug.Log("EndOfGame Reached");
            // tell the level manager to go back to the start menu
            LevelManager.S.GoToStartMenu();
        }
    }

    public void ProcessPlayerDeath()
    {
        GameManager.S.PlayerDied();
    }

}