Today, we are looking at some advanced Unity features that we can use to create our own “first person shooter” (FPS) style game. We will take a look at tools for quick level generation, dive into Unity’s Character Controller, take a deeper examination of the offerings of the Physics library, and finally dip our toes into some Enemy AI.
We are at a point where These lessons are no longer required information to complete requirements. From this point on, all lessons are strictly educational, but I strongly recommend trying to follow along as these systems are very useful for developing your own games.
Part 1: Level Prototyping (with ProBuilder)
ProBuilder is a very useful plugin for Unity, extending the editor by offering simple (but significantly improved) modeling and alignment tools. Once its own standalone product in the Asset Store, Unity has purchased it and now offers it free in the package manager.
ProBuilder is helpful if you need to quickly prototype some objects, rough out a level design, or generate a quick mesh for collisions. This provides enhanced mesh generation, and access down to the vertex level, as well as a quick way to create and adjust UV mapping for objects.
Another plugin from the same creators, PolyBrush, lets you sculpt, shape, and paint your meshes. It is also available for free in the Package Manager.
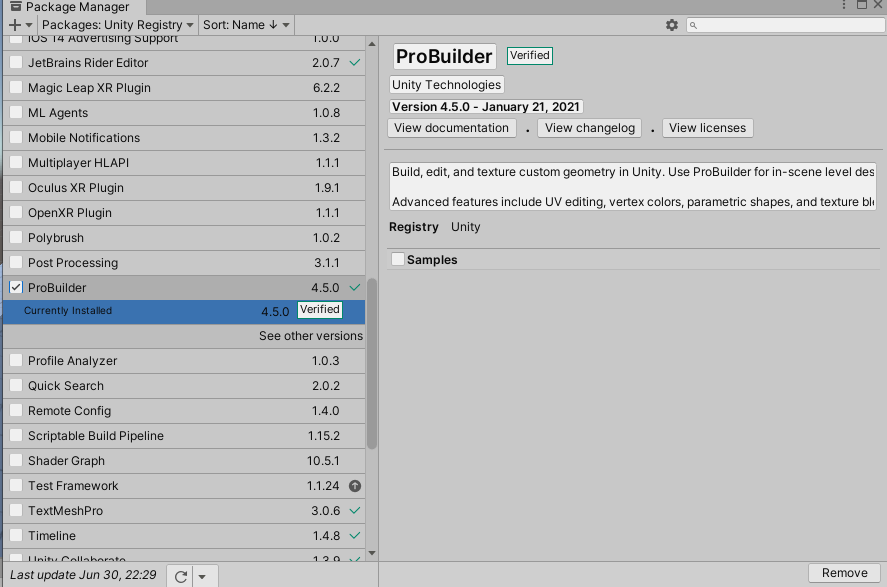
Installing ProBuilder
- Open the “Package Manager”, accessed by clicking on Window > Package Manager
- Select the “Unity Registry” option to see all available packages
- Scroll down until you see the “ProBuilder” entry, and then click “Install”
ProBuilder Interface
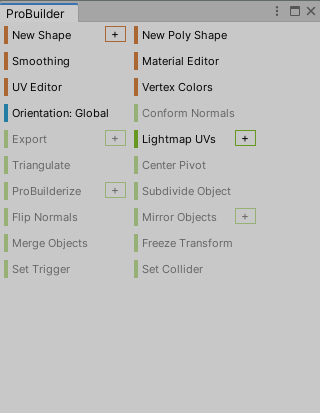
To start ProBuilder, navigate the top menu to Tools > ProBuilder > ProBuilder Window.
This will launch a window with either Text or Icon buttons. You can switch between modes by right-clicking a blank area in the window and selecting the other menu type.
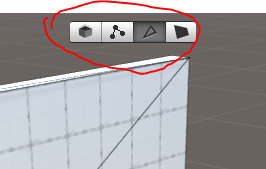
Notice that when you launch ProBuilder, you will also see a small icon menu in your Scene window. This indicates the selection type when interacting with a ProBuilder object.
These are, from left to right:
- OBJECT Selection
- VERTEX Selection
- EDGE Selection
- FACE Selection
The ProBuilder Button menu will change depending on the selection type that is active.
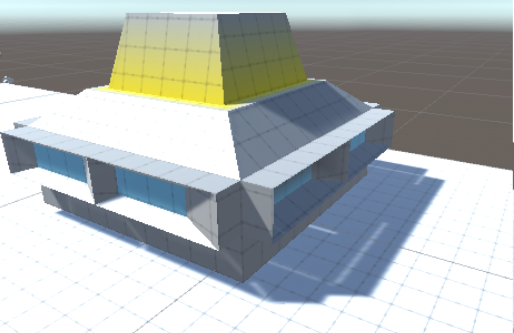
By using these selectors, you can grab just a part of an object and use the various transform tools to deform them into the shapes that you want. The ProBuilder menu contains a number of tools that can split, offset, subdivide, and transform these. Additionally, you can use the “shift” key to generate new geometry, including Shift-Move (face) to Extrude and Shift-Scale (face) to create an inset poly.
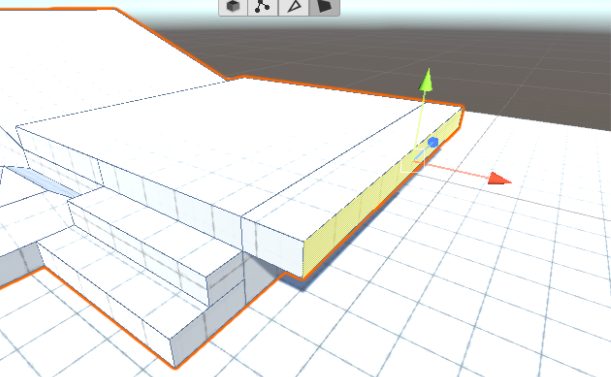
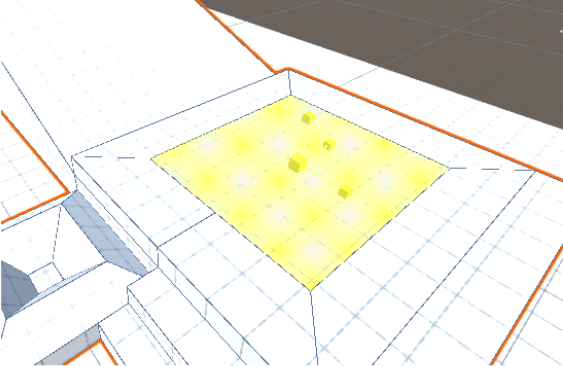
Additionally, you can use Vertex Color to set the color tint of surfaces. You can also set materials, and make adjustments to the UVW mapping (the way that texture images are applied to the surfaces.
ProBuilder can also Export a model into common 3D formats, including OBJ and STL. (I recommend using .obj as that tends to be the most common amongst other modeling applications).
ADVICE: ProBuilder is great for quickly generating or editing assets, but is not recommended to be used throughout the entire process. The procedural generation of the mesh at runtime makes it susceptible to small errors, at which point your work may be lost without an option for recovery. Once you are happy with an asset, it is highly recommended that you run the EXPORT process to convert it into a mesh file in your Asset folder.
Resources
Part 2: The Character Controller
In this section, we cover the how to implement Unity’s character controller as a FPS controller. Unity does have a premade FPS-style player object available in their Standard Assets, however it requires that you upgrade your project to the newer Input system. Since our lessons have focused on the legacy input system, we go about implementing our own version using the CharacterController component.
The first step is to create an object that will be our Player, and for this I like to use a Capsule primitive, as it roughly translates to a human-sized object of 2 units tall and 1 unit in diameter. I disable the Capsule Collider, and instead add the CharacterController component from the list of Physics components.
The CharacterController also uses a capsule-shaped collider, however this particular collider behaves differently than others. First, it does not rotate, so we don’t have to worry about tipping over. We will not be using a Rigidbody component to move this, rather we will write a different script that will move (or attempt to move) the collider, much in the same way that we commanded our 2D collider to “move” in each update. Next, this controller does not return Collision events, instead it has its own collision method that is thrown when it contacts a collider.
You may notice that the controller has some unique settings, such as Step Offset and Slope Limit. These are settings that give the controller information about what is considered “traversable” (meaning that we can travel on it). A slope climb above this range (expressed in degrees) or a vertical step above the offset value (in units) will prevent the character from making that movement.
We move the CharacterController with one of two commands – Move( ) and SimpleMove( ). SimpleMove allows us to move only in the X & Z planes (and ignores Y data from the Vector3) and it automatically applies gravity, so this method is best for games where jumping is not an option. Since we want the ability to jump, we are going to use the Move( ) command instead. In either case, you should only make one call to Move or SimpleMove per frame, due to the way that Unity processes these.
To make our character move, we are going to create a new script that I call PlayerFPS, and use the sample code from the CharacterController.Move( ) page. By running this, we see that our player is movement is not quite what we might expect. Our character movement is restricted to the two axis, and there is a “turning” that does not affect what way we move, even though we turn partway. We are going to have to make some edits.
public class Example : MonoBehaviour
{
    private CharacterController controller;
    private Vector3 playerVelocity;
    private bool groundedPlayer;
    private float playerSpeed = 2.0f;
    private float jumpHeight = 1.0f;
    private float gravityValue = -9.81f;

    private void Start()
    {
        controller = gameObject.AddComponent<CharacterController>();
    }

    void Update()
    {
        groundedPlayer = controller.isGrounded;
        if (groundedPlayer && playerVelocity.y < 0)
        {
            playerVelocity.y = 0f;
        }

        Vector3 move = new Vector3(Input.GetAxis("Horizontal"), 0, Input.GetAxis("Vertical"));
        controller.Move(move * Time.deltaTime * playerSpeed);

        if (move != Vector3.zero)
        {
            gameObject.transform.forward = move;
        }

        // Changes the height position of the player..
        if (Input.GetButtonDown("Jump") && groundedPlayer)
        {
            playerVelocity.y += Mathf.Sqrt(jumpHeight * -3.0f * gravityValue);
        }

        playerVelocity.y += gravityValue * Time.deltaTime;
        controller.Move(playerVelocity * Time.deltaTime);
    }
}
In this example version, the Update( ) function does the following:
- Gets the value of controller.isGrounded. This returns a boolean indicating whether or not the most recent move caused the controller to intersect with a collider underneath it.
- If isGrounded is true, it sets the y-value of the “playerVelocity” variable to 0. This is because the controller is considered “on the ground” and so is “resetting” the effect of gravity. PlayerVelocity is the vector representation of the speed with which a player is moving downward, to replicate gravity.
- Next a “move” directional vector is created using the horizontal and vertical axis, and the Move( ) command is called with that vector multiplied by speed and Time.deltaTime to indicate how far it should move in this frame.
- The next part rotates the game object to face the movement direction. This is not necessary for our purposes and we will comment this out of our version.
- Now the script checks the “jump” input button. If true, and if the player is grounded, it will apply a positive y force to the playervelocity variable.
- Finally, the player velocity adds the gravityvelocity (-9.81) multiplied by Time.deltaTime to create the effects of gravity, and again issues the Move( ) command. Yes, this goes against Unity’s own advice about not calling Move( ) twice in one frame, but it works here because one call handles X-Z movement, and one handles Y movement only.
In the accompanying video, I outline these changes:
- First, I remove the “turning” function from step 4.
- I set a camera as the child of the player object (and make this our primary camera for game view)
- Next I create a MouseLook function to control our player object. Using Input.GetAxis(“Mouse X”) I can translate horizontal mouse movement into player rotation around the y-axis (or up-axis).
- Now that our player body is being rotated, I redefine our PlayseFPS movement command to use the Horizontal and Vertical input axes as scalar values to apply towards the “forward” and “right” vectors of my player transform. This will return the world vectors of our local directions. I pass that value into the Move command and this allows us to move and strafe in a classic FPS style.
- Next I update MouseLook to rotate the camera up and down in response to the Mouse Y movement, implementing a Clamp to make sure we don’t rotate too far.
One key difference in using the CharacterController is that we are not using a standard collider. If we attempt to have our object run into objects with Rigidbodies, we will simply stop as though they are a solid wall. Instead, we must use OnCharacterColliderHit( ) that will inform us that a collision has occurred. Using the sample code from Unity’s site, we can see that we find the rigidbodies that we have hit, and use that to push the object.
public class Example : MonoBehaviour
{
    // this script pushes all rigidbodies that the character touches
    float pushPower = 2.0f;
    void OnControllerColliderHit(ControllerColliderHit hit)
    {
        Rigidbody body = hit.collider.attachedRigidbody;

        // no rigidbody
        if (body == null || body.isKinematic)
        {
            return;
        }

        // We dont want to push objects below us
        if (hit.moveDirection.y < -0.3)
        {
            return;
        }

        // Calculate push direction from move direction,
        // we only push objects to the sides never up and down
        Vector3 pushDir = new Vector3(hit.moveDirection.x, 0, hit.moveDirection.z);

        // If you know how fast your character is trying to move,
        // then you can also multiply the push velocity by that.

        // Apply the push
        body.velocity = pushDir * pushPower;
    }
}
Part 3: Physics
ForceMode Types
When we first started using Rigidbody Physics way back in the days of Pong (or BingoBangoBongo, as we called it), we set our ball in motion with a push that we created using AddForce( ). We passed a rather large force vector to make such a small and light object move at the speed we anticipated. This is due to the methods which Unity uses to apply forces to an object, known as the ForceMode.
There are four types of ForceMode:
- Force
- Acceleration
- Impulse
- VelocityChange
ForceMode.Force (default)
The default mode, ForceMode.Force is designed to apply a force over time to an object. It takes the mass of the object into consideration, so it will take more force to move heavier objects. It is designed to be used in FixedUpdate( ), as it will calculate the force to apply across that fixed time. The unit of force is calculated as:
(mass * distance) / (time^2)
This explains why our force needed to be so high to push a 1 kg object around the field of play. Our game provided one super quick burst, while this method is designed to be called repeatedly over time. A good use case would be a “thruster” that is called during every fixed update command.
ForceMode.Acceleration
Similar to ForceMode.Force, a force calculated over the time of FixedUpdate( ), except the force is applied equally to objects without regard to mass. Useful for purposes such as gravity effects, or driving games where the mass of the vehicle does not matter. The unit of force is applied as:
distance / (time^2)
ForceMode.Impulse
This mode takes the application of time out of the equation and delivers the force in one single burst, while taking mass into consideration. This mode is best for explosions, with an instant release of energy, but larger objects will affected less by it. The unit of force here is expressed as:
(mass * distance) / time
ForceMode.VelocityChange
Similar to impulse, but mass no longer has an effect. This mode instantly alters the velocity of the affected object by the value applied. (Remember, velocity is expressed as units per 1s). The “force” unit here is expressed as:
distance / time
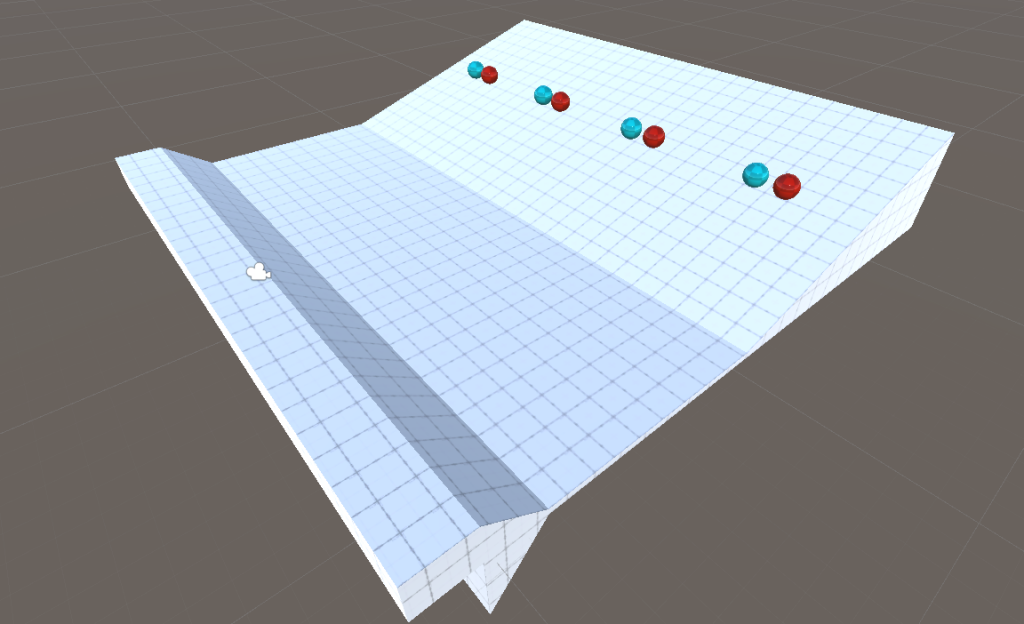
For our experiment, we created a ball prefab with the following script. We set up two balls side by side, one with a weight of “1” and the other a weight of “50”. We created a similar pairing for each ForceMode, and set the applied force value to be equal across all eight balls.
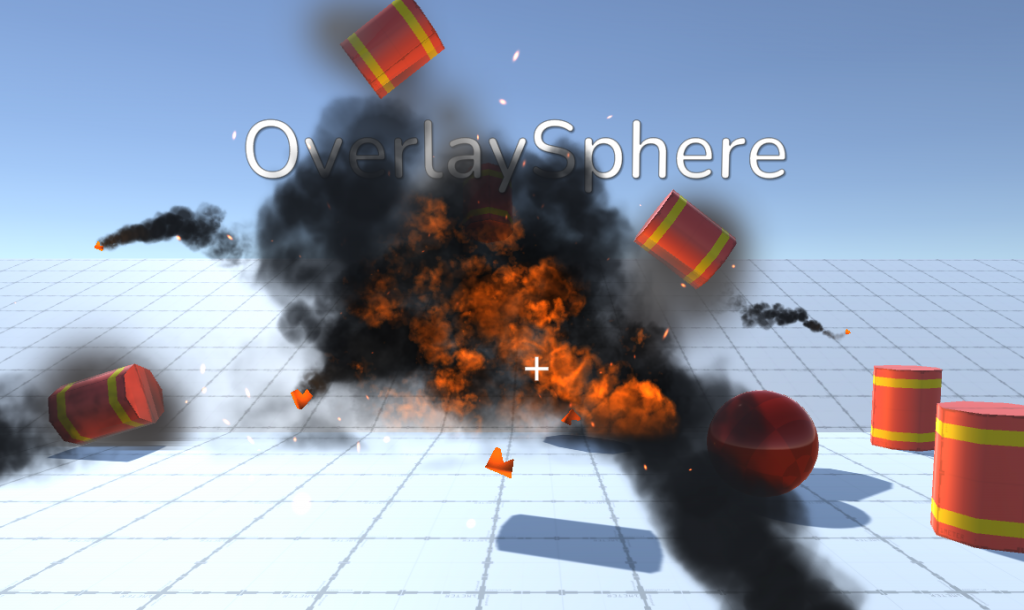
ForceMode.Force required the most effort, rapidly clicking the mouse to barely move the heavy ball, while making some progress getting the light ball up the hill. ForceMode.Acceleration made things a little easier, as the heavy and light ball responded equally to each click. ForceMode.Impulse had a much greater effect, moving the heavy ball a greater distance than Acceleration had, and launching the light ball off of the board. ForceMode.VelocityChange launched both light and heavy balls far into the distance.
Raycasting
Detail Here
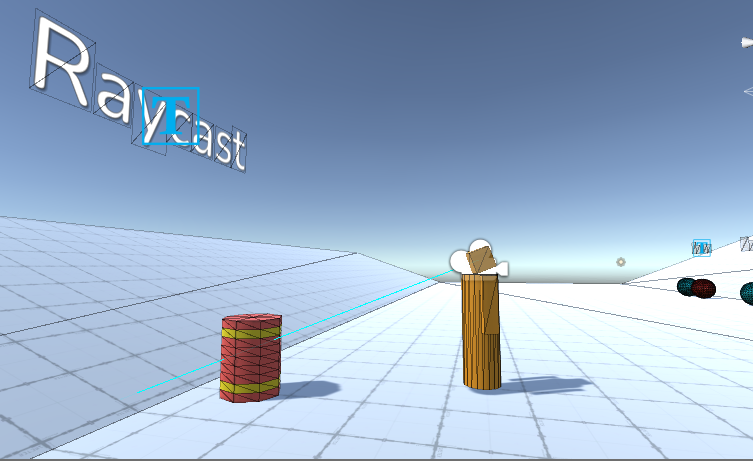
Overlay Sphere
Part 4: The Navmesh
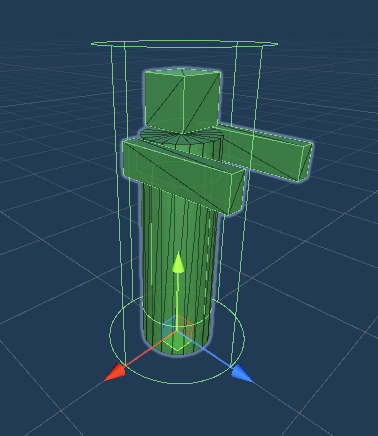
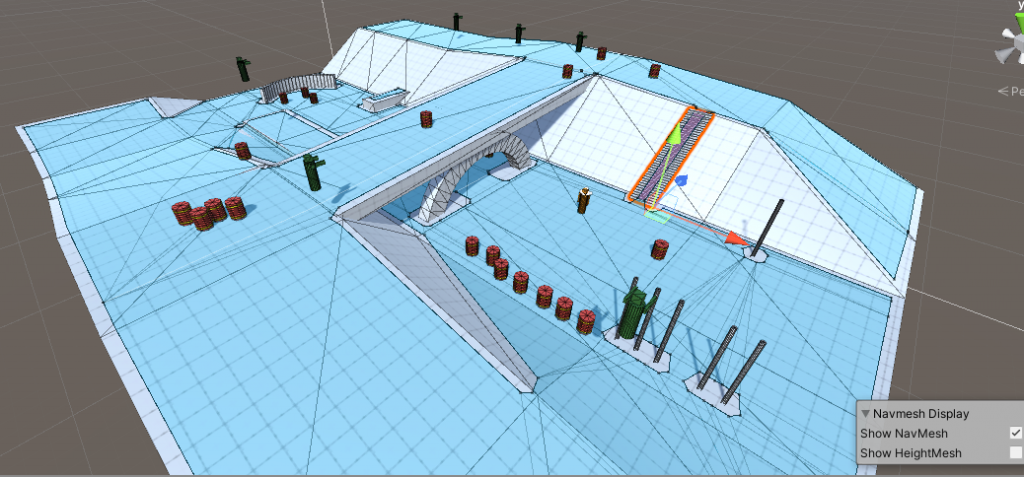
While it is fun to wander around blowing things up, I created this level for something more. I want to create enemy objects that have some intelligence and can pursue me through the level. In order to do this, I created a prefab variant of the Barrel that I named “AngryBarrel”. The Angry Barrel is recognizable by it’s greenish hue, it’s white cube on top to help indicate forward direction, and it’s ever present bloodlust.
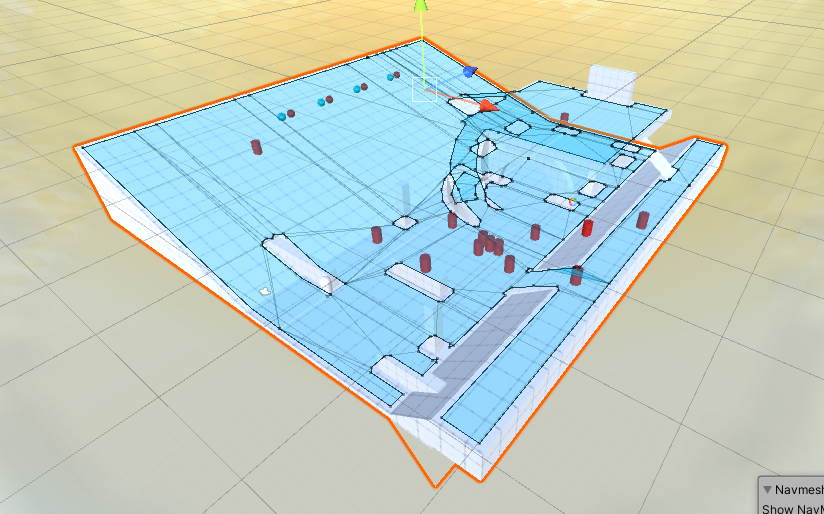
In order to make this object “intelligent”, or at least smart enough to figure out how to navigate my level, I need to define the areas that it is capable of travelling. This involves generating a surface shape that is comprised of all of the valid positions that one of the intelligent agents could occupy, which we call a Navmesh.
To create a NavMesh, you must first open the Navigation window, which can be reached by going to Window > AI > Navigation. This will open up another panel usually in the same area as the Inspector.
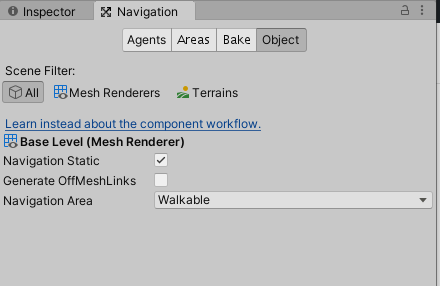
In order to create a Navmesh, you must tell the system which objects to include, and what the rules are about what is and is not accessible terrain. With the Object tab active, I selected all of the mesh objects that I wished to be part of my navigable layer, and checked the Navigation Static property, which indicates that this is an element to be included in the baking process. (You can include any object with either a Mesh Renderer or Terrain component)
Next, I set the conditions for the Agent Size that the bake should consider. This will analyze your navigation objects, and generate a simplified mesh that outlines the valid locations where an agent with these dimensions would fit. Finally I hit the Bake button, and soon I have my navmesh.
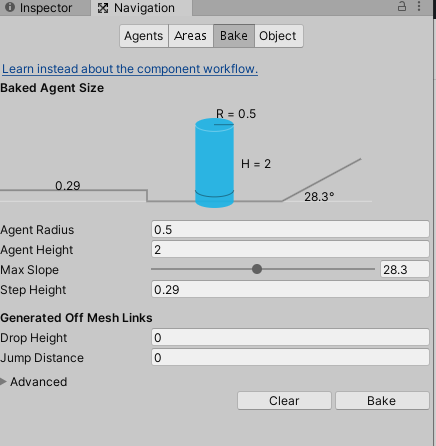
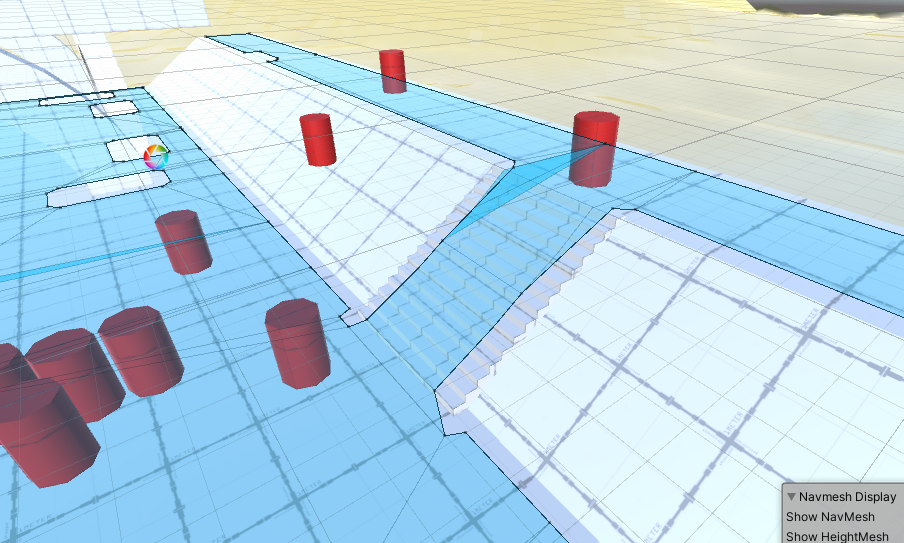
The “slope” property defines the maximum sloped angle to be considered traversable. The “step height” indicates how many units high the agent can “step up”. Thanks to the step settings, I was able to create a somewhat safe zone where the enemy cannot follow me up a slope, but must instead go around to use the stairs.
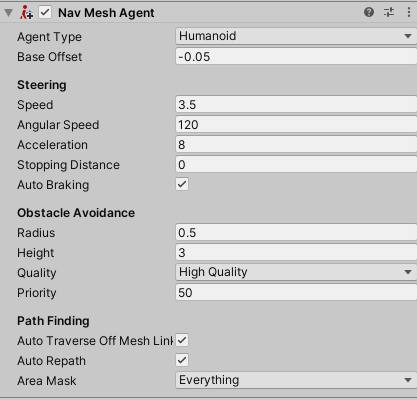
Next we add a Navmesh Agent component to our enemy objects, and then a small script to tell that Agent component where to go. If we feed the agent a position, it will automatically move at the designated speed to to that point considering the shortest path and moving around obstacles and other agents.
PlayerFPS.cs
using System.Collections;
using System.Collections.Generic;
using UnityEngine;

public class PlayerFPS : MonoBehaviour
{
    private CharacterController controller;
    private Vector3 playerVelocity;
    public bool groundedPlayer;
    public float playerSpeed = 2.0f;
    private float jumpHeight = 1.0f;
    private float gravityValue = -9.81f;

    public float pushPower = 2.0f;

    private void Start()
    {
        // controller = gameObject.AddComponent<CharacterController>();
        controller = gameObject.GetComponent<CharacterController>();
    }

    void Update()
    {
        // checking for the ground, and stopping our fall if grounded
        groundedPlayer = controller.isGrounded;
        if (groundedPlayer && playerVelocity.y < 0)
        {
            playerVelocity.y = 0f;
        }

        // moving the character on XZ
        // Vector3 move = new Vector3(Input.GetAxis("Horizontal"), 0, Input.GetAxis("Vertical"));

        float x = Input.GetAxis("Horizontal");
        float z = Input.GetAxis("Vertical");

        Vector3 move = (transform.right * x) + (transform.forward * z);


        controller.Move(move * Time.deltaTime * playerSpeed);

        /* unnecessary
        if (move != Vector3.zero)
        {
            gameObject.transform.forward = move;
        }
        */

        // application of jumping
        if (Input.GetButtonDown("Jump") && groundedPlayer)
        {
            playerVelocity.y += Mathf.Sqrt(jumpHeight * -3.0f * gravityValue);
        }
        // application of gravity
        playerVelocity.y += gravityValue * Time.deltaTime;
        controller.Move(playerVelocity * Time.deltaTime);
    }

    // this script pushes all rigidbodies that the character touches

    void OnControllerColliderHit(ControllerColliderHit hit)
    {
        Rigidbody body = hit.collider.attachedRigidbody;

        // no rigidbody
        if (body == null || body.isKinematic)
        {
            return;
        }

        // We dont want to push objects below us
        if (hit.moveDirection.y < -0.3)
        {
            return;
        }

        // Calculate push direction from move direction,
        // we only push objects to the sides never up and down
        Vector3 pushDir = new Vector3(hit.moveDirection.x, 0, hit.moveDirection.z);

        // If you know how fast your character is trying to move,
        // then you can also multiply the push velocity by that.

        // Apply the push
        body.velocity = pushDir * pushPower;
    }

}
MouseLook.cs
using System.Collections;
using System.Collections.Generic;
using UnityEngine;

public class mouseLook : MonoBehaviour
{
    public Transform playerBody;
    public float mouseSpeed = 100.0f;

    public float tiltRotation = 0.0f;

    // Start is called before the first frame update
    void Start()
    {
        Cursor.lockState = CursorLockMode.Locked;
    }

    // Update is called once per frame
    void Update()
    {
        float mouseX = Input.GetAxis("Mouse X");
        float mouseY = Input.GetAxis("Mouse Y");

        playerBody.Rotate(Vector3.up * (mouseX * mouseSpeed * Time.deltaTime));

        // tilt rotation
        tiltRotation -= mouseY * mouseSpeed * Time.deltaTime;
        // clamp
        tiltRotation = Mathf.Clamp(tiltRotation, -90.0f, 90.0f);
        // rotate the camera
        transform.localRotation = Quaternion.Euler(tiltRotation, 0, 0);

        // visualize the gaze direction
        Debug.DrawRay(transform.position, (transform.forward * 5.0f), Color.cyan);
    }
}
BarrelScript.cs
using System.Collections;
using System.Collections.Generic;
using UnityEngine;

public class BarrelScript : MonoBehaviour
{
    public GameObject smokePrefab;
    public GameObject explosionPrefab;


    public float forceRadius;
    public float forceApplied;
    public ForceMode forceMode;

    private bool _isLive = true;

    public void BarrelImpact()
    {
        // barrel has been hit, make it explode
        if (_isLive) { StartCoroutine(BarrelBurning());}
    }

    private void BarrelExplode()
    {
        _isLive = false;

        // make the barrel blow up
        Instantiate(explosionPrefab, transform.position, Quaternion.identity);

        Collider[] hitColliders = Physics.OverlapSphere(transform.position, forceRadius);

        foreach(Collider collider in hitColliders)
        {

            BarrelScript thisBarrel = collider.gameObject.GetComponent<BarrelScript>();
            if (thisBarrel) { thisBarrel.BarrelImpact(); }

            Rigidbody rb = collider.gameObject.GetComponent<Rigidbody>();
            if (rb)
            {
                rb.AddExplosionForce(forceApplied, transform.position, forceRadius, 10.0f, forceMode);
            }


        }


        Destroy(this.gameObject);
    }

    private IEnumerator BarrelBurning()
    {
        // start the smoke
        Instantiate(smokePrefab, transform.position, Quaternion.Euler(new Vector3(-90, 0,0)), transform);

        // wait for the fuse
        yield return new WaitForSeconds(2.0f);

        // time to die
        BarrelExplode();
    }

}
RaycastScript.cs
using System.Collections;
using System.Collections.Generic;
using UnityEngine;

public class RaycastScript : MonoBehaviour
{
    private AudioSource audio;
    public AudioClip gunshotSound;

    private void Start()
    {
        audio = GetComponent<AudioSource>();
    }

    void Update()
    {
        if (Input.GetMouseButtonDown(0))
        {
            // make the gun noise
            audio.PlayOneShot(gunshotSound);

            // check for a valid shot
            Transform cameraTransform = Camera.main.transform; // kind of a singleton

            // build my ray
            Ray ray = new Ray(cameraTransform.position, cameraTransform.forward); // return pos-z axis ray
            RaycastHit hit;

            if (Physics.Raycast(ray, out hit))
            {
                if (hit.transform.tag == "Barrel")
                {
                    // tell the barrel to explode
                    BarrelScript barrelScript = hit.transform.GetComponent<BarrelScript>();

                    // verify that I have a component
                    if (barrelScript)
                    {
                        barrelScript.BarrelImpact();
                    }
                }
            }

        }


    }


}
EnemyScript.cs
using System.Collections;
using System.Collections.Generic;
using UnityEngine;
using UnityEngine.AI;

public class EnemyScript : MonoBehaviour
{
    private NavMeshAgent agent;

    public Transform player;

    // Start is called before the first frame update
    void Start()
    {
        agent = GetComponent<NavMeshAgent>();
        StartCoroutine(UpdateTarget());
    }

    // Update is called once per frame
    void Update()
    {

    }

    private IEnumerator UpdateTarget()
    {
        while(true) {
            bool foundRoute = agent.SetDestination(player.position);
            Debug.Log("Destination = " + foundRoute);

            yield return new WaitForSeconds(2.0f);
        }
    }

}