For this project I made a device that will record the measurements you take on an lcd screen using a string wound around a rotary encoder.
Overview:
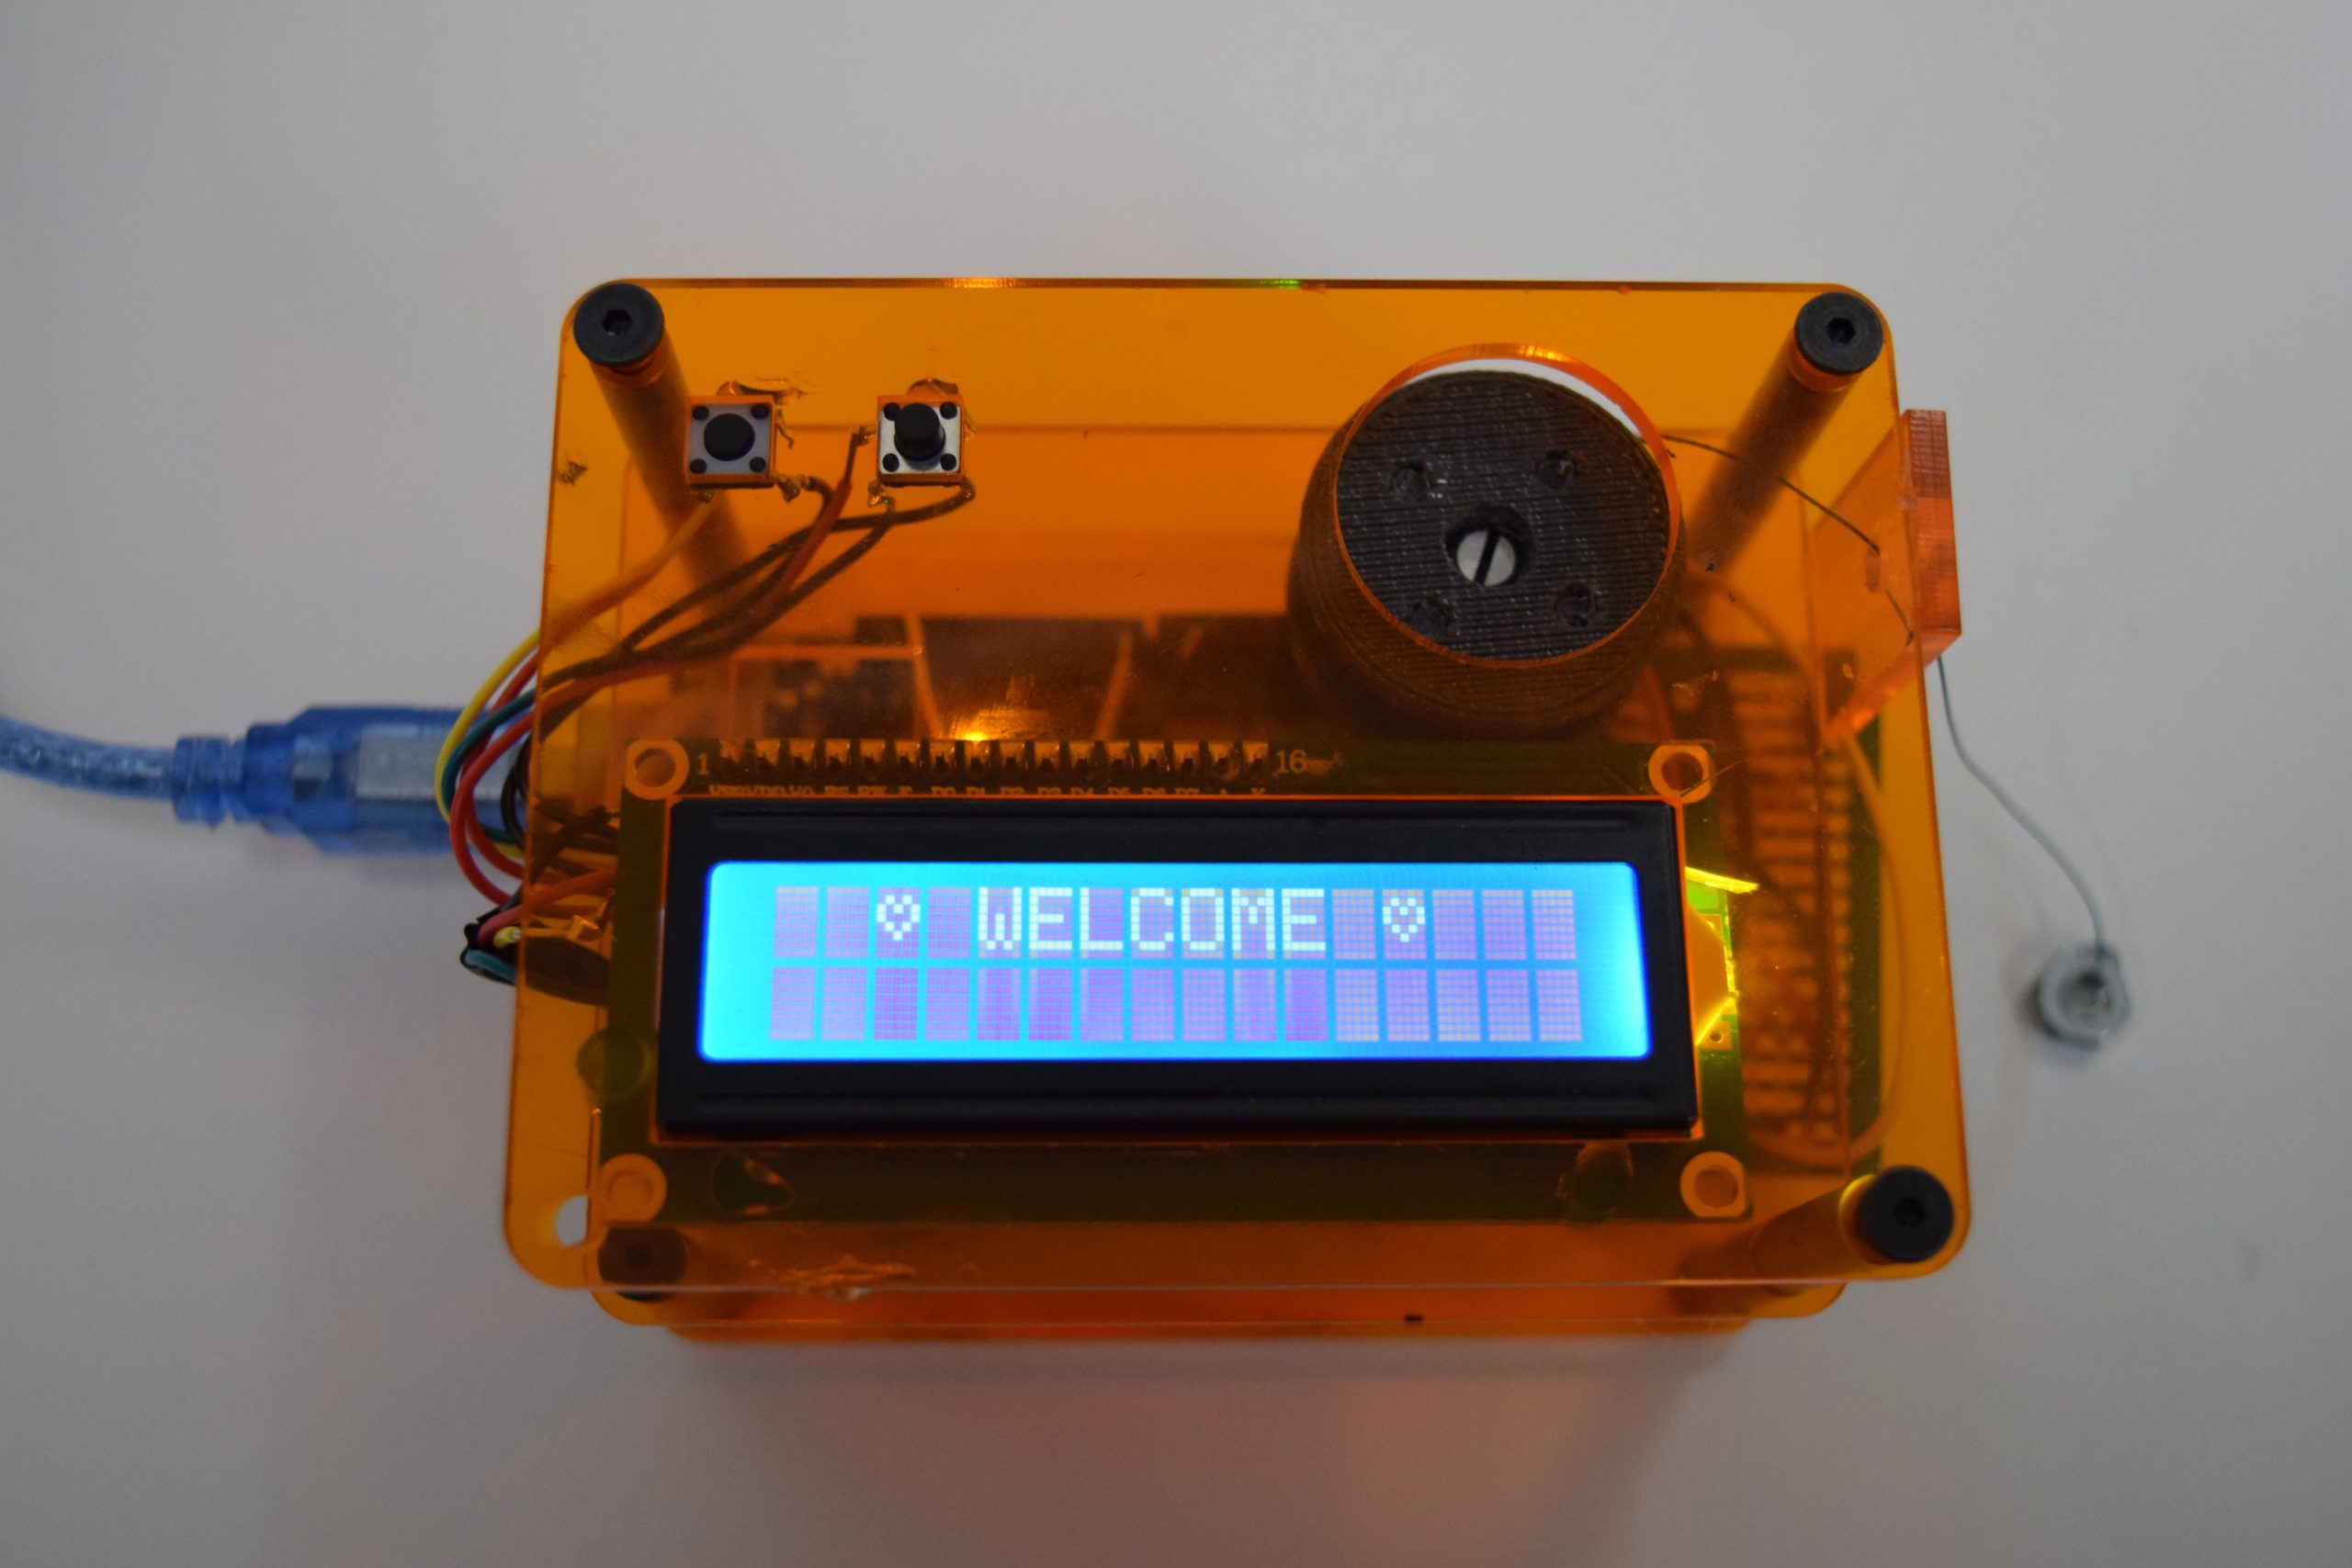
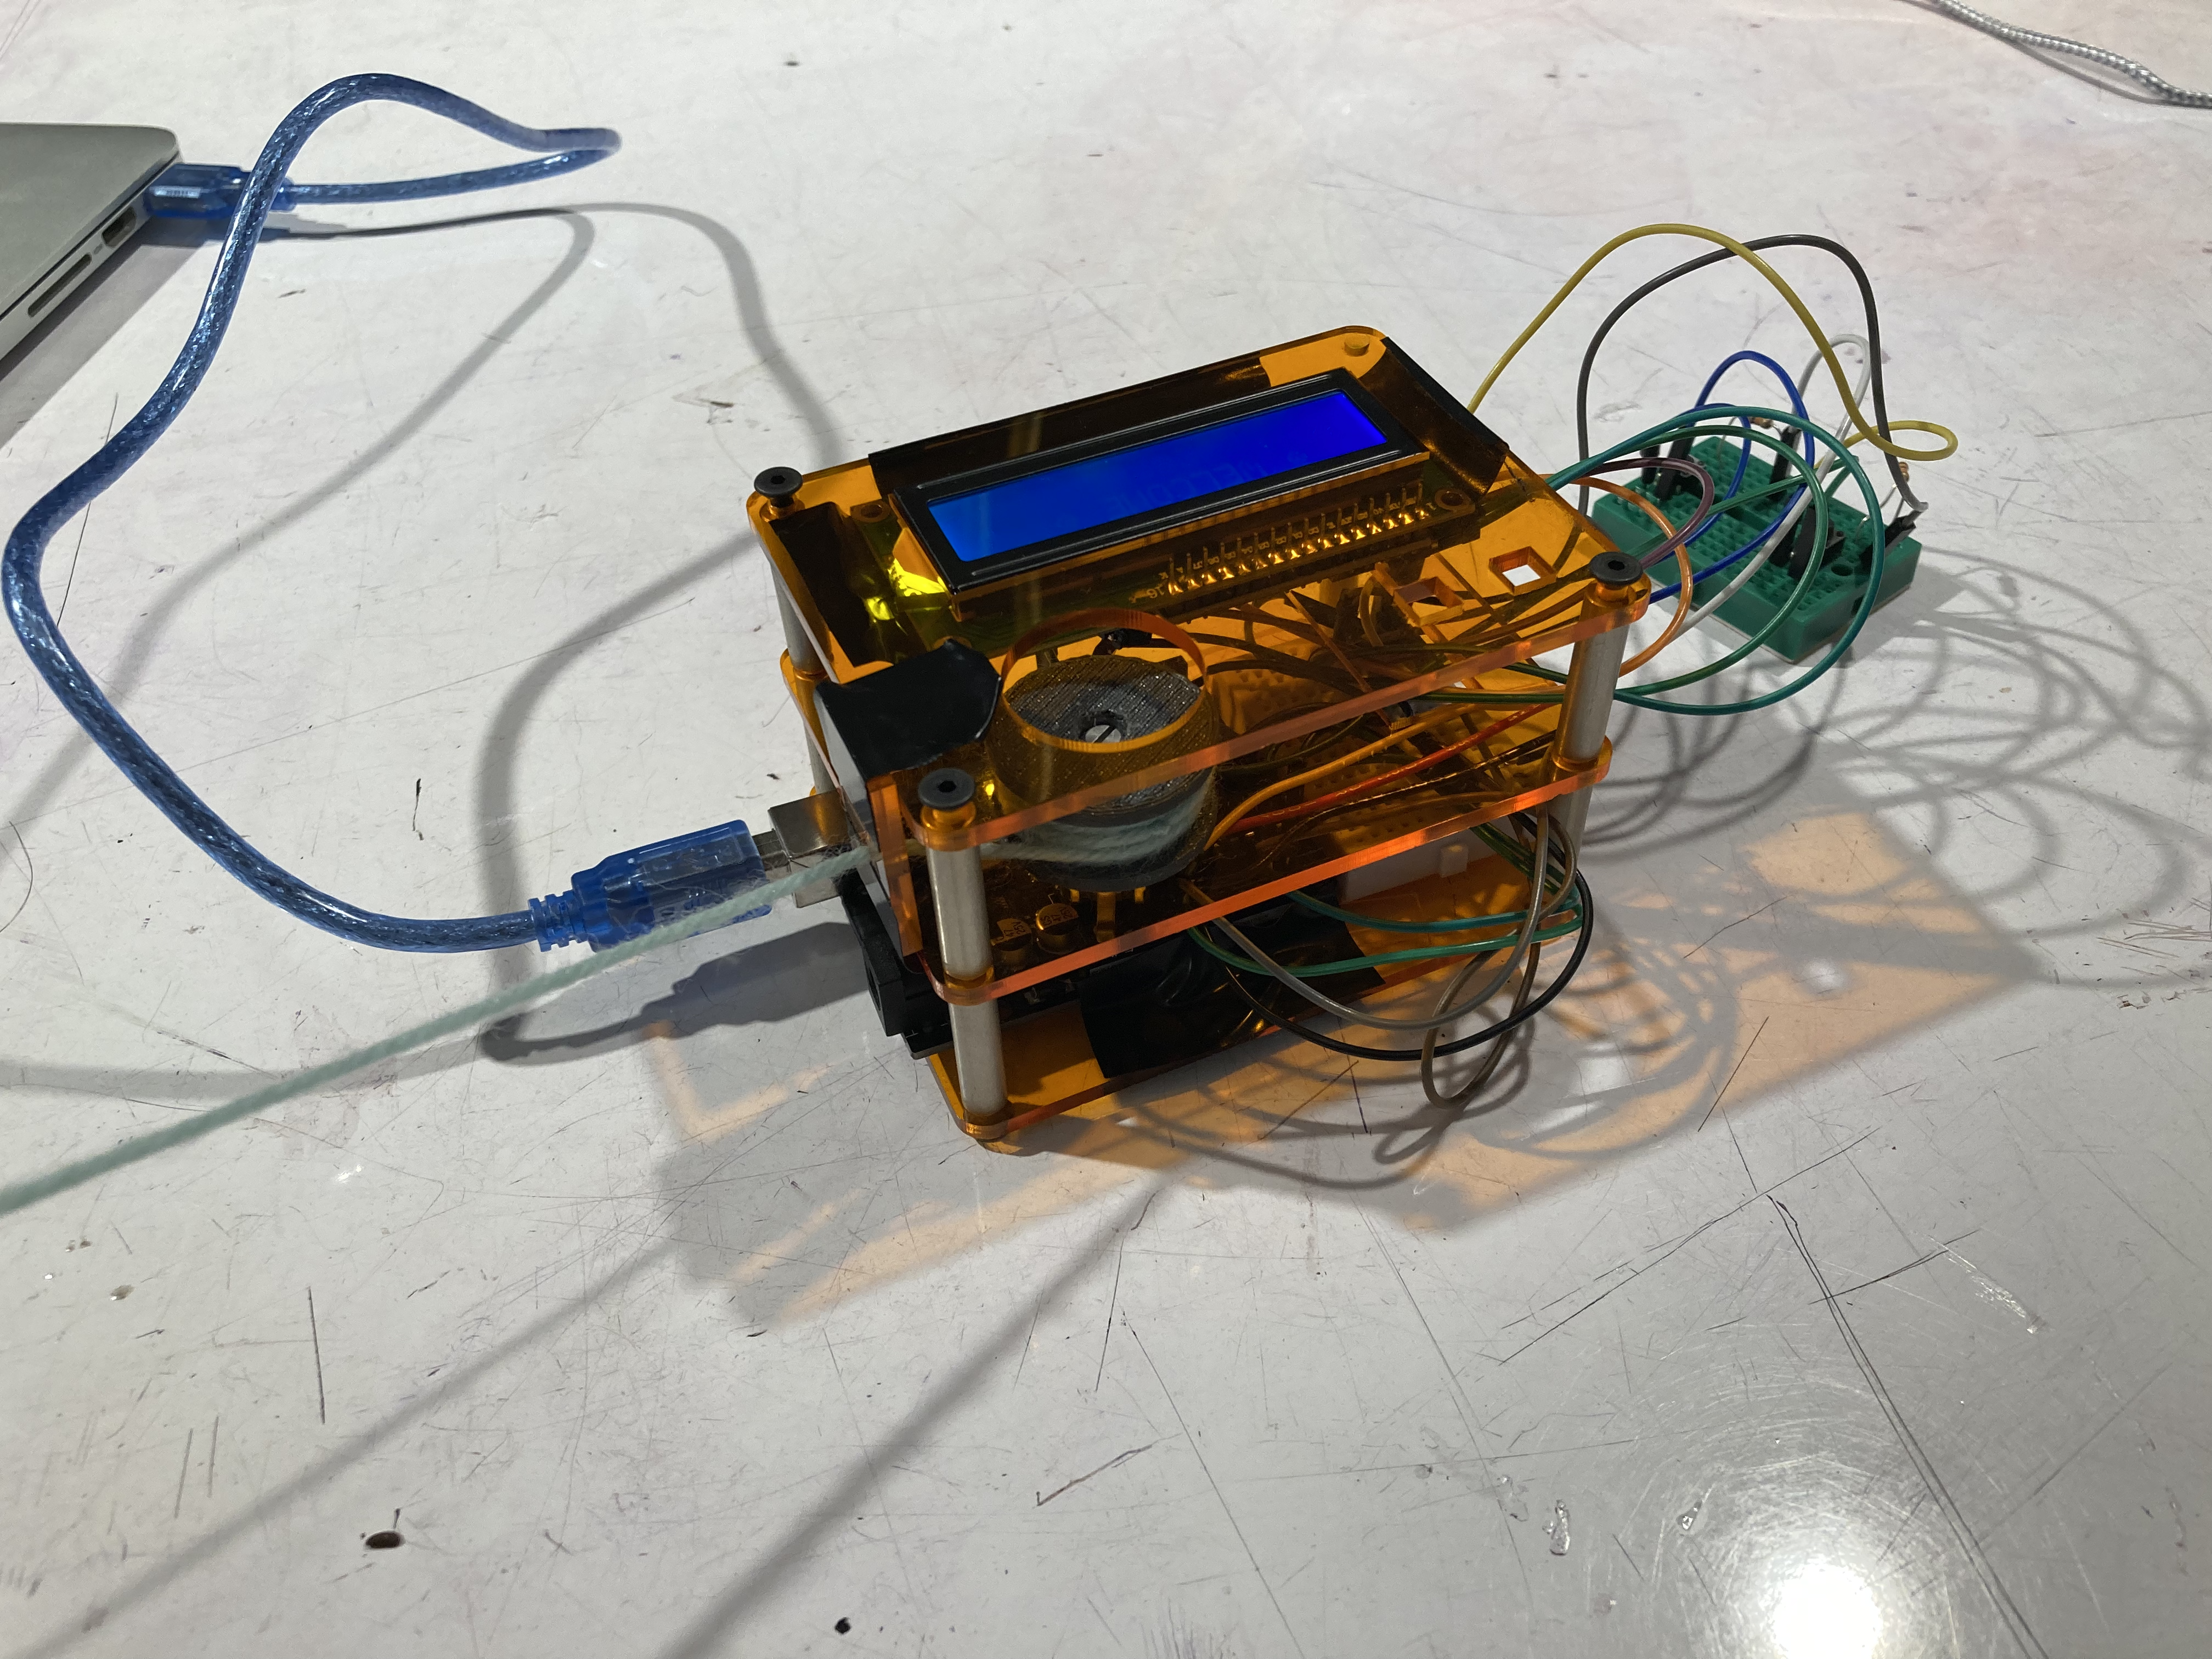
Top view on welcome screen
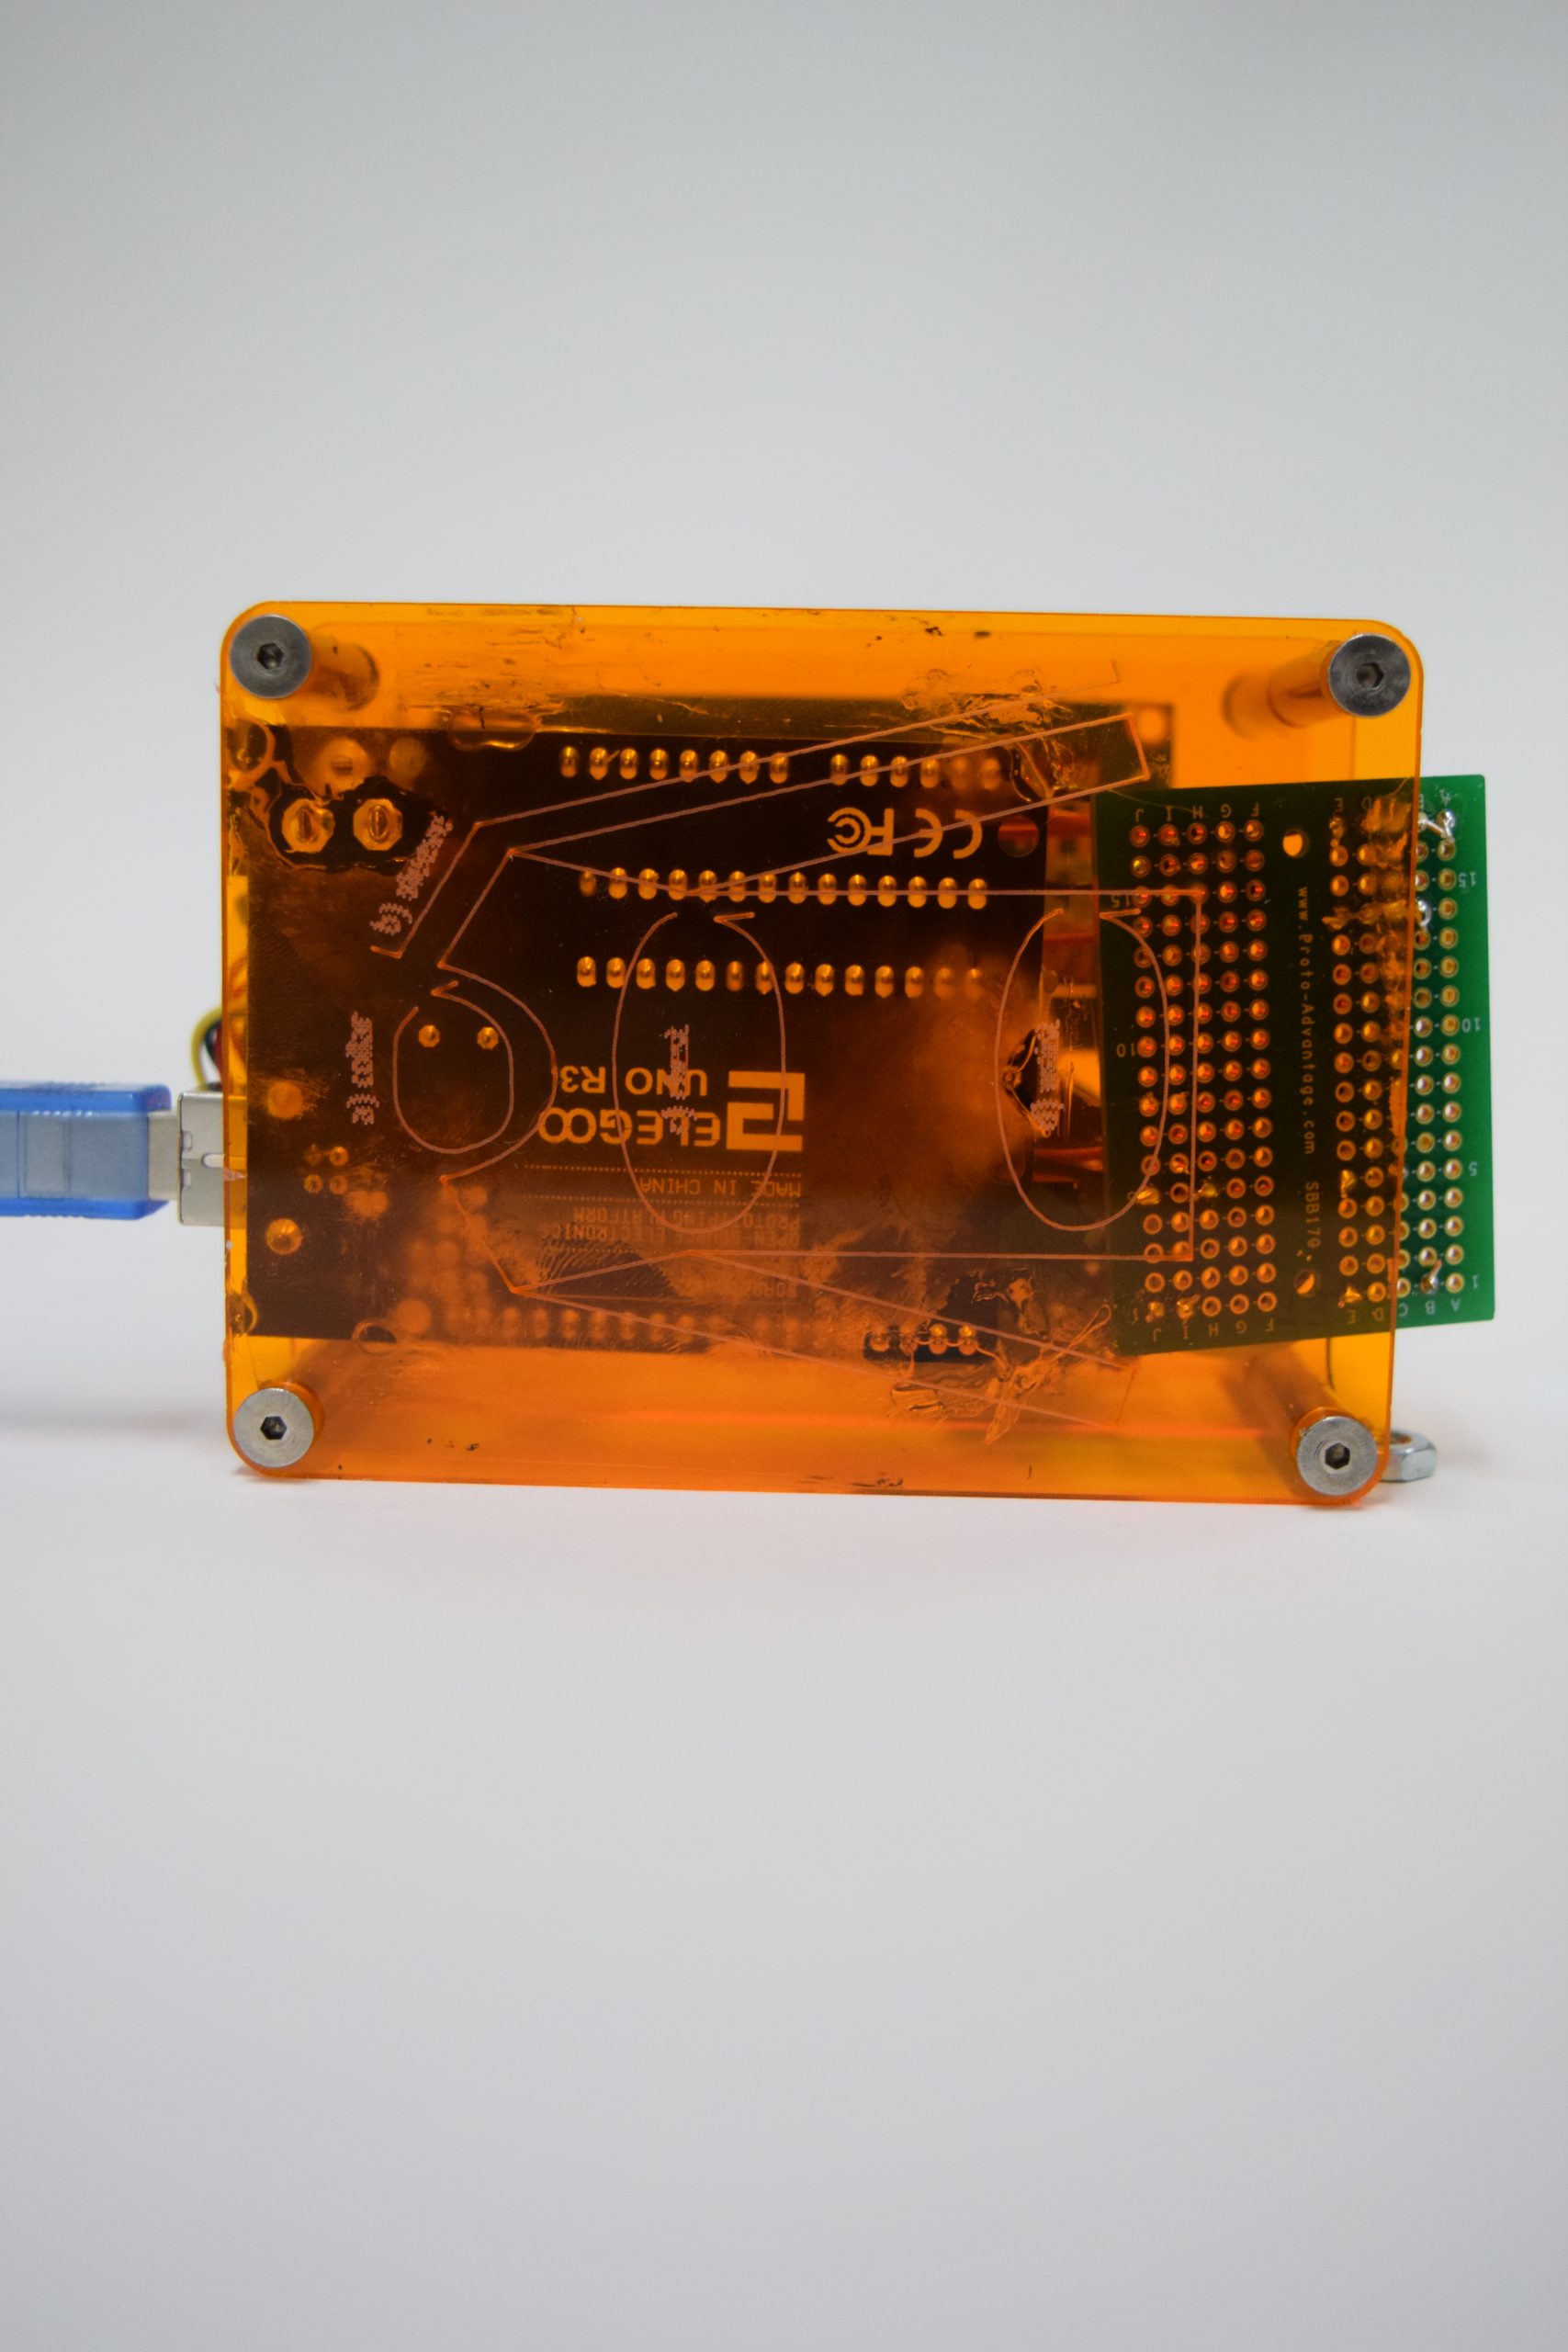
View of the bottom with laser engraving of which measurements to take. The glue I used to keep the Arduino in place took its toll on the acrylic

You can see the nut which is attached to the string used for measuring

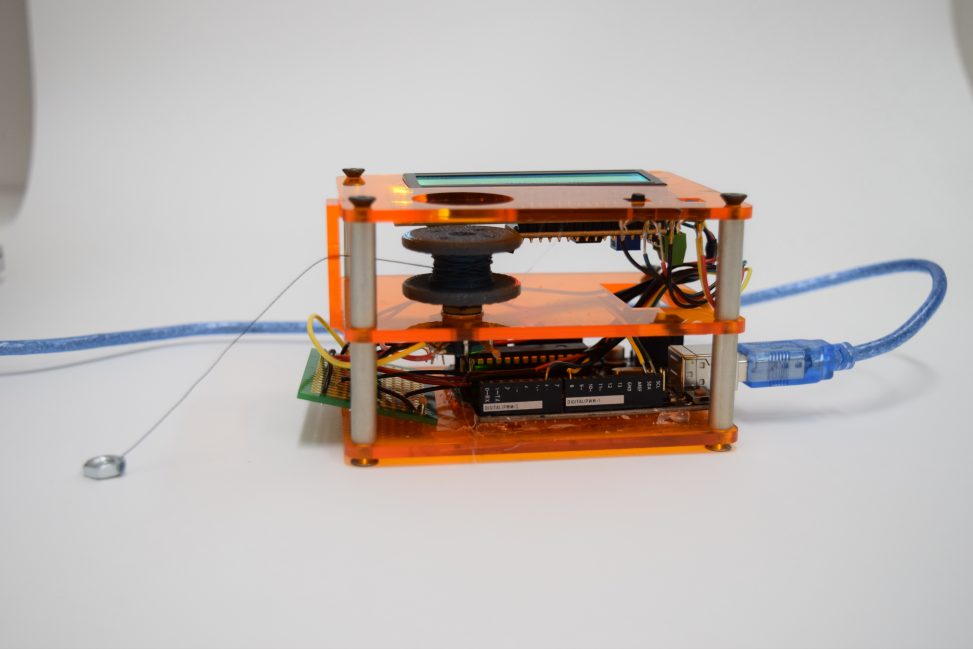
From this angle you can see all the circuits and the spool on different layers
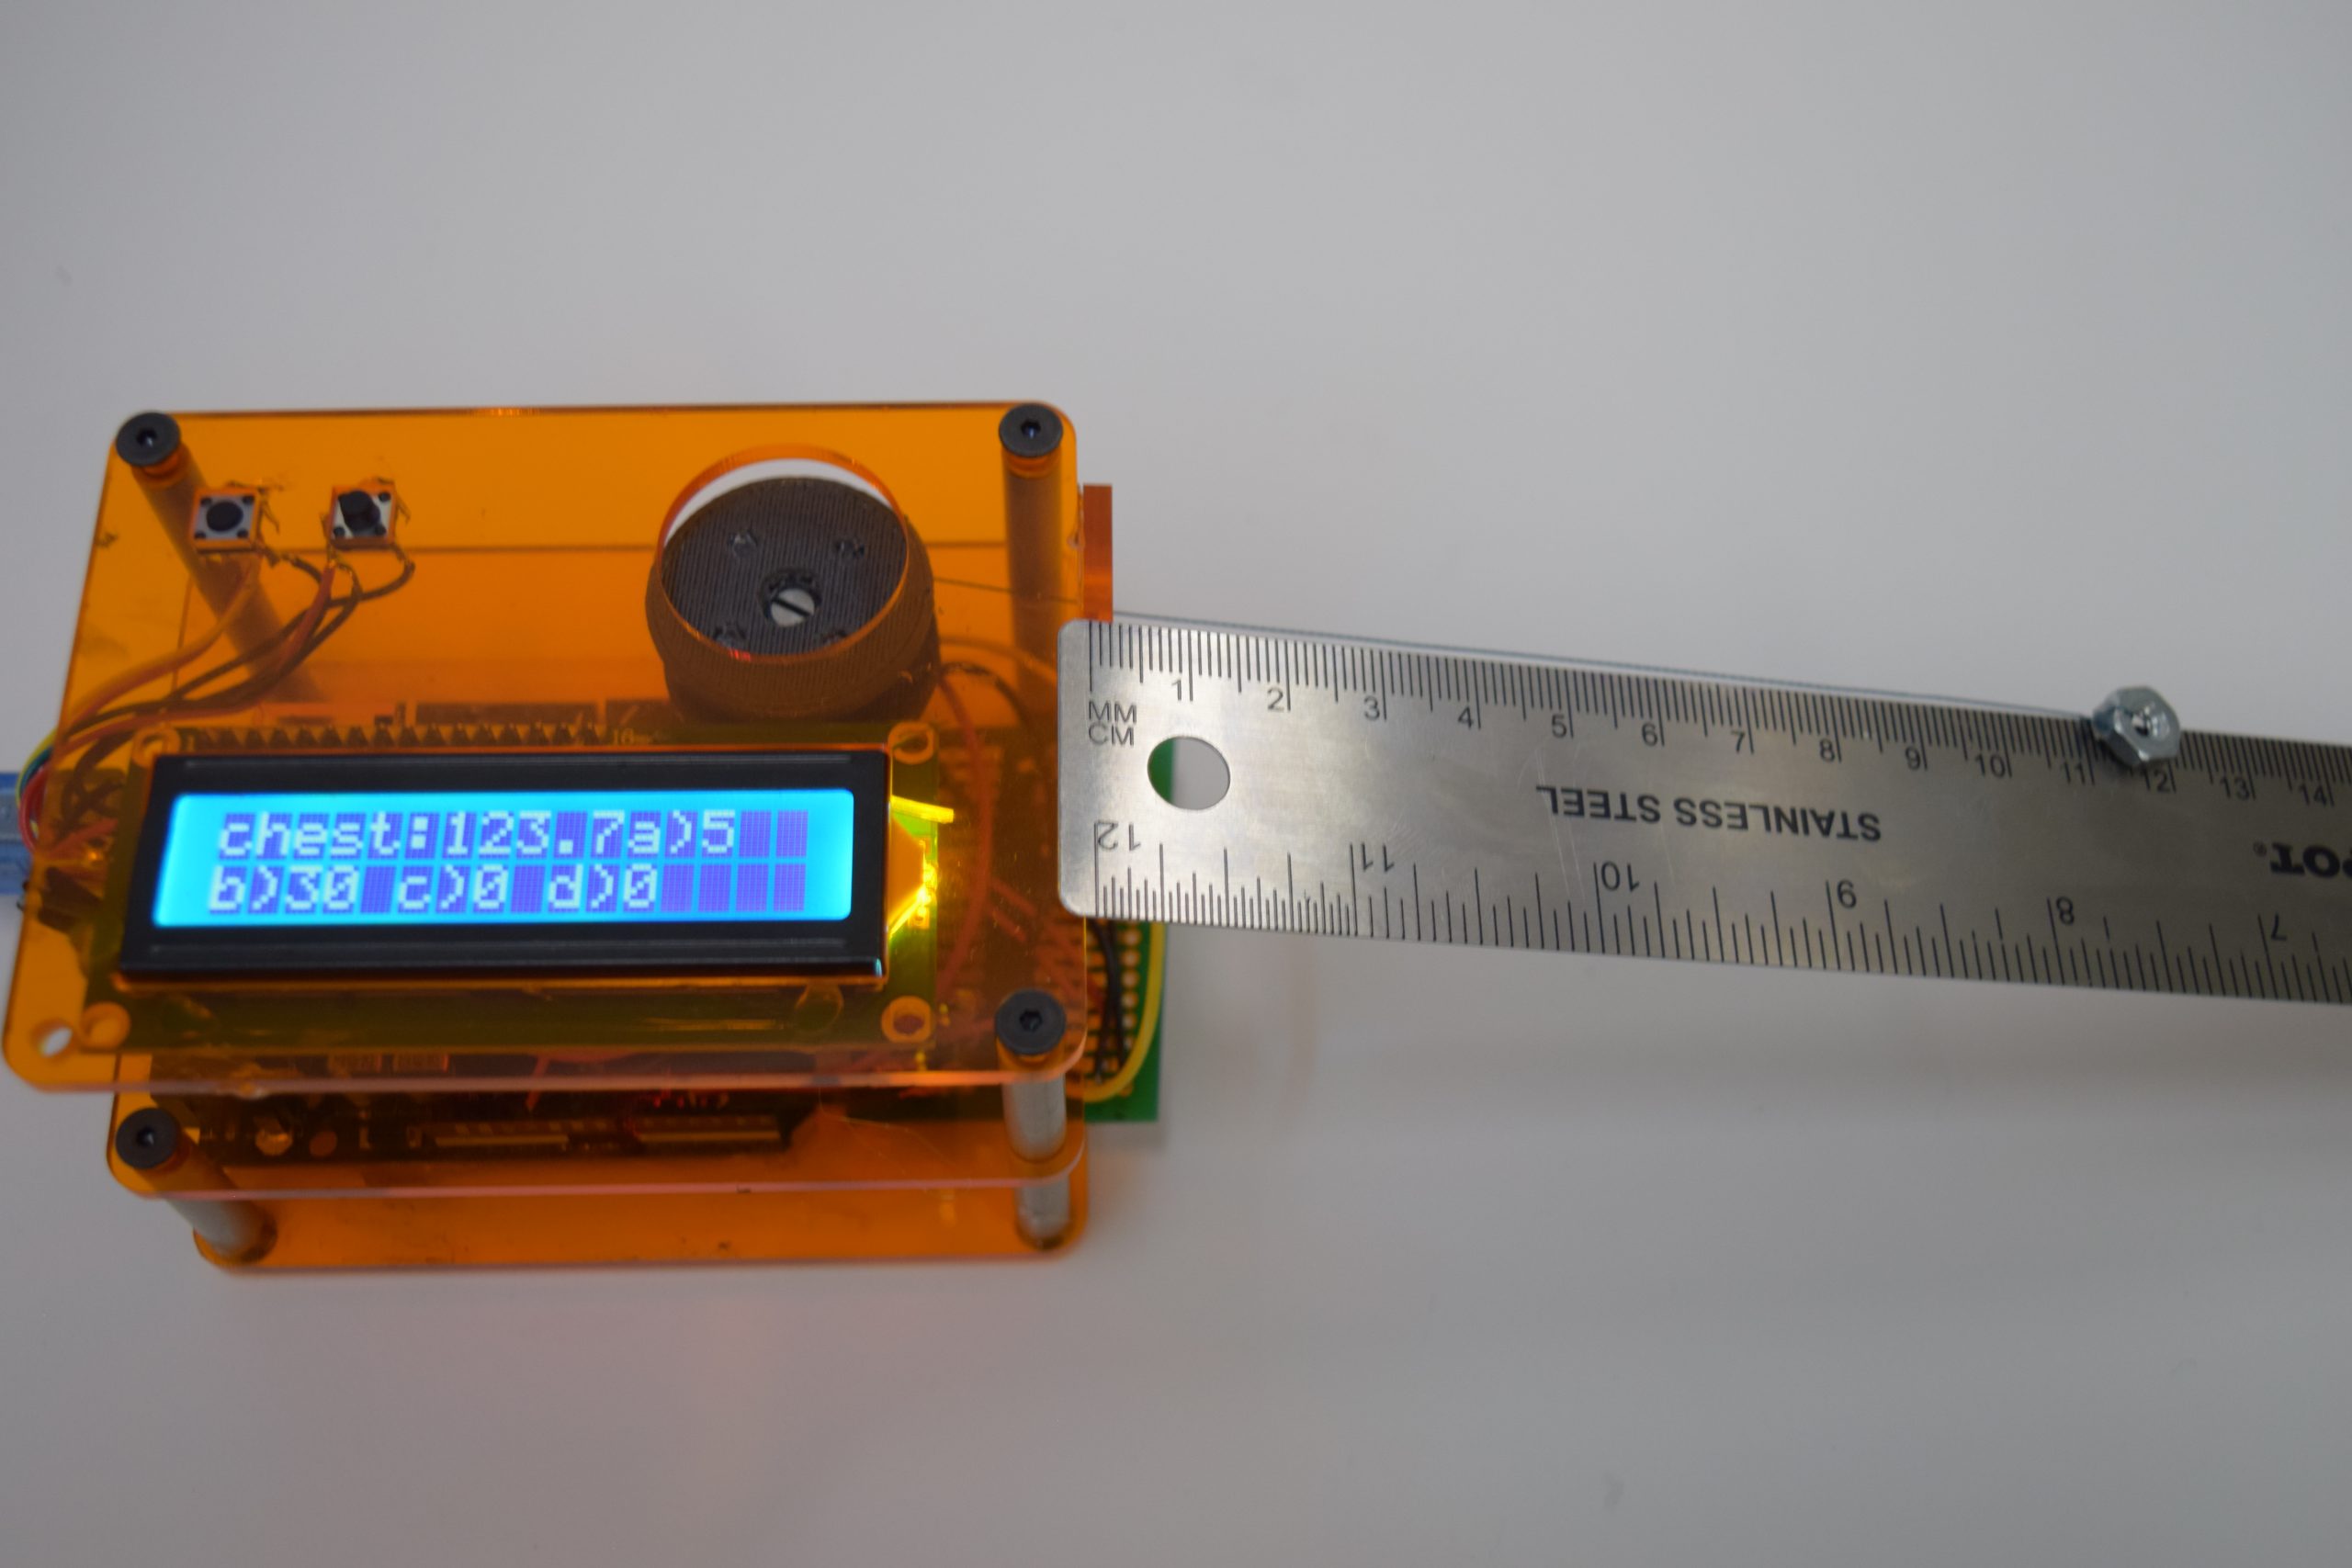
testing the device against a ruler, though the device is a little off here
This is a video of me testing the device against a ruler, after some calibrating the device works with results within a range of 5mm from the expected result. Featuring a small guest.
Process Images:
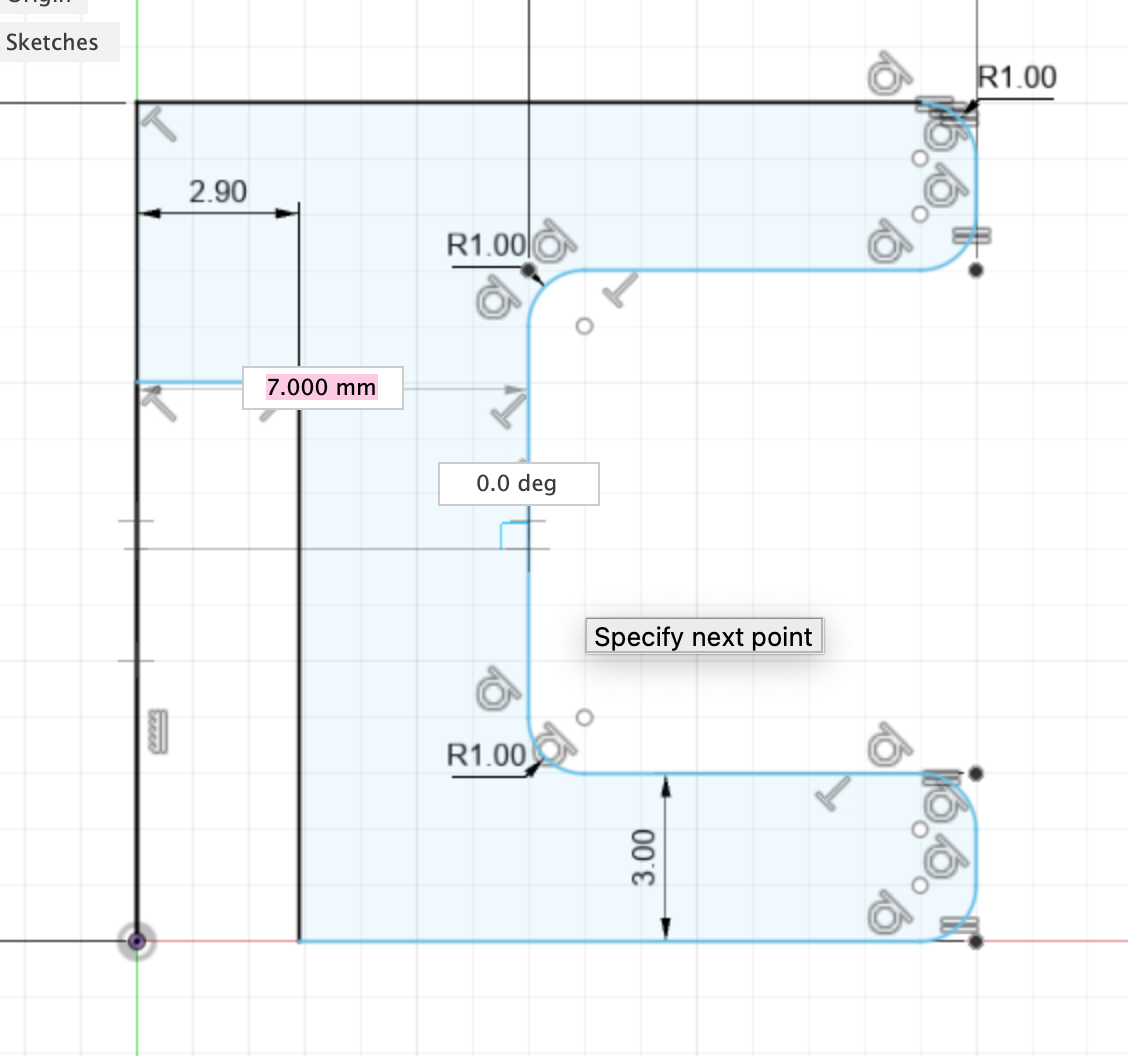
a screenshot of the measurements for the spool I 3D printed
At first I was a little more ambitious about the design and wanted to use a spring to rewind the string, but that turned out to be too much of a mechanical puzzle for me. My next thought was to use a crank, and I actually included holes in the spool for one to attach, but after the design was printed, cut, and put together, it became clear that the best method was the easiest one, just using my finger to rewind the string.
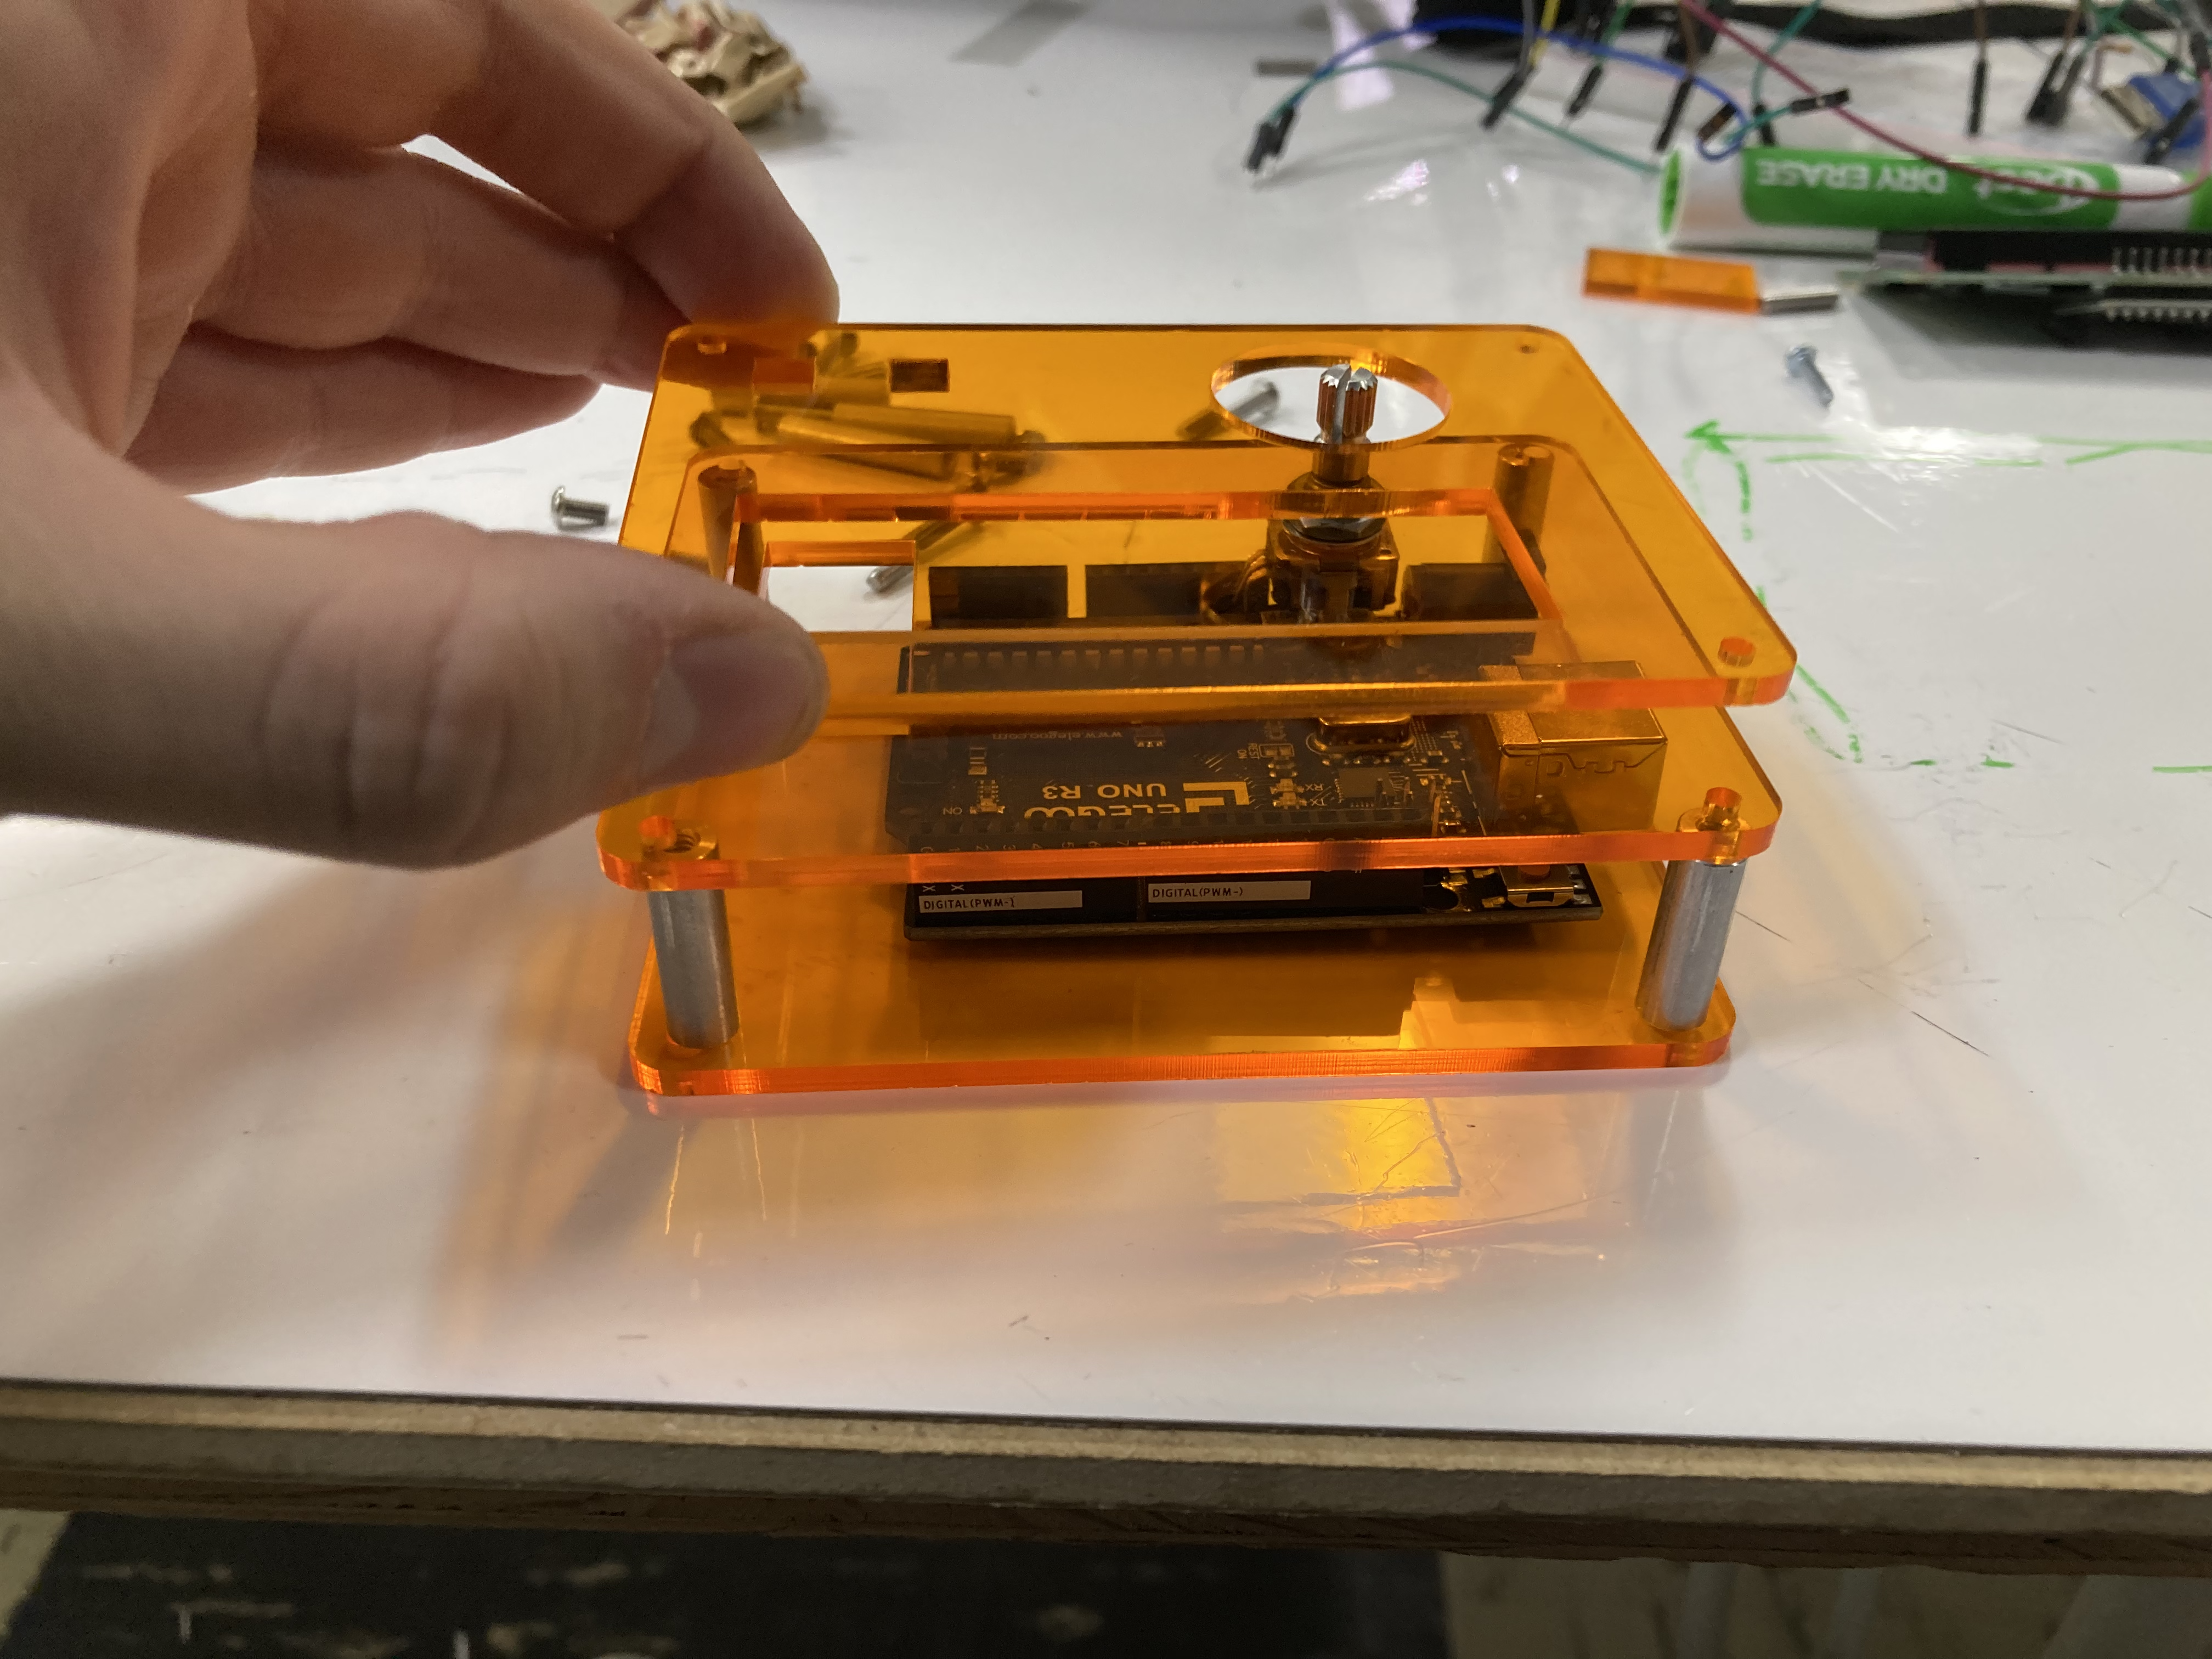
freshly laser cut, seeing what it looks like put together and figuring out which spacers work best
After I put my project together I realized that I needed to plan out the design better so that everything would fit. I went back afterwards and got rid of the excess wires and used glue instead of electrical tape to keep it all together, I was super happy with the 2nd version as compared to the bulkiness of the first (which had the buttons outside of the case). I was also able to switch out the yarn I was using with a more sturdy string and that made the results way more consistent, which made the project a lot more enjoyable.
First version of the project put together, I was having trouble using the wires with pins and couldn’t fit everything inside. I was also using yarn instead of the sturdy thread now being used.
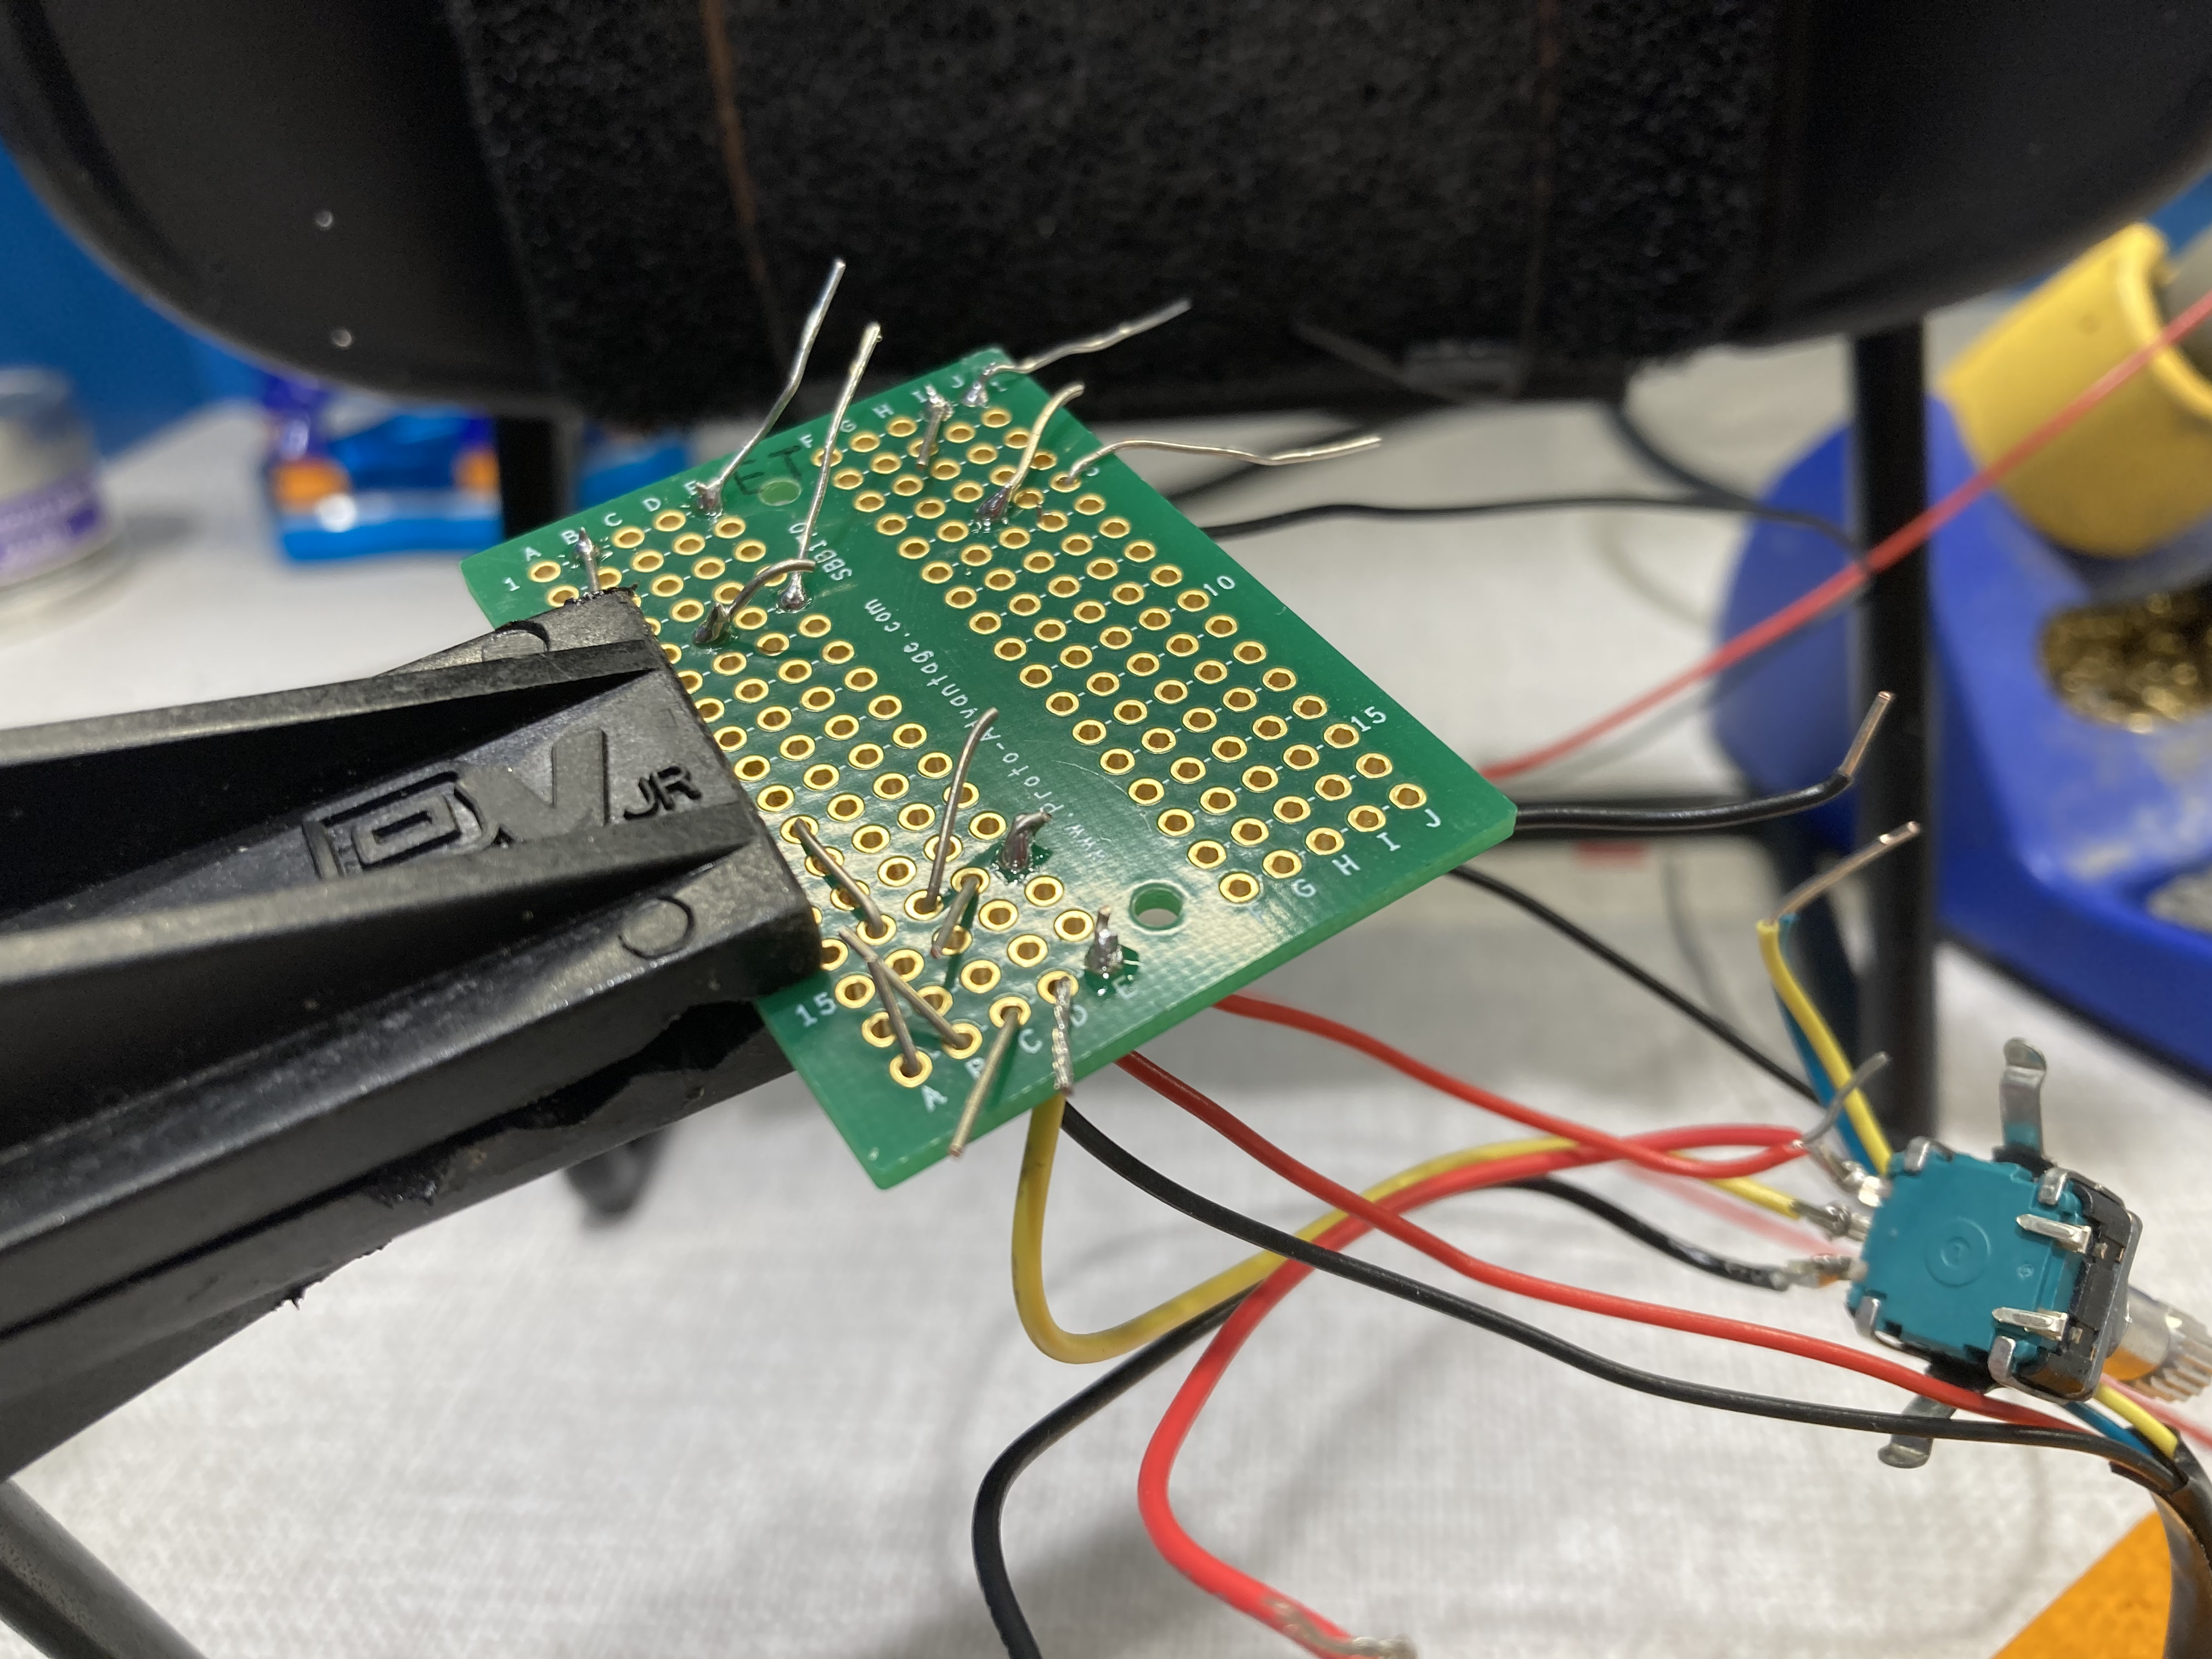
soldering a tiny protoboard so I can get rid of the breadboard and get everything to fit
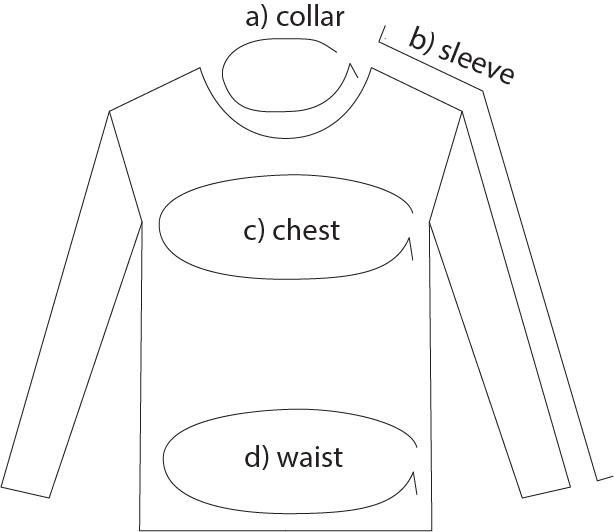
Shirt made in Illustrator for engraving
Discussion:
“With more time try having it be battery powered to be completely portable ”
I totally agree. I’m not sure in the current design where I would place a battery, but I’m sure there’s room for something. I think the wires had a little too much space to spread out, in a future iteration I would like to set up a path for the wires rather than the open design so that I can better place other parts of the project.
“A closed design might be better for something like this”
I think I agree, especially with the wires adding to the bulk. In the first version, pre soldering, the wires were sticking out the sides and it was pretty messy, though I think after cleaning it up the open design isn’t so bad to look at. I think the project looks cooler having the layers open like they are, but I think it also makes the project a lot more fragile.
“Millimeters is probably not the most useful unit for measurement?”
I agree. Since mm are such a small unit though, for the purpose of testing I thought they would be better to use. If I had more time and also more room on the LCD it would be useful to convert the measurement into inches or cm.
I really liked my final product. At first I was disappointed by the bulkiness of it, and the difficulty in getting an accurate reading, but after some soldering and a change of string, I was happy with the results. There are a lot of mistakes I made, and I feel that I could have gone farther with the case, but for a first laser cutting experience I thought it turned out well.
I feel that I learned a lot through this project. I struggled just to get the rotary encoder working, and if it wasn’t for Zach explaining the math, I’m sure it would have been a nightmare for me to figure out how to turn those measurements into distance. Though now looking back, I’m surprised that I struggled so much. I feel more prepared than I was before in starting what I’d consider a ‘technical’ project. I’m a big fan of motors and lights, but translating an input to an accurate reading is something I would usually avoid. After seeing the project work though, I feel a lot more confident. Something I would do differently next time is prepare the structure a little more. I like the design I used, but while putting it together I realized how much easier it would have been if I had taken every wire into consideration, not just the parts they attach to. I also ended up using glue to put the pieces in place, but in hindsight I would have preferred to use screws as much as possible.
I also learned how to laser cut (at least with the help of the IDeATe staff) and I want to try it out again soon!
If I were to iterate on this project I would definitely change the screen to an OLED, theres just not enough room on the LCD to show the readings. Also I’d like to add a battery so that the device is portable. One thing I wasn’t able to get to that I originally thought would be cool is to use a spring. This way the string would automatically rewind itself after being pulled out. I opted instead for a crank, but it became clear it was faster just to wind the spool itself. I also would rework the case and add holes for the Arduino and LCD to attach with screws. I might also add markings to the string just for clarities sake, and maybe figure out a way to make the engraving more visible, or less obstructed. I could add a receipt printer using bluetooth that could print out the measurements taken. Lastly I’d like to add a button that could convert the units into different measurements.
Technical Information:
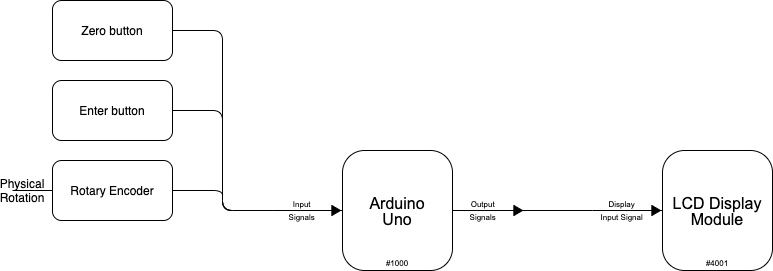
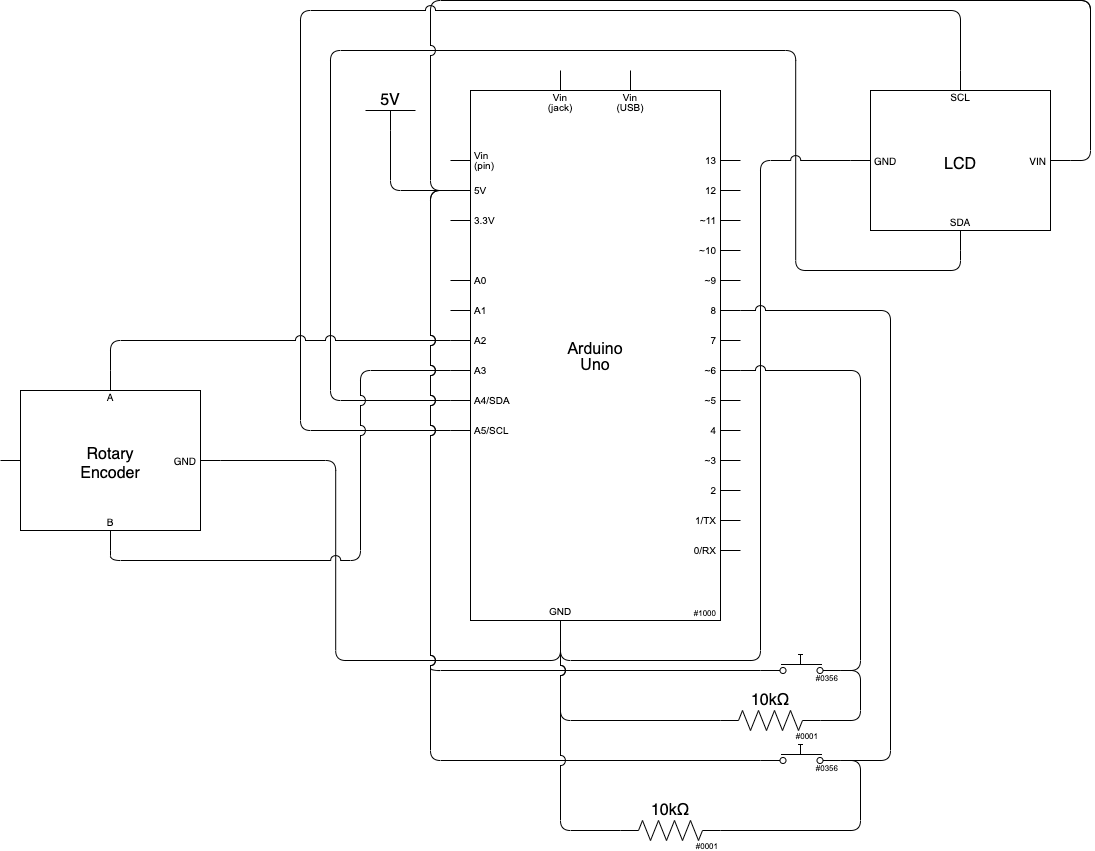
Schematic and Block Diagram:
Code:
/*
Electronic Tape Measurer
John Hewitt
This project uses a rotary encoder to take clothing measurements in mm

The buttons map to pins 6 and 8, while the rotary encoder is mapped to pins A2 and A3

I used this setup to get the rotary encoder working
https://forum.arduino.cc/t/getting-input-from-rotary-encoders/620026

*/

#include <Wire.h>
#include <LiquidCrystal_I2C.h>


LiquidCrystal_I2C screen(0x27, 16, 2);


 // used to draw a lil heart :] https://maxpromer.github.io/LCD-Character-Creator/
byte heart[] = {
  B00000,
  B01010,
  B10101,
  B10001,
  B01010,
  B00100,
  B00000,
  B00000
};

int clockP = A3;
int data = A2;
int count = 0;
int c = HIGH;
int cLast = HIGH;
int d = HIGH;


int collar = 0;
int sleeve = 0;
int chest = 0;
int waist = 0;

float current = 0;

int enter_button = 6;
int zero_button = 8;

float measurement;
float measurement_last;

bool no_change_on_screen = true;

bool measurement_mode = false;

bool start_screen = true;
bool start_display_up = false;

bool still_measuring = false;

int on_step = 1;

void setup() {

  pinMode (enter_button, INPUT);
  pinMode (zero_button, INPUT);

  pinMode (clockP, INPUT_PULLUP);
  pinMode (data, INPUT_PULLUP);


  screen.init();
  screen.backlight();
  screen.home();
  screen.display();
  screen.createChar(0, heart); //initialiaze heart to zero screen.write(0);
  screen.clear();
}


void loop() {


  //rotary encoder code
  c = digitalRead(clockP); // read pin A as clock
  d = digitalRead(data);  // read pin B as data


  if (c != cLast) {       // clock pin has changed value
    d = c^d;              // work out direction using an XOR
    if ( d ) {
      count++;
    } else {
      count--;
    }
    cLast = c;
  }


  if (digitalRead(zero_button) == HIGH) {
    //set current value to zero
    count = 0;
  }

//43.9823
  measurement = ((((float)count/ (float) 16)) *30);


  if (start_screen == true) {
    if (!start_display_up) {
      screen.setCursor(2, 0);
      screen.write(0);
      screen.print(" WELCOME ");
      screen.write(0);
      start_display_up = true;
    }
    if (digitalRead(enter_button) == HIGH) {
      start_screen = false;
      start_display_up = false;
      measurement_mode = true;
      no_change_on_screen = false;
      still_measuring = true;
      on_step = 1;
      delay(200);
    }
  }


  if (measurement_mode == true) {

    if (measurement_last != measurement) {
      measurement_last = measurement;
      no_change_on_screen = false;
    }

    if (still_measuring == true) {

      if (digitalRead(enter_button) == HIGH) {

        if (on_step == 1) {
          collar = measurement;
          on_step = 2;

          no_change_on_screen = false;

        } else if (on_step == 2) {
          sleeve = measurement;
          on_step = 3;

          no_change_on_screen = false;

        } else if (on_step == 3) {
          chest = measurement;
          on_step = 4;

          no_change_on_screen = false;

        } else if (on_step == 4) {
          waist = measurement;
          still_measuring = false;

          no_change_on_screen = false;

          still_measuring = false;
        }
        delay(200);
      }
    }

    if (!no_change_on_screen) {
      screen.clear();

      screen.setCursor(0, 0);
      if (on_step == 1) {
         screen.print("collar:");
         screen.print(measurement);
      } else if (on_step == 2) {
         screen.print("sleeve:");
         screen.print(measurement);
      } else if (on_step == 3) {
         screen.print("chest:");
         screen.print(measurement);
      } else if (on_step == 4) {
         screen.print("waist:");
         screen.print(measurement);
      }


      screen.setCursor(11, 0);
      screen.print("a)");
      screen.print(collar);

      screen.setCursor(0, 1);

      screen.print("b)");
      screen.print(sleeve);
      screen.print(" ");


      screen.print("c)");
      screen.print(chest);
      screen.print(" ");


      screen.print("d)");
      screen.print(waist);

      no_change_on_screen = true;
    }

    if (!still_measuring) {
      if (digitalRead(enter_button) == HIGH) {
        screen.clear();
        measurement_mode = false;
        collar = 0;
        sleeve = 0;
        chest = 0;
        waist = 0;
        start_screen = true;
        on_step = 1;
        delay(200);
      }
    }

  }

}