Throughout this course we develop physical and digital creation skills and put them to the test improving people’s quality of life. This team project is an assistive device designed for our client, Dave, whose physical disabilities prevent him from accessing the oven. The project aims to help him access the oven rack and lift up the dish to counter height more easily.
Description
The table can be positioned against the already opened oven and place the hook onto the oven rack with button control. Then the user can drag the table out, which in turn drag the rack out, allowing the user to access the dish. After manually sliding the dish onto the table, the user can raise the height-adjustable table to counter height, and push the dish onto the kitchen counter.
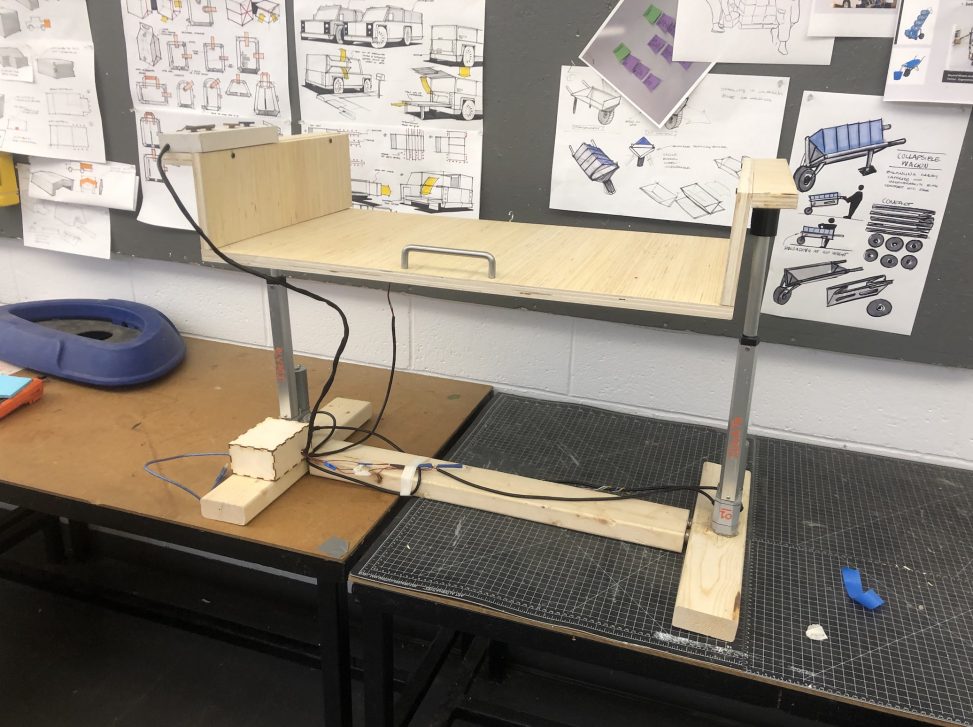
Images of the Final Product

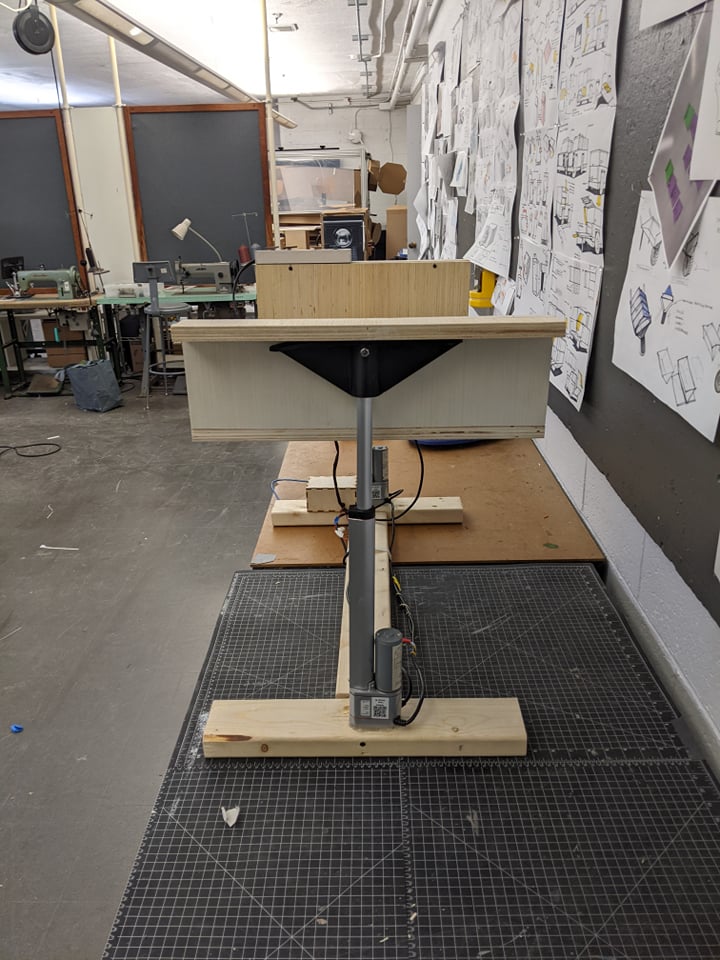
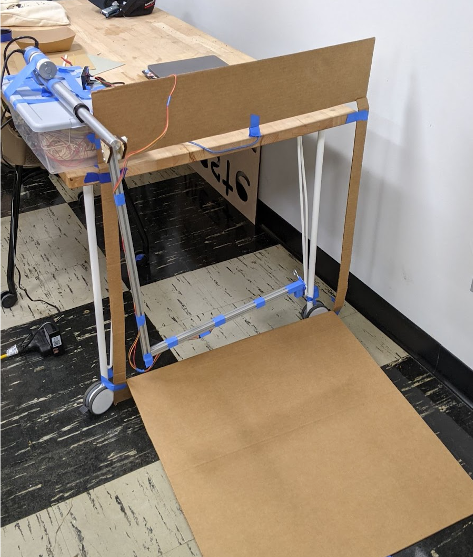
Overall Image
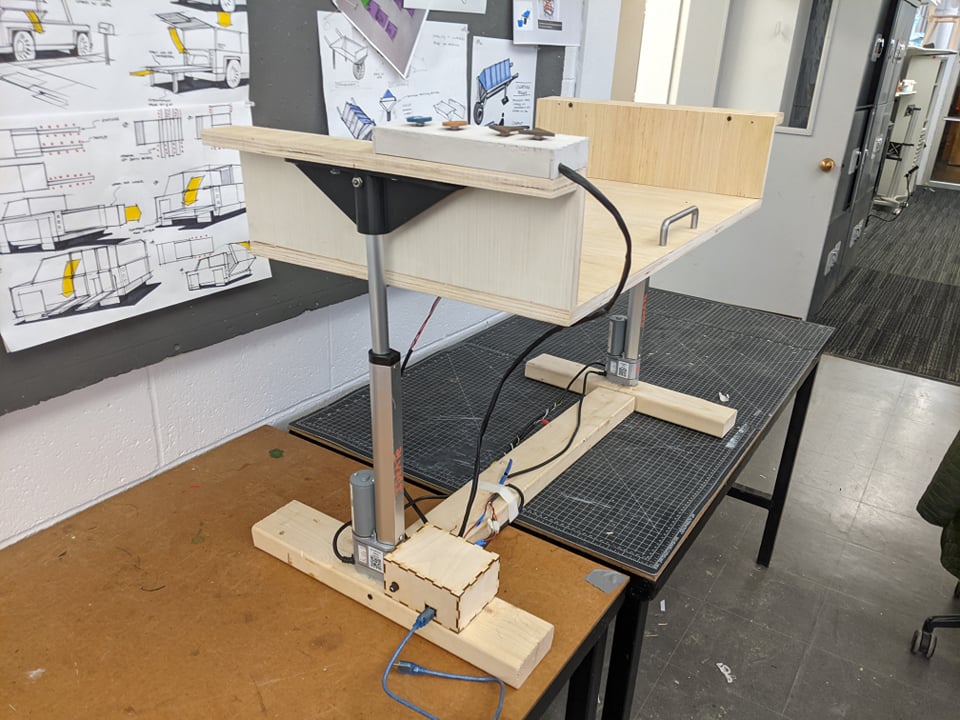
Side view of the overall table
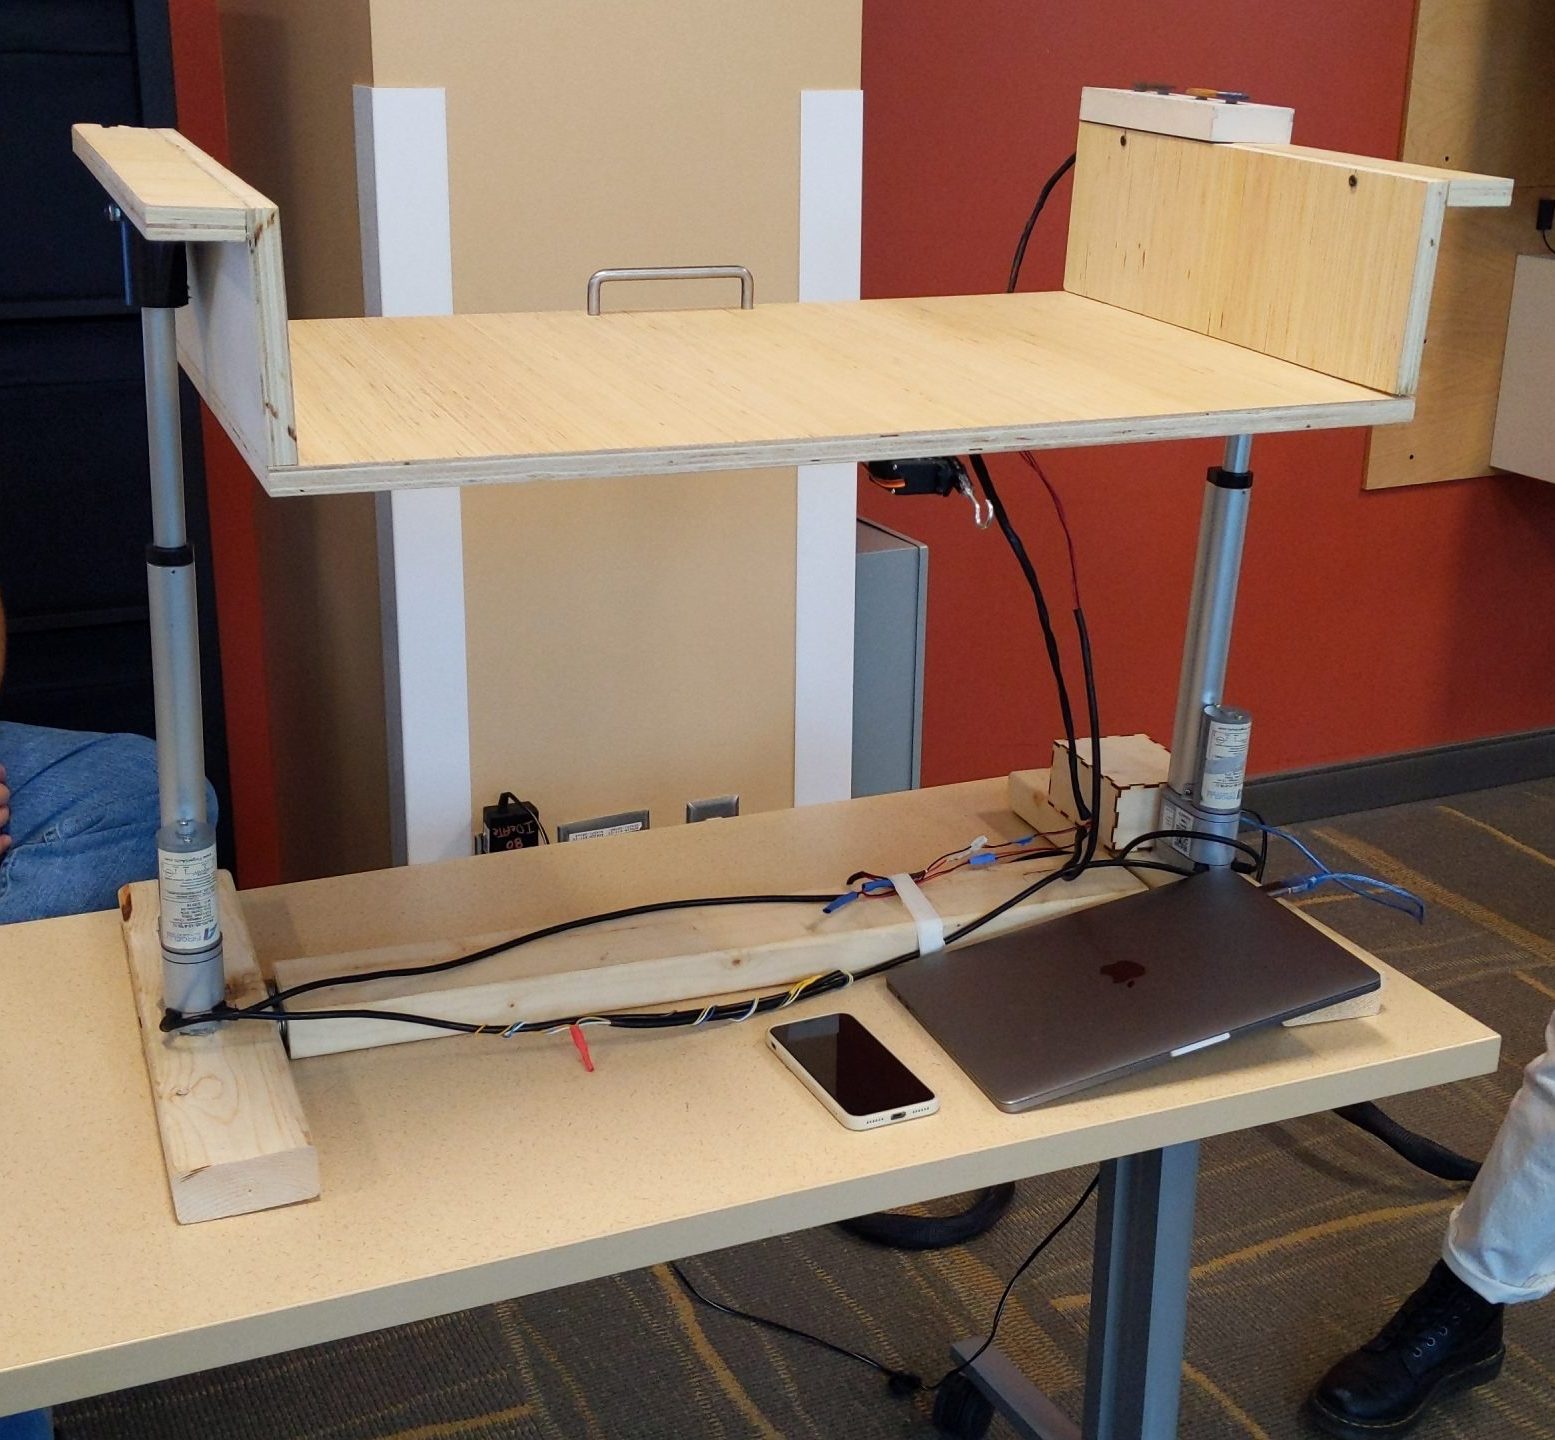
Overall Image during Presentation
Video Demo of the Final Project
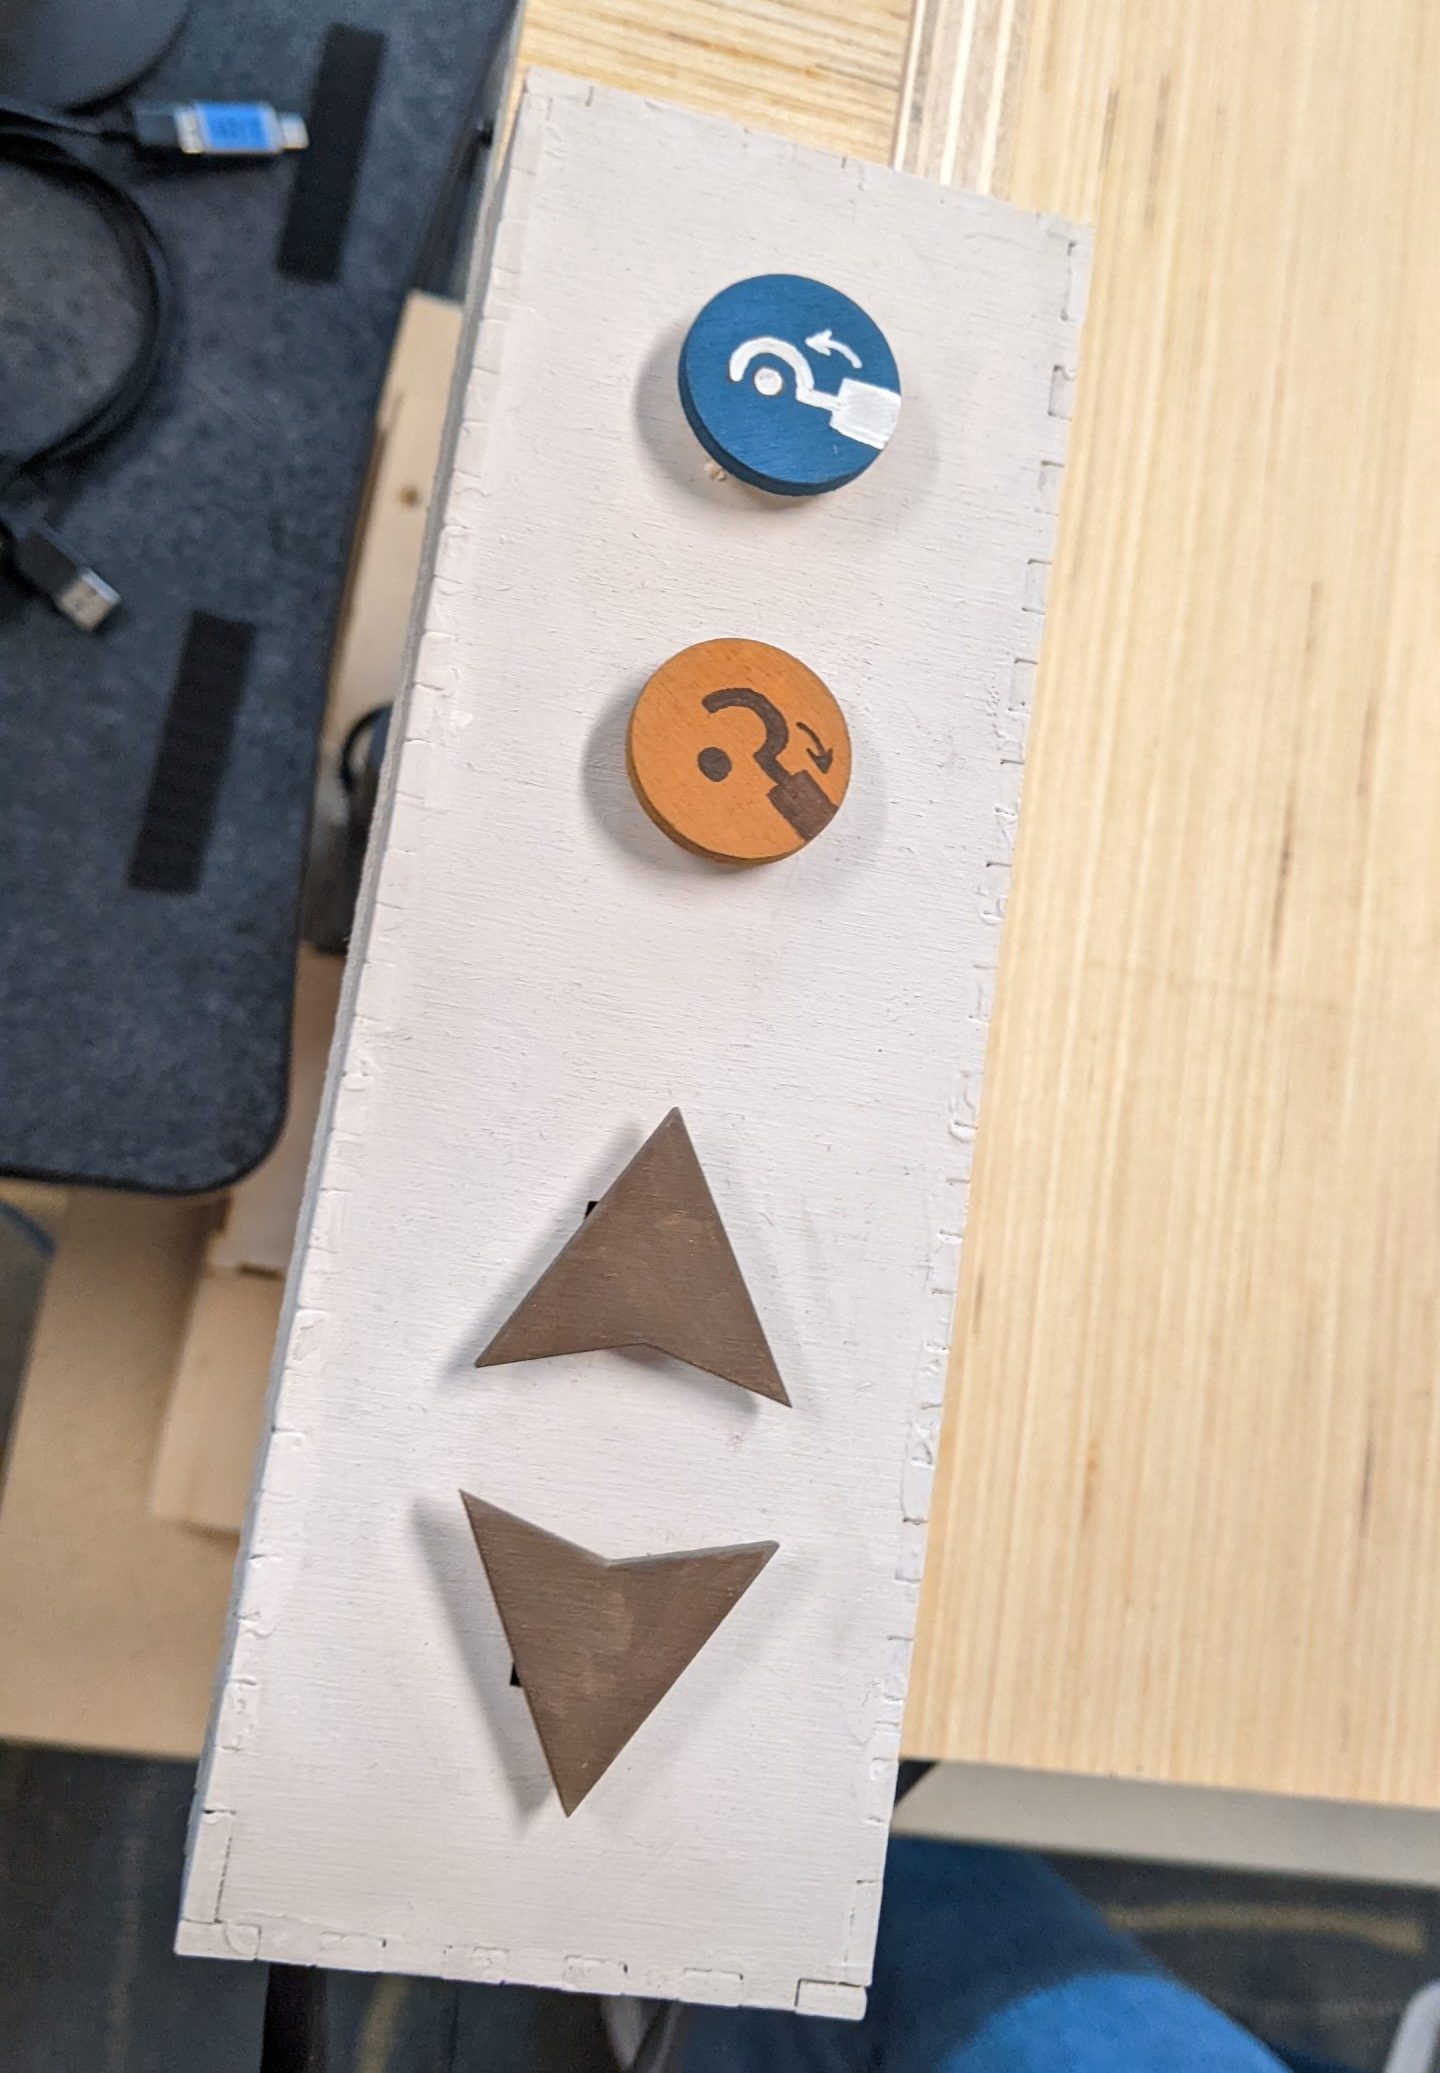
Detail: Controls
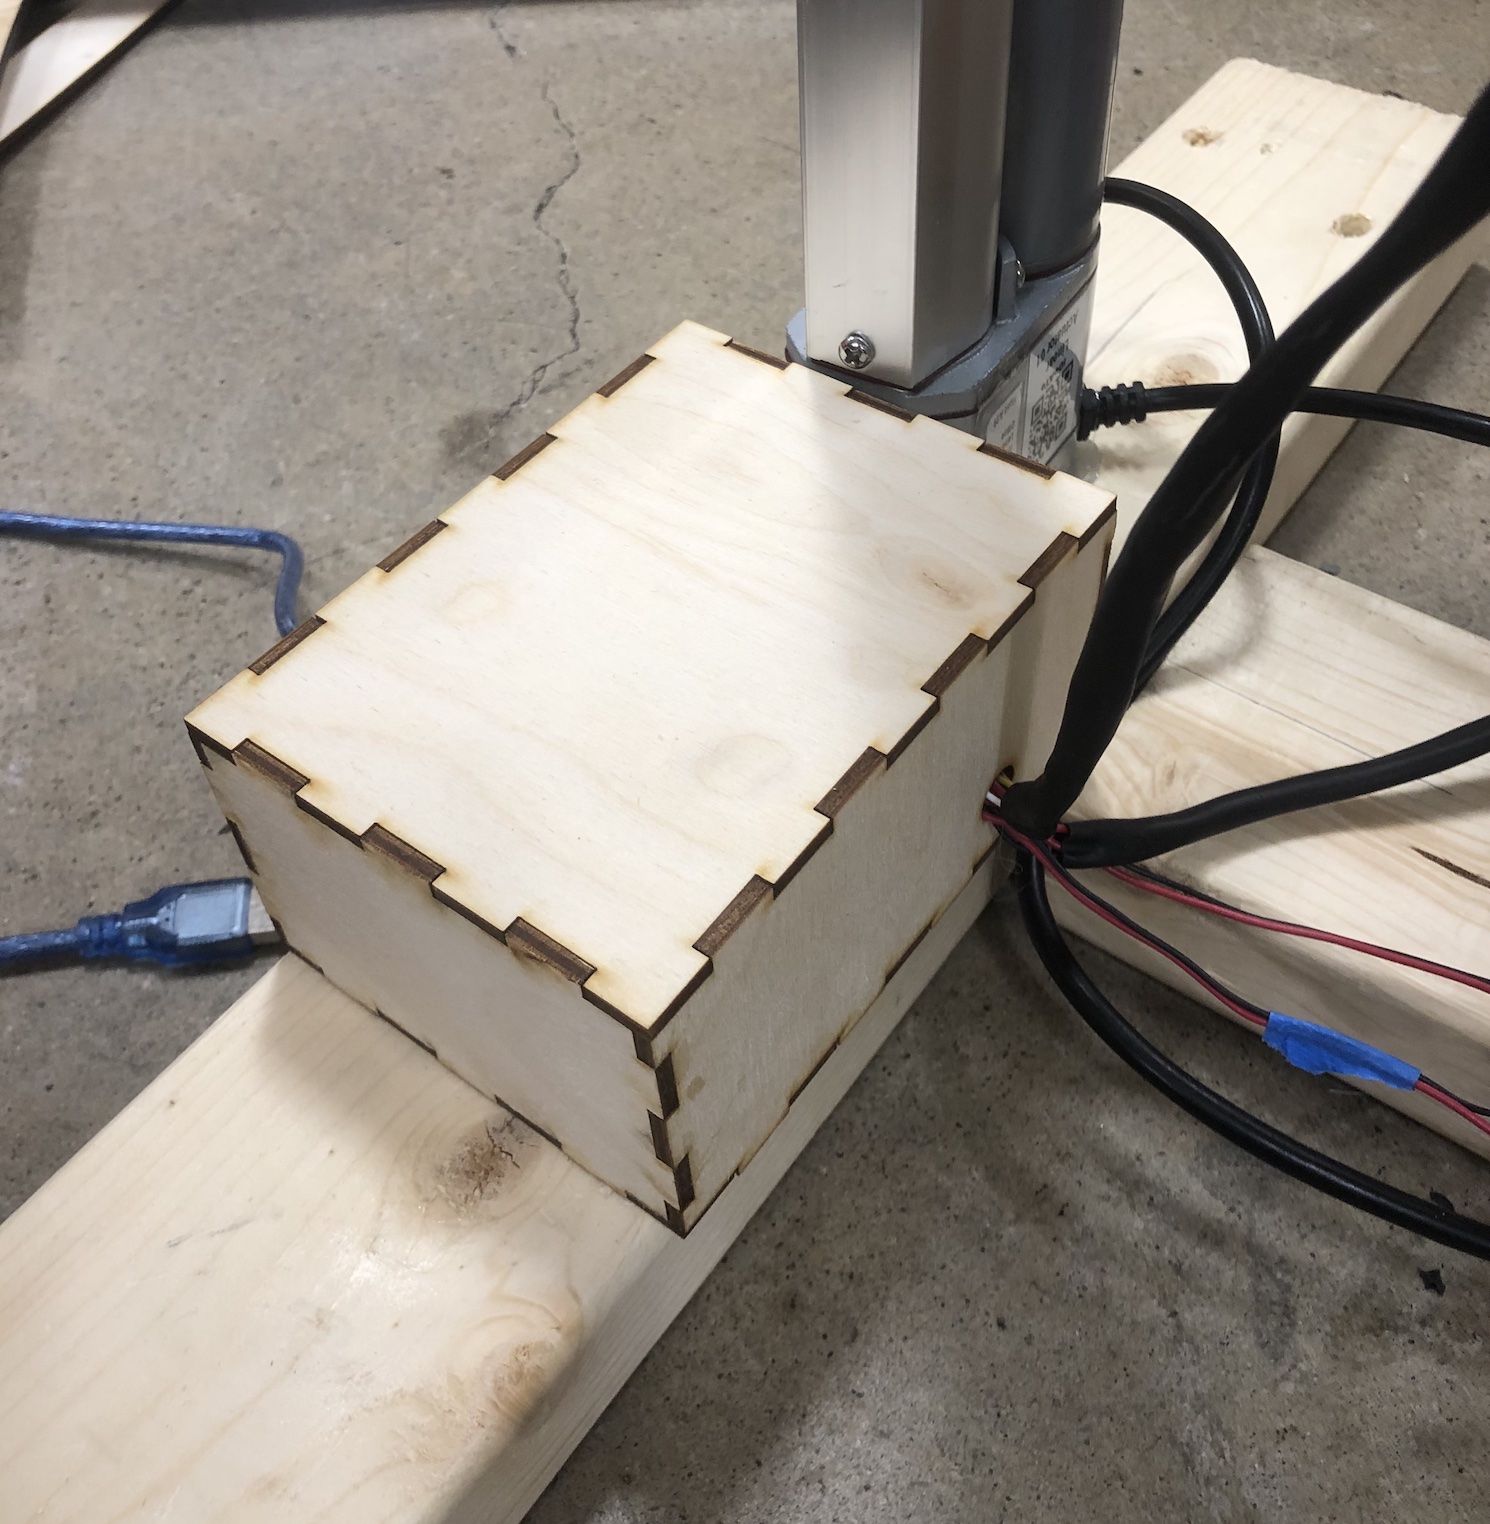
Detail: Wire box
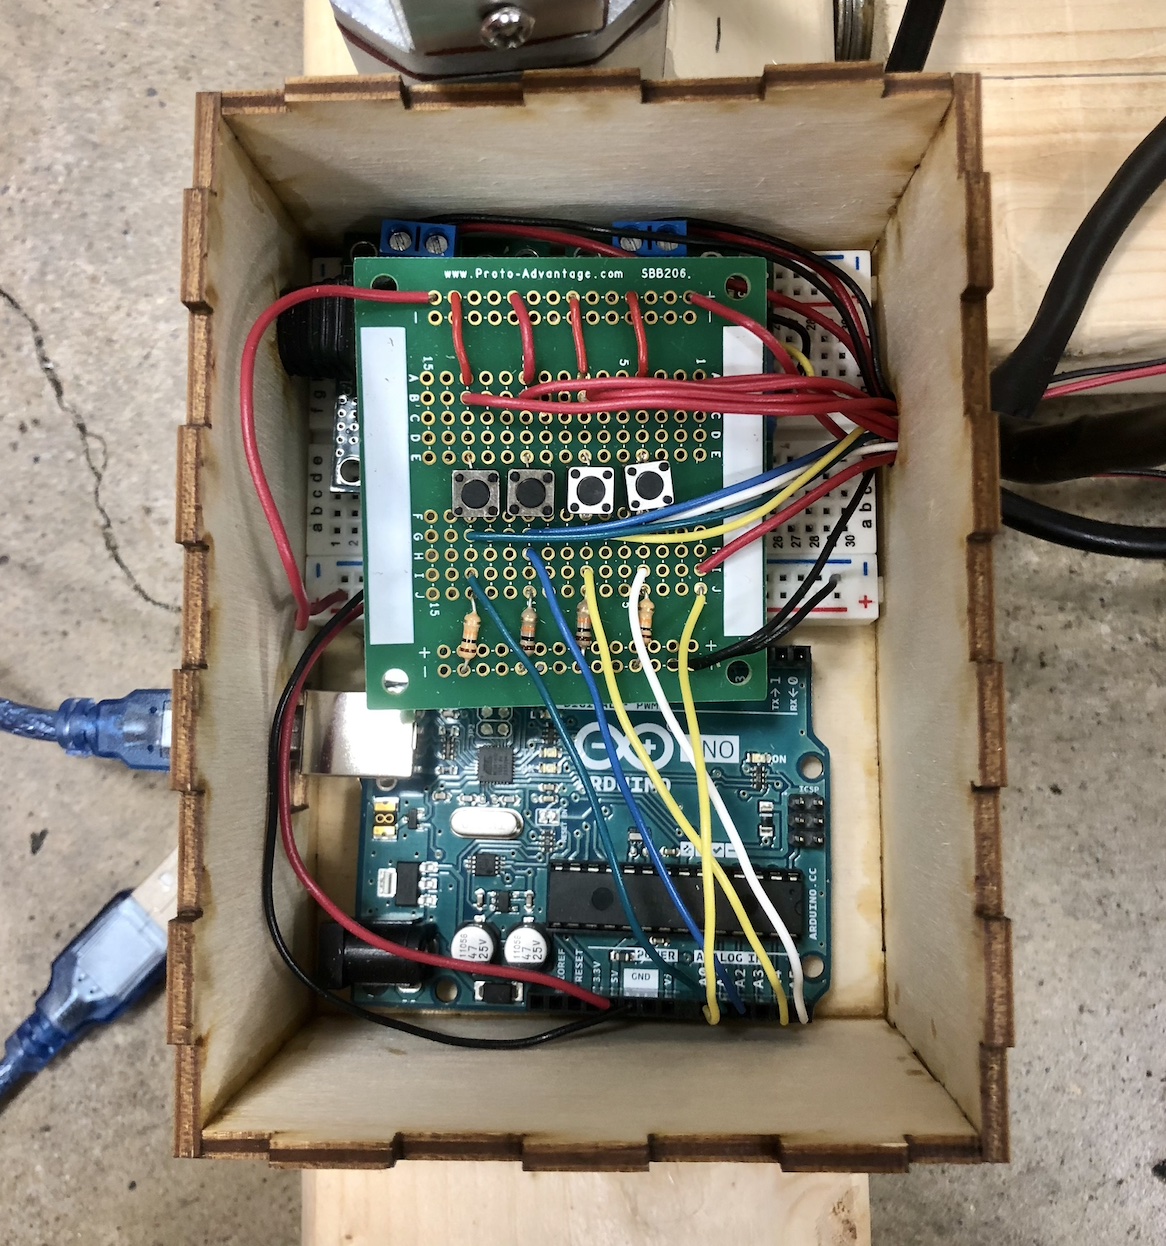
Detail: Inside the wire box
Detail: 3D printed Tabletop attachment point
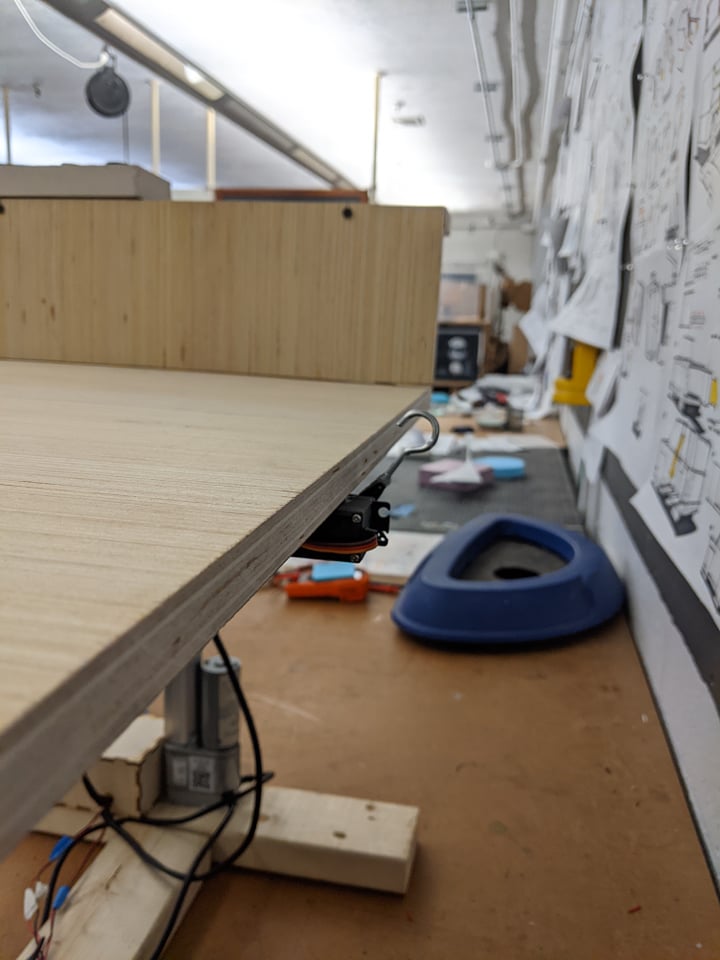
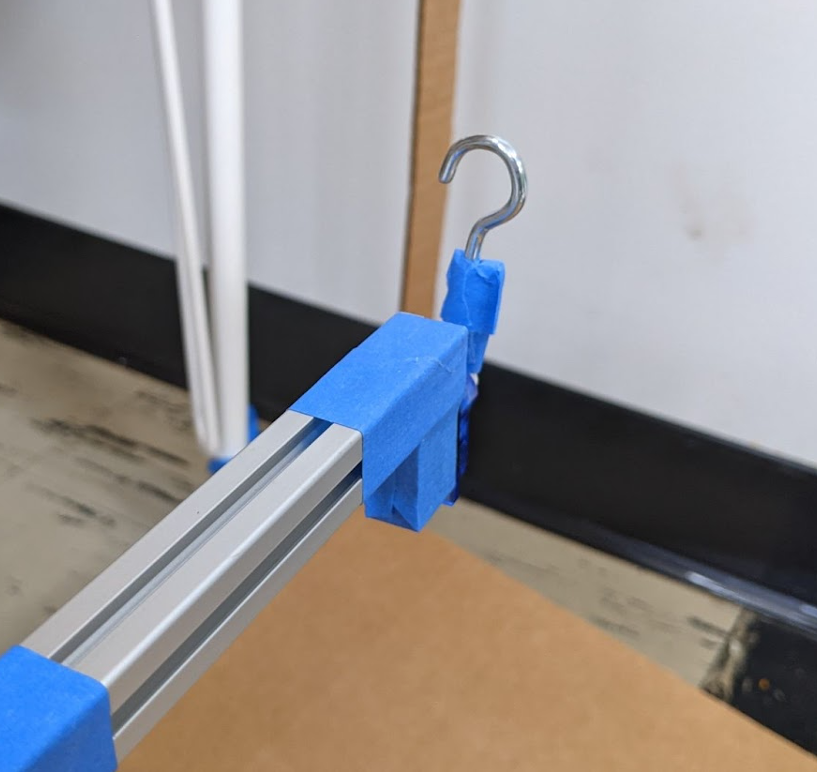
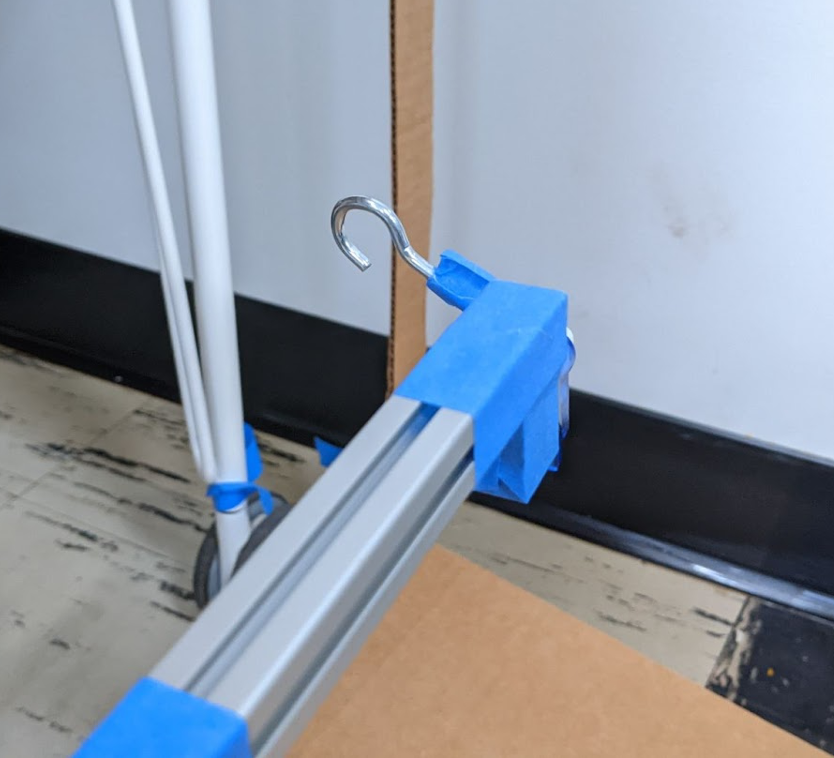
Detail: Servo attached hook
Narrative Sketch
With the winter season approaching, Dave and his friend’s are excited for the snow and championship season. The coming weekend happens to host both a snowy Saturday and a League Championship finals. Dave decides to seize the opportunity and reaches out on discord to set up a watching party. Come The night before the party, Dave wants to make it an extra special event, and decides to bake something grand for everyone to enjoy. He heads over to his kitchen and uses his rolling table to set up a wonderful lasagna for baking. When he is ready to bake, he clears the table except for his lasagna, and lowers the oven door. The table rolls right over the oven door, snugly fitting the sides of the door.
Dave pushes the lowering button on the controls to match the height of the oven rack and uses the illustrated hook buttons to latch onto the preferred rack. With a single hand, he slides in the lasagna dish, unhooks, and pulls his table out of the way to close the door and let the meal cook. When everything is ready, he lowers the oven door, lines up the table, and hooks on. The dish slides right onto the table, and Dave can unhook. Dave takes hold of the table by the handle and easily rolls the heavy dish out of the way. With the oven closed he can pull the table close to the counter and raise it to match counter height to slide it on. When game day arrives, Dave sets up the table with snacks and his lasagna and brings it to the living room, where everyone is excited for a great snowy night in.
Prototype
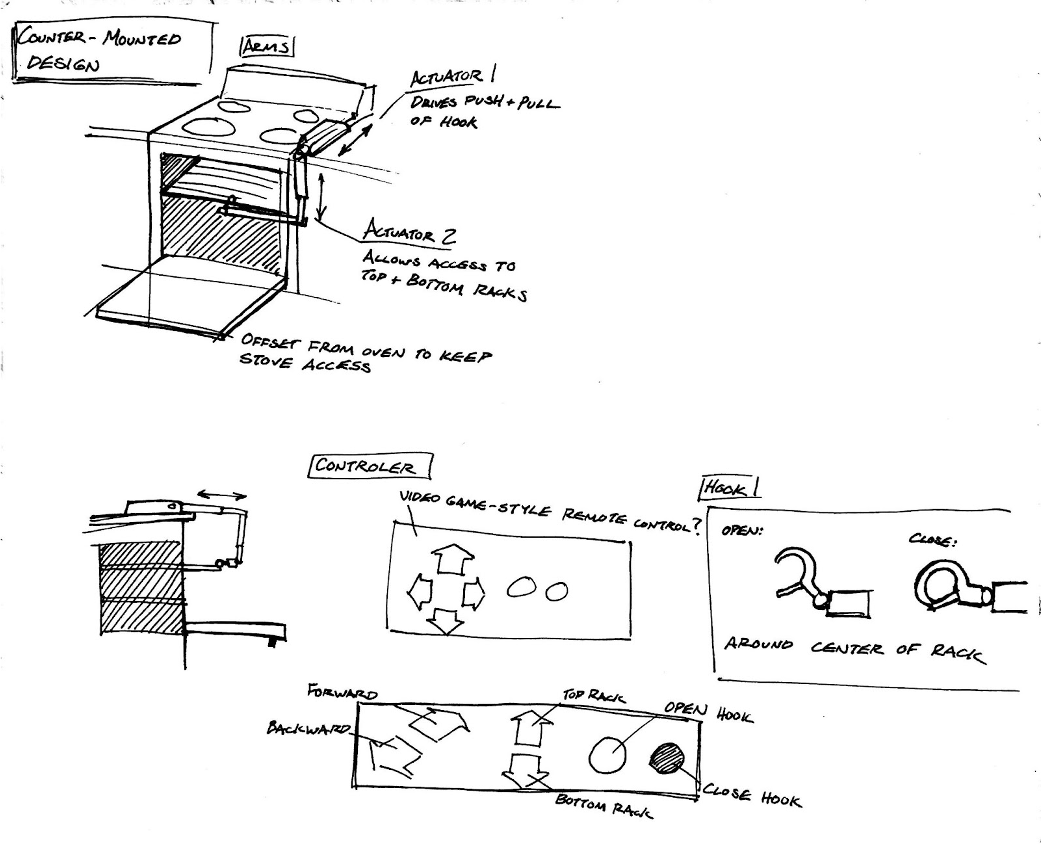
- The prototype was designed to solve the problem of accessing the oven rack while in a wheelchair.
- The prototype we built was a simple mechanical arm that can “drag out” the oven rack, allowing the user to access the dish. The device would be mounted on the countertop on one side of the oven. Then the user can use the controls to attach the hook onto the oven rack, extend the actuator, thus dragging out the rack.
- Images:
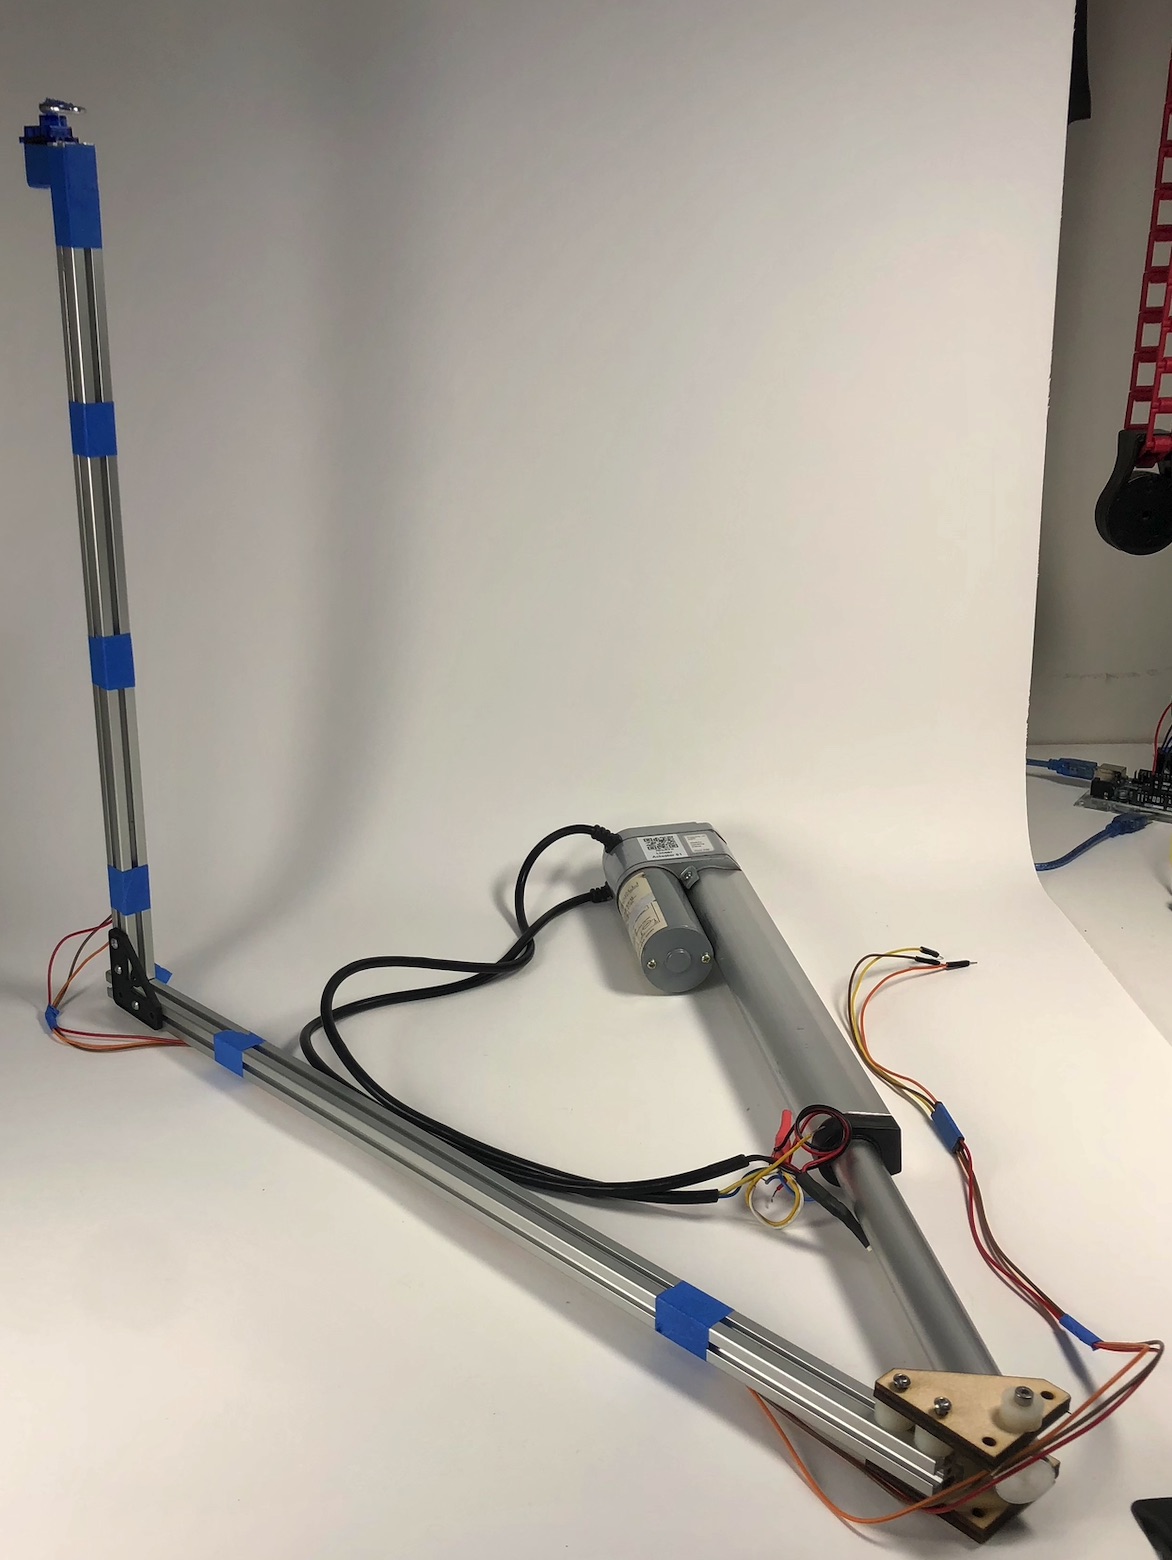
Overall Prototype Structure
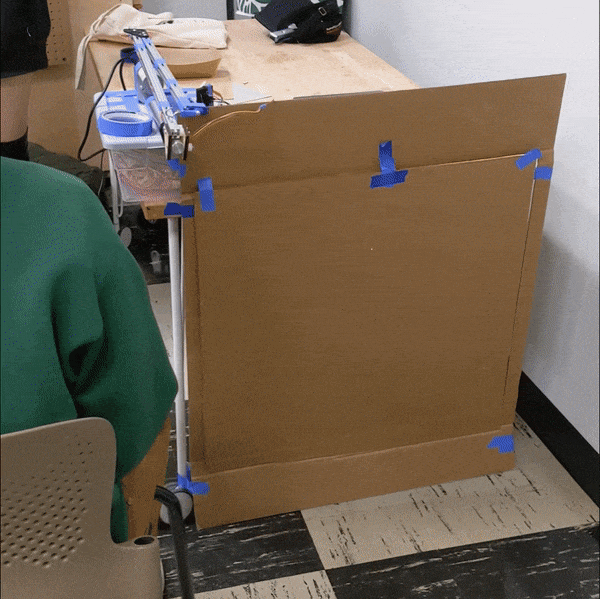
Prototype with “Oven”
Open Hook
Close Hook
- Demo of Prototype:
Demo of Prototype
- Prototype Development:
Sketch of Prototype
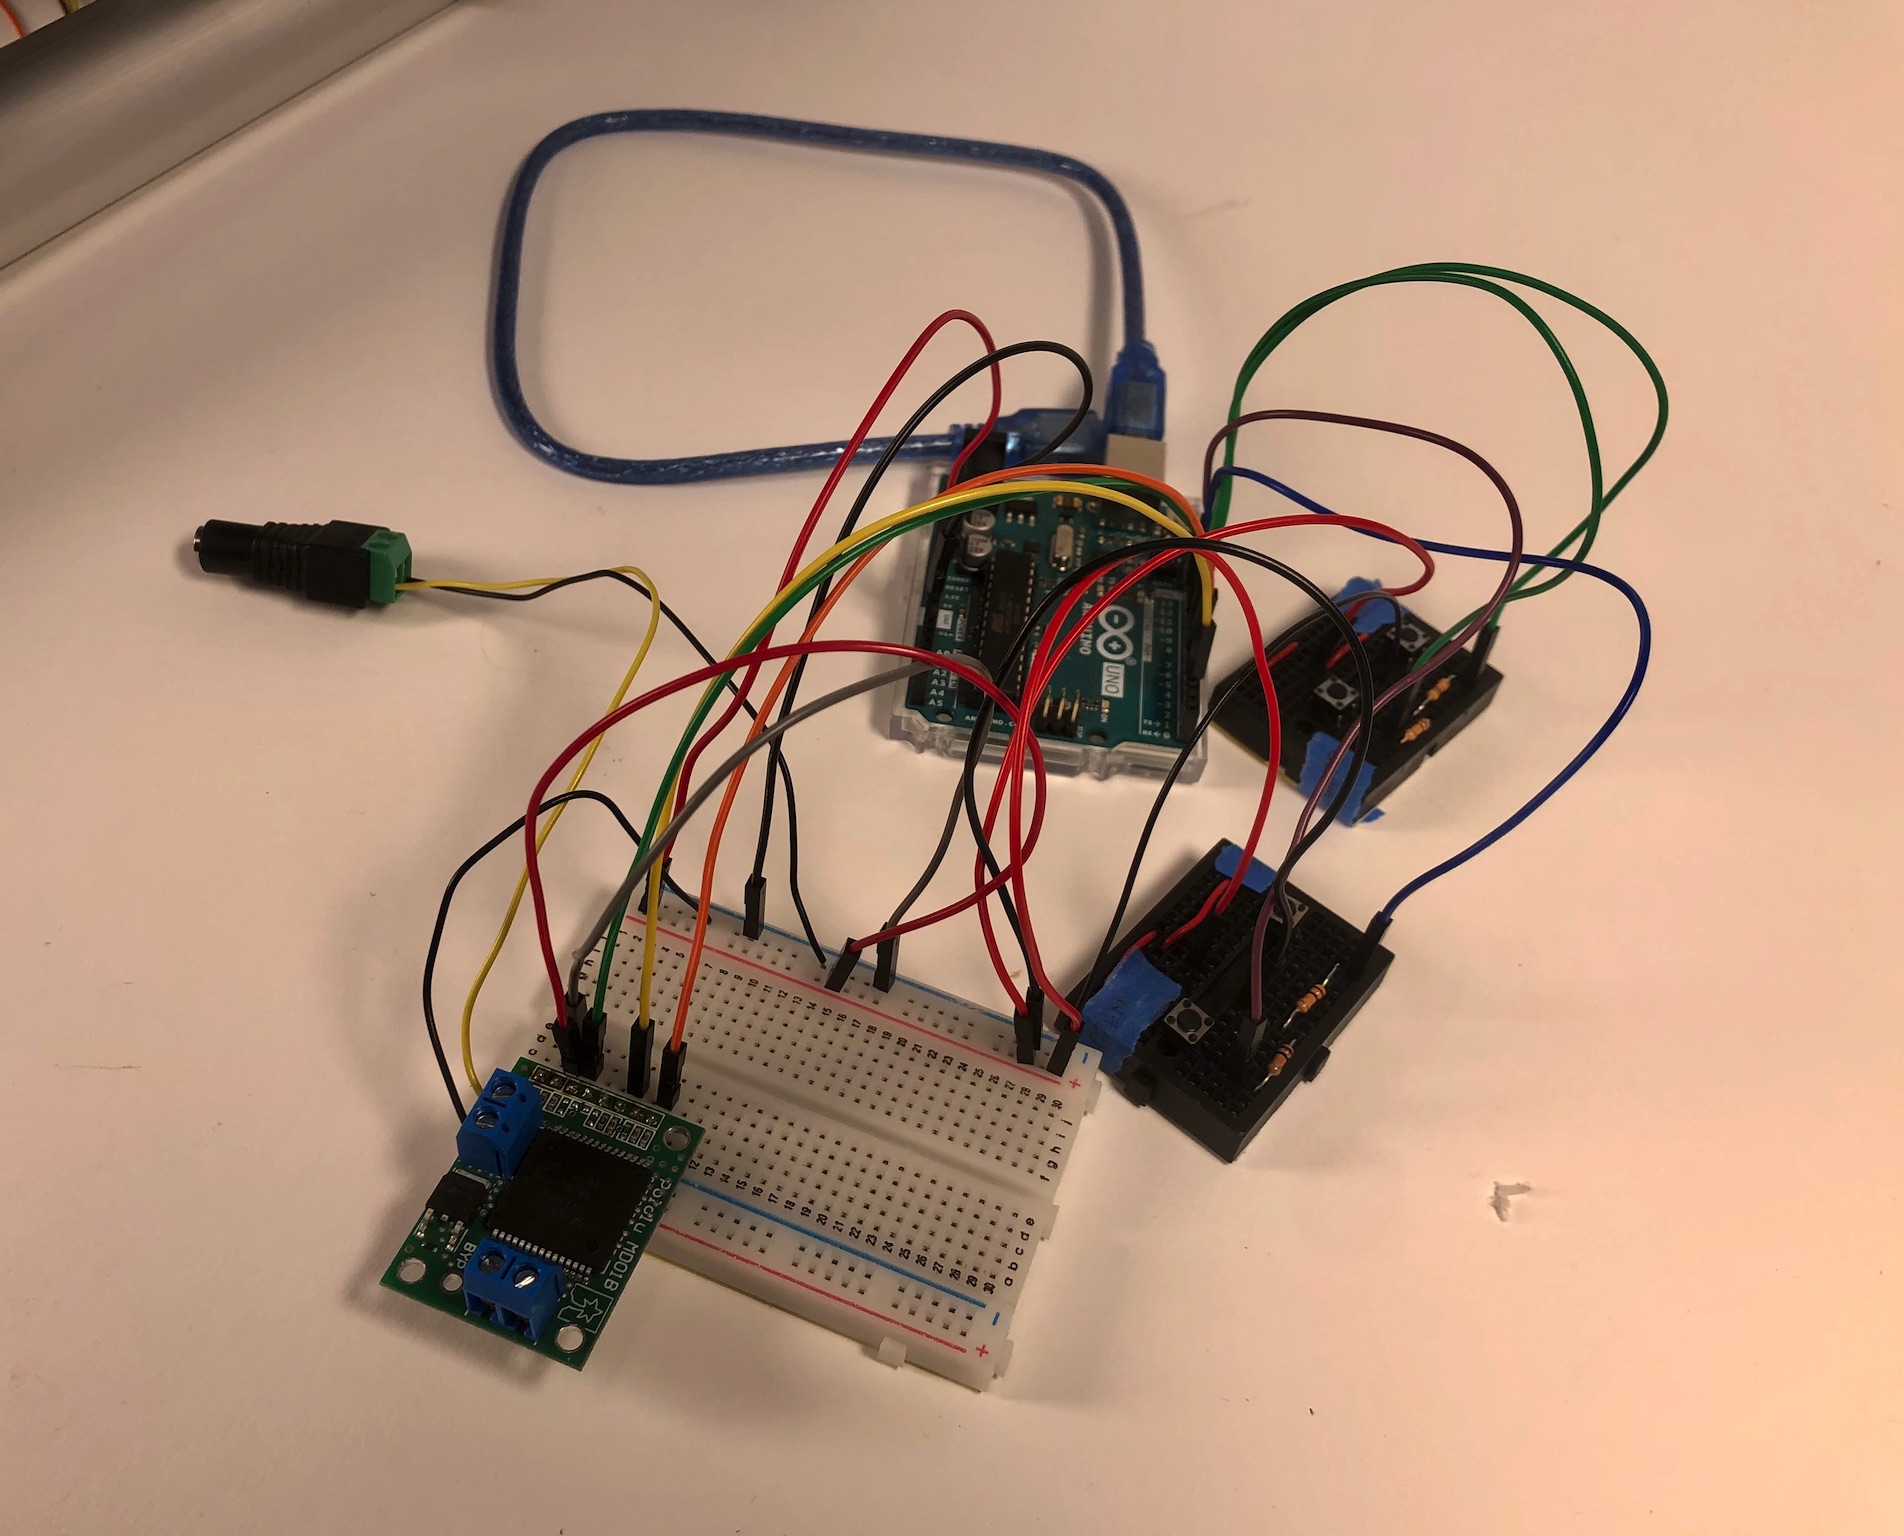
Working Software and Electrical Components
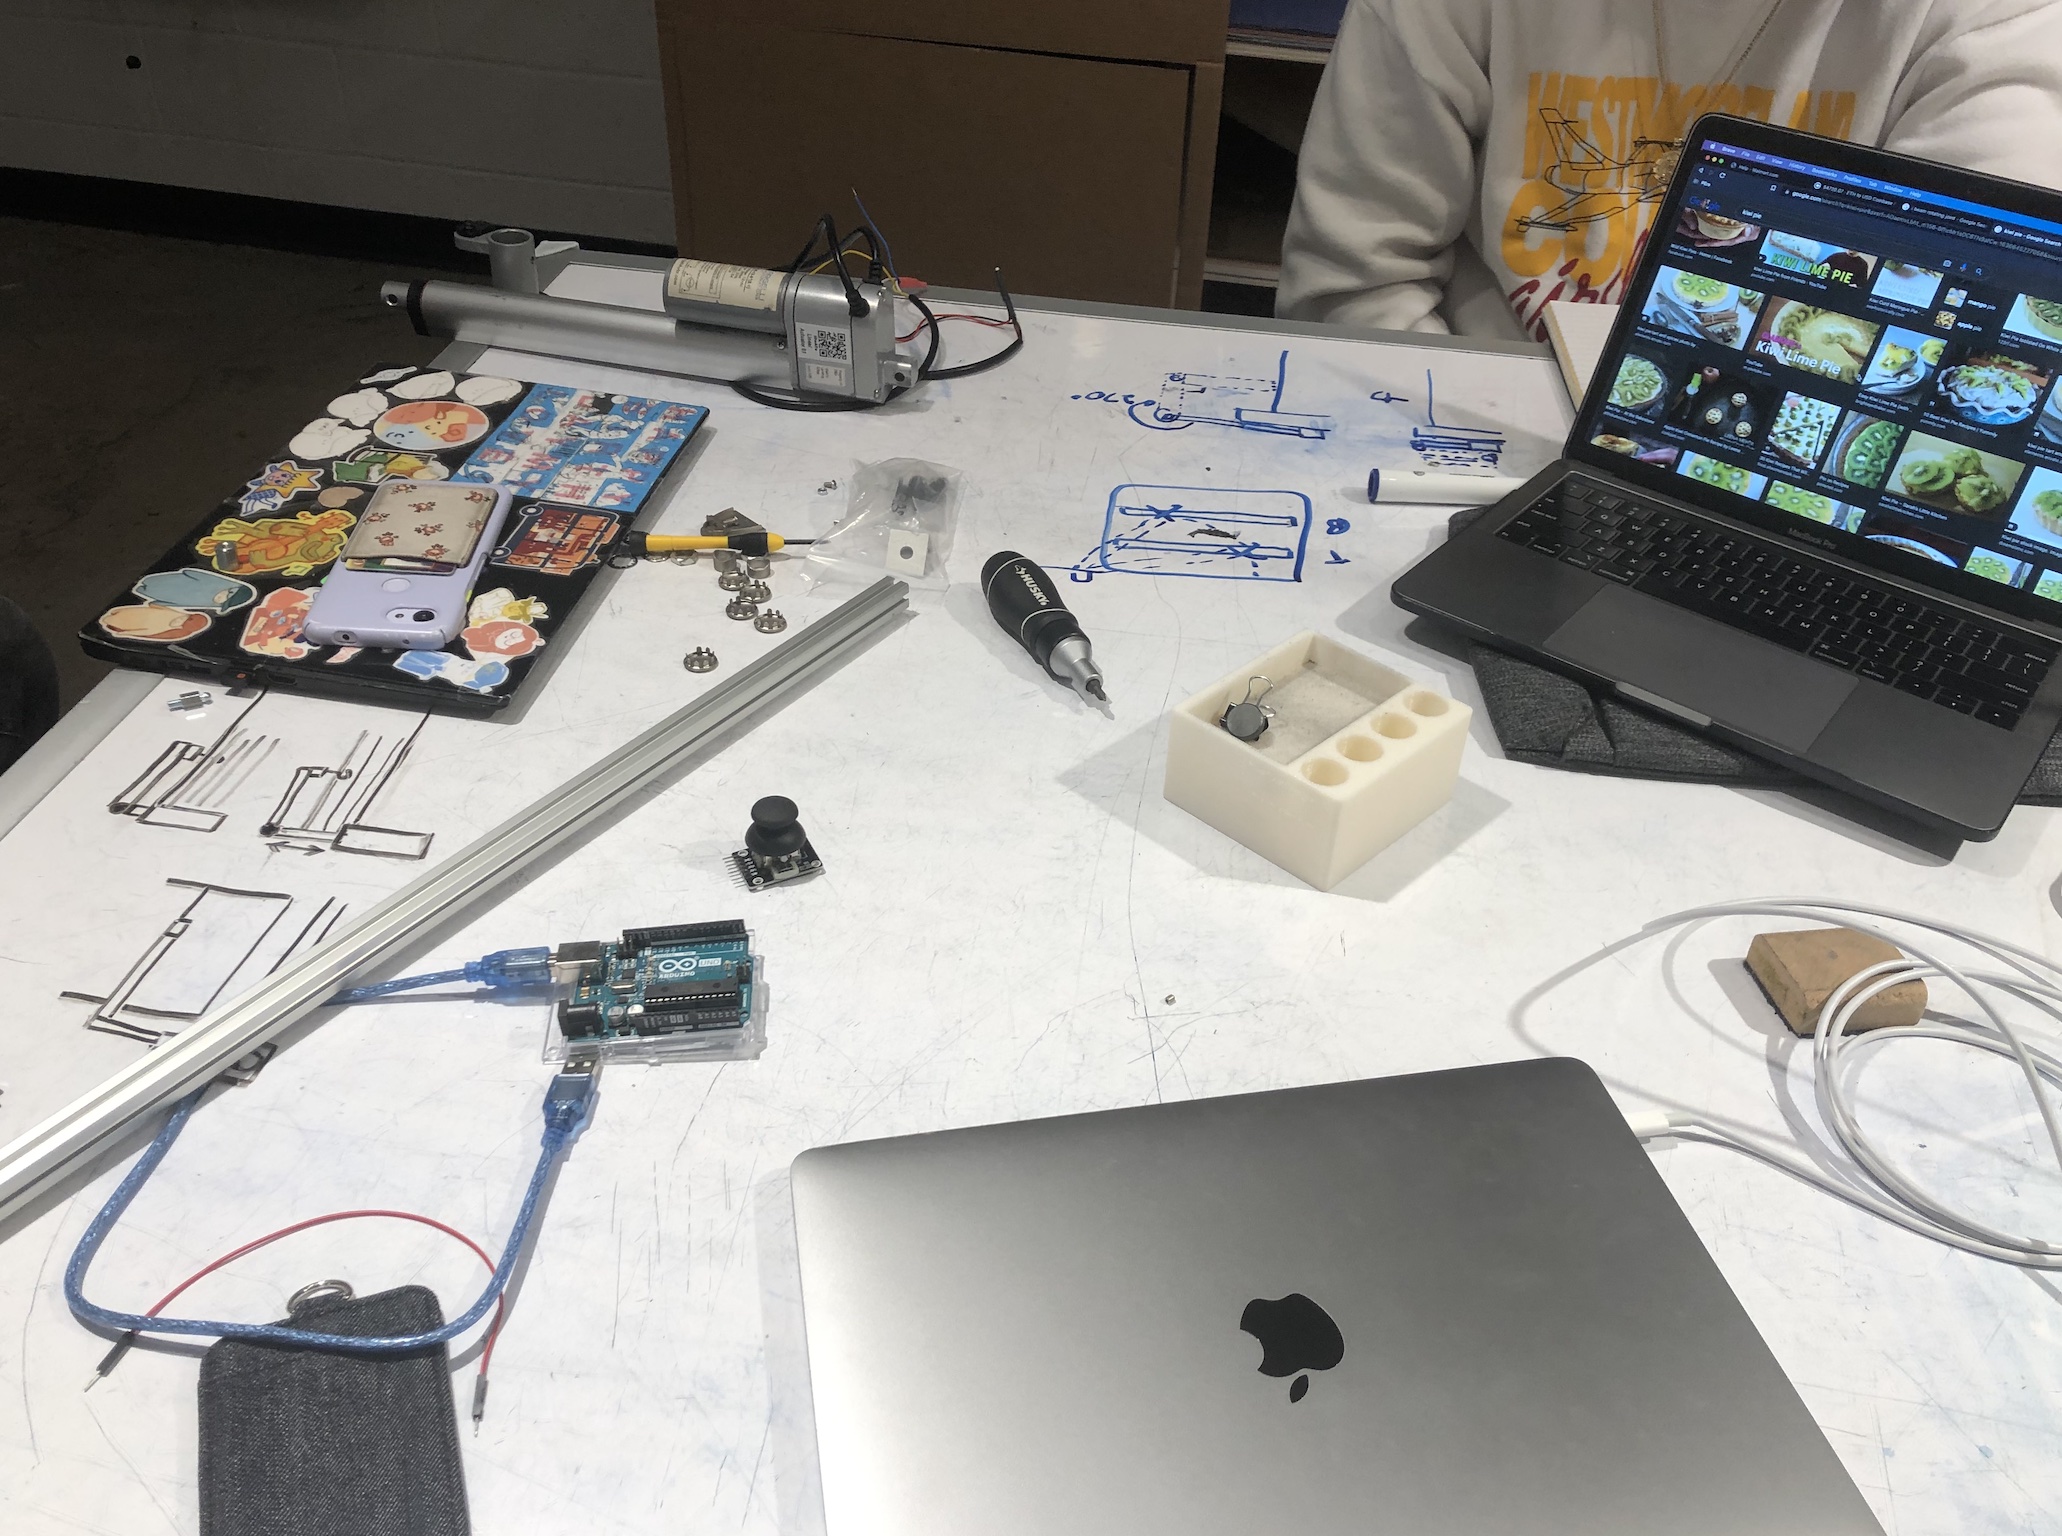
Brainstorming Prototype Design & Searching for Kiwi Pies
- Reflection:
The prototype mostly solved the problem of “getting the food out”. There were some technical details to be handled, such as how to prevent the actuator from rotating due to shift of the center of gravity when the arm is extended, but overall the prototype did what we intended. We learned a lot from our first product. Stability when overextended, rotation, and wire interference were all important subjects we saw highlighted. The prototype also taught us about the importance of anchoring and the versatility of open beams, but these teachings were not ultimately relevant in the final product.
After prototype demonstration and discussion with our client, we realized that there was another problem that we did not think of solving – getting the food from the rack up to the kitchen counter. Since our client only has one fully functional arm, it can be a challenge to lift a hot heavy dish onto the countertop. Therefore we decided to integrate the “height problem” into our final design as well. Several pieces of advice about positioning and rigidity were ignored as a result of such a big change in our form factor. When all was said and done, we were very surprised at the significance of our oversight, but excited by the new iteration of our product as it would be more of an impactful product.
Process
Demo of Software and Electrical Components
The electrical components were very delicate, especially in prototype form, where wires often needed to be temporarily taped together. Using clip wires or installing quick use sockets on the screw-in spots may have saved us time.
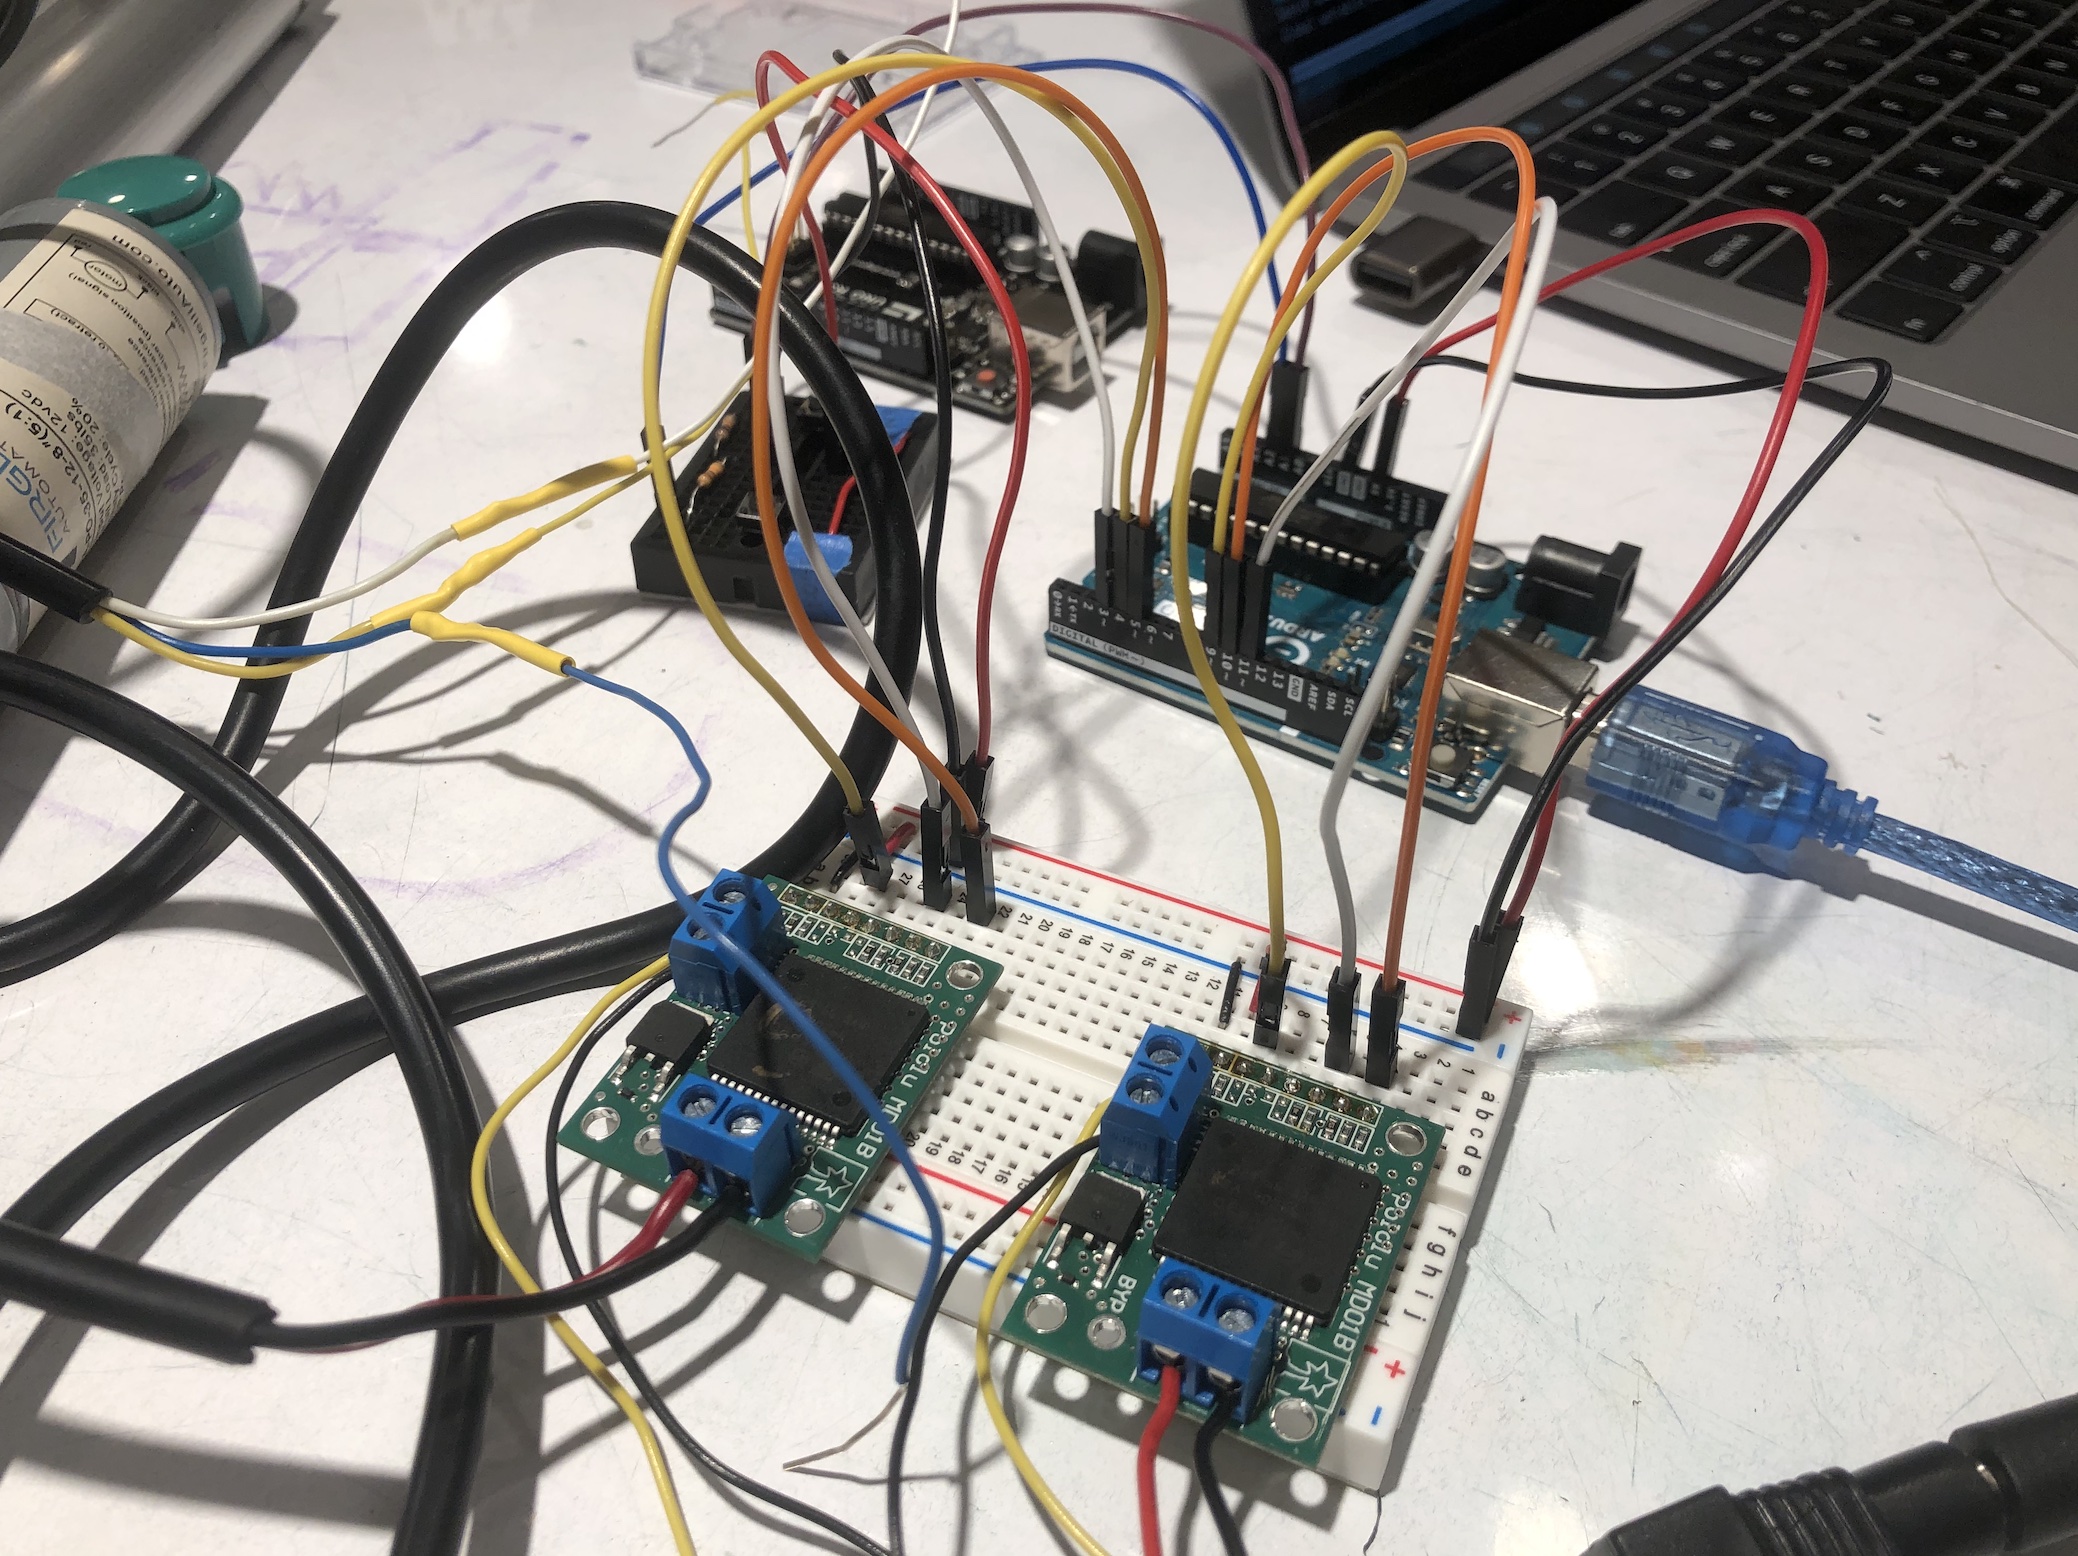
Fully functional electrical components
We did not have an large variety number of certain colors, or enough of some colors, more prep time would make prototypes clearer for third parties on another prototype attempt.
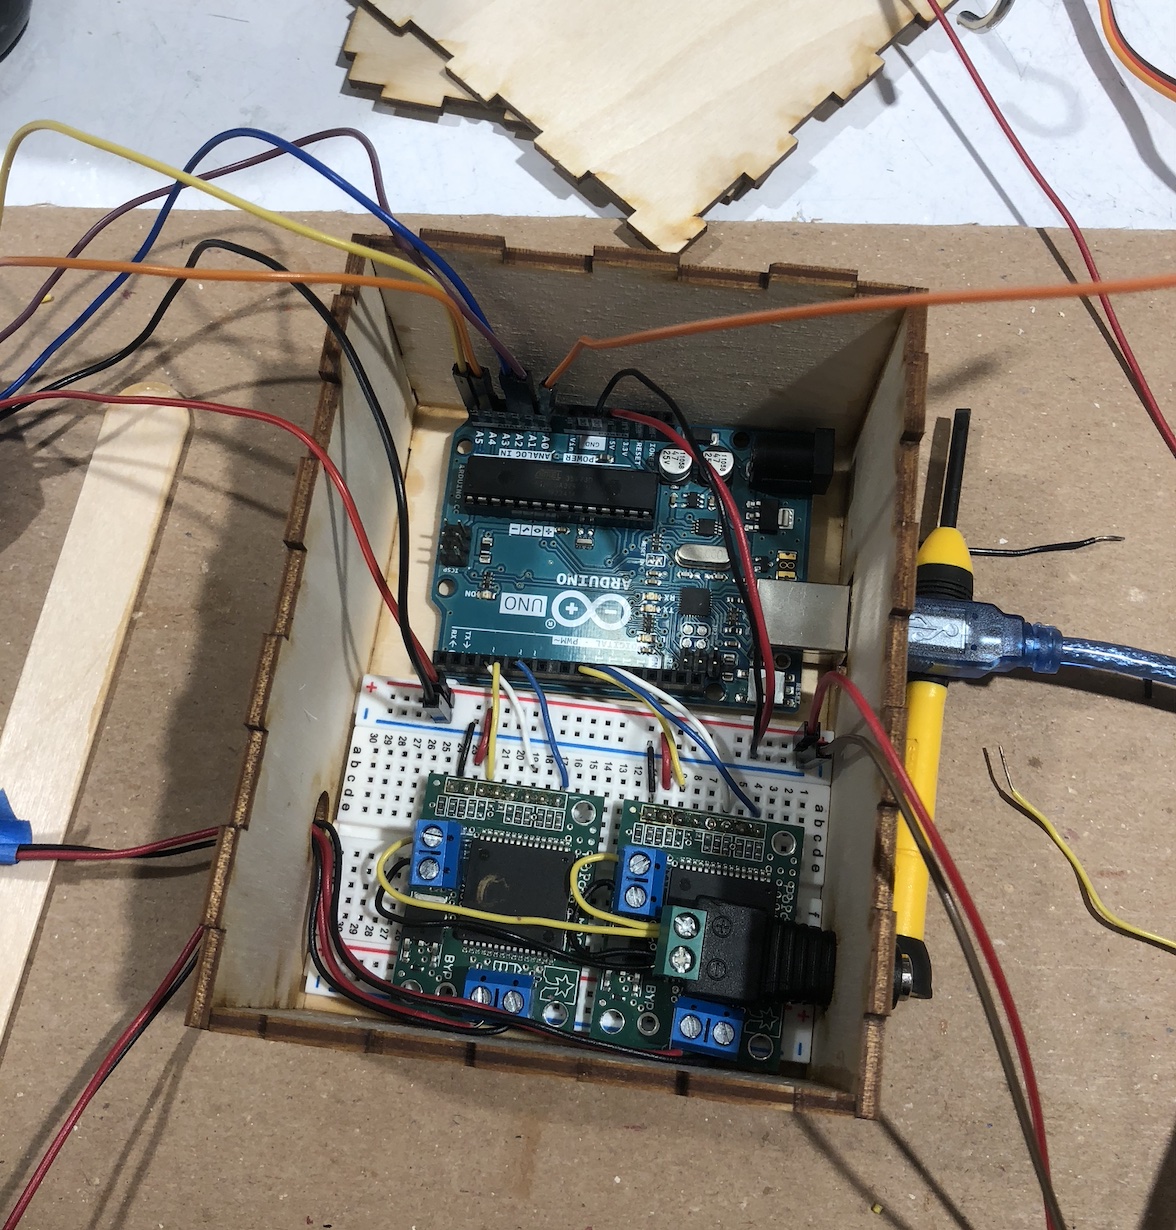
Putting the wires in a box
Our box was very well fit for our electronics, sometimes a little too well fit for troubleshooting. An alternative could be fitting it to synthesize with the larger table, allowing for more room without being clunky or intrusive.
Making the controls
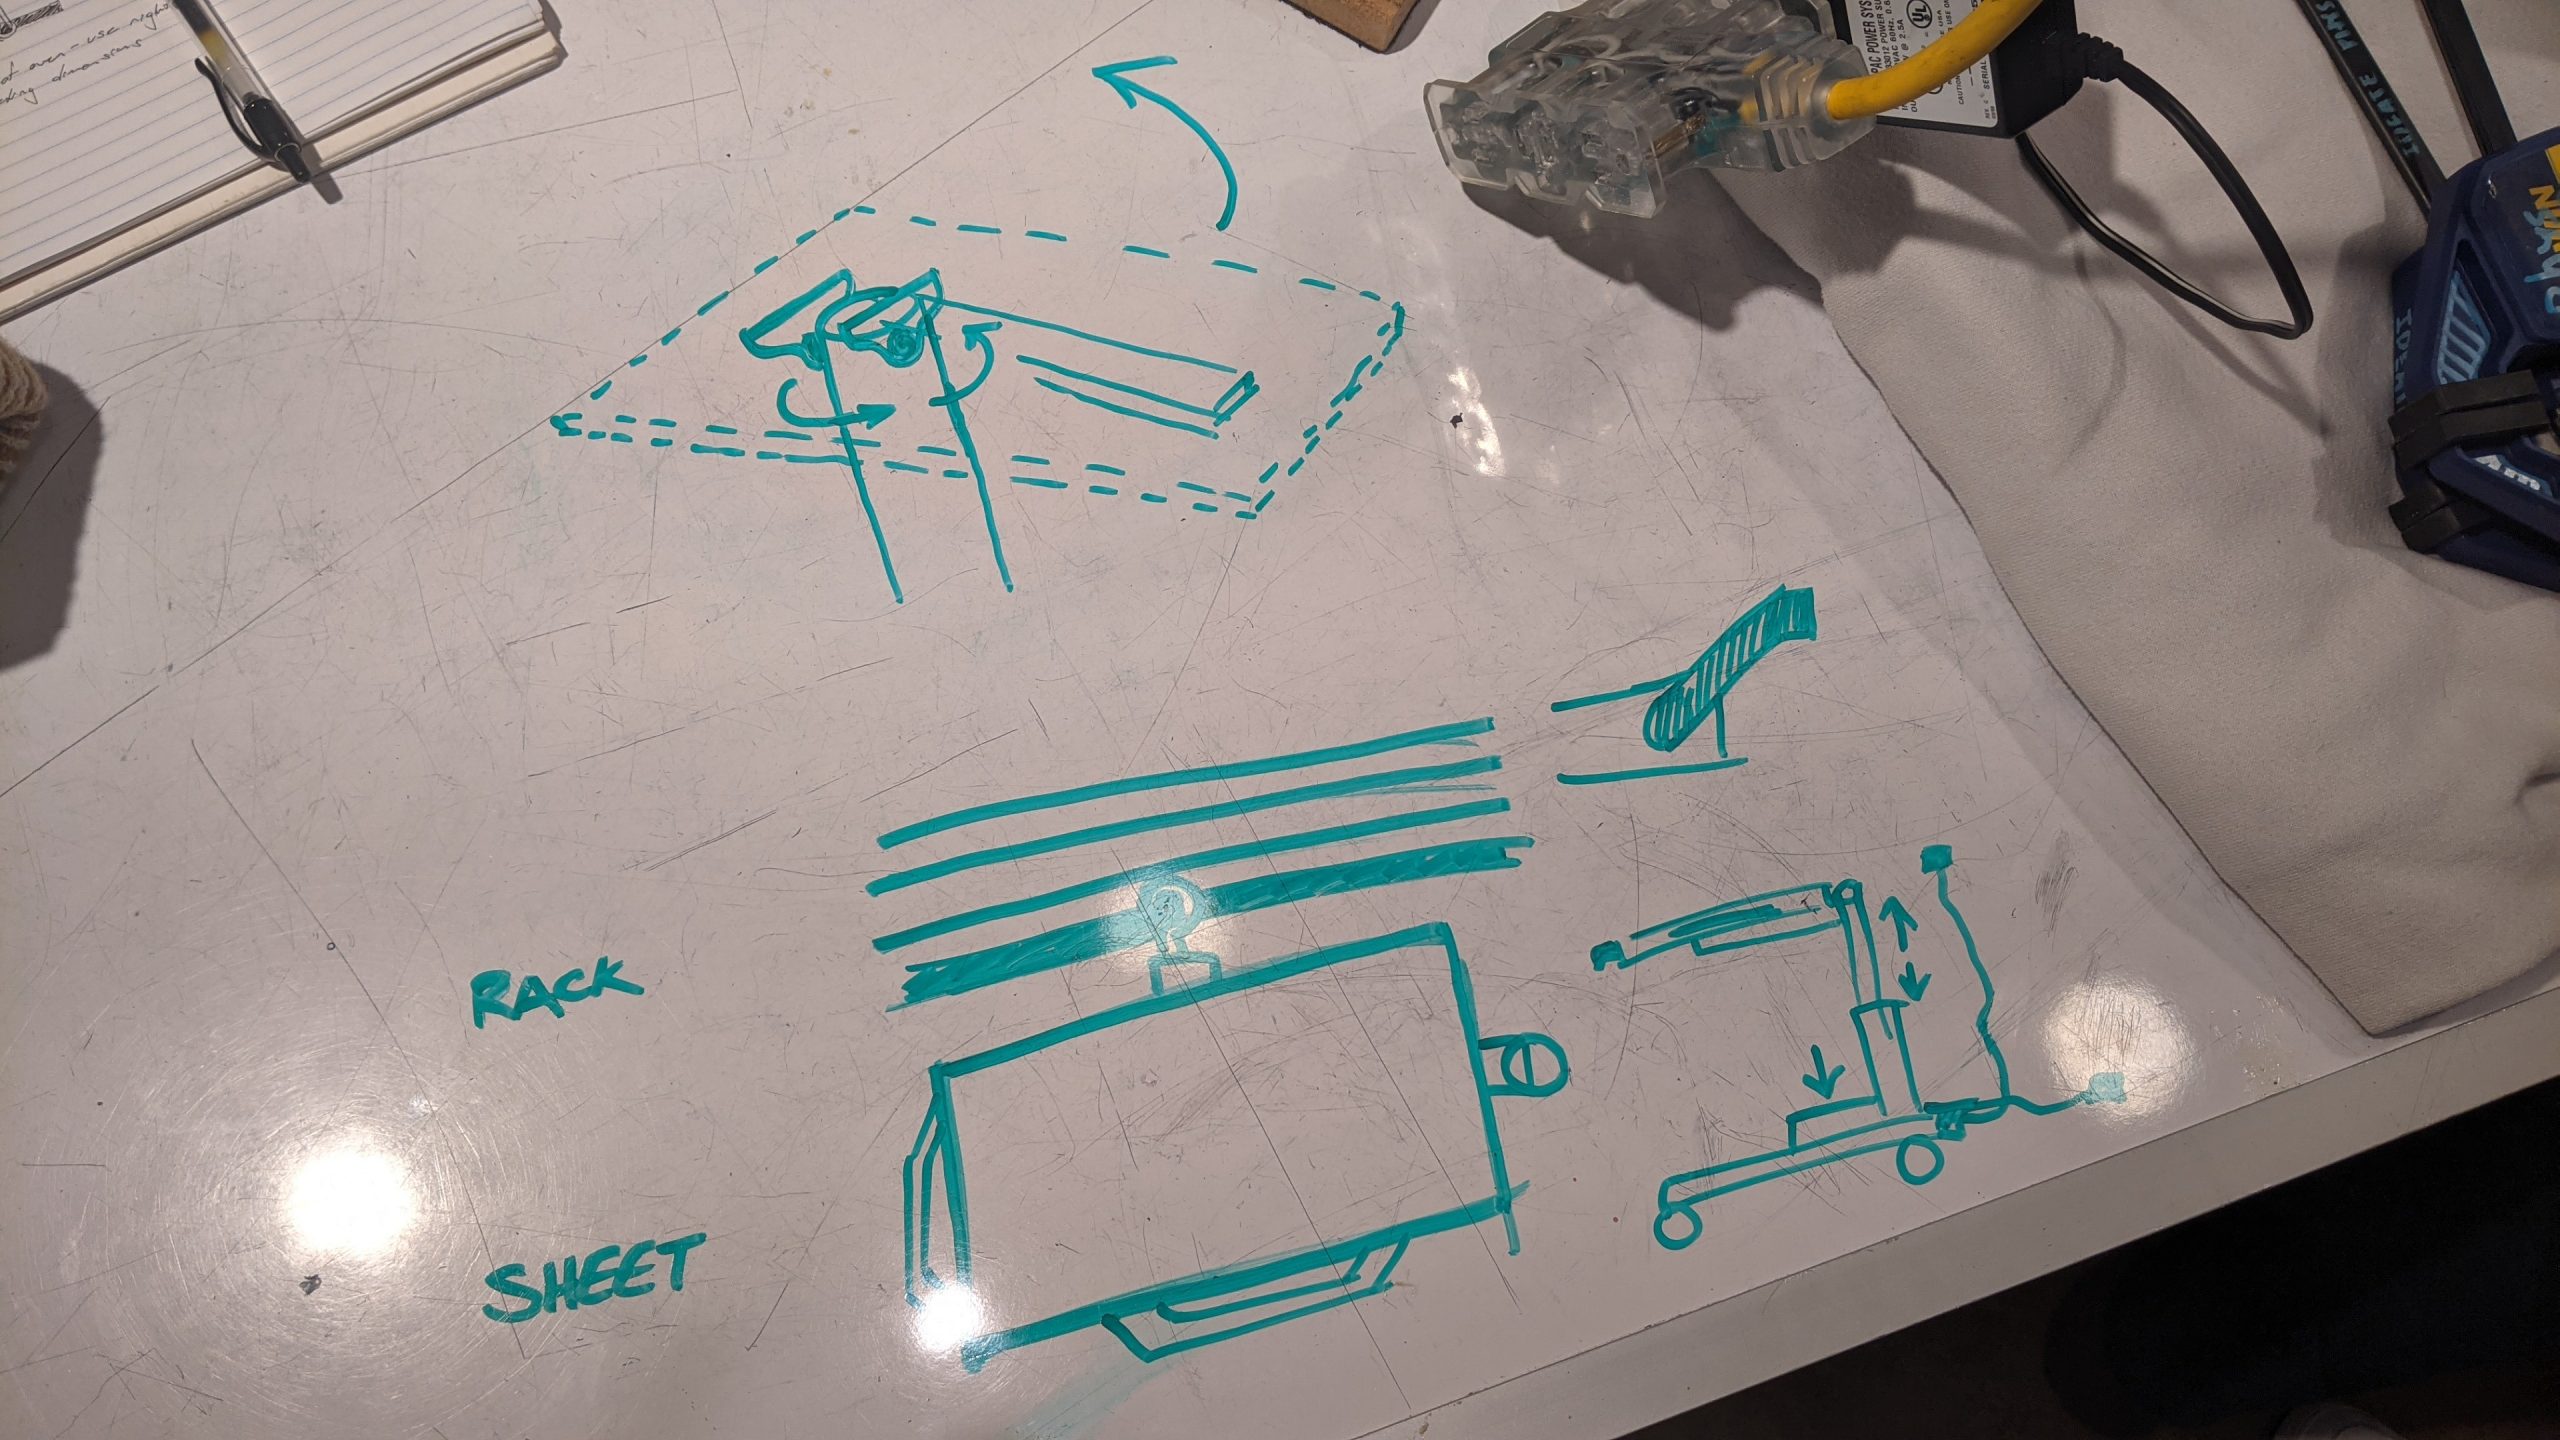
Early Whiteboard Ideation
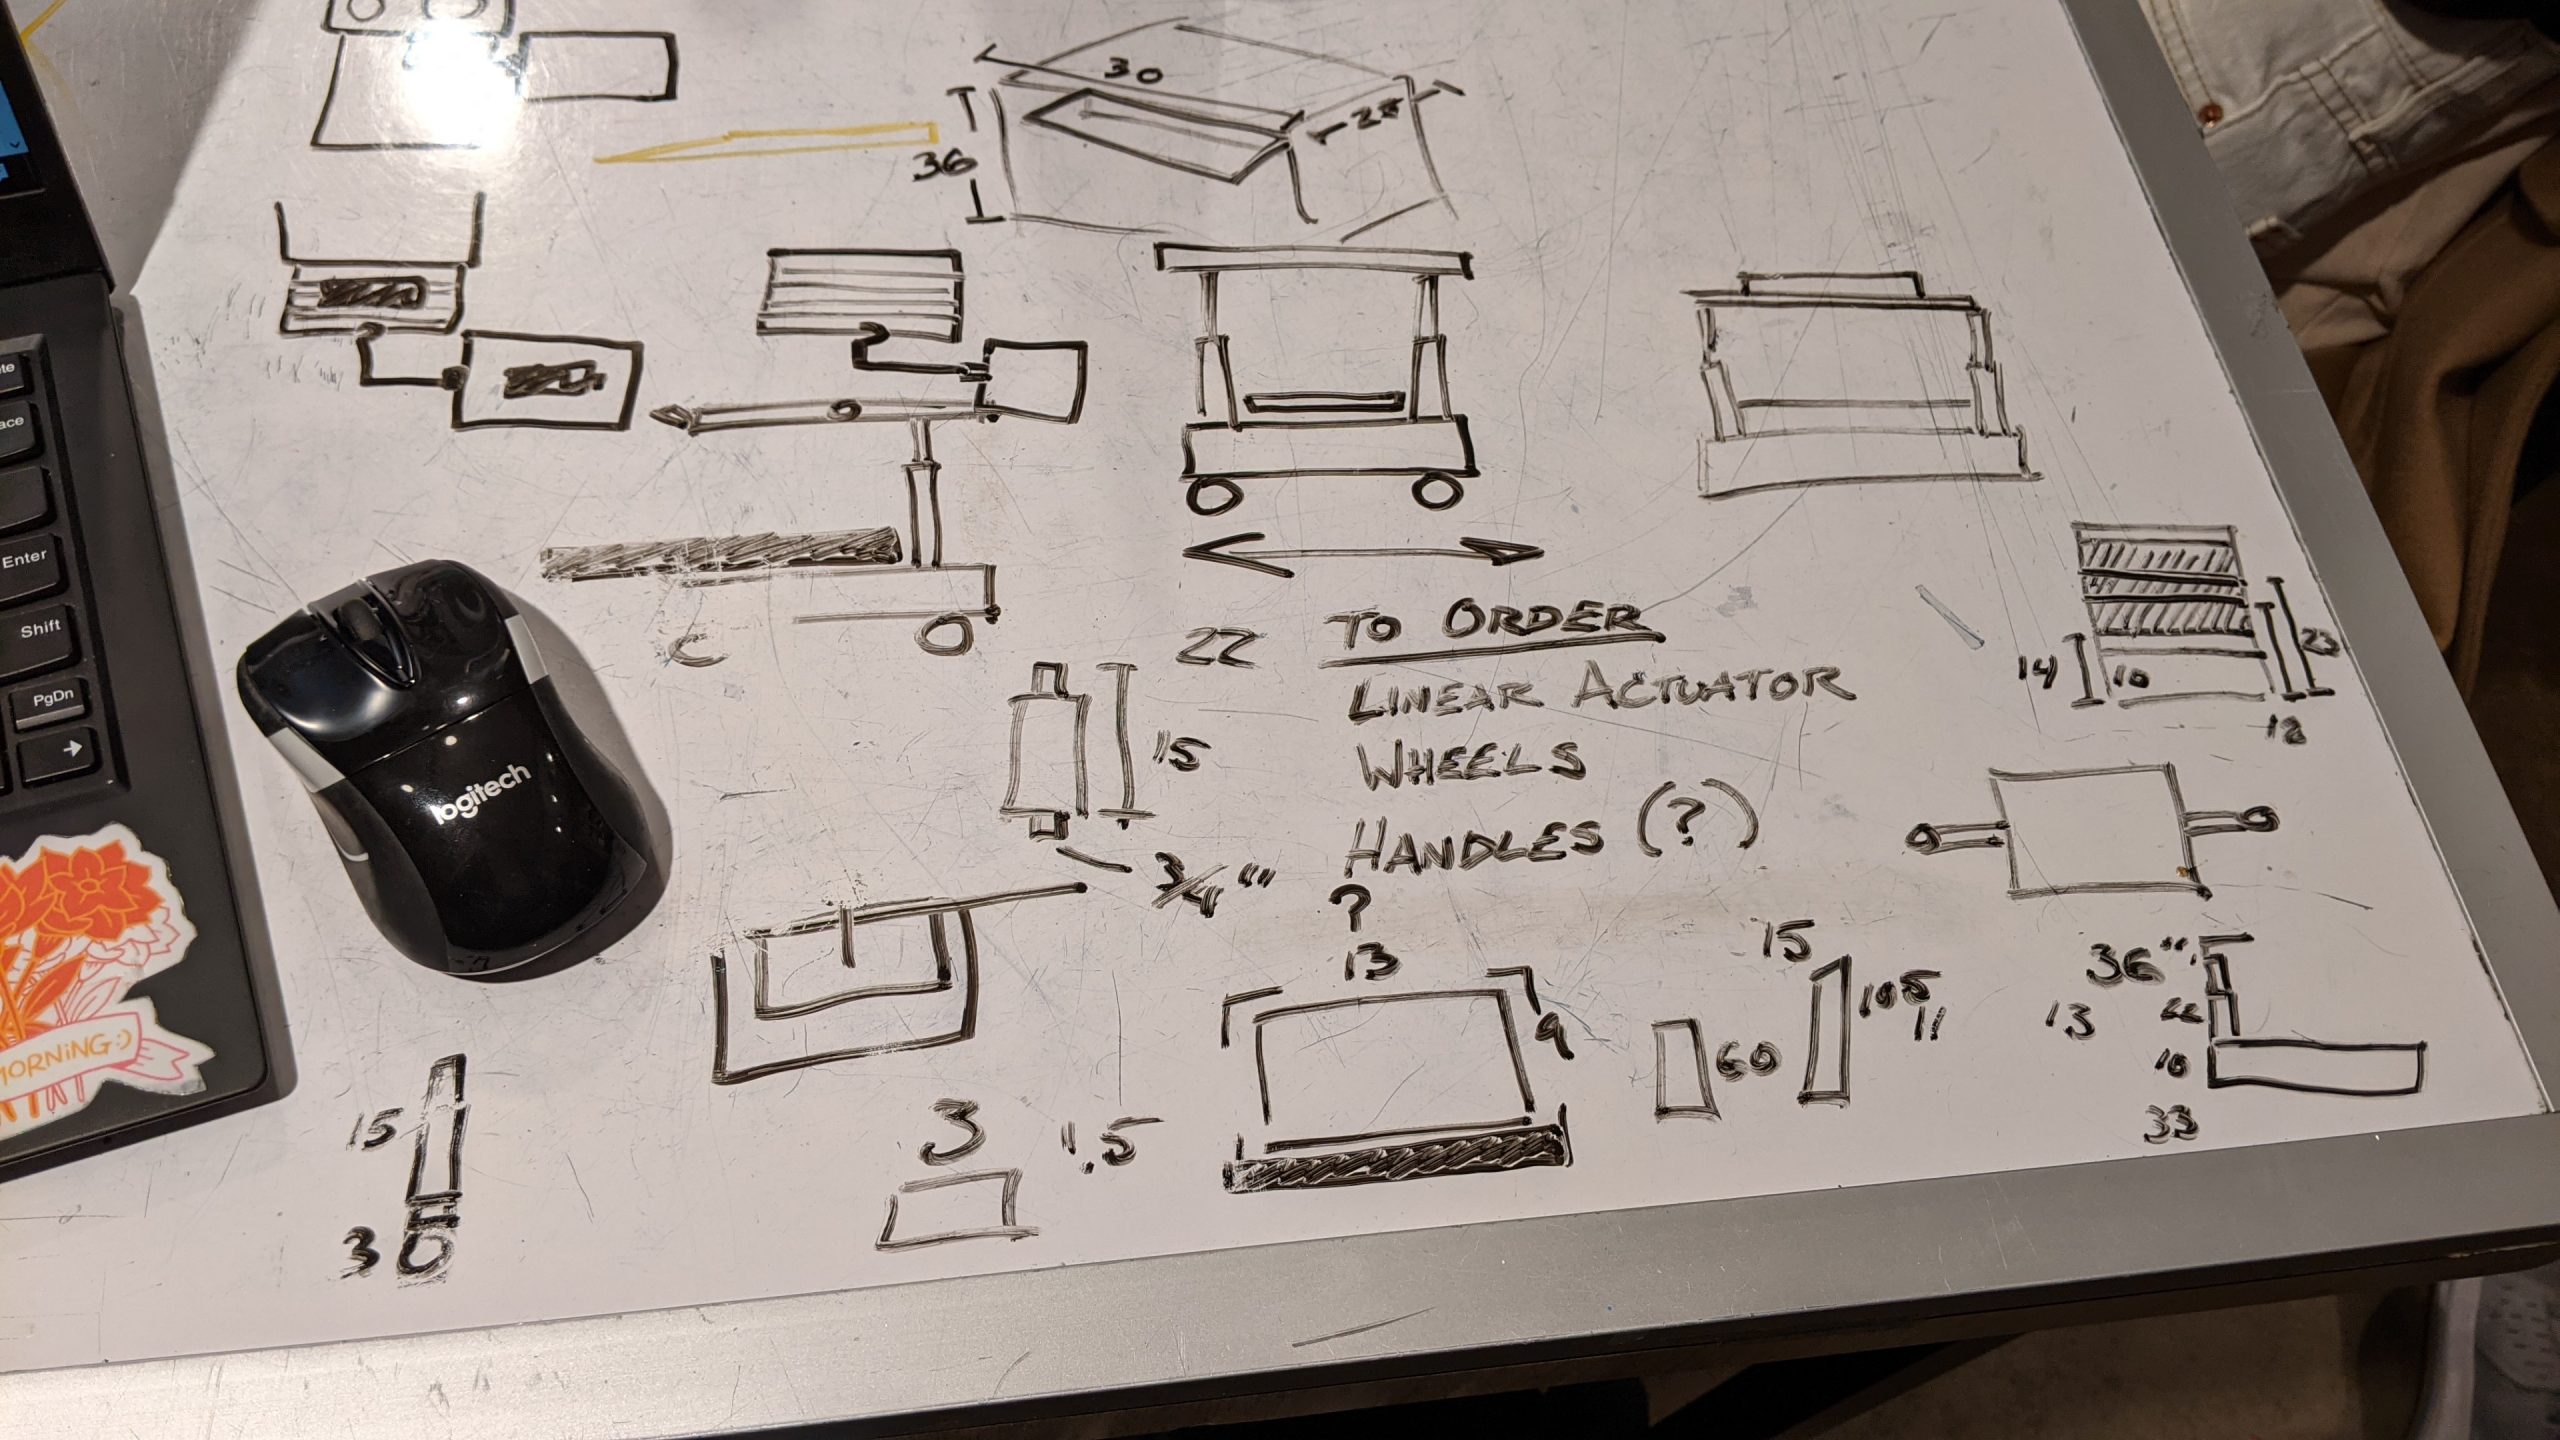
Whiteboard Ideation
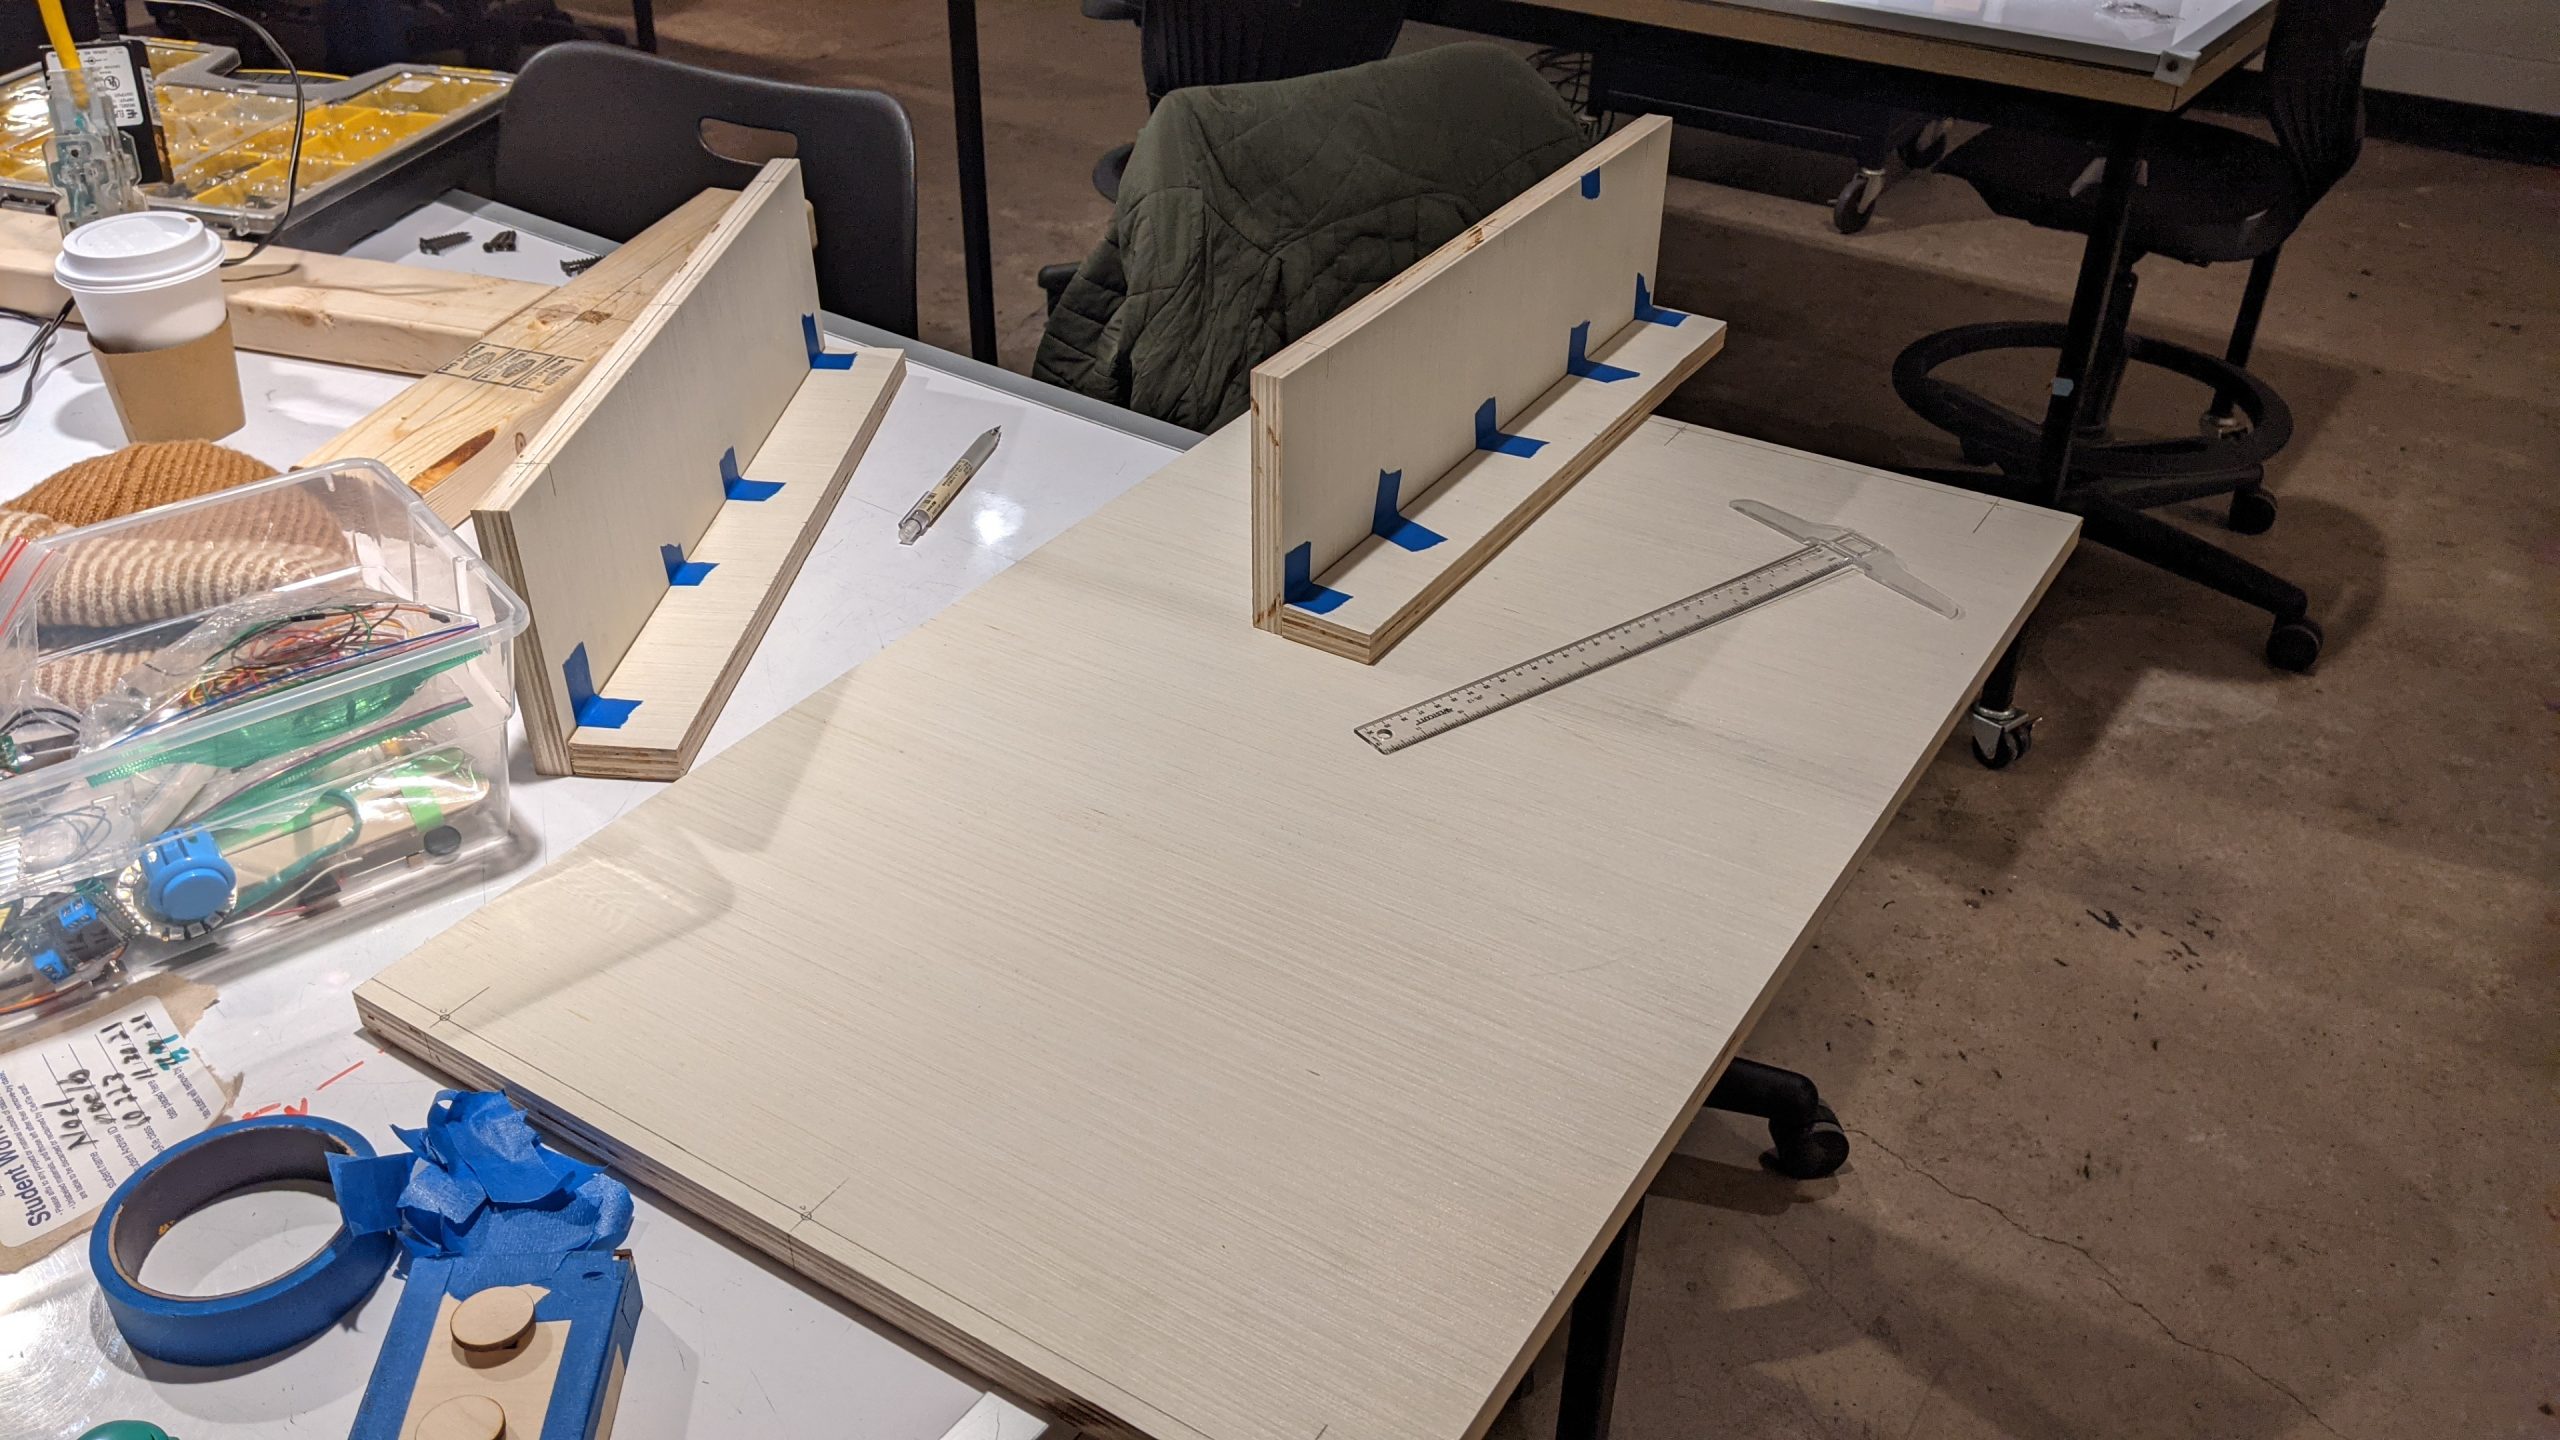
Building the table
Pre-drilled holes were essential to maintain the integrity of the wood. Drilling close to the edge caused some blemishes, even with pilot holes.
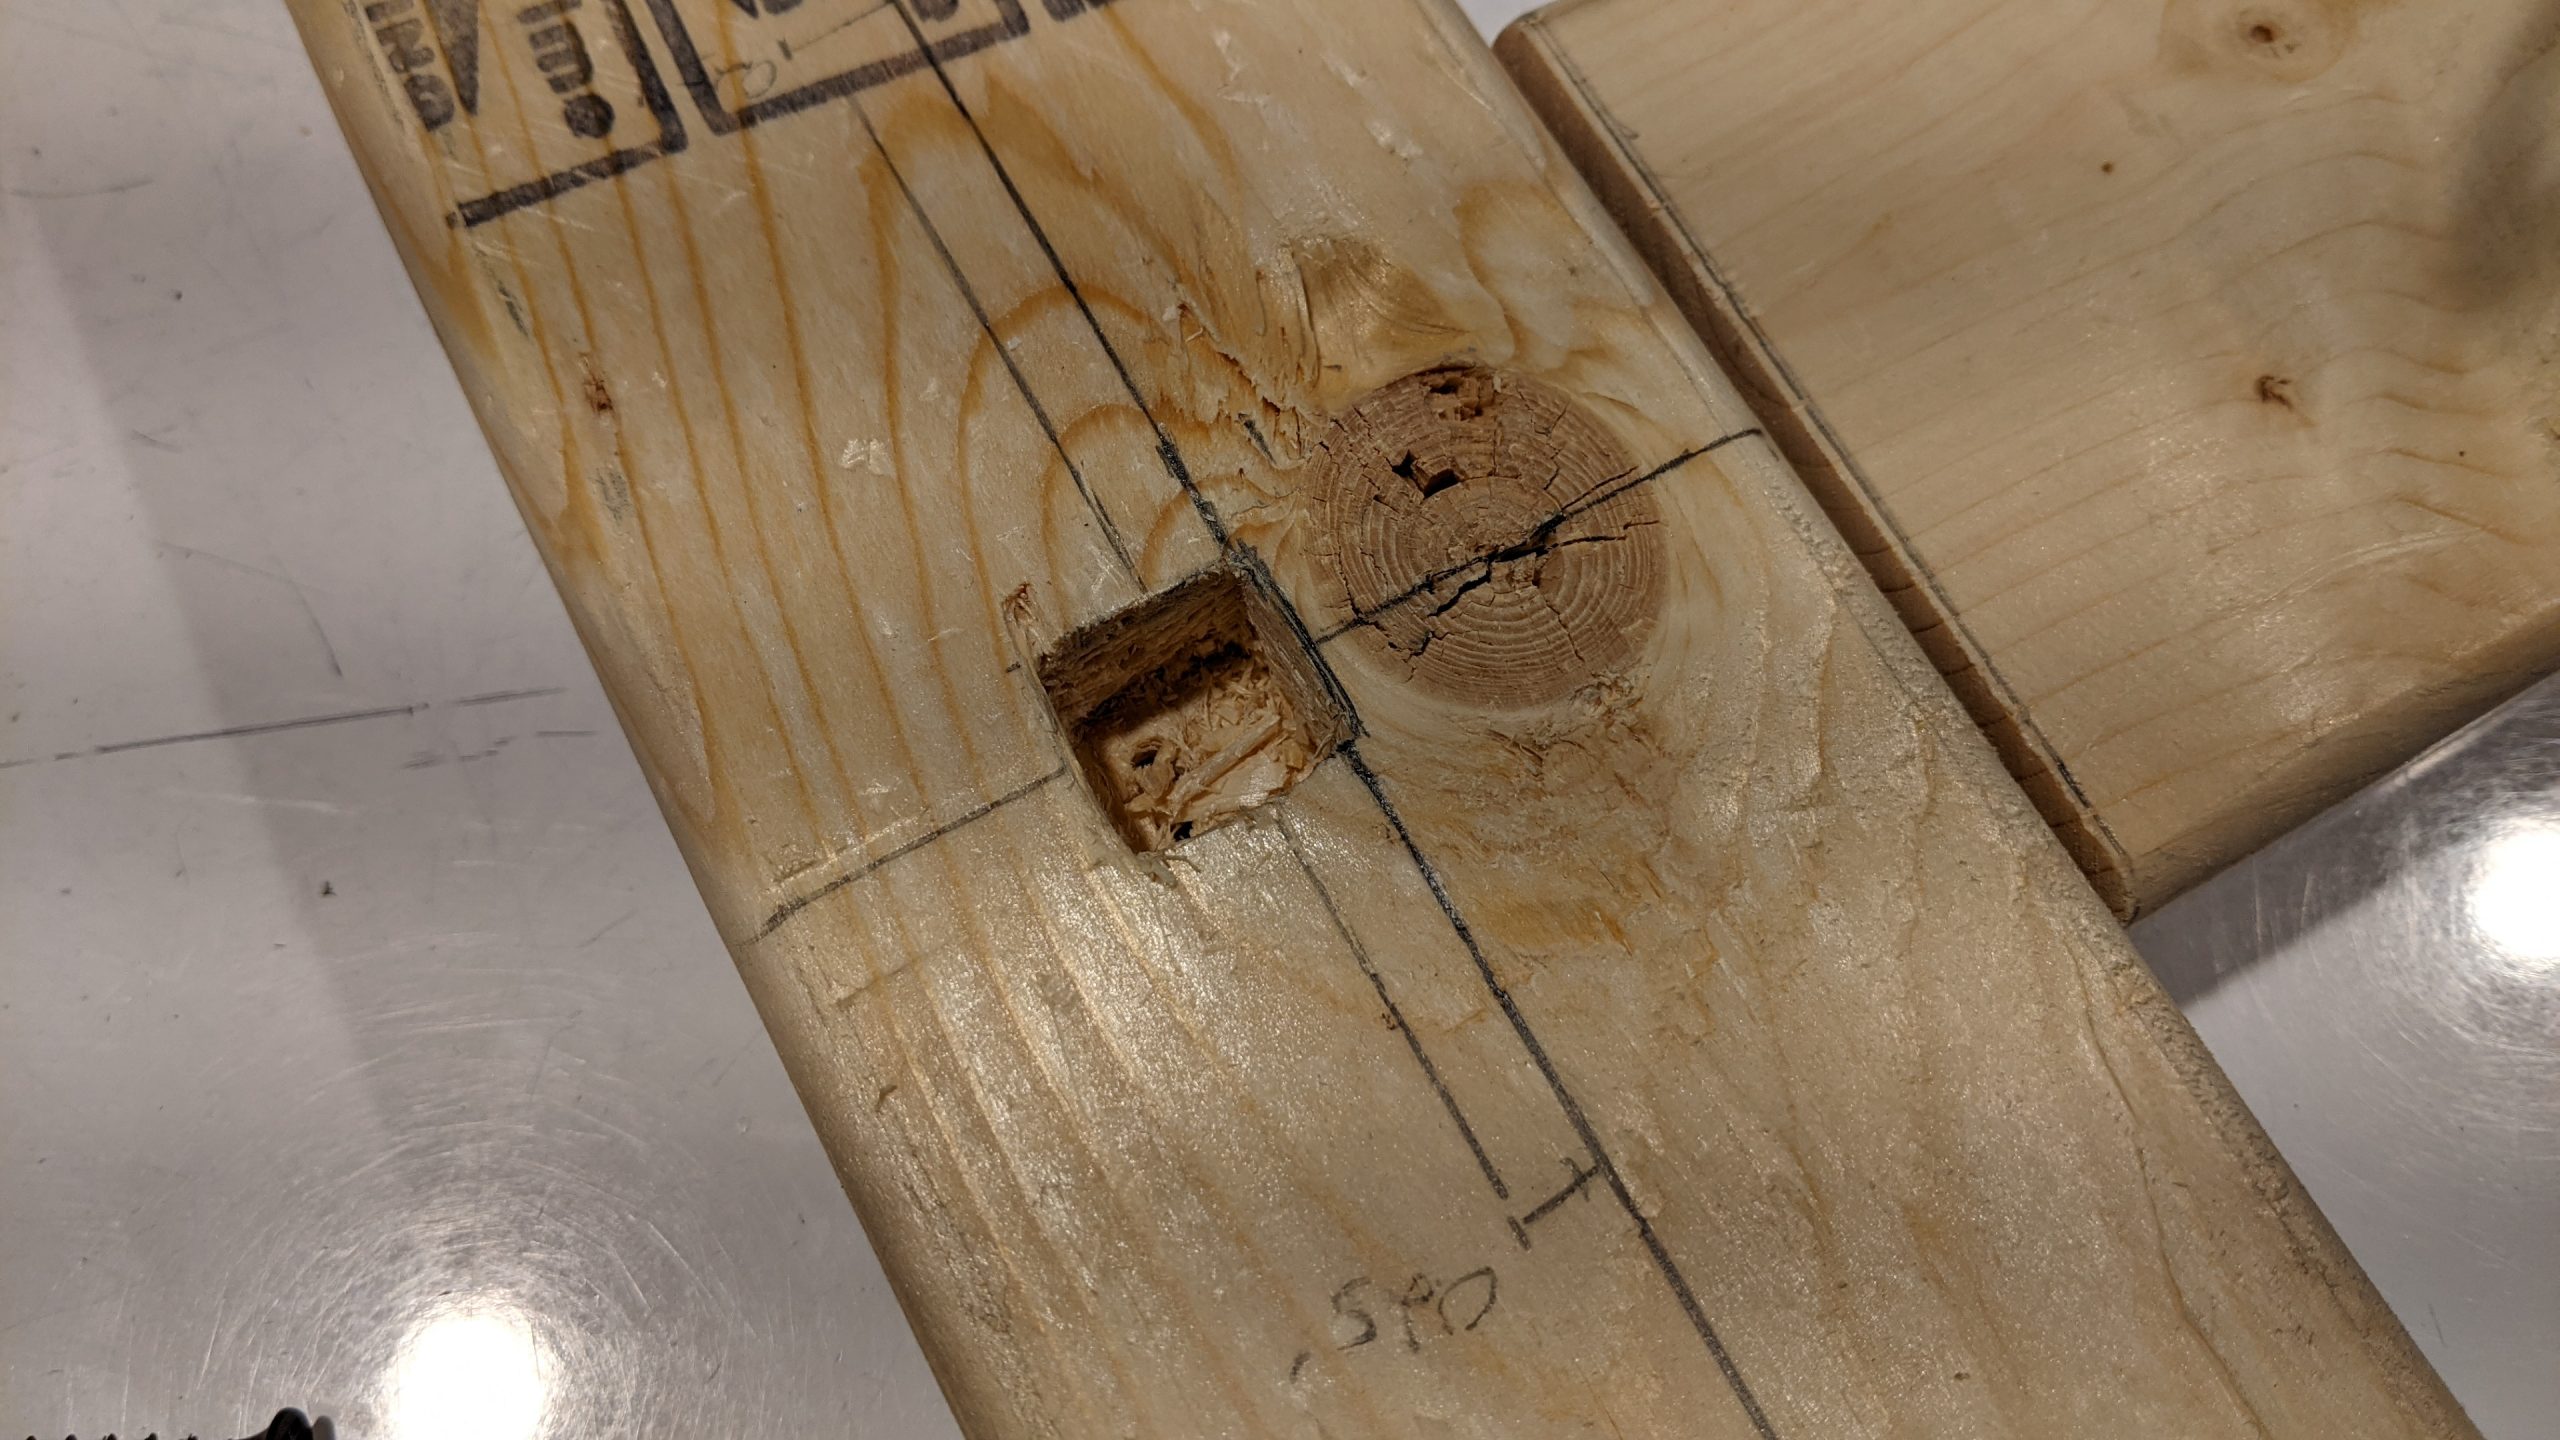
Chiseled piece for actuator
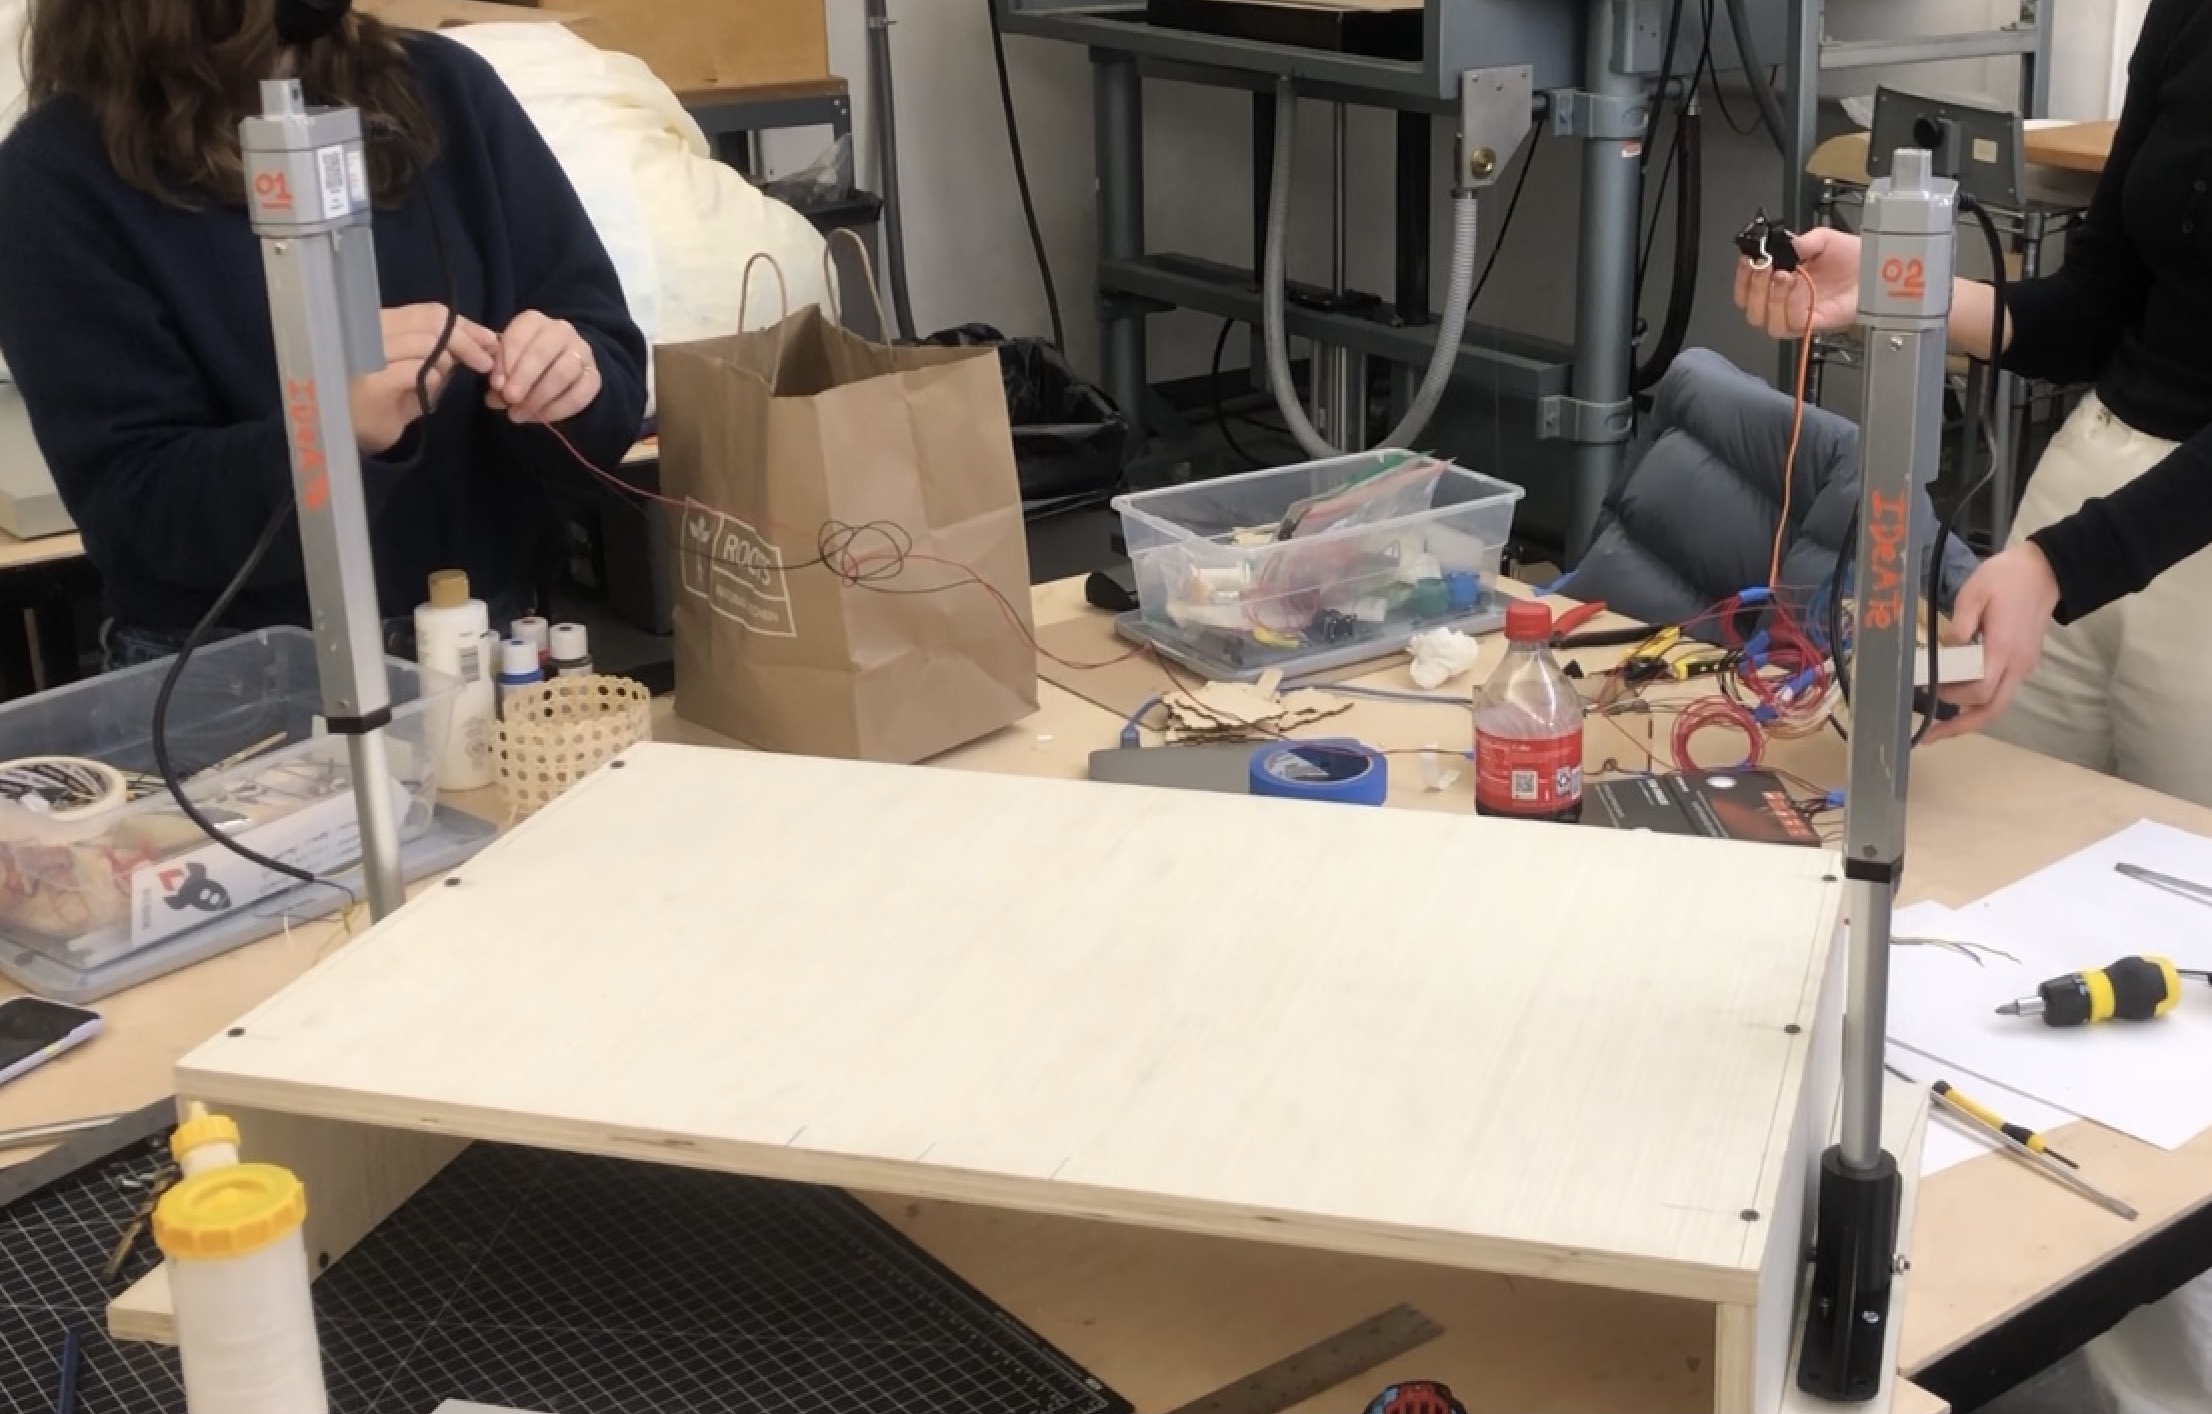
Testing half-built table
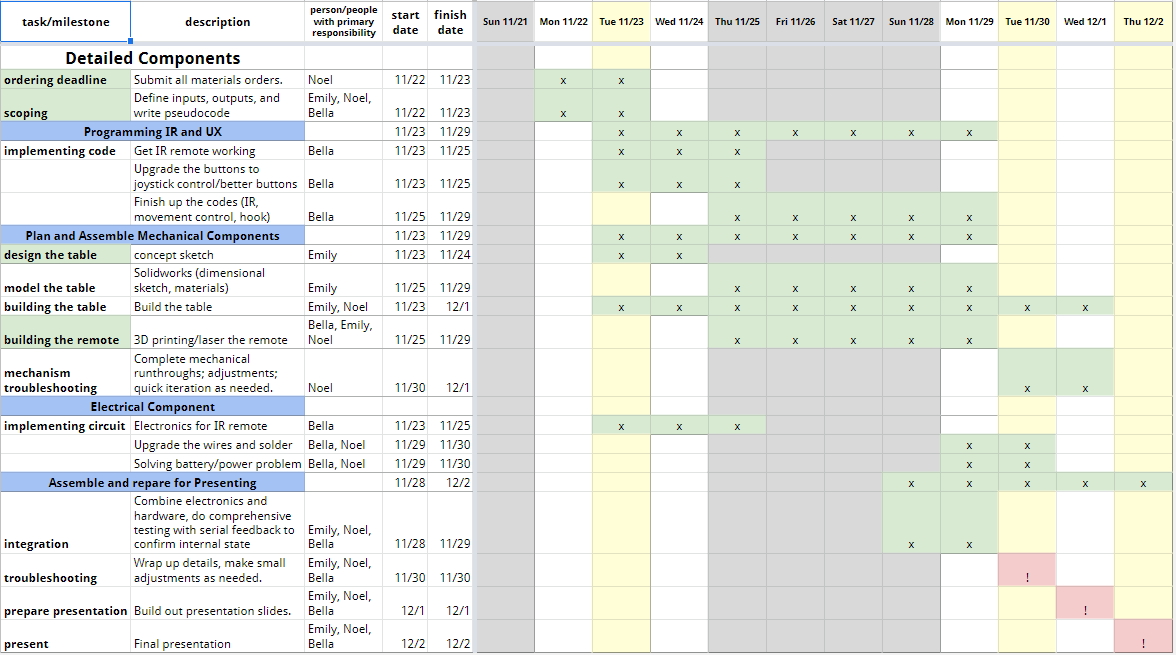
Our actual schedule was much more compressed. Immediately our material order was delayed because we had some trouble reaching our client for his oven heights, which would determine the actuators we needed. Following this trend many other dates were compressed because of our lack of access the woodshop during the thanksgiving break. Our design, electrical, and printing stayed to schedule. Our Assembly took longer than expected, but our very generous timeframe made it work.
Conclusion
The final critique allowed us to perceive our project from outside our many hours with it. An objective and critical eye gave us several new insights and even inspirations for the concept. The range of advice was broad, from changing the openness of the latching hook, to adding remote movement to the table. The most inspiring comment was simply “The structure can have many other purposes,…” This was representative of several comments which focused on the versatility of a motorized and mobile work surface. The comments inspired us to consider the optimizations possible to expand the reach of the device like range increases or wheelchair connection points.
Other comments helped us to improve the main focus of the device, use with an oven. One party suggested it “May need ‘ramp’ to help sliding pan.” This suggestion was a very do-able way to greatly reduce the force required to overcome the bump of the servo hook when sliding a dish in. Another piece of feedback addressed the polish of the table, it simply cited “Cable management.” This was a very fair critique and a component that can be fixed with better sleeving and more attachment points and ultimately deliver a safer product, an essential feature for a person with limited mobility. Two final pieces of critique coincided, and present a great finishing addition to the table. An observer noted that “The wood may be a fire hazard.” and “Cleaning issue. Maybe sealing it would help.” Dave also noted that he appreciated the wood surface as he liked to stain his wood furniture the same tones. Though we made sure the wood could safely withstand oven temperatures, as a final step, sealing and staining the table Dave’s preferred tone would make it extra safe and special for him.
Our project workflow was fragmented into in-person and remote work/interview sessions. The experience was unique in that we could both conveniently contact each other and still meet up to more accurately share ideas and unite components, especially physical components. The team had flexible schedules for independent and group work which allowed us to put the work in whenever we needed it. The connection with our client was not so concrete and did create some disconnects. The remote interview with our client, Dave, allowed us to view the environment the device was meant for and gave us insights that meetings at Ideate could never have. However, by not sharing the same space we did miss one of Dave’s main hurdles and objectives with this project until he visited in person to see our prototype, namely the need for conveying dishes from rack height to counter height. In retrospect, sharing a list of fundamental functions live with Dave may have helped us catch the divide between his needs and our ideas earlier.
The experience with Dave was an opportunity to re-analyze our built environments in detail. By considering his needs in our product design we dove into his challenges and focused on ideas that are not often highlighted. An example of these new insights came from his description of dealing with pneumatic doors. The need to operate doors that required significant force to operate shows that poorly designed force thresholds on everyday devices can be very damaging hurdles for some people. We quickly noticed how this extended to our own experiences with one very stiff door at the entrance of Hunt. A better built environment, for example, by way of a door with adaptive closing force, is essential for many individuals and generally a more person focused design. A flaw in our approach was the gap of understanding we had around Dave’s abilities. Though not always the most comfortable topic, it is an essential one when building a supporting device. Next time, I think one of the central focuses of the initial interview should be building a meaningful understanding of the relevant disability.
Throughout this project we expanded our experience with many subjects. Each member exercised their skill with design, physical fabrication, product sourcing, communication, electronics, debugging, and many more subjects. The most surprising of these was the exercise in empathy, to make useful and fitting devices for the people that need them. We learned about the practical limits of armature level manufacturing and how to develop ideas that are people-centric. The second time around we would not rush into the prototyping stage so brashly in order to assure our efforts were well spent, and we would make team hats.
Technical Details
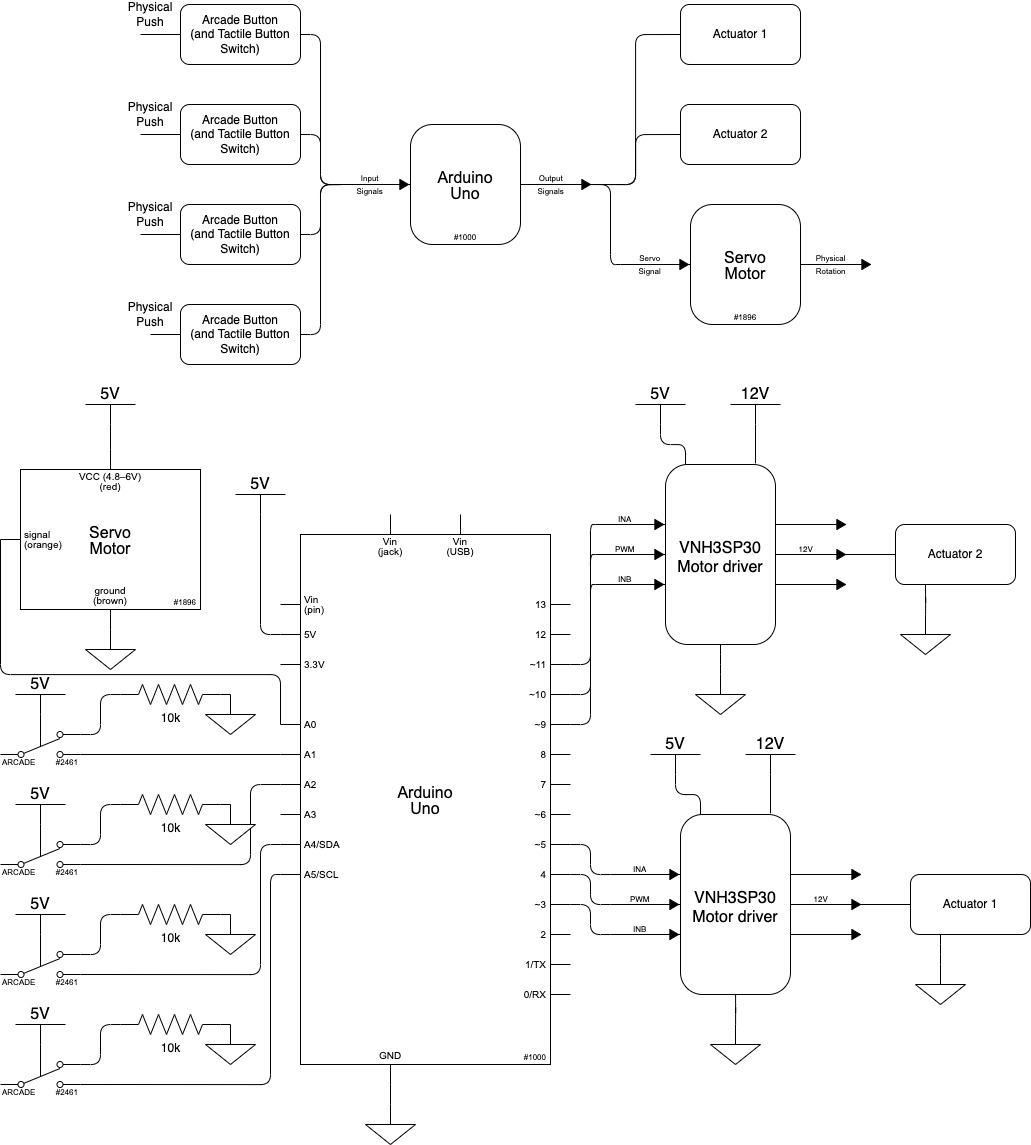
- Schematic and Block Diagram
- Code
/*
 * Project Title: Oven Assit Device
 * Team Kiwi Pies
 * Bella, Emily, Noel
 *
 * Description:
 *  The Arduino takes in the value of four buttons
 *  Two buttons for open/close hook
 *  Two buttons for raise/lower table
 *  And functions accordingly
 *
 *  Pin Mapping
 *
 *  A0 OUTPUT servo pin
 *  A1 INPUT button for raise table
 *  A2 INPUT button for lower table
 *  A4 INPUT button for open servo
 *  A5 INPUT button for close servo
 *
 *  4 OUTPUT IN_A pin for motor driver 1
 *  5 OUTPUT IN_B pin for motor driver 1
 *  3 OUTPUT PWM pin for motor driver 1
 *
 *  9  OUTPUT IN_A pin for motor driver 2
 *  10 OUTPUT IN_B pin for motor dirver 2
 *  11 OUTPUT PWM pin for motor driver 2
 *
 */

#include <Servo.h>
Servo servo1;

const int motorA = 4;
const int motorB = 5;
const int motorP = 3;

const int motorA_2 = 9;
const int motorB_2 = 10;
const int motorP_2 = 11;

bool motorAvalue = HIGH;
bool motorBvalue = LOW;

const int b1 = A1;
const int b2 = A2;

bool button1 = LOW;
bool button2 = LOW;

const int SERVOPIN = A0;
const int OPENPIN = A4;
const int CLOSEPIN = A5;

void setup() {
  pinMode(motorA, OUTPUT);
  pinMode(motorB, OUTPUT);
  pinMode(motorP, OUTPUT);

  pinMode(motorA_2, OUTPUT);
  pinMode(motorB_2, OUTPUT);
  pinMode(motorP_2, OUTPUT);

  pinMode(b1,INPUT);
  pinMode(b2,INPUT);

  pinMode(OPENPIN, INPUT);
  pinMode(CLOSEPIN, INPUT);
  pinMode(SERVOPIN, OUTPUT);

  servo1.attach(SERVOPIN);
  servo1.write(140); // servo reset to neutral position
}

void loop() {
  button1 = digitalRead(b1);
  button2 = digitalRead(b2);

  motorAvalue = button1;
  motorBvalue = button2;

  if (button1 == HIGH || button2 == HIGH){
    analogWrite(motorP, 120);
    analogWrite(motorP_2, 120);
  } else {
    analogWrite(motorP, 0);
    analogWrite(motorP_2, 0);
  }

  digitalWrite(motorA, motorAvalue);
  digitalWrite(motorB, motorBvalue);

  digitalWrite(motorA_2, motorAvalue);
  digitalWrite(motorB_2, motorBvalue);

  int hookOpen = digitalRead(OPENPIN);
  int hookClose = digitalRead(CLOSEPIN);

  if (hookOpen == HIGH) {
    servo1.write(60);
  }

  if (hookClose == HIGH) {
    servo1.write(140);
  }

}
- Design Files
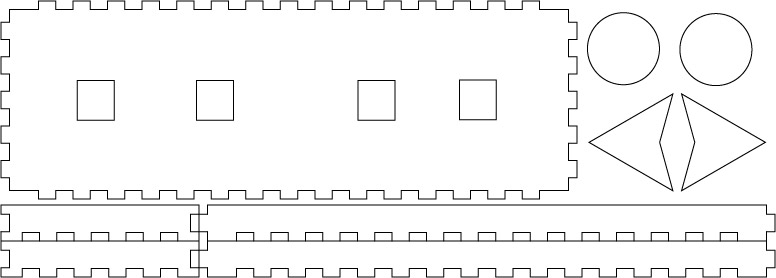
Design files for the controls
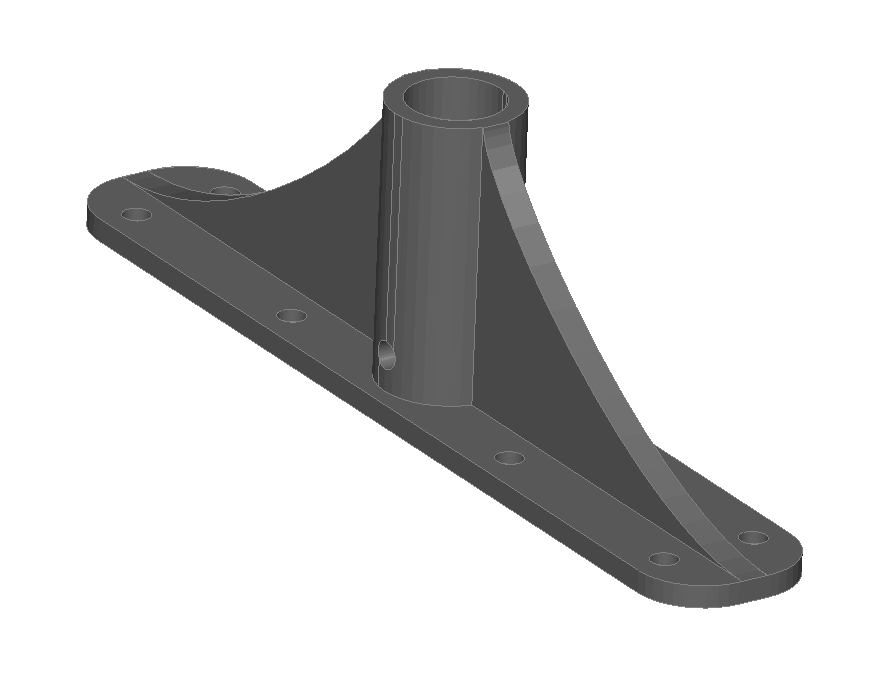
3D model of tabletop attachment piece

Design file for the overall product
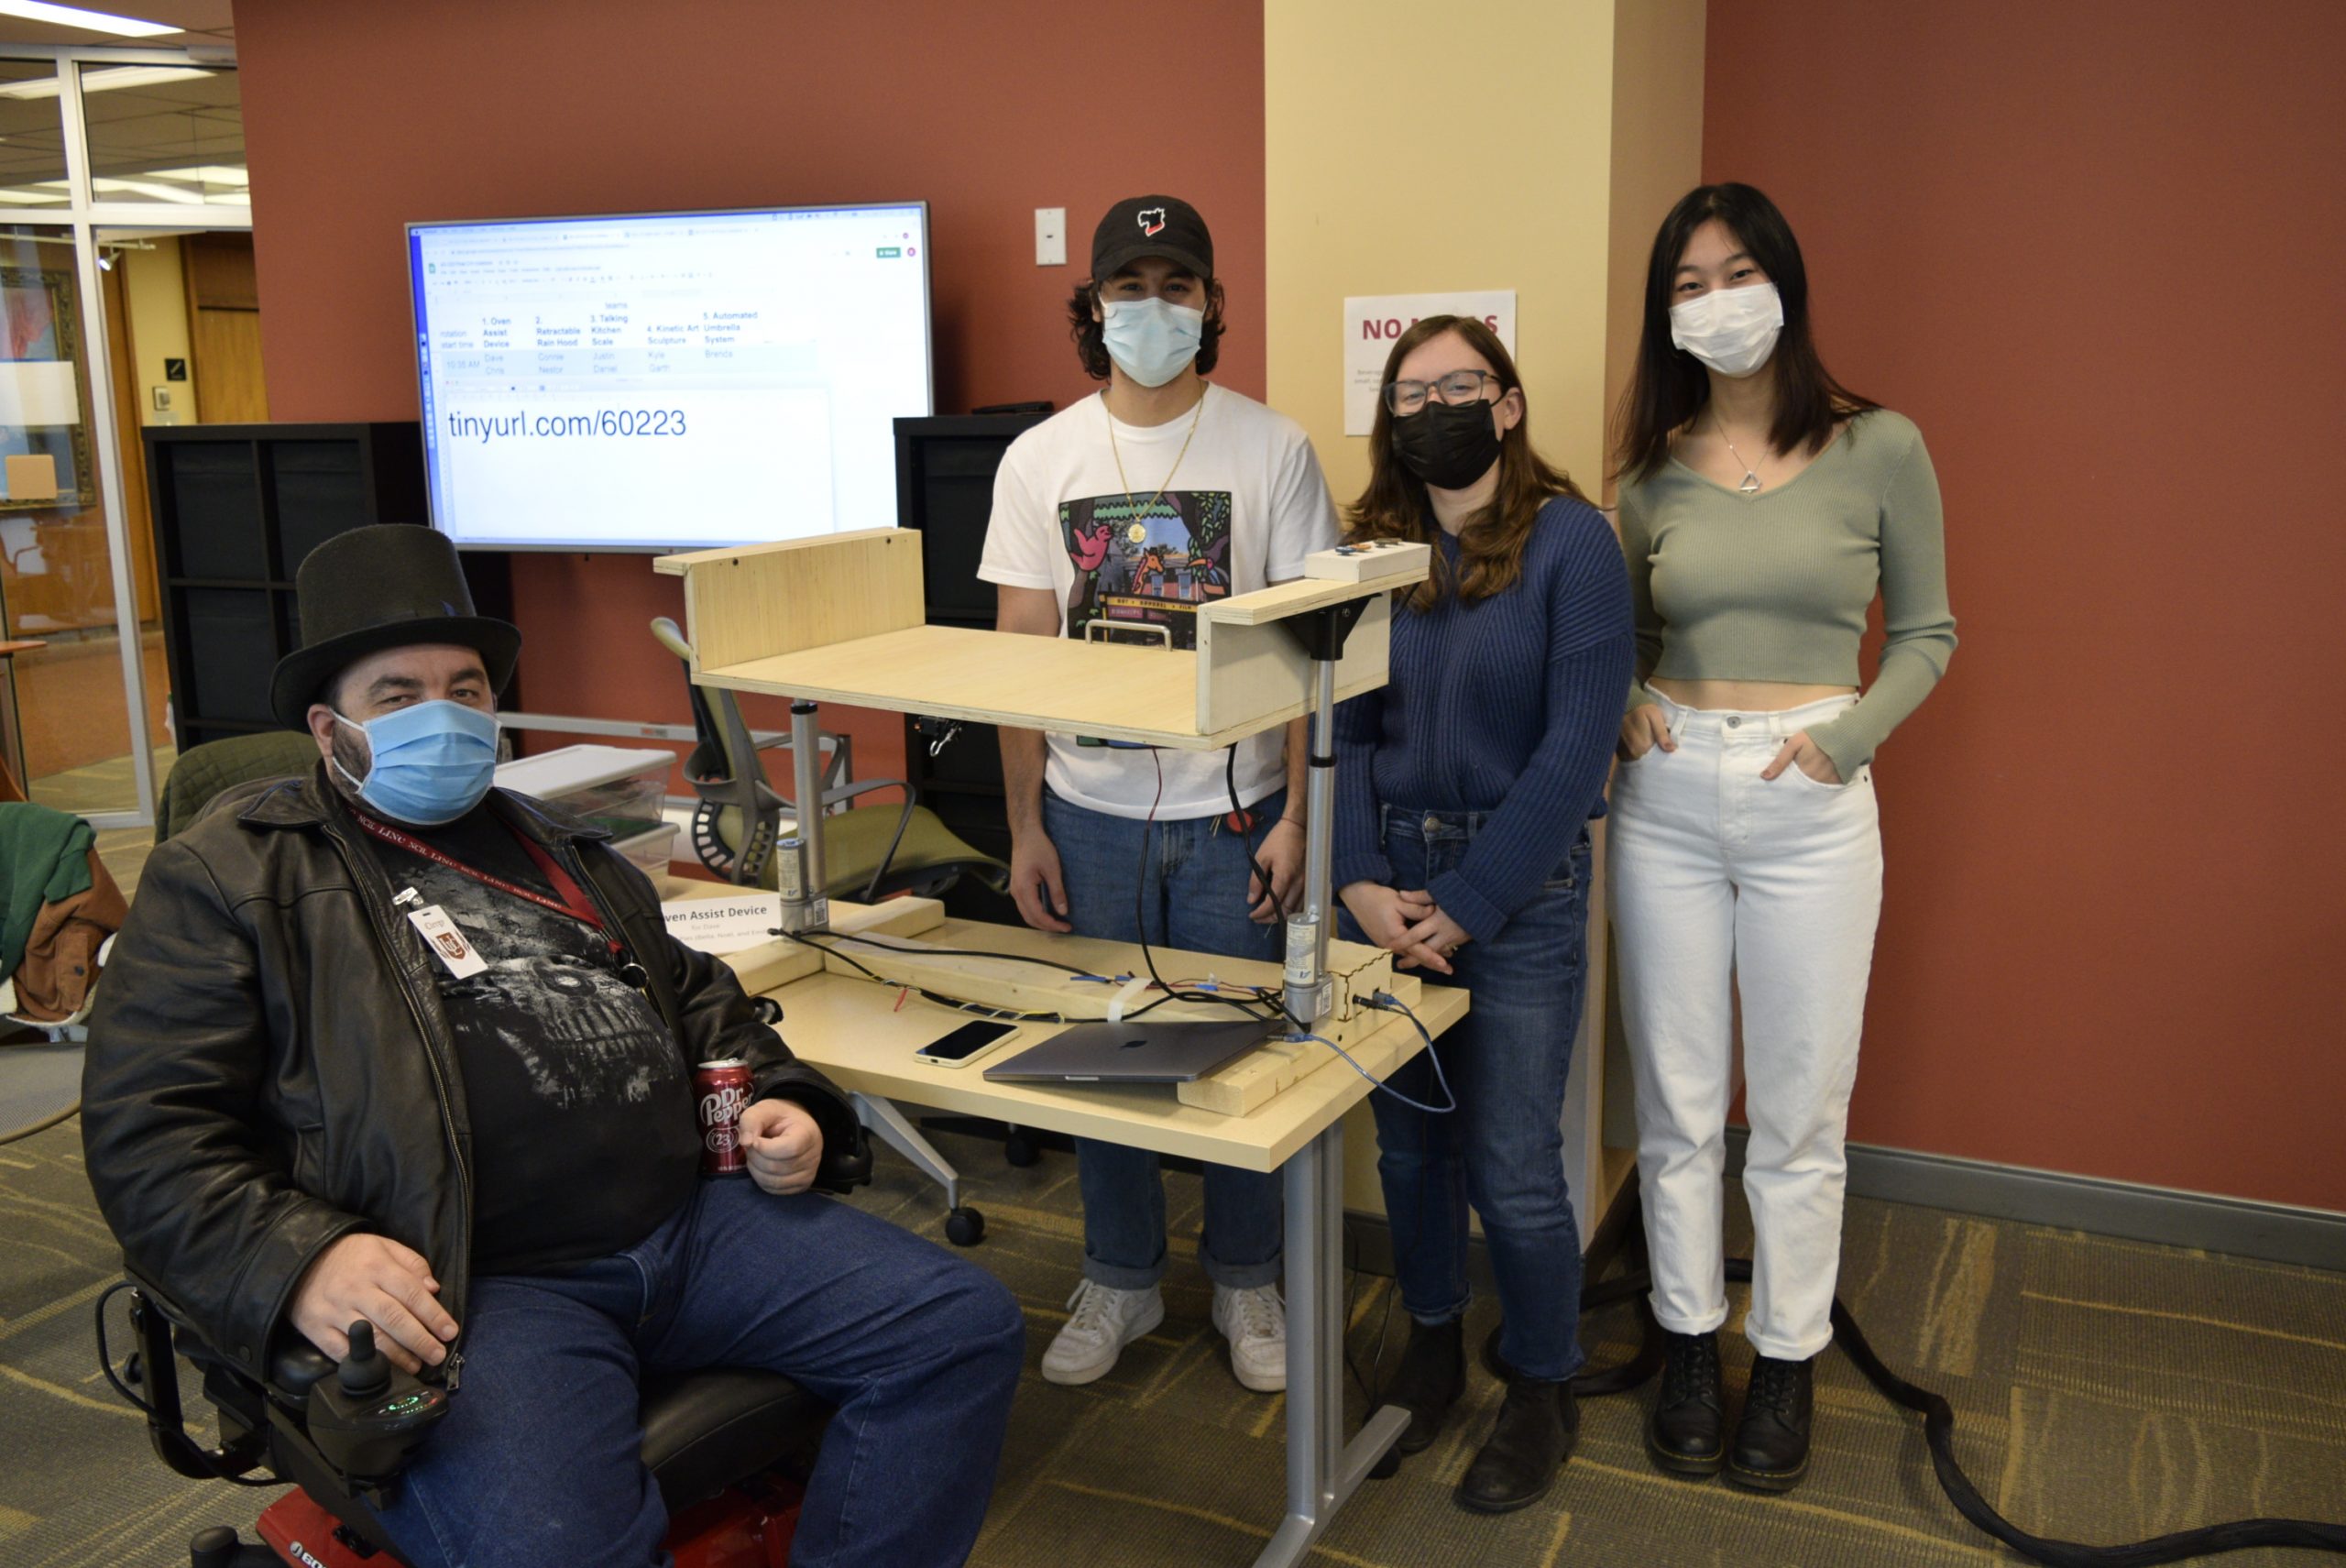
Kiwi Pies Squad pic