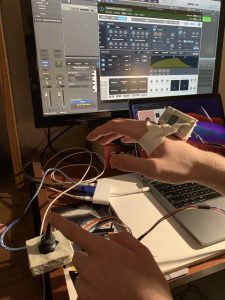
At last, a way to produce electronic music with physical gestures. Rotate your hand and wiggle a joystick to manipulate sound in four distinct ways.
Overview
At last, a way to produce electronic music with physical gestures. Rotate your hand and wiggle a joystick to manipulate sound in four distinct ways.

Relative proportion of Gesture Controller
Relative proportion of Joystick Controller
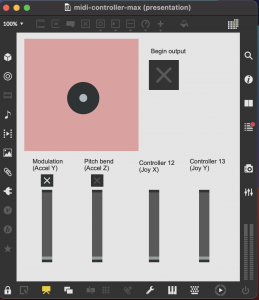
Graphical user interface and midi translator between Arduino and Logic Pro
Process Images and Review
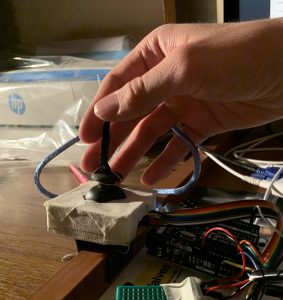
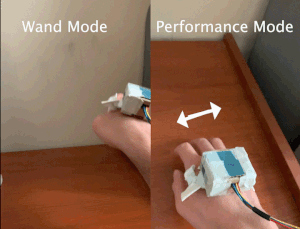
The Controller was going to have two modes: Performance Mode and Wand Mode
In Performance Mode, all 3 axes of the accelerometer would control 3 different parameters. Side to side for Pitch Bend and vibrato, front and back for Modulation, and up and down for Expression.
In Wand Mode, a single parameter would react to the overall motion.
In both modes, the joystick would control two parameters with the X and Y axes, but they would control slightly different parameters depending on the mode.
I had two major problems. In the first one, I had to calculate the velocity and position based on the acceleration readings, for all 3 axes.
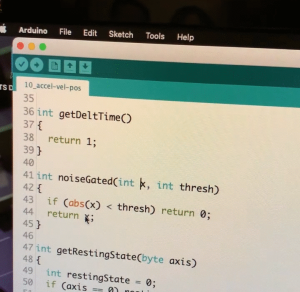
Code from the old physics suite: getDeltTime(), noiseGated(), and getRestingState()
The problem is that accelerometer readings are noisy and give data even when not moving. This random data was accumulating in the velocity calculations and causing my variables to overflow, and thus the position calculations were even worse.
I tried noise gating the data when the accelerometer was not moving (i.e. when the readings were at 0), and only letting the data through when above a certain threshold. But above that threshold, the readings were still noisy and inaccurate.
I scrapped almost all of that code.
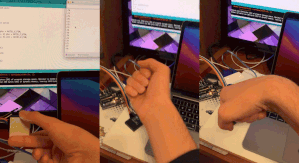
Demonstrating the new gestures the controller will respond to. (Far left) Printing accelerometer rotation readings.
Instead, I decided to make only one Mode, one that uses only the acceleration readings form the Y and Z axes. For this purpose, the acceleration readings were accurate enough, and I already had plenty of success using it.
The second problem was this. In both of the old modes and the new one, the joystick’s click function was going to turn Arduino’s output on and off. This would have let me choose when my motion was intended for performance and when to have the computer ignore it.
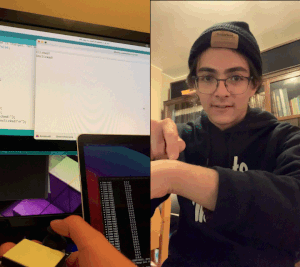
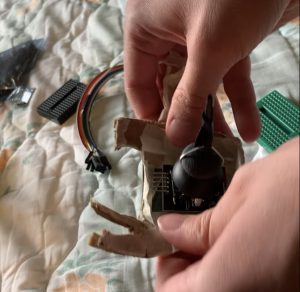
(Left) Joystick detects several clicks at a time (bouncing). (Right) Solution: apply a minimum delay that I measured with a stopwatch.
First, I the joystick was reading several button-downs and button-ups with one single click (called bouncing). My solution was for the Arduino, as soon as it read a button press, to wait 5 milliseconds before it read anything else. I measured the fastest I could possibly double-click button by using my watch’s stopwatch, and found that was around 8 milliseconds.
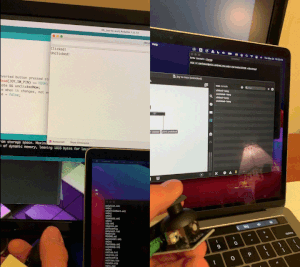
Successful debounce and communication with Max.
Once I successfully debounced the button, I also successfully made Max register the button-down as distinct from the button-up. I even got Max to freeze and unfreeze the joystick’s output based on if the button was pressed not.
Unfortunately, for some reason, putting the joystick and accelerometer together, I was only able to unfreeze the Arduino’s output with a click-down command, but never freeze it again with a click-up. I never knew why, and scrapped that feature, too.
Discussion
Students’ Critique
This was one student’s response to my project, in particular, to my presentation.
It would be good to get a background about the project before diving right into the demo because I wasn’t sure what we were looking at initially.
I couldn’t agree more with this. The demonstration was just Logic playing back a synthesize chord, and my motion changing the sound in bizarre and uninteresting ways. I do like giving the audience a sense of discovery, but since I didn’t verbally give context, and my performance didn’t fill that gap either, my cues didn’t help the audience grasp the device’s usefulness.
Later I was playing around with my device, improvising a performance, and realized how easy and compelling it would’ve been to do that performance for my presentation. Rip.
I absolutely love this:
Is there a way to preset chords such that as you rotate your wrist, it plays a simple song forwards or backwards?
What comes to my mind is called an arpeggiator. This is a really good idea, and possibly an easy one to implement. I could do it in Max and have it generate MIDI notes there. Logic also has MIDI plugin that lets you program in JavaScript any MIDI effect; maybe I could do it there.
This critique was my favorite.
Maybe have some sort of way to set it while inside the bathroom and display outside
Go ahead and let that simmer :=)
Lessons Learned.
My absolute greatest success in this project was making the simplest tests I could come up with. Even before I typed a single line of code, I chopped up the entire project into these tests, and scheduled out when I was going to make them, weeks in advance. This also included making schematics for each sub-circuit I had to test.
I ran tests as simple as printing the accelerometer axes on the Arduino. I made the Arduino, by itself, talk to Max with hard-coded numbers. I made Max, by itself, talk to Logic. Then I put all of those together and made the accelerometer talk to Max, and later, to Logic. And thus I scaffolded from very simple examples like that to the entire finished build.
This made it extremely easy to isolate the unique bugs of each subsystem and not let issues from other systems bleed over. Not only did I learn how to solve these issues, I mostly only had to solve them once! Because then I could take that success with me for the entire rest of the build!
I did find that each test was way less trivial than I thought at first. I would have way more problems than I expected, and the seemingly really long time cushions I would allocate for myself, I would spend all of it, or more, trying to solve those problems. It made me all the more grateful to have made “small” tests, and also to have scheduled such long cushions.
I will definitely keep these very good project management habits.
Next Steps
In the next iteration, I will definitely keep in mind that fantastic idea of arpeggiation. Maybe the angle of my wrist could correspond to playback speed, or I could build upon that idea in different ways.
I will also make a much sturdier, reusable, plug-and-play version setup. One that I don’t have to rip everything up every time I need the parts for something else. One that lets me just plug in the Arduino, the joystick, the accelerometer, and all of the cables.
Dissembling (actually destroying) the device
It would also be fantastic to have a drop-down menu in Max that lets me select what MIDI parameter I want each accelerometer and joystick axis to affect, and through what MIDI channel. Right now those things are hard-coded, and I need to unlock the patch and change the code to change the mapping.
Technical Information
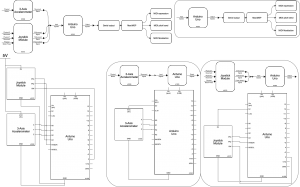
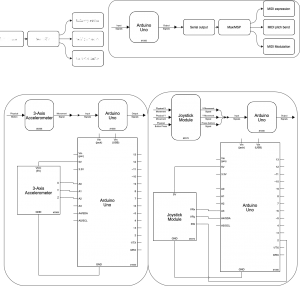
Functional Block Diagrams and schematics for final build, as well as sub-systems
/* Gestural Midi Controller
 *
 * Carlos Ortega (carlosor)
 *
 * Reads data from all axes of an accelerometer and a joystick,
 * converts the data into a usable range for MIDI,
 * formats the data to be interpretted in Max/MSP,
 * and sends to Max.
 *
 * Pin Mapping:
 *
 * Accel x      A0
 * Accel y      A1
 * Accel z      A2
 *
 * Joy x        A3
 * Joy y        A4
 *
 * Joy Switch   2
 *
 */

typedef int pin_t;
// Accelerometer pin mappings
pin_t ACCEL_X_PIN = A0;
pin_t ACCEL_Y_PIN = A1;
pin_t ACCEL_Z_PIN = A2;

// Joystick pin mappings
pin_t JOY_X_PIN = A3;
pin_t JOY_Y_PIN = A4;
pin_t JOY_SW_PIN = 2;

// Axis indices
typedef byte axis_t;
axis_t AXIS_X = 0;
axis_t AXIS_Y = 1;
axis_t AXIS_Z = 2;

axis_t JOY_SW = 255;

// Device type
typedef String device_t;
device_t DEV_ACCEL = "accel";
device_t DEV_JOY = "joy";

typedef String clickstate_t;
clickstate_t CLK = "clk";
clickstate_t UNCLK = "unclk";
clickstate_t NO_CHANGE = "no_change";

// Used for checking the moment
// when the joystick switch was clickedf
clickstate_t last_clck_state = UNCLK;
unsigned long clickTimer = 0;

// Returns pin number for device at axis
pin_t getAxisPin(axis_t axis, device_t device)
{
  pin_t pin = 0;
  if (device.equals(DEV_ACCEL))
  {
    if (axis == AXIS_X) pin = ACCEL_X_PIN;
    else if (axis == AXIS_Y) pin = ACCEL_Y_PIN;
    else if (axis == AXIS_Z) pin = ACCEL_Z_PIN;
  }
  else if (device.equals(DEV_JOY))
  {
    if (axis == AXIS_X) pin = JOY_X_PIN;
    else if (axis == AXIS_Y) pin = JOY_Y_PIN;
    else if (axis == JOY_SW) pin = JOY_SW_PIN;
  }
  return pin;
}

int getData(axis_t axis, device_t device)
{
  pin_t pin = getAxisPin(axis, device);
  if (axis == JOY_SW) return digitalRead(pin);
  return analogRead(pin);
}

// Have 5 millis passed since last switch?
bool clickWaitOver()
{
  return millis() - clickTimer > 5;
}

void updateClickTimer()
{
  clickTimer = millis();
}

// Determine if button was just now clicked, unclicked, or no change.
clickstate_t getSetClickState()
{
  clickstate_t clickState = last_clck_state;
  if (clickWaitOver())
  {
    // clickTimer = 0; // Reset timer

    bool clickedThen = last_clck_state.equals(CLK);
    // Input pullup makes for inverted button pressed state
    bool clickedNow = getData(JOY_SW, DEV_JOY) == LOW;

    if (!clickedThen && clickedNow) clickState = CLK;
    else if (clickedThen && !clickedNow) clickState = UNCLK;
  }
  updateClickTimer();
  if (last_clck_state == clickState) return NO_CHANGE;

  last_clck_state = clickState;
  return clickState;
}

bool clicked()
{
  return (getSetClickState()).equals(CLK);
}

bool unclicked()
{
  return (getSetClickState()).equals(UNCLK);
}

// Read from given pin for given device, and convert to MIDI.
byte getMidi(axis_t axis, device_t device)
{
  int data = getData(axis, device);
  int MIDI_LO = 0;
  int MIDI_HI = 127;

  // For joystick, no change needed for the following initialized values.
  int dataLo = 0;
  int dataHi = 1023;

  byte midi = 255;

  if (device.equals(DEV_ACCEL))
  {
    if (axis == AXIS_X)
    {
      dataLo = 278;
      dataHi = 413;
    }
    else if (axis == AXIS_Y)
    {
      dataLo = 260;
      dataHi = 408;
    }
    else if (axis == AXIS_Z)
    {
      dataLo = 270;
      dataHi = 412;
    }
  }
  // If checking Joystick only change midi if not checking switch.
  if (axis != JOY_SW) midi = map(data, dataLo, dataHi, MIDI_LO, MIDI_HI);
  return midi;
}

// Print MIDI data formatted to be read in Max.
void sendMidi(axis_t axis, device_t device)
{
  String prefix = "";
  if (device.equals(DEV_ACCEL))
  {
    if (axis == AXIS_X) prefix = "X"; // Ascii 88
    else if (axis == AXIS_Y) prefix = "Y"; // Ascii 89
    else if (axis == AXIS_Z) prefix = "Z"; // Ascii 90
  }

  else if (device.equals(DEV_JOY))
  {
    if (axis == AXIS_X) prefix = "x"; // Ascii 120
    else if (axis == AXIS_Y) prefix = "y"; // Ascii 121
    else if (axis == JOY_SW)
    {
      if (clicked()) prefix = "+\n"; // Ascii 43
      else if (unclicked()) prefix = "-\n"; // ascii 45
    }
  }
  byte midi = getMidi(axis, device);
  Serial.print(prefix);
  // 255 reserved for click. Only print midi if not for click.
  if (midi < 255) Serial.println(midi);
}

// Run initilization for Accelerometer
void setupAccel()
{
  pinMode(getAxisPin(AXIS_X, DEV_ACCEL), INPUT);
  pinMode(getAxisPin(AXIS_Y, DEV_ACCEL), INPUT);
  pinMode(getAxisPin(AXIS_Z, DEV_ACCEL), INPUT);
}

// Run initilization for Joystick
void setupJoy()
{
  pinMode(getAxisPin(AXIS_X, DEV_JOY), INPUT);
  pinMode(getAxisPin(AXIS_Y, DEV_JOY), INPUT);
  pinMode(getAxisPin(JOY_SW, DEV_JOY), INPUT_PULLUP);
}

void setup()
{
  Serial.begin(9600);
  setupAccel();
  setupJoy();
}

void loop()
{
  sendMidi(AXIS_X, DEV_ACCEL);
  sendMidi(AXIS_Y, DEV_ACCEL);
  sendMidi(AXIS_Z, DEV_ACCEL);

  sendMidi(AXIS_X, DEV_JOY);
  sendMidi(AXIS_Y, DEV_JOY);
  sendMidi(JOY_SW, DEV_JOY);
  delay(10);
}
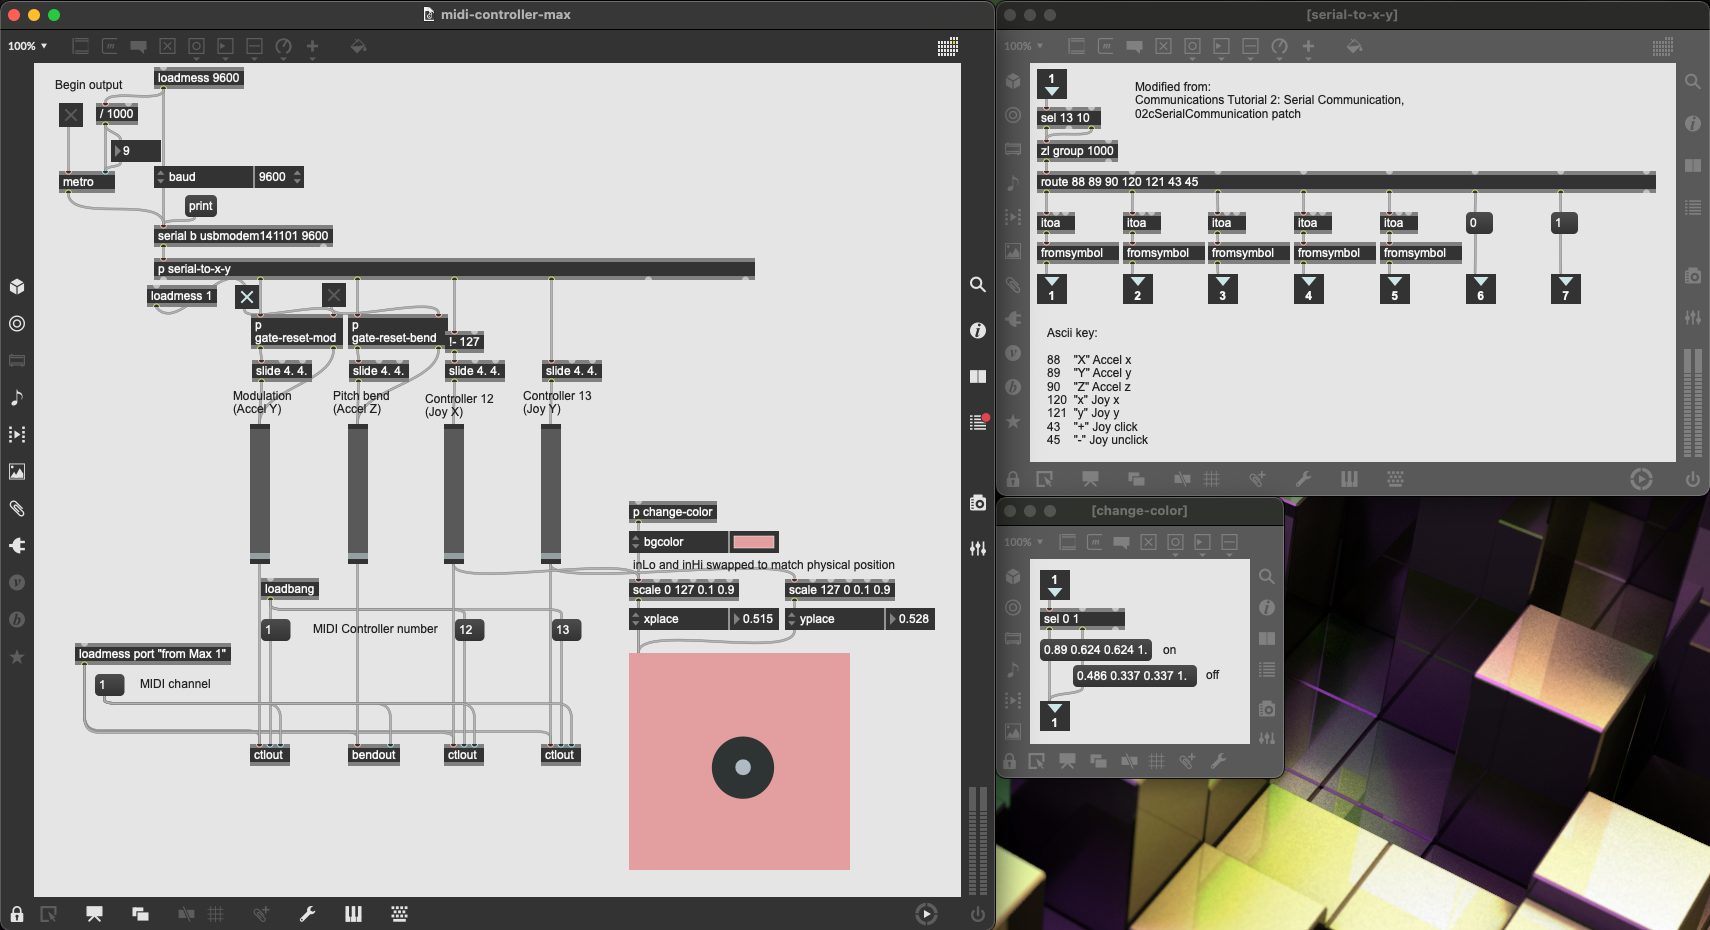
Code in the Max patch and subpatches