Final project: a useful implement for a person living with a disability
The first project of this semester was a technical exploration to help introduce you to new technologies and techniques. The second project was an opportunity for you to put your skills to work and create a complete, functioning device that would help you in your daily life. This final project is an opportunity for you to make something for somebody else. In particular, you will be working with a group of people who have physical disabilities; that said, you do not necessarily need to produce a product that relates to their disability. Rather, your assignment is to create something that is useful and relevant for your client in particular, driven by their wants or needs and nobody else’s.
Over the course of eight weeks, you will: conduct a needfinding interview with your client; distill and generate meaningful ideas from that discussion; make a thoughtfully designed working prototype to explore potential solutions to an identified problem; get feedback from the client and others on your prototype; and use your findings to create a second (and final) iteration, ideally to be given to the client to keep at the conclusion of the semester. You’ll document your process and products along the way. Please see prior semesters’ documentation to get a sense of the range of projects that have been completed for this assignment.
Your final deliverable is meant to serve a useful function for an audience of one: your client. The project must at least:
- Have some kind of interactivity which is mediated by an Arduino or another similar microcontroller,
- Possess well-considered physical embodiment, i.e. demonstrate good forethought and effort towards questions of aesthetics and design for usability, and
- Be built up to a reasonable standard of robustness in its software, electronics, and physical fabrication.
General structure:
- Interviews with design clients (before Wednesday, March 23rd)
- Ideation and convergence on an idea for prototyping (ideation sketches due at start of class Wednesday, March 23rd)
- Interview documentation (due at start of class Monday, March 28th)
- Physical prototype development (Monday, March 28th–Tuesday, April 5th)
- In-class presentation and critique of prototypes (Wednesday, April 6th)
- Final work plan (due at start of class Wednesday, April 13th)
- Elaboration/improvement/changes/finalization of the final project (Wednesday, April 13th–Monday, May 2nd)
- Final presentation and critique (Monday, May 2nd, 1–3:30 p.m.)
- Final documentation (Friday, May 6th, 5 p.m.)
Here’s a Gantt chart illustrating the flow of all of the dates listed above, with time ranges marked with green xs and due dates marked with red !s. Class dates are yellowish, and weekends are grey.
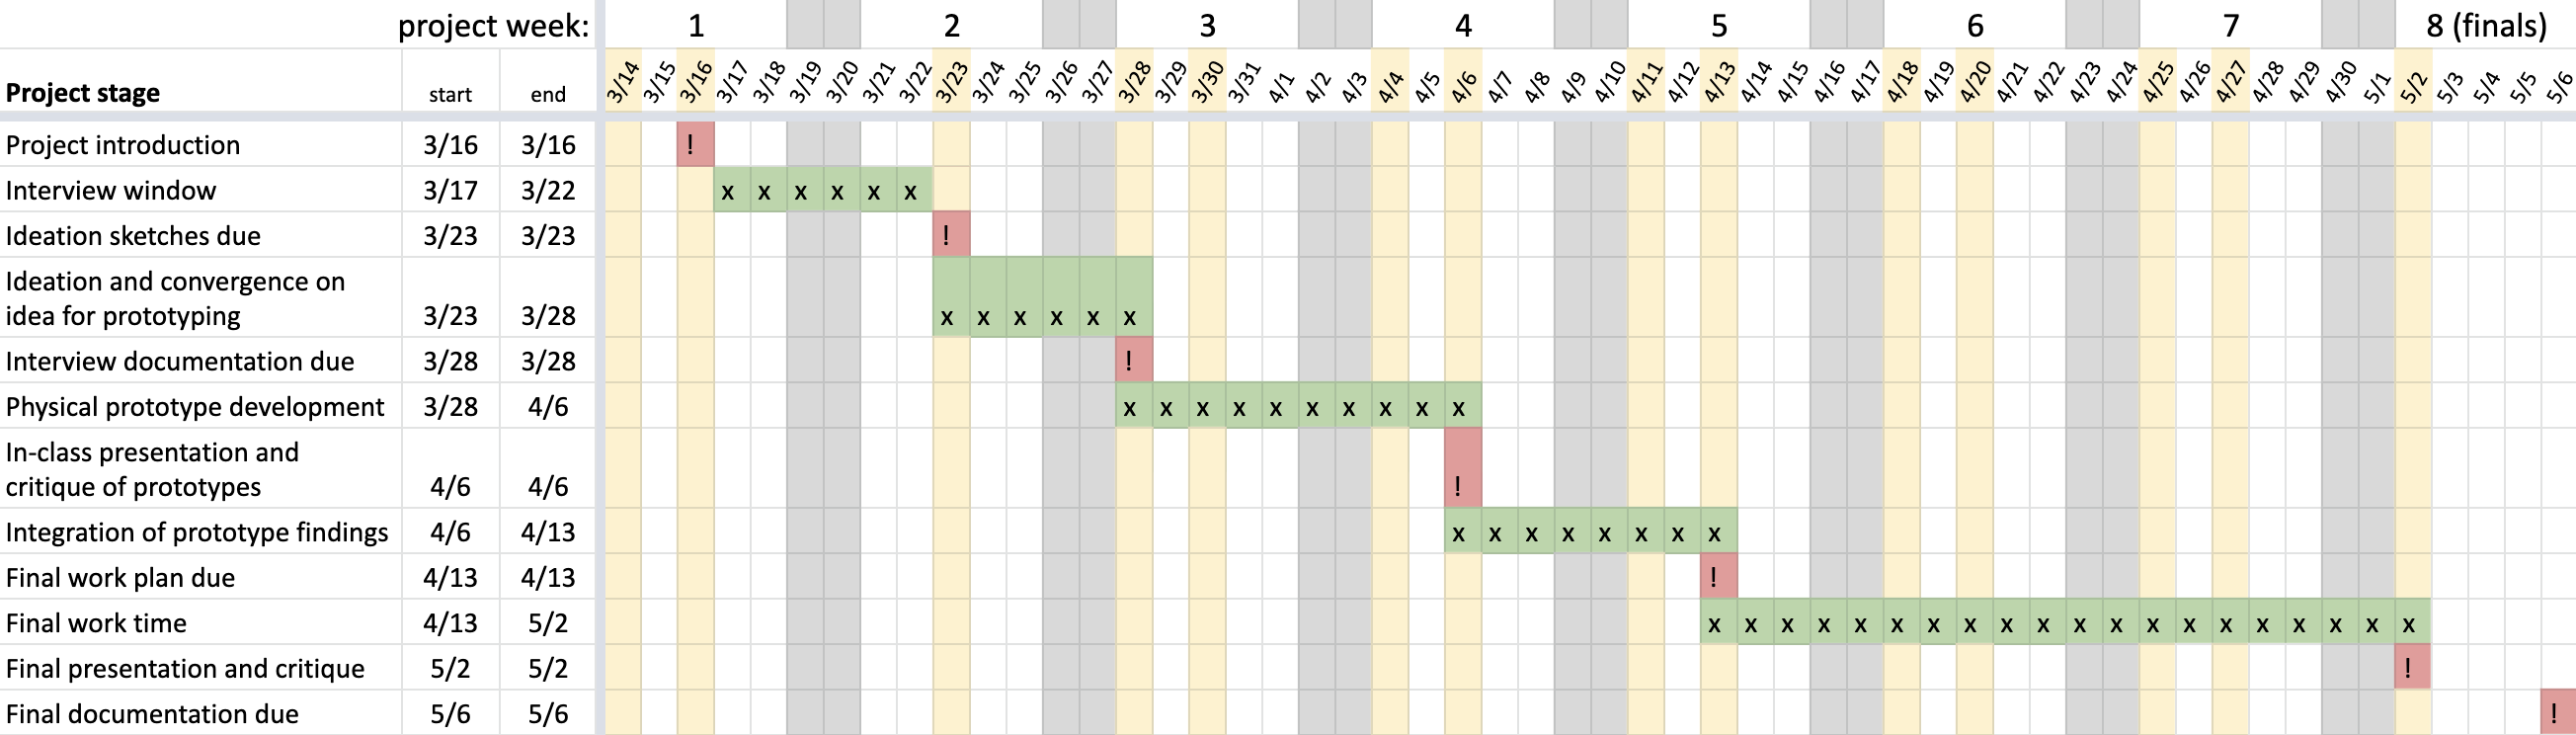
(Right-click and open the image in a new tab if it’s too small to be easily legible in your view)
Last and least: the grading scheme for this project.
1. Interviews with design clients
Prior to Wednesday, March 23rdsee below, each group will arrange for their own meeting with their assigned design client. The major purpose of this meeting is to gather sufficient information about that person’s life to be able to identify a need they have that can be fulfilled with a technological solution.
Note on meeting scheduling: The latest day you should meet is Tuesday, March 23rd. Meeting earlier rather than later is a good idea—it will give you more time to think over your meeting and extract meaning from it, to begin your prototype ideation.
Teams should reach out to their client using the provided contact information to set up a meeting at a time when all team members and the client can meet. If you wish to have an in-person meeting, and this is feasible and comfortable for both your client as well as all of your group members, that is totally fine, or you may set up a Zoom meeting. Please see this CMU resources page on Zoom for information on how to do that if you’re unfamiliar. If you Zoom, seek permission from your client to record the meeting for your easy reference later on; if you meet in person, consider making an audio or video recording of the meeting using a group member’s phone (again, only with everyone’s permission).
You should plan on scheduling the meeting to run for approximately 45 minutes to an hour.
You are running this meeting
Please be sure to go into the meeting with the mindset that you, the design team, are running the meeting. You should have a clear plan about what you want to talk about and how you want to talk about it. In the past, some student groups have been somewhat steamrolled by design clients who are very talkative, or who have particular ideas they wish to share with the team to the exclusion of other discussion. This is usually quite counterproductive!
If you feel things are going off the rails, don’t be afraid to politely share that you’ve got an agenda that you want to be sure to work through. (And then get back to your agenda!)
Meeting agenda jumping-off point
This is not an agenda that you should copy verbatim and use for your meeting. Rather, it’s meant to be a jumping-off point for your own interview planning.
- Introduction/icebreaker
- Introduce yourselves by name, sharing something that reflects a personal value, interest, or other bit of relevant data about your life which will help establish a personal connection. Possibility: share an anecdote about building the assistive device for yourself (Project 2). Or: how long have you been in Pittsburgh, and what do you like about living here? Etc.
- Ask your client to participate in turn, sharing their name, their interest in participating in this group activity, and prompt them with the same question(s) that you all answered to begin.
- Ask the client why they volunteered for this project as well, perhaps. What drew them to want to participate?
- Explanation and clarification about project goals
- You want to be sure to be on the same page about this project. Explain in clear terms what it is we’re trying to do, and what we’re not trying to do.
- We are:
- Trying to build prototype useful devices
- Engaging in an iterative design process, including gathering formative feedback around the midpoint of the process
- Taking about seven weeks to go from this meeting to a reasonably high-fidelity final product
- Documenting our process
- We are not:
- Professional technologists who are experienced in making polished products
- Planning to build something that will be sold commercially
- Constrained by any practicality outside of usefulness to the person we’re designing for
- Likely to invent a totally novel piece of electronics (we combine many existing available components in new ways, but don’t make components)
- Give a quick timeline overview of the process
- Be sure to solicit questions: ask “do you have any questions?” or “does this make sense?”, etc., as you’re going through this section
- Understanding needs and thinking of possible technological interventions
- This is the meat of the meeting, but it’s also the hardest part
- There are a broad variety of approaches that you could take. Some possibilities:
- Ask your client directly if they have any activities in their daily life that are difficult, frustrating, or otherwise seem like they could use an intervention. This direct question may bear some fruit, but you will probably need to do some probing and ask questions to guide the answering.
- Ask if they’d be willing to demonstrate a daily task or a series of tasks to you during the meeting. They can actually do the task if it’s something simple like getting a glass of water, or they may pantomime the task. The closer to reality this action is, the more likely you are to find a particular aspect of the task that’s harder than it needs to be.
- Have the client try to think of something that they used to enjoy doing, which has become harder over time for any reason. Are there creative ways to make that thing easier to do now?
- Use the simple creative act of drawing to bring out ideas: ask the client to draw a map or cartoon of their daily life and show it to you on camera, or have them narrate the action and do the drawing yourself in a way that’s visible to the group. It could be a map (literal map, showing travels), a sequence of cartoon panels (first I do this, then I do this), or take a more abstract form.
- In general, using a shared drawing-surface tool (such as a whiteboard in Zoom, or a piece of paper in real life) so that everybody can simultaneously contribute to and see others’ ideas is a great idea.
- Suggestions added by earlier students:
- Ask ethnographic questions: “why is this important to you?”
- Once you’ve asked some of these guiding questions, use materials you might have on hand (play dough, household building materials like toothpicks, tongue depressors, tape, etc.) to mock up solutions to the story you’re telling
- Make sure the client is a part of the process as much as possible
- Discuss and establish some categories for “problems” to narrow and refine the conversation
- Think of this as making a “convenience machine”, one that reduces one of the little annoyances we all have, maybe call it a “gadget”? Language is important.
- As you’re having this part of the discussion, document it as much as possible. At least one person should be taking notes, and at least one other person should be taking occasional photographs or screen grabs of your conversation (certainly if the client is demonstrating something it should be documented with photographs).
- Share thoughts and ideas as they come up. You’re trying to be as creatively fruitful as possible in a short time!
- Keep, and document, any artifacts generated from this meeting. This includes photos, screenshots and/or saving any drawings/models/etc.
- Regardless of your particular process, try to move towards some more concrete ideas after you’ve given the open ideation enough time. It’s best to have more than one possible idea moving out of this meeting so that you can funnel down later into narrower possibilities, instead of trying to invent new possibilities later.
- Conclude
- Thank your client for their time, make sure they have your contact information, and take any final documentation images/drawings/notes you may need to wrap up before you signing off.
- Reiterate the overall project schedule if you feel it would be necessary to clarify before leaving.
Some thoughts from an experienced interviewer
Below are some relevant passages from chapter 2 of Steve Portigal’s book Interviewing Users: How to Uncover Compelling Insights (Rosenfeld Media, 2013). Note that these techniques generally assume you’re meeting in person, and some of them are less relevant to remote meetings.
Work toward the tipping point
There’s often a visceral point in the interview where the exchange shifts from a back-and-forth of question-and-answer, question-and-answer to a question-story setup. It’s such a tangible shift in the interview that I feel as if I can point to it when it happens. Stories are where the richest insights lie, and your objective is to get to this point in every interview.
The thing about this tipping point is that you don’t know when it’s coming. So you have to be patient in the question-and-answer part of the interview because you don’t necessarily know that what you’re doing to build rapport is getting you anywhere. You have to trust in the process, which is easier with experience. (p. 24; my emphasis)
Listening
When you engage in conversation, you’re often thinking about what you want to say next and listening for the breathing cues that indicate it’s your turn to speak. As you jockey for your 51% of the conversation space, listening becomes a limited resource. Although we all like to consider ourselves “good listeners,” for interviewing you must rely on a very special form of listening that goes beyond the fundamentals, such as “don’t interrupt.”
Listening is the most effective way you can build rapport. It’s how you demonstrate tangibly to your participants that what they have to say is important to you. (p. 24)
Listen by Asking Questions
In addition to demonstrating listening by what you don’t say, you can also demonstrate that you are listening by what you do say. The questions you ask are signifiers that you are listening. Try to construct each question as a follow-up to a previous answer. If you are following up on something other than what the participant just said, indicate where your question comes from. For example, “Earlier, you told us that…” or “I want to go back to something else you said….” Not only does this help the person know that you’re looping back, it also indicates that you are really paying attention to what they are telling you, that you remember it, and that you are interested. If you are going to change topics, just signal your transitions: “Great. Now I’d like to move on to a totally different topic.” (p. 25)
Be Aware of Your Body Language
Make and maintain eye contact with your participant. If you find eye contact personally challenging, take breaks and aim your gaze at their face, their hands, and items they are showing you. Use your eyes to signal your commitment to the interview. Acknowledge their comments with head nods or simple “mm-hmm” sounds. Be conscious of your body position. When you are listening, you should be leaning forward and visibly engaged. When you aren’t listening, your body tells that story, too. (p. 25)
2. Ideation and convergence on an idea for prototyping
ideation sketches due at start of class Wednesday, March 23rd; 4% of project grade
In class on Wednesday, March 23rd, we’ll discuss your thoughts coming out of your interviews. The team as a whole is responsible for showing three sketched-out ideas for projects to build. If one person on the team is a strong sketcher, it’s fine for that person to do most or all of the drawings; but the whole of the work should be collaborative. (If one person draws, the others should be sure to write plenty.)
Each project idea should fit on a single 8-1/2” x 11” page, and should have at least three drawings or images, as well as ~150 words which may include descriptive text, captions, etc. The drawings and text may be arranged freely on the page, or in a more tightly structured way—whatever you decide upon as a group. The content matters here much more than the form.
The deliverable for this assignment is a PDF. It should be submitted to this Canvas assignment as a file upload.
3. Interview documentation
due at start of class Monday, March 28th; 7% of project grade
Submit your post’s URL to this Canvas assignment.
It’s important to carefully document the meeting you have with your client so that you are sure to get as much as possible out of the short time you’ve got together. A good meeting with poor notes taken will likely only remain in your mind for a few days, and that’s not long enough.
During your meeting, take notes and capture images! If the meeting produces any artifacts other than notes (if, for instance, you make a drawing or your client does), then be sure to capture good documentation of these. If the artifact is a drawing, then get a high-quality photograph or a scan of it; if the artifact is a small sculptural thing like a mockup with craft materials, then take a photograph or two which shows it clearly. Recording your Zoom call (with the permission of everyone on the call) is an easy way to capture some useful documentation, double-check the recording to make sure you’re quoting someone correctly, etc.
Each group is responsible for submitting a meeting documentation post to the student work site including at least the following elements:
-
A brief introduction: Write this with an ignorant audience member in mind, somebody who doesn’t know anything about our class project, who just found this page through a web search. You should explain the purpose of the meeting, who was present, and when it was held. (Stick to using first names when naming people.) Include your team name.
-
Your meeting agenda: The agenda you wrote before your meeting, illustrating how you planned for the meeting to be conducted. It may be handwritten (in which case it should be scanned and the image posted at “large” size), or electronic (in which case the full contents should be presented on the documentation page).
-
Meeting summary and major takeaways: The most important part of this documentation post. Here, you’re explaining what you learned over the course of the meeting. What did you discuss? Were there any especially noteworthy quotes or strong findings? This is the section where you should integrate media from the meeting like snippets of notes, photos/screenshots of acting out a particular idea or problem, photos of artifacts, etc. Write captions for images as appropriate. This section should not simply be a verbatim recital of your notes from the meeting.
-
Your thoughts after holding the meeting and discussing as a team: Use this section to present a critical reflection on the meeting. For instance: did the meeting follow your agenda or go way off the rails? Or was it difficult to get conversation started? Or did it go great? What would you want to do differently next time? Afterwards, did you realize any questions you wished you’d thought to ask? Did different members of your team have different opinions about how it went?
Technical WordPress notes about the post:
- Use the “multiple authors” feature to add each of your team members as authors on the post.
- Be sure to select a “featured image” so your post has a primary image associated with it.
- Label your post with the “Meeting documentation” category in WordPress.
Questions/concerns/etc.? Contact the instructor before the due date!
4. Prototype development
A prototype is an experiment designed to answer a question
We are building a prototype so that we can attempt to answer a question. The question may be something somewhat technical or tightly defined, like “where are the right places to put these buttons so that the user knows how to use this device?” or something broader, like “will this feature pique the user’s interest?” or even more existentially for the product, “will this be useful?”
When designing this prototype, you should at the outset define a question that you’re seeking to answer, and keep it in mind as you progress. As a team of two or three, you may well decide you have three different questions to ask, and give each of them to one of the teammates to address.
Prototypes come in different flavors
Different types of prototypes serve different purposes; one useful breakdown of a handful of these is given in Graham Pullin’s book Design Meets Disability, p. 138:
- Feels-like: an ergonomic prototype for feeling in hands, etc. This sort of prototype might answer the questions
- “how does the user respond to this size, shape, and weight?” or
- “is this too heavy to be comfortable?”
- Looks-like: an appearance model for form, colors, materials. This sort of prototype might answer the questions
- “are polka dots distracting or fun?” or
- “does the user believe this is sturdier if it’s got a metal exterior finish?”
- Works-like: an engineering prototype for electronics, electromechanics, etc. This prototype might answer the questions
- “can we fit the electronics into a small enough space to make this work?” or
- “will this thing overheat when it’s left running for a few hours?” or
- “is the range of the radio long enough?”
- Behaves-like: an experience prototype which models the fundamental user interactions. This prototype might answer the questions
- “does a user understand how to use this without being given verbal instructions?” or
- “will the user engage with this for more than a few seconds before getting bored?”
As you consider what kind of question you wish to answer, think about these categories of prototypes, which may help guide your thinking.
Wizard of Ozzing
In The Wizard of Oz, the titular Wizard is a big scary loud floating spectre who shoots fireballs. But actually the Wizard is an illusion operated by a man hiding behind a curtain, throwing switches and turning knobs.
For the purpose of this prototyping process, you may need to “Wizard of Oz” some of your user’s interactions with the physical thing that you build. That is to say: you might not be able to actually build out all of the interactive function into this thing that you’d like. For instance: if you wanted to build a device that senses a user’s clapping sound to trigger it to turn on, but you don’t have a microphone, then use a button to “sense” the clapping sound instead. (When your user claps, you’ll press that button.)
The expectation is that you will build some sort of physical embodiment (perhaps out of cardboard, paper, and tape—or whatever is available to you) and then sit that thing in front of a user for testing and feedback. Feel free to get creative with this! Do whatever you need to do to fake (Wizard of Oz) the interactions or behaviors you wish for your prototype to model. It may seem a bit silly, but it’s a perfectly legitimate form of prototyping.
You should take lots of pictures as you’re in your prototype phase. These will be integral to your process documentation later.
5. In-class presentation and critique of prototypes
in class on Wednesday, April 6th; 18% of project grade
A formative critique is one which occurs “mid-stream” in the design process; this is contrasted with a summative critique, which happens at the end. The purpose of a formative critique is to give the designer useful input that they can incorporate into their ongoing process, and that’s exactly what we’re going to aim for with this critique.
10:10–10:55 a.m.: group presentations to the room
Each group, one at a time, presents to the class and design clients. Fill in your own slides in this deck to present for ~7 minutes and include:
- team introduction (you are welcome to change your team name if you’d like),
- brief group member introductions, optionally sharing your disciplinary background at CMU (also include the design client in the introductions),
- the problem the group identified (pictures are helpful), as well as the suggested solution you’re working on,
- explanation (and quick demonstration) of the prototypes that are being shown, and
- any learning you’ve had from the prototyping process, including new findings, and your goals moving forward.
You are permitted (and encouraged) to customize the slides however you like; add images, text, add slides, remove slides, whatever is appropriate for your group. During the presentation, Zach will be sharing the slides from his computer and you’ll tell him verbally when it’s time to advance to the next slide.
After each group’s presentation there will be time for a few brief questions and comments from the class.
10:55–11:55 a.m.: group consultation time with their client
Each group has extended discussion and consultation time to get feedback directly from their client. Group members should show their prototype(s) and allow their client to try it/them out, and solicit feedback with open-ended questions. There’s plenty of time to enjoy an in-depth discussion, talk about shortcomings and possible changes, and spitball future possibilities. Be sure to take notes (and perhaps a few photos) during this meeting, both for documentation and so that you can hold on to as many lessons as possible.
6. Final work plan
due at start of class Wednesday, April 13th; 1% of project grade
In order to ensure that you are all on the same page regarding timing and completion of key tasks in the runup to final presentations, you’ll collaborate on a document which will describe who is expected to do what, and when.
The document you’ll be building is a “Gantt chart,” a type of visual organization which graphs the timing of milestones and tasks on a horizontal axis of time. Open this Gantt template and select File–>Make a copy. Change your copy’s name to 60-223 Team name Final project planning Gantt (substituting in your own Team name).
The linked Gantt chart contains some sample content to serve as a starting point. If it’s helpful, here are some more explicit instructions on how to use the Gantt chart to organize your team’s planning:
- Clear the text below the heading row in columns
AthroughEso you’re starting with a blank sheet. - As a team, discuss your major tasks between April 11th and May 2nd and list them in column
A, with extra vertical space in between them. - Add brief descriptions to each major task.
- Add subtasks (pieces of the major task that can be listed separately) beneath each task, and write descriptions for these.
- Assign point people to each task and subtask.
- To list a task, write its name in column
A, and its start and finish dates in columnsDandE. - Listing a subtask is the same as listing a task (just give it a name indicating it’s a subtask).
- To list a milestone, write its name in column
A, and use the same date as the start and finish in columnsDandE. - If the bar chart part of the sheet gets screwed up, just select the top row of that section (cells
F2throughAA2), and drag the bottom-right corner little square down from there to rewrite all of the formulas; that should fix things.
To complete this assignment, submit a text link to your own Gantt chart via the Canvas assignment, and please be sure that you’ve set the sharing permissions in Google Drive so that I can add comments to your document.
8. Final presentation and critique
in class on Monday, May 2nd, 1–3:30 p.m.; 30% of project grade
Projects are graded based on their presentation and demonstration of work at the time of the crit.
Presentation plan
- 1:05–1:10 p.m. Instructor’s welcome and introduction
- 1:10–1:55 p.m. Each group will present from this slide deck for seven minutes
- Slides include:
- group introduction
- identification of the problem and originally proposed solutions
- findings from prototyping
- final work product
- lessons learned and potential next steps
- Guests and other students are welcome to leave written feedback during this time
- Slides include:
- 1:55–3:00 p.m. Guest critiquers rotate through each group and give them individual verbal and written feedback: around eight minutes per rotation
- 3–3:30 p.m. Reconvene for a last group thanks and goodbye for the semester!
9. Final documentation
due at 5pm on Friday, May 6th; 40% of project grade
The final documentation for your pieces will be the longest-lasting, most portable, and most accessible evidence of the work you did. The final artifact itself will be given to the person that it was designed for—it may live in their home or in their traveling bag, but wherever it is, it won’t be in your hand.
You should spend time proofreading and double-checking your final documentation, and be careful to produce something you’ll be proud to point to for years to come when people ask what sorts of interesting projects you’ve completed in your time at Carnegie Mellon.
If you have any questions about the submissions requirements, or run into technical problems, be sure to contact the instructor before the due date.
Your documentation is submitted in the form of a post on the course WordPress site, and the link to that post is submitted to this Canvas assignment. In order from top to bottom, the documentation post should include:
1. Title and introduction (3 pts.)
- Title your post in the format: “Project Name by Group Name: final documentation”
- Underneath the title, write a paragraph to introduce your project in the context of this class to the uninitiated reader. Provide a very brief overview of the nature of the class’s collaborative effort with the client, and also include in the text links to your prior post so the reader knows they can look there for more context and process information.
2. What we built (10 pts.)
-
a. A one-paragraph description, in plain and spare language, of what your project does. Avoid technical terms.
-
b. Images of the final project as described below.
- For the final product, at least five still images and one animation:
- One overall image for proportion and scale (possibly the “featured image” you’ll use for the post, though not necessarily—also note that you can use a gif as a “featured image”).
- At least one brief movie (more than one is good, too) that shows the thing in action. This might be a single, unbroken take, or an edited-together video. See “WordPress notes” below for technical details.
- At least four detail images showing different views of the device.
- For the final product, at least five still images and one animation:
Each image should be captioned. (To add captions in WordPress: click on an image, click on the pencil icon to edit it, write a caption, and click “update.”) The captions serve to explain both what the viewer is looking at, as well as elucidating some of the operating details of the object.
In addition, if necessary, add
alt textto your imagesAlt textis a feature ofHTMLthat helps people who can’t see your images to understand what is in them. If your caption explains what’s happening in a picture, for instance: “This small grey box with red buttons is the main user interface,” then there’s no need to addalt text, because it would be redundant with the caption. If, however, your caption doesn’t explain the contents of the image well, for instance a caption like “The machine working,” you can addalt textvery easily in WordPress: click on an image, click the edit (pencil) icon, and enter your text into the “Alternative Text” area at the top of the dialogue. Here is some useful guidance about how to write goodalt text.
If you wish for us to see a physically small feature (such as text on an LCD screen, a small mark or other detail on your housing, etc.) then be sure to photograph that feature so that it is filling up much of the frame—or edit your image file to crop to the area of interest.
- c. A narrative sketch of the intended use—a “story” of sorts to illustrate your idealized vision of what this thing would do, being used by the person for whom it was designed. Here’s a made-up example:
When Sam gets home, he’s looking for some inspiration, and goes to his bookshelf, where his Book Suggestor sits. He pushes the big button marked
What should I read?and a display screen saysBrave New World by A. Huxleyon one line andshelf 4Ron the next line. He walks to shelf 4R and finds the book.
Two days later, he returns to the Book Suggestor and pushes the
rate that readbutton. He turns a knob, scrolling pastno thankstoso sotogood read!and clicks the knob to select that answer. The Book Suggestor remembers that Sam enjoyed that author, and will raise Huxley’s other books’ rankings when the next suggestion time comes around.
3. How we got here (prototype and process) (20 pts.)
A novice builder-of-things may assume that you 1) get an idea, 2) build it, and 3) you’re done! Your goal in “How we got here” is to disabuse them of this misconception.
a. Prototype
- A concise statement of the question(s) this prototype(s) was built to answer. You can be straightforward about this: write something like, “This prototype was designed to help answer the design question: [your question here].”
- A few sentences describing your prototype(s), in simple terms and avoiding jargon.
- At least three still images of the prototype. Caption the images as needed for the reader to understand what they’re looking at. Do your best to get reasonably good pictures.
- At least one image of each prototype should be an “overall” view for scale/proportion.
- At least one other image should reveal a detail of something you’d like to share.
- At least one moving image of the prototype(s): an embedded
gif,.mp4, or other short animated element demonstrating something interactive happening, showing motion, etc. It’s best to capture a subject’s interaction with your prototype, though that’s not strictly necessary. This image should also be captioned. - At least three images illustrating some aspect of your prototype development or feedback process. Please caption these. These could be, for instance:
- Pictures you take as you’re working on putting your prototype together
- Pictures you take capturing a failure, surprise, turning point, etc.
- Relevant screenshots of any aspect of your process
- Images of notes/drawings/etc. drawn from your prototyping session(s)
- Two or three paragraphs (~200 words) addressing:
- Your findings from the prototyping process. In essence—what was/were the answer(s) to your question(s)? Or if you didn’t find answers to your questions, then say so and explain what didn’t go to plan.
- What feedback from the critiques did you integrate into your team’s final design?
- What (if any) feedback did you ignore, and why?
- What surprises (if any) did you encounter during your prototyping process?
b. Process
Include at least six images to help tell about your process. Intersperse text and include captions as you see fit. The images may be photographs of a workspace, scans of notebook pages, screengrabs, or any other visual artifact that’s useful for your story.
Discuss and analyze retrospectively the decisions you made, mistakes and discoveries along the way, and share any breakthrough (or breakdown!) moments you had.
Address the extent to which you followed or did not follow your original schedule (feel free to reproduce an image of some or all of your planning Gantt chart). If you diverged from that schedule, what brought the divergence about? If you didn’t diverge from it, how did you manage to keep to your original goals?
4. Conclusions and lessons learned (12 pts.)
A few paragraphs here, addressing:
-
Salient findings from the final crit, which emerged from discussion and/or written feedback. For instance: did somebody suggest a simple change that would significantly improve your project? Please quote feedback verbatim, but do not name the person who gave that particular feedback. Be sure to respond to at least four pieces of written feedback. This spreadsheet captures all of the written feedback, including the feedback written on paper (it was typed up and added after class).
-
Major takeaways from the experience of working with a person with a disability to design something built just for them. What surprised you, what would you do differently next time, etc.
-
Any concluding thoughts you have about the project, different choices you’d make a second time around, lessons learned, etc.
There should be at least ~400 words in this section.
This folder contains the group photos from the final crit day, which you’re welcome to use in your post if you’d like.
5. Technical details (10 pts.)
This section, at the bottom of the post, is here primarily so that others can use and build on your work if they’re inspired by it. It is your responsibility to post actually working code and an actually valid, legible schematic and block diagram, otherwise you may just be giving somebody a headache instead of a leg up.
a. Schematic and block diagram
A cleanly drawn schematic and block diagram, correct and detailed, enabling a stranger to build their own copy of your electronics. Use our customized drawing software to create the drawing, following the conventions identified on the course standards page. You can combine both drawings onto one canvas or upload separate files. Either way:
Upload an SVG (this is a vector format which will preserve all your detail). From draw.io: File–>Export as…–>SVG… and click Ok. The default export settings are fine. Upload like any other image to WordPress.
b. Code
Your code should be reasonably commented throughout so that people other than you (the authors) can better understand it. You certainly don’t need to explain every single line—that would be overkill—but leave useful notes in a reasonable measure. Write a comment block at the top of the code including:
- the project title,
- (optionally) your names,
- a description (short or long) of what the code does,
- any description of pin mapping that would be useful to somebody else trying to recreate your work,
- appropriate credit to any code source that you incorporated into your project, and
- (optionally) a license notice (i.e. copyright, CC BY-SA 4.0, the MIT License, release it to the public domain, or just follow your heart). If you have written code that you wish to keep strictly proprietary for any reason, please speak with the instructor about an exception to this documentation requirement.
Make sure that your final code as it appears on the public-facing post is correct and will compile!
To embed the code properly: on the WordPress “Edit Post” page, move your cursor to where the code should be inserted in your post. Click the “Code Insert” button in the toolbar above the post (it is marked
{…}). For Language, selectC. Paste the code—properly indented!!—into the window, and click OK.
c. Design files (optional)
Include any design files that would help someone else reproduce your project; these may have been generated in Illustrator, SolidWorks, Inventor, Fusion 360, Rhino, or any other design software you used. If you have cutfiles (
.dxftypically), and/or 3D print files (.stlor other), share these as well. Zip all design files into a single.ziparchive and upload that file. Get in touch with the instructor if you’re having any technical trouble with uploading! (We’ve had difficulties with this in the past but now believe the problem is solved.)
WordPress notes:
- Use the “multiple authors” feature to add each of your team members as authors on the post
- Label the post with the category “final documentation,” which is a subcategory of “Final project: an assistive device for a person with a disability”
- Any paper document (notebook page, loose sheet of paper, etc.) should be scanned in a flatbed scanner if possible, rather than being photographed directly (the quality difference is huge)
- Select a “featured image” for the post
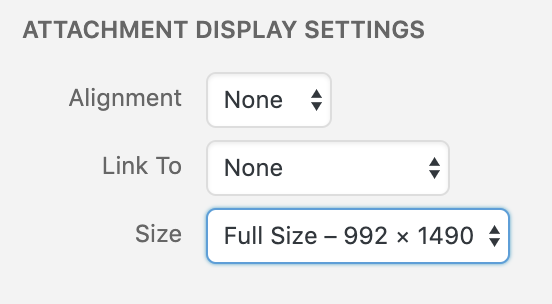
- When uploading images, in the “Add Media” window, select “Full Size” under the “Attachment Display Settings” header, as shown below. (If you choose a smaller size, your images will be downsampled, potentially with very ugly and destructive results.)
- Movies: your video should be an uploaded
.mp4ideally, though a.gifwill also work. Adding captions or other on-screen information will really help the viewer understand what they’re looking at, and also increases accessibility (and is therefore preferred over solely verbal narration).- To add on-screen text, you may like Kapwing, a web service with some features available for free, and there are also many other alternative downloadable applications.
- To add a
.mp4video to your post (this is preferable), upload the file to the Media Library, and under the “Attachment Display Settings” dropdown, select “Embed Media Player” before clicking “Insert into post.” This will ensure that the video itself, rather than a link to the file, appears in your documentation. - To add a
.gifto your post (lower quality and bigger file than a.mp4), simply insert it as you would any other static image.
Grading scheme
The final project as a whole is worth half of the total course grade. Students in each group all share the same grade, though in unusual circumstances individuals’ grades may be decoupled from each other; speak with the instructor at your earliest convenience if you have any concerns about the distribution of effort in your group. Small course corrections towards the beginning of this process are far easier to undertake than big shifts towards the end.
Here are the grade subsections:
| % of project | deliverable |
|---|---|
| 4% | Ideation sketches |
| 7% | Interview documentation |
| 18% | Prototype crit and presentation |
| 1% | Final work plan |
| 30% | Final crit and presentation |
| 40% | Final documentation |
