Class log
Note: “codebook” entries below are verbatim pasting of all of the code we wrote in class. It’s possible they may not compile (i.e. may have errors) if we left things unresolved, or were writing pseudocode, etc.
- Monday, Jan. 12th: Intro
- Wednesday, Jan. 14th: Diving In
- Wednesday, Jan. 21st: ioRef and Project 1 Intro
- Monday, Jan. 26th: Project 1 Ideation
- Wednesday, Jan. 28th: Project 1 Tech Skills
- Monday, Feb. 2nd: Project 1 work time
- Wednesday, Feb. 4th: Laser Cutting
- Monday, Feb. 9th: Project 1 Presentations
- Wednesday, Feb. 11th: First week of Domain-Specific Skill Building
- Monday, Feb. 16th: Domain-Specific Week #1 Demos
- Wednesday, Feb. 18th: Domain-Specific Week #2 Intro
- Monday, Feb. 23rd: Domain-Specific Week #2 Demos
- Wednesday, Feb. 25th: Project 2 Intro and Professional Phys Comp
- Monday, Mar. 9th: Project 2 Ideation Review
- Wednesday, Mar. 11th: Fabrication Resources and Project 2 Peer Feedback
- Monday, Mar. 16th: Project 2 Prototype Work Time
- Wednesday, Mar. 18th: Project 2 Prototype Presentations and FMS Intro
- Monday, Mar. 23rd: Project 2 Work Time
- Wednesday, Mar. 25th: Project 2 Final Critique
- Monday, Mar. 30th: Final Project Interviews
- Wednesday, Apr. 1st: Final Project Ideation Review
- Monday, Apr. 6th: Final Project Prototype Work Time
- Wednesday, Apr. 8th: Final Project Prototype Presentations
- Monday, Apr. 13th: Final Project Work Time
- Wednesday, Apr. 15th: More Final Project Work Time
- Monday, Apr. 20th: Final Project Work Time for the Final Time
- Wednesday, Apr. 22nd: Final Project Presentations!
Monday, Jan. 12th: Intro
- Welcome to class!
- Quick introductions: students in random pairs each answer a few questions about each other:
- Their name and pronouns
- What they’re studying and what year they’re in
- What brings them to this class
- Something fun/interesting/exciting/great/awful they did over winter break
- Review course Canvas site briefly
- Review main course site (the one you’re reading this on) briefly, going over the various sections listed in the navigation bar on the left
- Review Gantt chart of major course flow across the semester
- Quick IDeATe walking tour
- Phys Comp Lab tour. Room notes:
- Food and nonwater drink must be consumed in the Zone of Shame and are not allowed at tables
- Please use all resources within reason!
- Please use the “Name Coach” feature on Canvas today or tomorrow
- Strong recommendation: sign up for the university fire extinguisher training which is the hardest part of the process to gain access to IDeATe’s laser cutters. Link to relevant Bioraft (training system) page. There will also be IDeATe specific training dates TBD.
- Homework 1 assigned, due Wednesday 1/14
- Handing out beginning of course kit—each student gets an Arduino Uno R3 and USB cable (we didn’t quite get them in time for everone to get one in class, but they are in our class cubby in the Phys Comp Lab!)
Wednesday, Jan. 14th: Diving In
- Reviewing asynch discussion board homework questions
- Syllabus Review
- As of this writing only ~50% of people have read the syllabus!! Not very good!
- Weekly Feedback assignments introduction
- Weekly Feedback #1 is posted and due on Friday at 5pm
- Previous-semester projects review (this was part of Homework 1)
- Introducing the ioRef cards and associated resources
- Lesson on using ioRef cards to diagram data flow through a system
- Reminder to sign up for a fire extinguisher use training if you haven’t already (Still waiting to see if IDeATe will have some unlisted ones you could just show up to)
- Handing out course kit. Everybody gets:
- 1 6 qt. plastic tub with name tag (label your tub!)
- Inputs
- 1 CdS (cadmium sulfide) photoresistor
- 1 HC-SR04 ultrasonic ranger
- 1 10kΩ potentiometer
- 1 tactile pushbutton
- Outputs
- 3 LEDs (any colors you like)
- 1 hobby servo motor
- Connectors
- 1 breadboard
- ~10 male–male jumper wires, including at least two red and two black ones
- Electronics components
- 3 270Ω resistors
- 1 5.6kΩ (5,600Ω) resistor
- 1 10kΩ (10,000Ω) resistor
Wednesday, Jan. 21st: ioRef and Project 1 Intro
- Reviewing asynch discussion board homework questions
- Checking in on Fire Extinguisher training
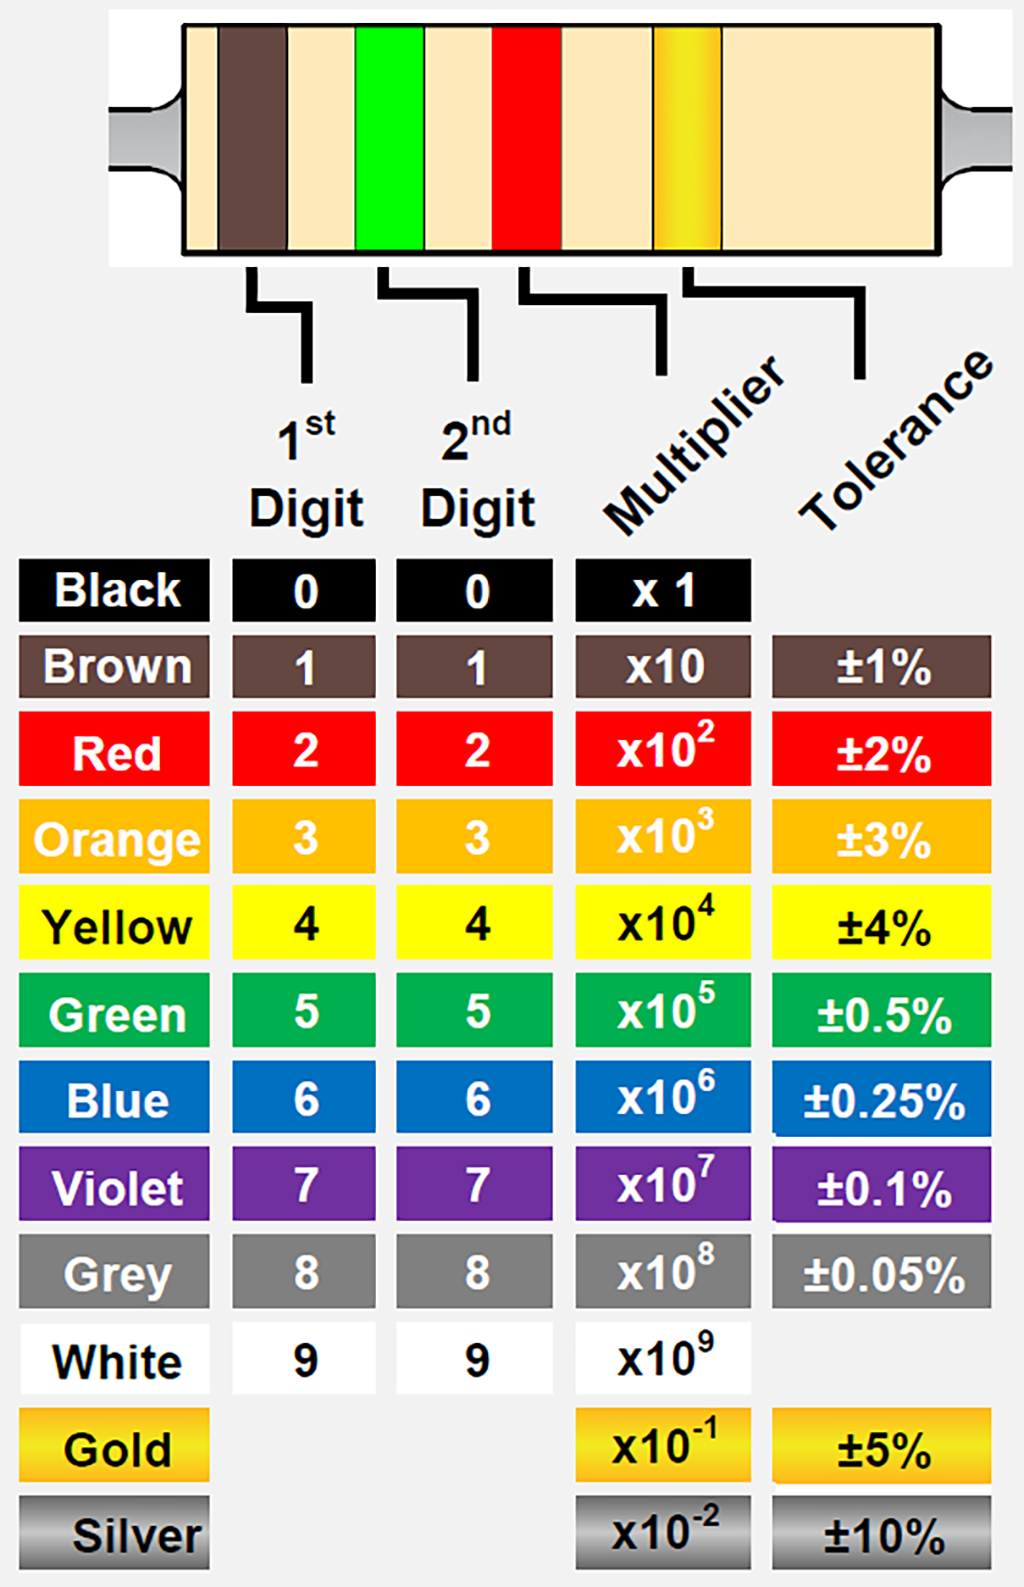
- Reading resistor color codes
- One reference image that works well: https://www.te.com/content/dam/te-com/images/corporate/marketing/global/infographics/resistor-color-code-bands-3-4-1024.png
- But there are many of these out there—maybe you can even design your own!
- Wiring buttons with
INPUT_PULLUPmode. Link to the Arduino reference page! - Data types in
Cbool:trueorfalseint: whole number in range –32,768 to 32,767unsigned int: the same number of values asint, but starting at 0, so: range is 0 to 65,535long: whole number in range approximately –2.1 billion to 2.1 billionunsigned long: the same number of values aslong, but starting at 0, so: range is 0 to about 4.3 billionfloat: “floating point” number, meaning something with a decimal in it like 1.543 or –10493.25, but with limits (afloathas 6 or 7 digits of precision, so it wouldn’t store 9872.19886757275 without truncating it). Range is about –3.4 × 1038 to 3.4 × 1038char: short for “character,” things likea,Q,?, or even8(as a character, not the value 8)String: a “string” of characters put together, like"Abracadabra!" she yelled., orq(yes, aStringcan be just one character long, confusingly), or735—though it looks like a number, it’s aStringso it has no numerical value- Read lots more details at this section of the main Arduino reference page
- IoRef Review
- Discuss and draw assigned devices: microwave, projector, radio-controlled toy car, refrigerator, old-school (wired) telephone
- Project 1 introduced
- Demo sample project shown in class
- Schematic drawing using draw.ioref.org
- Schematics aren’t the same as functional block diagrams
- They show every wired connection
- Use ground and power nets to reduce clutter!
- Groups introduced (posted as announcement in Canvas)
- Ideation is due Monday 1/26 at the start of class
- Schematic drawing using draw.ioref.org
- Schematics aren’t the same as functional block diagrams
- They show every wired connection
- Use ground and power nets to reduce clutter!
Monday, Jan. 26th: Project 1 Ideation
- HW 2 Grades are submitted, so 7 day re-grade requests are due before Monday Feb. 2nd!
- New Tutorials on the Website! (see the navigation bar)
- New office hours! Wednesday 4pm - 6pm. Wednesday Noon - 1pm office hours are shifting to “by appointment only”.
- Review Project Scoring Plan
- Review Voltage Dividers. You can view the circuit example here
- Sample software sketch introduced, including:
- Opening comment block explaining the software’s purpose and including a pin mapping
- Declaration of global variables
- Four part
loopwith named functions:- Read inputs
- Make decisions
- Drive outputs
- Report back to the user
- Review Ideation with each team.
Wednesday, Jan. 28th: Project 1 Tech Skills
- Weekly Feedback #2 is due friday before 5pm.
- Fire Extinguisher training check in: Looks like there are some new trainings with spots, including one on a Friday morning! Please sign up for one asap if you haven’t yet!
- Project 1 Logistics
- Deadline pushed back to Feb. 9, but it does compress HW 3 (previously due Feb 9th, now Feb 4th) and Documentation (now due just 2 days after the project 1 crit).
- Please read the entire project 1 write up on the website. Based on some of the questions I’ve gotten it’s clear not everyone has read it fully!
- You can share code/approaches with your team member, but you will each build your own physical double transducer (but then write the joint documentation page)
- Take advantage of all the fun craft supplies in the lab! Legos, knex, hot glue, popsicle sticks, etc are the build quality level I expect for this project. We’ll get into nicer cases later!
- To help you gauge your progress over the next week, here are some suggested milestones:
- Today, Jan. 28th: One input or output tested and working (hopefully the one you are most worried about!)
- Monday, Feb. 2nd: All the inputs and outputs of your transducers are wired up and working (and any mechanical bits have been built too)
- Wednesday, Feb. 4th: (we don’t have in-class work time this day!) LCD is tested and working, even if it isn’t fully integrated. All inputs and outputs are working and the skip the middle button is implemented too. Only soldering the middle step and working through the last couple bugs should be left!
- Pointing out particularly useful parts/materials for the project:
- Project 1 boards are in the class cubbies
- 16x2 I²C LCD displays in the “Output” section, ioRef part #0628 (female-male jumpers are useful for these)
- Lots of other devices that might be good for your inputs and outputs are around the lab! Walk around and see what you find!
- Example Double Transducer (Orientation/angle -> Light intensity -> temperature)
- Unit building and unit testing
- There is a lot going on in this project, which is pretty intimidating! Luckily, by making a system diagram you have already broken it into digestable chunks.
- Don’t try to build everything and then test -> Build one chunk (literally one block of your system diagram in this case) at a time and verify it with serial prints or test data
- Start with small, simple pieces and get them into a “known working” state
- As your first or second chunk, try the part of the project that scares you the most! It will likely take the longest and it is good to find any unsolvable issues sooner rather than later!
- Keep good practices
- Clean, well commented code
- Good Variable Names
- Clean Wiring with the propper colors (Red for power, black for gnd, other colors for anything else)
- Write test sketches that exercise a single part of your project and save them with good names
- SLOW IS FAST!
- Debugging flow chart from class (remember! this doesn’t work in all cases, but is a good mental model/jumping off point)
- Quick 2 minute checkins with each team
Monday, Feb. 2nd: Project 1 work time
- HW 3 Due on Wednesday!
- Ideation phase is graded, 7 day window for regrades now open (closes next monday)
- Brief review of Project 1 final critique grading (described fully here)
- Technical proficiency wants your signal to make it through the whole machine
- Skip-the-middle button should do what it says
- Physical arrangement is very straightforward
- Labeling is very straightforward
- Status display is pretty straightforward
- Soldered connections for the middle step (also please don’t solder right onto the pins of something you expect to put back into the lab stock)
- Proper wire colors is easy, too
- LCD Screen Checkin, see tutorial here
- Quick discussion of how to juggle multiple concurrent scheduled events, with reference to Blink without blocking sketch
- Our test code from class is here
- Overview of battery and power options
- 9V battery and barrel jack battery clip is a great way to make your project cord-less if you don’t have any high power devices
- Rechargable USB battery packs are also good
- Power supplies for higher voltages (9V and 12V) are in the back of the lab
- Soldering Demo
- To Be Continued Wednesday
- Remember to take pictures/screenshots/etc. as you go for process documentation—both successes and failures!
Wednesday, Feb. 4th: Laser Cutting
- Upcoming Deadlines:
- Weekly Feedback #3: Due start of class Monday! (Feb. 9th at 10am)
- Project 1 Presentations: Monday Feb 9th
- Project 1 Documentation: Wednesday Feb 11th (just 2 days after the presentations!)
- Please email me if you can’t access the class google site (the documentation site) or if you cannot duplicate the example page
- Handed out cardboard bases for project 1
- Project 1 presentations are Monday! We have a lot to get through so we’ll be starting right at 10!
- Extra office hours on Friday, Feb. 6th from ~2pm to ~5pm. Start time might vary slightly depending on when the Arduino Micro finishes up. I’ll try to be in the lab for at least a solid 2 hours though.
- Laser Cutting Demos! We’ll be splitting up into smaller groups since we don’t have much space in the laser cutter room. Keep working on Project 1 while you aren’t laser cutting. See the announcement on canvas for the groups.
- Presentation is here for reference
- Soldering lesson wrap up. Demo videos from previous semesters are on Canvas if you want to reference them later.
- Weekly Feedback #3 is up! Please fill it out before
5pm on Fridayclass on Monday! - For those outputing LED color with a common anode RGB LED, here is some sample code to help with the HSV to RGB conversion: hue_to_rgb.ino
Monday, Feb. 9th: Project 1 Presentations
- Upcoming Deadlines:
- Project 1 Documentation: Wednesday Feb 11th
- Each team presents their projects from the front of the room
- What are your three domains? (input, middle, output)
- How did you sense your input domain?
- How did you actuate and sense your middle domain?
- How did you actuate your output domain?
- Plug in your project and show it off!
- We try to put the transducers together into a chain at the end!
Wednesday, Feb. 11th: First week of Domain-Specific Skill Building
- Upcoming Deadlines:
- In class today - First Domain-Specific Skill Building topic should be chosen
- Friday, Feb. 13th, 5pm - Skill building week #1 Technical Training Sequence
- Friday, Feb. 13th, 5pm - Weekly Feedback #4 (Remember, these should take 5-10min at most!)
- Monday, Feb. 16th, ~halfway through class - Creative/exploratory output demos in class for skill building week #1
- Wednesday, Feb. 18th, 10am - Documentation for skill building week #1, topic proposal for skill building week #2
- !!FIRE EXTINGUISHER TRAINING!! We have a special session of fire extinguisher training scheduled for Friday, Feb. 20th at 10am in EHS Conference Room 307, FMS Building 3rd floor. Please come if you still need to be trained and are free!
- Other quick notes:
- If you weren’t able to get fusion to work, let me know and we can set up a time to go over that!
- The change that Fusion made recently means you need to select “hybrid design” when you’re making a new file. That will let you use both components and bodies like the tutorial talks about.
- We have a 3D printing submission folder! Bookmark this in case you want to 3D print any project parts!
- Published the Practical Considerations in Fabrication page now that we’re getting into more building
- If you feel you are missing any foundational info still or are struggling with a new piece of hardware, check out the Code Bites page and the other Tutorial pages. They have lots of concentrated info that will help you get going and solve issues much faster than asking an AI. (you can also email me to set up a time to go over things!)
- Quick Project 1 debrief in retrospect
- Intro to Domain-Specific Skill Building
- Major Steps:
- Pick a topic and submit a “proposal” via Canvas (just a couple questions if you are choosing one of the standard topics)
- Complete a technical training sequence, document with progress photos and a video, and submit the video to canvas
- Complete a creative/exploratory project, document process, and upload via Canvas
- Document your work on the student documentation site (extra important since other students will be able to reference these this semester and into the future!)
- Note on our friend Chatty G and its ilk: you are permitted to use generative AI from here on out in the course to help you write code. However! Be sure to add comments in your code indicating where you got help. Watch out, it will tend to overcomplicate things and ignore trusted libraries that would take just a couple minutes of googling to find.
- Team work is permitted for Domain-Specific Skill Building, but each team member has to submit all of their own stuff via Canvas
- Major Steps:
- Proposals are submitted in class and Joseph has two-minute conversations with people to get them rolling.
Monday, Feb. 16th: Domain-Specific Week #1 Demos
- Upcoming Deadlines:
- In class today - Domain-Specific Week #1 Demos
- Wednesday, Feb. 18th, 10am - Documentation for skill building week #1 and topic proposal for skill building week #2
- Friday, Feb. 20th, 5pm - Skill building week #2 Technical Training Sequence and Weekly Feedback #5
- Monday, Feb. 23rd, ~halfway through class - Creative/exploratory output demos in class for skill building week #2
- Please update permissions on all your videos and photos on the class website so they are visible without logging in!
- !!FIRE EXTINGUISHER TRAINING!! We have a special session of fire extinguisher training scheduled for Friday, Feb. 20th at 10am in EHS Conference Room 307, FMS Building 3rd floor. Please come if you still need to be trained and are free!
- Office Hours on Wednesday are ending early at 5:30
- Thoughts on this design for the skill building? How is it going? Is there anything you’d like to do differently the next time around?
- We’re going to rinse and repeat the Domain-specific skill building process starting Wednesday and running through next Monday. Please submit your round-two proposal by class on Wednesday.
- Build/work time followed by show-offs at 11:15(ish)
Wednesday, Feb. 18th: Domain-Specific Week #2 Intro
- Upcoming Deadlines:
- Before Class Today - Documentation for skill building week #1 and topic proposal for skill building week #2
- Friday, Feb. 20th, 5pm - Skill building week #1 Technical Training Sequence and Weekly Feedback #5
- Monday, Feb. 23rd, ~halfway through class - Creative/exploratory output demos in class for skill building week #2
- *Wednesday, Feb. 25th, 10am - Documentation for skill building week #2
- !!FIRE EXTINGUISHER TRAINING!! We have a special session of fire extinguisher training scheduled for Friday, Feb. 20th at 10am in EHS Conference Room 307, FMS Building 3rd floor. Please come if you still need to be trained and are free!
- Cookies because I’m still working on Project 1 grading
- Office Hours today are ending early at 5:30
- Please disassemble any remaining Project 1 boards and return the parts to their bins if they’re reusable; to the e-waste if they’re broken; to recycle if recyclable; and to trash if none of the above
- A few leftover skill demos from Monday and then work time for the rest of class
Monday, Feb. 23rd: Domain-Specific Week #2 Demos
- Upcoming Deadlines:
- In class today, ~halfway through class - Creative/exploratory output demos in class for skill building week #2
- Wednesday, Feb. 25th, 10am - Documentation for skill building week #2
- Friday, Feb. 27th, 5pm - Weekly Feedback #6
- Fire Extinguisher Training Check in
- Project 1 Graded!
- Don’t forget Alt-Text on your images!
- Higher quality photos really make the difference
- If you aren’t happy with any documentation grade, you can resubmit within seven days from when I gave you the grade and I’ll regrade the new submission without weighing in the old grade—this means you can turn a 0 into a 100 on any subsection by fixing what I pointed out was wrong. Let me know if you have questions about how to fix a section and I’m happy to help.
- Build/Work time followed by show and tell at 11:15(ish)
Wednesday, Feb. 25th: Project 2 Intro and Professional Phys Comp
- Upcoming Deadlines:
- Today, 10am - Documentation for skill building week #2
- Friday, Feb. 27th, 5pm - Weekly Feedback #6
- Monday, Mar. 6th, 10am - Project 2 Ideation
- Project 2 Intro
- Ideation is due the Monday we come back from break!
- Presentation on using Phys Comp skills in a professional setting
Monday, Mar. 9th: Project 2 Ideation Review
- Upcoming Deadlines:
- Today! Before Class! - Brainstorming Sketches and Notes
- Friday, March 13th, 5pm - Weekly Feedback #7
- Monday, March 16th - Global Documentation Regrade Request Deadline (I extended this since some of the regrade timelines overlapped with spring break)
- Wednesday, March 18th, in class - Prototype Presentations
- All Grading is caught up and midterm grades are submitted.
- Some folks are out or almost out of excused abscenses, which means more folks are close to dropping a letter grade than it might seem from the midterm grades. So please remember to come to class or email me if you are sick/unable to come.
- Project 2 Timeline and Prototyping Review
- Individual Meetings to go over brainstorming
Wednesday, Mar. 11th: Fabrication Resources and Project 2 Peer Feedback
- Upcoming Deadlines:
- Friday, March 13th, 5pm - Weekly Feedback #7
- Monday, March 16th - Global Documentation Regrade Request Deadline (I extended this since some of the regrade timelines overlapped with spring break)
- Wednesday, March 18th, in class - Prototype Presentations
- You should have a fairly clear idea of what you’re going to build for Project 2 by the end of class today at latest (if you’re dithering between two or more ideas, you’ll need to pick one and go with it!)
- Fabrication Resources
- Lots of good box generators out there. Prof. Garth Zeglin has a great list of them and I really like Boxes . py
- Don’t forget to add labels to any user inputs. You can import dxfs from boxes . py to fusion or illustrator and then add holes for buttons/switches and labels, etc
- Most button/switch datasheets describe the hole pattern you need to cut to make them fit (as well as what material thicknesses work)
- We also have a 3D printing submission folder! Bookmark this in case you want to 3D print any project parts!
- Most enclosures can be built with laser cutting, but if you need lots of curves for ergonomic reasons you might want to consider 3D printing
- Don’t forget to account for space for batteries and/or protoboards you might need.
- We have lots of good connectors for power/other stuff in the connection section
- You will almost certainly need at least 2 attempts at the enclosure fabrication so plan for that when thinking about time
- Finish up meetings about folks’ ideas
- Peer Feedback on Project 2 Ideas
- Students assigned to groups of 4
- Each student in the group takes 2 minutes to present what they’re thinking of making; any questions they have; and what they’d like some advice/input on
- After that 2-minute period, there are 5 minutes of feedback/help from the others in the group, who talk through the proposed project and give advice/suggestions/etc. Both Verbally and in this document.
- Order Form for project 2 is up! Please also email me if you submit things so that I can get them ordered asap.
Monday, Mar. 16th: Project 2 Prototype Work Time
- Upcoming Deadlines:
- Today, March 16th (by end of day) - Global Documentation Regrade Request Deadline
- Wednesday, March 18th, in class - Prototype Presentations
- Friday, March 20th, 5pm - Weekly Feedback #8
- Prototype critique on Wedensday will be quick (~2 minute) reviews of each person’s design, plus a couple minutes for peer feedback via a google dock
- Reminder to read the text of the prototype assignment deliverable (see project write up section)
- Remember, aspects of your design in descending order of difficulty and time to iterate are:
- Mechanical Elements (especially any moving parts)
- Electrical/electronic elements
- Software
- If you’d like to order any parts, let me know today during class!
- If you’d like to meet up with me for help outside of office hours let’s schedule at time!
Wednesday, Mar. 18th: Project 2 Prototype Presentations and FMS Intro
- Upcoming Deadlines:
- Today, March 18th in class - Project 2 Prototypes are due
- Friday, March 20th, 5pm - Weekly Feedback #8
- Wednesday, March 25th, at the start of class - Project 2 final critique
- A reminder to arrive on time for class, especially when we have critiques and other activities that need to begin right on time
- If you arrive late to class please write the time you arrived on the rolling whiteboard by the door. I don’t want this to call anyone out, but I need a way to keep track of when people arrive for attendance and I don’t want to keep interrupting what I’m doing to mark people as they come in.
- Presentation from FMS about what they do to keep our campus functioning!
- Prototype Presentations:
- 90 second presentation from each student about your prototype (including what question you’re answering with the prototype)
- ~2 minutes to write feedback in this document in our shared drive
Monday, Mar. 23rd: Project 2 Work Time
- Upcoming Deadlines:
- Wednesday, March 25th, at the start of class - Project 2 final critique
- Sunday, March 29th, by 5pm - Final Project Interview Agenda due on Canvas
- Wednesday, April 1st, by 10am - Final Project Ideation due
- Friday, April 3rd, by 5pm - Project 2 Documentation due
- Crit Format for Wednesday:
- Class divided in halves
- Each person presents/demos for ~2 minutes
- Invited guests and your peers will talk with you about your project for about 5 minutes
- Everyone will leave some written feedback for about 2 minutes
- Remember to put your device in “demo” mode if relavent. For instance, if your machine takes 24 hours to cycle, make it take 24 seconds (or 60 seconds or whatever) instead in order to demonstrate the function
- Grading is based on “technical performance” and “ergonomic considerations” as specified in the assignment
- Take a video as soon as your thing is working! It will hopefully work again, but there is no guarantee demo gremlins won’t get in the way. If it breaks, you can show the video at the crit
- Take pictures as you go for process documentation!
- I will be in the lab or in my office this afternoon from 2:30pm - 5:30pm. I am off campus on Tuesdays, so please come by if you are having any issues!
Wednesday, Mar. 25th: Project 2 Final Critique
- Upcoming Deadlines:
- No weekly feedback this week, please spend that time on the Interview Agenda
- Sunday, March 29th, by 5pm - Final Project Interview Agenda due on Canvas
- Wednesday, April 1st, by 10am - Final Project Ideation due
- Friday, April 3rd, by 5pm - Project 2 Documentation due
- Office Hours Cancelled Today (a work thing came up and I won’t be able to make it and I’m guessing it will be a pretty sparse day regardless)
- Project 2 critique as described above: class is divided into two teams, each student presents for about 2 minutes and gets feedback for another 7 or so.
- Written feedback is captured in a document available in our shared class drive
- After that round of presentations, science-fair–style showoff where each half of the class gets to play with the other half’s stuff
- Final project will start on Monday with interviews! Your agendas for this interview is due to canvas Sunday night!
Monday, Mar. 30th: Final Project Interviews
- Upcoming Deadlines:
- Wednesday, April 1st, by 10am - Final Project Ideation due
- Friday, April 3rd, by 5pm - Weekly Feedback #9 and Project 2 Documentation
- We walk down to the FMS building and teams conduct interviews with their final design clients
- Very quick debriefs with Joseph in the building before class is dismissed
Wednesday, Apr. 1st: Final Project Ideation Review
- Upcoming Deadlines:
- Wednesday, April 1st, by 10am - Final Project Ideation due
- Friday, April 3rd, by 5pm - Weekly Feedback #9 and Project 2 Documentation
- Monday, April 6th, by 10am - Final Project Interview Documentation due on Canvas
- Wednesday, April 8th, in Class! - Final Project Prototype. Our clients will visit us here to review those
- Quick class-wide debrief of Monday’s interviews
- Review of the prototype expectations for next Wednesday’s session with reference to relevant portion of project assignment
- Joseph meets with each team to go over their ideation and figure out a basic plan of action
- Take pictures as you go! Process documentation is part of the final documentation for this project
- Office Hours Updates
- Today, April 1st, office hours will be delayed due to an inflatables installation. Likely 5ish to 6ish
- Wednesday, April 8th, office hours will be cancelled due to a flight I have to catch to Atlanta that afternoon for an install
- Since the next two weeks have less office hours coverage please email me to get a time set up if you want to meet! I can definitely extend office hours Monday the 6th and could make it in this week on Thursday or Friday possibly if people want to meet
Monday, Apr. 6th: Final Project Prototype Work Time
- Upcoming Deadlines:
- Monday, April 6th, by 10am - Final Project Interview Documentation due on Canvas
- Wednesday, April 8th, in Class! - Final Project Prototype. Our clients will visit us here to review those. Please fill out the Slide Deck!
- Monday, April 13th, by the end of class - Final Project Work Plan due to Canvas.
- We have our prototyping review on Wednesday! Out of respect for our FMS clients, please arrive on time. Usually you receive a “tardy” and not an “absent” as long as you arrive within the first 15 minutes, but on Wednesday I’m reducing that to 5 minutes since it will be important for us to get started on time.
- Quick Check-ins with each team
- Take pictures as you go!
- IDeATe Open Labs and Studios on Friday April 10th during Carnival! Come check out the work from other students and classes!
Wednesday, Apr. 8th: Final Project Prototype Presentations
- Upcoming Deadlines:
- Students present to our guests from this prototype deck
- Teams meet up with their clients for direct feedback
- Gantt chart final project planning assignment reminder
- Submit any orders now so you have them asap. Shipping times are a bit wonky right now for some places. Order Submission Form
- Reminder there are no office hours today (I’m leaving for a work trip this afternoon), but please email me with any questions that come up!
Monday, Apr. 13th: Final Project Work Time
- Upcoming Deadlines:
- Review of a few final project fabrication considerations to keep in mind, as shown on this course page. For most teams, adding a simple barrel jack to allow your project to be plugged in will be the best/easiest answer for power.
- Overview of making crimped connectors (maybe…if our parts have arrived)
- Please update your project 2 documentation with the name of your project in your page title (for future semesters!)
- Group work time with reviews of work plans
- Take process photos as you go!
Wednesday, Apr. 15th: More Final Project Work Time
- Upcoming Deadlines:
- Friday, April 17th, 5pm - Final Weekly feedback of the semester!
- Wednesday, April 22nd - Final Project Presentations
- Making custom cables
- Work time!
- Final call for orders (as in it might be too late, but we can try): Order Submission Form
Monday, Apr. 20th: Final Project Work Time for the Final Time
- Upcoming Deadlines:
- Wednesday, April 22nd - Final Project Presentations (you must be on time this day!)
- Friday, May 1st, 5pm - Final Project Documentation Submission
- Wednesday’s critique structure:
- Each team has 5 minutes to present to the room from this deck
- Remainder of class time will be rotations so everyone present gets to respond to every project shown; roughly 10 minutes per rotation
- Reminder: the goal is to make your project function for Wednesday. It is not the final hand-off day—you will have time after Wednesday to continue tweaking/improving as needed. If you need to shed optional features, discuss as a team, and do it!
- Reminder: You’re asking for trouble if you wait until Tuesday night to bring your electronics and hardware/mechanism/enclosure for the first time. Usually, this process is not as smooth as you might imagine. Give yourself time for it to go wrong!
- Extra office hours today -> 12:00 - 12:30pm; 1:30 - 2:30pm (in my office); 4ish - 5:30pm. Email me if you have questions/issues. I could swing by after work on Tuesday too.
- Grading up to date now! Regrades for Project 2 documentation open through Wed. Apr. 29th so you don’t have to think about that until after the final project presentations.
Wednesday, Apr. 22nd: Final Project Presentations!
- Upcoming Deadlines:
- Friday, May 1st, 5pm - Final Project Documentation Submission
- Monday, May 4th, 5pm - Final Reflection due on Canvas
- Each team presents to our guests about their project
