LED strip
Table of contents:
Intro to the hardware
LED strips are a quick, easy, simple way to get lots of light and color into a project.
The type we have in the Phys Comp Lab (part # 2001 in our inventory) is composed of a series of small LED modules arranged next to each other on a band of plastic. We buy them on Amazon, but they are functionally identical to the Neopixel LED strips sold on Adafruit. Each individual LED module has four electrical connections:
5V: power (5 volts in this case)GND: groundDI: data inDO: data out
The plastic tape has some ebedded wires in it which connect all the LED modules on the strip to power and ground. The data in and data out work a little differently—note the little arrows on the strip:
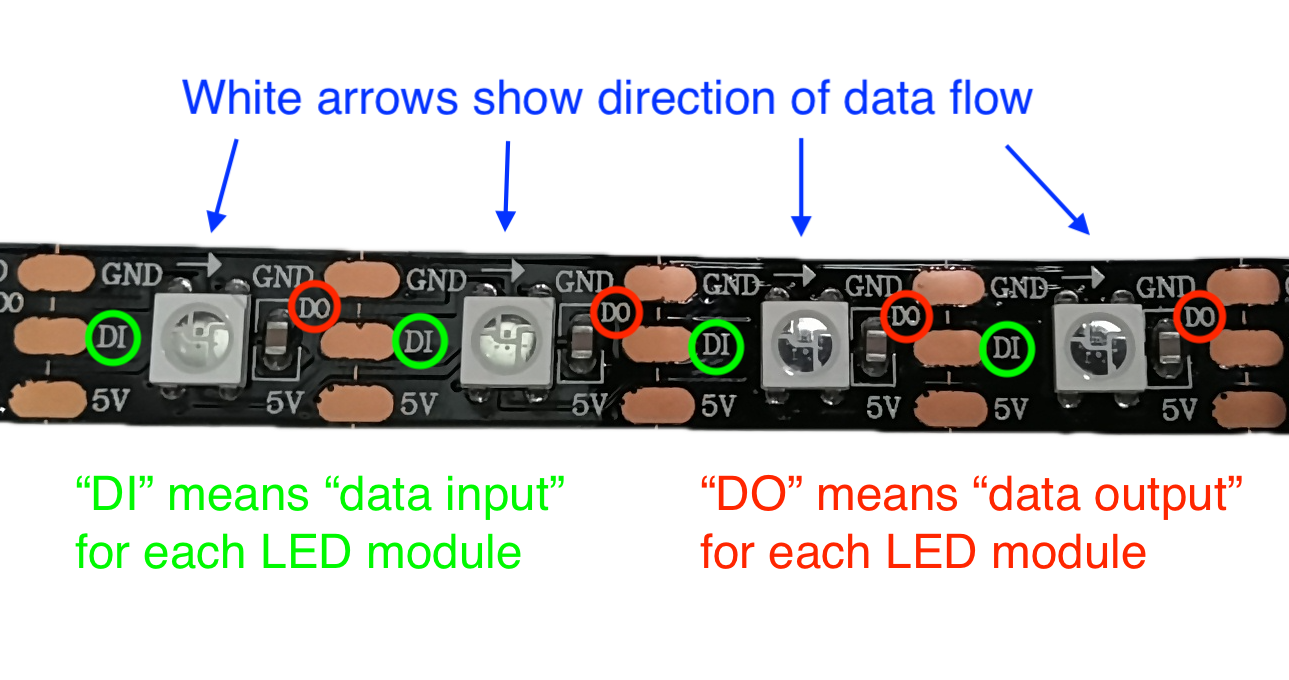
The white arrows show the direction the data flows. The first module gets data into its left side (DI), and then processes it, and passes the data through, out its DO pin. The next module takes that data into its DI pin, processes it, and emits it through its own DO pin. In this way, the LED strip modules act as a little bucket brigade for the data telling each LED which color to light up. The data protocol used is called WS2812B, and LEDs that use this protocol can be found in many different form factors (part #’s 0911, 0912, 0914, 0996, 0998, 1044, 1048, and 2344 in our inventory all use compatible LED modules).
Wiring and soldering
The LED strip needs power, ground, and a signal from a microcontroller (like an Arduino). You can cut the strip at any of the vertical white lines using regular scissors and then solder your wires right on to the gold-colored pads. Be sure to solder your data connection to the input side (labeled “DI” for “data input”). The power and ground wires can connect at the right, or left, or both.

For a relatively short strip (less than ~30 LEDs) you can safely use the Arduino Uno’s 5V power and ground to power the strip. But for a longer strip, you should use another 5V supply to supplement the Arduino’s power because when the LEDs all turn on they’ll need a fair bit of current (more than the Uno can supply).
Software
All LEDs the same color sample sketch
Here is some sample code that lights up the whole strip black, white, red, orange, yellow, green, blue, and indigo. It uses the “Adafruit NeoPixel” library, which you will have to download through the Arduino IDE before compiling or uploading the code. (You can read the authors’ library documentation here.) “NeoPixel” is the brand name Adafruit gave to the family of addressable LEDs that include the WS2812B (also includes the )
/*
  LED Strip Tester Sample Code

  Drives an LED strip/ring/stick that uses NeoPixel LEDs or
  other WS2812B compliant LEDs in a test color pattern.
  The LED count should be under 30 or only the first 30 will
  light up.

  Performs the following sequence of colors:
    1. Turns each LED red, one at a time
    2. Turns each LED green, one at a time
    3. Turns each LED blue, one at a time
    4. Turns each LED white, one at a time
    5. Turns the entire strip yellow and holds for 1 second
    6. Turns the entire strip cyan and holds for 1 second
    7. Turns the entire strip magenta and holds for 1 second
    8. Cycles through all the colors on the color wheel for
       ~3.6 seconds
    9. Turns of the LED strip for 1 second.

  Pin Mapping:

  Arduino Pin |  role  | description
  ----------- | ------ | -------------
  2           | output | Transmits color data to LEDs

  In parts, loosely based on the 'strandtest' example sketch
  in the Adafruit_Neopixel Library.

  Joseph Paetz, rpaetz@andrew.cmu.edu
  Feb. 2026
*/

#include <Adafruit_NeoPixel.h>

const int LED_DATA_PIN = 2; // pin connected to "DI" on the strip
const int NUM_LEDS = 30;    // number of LEDs in the strip

/*
Create a Neopixel Object (can control any chain of WS2812B LEDs)

Argument 1 = Number of pixels in the strip
Argument 2 = Arduino Pin Number
Argument 3 = 2 pre-defined values added together to give the
             library more info about the LED strip. This
             usually doesn't change, but more info can be found
             in the 'strandtest' example included with the library
*/
Adafruit_NeoPixel leds(NUM_LEDS, LED_DATA_PIN, NEO_GRB + NEO_KHZ800);


void setup() {
  // Initialize the LED strip (REQUIRED!)
  leds.begin();

  // clear the LED strip (we want to start with a blank strip)
  leds.clear();

  // Set the brightness of the LEDs. Range = 0 - 255
  // Start at 50 or less (~1/5 power). They are VERY bright
  leds.setBrightness(50);

  // Updates the LED strip with the most recent changes made
  // in the code.
  leds.show();
}

// Fill the LED strip with the given color, one pixel at a time.
// Argument 1 = color to fill the strip with
// Argument 2 = number of milliseconds to wait between each pixel
void colorWipe(uint32_t color, int wait) {
  for (int i = 0; i < NUM_LEDS; i++) {
    // used to set an individual pixel to a color
    leds.setPixelColor(i, color);
    leds.show(); // we HAVE to call this to update the strip
    delay(wait);
  }
}

void loop() {
  // the 'uint32_t' variable type can hold colors for the LED strip
  uint32_t red = leds.Color(255, 0, 0);
  uint32_t green = leds.Color(0, 255, 0);
  uint32_t blue = leds.Color(0, 0, 255);
  uint32_t white = leds.Color(255, 255, 255);
  uint32_t yellow = leds.Color(255, 255, 0);
  uint32_t cyan = leds.Color(0, 255, 255);
  uint32_t magenta = leds.Color(255, 0, 255);

  // Fill strip one by one with Red
  colorWipe(red, 50);

  // Fill strip one by one with green
  colorWipe(green, 50);

  // Fill strip one by one with blue
  colorWipe(blue, 50);

  // Fill strip one by one with white
  colorWipe(white, 50);

  // Fill strip all at once with yellow
  leds.fill(yellow);
  leds.show(); // Still need to make sure we update the strip!
  delay(1000);

  // Fill strip all at once with cyan
  leds.fill(cyan);
  leds.show();
  delay(1000);

  // Fill strip all at once with magenta
  leds.fill(magenta);
  leds.show();
  delay(1000);

  // Cycle the entire strip through the color
  // The ColorHSV function takes:
  //  Hue: 0 to 65535       (0 is ~red)
  //  Saturation: 0 to 255  (How grey or intense the color is)
  //  Value: 0 to 255       (~Brightness)
  int hue = 0;
  uint32_t color;
  for (int i = 0; i < 360; i++){
    hue = map(i, 0, 359, 0, 65535);
    color = leds.ColorHSV(hue, 255, 255);
    leds.fill(color);
    leds.show();

    delay(10);
  }

  leds.clear();
  leds.show();
  delay(1000);
}
