Project Narrative
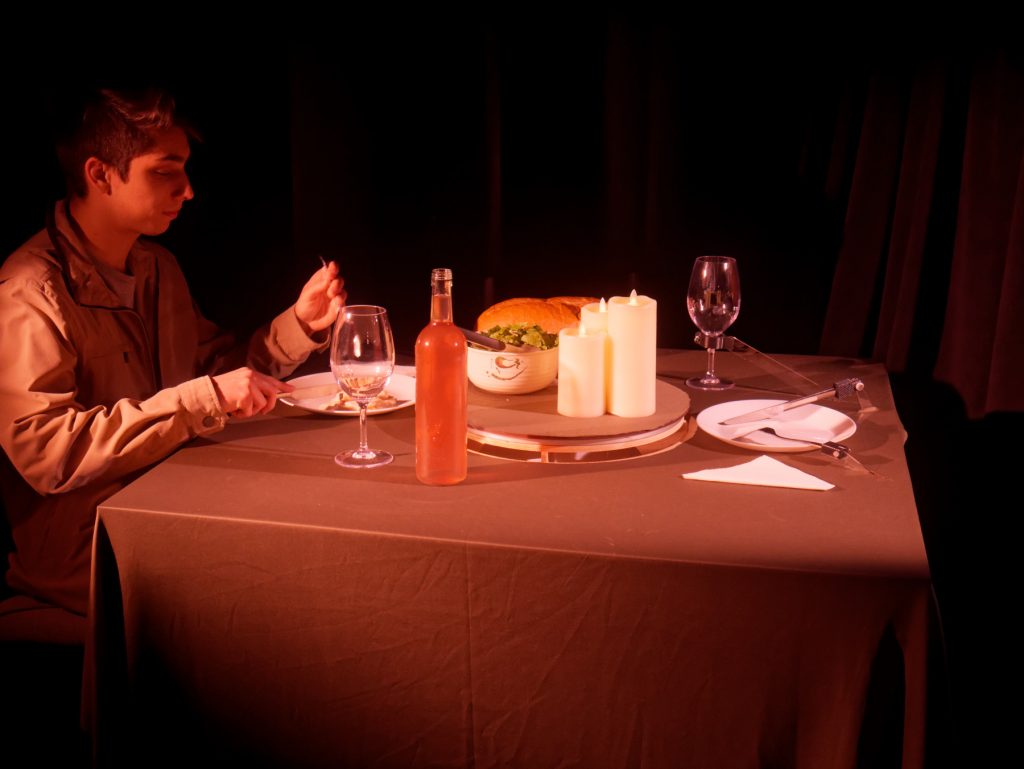
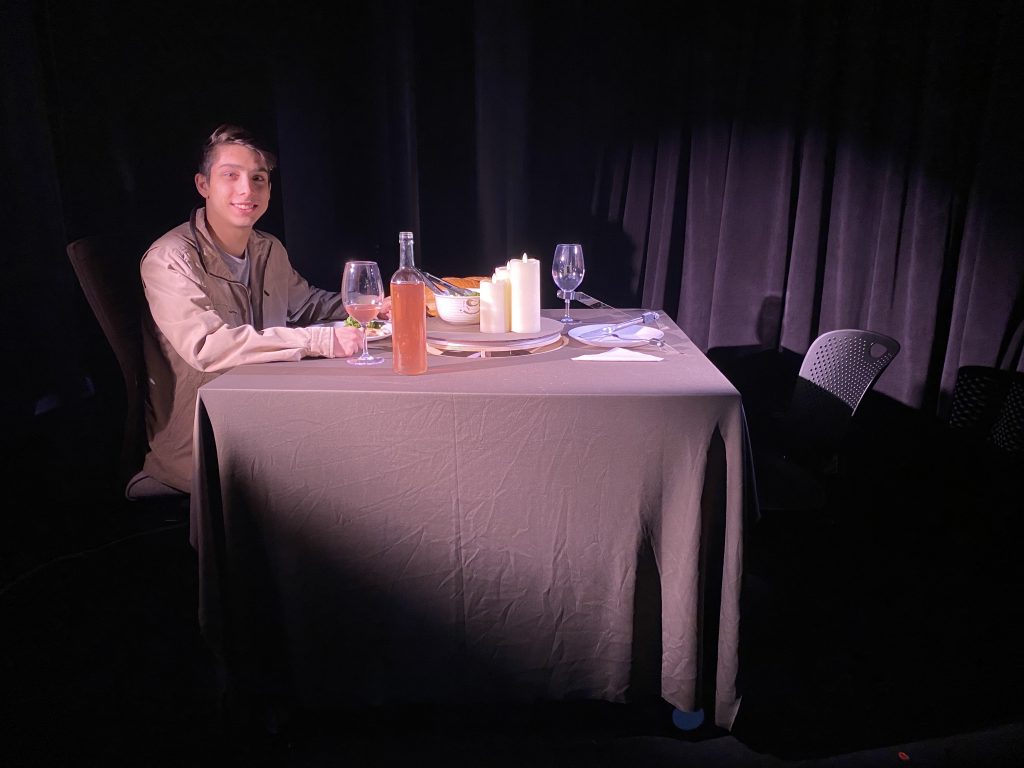
Our performance consists of a person who used their knowledge in robotics to create a structure that fills a void from loneliness and their inability to sit alone with their own thoughts as they share a meal together. The objective of our performance was for the audience to see how the performer is occupied by and content with their fictitious partner. Their reliance on each other builds sympathy for the performer as the audience is able to recognize how lonely they are and how the performer would rather eat with an invisible person than eating alone. We were trying to get the audience to reflect on their own lives, and what would they do if they were truly alone. Would they be able to sit with their own thoughts? Or are distractions such as TV, social media, or family members essential to occupy them during an otherwise lonely experience? People who struggle with mental health or stress may find distractions comforting in lonely times and it makes the audience question what else is going on in the performer’s life that they cannot see.
Relationship to Course Themes
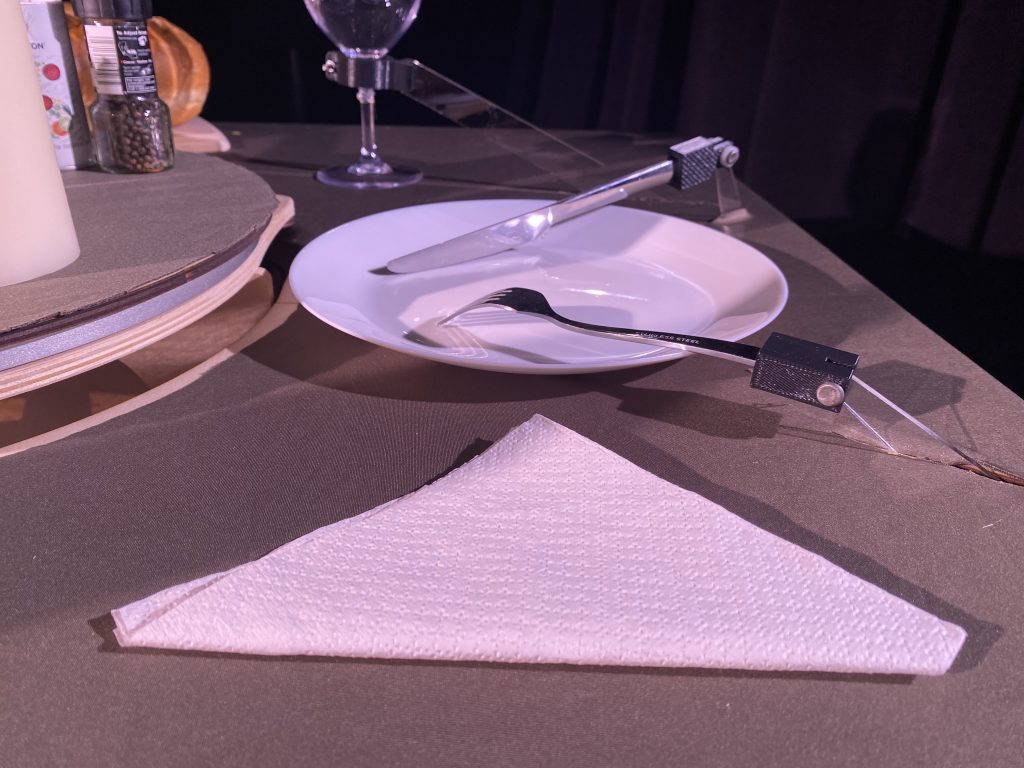
Our project aimed to connect with the course themes of using autonomy in a narrative medium and exploring the relationship between a human and robot in a hybrid performance. In terms of autonomy, we programmed the behavior of the fork and knife to be completely autonomous. Based off of a random value, the fork and knife moved, just the fork moved or just the knife moved at a constant interval. This autonomous movement allows the show to go on and eliminate downtime between elements that the performer actuates. The robot lifting the chalice and rotating the Lazy Suzan were all actuated by foot pedals that the performer would press under the tablecloth. This created a sense of mystery as it was not always clear as to what was automated and what was not.
The robot and the human performer interacted by ‘passing food’ via the Lazy Susan, “Cheers”ing each other’s chalice and by the performer smiling to the invisible person across the table showing the comfort that the robot brought to them.
By using motors and the clear acrylic as part of the illusion, we aimed to convert simple robotic movements into meaningful personifications of using utensils and drinking out of a chalice.
Outcomes
Mechanical Design and Assembly:
To create illusion by hiding the electrical components required to create our robot, we designed a false tabletop that everything sat below. Once we determined which table we were using for the performance, we created a CAD model assembly of the entire tabletop and Lazy Susan. This was effective in helping us visualize the scene and allowed us to catch mistakes in our design before fabricating. Various geometric and trigonometric calculations were required to optimize the size of the cut outs for the acrylic arm attachments.

We laser cut the entire assembly, excluding the Lazy Susan, out of 6mm plywood, and assembled with wood glue. This was effective in making our tabletop sturdy enough to support the food and decorations we wanted to place on top for the performance.
The chucks that held the fork and knife were created and 3D printed to have a tight fit to the irregular geometry of the fork and knife ends. This worked well as we did not need to glue the ends of the utensils inside of the chuck as the tolerance was small enough to hold them in with friction. The chalice holder was designed with greater tolerances, which allowed the chalice to actually tip at the top arc of its motion. This was an unintended consequence of the looser fit, but the outcome looked more realistic and further animated the robotic behavior.

Electrical Design and Control System:
We used a RaspberryPi Pico as our microcontroller to control the motors. We used two DC gear motors for moving the fork and knife, Matt had a strong Worm Gear motor from a previous project that we reused for lifting the glass, and we used a DC stepper motor for turning the Lazy Susan. The pico used motor drivers in order to control the speed and direction of the motors’ rotations, as well as how long they rotated (or how many steps in the case of the stepper motor). The code randomly chooses whether to move the fork, knife, or both. It moves the utensil(s) back and forth across the plate a few times, then pauses for a few seconds in a loop. Two foot pedals act as switches in order to trigger movement from the glass or the Lazy Susan. This movement is pre-programmed, and the pedals act as a switch in order to trigger the movement. One foot pedal causes the glass to be raised, as if someone is drinking from it, while the other foot pedal causes the Lazy Susan to turn half of a rotation. A 12V and 5V wall jack were used to power the motors and the pico.
Performance:
To set the stage, we used a tablecloth to cover the false tabletop. This hid everything and was effective in polishing the final look of our project. Many audience members did not even see the foot pedals under the table. The table was set with plates, napkins, salt & pepper, candles and real food that the performer was eating/ drinking during the performance. This, in addition to performing without speaking to the robot, upheld the emersion into the scene.
During the performance, there were no unexpected errors or problems. The robot ran exactly as programmed and the robot held up for the entire performance. We believe that the level of polish our assembly helped convey the messages we were trying to get across. While it was quite obvious to many audience members that the performer was lonely, the idea of not being able to sit with our thoughts alone did not get across until it was explained. We think that if we were to have more time, we could better convey this point my making the robot break mid performance, and the performer goes crazy trying to fix it or gets angry because he cannot handle not having his partner while he eats. While it was difficult to stay in character for the full performance, it was rewarding to see people’s reactions to our performance and we were happy that people enjoyed the show.
Performance Video
Citations
Example code from the Creative Kinetic Systems website was used as a starting point for our code: https://courses.ideate.cmu.edu/16-223/f2022/text/code/index.html
The Lazy Susan and the associated CAD files were created by Professor Garth Zeglin
Source Code
# DRV8833 carrier board: https://www.pololu.com/product/2130
################################################################
# CircuitPython module documentation:
# time https://circuitpython.readthedocs.io/en/latest/shared-bindings/time/index.html
# math https://circuitpython.readthedocs.io/en/latest/shared-bindings/math/index.html
# board https://circuitpython.readthedocs.io/en/latest/shared-bindings/board/index.html
# pwmio https://circuitpython.readthedocs.io/en/latest/shared-bindings/pwmio/index.html
################################################################################
# print a banner as reminder of what code is loaded
print("Starting script.")
# load standard Python modules
import math, time
# load the CircuitPython hardware definition module for pin definitions
import board
# load the CircuitPython pulse-width-modulation module for driving hardware
import pwmio
import time
from digitalio import DigitalInOut, Direction, Pull
import digitalio
import random as r
#--------------------------------------------------------------------------------
# Class to represent a single dual H-bridge driver.
class DRV8833():
def __init__(self, AIN1=board.GP18, AIN2=board.GP19, BIN2=board.GP20, BIN1=board.GP21, pwm_rate=20000):
# Create a pair of PWMOut objects for each motor channel.
self.ain1 = pwmio.PWMOut(AIN1, duty_cycle=0, frequency=pwm_rate)
self.ain2 = pwmio.PWMOut(AIN2, duty_cycle=0, frequency=pwm_rate)
self.bin1 = pwmio.PWMOut(BIN1, duty_cycle=0, frequency=pwm_rate)
self.bin2 = pwmio.PWMOut(BIN2, duty_cycle=0, frequency=pwm_rate)
def write(self, channel, rate):
"""Set the speed and direction on a single motor channel.
:param channel: 0 for motor A, 1 for motor B
:param rate: modulation value between -1.0 and 1.0, full reverse to full forward."""
# convert the rate into a 16-bit fixed point integer
pwm = min(max(int(2**16 * abs(rate)), 0), 65535)
if channel == 0:
if rate < 0:
self.ain1.duty_cycle = pwm
self.ain2.duty_cycle = 0
else:
self.ain1.duty_cycle = 0
self.ain2.duty_cycle = pwm
else:
if rate < 0:
self.bin1.duty_cycle = pwm
self.bin2.duty_cycle = 0
else:
self.bin1.duty_cycle = 0
self.bin2.duty_cycle = pwm
#--------------------------------------------------------------------------------
# Create an object to represent a dual motor driver.
print("Creating driver object.")
driver = DRV8833()
class A4988:
def __init__(self, DIR=board.GP16, STEP=board.GP17):
"""This class represents an A4988 stepper motor driver. It uses two output pins
for direction and step control signals."""
self._dir = digitalio.DigitalInOut(DIR)
self._step = digitalio.DigitalInOut(STEP)
self._dir.direction = digitalio.Direction.OUTPUT
self._step.direction = digitalio.Direction.OUTPUT
self._dir.value = False
self._step.value = False
def step(self, forward=True):
"""Emit one step pulse, with an optional direction flag."""
self._dir.value = forward
# Create a short pulse on the step pin. Note that CircuitPython is slow
# enough that normal execution delay is sufficient without actually
# sleeping.
self._step.value = True
# time.sleep(1e-6)
self._step.value = False
def move_sync(self, steps, speed=1000.0):
"""Move the stepper motor the signed number of steps forward or backward at the
speed specified in steps per second. N.B. this function will not return
until the move is done, so it is not compatible with asynchronous event
loops.
"""
self._dir.value = (steps >= 0)
#print(self._dir.value)
time_per_step = 1.0 / speed
#print(time_per_step)
for count in range(abs(steps)):
self._step.value = True
# time.sleep(1e-6)
self._step.value = False
time.sleep(time_per_step)
def deinit(self):
"""Manage resource release as part of object lifecycle."""
self._dir.deinit()
self._step.deinit()
self._dir = None
self._step = None
def __enter__(self):
return self
def __exit__(self):
# Automatically deinitializes the hardware when exiting a context.
self.deinit()
#--------------------------------------------------------------------------------
# Stepper motor demonstration.
def turn_half():
speed = 500
stepper.move_sync(1725, speed)
def turn_third():
speed = 500
stepper.move_sync(575, speed)
#--------------------------------------------------------------------------------
# Begin the main processing loop. This is structured as a looping script, since
# each movement primitive 'blocks', i.e. doesn't return until the action is
# finished.
def move_knife():
knifeUp = 0.8
knifeDown = 0.8
sleepUp = 0.15
sleepDown = 0.15
driver.write(0, knifeUp)
time.sleep(sleepUp)
driver.write(0, 0.55)
time.sleep(0.2)
driver.write(0, -1*knifeDown)
time.sleep(sleepDown)
driver.write(0, 0.55)
time.sleep(0.2)
def move_fork():
speedUp = 0.8
speedDown = 0.75
sleepUp = 0.13
sleepDown = 0.13
driver.write(1, speedUp)
time.sleep(sleepUp)
driver.write(1, 0.3)
time.sleep(0.2)
driver.write(1, -1*speedDown)
time.sleep(sleepDown)
driver.write(1, 0.4)
time.sleep(0.2)
def move_fork_and_knife():
knifeUp = 0.8
knifeDown = 0.8
forkUp = 0.8
forkDown = 0.85
sleepUp = 0.13
sleepDown = 0.13
driver.write(0, knifeUp)
driver.write(1, forkUp)
time.sleep(sleepUp)
driver.write(0, 0.55)
driver.write(1, 0.3)
time.sleep(0.2)
driver.write(0, -1*knifeDown)
driver.write(1, -1*forkDown)
time.sleep(sleepDown)
driver.write(0, 0.55)
driver.write(1, 0.55)
time.sleep(0.2)
# Pico pin 4, GPI34 -> PMW
# Pico pin 5, GPIO3 -> IN_A
# Pico pin 6, GPIO4 -> IN_B
IN_A =DigitalInOut(board.GP3)
IN_A.direction = Direction.OUTPUT
IN_B =DigitalInOut(board.GP4)
IN_B.direction = Direction.OUTPUT
PMW = pwmio.PWMOut(board.A2)
def motor_stop():
IN_A.value = False
IN_B.value = False
PMW.duty_cycle = 0
arm_pmw = 20000
def motor_cw():
IN_A.value = True
IN_B.value = False
PMW.duty_cycle = arm_pmw
def motor_ccw():
IN_A.value = False
IN_B.value = True
PMW.duty_cycle = arm_pmw
led = DigitalInOut(board.LED) # GP25
led.direction = Direction.OUTPUT
switch = DigitalInOut(board.GP15)
switch.direction = Direction.INPUT
switch2 = DigitalInOut(board.GP14)
switch2.direction = Direction.INPUT
time.sleep(3.0)
print("Starting main script.")
i = 0
j = 0
state_index = False
state_index2 = False
stepper = A4988()
fork_knife_move = r.randint(0,2)
print(fork_knife_move)
while True:
if state_index is False:
if switch.value is True:
state_index = True
print("susan On")
turn_half()
elif state_index is True:
if switch.value is False:
state_index = False
print("susan Off")
if state_index2 is False:
if switch2.value is True:
state_index2 = True
print("arm On")
motor_ccw()
time.sleep(1)
motor_stop()
time.sleep(0.6)
motor_cw()
time.sleep(0.66)
motor_stop()
elif state_index2 is True:
if switch2.value is False:
state_index2 = False
print("arm Off")
if i == 10 and j == 50:
i = 0
j=0
fork_knife_move = r.randint(0,2)
elif i == 10:
time.sleep(0.1)
j = j+1
else:
if fork_knife_move == 0:
move_fork()
elif fork_knife_move == 1:
move_knife()
else:
move_fork_and_knife()
i=i+1
Mechanical CAD Files
The file size of our CAD assembly was too big to upload to the Media Library. Please use the link below to find our FinalAssy.zip uploaded to Google Drive:
https://drive.google.com/file/d/16lPWVSlWRBp4n3A_TnQfvgPp6M4_eqgr/view?usp=share_link
Misc. CAD files that were separate from our tabletop assembly, including the fork and knife chucks, and the chalice components, here:
Photographs


Project Contributions
Matt: Mechanical design of false table top, design of fork, knife and chalice holders, performance, tuning PID for Webots simulation
Karen: Electrical design, project code, debugging, motor mount designs, design of Webots simulation.
Both: Staging the scene – food table cloth, etc., developing the narrative and assembly