Exercise: Simulator Wheelies
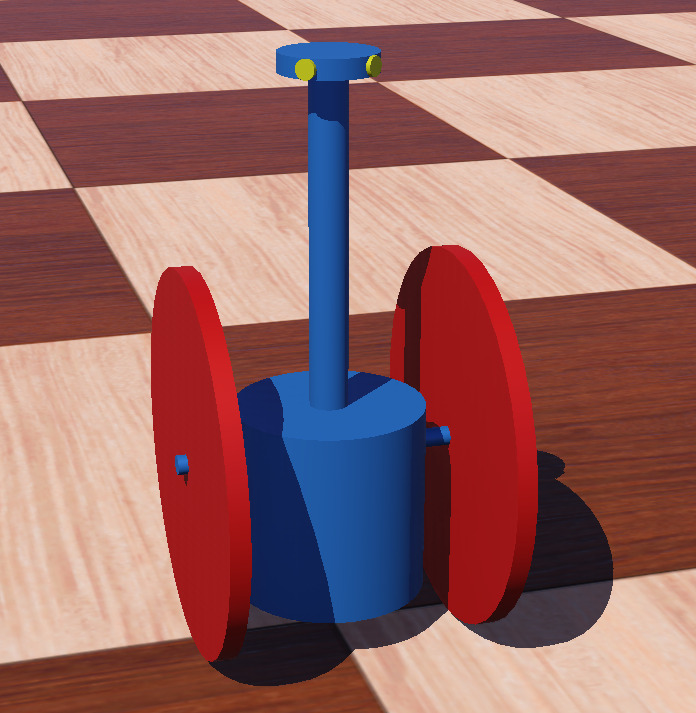
The main objective of this exercise is to become familiar with the Webots robot simulator we will be using for the first part of the course. We will use the ‘wobbly’ model, a two-wheeled mobile robot with potential for expressive dynamic movement.
Objectives
After this exercise, you should be able to:
Install the Webots simulator on your own computer.
Install a Python 3 programming system on your own computer.
Unpack a ‘Webots project’, i.e. a sample world definition.
Run the simulator.
Modify an existing Python script to customize the movement primitives.
Modify dynamic properties of a physical simulation.
Create a movie file.
Reference Guides
Please review the following course notes as needed:
Robot Model
All models are included in the reference project Webots.zip.
The sample Webots world for this exerise is
wobbly-exercise.wbtThe reference code is
wobbly_thd.py, located in thecontrollers/wobbly_thd/folder.The sample model is documented in Wobbly Robot Model.
Webots Documentation (external)
Steps and observations
The details of software installation can be found on the Webots and Python pages listed above, as well as links to the software documentation. Please try this soon, and let me know if you have problems getting this running on your own computer. There are many potential ways this might go go astray and I’d like it not to become a roadblock to progress.
On first launch, Webots will bring up the Guided Tour, which is a fun way to see the diversity of pre-installed robot models.
Please download the Webots project zip file linked above and unpack it wherever convenient for you. In general, these exercises will provide a template project as a starting point for you to modify. Webots expects a particular folder structure within the project. Each project can contain one or more world definitions with associated robot control programs and other object definitions. Please note the reference project will continue to be updated.
After unpacking, please locate the following contents:
Webots/worlds/wobbly-exercise.wbt: sample world file, opening it should launch the simulatorWebots/controllers/wobbly_thd/wobbly_thd.py: Python script to control each simulated two-wheeled robot
Please explore the interface. The play/rewind interface above the graphics interface should run and reset the simulation. The tree editor on the left is the “Scene Tree” which defines all the properties of the world and mechanism. The code editor should be open on the right; if not, please locate the Robot object in the scene tree, right-click on it and select ‘Edit Controller’ from the menu.
The key deliverable for the assignment is a movie of a movement sequence. This doesn’t need to be complicated, although I encourage you to experiment with a variety of choreography. Here are some suggested approaches of varying difficulty:
Modify the command sequence and timing in the
script.run()function defined in theScriptclass.Modify the fixed obstacles with the simulated scene to create more dynamic interaction.
Modify the robot geometry.
Add additional controller primitives within the
Wobblyclass.
Some ideas: can you discover inputs which activate the body physics in an expressive way? Can you build the movement to a climax? Can you push the limits of the simulation in an expressive way?
In this example, the robot model is created by
wobbly.proto, a type of script called a proto file. But each instance can be the expanded into a Robot definition within the scene tree. The Robot definition is deeply nested as it represents a graph of the kinematic structure.Parameters can be adjusted while the simulator is running. But I highly recommend you get in the habit of resetting the simulation state before saving any world changes in order to preserve the accuracy of the initial conditions. This does mean that desired positional changes need to be re-applied to the initial state.
If you have any questions, please email.
Finally, please render a short movie clip of your final results. You can either select File/Make Movie or the film icon in the toolbar.
Deliverables
A Google Doc with a brief paragraph describing your choreographic intent and outcome, submitted to the appropriate shared folder.
The key elements of your Python controller script, submitted as a properly-formatted block within the document.
Short video clip (less than 30 seconds) of robot performance, uploaded to the Google Shared Drive and included as a link within the document.