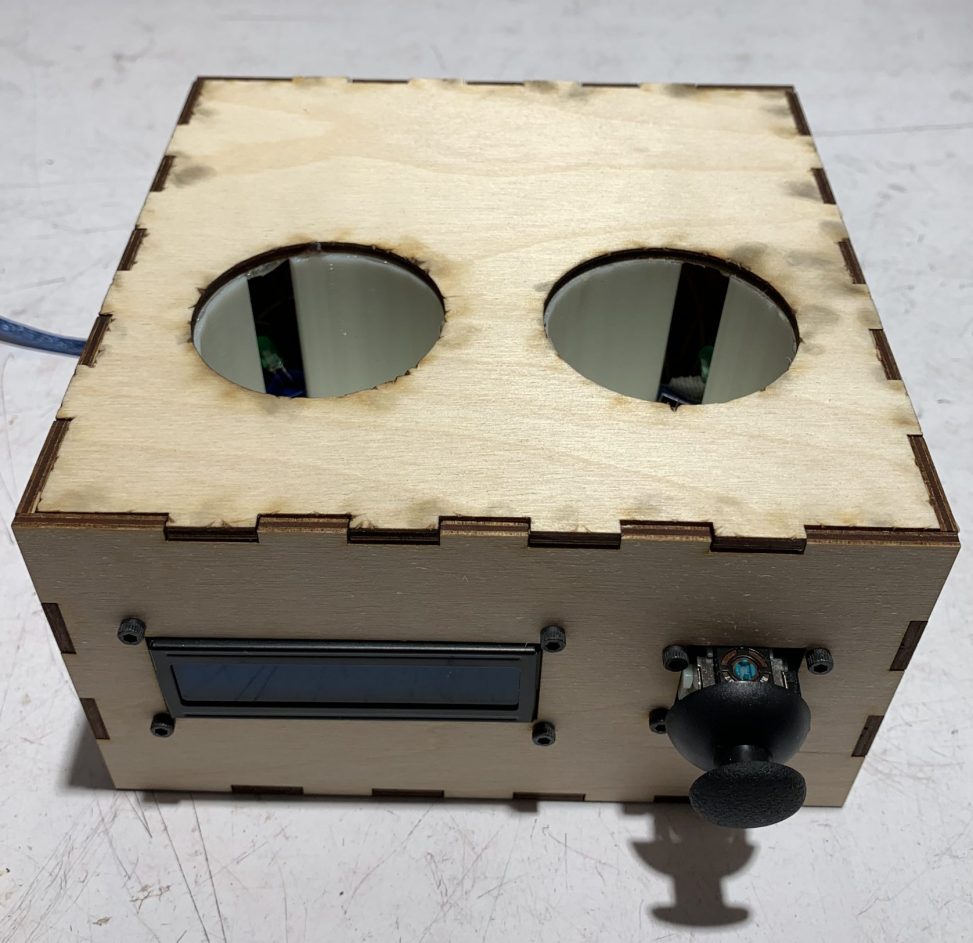

Final Project Full Image
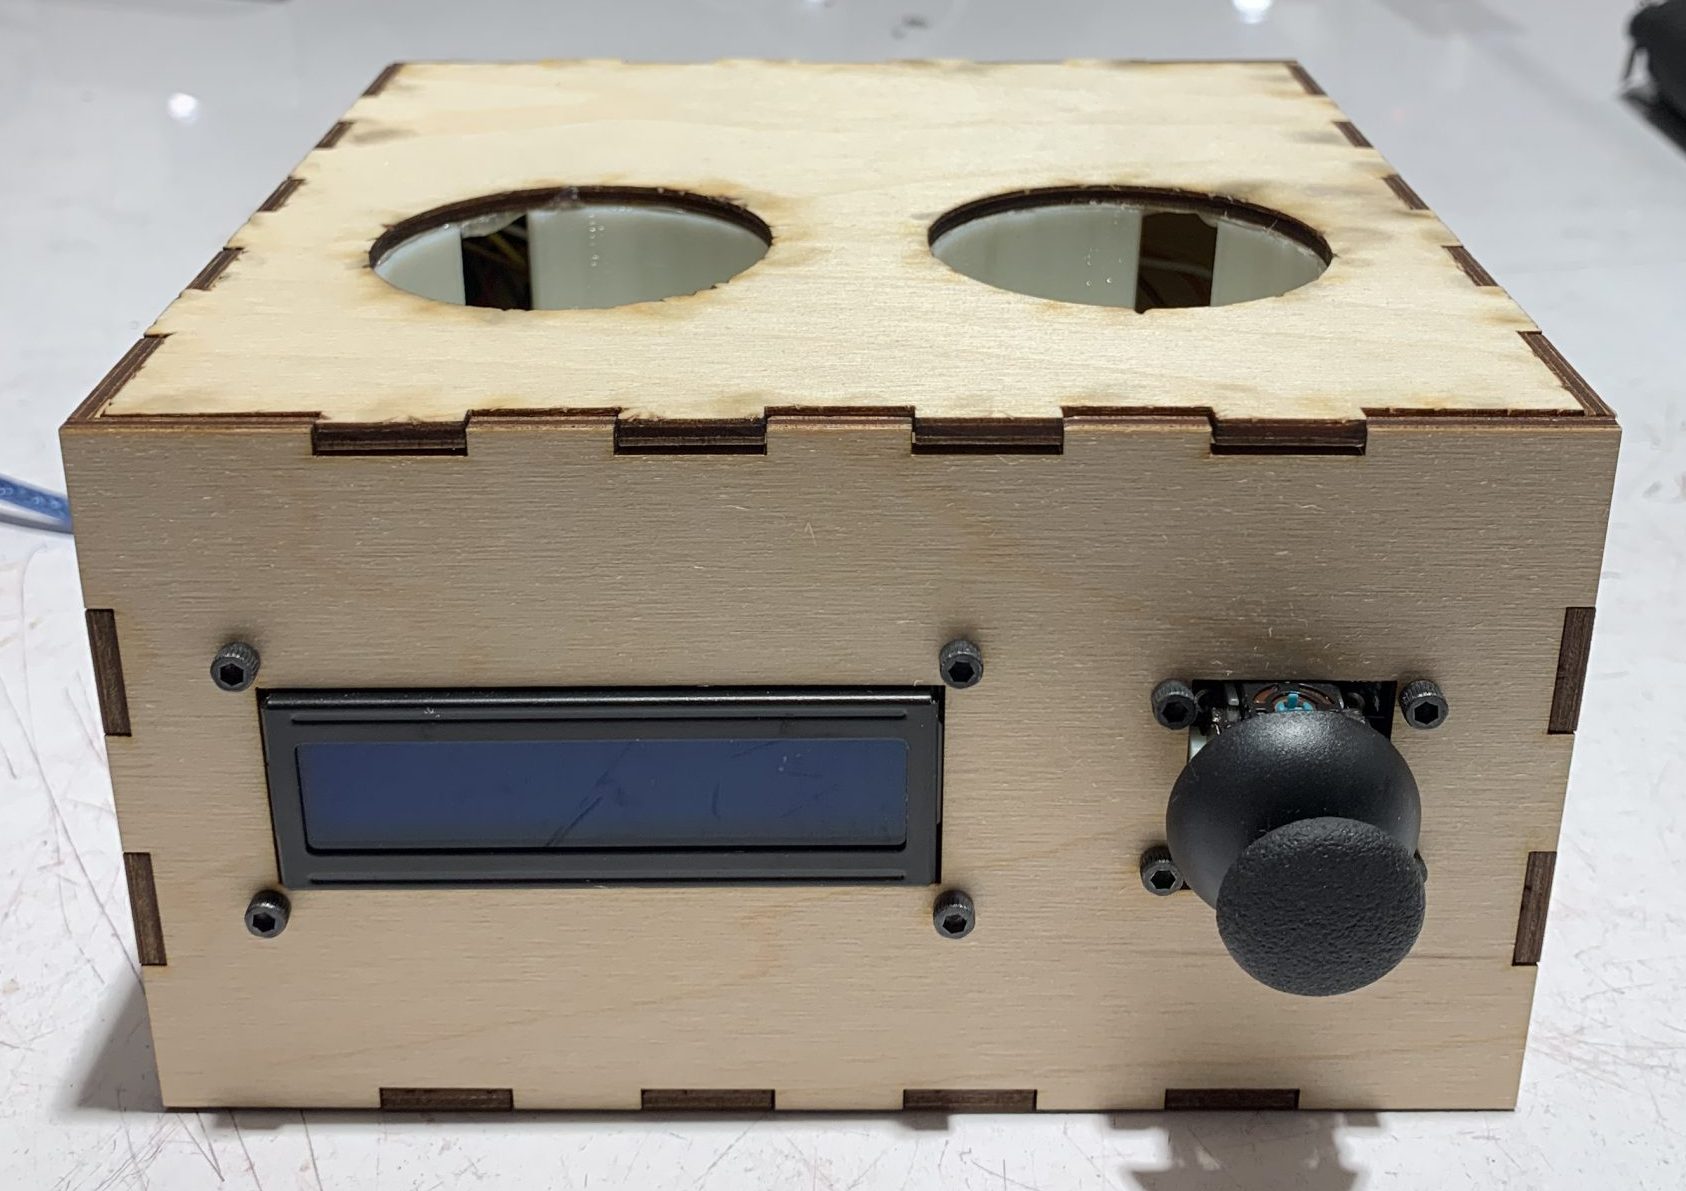
Final Project Full Image 2
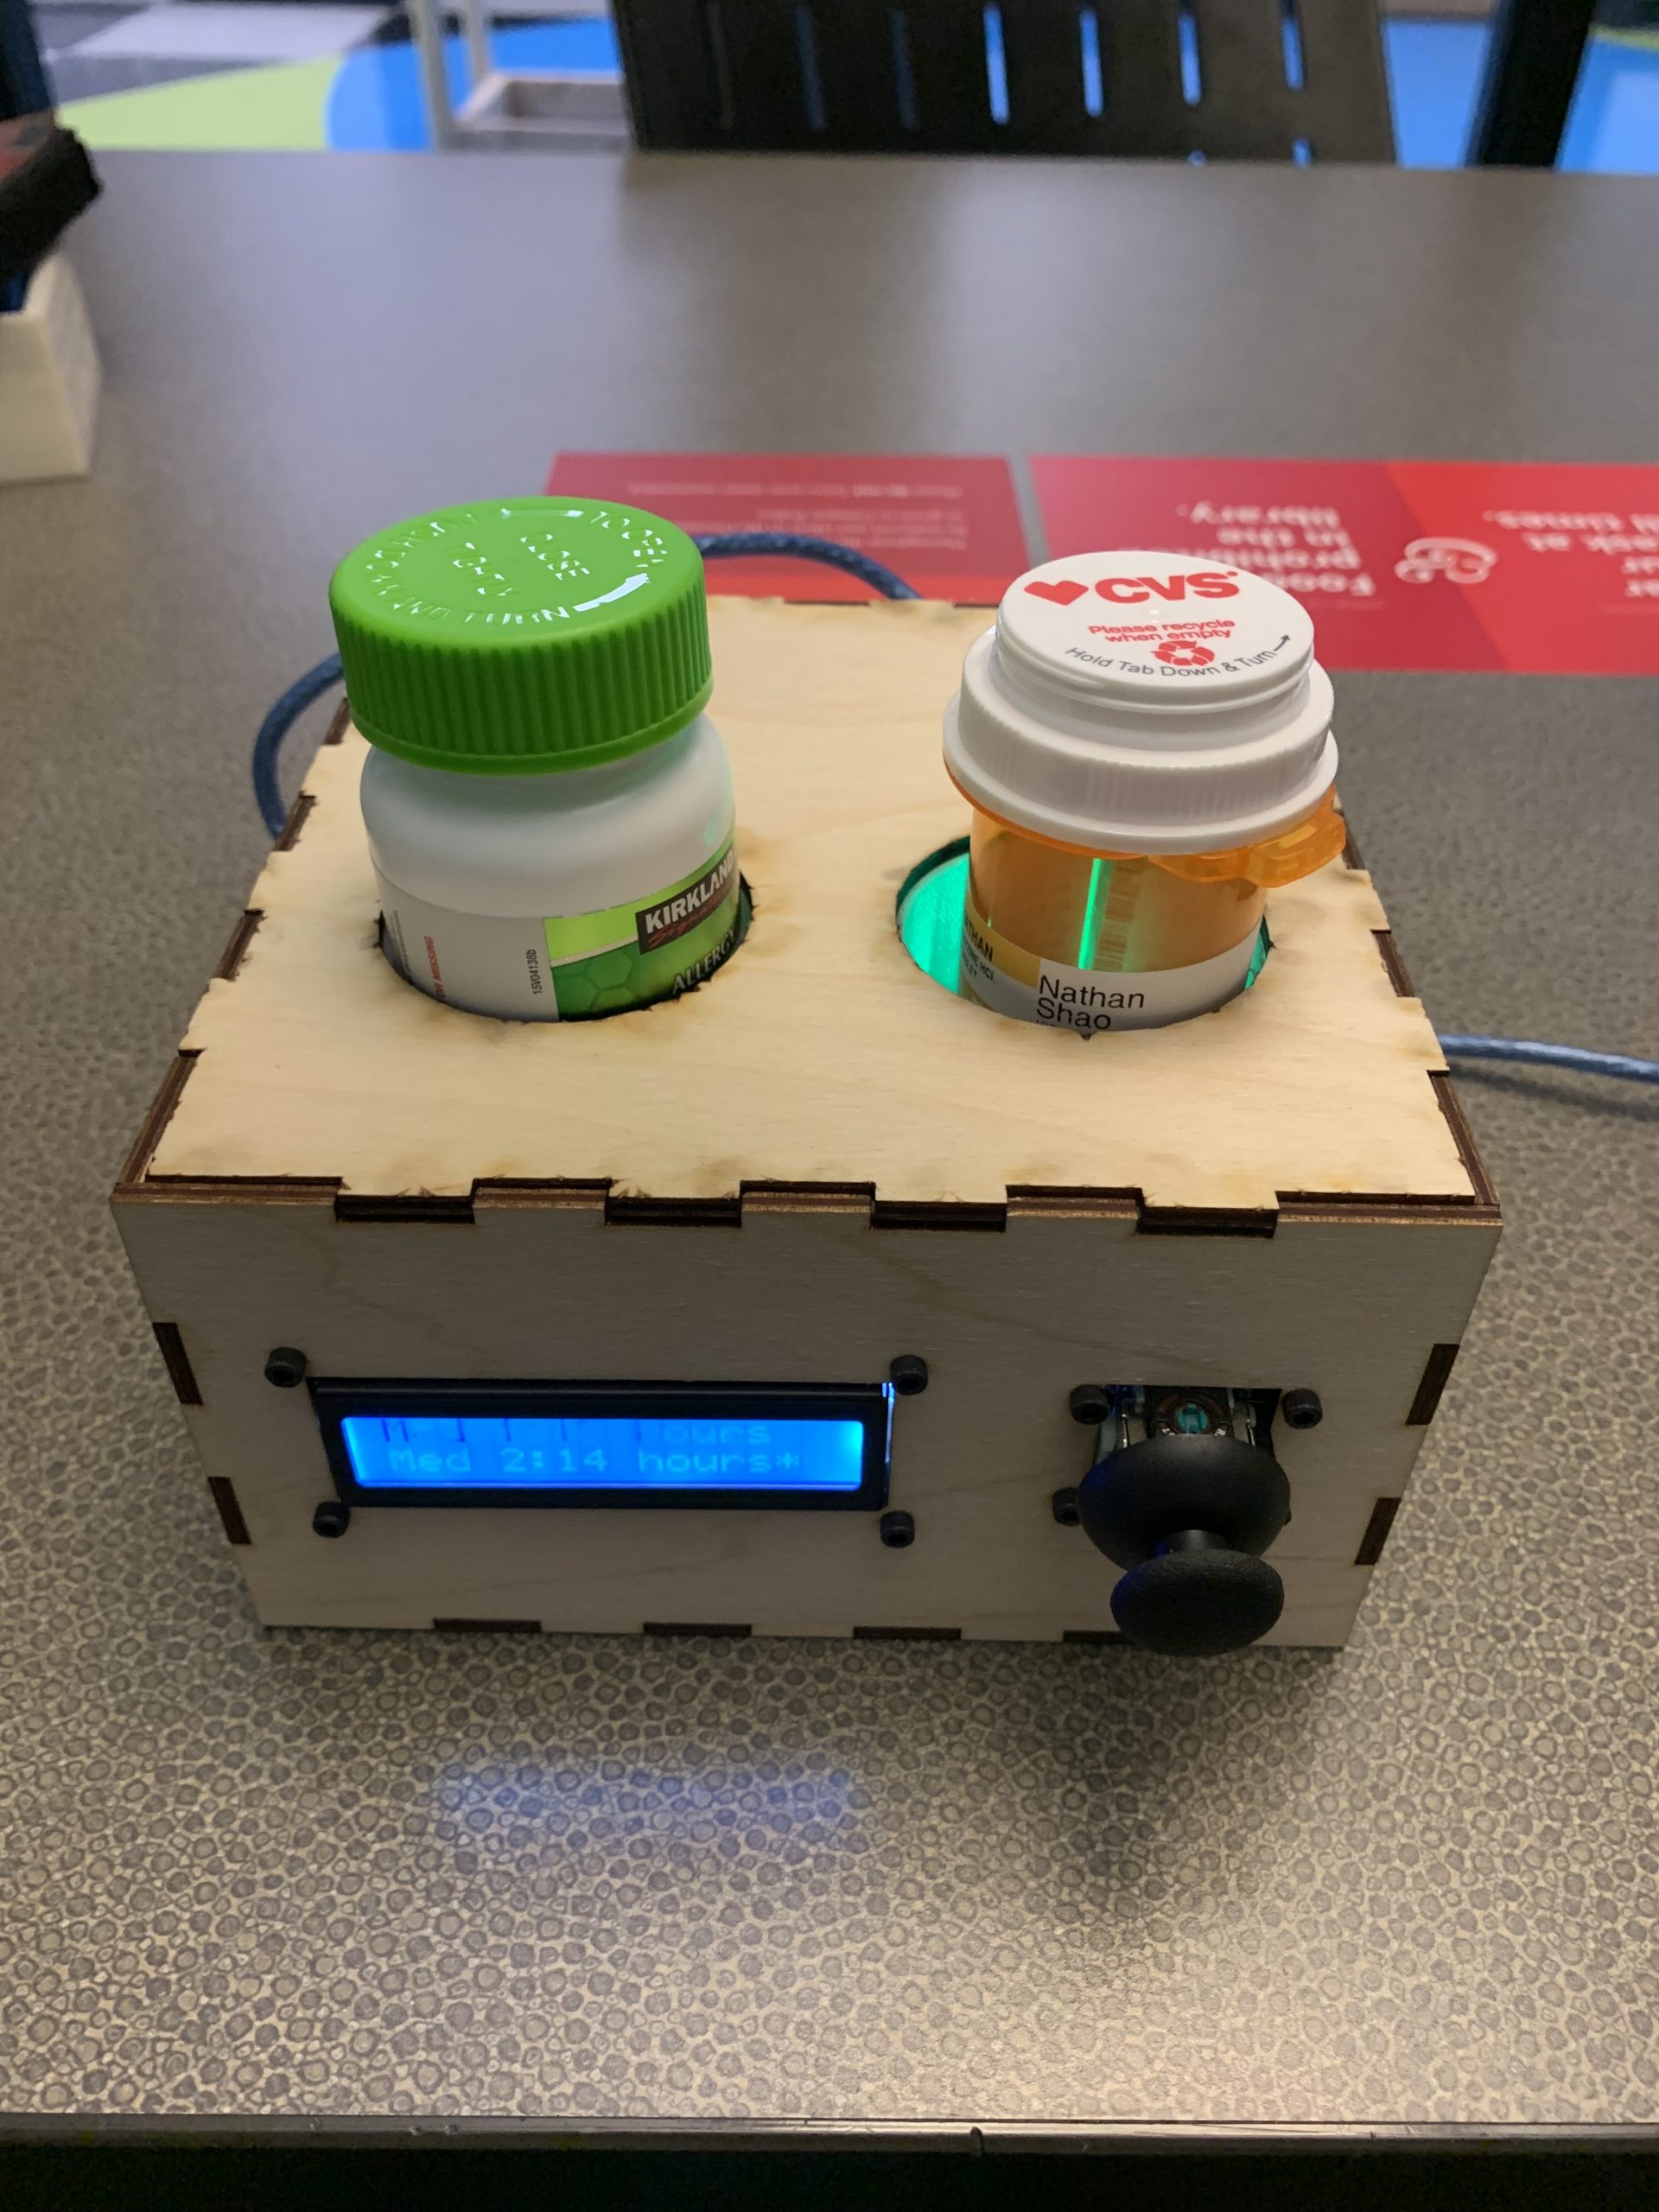
Project with medicine bottles for size
Overview
This project is meant to remind you on an interval to take your medication, but also let you know whether or not you have taken medication already to avoid double dosing. I often have a problem where I will forget whether or not I have already taken medication and in order to avoid double dosing, I will just not take medication that time. However, this absolutely leads to me to miss doses, and this project was meant to solve this issue.
Process Images and Review
The first design decision that I worked through was how to register the presence of the medication bottles within each container. My initial idea was to use a round force sensitive resistor to detect the bottles. As I designed and built this for my prototype, I realized that there were serious flaws with this idea, the first being the need for some way to concentrate the weight of the bottle onto the resistor. My solution, as shown in the image of my prototype, was to add a mushroom looking platform that sits on a small cylinder the size of the FSR. However, this was very finicky and unstable and inconsistent in registering presence.
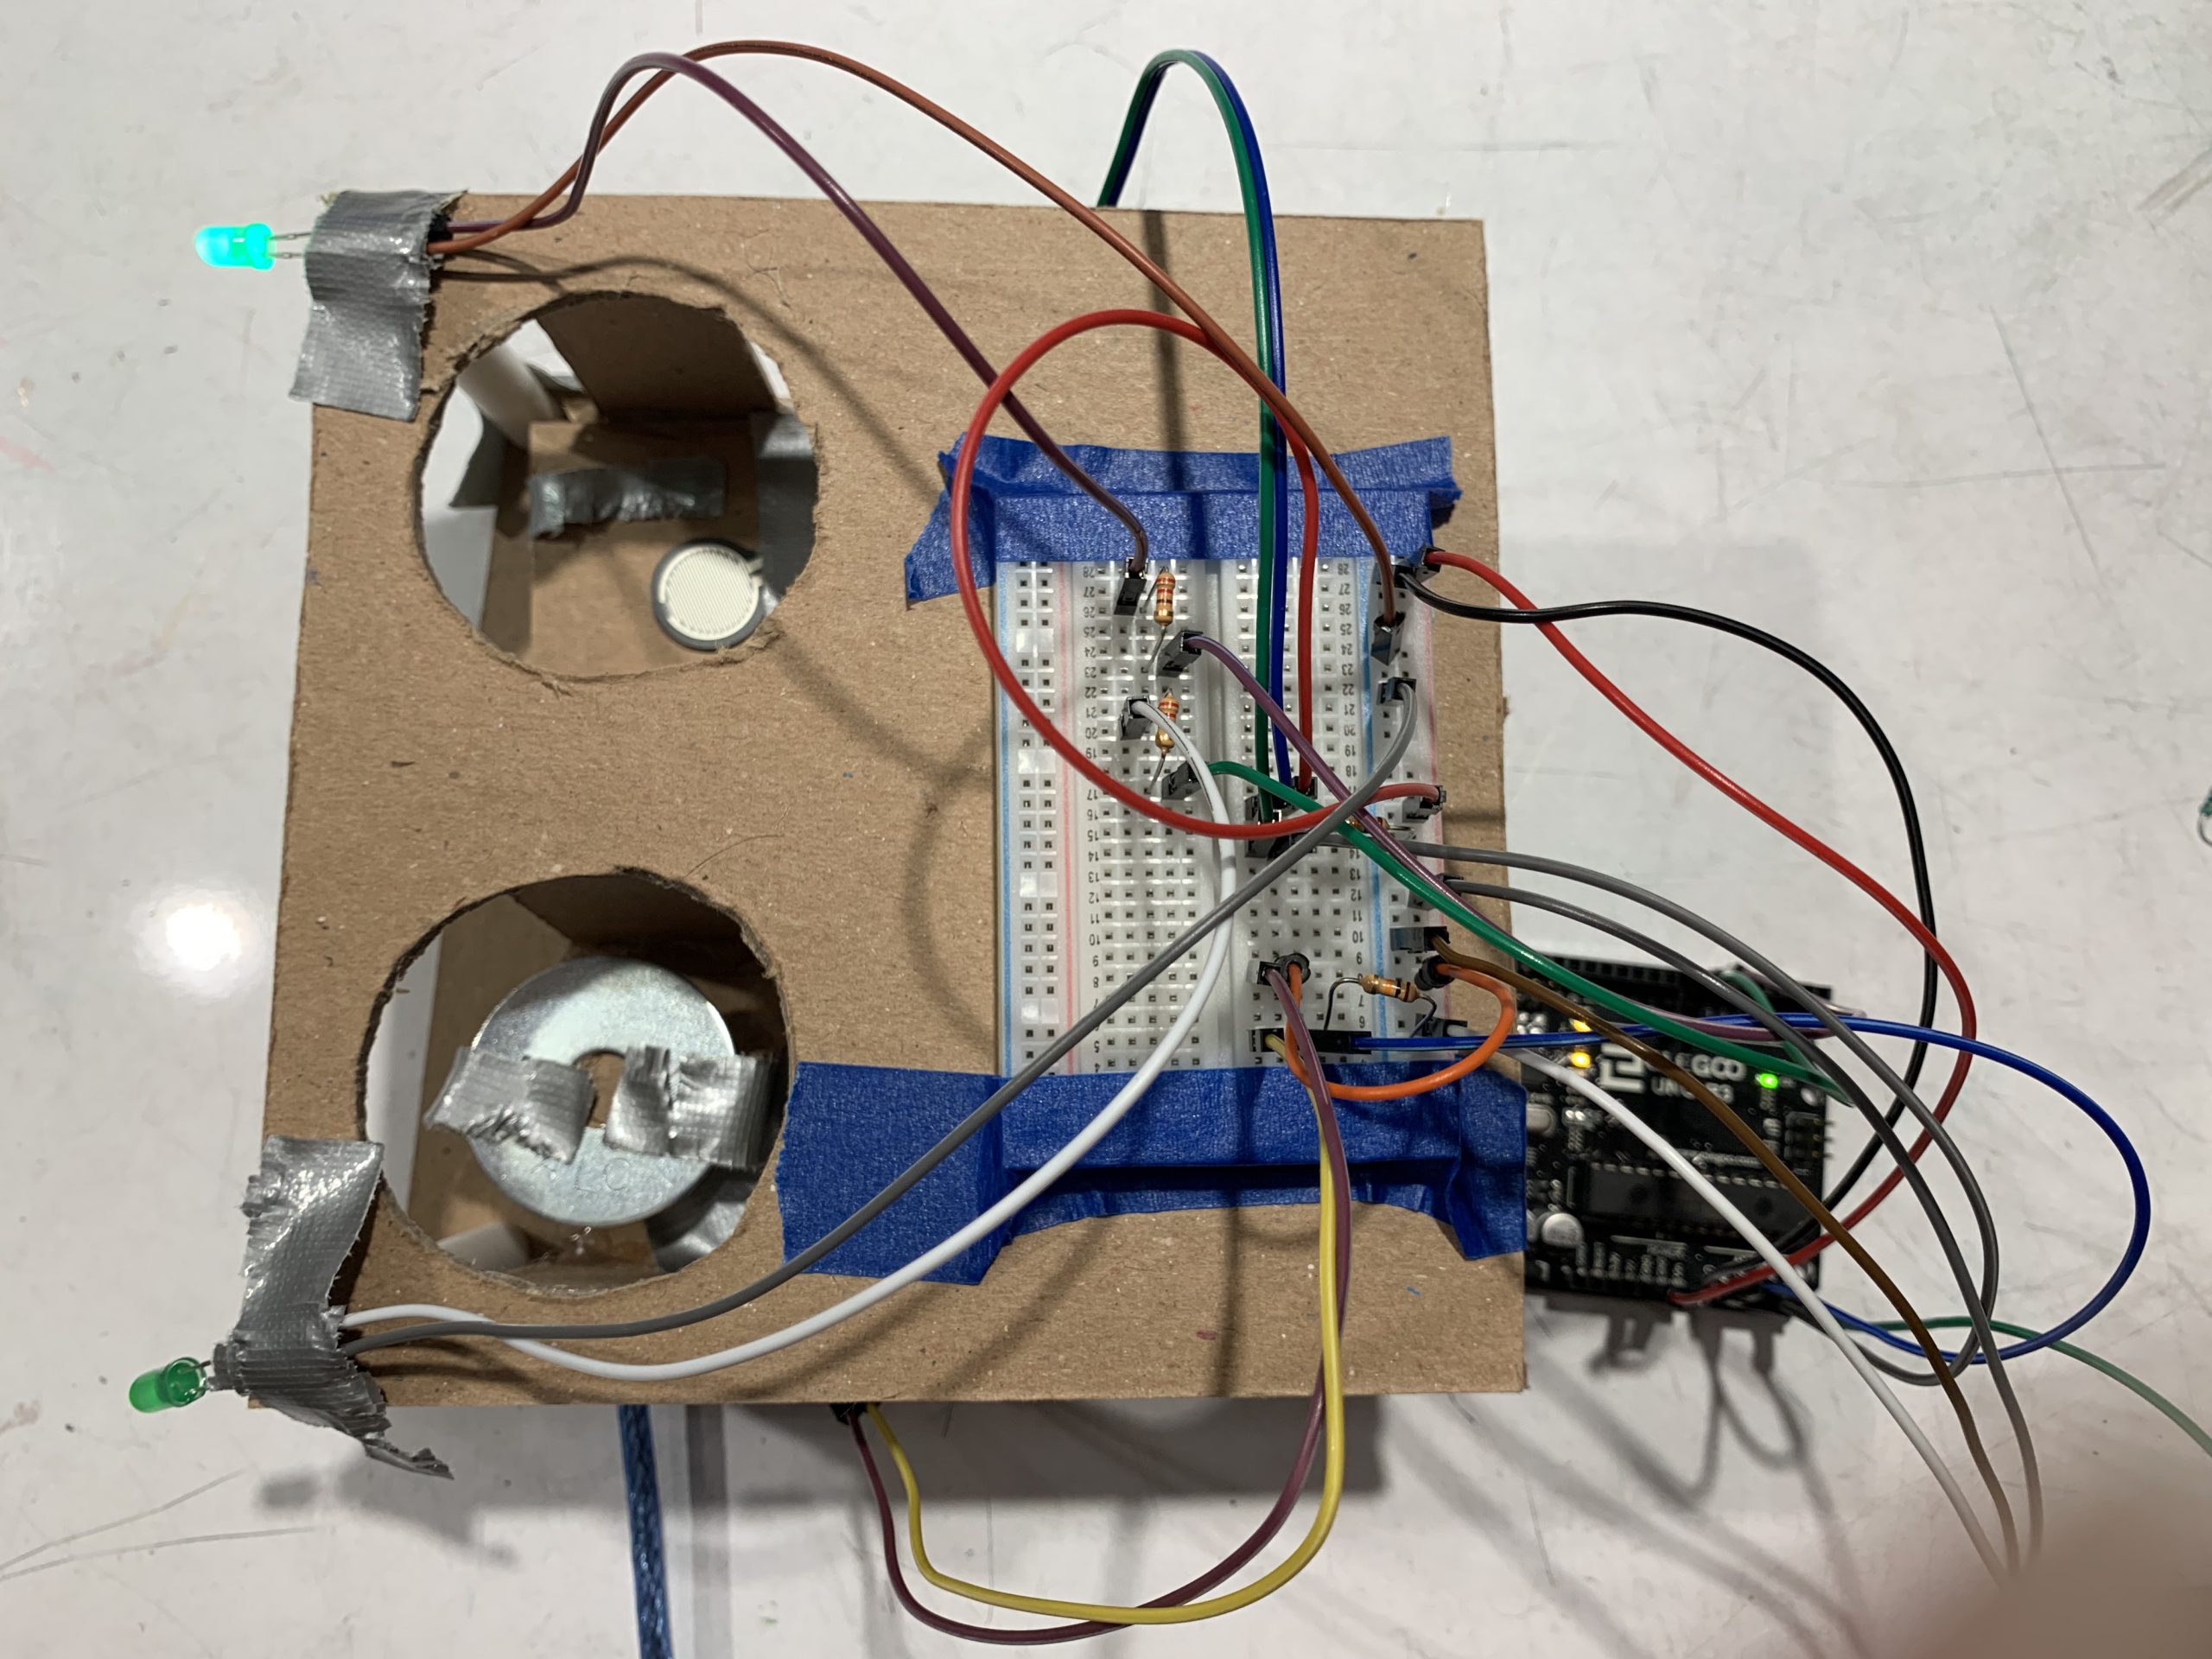
The top circle cutout shows what the FSR looks like, and the lower image shows the platform sitting on top of the FSR. This was the prototype before I made the design decision.
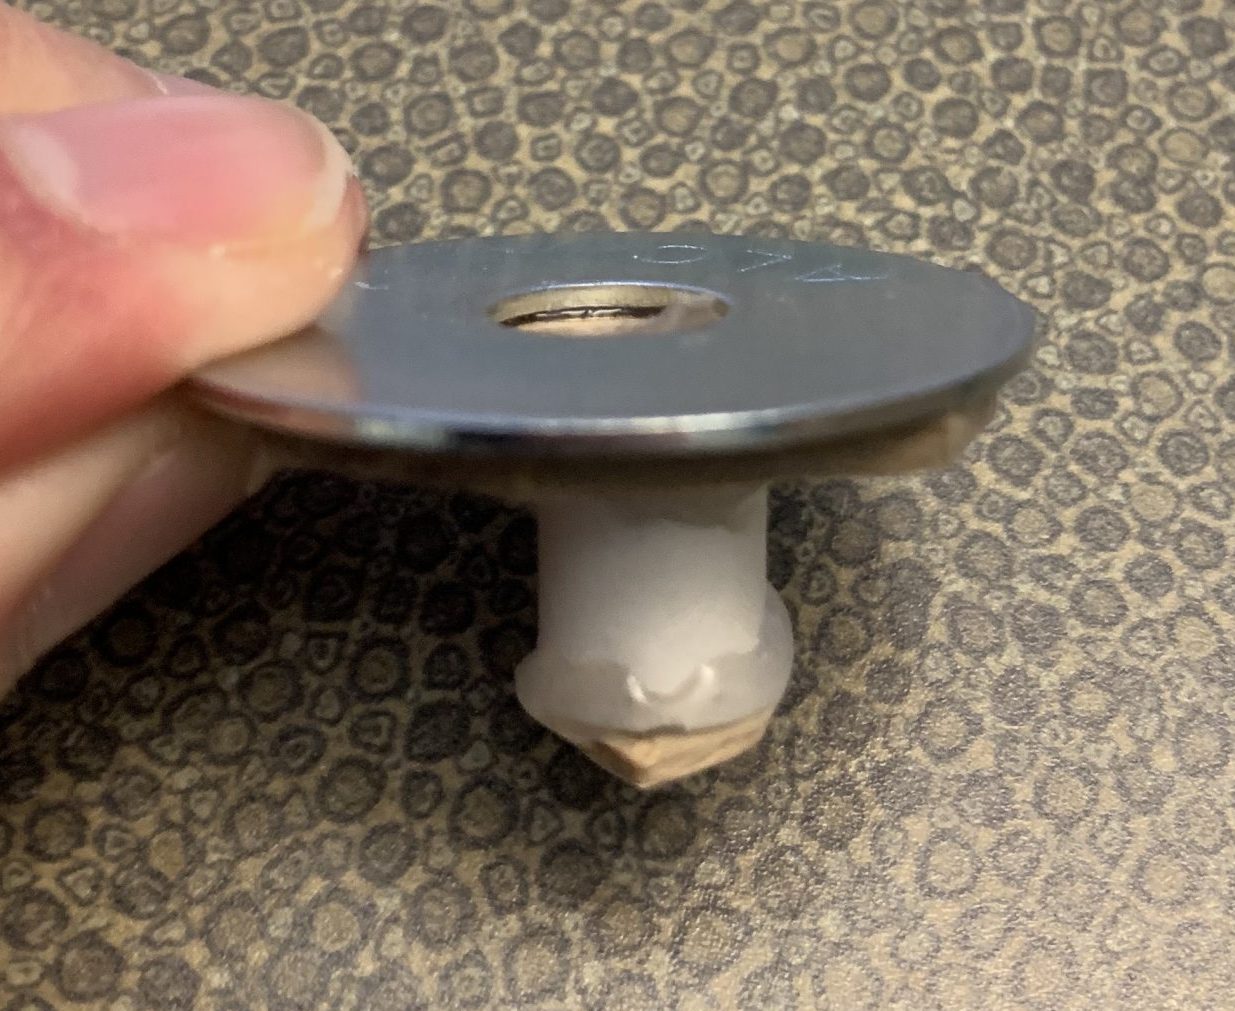
Close up of the platform
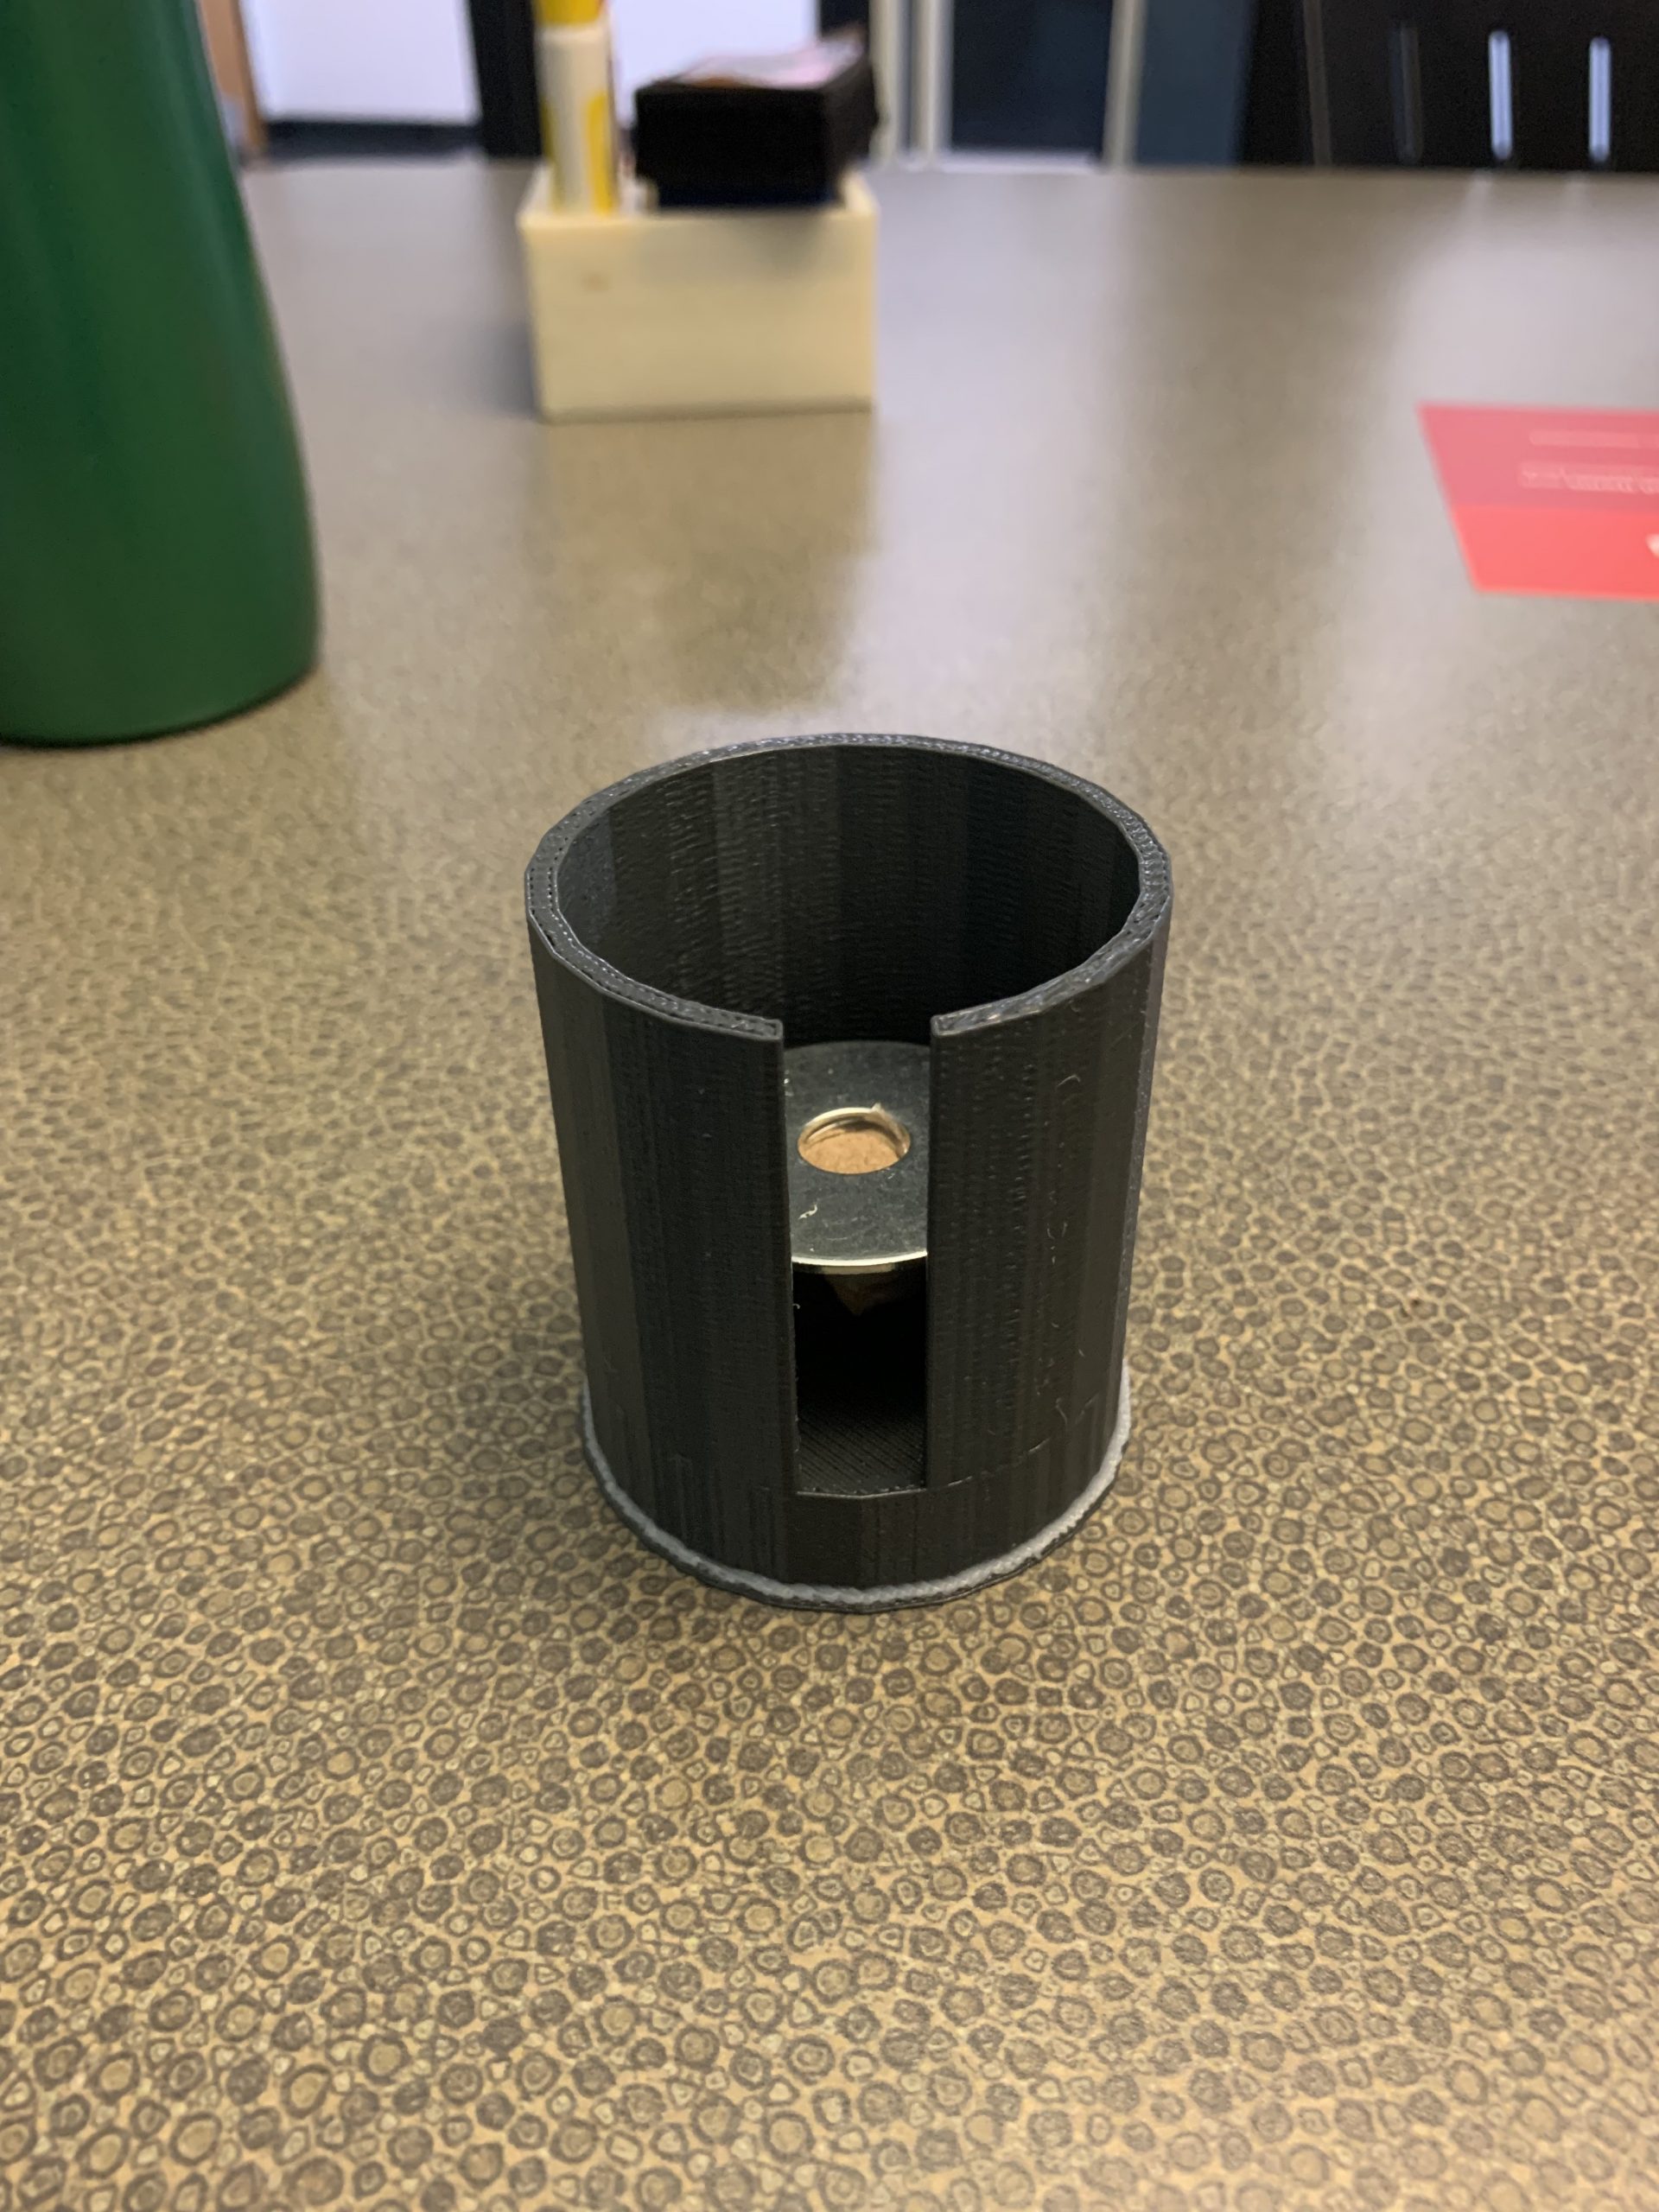
Platform sitting within a medicine holder
I decided to change this setup to take advantage of the small IR distance sensors that use photo-resistors to register distance. This was far more accurate and solved any inconsistency issues I had.
Another updated design decision that I made regarding this device, is the change from 4 holes to 2 holes for medication. Given the cables required for sensors, LEDs, the joystick, and the LCD display, space became quite limited within the box itself. 4 was an unfeasible number of medication slots for the device to have, it would not have been possible unless I designed the entire device as a cube.
Discussion
One comment that I received during the peer feedback was “Joystick has many functions that simplify user interface” and I completely agree. My original idea was to use 5 different buttons for up/down/left/right/click actions, but realized that the Joystick is a single object that allows for all of those movements. This meant that I can in the future add as many user settings as possible, and use L/R to scroll between the settings and U/D to change the settings, and click to confirm or reset the device time.
Another comment that I received was “The light source could be a bit brighter, since it is a bit muted right now because of the opaque 3d printing material in the way.” and in hindsight, this would have been great to take into consideration. My problem with displaying whether medication had been taken was that finding a place to put the LED so that it is visible was difficult. What this comment touches on, is why do I not create a clear container to hold the medication, and perhaps use an opaque wall to separate the container from other containers and the internal components. This would have been a much prettier and more effective design.
Overall, I am fairly happy with where the project ended up, but there were absolutely improvements that would have made the end product better. My goal with this project was to learn to laser cut and design using CAD software, learn to 3D print, and create a viable method of reminding myself to take medication. Laser cutting and 3D printing was a step of the creation process that I spent a lot of time on and think that I am far more comfortable with now. While this is a viable way to remind myself to take medication, my peers were correct when saying that a simple 7 day physical container for medication would have been much simpler. That is one of the flaws of the project as a whole, in that it was completely unnecessary but a lot of fun to create.
While working on this project, I definitely learned that laser cutting and 3D printing is not quite the scary monster that I had always considered it. For some reason, I had always considered these two things intimidating and psyched myself out of learning both skills. This project and the number of iterations I needed to make on my project gave me comfort with cutting with the Rabbit machines. I also learned that while in the past I was very good at just jamming wires into wherever it would fit, when trying to work with a box and size constraint, proper wire management is important and is something that I should look into planning for future projects. During this project I realized that creating pieces and parts that fit well with each other is surprisingly soothing and therapeutic, and on the other hand frustrating when they do not fit together, and I can definitely see myself coming to make small trinkets to give my brain a breather.
I do not expect to build another iteration of this project, like mentioned above, because this project is very redundant in its functionality. There is a far simpler alternative that would fulfill the same purpose far more reliably. If I were to remake it, I would change the material used to 3D print to a clear material, turn the box into acrylic for the aesthetic, and include proper wire management into size planning and the internal layout.
Technical Information
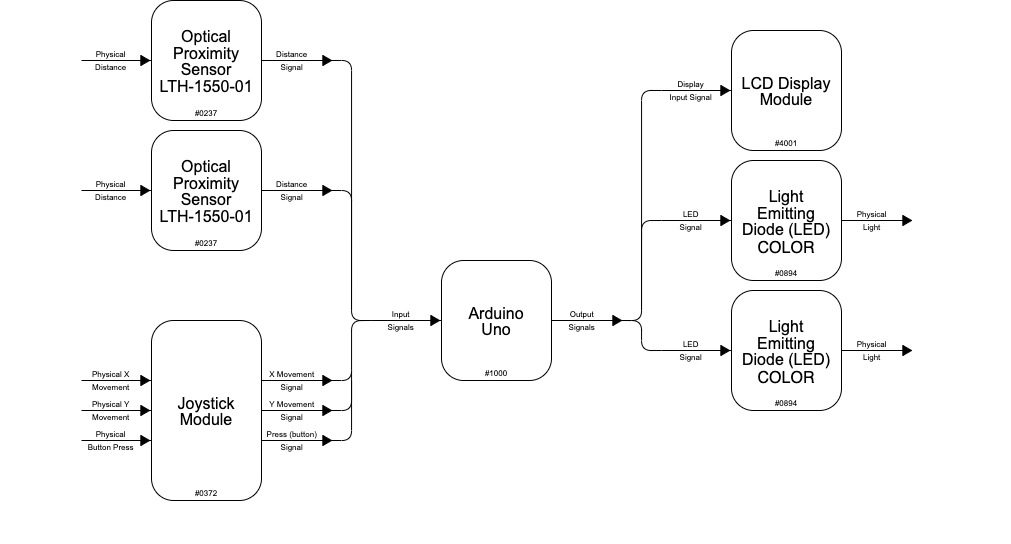
Block Diagram
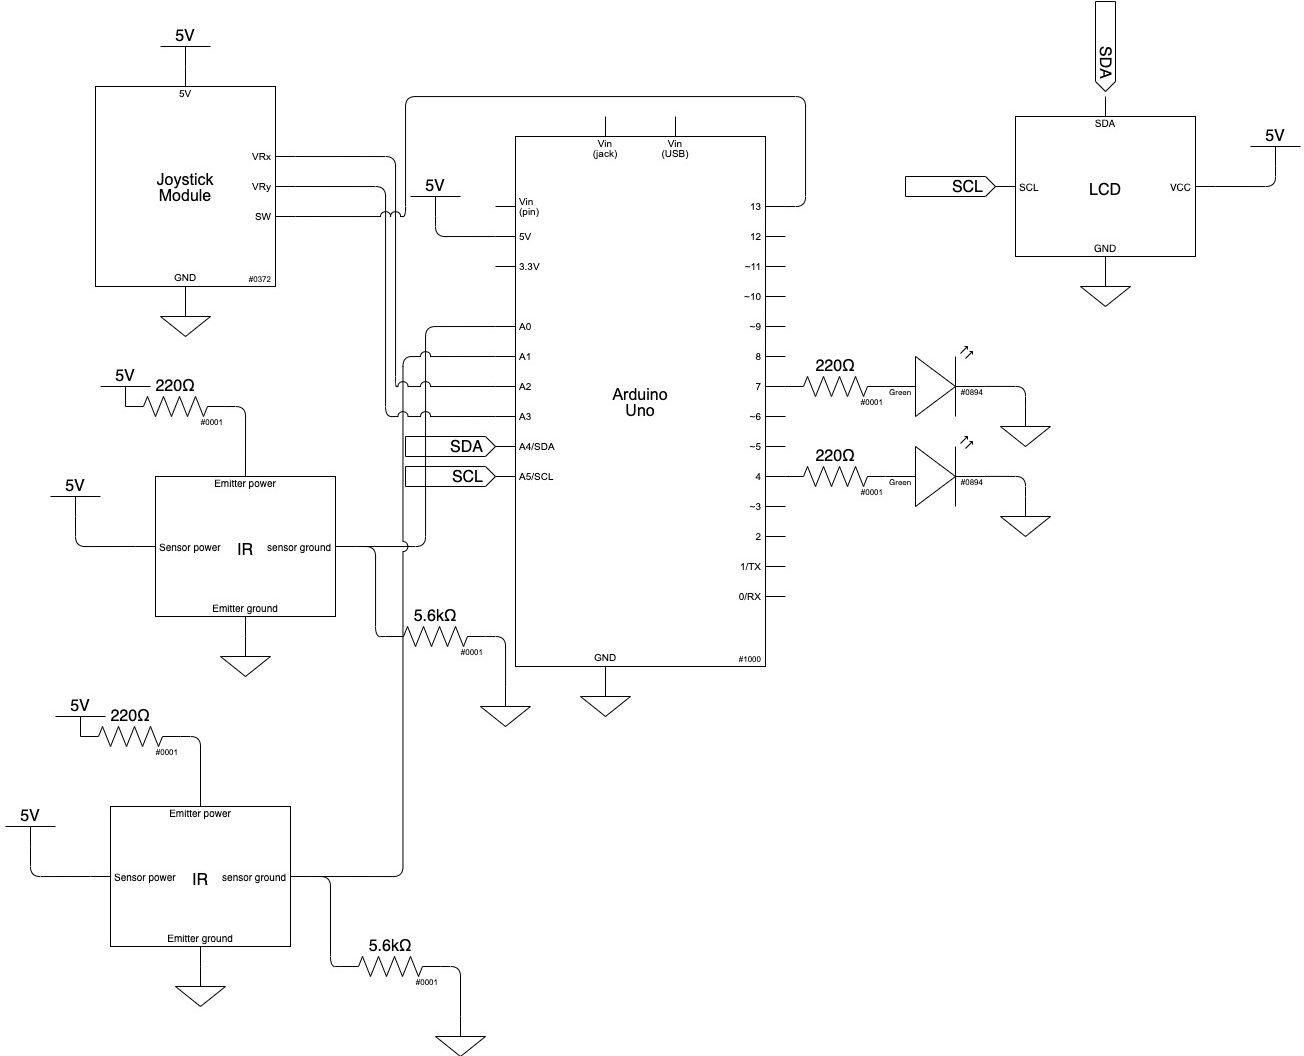
Schematic
#include <Wire.h>
#include <LiquidCrystal_I2C.h>

/*
Project Name: Medicine Taking Reminder
Nathan Shao
Description: This code powers the settings and timer functionality of the Medicine Taking Reminder Box. It allows a user to switch
             settings by moving a joystick left and right, and modifying that setting using up and down, and resetting the timer
             by pressing down on the joystick.
Credit: Some pieces of code were taken from the 60-223 course website at https://courses.ideate.cmu.edu/60-223/f2021/tutorials/I2C-lcd

*/
LiquidCrystal_I2C screen(0x27, 16, 2);

int VRx = A0;
int VRy = A1;
int SW = 2;

int photoresist1Pin = A2;
int LED1 = 13;
int photoresist2Pin = A3;
int LED2 = 12;

int xPosition = 0;
int yPosition = 0;
int SW_state = 0;
int mapX = 0;
int mapY = 0;

long def = 43200000; // 12 hours

long timer1 = 0;
bool read1 = false;

long timer2 = 0;
bool read2 = false;

int curSetting = 0;
long adjust = 0;
long settingTimer = 0;
long curTime = 0;
long medTime1 = def;
bool taken1 = false;
long medTime2 = def;
bool taken2 = false;

void setup() {
  // initialize the screen (only need to do this once)
  screen.init();

  // turn on the backlight to start
  screen.backlight();

  // set cursor to home position, i.e. the upper left corner
  screen.home();
  // print the words Hello, world! onto the screen starting at the above cursor position
  screen.print("Hello, world!");
  screen.clear();

  Serial.begin(9600);

  pinMode(VRx, INPUT);
  pinMode(VRy, INPUT);
  pinMode(SW, INPUT_PULLUP);

  pinMode(photoresist1Pin, INPUT);
  pinMode(LED1, OUTPUT);
  pinMode(photoresist2Pin, INPUT);
  pinMode(LED2, OUTPUT);

  curTime = millis();
}

// read the joystick
void readJoy() {
  xPosition = analogRead(VRx);
  yPosition = analogRead(VRy);
  SW_state = digitalRead(SW);
  mapX = map(xPosition, 0, 1023, -512, 512);
  mapY = map(yPosition, 0, 1023, -512, 512);
}

void processDisplay() {
  if (mapX > 300 && (millis() - settingTimer > 1000)) {
    // If the joystick moves left or right, change the setting currently selected
    curSetting = (curSetting + 1) % 2;
    settingTimer = millis();
  }
  else if (mapX < -300 && (millis() - settingTimer > 1000)) {
    curSetting = (curSetting + 1) % 2;
    settingTimer = millis();
  }
  // output updated selection and time to LCD
  screen.clear();
  screen.print("Med 1:");
  screen.print(medTime1 / 1000 / 60 / 60);
  screen.print(" hours");
  if (curSetting == 0) {
    screen.print("*");
  }
  screen.setCursor(0, 1);
  screen.print("Med 2:");
  screen.print(medTime2 / 1000 / 60 / 60);
  screen.print(" hours");
  if (curSetting == 1) {
    screen.print("*");
  }

  // If the joystick moves up or down, modify the selected setting by an hour each
  switch (curSetting) {
    case 0:
      if (mapY > 300 && (millis() - adjust > 500)) {
        medTime1 -= 3600000;
        adjust = millis();
      }
      else if (mapY < -300 && (millis() - adjust > 500)) {
        medTime1 += 3600000;
        adjust = millis();
      }
      break;
     case 1:
       if (mapY > 300 && (millis() - adjust > 500)) {
          medTime2 -= 3600000;
          adjust = millis();
        }
        else if (mapY < -300 && (millis() - adjust > 500)) {
          medTime2 += 3600000;
          adjust = millis();
        }
      break;
     default:
      break;
  }
}

// read the first IR sensor
void readIR1() {
  int readVal;
  readVal = analogRead(photoresist1Pin);
  if (readVal < 100 && !read1) {
    timer1 = millis() + 2000;
    read1 = true;
  }
  Serial.print(readVal);
}

// read the second IR sensor
void readIR2() {
  int readVal;
  readVal = analogRead(photoresist2Pin);
  if (readVal < 100 && !read2) {
    timer2 = millis() + 2000;
    read2 = true;
  }
  Serial.print(" ");
  Serial.println(readVal);
}


void loop() {
  readJoy();
  // if button press, reset the time
  if (SW_state == 0) {
    curTime = millis();
    taken1 = false;
    digitalWrite(LED1, LOW);
    digitalWrite(LED2, LOW);
  }

  processDisplay();

  readIR1();
  // update LED state as necessary
  if (millis() > timer1 && read1) {
    digitalWrite(LED1, HIGH);
    read1 = false;
  }

  readIR2();
  // update LED state as necessary
  if (millis() > timer2 && read2) {
    digitalWrite(LED2, HIGH);
    read2 = false;
  }

  // when time limit reached, reset LEDS.
  if (millis() > curTime + medTime1 && !taken1) {
    digitalWrite(LED1, LOW);
    digitalWrite(LED2, LOW);
    taken1 = true;
    curTime = millis();
  }
  // when time limit reached, reset LEDS.
  if (millis() > curTime + medTime2 && taken1) {
    digitalWrite(LED1, LOW);
    digitalWrite(LED2, LOW);
    curTime = millis();
    taken1 = false;
  }

  delay(100);
}