Final project: a useful implement for an older person
Overall goal: make a thoughtfully designed prototype that serves a particular older person’s particular need, get feedback from that person, and iterate on it. Document process along the way, and document the final product as well.
General structure:
- Meetings with older people in their home (between Thursday March 20th and Tuesday March 26th*)
- Ideation and convergence on an idea for prototyping (in class Wednesday March 27th)
- Meeting documentation (due Monday April 1st)
- Quick development and presentation of a “behaves-like” prototype (week of April 1st)
- Presentation and crit of these prototypes with older friends (Monday April 8th)
- Documentation of prototyping process and feedback (Wednesday April 10th)
- Elaboration/improvement/changes/finalization of the final project artifact (weeks of April 15th and 22nd)
- Final presentations and crits with older friends (Monday April 29th)
- Final documentation (Friday May 10th)
Last and least: the grading scheme for this project.
1. Structuring your initial research/design meeting
Prior to Wednesday March 28thsee below, each group will arrange for their own meeting with their assigned older person. The major purpose of this meeting is to gather sufficient information about that person’s life to be able to identify a need they have that can be fulfilled with a technological solution.
Note on meeting scheduling: Your meeting can be as late as Sunday, March 31st, but this is strongly discouraged. If at all possible, try to meet before Wednesday, March 27th so that you have time to digest the interview and get a step forward in prototype ideation.
The expectation is that meetings will happen in the client’s home; if this is difficult or not possible, contact RZ as soon as possible.
A suggested agenda that you may want to follow is here:
- Introduction/icebreaker
- Introduce yourselves by name, sharing something that reflects a personal value, interest, or other bit of relevant data about your life which will help establish a personal connection. Possibility: share an anecdote about building the assistive device for yourself (Project 2). Or: how long have you been in Pittsburgh, and what do you like about living here? Etc.
- Ask your older friend to participate in turn, sharing their name, their interest in participating in this group activity, and prompt them with the same question(s) that you all answered to begin.
- Ask the older friend why they volunteered for this project as well, perhaps. What drew them to want to participate?
- Explanation and clarification about project goals
- You want to be sure to be on the same page about this project. Explain in clear terms what it is we’re trying to do, and what we’re not trying to do.
- We are:
- Trying to build prototype useful devices
- Engaging in an iterative design process, including gathering formative feedback around the midpoint of the process
- Taking about six weeks to go from this meeting to a reasonably high-fidelity final product
- Documenting our process
- Capable of building sophisticated devices
- We are not:
- Professional technologists who are experienced in making polished products
- Planning to build something that will be sold commercially
- Constrained by any practicality outside of usefulness to the person we’re designing for
- Likely to invent a totally novel piece of electronics (we combine many existing available components in new ways, but don’t for the most part make components)
- Give a quick timeline overview of the process
- Be sure to solicit questions: ask “do you have any questions?” or “does this make sense?”, etc., as you’re going through this section
- Understanding needs and thinking of possible technological interventions
- This is the meat of the meeting, but it’s also the hardest part
- There are multiple approaches that you could take, depending on the particulars of where you’re meeting, and the willingness/active engagement of your older participant. Possibilities:
- Ask your older person directly if they have any activities in their daily life that are difficult, frustrating, or otherwise seem like they could use an intervention. This direct question may bear some fruit, but you will probably need to do some probing and ask questions to guide the answering.
- If you’re in their home: ask if they’d be willing to demonstrate a daily task or a series of tasks to you. They can actually do the task if it’s something simple like getting a glass of water, or they may pantomime the task. The closer to reality this action is, the more likely you are to find a particular aspect of the task that’s harder than it needs to be.
- Have the older person try to think of something that they remember enjoying doing, which has become harder with age. Are there creative ways to make that thing easier to do now?
- Use the simple creative act of drawing to bring out ideas: ask the older person to draw a map or cartoon of their daily life, or have them narrate the action and do the drawing yourself in a way that’s visible to the group. It could be a map (literal map, showing travels), a sequence of cartoon panels (first I do this, then I do this), or take a more abstract form.
- Bring some craft materials (tape, tongue depressors, popsicle sticks, paper, scissors, pipe cleaners) and try to mock up a problem in a funny/silly way using these materials.
- Suggestions added by students during class:
- Ask ethnographic questions: “why is this important to you?”
- Once you’ve asked some of these guiding questions, use materials (clay, building materials, etc.) to mock up solutions to the story you’re telling
- Make sure they are a part of the process as much as possible
- Discuss and establish some categories for “problems” to narrow and refine the conversation
- Think of this as making a “convenience machine”, one that reduces one of the little annoyances we all have, maybe call it a “gadget”? Language is important.
- As you’re having this part of the discussion, document it as much as possible. At least one person should be taking notes, and at least one other person should be taking occasional pictures in an unobtrusive way (certainly if the older person is demonstrating something it should be documented with photographs).
- Share thoughts and ideas as they come up. You’re trying to be as creatively fruitful as possible in a short time!
- Keep any artifacts generated from this meeting.
- Regardless of your particular process, try to move towards some more concrete ideas after you’ve given the open ideation enough time. It’s best to have more than one possible idea moving out of this meeting so that you can funnel down later into narrower possibilities, instead of trying to invent new possibilities later.
- Conclude
- Thank your older friend for their time, make sure they have your contact information, and take any final documentation images/drawings/notes you may need to wrap up before you leave the space you’re meeting in.
- Reiterate the overall schedule if you feel it would be necessary to clarify before leaving.
Some thoughts from an experienced interviewer
Below are some relevant passages from chapter 2 of Steve Portigal’s book Interviewing Users: How to Uncover Compelling Insights (Rosenfeld Media, 2013).
Work toward the tipping point
There’s often a visceral point in the interview where the exchange shifts from a back-and-forth of question-and-answer, question-and-answer to a question-story setup. It’s such a tangible shift in the interview that I feel as if I can point to it when it happens. Stories are where the richest insights lie, and your objective is to get to this point in every interview.
The thing about this tipping point is that you don’t know when it’s coming. So you have to be patient in the question-and-answer part of the interview because you don’t necessarily know that what you’re doing to build rapport is getting you anywhere. You have to trust in the process, which is easier with experience. (p. 24)
Listening
When you engage in conversation, you’re often thinking about what you want to say next and listening for the breathing cues that indicate it’s your turn to speak. As you jockey for your 51% of the conversation space, listening becomes a limited resource. Although we all like to consider ourselves “good listeners,” for interviewing you must rely on a very special form of listening that goes beyond the fundamentals, such as “don’t interrupt.”
Listening is the most effective way you can build rapport. It’s how you demonstrate tangibly to your participants that what they have to say is important to you. (p. 24)
Listen by Asking Questions
In addition to demonstrating listening by what you don’t say, you can also demonstrate that you are listening by what you do say. The questions you ask are signifiers that you are listening. Try to construct each question as a follow-up to a previous answer. If you are following up on something other than what the participant just said, indicate where your question comes from. For example, “Earlier, you told us that…” or “I want to go back to something else you said….” Not only does this help the person know that you’re looping back, it also indicates that you are really paying attention to what they are telling you, that you remember it, and that you are interested. If you are going to change topics, just signal your transitions: “Great. Now I’d like to move on to a totally different topic.” (p. 25)
Be Aware of Your Body Language
Make and maintain eye contact with your participant. If you find eye contact personally challenging, take breaks and aim your gaze at their face, their hands, and items they are showing you. Use your eyes to signal your commitment to the interview. Acknowledge their comments with head nods or simple “mm-hmm” sounds. Be conscious of your body position. When you are listening, you should be leaning forward and visibly engaged. When you aren’t listening, your body tells that story, too. (p. 25)
2. Developing a prototype
March 27th through April 7th is the (admittedly compressed) time for the development of an initial prototype. In class on Monday, April 8th, each group will present their prototype(s); the audience will be both the older person the group built the device for, as well as the rest of the class.
To ensure that the prototype development time is spent as productively as possible, it’s important that you have clear goals for this phase of the project. Prototypes come in many flavors, and one useful breakdown of a handful of types is given in Graham Pullin’s book Design Meets Disability, p. 138:
- “feels-like”: an ergonomic prototype for feeling in hands, etc.
- “looks-like”: an appearance model for form, colors, materials
- “works-like”: engineering prototype for electronics, electromechanics, etc.
All of these prototypes focus on a particular aspect of the final product’s quality—namely, feel, look, and function.
The sort of prototype that each group should focus their efforts towards building in this period falls into a fourth category: it is a “behaves-like” prototype. That is to say, it is an experience prototype. It may have tethers instead of being wireless; be built larger or smaller than the likely final size of the object; and/or have unfinished or arbitrarily chosen aesthetic qualities. The one aspect that this prototype must focus on is modeling the fundamental user interactions.
That being said, it follows naturally that if, for instance, if the size of the final design critically affects its behavior, then the “behaves-like” prototype should carefully be built at the appropriate scale. Otherwise, the behavior wouldn’t be well-modeled by the prototype! Likewise, some semblance of electronic, electromechanical, etc., function should probably be integrated as well, but only need be present to the extent that it will inform the user’s experience of the core interaction.
It is not unacceptable for the formative crit prototype to feel, look, or work like the envisioned final product: it is perfectly fine if it does. But the focus of the group effort in this short development period shouldn’t be on choosing the right shade of paint! Rather, it should be on building an object which will allow the intended user to explore, and respond to, the way the thing will ultimately behave when it’s complete.
Reminder: take lots of pictures as you’re going. These will be integral to your process documentation later.
3. Documenting the initial meeting
It’s important to carefully document the meeting you have with your older friend so that you are sure to get as much as possible out of the short time you’ve got together. A good meeting with poor notes taken will likely only remain in your mind for a few days, and that’s not long enough.
During your meeting, take notes and photos! If the meeting produces any artifacts other than notes (if, for instance, you make a drawing or your older friend does), then be sure to capture good documentation of these. If the artifact is a drawing, then get a high-quality photograph or a scan of it; if the artifact is a small sculptural thing like a mockup with craft materials, then take a photograph or two which shows it clearly.
If everyone is comfortable having their faces online, you may also want to take a group photo with your older person!
Each group is responsible for submitting a meeting documentation post to the student work site including at least the following elements:
-
A brief introduction: Write this with an ignorant audience member in mind, somebody who doesn’t know anything about our class project, who just found this page through a web search. You should explain the purpose of the meeting, who was present, and where and when it was held. (Stick to using first names when naming people.) Include your team name.
-
Your meeting agenda: The agenda you wrote before your meeting, illustrating how you planned for the meeting to be conducted. It may be handwritten (in which case it should be scanned and the image posted at “large” size), or electronic (in which case the full contents should be presented on the documentation page).
-
Meeting summary and major takeaways: The most important part of this documentation post. Here, you’re explaining what you learned over the course of the meeting. What did you discuss? Were there any especially noteworthy quotes or strong findings? This is the section where you should integrate media from the meeting like snippets of notes, photos of acting out a particular idea or problem, photos of artifacts, etc. Write captions for images as appropriate. This section should not simply be a verbatim recital of your notes from the meeting.
-
Your thoughts after holding the meeting and discussing as a team: Use this section to present a critical reflection on the meeting. For instance: did the meeting follow your agenda or go way off the rails? Or was it difficult to get conversation started? Or did it go great? What would you want to do differently next time? Afterwards, did you realize any questions you wished you’d thought to ask? Did different members of your team have different opinions about how it went?
Technical WordPress notes about the post:
- Use the “multiple authors” feature to add each of your team members as authors on the post.
- Be sure to select a “featured image” so your post has a primary image associated with it.
- Label your post with the “Meeting documentation” category in WordPress.
Questions/concerns/etc.? Contact course staff before the due date!
5. Formative critique
in class on Monday, April 8th
9:30–9:40 a.m.: get settled, eat food, drink coffee, etc.
9:40–10:15 a.m.: group presentations to the room
Each group, one at a time, presents to the class plus older friends. Fill in your own slides in this deck to present for ~3 minutes and include:
- group member introductions (include your older friend in the introductions),
- the problem the group identified, and
- and explanation (and demonstration) of the prototype that’s being shown
There will be time for a few brief questions and comments after each group’s presentation.
10:15–11:10 a.m.: group consultation time with their older friend
Each group has extended discussion and consultation time to get feedback directly from their older friend. Group members should show their prototype and allow their older friend to try it out, and solicit feedback with open-ended questions. There’s no rush, and this is an opportunity to talk about the possible directions to go from this moment.
11:10–11:20 p.m.: clean up and goodbyes
6. Prototype process documentation
due at beginning of class on Wednesday, April 10th
Make a post on the student work site that contains at least:
- A brief introduction for context, explaining in general terms what this post is documenting (including a link to your prior documentation post is a good idea as well)
- Prototype
- Three high-quality photographs showing the complete prototype. Use the PhotoZone to capture these. Caption them as needed for the user to understand what they’re looking at. At least one image should be an overall view for scale/proportion, and at least one other should show a detail of something you’d like to share.
- Optionally: an embedded gif, .mov, or other short animated element demonstrating the functioning of your prototype.
- A paragraph explaining, in simple terms and avoiding jargon, what the “function” of your functioning prototype is. What does it do? How does a person use it?
- Process
- At least eight, and no more than fifteen, visual snippets of your prototyping taken along the way. These need not be woven into a totally linear story. Each image should be captioned to help a reader understand its significance. A few captions may be brief (e.g. “A mechanical prototype”), but most should provide more insight (e.g. “An early mechanical experiment built of popsicle sticks. It fell apart soon after this picture was taken, but we thought the overall design was good and later incorporated it into our behaves-like prototype.”) Images may be photographs, screengrabs, drawings, scans of notebook sketches, etc. Images may include team members in them but do not need to. Do not re-create the past to take a photo of it for inclusion in your documentation. Doing so is presenting fiction as fact, which is more commonly called lying!
- Discussion
- Write at least one paragraph addressing the major challenges in your prototyping process.
- Write at least two paragraphs addressing the crit on April 8th. Topics you should cover:
- The utility—or non-utility—of the crit on April 8th for your group.
- What (if any) input from the crit will you be using moving forward? Be specific: “A question about blind users got us thinking about creating a more tactile interface…” rather than “Comments were mostly negative so we are going to try working on a different design.”
- What (if any) input will you be ignoring, and why?
- Write at least a paragraph addressing your planned next steps for the project.
General post notes:
- A good practice is to create a shared folder in a service such as Google Drive or Box into which all the group members copy their own images; this way, everybody in the group can see all of the collected media and make better decisions about what you may want to include in your documentation post.
- This documentation requires some paragraphs of writing sections. You may assign different parts of the writing to different members of your group, but it’s important to ensure that the whole post has a unified tone and voice (i.e.: it’s very confusing if one paragraph is written in the first person and present tense, while the next paragraph is written from the third person and in the past). Be sure to harmonize your writing sections if you have multiple people independently write them.
WordPress details:
- Title the post “Team ABC Prototype Documentation”, where ABC is your team name
- Use the “multiple authors” feature to add each of your team members as authors on the post
- Label the post with the category “Prototype documentation,” which is a sub-category of “Final project”
- Select a “featured image” for the post
8. Final crit
in class on Monday April 29th
Projects are graded based on their function, presentation, and utility at the time of the crit.
The crit session will run on this schedule:
9:35–9:40 a.m.: instructor’s introduction
9:40–10:15 a.m.: group presentations to the room (in room A5)
Each group, one at a time, presents to the class plus older friends. Aim to present for three minutes and include:
- group member introductions (include your older friend in the introductions),
- the problem the group identified
- the solution you built
10:15–11:20 a.m.: rotating crit
Nine tables are set up, one for each project. All participants and guests at the crits will rotate from table to table, spending a few minutes speaking with the group member(s), and providing written feedback before moving on. At least one person who built the project stays at that table at each round, and the rest are free to rotate as well.
9. Final documentation
due Friday May 10th at 5pm
The final documentation for your pieces will be the longest-lasting, most portable, and most accessible evidence of the work you did. The final artifact itself will be given to the person that it was designed for—it may live in their home or in their traveling bag, but wherever it is, it won’t be in your hand. You should spend time proofreading and double-checking your final documentation, and be careful to produce something you’ll be proud to point to for years to come when people ask what sorts of interesting projects you’ve completed in your time at Carnegie Mellon.
If you have any questions about the submissions requirements, or run into technical problems, be sure to contact the instructor before the due date.
Scans of the feedback forms collected at the final crit, as well as group photos which you may wish to include in your final documentation, are available in this Google Drive folder (only accessible to students in the course)
Your documentation is submitted in the form of a post on the course WordPress site. In order from top to bottom, the documentation post should include:
1. Title in the format: “Project Name by Group Name: final documentation” (1 pt.)
- Underneath the title, write a paragraph to introduce your project in the context of this class to the uninitiated reader. Provide a very brief overview, and also include in the text links to your prior posts so the reader knows they can look to those for more context and process information.
2. What we built (5 pts.)
- Begin with a one-paragraph description, in plain and spare language, of what your project does. Avoid technical terms.
- Carefully- and well-shot images of the final project. Take these using IDeATe’s PhotoZone backdrop and lighting for an especially easy professional look, or shoot out in the field if you prefer. The DSLR photography guide provides a lot of pointers.
At least eight images:- Overall photo for proportion and scale (possibly the “featured image” you’ll use, though not necessarily).
- Embed one or more .gif or .gifv or short .mov (do not merely link to an outside hosting service). These should be brief (1–10 seconds) and show the basic operation of your device.
- At least three: detail photos of any part that you’d like to highlight. These could be button layouts, screen displays showing text, other design choices, etc. The IDeATe cameras available for borrowing are able to focus quite close, so with a steady hand (and/or a Magic Arm or tripod) you should be able to get good, clear close-ups.
- At least three: images showing the use of the thing (pushing a button, using a menu, etc.)
Each image should be captioned. (To add captions in WordPress: click on an image, click on the pencil icon to edit it, write a caption, and click “update.”) The captions serve to explain both what the viewer is looking at, as well as elucidating some of the operating details of the object.
- A narrative sketch of the intended use—a “story” of sorts to illustrate your idealized vision of what this thing would do, being used by the person for whom it was designed. Here’s a made-up example:
When Sam gets home, he’s looking for some inspiration, and goes to his bookshelf, where his Book Suggestor sits. He pushes the big button marked “What should I read?” and a display screen says “Brave New World by A. Huxley” on one line and “shelf 4R” on the next line. He walks to shelf 4R and finds the book.
Two days later, he returns to the Book Suggestor and pushes the “rate that read” button. He turns a knob, scrolling past “no thanks” to “so so” to “good read!”, and clicks the knob to select that answer. The Book Suggestor remembers that Sam enjoyed that author, and will raise Huxley’s other books’ rankings when the next suggestion time comes around.
3. How we got here (5 pts.)
A novice builder-of-things may assume that you 1) get an idea, 2) build it, and 3) you’re done! Your goal in this section is to disabuse them of this misconception.
Some aspects of your months-long process were mandated by this class—there is no need to dwell on these moments as you’ve already documented them in your two prior posts for this project (your initial meeting notes and your formative crit notes).
Instead, use this section to discuss and analyze retrospectively the decisions you made, mistakes and discoveries along the way, and share any breakthrough (or breakdown!) moments you had. It is ok to recycle some narrative and/or images from prior posts, but this post should also have significant original content.
Be sure to address the extent to which you followed or did not follow your original schedule (feel free to include an image of the Gantt chart your team filled out, or a subset of it, if it’s relevant). If you diverged from it, what brought the divergence about? If you didn’t diverge from it, how did you manage to keep to your original goals?
Use images (at least eight) to help tell your story. Intersperse text and include captions as you see fit. The images may be photographs of a workspace, scans of notebook pages, screengrabs, or any other visual artifact that’s useful for your story.
There should be at least ~500 words and eight images in this section.
4. Conclusions and lessons learned (5 pts.)
A few paragraphs here, addressing:
-
Salient findings from the final crit, which emerged from discussion and/or written feedback. For instance: did somebody suggest a simple change that would significantly improve your project? Please quote feedback verbatim, but do not name the person who gave that particular feedback.
-
Major takeaways from the experience of working with an older person to design something built just for them. What surprised you, what would you do differently next time, etc.
-
Any concluding thoughts you have about the project. Different choices you’d make a second time around.
There should be at least ~400 words in this section.
5. Technical details (4 pts.)
This section, at the bottom of the post, is here primarily so that others can use and build on your work.
Include:
Code
Your code should be reasonably commented throughout so that people other than you (the author) can better understand it. You don’t need to explain every single line—that would be overkill—but leave useful notes in a reasonable measure. Write a comment block at the top of the code including:
- the project title,
- (optionally) your name,
- a description (short or long) of what the code does,
- any description of pin mapping that would be useful to somebody else trying to recreate your work,
- appropriate credit to any example code that you incorporated into your project, and
- (optionally) a license notice (i.e. copyright, CC BY-SA 4.0, the MIT License, release it to the public domain, or just follow your heart). If you have written code that you wish to keep strictly proprietary for any reason, please speak with the instructor about an exception to this documentation requirement.
Make sure that your final code as it appears on the public-facing post is correct and will compile!
To embed the code properly: on the WordPress “Edit Post” page, move your cursor to where the code should be inserted in your post. Click the “Code Insert” button in the toolbar above the post (it is marked
{…}). For Language, selectC. Paste the code—properly indented!!—into the window, and click OK.
Schematic and design files
In addition to the code, include:
-
A cleanly drawn schematic, legible to a person with a reasonable preparation in electronics. This may be neatly hand-drawn (use a ruler so your lines are straight) or sketched in software, such as Fritzing, EAGLE, CircuitLab, or in some flowchart application like draw.io. Be sure to upload a full-resolution version of this image so that a future reader isn’t left squinting at a pixelated version of it, unable to discern the details necessary to read your circuit.
-
Any design files that would help someone else reproduce your project; these could be generated in Illustrator, SolidWorks, Inventor, Fusion, Rhino, or any other design software you used. If you have cutfiles (
.dxftypically), and/or 3D print files (.stlor other), share these as well. Zip all design files into a single.ziparchive and upload that file. Get in touch with the instructor if you’re having any technical trouble with uploading! (We’ve had difficulties with this in the past but now believe the problem is solved.)
WordPress notes:
- Use the “multiple authors” feature to add each of your team members as authors on the post
- Label the post with the category “final documentation,” which is a subcategory of “Final project: an assistive device for an older person”
- Any paper document (notebook page, loose sheet of paper, etc.) should be scanned in a flatbed scanner, not photographed directly (the quality difference is huge)
- Select a “featured image” for the post
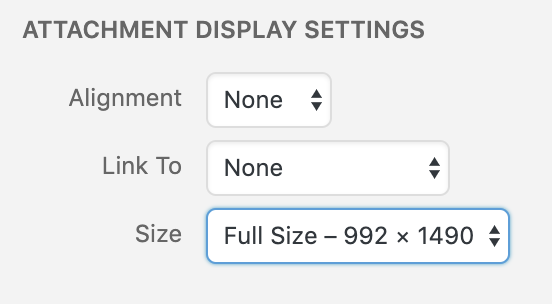
- When uploading images, in the “Add Media” window, select “Full Size” under the “Attachment Display Settings” header, as shown below. (If you choose a smaller size, your images will be downsampled, potentially with very ugly and destructive results.)
Grading scheme
The final project as a whole is worth half of the total course grade. Students in each group all share the same grade, though in unusual circumstances individuals’ grades may be decoupled from each other; speak with the instructor at your earliest convenience if you have any concerns about the distribution of effort in your group.
Here are the grade subsections:
- 5% Community/home/etc. meeting documentation
- 7.5% “Behaves-like” prototype process documentation
- 7.5% “Behaves-like” prototype crit and presentation
- 10% Final crit and presentation
- 20% Final documentation
