
The Muppet Box is a fidget device that incorporates a mini-game for those who aren’t simply content flicking a switch back and forth, using limit switches, LEDs, and vibrating disc motors.
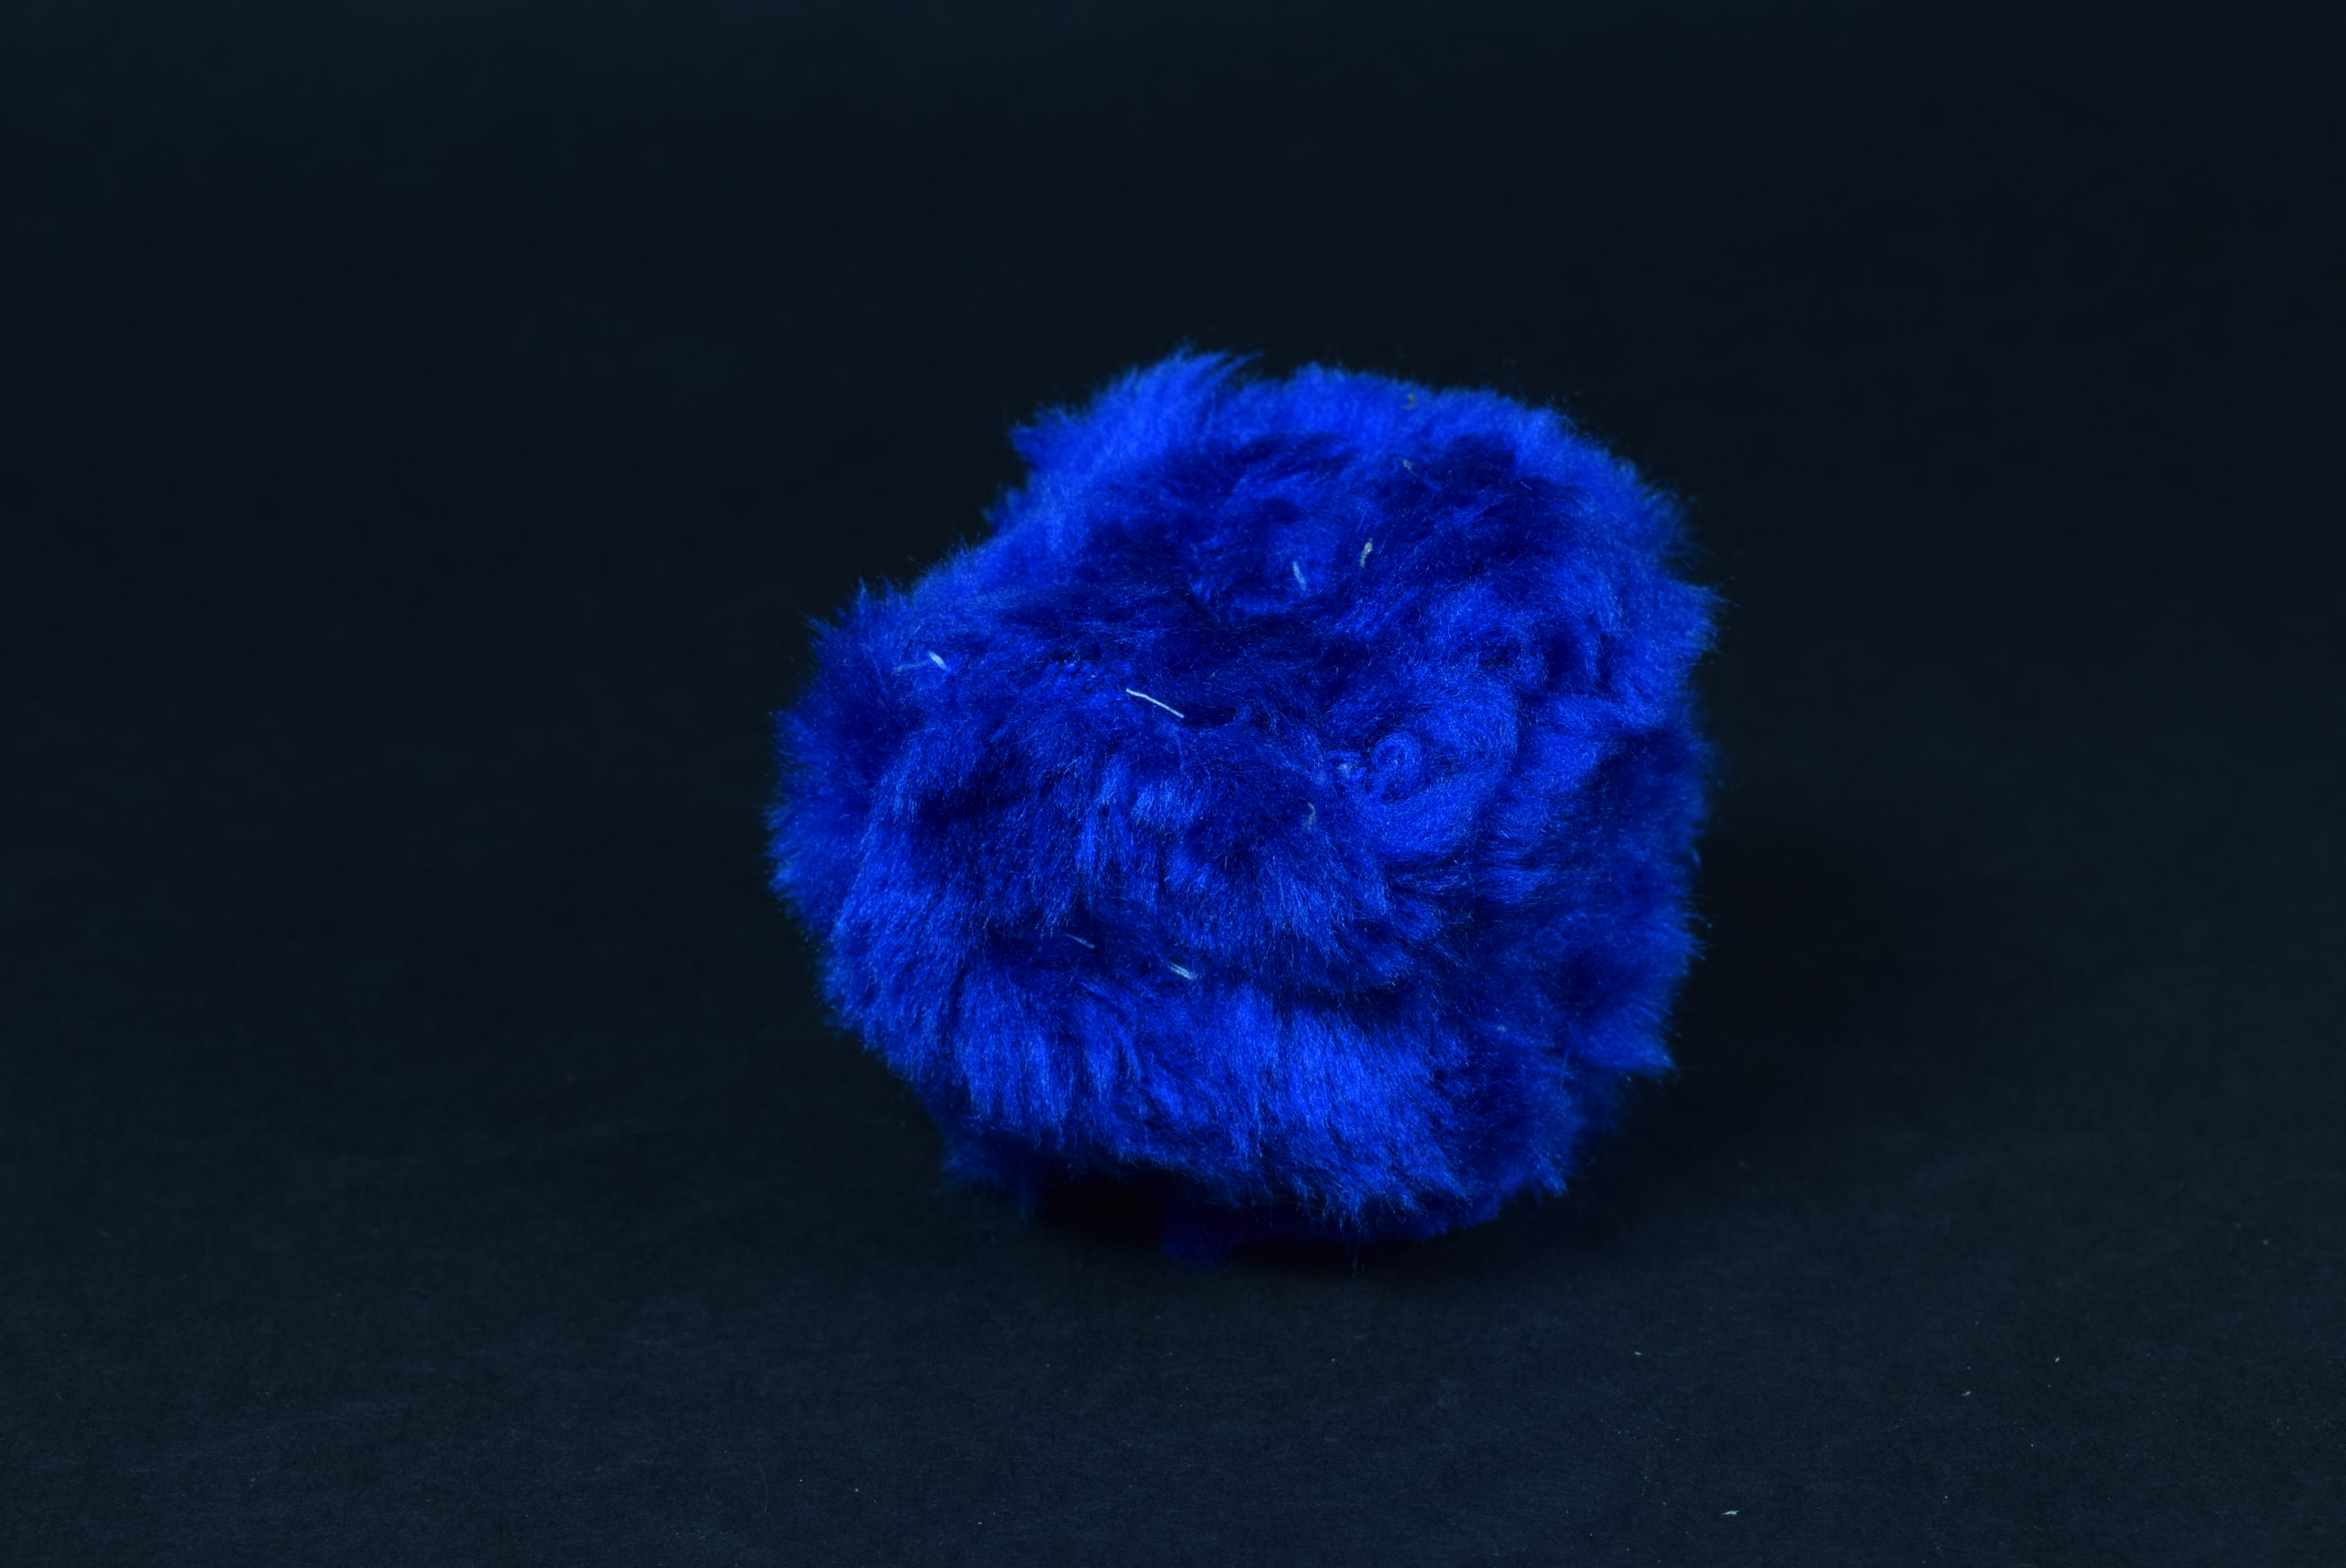
The front view of the Muppet Box. Note that the wires and electronics are hidden.
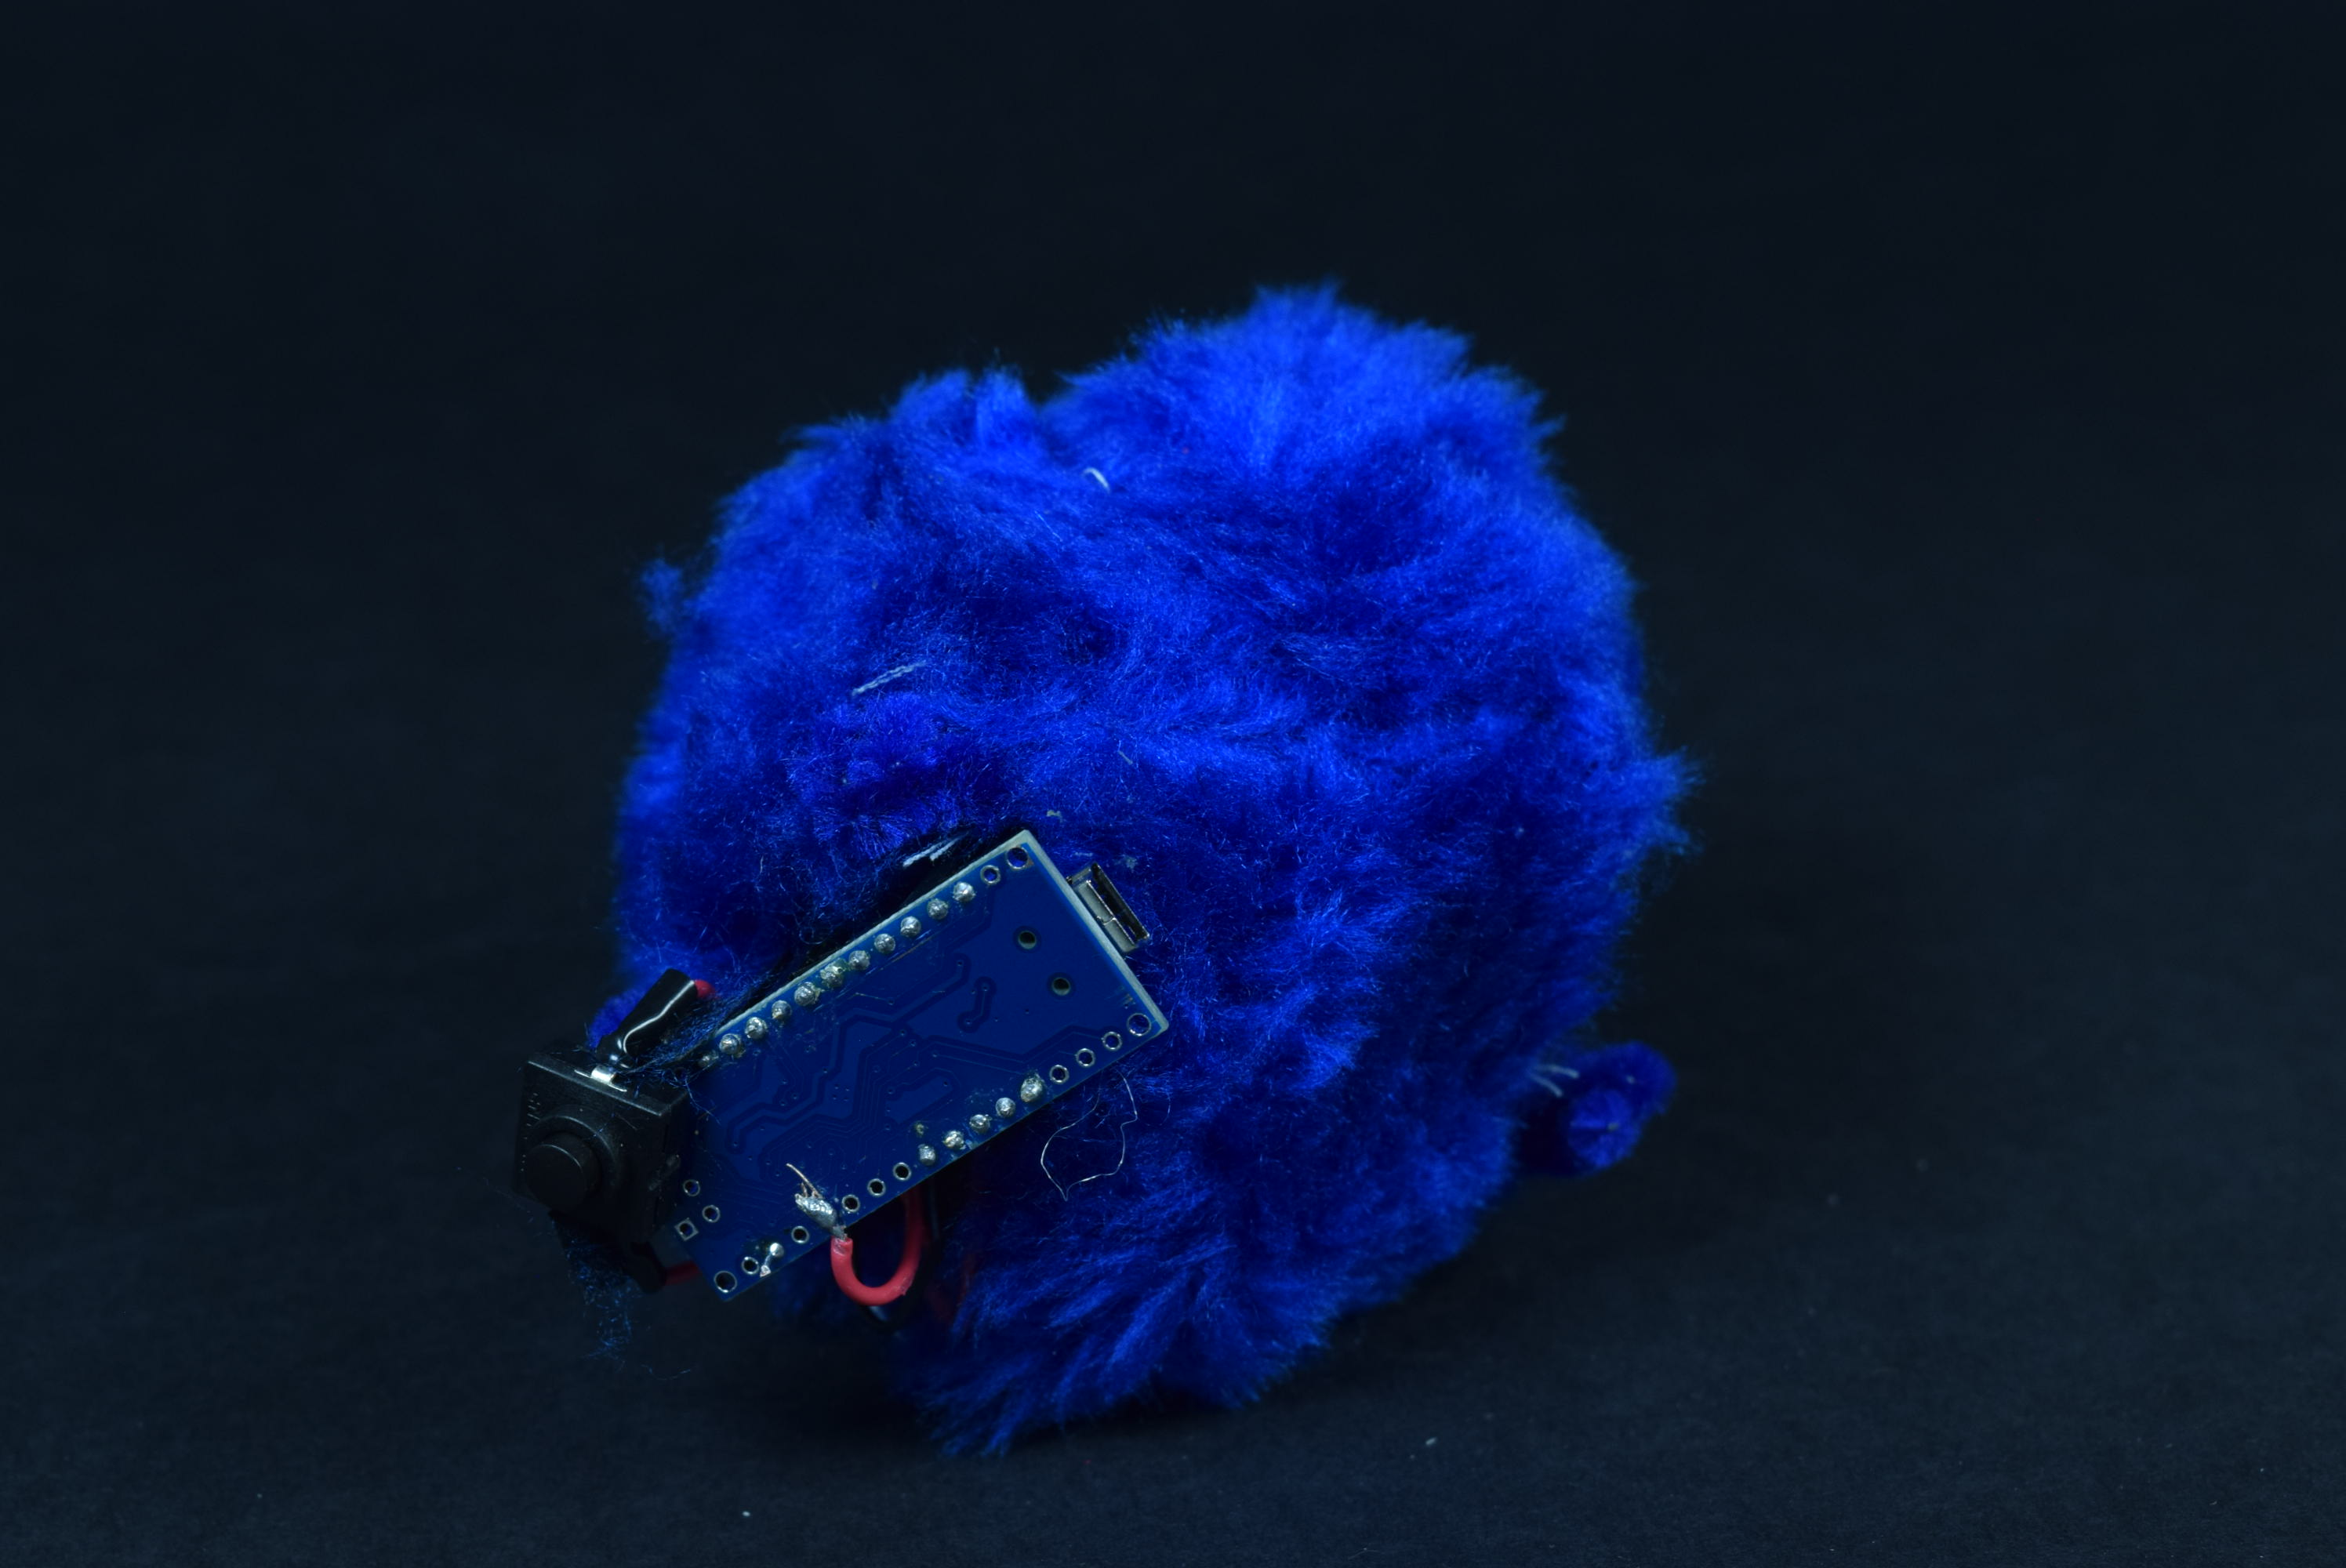
The rear view of the Muppet Box.
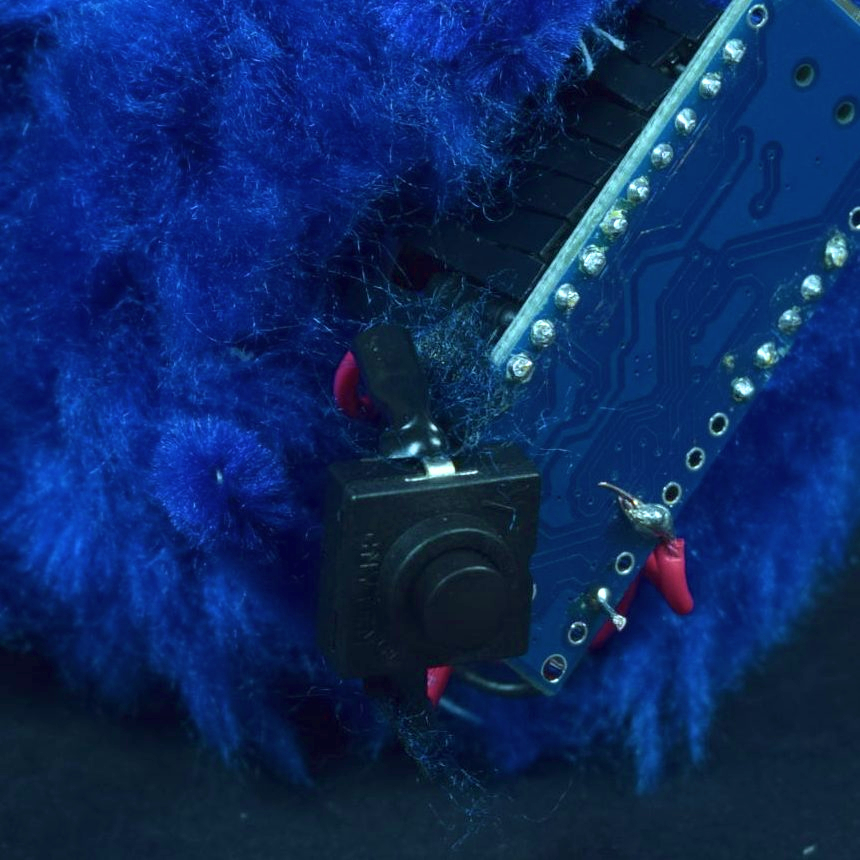
A close up of the power button. Hypothetically, the only visible button interface of the Muppet Box.

The Muppet Box in action.
Process
Starting the project, I was much more concerned about the size and final shape of the cube, but decided to start with electronics given my available materials.
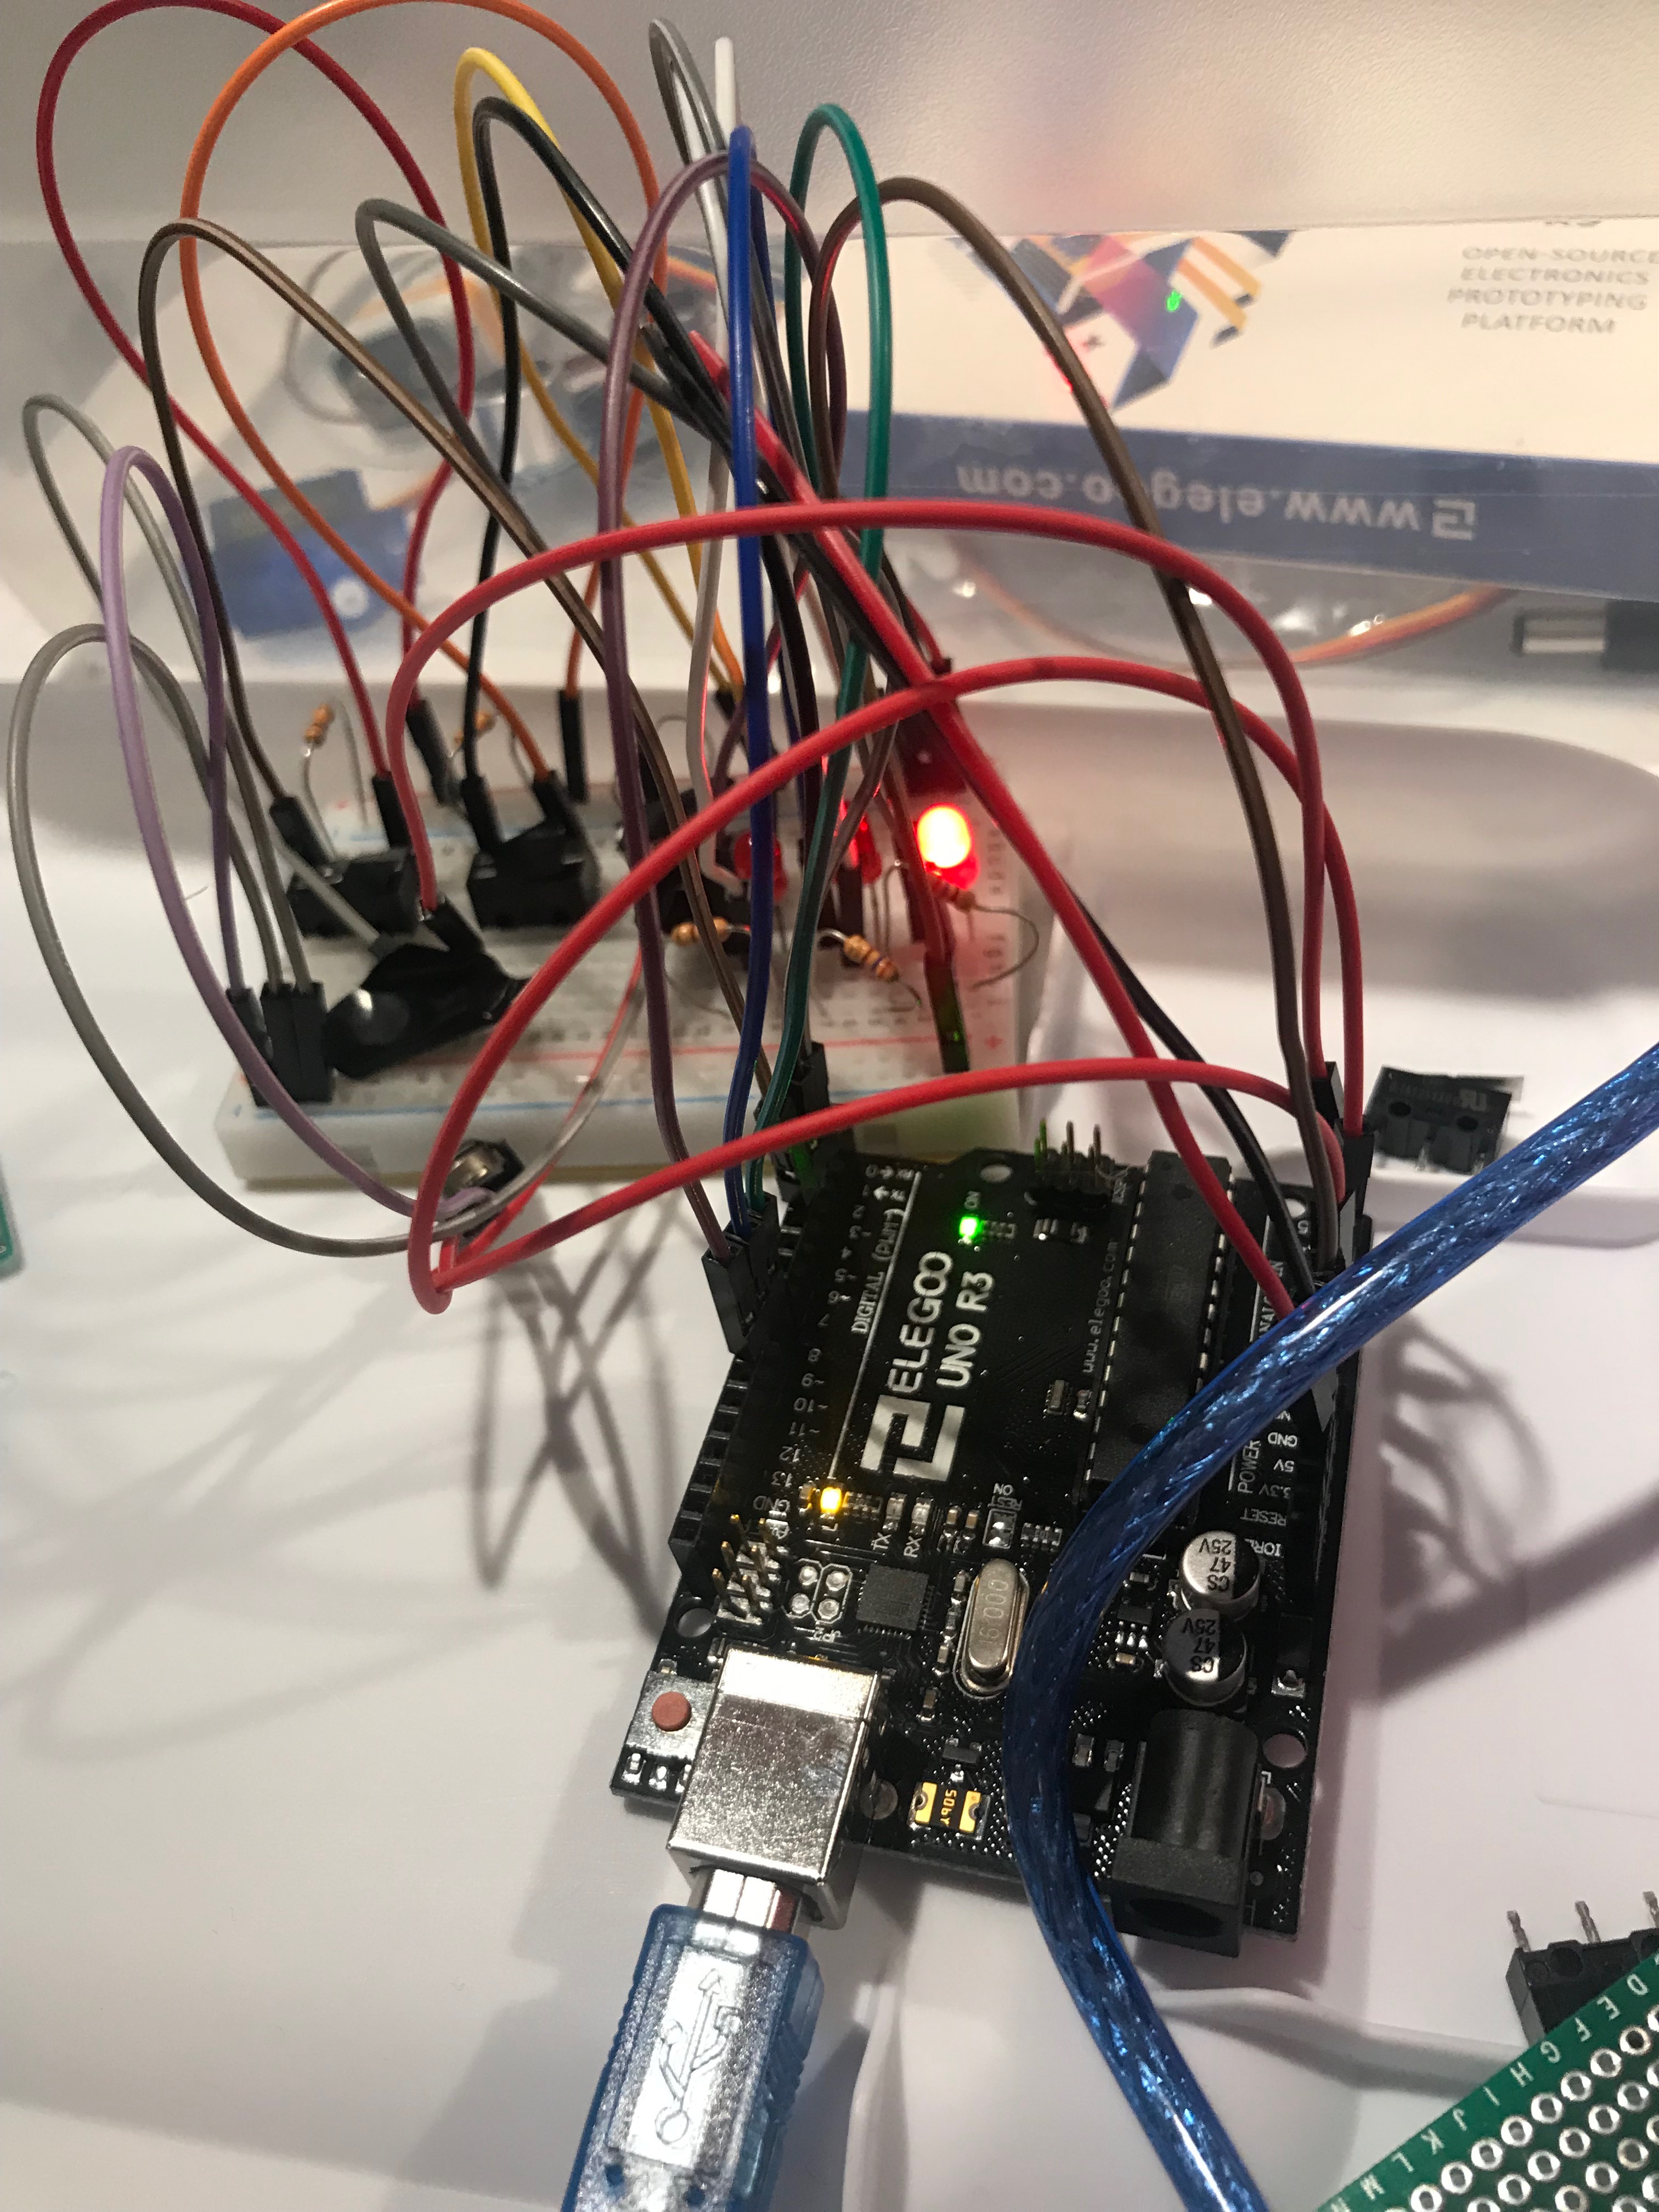
A breadboard-based prototype to test code only.
I made an Arduino Uno and breadboard prototype to set up the wiring and then moved onto soldering the pieces onto these small sawed-off proto boards. Everything went pretty swimmingly save for minor debugging and dumb wiring mistakes, as I was pretty new to the limit switches I used as well as soldering.
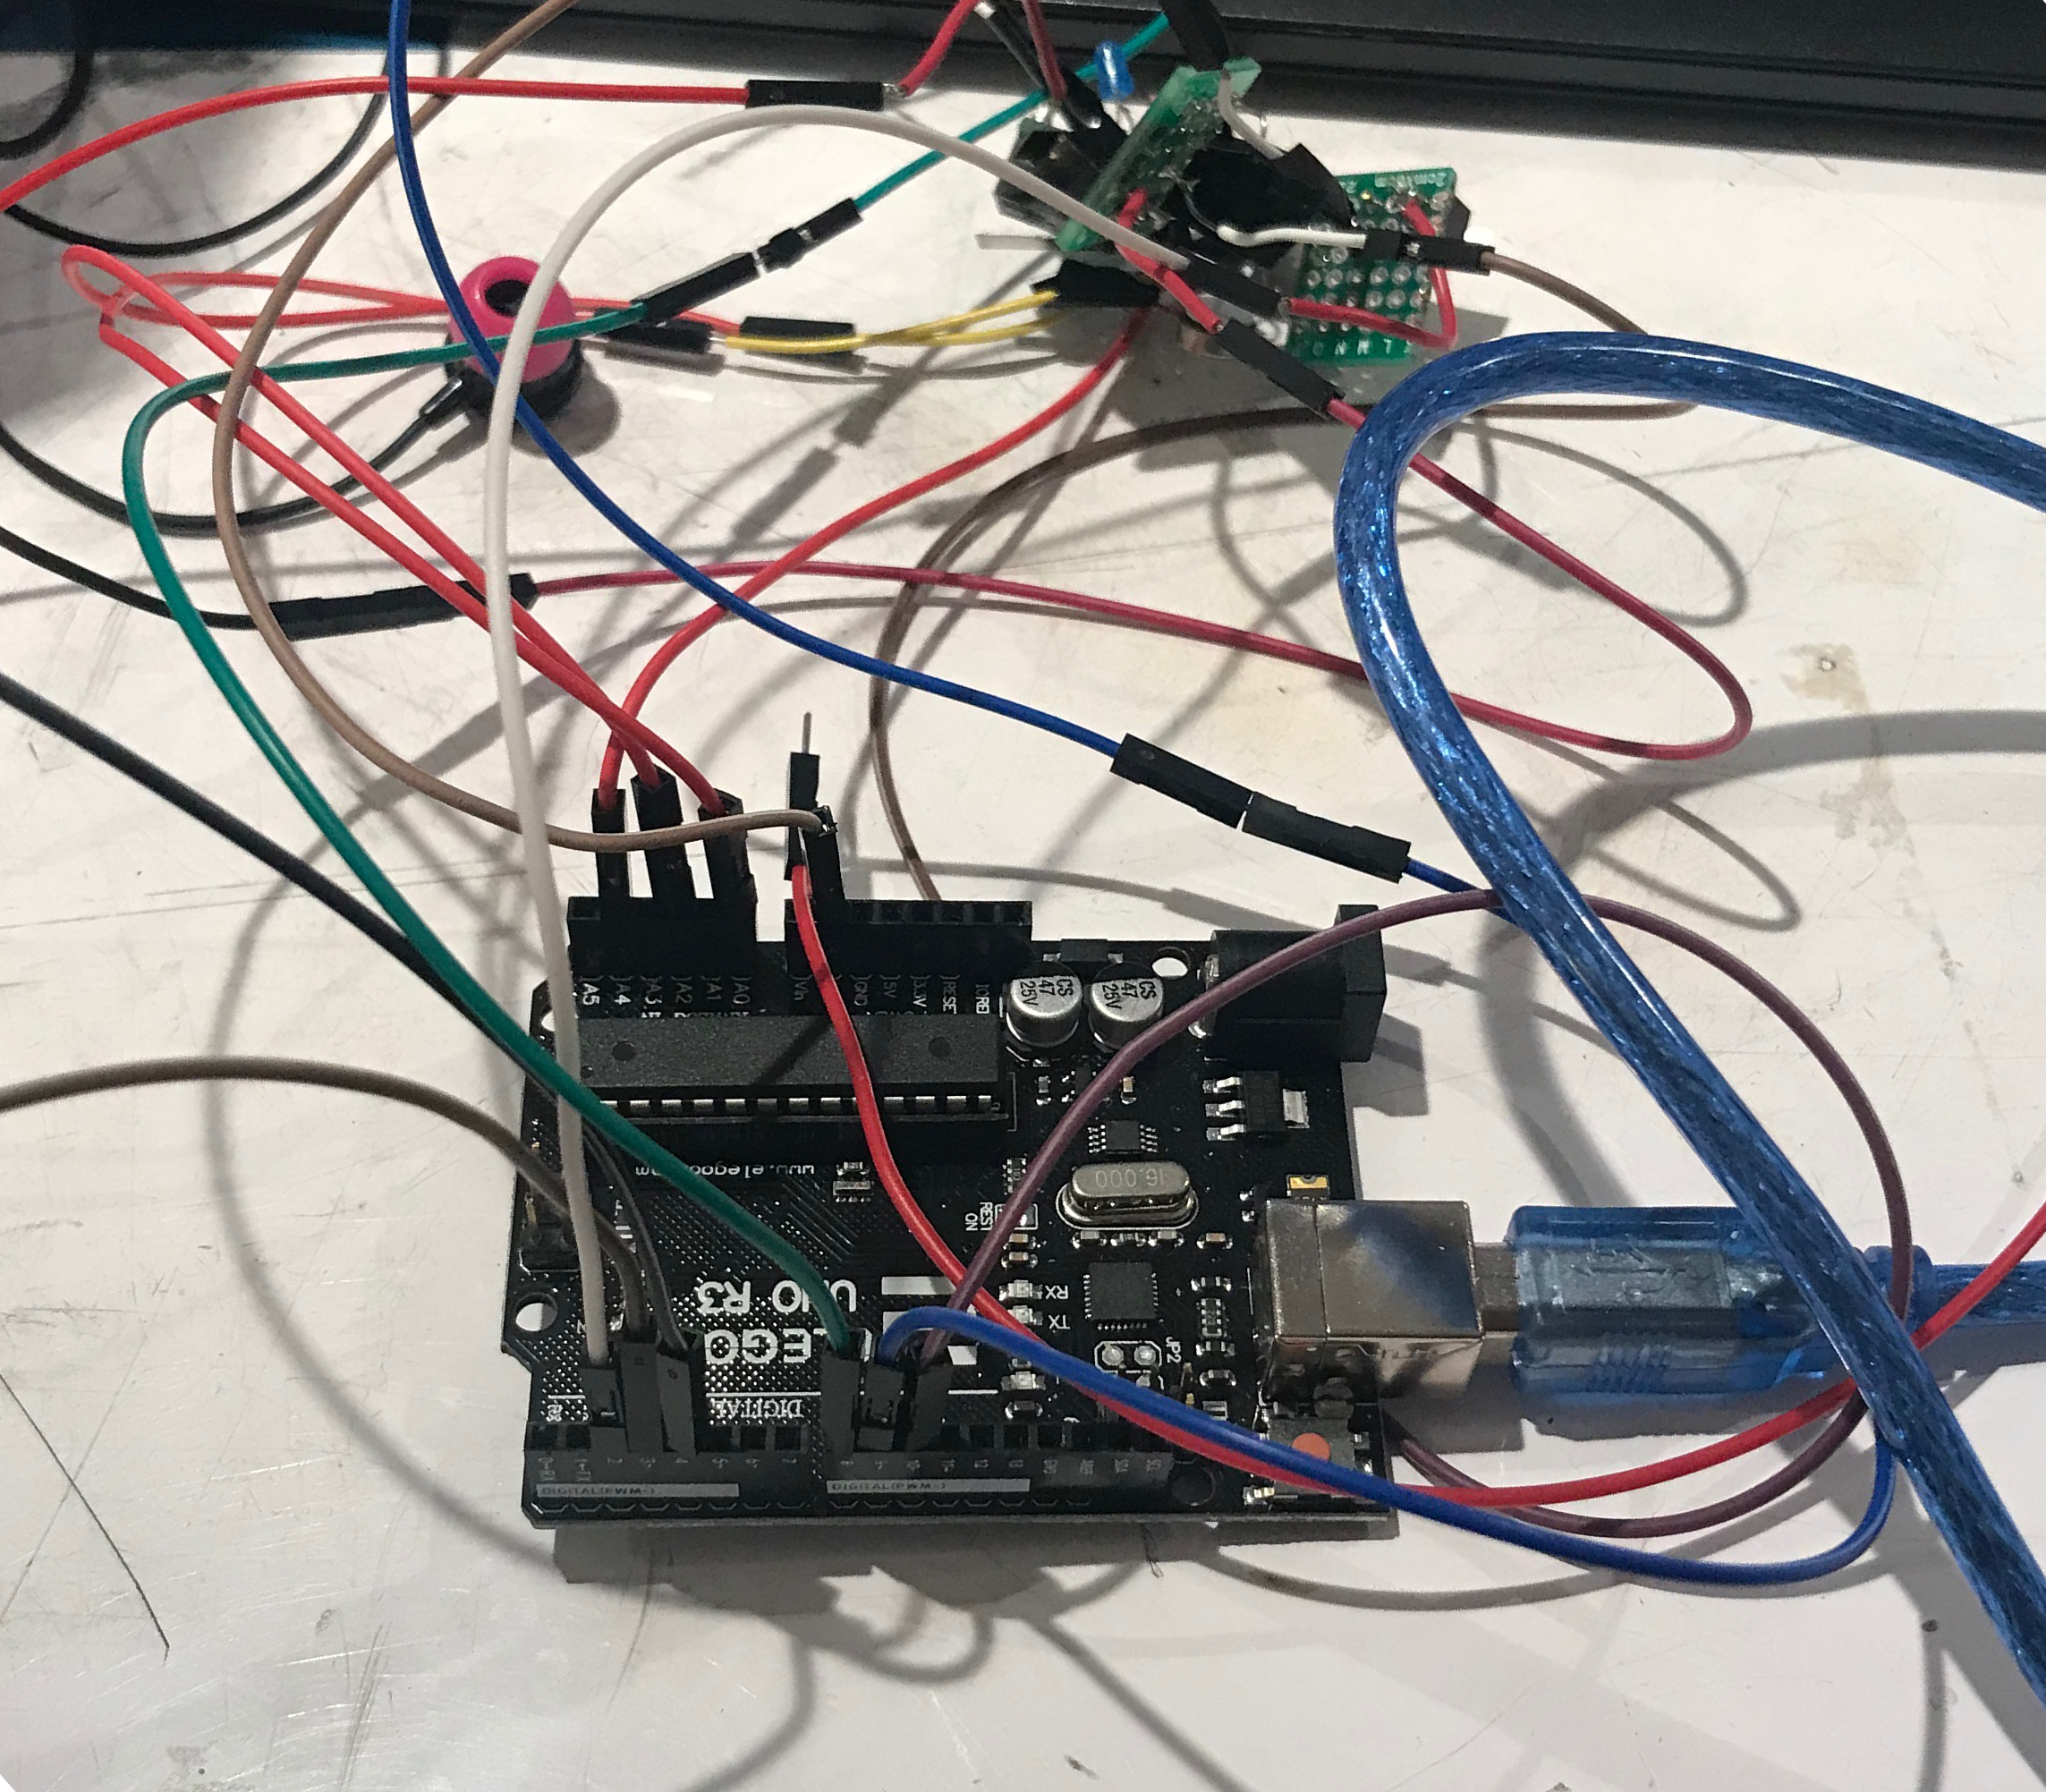
A set of 3 proto-board segments hooked up to the Arduino for testing.
One design issue that I had to take a moment to ponder is how I wanted the cube to incorporate the 5 proto-board segments. I was very set on the cube shape, but I also already had the idea of something soft and squishy in mind. I ended up starting off by soldering three of these segments together to make a corner, but not only was it precarious of a solder-job, but it also was not conducive to future debugging given the proximity of the pieces. There were a few regrettable decisions with the ground wires touching, for one. I decided to put the assembly of the cube off until I decided what to do about the furry cover. Mid-way, I switched from the Uno to the Nano for size purposes, as per my original plans.
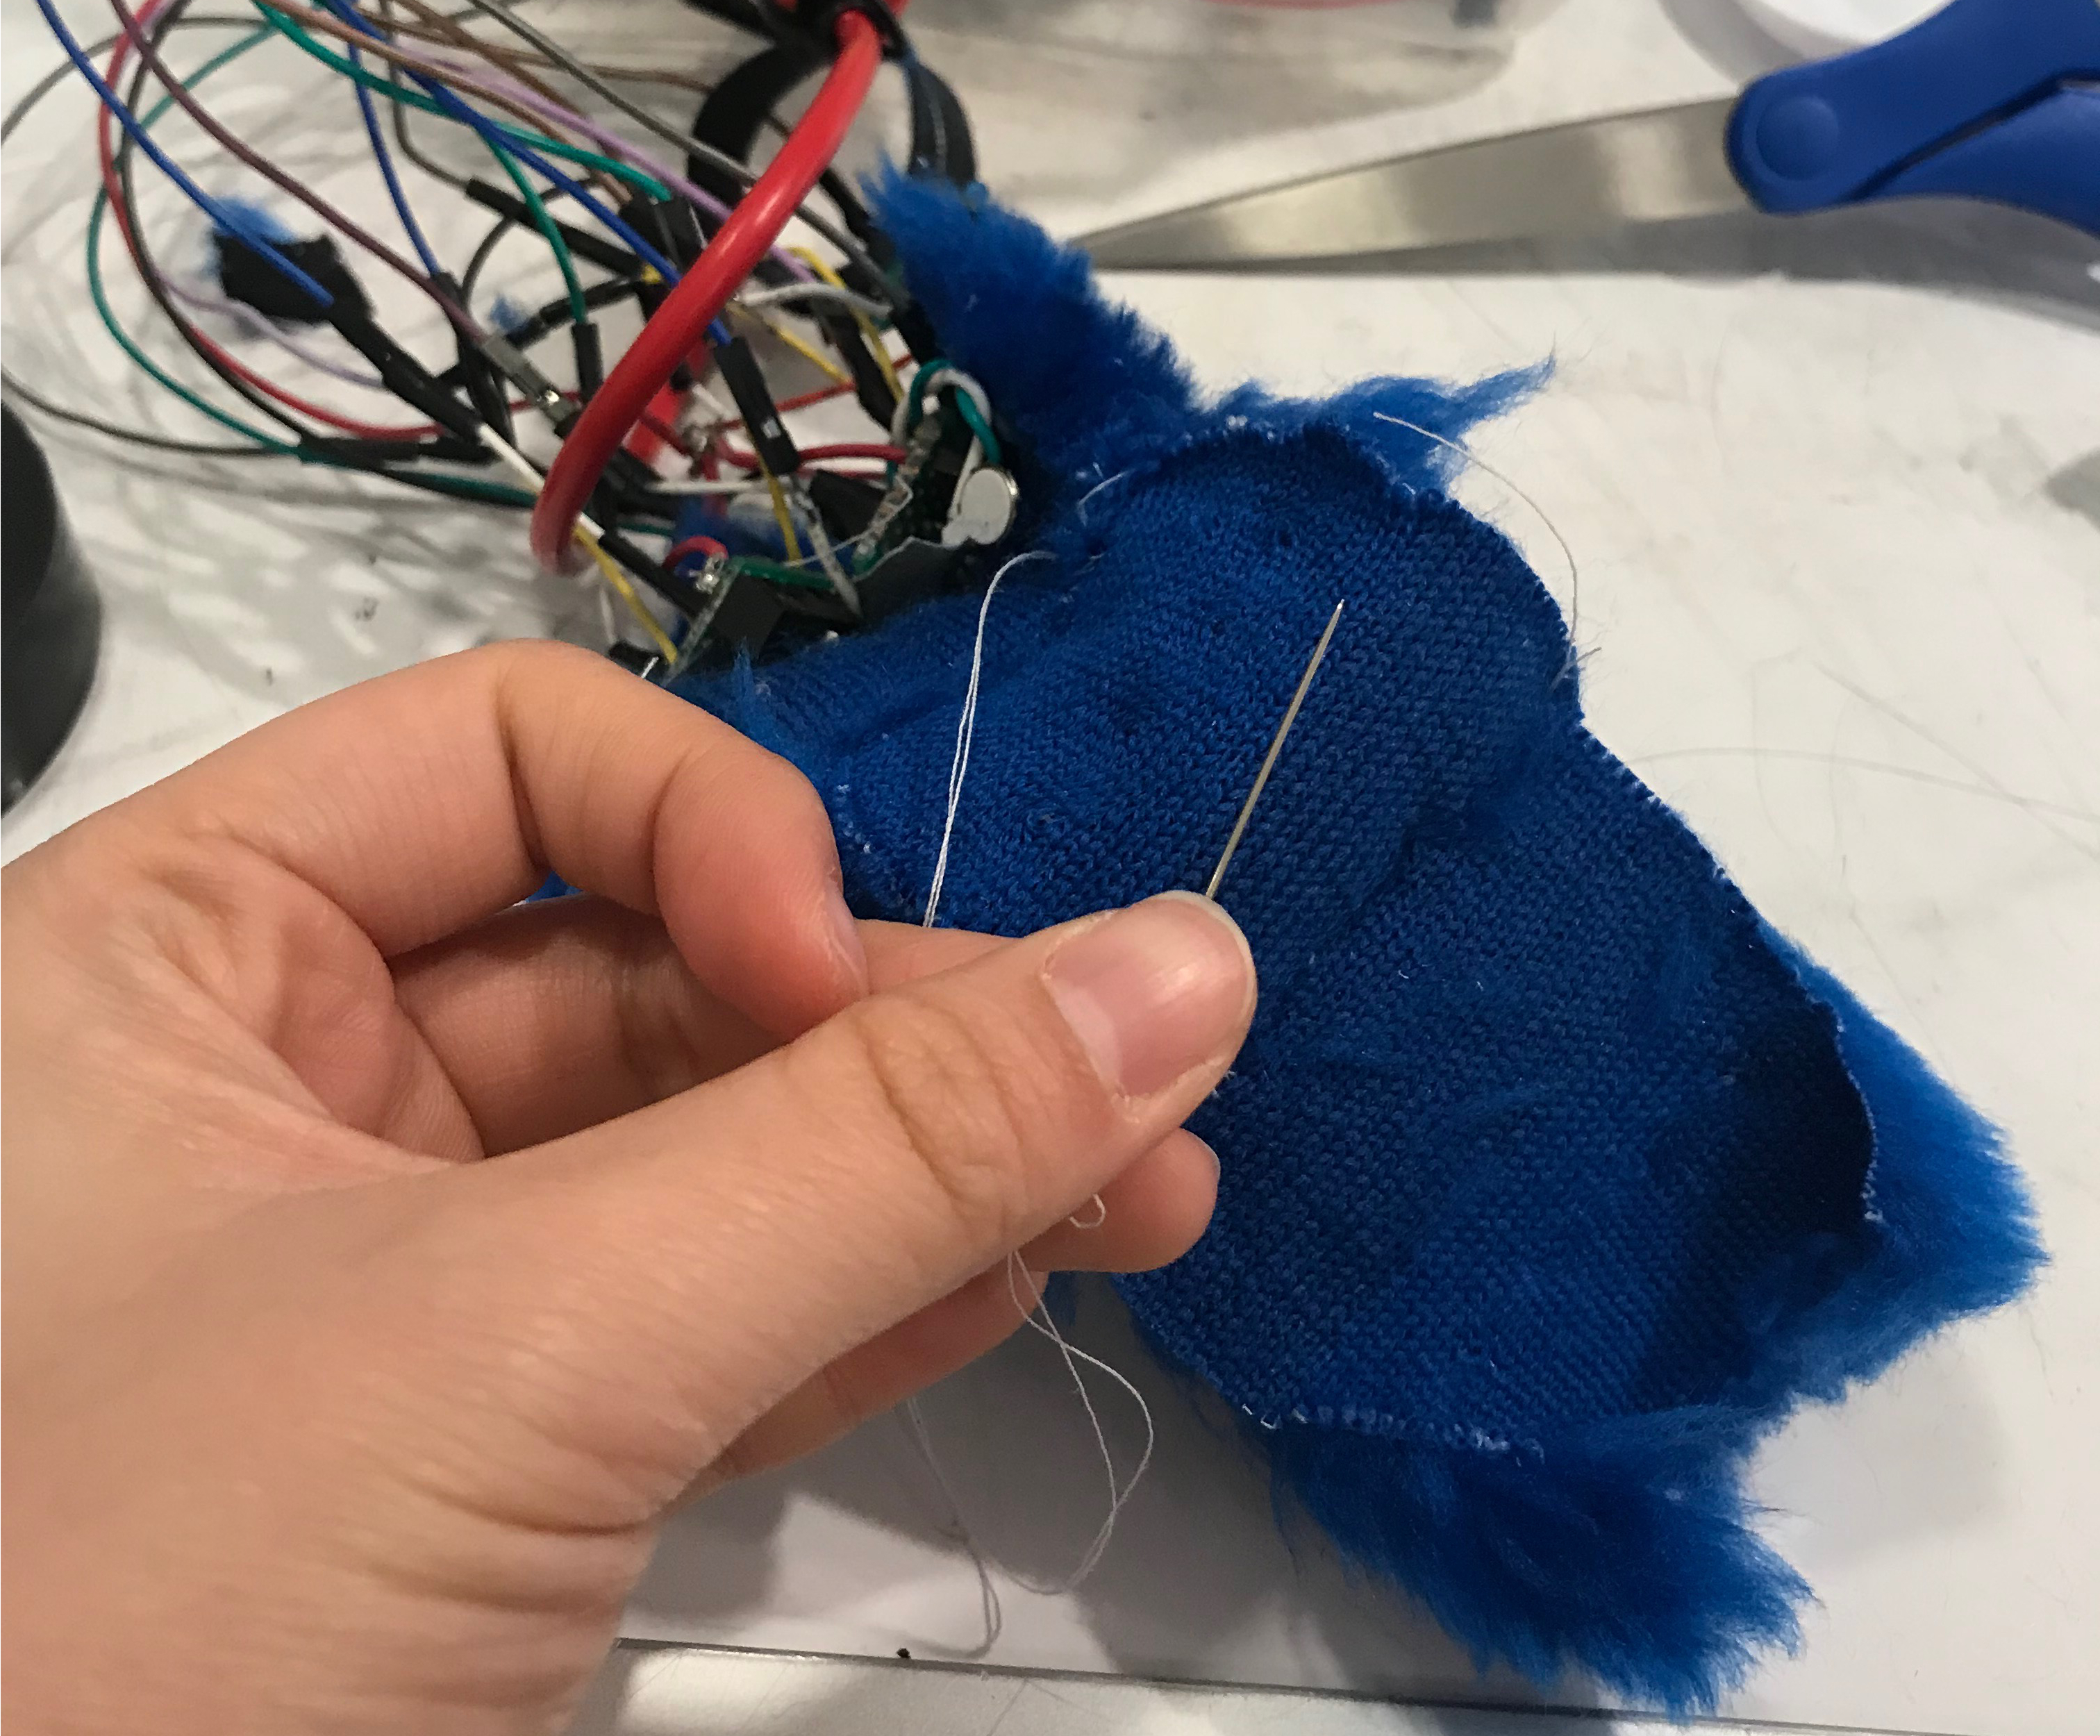
Sewing the blue fabric together.
A fortunate coincidence saddled me with this very soft blue fabric from Creative Reuse, so I decided to focus on how soft the project was gonna be. I started by cutting 6 squares of fabric out, then attaching two squares to each other. In the middle of sewing, it occurred to me that it would be much more exponentially difficult to sew in the electronics after finishing the fur cube, so I made a few rash decisions to sew each of the proto-board segments into the center of their respective square, then hope for the best. (Specifically, I threaded some string through the niche in the limit switch lever, fixed it to the fabric, then the LEDs, then tied it off.) The sewing process was doable but precarious. In the end it turned out weird and lumpy but acceptable. I nixed the idea of six proto-boards in the middle of this process. It was much easier to have one panel be a debug/power button/base side.
The final look of the Muppet Box, fresh from my hands.
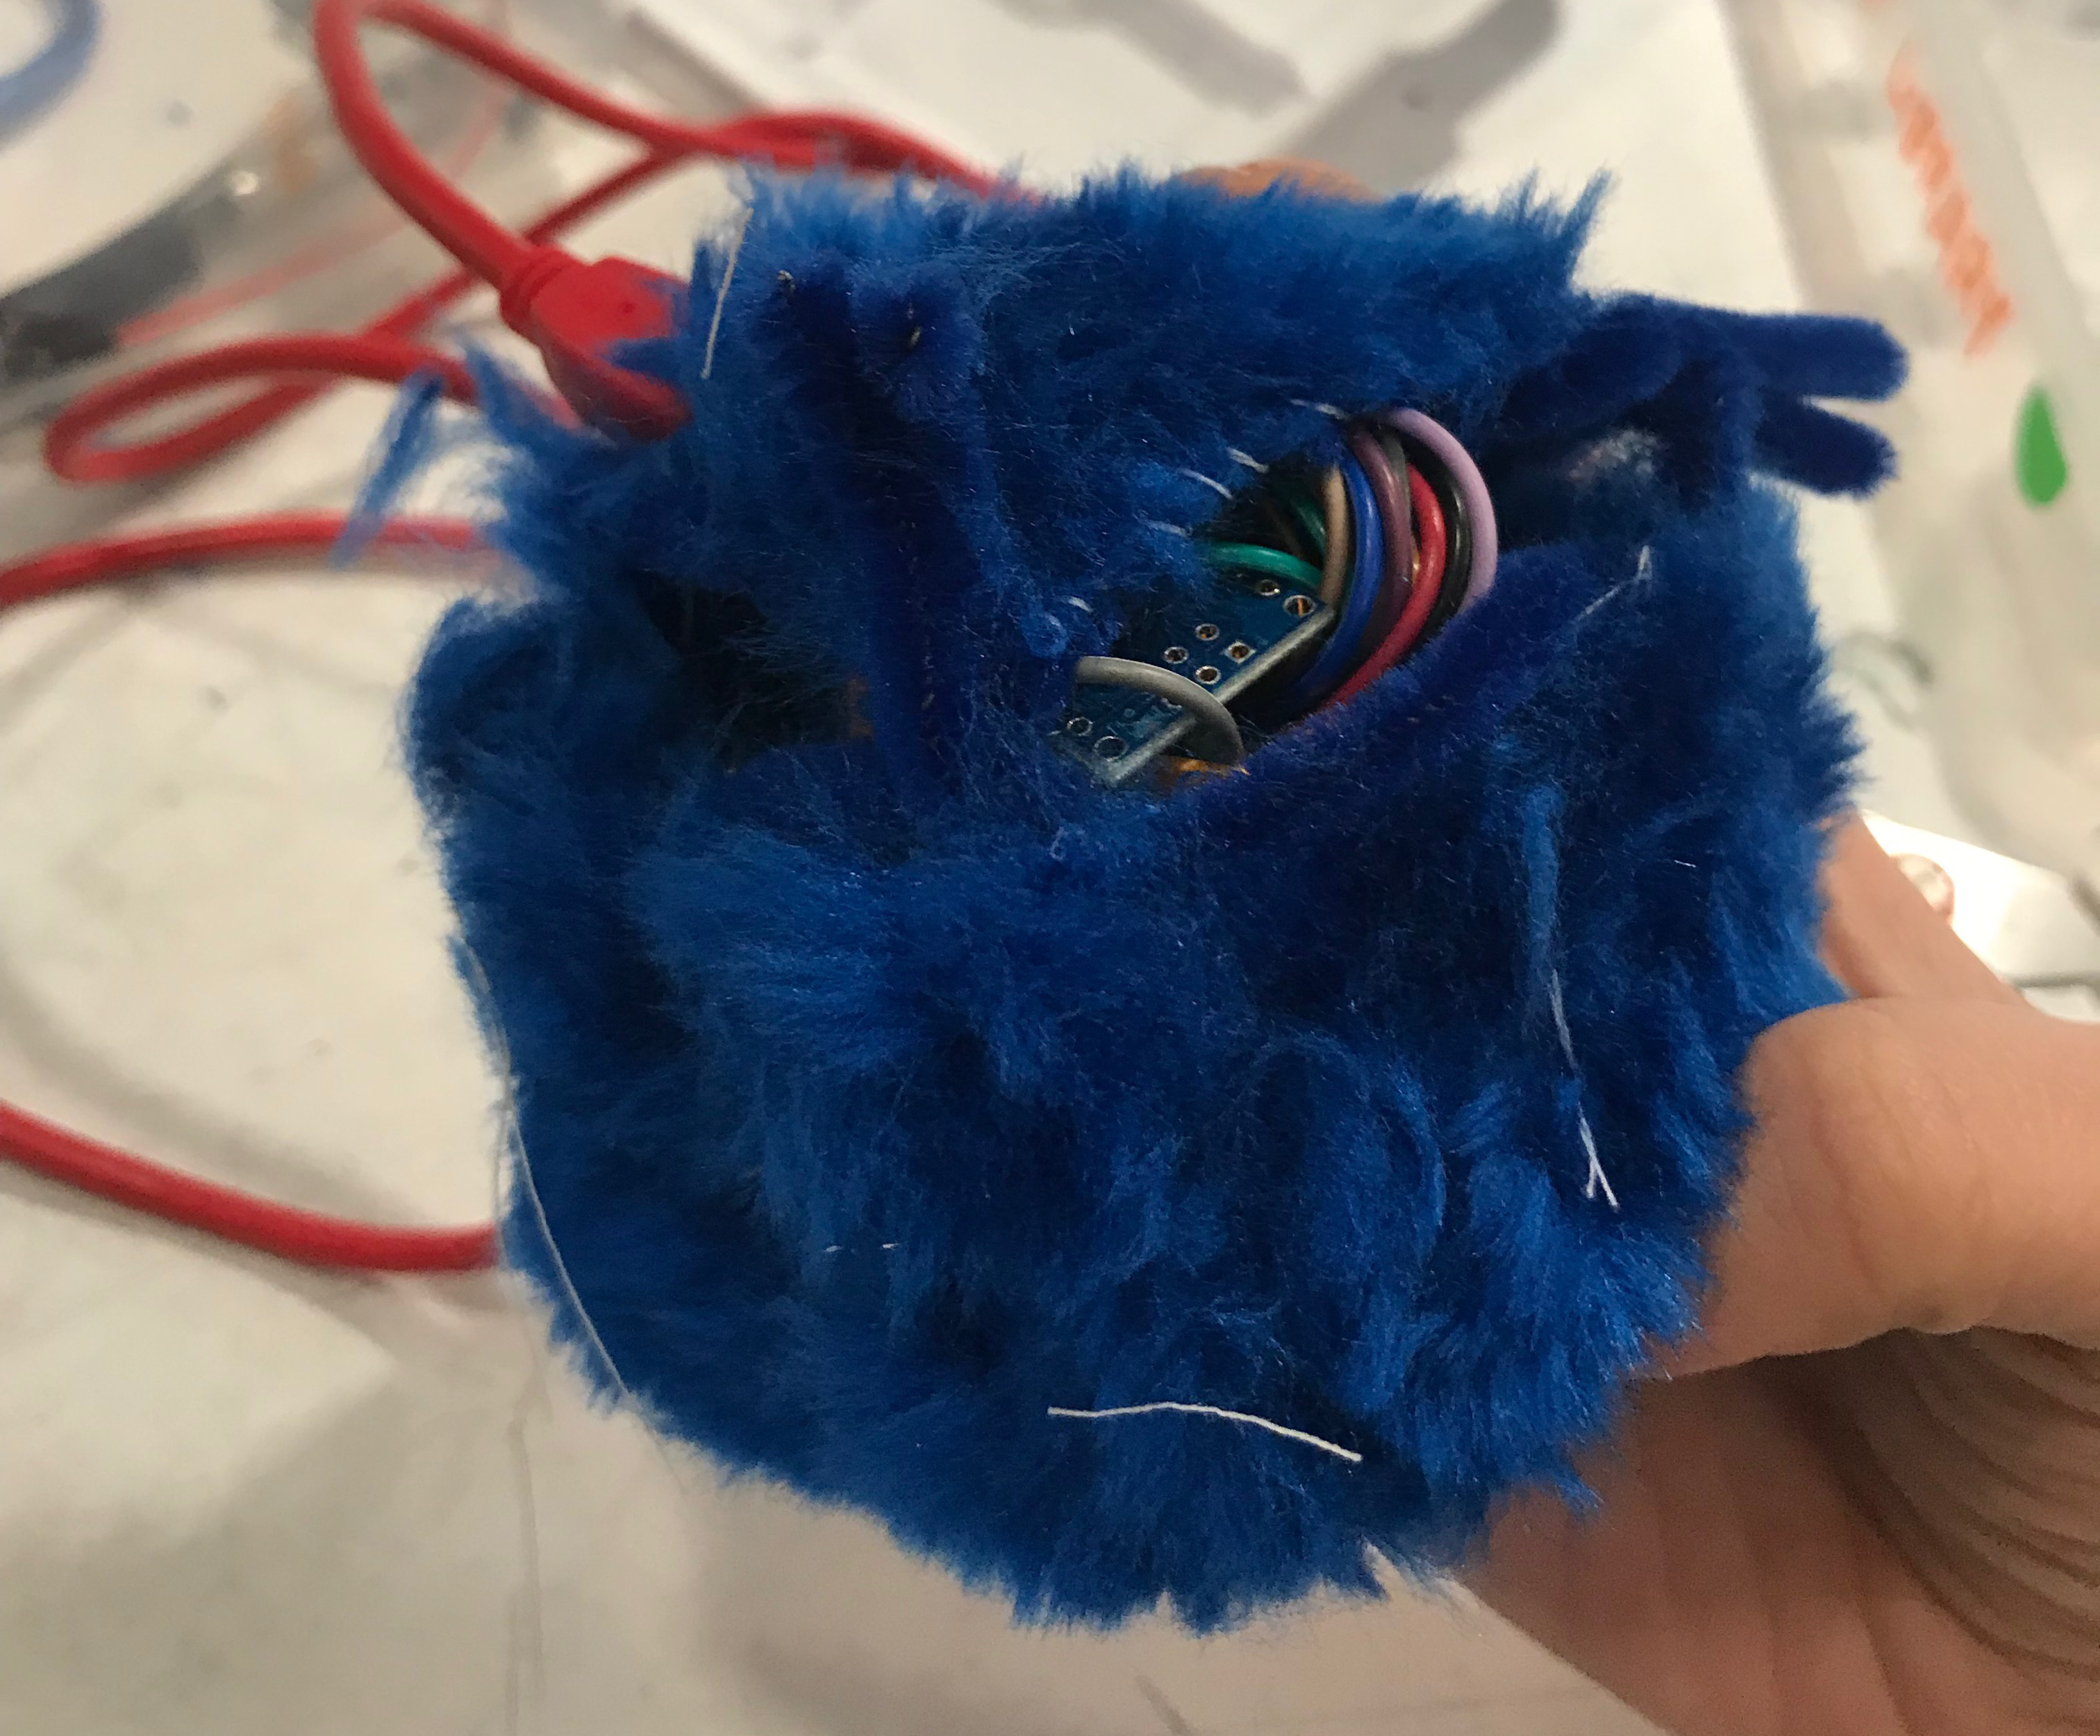
However, the sixth panel being loose and about meant some quick thoughts regarding how to fix it into place. In an ideal world I would have used zippers, but I had no zippers at the time. I got away with some similarly-colored pipe cleaners sewn to the mouth of the box to both hold its shape and to be able to tie them together (with more pipe cleaner). For demonstration purposes I would simply tuck the ends into the box, which was overstuffed with wires anyway.
At this point, a lot of debugging went into the badly soldered insides of the box, and I had to battle fluff and poor lighting conditions to re-do some ground wires that had broken apart. Regrettable, but necessary and character-building. It really taught me that I should solder more tightly.
Discussion
Response to Critique
“The vibrating aspect of it is creative and the lights are fun. I like how the lights are the same color as the fidget cube so you have to actually pay attention a little bit.”
“I love the textile aspect to this! It’s so soft and calming, I love the vibrations and lights!”
“The design and form factor is super cool, looking at this I wouldn’t even think it’s an Arduino project. The vibration and the fuzzy fabric feel really nice.”
“Really ergonomic and fun looking fidget cube that will probably keep stressed people / hyperactive kids at bay for a while”
One of the main factors of a fidget cube is tactile pleasure, which I tried to emphasize in the making of this project. I am certainly glad to hear that my attempts worked, and that it was successful as a toy.
“Really cool game. It’s really nice to feel and fun to find where the lights are. One aspect that may be interesting to pursue is to make it full integrated within the fur box. That way it becomes fully portable and doesn’t rely on a working external power source to function.”
“Really really cool. It’s nice and compact, very impressive that you were able to fit all your electronics in there. Maybe finding a way to power it externally, instead of through your computer. “
“One way you can possibly improve is by using a barrel jack and battery, that way it doesn’t have to be tethered to a computer to work. Other than that, really interesting and extremely unique project.”
This was a point of critique that really struck a chord with me. This device was always meant to be extremely portable and non-obstructive, so having it detached from an external power source was a very good idea. I implemented it immediately after hearing it, settling on coin batteries.
Self-Critique
To summarize my views on the project, I would say that it was an odd process. Starting with electronics was a bit of a mistake, because I had to design around what I had made without testing how it felt. This resulted in a weirdly lumpy spots and less than ideal wiring situations. In addition, the vibrating motors, while very pleasant to the touch and not a regrettable choice, did not work towards gameplay. I wish I had focused much more on playtesting what the game had to offer, which would have taken this project above and beyond. However, I am also cognizant of my (lack of) abilities in the hardware department, and can forgive myself for having spent so much time on re-soldering things over and over.
What I Learned
Some rather random things: I should do my planning more in advance, as so to deal with unexpected curveballs. Fluff sheds really badly, so do your soldering super well beforehand in order to not feel anxious over burnt fur. Make more prototypes to test how stuff would work before throwing all your chips in.
Next Time
I hope to incorporate the mistakes in planning. If I am to create a very tactile object, I should start with the tactile plans and work from there to the electronics. In addition, I would like to plan my soldering better and be more careful with exposed wires to cut down time in that part of the process. I would like to incorporate fabric earlier, as the combining of electronics and fabrics was ungainly, to say the least. The vibrating motors may need tweaking, as they weren’t as precise as I wanted them to be. The switches, while nicely tactile, are too easy to press. I should test other buttons under fabric. The fur is obscenely blue, and while it might be okay, one might prefer calmer colors for a calming item.
Technical Information
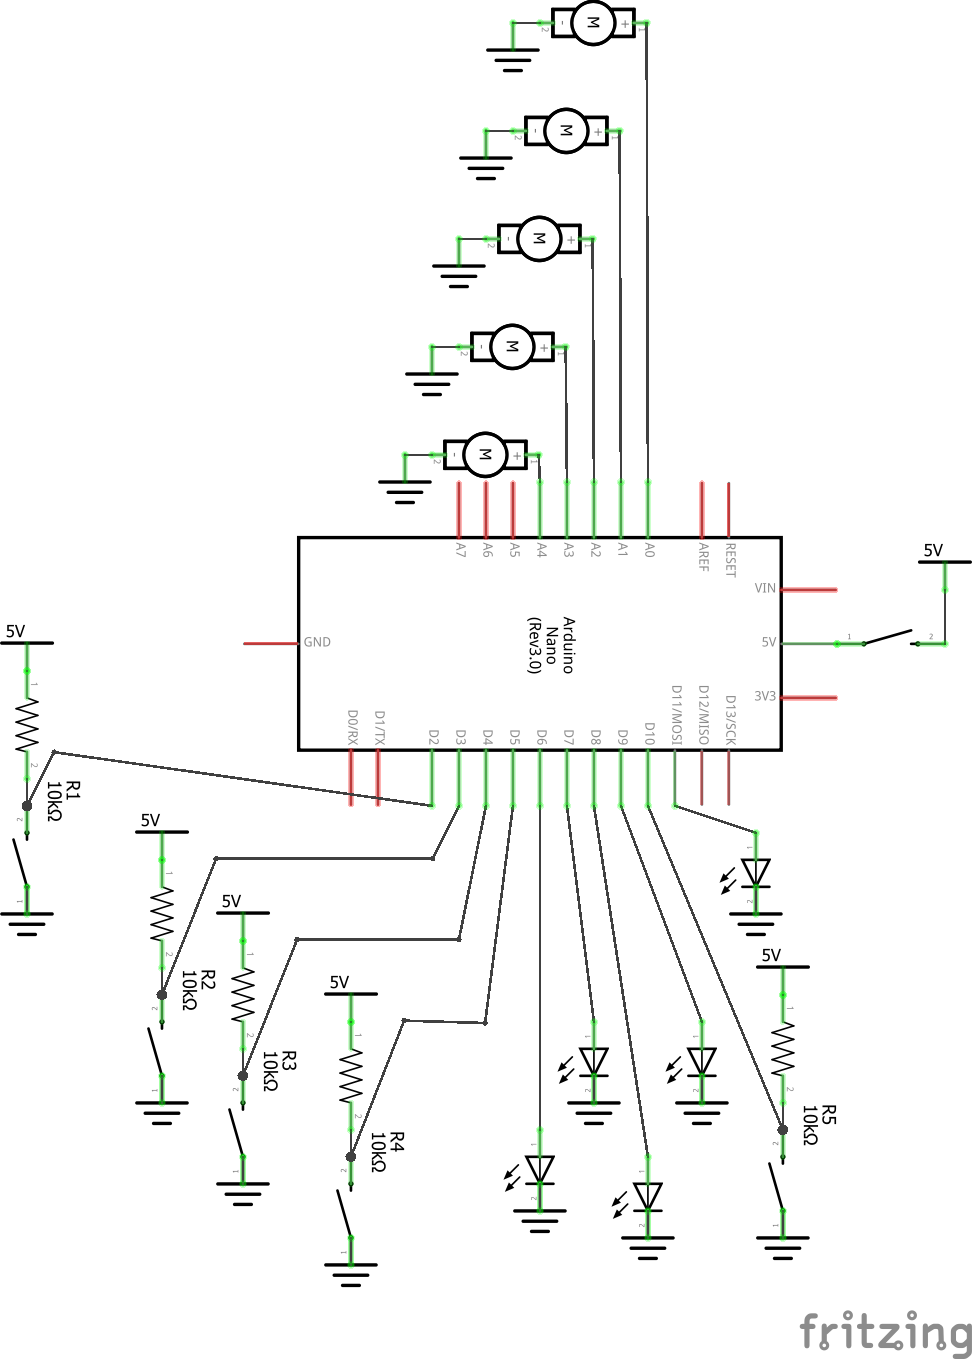
Schematic
- <span class="com">/*
- * Muppet Box
- * Sophia Cao (sccao)
- *
- * This code runs a short game based on a modifiable
- * number of limit switches and equal number of LED and
- * vibrating disc motor outputs.
- *
- */</span><span class="pln">
- </span><span class="com">// initializing the pins for the hardware</span><span class="pln">
- </span><span class="kwd">const</span><span class="pln"> </span><span class="kwd">int</span><span class="pln"> LVRPINS</span><span class="pun">[]</span><span class="pln"> </span><span class="pun">=</span><span class="pln"> </span><span class="pun">{</span><span class="lit">2</span><span class="pun">,</span><span class="lit">3</span><span class="pun">,</span><span class="lit">4</span><span class="pun">,</span><span class="lit">5</span><span class="pun">,</span><span class="lit">10</span><span class="pun">};</span><span class="pln">
- </span><span class="kwd">const</span><span class="pln"> </span><span class="kwd">int</span><span class="pln"> LVRNUM </span><span class="pun">=</span><span class="pln"> </span><span class="pun">(</span><span class="kwd">sizeof</span><span class="pun">(</span><span class="pln">LVRPINS</span><span class="pun">))/(</span><span class="kwd">sizeof</span><span class="pun">(</span><span class="kwd">const</span><span class="pln"> </span><span class="kwd">int</span><span class="pun">));</span><span class="pln">
- </span><span class="kwd">int</span><span class="pln"> PREOUT</span><span class="pun">[</span><span class="pln">LVRNUM</span><span class="pun">];</span><span class="pln">
- </span><span class="kwd">int</span><span class="pln"> LVROUT</span><span class="pun">[</span><span class="pln">LVRNUM</span><span class="pun">];</span><span class="pln">
- </span><span class="kwd">const</span><span class="pln"> </span><span class="kwd">int</span><span class="pln"> LEDS</span><span class="pun">[]</span><span class="pln"> </span><span class="pun">=</span><span class="pln"> </span><span class="pun">{</span><span class="lit">8</span><span class="pun">,</span><span class="lit">7</span><span class="pun">,</span><span class="lit">6</span><span class="pun">,</span><span class="lit">9</span><span class="pun">,</span><span class="lit">11</span><span class="pun">};</span><span class="pln">
- </span><span class="kwd">int</span><span class="pln"> LEDOUT</span><span class="pun">[</span><span class="pln">LVRNUM</span><span class="pun">];</span><span class="pln">
- </span><span class="kwd">const</span><span class="pln"> </span><span class="kwd">int</span><span class="pln"> VIBS</span><span class="pun">[]</span><span class="pln"> </span><span class="pun">=</span><span class="pln"> </span><span class="pun">{</span><span class="pln">A1</span><span class="pun">,</span><span class="pln">A2</span><span class="pun">,</span><span class="pln">A3</span><span class="pun">,</span><span class="pln">A0</span><span class="pun">,</span><span class="pln">A4 </span><span class="pun">};</span><span class="pln">
- </span><span class="kwd">int</span><span class="pln"> VIBTENSITY </span><span class="pun">=</span><span class="pln"> </span><span class="lit">128</span><span class="pun">;</span><span class="pln">
- </span><span class="com">//necessary variables</span><span class="pln">
- </span><span class="kwd">int</span><span class="pln"> curr</span><span class="pun">;</span><span class="pln">
- </span><span class="kwd">const</span><span class="pln"> </span><span class="kwd">int</span><span class="pln"> debounce</span><span class="pun">=</span><span class="pln"> </span><span class="lit">100</span><span class="pun">;</span><span class="pln">
- </span><span class="kwd">int</span><span class="pln"> timer</span><span class="pun">;</span><span class="pln">
- </span><span class="kwd">bool</span><span class="pln"> paused</span><span class="pun">;</span><span class="pln">
- </span><span class="kwd">int</span><span class="pln"> pause_amt </span><span class="pun">=</span><span class="pln"> </span><span class="lit">500</span><span class="pun">;</span><span class="pln">
- </span><span class="com">//initialize the pins</span><span class="pln">
- </span><span class="kwd">void</span><span class="pln"> setup</span><span class="pun">()</span><span class="pln"> </span><span class="pun">{</span><span class="pln">
- </span><span class="kwd">for</span><span class="pln"> </span><span class="pun">(</span><span class="kwd">int</span><span class="pln"> i</span><span class="pun">=</span><span class="lit">0</span><span class="pun">;</span><span class="pln">i</span><span class="pun"><</span><span class="pln">LVRNUM</span><span class="pun">;</span><span class="pln">i</span><span class="pun">++){</span><span class="pln">
- pinMode</span><span class="pun">(</span><span class="pln">LVRPINS</span><span class="pun">[</span><span class="pln">i</span><span class="pun">],</span><span class="pln">INPUT</span><span class="pun">);</span><span class="pln">
- pinMode</span><span class="pun">(</span><span class="pln">LEDS</span><span class="pun">[</span><span class="pln">i</span><span class="pun">],</span><span class="pln">OUTPUT</span><span class="pun">);</span><span class="pln">
- pinMode</span><span class="pun">(</span><span class="pln">VIBS</span><span class="pun">[</span><span class="pln">i</span><span class="pun">],</span><span class="pln">OUTPUT</span><span class="pun">);</span><span class="pln">
- </span><span class="pun">}</span><span class="pln">
- </span><span class="typ">Serial</span><span class="pun">.</span><span class="kwd">begin</span><span class="pun">(</span><span class="lit">9600</span><span class="pun">);</span><span class="pln">
- </span><span class="pun">}</span><span class="pln">
- </span><span class="kwd">void</span><span class="pln"> loop</span><span class="pun">()</span><span class="pln"> </span><span class="pun">{</span><span class="pln">
- timer</span><span class="pun">++;</span><span class="pln">
- </span><span class="com">//pause state</span><span class="pln">
- </span><span class="kwd">if</span><span class="pln"> </span><span class="pun">(</span><span class="pln">paused</span><span class="pun">==</span><span class="kwd">true</span><span class="pun">)</span><span class="pln"> </span><span class="pun">{</span><span class="pln">
- set_items</span><span class="pun">(-</span><span class="lit">1</span><span class="pun">);</span><span class="pln">
- </span><span class="kwd">if</span><span class="pln"> </span><span class="pun">(</span><span class="pln">timer</span><span class="pun">></span><span class="pln">pause_amt</span><span class="pun">){</span><span class="pln">
- paused</span><span class="pun">=</span><span class="kwd">false</span><span class="pun">;</span><span class="pln">
- </span><span class="pun">}</span><span class="pln">
- </span><span class="kwd">return</span><span class="pun">;</span><span class="pln">
- </span><span class="pun">}</span><span class="pln"> </span><span class="kwd">else</span><span class="pln"> </span><span class="pun">{</span><span class="pln">
- set_items</span><span class="pun">(</span><span class="pln">curr</span><span class="pun">);</span><span class="pln">
- </span><span class="pun">}</span><span class="pln">
- </span><span class="com">//check buttons for press. serial input for if the correct </span><span class="pln">
- </span><span class="com">//button was pressed.</span><span class="pln">
- </span><span class="kwd">for</span><span class="pln"> </span><span class="pun">(</span><span class="kwd">int</span><span class="pln"> i</span><span class="pun">=</span><span class="lit">0</span><span class="pun">;</span><span class="pln">i</span><span class="pun"><</span><span class="pln">LVRNUM</span><span class="pun">;</span><span class="pln">i</span><span class="pun">++){</span><span class="pln">
- PREOUT</span><span class="pun">[</span><span class="pln">i</span><span class="pun">]</span><span class="pln"> </span><span class="pun">=</span><span class="pln"> LVROUT</span><span class="pun">[</span><span class="pln">i</span><span class="pun">];</span><span class="pln">
- LVROUT</span><span class="pun">[</span><span class="pln">i</span><span class="pun">]</span><span class="pln"> </span><span class="pun">=</span><span class="pln"> digitalRead</span><span class="pun">(</span><span class="pln">LVRPINS</span><span class="pun">[</span><span class="pln">i</span><span class="pun">]);</span><span class="pln">
- </span><span class="kwd">if</span><span class="pln"> </span><span class="pun">((</span><span class="pln">PREOUT</span><span class="pun">[</span><span class="pln">i</span><span class="pun">]!=</span><span class="pln">LVROUT</span><span class="pun">[</span><span class="pln">i</span><span class="pun">])</span><span class="pln"> </span><span class="pun">&&</span><span class="pln"> </span><span class="pun">!</span><span class="pln">LVROUT</span><span class="pun">[</span><span class="pln">i</span><span class="pun">]){</span><span class="pln">
- </span><span class="kwd">if</span><span class="pln"> </span><span class="pun">(</span><span class="pln">i</span><span class="pun">==</span><span class="pln">curr</span><span class="pun">)</span><span class="pln"> </span><span class="pun">{</span><span class="pln">
- init_curr</span><span class="pun">();</span><span class="pln">
- </span><span class="typ">Serial</span><span class="pun">.</span><span class="pln">println</span><span class="pun">(</span><span class="str">"winner winner chicken dinner!"</span><span class="pun">);</span><span class="pln">
- timer</span><span class="pun">=</span><span class="lit">0</span><span class="pun">;</span><span class="pln">
- paused </span><span class="pun">=</span><span class="pln"> </span><span class="kwd">true</span><span class="pun">;</span><span class="pln">
- </span><span class="pun">}</span><span class="pln"> </span><span class="kwd">else</span><span class="pln"> </span><span class="pun">{</span><span class="pln">
- init_curr</span><span class="pun">();</span><span class="pln">
- </span><span class="typ">Serial</span><span class="pun">.</span><span class="pln">println</span><span class="pun">(</span><span class="str">"you lose!"</span><span class="pun">);</span><span class="pln">
- </span><span class="pun">}</span><span class="pln">
- </span><span class="pun">}</span><span class="pln">
- </span><span class="pun">}</span><span class="pln">
- delay</span><span class="pun">(</span><span class="pln">debounce</span><span class="pun">);</span><span class="pln">
- </span><span class="pun">}</span><span class="pln">
- </span><span class="com">//picks a new unit to set off</span><span class="pln">
- </span><span class="kwd">void</span><span class="pln"> init_curr</span><span class="pun">(){</span><span class="pln">
- curr </span><span class="pun">=</span><span class="pln"> </span><span class="pun">(</span><span class="kwd">int</span><span class="pun">)</span><span class="pln"> random</span><span class="pun">(</span><span class="lit">0</span><span class="pun">,</span><span class="pln">LVRNUM</span><span class="pun">);</span><span class="pln">
- </span><span class="pun">}</span><span class="pln">
- </span><span class="com">// activates the pin (c) that needs to be activated.</span><span class="pln">
- </span><span class="com">// else, deactivates all other pins.</span><span class="pln">
- </span><span class="kwd">void</span><span class="pln"> set_items</span><span class="pun">(</span><span class="kwd">int</span><span class="pln"> c</span><span class="pun">)</span><span class="pln"> </span><span class="pun">{</span><span class="pln">
- </span><span class="kwd">for</span><span class="pln"> </span><span class="pun">(</span><span class="kwd">int</span><span class="pln"> i</span><span class="pun">=</span><span class="lit">0</span><span class="pun">;</span><span class="pln">i</span><span class="pun"><</span><span class="pln">LVRNUM</span><span class="pun">;</span><span class="pln">i</span><span class="pun">++){</span><span class="pln">
- </span><span class="kwd">if</span><span class="pln"> </span><span class="pun">(</span><span class="pln">c</span><span class="pun">==</span><span class="pln">i</span><span class="pun">){</span><span class="pln">
- digitalWrite</span><span class="pun">(</span><span class="pln">LEDS</span><span class="pun">[</span><span class="pln">i</span><span class="pun">],</span><span class="pln">HIGH</span><span class="pun">);</span><span class="pln">
- analogWrite</span><span class="pun">(</span><span class="pln">VIBS</span><span class="pun">[</span><span class="pln">i</span><span class="pun">],</span><span class="pln">VIBTENSITY</span><span class="pun">);</span><span class="pln">
- </span><span class="pun">}</span><span class="pln"> </span><span class="kwd">else</span><span class="pln"> </span><span class="pun">{</span><span class="pln">
- digitalWrite</span><span class="pun">(</span><span class="pln">LEDS</span><span class="pun">[</span><span class="pln">i</span><span class="pun">],</span><span class="pln">LOW</span><span class="pun">);</span><span class="pln">
- analogWrite</span><span class="pun">(</span><span class="pln">VIBS</span><span class="pun">[</span><span class="pln">i</span><span class="pun">],</span><span class="lit">0</span><span class="pun">);</span><span class="pln">
- </span><span class="pun">}</span><span class="pln">
- </span><span class="pun">}</span><span class="pln">
- </span><span class="pun">}</span>
Comments are closed.