By Eric Mendez, Eliza Pratt, and Helen Yu
Introduction
In the past two weeks, our team synthesized observations from our meeting with Irv to develop a “convenience machine” he could use to improve his daily life. From our insights, we decided to create a reminder device that’s unique to Irv’s unique and busy lifestyle (e.g., tennis meetings, gardening, cultural events). In this post, we’ve documented our thought process, experience with different components, and the reasoning behind the coding, electrical, and design choices we’ve made.
Interactive Itinerary Prototype
The Interactive Itinerary is a digital reminder system (think Google Calendar) that feels like an analog device. The user can set alarms for tasks or events without having to type on a tricky touchscreen. Instead, the user would write down the task on a piece of paper and set the alarm using built in knobs.
The time and task knob add to the analog inputs and the screen prints the desired outputs, such as current time, task number, andd alarm settings
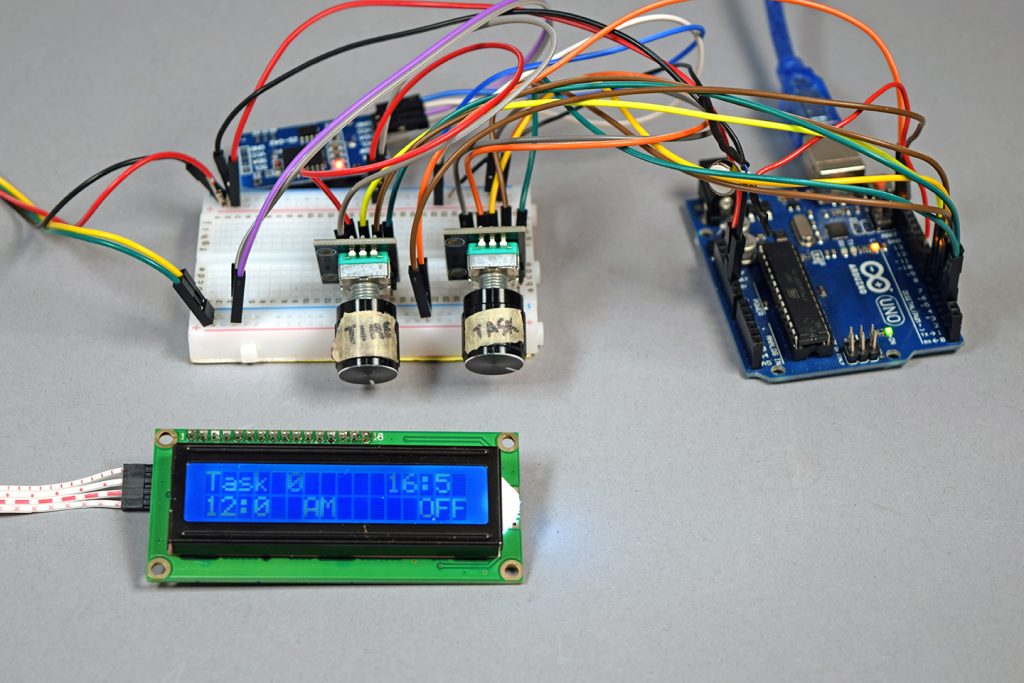
The interactive itinerary prototype has 3 key components: 1) Two knobs that set the task and alarm 2) the digital display that shows task, time, and set time 3) a vibrating motor that acts as an alarm. To use the interactive itinerary, the user would write down a task on a piece of paper with an empty list from 1 – 10. Using the task knob, the user would turn to the desired task number turn the alarm on. Then, they would set the time using the time knob. When the alarm starts to buzz, the user can turn off the alarm with the task knob.

The LCD screen displays the current task that the task knob is on, the current time in the top right corner, the set time (hour:minute AM/PM) in the bottom left corner, and whether or not the alarm for the specific task is on or off.
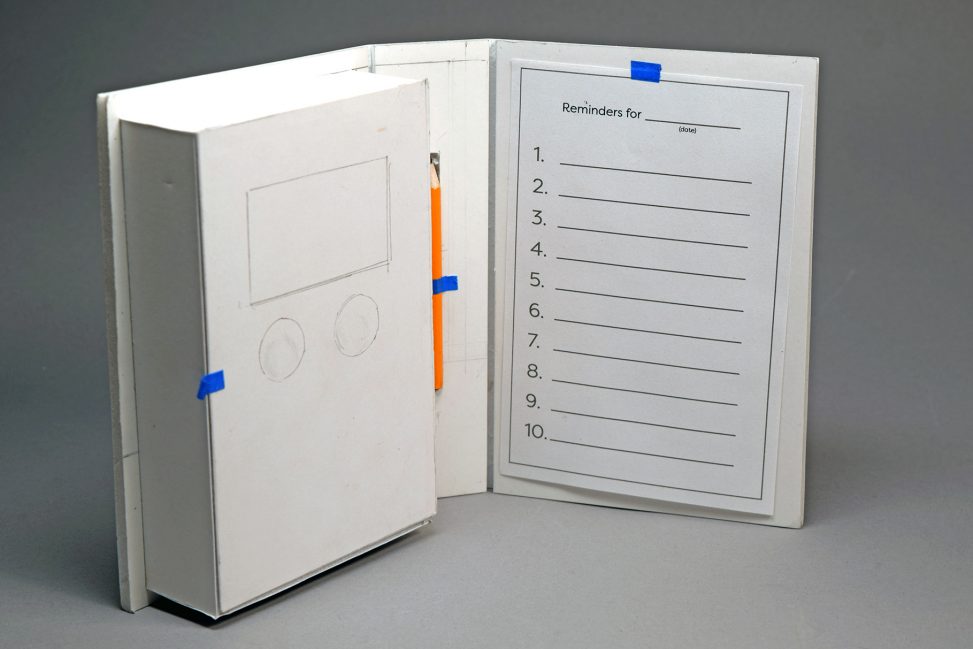
The housing for the device was modelled after a notebook/notepad. This interactive notebook makes it easy to keep tasks that need to be completed by a certain time.
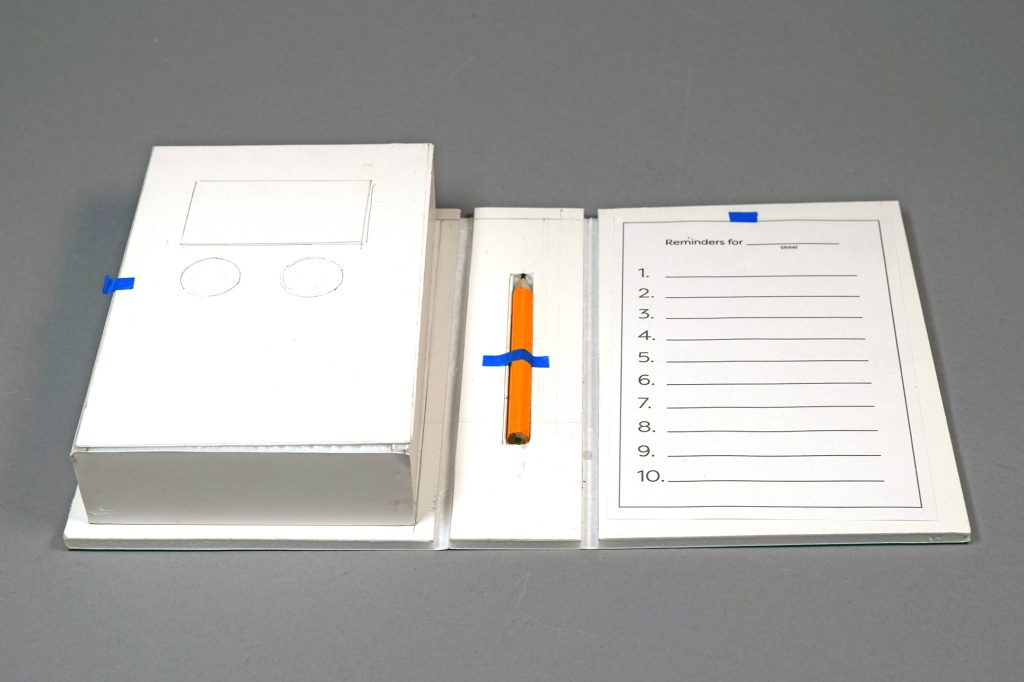
The mockup of the Interactive Itinerary housing is made out of foam core. The rectangle shows where the LCD screen would live. The two circles represent the task and time rotary encoders.
The electronics would live on the left side of the housing and the task list would live on the right side, making it easy for Irv, who is right-handed, to write down his daily tasks.
Process
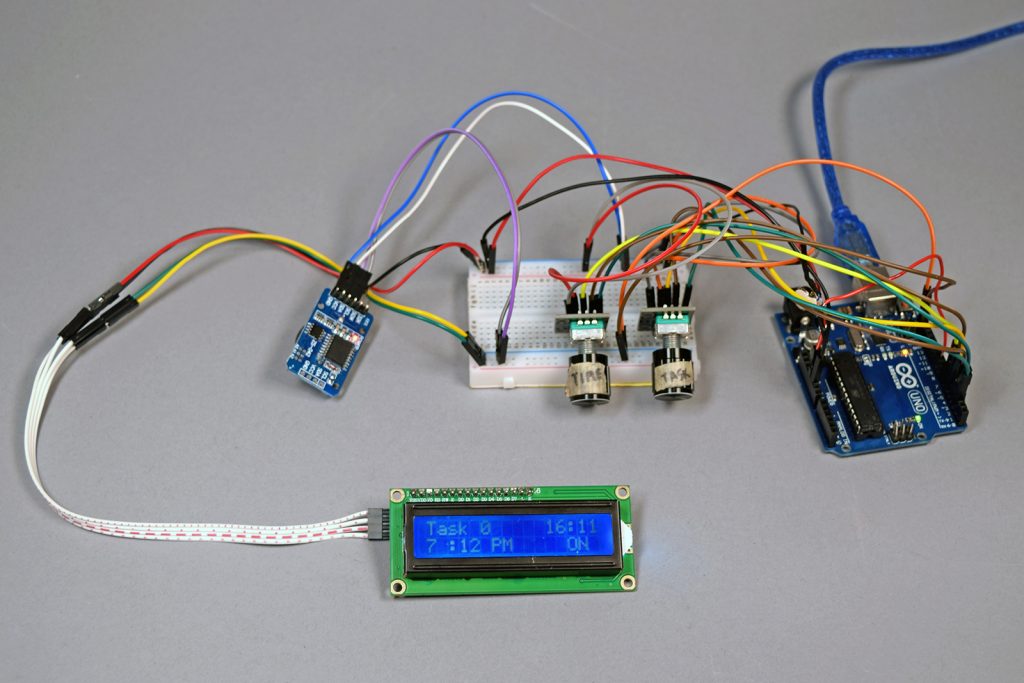
All the components of the prototype hooked up and ready to go
After meeting with Irv, we decided to move forward with the task reminder device that is more of a physical alarm, as opposed to a audible or visual alarm. Our team started by making a list of goals and potential features for the device.
After making a list of problems Irv mentioned, we branched off each idea to find ways to help Irv. The ideation tree helped us deterine basic goals for the design and feel of the device for Irv
Alarm Notification
Because Irv’s hearing is not great and because purely visual alarms are not noticeable when put away, our team chose a vibrating notification system. The micro vibration motor is very small but strong and noticeable, making it the perfect fit for this device. As shown in the picture below, we secured the soldering with heat shrink to keep the vibration motor attached.
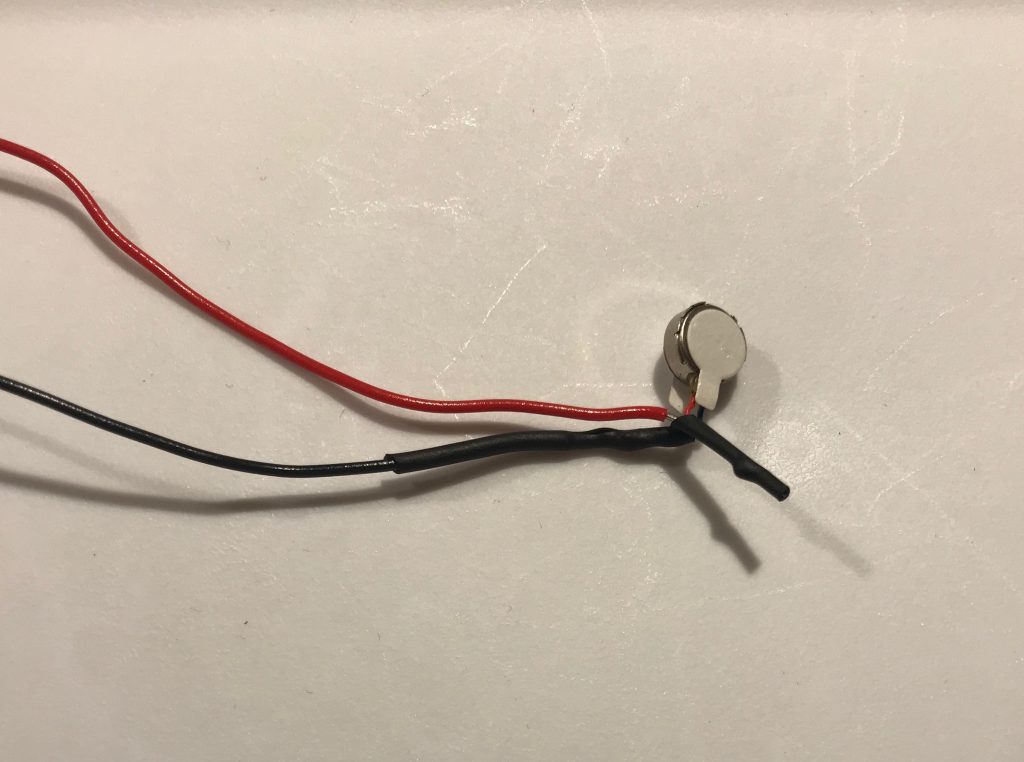
Heat shrink to secure soldered wires to the micro vibration motor because when it vibrates too much, the soldered wires fall apart.
Real Time Clock
Setting up the real time clock was relatively simple. We used a built-in example from the RTC library to set the time on the RTC. To get the time from the RTC and use it as an alarm, we used a built-in function from the Time.lib library called setSyncProvider(RTC.get).
When we initially ran the code without this line, the alarm did not work. WIth this line, we can also easily display the current time. After putting this in void setup(), we can use functions like hour() or minute() to collect the current hour and time data from the RTC.
Since the time on the RTC runs on military time and we wanted to display the time with AM and PM, we had adjust the logic of the alarm setting. We ran into trouble when we were trying to compare the PM times to the 24-hour time because the numbers do not match up. In this section of the code, we are storing an alarm hour for a specific task into an array title alarmHour. By modding the timeButtonCount by 5, we can get 5 states to condition over.
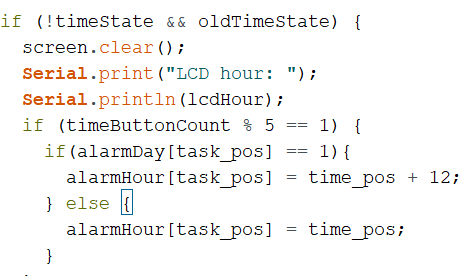
This section says that if we are setting the hour for a PM event, we will add 12 to the alarmHour for that specific task so that it matches the 24-hour time.
Rotary encoders
Since Irv is not comfortable using the touchscreen on his iPhone, we aimed to make the device as intuitive and analog as possible. The rotary encoders we used have 20 detents which provides a good tactile indication for the user. It also has built in push button that acts as a “confirmation” button for the time button. For the task button, the push button turns the alarm on or off.
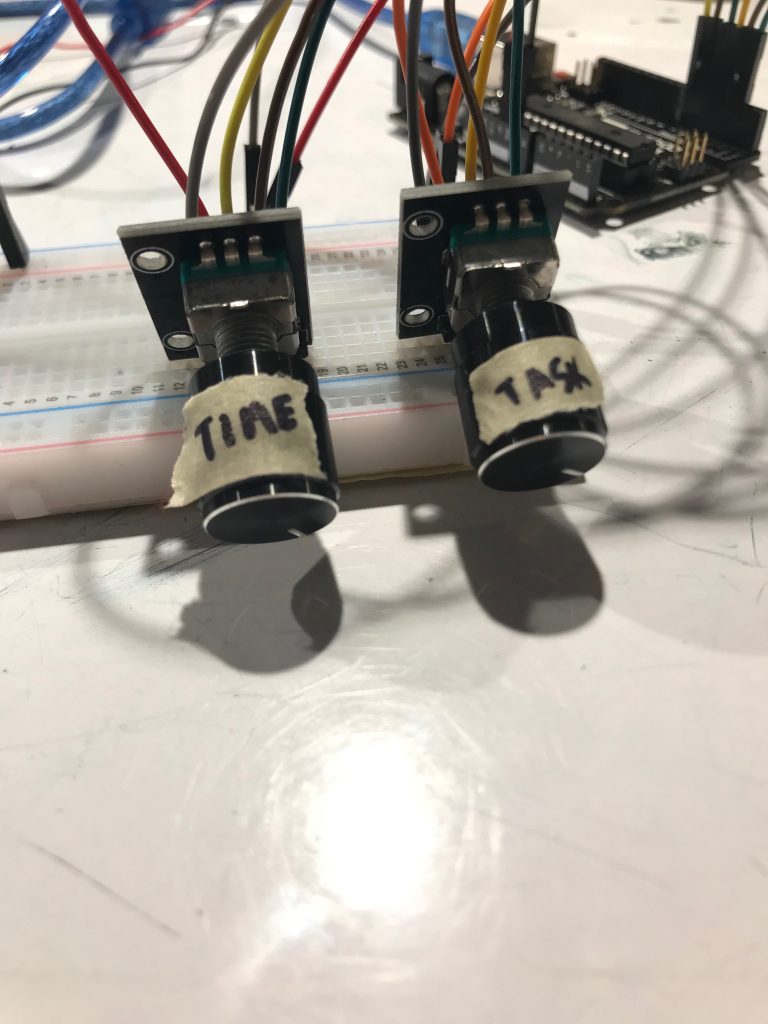
The task rotary encoder cycles from 1 to 10 as the user rotates the knob. The time rotary encoder cycles from 1 to 12 on the hour state, 0 to 59 in the minute state, and AM or PM in the time of day state.
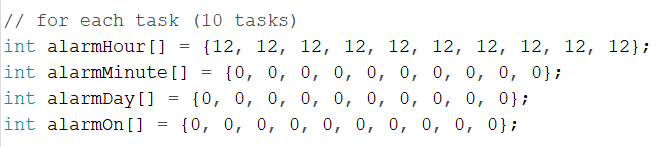
To keep each task alarm independent from other task, the alarm hour, minute, time of say, and on/off states are stored in matrices. Each matrix has 10 elements for the 10 tasks.
The alarm on/off button was initially dependent on the task position beause it was inside that if statement. To keep everything independent from one another, we kept each part of the device separate. So the time knob, time button, task knob, and task button are all in separate conditionals.
LCD Display
Our group wanted to use a Nokia 5510 graphic LCD 48 rows x 84 display because it had a better finish and display that the large blue LCD display. This graphic LCD proved to be a large challenge, partially because there is little documentation on the screen. The Nokia 5510 would involve bitmapping, which is something the group was unfamiliar with. After hooking up the Nokia 5510, and uploading a sample we found online, the screen remained blank but the LEDs in the back lit up. After troubleshooting for a while and a couple dead ends, we decided to transition to blue LCD and return to the Nokia 5510 at a later time.
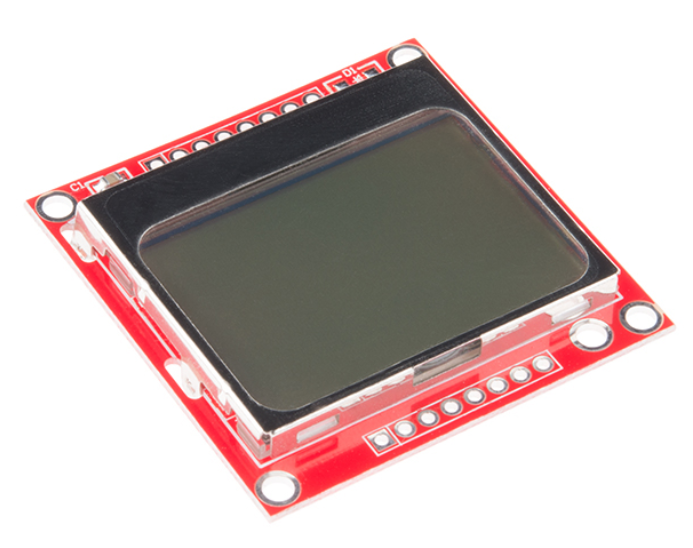
The Nokia 5510 has a small an clean interface that requires bitmapping. The Nokia display is preferred over the blue LCD.
Discussion
Our prototype was overall functional for the crit on April 8th. We demonstrates the buzzing alarm function to Irv and taught him how to set the task and time on the device. However, before the presentation, when our group powered the device using a 9 volt battery, the RTC reset it’s clock to 0:00. We managed to reset the current time on the RTC and reupload the code onto the device. However, we were only able to run the device on a laptop.
We received many helpful comments and feedback from the Osher group, Irv, and people in this course. One idea our team, including Irv, really liked was the snooze button because it is a function that will most definitely come in handy for Irv. After consulting Irv, we planned to add a snooze button that specifically snoozes for 15 minutes after the alarm. We also pulled out several different switches and buttons for Irv to try out to see which part felt best for him. Zach also suggested adding a cursor to the LCD display and reminded us to fix the current time display on the LCD screen so that the time reads in the 00:00 format. This change will make it less confusing for Irv and more uniform.
After the crit, the team, including Irv, decided set some goals for the final design of the Interactive Itinerary, We want to make the device as small and thin as possible so that it could ideally fit in Irv’s back pocket. This also means that the material should be flexible enough to maintain its structure when there is pressure applied to it. To make the Interactive Itinerary smaller, we would have to explore ways to rearrange the rotary encoders, which are relatively thick. So, we plan on exploring flexible but sturdy materials that can withstand a certain amount of stress as well.
Moving forward, our team plans on adding features and improvements to our existing prototype. In addition to the snooze button, cursor, and the time display, we also plan to display the task number when its alarm goes off. Since Irv prefers to set the time using military time, we will be taking out the AM/PM time format. We will have to figure out how to position the knobs to minimize the thickness. We want to troubleshoot how to power the device with a rechargeable battery without it resetting the RTC. While the LCD screen is easy to use and completely functional for our use, we still want to revisit the nokia screen and see if we can get it to work. Lastly, we would want to add a blue feature to the device because that is Irv’s favorite color.
Comments are closed.