I challenged to work with an array of mini vibration motors and wireless local networking. The goal of this project is to create an immersive AR interactivity by generating haptic feedback of the virtual objects interacting with a physical desk. The user feels the vibration of the AR ball bouncing on a table through the haptic device. Every time it bounces, a signal is sent wirelessly to the main PC, which is sent serially to Arduino to activate motors. The future step is to more precisely activate the array of motors by computing the level of vibration based on the locations of the AR objects and the device.
Exercise 8
For this assignment, I wanted to go back to object programming, because that confuses me more than most things, and I tend to be a generally confused person.
I also decided I was going to use Processing, because I’ve been watching a ton of coding train videos and I got tired of seeing suggestions come up on the side of my screen that look super cool but use Processing and had me thinking “that’s probably going to take me a while, I can’t learn how to use that right now.”
WHAT I MADE:
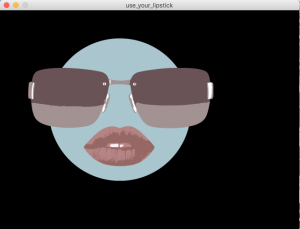
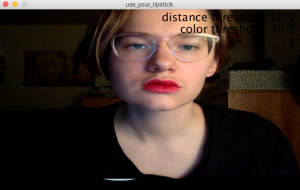
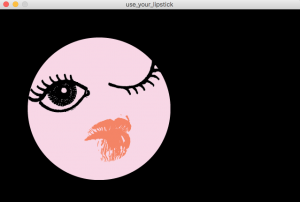
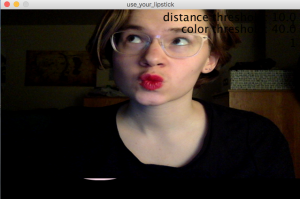
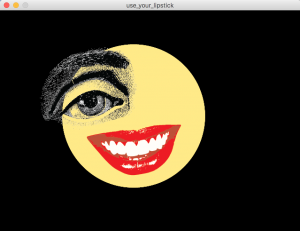
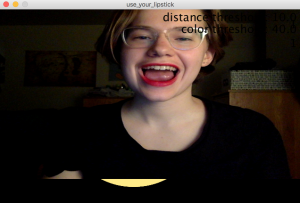
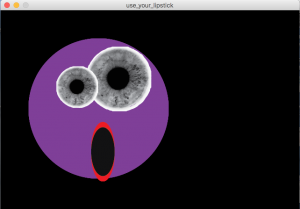
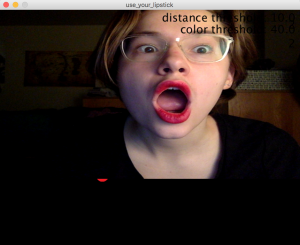
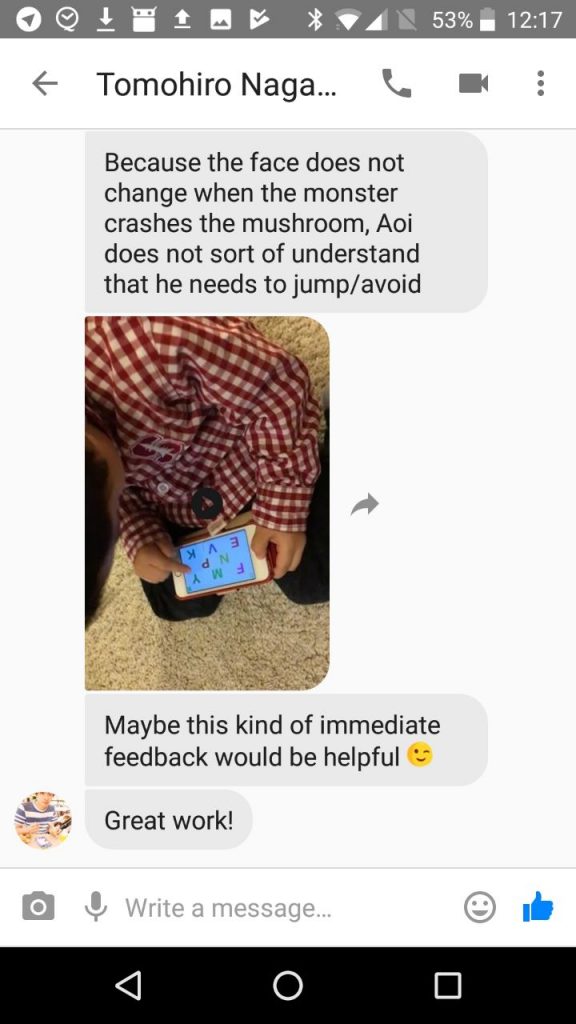
I used a blob detection code that allowed me to track a colour using my computer camera. I then decided I wanted to detect someone’s facial expression by using the shape of their lips. I could then use my millenial/gen X social media skills to create emojis that reflect typical facial expressions, and flash the related emoji at the user. Using my stellar illustrator skills and some photo bits and pieces off of the internet, I collaged a couple of emojis. I then used my a-ma-zing object programming skills to decode the code I was using and integrate an analysis of blob sizes and numbers. This took an insane amount time, because there are just so many objects, but I have it working! It’s super jittery though, especially between the “shock” face and “happy” face, and you have to be at just the right distance from the camera.
(I also started thinking: hey, if I can detect colors, maybe I’ll be able to detect light colors my arduino gives off and have an elementary replacement to my malfunctioning serial control.)
——————————————————–
If anyone wants to test this code out, your skin and lip color will be too similar, and if you mess with the code’s colour threshold you will definitely make it worse, so here’s the easiest fix: Put on some bright lipstick. If you’re reluctant to do so you’re going to have to figure out a way to make your lips change colour. Once you’ve defied the laws of nature (or used someone’s makeup kit) hit the ‘i’ key and click on your lips, then hit the ‘i’ key again.
It’s preset to a bright red, so if you already have a bright red lipstick on, you’re all set.
———————————————————
I sincerely apologize for the weird faces.
code and image files:
Class notes, 29 March
Reading assignment, try to finish by 10 April, In Praise of Shadows.
Assignment: write a short (~1 page) story about a final project. Don’t concern yourself with how it’s implemented or what it would cost, focus on a story of an interaction. (This can become the proposal for your final project.)
Rough calendar:
3 Apr – How to write a proposal
5 Apr – Review proposals for final project
10 Apr – work day
12 Apr – work day
17 Apr – rough crit
19 Apr – no class
24 Apr – work day
26 Apr – work day
1 May – crit + class show
3 May – crit + class show
Touchy: A Game for Toddlers
Abstract: Touchy a game for toddlers.
Method: Ethnographic study, Participatory Design with Parents
I spent a few months getting to know the participant, babysitting the kid. This helped me learn the interactions that the user was familiar with. I used the design elements that player was familiar with for e.g. Hey Dugee.
Playtesting: A demo of a player using the interface.
Parent Feedback:
Next steps: Add sound, use the yellow car a toy that
Demo: http://kmarkiv.com/a5/A5js/
[update]
After seeking feedback from parents, I added a button to support to direct the child’s attention to the screen.
- Demo 2: http://kmarkiv.com/a5/A5jsv2/
- Code: https://drive.google.com/open?id=1YBk1J4fUhweWXnX1DdudYCCycPalWCRn
- Feedback: Parents have now asked for learning component to make the child’s time productive. One design direction would be to speak the numbers slowly as the character jumps over the car.
Seminar Talk Thursday, April 5 at 1pm in GHC 6115:
Design for Autonomy and Fairness of New Technology Users in the Global South
Abstract:
2017 saw half the world online. As technology penetration and ecosystem maturity increase, there is a growing intent to use technology for socio-economic development for new technology users. However, complex long-standing challenges like affordability, safety, and socio-religious diktats affect people at the cusp of the Internet. My work aims to empower new technology users with increased autonomy and fairness through technology. I present my prior work on (i) design and evaluation of a cost transparency tool intended to help new mobile Internet users; (ii) design to tackle abuse and safety vectors for women in Internet technologies; and iii) design and deployment of an information broadcasting system for urban sex workers in India. I show how prevailing HCI assumptions of privacy, trust, and user identities need to be challenged as Internet advances to reach all edges of human society. Through these projects, I show how large problems can be practically addressed through a combination of design, policy, and algorithms.
Bio:
Sambasivan is a researcher focused on technology design for social, economic and political benefits in the Global South. Her research spans the areas of HCI and ICTD, and has won several recognitions at top conferences. She has been a researcher at Google since 2012, where she has co-founded a group to conduct future facing research on under-represented topics, such as gender equity and new technology users. Her research has influenced several large-scale real-world projects for the next billion users, and has been directly translated to core libraries, metrics, and guidance for Android and Web developers at Build for Billions, design.google/nbu, and Google I/O talks. Nithya has a Ph.D. and MS in information and computer sciences from University of California, Irvine and an MS in Human Computer Interaction (HCI) from Georgia Tech. Her dissertation focussed on technology design for the low-income communities of slums, urban sex workers and microenterprises in India. She is a recipient of Google’s Anita Borg and UC Irvine Dean’s fellowships. She has interned at Microsoft Research India, Nokia Research Center and IBM TJ Watson.
Nithya Sambasivan
HCII Seminar: Thursday, April 5 at 1pm in GHC 6115
Assignment Eight
Accelerometers, Interrupts, timing oh my.
Weakness: MPU-6050 GY-521 (a.k.a. “The Devil”)
I knew this was my weakness, and it still is. It’s broken me. After many frustrating hours moving this thing around, several tutorial (links below), and ultimately having it sit on the table and increment while no movement or rotation. I gave up. While I could get the tutorials to work, everything thing hooked up and the processing sketches to run, I still didn’t know what it was actually doing. Reading through the code only kind of helped, but when things started get dicey is how exactly they were using the raw data.
Arduino 5 Minute Tutorials: Lesson 7 – Accelerometers, Gyros, IMUs
Tutorial: How to use the GY-521 module (MPU-6050 breakout board) with the Arduino Uno
https://create.arduino.cc/projecthub/Aritro/getting-started-with-imu-6-dof-motion-sensor-96e066
http://www-robotics.cs.umass.edu/~grupen/503/Projects/ArduinoMPU6050-Tutorial.pdf
The list could go on. I’ve racked up an extensive search history of accelerometers & arduino as well as MPU6050 tutorials.
Interrupts
After picking myself back up, I decided to tackle another weakness. Interrupts. I’ve been avoiding them for some time, and am still working at fulling understanding their capabilities. The trouble I always run into is how to exit a light sequence. I also ran into some issues while using music. I decided to make a few simple interactions with button, sounds, and light to tackle my interrupt fears head on.
This project simple starts a song, pauses the song mid-way, lights a NeoPixel sequence (also the devil), and exits the sequence. A second button will stop the song or light sequence and restart the song from the beginning.
Arduino Code
/***************************************************
DFPlayer - A Mini MP3 Player For Arduino
<https://www.dfrobot.com/index.php?route=product/product&product_id=1121>
***************************************************
This example shows the basic function of library for DFPlayer.
Created 2016-12-07
By [Angelo qiao](Angelo.qiao@dfrobot.com)
GNU Lesser General Public License.
See <http://www.gnu.org/licenses/> for details.
All above must be included in any redistribution
****************************************************/
/***********Notice and Trouble shooting***************
1.Connection and Diagram can be found here
<https://www.dfrobot.com/wiki/index.php/DFPlayer_Mini_SKU:DFR0299#Connection_Diagram>
2.This code is tested on Arduino Uno, Leonardo, Mega boards.
****************************************************/
#include <SoftwareSerial.h>
#include <DFRobotDFPlayerMini.h>
SoftwareSerial mySoftwareSerial(10, 11); // RX, TX
DFRobotDFPlayerMini myDFPlayer;
void printDetail(uint8_t type, int value);
//--------NEOPIXEL SETUP --------
#include <Adafruit_NeoPixel.h>
#ifdef __AVR__
#include <avr/power.h>
#endif
static const int PIN = 5;
static const int NUMPIXELS = 2;
Adafruit_NeoPixel pixels = Adafruit_NeoPixel(NUMPIXELS, PIN, NEO_GRB + NEO_KHZ800);
//------------------------------
//------- TIMING --------
unsigned long lastSampleTime = 0;
unsigned long sampleInterval = 500; // in ms
//------------------------------
static const int bPinOne = 2;
static const int bPinTwo = 3;
int bCountOne = 0;
int bCountTwo = 0;
bool bStateOne = false;
bool bStateTwo = false;
int currentState = 0;
void setup() {
mySoftwareSerial.begin(9600);
Serial.begin(115200);
Serial.println();
Serial.println(F("DFRobot DFPlayer Mini Demo"));
Serial.println(F("Initializing DFPlayer ... (May take 3~5 seconds)"));
if (!myDFPlayer.begin(mySoftwareSerial)) { //Use softwareSerial to communicate with mp3.
Serial.println(F("Unable to begin:"));
Serial.println(F("1.Please recheck the connection!"));
Serial.println(F("2.Please insert the SD card!"));
while (true);
}
Serial.println(F("DFPlayer Mini online."));
myDFPlayer.volume(30); //Set volume value. From 0 to 30
myDFPlayer.play(1); //Play the first mp3
pinMode(bPinOne, INPUT_PULLUP);
pinMode(bPinTwo, INPUT_PULLUP);
attachInterrupt(digitalPinToInterrupt(bPinOne), bSwitchOne, CHANGE);
attachInterrupt(digitalPinToInterrupt(bPinTwo), bSwitchTwo, CHANGE);
pixels.begin();
pixels.show();
}
void loop(){
if(currentState == 3){
myDFPlayer.play(1);
}
if (currentState == 1){
myDFPlayer.pause();
rainbow(20);
} else if (currentState == 2){
pixelOff();
myDFPlayer.start();
}
if (myDFPlayer.available()) {
printDetail(myDFPlayer.readType(), myDFPlayer.read()); //Print the detail message from DFPlayer to handle different errors and states.
}
}
void bSwitchOne() {
unsigned long now = millis();
if (lastSampleTime + sampleInterval < now) {
lastSampleTime = now;
bCountOne++;
bStateOne = true;
Serial.print("button one: ");
Serial.println(bCountOne);
if (bCountOne % 2 == 1){
currentState = 1;
} else if (bCountOne % 2 == 0){
currentState = 2;
}
}
}
void bSwitchTwo() {
unsigned long now = millis();
if (lastSampleTime + sampleInterval < now) {
lastSampleTime = now;
bCountTwo++;
bStateTwo = true;
Serial.print("button two: ");
Serial.println(bCountTwo);
if (bCountTwo % 2 == 1){
currentState = 3;
} else if (bCountTwo % 2 == 0){
currentState = 4;
}
}
}
void rainbow(uint8_t wait) {
uint16_t i, j;
for (j = 0; j < 256; j++) {
for (i = 0; i < pixels.numPixels(); i++) {
pixels.setPixelColor(i, Wheel((i + j) & 255));
}
pixels.show();
delay(wait);
}
}
void pixelOff() {
for (int i = 0; i < pixels.numPixels(); i++) {
pixels.setPixelColor(i, (0, 0, 0));
}
pixels.show();
}
uint32_t Wheel(byte WheelPos) {
WheelPos = 255 - WheelPos;
if (WheelPos < 85) {
return pixels.Color(255 - WheelPos * 3, 0, WheelPos * 3);
}
if (WheelPos < 170) {
WheelPos -= 85;
return pixels.Color(0, WheelPos * 3, 255 - WheelPos * 3);
}
WheelPos -= 170;
return pixels.Color(WheelPos * 3, 255 - WheelPos * 3, 0);
}
void printDetail(uint8_t type, int value) {
switch (type) {
case TimeOut:
Serial.println(F("Time Out!"));
break;
case WrongStack:
Serial.println(F("Stack Wrong!"));
break;
case DFPlayerCardInserted:
Serial.println(F("Card Inserted!"));
break;
case DFPlayerCardRemoved:
Serial.println(F("Card Removed!"));
break;
case DFPlayerCardOnline:
Serial.println(F("Card Online!"));
break;
case DFPlayerPlayFinished:
Serial.print(F("Number:"));
Serial.print(value);
Serial.println(F(" Play Finished!"));
break;
case DFPlayerError:
Serial.print(F("DFPlayerError:"));
switch (value) {
case Busy:
Serial.println(F("Card not found"));
break;
case Sleeping:
Serial.println(F("Sleeping"));
break;
case SerialWrongStack:
Serial.println(F("Get Wrong Stack"));
break;
case CheckSumNotMatch:
Serial.println(F("Check Sum Not Match"));
break;
case FileIndexOut:
Serial.println(F("File Index Out of Bound"));
break;
case FileMismatch:
Serial.println(F("Cannot Find File"));
break;
case Advertise:
Serial.println(F("In Advertise"));
break;
default:
break;
}
break;
default:
break;
}
}
Assignment Seven
Patch UI
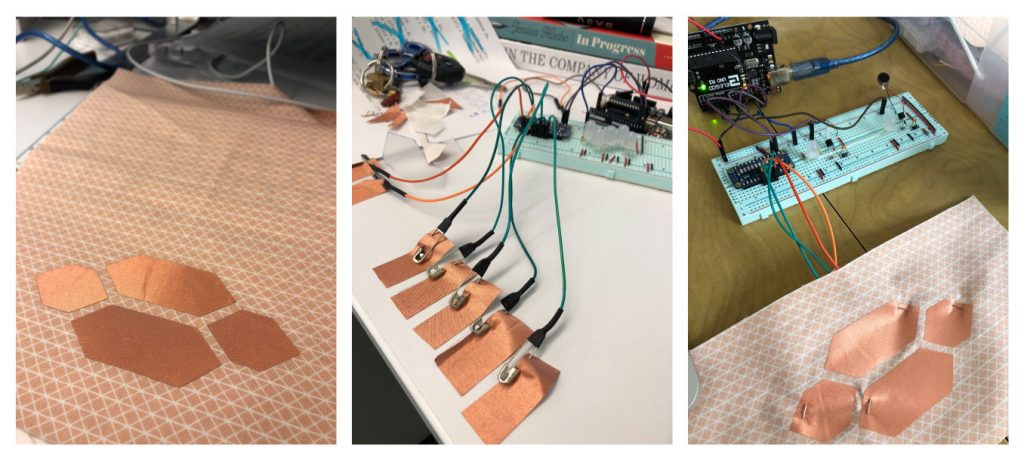
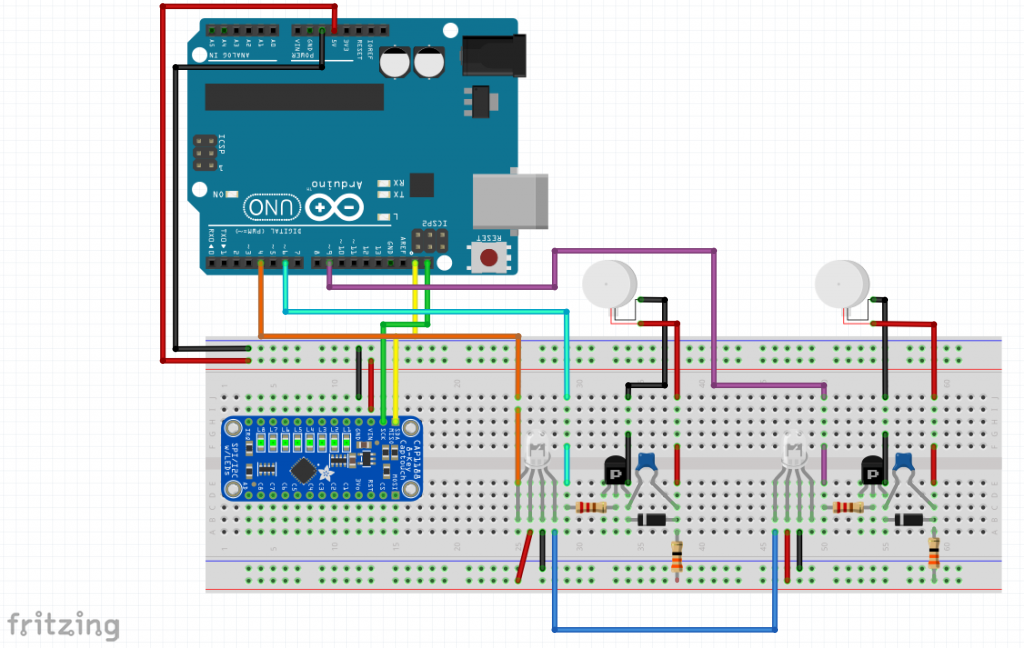
I wanted to create a simple wearable patch that could act as an integrated user interface. This first step was about understanding out this type of interface may work to send notifications. Using conductive fabric and capacitive touch, a user can simply touch the patch and send a light or vibration notification to someone. As I mentioned, this is just the first step, I plan to work further on this project to incorporate gestures such as swiping, investigate the form more by researching existing patch styles and alternative materials such as conductive ink that can be screen printed.
The patch itself is paired with a web program that can set the geometric pattern to hold different values. This way the user is able to program and reprogram the patch to suit their needs. This portion of the project needs a great deal of work, particularly in sending the data to the Arduino. This will be updated.
Password: MakingThingsInteractive
Arduino Code:
/***************************************************
This is a library for the CAP1188 I2C/SPI 8-chan Capacitive Sensor
Designed specifically to work with the CAP1188 sensor from Adafruit
----> https://www.adafruit.com/products/1602
These sensors use I2C/SPI to communicate, 2+ pins are required to
interface
Adafruit invests time and resources providing this open source code,
please support Adafruit and open-source hardware by purchasing
products from Adafruit!
Written by Limor Fried/Ladyada for Adafruit Industries.
BSD license, all text above must be included in any redistribution
****************************************************/
//--------CAP1188 SETUP --------
#include <Wire.h>
#include <SPI.h>
#include <Adafruit_CAP1188.h>
#define CAP1188_SENSITIVITY 0x1F // Setting the sensitivity....lower the number the more sensitive!!
static const int CAP1188_RESET = 12; // Reset Pin is used for I2C or SPI
Adafruit_CAP1188 cap = Adafruit_CAP1188();
//------------------------------
//--------NEOPIXEL SETUP --------
#include <Adafruit_NeoPixel.h>
#ifdef __AVR__
#include <avr/power.h>
#endif
static const int PIN = 4;
static const int NUMPIXELS = 2;
Adafruit_NeoPixel pixels = Adafruit_NeoPixel(NUMPIXELS, PIN, NEO_GRB + NEO_KHZ800);
//------------------------------
//------- TIMING --------
unsigned long lastSampleTime = 0;
unsigned long sampleInterval = 500; // in ms
//------------------------------
//-----INCOMING VALUES-----
String incomingString; // setting string from p5.js
//-----VIBE PINS-----
static const int vibePinOne = 6;
static const int vibePinTwo = 9;
int vibeOne;
int vibeTwo;
int wait = 10;
int touchedNUM;
int lightCount = 0;
int personOneCount = 0;
int personTwoCount = 0;
int vibeCount = 0;
bool personOne = false;
bool personTwo = false;
bool light = false;
bool vibe = false;
void setup() {
Serial.begin(9600);
Serial.println("CAP1188 test!");
if (!cap.begin()) { // Initialize the sensor, if using i2c you can pass in the i2c address // if (!cap.begin(0x28)) {
Serial.println("CAP1188 not found");
while (1);
}
Serial.println("CAP1188 found!");
cap.writeRegister(CAP1188_SENSITIVITY, 0x6F); // 2x sensitivity THIS SEEMS TO WORK THE BEST FOR 3.5" plate sensors
pinMode(vibePinOne, OUTPUT);
pinMode(vibePinTwo, OUTPUT);
pixels.begin();
pixels.show();
}
void loop() {
unsigned long now = millis();
uint8_t touched = cap.touched();
if (touched == 0) {
// No touch detected
return;
}
if (lastSampleTime + sampleInterval < now) {
lastSampleTime = now;
for (uint8_t i = 0; i < 8; i++) {
if (touched & (1 << i)) {
int currentTouch = i + 1;
if (currentTouch == 1) { // RIGHT Light
touchedNUM = 1;
lightCount++;
light = true;
vibe = false;
} else if (currentTouch == 2) { // TOP Person One
touchedNUM = 2;
personOneCount++;
personOne = true;
personTwo = false;
light = false;
vibe = false;
// Serial.print("PersonOne: "); Serial.println(personOne);
// Serial.print("PersonTwo: "); Serial.println(personTwo);
} else if (currentTouch == 3) { // BOTTOM Person Two
touchedNUM = 3;
personTwoCount++;
personOne = false;
personTwo = true;
light = false;
vibe = false;
// Serial.print("PersonOne: "); Serial.println(personOne);
// Serial.print("PersonTwo: "); Serial.println(personTwo);
} else if (currentTouch == 4) { // LEFT Vibe
touchedNUM = 4;
vibeCount++;
light = false;
vibe = true;
}
if (personOne == true){
Serial.println("Active: PERSON ONE");
} else if (personTwo == true) {
Serial.println("Active: PERSON TWO");
}
}
}
}
personOneFun();
personTwoFun();
}
void personOneFun() {
if (personOne == true && personTwo == false && light == true) {
lightBLINK(0);
//lightON(0); // person ONE light on
lightOFF(1); // person two light off
vibeOFF(0); // vibes off
vibeOFF(1);
} else if (personOne == true && personTwo == false && vibe == true) {
lightOFF(0); // lights off
lightOFF(1);
vibeON(0); // person ONE vibe on
vibeOFF(1); // person two vibe off
} else {
lightOFF(0); // lights off
lightOFF(1);
vibeOFF(0); // vibes off
vibeOFF(1);
}
// Serial.print("Light Count: "); Serial.println(lightCount);
// Serial.print("Vibe Count: "); Serial.println(vibeCount);
}
void personTwoFun() {
if (personOne == false && personTwo == true && light == true) {
lightBLINK(1);
// lightON(1); // person TWO light on
lightOFF(0); // person one light off
vibeOFF(0); // vibes off
vibeOFF(1);
} else if (personOne == false && personTwo == true && vibe == true) {
lightOFF(0); // lights off
lightOFF(1);
vibeON(1); // person TWO vibe on
vibeOFF(0); // person one vibe off
} else {
lightOFF(0); // lights off
lightOFF(1);
vibeOFF(0); // vibes off
vibeOFF(1);
}
// Serial.print("Light Count: "); Serial.println(lightCount);
// Serial.print("Vibe Count: "); Serial.println(vibeCount);
}
void vibeON(int m) {
if (m == 0) {
digitalWrite(vibePinOne, HIGH);
delay(500);
digitalWrite(vibePinOne, LOW);
delay(250);
} else if (m == 1) {
digitalWrite(vibePinTwo, HIGH);
delay(500);
digitalWrite(vibePinTwo, LOW);
delay(250);
}
}
void vibeOFF(int m) {
if (m == 0) {
digitalWrite(vibePinOne, LOW);
} else if (m == 1) {
digitalWrite(vibePinTwo, LOW);
}
}
void lightON (int m) {
pixels.setPixelColor(m, pixels.Color(255, 255, 255));
pixels.show();
}
void lightOFF (int m) {
pixels.setPixelColor(m, pixels.Color(0, 0, 0));
pixels.show();
}
void lightBLINK (int m) {
pixels.setPixelColor(m, pixels.Color(255, 255, 255));
pixels.show();
delay(750);
pixels.setPixelColor(m, pixels.Color(0, 0, 0));
pixels.show();
delay(500);
pixels.setPixelColor(m, pixels.Color(255, 255, 255));
pixels.show();
delay(750);
pixels.setPixelColor(m, pixels.Color(0, 0, 0));
pixels.show();
delay(500);
}
p5js Code:
//-----SERIAL VARIABLES-----
var serial;
var portName = '/dev/cu.usbmodem1411';
//-----WINDOW DIMENSIONS-----
var windW = 900;
var windH = 600;
//-----Color Values-----
var colorLeft = 255;
var colorTop = 255;
var colorRight = 255;
var colorBottom = 255;
var personOneColor = 255;
var personTwoColor = 255;
var lightColor = 255;
var vibeColor = 255;
//-----button counts-----
var countLeft = 0;
var countTop = 0;
var countRight = 0;
var countBottom = 0;
var personOneClick = 0;
var personTwoClick = 0;
var lightClick = 0;
var vibeClick = 0;
//-----button selected-----
var buttonLeft = false;
var buttonTop = false;
var buttonRight = false;
var buttonBottom = false;
var personOne = false;
var personTwo = false;
var light = false;
var vibe = false;
//-----Icons & Images -----
var personOneImg , personTwoImg, lightImg, vibeImg;
var personOneImgW , personTwoImgW, lightImgW, vibeImgW;
var squares = [];
//------------------------
var latestData
var serialPortThree;
function preload() {
// preload() runs once
personOneImg = loadImage('assets/person.png');
personTwoImg = loadImage('assets/person.png');
lightImg = loadImage('assets/light.png');
vibeImg = loadImage('assets/vibe.png');
personOneImgW = loadImage('assets/person-w.png');
personTwoImgW = loadImage('assets/person-w.png');
lightImgW = loadImage('assets/light-w.png');
vibeImgW = loadImage('assets/vibe-w.png');
}
function setup() {
//-----Serial Setup-----
serial = new p5.SerialPort();
serial.on('list', printList);
serial.on('connected', serverConnected);
serial.on('open', portOpen);
serial.on('data', gotData);
serial.on('error', serialError);
serial.on('close', portClose);
serial.list();
serial.open(portName);
console.log("Port Name: " + portName);
//----------------------
createCanvas(windW, windH);
smooth();
background(240);
// initial text at the top (where your color's RGB will be)
push();
textSize(25);
textAlign(CENTER);
noStroke();
text("PATCH UI", windW / 2, 50);
pop();
// for (var i = 0; i 220 && mouseX 195 && mouseY 330 && mouseX 151 && mouseY 544 && mouseX 195 && mouseY 330 && mouseX 239 && mouseY 140 && mouseX 400 && mouseY 315 && mouseX 400 && mouseY 480 && mouseX 400 && mouseY 645 && mouseX 400 && mouseY < 500) {
vibeClick++;
if (vibeClick % 2 == 1 ){ //&& personTwo == false && personOne == false && light == false
vibeColor = 100;
vibe = true;
} else if (vibeClick % 2 == 0){
vibeColor = 255;
vibe = false;
personOneClick = 0;
personTwoClick = 0;
lightClick = 0;
}
console.log("Vibe clicked: " + vibeClick);
}
}
//-----SERIAL FUNCTIONS-----
function printList(portList) {
for (var i = 0; i 5)
// {
// aNum = aString[1];
// aOff = aString[3];
// aSize = aString[5];
// }
// console.log("aNum: " + aNum + "aOff: " + aOff + "aSize: " + aSize);
}
function serialError(err) {
// print('serialError ' + err);
}
function portClose() {
// print('portClose');
}
Arduino + p5js + Fritzing files
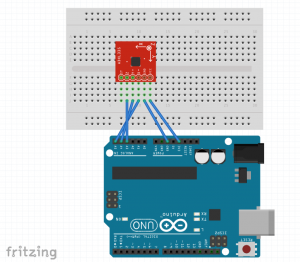
Assignment 7: Musical Runs
For this assignment, I chose to make a script that allows a user to select a running pace (in steps per minute), which, in turn, selects a preloaded song whose bpm matches the steps per minute of the user. I then used a pedometer code to run a servo that would rotate at a certain speed based on the steps per minute of the user. In a more thoroughly developed version of this design, the servo would run a music box-esque display.
My original idea for this was to have the pedometer run all aspects of the project: it would determine the song choice and the display. I also wanted to use the spotify API to somehow allow a wider range of song choices that would match the pace goal perfectly. Unfortunately, I got too frustrated trying to find a way to use spotify, and my serial connection didn’t work, so I had to split my project into a computer half and an arduino half, and give up on the song range. What I ended up creating uses the computer to set a goal, and the arduino to give the user a visual platform to match the set goal. This way, a user sets their goal via the p5 platform, which sets the song beat, and then has to run at a pace that ensures that the servo rotation matches the song beat. It’s fun to play with. I also added a graphic display that allows the user to see the beat of the song as well as hear it.
Here are my codes:
And my fritzing sketch:
Class Notes, 22 March 2018
Nathan Shedroff’s definition of interaction tweaked by me. (I’m not sure from where I cut-and-pasted this.)
- Duration: Initiation, Immersion, Conclusion, and Continuation. (I would include “memory” in this, that’s part of the duration of an event.)
- Intensity: Reflex, Habit, Engagement
- Breadth: Products, Services, Brands, Nomenclatures, Channels/Environment/Promotion, and Price
- Interaction: Passive < > Active < > Interactive (I would say “aggressive” goes after “interactive.)
- Triggers: Human Senses, Concepts, and Symbols (Swastikas in post WWII western countries vs. maps in Japan.)
- Significance: Meaning, Status, Emotion, Price, and Function (How does an interaction compare to a static physical entity?)
Assignment7 – AR-Powered Walking Assistant
For this assignment, I worked with ARKit to turn our mobile phones into an effective physical-assistive device. Using ARKit’s plane recognition feature, I created a virtual “stick” which the user can adjust its length and makes vibration when it is hitting the ground plane. From such haptic feedback, the user understands a correct navigation of the path. This is a more portable and customizable solution compared to the existing physical stick.