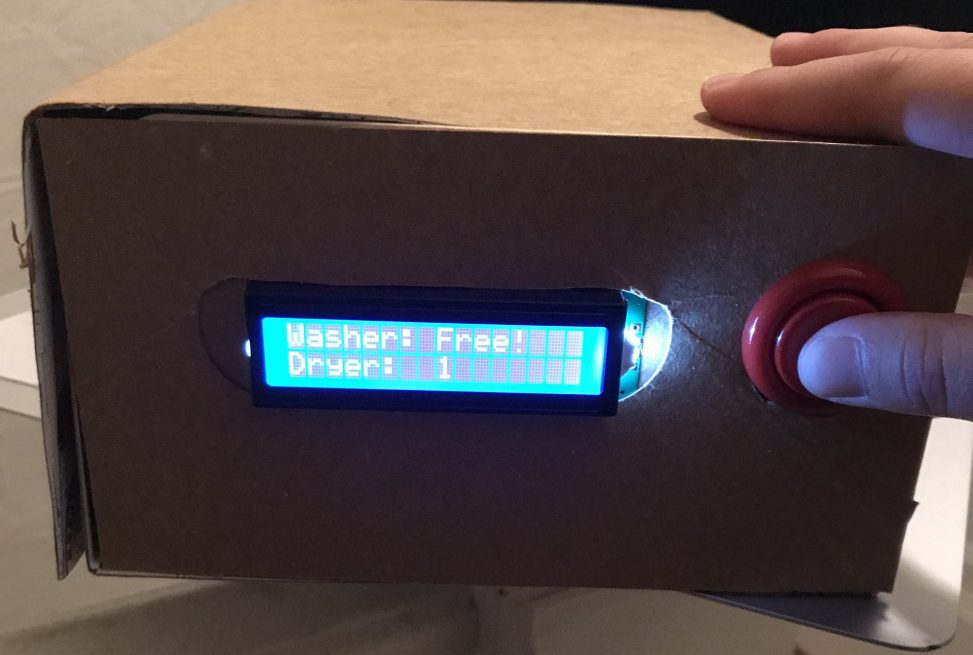
The laundry tracker displays when the washer and dryer are not in use or how long they have been on for when a button is pressed.
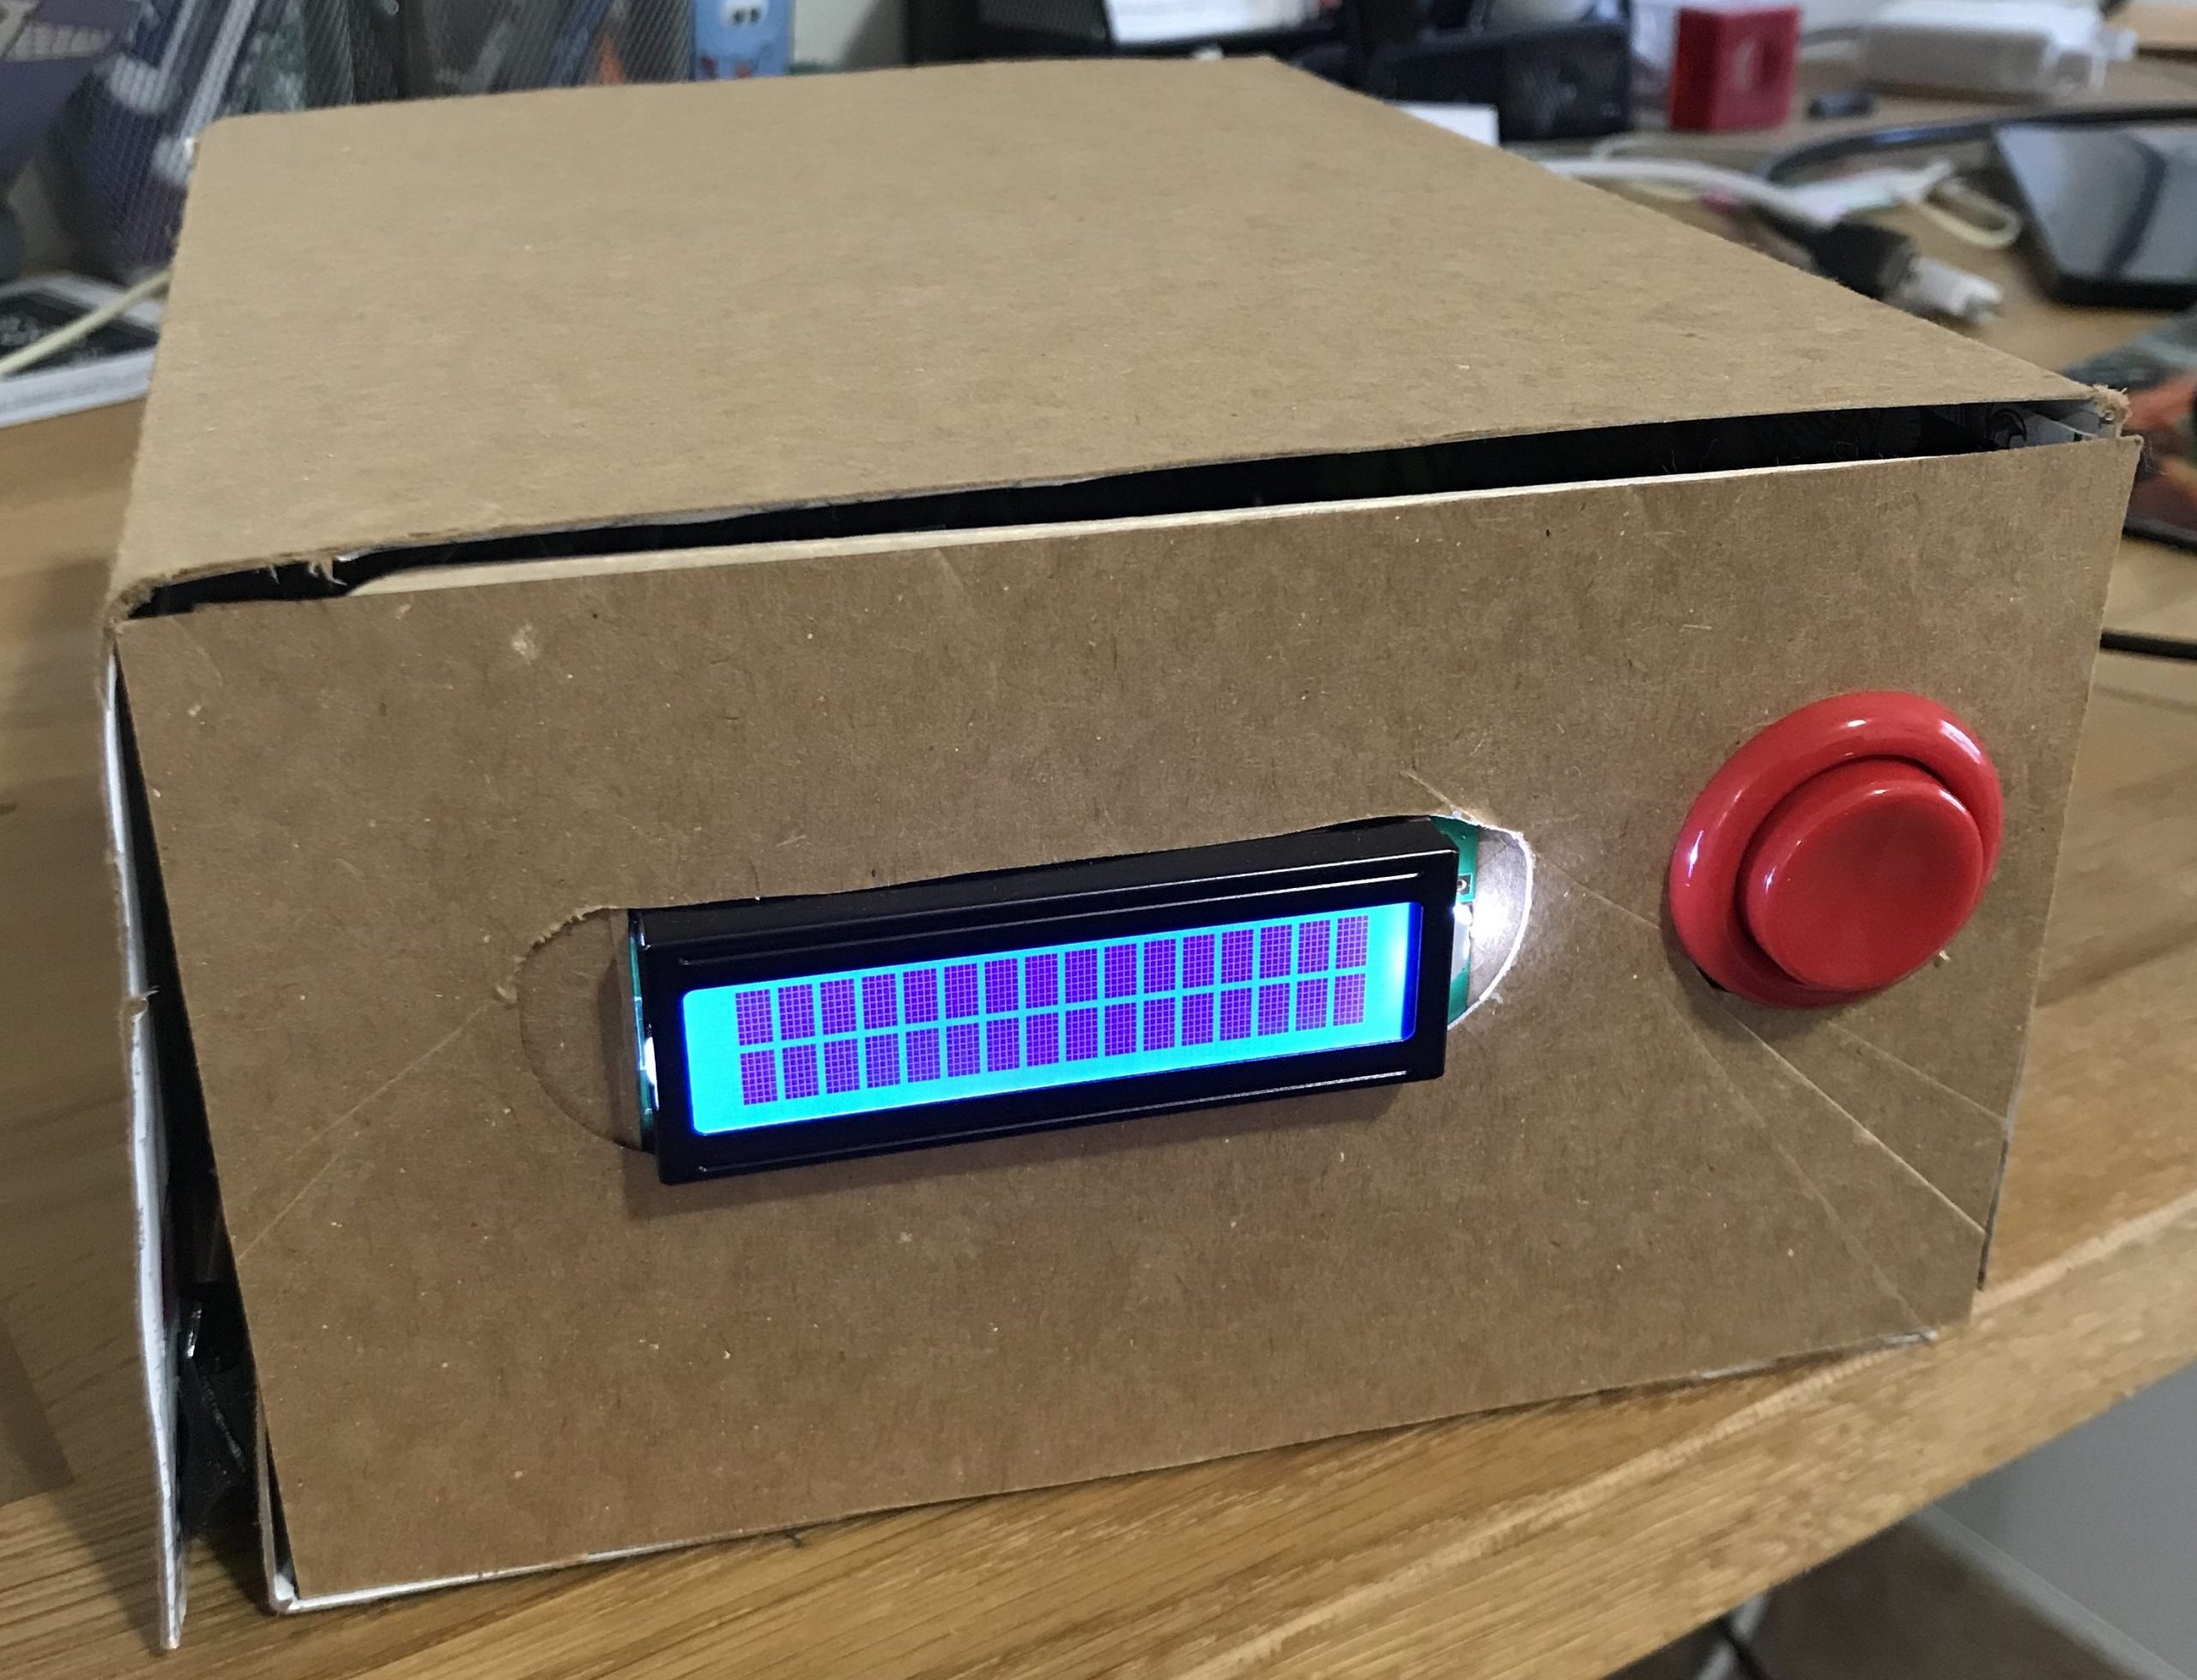
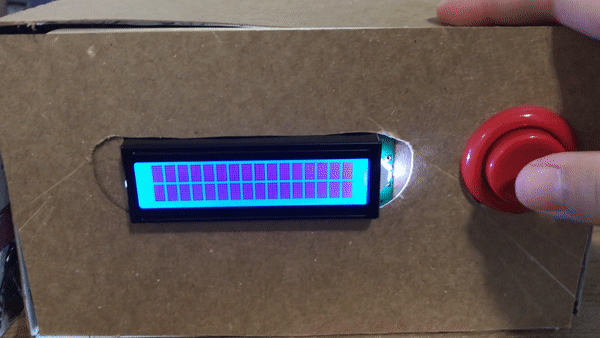
The overall view of the laundry tracker display box.
When the button is pushed the LCD displays the desired text
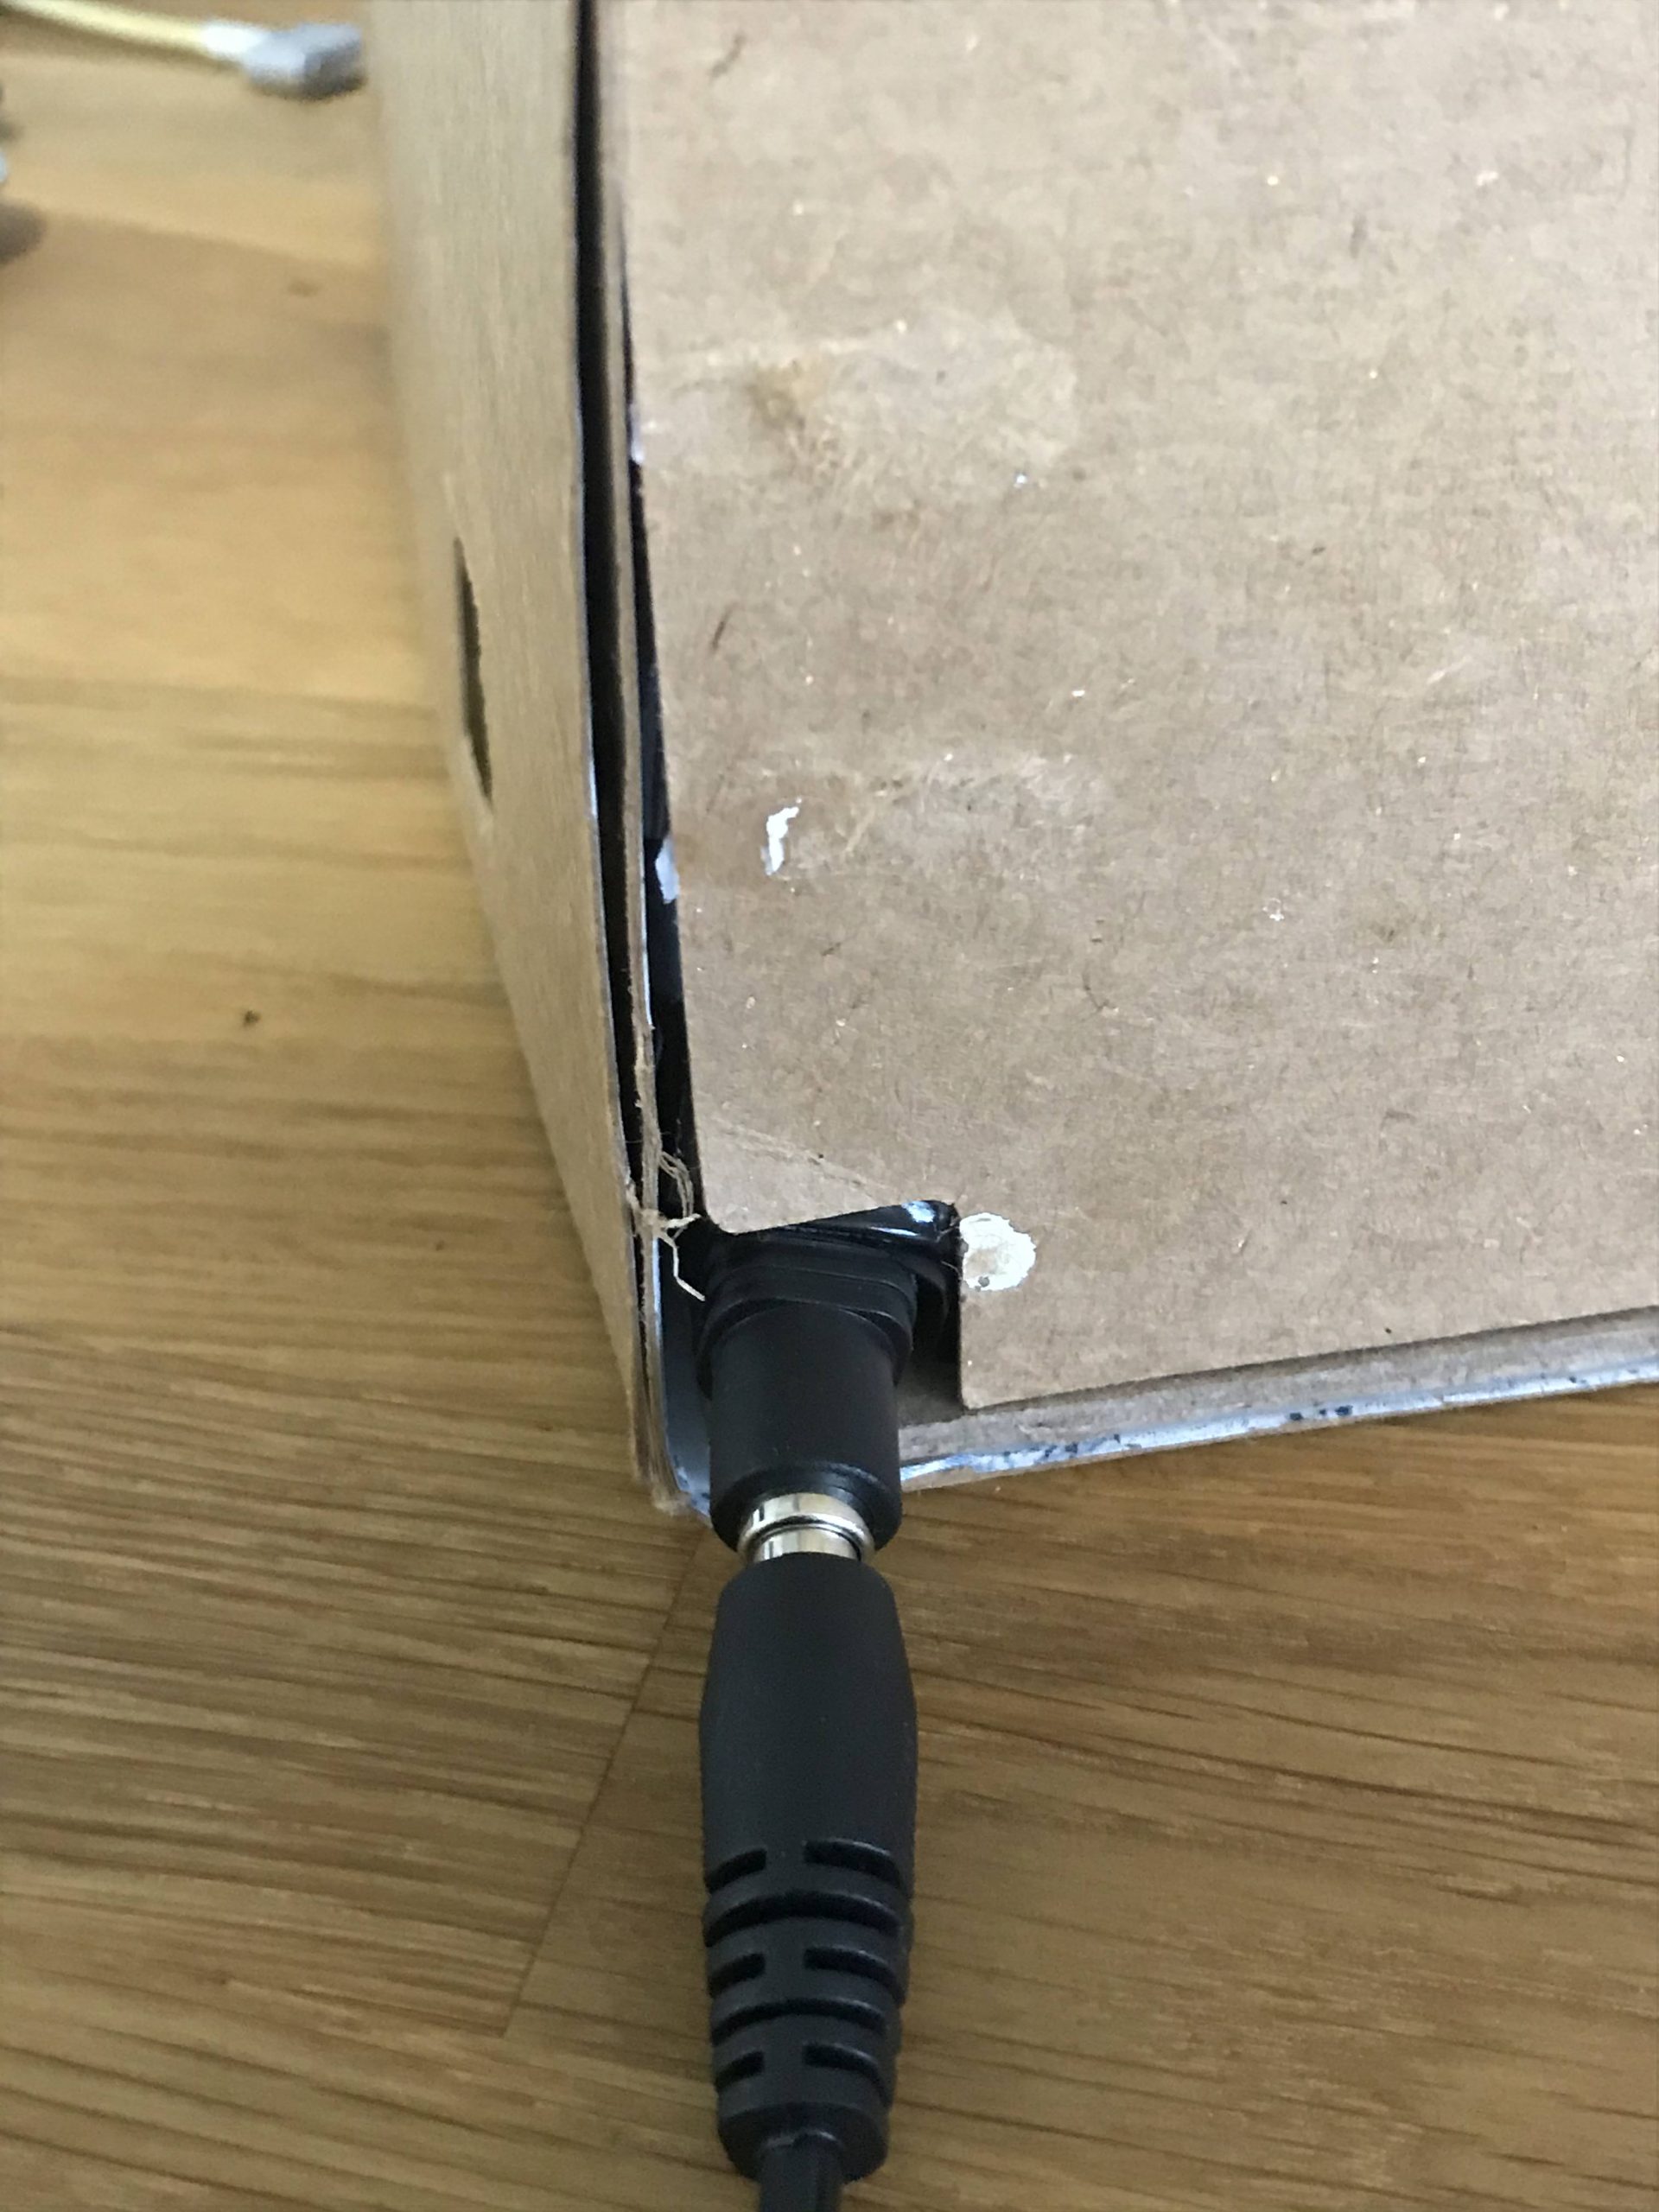
The laundry tracker is plugged into a 5V source through an opening in the back of the box.
Process :
Decision 1: Add a push button
When the button was pushed the LCD displayed the text about the washer and the dryer. I decided to add this feature so that the screen was not constantly displaying the text. Leaving the display on permanently would have been annoying because this box is only needed when I am looking to do laundry, which is on the order of twice a week.
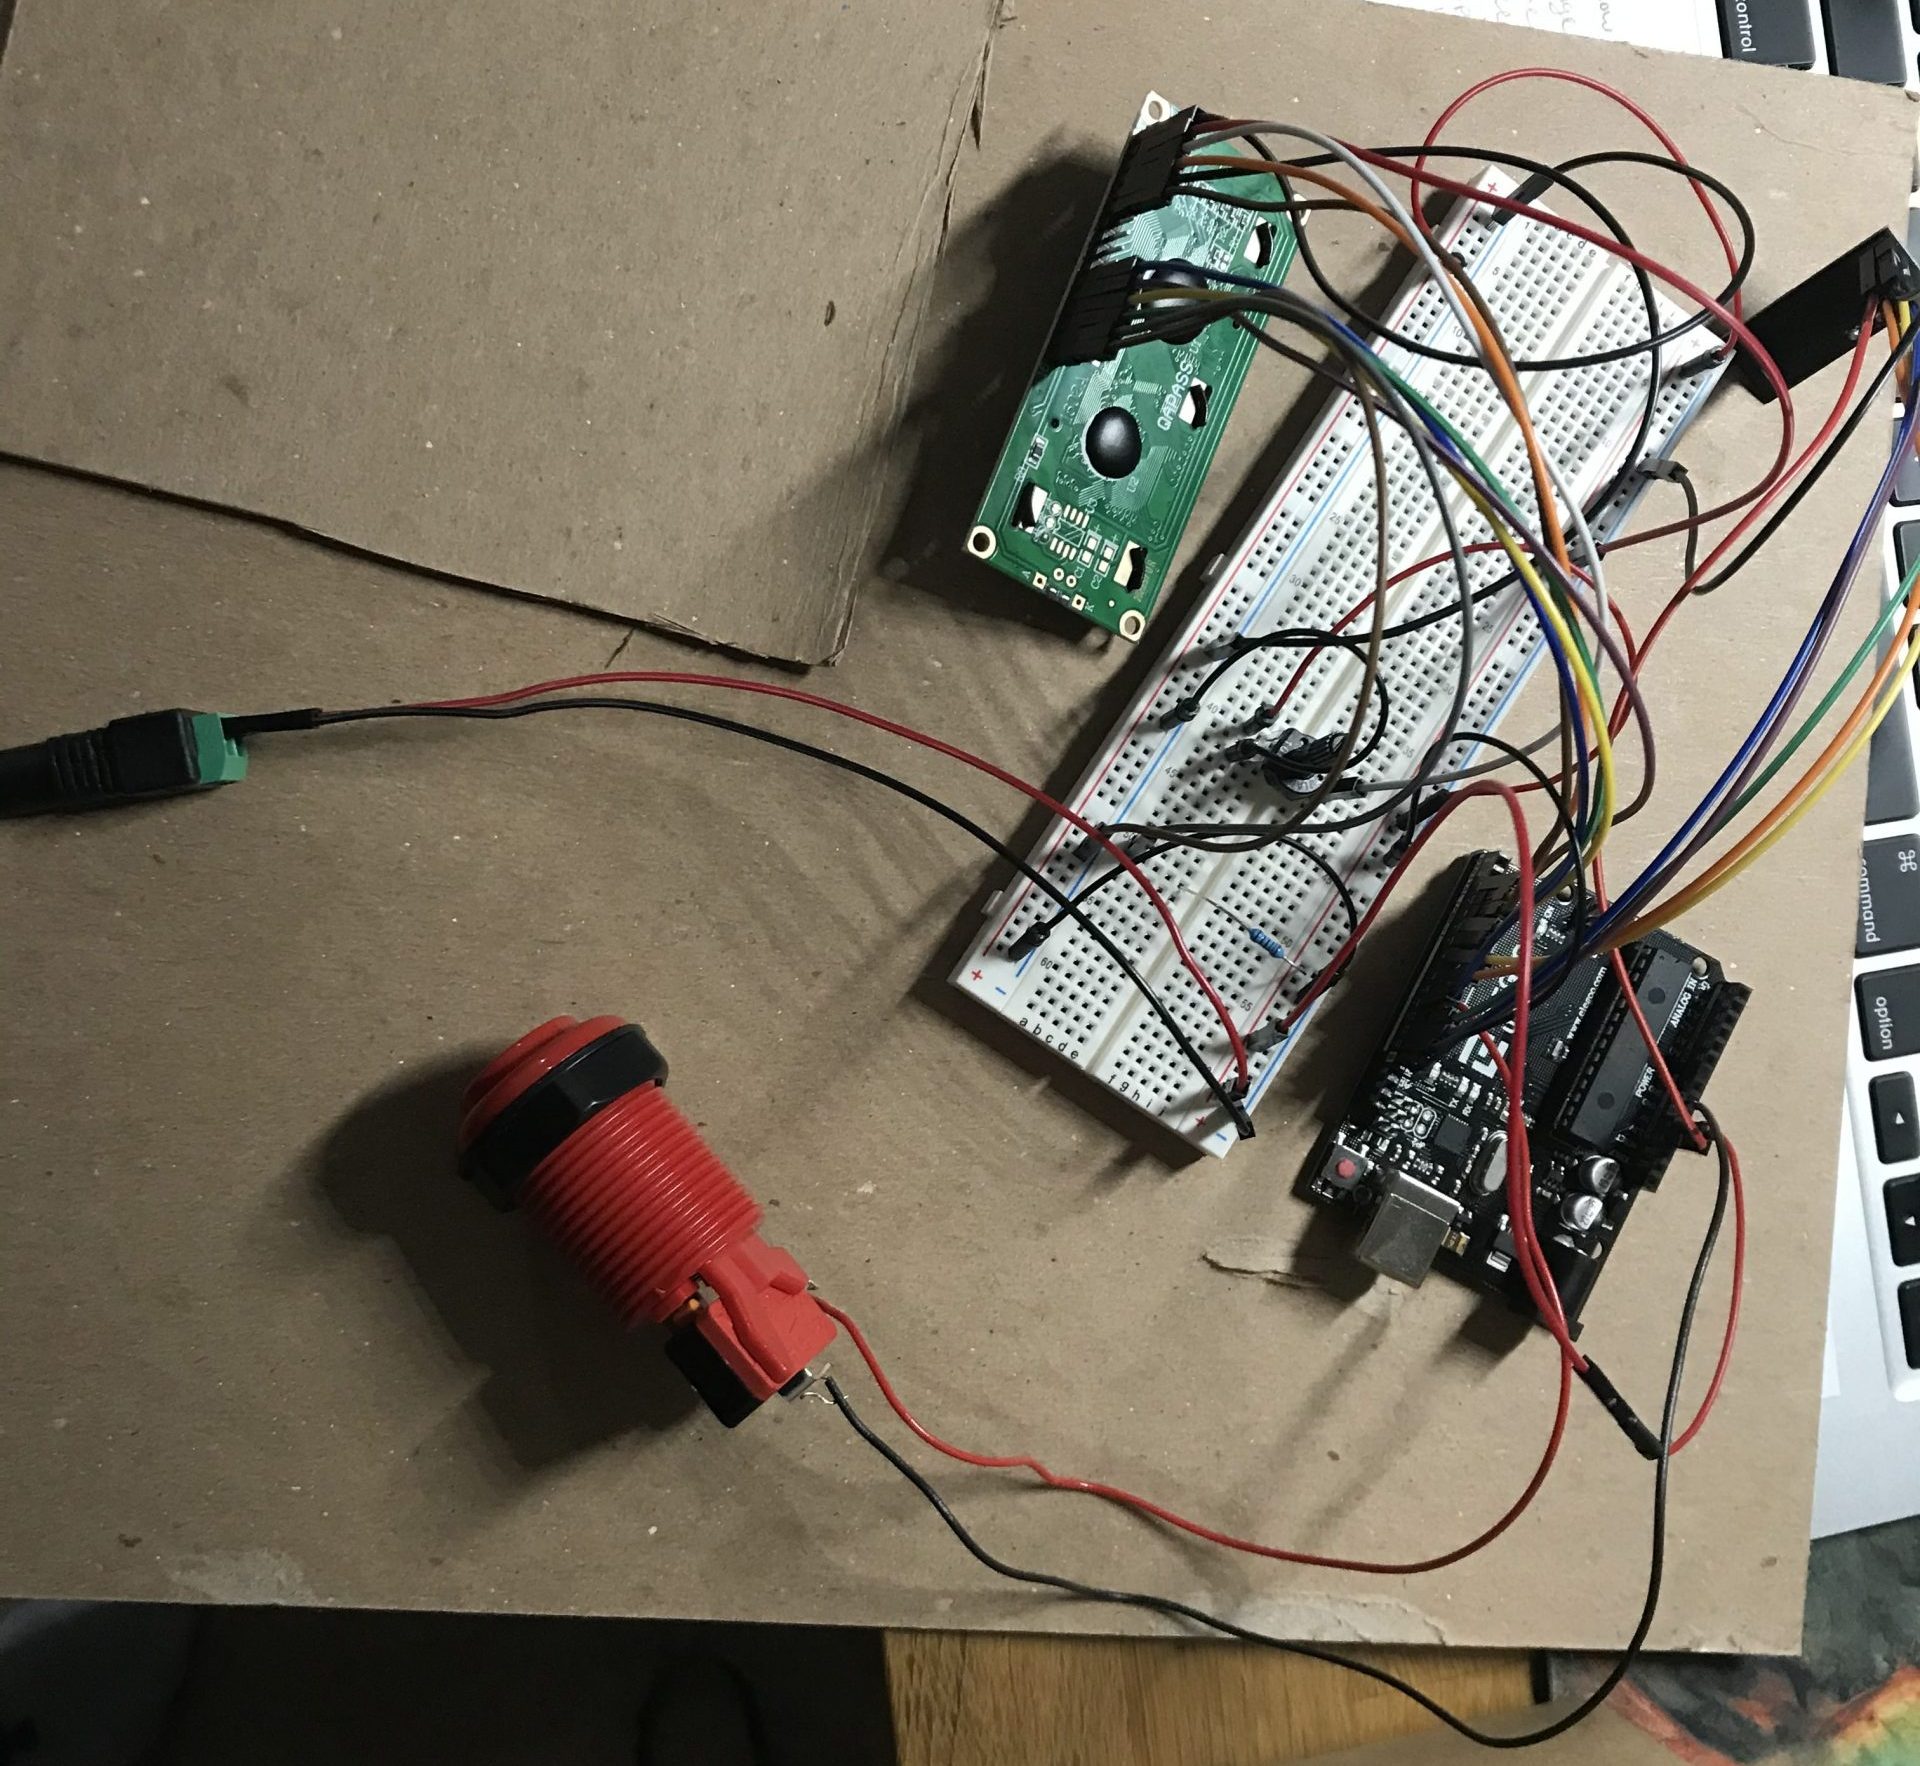
The push button is wired to the arduino to control the LCD display.
Decision 2: Display the amount of time the washer/ dryer was on
Originally the LCD was going to start a count down timer when the washer or dryer were determined to be on. For example, when the washer was determined to be on a 30 minute timer was going to be started that the LCD would have displayed. I decided to change this to a timer that counted up from zero like a stop watch. I made this decision because the washer and the dryer do not always run for a set time. The run times are determined by the who ever is doing laundry. There was no way for me to determine this using accelerometers so I decided to count up time instead. The information displayed on the LCD would more accuracy describe the state the washer and the dryer were in.
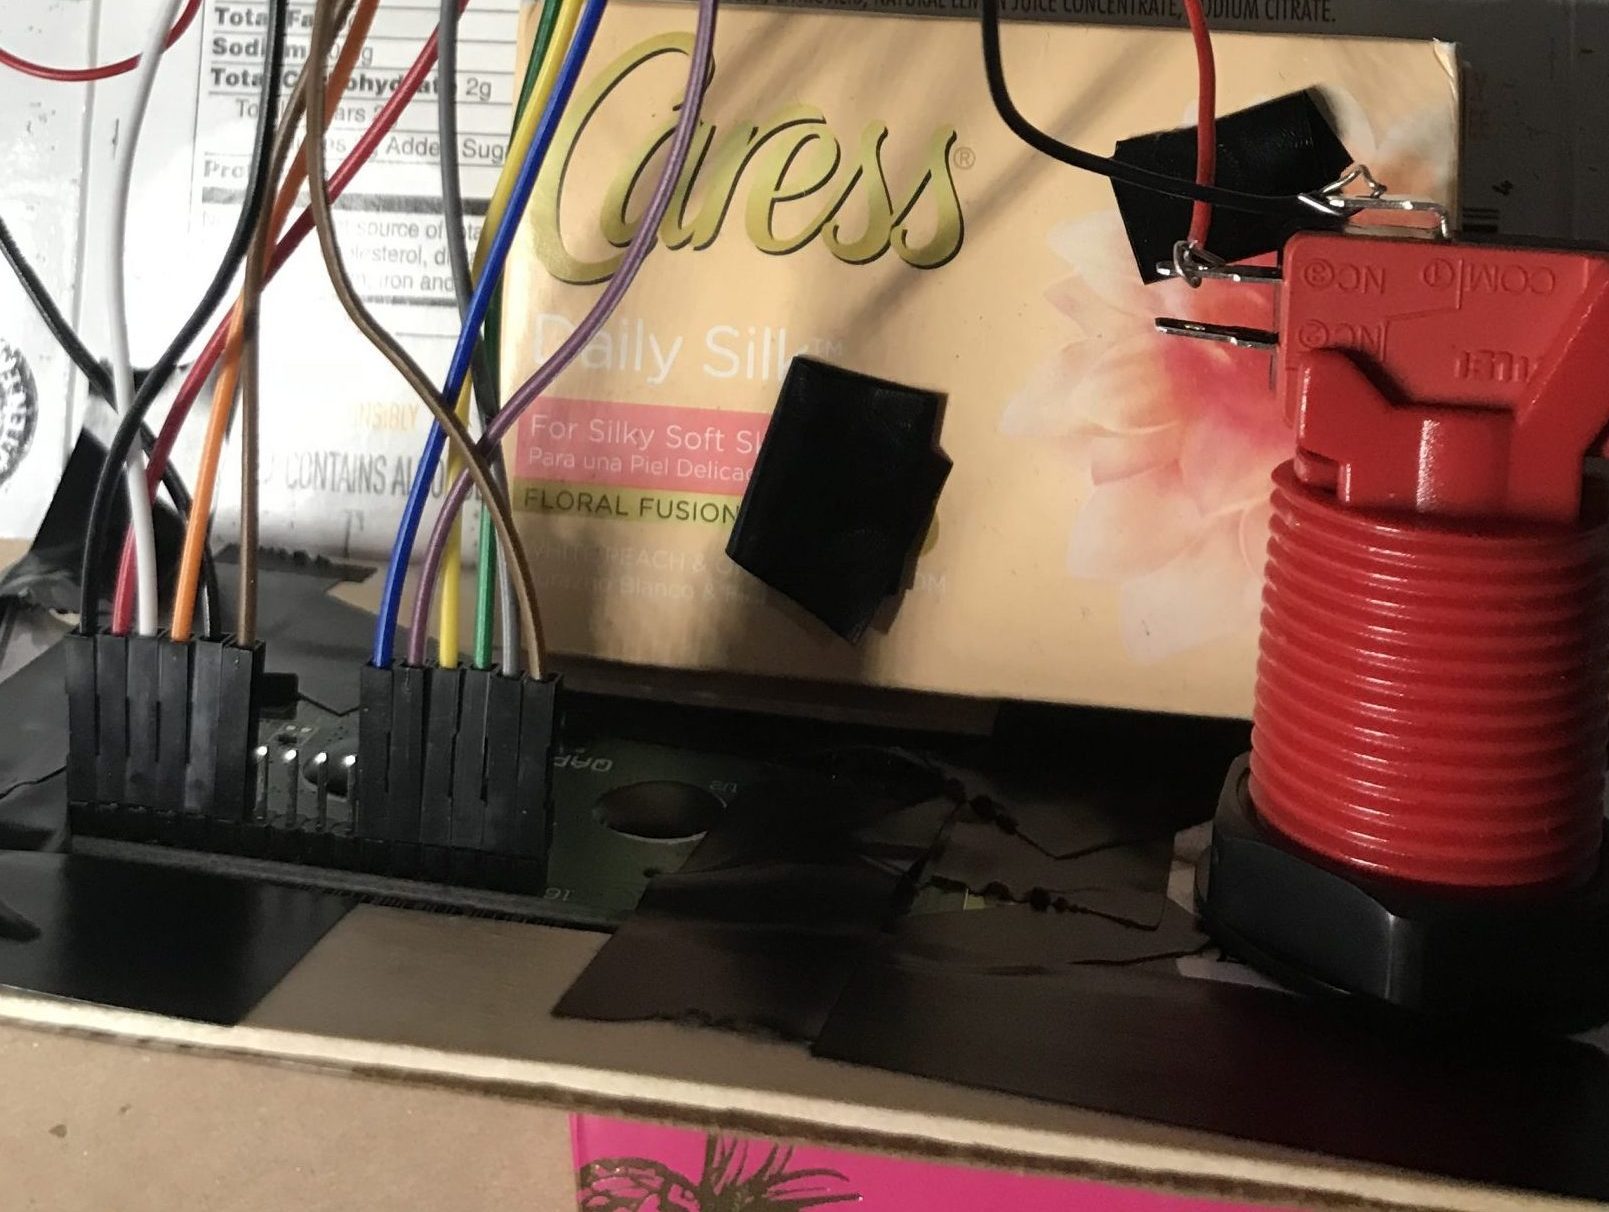
Illustrates how the button and the LCD were arranged on the inside of the display box so that the wires were all hidden and the outside of the box looked neat.
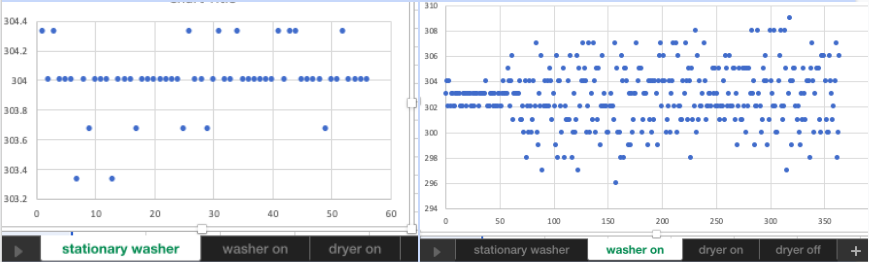
The signal values the accelerometer was reading when the washer was off (left) and when the washer was off (right). The y-axis is the signal reading and the x-axis is index of the signal value. This was use to figure out when the washer (and with other graphs, the dryer) was on or off.
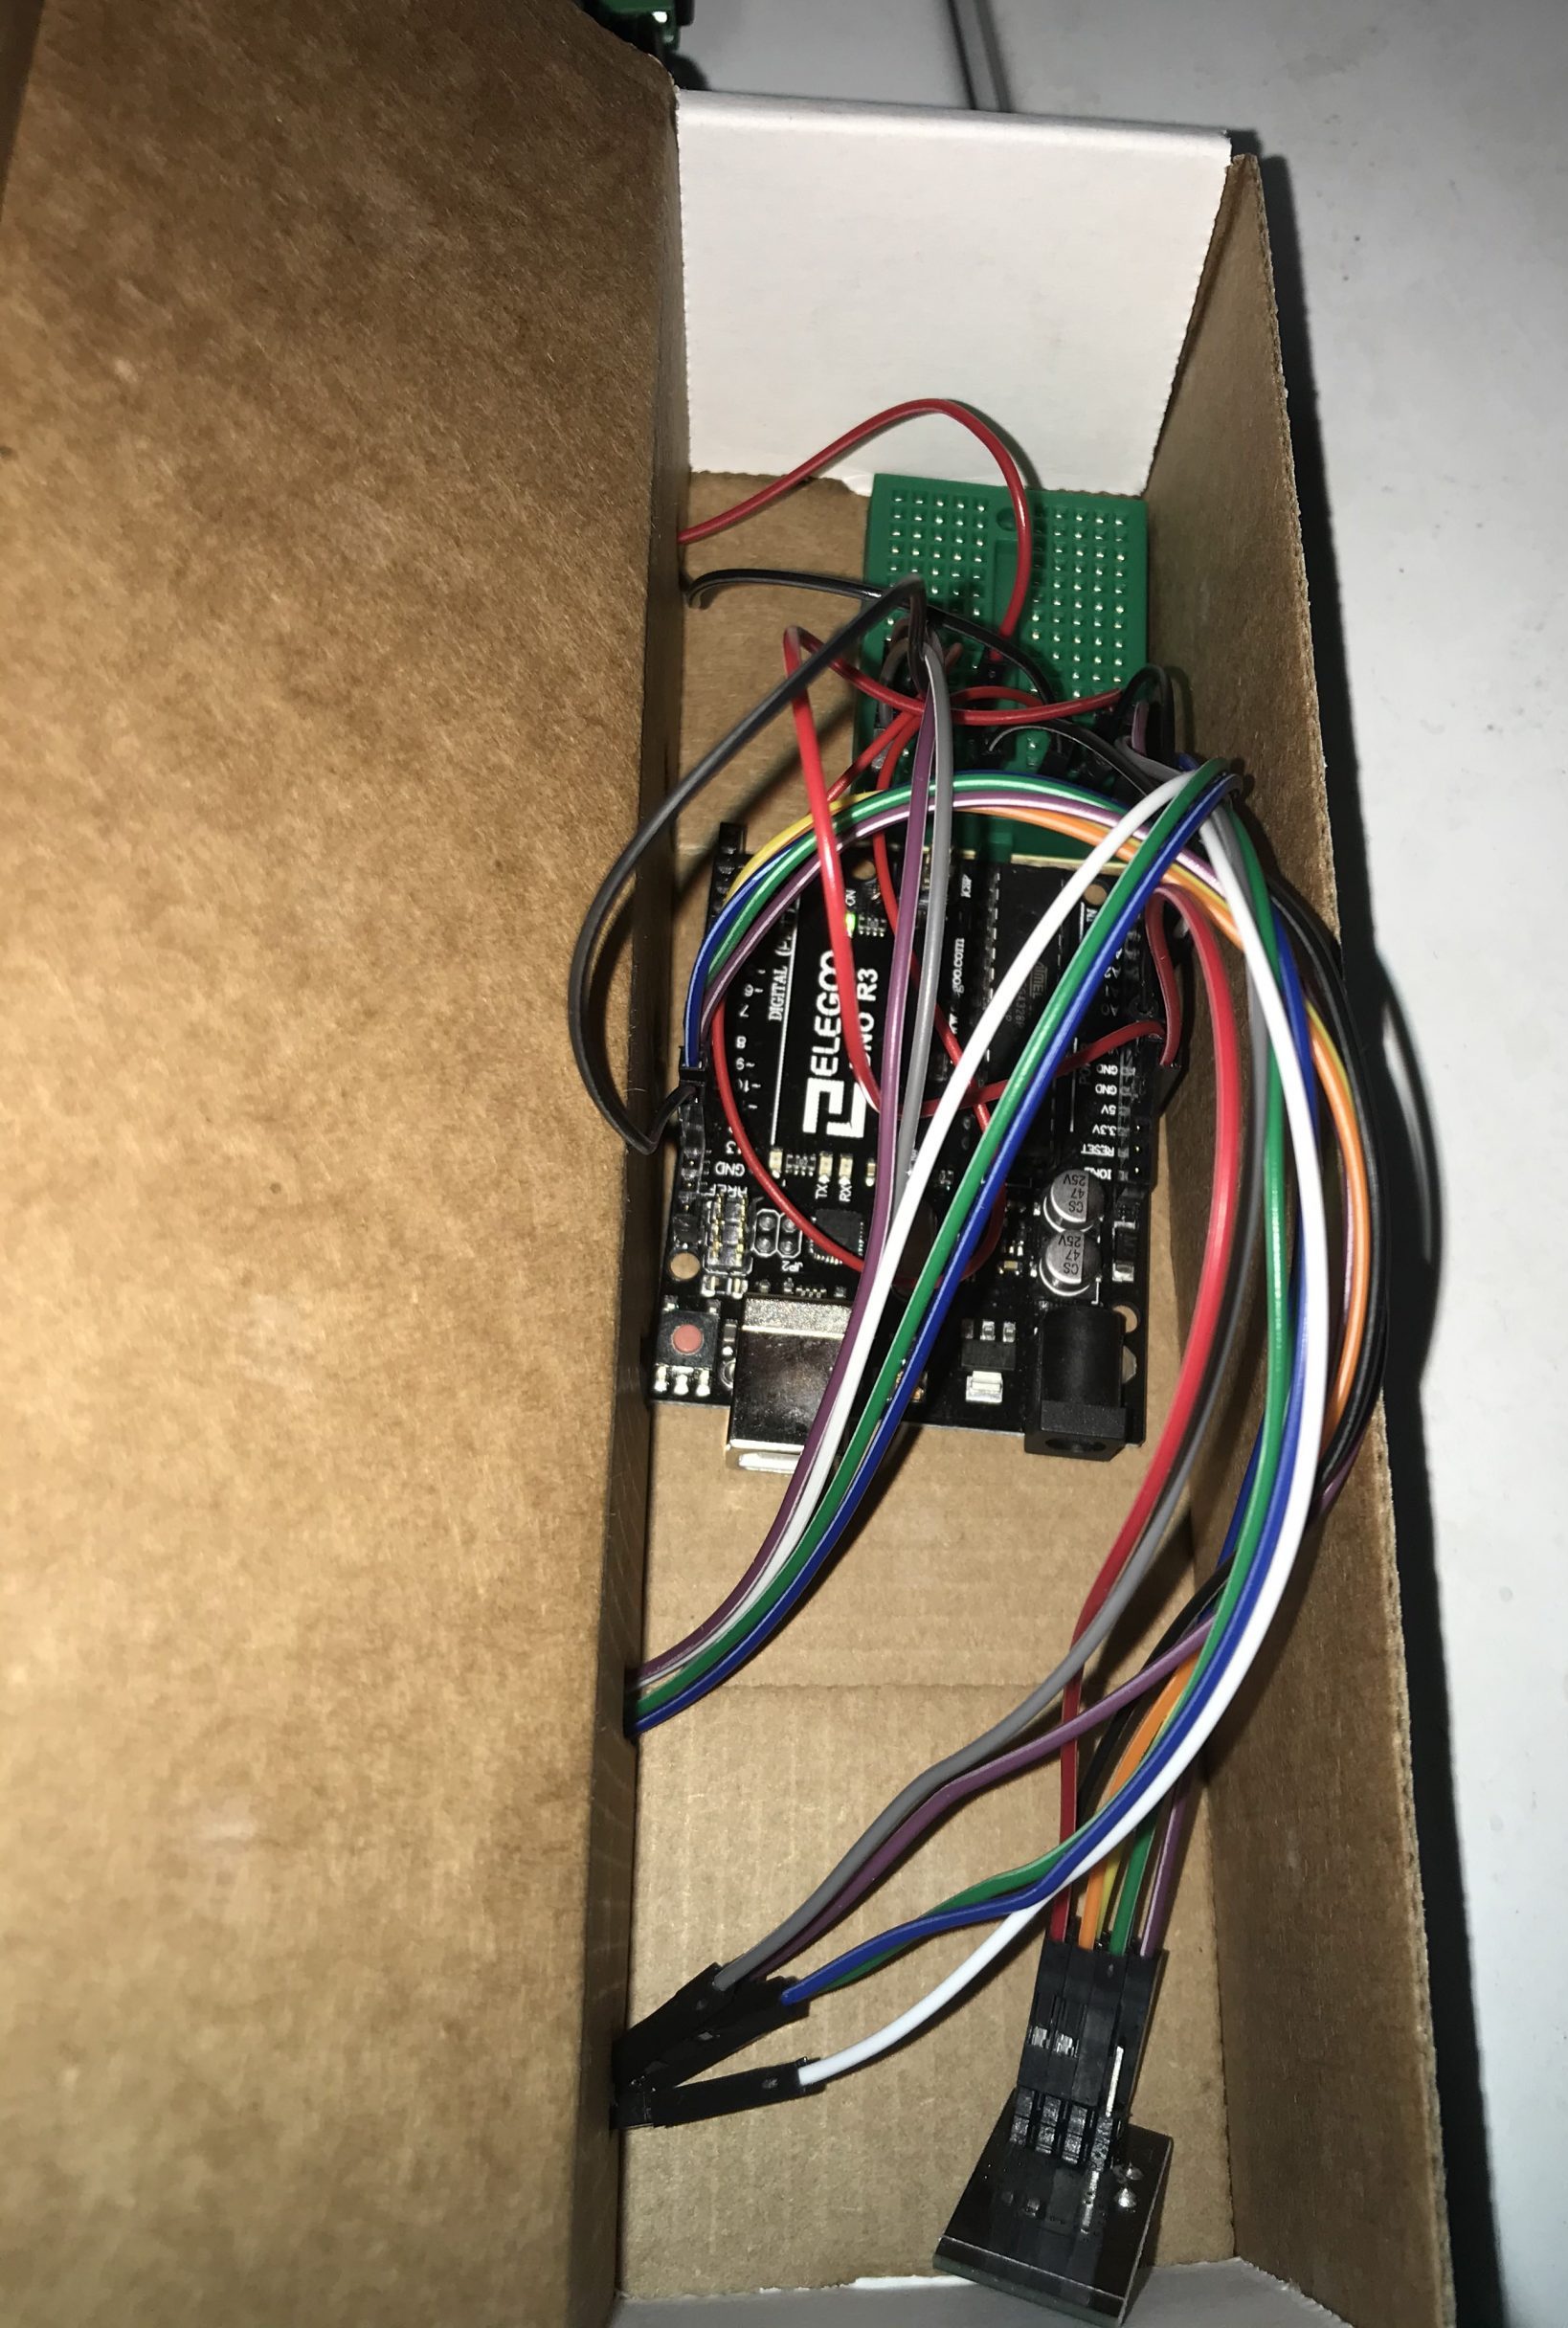
The process of making the wires neat and organized for the electronics that went in the basement with the washer and dryer.
Discussion:
The only piece of written feedback I got said in part, “I think with a higher sampling rate and some digital signal processing this could be generalized to detect all sort of mechanical processes. You could even attempt human activity recognition by measuring the floor vibration and collecting data on the characteristic signals of daily life.” I disagree with the second part of this statement. I disagree because of the data I recorded from testing the accelerometers on my washer and dryer. When I sampled at the fastest rate over an extended period of time it was barely able to determine whether the washer or dryer was on. I don’t believe the accelerometers, at least how they were arranged for my project, are sensitive to measure something like the vibrations produced from people walking.
In this project I think that overall I did a good job and I am happy with the final product. My project worked how I intended. It was able to sense when the washer or dryer was on and send that information to an LCD to display how long each machine was on for at that moment. Making everything look nice was hard because that is not one of my strengths and I focused a lot on making all the electronics and code work properly. However it was also really enjoyable to make a presentable box from things I found around my house and a really good learning experience. Furthermore, processing the data from the accelerometer proved to be much harder than I thought it would be. The problem was that the signals from when the machines were on and off were similar. I had to take a range of values and compute the deviation to determine if the machines were on or off. From this I learned how to deal and process signals from sensors in a way to get out the desired information.
Given that I made the display box out of cardboard I found in my house, I think that it looks pretty neat and put together. For the next iteration I would like to laser cut the display box to make it neater and more presentable. I would also use stronger radio modules because when the display box was in my room it could not pick up the radio signal from the washer and dryer. The display box could pick up the signal down the hall from my room but the cutoff was before my room. It would be nice to be able to leave the box in my room where my laundry bag is rather than in the hallway.
Schematic:
Emitter
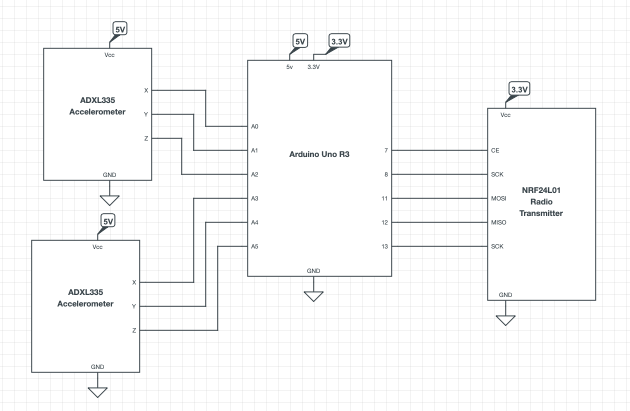
Electronic schematic for the transmitter setup that was placed with the washer and the dryer.
Receiver
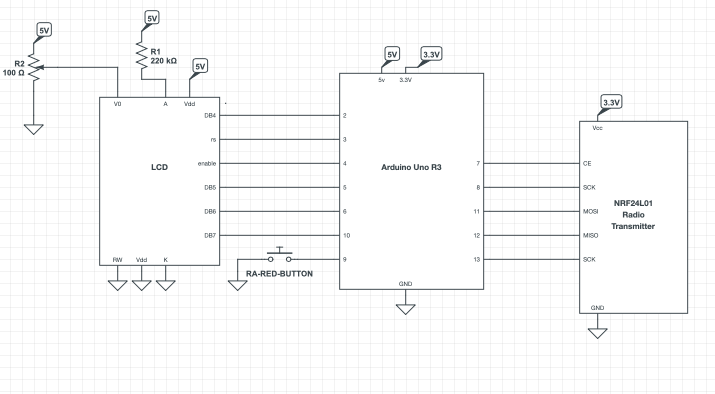
Electronic schematic that depicts the electronics that received the data and was housed in the display box.
Code:
Emitter
/*
Title: Laundry Tracker
(emitter)
By: Mimi Marino

Description: This code takes readings from an
accelerometer attached to a washer and an
accelerometer attached to a dryer. 100 readings are
taken at a time for both the washer and the dryer and
the max and min values are determined. If the range of
the max min values is large enough it is deteremined
that particular machine is on. The radio module then
sends out a signal that indicates if both, only the
washer, only the dryer or neither is on.

Pin Mapping:

 pin   | mode   | description
 ------|--------|------------
  7      output   Radio - CE
  8      output   Radio - CSN
  11     output   Radio - MOSI
  12     output   Radio - MISO
  13     output   Radio - SCK
  A0     input    Accelerometer_W
  A1     input    Accelerometer_W
  A2     input    Accelerometer_W
  A3     input    Accelerometer_D
  A4     input    Accelerometer_D
  A5     input    Accelerometer_D

Credit:
-starter code for NRF24L01 radio transmitter
https://github.com/robzach/Empathy_Machine/blob/master/development/transmit_analog_read/transmit_analog_read.ino

-How to wire NRF24L01 radio module
//https://howtomechatronics.com/tutorials/arduino/arduino-wireless-communication-//nrf24l01-tutorial/


*/
#include <SPI.h>
#include <nRF24L01.h>
#include <RF24.h>

const int XPIN_W = A0;
const int YPIN_W = A1;
const int ZPIN_W = A2;

const int XPIN_D = A3;
const int YPIN_D = A4;
const int ZPIN_D = A5;

const int RADIO_CE = 7;
const int RADIO_CSN = 8;
RF24 radio(RADIO_CE, RADIO_CSN);
const byte address[6] = "00001";

void setup() {
  // set up radio
  Serial.begin(9600);
  radio.begin();
  radio.openWritingPipe(address);
  radio.setPALevel(RF24_PA_HIGH);
  radio.stopListening();

  pinMode(XPIN_W, INPUT);
  pinMode(YPIN_W, INPUT);
  pinMode(ZPIN_W, INPUT);
  pinMode(XPIN_D, INPUT);
  pinMode(YPIN_D, INPUT);
  pinMode(ZPIN_D, INPUT);
}


void loop() {
  int on=0;
  int count=0;
  int maxValueW=0;
  int minValueW=1023;
  int maxValueD=0;
  int minValueD=1023;

  //will hold current sensor reading
  int currentWasher;
  int currentDryer;

  //takes 100 reading from both the washer and dryer
  //sensors and finds the max/ min of the 100 values
  while (count<100){
    //avg of the X, Y and Z readings
    currentWasher = (analogRead(XPIN_W) + analogRead(YPIN_W) + analogRead(ZPIN_W))/3;
    currentDryer = (analogRead(XPIN_D) + analogRead(YPIN_D) + analogRead(ZPIN_D))/3;
    if (currentWasher<minValueW){
      minValueW=currentWasher;
    }
    if (currentWasher>maxValueW){
      maxValueW=currentWasher;
    }
    if (currentDryer<minValueD){
      minValueD=currentDryer;
    }
    if (currentDryer>maxValueD){
      maxValueD=currentDryer;
    }
    count++;
  }

  //when the range btw max and min is greater than 2
  //the machine is determined to beon
  if ((maxValueW-minValueW >2) and (maxValueD-minValueD >2)){
    //both washer and dryer are on
    on=6;
  }
  else{
    if (maxValueW-minValueW >2){
      //just washer is on
      on=3;
    }
    else if (maxValueD-minValueD >2){
      //just dryer is on
      on=2;
    }
    else {
      //neither is on
      on=5;
    }
  }
  // transmit values
  radio.write(&on, sizeof(on));
}- <span class="com">/*
- Title: Laundry Tracker
- (emitter)
- By: Mimi Marino
- Description: This code takes readings from an
- accelerometer attached to a washer and an
- accelerometer attached to a dryer. 100 readings are
- taken at a time for both the washer and the dryer and
- the max and min values are determined. If the range of
- the max min values is large enough it is deteremined
- that particular machine is on. The radio module then
- sends out a signal that indicates if both, only the
- washer, only the dryer or neither is on.
- Pin Mapping:
- pin | mode | description
- ------|--------|------------
- 7 output Radio - CE
- 8 output Radio - CSN
- 11 output Radio - MOSI
- 12 output Radio - MISO
- 13 output Radio - SCK
- A0 input Accelerometer_W
- A1 input Accelerometer_W
- A2 input Accelerometer_W
- A3 input Accelerometer_D
- A4 input Accelerometer_D
- A5 input Accelerometer_D
- Credit:
- -starter code for NRF24L01 radio transmitter
- https://github.com/robzach/Empathy_Machine/blob/master/development/transmit_analog_read/transmit_analog_read.ino
- -How to wire NRF24L01 radio module
- //https://howtomechatronics.com/tutorials/arduino/arduino-wireless-communication-//nrf24l01-tutorial/
- */</span><span class="pln">
- </span><span class="com">#include</span><span class="pln"> </span><span class="str"><SPI.h></span><span class="pln">
- </span><span class="com">#include</span><span class="pln"> </span><span class="str"><nRF24L01.h></span><span class="pln">
- </span><span class="com">#include</span><span class="pln"> </span><span class="str"><RF24.h></span><span class="pln">
- </span><span class="kwd">const</span><span class="pln"> </span><span class="kwd">int</span><span class="pln"> XPIN_W </span><span class="pun">=</span><span class="pln"> A0</span><span class="pun">;</span><span class="pln">
- </span><span class="kwd">const</span><span class="pln"> </span><span class="kwd">int</span><span class="pln"> YPIN_W </span><span class="pun">=</span><span class="pln"> A1</span><span class="pun">;</span><span class="pln">
- </span><span class="kwd">const</span><span class="pln"> </span><span class="kwd">int</span><span class="pln"> ZPIN_W </span><span class="pun">=</span><span class="pln"> A2</span><span class="pun">;</span><span class="pln">
- </span><span class="kwd">const</span><span class="pln"> </span><span class="kwd">int</span><span class="pln"> XPIN_D </span><span class="pun">=</span><span class="pln"> A3</span><span class="pun">;</span><span class="pln">
- </span><span class="kwd">const</span><span class="pln"> </span><span class="kwd">int</span><span class="pln"> YPIN_D </span><span class="pun">=</span><span class="pln"> A4</span><span class="pun">;</span><span class="pln">
- </span><span class="kwd">const</span><span class="pln"> </span><span class="kwd">int</span><span class="pln"> ZPIN_D </span><span class="pun">=</span><span class="pln"> A5</span><span class="pun">;</span><span class="pln">
- </span><span class="kwd">const</span><span class="pln"> </span><span class="kwd">int</span><span class="pln"> RADIO_CE </span><span class="pun">=</span><span class="pln"> </span><span class="lit">7</span><span class="pun">;</span><span class="pln">
- </span><span class="kwd">const</span><span class="pln"> </span><span class="kwd">int</span><span class="pln"> RADIO_CSN </span><span class="pun">=</span><span class="pln"> </span><span class="lit">8</span><span class="pun">;</span><span class="pln">
- RF24 radio</span><span class="pun">(</span><span class="pln">RADIO_CE</span><span class="pun">,</span><span class="pln"> RADIO_CSN</span><span class="pun">);</span><span class="pln">
- </span><span class="kwd">const</span><span class="pln"> </span><span class="kwd">byte</span><span class="pln"> address</span><span class="pun">[</span><span class="lit">6</span><span class="pun">]</span><span class="pln"> </span><span class="pun">=</span><span class="pln"> </span><span class="str">"00001"</span><span class="pun">;</span><span class="pln">
- </span><span class="kwd">void</span><span class="pln"> setup</span><span class="pun">()</span><span class="pln"> </span><span class="pun">{</span><span class="pln">
- </span><span class="com">// set up radio</span><span class="pln">
- </span><span class="typ">Serial</span><span class="pun">.</span><span class="kwd">begin</span><span class="pun">(</span><span class="lit">9600</span><span class="pun">);</span><span class="pln">
- radio</span><span class="pun">.</span><span class="kwd">begin</span><span class="pun">();</span><span class="pln">
- radio</span><span class="pun">.</span><span class="pln">openWritingPipe</span><span class="pun">(</span><span class="pln">address</span><span class="pun">);</span><span class="pln">
- radio</span><span class="pun">.</span><span class="pln">setPALevel</span><span class="pun">(</span><span class="pln">RF24_PA_HIGH</span><span class="pun">);</span><span class="pln">
- radio</span><span class="pun">.</span><span class="pln">stopListening</span><span class="pun">();</span><span class="pln">
- pinMode</span><span class="pun">(</span><span class="pln">XPIN_W</span><span class="pun">,</span><span class="pln"> INPUT</span><span class="pun">);</span><span class="pln">
- pinMode</span><span class="pun">(</span><span class="pln">YPIN_W</span><span class="pun">,</span><span class="pln"> INPUT</span><span class="pun">);</span><span class="pln">
- pinMode</span><span class="pun">(</span><span class="pln">ZPIN_W</span><span class="pun">,</span><span class="pln"> INPUT</span><span class="pun">);</span><span class="pln">
- pinMode</span><span class="pun">(</span><span class="pln">XPIN_D</span><span class="pun">,</span><span class="pln"> INPUT</span><span class="pun">);</span><span class="pln">
- pinMode</span><span class="pun">(</span><span class="pln">YPIN_D</span><span class="pun">,</span><span class="pln"> INPUT</span><span class="pun">);</span><span class="pln">
- pinMode</span><span class="pun">(</span><span class="pln">ZPIN_D</span><span class="pun">,</span><span class="pln"> INPUT</span><span class="pun">);</span><span class="pln">
- </span><span class="pun">}</span><span class="pln">
- </span><span class="kwd">void</span><span class="pln"> loop</span><span class="pun">()</span><span class="pln"> </span><span class="pun">{</span><span class="pln">
- </span><span class="kwd">int</span><span class="pln"> on</span><span class="pun">=</span><span class="lit">0</span><span class="pun">;</span><span class="pln">
- </span><span class="kwd">int</span><span class="pln"> count</span><span class="pun">=</span><span class="lit">0</span><span class="pun">;</span><span class="pln">
- </span><span class="kwd">int</span><span class="pln"> maxValueW</span><span class="pun">=</span><span class="lit">0</span><span class="pun">;</span><span class="pln">
- </span><span class="kwd">int</span><span class="pln"> minValueW</span><span class="pun">=</span><span class="lit">1023</span><span class="pun">;</span><span class="pln">
- </span><span class="kwd">int</span><span class="pln"> maxValueD</span><span class="pun">=</span><span class="lit">0</span><span class="pun">;</span><span class="pln">
- </span><span class="kwd">int</span><span class="pln"> minValueD</span><span class="pun">=</span><span class="lit">1023</span><span class="pun">;</span><span class="pln">
- </span><span class="com">//will hold current sensor reading</span><span class="pln">
- </span><span class="kwd">int</span><span class="pln"> currentWasher</span><span class="pun">;</span><span class="pln">
- </span><span class="kwd">int</span><span class="pln"> currentDryer</span><span class="pun">;</span><span class="pln">
- </span><span class="com">//takes 100 reading from both the washer and dryer</span><span class="pln">
- </span><span class="com">//sensors and finds the max/ min of the 100 values</span><span class="pln">
- </span><span class="kwd">while</span><span class="pln"> </span><span class="pun">(</span><span class="pln">count</span><span class="pun"><</span><span class="lit">100</span><span class="pun">){</span><span class="pln">
- </span><span class="com">//avg of the X, Y and Z readings</span><span class="pln">
- currentWasher </span><span class="pun">=</span><span class="pln"> </span><span class="pun">(</span><span class="pln">analogRead</span><span class="pun">(</span><span class="pln">XPIN_W</span><span class="pun">)</span><span class="pln"> </span><span class="pun">+</span><span class="pln"> analogRead</span><span class="pun">(</span><span class="pln">YPIN_W</span><span class="pun">)</span><span class="pln"> </span><span class="pun">+</span><span class="pln"> analogRead</span><span class="pun">(</span><span class="pln">ZPIN_W</span><span class="pun">))/</span><span class="lit">3</span><span class="pun">;</span><span class="pln">
- currentDryer </span><span class="pun">=</span><span class="pln"> </span><span class="pun">(</span><span class="pln">analogRead</span><span class="pun">(</span><span class="pln">XPIN_D</span><span class="pun">)</span><span class="pln"> </span><span class="pun">+</span><span class="pln"> analogRead</span><span class="pun">(</span><span class="pln">YPIN_D</span><span class="pun">)</span><span class="pln"> </span><span class="pun">+</span><span class="pln"> analogRead</span><span class="pun">(</span><span class="pln">ZPIN_D</span><span class="pun">))/</span><span class="lit">3</span><span class="pun">;</span><span class="pln">
- </span><span class="kwd">if</span><span class="pln"> </span><span class="pun">(</span><span class="pln">currentWasher</span><span class="pun"><</span><span class="pln">minValueW</span><span class="pun">){</span><span class="pln">
- minValueW</span><span class="pun">=</span><span class="pln">currentWasher</span><span class="pun">;</span><span class="pln">
- </span><span class="pun">}</span><span class="pln">
- </span><span class="kwd">if</span><span class="pln"> </span><span class="pun">(</span><span class="pln">currentWasher</span><span class="pun">></span><span class="pln">maxValueW</span><span class="pun">){</span><span class="pln">
- maxValueW</span><span class="pun">=</span><span class="pln">currentWasher</span><span class="pun">;</span><span class="pln">
- </span><span class="pun">}</span><span class="pln">
- </span><span class="kwd">if</span><span class="pln"> </span><span class="pun">(</span><span class="pln">currentDryer</span><span class="pun"><</span><span class="pln">minValueD</span><span class="pun">){</span><span class="pln">
- minValueD</span><span class="pun">=</span><span class="pln">currentDryer</span><span class="pun">;</span><span class="pln">
- </span><span class="pun">}</span><span class="pln">
- </span><span class="kwd">if</span><span class="pln"> </span><span class="pun">(</span><span class="pln">currentDryer</span><span class="pun">></span><span class="pln">maxValueD</span><span class="pun">){</span><span class="pln">
- maxValueD</span><span class="pun">=</span><span class="pln">currentDryer</span><span class="pun">;</span><span class="pln">
- </span><span class="pun">}</span><span class="pln">
- count</span><span class="pun">++;</span><span class="pln">
- </span><span class="pun">}</span><span class="pln">
- </span><span class="com">//when the range btw max and min is greater than 2</span><span class="pln">
- </span><span class="com">//the machine is determined to beon</span><span class="pln">
- </span><span class="kwd">if</span><span class="pln"> </span><span class="pun">((</span><span class="pln">maxValueW</span><span class="pun">-</span><span class="pln">minValueW </span><span class="pun">></span><span class="lit">2</span><span class="pun">)</span><span class="pln"> </span><span class="kwd">and</span><span class="pln"> </span><span class="pun">(</span><span class="pln">maxValueD</span><span class="pun">-</span><span class="pln">minValueD </span><span class="pun">></span><span class="lit">2</span><span class="pun">)){</span><span class="pln">
- </span><span class="com">//both washer and dryer are on</span><span class="pln">
- on</span><span class="pun">=</span><span class="lit">6</span><span class="pun">;</span><span class="pln">
- </span><span class="pun">}</span><span class="pln">
- </span><span class="kwd">else</span><span class="pun">{</span><span class="pln">
- </span><span class="kwd">if</span><span class="pln"> </span><span class="pun">(</span><span class="pln">maxValueW</span><span class="pun">-</span><span class="pln">minValueW </span><span class="pun">></span><span class="lit">2</span><span class="pun">){</span><span class="pln">
- </span><span class="com">//just washer is on</span><span class="pln">
- on</span><span class="pun">=</span><span class="lit">3</span><span class="pun">;</span><span class="pln">
- </span><span class="pun">}</span><span class="pln">
- </span><span class="kwd">else</span><span class="pln"> </span><span class="kwd">if</span><span class="pln"> </span><span class="pun">(</span><span class="pln">maxValueD</span><span class="pun">-</span><span class="pln">minValueD </span><span class="pun">></span><span class="lit">2</span><span class="pun">){</span><span class="pln">
- </span><span class="com">//just dryer is on</span><span class="pln">
- on</span><span class="pun">=</span><span class="lit">2</span><span class="pun">;</span><span class="pln">
- </span><span class="pun">}</span><span class="pln">
- </span><span class="kwd">else</span><span class="pln"> </span><span class="pun">{</span><span class="pln">
- </span><span class="com">//neither is on</span><span class="pln">
- on</span><span class="pun">=</span><span class="lit">5</span><span class="pun">;</span><span class="pln">
- </span><span class="pun">}</span><span class="pln">
- </span><span class="pun">}</span><span class="pln">
- </span><span class="com">// transmit values</span><span class="pln">
- radio</span><span class="pun">.</span><span class="pln">write</span><span class="pun">(&</span><span class="pln">on</span><span class="pun">,</span><span class="pln"> </span><span class="kwd">sizeof</span><span class="pun">(</span><span class="pln">on</span><span class="pun">));</span><span class="pln">
- </span><span class="pun">}</span>
<span class="com">/*
Title: Laundry Tracker
(emitter)
By: Mimi Marino

Description: This code takes readings from an
accelerometer attached to a washer and an
accelerometer attached to a dryer. 100 readings are
taken at a time for both the washer and the dryer and
the max and min values are determined. If the range of
the max min values is large enough it is deteremined
that particular machine is on. The radio module then
sends out a signal that indicates if both, only the
washer, only the dryer or neither is on.

Pin Mapping:

 pin   | mode   | description
 ------|--------|------------
  7      output   Radio - CE
  8      output   Radio - CSN
  11     output   Radio - MOSI
  12     output   Radio - MISO
  13     output   Radio - SCK
  A0     input    Accelerometer_W
  A1     input    Accelerometer_W
  A2     input    Accelerometer_W
  A3     input    Accelerometer_D
  A4     input    Accelerometer_D
  A5     input    Accelerometer_D

Credit:
-starter code for NRF24L01 radio transmitter
https://github.com/robzach/Empathy_Machine/blob/master/development/transmit_analog_read/transmit_analog_read.ino

-How to wire NRF24L01 radio module
//https://howtomechatronics.com/tutorials/arduino/arduino-wireless-communication-//nrf24l01-tutorial/


*/</span><span class="pln">
</span><span class="com">#include</span><span class="pln"> </span><span class="str"><SPI.h></span><span class="pln">
</span><span class="com">#include</span><span class="pln"> </span><span class="str"><nRF24L01.h></span><span class="pln">
</span><span class="com">#include</span><span class="pln"> </span><span class="str"><RF24.h></span><span class="pln">

</span><span class="kwd">const</span><span class="pln"> </span><span class="kwd">int</span><span class="pln"> XPIN_W </span><span class="pun">=</span><span class="pln"> A0</span><span class="pun">;</span><span class="pln">
</span><span class="kwd">const</span><span class="pln"> </span><span class="kwd">int</span><span class="pln"> YPIN_W </span><span class="pun">=</span><span class="pln"> A1</span><span class="pun">;</span><span class="pln">
</span><span class="kwd">const</span><span class="pln"> </span><span class="kwd">int</span><span class="pln"> ZPIN_W </span><span class="pun">=</span><span class="pln"> A2</span><span class="pun">;</span><span class="pln">

</span><span class="kwd">const</span><span class="pln"> </span><span class="kwd">int</span><span class="pln"> XPIN_D </span><span class="pun">=</span><span class="pln"> A3</span><span class="pun">;</span><span class="pln">
</span><span class="kwd">const</span><span class="pln"> </span><span class="kwd">int</span><span class="pln"> YPIN_D </span><span class="pun">=</span><span class="pln"> A4</span><span class="pun">;</span><span class="pln">
</span><span class="kwd">const</span><span class="pln"> </span><span class="kwd">int</span><span class="pln"> ZPIN_D </span><span class="pun">=</span><span class="pln"> A5</span><span class="pun">;</span><span class="pln">

</span><span class="kwd">const</span><span class="pln"> </span><span class="kwd">int</span><span class="pln"> RADIO_CE </span><span class="pun">=</span><span class="pln"> </span><span class="lit">7</span><span class="pun">;</span><span class="pln">
</span><span class="kwd">const</span><span class="pln"> </span><span class="kwd">int</span><span class="pln"> RADIO_CSN </span><span class="pun">=</span><span class="pln"> </span><span class="lit">8</span><span class="pun">;</span><span class="pln">
RF24 radio</span><span class="pun">(</span><span class="pln">RADIO_CE</span><span class="pun">,</span><span class="pln"> RADIO_CSN</span><span class="pun">);</span><span class="pln">
</span><span class="kwd">const</span><span class="pln"> </span><span class="kwd">byte</span><span class="pln"> address</span><span class="pun">[</span><span class="lit">6</span><span class="pun">]</span><span class="pln"> </span><span class="pun">=</span><span class="pln"> </span><span class="str">"00001"</span><span class="pun">;</span><span class="pln">

</span><span class="kwd">void</span><span class="pln"> setup</span><span class="pun">()</span><span class="pln"> </span><span class="pun">{</span><span class="pln">
  </span><span class="com">// set up radio</span><span class="pln">
  </span><span class="typ">Serial</span><span class="pun">.</span><span class="kwd">begin</span><span class="pun">(</span><span class="lit">9600</span><span class="pun">);</span><span class="pln">
  radio</span><span class="pun">.</span><span class="kwd">begin</span><span class="pun">();</span><span class="pln">
  radio</span><span class="pun">.</span><span class="pln">openWritingPipe</span><span class="pun">(</span><span class="pln">address</span><span class="pun">);</span><span class="pln">
  radio</span><span class="pun">.</span><span class="pln">setPALevel</span><span class="pun">(</span><span class="pln">RF24_PA_HIGH</span><span class="pun">);</span><span class="pln">
  radio</span><span class="pun">.</span><span class="pln">stopListening</span><span class="pun">();</span><span class="pln">

  pinMode</span><span class="pun">(</span><span class="pln">XPIN_W</span><span class="pun">,</span><span class="pln"> INPUT</span><span class="pun">);</span><span class="pln">
  pinMode</span><span class="pun">(</span><span class="pln">YPIN_W</span><span class="pun">,</span><span class="pln"> INPUT</span><span class="pun">);</span><span class="pln">
  pinMode</span><span class="pun">(</span><span class="pln">ZPIN_W</span><span class="pun">,</span><span class="pln"> INPUT</span><span class="pun">);</span><span class="pln">
  pinMode</span><span class="pun">(</span><span class="pln">XPIN_D</span><span class="pun">,</span><span class="pln"> INPUT</span><span class="pun">);</span><span class="pln">
  pinMode</span><span class="pun">(</span><span class="pln">YPIN_D</span><span class="pun">,</span><span class="pln"> INPUT</span><span class="pun">);</span><span class="pln">
  pinMode</span><span class="pun">(</span><span class="pln">ZPIN_D</span><span class="pun">,</span><span class="pln"> INPUT</span><span class="pun">);</span><span class="pln">
</span><span class="pun">}</span><span class="pln">


</span><span class="kwd">void</span><span class="pln"> loop</span><span class="pun">()</span><span class="pln"> </span><span class="pun">{</span><span class="pln">
  </span><span class="kwd">int</span><span class="pln"> on</span><span class="pun">=</span><span class="lit">0</span><span class="pun">;</span><span class="pln">
  </span><span class="kwd">int</span><span class="pln"> count</span><span class="pun">=</span><span class="lit">0</span><span class="pun">;</span><span class="pln">
  </span><span class="kwd">int</span><span class="pln"> maxValueW</span><span class="pun">=</span><span class="lit">0</span><span class="pun">;</span><span class="pln">
  </span><span class="kwd">int</span><span class="pln"> minValueW</span><span class="pun">=</span><span class="lit">1023</span><span class="pun">;</span><span class="pln">
  </span><span class="kwd">int</span><span class="pln"> maxValueD</span><span class="pun">=</span><span class="lit">0</span><span class="pun">;</span><span class="pln">
  </span><span class="kwd">int</span><span class="pln"> minValueD</span><span class="pun">=</span><span class="lit">1023</span><span class="pun">;</span><span class="pln">

  </span><span class="com">//will hold current sensor reading</span><span class="pln">
  </span><span class="kwd">int</span><span class="pln"> currentWasher</span><span class="pun">;</span><span class="pln">
  </span><span class="kwd">int</span><span class="pln"> currentDryer</span><span class="pun">;</span><span class="pln">

  </span><span class="com">//takes 100 reading from both the washer and dryer</span><span class="pln">
  </span><span class="com">//sensors and finds the max/ min of the 100 values</span><span class="pln">
  </span><span class="kwd">while</span><span class="pln"> </span><span class="pun">(</span><span class="pln">count</span><span class="pun"><</span><span class="lit">100</span><span class="pun">){</span><span class="pln">
    </span><span class="com">//avg of the X, Y and Z readings</span><span class="pln">
    currentWasher </span><span class="pun">=</span><span class="pln"> </span><span class="pun">(</span><span class="pln">analogRead</span><span class="pun">(</span><span class="pln">XPIN_W</span><span class="pun">)</span><span class="pln"> </span><span class="pun">+</span><span class="pln"> analogRead</span><span class="pun">(</span><span class="pln">YPIN_W</span><span class="pun">)</span><span class="pln"> </span><span class="pun">+</span><span class="pln"> analogRead</span><span class="pun">(</span><span class="pln">ZPIN_W</span><span class="pun">))/</span><span class="lit">3</span><span class="pun">;</span><span class="pln">
    currentDryer </span><span class="pun">=</span><span class="pln"> </span><span class="pun">(</span><span class="pln">analogRead</span><span class="pun">(</span><span class="pln">XPIN_D</span><span class="pun">)</span><span class="pln"> </span><span class="pun">+</span><span class="pln"> analogRead</span><span class="pun">(</span><span class="pln">YPIN_D</span><span class="pun">)</span><span class="pln"> </span><span class="pun">+</span><span class="pln"> analogRead</span><span class="pun">(</span><span class="pln">ZPIN_D</span><span class="pun">))/</span><span class="lit">3</span><span class="pun">;</span><span class="pln">
    </span><span class="kwd">if</span><span class="pln"> </span><span class="pun">(</span><span class="pln">currentWasher</span><span class="pun"><</span><span class="pln">minValueW</span><span class="pun">){</span><span class="pln">
      minValueW</span><span class="pun">=</span><span class="pln">currentWasher</span><span class="pun">;</span><span class="pln">
    </span><span class="pun">}</span><span class="pln">
    </span><span class="kwd">if</span><span class="pln"> </span><span class="pun">(</span><span class="pln">currentWasher</span><span class="pun">></span><span class="pln">maxValueW</span><span class="pun">){</span><span class="pln">
      maxValueW</span><span class="pun">=</span><span class="pln">currentWasher</span><span class="pun">;</span><span class="pln">
    </span><span class="pun">}</span><span class="pln">
    </span><span class="kwd">if</span><span class="pln"> </span><span class="pun">(</span><span class="pln">currentDryer</span><span class="pun"><</span><span class="pln">minValueD</span><span class="pun">){</span><span class="pln">
      minValueD</span><span class="pun">=</span><span class="pln">currentDryer</span><span class="pun">;</span><span class="pln">
    </span><span class="pun">}</span><span class="pln">
    </span><span class="kwd">if</span><span class="pln"> </span><span class="pun">(</span><span class="pln">currentDryer</span><span class="pun">></span><span class="pln">maxValueD</span><span class="pun">){</span><span class="pln">
      maxValueD</span><span class="pun">=</span><span class="pln">currentDryer</span><span class="pun">;</span><span class="pln">
    </span><span class="pun">}</span><span class="pln">
    count</span><span class="pun">++;</span><span class="pln">
  </span><span class="pun">}</span><span class="pln">

  </span><span class="com">//when the range btw max and min is greater than 2</span><span class="pln">
  </span><span class="com">//the machine is determined to beon</span><span class="pln">
  </span><span class="kwd">if</span><span class="pln"> </span><span class="pun">((</span><span class="pln">maxValueW</span><span class="pun">-</span><span class="pln">minValueW </span><span class="pun">></span><span class="lit">2</span><span class="pun">)</span><span class="pln"> </span><span class="kwd">and</span><span class="pln"> </span><span class="pun">(</span><span class="pln">maxValueD</span><span class="pun">-</span><span class="pln">minValueD </span><span class="pun">></span><span class="lit">2</span><span class="pun">)){</span><span class="pln">
    </span><span class="com">//both washer and dryer are on</span><span class="pln">
    on</span><span class="pun">=</span><span class="lit">6</span><span class="pun">;</span><span class="pln">
  </span><span class="pun">}</span><span class="pln">
  </span><span class="kwd">else</span><span class="pun">{</span><span class="pln">
    </span><span class="kwd">if</span><span class="pln"> </span><span class="pun">(</span><span class="pln">maxValueW</span><span class="pun">-</span><span class="pln">minValueW </span><span class="pun">></span><span class="lit">2</span><span class="pun">){</span><span class="pln">
      </span><span class="com">//just washer is on</span><span class="pln">
      on</span><span class="pun">=</span><span class="lit">3</span><span class="pun">;</span><span class="pln">
    </span><span class="pun">}</span><span class="pln">
    </span><span class="kwd">else</span><span class="pln"> </span><span class="kwd">if</span><span class="pln"> </span><span class="pun">(</span><span class="pln">maxValueD</span><span class="pun">-</span><span class="pln">minValueD </span><span class="pun">></span><span class="lit">2</span><span class="pun">){</span><span class="pln">
      </span><span class="com">//just dryer is on</span><span class="pln">
      on</span><span class="pun">=</span><span class="lit">2</span><span class="pun">;</span><span class="pln">
    </span><span class="pun">}</span><span class="pln">
    </span><span class="kwd">else</span><span class="pln"> </span><span class="pun">{</span><span class="pln">
      </span><span class="com">//neither is on</span><span class="pln">
      on</span><span class="pun">=</span><span class="lit">5</span><span class="pun">;</span><span class="pln">
    </span><span class="pun">}</span><span class="pln">
  </span><span class="pun">}</span><span class="pln">
  </span><span class="com">// transmit values</span><span class="pln">
  radio</span><span class="pun">.</span><span class="pln">write</span><span class="pun">(&</span><span class="pln">on</span><span class="pun">,</span><span class="pln"> </span><span class="kwd">sizeof</span><span class="pun">(</span><span class="pln">on</span><span class="pun">));</span><span class="pln">
</span><span class="pun">}</span>
Receiver
/*
Title: Laundry Tracker
(reciever)
By: Mimi Marino

Description: I this code we recieve information from
another radio module. That information says if the
washer, or dryer are on or off. With that information
this code calculates how long each has been on for.
When a button is pressed the LCD displays this
information in a easy to read way so the user knows
if the washer and dryer are being used and and how
long they have been on for so far.

Pin Mapping:

 pin   | mode   | description
 ------|--------|------------
  7      output   Radio - CE
  8      output   Radio - CSN
  11     output   Radio - MOSI
  12     output   Radio - MISO
  13     output   Radio - SCK
  3      output   LCD - rs
  4      output   LCD - enable
  10     output   LCD -db4
  2      output   LCD -db5
  5      output   LCD - db6
  6      output   LCD - db7
  9      input    button

Credit:
-starter code for NRF24L01 radio reciever
https://github.com/robzach/Empathy_Machine/blob/master/development/read_radio_signal/read_radio_signal.ino

//-How to wire NRF24L01 radio module
//https://howtomechatronics.com/tutorials/arduino/arduino-wireless-communication-//nrf24l01-tutorial/
*/

#include <SPI.h>
#include <nRF24L01.h>
#include <RF24.h>
#include <LiquidCrystal.h>
//LiquidCrystal(rs, enable, db4, db5, db6, db7)
LiquidCrystal lcd(3, 4, 10, 2, 5, 6);

const int BUTTON_PIN = 9;
const int RADIO_CE_PIN = 7;
const int RADIO_CSN_PIN = 8;
RF24 radio(RADIO_CE_PIN, RADIO_CSN_PIN);
const byte address[6] = "00001";
unsigned long timer = 0;
int displayClockW=0;
int displayClockD=0;

void setup() {
  Serial.begin(9600);
  lcd.begin(16, 2);
  radio.begin();
  radio.openReadingPipe(0, address);
  radio.setPALevel(RF24_PA_HIGH);
  radio.startListening();
  //initiliazes the button pin as a pullup pin
  pinMode(BUTTON_PIN,INPUT_PULLUP);
}

void loop() {
  //get radio input from transmitter
  if (radio.available()) {
    int readVal;
    radio.read(&readVal, sizeof(readVal));
    //only executes every minute
      if (millis() -timer >= 60000){
        lcd.setCursor(0,0);
        //readVal=6 if the washer and dryer are on
        //readVal=3 if just the washer is on
        //readVal=2 if just the dryer is on
        //readVal=5 if neither are on

        //updates the washer clock
        if (readVal%3==0){
          displayClockW +=1;
        }
        else{
          displayClockW=0;
        }

        //updates the dryer clock
        if (readVal%2==0){
          displayClockD +=1;
        }
        else {
          displayClockD=0;
        }
       timer= millis();
       }
    }
    //When the button is pushed, LCD is updated
    //with acurrate information about the washer
    //and dryer
    //when button is not pushed the LCD displays nothing

    //digitalRead(BUTTON_PIN)==0 is true when
    //the button is being pressed
    if (digitalRead(BUTTON_PIN)==0){
      lcd.setCursor(0,0);
      //when the washer is off
      if (displayClockW==0){
        lcd.print((String)"Washer: Free!");
      }
      //when the washer is on
      else{
        lcd.print((String)"Washer: "+displayClockW);
      }
      lcd.setCursor(0,1);
      //when the dryer is off
      if (displayClockD ==0){
        lcd.print((String)"Dryer:  Free!");
      }
      //when the dryer is on
      else{
        lcd.print((String)"Dryer:  "+displayClockD);
      }
    }
    else{
      lcd.clear();
    }
}- <span class="com">/*
- Title: Laundry Tracker
- (reciever)
- By: Mimi Marino
- Description: I this code we recieve information from
- another radio module. That information says if the
- washer, or dryer are on or off. With that information
- this code calculates how long each has been on for.
- When a button is pressed the LCD displays this
- information in a easy to read way so the user knows
- if the washer and dryer are being used and and how
- long they have been on for so far.
- Pin Mapping:
- pin | mode | description
- ------|--------|------------
- 7 output Radio - CE
- 8 output Radio - CSN
- 11 output Radio - MOSI
- 12 output Radio - MISO
- 13 output Radio - SCK
- 3 output LCD - rs
- 4 output LCD - enable
- 10 output LCD -db4
- 2 output LCD -db5
- 5 output LCD - db6
- 6 output LCD - db7
- 9 input button
- Credit:
- -starter code for NRF24L01 radio reciever
- https://github.com/robzach/Empathy_Machine/blob/master/development/read_radio_signal/read_radio_signal.ino
- //-How to wire NRF24L01 radio module
- //https://howtomechatronics.com/tutorials/arduino/arduino-wireless-communication-//nrf24l01-tutorial/
- */</span><span class="pln">
- </span><span class="com">#include</span><span class="pln"> </span><span class="str"><SPI.h></span><span class="pln">
- </span><span class="com">#include</span><span class="pln"> </span><span class="str"><nRF24L01.h></span><span class="pln">
- </span><span class="com">#include</span><span class="pln"> </span><span class="str"><RF24.h></span><span class="pln">
- </span><span class="com">#include</span><span class="pln"> </span><span class="str"><LiquidCrystal.h></span><span class="pln">
- </span><span class="com">//LiquidCrystal(rs, enable, db4, db5, db6, db7) </span><span class="pln">
- </span><span class="typ">LiquidCrystal</span><span class="pln"> lcd</span><span class="pun">(</span><span class="lit">3</span><span class="pun">,</span><span class="pln"> </span><span class="lit">4</span><span class="pun">,</span><span class="pln"> </span><span class="lit">10</span><span class="pun">,</span><span class="pln"> </span><span class="lit">2</span><span class="pun">,</span><span class="pln"> </span><span class="lit">5</span><span class="pun">,</span><span class="pln"> </span><span class="lit">6</span><span class="pun">);</span><span class="pln">
- </span><span class="kwd">const</span><span class="pln"> </span><span class="kwd">int</span><span class="pln"> BUTTON_PIN </span><span class="pun">=</span><span class="pln"> </span><span class="lit">9</span><span class="pun">;</span><span class="pln">
- </span><span class="kwd">const</span><span class="pln"> </span><span class="kwd">int</span><span class="pln"> RADIO_CE_PIN </span><span class="pun">=</span><span class="pln"> </span><span class="lit">7</span><span class="pun">;</span><span class="pln">
- </span><span class="kwd">const</span><span class="pln"> </span><span class="kwd">int</span><span class="pln"> RADIO_CSN_PIN </span><span class="pun">=</span><span class="pln"> </span><span class="lit">8</span><span class="pun">;</span><span class="pln">
- RF24 radio</span><span class="pun">(</span><span class="pln">RADIO_CE_PIN</span><span class="pun">,</span><span class="pln"> RADIO_CSN_PIN</span><span class="pun">);</span><span class="pln">
- </span><span class="kwd">const</span><span class="pln"> </span><span class="kwd">byte</span><span class="pln"> address</span><span class="pun">[</span><span class="lit">6</span><span class="pun">]</span><span class="pln"> </span><span class="pun">=</span><span class="pln"> </span><span class="str">"00001"</span><span class="pun">;</span><span class="pln">
- </span><span class="kwd">unsigned</span><span class="pln"> </span><span class="kwd">long</span><span class="pln"> timer </span><span class="pun">=</span><span class="pln"> </span><span class="lit">0</span><span class="pun">;</span><span class="pln">
- </span><span class="kwd">int</span><span class="pln"> displayClockW</span><span class="pun">=</span><span class="lit">0</span><span class="pun">;</span><span class="pln">
- </span><span class="kwd">int</span><span class="pln"> displayClockD</span><span class="pun">=</span><span class="lit">0</span><span class="pun">;</span><span class="pln">
- </span><span class="kwd">void</span><span class="pln"> setup</span><span class="pun">()</span><span class="pln"> </span><span class="pun">{</span><span class="pln">
- </span><span class="typ">Serial</span><span class="pun">.</span><span class="kwd">begin</span><span class="pun">(</span><span class="lit">9600</span><span class="pun">);</span><span class="pln">
- lcd</span><span class="pun">.</span><span class="kwd">begin</span><span class="pun">(</span><span class="lit">16</span><span class="pun">,</span><span class="pln"> </span><span class="lit">2</span><span class="pun">);</span><span class="pln">
- radio</span><span class="pun">.</span><span class="kwd">begin</span><span class="pun">();</span><span class="pln">
- radio</span><span class="pun">.</span><span class="pln">openReadingPipe</span><span class="pun">(</span><span class="lit">0</span><span class="pun">,</span><span class="pln"> address</span><span class="pun">);</span><span class="pln">
- radio</span><span class="pun">.</span><span class="pln">setPALevel</span><span class="pun">(</span><span class="pln">RF24_PA_HIGH</span><span class="pun">);</span><span class="pln">
- radio</span><span class="pun">.</span><span class="pln">startListening</span><span class="pun">();</span><span class="pln">
- </span><span class="com">//initiliazes the button pin as a pullup pin</span><span class="pln">
- pinMode</span><span class="pun">(</span><span class="pln">BUTTON_PIN</span><span class="pun">,</span><span class="pln">INPUT_PULLUP</span><span class="pun">);</span><span class="pln">
- </span><span class="pun">}</span><span class="pln">
- </span><span class="kwd">void</span><span class="pln"> loop</span><span class="pun">()</span><span class="pln"> </span><span class="pun">{</span><span class="pln">
- </span><span class="com">//get radio input from transmitter</span><span class="pln">
- </span><span class="kwd">if</span><span class="pln"> </span><span class="pun">(</span><span class="pln">radio</span><span class="pun">.</span><span class="pln">available</span><span class="pun">())</span><span class="pln"> </span><span class="pun">{</span><span class="pln">
- </span><span class="kwd">int</span><span class="pln"> readVal</span><span class="pun">;</span><span class="pln">
- radio</span><span class="pun">.</span><span class="pln">read</span><span class="pun">(&</span><span class="pln">readVal</span><span class="pun">,</span><span class="pln"> </span><span class="kwd">sizeof</span><span class="pun">(</span><span class="pln">readVal</span><span class="pun">));</span><span class="pln">
- </span><span class="com">//only executes every minute</span><span class="pln">
- </span><span class="kwd">if</span><span class="pln"> </span><span class="pun">(</span><span class="pln">millis</span><span class="pun">()</span><span class="pln"> </span><span class="pun">-</span><span class="pln">timer </span><span class="pun">>=</span><span class="pln"> </span><span class="lit">60000</span><span class="pun">){</span><span class="pln">
- lcd</span><span class="pun">.</span><span class="pln">setCursor</span><span class="pun">(</span><span class="lit">0</span><span class="pun">,</span><span class="lit">0</span><span class="pun">);</span><span class="pln">
- </span><span class="com">//readVal=6 if the washer and dryer are on</span><span class="pln">
- </span><span class="com">//readVal=3 if just the washer is on</span><span class="pln">
- </span><span class="com">//readVal=2 if just the dryer is on</span><span class="pln">
- </span><span class="com">//readVal=5 if neither are on</span><span class="pln">
- </span><span class="com">//updates the washer clock </span><span class="pln">
- </span><span class="kwd">if</span><span class="pln"> </span><span class="pun">(</span><span class="pln">readVal</span><span class="pun">%</span><span class="lit">3</span><span class="pun">==</span><span class="lit">0</span><span class="pun">){</span><span class="pln">
- displayClockW </span><span class="pun">+=</span><span class="lit">1</span><span class="pun">;</span><span class="pln">
- </span><span class="pun">}</span><span class="pln">
- </span><span class="kwd">else</span><span class="pun">{</span><span class="pln">
- displayClockW</span><span class="pun">=</span><span class="lit">0</span><span class="pun">;</span><span class="pln">
- </span><span class="pun">}</span><span class="pln">
-
- </span><span class="com">//updates the dryer clock</span><span class="pln">
- </span><span class="kwd">if</span><span class="pln"> </span><span class="pun">(</span><span class="pln">readVal</span><span class="pun">%</span><span class="lit">2</span><span class="pun">==</span><span class="lit">0</span><span class="pun">){</span><span class="pln">
- displayClockD </span><span class="pun">+=</span><span class="lit">1</span><span class="pun">;</span><span class="pln">
- </span><span class="pun">}</span><span class="pln">
- </span><span class="kwd">else</span><span class="pln"> </span><span class="pun">{</span><span class="pln">
- displayClockD</span><span class="pun">=</span><span class="lit">0</span><span class="pun">;</span><span class="pln">
- </span><span class="pun">}</span><span class="pln">
- timer</span><span class="pun">=</span><span class="pln"> millis</span><span class="pun">();</span><span class="pln">
- </span><span class="pun">}</span><span class="pln">
- </span><span class="pun">}</span><span class="pln">
- </span><span class="com">//When the button is pushed, LCD is updated</span><span class="pln">
- </span><span class="com">//with acurrate information about the washer </span><span class="pln">
- </span><span class="com">//and dryer </span><span class="pln">
- </span><span class="com">//when button is not pushed the LCD displays nothing</span><span class="pln">
-
- </span><span class="com">//digitalRead(BUTTON_PIN)==0 is true when </span><span class="pln">
- </span><span class="com">//the button is being pressed</span><span class="pln">
- </span><span class="kwd">if</span><span class="pln"> </span><span class="pun">(</span><span class="pln">digitalRead</span><span class="pun">(</span><span class="pln">BUTTON_PIN</span><span class="pun">)==</span><span class="lit">0</span><span class="pun">){</span><span class="pln">
- lcd</span><span class="pun">.</span><span class="pln">setCursor</span><span class="pun">(</span><span class="lit">0</span><span class="pun">,</span><span class="lit">0</span><span class="pun">);</span><span class="pln">
- </span><span class="com">//when the washer is off</span><span class="pln">
- </span><span class="kwd">if</span><span class="pln"> </span><span class="pun">(</span><span class="pln">displayClockW</span><span class="pun">==</span><span class="lit">0</span><span class="pun">){</span><span class="pln">
- lcd</span><span class="pun">.</span><span class="kwd">print</span><span class="pun">((</span><span class="typ">String</span><span class="pun">)</span><span class="str">"Washer: Free!"</span><span class="pun">);</span><span class="pln">
- </span><span class="pun">}</span><span class="pln">
- </span><span class="com">//when the washer is on</span><span class="pln">
- </span><span class="kwd">else</span><span class="pun">{</span><span class="pln">
- lcd</span><span class="pun">.</span><span class="kwd">print</span><span class="pun">((</span><span class="typ">String</span><span class="pun">)</span><span class="str">"Washer: "</span><span class="pun">+</span><span class="pln">displayClockW</span><span class="pun">);</span><span class="pln">
- </span><span class="pun">}</span><span class="pln">
- lcd</span><span class="pun">.</span><span class="pln">setCursor</span><span class="pun">(</span><span class="lit">0</span><span class="pun">,</span><span class="lit">1</span><span class="pun">);</span><span class="pln">
- </span><span class="com">//when the dryer is off</span><span class="pln">
- </span><span class="kwd">if</span><span class="pln"> </span><span class="pun">(</span><span class="pln">displayClockD </span><span class="pun">==</span><span class="lit">0</span><span class="pun">){</span><span class="pln">
- lcd</span><span class="pun">.</span><span class="kwd">print</span><span class="pun">((</span><span class="typ">String</span><span class="pun">)</span><span class="str">"Dryer: Free!"</span><span class="pun">);</span><span class="pln">
- </span><span class="pun">}</span><span class="pln">
- </span><span class="com">//when the dryer is on</span><span class="pln">
- </span><span class="kwd">else</span><span class="pun">{</span><span class="pln">
- lcd</span><span class="pun">.</span><span class="kwd">print</span><span class="pun">((</span><span class="typ">String</span><span class="pun">)</span><span class="str">"Dryer: "</span><span class="pun">+</span><span class="pln">displayClockD</span><span class="pun">);</span><span class="pln">
- </span><span class="pun">}</span><span class="pln">
- </span><span class="pun">}</span><span class="pln">
- </span><span class="kwd">else</span><span class="pun">{</span><span class="pln">
- lcd</span><span class="pun">.</span><span class="pln">clear</span><span class="pun">();</span><span class="pln">
- </span><span class="pun">}</span><span class="pln">
- </span><span class="pun">}</span>
<span class="com">/*
Title: Laundry Tracker
(reciever)
By: Mimi Marino

Description: I this code we recieve information from
another radio module. That information says if the
washer, or dryer are on or off. With that information
this code calculates how long each has been on for.
When a button is pressed the LCD displays this
information in a easy to read way so the user knows
if the washer and dryer are being used and and how
long they have been on for so far.

Pin Mapping:

 pin   | mode   | description
 ------|--------|------------
  7      output   Radio - CE
  8      output   Radio - CSN
  11     output   Radio - MOSI
  12     output   Radio - MISO
  13     output   Radio - SCK
  3      output   LCD - rs
  4      output   LCD - enable
  10     output   LCD -db4
  2      output   LCD -db5
  5      output   LCD - db6
  6      output   LCD - db7
  9      input    button

Credit:
-starter code for NRF24L01 radio reciever
https://github.com/robzach/Empathy_Machine/blob/master/development/read_radio_signal/read_radio_signal.ino

//-How to wire NRF24L01 radio module
//https://howtomechatronics.com/tutorials/arduino/arduino-wireless-communication-//nrf24l01-tutorial/
*/</span><span class="pln">

</span><span class="com">#include</span><span class="pln"> </span><span class="str"><SPI.h></span><span class="pln">
</span><span class="com">#include</span><span class="pln"> </span><span class="str"><nRF24L01.h></span><span class="pln">
</span><span class="com">#include</span><span class="pln"> </span><span class="str"><RF24.h></span><span class="pln">
</span><span class="com">#include</span><span class="pln"> </span><span class="str"><LiquidCrystal.h></span><span class="pln">
</span><span class="com">//LiquidCrystal(rs, enable, db4, db5, db6, db7) </span><span class="pln">
</span><span class="typ">LiquidCrystal</span><span class="pln"> lcd</span><span class="pun">(</span><span class="lit">3</span><span class="pun">,</span><span class="pln"> </span><span class="lit">4</span><span class="pun">,</span><span class="pln"> </span><span class="lit">10</span><span class="pun">,</span><span class="pln"> </span><span class="lit">2</span><span class="pun">,</span><span class="pln"> </span><span class="lit">5</span><span class="pun">,</span><span class="pln"> </span><span class="lit">6</span><span class="pun">);</span><span class="pln">

</span><span class="kwd">const</span><span class="pln"> </span><span class="kwd">int</span><span class="pln"> BUTTON_PIN </span><span class="pun">=</span><span class="pln"> </span><span class="lit">9</span><span class="pun">;</span><span class="pln">
</span><span class="kwd">const</span><span class="pln"> </span><span class="kwd">int</span><span class="pln"> RADIO_CE_PIN </span><span class="pun">=</span><span class="pln"> </span><span class="lit">7</span><span class="pun">;</span><span class="pln">
</span><span class="kwd">const</span><span class="pln"> </span><span class="kwd">int</span><span class="pln"> RADIO_CSN_PIN </span><span class="pun">=</span><span class="pln"> </span><span class="lit">8</span><span class="pun">;</span><span class="pln">
RF24 radio</span><span class="pun">(</span><span class="pln">RADIO_CE_PIN</span><span class="pun">,</span><span class="pln"> RADIO_CSN_PIN</span><span class="pun">);</span><span class="pln">
</span><span class="kwd">const</span><span class="pln"> </span><span class="kwd">byte</span><span class="pln"> address</span><span class="pun">[</span><span class="lit">6</span><span class="pun">]</span><span class="pln"> </span><span class="pun">=</span><span class="pln"> </span><span class="str">"00001"</span><span class="pun">;</span><span class="pln">
</span><span class="kwd">unsigned</span><span class="pln"> </span><span class="kwd">long</span><span class="pln"> timer </span><span class="pun">=</span><span class="pln"> </span><span class="lit">0</span><span class="pun">;</span><span class="pln">
</span><span class="kwd">int</span><span class="pln"> displayClockW</span><span class="pun">=</span><span class="lit">0</span><span class="pun">;</span><span class="pln">
</span><span class="kwd">int</span><span class="pln"> displayClockD</span><span class="pun">=</span><span class="lit">0</span><span class="pun">;</span><span class="pln">

</span><span class="kwd">void</span><span class="pln"> setup</span><span class="pun">()</span><span class="pln"> </span><span class="pun">{</span><span class="pln">
  </span><span class="typ">Serial</span><span class="pun">.</span><span class="kwd">begin</span><span class="pun">(</span><span class="lit">9600</span><span class="pun">);</span><span class="pln">
  lcd</span><span class="pun">.</span><span class="kwd">begin</span><span class="pun">(</span><span class="lit">16</span><span class="pun">,</span><span class="pln"> </span><span class="lit">2</span><span class="pun">);</span><span class="pln">
  radio</span><span class="pun">.</span><span class="kwd">begin</span><span class="pun">();</span><span class="pln">
  radio</span><span class="pun">.</span><span class="pln">openReadingPipe</span><span class="pun">(</span><span class="lit">0</span><span class="pun">,</span><span class="pln"> address</span><span class="pun">);</span><span class="pln">
  radio</span><span class="pun">.</span><span class="pln">setPALevel</span><span class="pun">(</span><span class="pln">RF24_PA_HIGH</span><span class="pun">);</span><span class="pln">
  radio</span><span class="pun">.</span><span class="pln">startListening</span><span class="pun">();</span><span class="pln">
  </span><span class="com">//initiliazes the button pin as a pullup pin</span><span class="pln">
  pinMode</span><span class="pun">(</span><span class="pln">BUTTON_PIN</span><span class="pun">,</span><span class="pln">INPUT_PULLUP</span><span class="pun">);</span><span class="pln">
</span><span class="pun">}</span><span class="pln">

</span><span class="kwd">void</span><span class="pln"> loop</span><span class="pun">()</span><span class="pln"> </span><span class="pun">{</span><span class="pln">
  </span><span class="com">//get radio input from transmitter</span><span class="pln">
  </span><span class="kwd">if</span><span class="pln"> </span><span class="pun">(</span><span class="pln">radio</span><span class="pun">.</span><span class="pln">available</span><span class="pun">())</span><span class="pln"> </span><span class="pun">{</span><span class="pln">
    </span><span class="kwd">int</span><span class="pln"> readVal</span><span class="pun">;</span><span class="pln">
    radio</span><span class="pun">.</span><span class="pln">read</span><span class="pun">(&</span><span class="pln">readVal</span><span class="pun">,</span><span class="pln"> </span><span class="kwd">sizeof</span><span class="pun">(</span><span class="pln">readVal</span><span class="pun">));</span><span class="pln">
    </span><span class="com">//only executes every minute</span><span class="pln">
      </span><span class="kwd">if</span><span class="pln"> </span><span class="pun">(</span><span class="pln">millis</span><span class="pun">()</span><span class="pln"> </span><span class="pun">-</span><span class="pln">timer </span><span class="pun">>=</span><span class="pln"> </span><span class="lit">60000</span><span class="pun">){</span><span class="pln">
        lcd</span><span class="pun">.</span><span class="pln">setCursor</span><span class="pun">(</span><span class="lit">0</span><span class="pun">,</span><span class="lit">0</span><span class="pun">);</span><span class="pln">
        </span><span class="com">//readVal=6 if the washer and dryer are on</span><span class="pln">
        </span><span class="com">//readVal=3 if just the washer is on</span><span class="pln">
        </span><span class="com">//readVal=2 if just the dryer is on</span><span class="pln">
        </span><span class="com">//readVal=5 if neither are on</span><span class="pln">

        </span><span class="com">//updates the washer clock </span><span class="pln">
        </span><span class="kwd">if</span><span class="pln"> </span><span class="pun">(</span><span class="pln">readVal</span><span class="pun">%</span><span class="lit">3</span><span class="pun">==</span><span class="lit">0</span><span class="pun">){</span><span class="pln">
          displayClockW </span><span class="pun">+=</span><span class="lit">1</span><span class="pun">;</span><span class="pln">
        </span><span class="pun">}</span><span class="pln">
        </span><span class="kwd">else</span><span class="pun">{</span><span class="pln">
          displayClockW</span><span class="pun">=</span><span class="lit">0</span><span class="pun">;</span><span class="pln">
        </span><span class="pun">}</span><span class="pln">

        </span><span class="com">//updates the dryer clock</span><span class="pln">
        </span><span class="kwd">if</span><span class="pln"> </span><span class="pun">(</span><span class="pln">readVal</span><span class="pun">%</span><span class="lit">2</span><span class="pun">==</span><span class="lit">0</span><span class="pun">){</span><span class="pln">
          displayClockD </span><span class="pun">+=</span><span class="lit">1</span><span class="pun">;</span><span class="pln">
        </span><span class="pun">}</span><span class="pln">
        </span><span class="kwd">else</span><span class="pln"> </span><span class="pun">{</span><span class="pln">
          displayClockD</span><span class="pun">=</span><span class="lit">0</span><span class="pun">;</span><span class="pln">
        </span><span class="pun">}</span><span class="pln">
       timer</span><span class="pun">=</span><span class="pln"> millis</span><span class="pun">();</span><span class="pln">
       </span><span class="pun">}</span><span class="pln">
    </span><span class="pun">}</span><span class="pln">
    </span><span class="com">//When the button is pushed, LCD is updated</span><span class="pln">
    </span><span class="com">//with acurrate information about the washer </span><span class="pln">
    </span><span class="com">//and dryer </span><span class="pln">
    </span><span class="com">//when button is not pushed the LCD displays nothing</span><span class="pln">

    </span><span class="com">//digitalRead(BUTTON_PIN)==0 is true when </span><span class="pln">
    </span><span class="com">//the button is being pressed</span><span class="pln">
    </span><span class="kwd">if</span><span class="pln"> </span><span class="pun">(</span><span class="pln">digitalRead</span><span class="pun">(</span><span class="pln">BUTTON_PIN</span><span class="pun">)==</span><span class="lit">0</span><span class="pun">){</span><span class="pln">
      lcd</span><span class="pun">.</span><span class="pln">setCursor</span><span class="pun">(</span><span class="lit">0</span><span class="pun">,</span><span class="lit">0</span><span class="pun">);</span><span class="pln">
      </span><span class="com">//when the washer is off</span><span class="pln">
      </span><span class="kwd">if</span><span class="pln"> </span><span class="pun">(</span><span class="pln">displayClockW</span><span class="pun">==</span><span class="lit">0</span><span class="pun">){</span><span class="pln">
        lcd</span><span class="pun">.</span><span class="kwd">print</span><span class="pun">((</span><span class="typ">String</span><span class="pun">)</span><span class="str">"Washer: Free!"</span><span class="pun">);</span><span class="pln">
      </span><span class="pun">}</span><span class="pln">
      </span><span class="com">//when the washer is on</span><span class="pln">
      </span><span class="kwd">else</span><span class="pun">{</span><span class="pln">
        lcd</span><span class="pun">.</span><span class="kwd">print</span><span class="pun">((</span><span class="typ">String</span><span class="pun">)</span><span class="str">"Washer: "</span><span class="pun">+</span><span class="pln">displayClockW</span><span class="pun">);</span><span class="pln">
      </span><span class="pun">}</span><span class="pln">
      lcd</span><span class="pun">.</span><span class="pln">setCursor</span><span class="pun">(</span><span class="lit">0</span><span class="pun">,</span><span class="lit">1</span><span class="pun">);</span><span class="pln">
      </span><span class="com">//when the dryer is off</span><span class="pln">
      </span><span class="kwd">if</span><span class="pln"> </span><span class="pun">(</span><span class="pln">displayClockD </span><span class="pun">==</span><span class="lit">0</span><span class="pun">){</span><span class="pln">
        lcd</span><span class="pun">.</span><span class="kwd">print</span><span class="pun">((</span><span class="typ">String</span><span class="pun">)</span><span class="str">"Dryer:  Free!"</span><span class="pun">);</span><span class="pln">
      </span><span class="pun">}</span><span class="pln">
      </span><span class="com">//when the dryer is on</span><span class="pln">
      </span><span class="kwd">else</span><span class="pun">{</span><span class="pln">
        lcd</span><span class="pun">.</span><span class="kwd">print</span><span class="pun">((</span><span class="typ">String</span><span class="pun">)</span><span class="str">"Dryer:  "</span><span class="pun">+</span><span class="pln">displayClockD</span><span class="pun">);</span><span class="pln">
      </span><span class="pun">}</span><span class="pln">
    </span><span class="pun">}</span><span class="pln">
    </span><span class="kwd">else</span><span class="pun">{</span><span class="pln">
      lcd</span><span class="pun">.</span><span class="pln">clear</span><span class="pun">();</span><span class="pln">
    </span><span class="pun">}</span><span class="pln">
  </span><span class="pun">}</span>