
What is ToneFlex? Our product is a musical device that caters to those who struggle with grip force and strength. Before we were able to come up with our final concept, there was an extensive process. Starting off with interviewing with our client to get a better stance on how we can work together to design a device that caters towards them to brainstorming potential ideas. Unfortunately, we were stuck for a while about what direction we should go with the project. A project that is useful for an important task? or a fun activity? Because of all of our questions, we had no clue where to start. This type of confusion was not only because of how many potential directions we could take, but also because our client has had so much experience in this field, because of her education in biomedical engineering and rehabilitation science, we were unsure of what the expectations were. The suggestions given by our client were too complex for our expertise, so we had to pivot and look in a different way to work with Elaine. As we talked and got to know Elaine better, we were able to find more about her own personal life like hobbies and interests. Overall, we were able to learn that Elaine enjoys music but has always struggled with finding instruments that were accessible to her. So, that’s how we started ToneFlex! Her experience helped us make our device goal based on her description of how instruments were inconvenient and difficult to use. From then, we were able to start prototyping and doing user research to finalize our product. Our device’s goal is to aid Elaine, who has difficulty with devices that require the use of grip force and strength, to play musical devices as if she was playing those actual instruments.
Device Summary
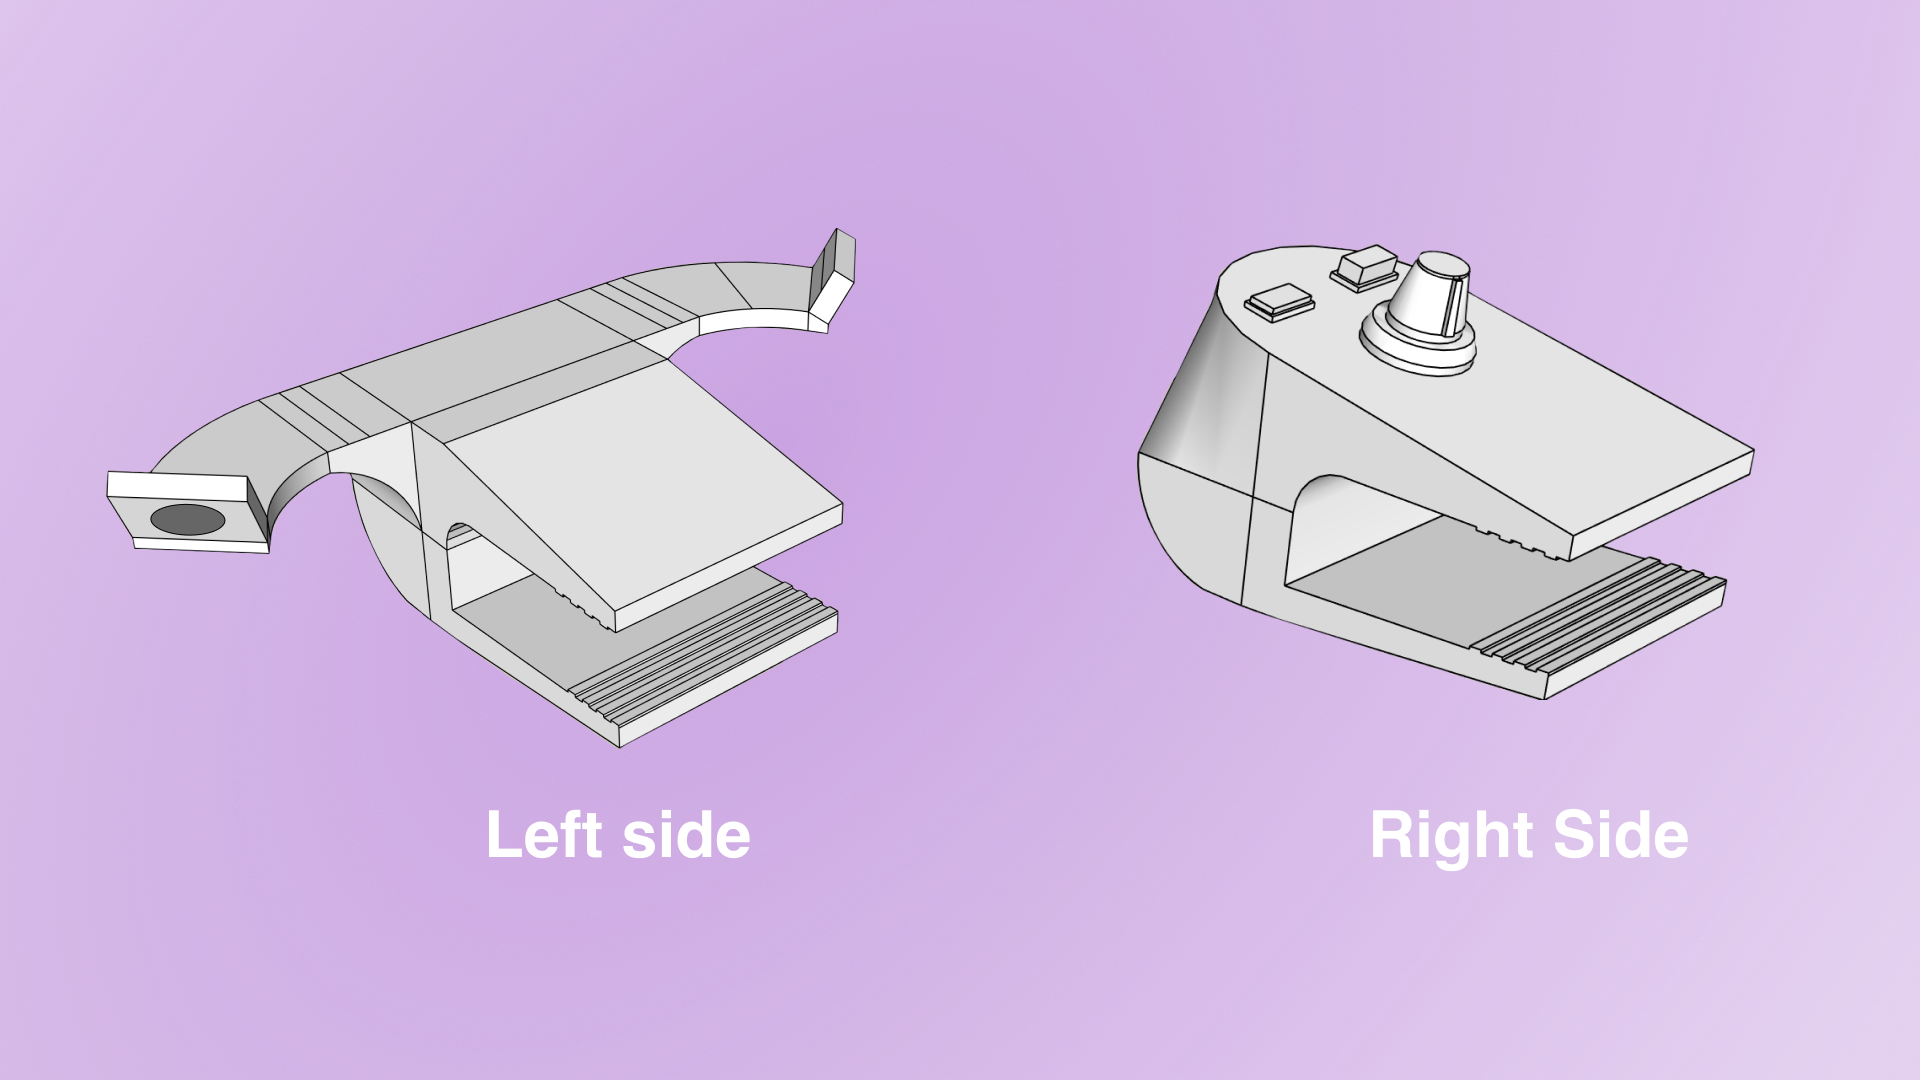
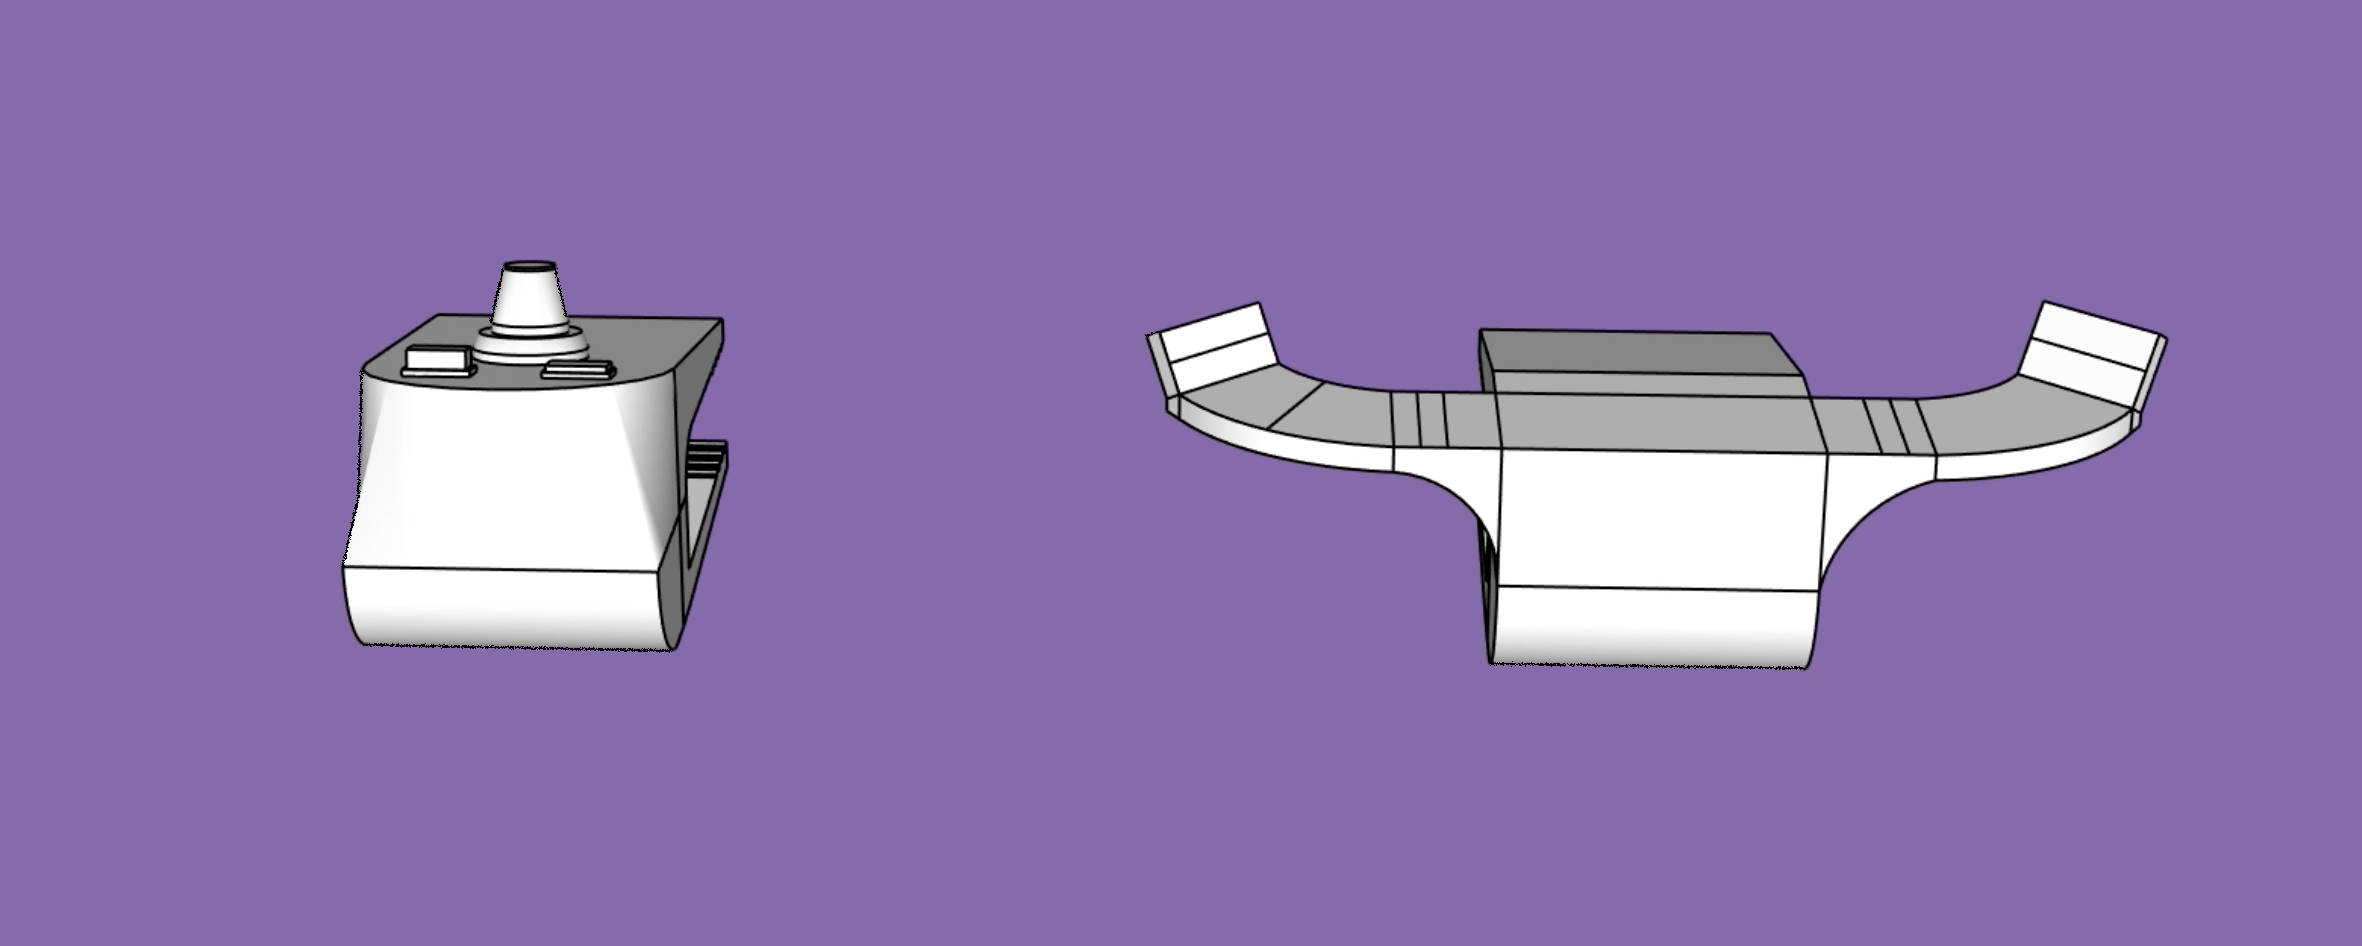
ToneFlex is a musical device that uses both sense and touch to manipulate pitch and volume. The end goal of this device is to allow users who struggle with grip force and strength to have an easier and more efficient way to create music. There are two parts to the product. The left side uses sensors to change the pitch based on how far or close a user’s hand is. On the other side of the device, it has two pushbuttons and a potentiometer to play, stop, and change the volume. The two parts are able to be clipped on and attached to the arm of the chair or any surface.
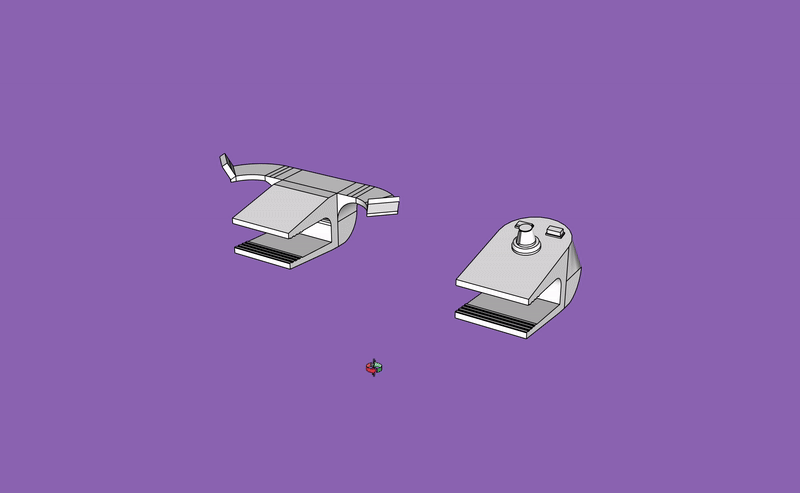
This is our final device design!
Before getting to our final product, we went through various types of research to help us conclude what we needed. As a team, we were able to conclude that having extra feedback meetings with Elaine was extremely helpful as they would aid to get rid of any assumptions we would have while designing. Our biggest takeaway for the design was making sure that the device uses both hands as Elaine has varying mechanical applications for each hand. She emphasized how it is much harder to only use one hand with her because of the constraints she faces with her hands, arms, and overall extension. From those discussions and collaboration, we were able to start prototyping our idea.
A big part of our process was focusing on the specific components to use for the device. On the left side, we used an Adafruit Sensor to get the input for the pitch, because it is much more detailed than the typical proximity sensor. We purposely only used one main interaction component for the left device since that was one of Elaine’s request.

This is our map of where the component is on the left side of the device.
Then, on the right side, we used two pushbuttons and a potentiometer. The buttons are used to play and pause the pitches on the digital synthesizer so our user can make their own music. The potentiometer is to adjust the volume of the pitches which in unison with the manipulation of pitches can produce fun music.
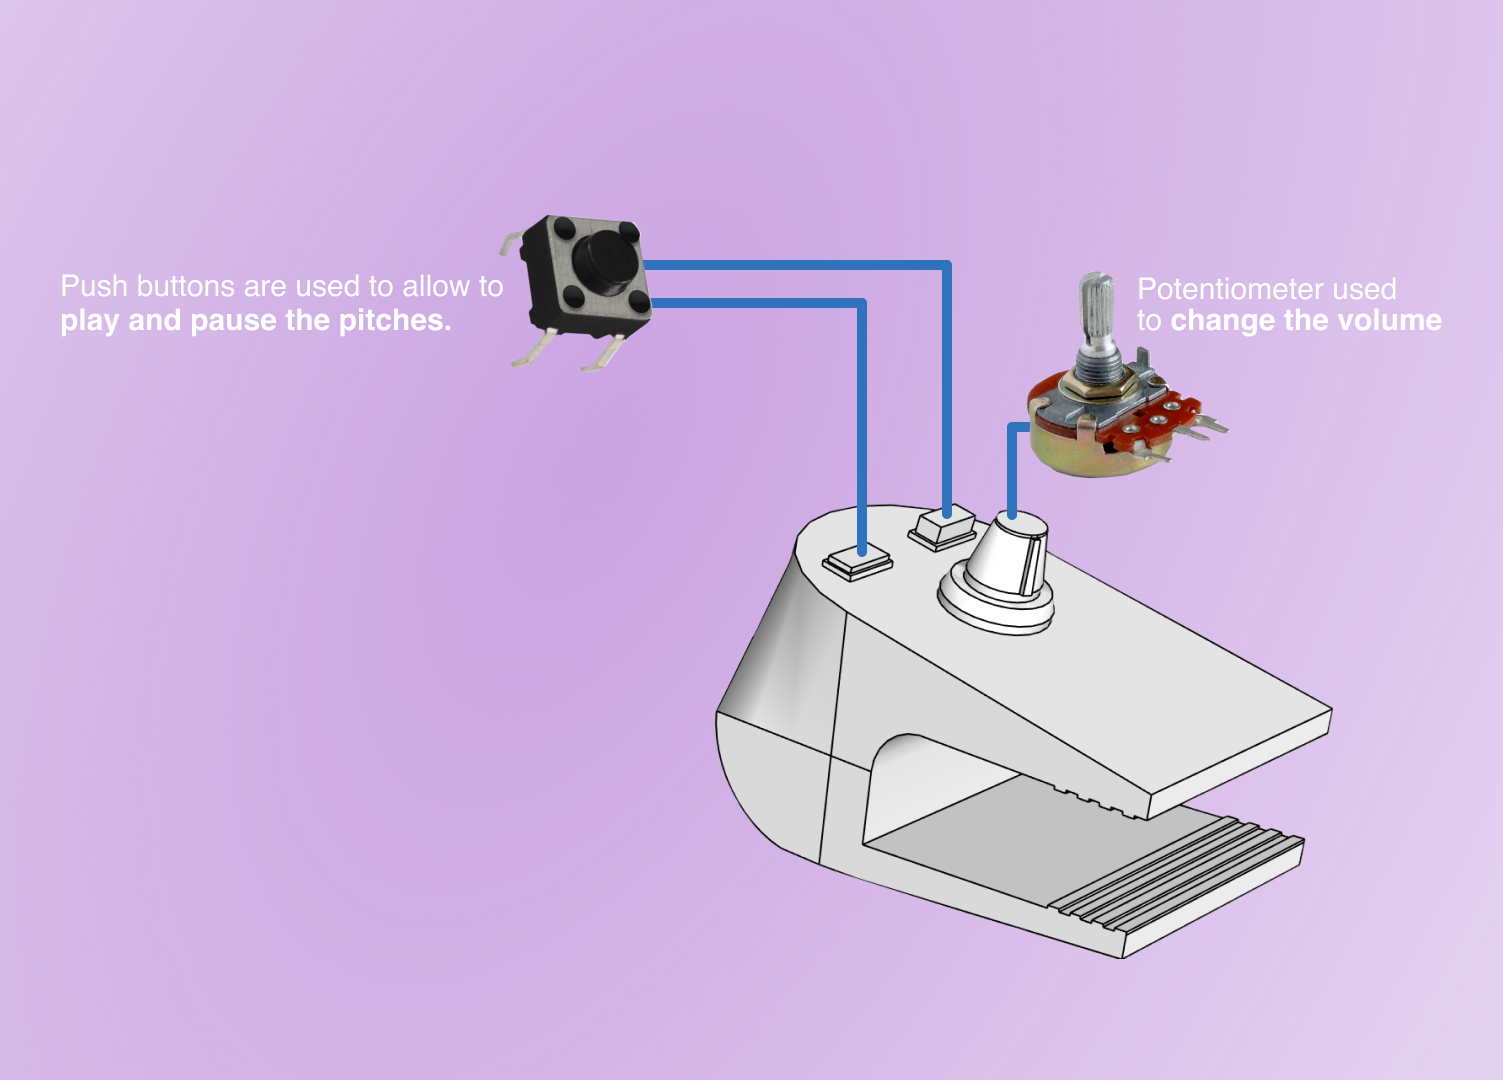
This is the map of the right side of our product.
In order to give a better representation of how our device works, we tried having a quick animation to demo. Due to the limited size of the video, we had to cut the clips into parts. The first clip shows how the input sensor interacts with the user. As you can see there is a hand that comes in a waves in between the device. We made the design of the left device to be curved. This design choice was intentional as we user tested and realized that having a flat space was much more uncomfortable because the user would have raise their arm slightly to reach the distance. Having the space curves, allows the user to comfortably rest their arm on the device while pivoting side to side through the space to change the pitch.
This is an animation showing the physical interactions with our device
With our final model, we used SketchUp to render it. That platform was extremely useful in working remotely together, because it allows various people to work on the file together.
Here is a gif of our device from various angles. The quality is not as strong because it was converted to this format, but is a great representation of our design.
Here is a front view of our device.
Here a the backside of our final device design!
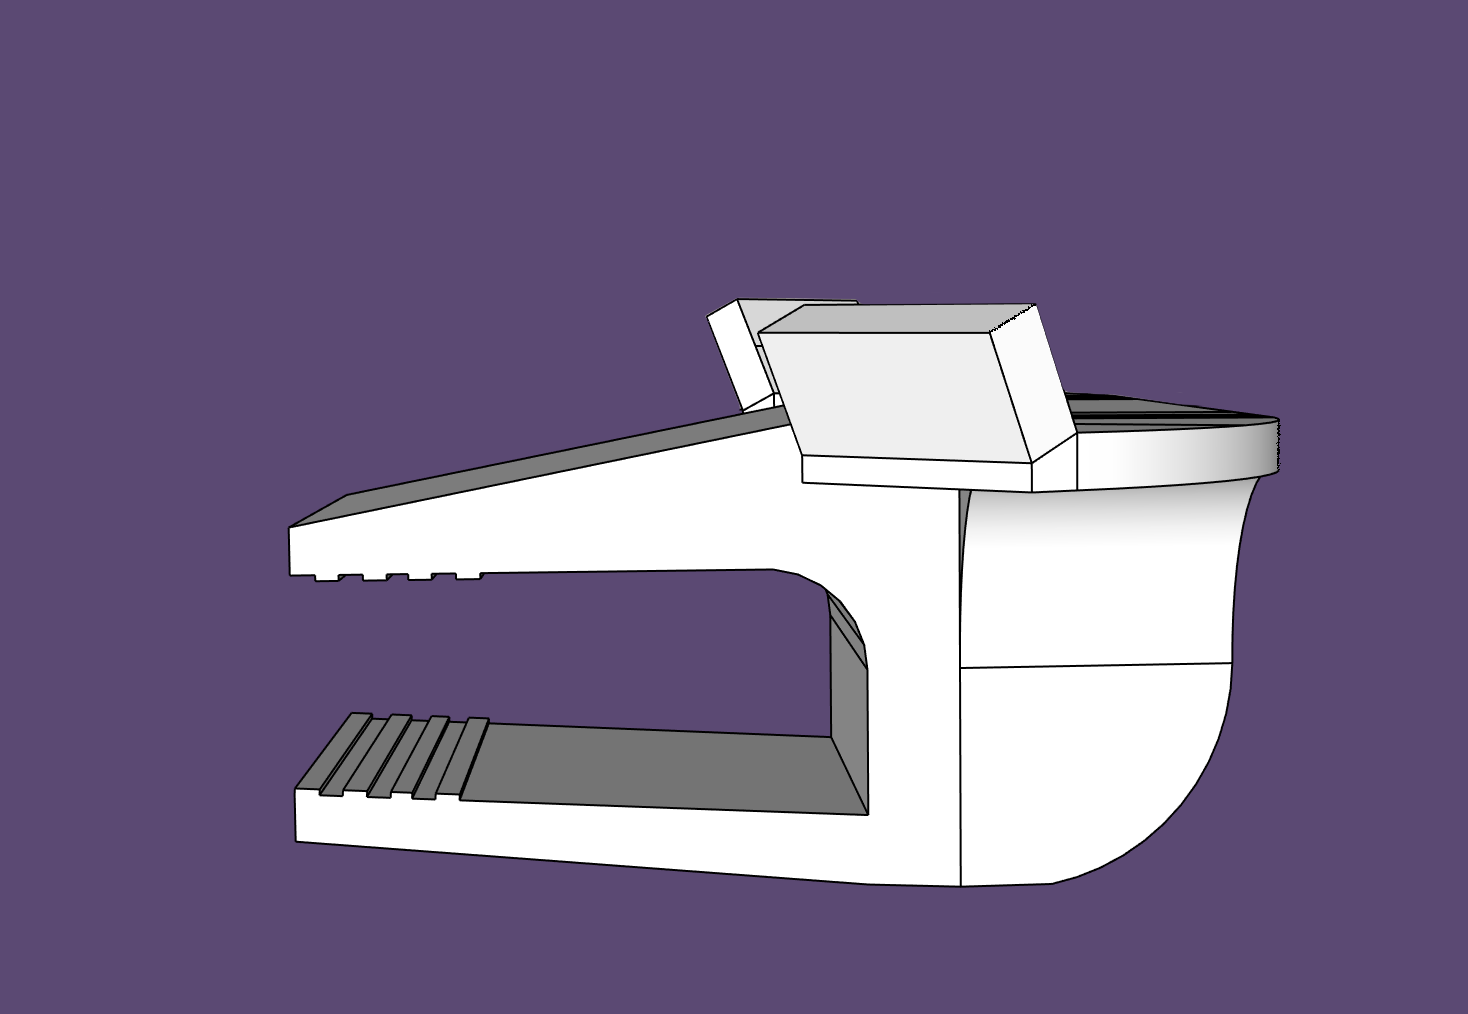
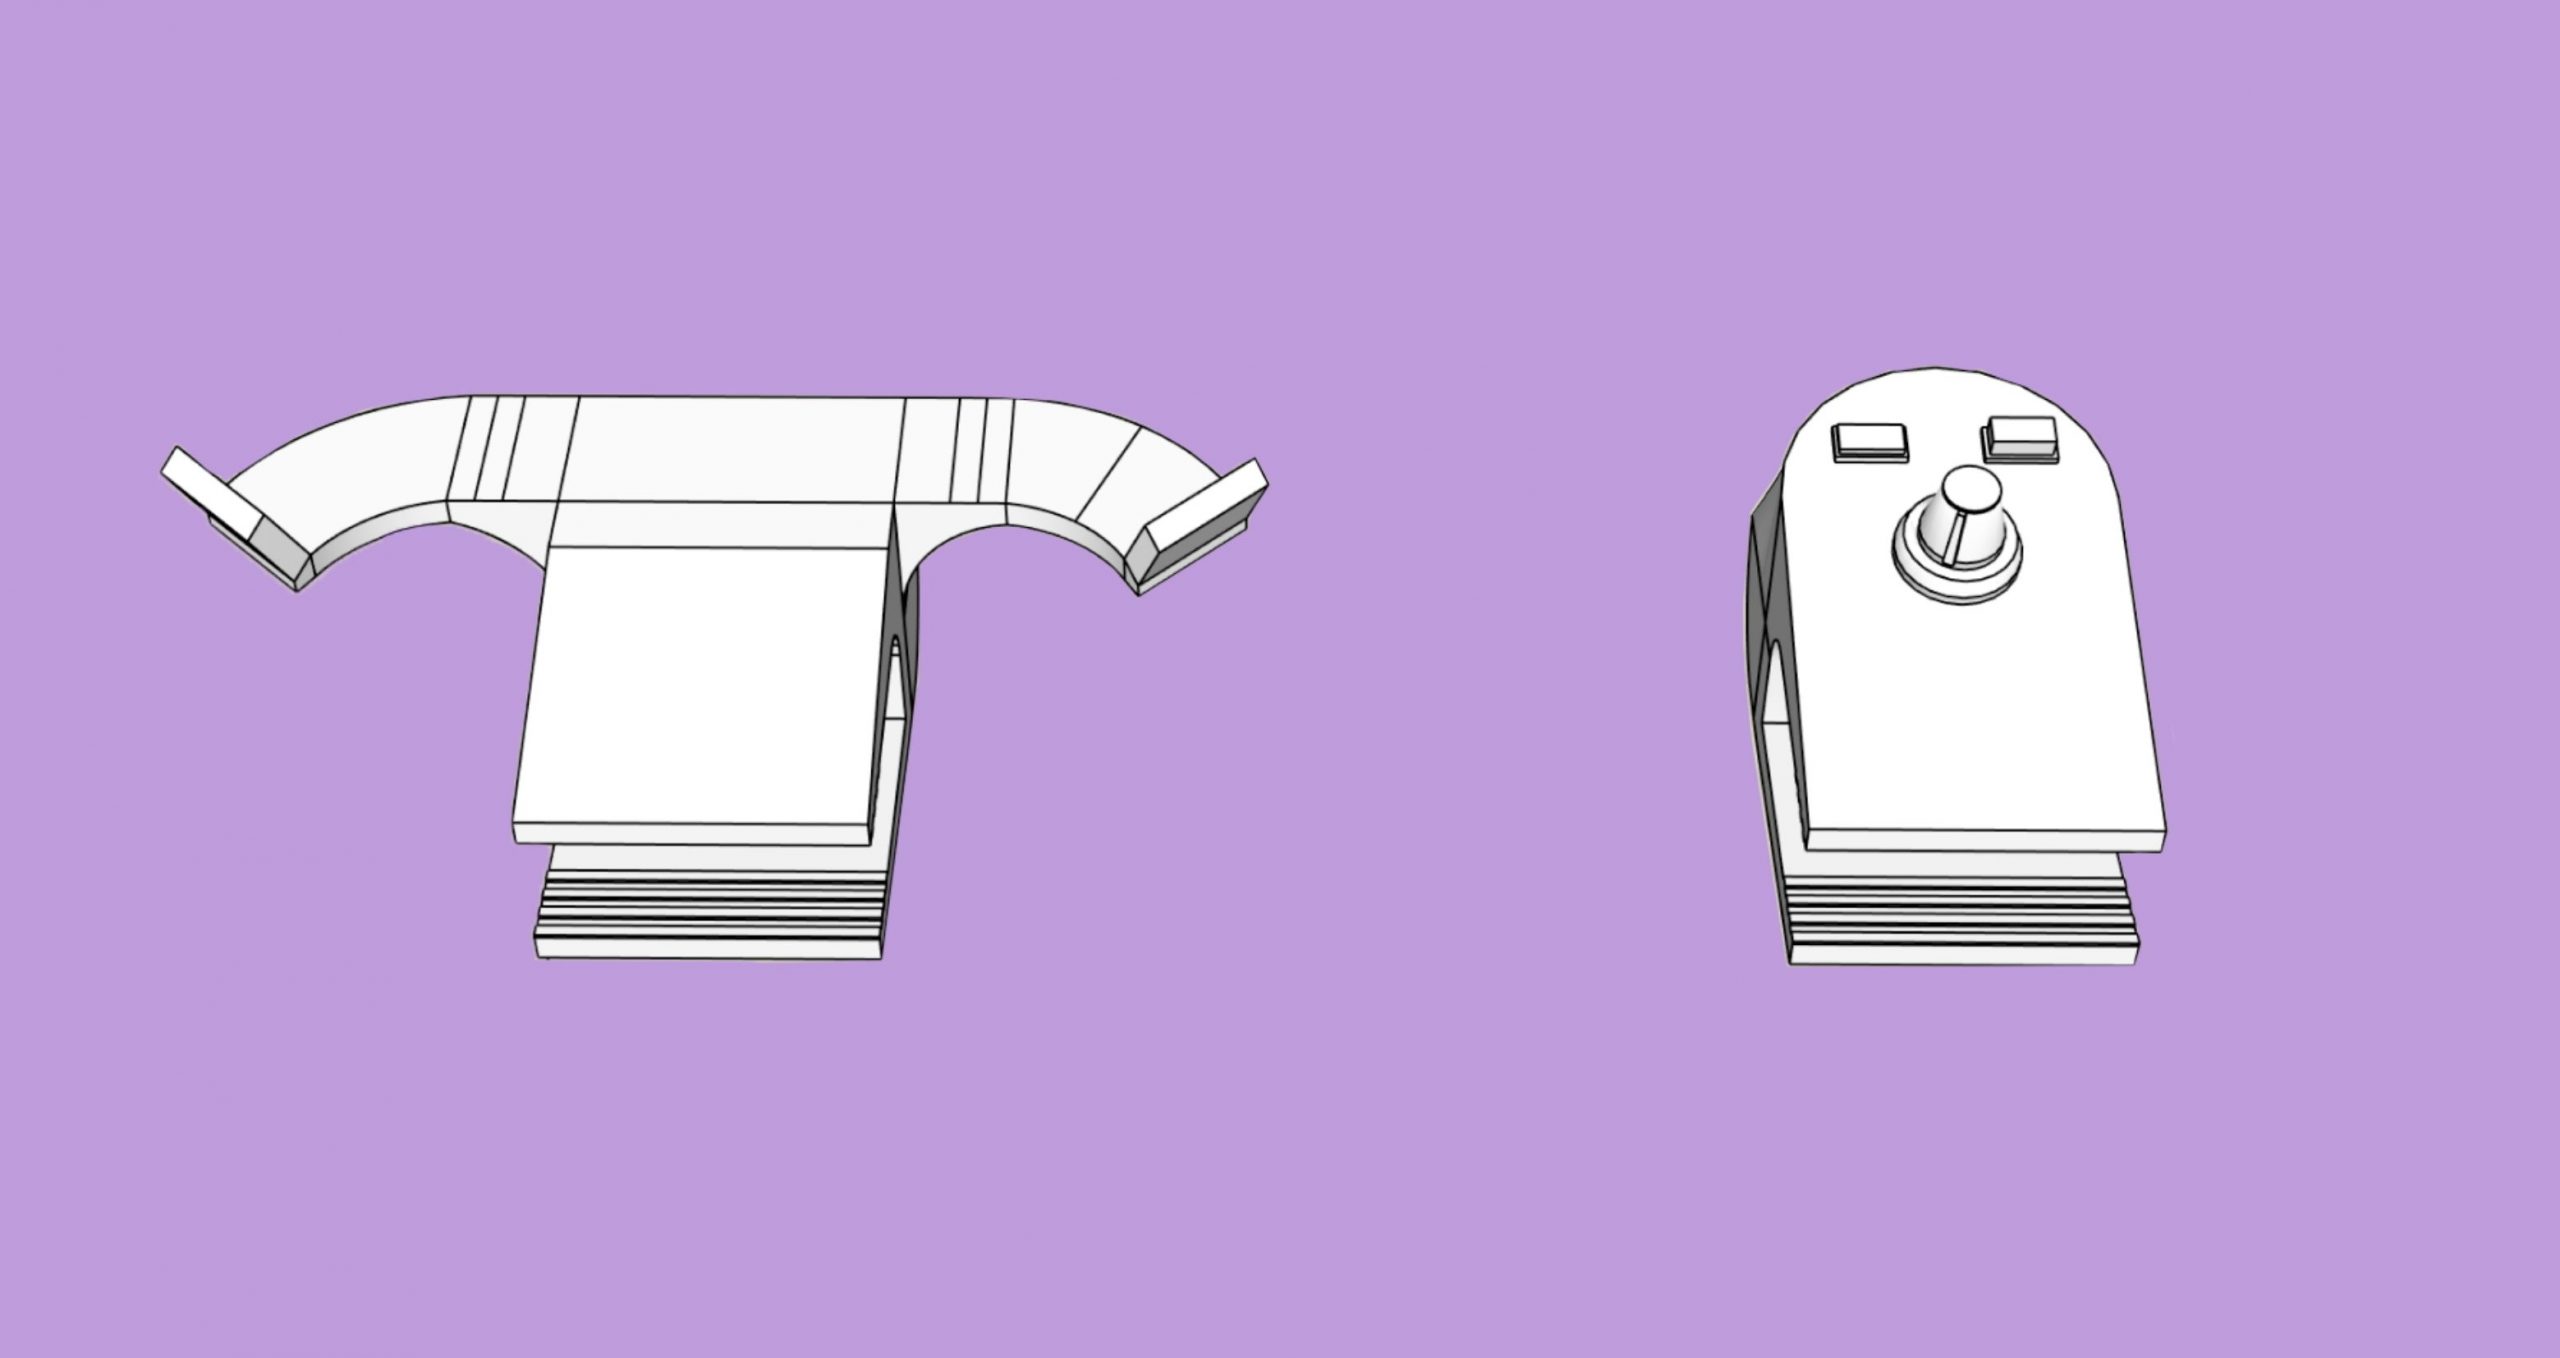
Here is the left device’s side profile.
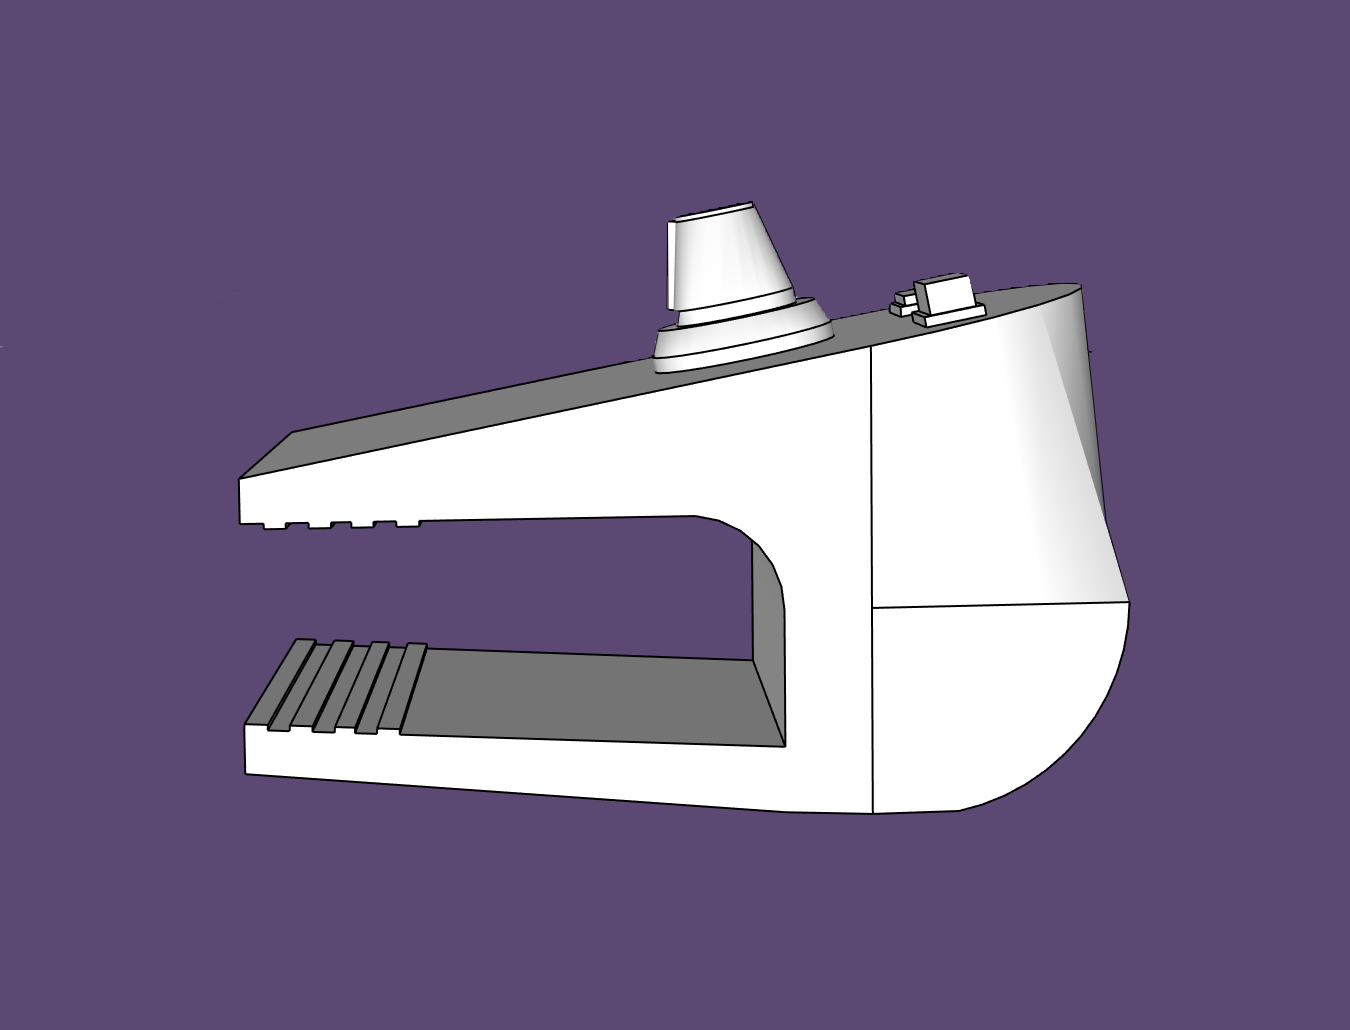
Here is the right side’s profile view.
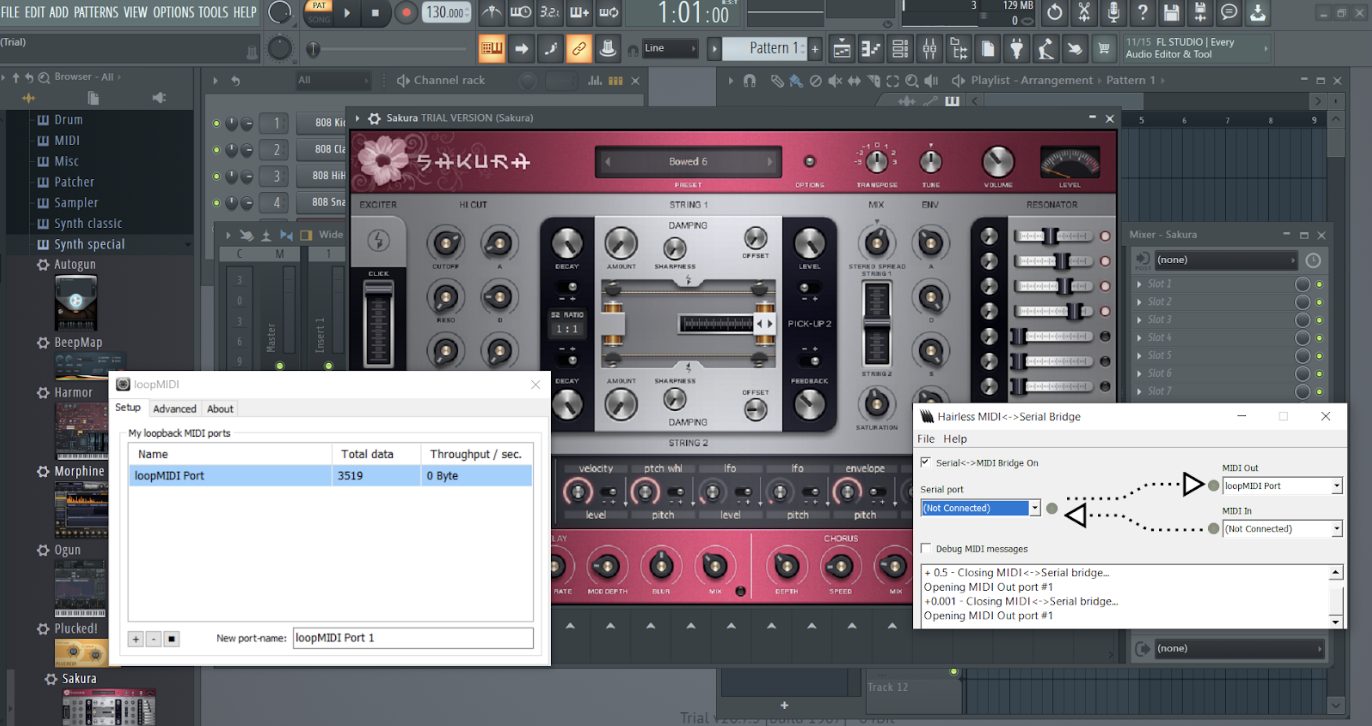
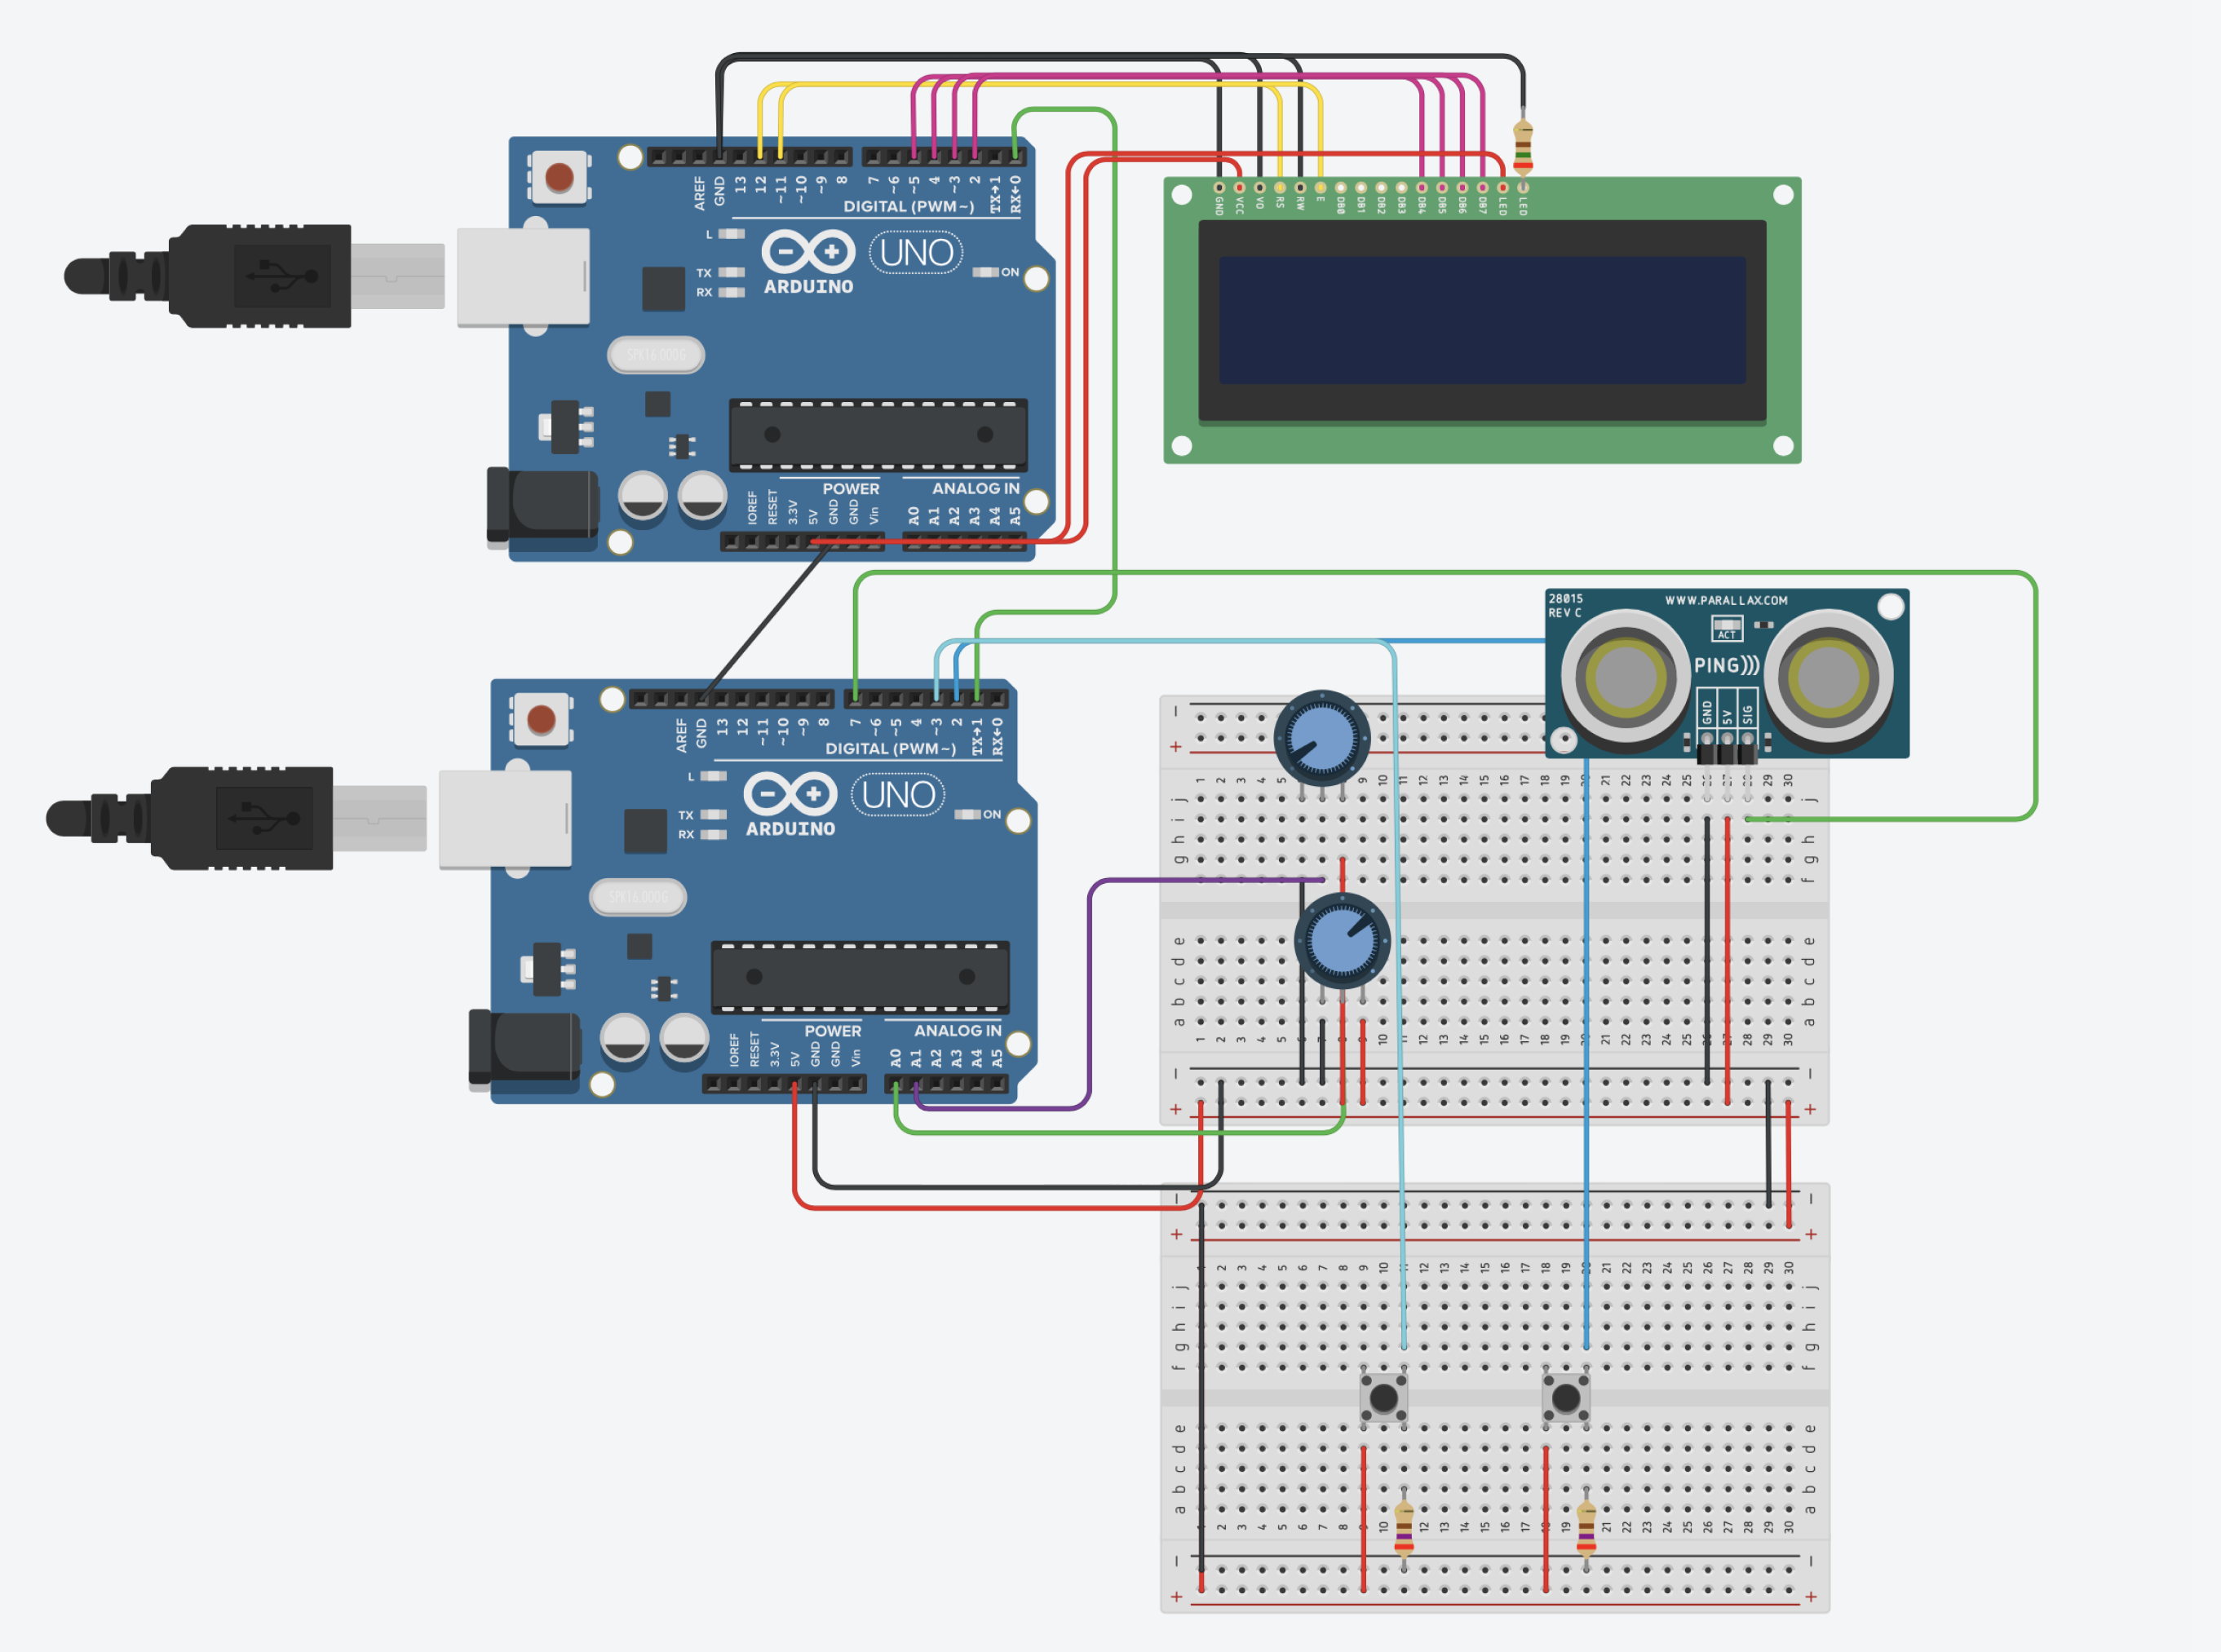
For our TinkerCAD experience, we were unable to show it exactly the same, so we used slightly different components to still explain our overall interactions. What happens in the real device is that the readings received from the sensors are converted to MIDI format and then sent to a digital synthesizer over the serial port from which the music is played. However, TinkerCAD does not have a Serial port communication to external applications as an option and so instead we used another Arduino that is connected by a serial to the main Arduino which receives the signal in MIDI format and displays it on the LCD to indicate what was sent.
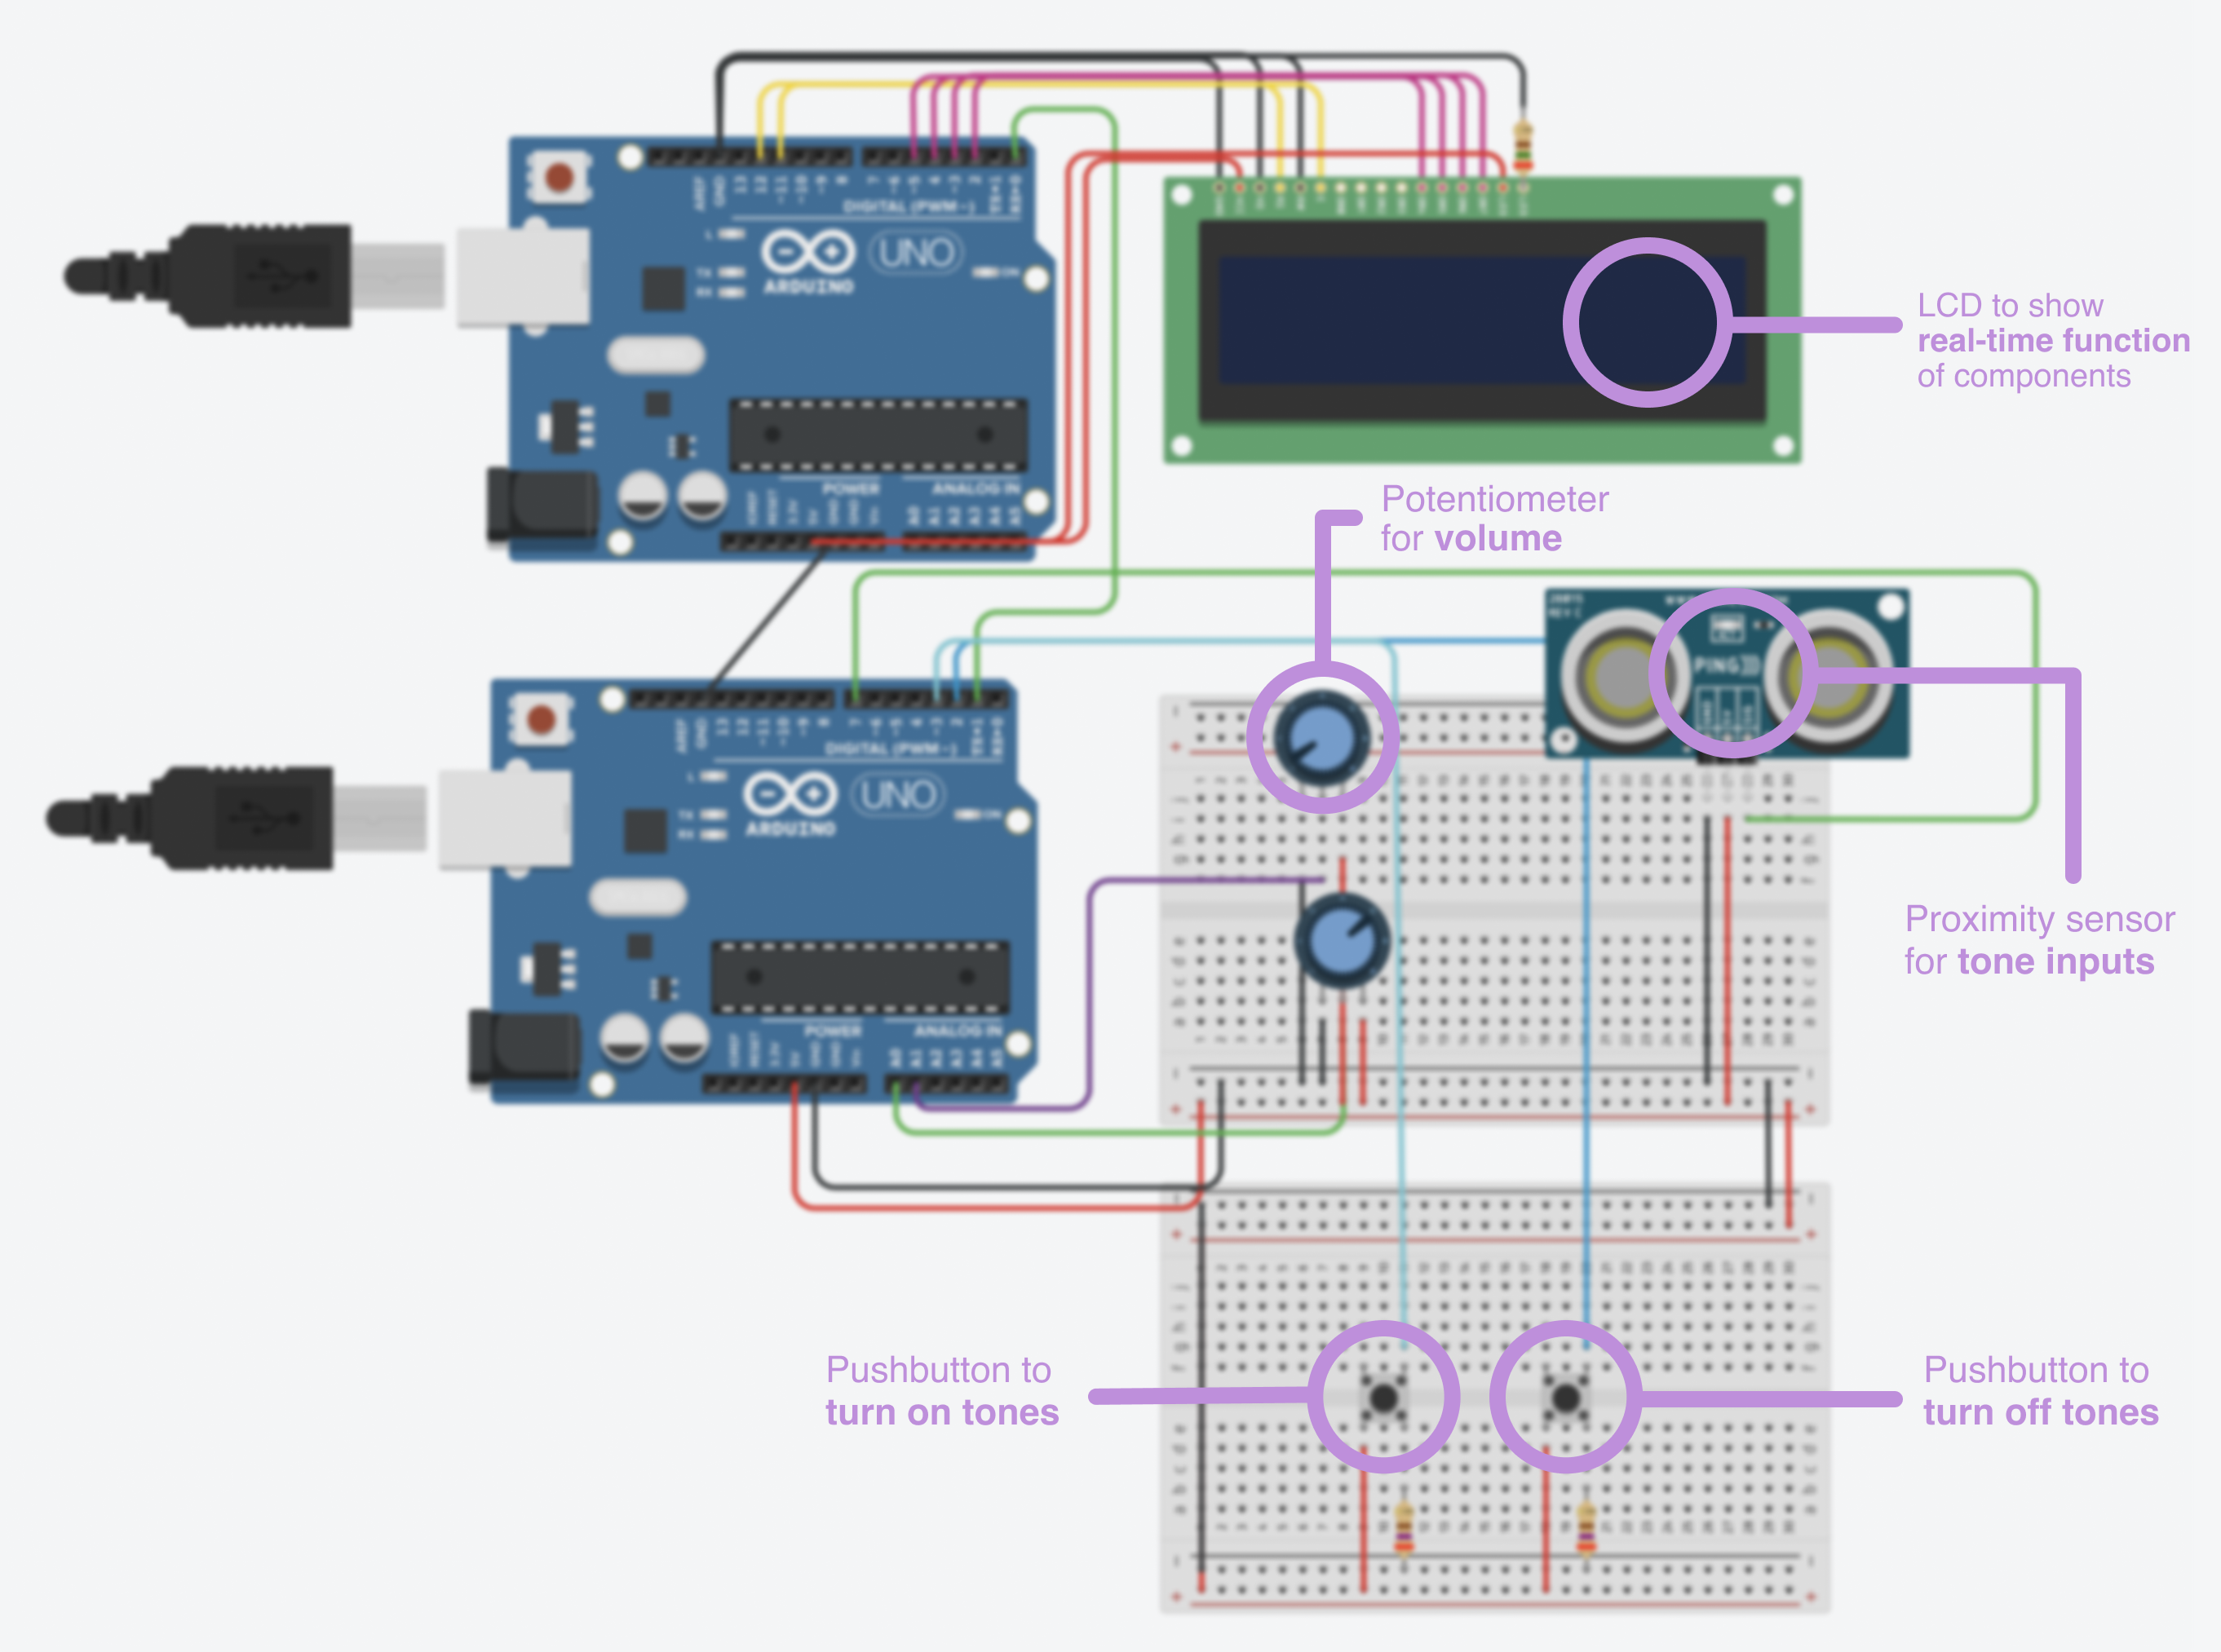
This is a diagram of components in our TinkerCAD!
In our demo, you are able to see how the components are supposed to interact to get a better understanding of our device’s goals. On the left bottom corner, you are able to see what is specifically going on with our Arduinos.
This is our TinkerCAD demo!
Lastly, because we used an outside synthesizer, we were unable to show the sounds on TinkerCAD, but we can show a quick demo of the actual software being used for our device. The options on this software allows users to create actual instruments from wind, brass, and even strings!
This is our software sound demo! Please lower your volume, because the sound of this video is quite loud.
This is our storyboard of how we imagine Elaine using our device!
Our short story gives a small glimpse of how we would want Elaine to interact with our device. While Elaine listens to music, she gets inspiration and wants to create her own! All her life, she has been unable to play most instruments due to her limited movements, but she has always still wanted to at least try one day. That is when she uses ToneFlex by attaching it to her chair and being able to produce her own music. Once she is done making her music, she is able to share it with anyone and continue her day.
Process
Getting started with this project, we were given the opportunity to interview our client, Elaine Houston, so that we can collaborate together too design an assistive device that caters towards her. Before our meeting, as a team, we sat down and debriefed our intent, goals, learning objectives, and secondary research. Because we had already learned a little bit about Elaine through our secondary research, our conversation was extremely comfortable and we were able to relate and get things started right away. This stage did take longer than we expected, but in the end, it was extremely beneficial as the extra preparation helped us when we had a problem arise later on in the process.
Here is the brief we created before starting the project.
This was the document that we put all of our secondary research about Elaine.
From there we were able to learn more about Elaine.Our interview with Elaine took many turns, covering subjects we could not have foreseen. Elaine shared a lot of her knowledge and wisdom of past projects she has been a part of in the world of inclusive design. She continued to come back to an emphasis on making things experiences that aren’t just accessible to one group of marginalized people, but rather accessible to all including those that happen to be marginalized. Between anecdotes, we discussed her experiences with a service dog, difficultly with fine motor objects, and how awkward others may feel the need to make social interactions with her.
If we were to go back and interview Elaine again for the first time, we would approach our structure differently. The questions we asked to nudge the conversation were super open ended in nature, which can be good until the conversation wanders out of the scope of the project. Our structure would benefit from picking a tight set of objectives we needed to hit and walk away with and building guiding questions around them. It would be best to state these objectives at the top of our conversation, almost like a brief outline. That way, everybody involved at least has a sense of what we want to hit and the pace at which we are hitting those points.
After our interview, we were somewhat stuck. Many of the issues we discussed with Elaine fell closer to the realm of mechanical engineering. These were still valid problems, but likely too big for us to chew as undergraduates in an intro level course. Elaine’s is always tinkering, and many of the small needs she has encountered in her life she been proactive in finding solutions to for herself. To have a lack problems in Elaine’s life for us to tackle was a strange problem, and we were frankly stuck.
We spent time taking a step back. Maybe if we can’t pinpoint a need to take on, we can find other ways to enrich Elaine’s life through her interests. Visiting her personal website, we found a page detailing what Elaine considers to be her favorite “theme” songs. We knew at least listening to music was an important part of her life, and we began to think about how the experience of making it would be for her. With the theremin as a starting point of inspiration, we began to prototype different aspects of the experiences.
We divided our explorations into areas of ergonomics, interaction, and software. We knew that all of which would come together to inform our final product. In the ergonomic testing, we spent time understanding Elaine’s range of motion firsthand. Connor built a quick device out of an exercise band and rope which would limit the wearer’s range of motion. We knew that Elaine had a maximum extension of 90 degrees, but this activity revealed there was no need to push that vertical range of motion to its max.
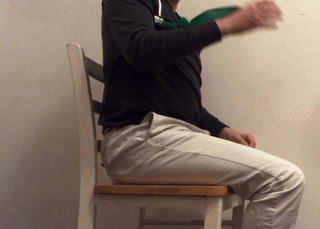
This is a gif our interaction.
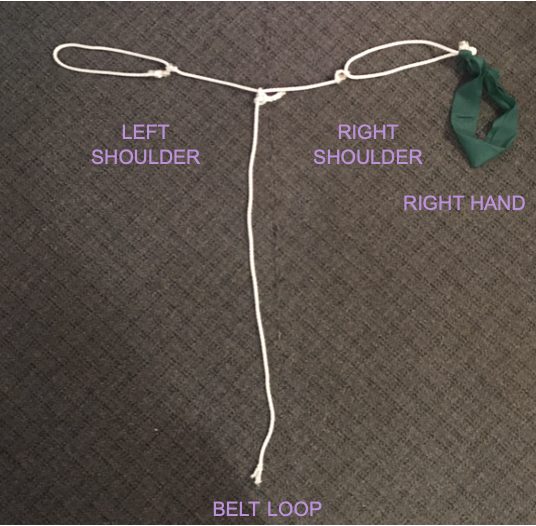
Here is a diagram of our ergonomic exploration.
Jina worked on interaction prototyping which focused on manipulating conductivity on electric tape. Different graphic arrangements of tape laid a map for different journeys of motion and ways to manipulate sound. The activity raised useful questions about where this device will be located, which complemented the ergonomic prototyping. In addition, we looked another way of getting input by using sensors. Before divining into the design elements, as a team, we sat together and wrote done elements that we thought would work and then was able to iterate.
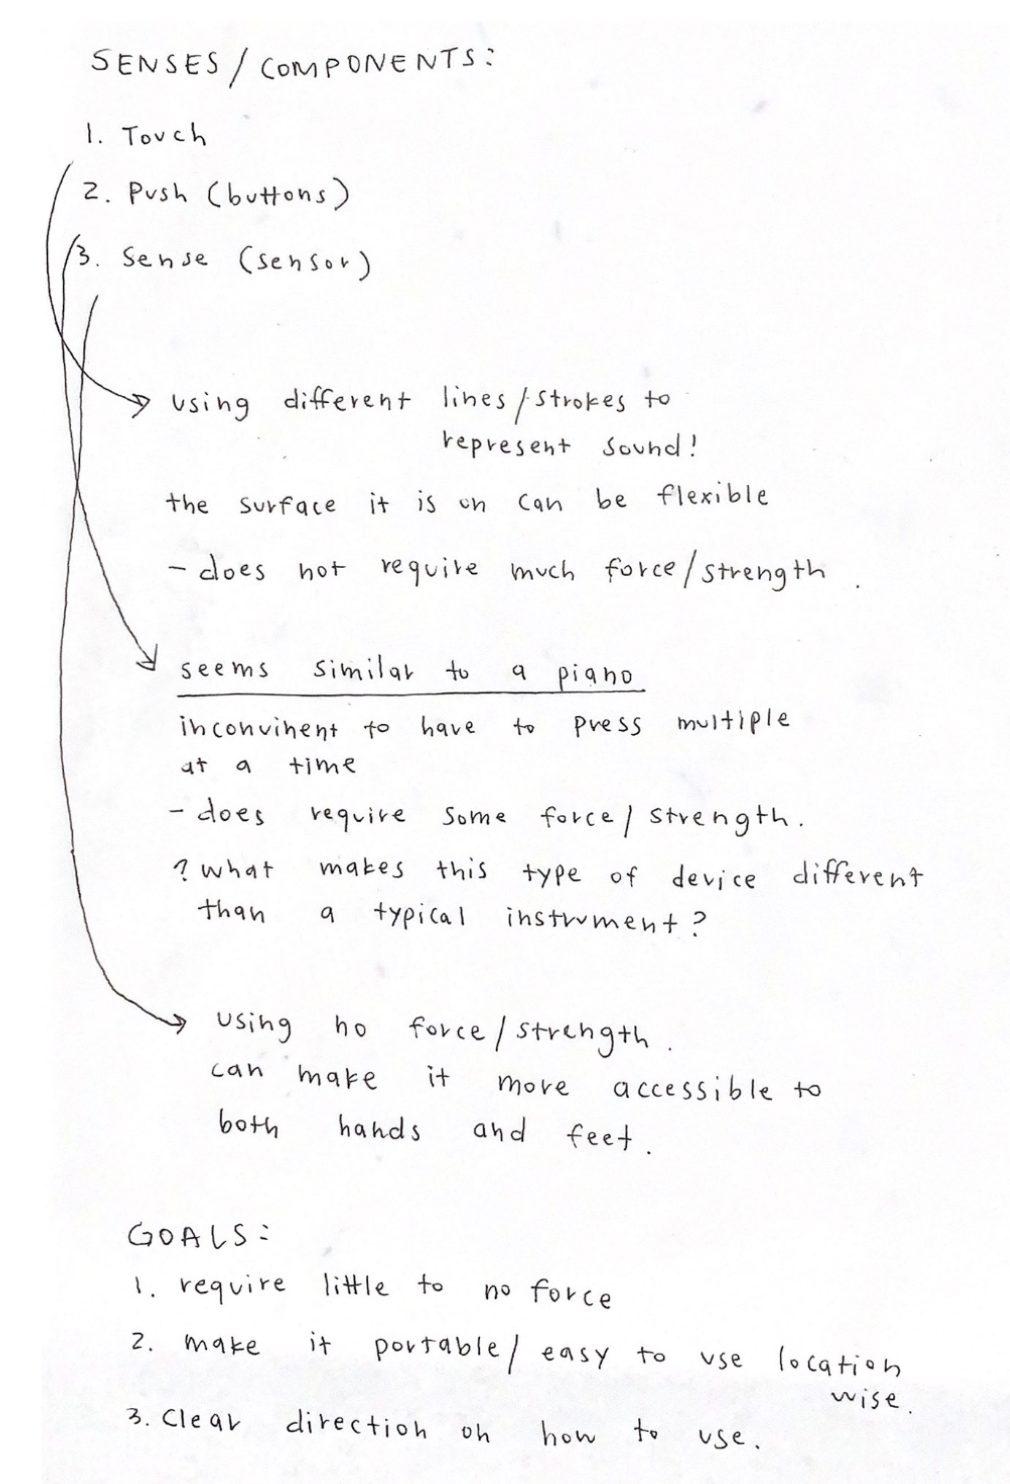
Our first design meeting notes about what direction to take.

This is a diagram of our first design prototype that use the function of touch!
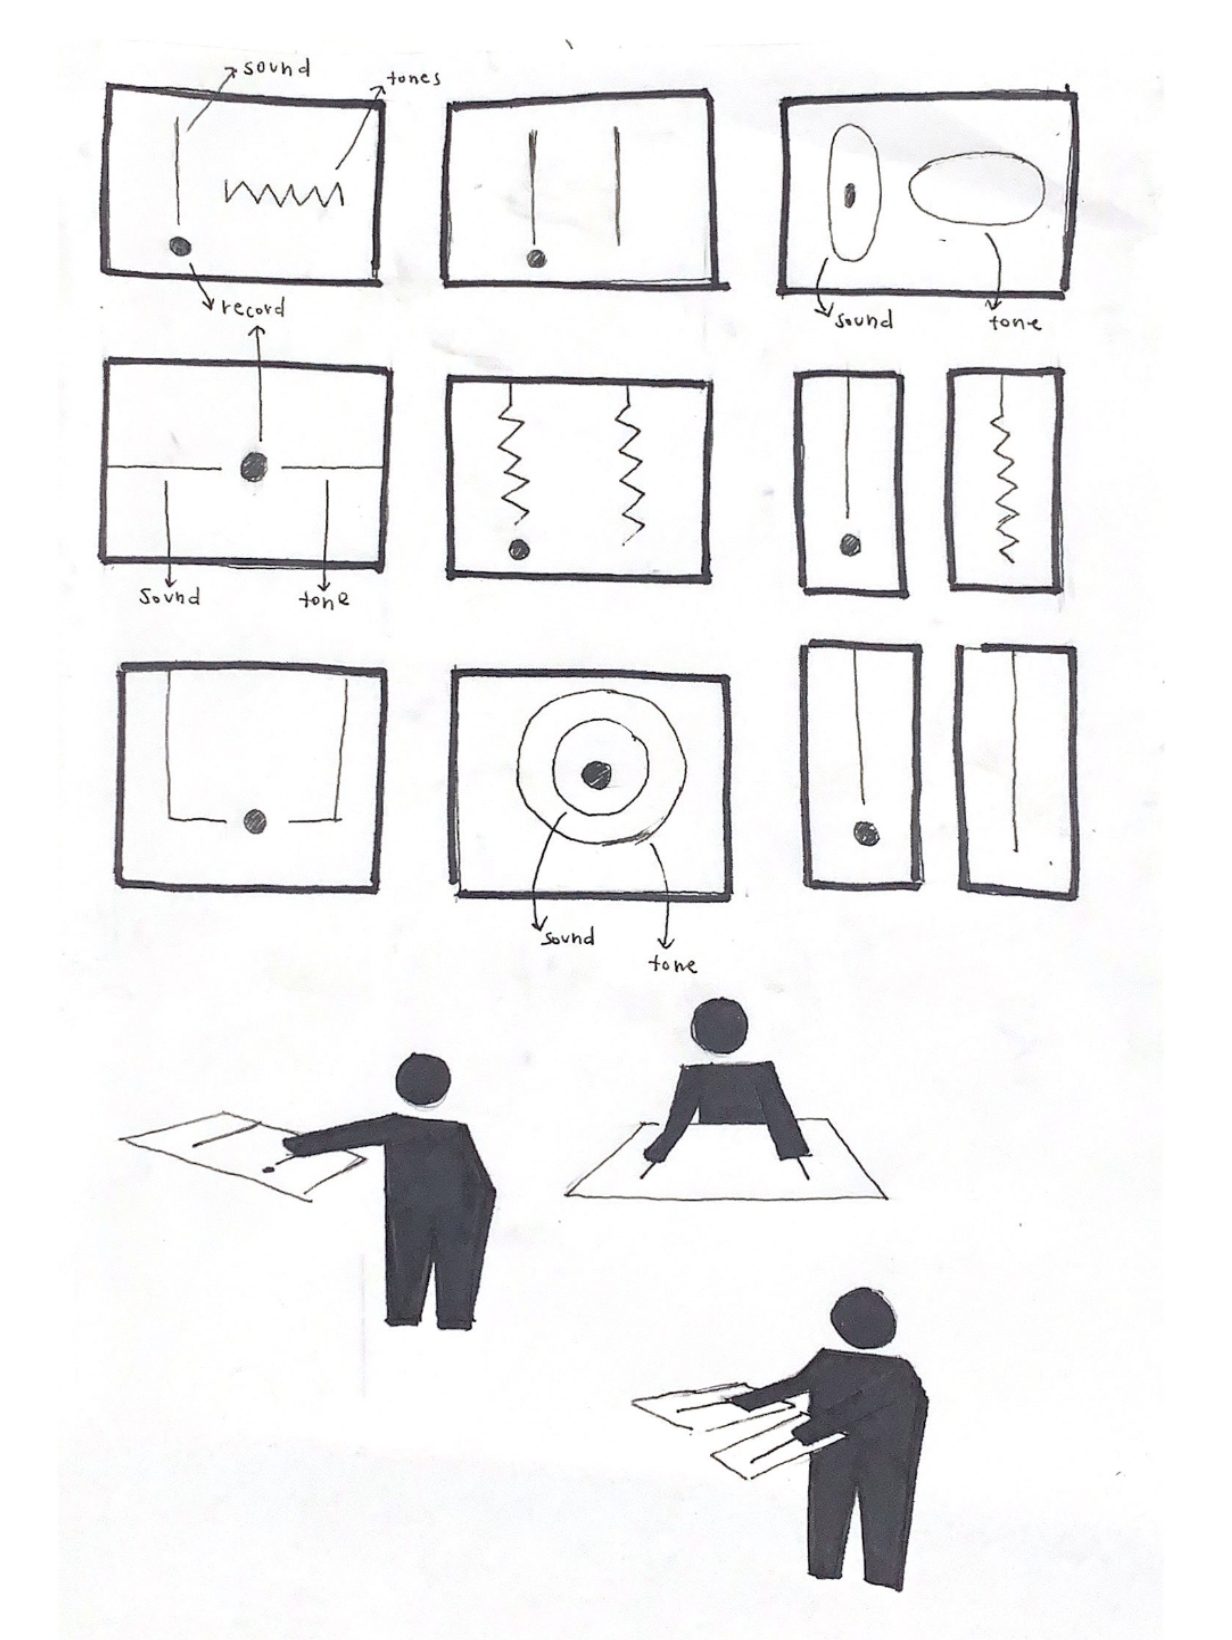
These were the sketches made before actually physically making the prototype.
This is our second prototype that uses sensors.
This is a birds-eye view of the second prototype.
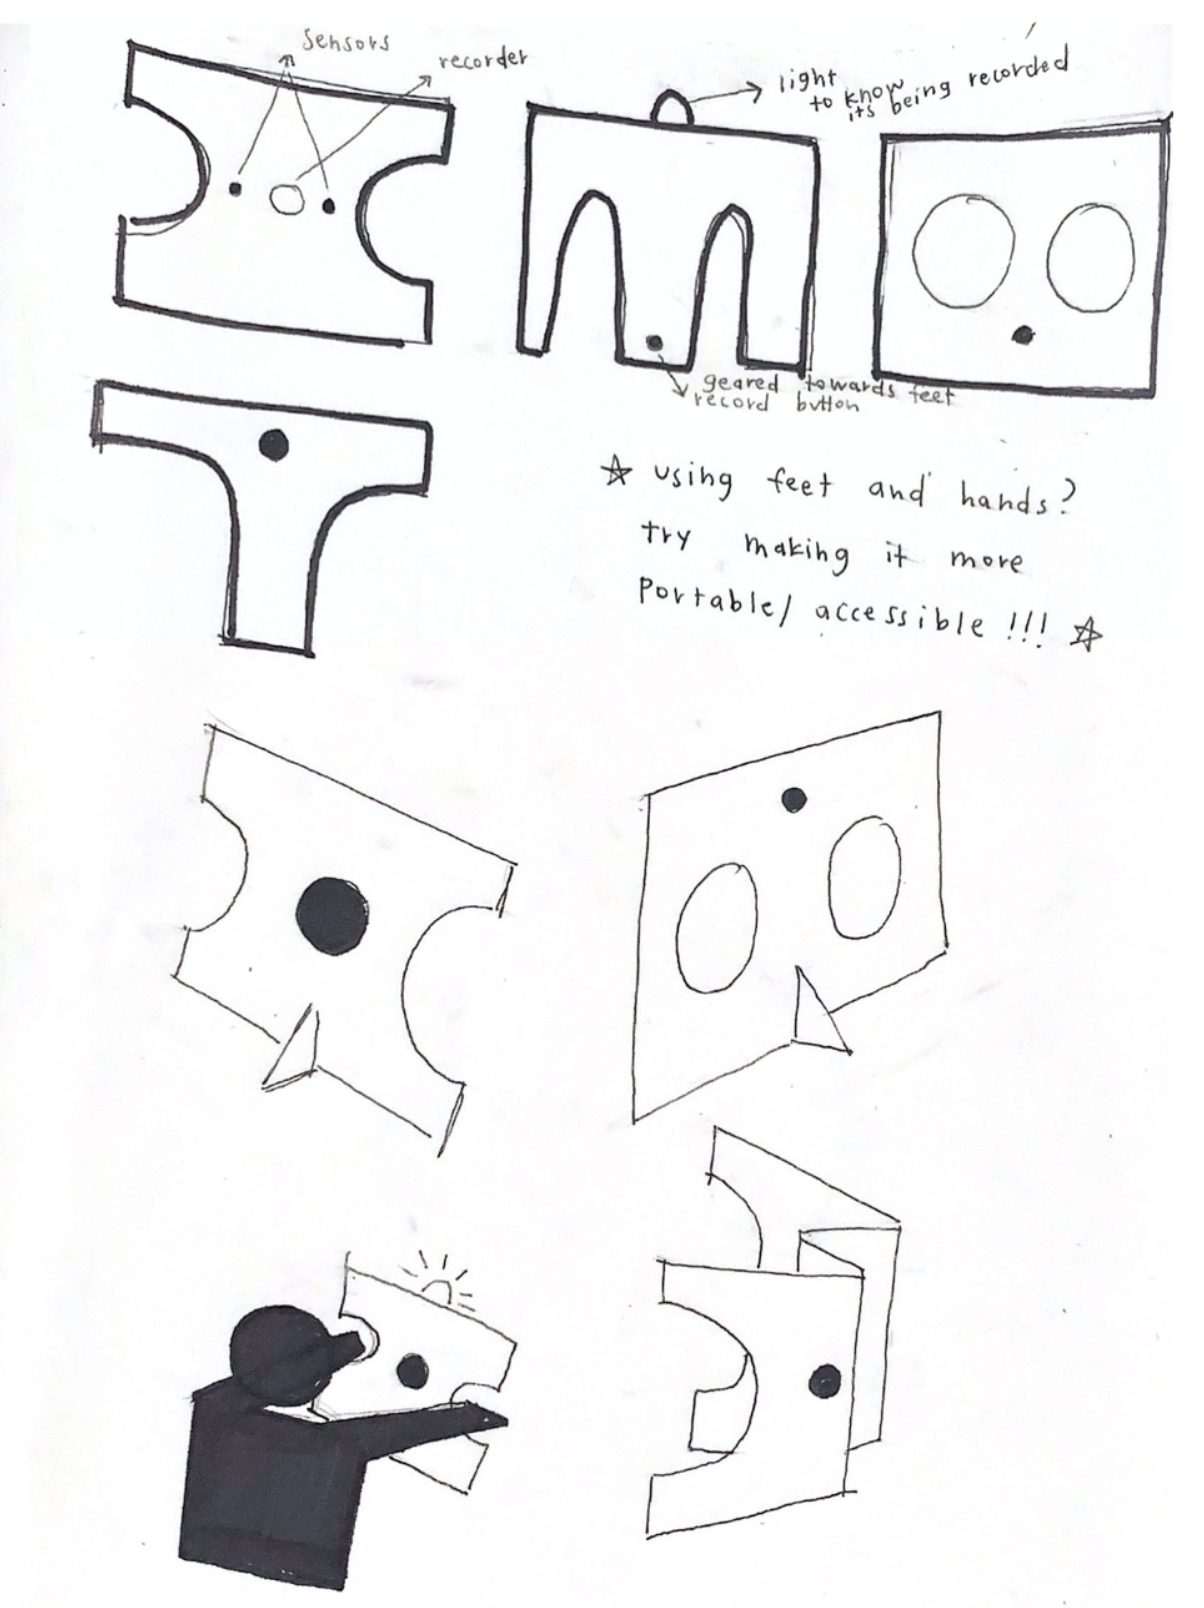
These are our sketches for our second prototype design.
Sruti did work with software prototyping to understand how we could translate our physical interactions to manipulate MIDI sounds. This was fundamental to giving the instrument a voice that someone would want to interact with. The work done revealed how we might manipulate volume and tone as flexible variables.
Here is a screen grab of the software that was being tested for the synthesizer.
From those prototypes, we were able to user test and get feedback about our direction. It was extremely effective as there was co-creating element where the users actually helped by sketching their feedback and potential next steps. On the left, you can see some of the notes we took while observing our users. On the right, you can see the suggestions that we received by the testers. This type of exercise was extremely helpful in aiding our team to understand what were the gaps that we failed to see while working.

Here were the overall notes from one of the user tests.
We were anxious to present our progress to Elaine, as we had taken liberties in the direction we had moved since our interview and were hoping it would be a pleasant and engaging surprise. Luckily for everyone, our direction resonated with her. Elaine shared stories about her time as a young kid in her school’s music class learning to play the recorder. The instrument requires ten fingers to play all notes on, so Elaine was frustrated she couldn’t participate. She showed us an adapter which was recently designed that she was able to 3D print to play the recorder today. It used a mechanical solution similar to that of a clarinet or saxophone, where certain tabs could be pressed to cover multiple holes on the instrument at the same time. Our project was of interest in that it differs from the start, where there is no need for an adapter to make it different from anybody else’s.
Elaine still had useful feedback for us after we shared our prototypes. In terms of ergonomics, Elaine shared valuable insights to add to our knowledge of her range of motion. She talked about how gravity is difficult to constantly work against, so when her arm is at a certain elevation it is easiest for her to continue working with it at that elevation. However, she noted that it is not comfortable to be interacting with interfaces directly in front of her as it requires muscle strength she does not have. As for interaction, she was interested in the theremin as a starting point and gave us the green light on proximity sensors as a primary interaction.
We kept all of this feedback in mind as we began to bring our prototyping together. In developing the form it would take, we knew it would work best attached to the arms of Elaine’s chair. That is where her arms already naturally rest. This rules out earlier prototypes with interfaces on the side of the chair and earlier ones we had teased that were set up like a centered control board. Attaching the instrument to the chair had to be easy, yet structurally sound. The controls of the instrument had to embody the tone and volume controls which Sruti had been working on manipulating. Drawings were initially done with a rough concept in mind, which were then iterated many times digitally in Sketchup to arrive at our final product.
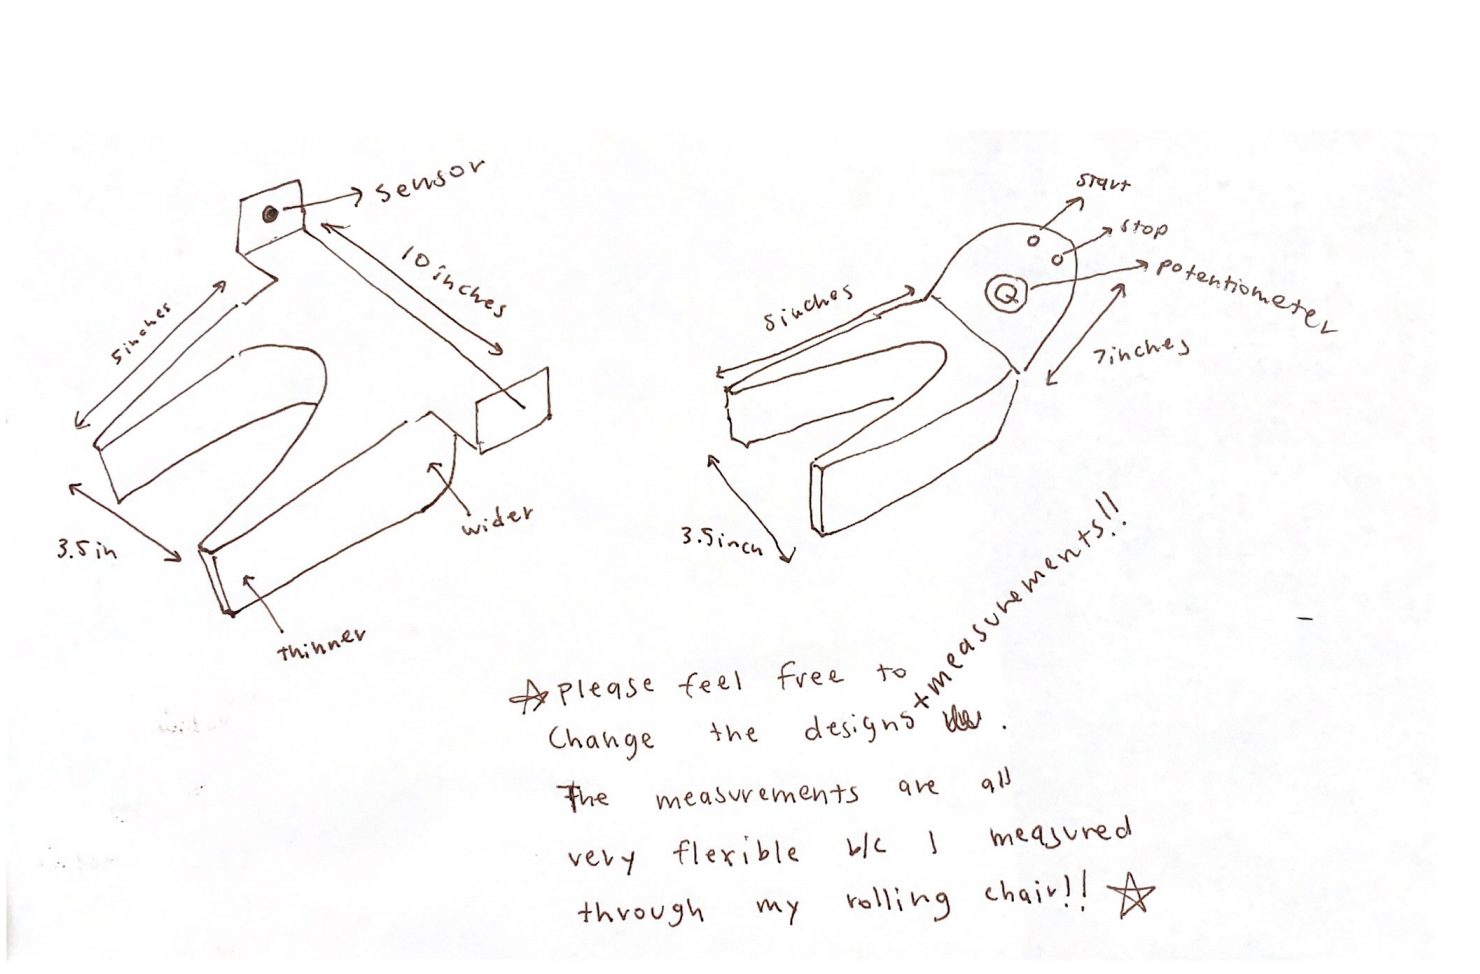
This is our sketch for our final design direction!
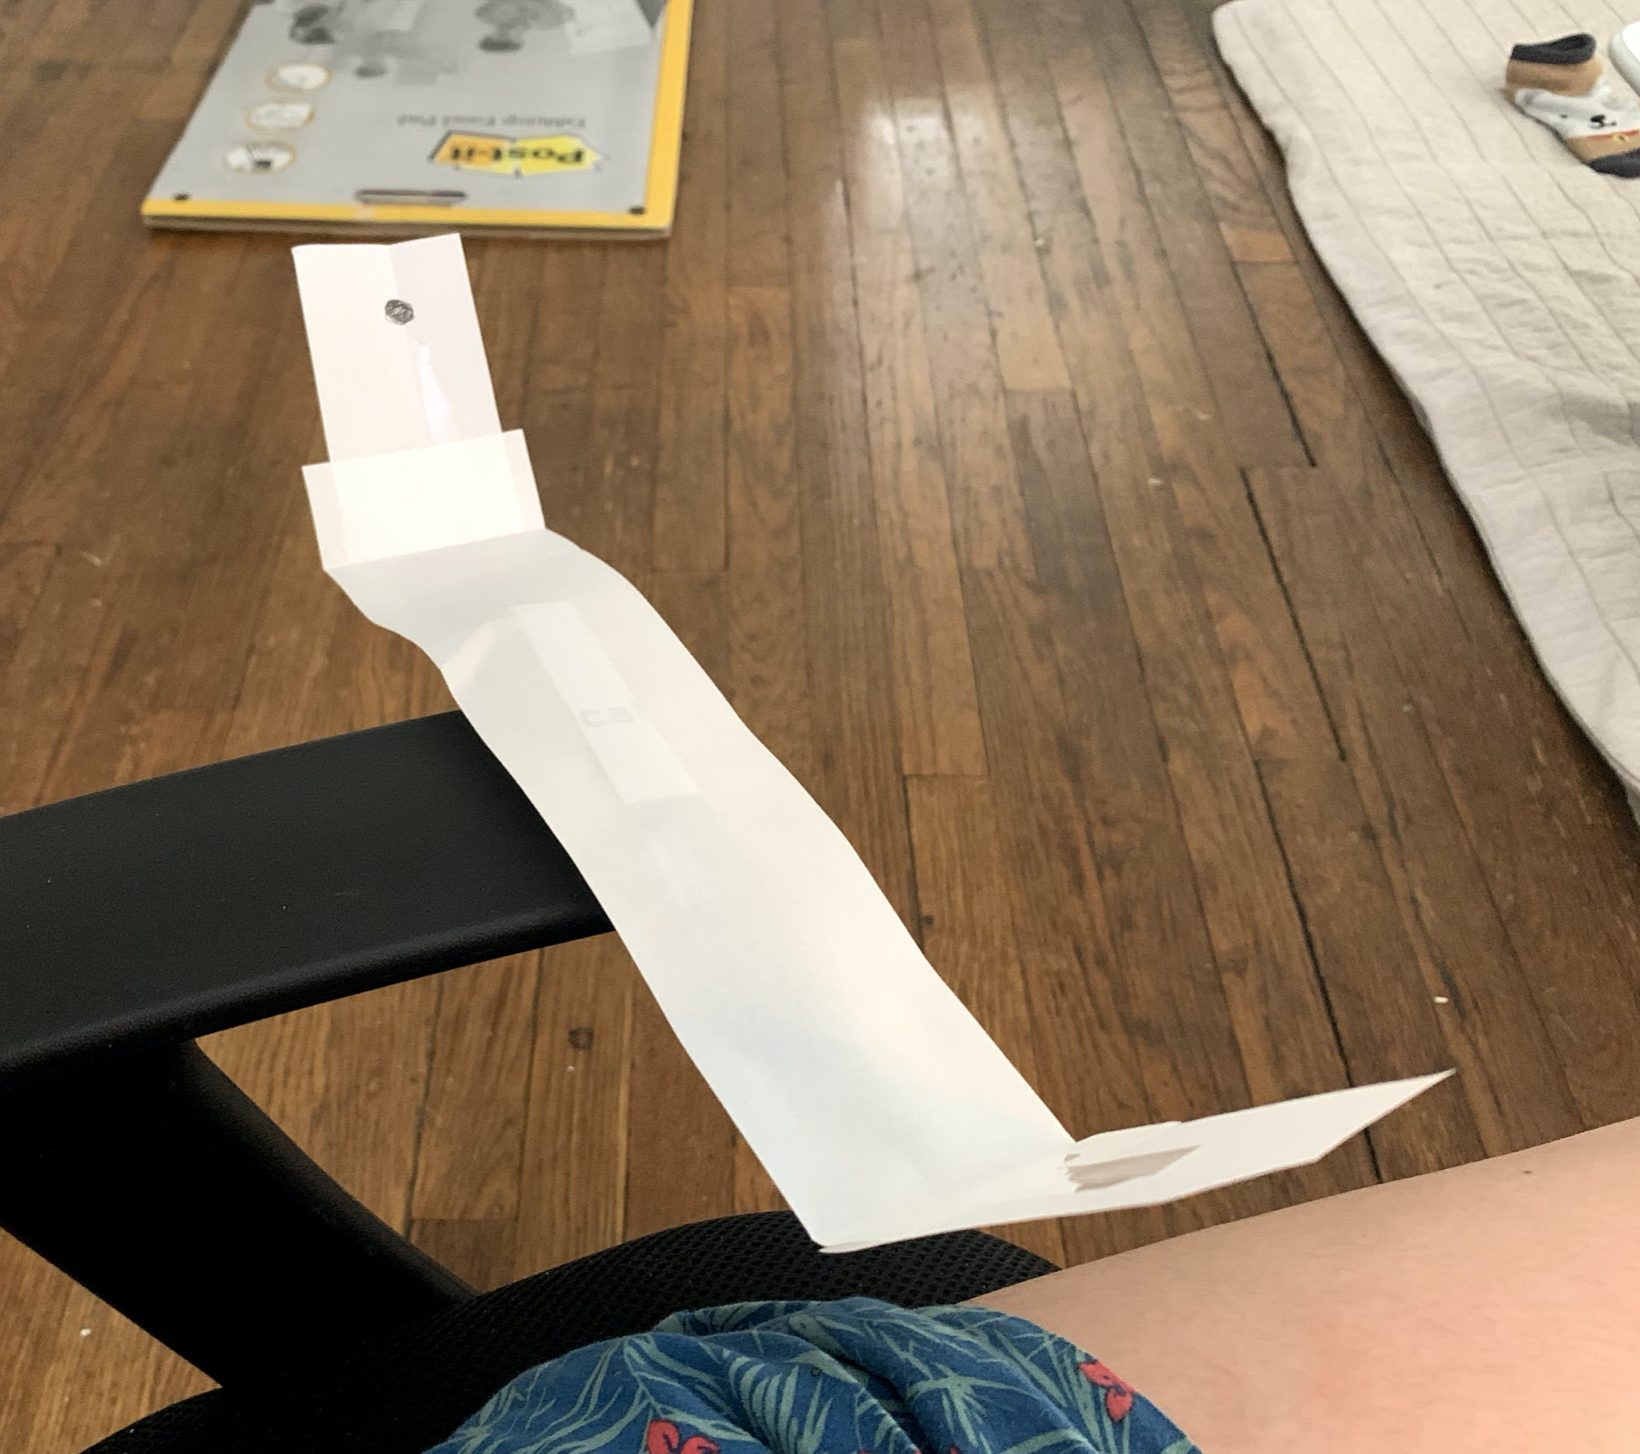
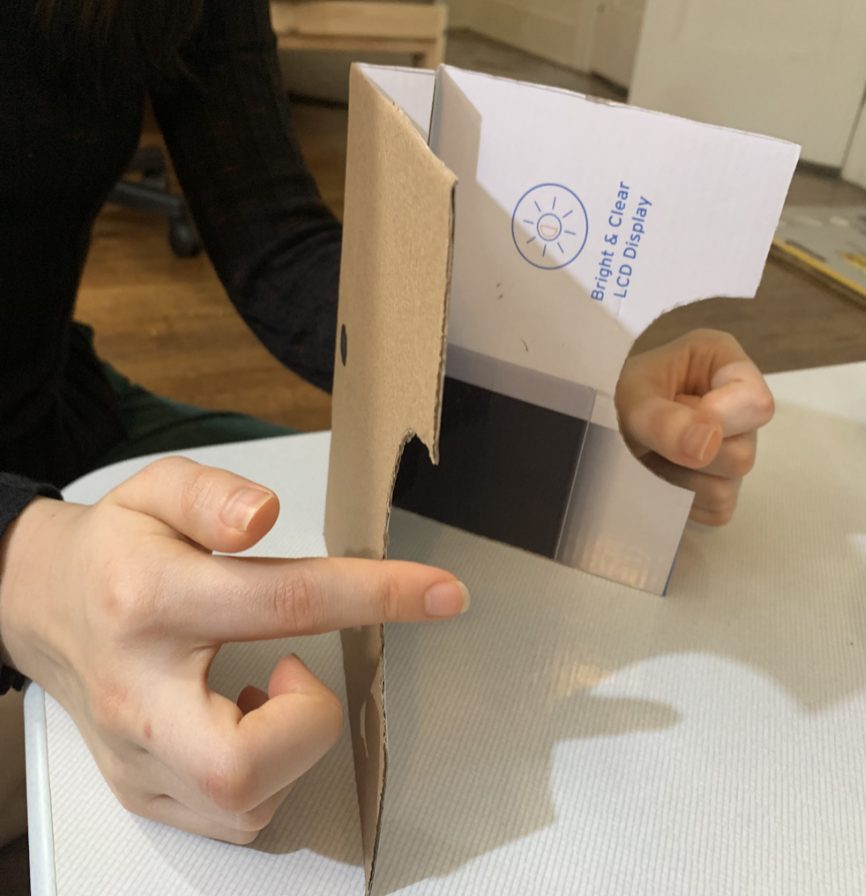
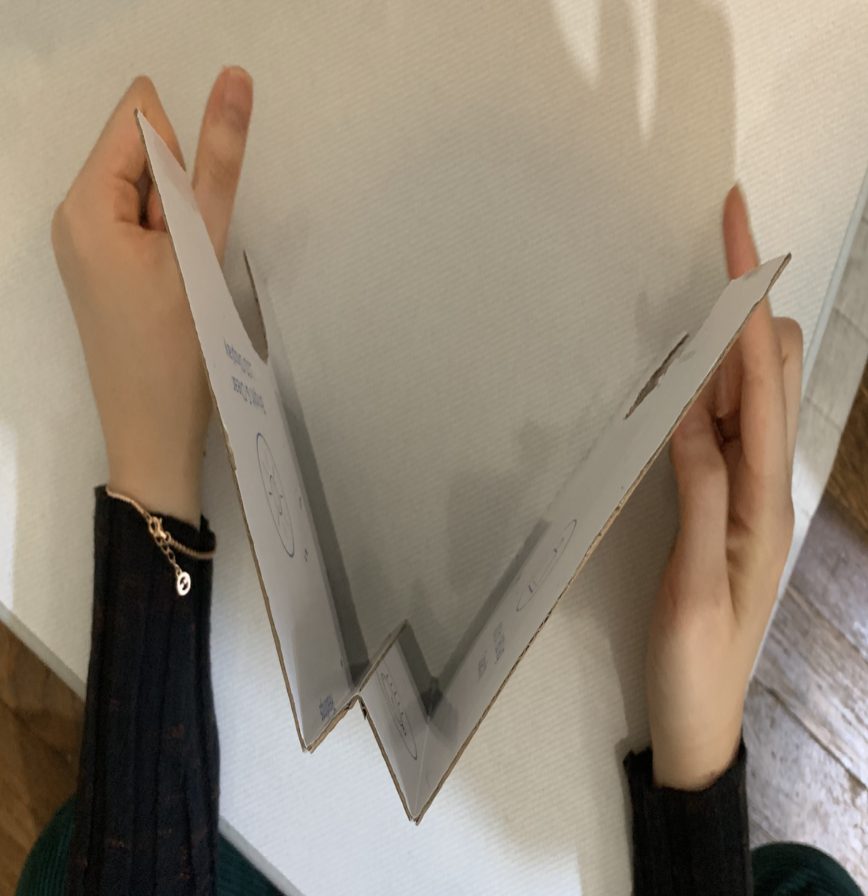
This was the physical model we quickly made to test out if the interaction made sense.
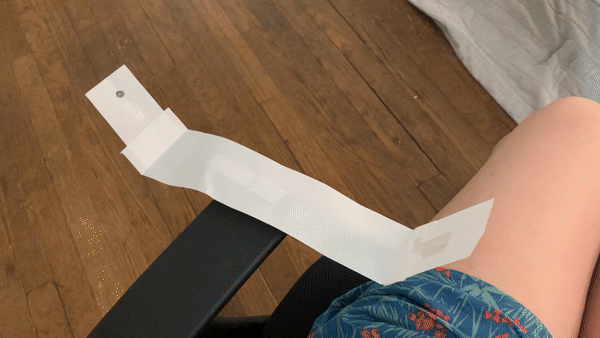
This is a gif to quickly explain the movement we were planing for our device.
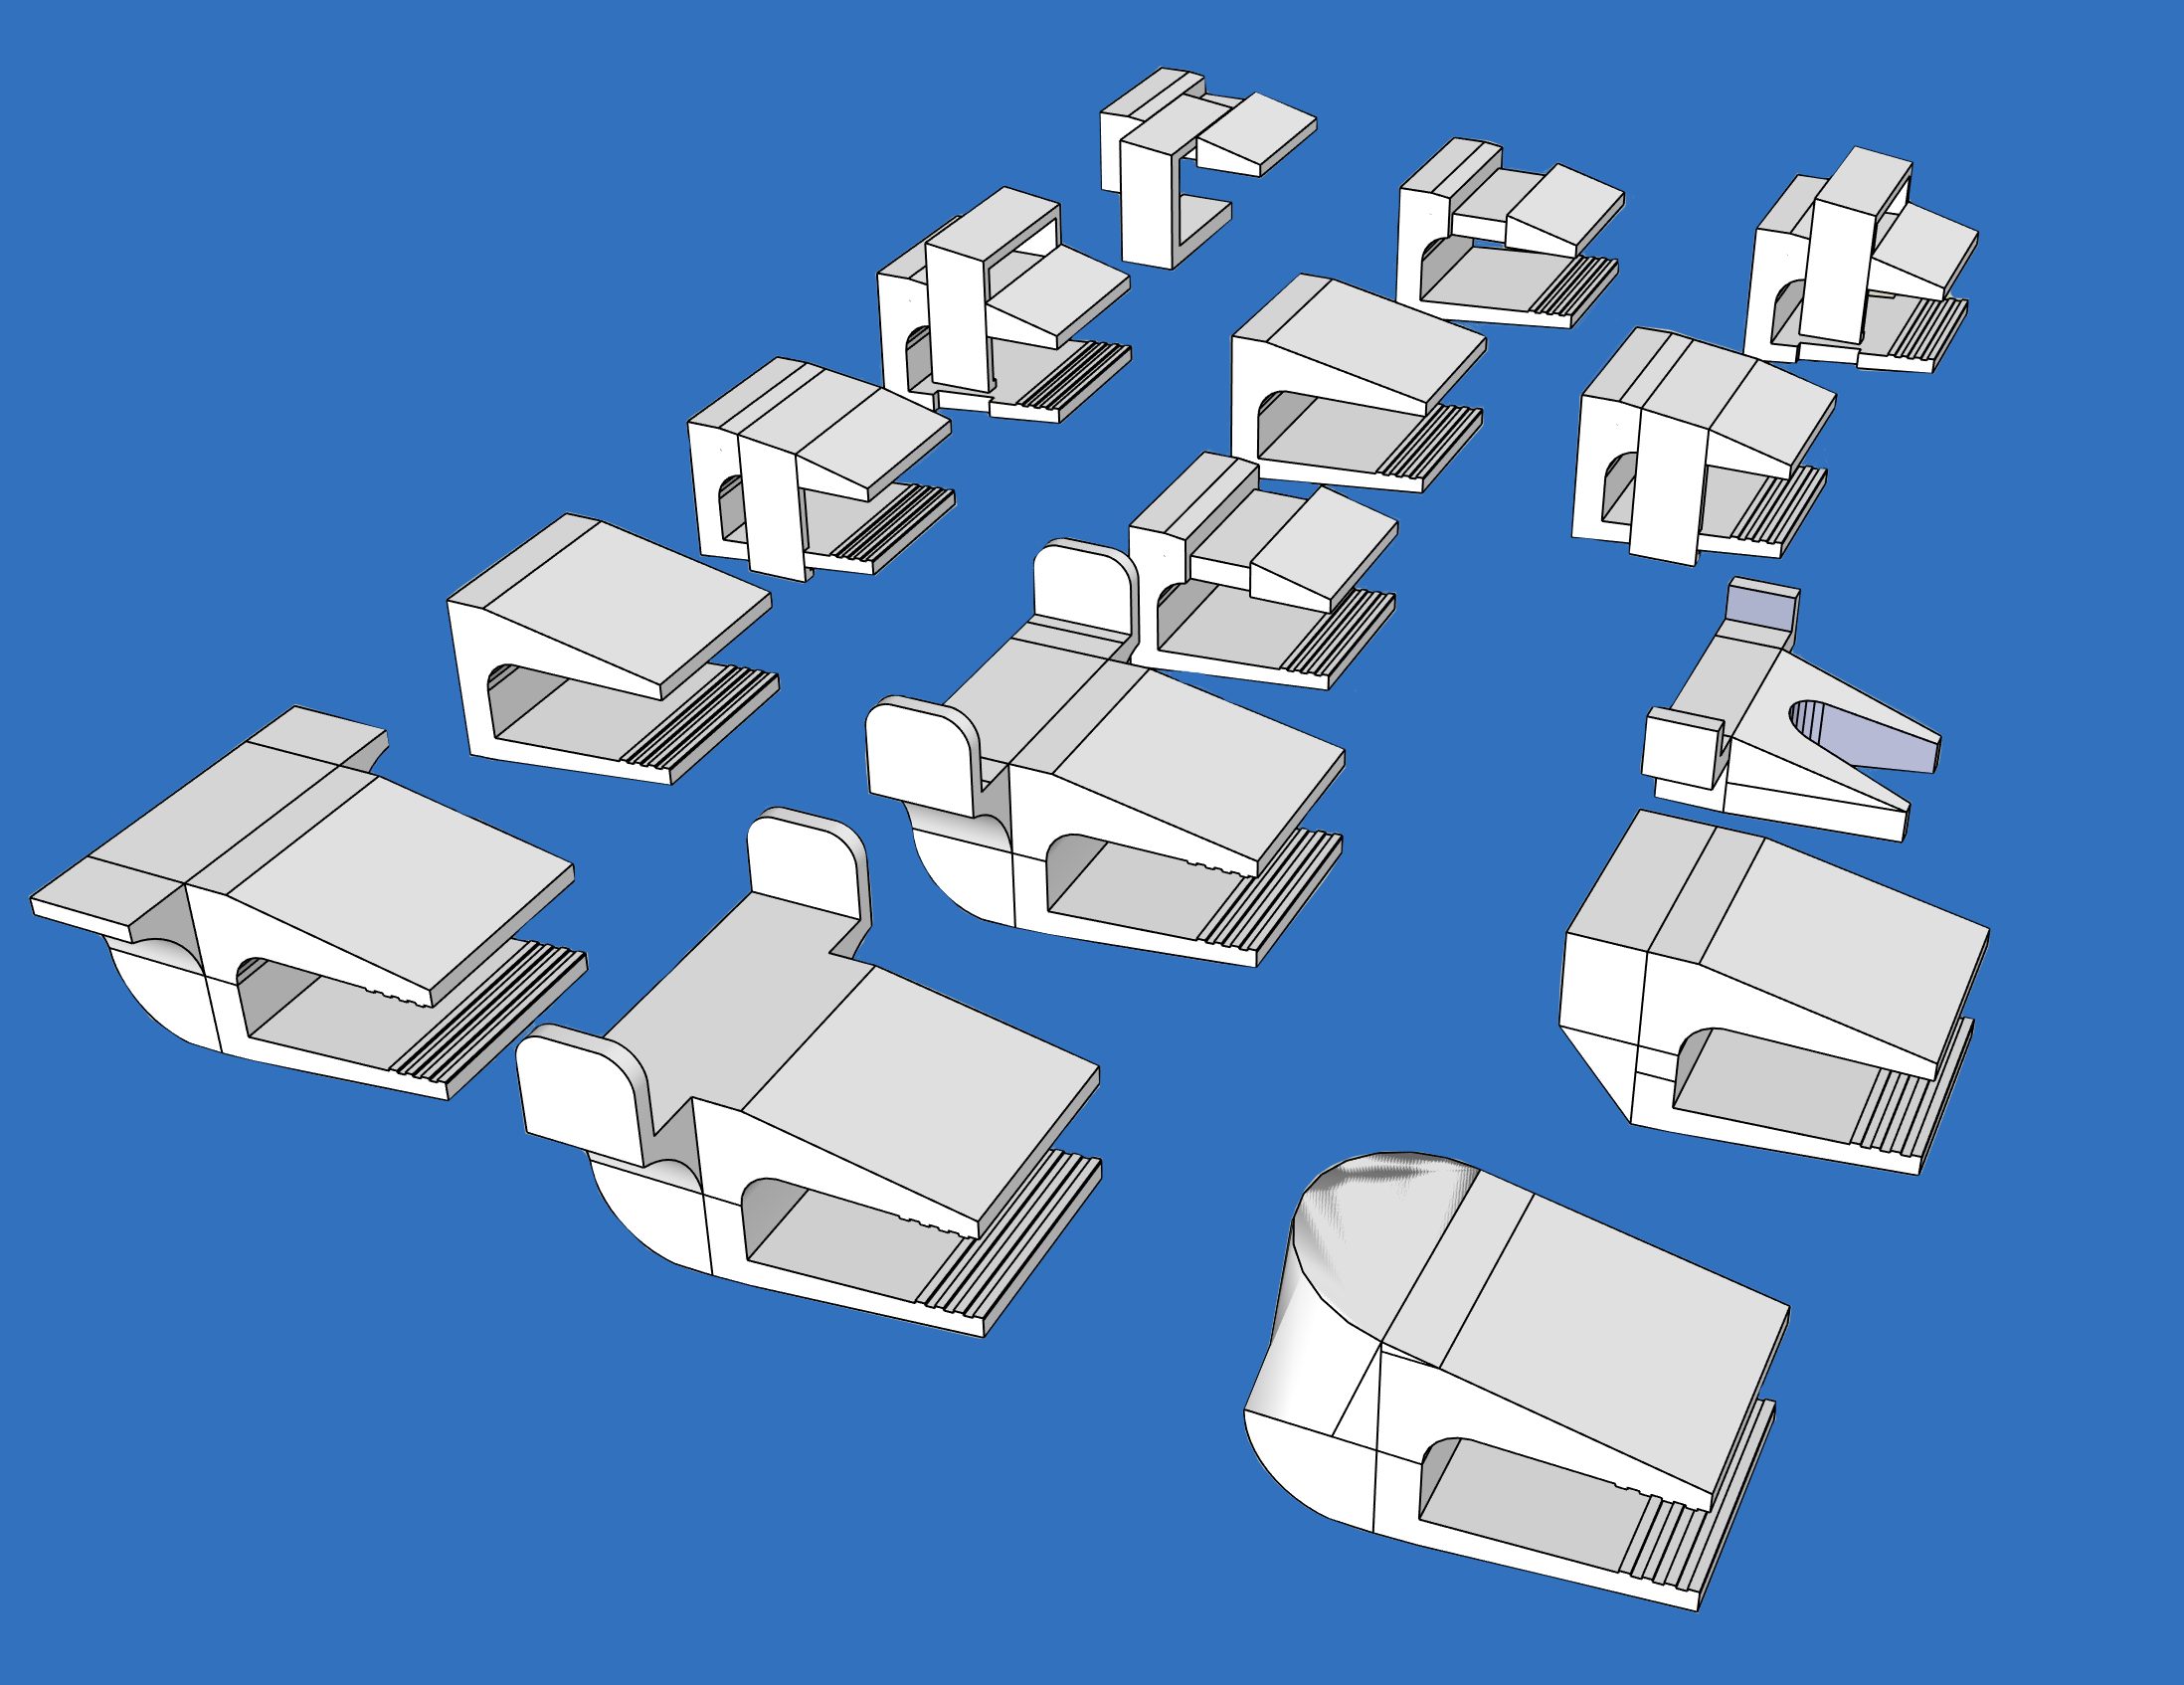
Here are all the types of models we tried our in sketches before getting to our final!
After making these mock-ups, we were thankful enough to do one more user testing with the people we tried earlier on in our process. From there, we were able to get feedback on how having the left device only straight brought constraints to their arms as they would have to slightly lift them when moving father away from the sensor, causing us to further iterate and make our final left device version curved to bring about more comfortability.
Reflection
After our final presentation, we were able to have wonderful discussions and get lots of feedback on our device. It was extremely helpful to get extra time to talk with new people and get new perspectives on what we did. First and foremost, Elaine’s feedback was the top of our priority! When we talked with her at our final demo presentation, she emphasized how she appreciated how interesting our concept with the changing components on our device was. In addition, she mentioned that all the specific constraints she told us about we all met! She suggested on having a bigger knob for the volume or even using a slider to make the that component have more dexterity. As of right now, our knob works, but it would be much easier for her with the newest suggestions.
Slides were super clean (and gorgeous!!) and easy to understand which allowed for your communication of concept to really shine. I enjoyed all of the prototype iteration you did to work towards an intuitive and comfortable experience.
Adding on, we got a lot of positive feedback from the other classmates and clients to the point where they asked how this device could be accessible to them. Those types of questions helped us have an eye-opening experience to understand how different everyones’ abilities are and how everyone prefers different types of interactions and constraints. Though our focus for this project was solely on Elaine, when talking with other people, we realized that others face different disabilities that may cause them to find Elaine’s constraints their main way of functioning. For example, two people we talked to mentioned that they prefer having only one hand in use for the device rather than two. Our decision of using two separate devices were due to Elaine’s request, because it is easier for her to use simple movement with her left hand and slightly more complex ones using more strength with her right hand. But from discussing with other people, it was extremely interesting to hear about different people’ abilities, causing us to reflect on how difficult accessibility is to implement overall.
Later on, we were able to reach out to Elaine to talk to her about potentially furthering the accessibility use of our device as the other client’s gave us feedback based on their constraints. When we brought up the one handed device suggestions, she emphasized that it is much more difficult for her. She continued to talk to us about how those types of decisions are very dependent on the nature of the disabilities. “Some people will prefer both hands which require finger control that some may not have, while others maybe prefer only one hand.” From that discussion, we realized how important it is to find a sweet spot with our overall mechanism to allow various types of users participate like using eye-tracking or head movement which makes the device have a wider range of users which is something we would love to look into and potentially add it into our device.
I think it was a very advanced project but with an intuitive mechanism. Loved how you guys connected it to another audio software.
The overall project experience went much better than expected! A big concern that our team had was the varying levels of expertise in software, electrical, and fabrication, but we were all able to be transparent and truly use each others’ strengths to better the project. Though we were remote, because we were continuously communicating with one another, we did not face any problems as a team. In addition, if someone needed help, it was always comfortable to reach out and get advice from others in our team. The biggest takeaway from this experience was truly learning all these various types of co-creative platforms to help working remotely. For example, SketchUp is flexible enough for all of us to collaboratively work together on the final design, allowing us to make sure that this device concept and design was created as a whole team. There isn’t anything from a teamwork standpoint where we struggled and would continue to work like we did if we were to work again together.
Moving on, as a team, we appreciated the high level of expertise that Elaine has, allowing her to push us with our thinking and overall project. At first, it was concerning to us because we were worried that we would not be able to meet up to her expectations, since she has so much experience with developing devices especially in rehabilitation science. However, once we started to work together, Elaine brought so many insightful feedback and new knowledge that really helped our device get to another level. One thing that we did have a challenge with was keeping in communication with Elaine, because of her busy schedule, causing us to delay our timelines during our process. In the future, it would be better if we could schedule a weekly meeting time with our client so that we are able to keep each other informed about what is going on, rather than having to wait until there is a response. In addition, we hoped that in the future, the guidelines and overall goals are aligned with our client because in the beginning there seemed to be some misunderstanding with the overall level of the project we were meant to make. Further iterating, it seemed that the problems that Elaine brought were much more difficult than our skill level, causing us to have to pivot and be stuck for a little bit of our process. In the end, we really appreciated Elaine’s time and contribution to our overall collaboration as we were all able to learn and use the lessons from the whole semester.
Not only did this project help us utilize and learn new skills, it has helped us become more aware about inclusiveness for those with disabilities. All of us were aware, but was not as knowledgable as we are know with the struggled that people with disabilities face. Through hearing about Elaine’s tough experiences facing accessibility issues, it was extremely sad to hear how there are also so many other people who also face those hardships. It is unfortunate to see how in most designs today, they neglect the needs of the disabled. This experience has helped us truly focus and understand what it means to work and make a Universal design. When designing, especially in the beginning stages of our process, there were times where the mobility issues would slip out of our minds, causing us to have to take steps back with our progress to fix those issues. These types of experiences were really great learning lessons for us overall. While we were user-testing, it was interesting to see how designing for inclusion can help develop better products for all. For example, our first design user testing, we asked our testers to just use the device without telling them the constraints that the primary user has. After getting their feedback, it was fascinating to see how their critique was very similar to what Elaine later told us, reinforcing this idea that inclusive design is not just helping those with disabilities, but makes anyone’s experience better.
In the end, our team was able to truly reflect on how objects and interaction around us influence our ability to participate in society which should give equal opportunities to everyone. The people who design those participations are often the ones who decide who can and cannot participate based on abilities and other factors. As students, we should start to raise awareness to this issue so that future products truly include all abilities. If we were to do this project again, a big thing we would love to do is do more research on inclusiveness and accessibility to enhance our devices experience even further, because that knowledge is something that we still have gaps on since we are unable to truly understand the experience of those with disabilities.
Next Steps
Based on the feedback we got from our final demo and from our overall team discussion, there are definitely aspects of our device that we would like to continue iterating and researching. Due to our remote situation, there are aspects of our device that we were unable to execute which includes physically building the device, material research, and user testing. In the future, we plan on looking into making the physical design of the device to be more flexible based on setting and user, which is something we would revise through physical user-testings to see any gaps that are not visible through the remote realm. In addition, we would love to explore potential materials that the product could be made out of so that it is comfortable to rest your arm on. Right now, the final rendering looks like plastic, but we would prefer to use another type of material that is more comfortable or adding cushion paddings onto the design. Another aspect that we have not quite yet approached was error prevention, so being able to understand what are the problems that users will face while using our device and how might we create simple solutions that they can use to execute on their own. Lastly, the software can only use one instrument at a time, but it can be changed manually through the digital synthesizer. We would like to look into other softwares that are mire flexible with the ability to switch musical instruments through our devices components and not within the actual music software. In the end, we understand that the constraints that we faced with this project were super helpful in helping us think in new ways to work with them. As a team, we agreed that this device is definitely something that we would love to further refine and get to Elaine once the pandemic gets better!
Technical details
Tinkercad link and breadboard image
For our technical details, we will display our TinkerCAD, codes (TinkerCAD Version and Music Software Version), and schematic drawings (TinkerCAD Version and actual device map). There are still some parts of our technical aspect that we would like to further refine as there are other ways to solve the problems we are looking at.
Link to the TinkerCAD project: https://www.tinkercad.com/things/5noXteuGj3d
Below, you will see our main TinkerCAD set up to get a better understanding of our breadboard and electronics set-up. Please keep in mind that our TinkerCAD is just a way to express the overall goal of our device, because the platform is unable to completely function the way that we want it to like missing certain parts and unable to do certain functions.
This is our main TinkerCAD setup.
Code
- <span class="com">/*
- * Project: Tone Flex
- * By Jina Lee, Connor Mcgaffin, Sruti Srinidhi
- *
- * The code below takes an ultrasonic distance sensor
- * and a potentiometer as input which are mapped to
- * appropriate ranges to get the pitch and volume
- * of the note being played respectively. The pitch
- * and volume is then sent in the MIDI format over the
- * serial port to the other Arduino which then displays
- * the signal it receives on the LCD display.
- *
- * Pin mapping:
- *
- * pin | mode | description
- * ------|-------------|------------
- * 2 input start button
- * 3 input stop button
- * 7 input/output ultrasonic distance sensor pin
- * A0 input potentiometer
- * A1 input potentiometer for volume
- *
- * Code for the ultrasonic distance sensor was taken and
- * modified from David A. Mellis's project
- * http://www.arduino.cc/en/Tutorial/Ping
- */</span><span class="pln">
- </span><span class="com">/* SENDER */</span><span class="pln">
- </span><span class="com">// Initializing pins</span><span class="pln">
- </span><span class="kwd">const</span><span class="pln"> </span><span class="kwd">int</span><span class="pln"> VOLUMEPIN </span><span class="pun">=</span><span class="pln"> A1</span><span class="pun">;</span><span class="pln">
- </span><span class="kwd">const</span><span class="pln"> </span><span class="kwd">int</span><span class="pln"> pingPin </span><span class="pun">=</span><span class="pln"> </span><span class="lit">7</span><span class="pun">;</span><span class="pln">
- </span><span class="kwd">void</span><span class="pln"> setup</span><span class="pun">()</span><span class="pln"> </span><span class="pun">{</span><span class="pln">
- pinMode</span><span class="pun">(</span><span class="pln">VOLUMEPIN</span><span class="pun">,</span><span class="pln"> INPUT</span><span class="pun">);</span><span class="pln">
- </span><span class="typ">Serial</span><span class="pun">.</span><span class="kwd">begin</span><span class="pun">(</span><span class="lit">9600</span><span class="pun">);</span><span class="pln">
- </span><span class="pun">}</span><span class="pln">
- </span><span class="kwd">void</span><span class="pln"> loop</span><span class="pun">()</span><span class="pln"> </span><span class="pun">{</span><span class="pln">
- </span><span class="com">// Get duration between sending and receiving signal for </span><span class="pln">
- </span><span class="com">// ultrasonic distance sensor</span><span class="pln">
- </span><span class="kwd">long</span><span class="pln"> duration</span><span class="pun">,</span><span class="pln"> cm</span><span class="pun">;</span><span class="pln">
- pinMode</span><span class="pun">(</span><span class="pln">pingPin</span><span class="pun">,</span><span class="pln"> OUTPUT</span><span class="pun">);</span><span class="pln">
- digitalWrite</span><span class="pun">(</span><span class="pln">pingPin</span><span class="pun">,</span><span class="pln"> LOW</span><span class="pun">);</span><span class="pln">
- delayMicroseconds</span><span class="pun">(</span><span class="lit">2</span><span class="pun">);</span><span class="pln">
- digitalWrite</span><span class="pun">(</span><span class="pln">pingPin</span><span class="pun">,</span><span class="pln"> HIGH</span><span class="pun">);</span><span class="pln">
- delayMicroseconds</span><span class="pun">(</span><span class="lit">5</span><span class="pun">);</span><span class="pln">
- digitalWrite</span><span class="pun">(</span><span class="pln">pingPin</span><span class="pun">,</span><span class="pln"> LOW</span><span class="pun">);</span><span class="pln">
- pinMode</span><span class="pun">(</span><span class="pln">pingPin</span><span class="pun">,</span><span class="pln"> INPUT</span><span class="pun">);</span><span class="pln">
- duration </span><span class="pun">=</span><span class="pln"> pulseIn</span><span class="pun">(</span><span class="pln">pingPin</span><span class="pun">,</span><span class="pln"> HIGH</span><span class="pun">);</span><span class="pln">
- </span><span class="com">// Covert duration to a distance which is used as pitch value</span><span class="pln">
- </span><span class="kwd">int</span><span class="pln"> pitchval </span><span class="pun">=</span><span class="pln"> microsecondsToCentimeters</span><span class="pun">(</span><span class="pln">duration</span><span class="pun">);</span><span class="pln">
- </span><span class="com">// Read potentiometer for volume</span><span class="pln">
- </span><span class="kwd">int</span><span class="pln"> volumeval </span><span class="pun">=</span><span class="pln"> analogRead</span><span class="pun">(</span><span class="pln">VOLUMEPIN</span><span class="pun">);</span><span class="pln">
- </span><span class="com">// Map pitch and volume to appropriate ranges</span><span class="pln">
- </span><span class="kwd">int</span><span class="pln"> tone </span><span class="pun">=</span><span class="pln"> map</span><span class="pun">(</span><span class="pln">pitchval</span><span class="pun">,</span><span class="pln"> </span><span class="lit">0</span><span class="pun">,</span><span class="pln"> </span><span class="lit">340</span><span class="pun">,</span><span class="pln"> </span><span class="lit">1</span><span class="pun">,</span><span class="pln"> </span><span class="lit">127</span><span class="pun">);</span><span class="pln">
- </span><span class="kwd">int</span><span class="pln"> volume </span><span class="pun">=</span><span class="pln"> map</span><span class="pun">(</span><span class="pln">volumeval</span><span class="pun">,</span><span class="pln"> </span><span class="lit">0</span><span class="pun">,</span><span class="pln"> </span><span class="lit">1028</span><span class="pun">,</span><span class="pln"> </span><span class="lit">1</span><span class="pun">,</span><span class="pln"> </span><span class="lit">127</span><span class="pun">);</span><span class="pln">
- </span><span class="com">// Send MIDI play message</span><span class="pln">
- </span><span class="typ">MIDImessage</span><span class="pun">(</span><span class="lit">144</span><span class="pun">,</span><span class="pln">tone</span><span class="pun">,</span><span class="pln">volume</span><span class="pun">);</span><span class="pln">
- delay</span><span class="pun">(</span><span class="lit">500</span><span class="pun">);</span><span class="pln">
- </span><span class="com">// Send MIDI pause message</span><span class="pln">
- </span><span class="typ">MIDImessage</span><span class="pun">(</span><span class="lit">128</span><span class="pun">,</span><span class="pln"> tone</span><span class="pun">,</span><span class="pln"> volume</span><span class="pun">);</span><span class="pln">
- delay</span><span class="pun">(</span><span class="lit">500</span><span class="pun">);</span><span class="pln">
- </span><span class="pun">}</span><span class="pln">
- </span><span class="com">// Send MIDI signal in appropriate format over serial</span><span class="pln">
- </span><span class="kwd">void</span><span class="pln"> </span><span class="typ">MIDImessage</span><span class="pun">(</span><span class="kwd">int</span><span class="pln"> command</span><span class="pun">,</span><span class="pln"> </span><span class="kwd">int</span><span class="pln"> </span><span class="typ">MIDInote</span><span class="pun">,</span><span class="pln"> </span><span class="kwd">int</span><span class="pln"> </span><span class="typ">MIDIvelocity</span><span class="pun">)</span><span class="pln"> </span><span class="pun">{</span><span class="pln">
- </span><span class="typ">Serial</span><span class="pun">.</span><span class="kwd">print</span><span class="pun">(</span><span class="pln">command</span><span class="pun">);</span><span class="com">//send note on or note off command </span><span class="pln">
- </span><span class="typ">Serial</span><span class="pun">.</span><span class="kwd">print</span><span class="pun">(</span><span class="str">','</span><span class="pun">);</span><span class="pln">
- </span><span class="typ">Serial</span><span class="pun">.</span><span class="kwd">print</span><span class="pun">(</span><span class="typ">MIDInote</span><span class="pun">);</span><span class="com">//send pitch data</span><span class="pln">
- </span><span class="typ">Serial</span><span class="pun">.</span><span class="kwd">print</span><span class="pun">(</span><span class="str">','</span><span class="pun">);</span><span class="pln">
- </span><span class="typ">Serial</span><span class="pun">.</span><span class="pln">println</span><span class="pun">(</span><span class="typ">MIDIvelocity</span><span class="pun">);</span><span class="com">//send velocity data</span><span class="pln">
- </span><span class="pun">}</span><span class="pln">
- </span><span class="kwd">long</span><span class="pln"> microsecondsToCentimeters</span><span class="pun">(</span><span class="kwd">long</span><span class="pln"> microseconds</span><span class="pun">)</span><span class="pln"> </span><span class="pun">{</span><span class="pln">
- </span><span class="com">// The speed of sound is 340 m/s or 29 microseconds per centimeter.</span><span class="pln">
- </span><span class="com">// The ping travels out and back, so to find the distance of the</span><span class="pln">
- </span><span class="com">// object we take half of the distance traveled.</span><span class="pln">
- </span><span class="kwd">return</span><span class="pln"> microseconds </span><span class="pun">/</span><span class="pln"> </span><span class="lit">29</span><span class="pln"> </span><span class="pun">/</span><span class="pln"> </span><span class="lit">2</span><span class="pun">;</span><span class="pln">
- </span><span class="pun">}</span>
- <span class="com">/*
- *Pin mapping:
- *
- * pin | mode | description
- * ------|--------|------------
- * 2 output LCD - DB7
- * 3 output LCD - DB6
- * 4 output LCD - DB5
- * 5 output LCD - DB4
- * 11 output LCD - E
- * 12 output LCD - RS
- *
- * Code to receive serial data completed
- * with the help of Professor Zacharias
- */</span><span class="pln">
- </span><span class="com">/* RECEIVER */</span><span class="pln">
- </span><span class="com">#include</span><span class="str"><LiquidCrystal.h></span><span class="pln">
- </span><span class="typ">LiquidCrystal</span><span class="pln"> lcd</span><span class="pun">(</span><span class="lit">12</span><span class="pun">,</span><span class="pln"> </span><span class="lit">11</span><span class="pun">,</span><span class="pln"> </span><span class="lit">5</span><span class="pun">,</span><span class="pln"> </span><span class="lit">4</span><span class="pun">,</span><span class="pln"> </span><span class="lit">3</span><span class="pun">,</span><span class="pln"> </span><span class="lit">2</span><span class="pun">);</span><span class="pln">
- </span><span class="kwd">int</span><span class="pln"> numReceived</span><span class="pun">;</span><span class="pln">
- </span><span class="kwd">int</span><span class="pln"> secondNumReceived</span><span class="pun">;</span><span class="pln">
- </span><span class="kwd">int</span><span class="pln"> thirdNumReceived</span><span class="pun">;</span><span class="pln">
- </span><span class="kwd">void</span><span class="pln"> setup</span><span class="pun">(){</span><span class="pln">
- </span><span class="typ">Serial</span><span class="pun">.</span><span class="kwd">begin</span><span class="pun">(</span><span class="lit">9600</span><span class="pun">);</span><span class="pln">
- lcd</span><span class="pun">.</span><span class="kwd">begin</span><span class="pun">(</span><span class="lit">16</span><span class="pun">,</span><span class="pln"> </span><span class="lit">2</span><span class="pun">);</span><span class="pln">
- </span><span class="pun">}</span><span class="pln">
- </span><span class="kwd">void</span><span class="pln"> loop</span><span class="pun">(){</span><span class="pln">
- </span><span class="com">// if data has been received on the software serial</span><span class="pln">
- </span><span class="kwd">if</span><span class="pln"> </span><span class="pun">(</span><span class="typ">Serial</span><span class="pun">.</span><span class="pln">available</span><span class="pun">()){</span><span class="pln">
- </span><span class="com">// read it and save into numReceived</span><span class="pln">
- numReceived </span><span class="pun">=</span><span class="pln"> </span><span class="typ">Serial</span><span class="pun">.</span><span class="pln">parseInt</span><span class="pun">();</span><span class="pln">
- </span><span class="com">// read second number and save it into secondNumReceived</span><span class="pln">
- secondNumReceived </span><span class="pun">=</span><span class="pln"> </span><span class="typ">Serial</span><span class="pun">.</span><span class="pln">parseInt</span><span class="pun">();</span><span class="pln">
- </span><span class="com">// read third number and save it into secondNumReceived</span><span class="pln">
- thirdNumReceived </span><span class="pun">=</span><span class="pln"> </span><span class="typ">Serial</span><span class="pun">.</span><span class="pln">parseInt</span><span class="pun">();</span><span class="pln">
- </span><span class="pun">}</span><span class="pln">
- </span><span class="com">// Write to LCD</span><span class="pln">
- lcd</span><span class="pun">.</span><span class="pln">clear</span><span class="pun">();</span><span class="pln">
- lcd</span><span class="pun">.</span><span class="pln">setCursor</span><span class="pun">(</span><span class="lit">0</span><span class="pun">,</span><span class="lit">0</span><span class="pun">);</span><span class="pln">
- </span><span class="kwd">if</span><span class="pln"> </span><span class="pun">(</span><span class="pln">numReceived </span><span class="pun">==</span><span class="pln"> </span><span class="lit">144</span><span class="pun">){</span><span class="pln">
- lcd</span><span class="pun">.</span><span class="kwd">print</span><span class="pun">(</span><span class="str">"Play "</span><span class="pun">);</span><span class="pln">
- </span><span class="pun">}</span><span class="kwd">else</span><span class="pln"> </span><span class="pun">{</span><span class="pln">
- lcd</span><span class="pun">.</span><span class="kwd">print</span><span class="pun">(</span><span class="str">"Pause "</span><span class="pun">);</span><span class="pln">
- </span><span class="pun">}</span><span class="pln">
- lcd</span><span class="pun">.</span><span class="pln">setCursor</span><span class="pun">(</span><span class="lit">0</span><span class="pun">,</span><span class="lit">1</span><span class="pun">);</span><span class="pln">
- lcd</span><span class="pun">.</span><span class="kwd">print</span><span class="pun">(</span><span class="str">"Pitch= "</span><span class="pun">);</span><span class="pln">
- lcd</span><span class="pun">.</span><span class="pln">setCursor</span><span class="pun">(</span><span class="lit">7</span><span class="pun">,</span><span class="lit">1</span><span class="pun">);</span><span class="pln">
- lcd</span><span class="pun">.</span><span class="kwd">print</span><span class="pun">((</span><span class="typ">String</span><span class="pun">)</span><span class="pln">secondNumReceived</span><span class="pun">);</span><span class="pln">
- lcd</span><span class="pun">.</span><span class="pln">setCursor</span><span class="pun">(</span><span class="lit">7</span><span class="pun">,</span><span class="lit">0</span><span class="pun">);</span><span class="pln">
- lcd</span><span class="pun">.</span><span class="kwd">print</span><span class="pun">(</span><span class="str">"Vol= "</span><span class="pun">);</span><span class="pln">
- lcd</span><span class="pun">.</span><span class="pln">setCursor</span><span class="pun">(</span><span class="lit">12</span><span class="pun">,</span><span class="lit">0</span><span class="pun">);</span><span class="pln">
- lcd</span><span class="pun">.</span><span class="kwd">print</span><span class="pun">((</span><span class="typ">String</span><span class="pun">)</span><span class="pln">thirdNumReceived</span><span class="pun">);</span><span class="pln">
- </span><span class="pun">}</span>
Schematic and design files
For our schematic drawings, we created two. The first one represents our mapping of components that our actual devices uses and the second version was what our TinkerCAD schematic is. We purposely made both versions to verify and make sure that our overall interactions make sense are are able to handle one another. These schematics were made while we were designing our device, which we found extremely helpful as the map aided to know if there was some type of electronics that would not make sense and not work. The difference between the drawings are that the TinkerCAD drawing has an LCD.
Adding on, for our device mockups, we used SkecthUp.
Here is the file for our renderings: Design SkecthUp Files
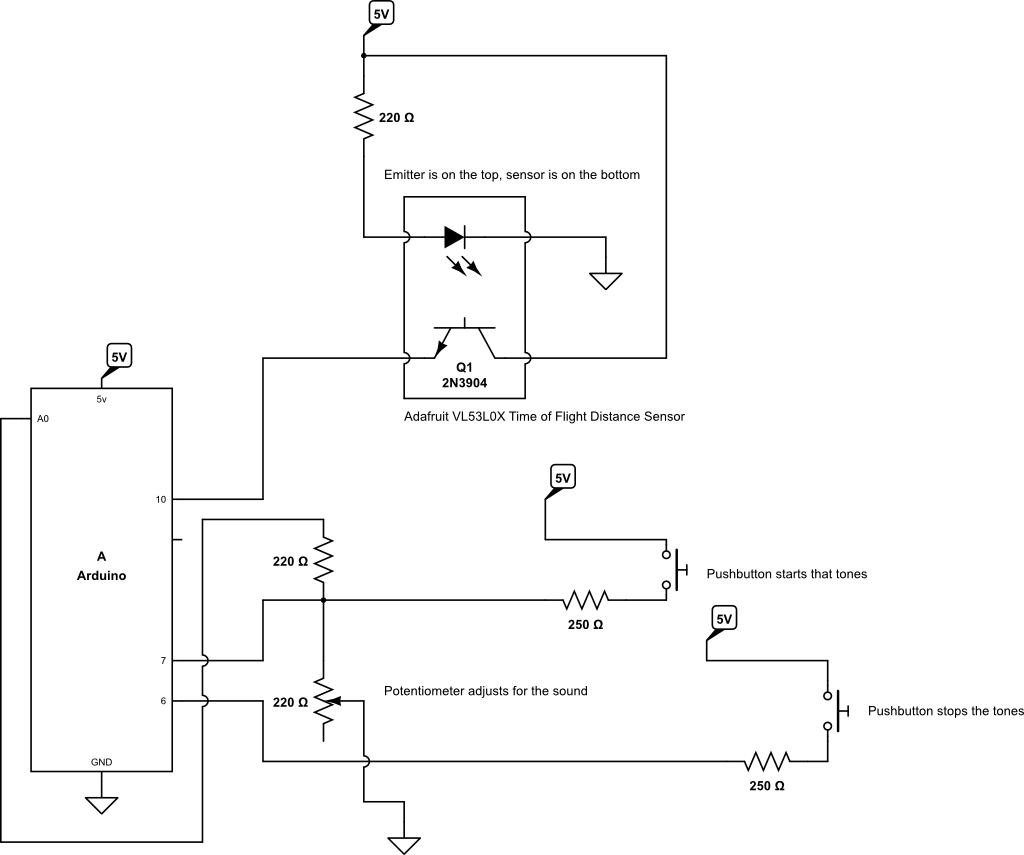
This is our main device schematic drawing!
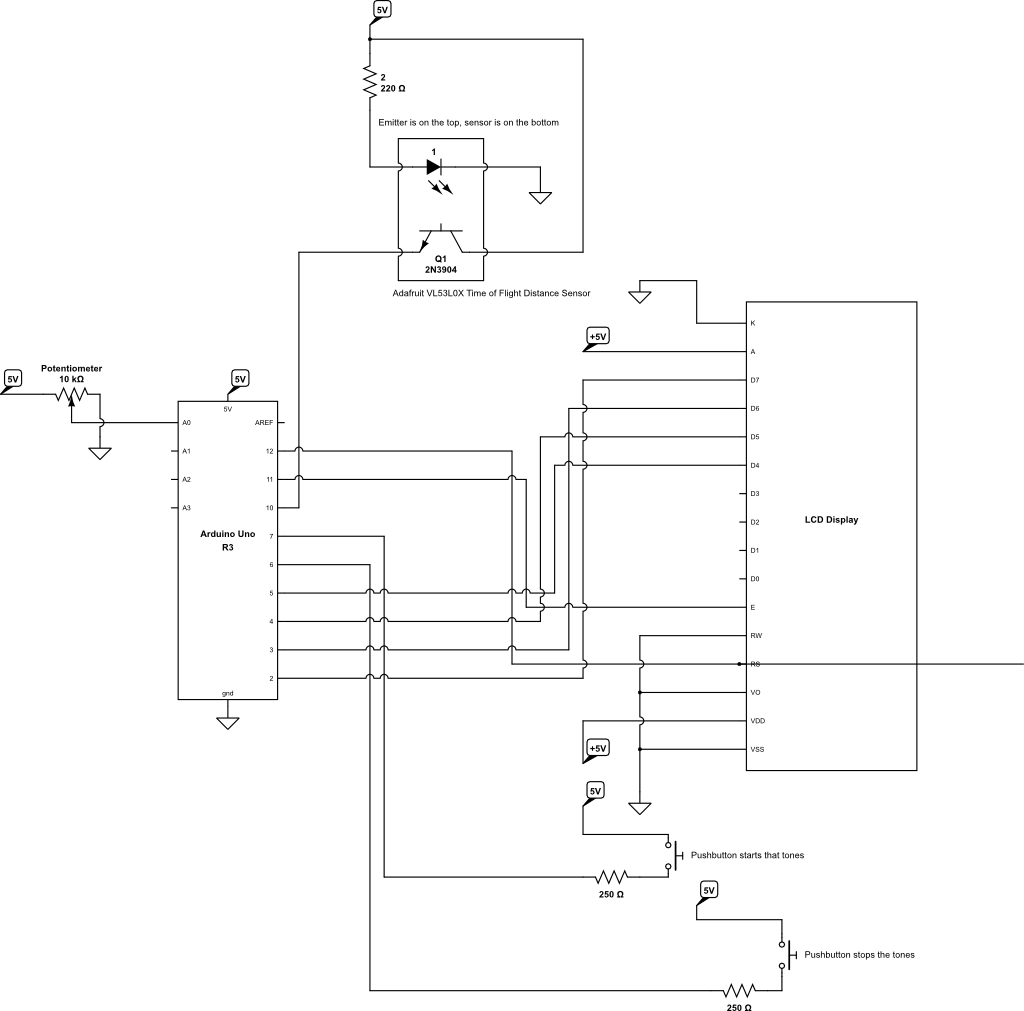
Here is our TinkerCAD schematic drawing.