For this project, we were tasked with creating an assistive device for an older person we were paired with from CMU’s Osher Institute. We were paired with Richard and met with him in his home to talk to him more about his day to day life, what tasks he had trouble with, and areas he felt could be improved by the creation of some sort of gadget or device, documentation from which you can find here. Based off of what we learned from our discussion with Richard, we began to build an interactive iPad stand that would make his process of making drawings for jewelry commissions easier and more efficient. First, we built a prototype, documentation from which you can find here. We then began building a final model, the documentation for which can be found below.
What We Built:
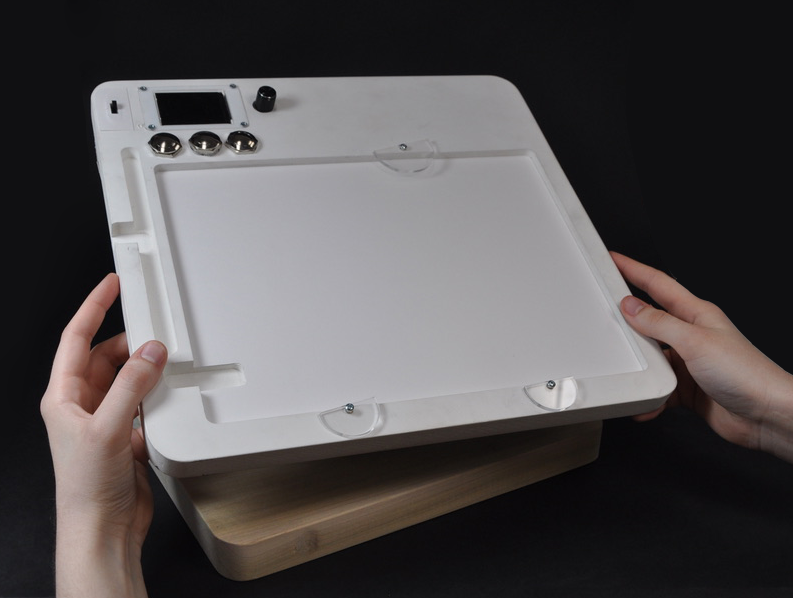
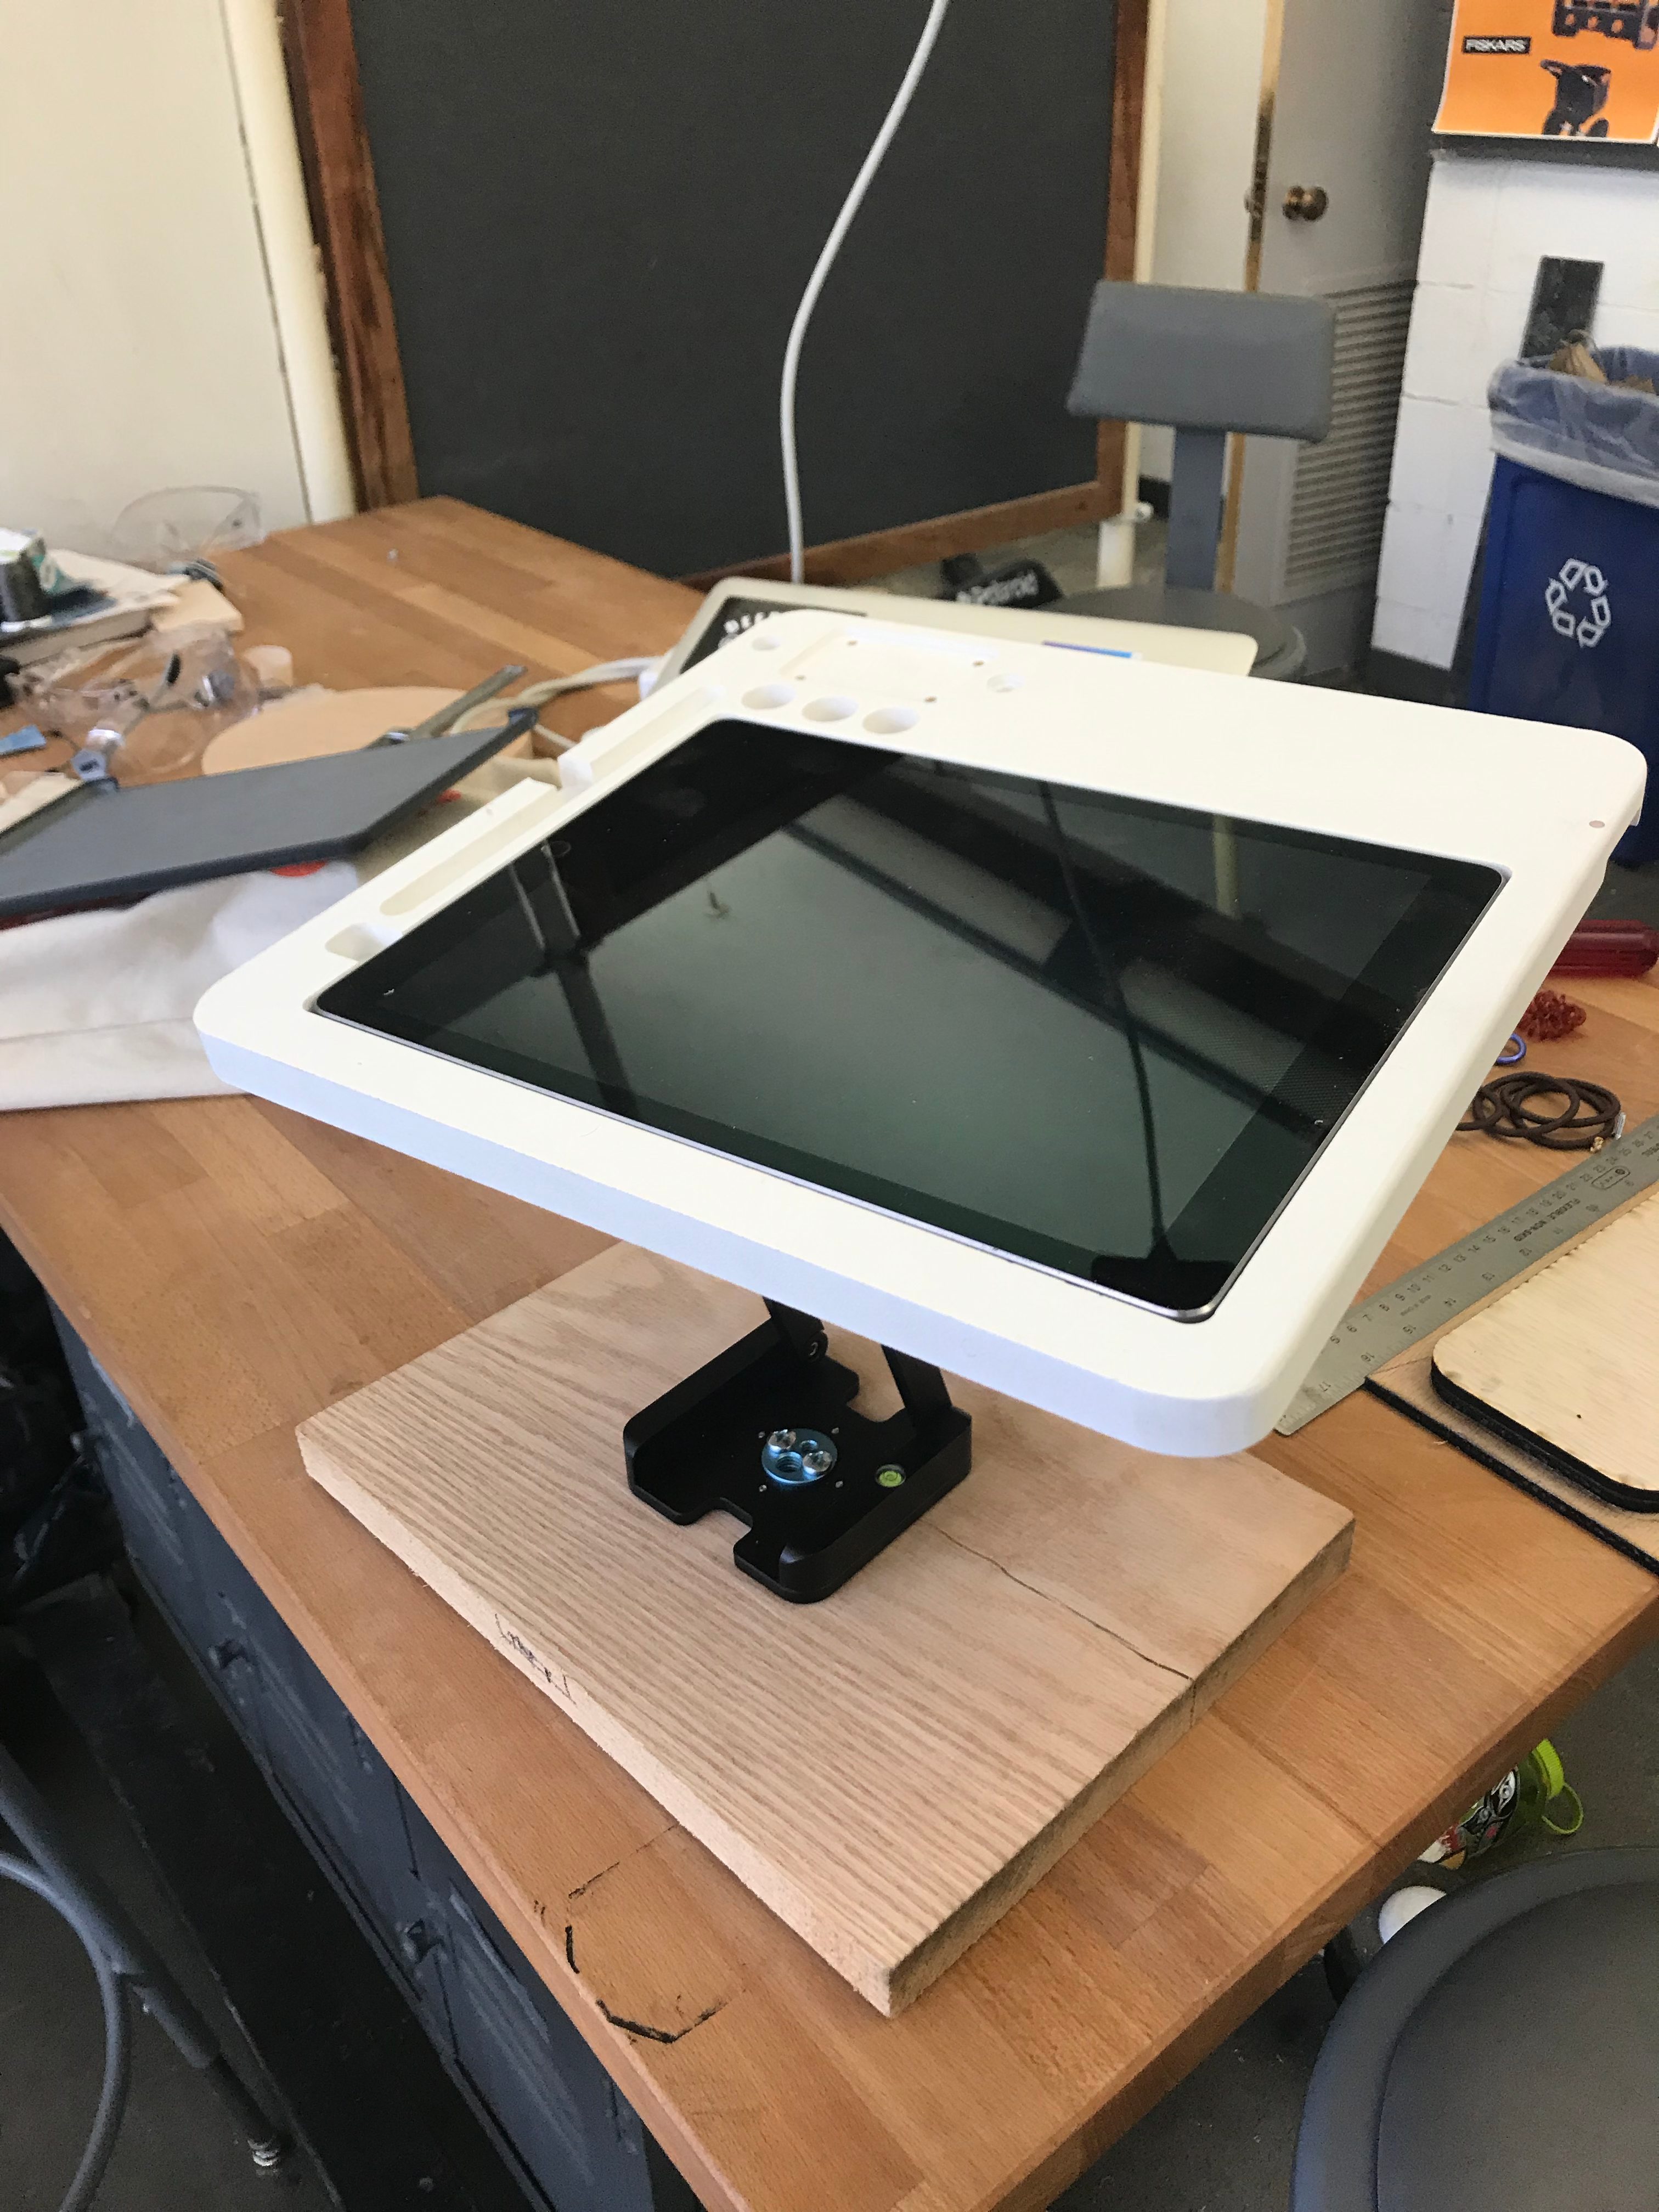
We built an interactive iPad stand for Richard that allows him to position his iPad in different directions and angles while keeping a log of his different commissions and tracking how long he’s been working on drawings for each one. On the mechanical spectrum, the stand is comprised of a baseboard made of wood, on which a joint that allows the top plate to move up and down, into which a ball and socket joint is screwed, which connects to the top board via a plate screwed into the plastic of the top material. The top board is made of a plastic composite that was milled on both sides, and has slots for Richard’s iPad and Apple Pencil. The electronics consist of a screen, buttons to navigate the menu on the screen, and a rotary encoder to input names for each commission.
Final Images
Photo showing scale and proportion of device from the front.
Overall image showing scale and proportion, and the back of the device.
Close up showing the different pockets and finger slots milled into the front of the board
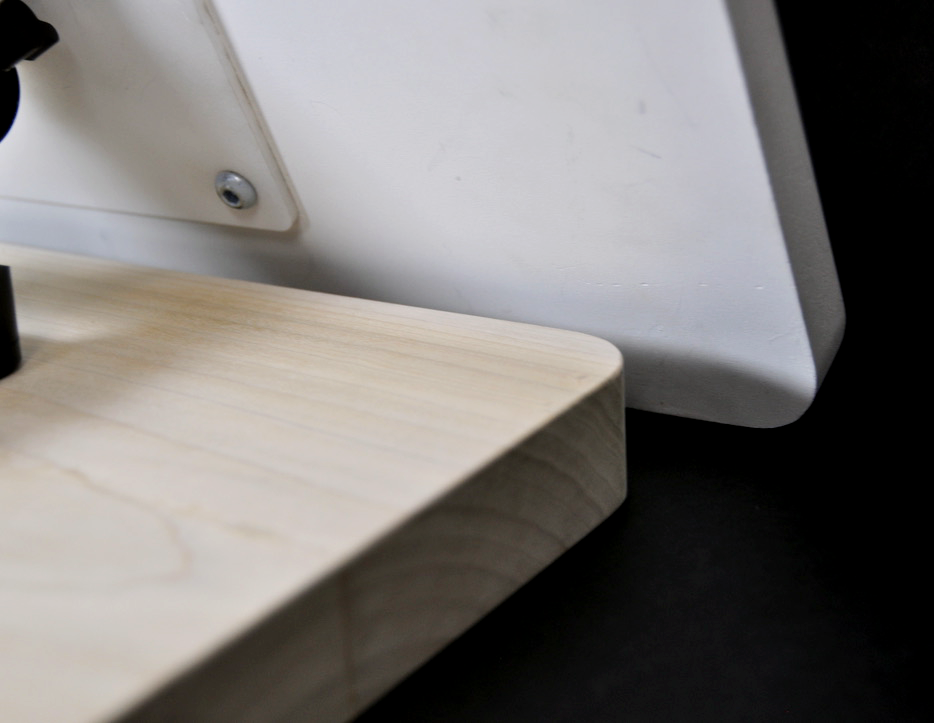
Up close shot showing the two joints, which connected the base to the top board, in action.
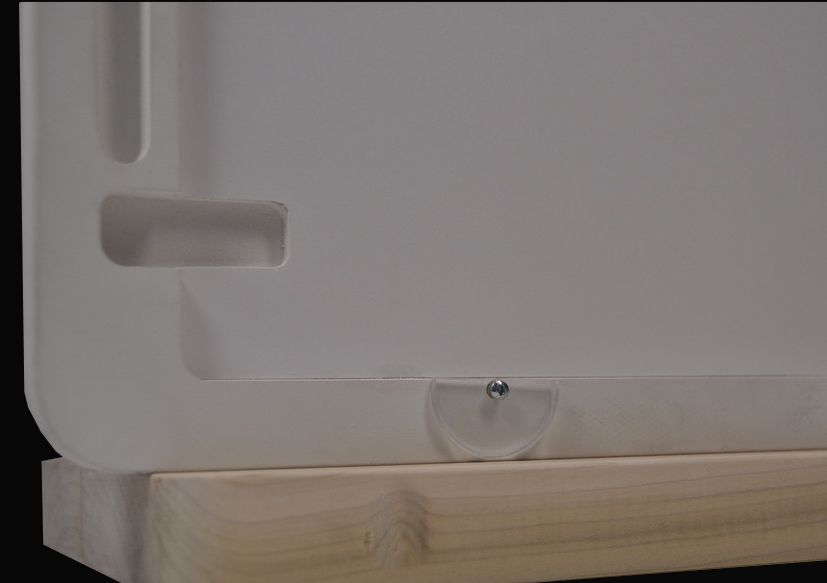
Close up of added acrylic semi circles that could be rotated to keep the iPad from falling out during use. You can also see the paper backing that was glued to the back of where the iPad rests so that the t screws attaching the joint to the board were covered.
Close up of corners on base and top board hand rounded so as to be comfortable to use for a long period of time.
The board can be positioned and different heights and angles, and is adjusted manually, as shown in this photo.
This video shows some of the menu’s functionality, including entering a new project, saving then resuming said project, and then archiving it once it’s finished.
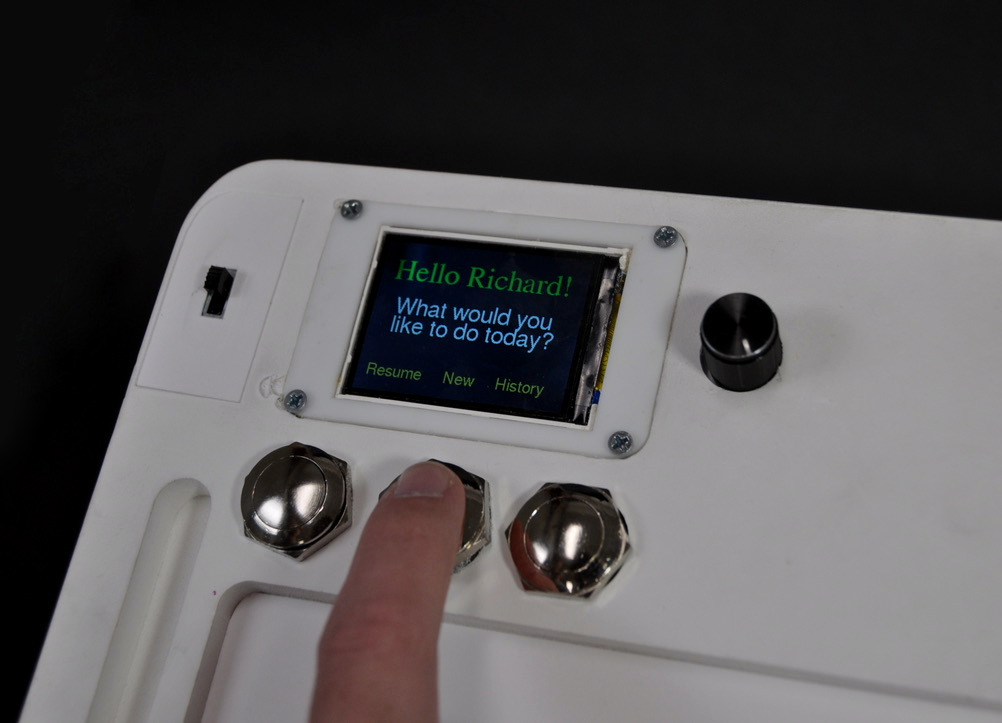
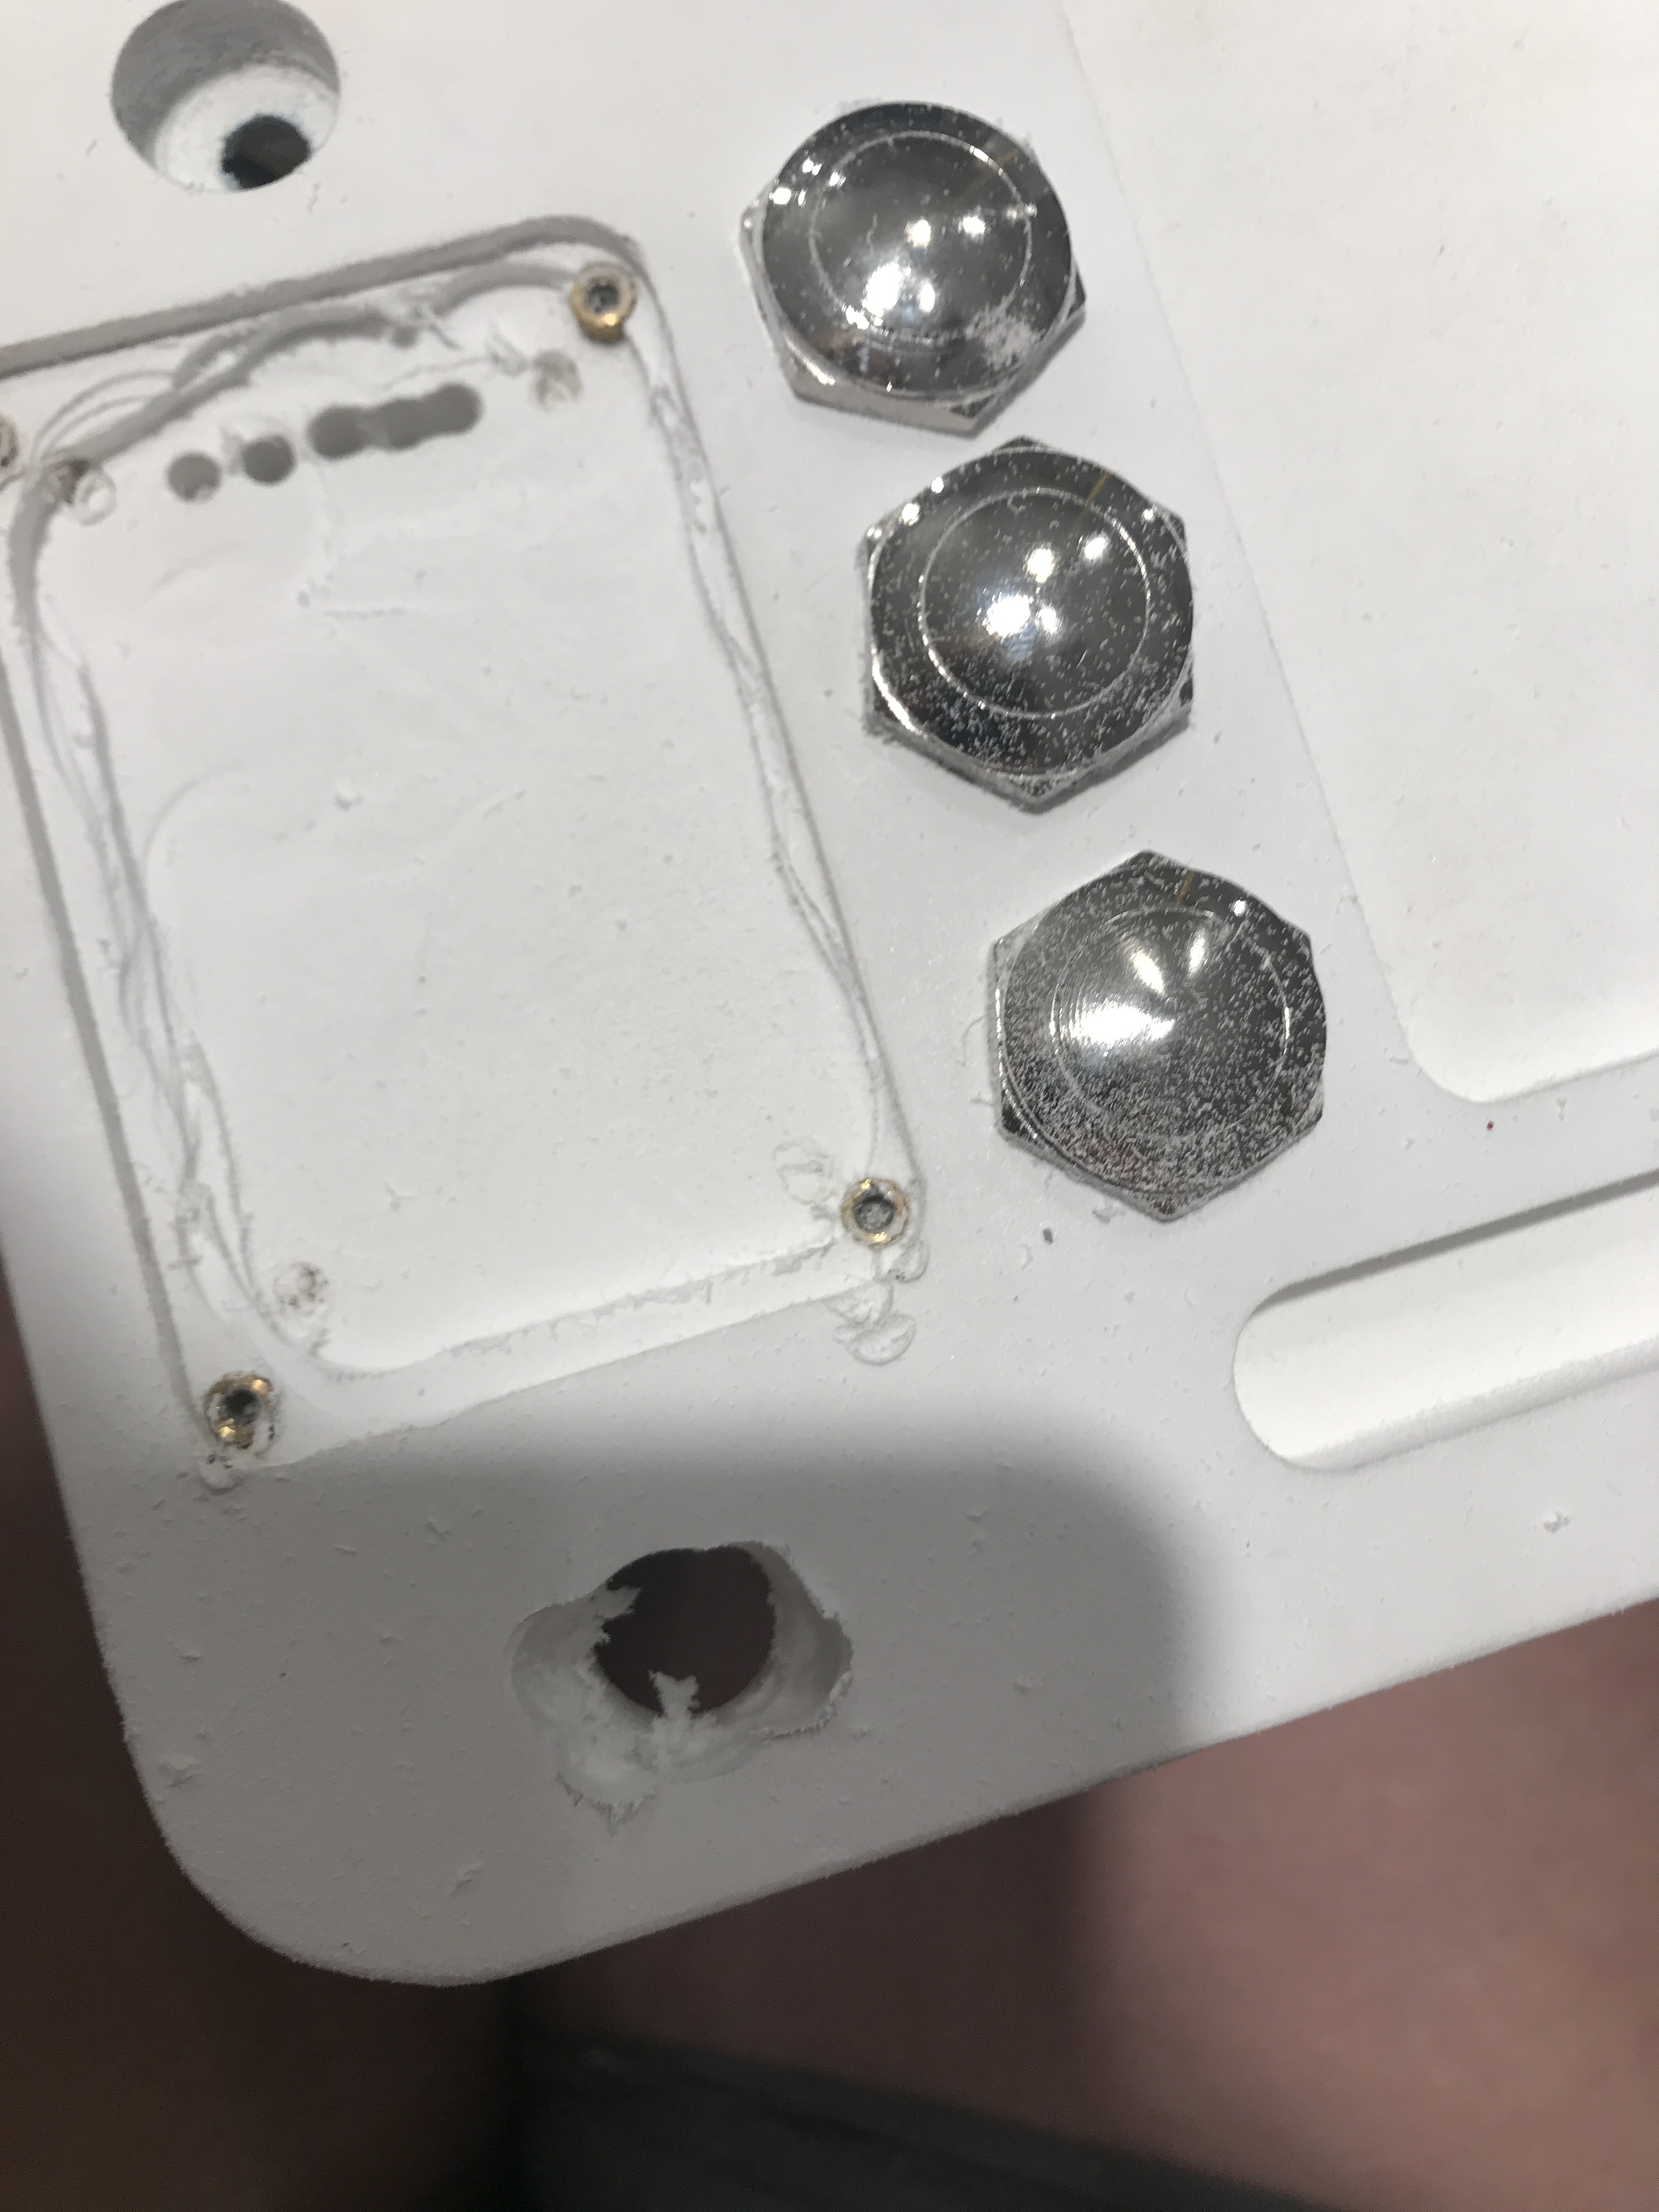
The use for the three buttons depends on which menu screen is being shown. The function of each button is shown above it on the screen.

A rotary encoder was used to input names for each project that was being timed. These names were inputted on the “Start New” screen.
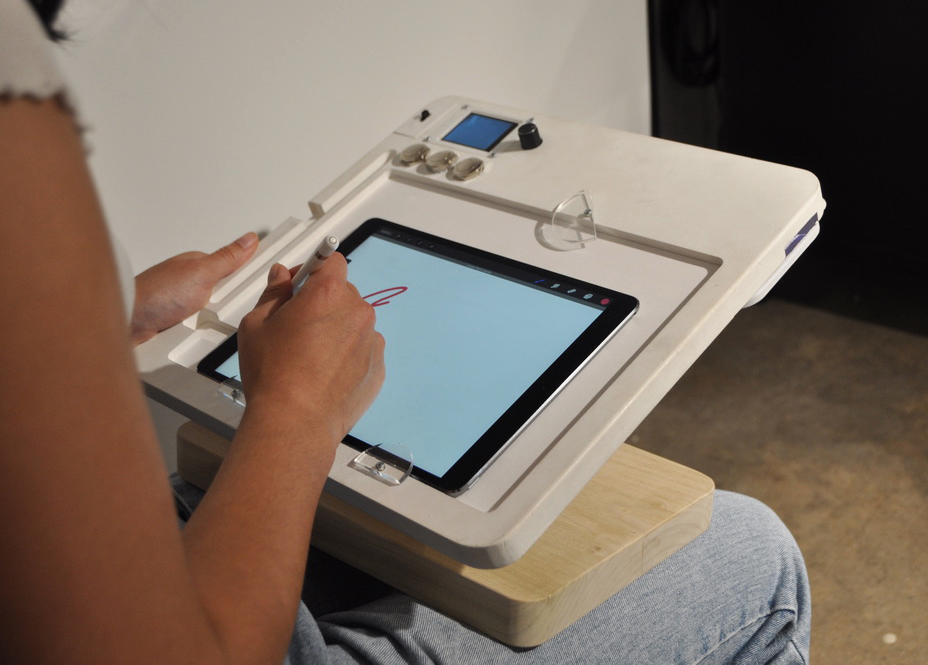
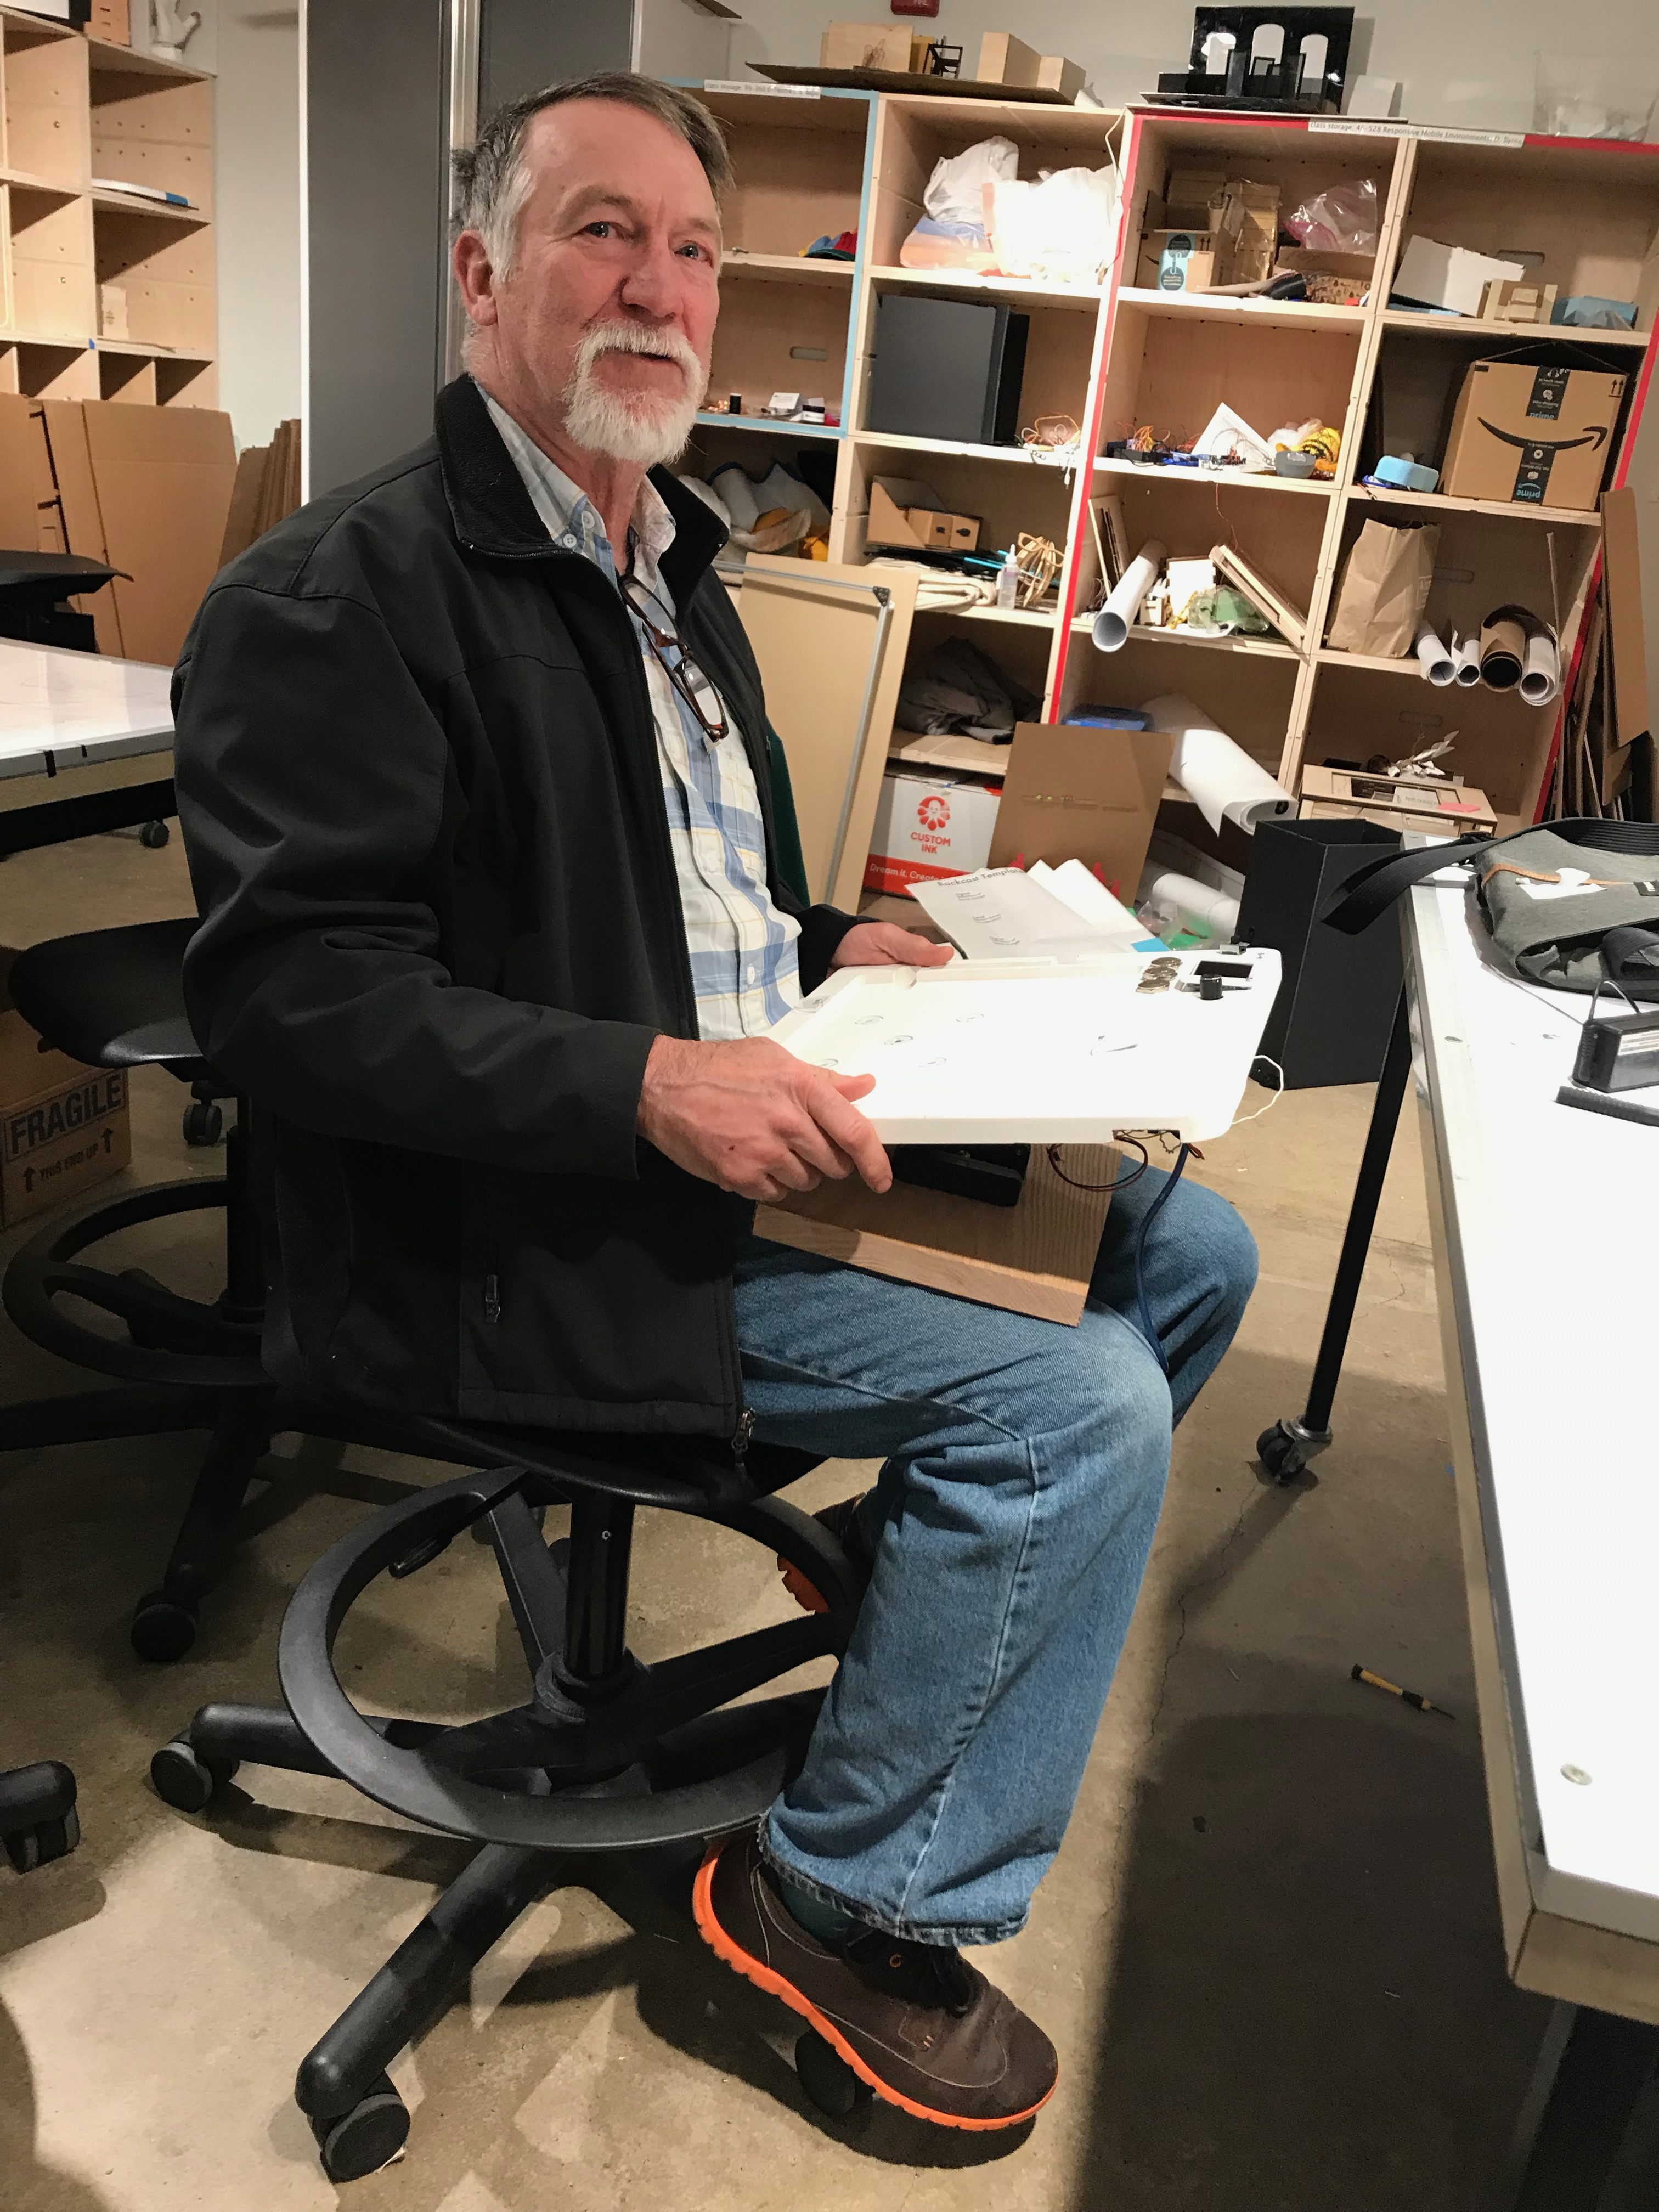
The device can be placed on your lap or on a table, and your iPad rests into the board while you draw. The pocket in the board is milled for Richard’s 12″ iPad, the one being used for reference in this photo is a 9″ iPad.
Here’s a hypothetical situation for its use: Richard and his wife have just finished dinner and now are sitting on the couch watching the news, as they do many nights. Richard wants to work on drawings for a new jewelry commission of a necklace charm he’s just received for a client, Anna, so he grabs his iPad stand, puts it on his lap and begins.
He starts by turning on the screen embedded in the top board of the stand, and navigates to input a new project. Using the rotary encoder, he names the project “Anna”, hits the center button to go navigate to and start the timer, and begins to draw on his iPad. When he’s finished drawing for the night, he hits the “Archive” button, then switches the screen off. The next night, he starts up the timer where it left off and continues to draw Anna’s necklace charm.
How We Got Here:
In our chart we’d hoped to have the electronic and design components prototyped much earlier in the process so we could spend time at the end combining the two, doing lots of testing, and showing a functional MDF prototype to Richard before moving to the final material. We ended up deviating significantly from the timeline we set up in our Gantt chart. Our software was much more complicated and time consuming to write than expected, and it took longer than we’d expected for the mills to be completed due to the number of people using the mill, so we ended up working on both the electronic and design portions of the device up until the end of the project.
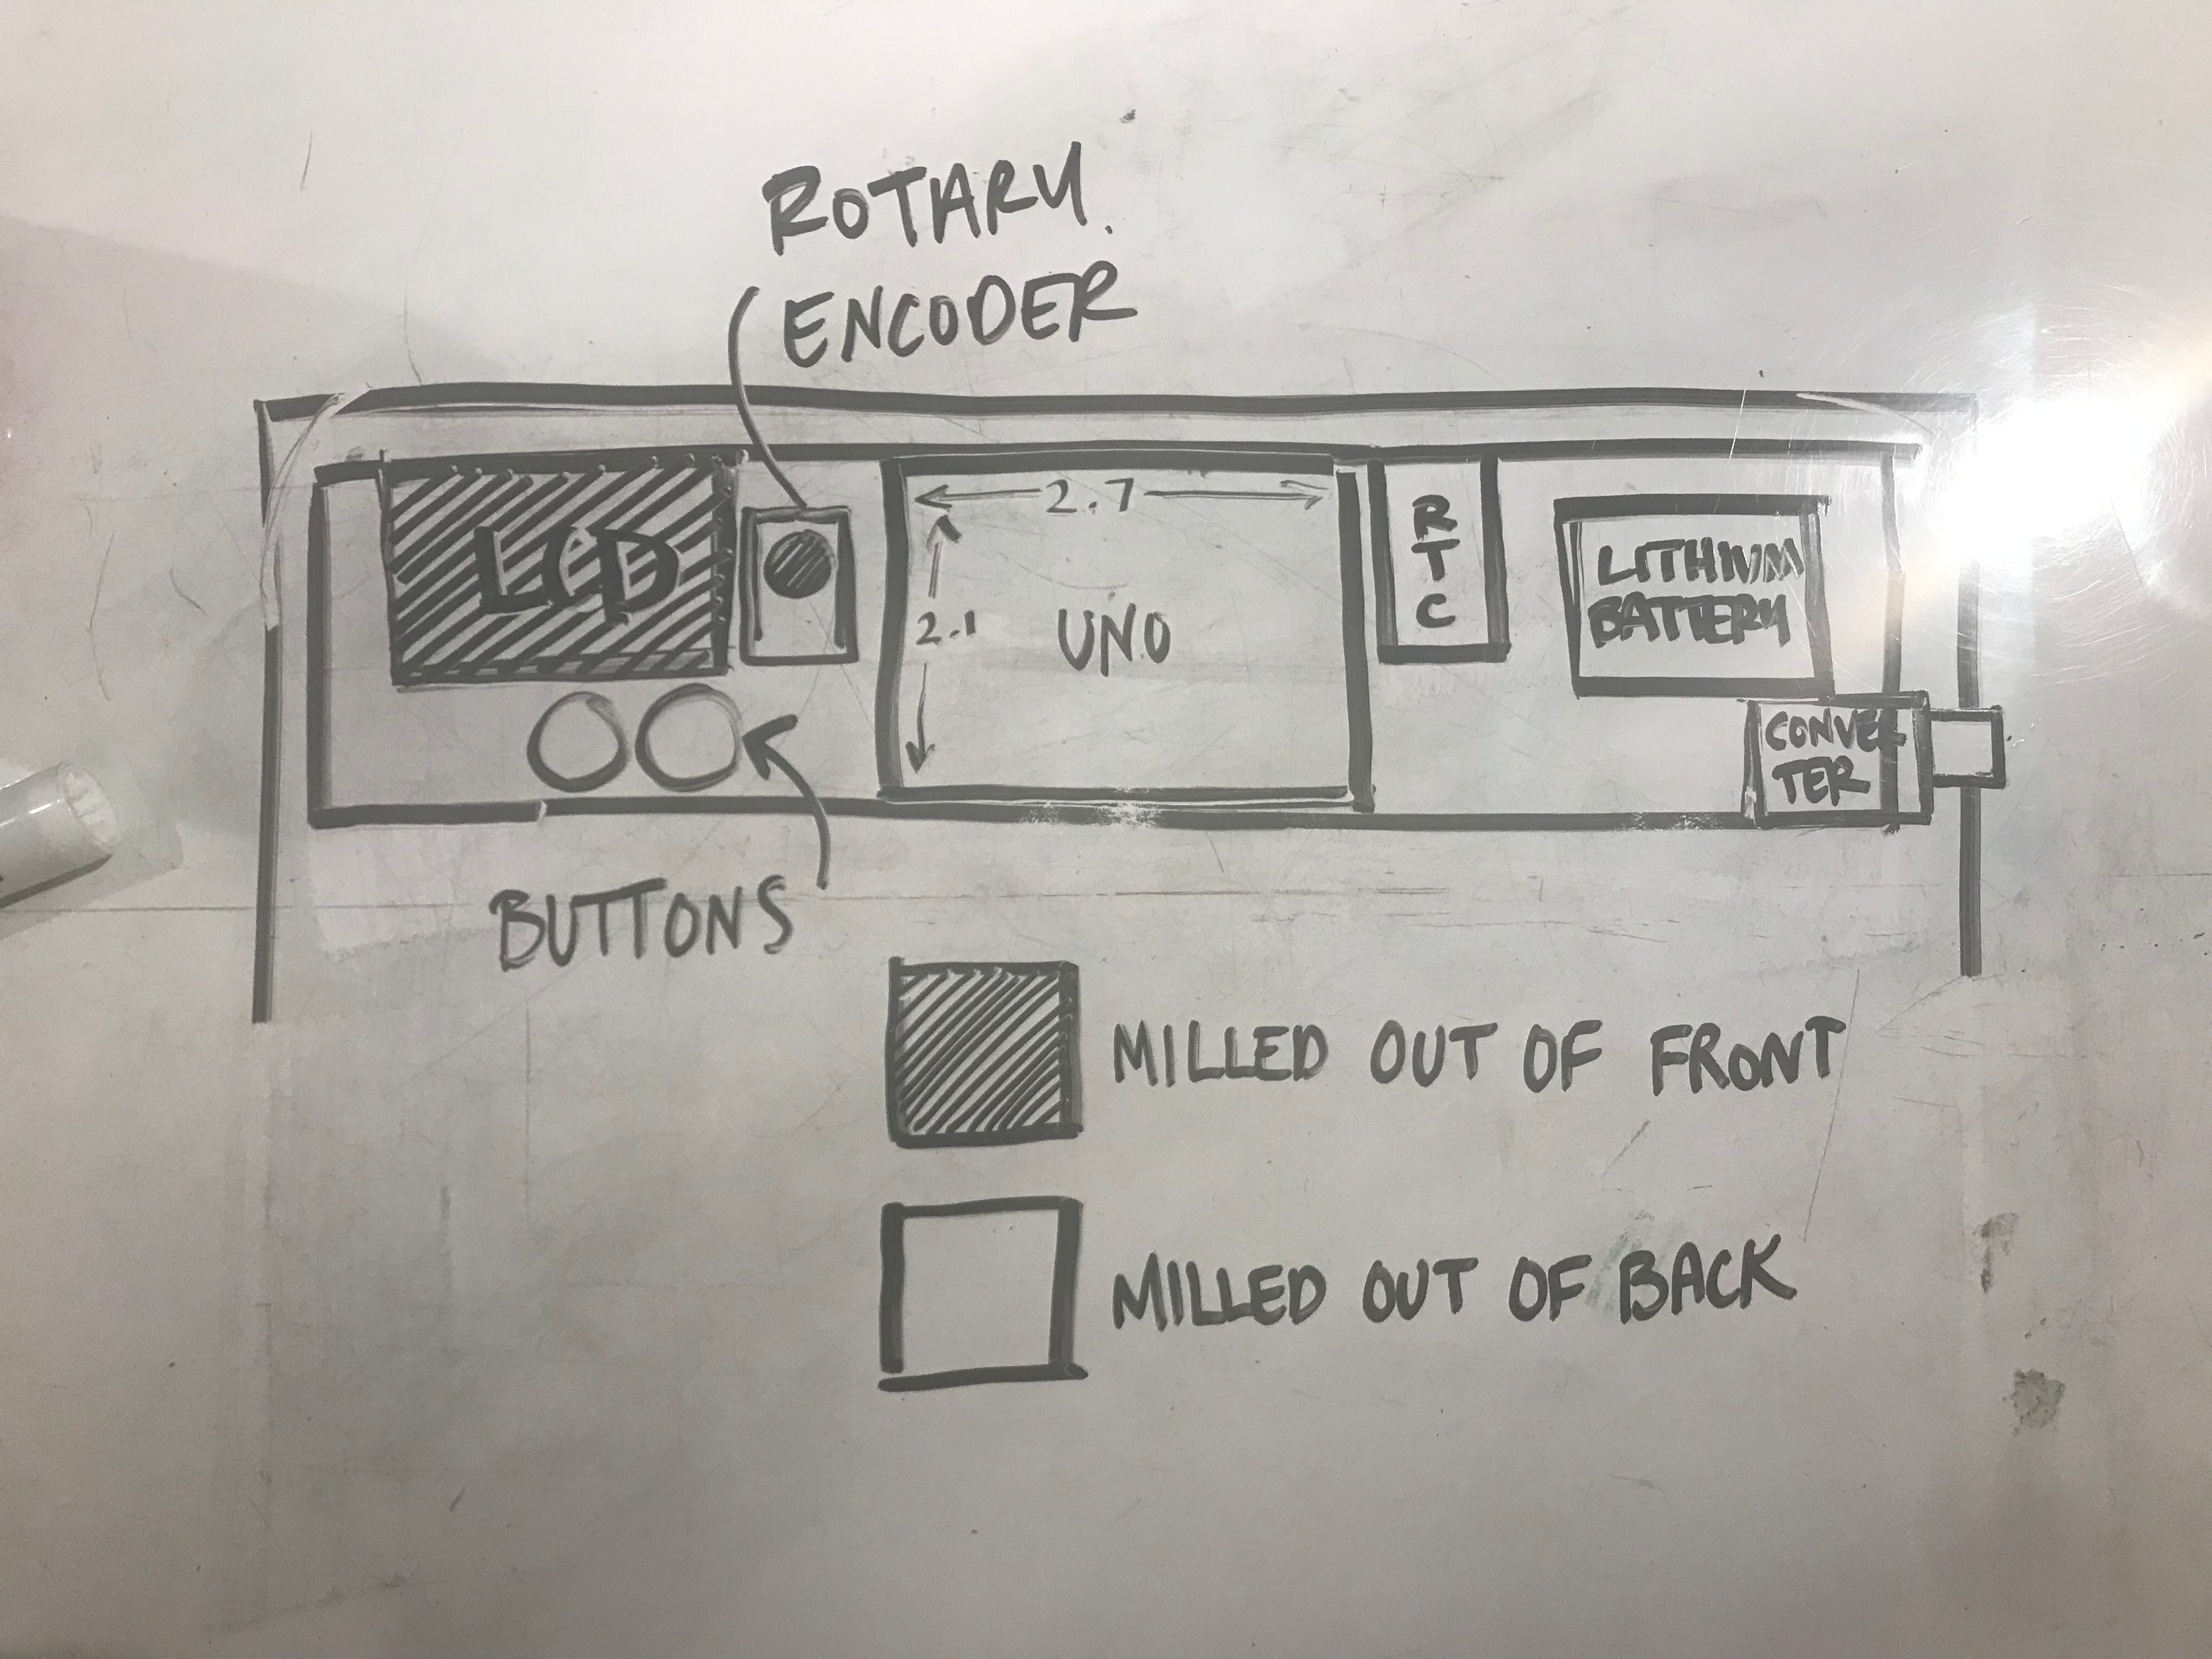
Initial sketch I used as a guideline to create the 3D model for milling the back of the board for the electronics to fit into.
It was challenging to update the design for the final mill into the new plastic we were using because of time restraints. Because of the line to use the CNC machine, we needed to submit the final mill file the day after we got the prototype fully milled for it to be finished in time. The other was that we weren’t able to get our electronics wired together as quickly as we’d expected due to software issues, so we weren’t able to mount them into the MDF prototype and actually test all of the components together as we’d initially hoped to.
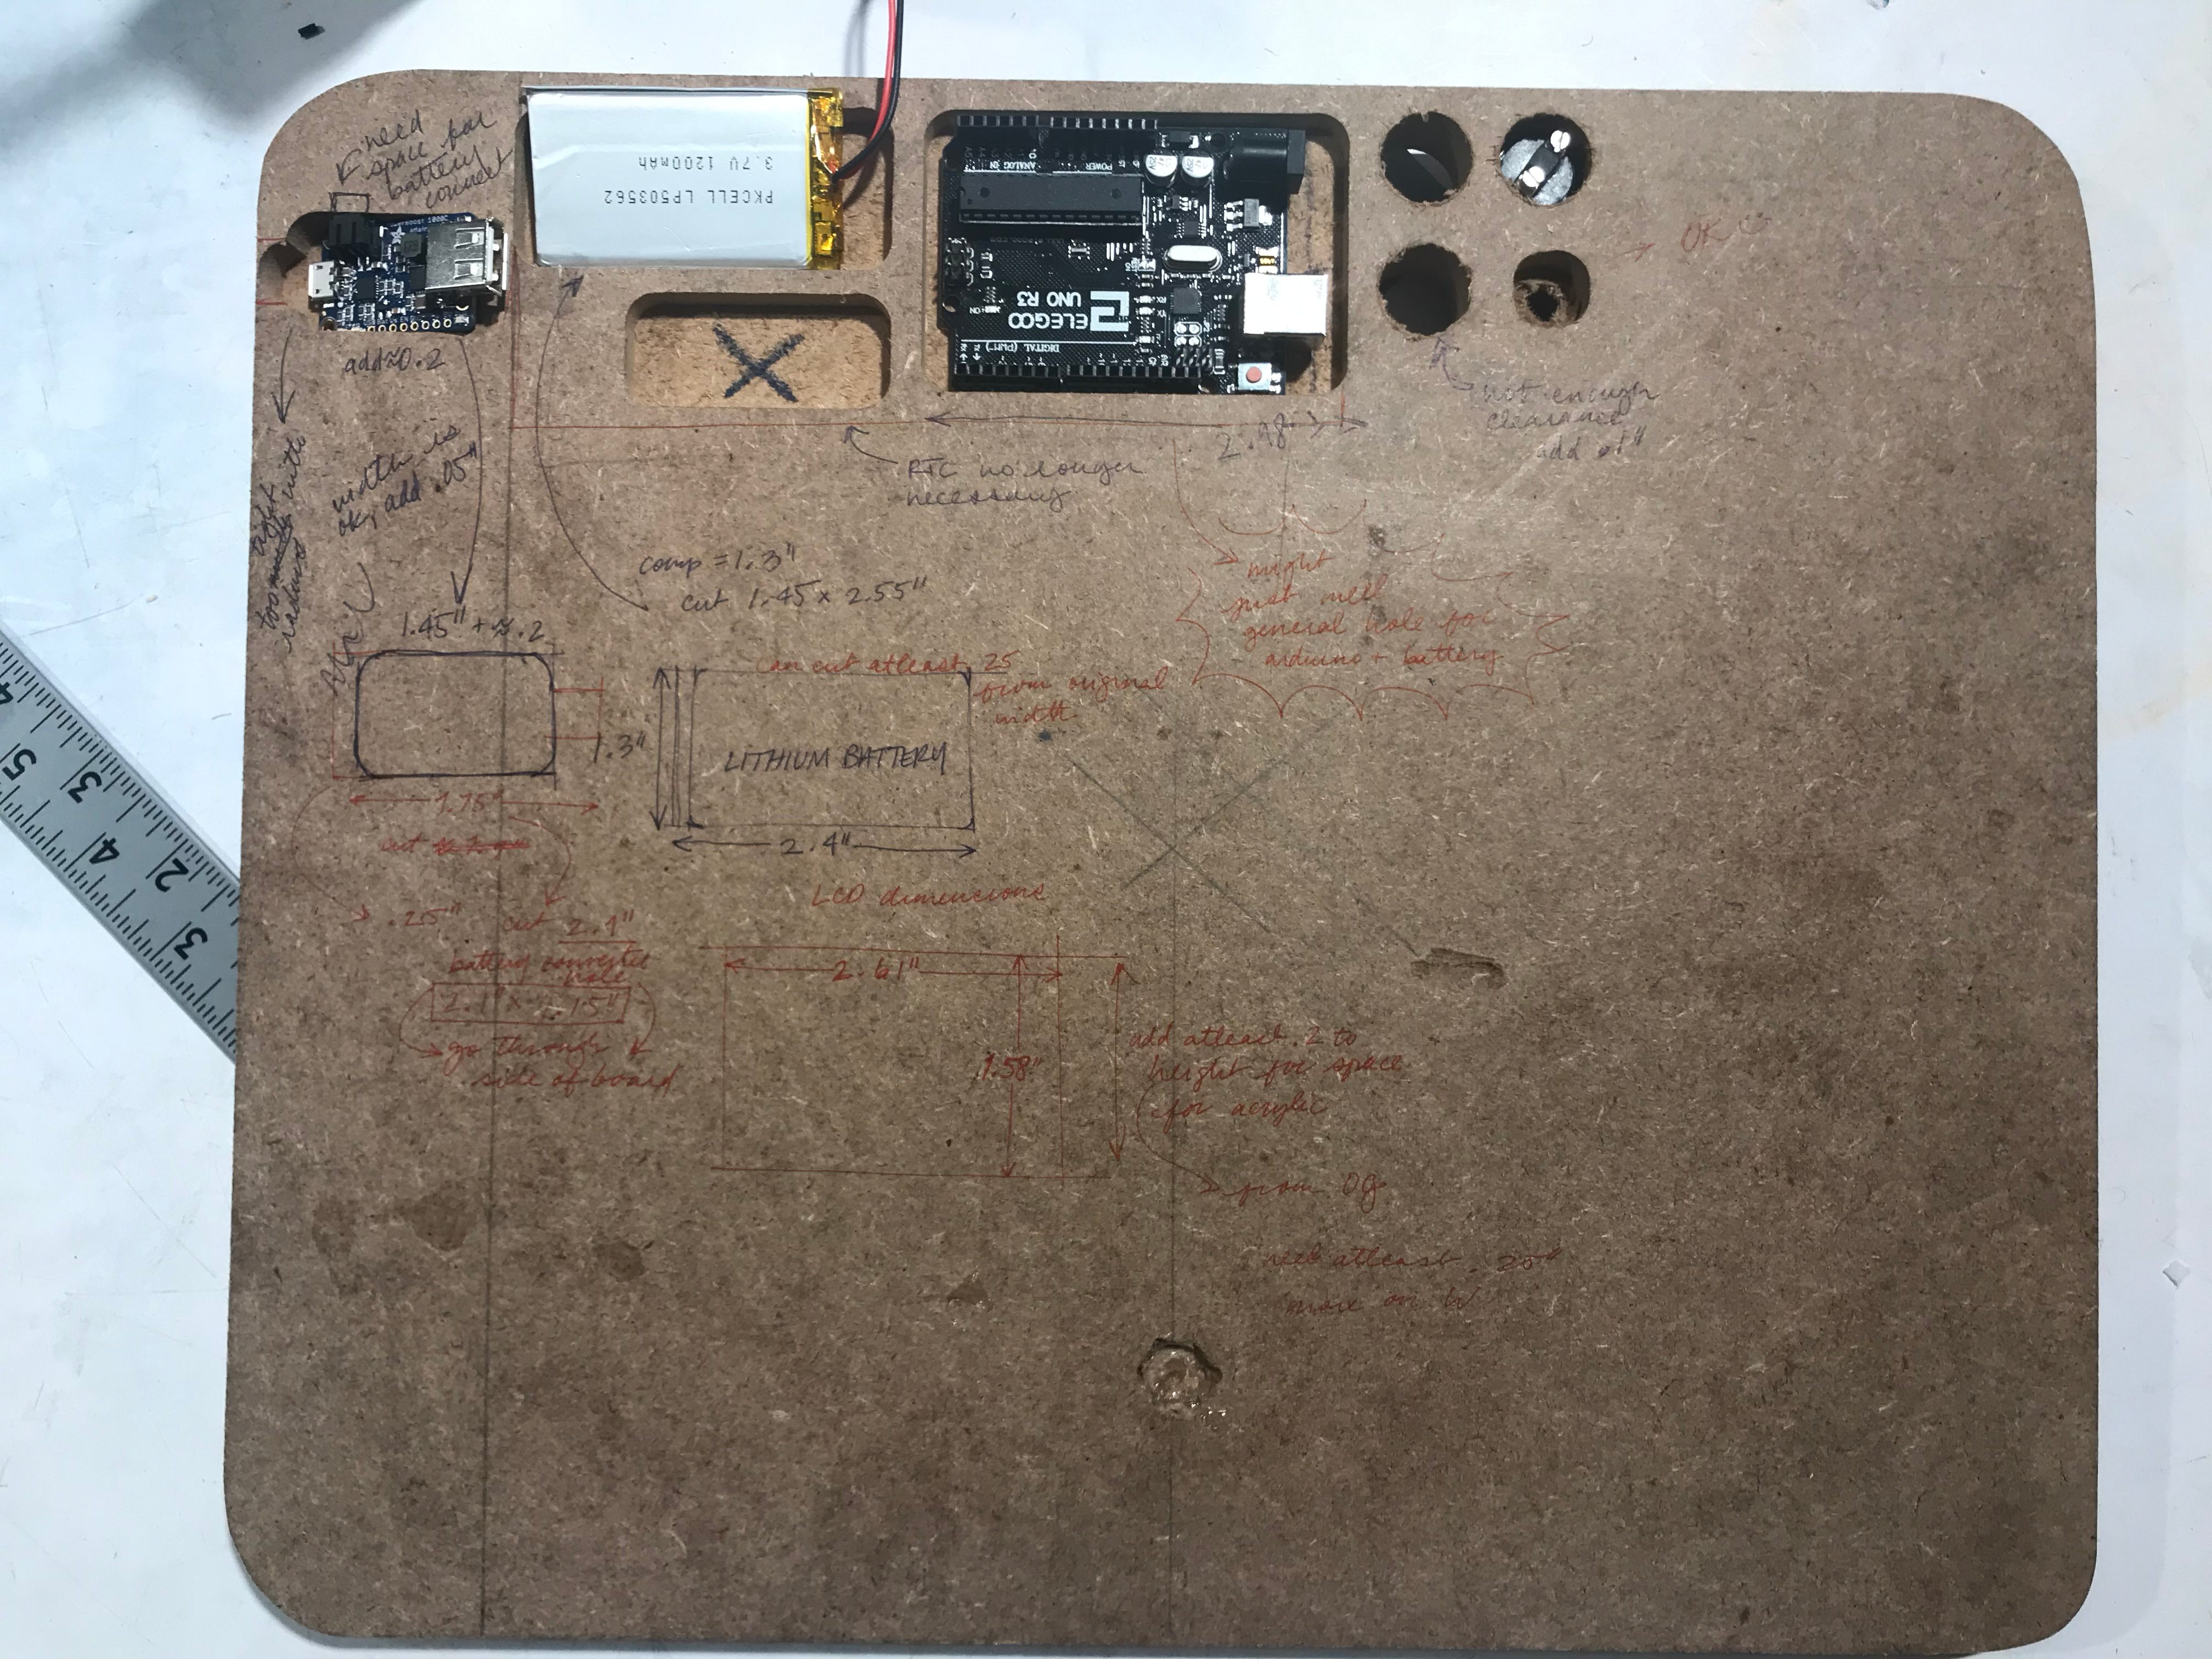
Notes from measuring the electronics against the MDF prototype.
When we milled the back of the MDF prototype, we did our best to gauge what measurements were correct and which should be changed. I realized it would be difficult to mill at a depth where everything would be submerged in the material, and changed my design for the back to include a larger pocket for the electronics to be drilled into. Because of this, I could no longer plan to just screw an acrylic cover over the components and instead began to plan a vacuum-formed plastic piece that would cover the components.
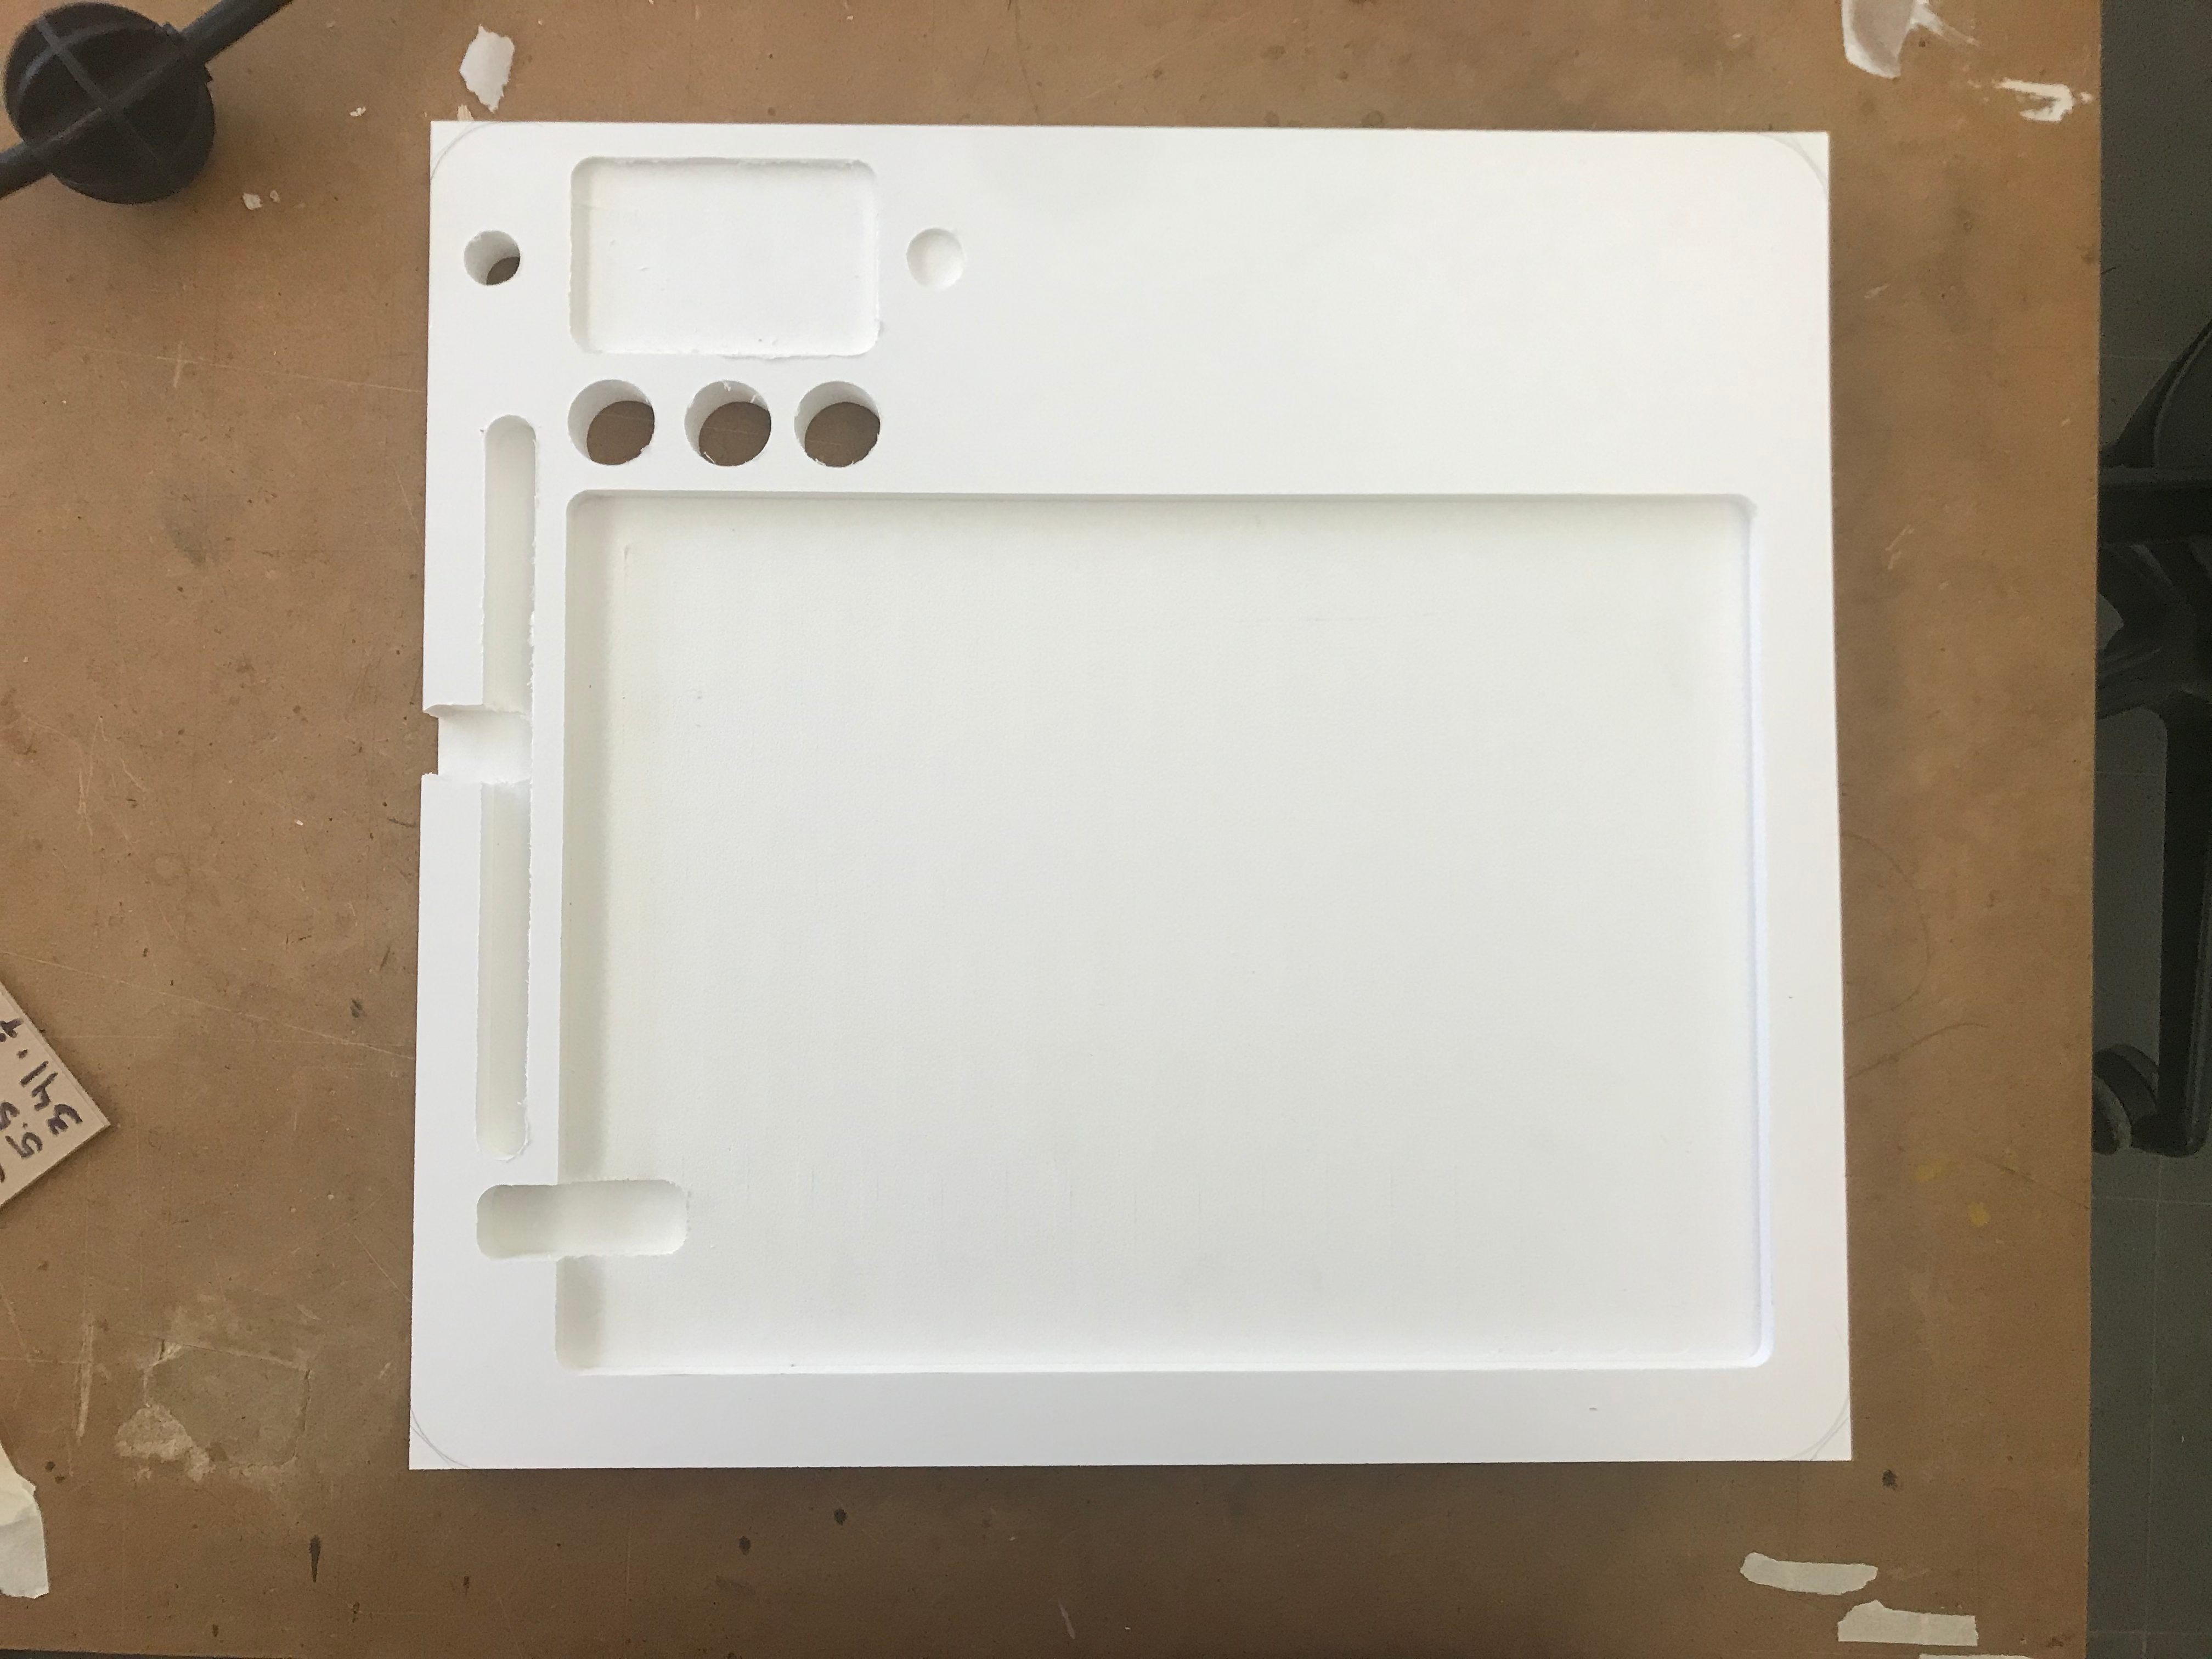
The plastic composite we were using for our final prototype after being milled, before any hand finishing.
Our functional design/mechanical prototype featuring a baseboard made from scrap wood, but that kept the device from tipping, and a joint that interfaced with the top board and allowed for a great degree of movement for positioning.

Our initial attempt at combining the electronic and design components of the device immediately revealed some problems with fitting the pieces together.
A lot of finishing work went into the design, including rounding all the edges and sanding both the base and the top board, and spray painting the top, making a paper backing to cover the t-screws holding the top board in place, and paper, acrylic, and vacuum formed styrene covers for the electronics. If I’d done this a second time I would have made the top board grey so that it wouldn’t get dirty so quickly.
During crit we had Richard hold the device on his lap as he might at home. From his feedback, we decided to make the baseboard a bit wider, and to round the edges of the wood more for his comfort.
Due to wrong initial dimensions and changing components, some of what was milled needed to be altered. I did this by dremmeling the pockets/holes until they were roughly the desired size/shape. The screen pocket was just an issue of depth for the component, not for its acrylic cover, so I dremmeled a deeper pocket for the component, then used a glue specifically for acrylic to bond the component to it’s cover, and screwed the cover into the plastic.
The screen pocket and hole for the power switch after being dremmeled, before their new components were added back in.
We encountered a lot of issues with the electronics, particularly after we’d solder them all together. We’d initially soldered all of our wires into the Arduino, but after we continued to have problems, we ended up cutting the wires and moving back to sticking the wires into the header pins mounted on the arduino.

When working on developing the display software, we encountered difficulties with the internal arduino timing and the rotary input
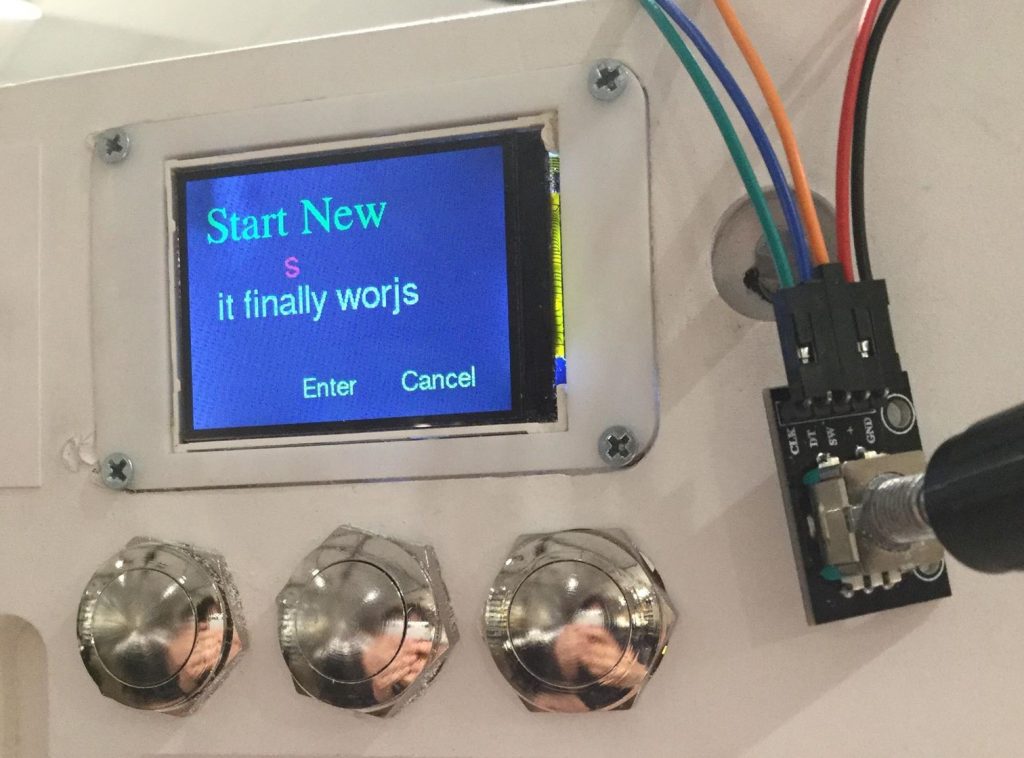
After many hours analyzing the code to determine what was causing issues with our rotary input, we determined that it was due to a library conflict, and rewrote the code to utilize a different library- resulting in an encoder that “worjs”.
Developing the software was a lot more difficult than anticipated. Previous to receiving the screen, we focused on creating separate files of code for the logic of each individual function of the device- rotary input, timing, and data storage. Unfortunately, combining perfectly functional separate programs into one doesn’t always work out perfectly; we experienced library and compilation conflicts that caused us to have to re-write large sections of code for it to be compatible with other functions of the device.
Conclusions
While a lot of the feedback we got from the crit revolved around things we already knew were issues – in particular, that “some components weren’t secured/working right”, and that because our ball socket wore out during the crit the top board was “floppy”, some of the feedback brought up things we hadn’t even considered. Someone brought up that we should “consider whether the client was right or left handed” because our current positioning of the electronics was on the left side of the board.
Two people brought up the issue that maybe using an app or timer already on the iPad would be more effective, with someone saying that “the UI for tracking projects was clunky and would be better solved by an app on the iPad”. While this is a good point, and there may be more sophisticated timer options in the app store, this was something we’d talked about with Richard when we’d first met with each other, and while he acknowledged that it was something he could do on his iPad, he liked the idea of it being somewhere he wouldn’t have to minimize his drawing app to access.
It was interesting to work with Richard and to create something that tailored to his needs and interests specifically. Making something for the purpose of a crit is very different from the process of making something to last someone for a while. I think if we were able to get a stronger ball and socket joint, as the one we used wore out incredibly quickly, the mechanical and design aspects of this project would last a good amount of time and be reliable for him to draw on.
We went into this process thinking both the design and the electronic aspects were a lot less complicated than they actually ended up being, and so we didn’t front-load the work as much as we should have. Our design elements ended up needing a lot more finishing work than was initially expected, and because we were handing it off to a client as opposed to it just being for crit, I felt more compelled to do the work to make it look nice and functional. If we were to do this project again knowing what we know now, I think we would make a big effort to frontload as much as possible, and get electronics and a basic design prototype in place as quickly as we could so that we could focus more on testing and making this stable enough to last Richard a long time.
Technical Details
Code Submission
- <span class="pln">
- </span><span class="com">/***************************************************
- Adrien Krupenkin, 2019
- Operates a menu-based system that allows the user to
- input and track projects they are working on, to be displayed
- on a TFT screen.
- ****************************************************/</span><span class="pln">
- </span><span class="com">#include</span><span class="pln"> </span><span class="str">"SPI.h"</span><span class="pln">
- </span><span class="com">//#include "Adafruit_GFX.h"</span><span class="pln">
- </span><span class="com">#include</span><span class="pln"> </span><span class="str">"Adafruit_ILI9341.h"</span><span class="pln">
- </span><span class="com">#include</span><span class="pln"> </span><span class="str"><Encoder.h></span><span class="pln">
- </span><span class="com">#include</span><span class="pln"> </span><span class="str"><Fonts/FreeSerif24pt7b.h></span><span class="pln">
- </span><span class="com">#include</span><span class="pln"> </span><span class="str"><Fonts/FreeSans18pt7b.h></span><span class="pln">
- </span><span class="com">#include</span><span class="pln"> </span><span class="str"><Fonts/FreeSans12pt7b.h></span><span class="pln">
- </span><span class="kwd">const</span><span class="pln"> </span><span class="kwd">int</span><span class="pln"> button1Pin </span><span class="pun">=</span><span class="pln"> </span><span class="lit">5</span><span class="pun">;</span><span class="pln">
- </span><span class="kwd">const</span><span class="pln"> </span><span class="kwd">int</span><span class="pln"> button2Pin </span><span class="pun">=</span><span class="pln"> </span><span class="lit">6</span><span class="pun">;</span><span class="pln">
- </span><span class="kwd">const</span><span class="pln"> </span><span class="kwd">int</span><span class="pln"> button3Pin </span><span class="pun">=</span><span class="pln"> </span><span class="lit">7</span><span class="pun">;</span><span class="pln">
- </span><span class="kwd">const</span><span class="pln"> </span><span class="kwd">int</span><span class="pln"> offPin </span><span class="pun">=</span><span class="pln"> </span><span class="lit">3</span><span class="pun">;</span><span class="pln">
- </span><span class="kwd">int</span><span class="pln"> menuPage </span><span class="pun">=</span><span class="pln"> </span><span class="lit">0</span><span class="pun">;</span><span class="pln">
- </span><span class="kwd">int</span><span class="pln"> currentprojectNumber </span><span class="pun">=</span><span class="pln"> </span><span class="lit">0</span><span class="pun">;</span><span class="pln">
- </span><span class="kwd">int</span><span class="pln"> pastprojectNumber </span><span class="pun">=</span><span class="pln"> </span><span class="lit">0</span><span class="pun">;</span><span class="pln">
- </span><span class="kwd">int</span><span class="pln"> scrollVal </span><span class="pun">=</span><span class="pln"> </span><span class="lit">0</span><span class="pun">;</span><span class="pln">
- </span><span class="kwd">int</span><span class="pln"> positionVal</span><span class="pun">;</span><span class="pln">
- </span><span class="kwd">bool</span><span class="pln"> button1Val </span><span class="pun">=</span><span class="pln"> </span><span class="lit">1</span><span class="pun">;</span><span class="pln">
- </span><span class="kwd">bool</span><span class="pln"> button2Val </span><span class="pun">=</span><span class="pln"> </span><span class="lit">1</span><span class="pun">;</span><span class="pln">
- </span><span class="kwd">bool</span><span class="pln"> button3Val </span><span class="pun">=</span><span class="pln"> </span><span class="lit">1</span><span class="pun">;</span><span class="pln">
- </span><span class="kwd">bool</span><span class="pln"> onoff </span><span class="pun">=</span><span class="pln"> </span><span class="lit">1</span><span class="pun">;</span><span class="pln">
- </span><span class="kwd">char</span><span class="pln"> letter</span><span class="pun">;</span><span class="pln">
- </span><span class="kwd">const</span><span class="pln"> </span><span class="kwd">int</span><span class="pln"> encoderA </span><span class="pun">=</span><span class="pln"> </span><span class="lit">2</span><span class="pun">;</span><span class="pln"> </span><span class="com">// CLK pin of Rotary Enocoder</span><span class="pln">
- </span><span class="kwd">const</span><span class="pln"> </span><span class="kwd">int</span><span class="pln"> encoderB </span><span class="pun">=</span><span class="pln"> </span><span class="lit">3</span><span class="pun">;</span><span class="pln"> </span><span class="com">// DT pin of Rotary Enocoder</span><span class="pln">
- </span><span class="kwd">const</span><span class="pln"> </span><span class="kwd">int</span><span class="pln"> BUT_ENTER </span><span class="pun">=</span><span class="pln"> </span><span class="lit">4</span><span class="pun">;</span><span class="pln"> </span><span class="com">// button pin of Rotary Enocoder</span><span class="pln">
- </span><span class="typ">String</span><span class="pln"> projects</span><span class="pun">[</span><span class="lit">15</span><span class="pun">];</span><span class="pln">
- </span><span class="typ">String</span><span class="pln"> pastprojects</span><span class="pun">[</span><span class="lit">32</span><span class="pun">];</span><span class="pln">
- </span><span class="typ">String</span><span class="pln"> projectTimes</span><span class="pun">[</span><span class="lit">15</span><span class="pun">];</span><span class="pln">
- </span><span class="typ">String</span><span class="pln"> pastprojectTimes</span><span class="pun">[</span><span class="lit">32</span><span class="pun">];</span><span class="pln">
- </span><span class="com">// variables for rotary encoder</span><span class="pln">
- </span><span class="kwd">int</span><span class="pln"> aLastState</span><span class="pun">;</span><span class="pln">
- </span><span class="com">// didn't implement debouncing</span><span class="pln">
- </span><span class="kwd">int</span><span class="pln"> encoder_pos </span><span class="pun">=</span><span class="pln"> </span><span class="lit">1</span><span class="pun">;</span><span class="pln">
- </span><span class="kwd">int</span><span class="pln"> n </span><span class="pun">=</span><span class="pln"> </span><span class="lit">0</span><span class="pun">;</span><span class="pln">
- </span><span class="kwd">int</span><span class="pln"> seconds</span><span class="pun">[</span><span class="lit">15</span><span class="pun">]={</span><span class="lit">0</span><span class="pun">,</span><span class="lit">0</span><span class="pun">,</span><span class="lit">0</span><span class="pun">,</span><span class="lit">0</span><span class="pun">,</span><span class="lit">0</span><span class="pun">,</span><span class="lit">0</span><span class="pun">,</span><span class="lit">0</span><span class="pun">,</span><span class="lit">0</span><span class="pun">,</span><span class="lit">0</span><span class="pun">,</span><span class="lit">0</span><span class="pun">,</span><span class="lit">0</span><span class="pun">,</span><span class="lit">0</span><span class="pun">,</span><span class="lit">0</span><span class="pun">,</span><span class="lit">0</span><span class="pun">,</span><span class="lit">0</span><span class="pun">};</span><span class="pln">
- </span><span class="kwd">int</span><span class="pln"> minutes</span><span class="pun">[</span><span class="lit">15</span><span class="pun">]={</span><span class="lit">0</span><span class="pun">,</span><span class="lit">0</span><span class="pun">,</span><span class="lit">0</span><span class="pun">,</span><span class="lit">0</span><span class="pun">,</span><span class="lit">0</span><span class="pun">,</span><span class="lit">0</span><span class="pun">,</span><span class="lit">0</span><span class="pun">,</span><span class="lit">0</span><span class="pun">,</span><span class="lit">0</span><span class="pun">,</span><span class="lit">0</span><span class="pun">,</span><span class="lit">0</span><span class="pun">,</span><span class="lit">0</span><span class="pun">,</span><span class="lit">0</span><span class="pun">,</span><span class="lit">0</span><span class="pun">,</span><span class="lit">0</span><span class="pun">};</span><span class="pln">
- </span><span class="kwd">int</span><span class="pln"> hours</span><span class="pun">[</span><span class="lit">15</span><span class="pun">]={</span><span class="lit">0</span><span class="pun">,</span><span class="lit">0</span><span class="pun">,</span><span class="lit">0</span><span class="pun">,</span><span class="lit">0</span><span class="pun">,</span><span class="lit">0</span><span class="pun">,</span><span class="lit">0</span><span class="pun">,</span><span class="lit">0</span><span class="pun">,</span><span class="lit">0</span><span class="pun">,</span><span class="lit">0</span><span class="pun">,</span><span class="lit">0</span><span class="pun">,</span><span class="lit">0</span><span class="pun">,</span><span class="lit">0</span><span class="pun">,</span><span class="lit">0</span><span class="pun">,</span><span class="lit">0</span><span class="pun">,</span><span class="lit">0</span><span class="pun">};</span><span class="pln">
- </span><span class="kwd">int</span><span class="pln"> lim </span><span class="pun">=</span><span class="pln"> </span><span class="lit">0</span><span class="pun">;</span><span class="pln">
- </span><span class="kwd">unsigned</span><span class="pln"> </span><span class="kwd">long</span><span class="pln"> count</span><span class="pun">;</span><span class="pln">
- </span><span class="kwd">unsigned</span><span class="pln"> </span><span class="kwd">long</span><span class="pln"> offcount </span><span class="pun">=</span><span class="pln"> </span><span class="lit">0</span><span class="pun">;</span><span class="pln">
- </span><span class="kwd">bool</span><span class="pln"> timer</span><span class="pun">[</span><span class="lit">15</span><span class="pun">];</span><span class="pln">
- </span><span class="com">// letters, numbers, space, characters</span><span class="pln">
- </span><span class="kwd">const</span><span class="pln"> </span><span class="kwd">int</span><span class="pln"> str_len </span><span class="pun">=</span><span class="pln"> </span><span class="lit">44</span><span class="pun">;</span><span class="pln">
- </span><span class="kwd">char</span><span class="pln"> alphabet</span><span class="pun">[</span><span class="lit">44</span><span class="pun">]</span><span class="pln"> </span><span class="pun">=</span><span class="pln"> </span><span class="str">"abcdefghijklmnopqrstuvwxyz0123456789 !?,.:-"</span><span class="pun">;</span><span class="pln">
- </span><span class="typ">String</span><span class="pln"> message </span><span class="pun">=</span><span class="pln"> </span><span class="str">""</span><span class="pun">;</span><span class="pln">
- </span><span class="com">// Declare encoder (from library)</span><span class="pln">
- </span><span class="typ">Encoder</span><span class="pln"> encoder</span><span class="pun">(</span><span class="pln">encoderA</span><span class="pun">,</span><span class="pln"> encoderB</span><span class="pun">);</span><span class="pln">
- </span><span class="com">// For the Adafruit shield, these are the default.</span><span class="pln">
- </span><span class="com">#define</span><span class="pln"> TFT_DC </span><span class="lit">9</span><span class="pln">
- </span><span class="com">#define</span><span class="pln"> TFT_CS </span><span class="lit">10</span><span class="pln">
- </span><span class="com">// Use hardware SPI (on Uno, #13, #12, #11) and the above for CS/DC</span><span class="pln">
- </span><span class="typ">Adafruit_ILI9341</span><span class="pln"> tft </span><span class="pun">=</span><span class="pln"> </span><span class="typ">Adafruit_ILI9341</span><span class="pun">(</span><span class="pln">TFT_CS</span><span class="pun">,</span><span class="pln"> TFT_DC</span><span class="pun">);</span><span class="pln">
- </span><span class="kwd">void</span><span class="pln"> setup</span><span class="pun">()</span><span class="pln"> </span><span class="pun">{</span><span class="pln">
- pinMode</span><span class="pun">(</span><span class="pln">offPin</span><span class="pun">,</span><span class="pln"> INPUT_PULLUP</span><span class="pun">);</span><span class="pln">
- pinMode</span><span class="pun">(</span><span class="pln">BUT_ENTER</span><span class="pun">,</span><span class="pln"> INPUT_PULLUP</span><span class="pun">);</span><span class="pln">
- </span><span class="typ">Serial</span><span class="pun">.</span><span class="kwd">begin</span><span class="pun">(</span><span class="lit">9600</span><span class="pun">);</span><span class="pln">
- aLastState </span><span class="pun">=</span><span class="pln"> digitalRead</span><span class="pun">(</span><span class="pln">encoderA</span><span class="pun">);</span><span class="pln"> </span><span class="com">//initialize variable for rotary encoder</span><span class="pln">
- </span><span class="typ">Serial</span><span class="pun">.</span><span class="pln">println</span><span class="pun">(</span><span class="str">"ILI9341 Test!"</span><span class="pun">);</span><span class="pln">
- pinMode</span><span class="pun">(</span><span class="pln">button1Pin</span><span class="pun">,</span><span class="pln"> INPUT_PULLUP</span><span class="pun">);</span><span class="pln">
- pinMode</span><span class="pun">(</span><span class="pln">button2Pin</span><span class="pun">,</span><span class="pln"> INPUT_PULLUP</span><span class="pun">);</span><span class="pln">
- pinMode</span><span class="pun">(</span><span class="pln">button3Pin</span><span class="pun">,</span><span class="pln"> INPUT_PULLUP</span><span class="pun">);</span><span class="pln">
- tft</span><span class="pun">.</span><span class="kwd">begin</span><span class="pun">();</span><span class="pln">
- </span><span class="kwd">int</span><span class="pln"> encoder_pos</span><span class="pun">;</span><span class="pln">
- tft</span><span class="pun">.</span><span class="pln">fillScreen</span><span class="pun">(</span><span class="pln">ILI9341_BLACK</span><span class="pun">);</span><span class="pln">
- tft</span><span class="pun">.</span><span class="pln">setFont</span><span class="pun">(&</span><span class="typ">FreeSans18pt7b</span><span class="pun">);</span><span class="pln">
- </span><span class="pun">}</span><span class="pln">
- </span><span class="kwd">void</span><span class="pln"> loop</span><span class="pun">(</span><span class="kwd">void</span><span class="pun">)</span><span class="pln"> </span><span class="pun">{</span><span class="pln">
- </span><span class="com">//Home Screen</span><span class="pln">
- </span><span class="kwd">if</span><span class="pln"> </span><span class="pun">(</span><span class="pln">menuPage </span><span class="pun">==</span><span class="pln"> </span><span class="lit">0</span><span class="pun">)</span><span class="pln"> </span><span class="pun">{</span><span class="pln">
- tft</span><span class="pun">.</span><span class="pln">setRotation</span><span class="pun">(</span><span class="lit">1</span><span class="pun">);</span><span class="pln">
- tft</span><span class="pun">.</span><span class="pln">setCursor</span><span class="pun">(</span><span class="lit">20</span><span class="pun">,</span><span class="pln"> </span><span class="lit">60</span><span class="pun">);</span><span class="pln">
- tft</span><span class="pun">.</span><span class="pln">setTextColor</span><span class="pun">(</span><span class="pln">ILI9341_GREEN</span><span class="pun">);</span><span class="pln"> tft</span><span class="pun">.</span><span class="pln">setTextSize</span><span class="pun">(</span><span class="lit">1</span><span class="pun">);</span><span class="pln">
- tft</span><span class="pun">.</span><span class="pln">setFont</span><span class="pun">(&</span><span class="typ">FreeSerif24pt7b</span><span class="pun">);</span><span class="pln">
- tft</span><span class="pun">.</span><span class="pln">println</span><span class="pun">(</span><span class="str">"Hello Richard!"</span><span class="pun">);</span><span class="pln">
- tft</span><span class="pun">.</span><span class="pln">setFont</span><span class="pun">(&</span><span class="typ">FreeSans18pt7b</span><span class="pun">);</span><span class="pln">
- tft</span><span class="pun">.</span><span class="pln">setCursor</span><span class="pun">(</span><span class="lit">35</span><span class="pun">,</span><span class="pln"> </span><span class="lit">115</span><span class="pun">);</span><span class="pln">
- tft</span><span class="pun">.</span><span class="pln">setTextColor</span><span class="pun">(</span><span class="pln">ILI9341_WHITE</span><span class="pun">);</span><span class="pln"> tft</span><span class="pun">.</span><span class="pln">setTextSize</span><span class="pun">(</span><span class="lit">1</span><span class="pun">);</span><span class="pln">
- tft</span><span class="pun">.</span><span class="pln">println</span><span class="pun">(</span><span class="str">"What would you"</span><span class="pun">);</span><span class="pln">
- tft</span><span class="pun">.</span><span class="pln">setCursor</span><span class="pun">(</span><span class="lit">35</span><span class="pun">,</span><span class="pln"> </span><span class="lit">145</span><span class="pun">);</span><span class="pln">
- tft</span><span class="pun">.</span><span class="pln">println</span><span class="pun">(</span><span class="str">"like to do today?"</span><span class="pun">);</span><span class="pln">
- tft</span><span class="pun">.</span><span class="pln">setFont</span><span class="pun">(&</span><span class="typ">FreeSans12pt7b</span><span class="pun">);</span><span class="pln">
- tft</span><span class="pun">.</span><span class="pln">setTextColor</span><span class="pun">(</span><span class="pln">ILI9341_YELLOW</span><span class="pun">);</span><span class="pln"> tft</span><span class="pun">.</span><span class="pln">setTextSize</span><span class="pun">(</span><span class="lit">1</span><span class="pun">);</span><span class="pln">
- tft</span><span class="pun">.</span><span class="pln">setCursor</span><span class="pun">(</span><span class="lit">15</span><span class="pun">,</span><span class="pln"> </span><span class="lit">215</span><span class="pun">);</span><span class="pln">
- tft</span><span class="pun">.</span><span class="pln">println</span><span class="pun">(</span><span class="str">"Resume"</span><span class="pun">);</span><span class="pln">
- tft</span><span class="pun">.</span><span class="pln">setCursor</span><span class="pun">(</span><span class="lit">135</span><span class="pun">,</span><span class="pln"> </span><span class="lit">215</span><span class="pun">);</span><span class="pln">
- tft</span><span class="pun">.</span><span class="pln">println</span><span class="pun">(</span><span class="str">"New"</span><span class="pun">);</span><span class="pln">
- tft</span><span class="pun">.</span><span class="pln">setCursor</span><span class="pun">(</span><span class="lit">215</span><span class="pun">,</span><span class="pln"> </span><span class="lit">215</span><span class="pun">);</span><span class="pln">
- tft</span><span class="pun">.</span><span class="pln">println</span><span class="pun">(</span><span class="str">"History"</span><span class="pun">);</span><span class="pln">
- button1Val </span><span class="pun">=</span><span class="pln"> digitalRead</span><span class="pun">(</span><span class="pln">button1Pin</span><span class="pun">);</span><span class="pln">
- button2Val </span><span class="pun">=</span><span class="pln"> digitalRead</span><span class="pun">(</span><span class="pln">button2Pin</span><span class="pun">);</span><span class="pln">
- button3Val </span><span class="pun">=</span><span class="pln"> digitalRead</span><span class="pun">(</span><span class="pln">button3Pin</span><span class="pun">);</span><span class="pln">
- </span><span class="kwd">if</span><span class="pln"> </span><span class="pun">(</span><span class="pln">button1Val </span><span class="pun">==</span><span class="pln"> </span><span class="lit">0</span><span class="pun">)</span><span class="pln"> </span><span class="pun">{</span><span class="pln">
- menuPage </span><span class="pun">=</span><span class="pln"> </span><span class="lit">1</span><span class="pun">;</span><span class="pln">
- tft</span><span class="pun">.</span><span class="pln">fillScreen</span><span class="pun">(</span><span class="pln">ILI9341_BLACK</span><span class="pun">);</span><span class="pln">
- </span><span class="pun">}</span><span class="pln">
- </span><span class="kwd">if</span><span class="pln"> </span><span class="pun">(</span><span class="pln">button2Val </span><span class="pun">==</span><span class="pln"> </span><span class="lit">0</span><span class="pun">)</span><span class="pln"> </span><span class="pun">{</span><span class="pln">
- menuPage </span><span class="pun">=</span><span class="pln"> </span><span class="lit">3</span><span class="pun">;</span><span class="pln">
- tft</span><span class="pun">.</span><span class="pln">fillScreen</span><span class="pun">(</span><span class="pln">ILI9341_BLACK</span><span class="pun">);</span><span class="pln">
- </span><span class="pun">}</span><span class="pln">
- </span><span class="kwd">if</span><span class="pln"> </span><span class="pun">(</span><span class="pln">button3Val </span><span class="pun">==</span><span class="pln"> </span><span class="lit">0</span><span class="pun">)</span><span class="pln"> </span><span class="pun">{</span><span class="pln">
- menuPage </span><span class="pun">=</span><span class="pln"> </span><span class="lit">4</span><span class="pun">;</span><span class="pln">
- tft</span><span class="pun">.</span><span class="pln">fillScreen</span><span class="pun">(</span><span class="pln">ILI9341_BLACK</span><span class="pun">);</span><span class="pln">
- </span><span class="pun">}</span><span class="pln">
- </span><span class="pun">}</span><span class="pln">
- </span><span class="com">//Resume Menu</span><span class="pln">
- </span><span class="kwd">if</span><span class="pln"> </span><span class="pun">(</span><span class="pln">menuPage </span><span class="pun">==</span><span class="pln"> </span><span class="lit">1</span><span class="pun">)</span><span class="pln"> </span><span class="pun">{</span><span class="pln">
- tft</span><span class="pun">.</span><span class="pln">setRotation</span><span class="pun">(</span><span class="lit">1</span><span class="pun">);</span><span class="pln">
- tft</span><span class="pun">.</span><span class="pln">setCursor</span><span class="pun">(</span><span class="lit">20</span><span class="pun">,</span><span class="pln"> </span><span class="lit">60</span><span class="pun">);</span><span class="pln">
- tft</span><span class="pun">.</span><span class="pln">setTextColor</span><span class="pun">(</span><span class="pln">ILI9341_GREEN</span><span class="pun">);</span><span class="pln"> tft</span><span class="pun">.</span><span class="pln">setTextSize</span><span class="pun">(</span><span class="lit">1</span><span class="pun">);</span><span class="pln">
- tft</span><span class="pun">.</span><span class="pln">setFont</span><span class="pun">(&</span><span class="typ">FreeSerif24pt7b</span><span class="pun">);</span><span class="pln">
- tft</span><span class="pun">.</span><span class="pln">println</span><span class="pun">(</span><span class="str">"Project Menu"</span><span class="pun">);</span><span class="pln">
- </span><span class="kwd">if</span><span class="pln"> </span><span class="pun">(</span><span class="lit">0</span><span class="pln"> </span><span class="pun"><=</span><span class="pln"> n </span><span class="pun">&&</span><span class="pln"> n </span><span class="pun"><=</span><span class="pln"> currentprojectNumber</span><span class="pun">)</span><span class="pln">
- </span><span class="pun">{</span><span class="pln">
- tft</span><span class="pun">.</span><span class="pln">setFont</span><span class="pun">(&</span><span class="typ">FreeSans12pt7b</span><span class="pun">);</span><span class="pln">
- tft</span><span class="pun">.</span><span class="pln">setTextColor</span><span class="pun">(</span><span class="pln">ILI9341_WHITE</span><span class="pun">);</span><span class="pln"> tft</span><span class="pun">.</span><span class="pln">setTextSize</span><span class="pun">(</span><span class="lit">1</span><span class="pun">);</span><span class="pln">
- positionVal </span><span class="pun">=</span><span class="pln"> positionVal </span><span class="pun">+</span><span class="pln"> </span><span class="lit">20</span><span class="pln"> </span><span class="pun">-</span><span class="pln"> scrollVal</span><span class="pun">;</span><span class="pln">
- tft</span><span class="pun">.</span><span class="pln">setCursor</span><span class="pun">(</span><span class="lit">15</span><span class="pun">,</span><span class="pln"> </span><span class="lit">115</span><span class="pun">);</span><span class="pln">
- tft</span><span class="pun">.</span><span class="kwd">print</span><span class="pun">(</span><span class="pln">projects</span><span class="pun">[</span><span class="pln">n</span><span class="pun">]);</span><span class="pln">
- </span><span class="com">//will later edit to list name and time</span><span class="pln">
- </span><span class="pun">}</span><span class="pln">
- tft</span><span class="pun">.</span><span class="pln">setCursor</span><span class="pun">(</span><span class="lit">15</span><span class="pun">,</span><span class="pln"> </span><span class="lit">215</span><span class="pun">);</span><span class="pln">
- tft</span><span class="pun">.</span><span class="pln">setFont</span><span class="pun">(&</span><span class="typ">FreeSans12pt7b</span><span class="pun">);</span><span class="pln">
- tft</span><span class="pun">.</span><span class="pln">setTextColor</span><span class="pun">(</span><span class="pln">ILI9341_YELLOW</span><span class="pun">);</span><span class="pln"> tft</span><span class="pun">.</span><span class="pln">setTextSize</span><span class="pun">(</span><span class="lit">1</span><span class="pun">);</span><span class="pln">
- tft</span><span class="pun">.</span><span class="pln">println</span><span class="pun">(</span><span class="str">"Previous"</span><span class="pun">);</span><span class="pln">
- tft</span><span class="pun">.</span><span class="pln">setCursor</span><span class="pun">(</span><span class="lit">115</span><span class="pun">,</span><span class="pln"> </span><span class="lit">215</span><span class="pun">);</span><span class="pln">
- tft</span><span class="pun">.</span><span class="pln">println</span><span class="pun">(</span><span class="str">"Select"</span><span class="pun">);</span><span class="pln">
- tft</span><span class="pun">.</span><span class="pln">setCursor</span><span class="pun">(</span><span class="lit">215</span><span class="pun">,</span><span class="pln"> </span><span class="lit">215</span><span class="pun">);</span><span class="pln">
- tft</span><span class="pun">.</span><span class="pln">println</span><span class="pun">(</span><span class="str">"Next"</span><span class="pun">);</span><span class="pln">
- button1Val </span><span class="pun">=</span><span class="pln"> digitalRead</span><span class="pun">(</span><span class="pln">button1Pin</span><span class="pun">);</span><span class="pln">
- button2Val </span><span class="pun">=</span><span class="pln"> digitalRead</span><span class="pun">(</span><span class="pln">button2Pin</span><span class="pun">);</span><span class="pln">
- button3Val </span><span class="pun">=</span><span class="pln"> digitalRead</span><span class="pun">(</span><span class="pln">button3Pin</span><span class="pun">);</span><span class="pln">
- </span><span class="kwd">if</span><span class="pln"> </span><span class="pun">(</span><span class="pln">button1Val </span><span class="pun">==</span><span class="pln"> </span><span class="lit">0</span><span class="pun">)</span><span class="pln"> </span><span class="pun">{</span><span class="pln">
- n </span><span class="pun">=</span><span class="pln"> n </span><span class="pun">-</span><span class="pln"> </span><span class="lit">1</span><span class="pun">;</span><span class="pln">
- tft</span><span class="pun">.</span><span class="pln">fillScreen</span><span class="pun">(</span><span class="pln">ILI9341_BLACK</span><span class="pun">);</span><span class="pln">
- </span><span class="pun">}</span><span class="pln">
- </span><span class="kwd">if</span><span class="pln"> </span><span class="pun">(</span><span class="pln">button2Val </span><span class="pun">==</span><span class="pln"> </span><span class="lit">0</span><span class="pun">)</span><span class="pln"> </span><span class="pun">{</span><span class="pln">
- menuPage </span><span class="pun">=</span><span class="pln"> </span><span class="lit">2</span><span class="pun">;</span><span class="pln">
- count </span><span class="pun">=</span><span class="pln"> </span><span class="lit">0</span><span class="pun">;</span><span class="pln">
- tft</span><span class="pun">.</span><span class="pln">fillScreen</span><span class="pun">(</span><span class="pln">ILI9341_BLACK</span><span class="pun">);</span><span class="pln">
- </span><span class="pun">}</span><span class="pln">
- </span><span class="kwd">if</span><span class="pln"> </span><span class="pun">(</span><span class="pln">button3Val </span><span class="pun">==</span><span class="pln"> </span><span class="lit">0</span><span class="pun">)</span><span class="pln"> </span><span class="pun">{</span><span class="pln">
- scrollVal </span><span class="pun">=</span><span class="pln"> scrollVal </span><span class="pun">-</span><span class="pln"> </span><span class="lit">25</span><span class="pun">;</span><span class="pln">
- tft</span><span class="pun">.</span><span class="pln">fillScreen</span><span class="pun">(</span><span class="pln">ILI9341_BLACK</span><span class="pun">);</span><span class="pln">
- n </span><span class="pun">=</span><span class="pln"> n </span><span class="pun">+</span><span class="pln"> </span><span class="lit">1</span><span class="pun">;</span><span class="pln">
- </span><span class="pun">}</span><span class="pln">
- </span><span class="pun">}</span><span class="pln">
- </span><span class="com">//Resume Project</span><span class="pln">
- </span><span class="kwd">if</span><span class="pln"> </span><span class="pun">(</span><span class="pln">menuPage </span><span class="pun">==</span><span class="pln"> </span><span class="lit">2</span><span class="pun">)</span><span class="pln"> </span><span class="pun">{</span><span class="pln">
- tft</span><span class="pun">.</span><span class="pln">setRotation</span><span class="pun">(</span><span class="lit">1</span><span class="pun">);</span><span class="pln">
- tft</span><span class="pun">.</span><span class="pln">setCursor</span><span class="pun">(</span><span class="lit">20</span><span class="pun">,</span><span class="pln"> </span><span class="lit">60</span><span class="pun">);</span><span class="pln">
- tft</span><span class="pun">.</span><span class="pln">setTextColor</span><span class="pun">(</span><span class="pln">ILI9341_GREEN</span><span class="pun">);</span><span class="pln"> tft</span><span class="pun">.</span><span class="pln">setTextSize</span><span class="pun">(</span><span class="lit">1</span><span class="pun">);</span><span class="pln">
- tft</span><span class="pun">.</span><span class="pln">setFont</span><span class="pun">(&</span><span class="typ">FreeSerif24pt7b</span><span class="pun">);</span><span class="pln">
- tft</span><span class="pun">.</span><span class="pln">println</span><span class="pun">(</span><span class="pln">projects</span><span class="pun">[</span><span class="pln">n</span><span class="pun">]);</span><span class="pln">
- tft</span><span class="pun">.</span><span class="pln">setFont</span><span class="pun">(&</span><span class="typ">FreeSans18pt7b</span><span class="pun">);</span><span class="pln">
- tft</span><span class="pun">.</span><span class="pln">setCursor</span><span class="pun">(</span><span class="lit">35</span><span class="pun">,</span><span class="pln"> </span><span class="lit">115</span><span class="pun">);</span><span class="pln">
- tft</span><span class="pun">.</span><span class="pln">setTextColor</span><span class="pun">(</span><span class="pln">ILI9341_WHITE</span><span class="pun">);</span><span class="pln"> tft</span><span class="pun">.</span><span class="pln">setTextSize</span><span class="pun">(</span><span class="lit">1</span><span class="pun">);</span><span class="pln">
- </span><span class="kwd">if</span><span class="pln"> </span><span class="pun">(</span><span class="pln">timer</span><span class="pun">[</span><span class="pln">n</span><span class="pun">]</span><span class="pln"> </span><span class="pun">==</span><span class="pln"> </span><span class="lit">1</span><span class="pun">)</span><span class="pln"> </span><span class="pun">{</span><span class="pln">
- </span><span class="kwd">if</span><span class="pln"> </span><span class="pun">(</span><span class="pln">count </span><span class="pun">+</span><span class="pln"> </span><span class="lit">1000</span><span class="pln"> </span><span class="pun"><</span><span class="pln"> millis</span><span class="pun">())</span><span class="pln"> </span><span class="pun">{</span><span class="pln">
- </span><span class="com">//timer operation</span><span class="pln">
- </span><span class="com">//delay (1000);</span><span class="pln">
- seconds</span><span class="pun">[</span><span class="pln">n</span><span class="pun">]</span><span class="pln"> </span><span class="pun">=</span><span class="pln"> seconds</span><span class="pun">[</span><span class="pln">n</span><span class="pun">]</span><span class="pln"> </span><span class="pun">+</span><span class="pln"> </span><span class="lit">1</span><span class="pun">;</span><span class="pln">
- </span><span class="kwd">if</span><span class="pln"> </span><span class="pun">(</span><span class="pln">seconds</span><span class="pun">[</span><span class="pln">n</span><span class="pun">]</span><span class="pln"> </span><span class="pun">==</span><span class="pln"> </span><span class="lit">60</span><span class="pun">)</span><span class="pln">
- </span><span class="pun">{</span><span class="pln">
- seconds</span><span class="pun">[</span><span class="pln">n</span><span class="pun">]</span><span class="pln"> </span><span class="pun">=</span><span class="pln"> </span><span class="lit">0</span><span class="pun">;</span><span class="pln">
- minutes</span><span class="pun">[</span><span class="pln">n</span><span class="pun">]</span><span class="pln"> </span><span class="pun">=</span><span class="pln"> minutes</span><span class="pun">[</span><span class="pln">n</span><span class="pun">]</span><span class="pln"> </span><span class="pun">+</span><span class="pln"> </span><span class="lit">1</span><span class="pun">;</span><span class="pln">
- </span><span class="pun">}</span><span class="pln">
- </span><span class="kwd">if</span><span class="pln"> </span><span class="pun">(</span><span class="pln">minutes</span><span class="pun">[</span><span class="pln">n</span><span class="pun">]</span><span class="pln"> </span><span class="pun">==</span><span class="pln"> </span><span class="lit">60</span><span class="pun">)</span><span class="pln">
- </span><span class="pun">{</span><span class="pln">
- minutes</span><span class="pun">[</span><span class="pln">n</span><span class="pun">]</span><span class="pln"> </span><span class="pun">=</span><span class="pln"> </span><span class="lit">0</span><span class="pun">;</span><span class="pln">
- hours</span><span class="pun">[</span><span class="pln">n</span><span class="pun">]</span><span class="pln"> </span><span class="pun">=</span><span class="pln"> hours</span><span class="pun">[</span><span class="pln">n</span><span class="pun">]</span><span class="pln"> </span><span class="pun">+</span><span class="pln"> </span><span class="lit">1</span><span class="pun">;</span><span class="pln">
- </span><span class="pun">}</span><span class="pln">
- </span><span class="typ">String</span><span class="pln"> throwawaystring </span><span class="pun">=</span><span class="pln"> </span><span class="str">" "</span><span class="pun">;</span><span class="pln">
- </span><span class="typ">String</span><span class="pln"> colon </span><span class="pun">=</span><span class="pln"> </span><span class="str">":"</span><span class="pun">;</span><span class="pln">
- </span><span class="typ">String</span><span class="pln"> timercount </span><span class="pun">=</span><span class="pln"> throwawaystring </span><span class="pun">+</span><span class="pln"> hours</span><span class="pun">[</span><span class="pln">n</span><span class="pun">]</span><span class="pln"> </span><span class="pun">+</span><span class="pln"> colon </span><span class="pun">+</span><span class="pln"> minutes</span><span class="pun">[</span><span class="pln">n</span><span class="pun">]</span><span class="pln"> </span><span class="pun">+</span><span class="pln"> colon </span><span class="pun">+</span><span class="pln"> seconds</span><span class="pun">[</span><span class="pln">n</span><span class="pun">];</span><span class="pln">
- projectTimes</span><span class="pun">[</span><span class="pln">n</span><span class="pun">]</span><span class="pln"> </span><span class="pun">=</span><span class="pln"> timercount</span><span class="pun">;</span><span class="pln">
- tft</span><span class="pun">.</span><span class="pln">fillRect</span><span class="pun">(</span><span class="lit">35</span><span class="pun">,</span><span class="pln"> </span><span class="lit">80</span><span class="pun">,</span><span class="pln"> </span><span class="lit">160</span><span class="pun">,</span><span class="pln"> </span><span class="lit">50</span><span class="pun">,</span><span class="pln"> ILI9341_BLACK</span><span class="pun">);</span><span class="pln">
- tft</span><span class="pun">.</span><span class="pln">setCursor</span><span class="pun">(</span><span class="lit">35</span><span class="pun">,</span><span class="pln"> </span><span class="lit">115</span><span class="pun">);</span><span class="pln">
- count </span><span class="pun">=</span><span class="pln"> millis</span><span class="pun">();</span><span class="pln">
- tft</span><span class="pun">.</span><span class="pln">setTextColor</span><span class="pun">(</span><span class="pln">ILI9341_WHITE</span><span class="pun">);</span><span class="pln"> tft</span><span class="pun">.</span><span class="pln">setTextSize</span><span class="pun">(</span><span class="lit">1</span><span class="pun">);</span><span class="pln">
- tft</span><span class="pun">.</span><span class="pln">println</span><span class="pun">(</span><span class="pln">projectTimes</span><span class="pun">[</span><span class="pln">n</span><span class="pun">]);</span><span class="pln">
- </span><span class="pun">}</span><span class="pln">
- </span><span class="pun">}</span><span class="pln">
- tft</span><span class="pun">.</span><span class="pln">setFont</span><span class="pun">(&</span><span class="typ">FreeSans12pt7b</span><span class="pun">);</span><span class="pln">
- tft</span><span class="pun">.</span><span class="pln">setTextColor</span><span class="pun">(</span><span class="pln">ILI9341_YELLOW</span><span class="pun">);</span><span class="pln"> tft</span><span class="pun">.</span><span class="pln">setTextSize</span><span class="pun">(</span><span class="lit">1</span><span class="pun">);</span><span class="pln">
- tft</span><span class="pun">.</span><span class="pln">setCursor</span><span class="pun">(</span><span class="lit">15</span><span class="pun">,</span><span class="pln"> </span><span class="lit">215</span><span class="pun">);</span><span class="pln">
- tft</span><span class="pun">.</span><span class="pln">println</span><span class="pun">(</span><span class="str">"Home"</span><span class="pun">);</span><span class="pln">
- tft</span><span class="pun">.</span><span class="pln">setCursor</span><span class="pun">(</span><span class="lit">115</span><span class="pun">,</span><span class="pln"> </span><span class="lit">215</span><span class="pun">);</span><span class="pln">
- tft</span><span class="pun">.</span><span class="pln">println</span><span class="pun">(</span><span class="str">"Timer"</span><span class="pun">);</span><span class="pln">
- tft</span><span class="pun">.</span><span class="pln">setCursor</span><span class="pun">(</span><span class="lit">215</span><span class="pun">,</span><span class="pln"> </span><span class="lit">215</span><span class="pun">);</span><span class="pln">
- tft</span><span class="pun">.</span><span class="pln">println</span><span class="pun">(</span><span class="str">"Archive"</span><span class="pun">);</span><span class="pln">
- button1Val </span><span class="pun">=</span><span class="pln"> digitalRead</span><span class="pun">(</span><span class="pln">button1Pin</span><span class="pun">);</span><span class="pln">
- button2Val </span><span class="pun">=</span><span class="pln"> digitalRead</span><span class="pun">(</span><span class="pln">button2Pin</span><span class="pun">);</span><span class="pln">
- button3Val </span><span class="pun">=</span><span class="pln"> digitalRead</span><span class="pun">(</span><span class="pln">button3Pin</span><span class="pun">);</span><span class="pln">
- </span><span class="kwd">if</span><span class="pln"> </span><span class="pun">(</span><span class="pln">button1Val </span><span class="pun">==</span><span class="pln"> </span><span class="lit">0</span><span class="pun">)</span><span class="pln"> </span><span class="pun">{</span><span class="pln">
- menuPage </span><span class="pun">=</span><span class="pln"> </span><span class="lit">0</span><span class="pun">;</span><span class="pln">
- tft</span><span class="pun">.</span><span class="pln">fillScreen</span><span class="pun">(</span><span class="pln">ILI9341_BLACK</span><span class="pun">);</span><span class="pln">
- </span><span class="pun">}</span><span class="pln">
- </span><span class="kwd">if</span><span class="pln"> </span><span class="pun">(</span><span class="pln">button2Val </span><span class="pun">==</span><span class="pln"> </span><span class="lit">0</span><span class="pun">)</span><span class="pln"> </span><span class="pun">{</span><span class="pln">
- timer</span><span class="pun">[</span><span class="pln">n</span><span class="pun">]</span><span class="pln"> </span><span class="pun">=</span><span class="pln"> </span><span class="pun">!</span><span class="pln">timer</span><span class="pun">[</span><span class="pln">n</span><span class="pun">];</span><span class="pln">
- </span><span class="com">//timer operation</span><span class="pln">
- </span><span class="pun">}</span><span class="pln">
- </span><span class="kwd">if</span><span class="pln"> </span><span class="pun">(</span><span class="pln">button3Val </span><span class="pun">==</span><span class="pln"> </span><span class="lit">0</span><span class="pun">)</span><span class="pln"> </span><span class="pun">{</span><span class="pln">
- menuPage </span><span class="pun">=</span><span class="pln"> </span><span class="lit">4</span><span class="pun">;</span><span class="pln">
- tft</span><span class="pun">.</span><span class="pln">fillScreen</span><span class="pun">(</span><span class="pln">ILI9341_BLACK</span><span class="pun">);</span><span class="pln">
- pastprojectNumber </span><span class="pun">=</span><span class="pln"> pastprojectNumber </span><span class="pun">+</span><span class="pln"> </span><span class="lit">1</span><span class="pun">;</span><span class="pln">
- pastprojects</span><span class="pun">[</span><span class="pln">pastprojectNumber</span><span class="pun">]</span><span class="pln"> </span><span class="pun">=</span><span class="pln"> projects</span><span class="pun">[</span><span class="pln">n</span><span class="pun">];</span><span class="pln">
- pastprojectTimes</span><span class="pun">[</span><span class="pln">pastprojectNumber</span><span class="pun">]</span><span class="pln"> </span><span class="pun">=</span><span class="pln"> projectTimes</span><span class="pun">[</span><span class="pln">n</span><span class="pun">];</span><span class="pln">
- </span><span class="kwd">for</span><span class="pln"> </span><span class="pun">(</span><span class="kwd">int</span><span class="pln"> j </span><span class="pun">=</span><span class="pln"> n</span><span class="pun">;</span><span class="pln"> j </span><span class="pun"><=</span><span class="pln"> currentprojectNumber</span><span class="pun">;</span><span class="pln"> j</span><span class="pun">++)</span><span class="pln"> </span><span class="pun">{</span><span class="pln">
- projects</span><span class="pun">[</span><span class="pln">j</span><span class="pun">]</span><span class="pln"> </span><span class="pun">=</span><span class="pln"> projects</span><span class="pun">[</span><span class="pln">j </span><span class="pun">+</span><span class="pln"> </span><span class="lit">1</span><span class="pun">];</span><span class="pln">
- projectTimes</span><span class="pun">[</span><span class="pln">j</span><span class="pun">]</span><span class="pln"> </span><span class="pun">=</span><span class="pln"> projectTimes</span><span class="pun">[</span><span class="pln">j </span><span class="pun">+</span><span class="pln"> </span><span class="lit">1</span><span class="pun">];</span><span class="pln">
- seconds</span><span class="pun">[</span><span class="pln">j</span><span class="pun">]=</span><span class="pln">seconds</span><span class="pun">[</span><span class="pln">j </span><span class="pun">+</span><span class="pln"> </span><span class="lit">1</span><span class="pun">];</span><span class="pln">
- minutes</span><span class="pun">[</span><span class="pln">j</span><span class="pun">]=</span><span class="pln">minutes</span><span class="pun">[</span><span class="pln">j </span><span class="pun">+</span><span class="pln"> </span><span class="lit">1</span><span class="pun">];</span><span class="pln">
- hours</span><span class="pun">[</span><span class="pln">j</span><span class="pun">]=</span><span class="pln">hours</span><span class="pun">[</span><span class="pln">j </span><span class="pun">+</span><span class="pln"> </span><span class="lit">1</span><span class="pun">];</span><span class="pln">
- </span><span class="pun">}</span><span class="pln">
- currentprojectNumber </span><span class="pun">=</span><span class="pln"> currentprojectNumber </span><span class="pun">-</span><span class="pln"> </span><span class="lit">1</span><span class="pun">;</span><span class="pln">
- </span><span class="com">//save project time and add to list</span><span class="pln">
- </span><span class="pun">}</span><span class="pln">
- </span><span class="pun">}</span><span class="pln">
- </span><span class="com">//New Project</span><span class="pln">
- </span><span class="kwd">if</span><span class="pln"> </span><span class="pun">(</span><span class="pln">menuPage </span><span class="pun">==</span><span class="pln"> </span><span class="lit">3</span><span class="pun">)</span><span class="pln"> </span><span class="pun">{</span><span class="pln">
- tft</span><span class="pun">.</span><span class="pln">setRotation</span><span class="pun">(</span><span class="lit">1</span><span class="pun">);</span><span class="pln">
- tft</span><span class="pun">.</span><span class="pln">setCursor</span><span class="pun">(</span><span class="lit">20</span><span class="pun">,</span><span class="pln"> </span><span class="lit">60</span><span class="pun">);</span><span class="pln">
- tft</span><span class="pun">.</span><span class="pln">setTextColor</span><span class="pun">(</span><span class="pln">ILI9341_GREEN</span><span class="pun">);</span><span class="pln">
- tft</span><span class="pun">.</span><span class="pln">setTextSize</span><span class="pun">(</span><span class="lit">1</span><span class="pun">);</span><span class="pln">
- tft</span><span class="pun">.</span><span class="pln">setFont</span><span class="pun">(&</span><span class="typ">FreeSerif24pt7b</span><span class="pun">);</span><span class="pln">
- tft</span><span class="pun">.</span><span class="pln">println</span><span class="pun">(</span><span class="str">"Start New"</span><span class="pun">);</span><span class="pln">
- tft</span><span class="pun">.</span><span class="pln">setFont</span><span class="pun">(&</span><span class="typ">FreeSans18pt7b</span><span class="pun">);</span><span class="pln">
- tft</span><span class="pun">.</span><span class="pln">setTextColor</span><span class="pun">(</span><span class="pln">ILI9341_YELLOW</span><span class="pun">);</span><span class="pln"> tft</span><span class="pun">.</span><span class="pln">setTextSize</span><span class="pun">(</span><span class="lit">1</span><span class="pun">);</span><span class="pln">
- </span><span class="com">//Rotary code here</span><span class="pln">
- </span><span class="kwd">int</span><span class="pln"> newPos </span><span class="pun">=</span><span class="pln"> encoder</span><span class="pun">.</span><span class="pln">read</span><span class="pun">();</span><span class="pln">
- </span><span class="typ">Serial</span><span class="pun">.</span><span class="pln">println</span><span class="pun">(</span><span class="pln">newPos</span><span class="pun">);</span><span class="pln">
- lim </span><span class="pun">=</span><span class="pln"> newPos</span><span class="pun">/</span><span class="lit">4</span><span class="pln"> </span><span class="pun">%</span><span class="pln"> str_len</span><span class="pun">;</span><span class="pln">
- </span><span class="com">// lim is the index of the characters in the variable "alphabet"</span><span class="pln">
- </span><span class="kwd">if</span><span class="pln"> </span><span class="pun">(</span><span class="pln">lim </span><span class="pun"><</span><span class="pln"> </span><span class="lit">0</span><span class="pun">)</span><span class="pln"> </span><span class="pun">{</span><span class="pln">
- lim </span><span class="pun">+=</span><span class="pln"> str_len</span><span class="pun">;</span><span class="pln"> </span><span class="com">// loop around to the first index of the characters, </span><span class="pln">
- </span><span class="com">// so you don't have to move all the way back from z to a</span><span class="pln">
- </span><span class="pun">}</span><span class="pln">
- </span><span class="kwd">if</span><span class="pln"> </span><span class="pun">(</span><span class="pln">encoder_pos </span><span class="pun">!=</span><span class="pln"> newPos</span><span class="pun">)</span><span class="pln"> </span><span class="pun">{</span><span class="pln"> </span><span class="com">// if encoder is being rotated</span><span class="pln">
- </span><span class="com">//lim = newPos;</span><span class="pln">
- </span><span class="com">// lim is the index of the characters in the variable "alphabet"</span><span class="pln">
- encoder_pos </span><span class="pun">=</span><span class="pln"> newPos</span><span class="pun">;</span><span class="pln">
- </span><span class="kwd">char</span><span class="pln"> letter </span><span class="pun">=</span><span class="pln"> alphabet</span><span class="pun">[</span><span class="pln">lim</span><span class="pun">];</span><span class="pln">
- tft</span><span class="pun">.</span><span class="pln">setFont</span><span class="pun">(&</span><span class="typ">FreeSans18pt7b</span><span class="pun">);</span><span class="pln">
- tft</span><span class="pun">.</span><span class="pln">setTextColor</span><span class="pun">(</span><span class="pln">ILI9341_RED</span><span class="pun">);</span><span class="pln"> tft</span><span class="pun">.</span><span class="pln">setTextSize</span><span class="pun">(</span><span class="lit">1</span><span class="pun">);</span><span class="pln">
- tft</span><span class="pun">.</span><span class="pln">setCursor</span><span class="pun">(</span><span class="lit">100</span><span class="pun">,</span><span class="pln"> </span><span class="lit">100</span><span class="pun">);</span><span class="pln">
- tft</span><span class="pun">.</span><span class="pln">fillRect</span><span class="pun">(</span><span class="lit">100</span><span class="pun">,</span><span class="pln"> </span><span class="lit">75</span><span class="pun">,</span><span class="pln"> </span><span class="lit">30</span><span class="pun">,</span><span class="pln"> </span><span class="lit">40</span><span class="pun">,</span><span class="pln"> ILI9341_BLACK</span><span class="pun">);</span><span class="pln">
- tft</span><span class="pun">.</span><span class="kwd">print</span><span class="pun">(</span><span class="pln">letter</span><span class="pun">);</span><span class="pln">
- </span><span class="typ">Serial</span><span class="pun">.</span><span class="pln">println</span><span class="pun">(</span><span class="str">"here"</span><span class="pun">);</span><span class="pln">
- </span><span class="pun">}</span><span class="pln">
- </span><span class="kwd">if</span><span class="pln"> </span><span class="pun">(</span><span class="pln">digitalRead</span><span class="pun">(</span><span class="pln">BUT_ENTER</span><span class="pun">)</span><span class="pln"> </span><span class="pun">==</span><span class="pln"> </span><span class="lit">0</span><span class="pun">)</span><span class="pln"> </span><span class="pun">{</span><span class="pln"> </span><span class="com">// if encoder button is pressed, i.e. to select a char</span><span class="pln">
- delay</span><span class="pun">(</span><span class="lit">500</span><span class="pun">);</span><span class="pln"> </span><span class="com">// so you don't accidentally select the letter many times</span><span class="pln">
- message </span><span class="pun">=</span><span class="pln"> message </span><span class="pun">+</span><span class="pln"> alphabet</span><span class="pun">[</span><span class="pln">lim</span><span class="pun">];</span><span class="pln"> </span><span class="com">// add the selected letter to the message</span><span class="pln">
- tft</span><span class="pun">.</span><span class="pln">setCursor</span><span class="pun">(</span><span class="lit">30</span><span class="pun">,</span><span class="pln"> </span><span class="lit">135</span><span class="pun">);</span><span class="pln">
- tft</span><span class="pun">.</span><span class="pln">setTextColor</span><span class="pun">(</span><span class="pln">ILI9341_WHITE</span><span class="pun">);</span><span class="pln"> tft</span><span class="pun">.</span><span class="pln">setTextSize</span><span class="pun">(</span><span class="lit">1</span><span class="pun">);</span><span class="pln">
- tft</span><span class="pun">.</span><span class="pln">println</span><span class="pun">(</span><span class="pln">message</span><span class="pun">);</span><span class="pln">
- </span><span class="typ">Serial</span><span class="pun">.</span><span class="kwd">print</span><span class="pun">(</span><span class="pln">message</span><span class="pun">);</span><span class="pln">
- </span><span class="pun">}</span><span class="pln">
- tft</span><span class="pun">.</span><span class="pln">setFont</span><span class="pun">(&</span><span class="typ">FreeSans12pt7b</span><span class="pun">);</span><span class="pln">
- tft</span><span class="pun">.</span><span class="pln">setTextColor</span><span class="pun">(</span><span class="pln">ILI9341_YELLOW</span><span class="pun">);</span><span class="pln"> tft</span><span class="pun">.</span><span class="pln">setTextSize</span><span class="pun">(</span><span class="lit">1</span><span class="pun">);</span><span class="pln">
- tft</span><span class="pun">.</span><span class="pln">setCursor</span><span class="pun">(</span><span class="lit">115</span><span class="pun">,</span><span class="pln"> </span><span class="lit">215</span><span class="pun">);</span><span class="pln">
- tft</span><span class="pun">.</span><span class="pln">println</span><span class="pun">(</span><span class="str">"Enter"</span><span class="pun">);</span><span class="pln">
- tft</span><span class="pun">.</span><span class="pln">setCursor</span><span class="pun">(</span><span class="lit">215</span><span class="pun">,</span><span class="pln"> </span><span class="lit">215</span><span class="pun">);</span><span class="pln">
- tft</span><span class="pun">.</span><span class="pln">println</span><span class="pun">(</span><span class="str">"Cancel"</span><span class="pun">);</span><span class="pln">
- button1Val </span><span class="pun">=</span><span class="pln"> digitalRead</span><span class="pun">(</span><span class="pln">button1Pin</span><span class="pun">);</span><span class="pln">
- button2Val </span><span class="pun">=</span><span class="pln"> digitalRead</span><span class="pun">(</span><span class="pln">button2Pin</span><span class="pun">);</span><span class="pln">
- button3Val </span><span class="pun">=</span><span class="pln"> digitalRead</span><span class="pun">(</span><span class="pln">button3Pin</span><span class="pun">);</span><span class="pln">
- </span><span class="kwd">if</span><span class="pln"> </span><span class="pun">(</span><span class="pln">button1Val </span><span class="pun">==</span><span class="pln"> </span><span class="lit">0</span><span class="pun">)</span><span class="pln"> </span><span class="pun">{</span><span class="pln">
- </span><span class="com">//backspace operation</span><span class="pln">
- </span><span class="pun">}</span><span class="pln">
- </span><span class="kwd">if</span><span class="pln"> </span><span class="pun">(</span><span class="pln">button2Val </span><span class="pun">==</span><span class="pln"> </span><span class="lit">0</span><span class="pun">)</span><span class="pln"> </span><span class="pun">{</span><span class="pln">
- menuPage </span><span class="pun">=</span><span class="pln"> </span><span class="lit">1</span><span class="pun">;</span><span class="pln">
- projects</span><span class="pun">[</span><span class="pln">currentprojectNumber</span><span class="pun">]</span><span class="pln"> </span><span class="pun">=</span><span class="pln"> message</span><span class="pun">;</span><span class="pln">
- message </span><span class="pun">=</span><span class="pln"> </span><span class="str">""</span><span class="pun">;</span><span class="pln">
- currentprojectNumber </span><span class="pun">=</span><span class="pln"> currentprojectNumber </span><span class="pun">+</span><span class="pln"> </span><span class="lit">1</span><span class="pun">;</span><span class="pln">
- tft</span><span class="pun">.</span><span class="pln">fillScreen</span><span class="pun">(</span><span class="pln">ILI9341_BLACK</span><span class="pun">);</span><span class="pln">
- </span><span class="pun">}</span><span class="pln">
- </span><span class="kwd">if</span><span class="pln"> </span><span class="pun">(</span><span class="pln">button3Val </span><span class="pun">==</span><span class="pln"> </span><span class="lit">0</span><span class="pun">)</span><span class="pln"> </span><span class="pun">{</span><span class="pln">
- menuPage </span><span class="pun">=</span><span class="pln"> </span><span class="lit">0</span><span class="pun">;</span><span class="pln">
- tft</span><span class="pun">.</span><span class="pln">fillScreen</span><span class="pun">(</span><span class="pln">ILI9341_BLACK</span><span class="pun">);</span><span class="pln">
- </span><span class="pun">}</span><span class="pln">
- </span><span class="pun">}</span><span class="pln">
- </span><span class="com">//History Menu</span><span class="pln">
- </span><span class="kwd">if</span><span class="pln"> </span><span class="pun">(</span><span class="pln">menuPage </span><span class="pun">==</span><span class="pln"> </span><span class="lit">4</span><span class="pun">)</span><span class="pln"> </span><span class="pun">{</span><span class="pln">
- positionVal </span><span class="pun">=</span><span class="pln"> </span><span class="lit">100</span><span class="pln"> </span><span class="pun">-</span><span class="pln"> scrollVal</span><span class="pun">;</span><span class="pln">
- tft</span><span class="pun">.</span><span class="pln">setRotation</span><span class="pun">(</span><span class="lit">1</span><span class="pun">);</span><span class="pln">
- tft</span><span class="pun">.</span><span class="pln">setCursor</span><span class="pun">(</span><span class="lit">20</span><span class="pun">,</span><span class="pln"> </span><span class="lit">60</span><span class="pun">);</span><span class="pln">
- tft</span><span class="pun">.</span><span class="pln">setTextColor</span><span class="pun">(</span><span class="pln">ILI9341_GREEN</span><span class="pun">);</span><span class="pln"> tft</span><span class="pun">.</span><span class="pln">setTextSize</span><span class="pun">(</span><span class="lit">1</span><span class="pun">);</span><span class="pln">
- tft</span><span class="pun">.</span><span class="pln">setFont</span><span class="pun">(&</span><span class="typ">FreeSerif24pt7b</span><span class="pun">);</span><span class="pln">
- tft</span><span class="pun">.</span><span class="pln">println</span><span class="pun">(</span><span class="str">"History"</span><span class="pun">);</span><span class="pln">
- </span><span class="kwd">for</span><span class="pln"> </span><span class="pun">(</span><span class="kwd">int</span><span class="pln"> y </span><span class="pun">=</span><span class="pln"> </span><span class="lit">0</span><span class="pun">;</span><span class="pln"> y </span><span class="pun"><=</span><span class="pln"> pastprojectNumber</span><span class="pun">;</span><span class="pln"> y</span><span class="pun">++)</span><span class="pln">
- </span><span class="pun">{</span><span class="pln">
- tft</span><span class="pun">.</span><span class="pln">setFont</span><span class="pun">(&</span><span class="typ">FreeSans12pt7b</span><span class="pun">);</span><span class="pln">
- tft</span><span class="pun">.</span><span class="pln">setTextColor</span><span class="pun">(</span><span class="pln">ILI9341_WHITE</span><span class="pun">);</span><span class="pln"> tft</span><span class="pun">.</span><span class="pln">setTextSize</span><span class="pun">(</span><span class="lit">1</span><span class="pun">);</span><span class="pln">
- </span><span class="kwd">if</span><span class="pln"> </span><span class="pun">(</span><span class="lit">60</span><span class="pln"> </span><span class="pun"><</span><span class="pln"> positionVal </span><span class="pun">&&</span><span class="pln"> positionVal </span><span class="pun"><</span><span class="pln"> </span><span class="lit">215</span><span class="pun">)</span><span class="pln"> </span><span class="pun">{</span><span class="pln">
- tft</span><span class="pun">.</span><span class="pln">setCursor</span><span class="pun">(</span><span class="lit">15</span><span class="pun">,</span><span class="pln"> positionVal</span><span class="pun">);</span><span class="pln">
- tft</span><span class="pun">.</span><span class="kwd">print</span><span class="pun">(</span><span class="pln">pastprojects</span><span class="pun">[</span><span class="pln">y</span><span class="pun">]);</span><span class="pln">
- tft</span><span class="pun">.</span><span class="kwd">print</span><span class="pun">(</span><span class="pln">pastprojectTimes</span><span class="pun">[</span><span class="pln">y</span><span class="pun">]);</span><span class="pln">
- </span><span class="com">//will later edit to list name and time</span><span class="pln">
- </span><span class="pun">}</span><span class="pln">
- positionVal </span><span class="pun">=</span><span class="pln"> positionVal </span><span class="pun">+</span><span class="pln"> </span><span class="lit">25</span><span class="pun">;</span><span class="pln">
- </span><span class="pun">}</span><span class="pln">
- tft</span><span class="pun">.</span><span class="pln">setFont</span><span class="pun">(&</span><span class="typ">FreeSans12pt7b</span><span class="pun">);</span><span class="pln">
- tft</span><span class="pun">.</span><span class="pln">setTextColor</span><span class="pun">(</span><span class="pln">ILI9341_YELLOW</span><span class="pun">);</span><span class="pln"> tft</span><span class="pun">.</span><span class="pln">setTextSize</span><span class="pun">(</span><span class="lit">1</span><span class="pun">);</span><span class="pln">
- tft</span><span class="pun">.</span><span class="pln">setCursor</span><span class="pun">(</span><span class="lit">15</span><span class="pun">,</span><span class="pln"> </span><span class="lit">215</span><span class="pun">);</span><span class="pln">
- tft</span><span class="pun">.</span><span class="pln">println</span><span class="pun">(</span><span class="str">"Up"</span><span class="pun">);</span><span class="pln">
- tft</span><span class="pun">.</span><span class="pln">setCursor</span><span class="pun">(</span><span class="lit">115</span><span class="pun">,</span><span class="pln"> </span><span class="lit">215</span><span class="pun">);</span><span class="pln">
- tft</span><span class="pun">.</span><span class="pln">println</span><span class="pun">(</span><span class="str">"Home"</span><span class="pun">);</span><span class="pln">
- tft</span><span class="pun">.</span><span class="pln">setCursor</span><span class="pun">(</span><span class="lit">215</span><span class="pun">,</span><span class="pln"> </span><span class="lit">215</span><span class="pun">);</span><span class="pln">
- tft</span><span class="pun">.</span><span class="pln">println</span><span class="pun">(</span><span class="str">"Down"</span><span class="pun">);</span><span class="pln">
- button1Val </span><span class="pun">=</span><span class="pln"> digitalRead</span><span class="pun">(</span><span class="pln">button1Pin</span><span class="pun">);</span><span class="pln">
- button2Val </span><span class="pun">=</span><span class="pln"> digitalRead</span><span class="pun">(</span><span class="pln">button2Pin</span><span class="pun">);</span><span class="pln">
- button3Val </span><span class="pun">=</span><span class="pln"> digitalRead</span><span class="pun">(</span><span class="pln">button3Pin</span><span class="pun">);</span><span class="pln">
- </span><span class="kwd">if</span><span class="pln"> </span><span class="pun">(</span><span class="pln">button1Val </span><span class="pun">==</span><span class="pln"> </span><span class="lit">0</span><span class="pun">)</span><span class="pln"> </span><span class="pun">{</span><span class="pln">
- scrollVal </span><span class="pun">=</span><span class="pln"> scrollVal </span><span class="pun">+</span><span class="pln"> </span><span class="lit">25</span><span class="pun">;</span><span class="pln">
- tft</span><span class="pun">.</span><span class="pln">fillScreen</span><span class="pun">(</span><span class="pln">ILI9341_BLACK</span><span class="pun">);</span><span class="pln">
- </span><span class="pun">}</span><span class="pln">
- </span><span class="kwd">if</span><span class="pln"> </span><span class="pun">(</span><span class="pln">button2Val </span><span class="pun">==</span><span class="pln"> </span><span class="lit">0</span><span class="pun">)</span><span class="pln"> </span><span class="pun">{</span><span class="pln">
- menuPage </span><span class="pun">=</span><span class="pln"> </span><span class="lit">0</span><span class="pun">;</span><span class="pln">
- scrollVal </span><span class="pun">=</span><span class="pln"> </span><span class="lit">0</span><span class="pun">;</span><span class="pln">
- tft</span><span class="pun">.</span><span class="pln">fillScreen</span><span class="pun">(</span><span class="pln">ILI9341_BLACK</span><span class="pun">);</span><span class="pln">
- </span><span class="pun">}</span><span class="pln">
- </span><span class="kwd">if</span><span class="pln"> </span><span class="pun">(</span><span class="pln">button3Val </span><span class="pun">==</span><span class="pln"> </span><span class="lit">0</span><span class="pun">)</span><span class="pln"> </span><span class="pun">{</span><span class="pln">
- scrollVal </span><span class="pun">=</span><span class="pln"> scrollVal </span><span class="pun">-</span><span class="pln"> </span><span class="lit">25</span><span class="pun">;</span><span class="pln">
- tft</span><span class="pun">.</span><span class="pln">fillScreen</span><span class="pun">(</span><span class="pln">ILI9341_BLACK</span><span class="pun">);</span><span class="pln">
- </span><span class="pun">}</span><span class="pln">
- </span><span class="pun">}</span><span class="pln">
- </span><span class="pun">}</span>
Schematic
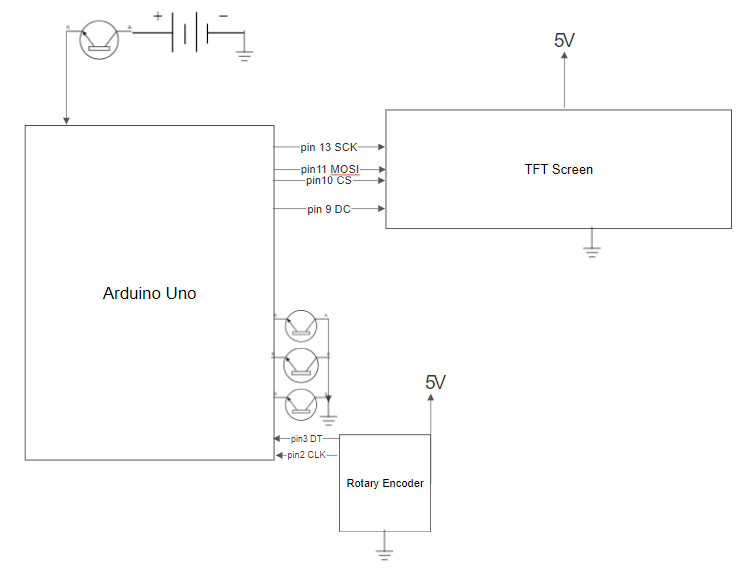
Design Files
Linked is the .stl file for milling the top board, as well as .dxf files for lasercutting the screen cover and the semi-circles that hold the iPad in place.
Comments are closed.