Adding images to the Media Library in WordPress
- Scan or take a photo of each of your toy sketches. If necessary, use a tool such as Photoshop to clean up and crop your sketch. Name each image file with your andrew id followed by the name of your toy concept. This will help your find your images once the Media Library fills up with everyone else’s images.
- Go to the WordPress dashboard for the class web site. Click the Media tab in the left-hand menu. In the Media Library, click the Add New button. Drag your images onto the page.
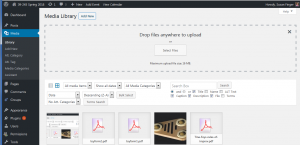
- Click on your image and give it a title, a caption, and alt text. The alt text should describe the picture. The alt text should be descriptive so that someone who is using a screen reader will know what is in the image. You can also restrict who can view the image — although your ability to restrict is limited.
Creating a new WordPress page
- Once all your sketches are in the Media Library, select the Pages tab from the left-hand menu. You should get a list of all the pages that are currently part of the site.
- Hover over the link for the “- – Template for Toy Concept Page.” You will get a menu that lets you edit, view, or duplicate the page. Select Duplicate This.
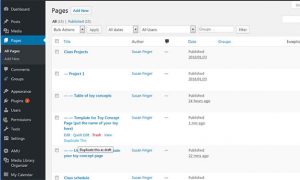
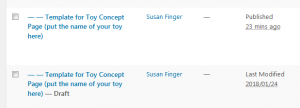
- You should now have a new link that looks just like the original link except that you will be listed as the author and the page will be a Draft.
- Note: This tutorial uses a template to get you started. You can also create a new page by selecting Add New from the Pages tab in the left-hand menu and start from scratch.
Naming a WordPress page
- Click on the link for the draft of the Toy Concept page. Don’t click on the original page because that page belongs to me and should stay as a template.
- Clicking on the link opens the page in edit mode, You should now have a screen that looks something like:
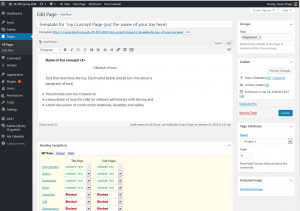
- First look at the title bar, which is right under Edit Page. What appears in the text box is the title of your web page. Your title will show up on the browser tab for the page and in the internal list of pages. Please do not call it Toy Concept 1 — give it a descriptive name like “3 Child See Saw.” First put the name in the title bar, then replace the heading on the page with the same name:
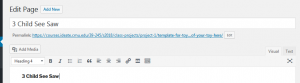
- Directly under the page title text box, you will see the permalink to your page. Right now, it looks like a link to the original page, so click the Edit button at the end of the link. Type in the name if your toy. Use hyphens instead of blanks to separate the words.

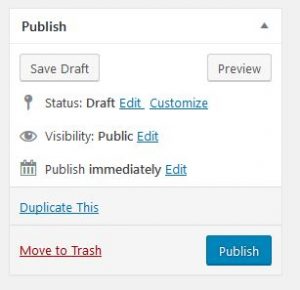
- Now would be a good time to save your page. On the right -hand side of the page should see the Publish panel. You have two choices: Save draft or Publish. For now, you can save it as a draft, but you need to remember to publish it before the assignment is due.
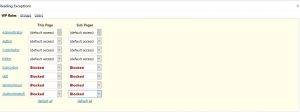
- WordPress lets you control who can see your page when it is published. Scroll to the bottom of the page to see who can read your page. If the Reading exceptions panel is collapsed, click the arrow on the right-hand side to expand it. in the panel below, I have denied read access to anyone who isn’t subscribed to the class:
- To save the new settings, press the Update button in the Publish panel.
Editing a WordPress page
- Next, look at the icons in the editing bar.

- Replace “Name of Toy concept <1>” with the name of your toy. Notice that the style for the name is Header 4. You can use the pull down menu to change style applied to the text. You can also use bold, italic, numbering buttons to make simple changes to the text formatting.
- Aside: If you know html, you can do more complex styling by clicking on the Text tab and editing the html directly.
- To insert your sketch, select the text that says “<Sketch of Toy>” Then click on the Add Media button that is just above the editing window. Clicking bring up a popup window with all the items in the Media Library. Select your sketch and then click the Insert into Page button at the bottom of the window. (If your sketch isn’t there, you can click the Upload Files tab at the top of the page and repeat the beginning part of this lab.)
- Now, you can edit the text to describe your toy and answer the questions. Remember to press the Update button frequently to save your work.
- You can also click the Preview Changes button in the Publish panel to see what your page will look like in a browser.
- At the bottom of the page, put either your student number or your name so I know who’s toy it is.
- Do this entire process 3 times, once for each toy concept.
Parent pages
WordPress lets you make a hierarchy of pages – sort of like folders, except the pages stored in the folders are always visible. If you have already created a page, you can change the parent page using the Quick Edit option.
- Select the Pages tab from the left-hand menu. Find your page in the list of all the pages. Remember that you can filter the pages by the author which makes it easier to find your pages.
- Hover over the page you want to change. You will get a menu that lets you Edit, Quick Edit, Trash (don’t do this), View or Duplicate the page. Note that if the page belongs to someone else and you just want to check it out, you can use the View button.

- To change the parent page, select Quick Edit. You will get the Quick Edit menu:
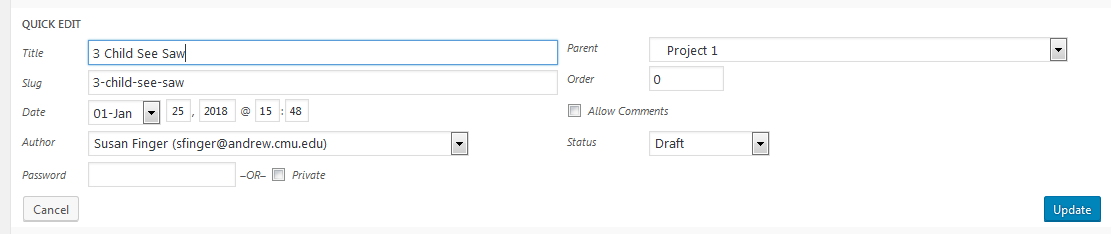
- On the right-hand side of the menu, you should see the Parent page pull down menu. The pull down menu has all the pages that have been created in the WordPress site. For your Toy Concept pages, select the Project 1 page.
- Click the Update button and you’re done.
- You can also change the parent page while you are in Edit mode. Toward the bottom of the right-hand column is the Page Attributes panel. This has the same pull down menu that lets you select the parent page.