Make It So Chapters 3, 4, & 5

Chapter 3:

Throughout the chapter, there were three things that were portrayed as critical to an interface’s functionality and perception. The first of these categories was font and its use to convey information through a screen. Font is super important because it conveys information to the user through it’s appearance. Fonts that are more block-like and all uppercase tend to be harder to read and mimic early style computers making the user seem more intelligent or knowledgeable. In addition, fonts that have more character like serif fonts are more readable and can be used to convey very important information that needs to be read. The size of the font is also important providing insight into the importance of the information. All of these characteristics add up to convey information about the importance and urgency of the words being displayed without the user even having to read them.

In addition to font, color is also stressed as a very important visual aspect when it comes to displays. One aspect mentioned throughout chapter 3 is the idea of the blue and glow phenomena that conveys futuristic text. This is interesting because whenever I hear blue and glow I think of hologram which is very futuristic highlighting the cultural implications of this color. In addition, colors like red on a display signify more urgent or error-like messages. While this isn’t always the case, red is described as having a sense of danger. This is an interesting interpretation because red in other cultures also signifies good luck or happiness which is generally thought of to be the opposite of danger. This difference in color perception is very interesting because it brings up the idea that it is pretty much impossible to create a perfectly perceptible user interface. While we can come to a general consensus on what means what, it is very hard to create a display that means the same thing regardless of culture especially when it comes to color schemes.

Finally, in addition to color and font size, one large aspect of displays is the user interaction through buttons or cursors. One example brought up in chapter 3 is the Star Trek LCARS interface that uses shadows to give the digital buttons on the screen a sort of depth and animation. This not only makes them feel more life-like but also gives feedback as to whether the button was pressed or not. These types of visual cues that are missed when translating from physical to digital interfaces are key in user interaction and is something that can contribute to a device being amazing or completely unusable.

Chapter 4:

Volumetric projections are very good at portraying information in such a way that humans are comfortable with. Since we see the world in 3D, VP’s allow the user to interact with the information in such a way that mimics their natural perspective. Where this can become an issue, however, is in the realness of the projection. As discussed in chapter 4, VP’s can be very tricky if they are made too realistic because the user might actually think there is something there when in reality there isn’t. While this isn’t all bad for most applications, when something that has to be physical for the safety of the user is made virtual (like a step or floor) this can create circumstances ready for injury.  In addition to safety and trickery, VP’s also have to portray the 3D information in such a way that looks natural and mimics the proportions of regular space. Otherwise the information might seem very abnormal and not as informative.

Chapter 5:

Gestural interfaces are very intuitive for the most part but also have the caveat of moving the entire body to do one single action. While there are seven distinct motions set by physical intuition but also movies and TV, these motions require sustained use of the arms at heights around heart level requiring lots of strength and endurance to keep up. This results in the user getting very tired after a small amount of use. So while gestural interfaces might seem cool, they are mostly just used for futuristic looking interfaces.

Good and Bad Visual Feedback

Doors:

Many doors that I have encountered are very poorly designed in that they don’t indicate which direction they are supposed to be opened or where they are hinged. While this might look good from an aesthetics stand point, it hinders the ability to quickly recognize which side of the door to push or pull and whether or not to push or pull. One example of a very poorly designed door are those entering the UC from the football field entrance. While they do a good job of showing where the door hits a stop and thus whether it will be a push or pull open, they hide their hinges very well and have no physical indicators to persuade users to one side of the door or another. This has on many occasions resulted in me walking right into the door and being immediately brought to a halt because it’s the wrong side. On doors with a turn handle or ones with a push to open bar that has a direction to is, the side to push or pull from is made much more clear.

Assignment: Visual

The assignment is two parts- one, reading chapters 3-5 in Make It So, and two, examples of good and bad visuals.


Readings

Chapter 3: Visual Interfaces

The authors discuss visuals in the context of user interfaces and controls, identifying cinematic cliches such as the heavy use of blue glow, transparencies, and circular screens to suggest futuristic technology. The drivers coming from the needs of film include post-production work, legibility (movie watchers can only read so much text on a screen so fast), and narratives (communicating additional information about the scenario or cultures of of the users, dramatic tension, attractive/entertaining visuals for audiences).

Chapter 4: Volumetric Projection

The volumetric projection, aka projections of massless, moving 3d imagery, is used as a futuristic means of communicating, despite various practical drawbacks (need for stealth/privacy, and need for sorting out eye contact).. Authors address that 2d information representation may be better than 3d and challenges with VP, including that past VP remains very similar across time, and that deviating from the tried-and-true qualities may lead to confusing and failure to fulfill audience expectations.

Chapter 5: Gesture

The authors discuss examples of using gestures to provide input  to a system and challenges associated with their use, given that gestural interface systems need to understand intent and need to be able to be manipulated to do a variety of tasks, many of which are abstract. Minority Report, which we discussed in class, was referenced. The authors list 7 major gestures used in Hollywood, which are intuitive to our understanding of working with tactile objects in the real world (the book says pinch and spread for scaling has no physical analog, but it is very commonly used today for the manipulation of touchscreens). They discuss the limitations of a ‘natural’ user interface working off of gestures- also, in class, we discuss how gestures can differ between cultures, even for gestures that we may consider ‘natural.’

Good and Bad Visuals

Unusual Stop Sign: On my commute, there is a stop sign at a mostly L-intersection that had a second sign beneath it saying “Except for Right Turn” – meaning that those approaching the  T can turn. It is located at a unique condition, where the L-intersection has a fenced off road to one side (which gives it the look of a T-intersection). Given that the area is a bottleneck, this sign encourages that traffic continues to flow, especially since it seems the majority of people do turn right. I have thought it was weird since I first saw it, but I cannot think of a better way to communicate to drivers. It is good to show the STOP, in case the driver is turning left. Then, as the driver prepares to stop, they read “except for right turn” and those turning right keep moving.

3d or 2d: We had a seminar presentation about modelling hazards and infrastructural risks in the event of natural disasters. One student asked the presenter about 3d modelling and topography, and the presenter showed an example of using 3d, but also said that when one works with data in 3d (4d, really, if we are considering time as an integral dimension to these predictive models), the computational lag is so great that it cannot perform under the tight time constraints sometimes needed for natural disaster risk assessment and disaster response. Therefore, working in 3d may actually not be suitable or appropriate, depending on the scope and scale of the problem.

Assignment 7: Sound with Meaning

To develop ‘sound with meaning,’ I wrote a sketch using the tone() function to replicate the ‘wah wah wah’ trombone sound. Sketch and video below.


void setup() {

  tone(7, 293.66, 1000);
  delay(1000);
  noTone(7);
  delay(500);
  tone(7,277.18,1000);
  delay(1000);
  noTone(7);
  delay(500);
  tone(7,261.63,1000);
  delay(1000);
  noTone(7);
  delay(500);
  tone(7,246.94,3000);
  delay(1500);
  noTone(7);
  delay(3000);
}

void loop() {


}


I had a 60 hertz hum with the original power supply I used the first time around. Switching to another power reduced the issue, but it’s still there.

Resources

More background on the Teensy audio library and MQS:

https://melp242.blogspot.com/2020/10/audio-output-on-teensy-4x-boards.html

Note frequencies:

https://pages.mtu.edu/~suits/notefreqs.html

Assignment 7: Sound that has meaning

Description:

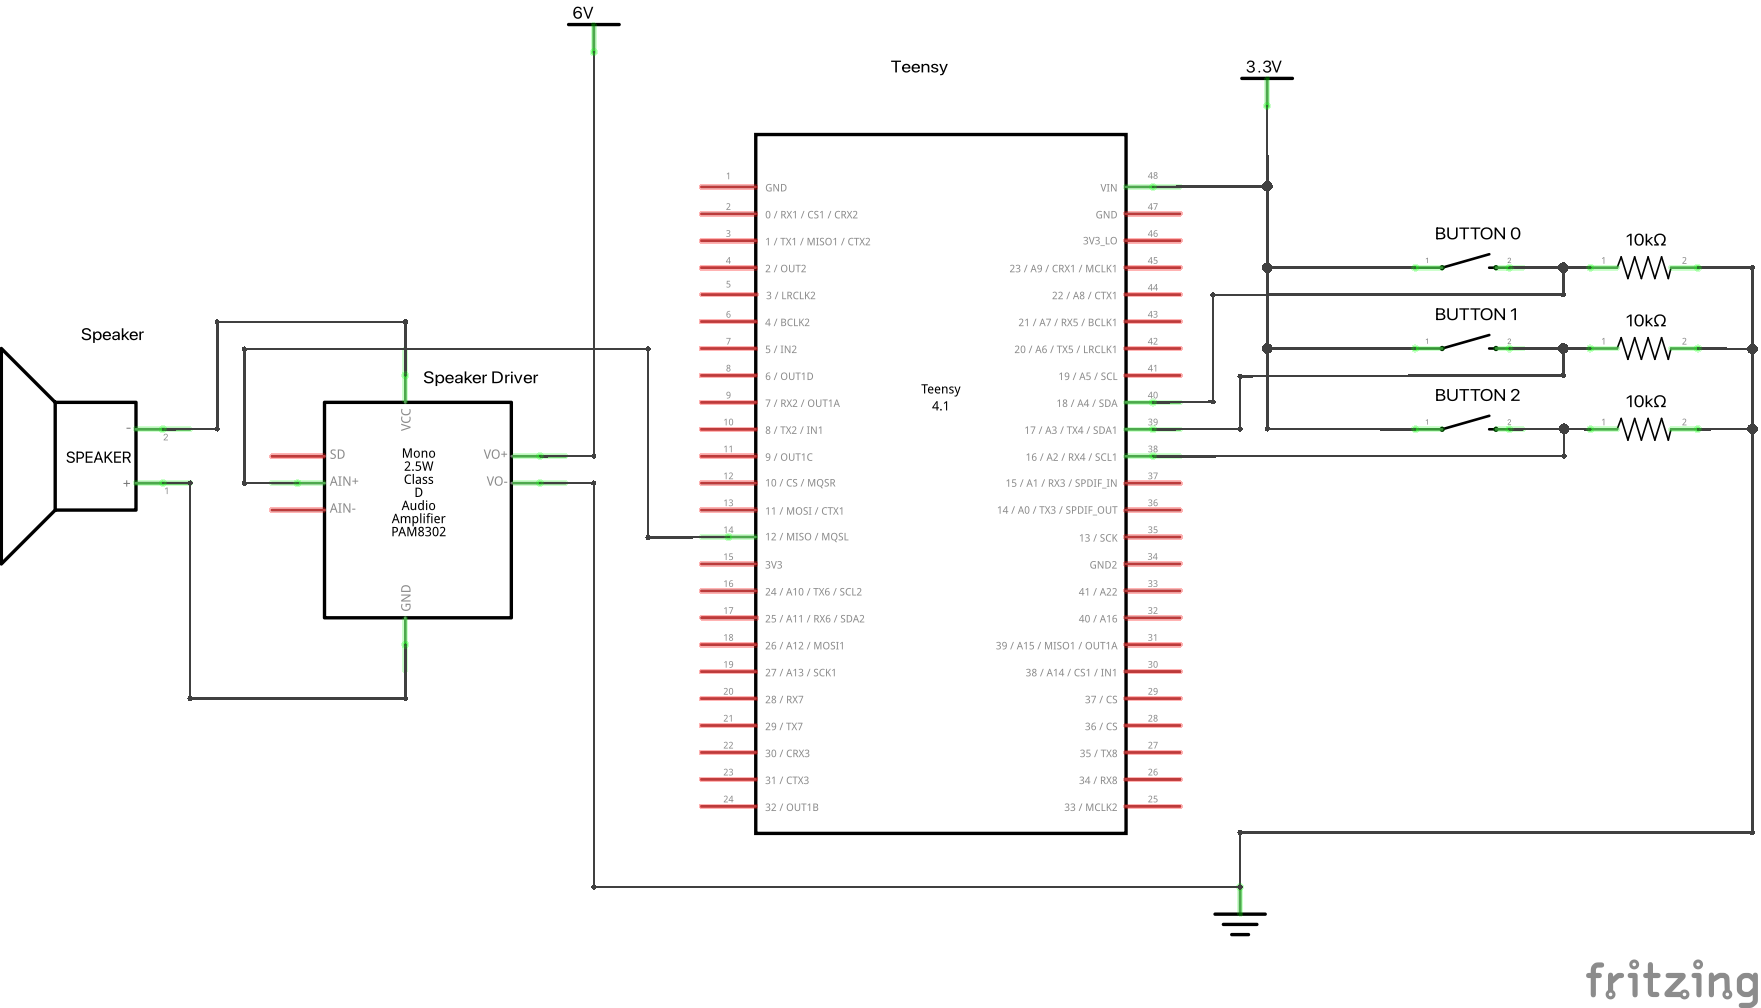
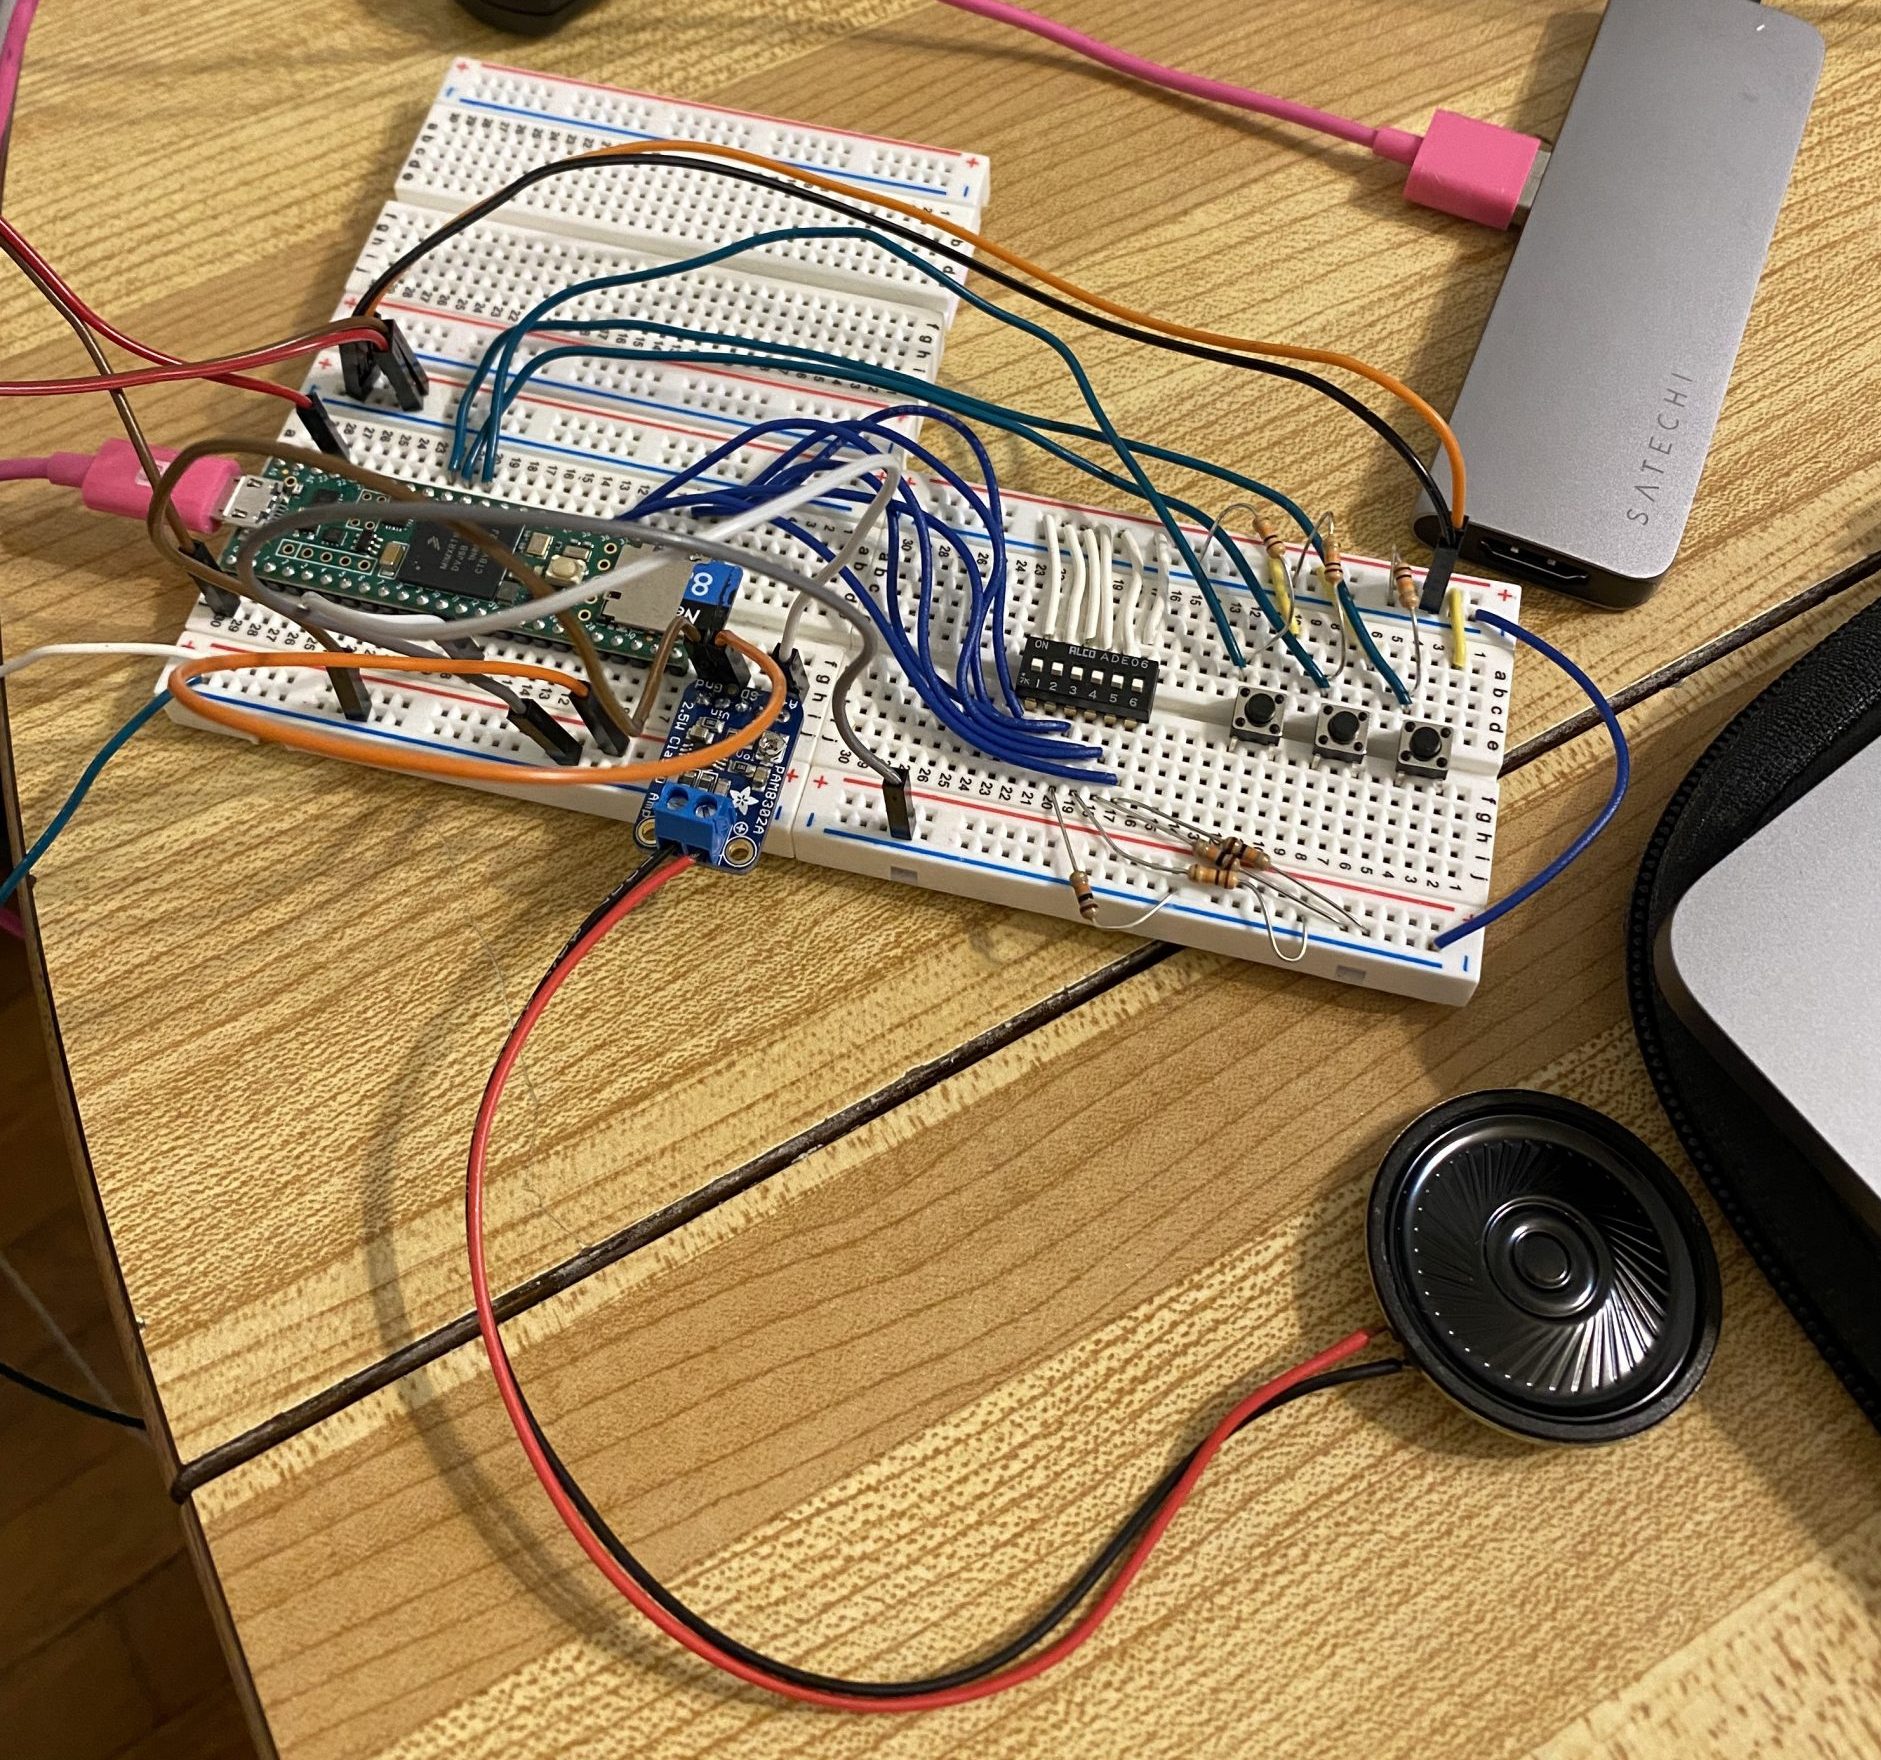
This project was meant to convey emotions through sound by playing a song corresponding to the user’s emotions when a button is pressed. Currently there are only 3 buttons for 3 different sounds/songs but the idea is to be able to hook up more and more as songs stick out as conveying your emotions. The main components for this build are buttons, resistors, a speaker and amplifier, and the Teensy 4.1. When each button is pressed, a certain song corresponding to a different emotion will start to play through. When the song is over, it waits for the next button to be pressed and does not repeat the current sound. When each button is pressed, the current song being played will stop playing and switch to the next song corresponding to the button press. As of now, button 0 plays the Jaws intense sound that signifies a stress and anxiety. Button 1 plays an African Safari game sound that signifies being happy and adventurous. Button 2 plays a relaxing song to convey peace and relaxation.

Video:

Demo Video

Images:

Code:

/*
 * Assignment 7: Sound with Meaning
 * Judson Kyle
 * judsonk
 * 
 * Description: This sketch plays a sound corresponding to the users mood at the
 *              time. Depending on the button pressed, a sound corresponding to
 *              one of three emotions will play. These emotions are intense/stressed,
 *              happy/upbeat, and peaceful/relaxed corresponding to buttons 0, 1,
 *              and 2 respectively. Each sound will only play once through to the
 *              end and not repeat after that.
 */

#include <Audio.h>
#include <Wire.h>
#include <SPI.h>
#include <SD.h>
#include <SerialFlash.h>

AudioPlaySdWav           playWav1;
AudioMixer4              mixer1;         //xy=647,408
AudioOutputMQS           mqs1;           //xy=625,279
AudioConnection          patchCord1(playWav1, 0, mqs1, 0);
AudioConnection          patchCord2(playWav1, 1, mqs1, 1);

#define SDCARD_CS_PIN    BUILTIN_SDCARD
#define SDCARD_MOSI_PIN  11  // not actually used
#define SDCARD_SCK_PIN   13  // not actually used

#define SWITCH0   33
#define SWITCH1   34
#define SWITCH2   35
#define SWITCH3   37
#define SWITCH4   38
#define SWITCH5   39

#define BUTTON0   16
#define BUTTON1   17
#define BUTTON2   18

unsigned long currTime = 0;
unsigned long debounceTime = 0;
volatile unsigned long startTime = 0;

volatile bool DEBOUNCE = false;

int numButtons = 3;

volatile int state = 0;

const char* currFileName = "Shark Attack Shortened.WAV";

void setup(void)
{
  // Wait for at least 3 seconds for the USB serial connection
  Serial.begin (9600);

  AudioMemory(8);

  pinMode(SWITCH0, INPUT);
  pinMode(SWITCH1, INPUT);
  pinMode(SWITCH2, INPUT);
  pinMode(SWITCH3, INPUT);
  pinMode(SWITCH4, INPUT);
  pinMode(SWITCH5, INPUT);

  attachInterrupt(digitalPinToInterrupt(BUTTON0), button0Pressed, CHANGE);
  attachInterrupt(digitalPinToInterrupt(BUTTON1), button1Pressed, CHANGE);
  attachInterrupt(digitalPinToInterrupt(BUTTON2), button2Pressed, CHANGE);

  SPI.setMOSI(SDCARD_MOSI_PIN);
  SPI.setSCK(SDCARD_SCK_PIN);
  if (!(SD.begin(SDCARD_CS_PIN))) {
    // stop here, but print a message repetitively
    while (1) {
      Serial.println("Unable to access the SD card");
      delay(500);
    }
  }

}

void loop (void)
{
  currTime = millis();
  static int prevState = 0;

  if (prevState != state) {
    if (playWav1.isPlaying()) {
      playWav1.stop();
    }
    switch (state) {
      case 0: //Play intense sound
        currFileName = "Shark Attack Shortened.WAV";
        playWav1.play(currFileName);
        printPlayState(currFileName);
        delay(5);
        break;
      case 1: //Play fun/upbeat sound
        currFileName = "African_fun_long.WAV";
        playWav1.play(currFileName);
        printPlayState(currFileName);
        delay(5);
        break;
      case 2: //Play peaceful sound
        currFileName = "With-You-in-My-Arms-SSJ011001.WAV";
        playWav1.play(currFileName);
        printPlayState(currFileName);
        delay(5);
        break;
    }
  }
  prevState = state;
  
  //Update debounce state
  DEBOUNCE = abs(currTime - startTime) < debounceTime;
}

//Button 0 interrupt function
void button0Pressed() {
  if ((digitalRead(BUTTON0) < 1) && !DEBOUNCE) {
    state = 0;
    startTime = currTime;
    DEBOUNCE = true;
  }
}

//Button 1 interrupt function
void button1Pressed() {
  if ((digitalRead(BUTTON1) < 1) && !DEBOUNCE) {
    state = 1;
    startTime = currTime;
    DEBOUNCE = true;
  }
}

//Button 2 interrupt function
void button2Pressed() {
  if ((digitalRead(BUTTON2) < 1) && !DEBOUNCE) {
    state = 2;
    startTime = currTime;
    DEBOUNCE = true;
  }
}

//Print out the current cong being played or return an error message if the song isn't being played
void printPlayState(const char* fileName) {
  if (!playWav1.isPlaying()) {
    Serial.print("Error playing: ");
    Serial.println(fileName);
    delay(5);
  }
  else {
    Serial.print("Playing: ");
    Serial.println(fileName);
    delay(5);
  }
}

Electrical Schematic:

Assignment 7: Sound with Meaning – James Kyle

Concept:

For my sound with meaning, I tried to recreate the jaws “duuuuuuuuuh…duh” tune on an interrupt as an indication that someone is approaching. I tried creating my own tune using the tone() function and playing F1 for 1 second and then and F1# for a quarter second but it wasn’t realistic enough for me. I ended up using an SD card loaded with some ambient noise and a clip from the Jaws theme song to indicate the states of the device. When the button is pressed, it triggers the Jaws snippet and then goes back to ambient noise once the tune is finished.

Demo Video:

Circuit Diagram:

Woes:

I faced a lot of issues getting the sound to play from the amplifier and here are some things I learned. First and foremost, the amplifier needs to be tuned to the correct volume so that you can clearly hear you sound. When it wasn’t tuned correctly, I would get a lot of static or muffled versions of the sound I was trying to play. I also ran into the problem of playing the tunes too fast which gave me a beeping machine error type f sound. From experimenting with the circuit and code a little, I have pinned this problem down to playing tunes too fast in succession (not waiting for the tunes to finish before playing it again).


Assignment 7: sound with meaning

For this assignment, using a Teensy, generate sound-over-time and sound-by-interrupt that conveys meaning, feeling, or specific content.  You can generate sound with a speaker or a kinetic device (ex: door chime) or some other novel invention.  I should be able to figure out what I’m hearing and what it means with no advise/help.

This is a good time to use push buttons or other inputs to trigger sound and another input to define the type of sound.

This is also where interrupts are very useful.

My  phone *doesn’t* do this well.  If I am listening to music and someone rings my doorbell at home, my phone continues to play music *and* the doorbell notification sound at the same time.  What it should do is stop the music, play the notification, then give me the opportunity to talk to the person at the door, then continue playing music.

Due next class.

Reading Assignment: Make It So, 3/17

Reading assignment: Chapters 6 and 10 Of Make it So

Chapter 6: Sonic Interfaces

The authors establish 2 major categories for sonic interfaces: sonic output and voice interfaces. The chapter covers outputs including considerations for effects such as alarms, ambient sound such as buzzing or clattering made by machinery, and directional sound. Topics around interfaces deal with music and multiple types of voice interfaces, including more sophisticated conversational interfaces. I agree that the more sophisticated the voice interface, the more that is expected out of it (for example, when dealing with the automated voice when calling insurance or the bank).  Still, I’m surprised that there still is not a feature that allows automated systems to measure how annoyed a person is getting with the system (for example, syllables becoming more terse, or volume increasing) and getting the caller over to a human associate as quickly as possible. Perhaps everyone gets terse and annoyed, so there’s no need to measure it, or rank people by the amount that the automated system annoys them.

—-

Chapter 10: Communication

I was interested to see authors using terms “asynchronous” and “synchronous,” which I’m sure have been used in discussions around communication for a long time, but I only started seeing that term at the start of COVID-19 to make a distinction between a zoom call and a zoom recording. The chapter identifies the functions needed in both categories of communication: composing, playback, activation, connecting between caller and receiver, connection monitoring, ending a call. Other considerations addressed include volume control, accompanying visuals/video, mute functions, language translation, and disguises. One of the noted opportunities- subtle appearance alteration (lighting correction, blurred background, etc)- is realized today with features on Zoom.

One of the subjects addresses is the complexities of language translation- it reminded me of an article I read about the challenges of translating Twenty Fragments of a Ravenous Youth, written in Chinese by  Xiaolu Guo. The author describes the language of the book as “slangy, raw Chinese” and the article discussed the difficulties of conveying that tone and the cultural connotations associated with it into English. By comparison, machines attempting to translate in real time would be at an even greater disadvantage. Perhaps the translate-in-real-time would be forced to restrict itself to austere and utilitarian function, or risk completely missing the boat.


Assignment 6 Update

With the wires back on the fan motor, I confirmed that code works in two ways: 1) when the humidity sensor detects that the average humidity is less than 50% the fan turns on, and 2) when the average humidity is less than 50% the fan turns off. Next, with condition 2 as the base conditions, I needed to test if the fan will turn on when the humidity sensor detects that the average humidity has increased to above 50%.

With my first version of the code, the fan was not responding the way I wanted to the humidity sensor readings.

This second version of the code using millis() was successful:

#include <DHT.h>
#include <DHT_U.h>
#define DHTPIN 2        // sensor DHT22 data connected to Arduino pin 2
#define DHTTYPE DHT22  // using sensor DHT22
DHT dht(DHTPIN, DHTTYPE);  //dht library
int chk;
int humid; //stores humidity


//data smoothing
const int numReadings = 5;
int humReadings [numReadings];
int humReadIndex = 0;
int humTotal = 0;
int humAverage = 0;
int inputPin = 2; //put dht 222 sensor pin here
//detecting sensor change
int last;
//response to sensor change


//for fan and motor
int speedPin = 5;
int dir1 = 4;
int dir2 = 3;
int mSpeed = 0;
unsigned long lastReadTime = 0;

void setup() {
  // put your setup code here, to run once:
  //pins for fan and motot
  pinMode(speedPin, OUTPUT);
  pinMode(dir1, OUTPUT);
  pinMode(dir2, OUTPUT);


  //dht sensor
  dht.begin();

//data smoothing for humidity
  for (int thisReading = 0; thisReading < numReadings; thisReading++) {
    //tempReadings[thisReading] = 0;
    humReadings[thisReading] = 0;
  }
  Serial.begin(9600);

  lastReadTime = millis();
}

void loop() {
  //delay(1000);

  if ((millis() - lastReadTime) >= 10000UL) {
    //Serial.println(lastReadTime); //used to check millis 
    //Serial.println(millis());//used to check millis
    lastReadTime = millis();
    humid = dht.readHumidity();
    Serial.println(humid); //prints the current sensor reading
    humTotal = humTotal - humReadings[humReadIndex];
    humReadings[humReadIndex] = humid;
    humTotal = humTotal + humReadings [humReadIndex];
    humReadIndex = humReadIndex + 1;
    if (humReadIndex >= numReadings) {
      humReadIndex = 0;
    }
    humAverage = humTotal / numReadings;
    Serial.println(humAverage);

  }


  if (humAverage > 50)
  {
    digitalWrite(dir1, HIGH);
    digitalWrite(dir2, LOW);
    analogWrite(speedPin, 225);
  }else
  {
    digitalWrite(dir1,HIGH);
    digitalWrite(dir2,LOW);
    analogWrite(speedPin, 0);
  }
}

I started in a room with humidity readings less than 50 (no fan motion). I turned on hot water in the bathroom, and after a few minutes, moved the sensor and fan into that room. As the sensor’s humidity reading rose, so did the average humidity reading. Once the average humidity reading rose above 50, the fan began to turn. Then I moved the sensor and fan back into the original room, and waited for the average humidity to fall. When the average humidity fell below 50 again, the fan motor turned off.

Note on power and troubleshooting:

I originally had both the fan and the humidity sensor connected to the rail. This worked the first time I tried it, but the sensor began to send back 0 readings after a few test runs. I had to connect the DHT22 sensor to the arduino and the fan to the rail (with 5V power supply connected to 9V battery) for both the sensor and the fan to work properly. My clue was that the LED light on the power supply started bright and dimmed as the code started running.

Assignment 6 – Jud

Description:

This circuit turns the data that the sound sensor gets into an angle based off of a moving average of the amplitude of the data received. The data from the sensor captures the raw sound waves from the air and sends them to the arduino which has a very spiky and unsmooth nature. In addition, the data transitions for increasing to decreasing very rapidly so a traditional filter or tracking the change in the data does not work well at all. Instead, I have implemented a moving average method where the code tracks a certain number of data points, calculates the max and min of the data, and then uses the difference between these values as the new data. This is then multiplied by some multiplier to increase the variance and translated into an angle for a servo to travel to. The algorithm for calculating the angle works wonders while the servo isn’t connected, however, as depicted in the video, the noise of the servo creates an uncontrollable feedback look that results in the servo moving out of control. Regardless, the system responds to noise in the way that it should translating a noise in the environment into an angle for the servo to move to.

Video:

Code:

#include <Servo.h>

//Define Accelerometer Variables for pins
#define MICROPHONE    A0
#define SERVO_PIN     9

Servo servo;

double servoAngle = 0;

double alpha = 0.9;
double multiplier = 5;

//Array to hold data for moving average calculation
double speakerData[100]; // {0, 1, 2, 3, 4, 5, 6, 7, 8, 9}

double speakerLevel = 0;
double prevSpeakerLevel = 0;
double maxSpeakerLevel = 200;
double minSpeakerLevel = 50;


void setup() {
  //Setup pins as inputs
  pinMode(MICROPHONE, INPUT);

  //Create servo object
  servo.attach(SERVO_PIN);
  
}

void loop() {

  //Update moving average array
  for (int i = (sizeof(speakerData)/sizeof(speakerData[0]) - 1); i >= 0; i--) {
    if (i != 0) {
      speakerData[i] = speakerData[i - 1];
    }
    else {
      speakerData[i] = analogRead(MICROPHONE);
    }
  }

  double MIN = findMin();
  double MAX = findMax();

  speakerLevel = MAX - MIN;
  speakerLevel = multiplier*(alpha*speakerLevel + (1 - alpha)*prevSpeakerLevel);  //Filter data

  //Put upper and lower bounds on data
  if (speakerLevel >= maxSpeakerLevel) {
    speakerLevel = maxSpeakerLevel;
  }
  else if (speakerLevel <= minSpeakerLevel) {
    speakerLevel = minSpeakerLevel;
  }

  servoAngle = 180*(speakerLevel - minSpeakerLevel)/(maxSpeakerLevel - minSpeakerLevel);
  servo.write((int) servoAngle);

  prevSpeakerLevel = speakerLevel;
  
}

int findMin() {
  double minimum = 0;
  for (int i = 0; i < sizeof(speakerData)/sizeof(speakerData[0]); i++) {
    if (speakerData[i] < minimum || i == 0) {
      minimum = speakerData[i];
    }
  }
  return minimum;
}

int findMax() {
  double maximum = 0;
  for (int i = 0; i < sizeof(speakerData)/sizeof(speakerData[0]); i++) {
    if (speakerData[i] > maximum) {
      maximum = speakerData[i];
    }
  }
  return maximum;
}