Debouncing inputs

(CC0 image from user zimt2003 via pixabay)
When you push on a small button, such as a tactile button or limit switch, you can feel and hear its internal parts moving. On a human scale, you can hear it click when you push it, and then unclick when you let go. But that’s not the whole story.
The problem
The very small metal parts inside the switch are likely not simply clicking and unclicking once, moving from one definite state of touching to a different definite state of not-touching or vice versa. Instead, the tiny metal pieces can act as bouncy springs, jumping back and forth between connected and disconnected (touching and not touching) with a very high frequency for a bit of time until they settle on their final state.
What if you wanted to count the number of button pushes in software? To the Arduino, which can count things very fast, it might see the switch go on, then off, then on again in less than a millisecond—and it would then think, naturally, that you pushed the switch twice. Now there’s a problem: you meant to push the switch once, but it was hopping back and forth very fast so the Arduino thought you pushed it, let go, and pushed it again.
While the switch is hopping back and forth bewteen states, it is said to be “bouncing,” and there are two major approaches you can use to “debounce” it: hardware, and software.
Hardware debouncing
Hardware debouncing means building something additional into the switch/button circuit that will electrically smooth out the bouncing signal. Unlike the other passive electrical components we’ve used (such as resistors and LEDs), we’ll need to build a circuit that has some specific response to time.
The circuit we’ll build combines a part we’re familiar with (a resistor) with a part that’s new to us: a capacitor. These are electronic components that are designed to store up a small amount of energy which can then be released later, like very small batteries. We will build a circuit that takes advantage of the fact that capacitors can’t instantly charge up or discharge: therein lies the time element of the circuit.
Our basic switch circuit without debouncing looks like this:
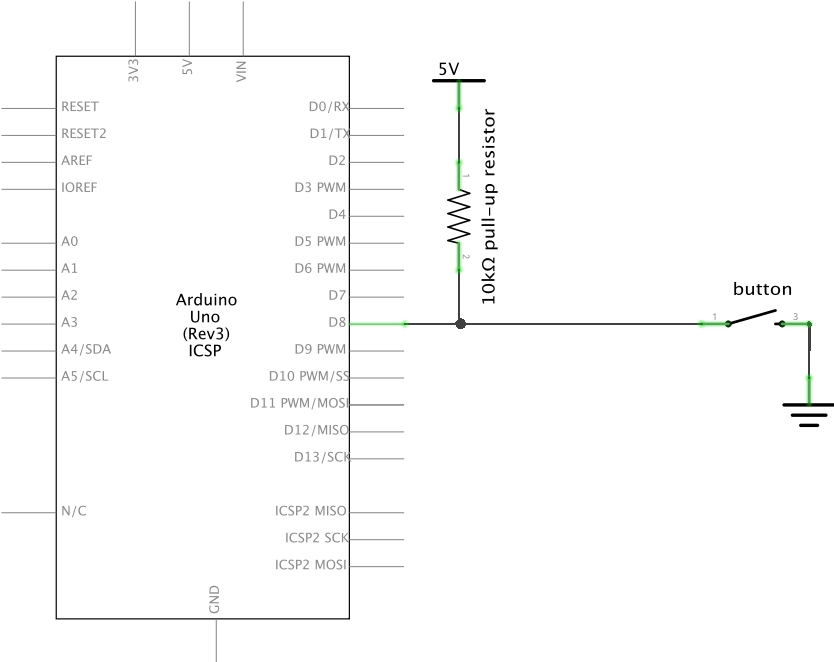
It’s a basic switch/button input circuit with a pull-up resistor (when the button is not pressed, a digitalRead() of that pin will return HIGH).
The new-and-improved, hardware-debounced circuit adds two new components: a 1µF capacitor, and a 1kΩ resistor, in the following configuration:
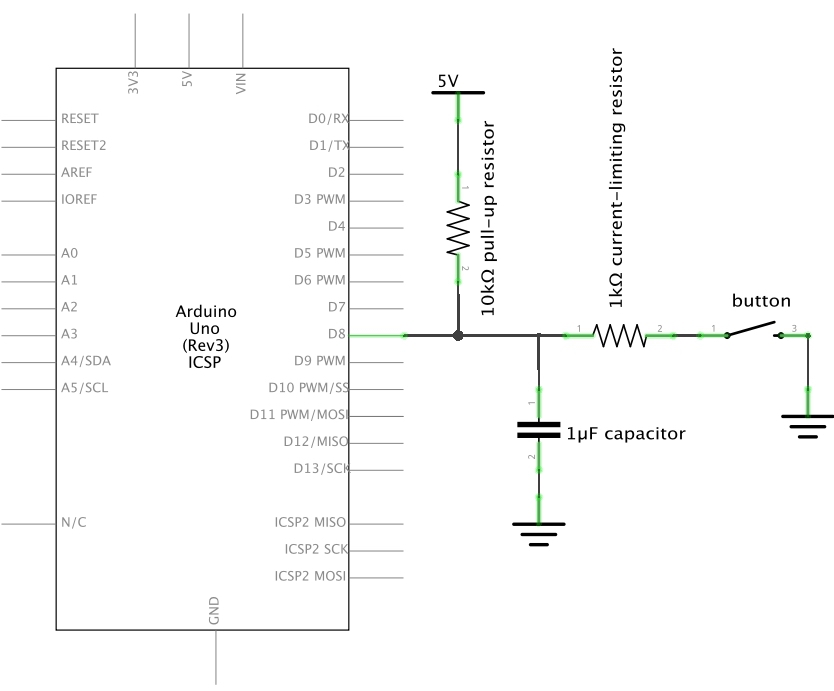
If this button is opened and closed at a high rate (as is typical for the first ~millisecond after a button is pressed), those rapidly-changing signals will be greatly attenuated (reduced) by the capacitor in the circuit. An explanation as to why is beyond the scope of this tutorial, but a good starting point is this Wikipedia article on low-pass filters.
Software debouncing
Debouncing in software is easier than hardware in the sense that you don’t need to build any additional components—but it can also somewhat reduces the legibility of your code and introduce timing difficulties if you’re not careful.
The simplest and laziest software debouncing comes from knowing that all of the “bounce” happens in the handful of milliseconds after the button opens or closes, and simply ignoring new inputs/outputs during that time with a short delay():
if (digitalRead(BUTTONPIN) == HIGH){
    delay(3);
    // whatever command(s) should happen when the button is pressed
}
If a delay() like this is acceptable in your code (and in many cases it will be), then that alone should achieve the intended outcome.
A slightly more complete version of the above might modify a boolean variable called buttonState, and then some other routine in the loop() would change different outcomes based on that variable’s state:
if (digitalRead(BUTTONPIN) == HIGH){
    delay(3);
    buttonState = HIGH;
}
else {
    buttonState = LOW;
}
Pasted below is a more sophisicated approach. Note the Arduino royalty who worked on it over the years: David Mellis, one of the Arduino project founders wrote it originally, and then Limor Fried (founder of Adafruit) modified it.
It does not use any delay() statements but the extra code required to work around that is significant! Sourced from the Arduino project site. This sketch accomplishes something pretty commonly needed: turning a momentary pushbutton into an on/off switch, what’s called a “flip flop” in electronics. Pushing the button will flip buttonState high, and pushing it again will flip it low.
Note that like in the code snippet above, the “is the button pressed?” detector in this code modifies a boolean variable (buttonState) rather than directly switching the LED itself. This is often the preferred way of structuring code.
/*
  Debounce

  Each time the input pin goes from LOW to HIGH (e.g. because of a push-button
  press), the output pin is toggled from LOW to HIGH or HIGH to LOW. There's a
  minimum delay between toggles to debounce the circuit (i.e. to ignore noise).

  The circuit:
  - LED attached from pin 13 to ground
  - pushbutton attached from pin 2 to +5V
  - 10 kilohm resistor attached from pin 2 to ground

  - Note: On most Arduino boards, there is already an LED on the board connected
    to pin 13, so you don't need any extra components for this example.

  created 21 Nov 2006
  by David A. Mellis
  modified 30 Aug 2011
  by Limor Fried
  modified 28 Dec 2012
  by Mike Walters
  modified 30 Aug 2016
  by Arturo Guadalupi

  This example code is in the public domain.

  http://www.arduino.cc/en/Tutorial/Debounce
*/

// constants won't change. They're used here to set pin numbers:
const int buttonPin = 2;    // the number of the pushbutton pin
const int ledPin = 13;      // the number of the LED pin

// Variables will change:
int ledState = HIGH;         // the current state of the output pin
int buttonState;             // the current reading from the input pin
int lastButtonState = LOW;   // the previous reading from the input pin

// the following variables are unsigned longs because the time, measured in
// milliseconds, will quickly become a bigger number than can be stored in an int.
unsigned long lastDebounceTime = 0;  // the last time the output pin was toggled
unsigned long debounceDelay = 50;    // the debounce time; increase if the output flickers

void setup() {
  pinMode(buttonPin, INPUT);
  pinMode(ledPin, OUTPUT);

  // set initial LED state
  digitalWrite(ledPin, ledState);
}

void loop() {
  // read the state of the switch into a local variable:
  int reading = digitalRead(buttonPin);

  // check to see if you just pressed the button
  // (i.e. the input went from LOW to HIGH), and you've waited long enough
  // since the last press to ignore any noise:

  // If the switch changed, due to noise or pressing:
  if (reading != lastButtonState) {
    // reset the debouncing timer
    lastDebounceTime = millis();
  }

  if ((millis() - lastDebounceTime) > debounceDelay) {
    // whatever the reading is at, it's been there for longer than the debounce
    // delay, so take it as the actual current state:

    // if the button state has changed:
    if (reading != buttonState) {
      buttonState = reading;

      // only toggle the LED if the new button state is HIGH
      if (buttonState == HIGH) {
        ledState = !ledState;
      }
    }
  }

  // set the LED:
  digitalWrite(ledPin, ledState);

  // save the reading. Next time through the loop, it'll be the lastButtonState:
  lastButtonState = reading;
}
