With this project, we set out to design and build a device to help an older person in the Pittsburgh community. After an initial meeting with Gary (the older person who we partnered with), we decided to create a way to help people who are recovering from a stroke to quantitatively measure the resulting strength differences between both sides of their body. We spent several weeks creating a prototype, and received lots of valuable feedback that ultimately led us to this final product.
What We Built
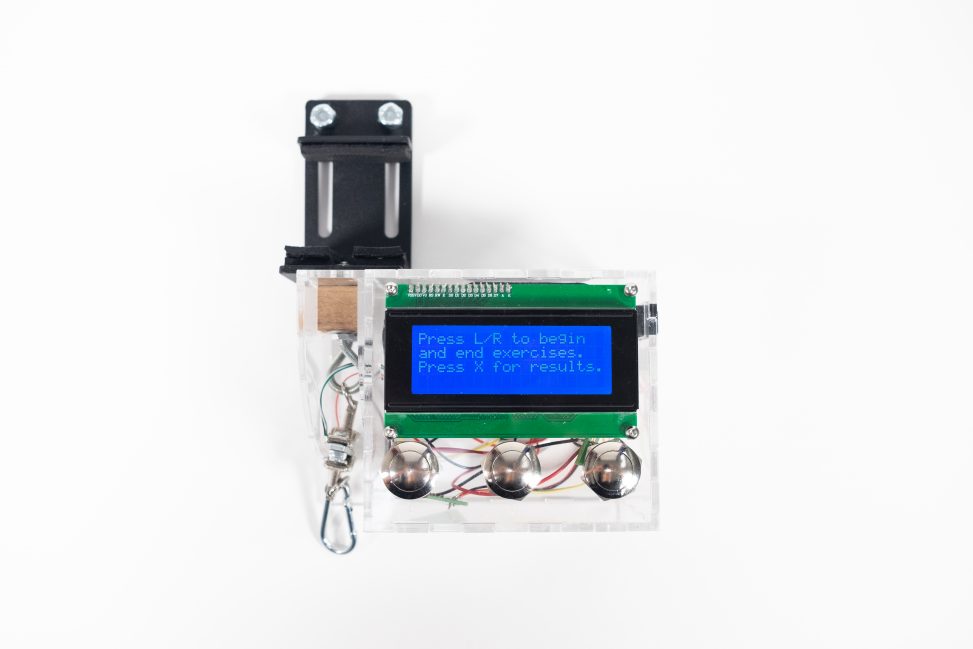
We created a device that enables users to perform several different physical exercises such as bicep curls, lateral raises, and many other resistance band exercises in a home gym setting. They are then able to access information on their performance including max weight, the number of repetitions, and how their left and right sides compare to each other. To accomplish this, we decided on anchoring a sensor connected to a resistance band to the base of a door since we saw this as a convenient location that everyone would have in their homes. Adjacent to the sensor is an interface that users can use to see the results of their exercises.
The device has a main display that welcomes the user and then prompts them to begin an exercise on either their left or right side. Once a side is selected, there is a brief countdown to allow the user to get into position and begin the exercise. After the exercise is completed, the user can either perform another exercise on the other side or view their results at any time.
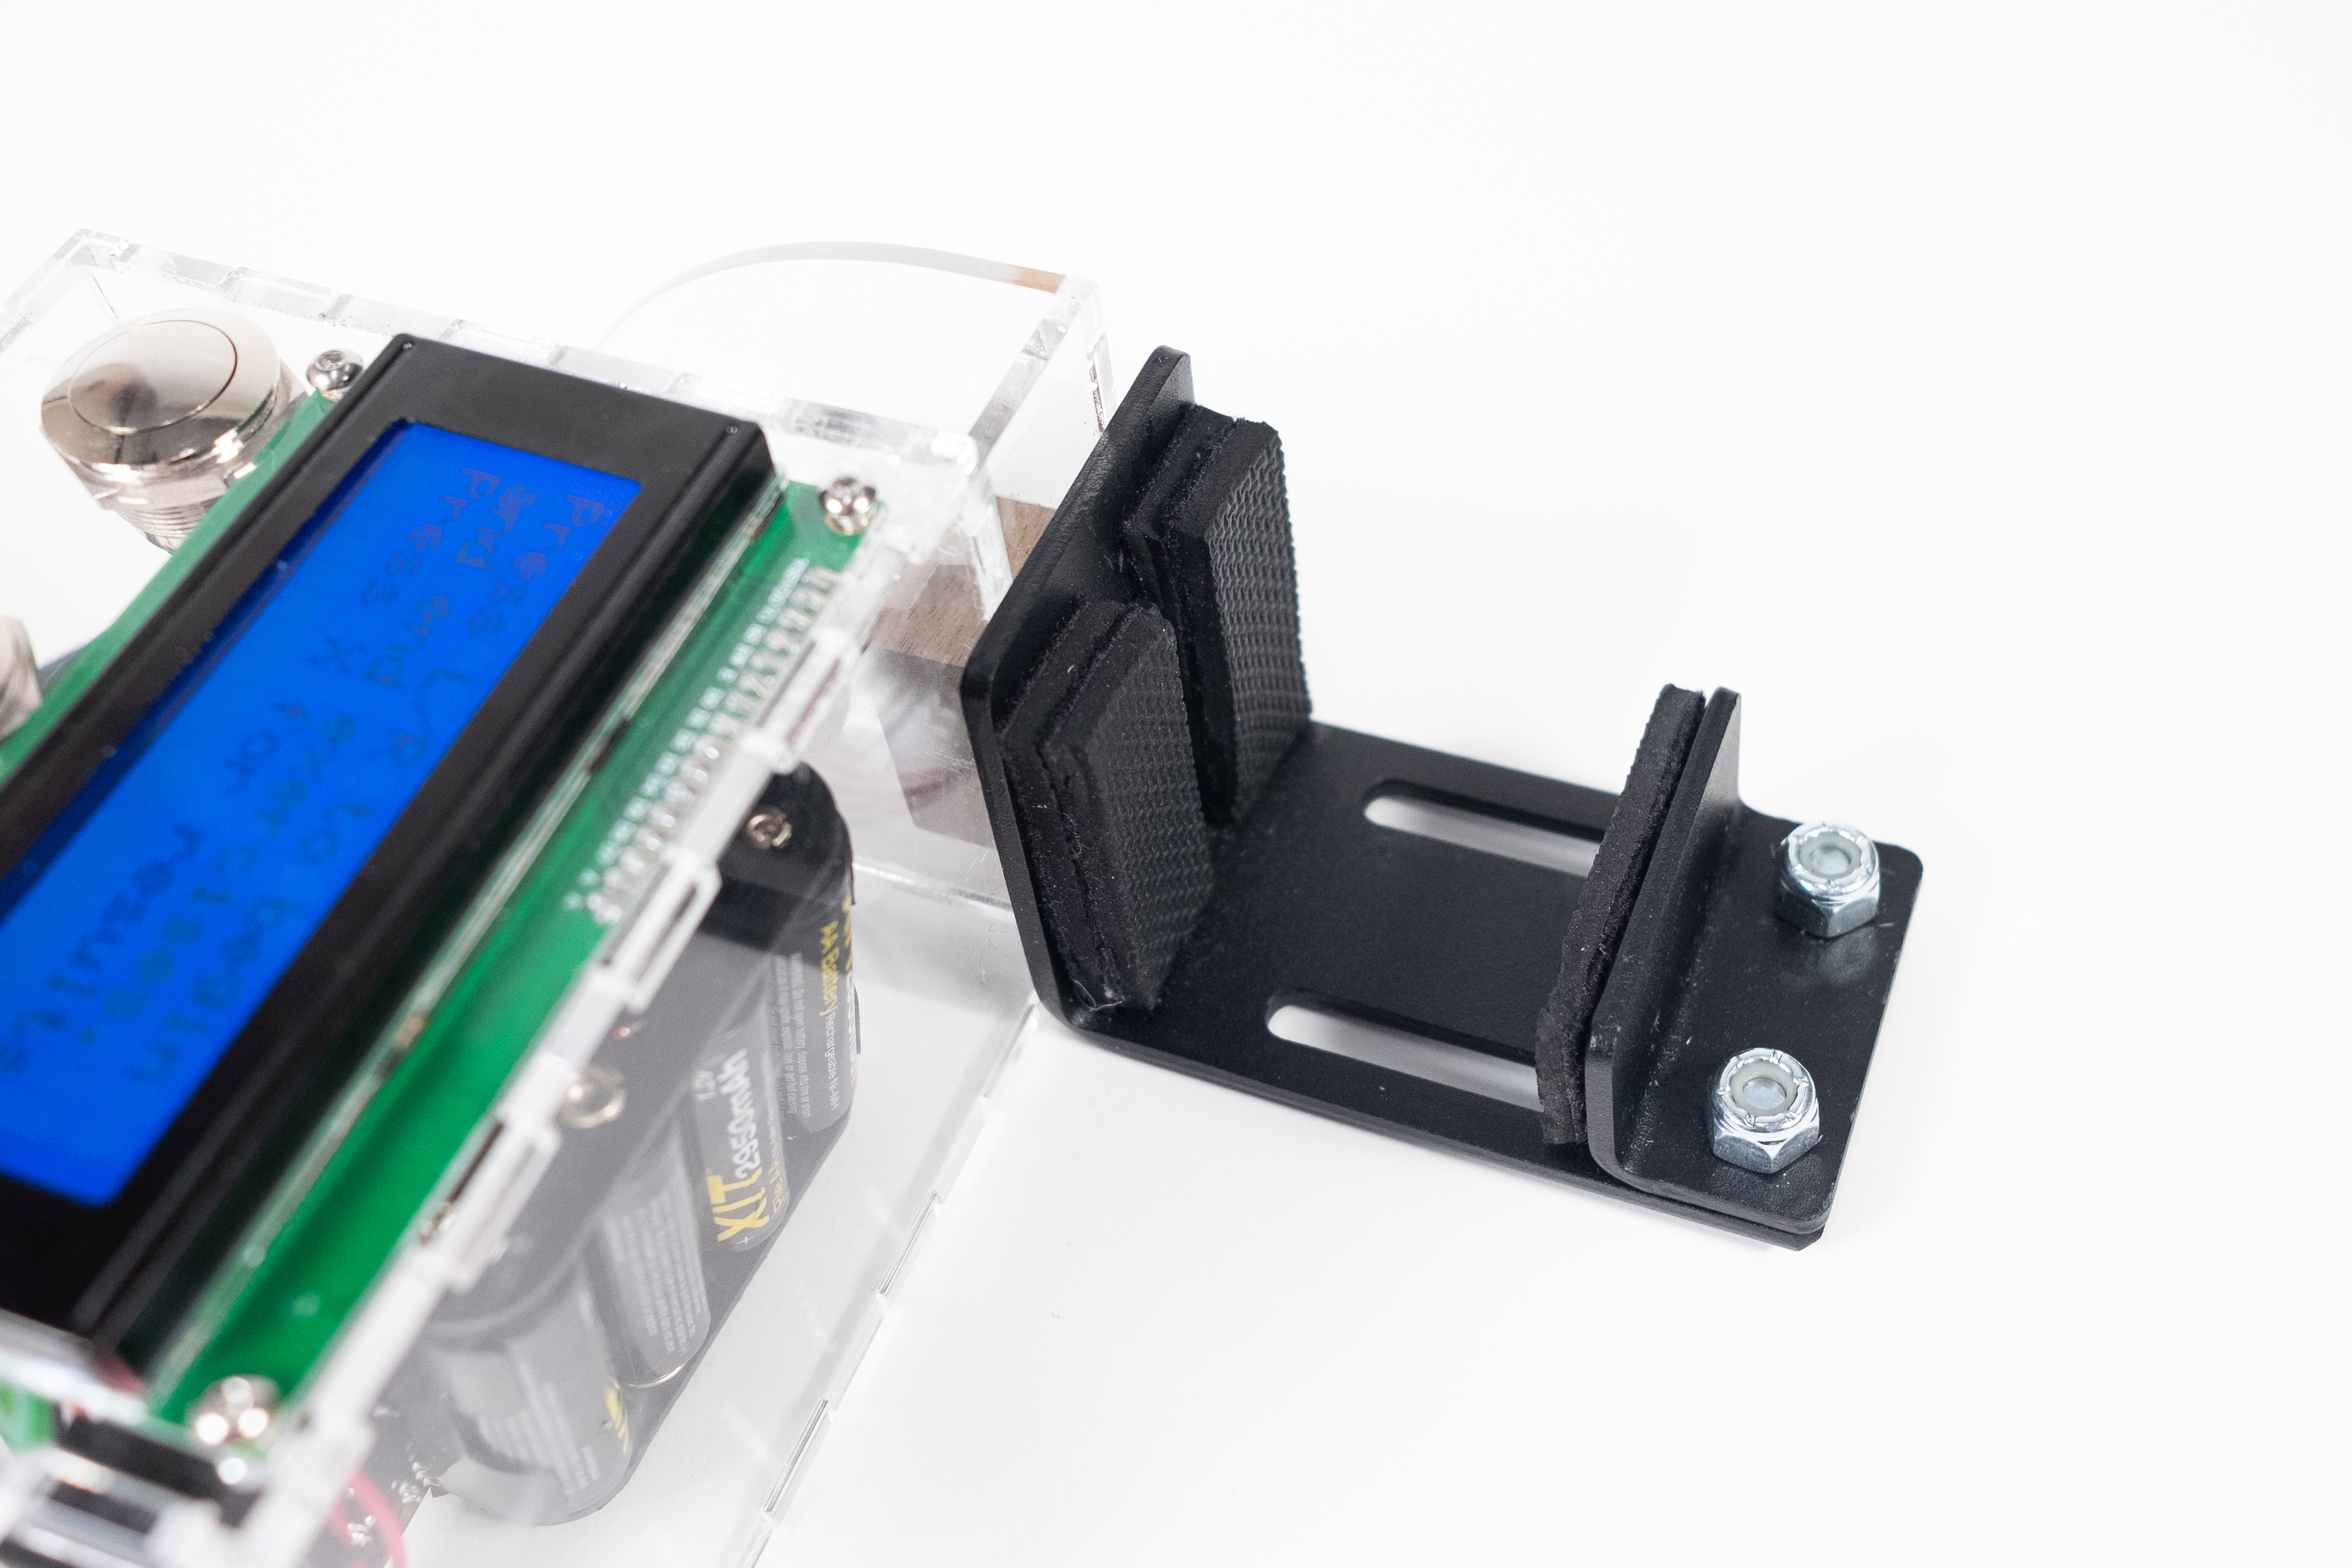
There is an adjustable metal bracket that allows the device to be anchored underneath doors of varying widths. Foam/rubber pads protect the door and prevent the device from sliding horizontally along the bottom of the door.
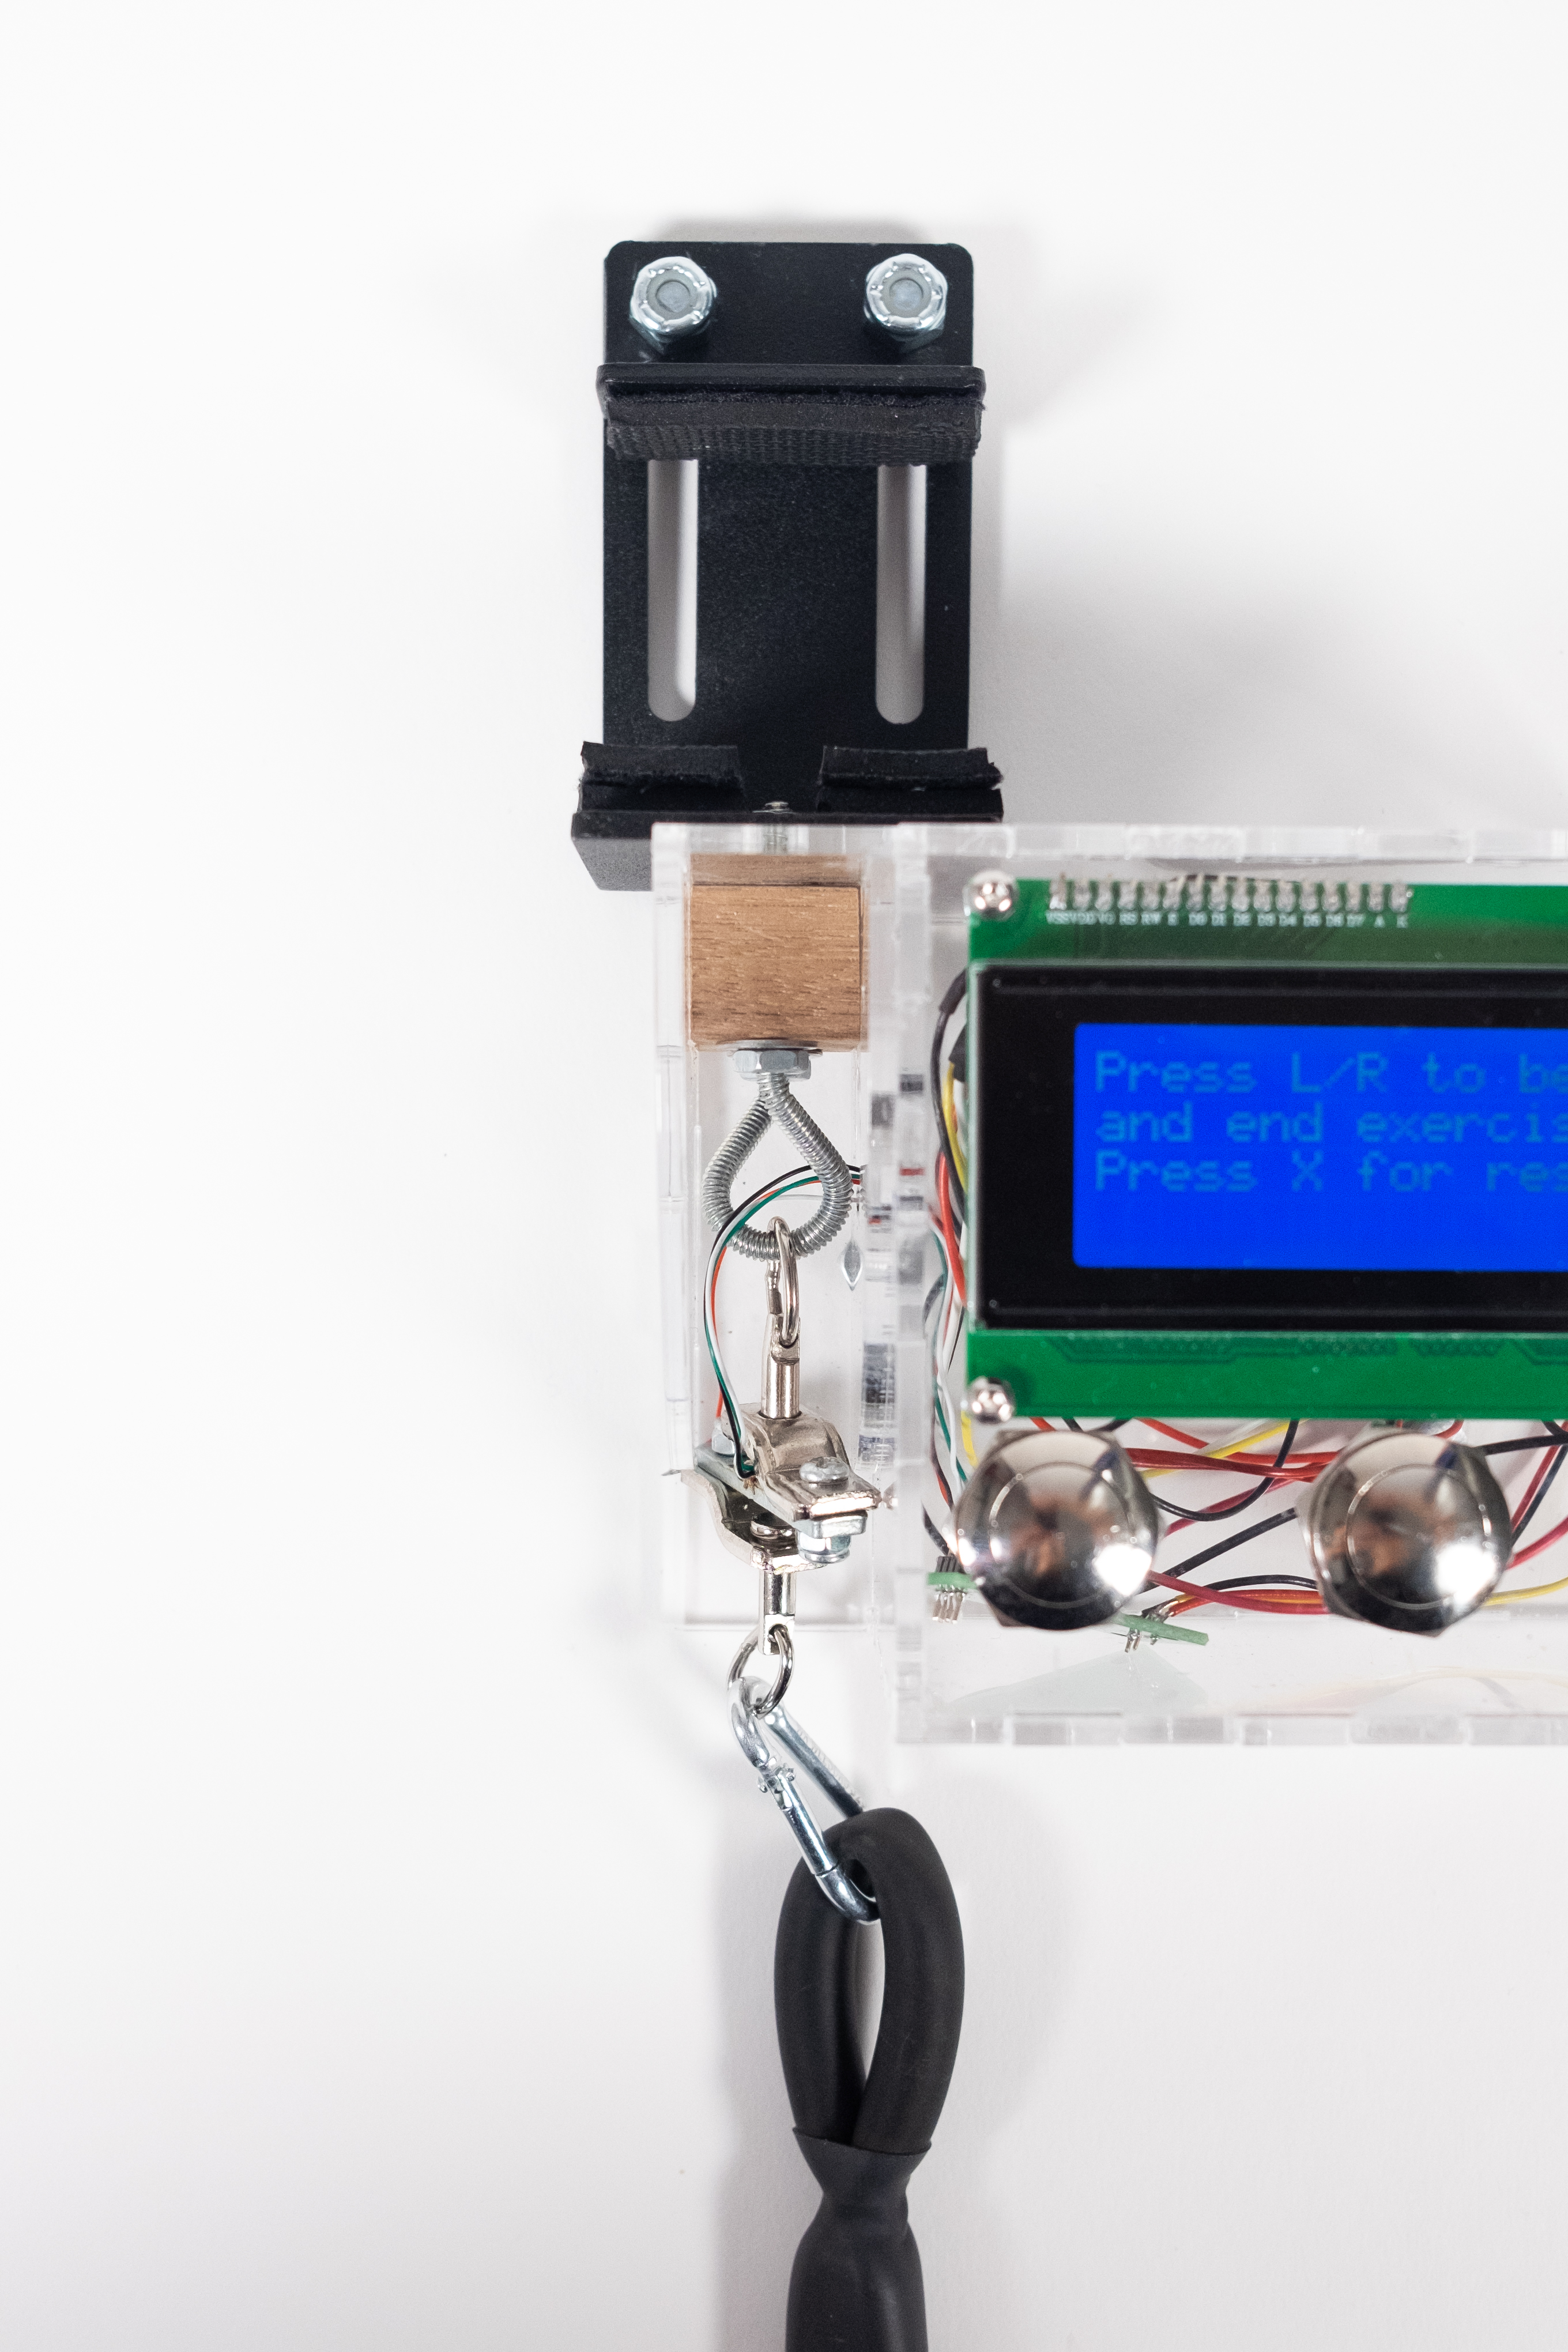
Connected directly to the metal bracket is a load cell that measures the force pulling on it from a resistance band. The load cell is connected in such a way that it can pivot in a 90 degree arc allowing for many more exercises to be done.
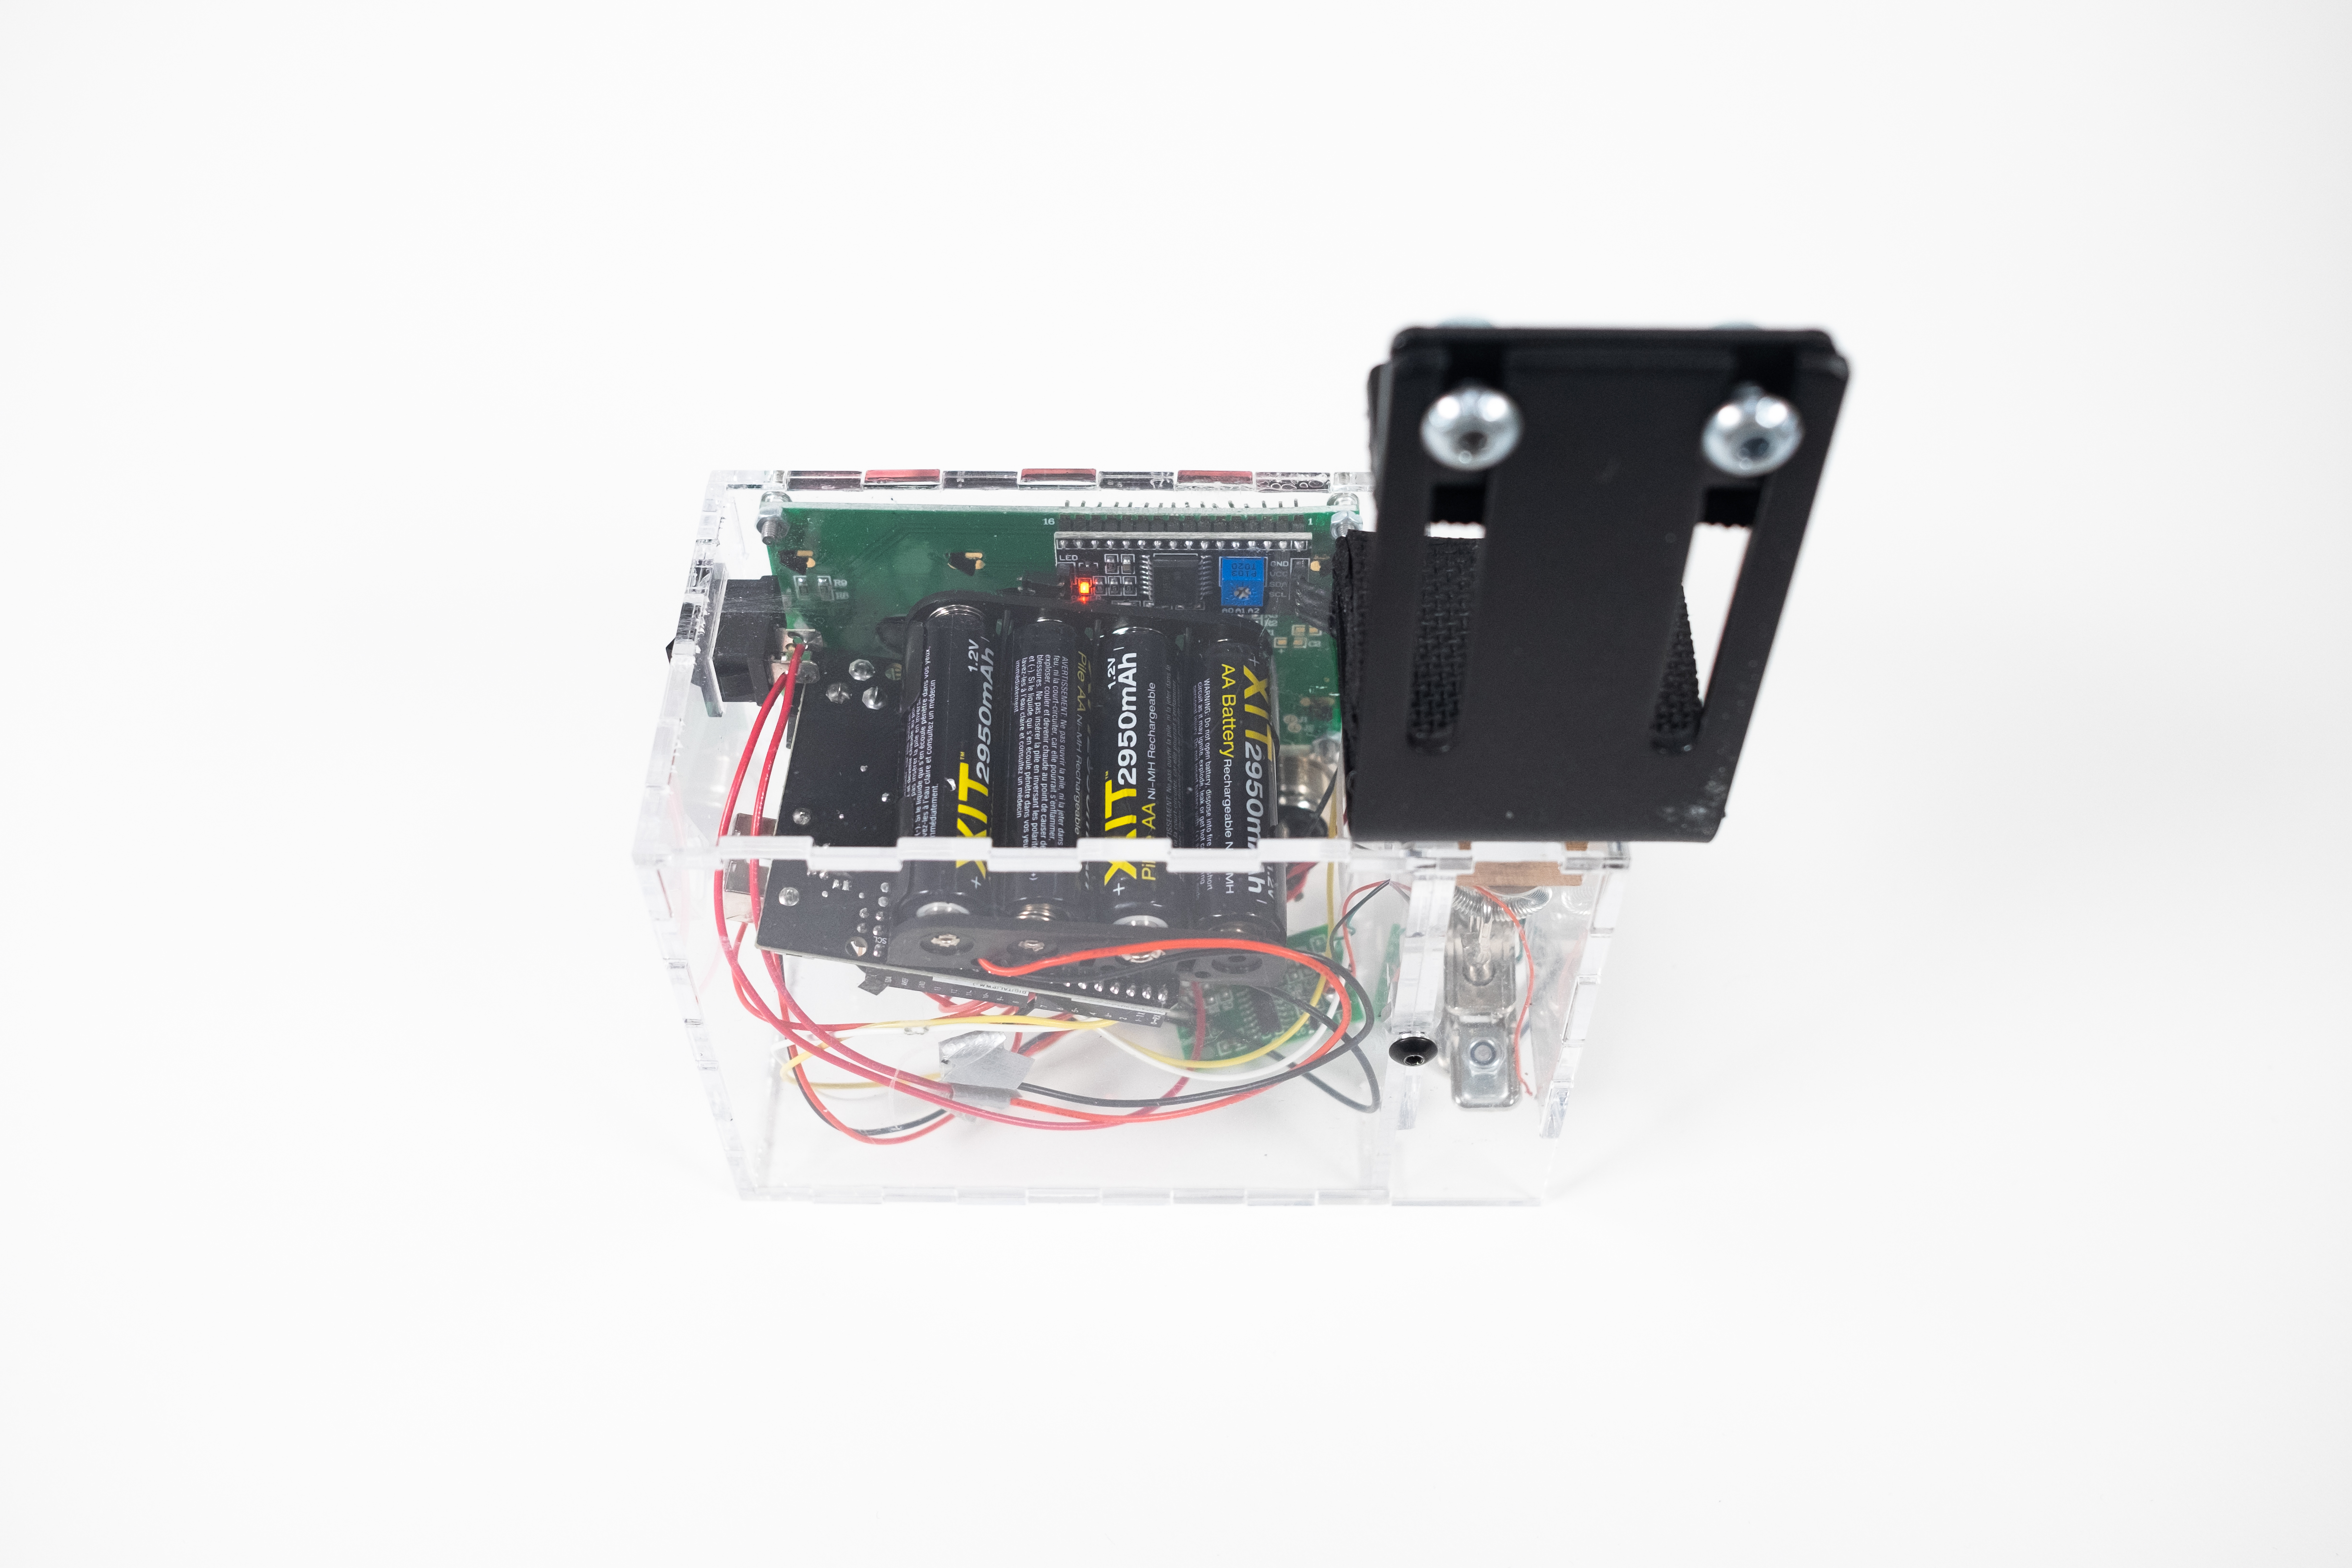
On the bottom side of the device is a removable panel that gives users access to the battery holder in order to change batteries once they are worn out. Additionally, to save battery, there is an on/off switch on the side of the device so that the Arduino only draws power when the device is in use.
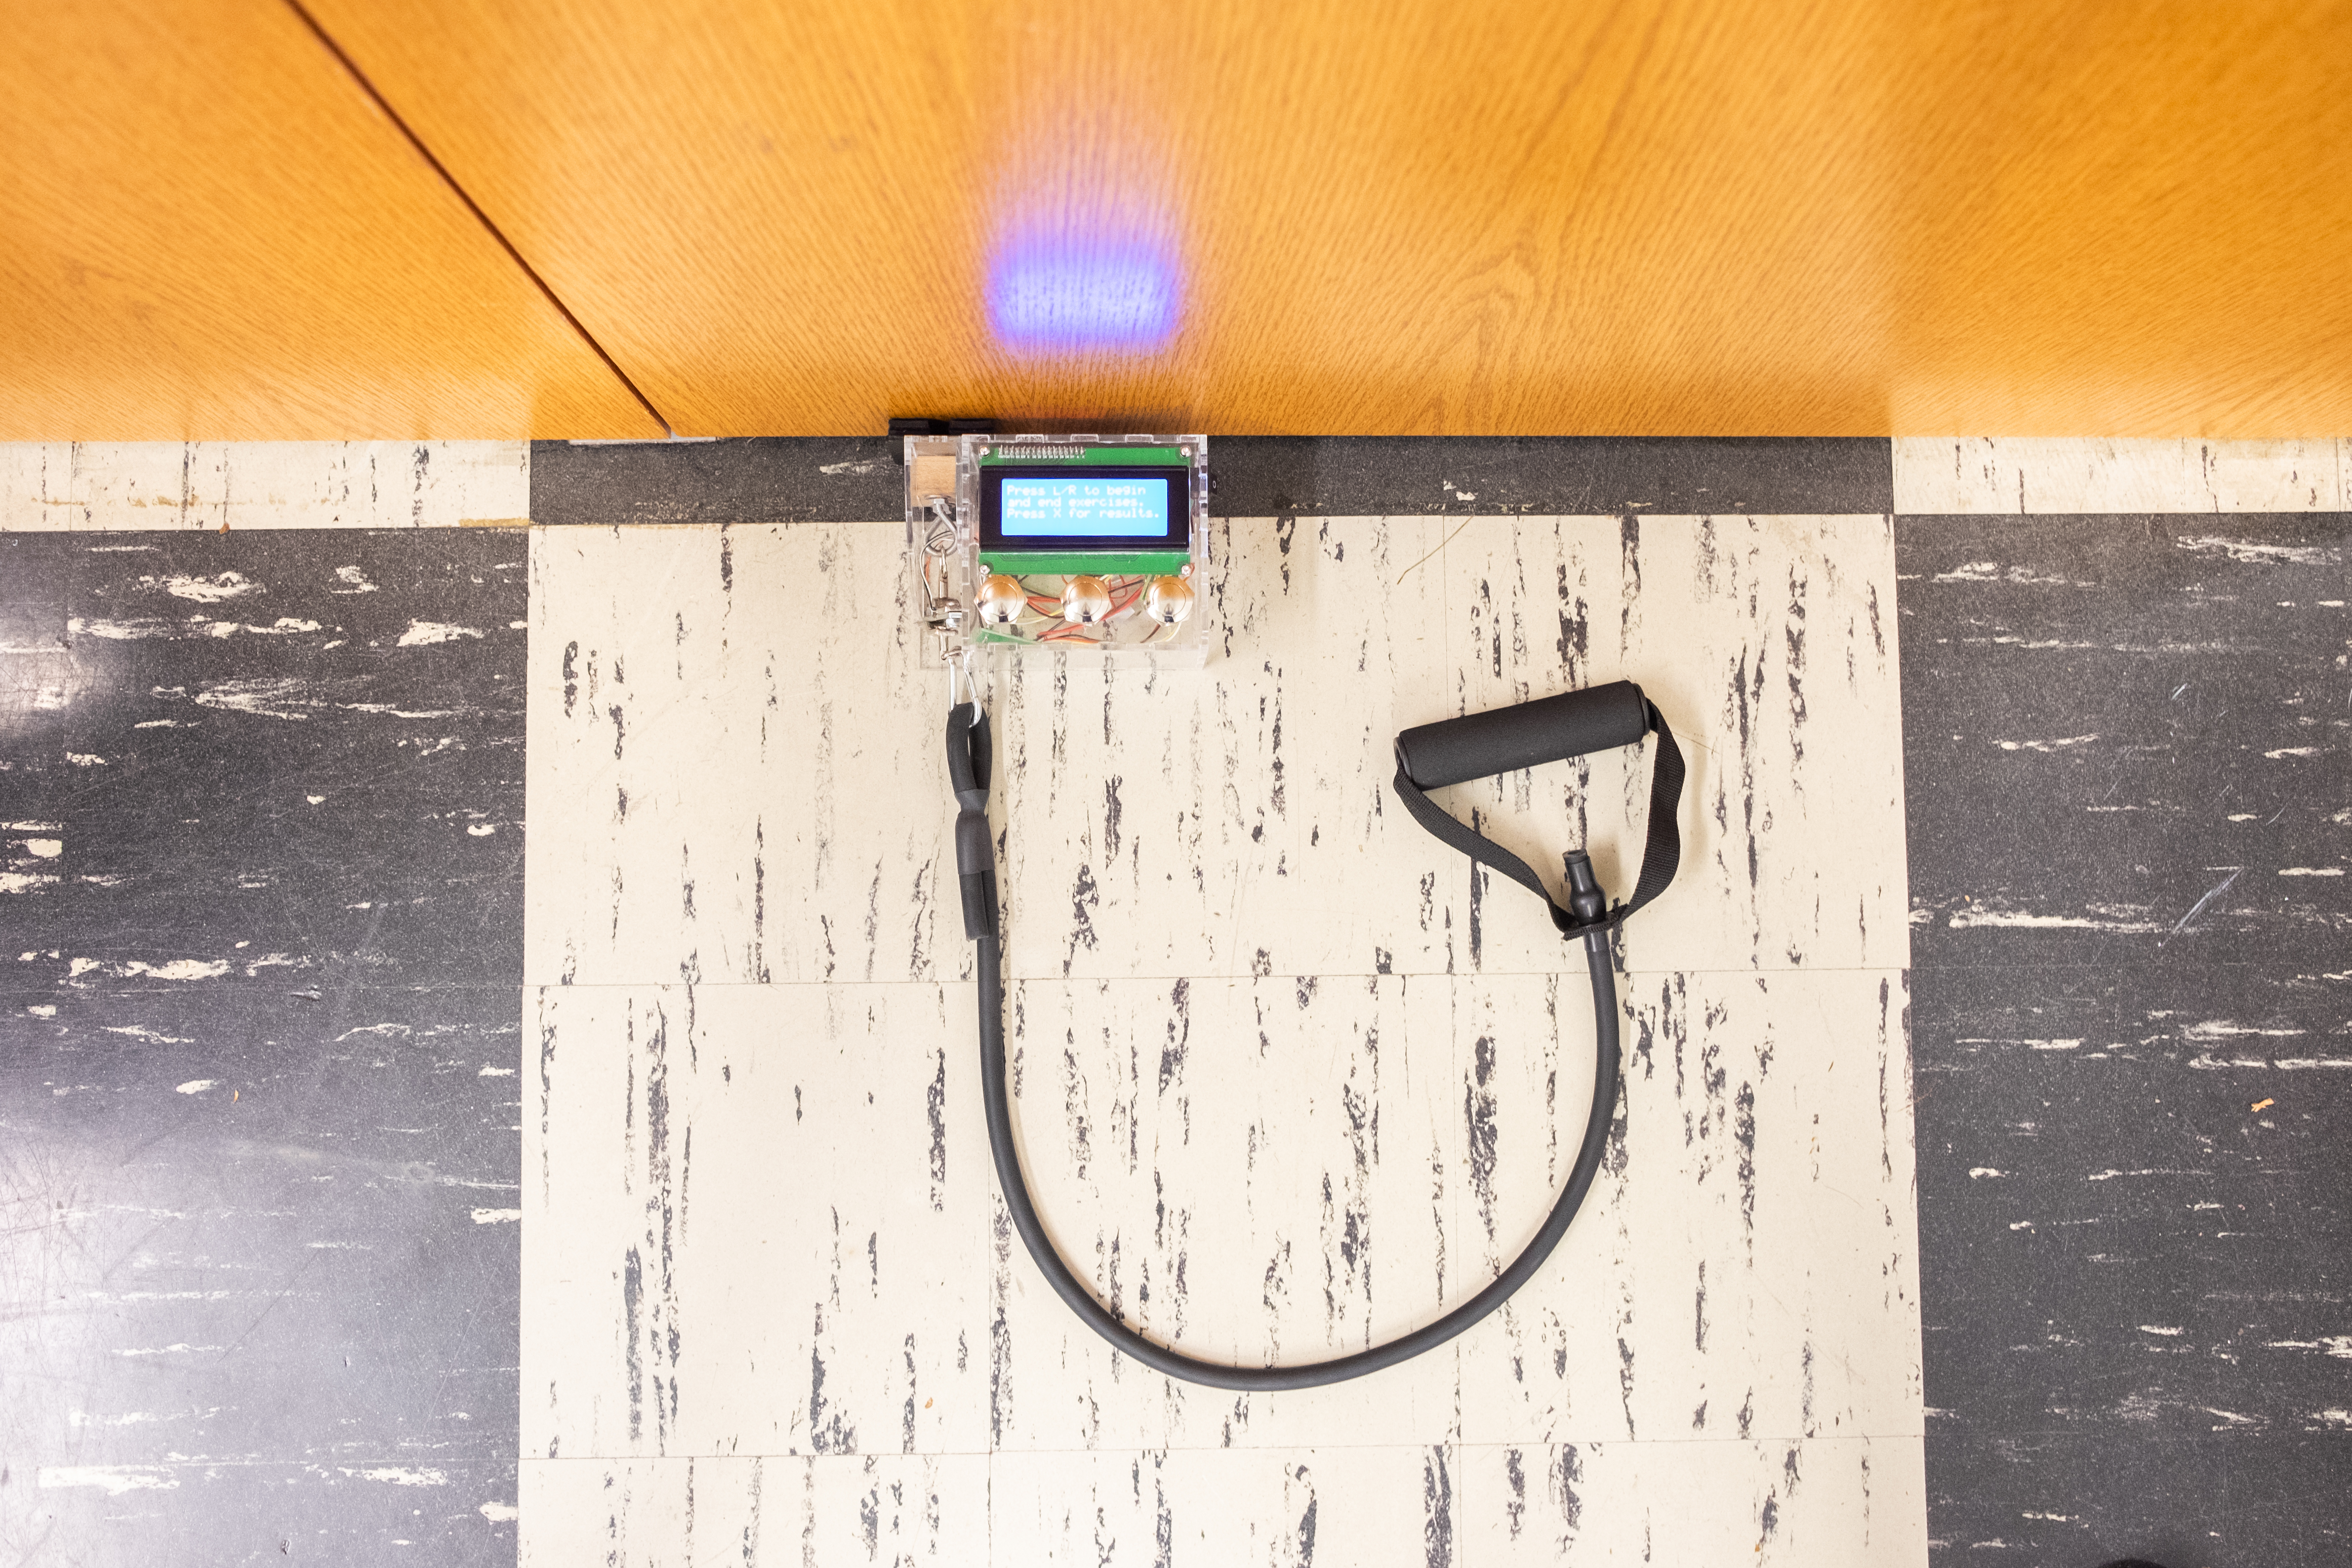
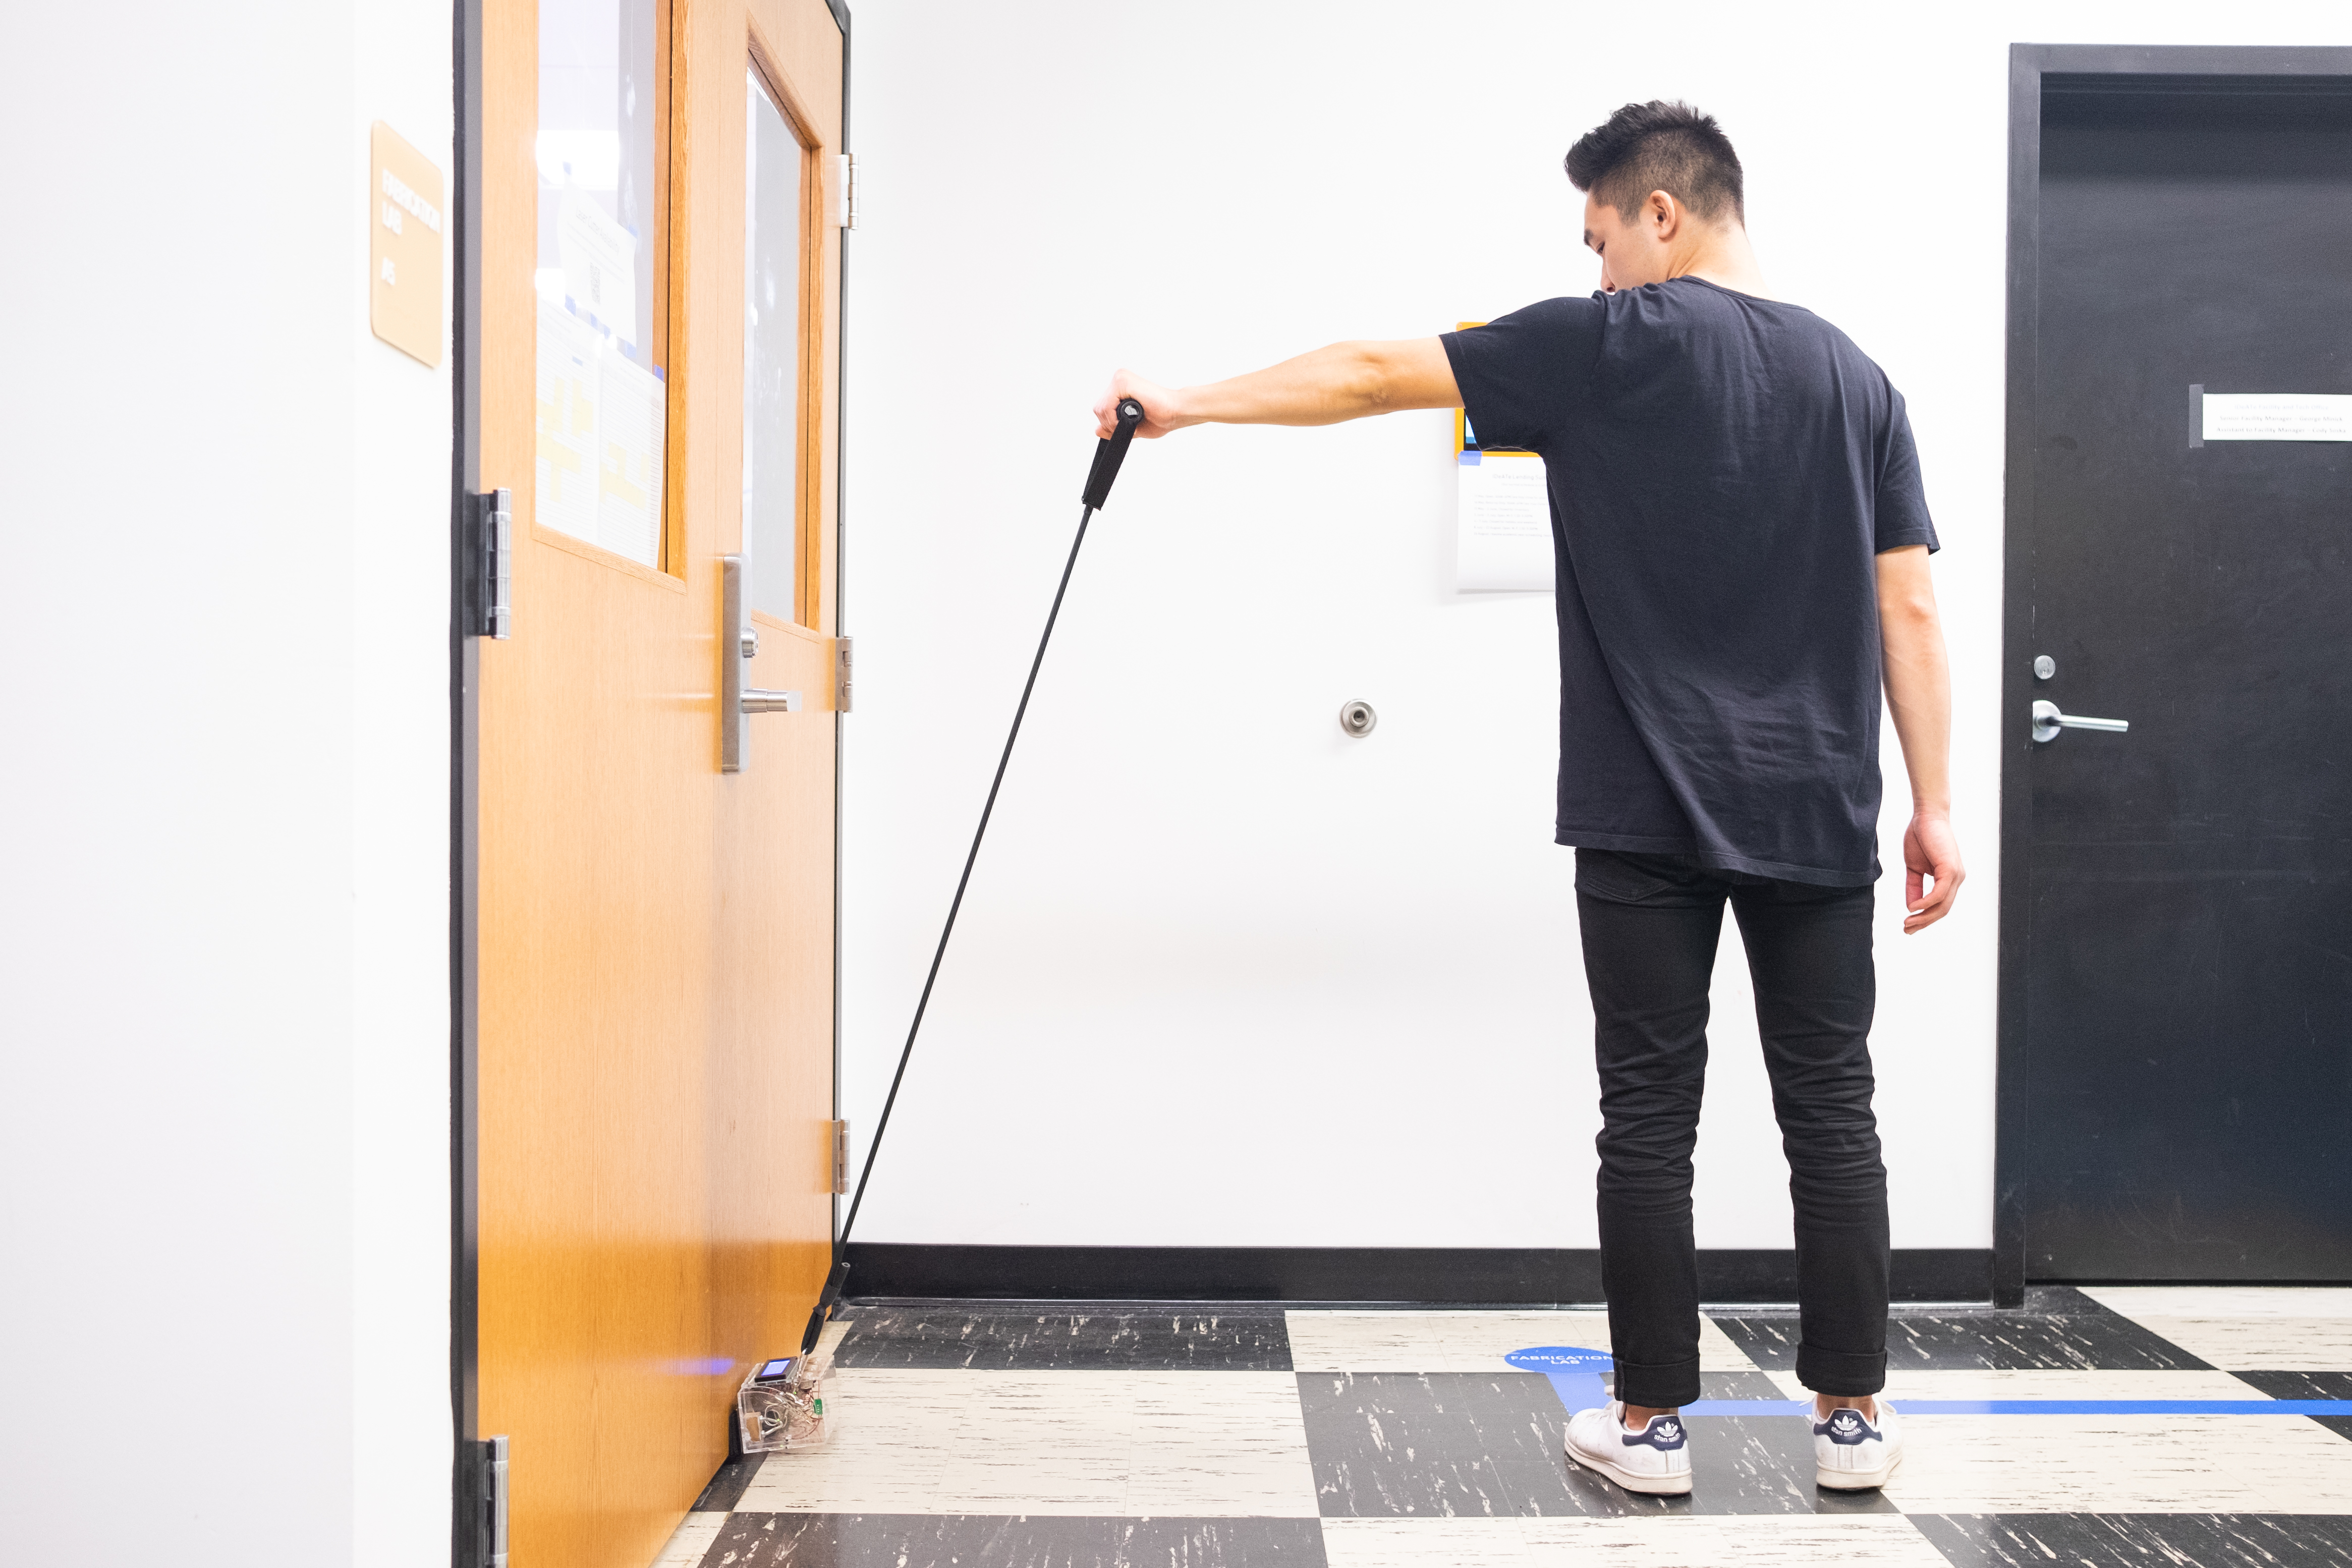
The device is anchored by ensuring that the adjustable bracket is set to the correct width and then sliding it underneath a door.
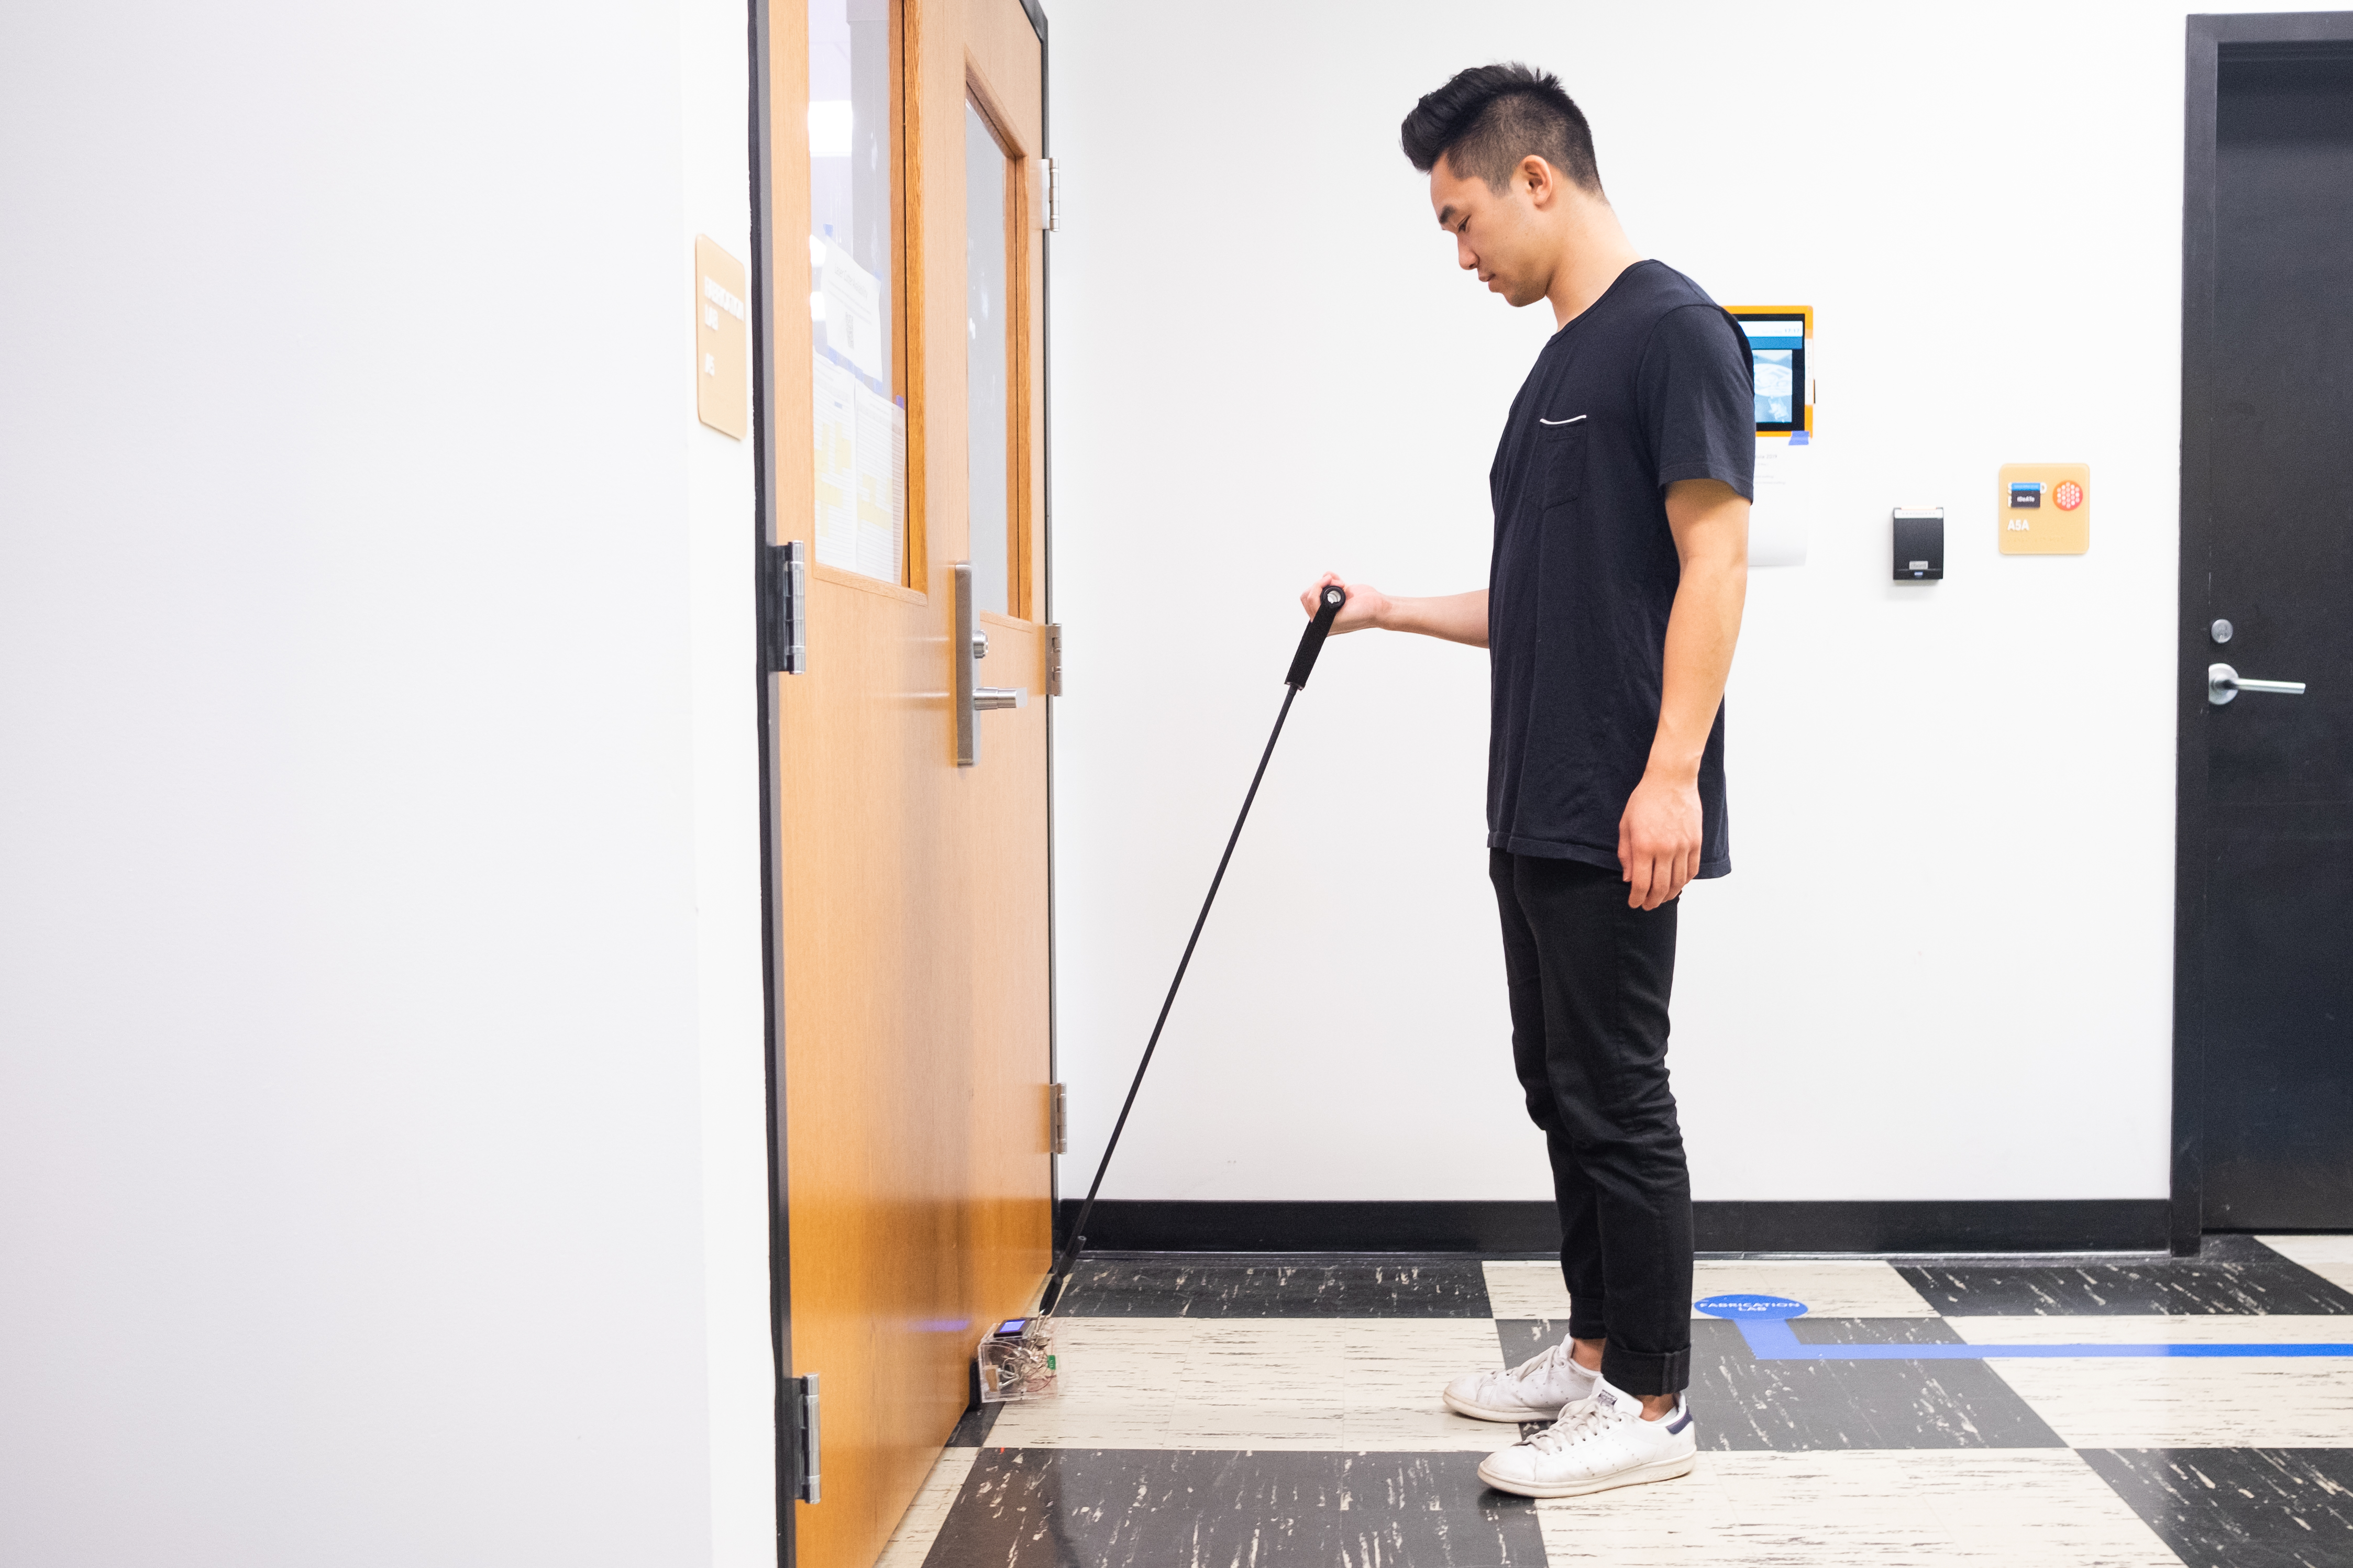
A user performing a bicep curl.
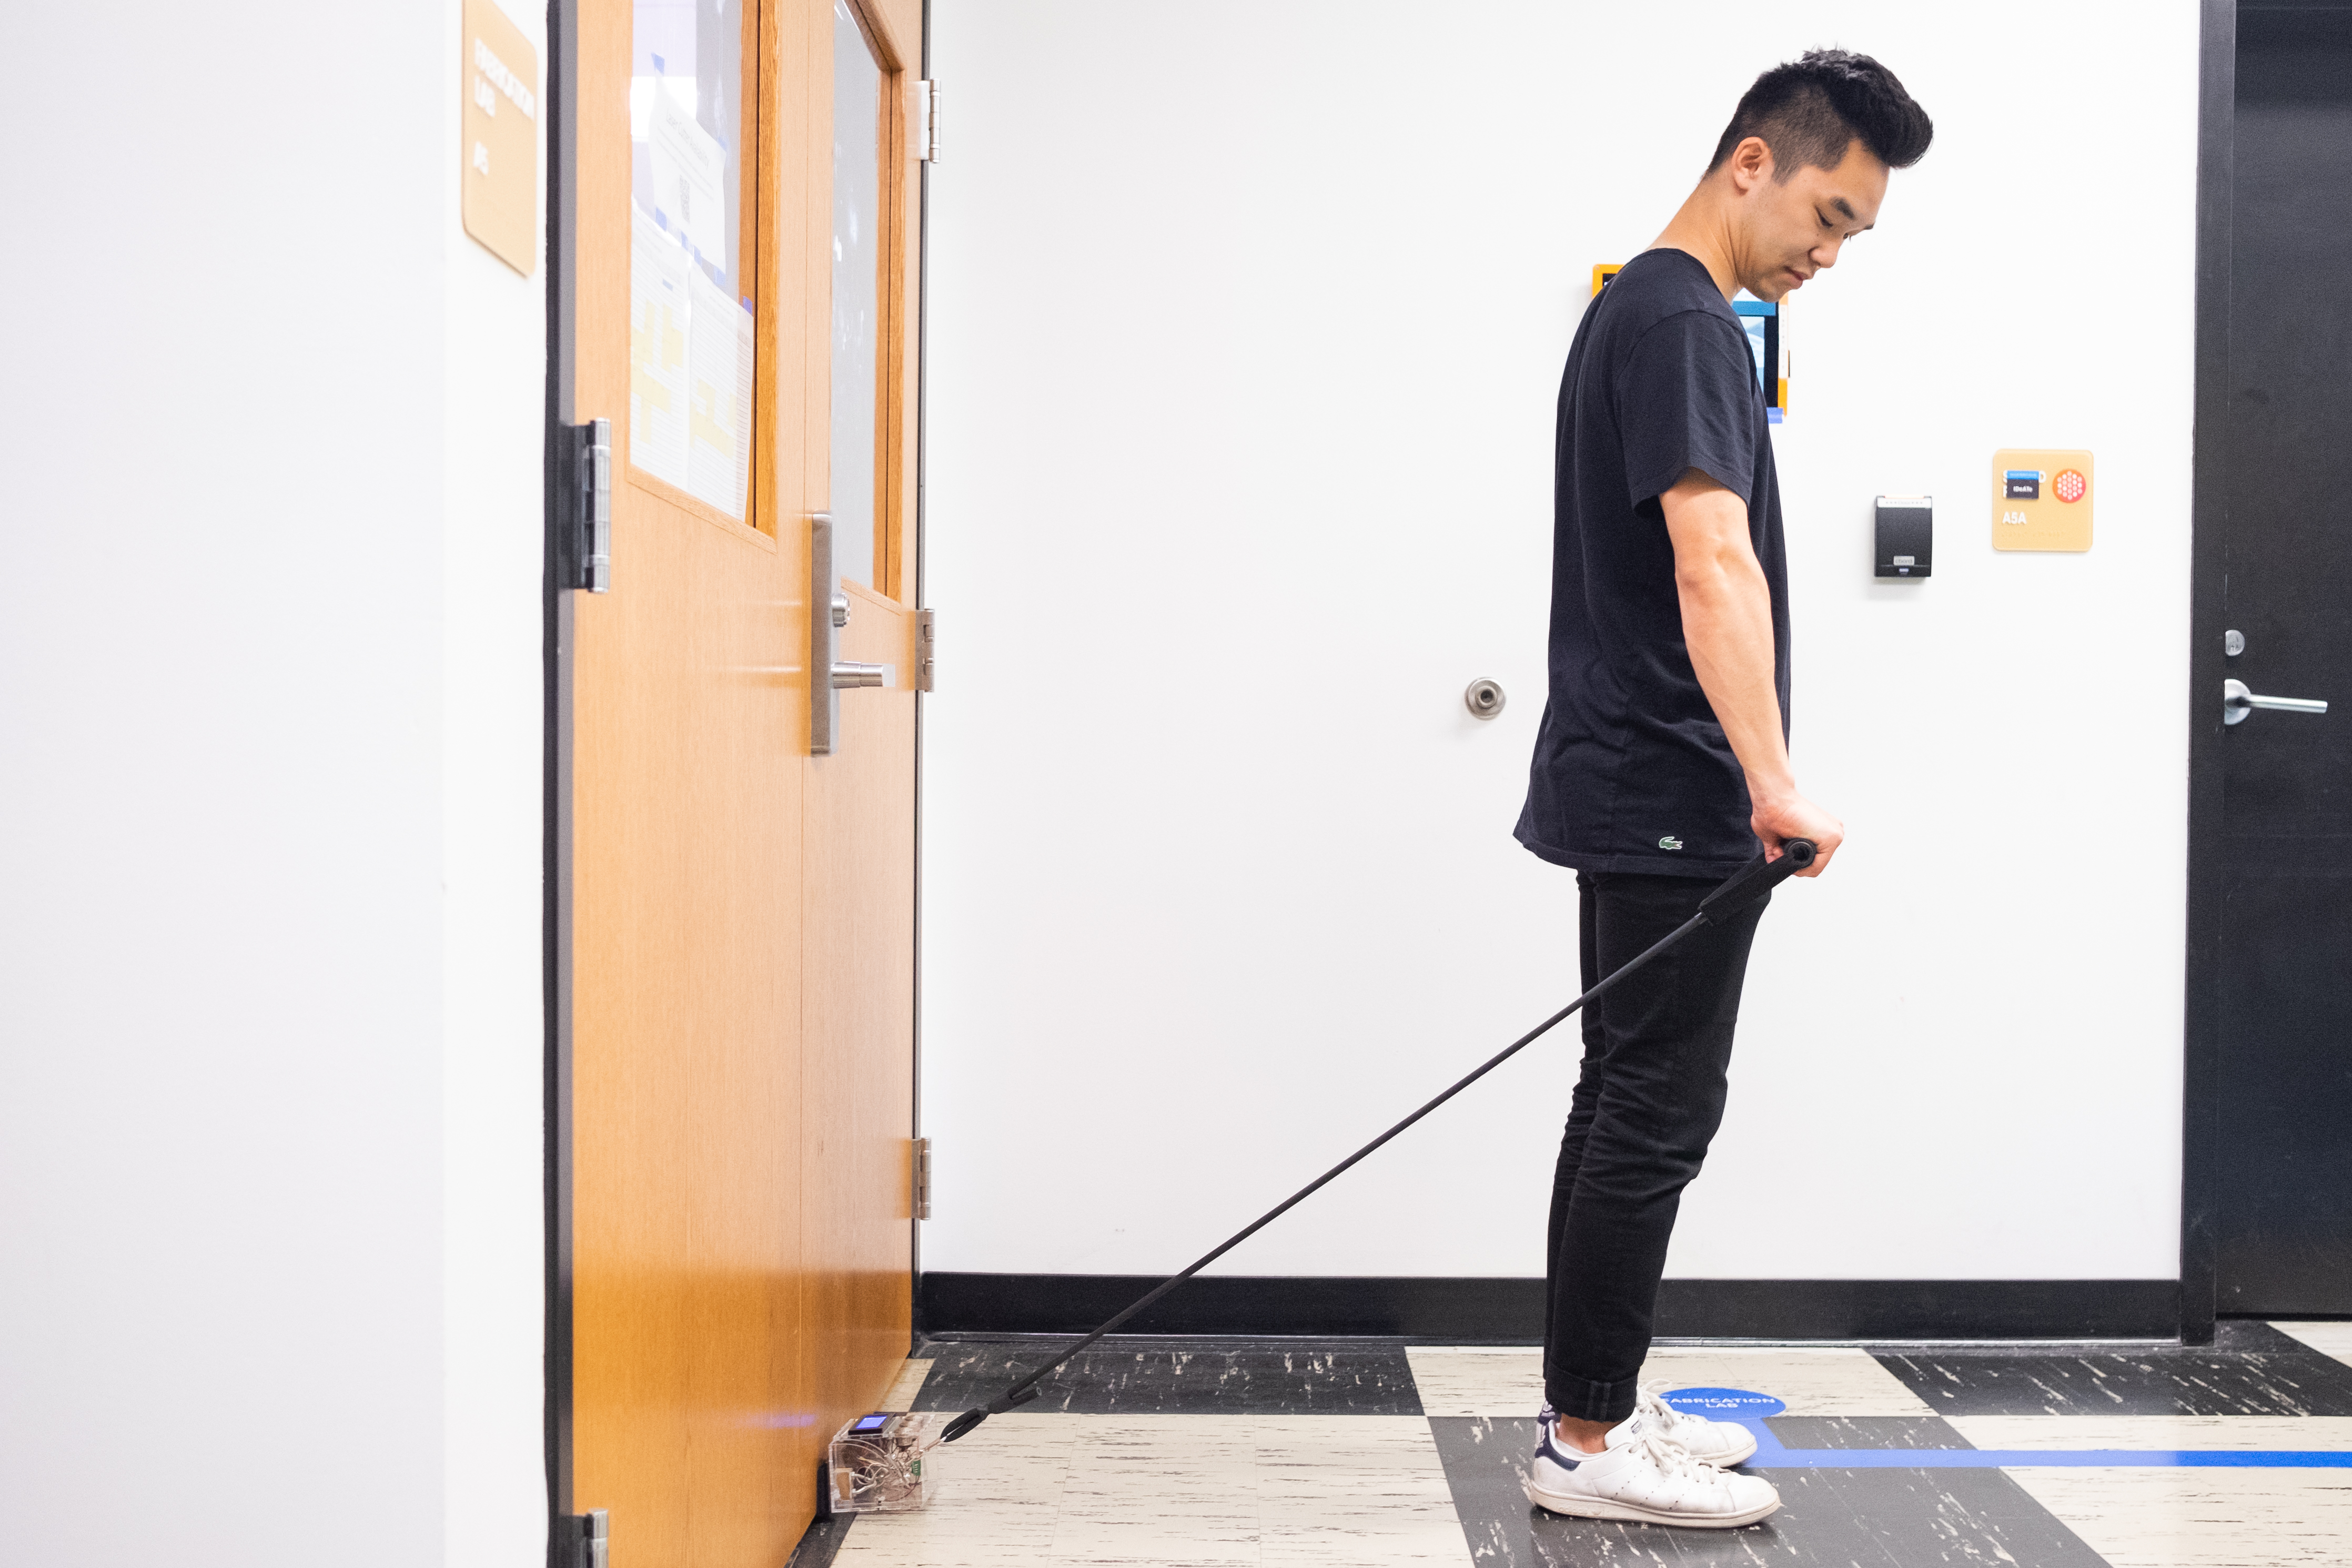
Users can change the resistance by stepping further/closer to the door and then performing their exercise.
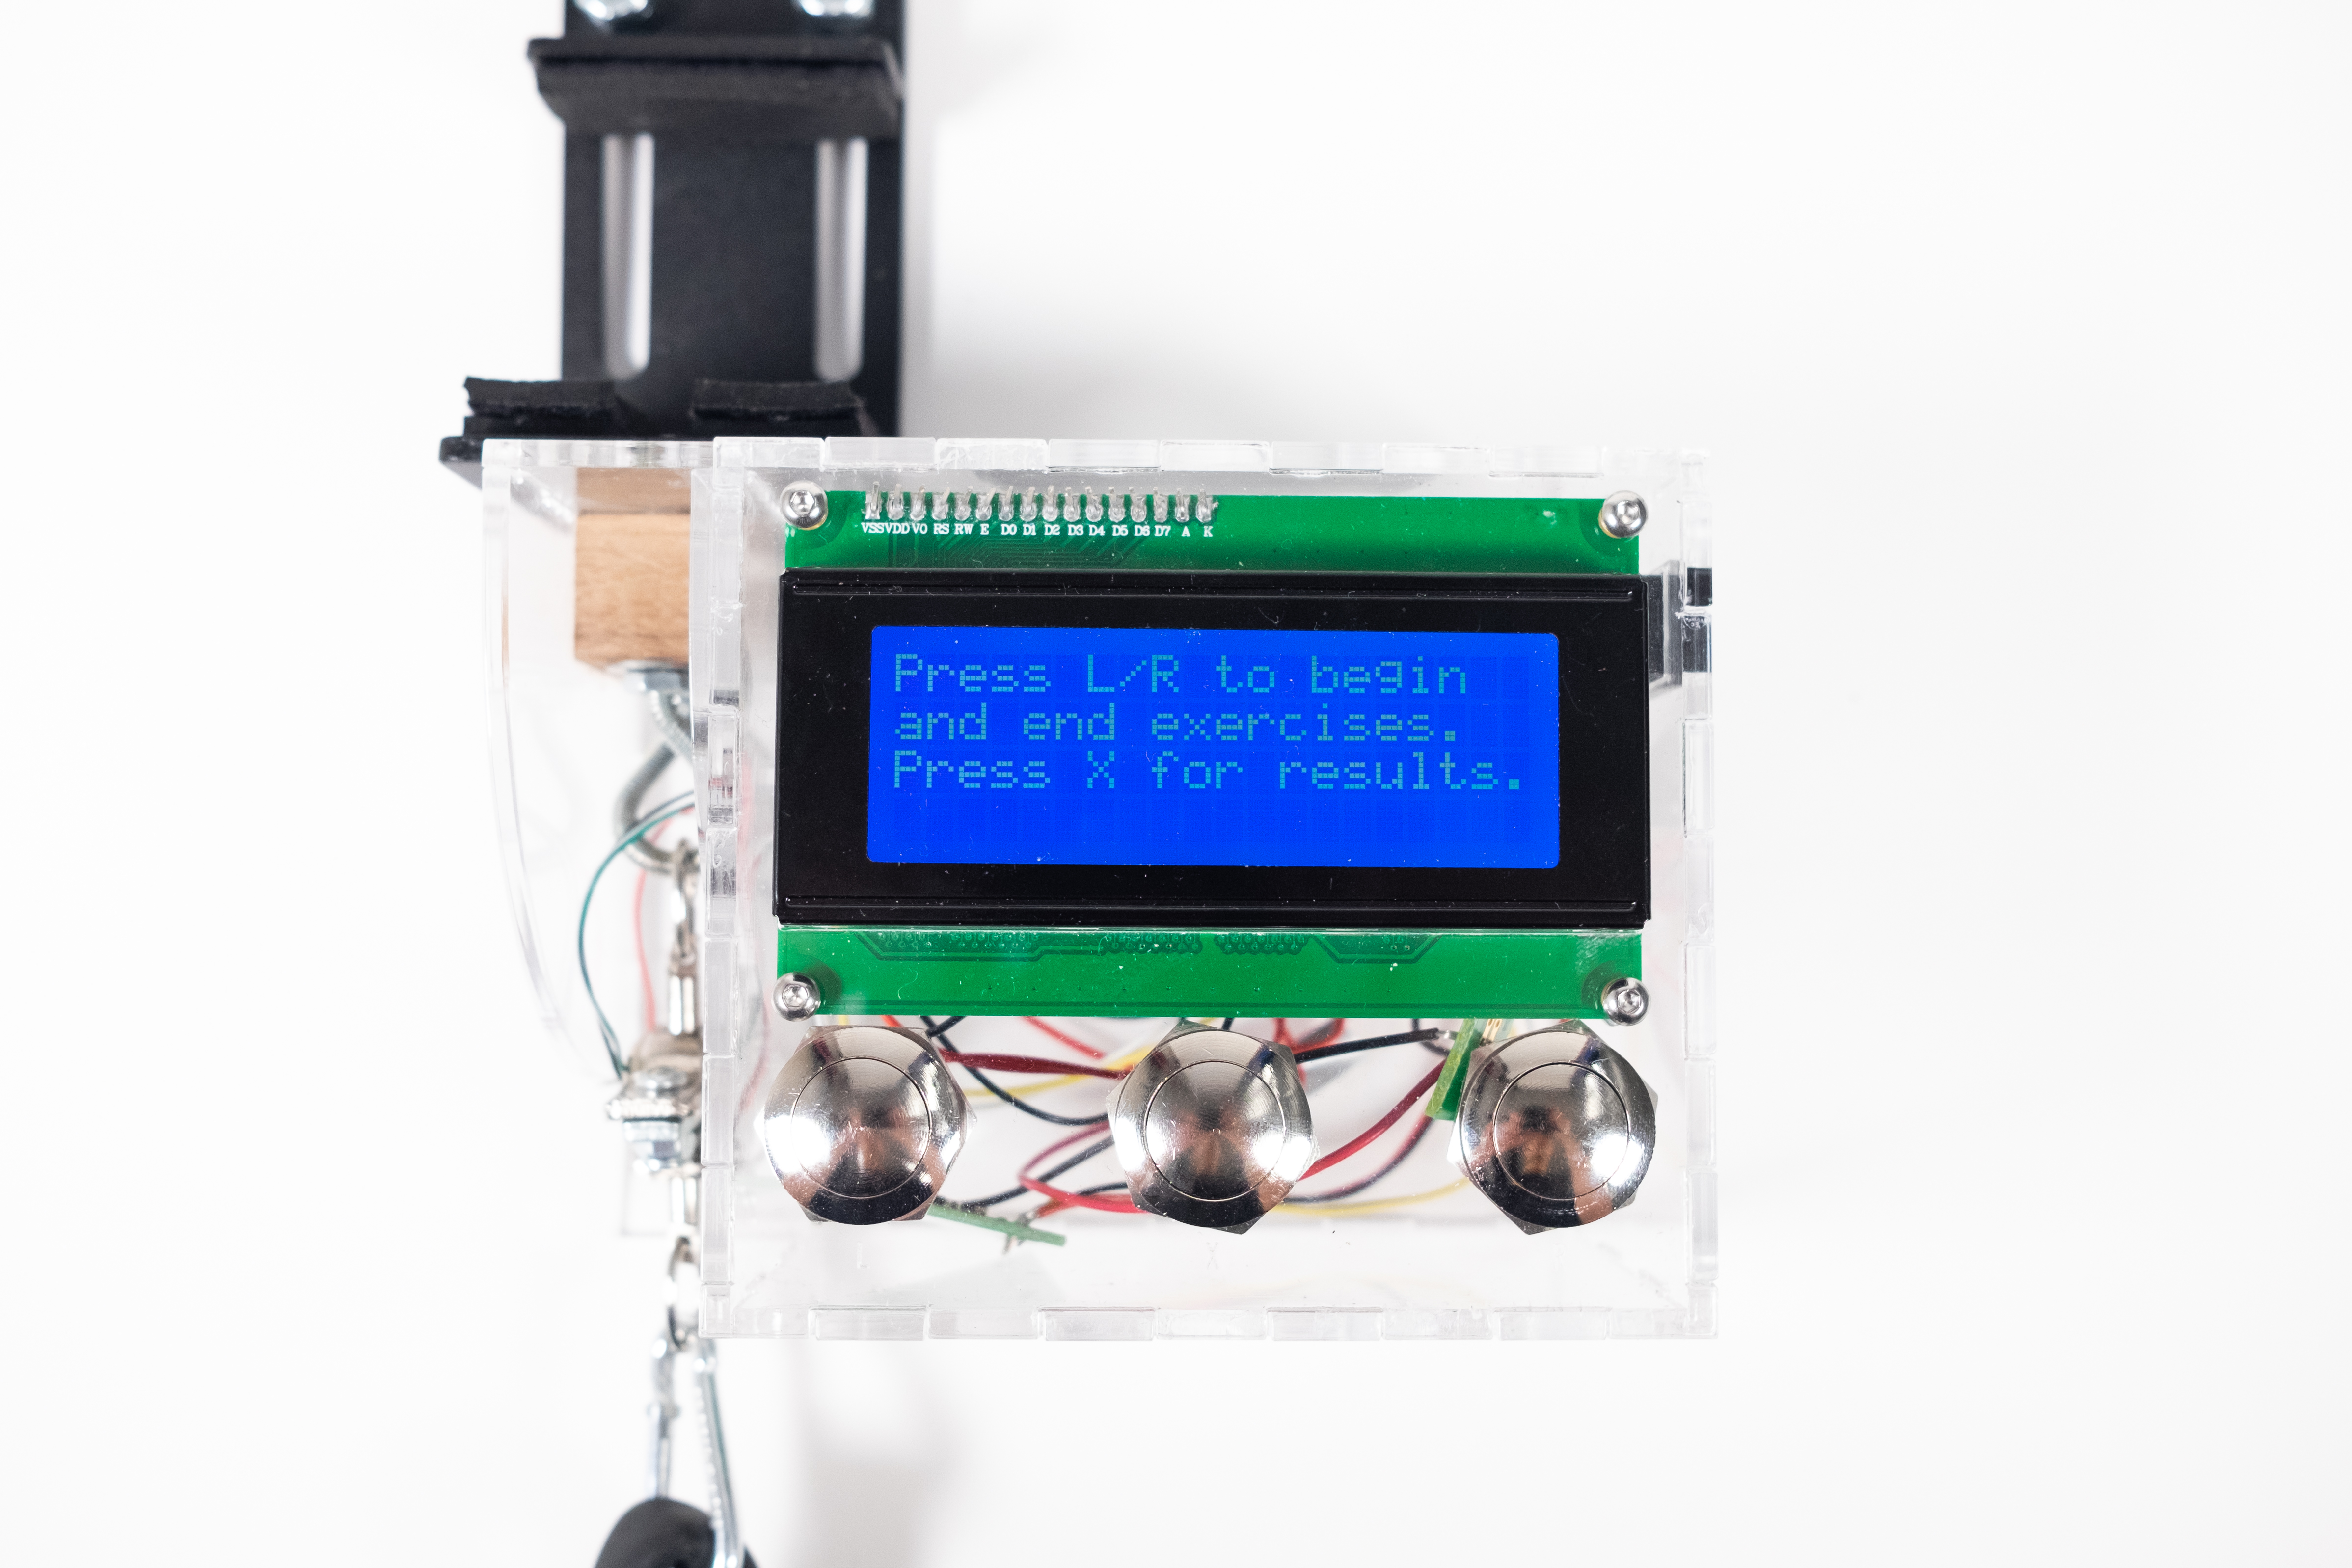
By pressing buttons on the device, users can change sides, switch exercises, and view the results of their workout.
The following is a brief narrative sketch to help describe how our device fits in the context of everyday life:
Gary suffered a stroke and has been working hard in his home gym to correct the resulting muscle imbalance. While Gary has a trainer to help him do this, neither Gary nor his trainer have a way to quantitatively measure fine differences in strength on either side of Gary’s body.
At the beginning of each week, Gary performs several exercises such as bicep curls, lateral raises, and leg lifts using the device, and notes which side of his body is stronger and by how much. He is then able to work with his trainer to structure his week’s workout routine with the goal of balancing his strength accordingly. He is able to use the device at any point (similar to how one might use a scale to check their weight) in order to see his progress and have hard numbers to work with in improving his physical strength and becoming more balanced.
How We Got Here
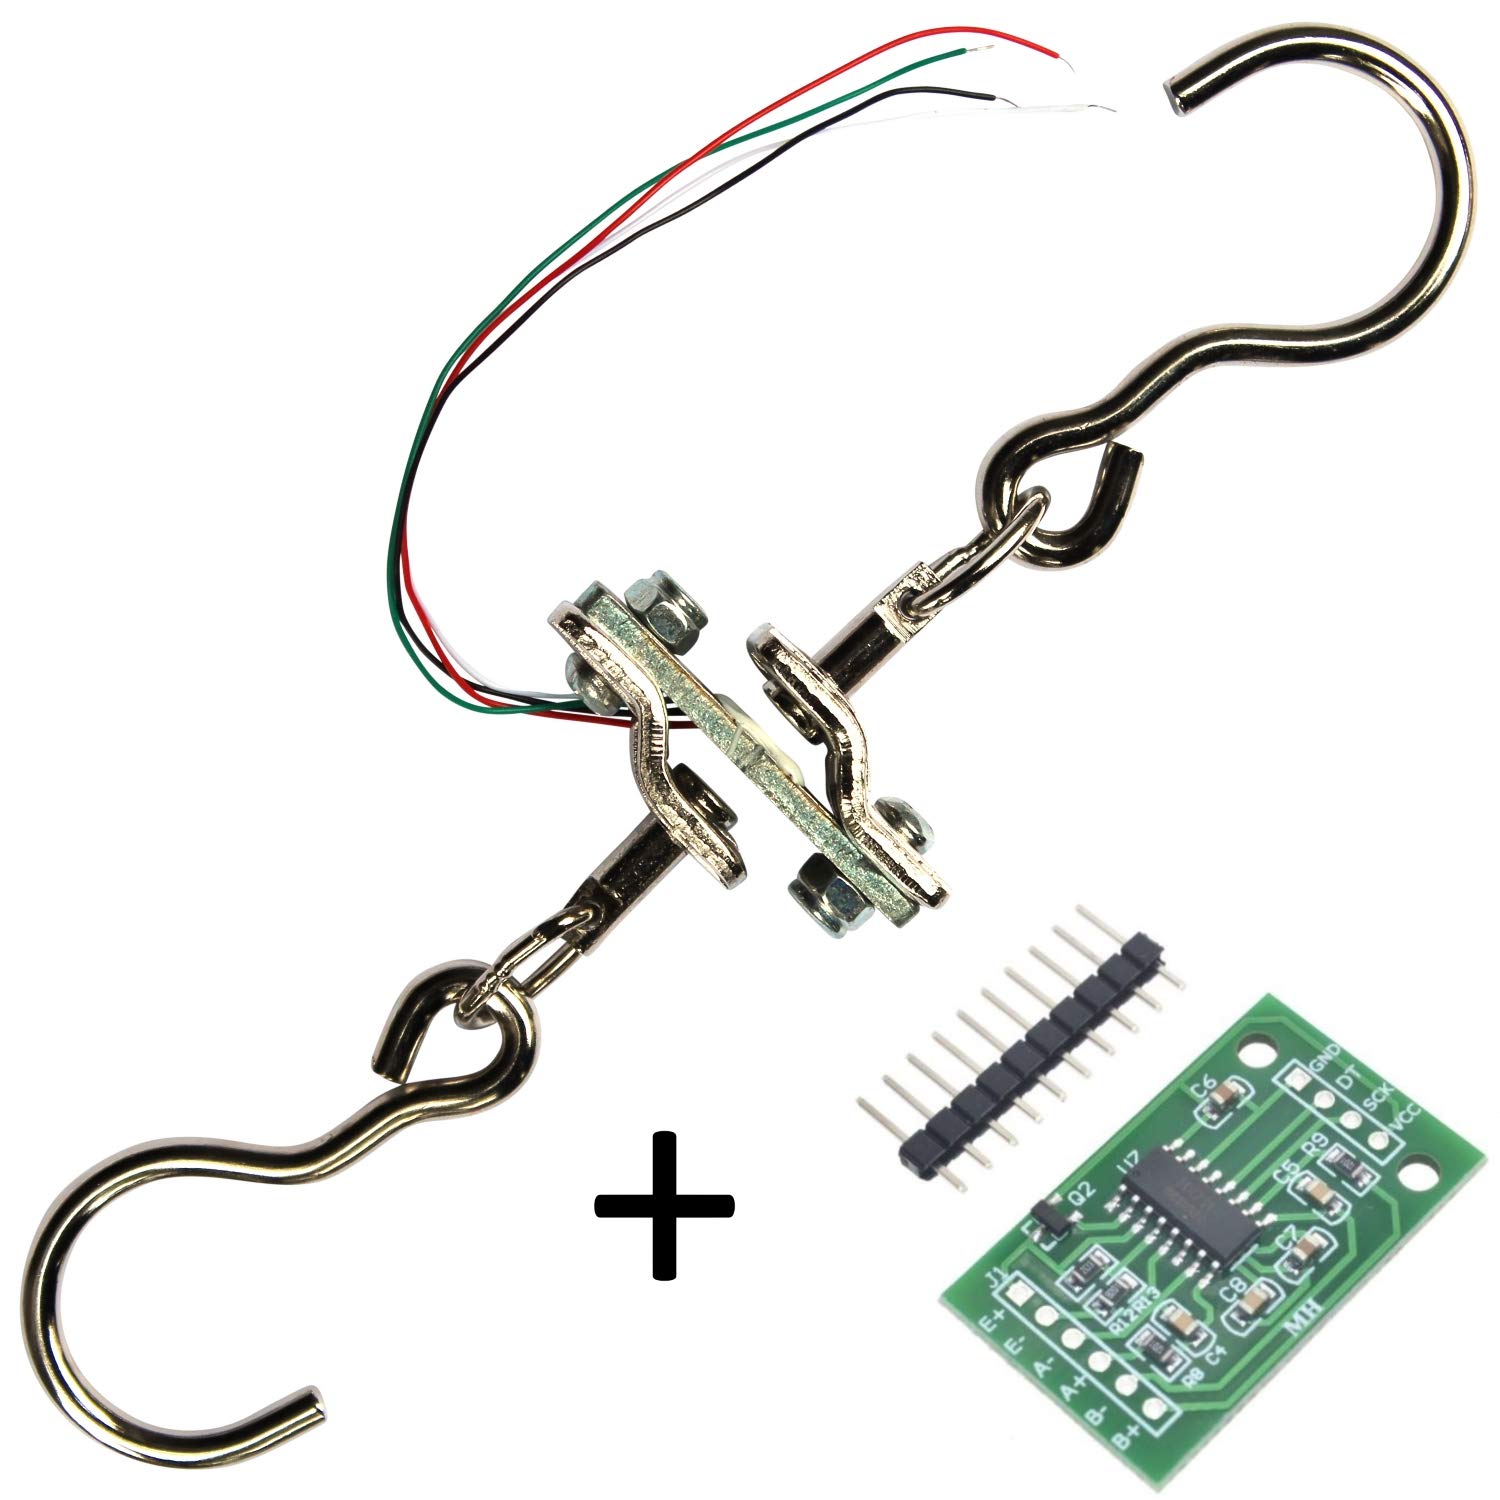
The load cell sensor we were worked with
One of the first decisions we made as a team was the choice of sensors. Due to the form factor and flexibility we needed in our solution, a load cell seemed like the best bet, but we also initially considered using pressure sensors. The choice of load cell was the decision we look back on and wish we could have changed. We selected a 40kg bearing load cell from Amazon, which also came with an integrated board that amplified signals from the sensor and worked perfectly with an Arduino. Not only was the hardware supposed to integrate perfectly with our Arduino, but the product included a well written tutorial on how to capture signals from the load cell. In being content with the tight integration with our Arduino, however, we failed to consider just how flimsy and difficult the load cell would be to work with.
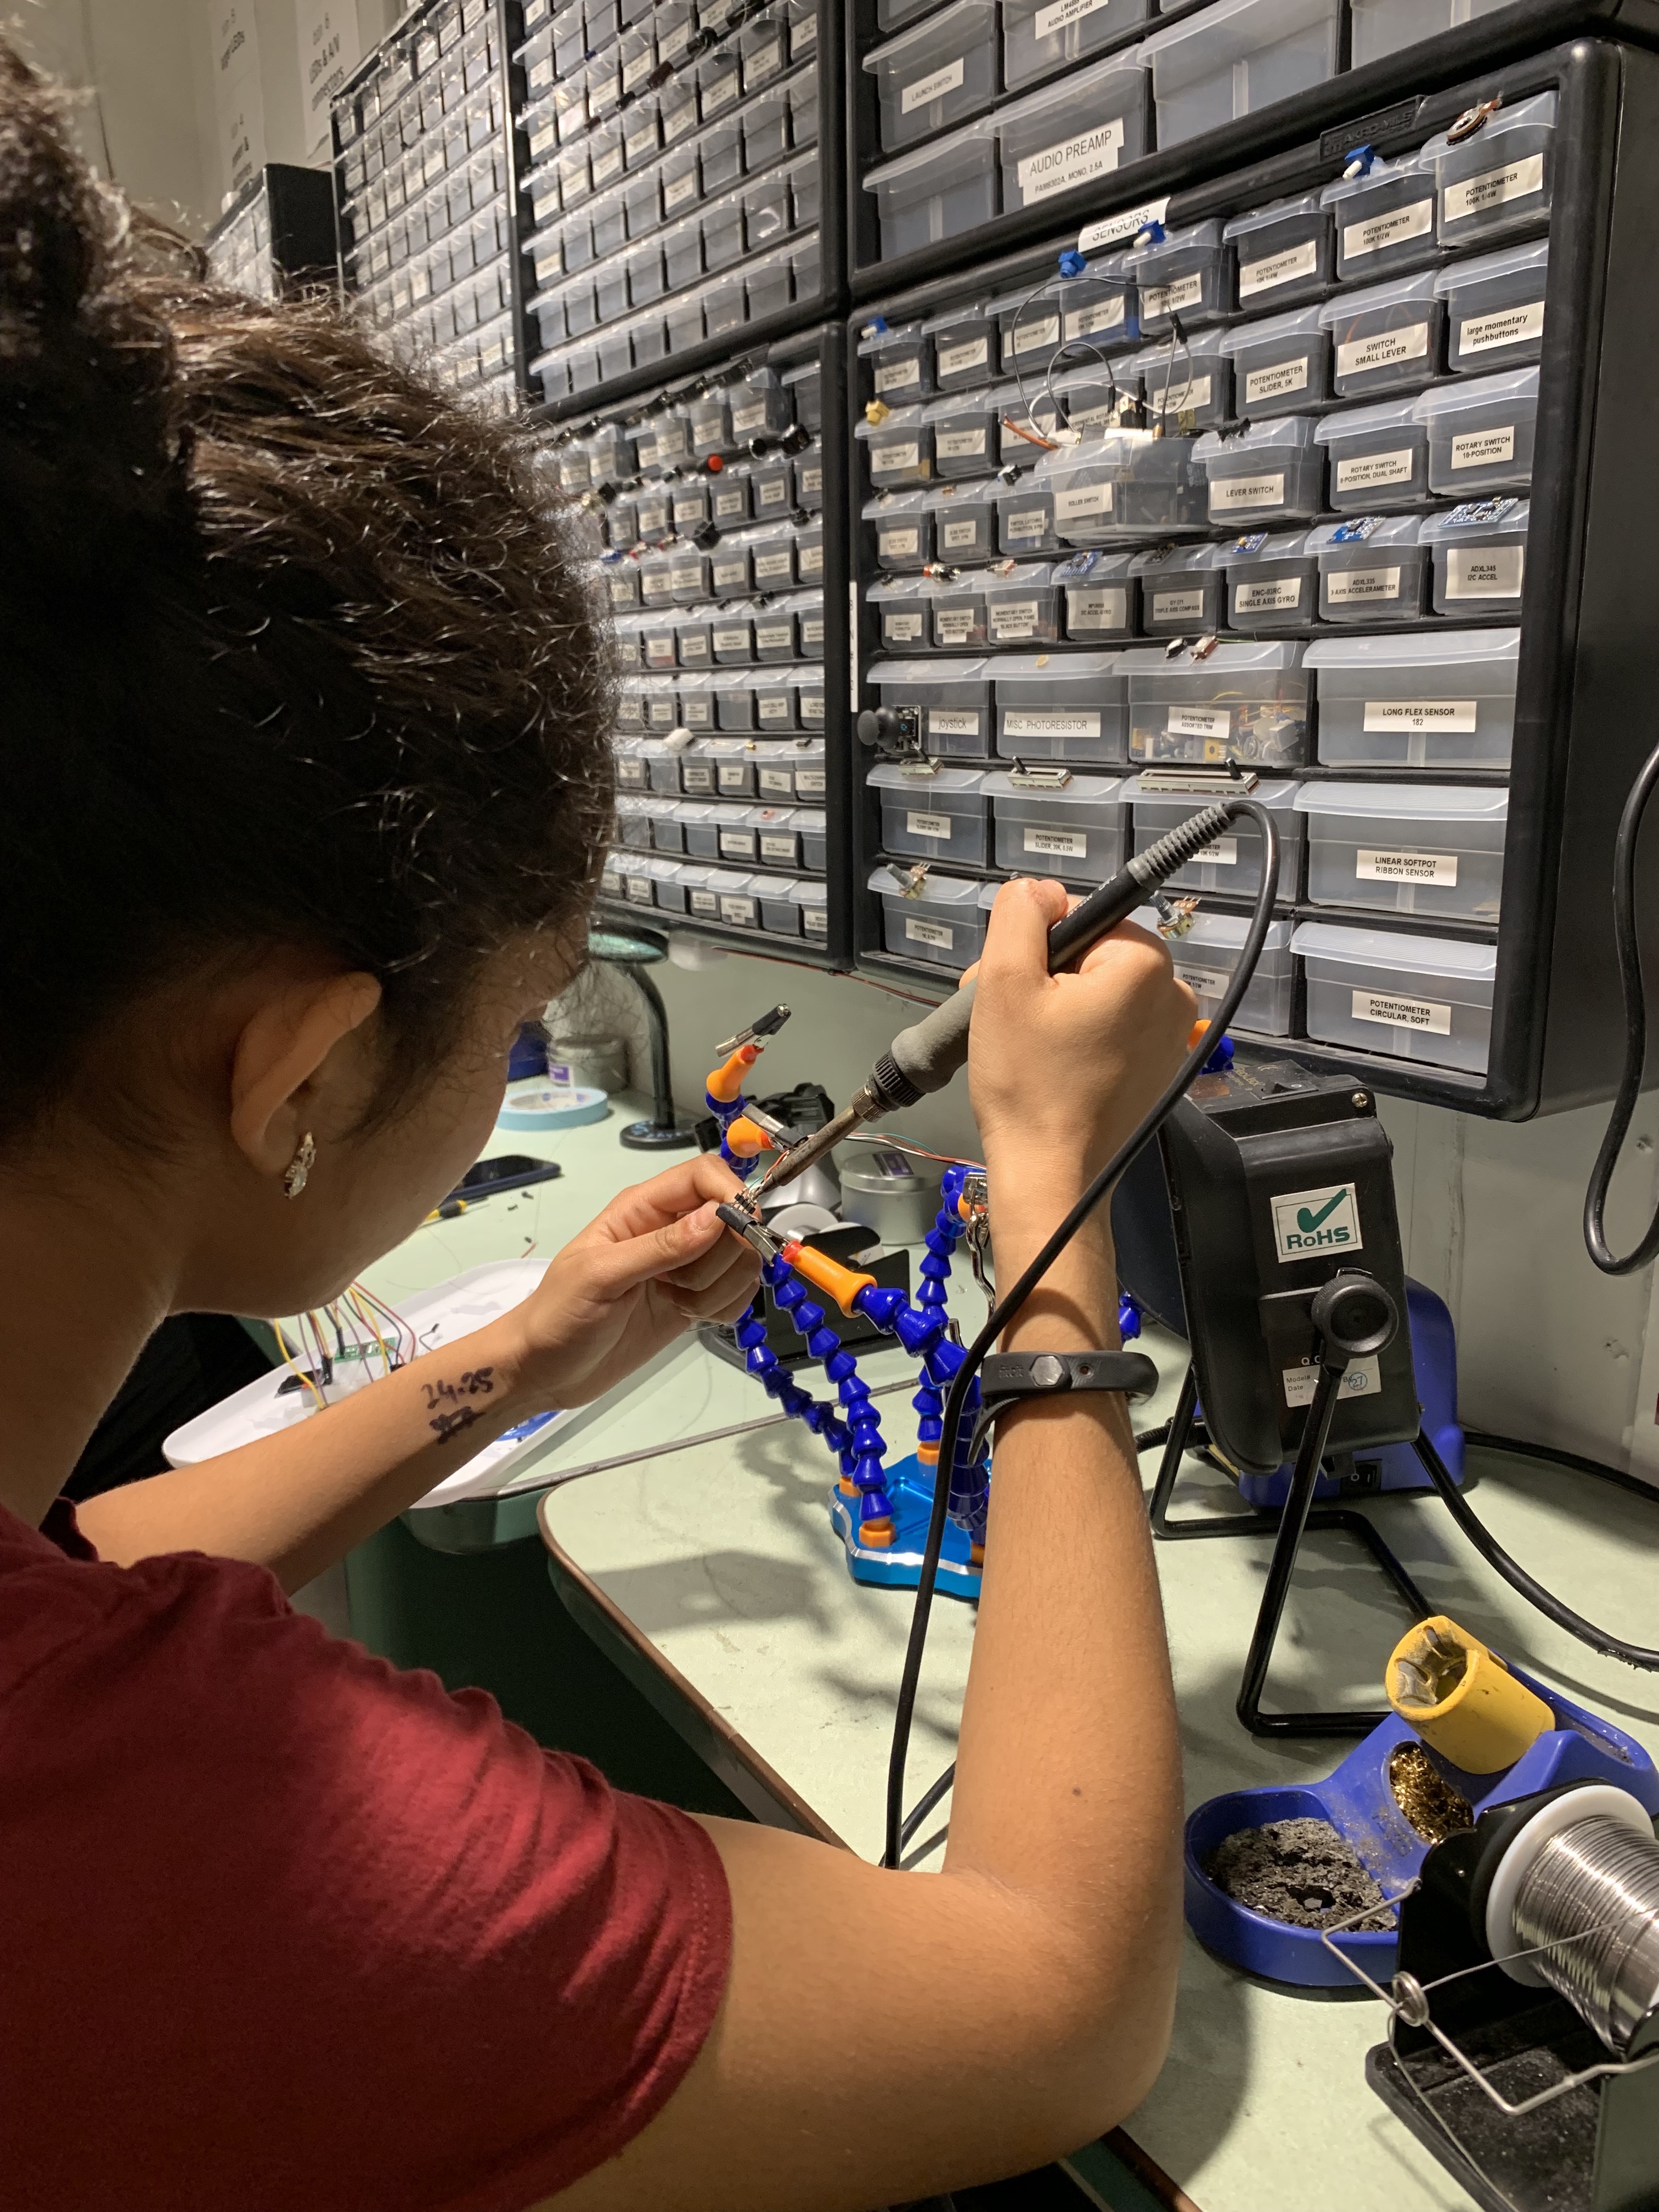
Resoldering the broken wires on the load cell
The load cell was designed to support 40kg, but the wires that detected changes in force were extremely thin and connected to the sensor with a fine plastic coating. This coating barely held the wires in place and we ended up tearing one of the wires within a few days of development. Attempts to solder it back were fruitless because there was limited wire to metal contact and the plastic coating had burned. In the end, a new, second sensor that we took extreme precaution with also broke, leading us to conclude that a more durable load cell would have been better from the get go. In fact, we have ordered a new one to be used in the final product we give to Gary.
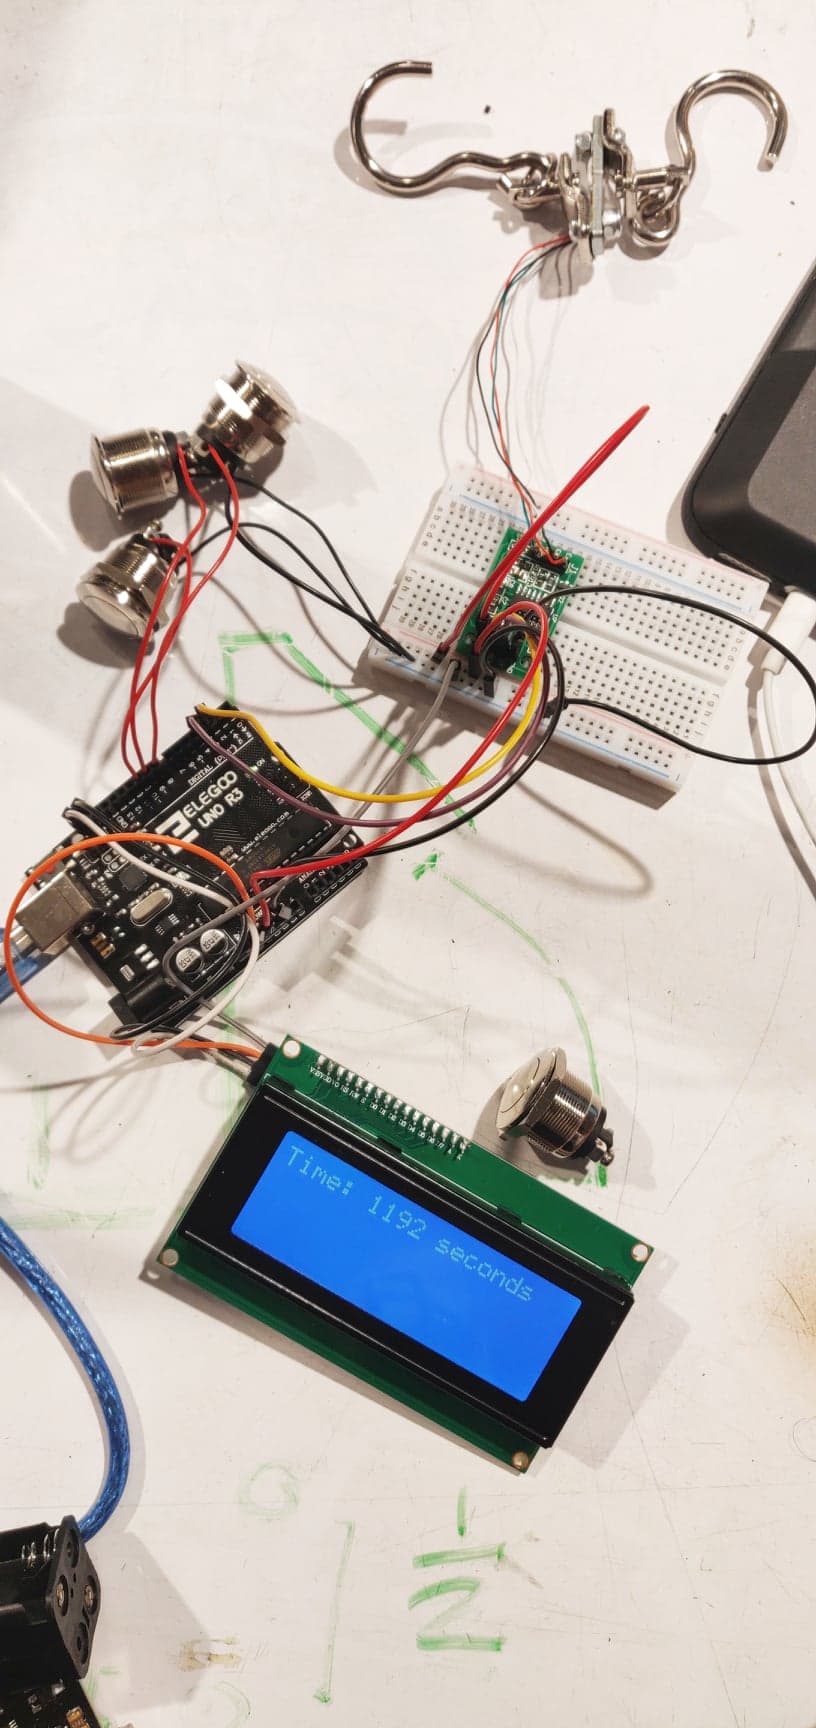
Full electronic prototype, with working load cell, buttons, and screen interface
The lesson we learned from this was to first analyze how a physical component would perform in the real world as opposed to determining its simplicity for use with hardware or software. The sensor not only created trouble when assembling and testing our device, but also in the software development phase because we didn’t know if the problem was with the physical load cell or with the software. Before we knew that it was the weak wiring that was causing the problem, this was highly frustrating.
One of the challenging aspects of our project was repetition counting and weight measurement. After discussing with our professor and understanding the processing limits of the Arduino, we decided to implement a windowing approach. Our code kept a few hundred milliseconds of data and averages in buffers and calculated local maxima based on the slope of the data.
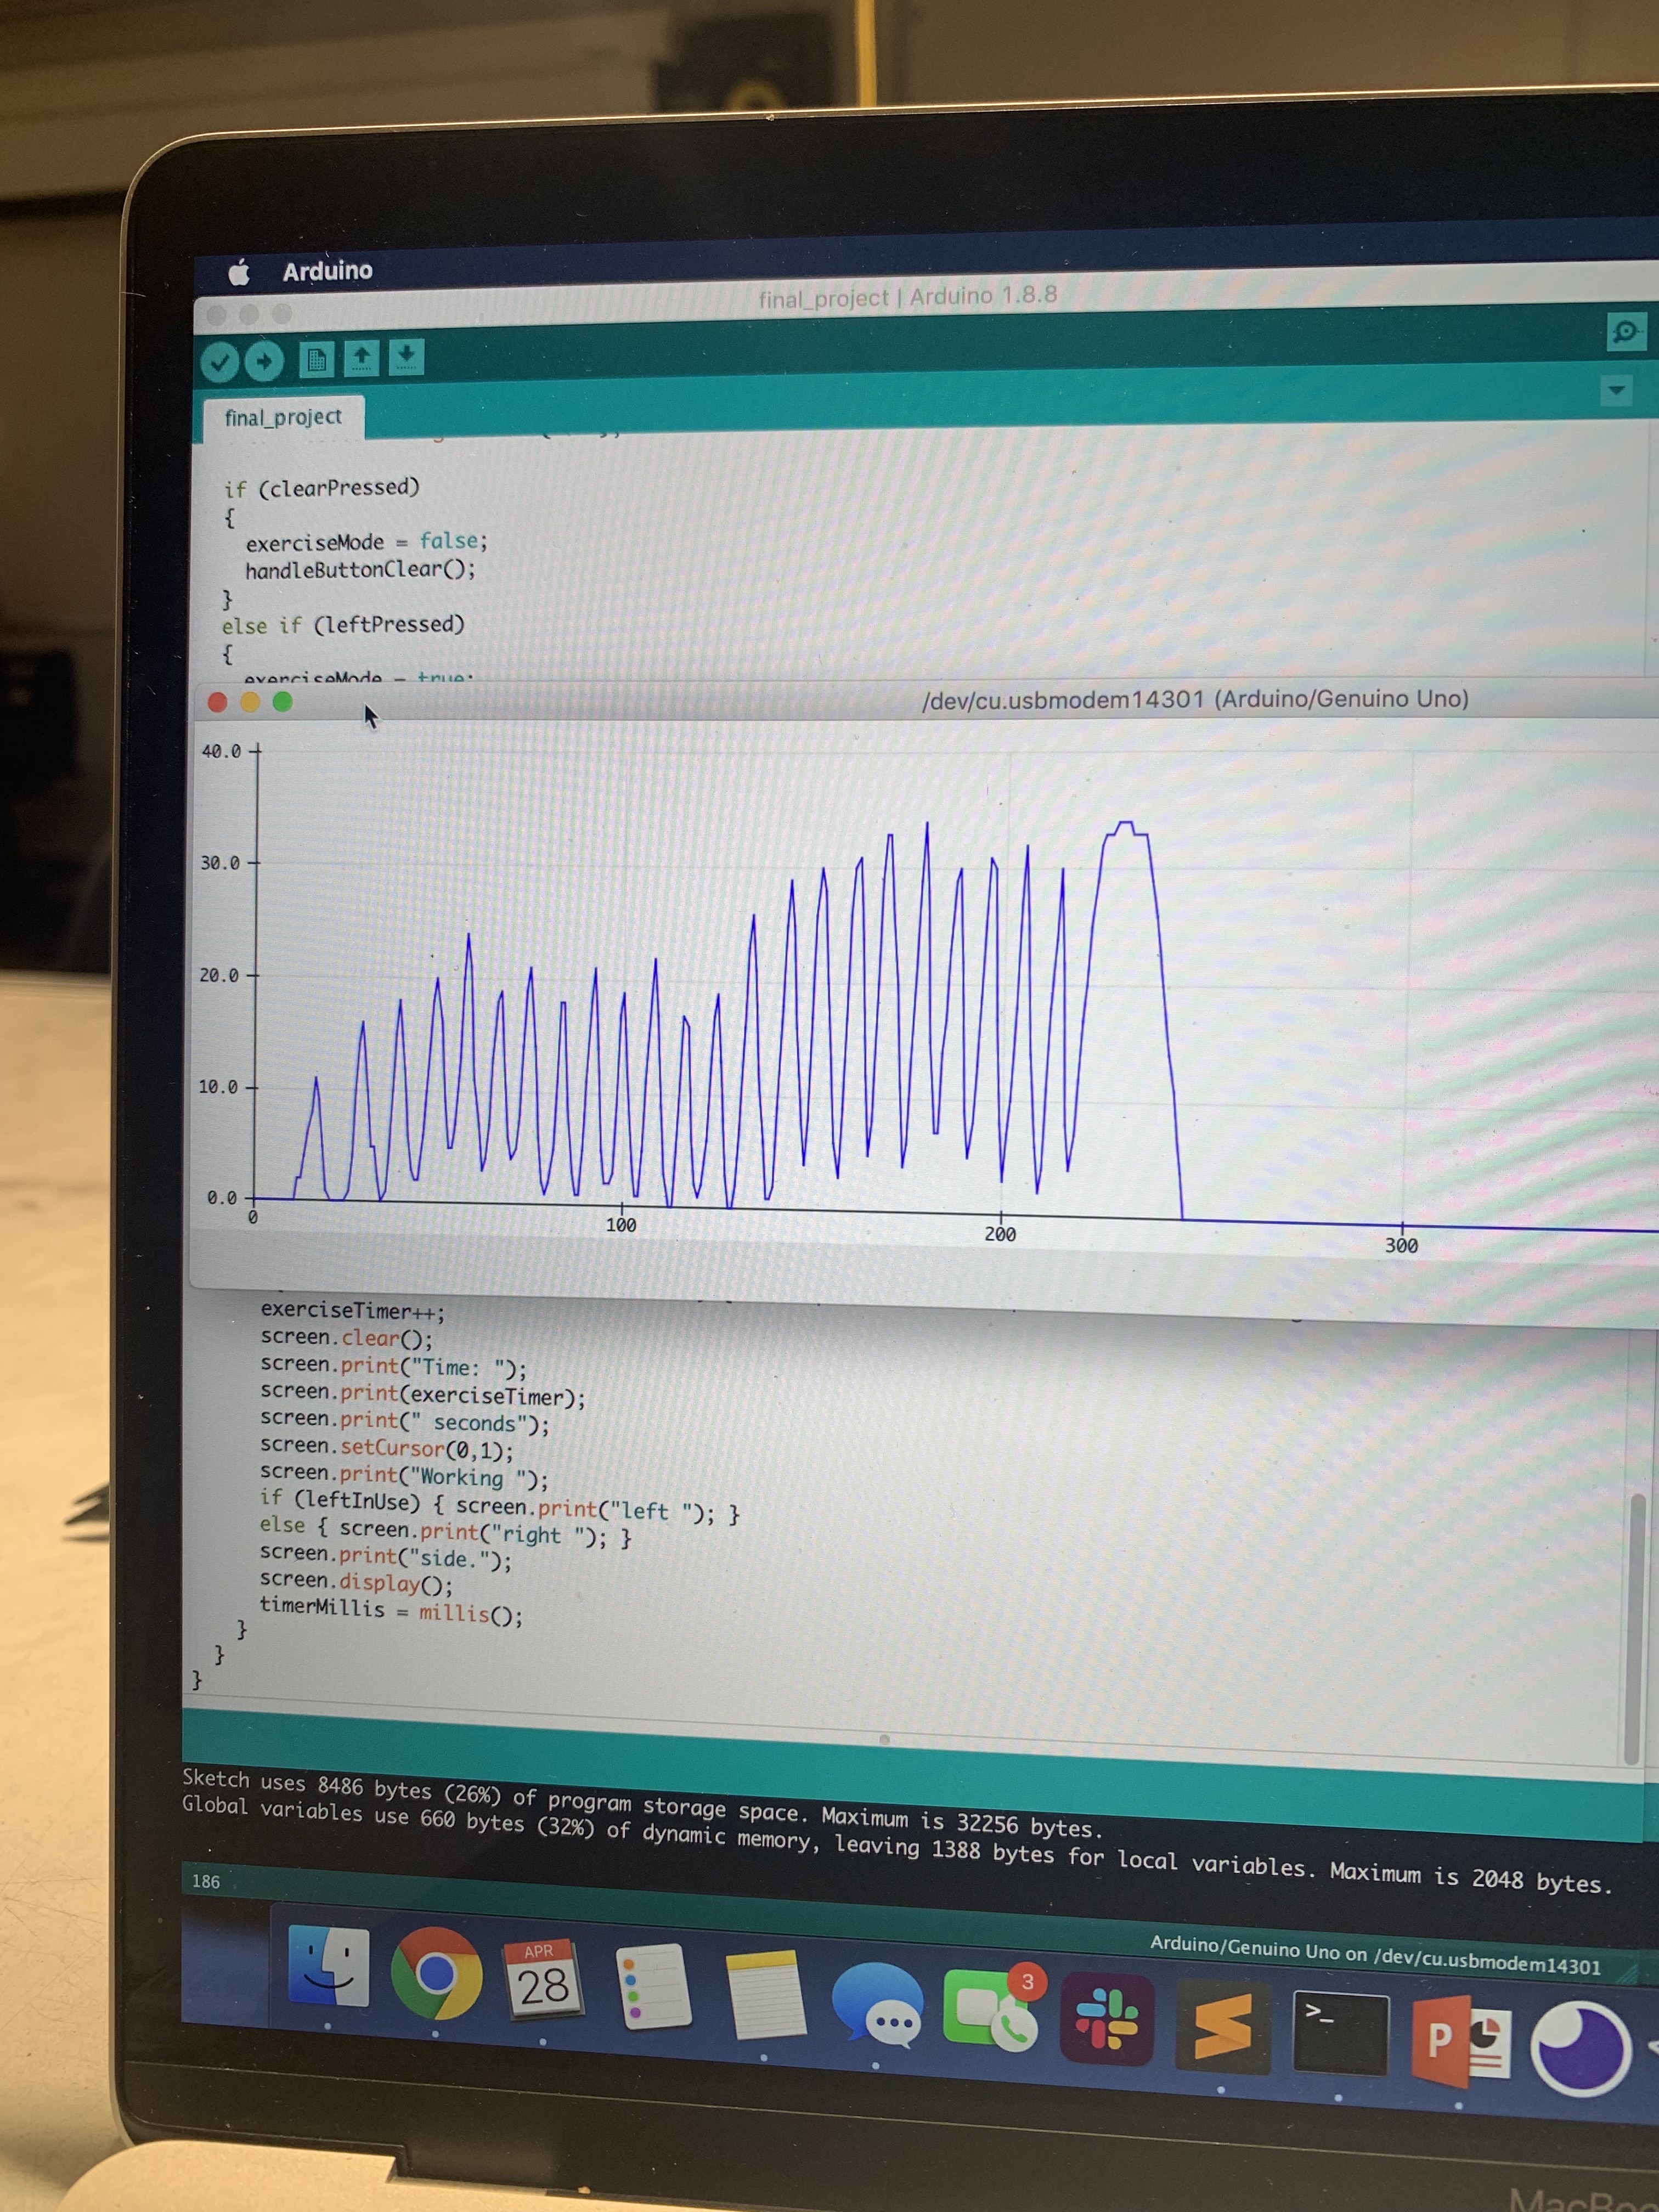
Signals captured from exercise repetitions, when the sensor was working
When we tested this on actual measurements from the device, it worked extremely well. This was a breakthrough moment for us and helped refocus our efforts on the physical and reliability aspects of the device. In general, the software aspect of our project was not very time consuming and we were done with that part ahead of schedule.

Testing the load cell while it was not working, not knowing what the problem was (feat. helpful non-class member)
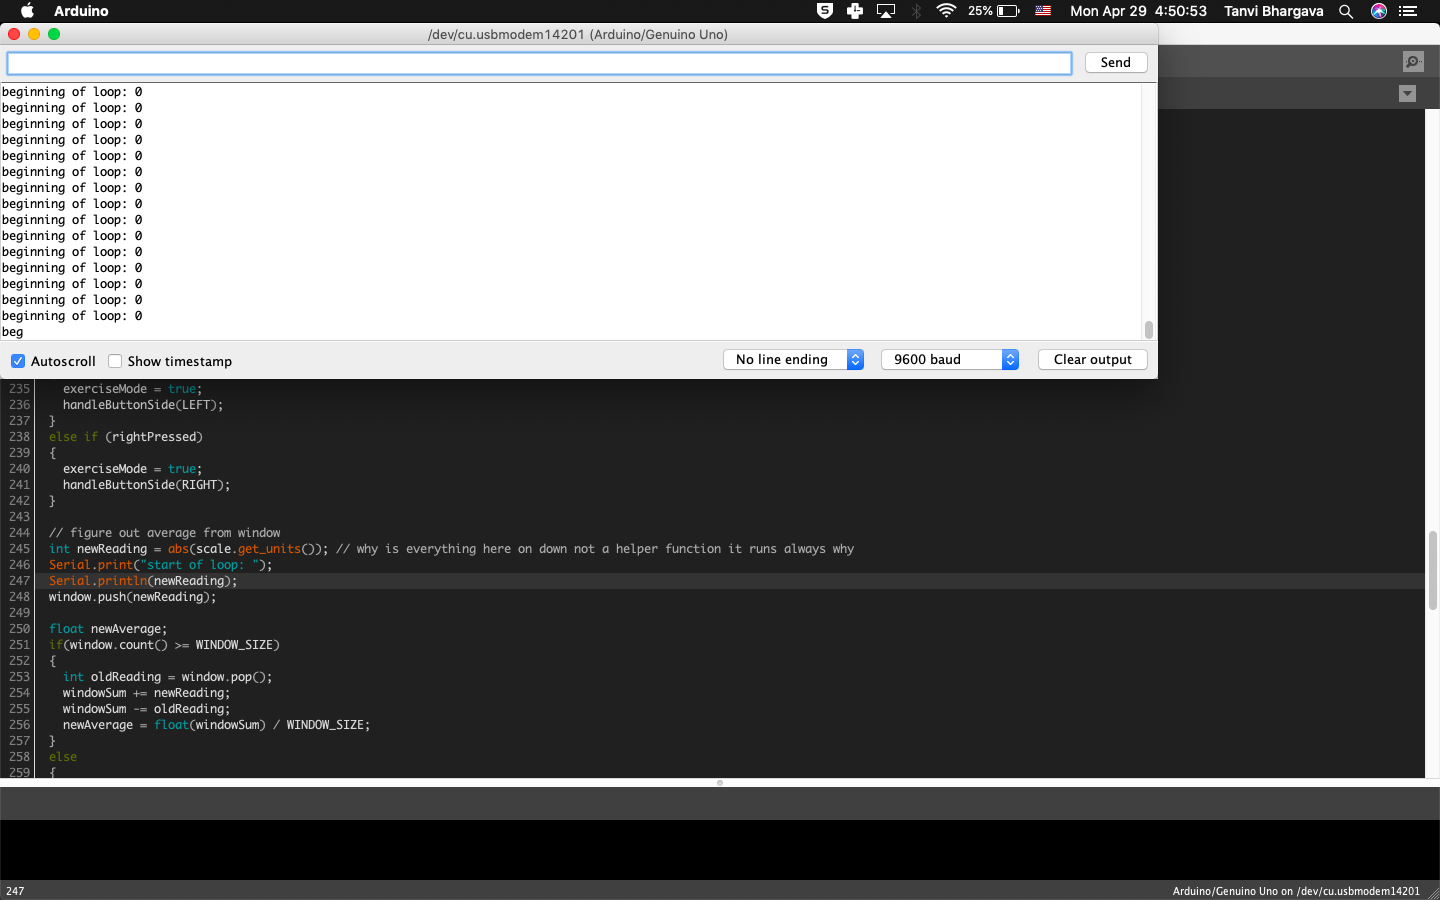
Frustration with device – it was not communicating with the computer
The physical construction of the device was something we discussed at length. At first, we were debating whether to use a device mounted to the door (as in our final product) or to use something in line with a resistance band, to measure the force exerted by pulling on both sides of the band. Then, we needed to decide how best to house the load cell sensor as well as the screen and buttons interface – we considered having two parts to the project, so that the screen and buttons could perhaps be a separate handheld component. However, we decided against this as it would require two Arduinos and thus two sources of power, making the whole setup less clean. We eventually settled on a door-mounted, single-box design.

Sketches of ideas for housing the device and load cell
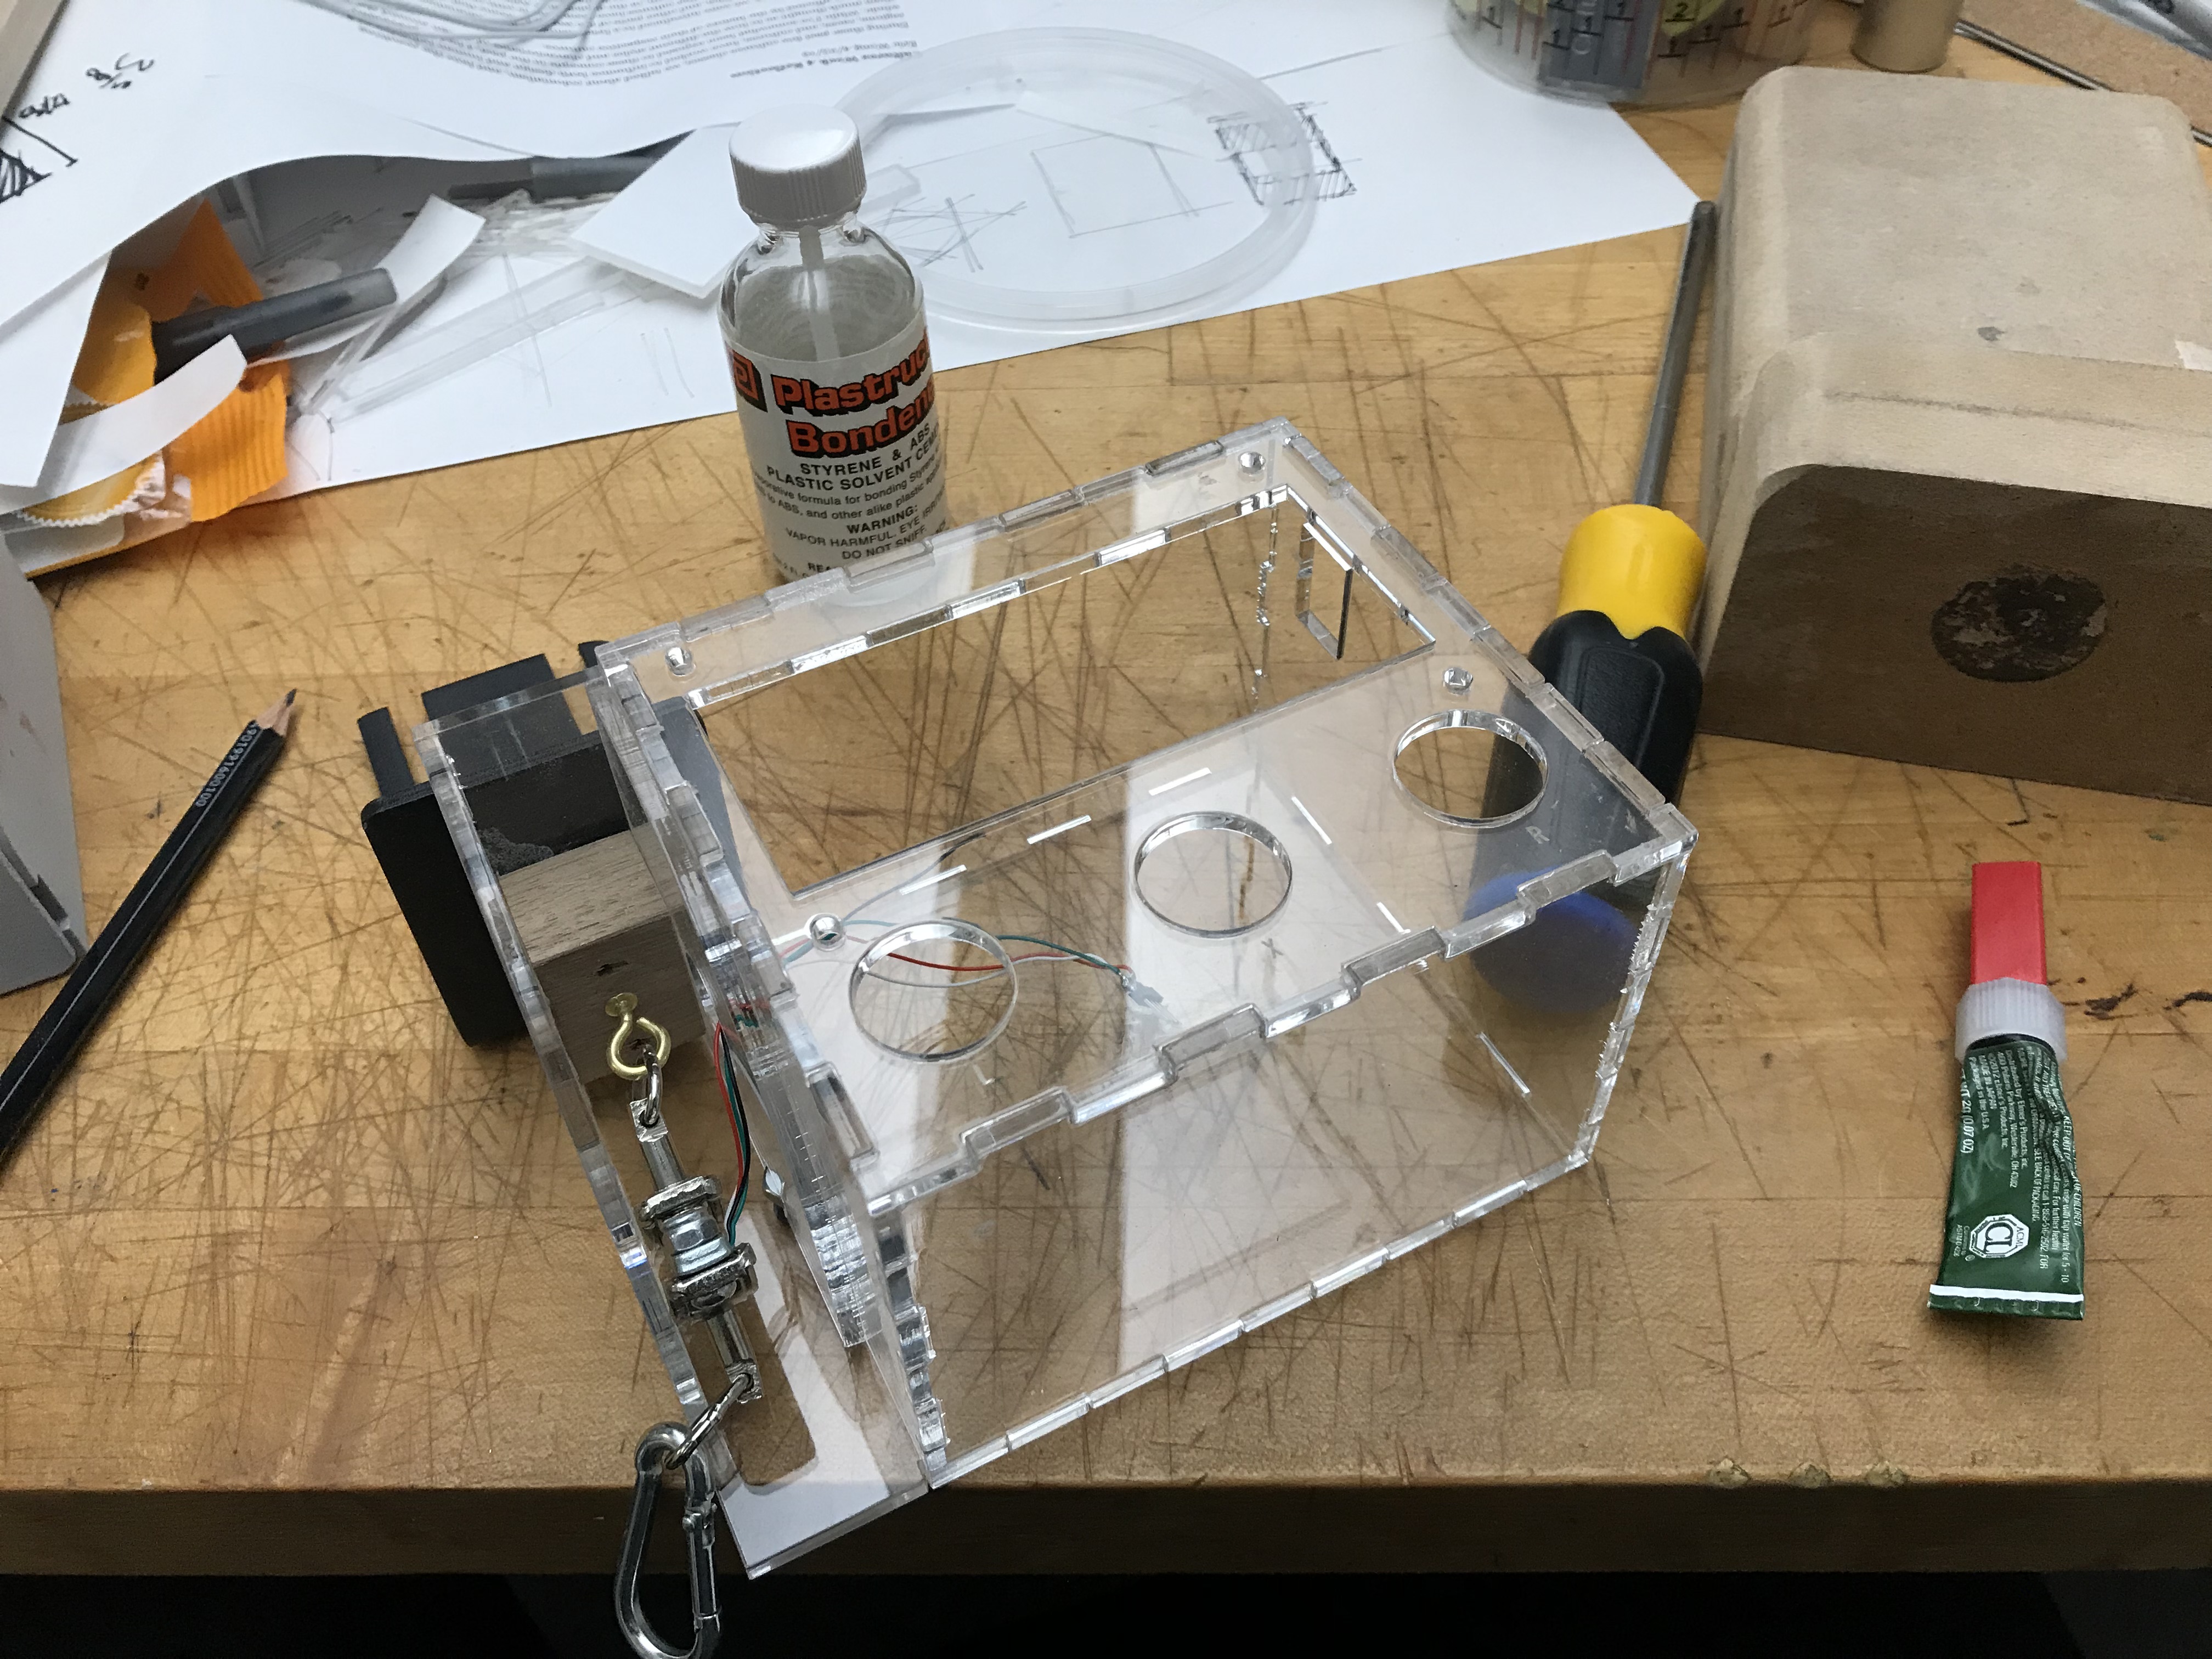
Assembling the housing using plastic solvent
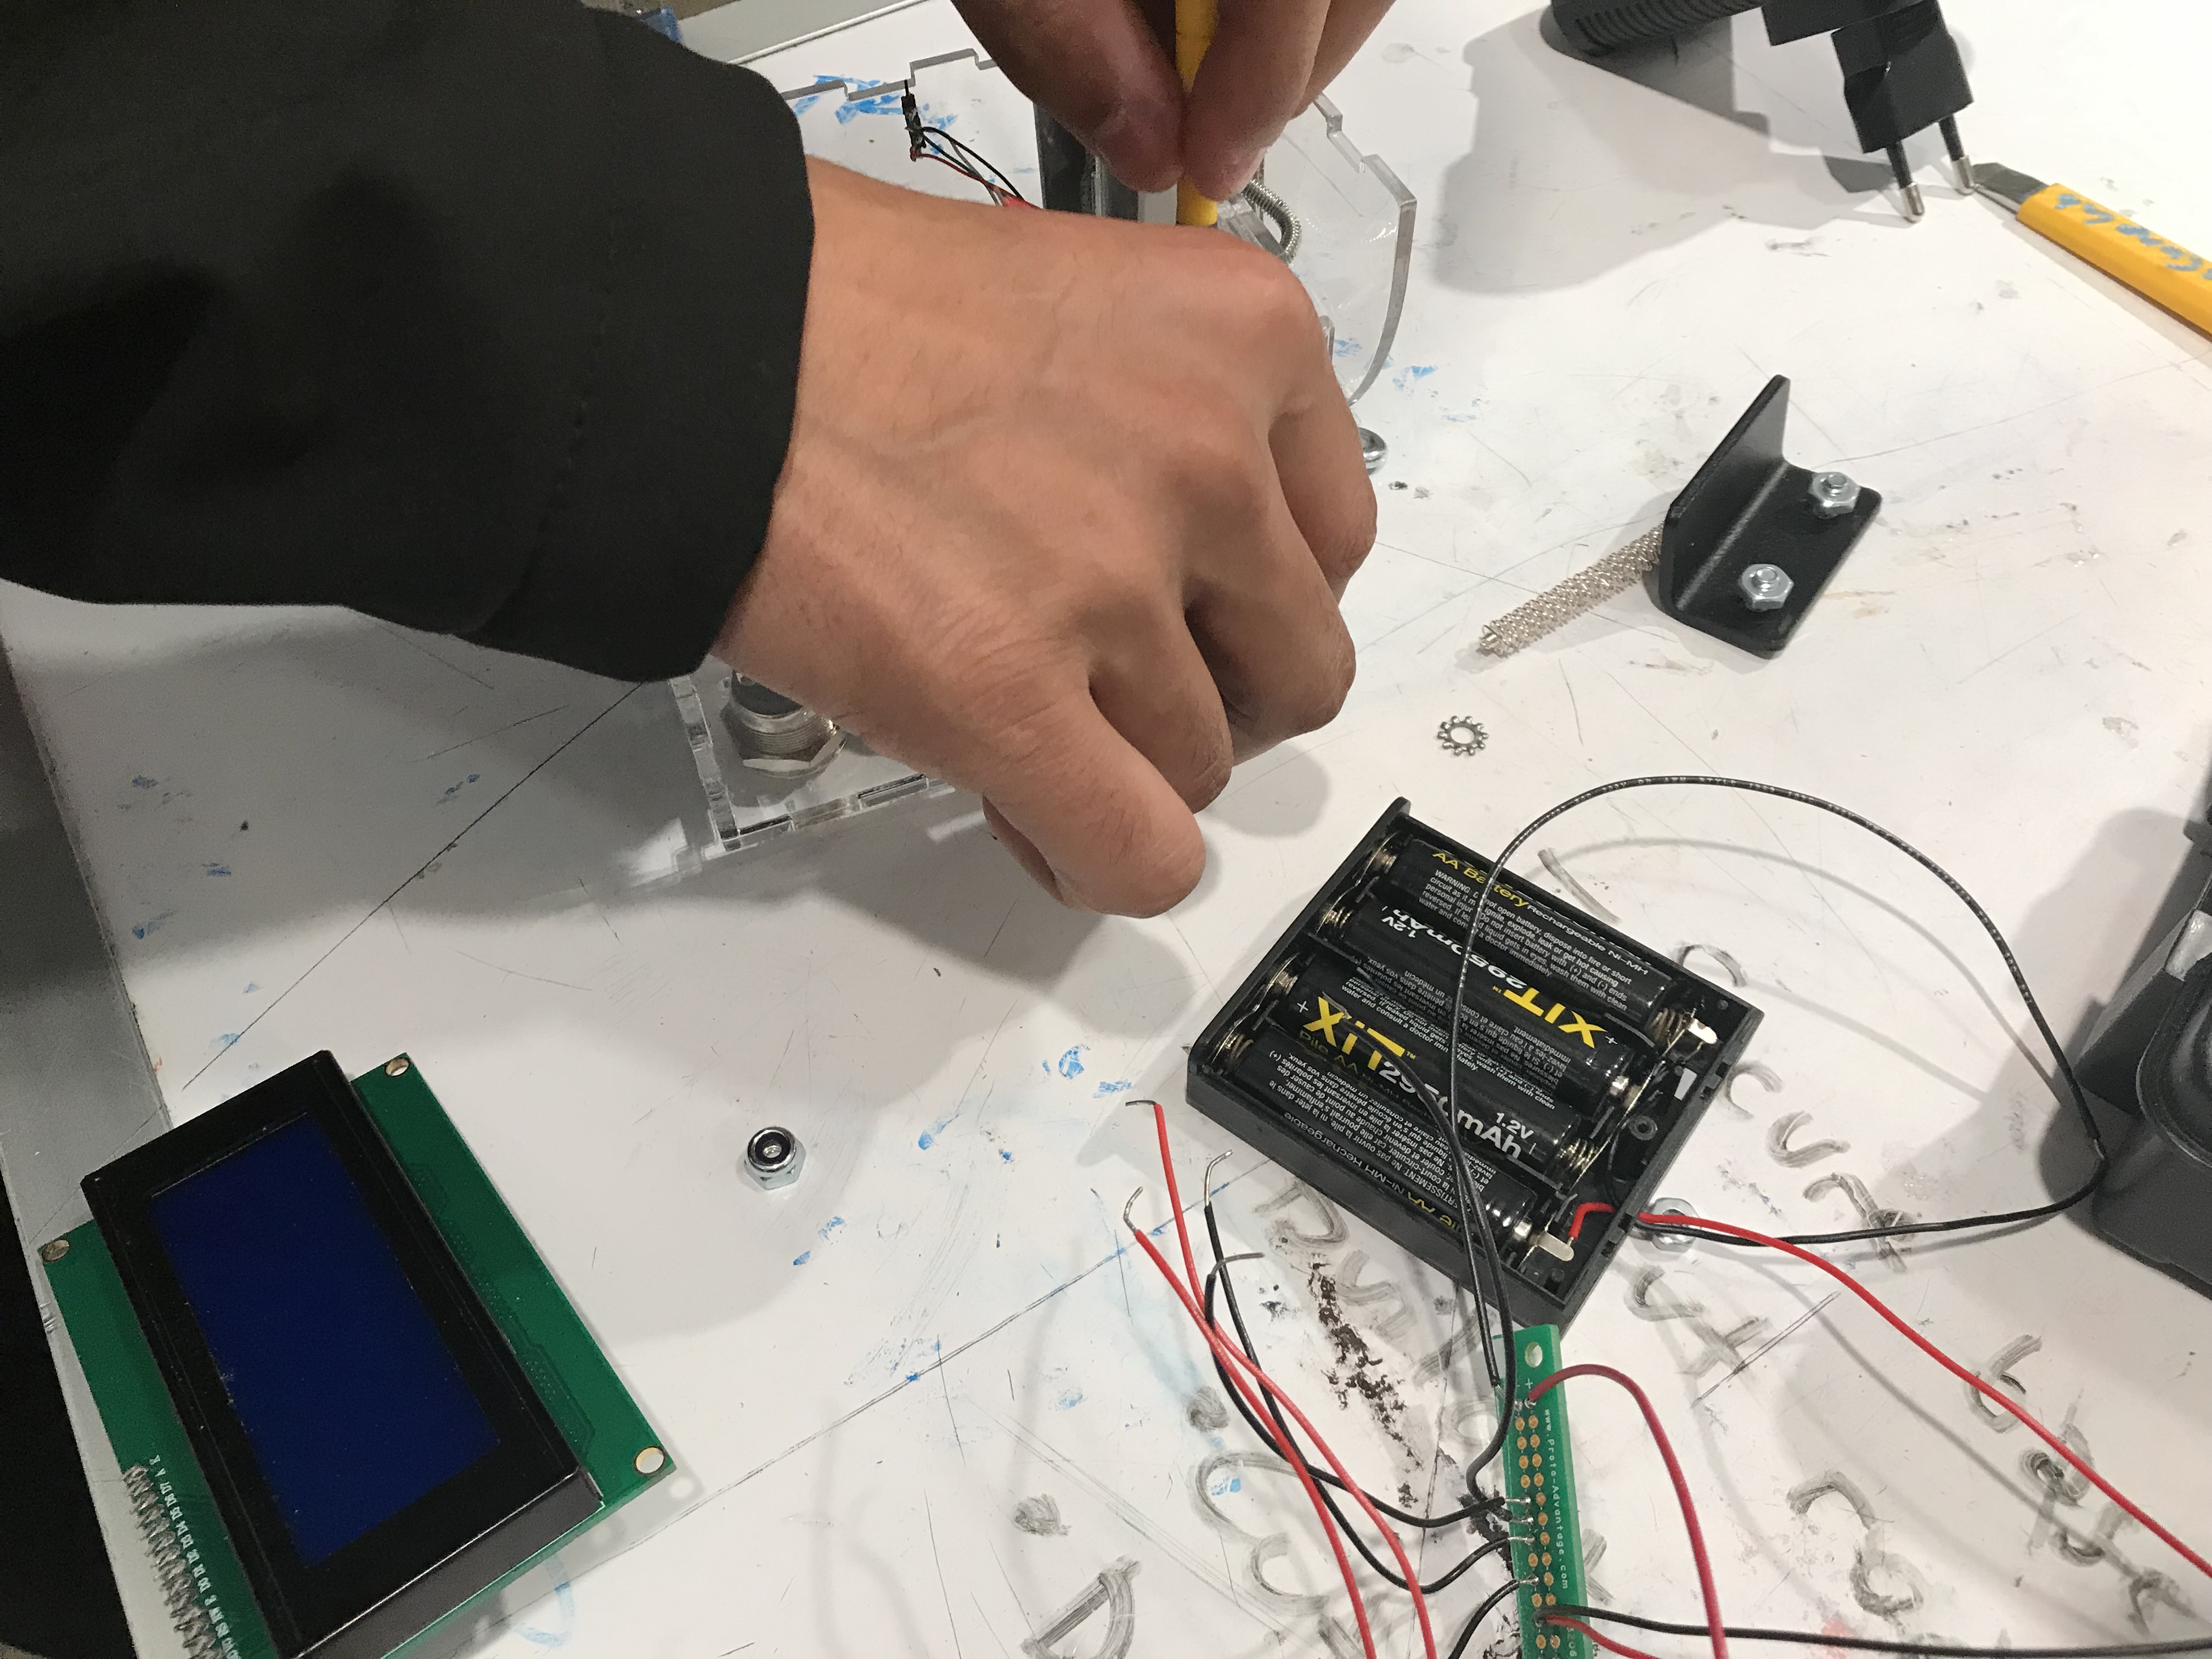
Fitting the electronics into the housing. Finding an intuitive way to organize the Arduino, sensors, battery holder, etc. proved more challenging than we initially thought.
We didn’t follow our schedule too well and underestimated how long it would take to physically wire up and build the device, but were able to manage the rest of our time fairly effectively. This was possible because we delegated certain aspects of the project to each group member according to their strengths.
Conclusions and Lessons Learned
Several people stated that they “would like to see a smaller device” more in line with the resistance band, as something smaller might be more convenient to use on a regular basis. We had already recognized this as a way to continue improving our design, and were relatively unsurprised that the size of the device was brought up by multiple people. However, a comment stated that it was unfortunate that the user had to bend down to press the buttons, which is a good point. We thought about ways we could have fixed this, but couldn’t find any solutions that didn’t involve having another, separate part of the device,
Many of our reviews mention that the device “feels fragile and makes the user afraid to apply full force”, although the force is not applied directly to the box. During the final crit, we found ourselves explaining this to people repeatedly, which is a sign that we should have made our device visibly appear more sturdy. We believe this perception of our device could be due to the transparency of the acrylic used for the housing, although this has no impact on its actual strength. We did not realize how much this would affect people’s perception of the device.
Our device intrigued the Osher students who observed it, and throughout the crit we were asked if the device could be applied to multiple different exercises. We showed them different ways to hold the resistance band to work different muscles, but a prevailing idea seemed to be to provide multiple attachments for the device (not just the resistance band). Our device is already capable of doing this, since the attachment would just need to be able to connect to a carabiner, but this feedback reinforced the idea of preserving the adaptability of our device to multiple exercises and situations. For example, having our device be able to handle “different door placements”, different exercises, and different amounts of force.
Working with Gary was a pleasure – he had a clear idea of what he wanted from the very beginning, which surprised us but was very helpful in getting us started. He was always available for feedback, and seemed very happy with the direction we were going in. However, we were working somewhat blindly, as he didn’t tell us what specific exercises he did and we just worked off our best guess of what he needed. We happened to make the right choices, but were I to do this again I would make sure to ask for all the information we need from the start.
Overall, we had a relatively even distribution of work over time, but fell off schedule and spent a large portion of a day putting everything together. Doing this again, we would attempt to stay on track and finish different parts of the project by the scheduled times. This way, we would be able to achieve our longer-term goals, such as making our design more compact by using a smaller Arduino or microcontroller.
It was a very rewarding experience to be able to make something suited to someone we have been talking to for over a month, and have it suit his specific needs, but also be applicable to many other situations. Gary actually wants to take this project forward and develop it into a more marketable product, which is unexpected, but it is very exciting that Gary thinks that our product has potential in the market.
Technical Details
Code
- <span class="com">/*
- * Strength Balance
- *
- * Description: We created a device that enables users to perform several different physical exercises
- * such as bicep curls, lateral raises, and many other resistance band exercises in a home gym setting.
- * They are then able to access information on their performance including max weight, the number of
- * repetitions, and how their left and right sides compare to each other. To accomplish this,
- * we decided on anchoring a sensor connected to a resistance band to the base of a door since we saw
- * this as a convenient location that everyone would have in their homes. Adjacent to the sensor is an
- * interface that users can use to see the results of their exercises.
- *
- *
- * This code takes load cell data, processes it, and displays the results on a
- * screen. It also responds to user input, by means of thee buttons.
- * Input: 3 buttons, 1 load cell sensor || Output: 1 LCD screen
- *
- * PIN 2 = Load Cell Sensor Pin CLK
- * PIN 3 = Load Cell Sensor Pin DOUT
- * PIN 8 = Clear Button
- * PIN 9 = Right Button
- * PIN 10 = Left Button
- *
- */</span><span class="pln">
- </span><span class="com">#include</span><span class="pln"> </span><span class="str"><SPI.h></span><span class="pln">
- </span><span class="com">#include</span><span class="pln"> </span><span class="str"><Wire.h></span><span class="pln">
- </span><span class="com">#include</span><span class="pln"> </span><span class="str"><LiquidCrystal_I2C.h></span><span class="pln">
- </span><span class="com">#include</span><span class="pln"> </span><span class="str">"Queue.h"</span><span class="pln">
- </span><span class="com">#include</span><span class="pln"> </span><span class="str">"HX711.h"</span><span class="pln">
- </span><span class="com">#define</span><span class="pln"> DOUT </span><span class="lit">3</span><span class="pln"> </span><span class="com">// Load Cell pin 1</span><span class="pln">
- </span><span class="com">#define</span><span class="pln"> CLK </span><span class="lit">2</span><span class="pln"> </span><span class="com">// Load Cell pin 2</span><span class="pln">
- </span><span class="com">#define</span><span class="pln"> BUTX </span><span class="lit">8</span><span class="pln"> </span><span class="com">// Clear Button</span><span class="pln">
- </span><span class="com">#define</span><span class="pln"> BUTR </span><span class="lit">9</span><span class="pln">
- </span><span class="com">#define</span><span class="pln"> BUTL </span><span class="lit">10</span><span class="pln">
- </span><span class="com">#define</span><span class="pln"> CALIBRATION_FACTOR </span><span class="pun">-</span><span class="lit">7050</span><span class="pln">
- </span><span class="com">#define</span><span class="pln"> WINDOW_SIZE </span><span class="lit">5</span><span class="pln">
- </span><span class="com">#define</span><span class="pln"> AVERAGES_SIZE </span><span class="lit">5</span><span class="pln">
- </span><span class="typ">LiquidCrystal_I2C</span><span class="pln"> screen</span><span class="pun">(</span><span class="lit">0x27</span><span class="pun">,</span><span class="pln"> </span><span class="lit">20</span><span class="pun">,</span><span class="pln"> </span><span class="lit">4</span><span class="pun">);</span><span class="pln">
- HX711 scale</span><span class="pun">;</span><span class="pln">
- </span><span class="kwd">const</span><span class="pln"> </span><span class="kwd">char</span><span class="pln"> LEFT </span><span class="pun">=</span><span class="pln"> </span><span class="lit">0</span><span class="pun">;</span><span class="pln">
- </span><span class="kwd">const</span><span class="pln"> </span><span class="kwd">char</span><span class="pln"> RIGHT </span><span class="pun">=</span><span class="pln"> </span><span class="lit">1</span><span class="pun">;</span><span class="pln">
- </span><span class="kwd">float</span><span class="pln"> calibrationFactor </span><span class="pun">=</span><span class="pln"> </span><span class="pun">-</span><span class="lit">7050</span><span class="pun">;</span><span class="pln">
- </span><span class="com">//calibration factor used by HX711 library to do some sort of data filtering</span><span class="pln">
- </span><span class="kwd">unsigned</span><span class="pln"> </span><span class="kwd">long</span><span class="pln"> startMillis</span><span class="pun">;</span><span class="pln">
- </span><span class="kwd">unsigned</span><span class="pln"> </span><span class="kwd">long</span><span class="pln"> timerMillis</span><span class="pun">;</span><span class="pln">
- </span><span class="kwd">unsigned</span><span class="pln"> </span><span class="kwd">long</span><span class="pln"> currentMillis</span><span class="pun">;</span><span class="pln">
- </span><span class="kwd">int</span><span class="pln"> exerciseTimer </span><span class="pun">=</span><span class="pln"> </span><span class="lit">0</span><span class="pun">;</span><span class="pln">
- </span><span class="kwd">int</span><span class="pln"> rightPressed </span><span class="pun">=</span><span class="pln"> </span><span class="lit">1</span><span class="pun">;</span><span class="pln">
- </span><span class="kwd">int</span><span class="pln"> leftPressed </span><span class="pun">=</span><span class="pln"> </span><span class="lit">1</span><span class="pun">;</span><span class="pln">
- </span><span class="kwd">int</span><span class="pln"> clearPressed </span><span class="pun">=</span><span class="pln"> </span><span class="lit">1</span><span class="pun">;</span><span class="pln">
- </span><span class="kwd">bool</span><span class="pln"> exerciseMode </span><span class="pun">=</span><span class="pln"> </span><span class="kwd">false</span><span class="pun">;</span><span class="pln">
- </span><span class="kwd">int</span><span class="pln"> leftMax </span><span class="pun">=</span><span class="pln"> </span><span class="lit">0</span><span class="pun">;</span><span class="pln">
- </span><span class="kwd">int</span><span class="pln"> rightMax </span><span class="pun">=</span><span class="pln"> </span><span class="lit">0</span><span class="pun">;</span><span class="pln">
- </span><span class="kwd">bool</span><span class="pln"> leftActivated </span><span class="pun">=</span><span class="pln"> </span><span class="kwd">false</span><span class="pun">;</span><span class="pln">
- </span><span class="kwd">bool</span><span class="pln"> rightActivated </span><span class="pun">=</span><span class="pln"> </span><span class="kwd">false</span><span class="pun">;</span><span class="pln">
- </span><span class="kwd">bool</span><span class="pln"> leftInUse </span><span class="pun">=</span><span class="pln"> </span><span class="kwd">false</span><span class="pun">;</span><span class="pln">
- </span><span class="kwd">bool</span><span class="pln"> rightInUse </span><span class="pun">=</span><span class="pln"> </span><span class="kwd">false</span><span class="pun">;</span><span class="pln">
- </span><span class="com">// window and average queues</span><span class="pln">
- </span><span class="typ">Queue</span><span class="str"><int></span><span class="pln"> window </span><span class="pun">=</span><span class="pln"> </span><span class="typ">Queue</span><span class="str"><int></span><span class="pun">(</span><span class="pln">WINDOW_SIZE</span><span class="pun">);</span><span class="pln">
- </span><span class="kwd">int</span><span class="pln"> windowSum </span><span class="pun">=</span><span class="pln"> </span><span class="lit">0</span><span class="pun">;</span><span class="pln">
- </span><span class="typ">Queue</span><span class="str"><float></span><span class="pln"> averages </span><span class="pun">=</span><span class="pln"> </span><span class="typ">Queue</span><span class="str"><float></span><span class="pun">(</span><span class="pln">AVERAGES_SIZE</span><span class="pun">);</span><span class="pln">
- </span><span class="kwd">float</span><span class="pln"> averagesSum </span><span class="pun">=</span><span class="pln"> </span><span class="lit">0</span><span class="pun">;</span><span class="pln">
- </span><span class="com">// variables to help with repetition counting</span><span class="pln">
- </span><span class="typ">String</span><span class="pln"> oldSlope </span><span class="pun">=</span><span class="pln"> </span><span class="str">"flat"</span><span class="pun">;</span><span class="pln">
- </span><span class="kwd">int</span><span class="pln"> repLeftCount </span><span class="pun">=</span><span class="pln"> </span><span class="lit">0</span><span class="pun">;</span><span class="pln">
- </span><span class="kwd">int</span><span class="pln"> repLeftWeightSum </span><span class="pun">=</span><span class="pln"> </span><span class="lit">0</span><span class="pun">;</span><span class="pln">
- </span><span class="kwd">int</span><span class="pln"> repRightCount </span><span class="pun">=</span><span class="pln"> </span><span class="lit">0</span><span class="pun">;</span><span class="pln">
- </span><span class="kwd">int</span><span class="pln"> repRightWeightSum </span><span class="pun">=</span><span class="pln"> </span><span class="lit">0</span><span class="pun">;</span><span class="pln">
- </span><span class="com">//--- HELPERS ---</span><span class="pln">
- </span><span class="kwd">void</span><span class="pln"> initLoadCell</span><span class="pun">()</span><span class="pln">
- </span><span class="pun">{</span><span class="pln">
- scale</span><span class="pun">.</span><span class="kwd">begin</span><span class="pun">(</span><span class="pln">DOUT</span><span class="pun">,</span><span class="pln"> CLK</span><span class="pun">);</span><span class="pln">
- scale</span><span class="pun">.</span><span class="pln">set_scale</span><span class="pun">(</span><span class="pln">CALIBRATION_FACTOR</span><span class="pun">);</span><span class="pln">
- scale</span><span class="pun">.</span><span class="pln">tare</span><span class="pun">();</span><span class="pln"> </span><span class="com">//Reset the scale to 0</span><span class="pln">
- </span><span class="pun">}</span><span class="pln">
- </span><span class="kwd">void</span><span class="pln"> homeScreen</span><span class="pun">()</span><span class="pln"> </span><span class="pun">{</span><span class="pln">
- screen</span><span class="pun">.</span><span class="pln">home</span><span class="pun">();</span><span class="pln">
- screen</span><span class="pun">.</span><span class="pln">clear</span><span class="pun">();</span><span class="pln">
- screen</span><span class="pun">.</span><span class="kwd">print</span><span class="pun">(</span><span class="str">"Press L/R to begin"</span><span class="pun">);</span><span class="pln">
- screen</span><span class="pun">.</span><span class="pln">setCursor</span><span class="pun">(</span><span class="lit">0</span><span class="pun">,</span><span class="pln"> </span><span class="lit">1</span><span class="pun">);</span><span class="pln">
- screen</span><span class="pun">.</span><span class="kwd">print</span><span class="pun">(</span><span class="str">"and end exercises."</span><span class="pun">);</span><span class="pln">
- screen</span><span class="pun">.</span><span class="pln">setCursor</span><span class="pun">(</span><span class="lit">0</span><span class="pun">,</span><span class="pln"> </span><span class="lit">2</span><span class="pun">);</span><span class="pln">
- screen</span><span class="pun">.</span><span class="kwd">print</span><span class="pun">(</span><span class="str">"Press X for results."</span><span class="pun">);</span><span class="pln">
- screen</span><span class="pun">.</span><span class="pln">display</span><span class="pun">();</span><span class="pln">
- </span><span class="pun">}</span><span class="pln">
- </span><span class="kwd">void</span><span class="pln"> beginExDisp</span><span class="pun">()</span><span class="pln"> </span><span class="pun">{</span><span class="pln">
- </span><span class="kwd">for</span><span class="pln"> </span><span class="pun">(</span><span class="kwd">int</span><span class="pln"> i </span><span class="pun">=</span><span class="pln"> </span><span class="lit">5</span><span class="pun">;</span><span class="pln"> i </span><span class="pun">></span><span class="pln"> </span><span class="lit">0</span><span class="pun">;</span><span class="pln"> i</span><span class="pun">--)</span><span class="pln"> </span><span class="pun">{</span><span class="pln">
- screen</span><span class="pun">.</span><span class="pln">home</span><span class="pun">();</span><span class="pln">
- screen</span><span class="pun">.</span><span class="pln">clear</span><span class="pun">();</span><span class="pln">
- screen</span><span class="pun">.</span><span class="kwd">print</span><span class="pun">(</span><span class="str">"Start in "</span><span class="pun">);</span><span class="pln">
- screen</span><span class="pun">.</span><span class="kwd">print</span><span class="pun">(</span><span class="pln">i</span><span class="pun">);</span><span class="pln">
- screen</span><span class="pun">.</span><span class="kwd">print</span><span class="pun">(</span><span class="str">" seconds"</span><span class="pun">);</span><span class="pln">
- screen</span><span class="pun">.</span><span class="pln">display</span><span class="pun">();</span><span class="pln">
- delay</span><span class="pun">(</span><span class="lit">1000</span><span class="pun">);</span><span class="pln">
- </span><span class="pun">}</span><span class="pln">
- screen</span><span class="pun">.</span><span class="pln">clear</span><span class="pun">();</span><span class="pln">
- screen</span><span class="pun">.</span><span class="kwd">print</span><span class="pun">(</span><span class="str">"Go!"</span><span class="pun">);</span><span class="pln">
- delay</span><span class="pun">(</span><span class="lit">500</span><span class="pun">);</span><span class="pln">
- screen</span><span class="pun">.</span><span class="pln">display</span><span class="pun">();</span><span class="pln">
- startMillis </span><span class="pun">=</span><span class="pln"> millis</span><span class="pun">();</span><span class="pln">
- exerciseTimer </span><span class="pun">=</span><span class="pln"> </span><span class="lit">0</span><span class="pun">;</span><span class="pln">
- </span><span class="pun">}</span><span class="pln">
- </span><span class="kwd">void</span><span class="pln"> handleButtonSide</span><span class="pun">(</span><span class="kwd">char</span><span class="pln"> side</span><span class="pun">)</span><span class="pln"> </span><span class="pun">{</span><span class="pln">
- beginExDisp</span><span class="pun">();</span><span class="pln">
- </span><span class="kwd">if</span><span class="pln"> </span><span class="pun">(</span><span class="pln">side </span><span class="pun">==</span><span class="pln"> LEFT</span><span class="pun">)</span><span class="pln">
- </span><span class="pun">{</span><span class="pln">
- leftActivated </span><span class="pun">=</span><span class="pln"> </span><span class="kwd">true</span><span class="pun">;</span><span class="pln">
- leftInUse </span><span class="pun">=</span><span class="pln"> </span><span class="kwd">true</span><span class="pun">;</span><span class="pln">
- rightInUse </span><span class="pun">=</span><span class="pln"> </span><span class="kwd">false</span><span class="pun">;</span><span class="pln">
- </span><span class="pun">}</span><span class="pln">
- </span><span class="kwd">else</span><span class="pln">
- </span><span class="pun">{</span><span class="pln">
- rightActivated </span><span class="pun">=</span><span class="pln"> </span><span class="kwd">true</span><span class="pun">;</span><span class="pln">
- leftInUse </span><span class="pun">=</span><span class="pln"> </span><span class="kwd">false</span><span class="pun">;</span><span class="pln">
- rightInUse </span><span class="pun">=</span><span class="pln"> </span><span class="kwd">true</span><span class="pun">;</span><span class="pln">
- </span><span class="pun">}</span><span class="pln">
- </span><span class="pun">}</span><span class="pln">
- </span><span class="kwd">void</span><span class="pln"> handleButtonClear</span><span class="pun">()</span><span class="pln"> </span><span class="pun">{</span><span class="pln">
- </span><span class="com">// if both the left and right buttons were pressed during </span><span class="pln">
- </span><span class="com">// the last exercise set</span><span class="pln">
- screen</span><span class="pun">.</span><span class="pln">clear</span><span class="pun">();</span><span class="pln">
- </span><span class="kwd">if</span><span class="pln"> </span><span class="pun">(</span><span class="pln">leftActivated </span><span class="pun">&&</span><span class="pln"> rightActivated</span><span class="pun">)</span><span class="pln">
- </span><span class="pun">{</span><span class="pln">
- screen</span><span class="pun">.</span><span class="kwd">print</span><span class="pun">(</span><span class="str">"Left Max: "</span><span class="pun">);</span><span class="pln">
- screen</span><span class="pun">.</span><span class="kwd">print</span><span class="pun">(</span><span class="pln">leftMax</span><span class="pun">);</span><span class="pln">
- screen</span><span class="pun">.</span><span class="pln">setCursor</span><span class="pun">(</span><span class="lit">0</span><span class="pun">,</span><span class="pln"> </span><span class="lit">1</span><span class="pun">);</span><span class="pln">
- screen</span><span class="pun">.</span><span class="kwd">print</span><span class="pun">(</span><span class="str">"Reps: "</span><span class="pun">);</span><span class="pln">
- screen</span><span class="pun">.</span><span class="kwd">print</span><span class="pun">(</span><span class="pln">repLeftCount</span><span class="pun">);</span><span class="pln">
- screen</span><span class="pun">.</span><span class="pln">setCursor</span><span class="pun">(</span><span class="lit">0</span><span class="pun">,</span><span class="pln"> </span><span class="lit">2</span><span class="pun">);</span><span class="pln">
- screen</span><span class="pun">.</span><span class="kwd">print</span><span class="pun">(</span><span class="str">"Avg Weight: "</span><span class="pun">);</span><span class="pln">
- </span><span class="kwd">float</span><span class="pln"> leftAvg </span><span class="pun">=</span><span class="pln"> </span><span class="pun">(</span><span class="kwd">float</span><span class="pun">)</span><span class="pln">repLeftWeightSum </span><span class="pun">/</span><span class="pln"> </span><span class="pun">(</span><span class="kwd">float</span><span class="pun">)</span><span class="pln">repLeftCount</span><span class="pun">;</span><span class="pln">
- screen</span><span class="pun">.</span><span class="kwd">print</span><span class="pun">(</span><span class="pln">leftAvg</span><span class="pun">);</span><span class="pln">
- delay</span><span class="pun">(</span><span class="lit">3000</span><span class="pun">);</span><span class="pln">
- screen</span><span class="pun">.</span><span class="pln">clear</span><span class="pun">();</span><span class="pln">
- screen</span><span class="pun">.</span><span class="kwd">print</span><span class="pun">(</span><span class="str">"Right Max: "</span><span class="pun">);</span><span class="pln">
- screen</span><span class="pun">.</span><span class="kwd">print</span><span class="pun">(</span><span class="pln">rightMax</span><span class="pun">);</span><span class="pln">
- screen</span><span class="pun">.</span><span class="pln">setCursor</span><span class="pun">(</span><span class="lit">0</span><span class="pun">,</span><span class="pln"> </span><span class="lit">1</span><span class="pun">);</span><span class="pln">
- screen</span><span class="pun">.</span><span class="kwd">print</span><span class="pun">(</span><span class="str">"Reps: "</span><span class="pun">);</span><span class="pln">
- screen</span><span class="pun">.</span><span class="kwd">print</span><span class="pun">(</span><span class="pln">repRightCount</span><span class="pun">);</span><span class="pln">
- screen</span><span class="pun">.</span><span class="pln">setCursor</span><span class="pun">(</span><span class="lit">0</span><span class="pun">,</span><span class="pln"> </span><span class="lit">2</span><span class="pun">);</span><span class="pln">
- screen</span><span class="pun">.</span><span class="kwd">print</span><span class="pun">(</span><span class="str">"Avg Weight: "</span><span class="pun">);</span><span class="pln">
- </span><span class="kwd">float</span><span class="pln"> rightAvg </span><span class="pun">=</span><span class="pln"> </span><span class="pun">(</span><span class="kwd">float</span><span class="pun">)</span><span class="pln">repRightWeightSum </span><span class="pun">/</span><span class="pln"> </span><span class="pun">(</span><span class="kwd">float</span><span class="pun">)</span><span class="pln">repRightCount</span><span class="pun">;</span><span class="pln">
- screen</span><span class="pun">.</span><span class="kwd">print</span><span class="pun">(</span><span class="pln">rightAvg</span><span class="pun">);</span><span class="pln">
- delay</span><span class="pun">(</span><span class="lit">3000</span><span class="pun">);</span><span class="pln">
- </span><span class="kwd">if</span><span class="pln"> </span><span class="pun">(!(</span><span class="pln">leftAvg </span><span class="pun">==</span><span class="pln"> </span><span class="lit">0</span><span class="pun">))</span><span class="pln"> </span><span class="pun">{</span><span class="pln">
- screen</span><span class="pun">.</span><span class="pln">clear</span><span class="pun">();</span><span class="pln">
- screen</span><span class="pun">.</span><span class="kwd">print</span><span class="pun">(</span><span class="str">"Right : Left = "</span><span class="pun">);</span><span class="pln">
- screen</span><span class="pun">.</span><span class="pln">setCursor</span><span class="pun">(</span><span class="lit">0</span><span class="pun">,</span><span class="pln"> </span><span class="lit">1</span><span class="pun">);</span><span class="pln">
- screen</span><span class="pun">.</span><span class="kwd">print</span><span class="pun">(</span><span class="pln">rightAvg</span><span class="pun">);</span><span class="pln">
- screen</span><span class="pun">.</span><span class="kwd">print</span><span class="pun">(</span><span class="str">" : "</span><span class="pun">);</span><span class="pln">
- screen</span><span class="pun">.</span><span class="kwd">print</span><span class="pun">(</span><span class="pln">leftAvg</span><span class="pun">);</span><span class="pln">
- delay</span><span class="pun">(</span><span class="lit">3000</span><span class="pun">);</span><span class="pln">
- </span><span class="pun">}</span><span class="pln">
- </span><span class="pun">}</span><span class="pln">
- </span><span class="kwd">else</span><span class="pln"> </span><span class="kwd">if</span><span class="pln"> </span><span class="pun">(</span><span class="pln">leftActivated</span><span class="pun">)</span><span class="pln">
- </span><span class="pun">{</span><span class="pln">
- screen</span><span class="pun">.</span><span class="kwd">print</span><span class="pun">(</span><span class="str">"Left Max: "</span><span class="pun">);</span><span class="pln">
- screen</span><span class="pun">.</span><span class="kwd">print</span><span class="pun">(</span><span class="pln">leftMax</span><span class="pun">);</span><span class="pln">
- screen</span><span class="pun">.</span><span class="pln">setCursor</span><span class="pun">(</span><span class="lit">0</span><span class="pun">,</span><span class="pln"> </span><span class="lit">1</span><span class="pun">);</span><span class="pln">
- screen</span><span class="pun">.</span><span class="kwd">print</span><span class="pun">(</span><span class="str">"Reps: "</span><span class="pun">);</span><span class="pln">
- screen</span><span class="pun">.</span><span class="kwd">print</span><span class="pun">(</span><span class="pln">repLeftCount</span><span class="pun">);</span><span class="pln">
- screen</span><span class="pun">.</span><span class="pln">setCursor</span><span class="pun">(</span><span class="lit">0</span><span class="pun">,</span><span class="pln"> </span><span class="lit">2</span><span class="pun">);</span><span class="pln">
- screen</span><span class="pun">.</span><span class="kwd">print</span><span class="pun">(</span><span class="str">"Avg Weight: "</span><span class="pun">);</span><span class="pln">
- </span><span class="kwd">float</span><span class="pln"> leftAvg </span><span class="pun">=</span><span class="pln"> </span><span class="pun">(</span><span class="kwd">float</span><span class="pun">)</span><span class="pln">repLeftWeightSum </span><span class="pun">/</span><span class="pln"> </span><span class="pun">(</span><span class="kwd">float</span><span class="pun">)</span><span class="pln">repLeftCount</span><span class="pun">;</span><span class="pln">
- </span><span class="typ">Serial</span><span class="pun">.</span><span class="kwd">print</span><span class="pun">(</span><span class="pln">leftAvg</span><span class="pun">);</span><span class="pln">
- screen</span><span class="pun">.</span><span class="kwd">print</span><span class="pun">(</span><span class="pln">leftAvg</span><span class="pun">);</span><span class="pln">
- delay</span><span class="pun">(</span><span class="lit">3000</span><span class="pun">);</span><span class="pln">
- </span><span class="pun">}</span><span class="pln">
- </span><span class="kwd">else</span><span class="pln"> </span><span class="kwd">if</span><span class="pln"> </span><span class="pun">(</span><span class="pln">rightActivated</span><span class="pun">)</span><span class="pln">
- </span><span class="pun">{</span><span class="pln">
- screen</span><span class="pun">.</span><span class="kwd">print</span><span class="pun">(</span><span class="str">"Right Max: "</span><span class="pun">);</span><span class="pln">
- screen</span><span class="pun">.</span><span class="kwd">print</span><span class="pun">(</span><span class="pln">rightMax</span><span class="pun">);</span><span class="pln">
- screen</span><span class="pun">.</span><span class="pln">setCursor</span><span class="pun">(</span><span class="lit">0</span><span class="pun">,</span><span class="pln"> </span><span class="lit">1</span><span class="pun">);</span><span class="pln">
- screen</span><span class="pun">.</span><span class="kwd">print</span><span class="pun">(</span><span class="str">"Reps: "</span><span class="pun">);</span><span class="pln">
- screen</span><span class="pun">.</span><span class="kwd">print</span><span class="pun">(</span><span class="pln">repRightCount</span><span class="pun">);</span><span class="pln">
- screen</span><span class="pun">.</span><span class="pln">setCursor</span><span class="pun">(</span><span class="lit">0</span><span class="pun">,</span><span class="pln"> </span><span class="lit">2</span><span class="pun">);</span><span class="pln">
- screen</span><span class="pun">.</span><span class="kwd">print</span><span class="pun">(</span><span class="str">"Avg Weight: "</span><span class="pun">);</span><span class="pln">
- </span><span class="kwd">float</span><span class="pln"> rightAvg </span><span class="pun">=</span><span class="pln"> </span><span class="pun">(</span><span class="kwd">float</span><span class="pun">)</span><span class="pln">repRightWeightSum </span><span class="pun">/</span><span class="pln"> </span><span class="pun">(</span><span class="kwd">float</span><span class="pun">)</span><span class="pln">repRightCount</span><span class="pun">;</span><span class="pln">
- </span><span class="typ">Serial</span><span class="pun">.</span><span class="kwd">print</span><span class="pun">(</span><span class="pln">rightAvg</span><span class="pun">);</span><span class="pln">
- screen</span><span class="pun">.</span><span class="kwd">print</span><span class="pun">(</span><span class="pln">rightAvg</span><span class="pun">);</span><span class="pln">
- delay</span><span class="pun">(</span><span class="lit">3000</span><span class="pun">);</span><span class="pln">
- </span><span class="pun">}</span><span class="pln">
- </span><span class="kwd">else</span><span class="pln">
- </span><span class="pun">{</span><span class="pln">
- screen</span><span class="pun">.</span><span class="kwd">print</span><span class="pun">(</span><span class="str">"No reps counted!"</span><span class="pun">);</span><span class="pln">
- delay</span><span class="pun">(</span><span class="lit">500</span><span class="pun">);</span><span class="pln">
- </span><span class="pun">}</span><span class="pln">
- </span><span class="com">// reset globals</span><span class="pln">
- leftMax </span><span class="pun">=</span><span class="pln"> </span><span class="lit">0.0</span><span class="pun">;</span><span class="pln">
- rightMax </span><span class="pun">=</span><span class="pln"> </span><span class="lit">0.0</span><span class="pun">;</span><span class="pln">
- leftActivated </span><span class="pun">=</span><span class="pln"> </span><span class="kwd">false</span><span class="pun">;</span><span class="pln">
- rightActivated </span><span class="pun">=</span><span class="pln"> </span><span class="kwd">false</span><span class="pun">;</span><span class="pln">
- leftInUse </span><span class="pun">=</span><span class="pln"> </span><span class="kwd">false</span><span class="pun">;</span><span class="pln">
- rightInUse </span><span class="pun">=</span><span class="pln"> </span><span class="kwd">false</span><span class="pun">;</span><span class="pln">
- homeScreen</span><span class="pun">();</span><span class="pln">
- initLoadCell</span><span class="pun">();</span><span class="pln">
- repLeftCount </span><span class="pun">=</span><span class="pln"> </span><span class="lit">0</span><span class="pun">;</span><span class="pln">
- repLeftWeightSum </span><span class="pun">=</span><span class="pln"> </span><span class="lit">0</span><span class="pun">;</span><span class="pln">
- repRightCount </span><span class="pun">=</span><span class="pln"> </span><span class="lit">0</span><span class="pun">;</span><span class="pln">
- repRightWeightSum </span><span class="pun">=</span><span class="pln"> </span><span class="lit">0</span><span class="pun">;</span><span class="pln">
- </span><span class="typ">Serial</span><span class="pun">.</span><span class="pln">println</span><span class="pun">(</span><span class="str">"reset reps"</span><span class="pun">);</span><span class="pln">
- </span><span class="pun">}</span><span class="pln">
- </span><span class="com">//--- MAIN CODE ---</span><span class="pln">
- </span><span class="kwd">void</span><span class="pln"> setup</span><span class="pun">()</span><span class="pln"> </span><span class="pun">{</span><span class="pln">
- </span><span class="typ">Serial</span><span class="pun">.</span><span class="kwd">begin</span><span class="pun">(</span><span class="lit">9600</span><span class="pun">);</span><span class="pln">
- pinMode</span><span class="pun">(</span><span class="pln">BUTR</span><span class="pun">,</span><span class="pln"> INPUT_PULLUP</span><span class="pun">);</span><span class="pln">
- pinMode</span><span class="pun">(</span><span class="pln">BUTL</span><span class="pun">,</span><span class="pln"> INPUT_PULLUP</span><span class="pun">);</span><span class="pln">
- pinMode</span><span class="pun">(</span><span class="pln">BUTX</span><span class="pun">,</span><span class="pln"> INPUT_PULLUP</span><span class="pun">);</span><span class="pln">
- screen</span><span class="pun">.</span><span class="pln">init</span><span class="pun">();</span><span class="pln">
- screen</span><span class="pun">.</span><span class="pln">backlight</span><span class="pun">();</span><span class="pln">
- screen</span><span class="pun">.</span><span class="kwd">print</span><span class="pun">(</span><span class="str">"Welcome, Gary!"</span><span class="pun">);</span><span class="pln">
- delay</span><span class="pun">(</span><span class="lit">1000</span><span class="pun">);</span><span class="pln">
- homeScreen</span><span class="pun">();</span><span class="pln">
- scale</span><span class="pun">.</span><span class="kwd">begin</span><span class="pun">(</span><span class="pln">DOUT</span><span class="pun">,</span><span class="pln"> CLK</span><span class="pun">);</span><span class="pln">
- scale</span><span class="pun">.</span><span class="pln">set_scale</span><span class="pun">(</span><span class="pln">CALIBRATION_FACTOR</span><span class="pun">);</span><span class="pln">
- scale</span><span class="pun">.</span><span class="pln">tare</span><span class="pun">();</span><span class="pln">
- startMillis </span><span class="pun">=</span><span class="pln"> millis</span><span class="pun">();</span><span class="pln">
- timerMillis </span><span class="pun">=</span><span class="pln"> millis</span><span class="pun">();</span><span class="pln">
- </span><span class="pun">}</span><span class="pln">
- </span><span class="kwd">void</span><span class="pln"> loop</span><span class="pun">()</span><span class="pln"> </span><span class="pun">{</span><span class="pln">
- screen</span><span class="pun">.</span><span class="pln">home</span><span class="pun">();</span><span class="pln">
- scale</span><span class="pun">.</span><span class="pln">set_scale</span><span class="pun">(</span><span class="pln">calibrationFactor</span><span class="pun">);</span><span class="pln">
- currentMillis </span><span class="pun">=</span><span class="pln"> millis</span><span class="pun">();</span><span class="pln">
- rightPressed </span><span class="pun">=</span><span class="pln"> </span><span class="pun">!</span><span class="pln">digitalRead</span><span class="pun">(</span><span class="pln">BUTR</span><span class="pun">);</span><span class="pln">
- leftPressed </span><span class="pun">=</span><span class="pln"> </span><span class="pun">!</span><span class="pln">digitalRead</span><span class="pun">(</span><span class="pln">BUTL</span><span class="pun">);</span><span class="pln">
- clearPressed </span><span class="pun">=</span><span class="pln"> </span><span class="pun">!</span><span class="pln">digitalRead</span><span class="pun">(</span><span class="pln">BUTX</span><span class="pun">);</span><span class="pln">
- </span><span class="kwd">if</span><span class="pln"> </span><span class="pun">(</span><span class="pln">clearPressed</span><span class="pun">)</span><span class="pln">
- </span><span class="pun">{</span><span class="pln">
- exerciseMode </span><span class="pun">=</span><span class="pln"> </span><span class="kwd">false</span><span class="pun">;</span><span class="pln">
- handleButtonClear</span><span class="pun">();</span><span class="pln">
- </span><span class="pun">}</span><span class="pln">
- </span><span class="kwd">else</span><span class="pln"> </span><span class="kwd">if</span><span class="pln"> </span><span class="pun">(</span><span class="pln">leftPressed</span><span class="pun">)</span><span class="pln">
- </span><span class="pun">{</span><span class="pln">
- exerciseMode </span><span class="pun">=</span><span class="pln"> </span><span class="kwd">true</span><span class="pun">;</span><span class="pln">
- handleButtonSide</span><span class="pun">(</span><span class="pln">LEFT</span><span class="pun">);</span><span class="pln">
- </span><span class="pun">}</span><span class="pln">
- </span><span class="kwd">else</span><span class="pln"> </span><span class="kwd">if</span><span class="pln"> </span><span class="pun">(</span><span class="pln">rightPressed</span><span class="pun">)</span><span class="pln">
- </span><span class="pun">{</span><span class="pln">
- exerciseMode </span><span class="pun">=</span><span class="pln"> </span><span class="kwd">true</span><span class="pun">;</span><span class="pln">
- handleButtonSide</span><span class="pun">(</span><span class="pln">RIGHT</span><span class="pun">);</span><span class="pln">
- </span><span class="pun">}</span><span class="pln">
- </span><span class="com">// figure out average from window</span><span class="pln">
- </span><span class="kwd">int</span><span class="pln"> newReading </span><span class="pun">=</span><span class="pln"> abs</span><span class="pun">(</span><span class="pln">scale</span><span class="pun">.</span><span class="pln">get_units</span><span class="pun">());</span><span class="pln">
- window</span><span class="pun">.</span><span class="pln">push</span><span class="pun">(</span><span class="pln">newReading</span><span class="pun">);</span><span class="pln">
- </span><span class="kwd">float</span><span class="pln"> newAverage</span><span class="pun">;</span><span class="pln">
- </span><span class="kwd">if</span><span class="pun">(</span><span class="pln">window</span><span class="pun">.</span><span class="pln">count</span><span class="pun">()</span><span class="pln"> </span><span class="pun">>=</span><span class="pln"> WINDOW_SIZE</span><span class="pun">)</span><span class="pln">
- </span><span class="pun">{</span><span class="pln">
- </span><span class="kwd">int</span><span class="pln"> oldReading </span><span class="pun">=</span><span class="pln"> window</span><span class="pun">.</span><span class="pln">pop</span><span class="pun">();</span><span class="pln">
- windowSum </span><span class="pun">+=</span><span class="pln"> newReading</span><span class="pun">;</span><span class="pln">
- windowSum </span><span class="pun">-=</span><span class="pln"> oldReading</span><span class="pun">;</span><span class="pln">
- newAverage </span><span class="pun">=</span><span class="pln"> </span><span class="kwd">float</span><span class="pun">(</span><span class="pln">windowSum</span><span class="pun">)</span><span class="pln"> </span><span class="pun">/</span><span class="pln"> WINDOW_SIZE</span><span class="pun">;</span><span class="pln">
- </span><span class="pun">}</span><span class="pln">
- </span><span class="kwd">else</span><span class="pln">
- </span><span class="pun">{</span><span class="pln">
- windowSum </span><span class="pun">+=</span><span class="pln"> newReading</span><span class="pun">;</span><span class="pln">
- newAverage </span><span class="pun">=</span><span class="pln"> </span><span class="kwd">float</span><span class="pun">(</span><span class="pln">windowSum</span><span class="pun">)</span><span class="pln"> </span><span class="pun">/</span><span class="pln"> window</span><span class="pun">.</span><span class="pln">count</span><span class="pun">();</span><span class="pln">
- </span><span class="pun">}</span><span class="pln">
- </span><span class="com">// figure out up/down from average</span><span class="pln">
- averages</span><span class="pun">.</span><span class="pln">push</span><span class="pun">(</span><span class="pln">newAverage</span><span class="pun">);</span><span class="pln">
- </span><span class="kwd">float</span><span class="pln"> oldTotal </span><span class="pun">=</span><span class="pln"> averagesSum</span><span class="pun">;</span><span class="pln">
- </span><span class="kwd">float</span><span class="pln"> newTotal</span><span class="pun">;</span><span class="pln">
- </span><span class="kwd">if</span><span class="pun">(</span><span class="pln">averages</span><span class="pun">.</span><span class="pln">count</span><span class="pun">()</span><span class="pln"> </span><span class="pun">>=</span><span class="pln"> AVERAGES_SIZE</span><span class="pun">)</span><span class="pln">
- </span><span class="pun">{</span><span class="pln">
- </span><span class="kwd">float</span><span class="pln"> oldAverage </span><span class="pun">=</span><span class="pln"> averages</span><span class="pun">.</span><span class="pln">pop</span><span class="pun">();</span><span class="pln">
- averagesSum </span><span class="pun">+=</span><span class="pln"> newAverage</span><span class="pun">;</span><span class="pln">
- averagesSum </span><span class="pun">-=</span><span class="pln"> oldAverage</span><span class="pun">;</span><span class="pln">
- newTotal </span><span class="pun">=</span><span class="pln"> averagesSum</span><span class="pun">;</span><span class="pln">
- </span><span class="pun">}</span><span class="pln">
- </span><span class="kwd">else</span><span class="pln">
- </span><span class="pun">{</span><span class="pln">
- averagesSum </span><span class="pun">+=</span><span class="pln"> newAverage</span><span class="pun">;</span><span class="pln">
- newTotal </span><span class="pun">=</span><span class="pln"> averagesSum</span><span class="pun">;</span><span class="pln">
- </span><span class="pun">}</span><span class="pln">
- </span><span class="com">// decide if up/down, adjust vars</span><span class="pln">
- </span><span class="com">// figure out the new slope</span><span class="pln">
- </span><span class="kwd">float</span><span class="pln"> difference </span><span class="pun">=</span><span class="pln"> newTotal </span><span class="pun">-</span><span class="pln"> oldTotal</span><span class="pun">;</span><span class="pln">
- </span><span class="typ">String</span><span class="pln"> newSlope </span><span class="pun">=</span><span class="pln"> </span><span class="str">""</span><span class="pun">;</span><span class="pln">
- </span><span class="kwd">if</span><span class="pln"> </span><span class="pun">(</span><span class="pln">difference </span><span class="pun"><=</span><span class="pln"> </span><span class="lit">0.02</span><span class="pln"> </span><span class="pun">&&</span><span class="pln"> difference </span><span class="pun">>=</span><span class="pln"> </span><span class="pun">-</span><span class="lit">0.02</span><span class="pun">)</span><span class="pln">
- </span><span class="pun">{</span><span class="pln">
- newSlope </span><span class="pun">=</span><span class="pln"> </span><span class="str">"flat"</span><span class="pun">;</span><span class="pln">
- </span><span class="pun">}</span><span class="pln">
- </span><span class="kwd">else</span><span class="pln"> </span><span class="kwd">if</span><span class="pun">(</span><span class="pln">difference </span><span class="pun">>=</span><span class="pln"> </span><span class="lit">0.02</span><span class="pun">)</span><span class="pln">
- </span><span class="pun">{</span><span class="pln">
- newSlope </span><span class="pun">=</span><span class="pln"> </span><span class="str">"positive"</span><span class="pun">;</span><span class="pln">
- </span><span class="pun">}</span><span class="pln">
- </span><span class="kwd">else</span><span class="pln"> </span><span class="kwd">if</span><span class="pun">(</span><span class="pln">difference </span><span class="pun"><=</span><span class="pln"> </span><span class="pun">-</span><span class="lit">0.02</span><span class="pun">)</span><span class="pln">
- </span><span class="pun">{</span><span class="pln">
- newSlope </span><span class="pun">=</span><span class="pln"> </span><span class="str">"negative"</span><span class="pun">;</span><span class="pln">
- </span><span class="pun">}</span><span class="pln">
- </span><span class="com">// decide if a repitition was performed</span><span class="pln">
- </span><span class="kwd">if</span><span class="pln"> </span><span class="pun">(</span><span class="pln">newSlope </span><span class="pun">==</span><span class="pln"> </span><span class="str">"negative"</span><span class="pln"> </span><span class="pun">&&</span><span class="pln"> oldSlope </span><span class="pun">==</span><span class="pln"> </span><span class="str">"positive"</span><span class="pun">)</span><span class="pln">
- </span><span class="pun">{</span><span class="pln">
- </span><span class="kwd">if</span><span class="pln"> </span><span class="pun">(</span><span class="pln">leftInUse</span><span class="pun">)</span><span class="pln">
- </span><span class="pun">{</span><span class="pln">
- repLeftCount</span><span class="pun">++;</span><span class="pln">
- repLeftWeightSum </span><span class="pun">+=</span><span class="pln"> newReading</span><span class="pun">;</span><span class="pln">
- </span><span class="typ">Serial</span><span class="pun">.</span><span class="pln">println</span><span class="pun">(</span><span class="str">"left side reading: "</span><span class="pun">);</span><span class="pln">
- </span><span class="typ">Serial</span><span class="pun">.</span><span class="kwd">print</span><span class="pun">(</span><span class="pln">newReading</span><span class="pun">);</span><span class="pln">
- </span><span class="pun">}</span><span class="pln">
- </span><span class="kwd">else</span><span class="pln"> </span><span class="kwd">if</span><span class="pun">(</span><span class="pln">rightInUse</span><span class="pun">)</span><span class="pln">
- </span><span class="pun">{</span><span class="pln">
- repRightCount</span><span class="pun">++;</span><span class="pln">
- repRightWeightSum </span><span class="pun">+=</span><span class="pln"> newReading</span><span class="pun">;</span><span class="pln">
- </span><span class="typ">Serial</span><span class="pun">.</span><span class="pln">println</span><span class="pun">(</span><span class="str">"Right side reading: "</span><span class="pun">);</span><span class="pln">
- </span><span class="typ">Serial</span><span class="pun">.</span><span class="kwd">print</span><span class="pun">(</span><span class="pln">newReading</span><span class="pun">);</span><span class="pln">
- </span><span class="pun">}</span><span class="pln">
- </span><span class="pun">}</span><span class="pln">
- oldSlope </span><span class="pun">=</span><span class="pln"> newSlope</span><span class="pun">;</span><span class="pln">
- </span><span class="com">// update maximum reading</span><span class="pln">
- </span><span class="kwd">if</span><span class="pln"> </span><span class="pun">(</span><span class="pln">leftInUse </span><span class="pun">&&</span><span class="pln"> </span><span class="pun">(</span><span class="pln">leftMax </span><span class="pun"><</span><span class="pln"> newReading</span><span class="pun">))</span><span class="pln">
- </span><span class="pun">{</span><span class="pln">
- leftMax </span><span class="pun">=</span><span class="pln"> newReading</span><span class="pun">;</span><span class="pln">
- </span><span class="pun">}</span><span class="pln">
- </span><span class="kwd">else</span><span class="pln"> </span><span class="kwd">if</span><span class="pun">(</span><span class="pln">rightInUse </span><span class="pun">&&</span><span class="pln"> </span><span class="pun">(</span><span class="pln">rightMax </span><span class="pun"><</span><span class="pln"> newReading</span><span class="pun">))</span><span class="pln">
- </span><span class="pun">{</span><span class="pln">
- rightMax </span><span class="pun">=</span><span class="pln"> newReading</span><span class="pun">;</span><span class="pln">
- </span><span class="pun">}</span><span class="pln">
- </span><span class="kwd">if</span><span class="pln"> </span><span class="pun">(</span><span class="pln">exerciseMode</span><span class="pun">)</span><span class="pln"> </span><span class="pun">{</span><span class="pln">
- </span><span class="kwd">if</span><span class="pln"> </span><span class="pun">(</span><span class="pln">currentMillis </span><span class="pun">-</span><span class="pln"> timerMillis </span><span class="pun">>=</span><span class="pln"> </span><span class="lit">1000</span><span class="pun">)</span><span class="pln"> </span><span class="pun">{</span><span class="pln"> </span><span class="com">// keep track of time passed while exercising</span><span class="pln">
- exerciseTimer</span><span class="pun">++;</span><span class="pln">
- screen</span><span class="pun">.</span><span class="pln">clear</span><span class="pun">();</span><span class="pln">
- screen</span><span class="pun">.</span><span class="kwd">print</span><span class="pun">(</span><span class="str">"Time: "</span><span class="pun">);</span><span class="pln">
- screen</span><span class="pun">.</span><span class="kwd">print</span><span class="pun">(</span><span class="pln">exerciseTimer</span><span class="pun">);</span><span class="pln">
- screen</span><span class="pun">.</span><span class="kwd">print</span><span class="pun">(</span><span class="str">" seconds"</span><span class="pun">);</span><span class="pln">
- screen</span><span class="pun">.</span><span class="pln">setCursor</span><span class="pun">(</span><span class="lit">0</span><span class="pun">,</span><span class="lit">1</span><span class="pun">);</span><span class="pln">
- screen</span><span class="pun">.</span><span class="kwd">print</span><span class="pun">(</span><span class="str">"Working "</span><span class="pun">);</span><span class="pln">
- </span><span class="kwd">if</span><span class="pln"> </span><span class="pun">(</span><span class="pln">leftInUse</span><span class="pun">)</span><span class="pln"> </span><span class="pun">{</span><span class="pln"> screen</span><span class="pun">.</span><span class="kwd">print</span><span class="pun">(</span><span class="str">"left "</span><span class="pun">);</span><span class="pln"> </span><span class="pun">}</span><span class="pln">
- </span><span class="kwd">else</span><span class="pln"> </span><span class="pun">{</span><span class="pln"> screen</span><span class="pun">.</span><span class="kwd">print</span><span class="pun">(</span><span class="str">"right "</span><span class="pun">);</span><span class="pln"> </span><span class="pun">}</span><span class="pln">
- screen</span><span class="pun">.</span><span class="kwd">print</span><span class="pun">(</span><span class="str">"side."</span><span class="pun">);</span><span class="pln">
- screen</span><span class="pun">.</span><span class="pln">display</span><span class="pun">();</span><span class="pln">
- timerMillis </span><span class="pun">=</span><span class="pln"> millis</span><span class="pun">();</span><span class="pln">
- </span><span class="pun">}</span><span class="pln">
- </span><span class="pun">}</span><span class="pln">
- </span><span class="pun">}</span>
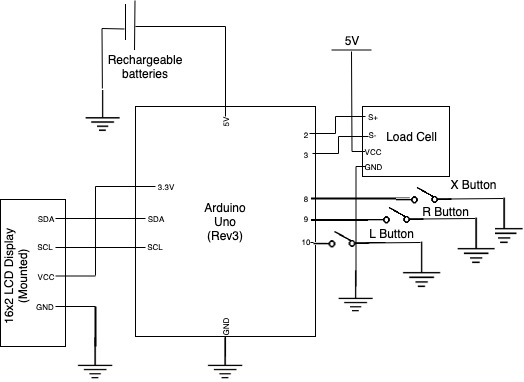
Schematic
Comments are closed.