Lending schedule next week will be:
Thu(4/19): close by 6pm
Fri(4/20): open 8am – 1pm, close by 1pm
Sat(4/21): close all day
Sun(4/22): open 10am – 10pm ( back to regular hours)
48-339/739 Spring 2018
Lending schedule next week will be:
Thu(4/19): close by 6pm
Fri(4/20): open 8am – 1pm, close by 1pm
Sat(4/21): close all day
Sun(4/22): open 10am – 10pm ( back to regular hours)
Why a music box?
I like to put music on while i’m working, however in this digital age, the “recommendations” and changing between screens can be quite a distraction. A music box with physical interaction should be able to minize that as much as possible, while still kept the interaction entertaining.
How it works:
The music box would come with figurines with RFID tags. When different figurines are put on top of the music box, different sets of music would play. Ideally, if it can be achieved, the user can put their own music album and make their own figurine.
The final project would be based on the previous assignment where I used touch sensor and Arduino Uno with a simple p5js interface. Here is the basic outline of the project:
On the day of the show, I would need a outlet for charging the battery, and a wifi base, which potentially could be my laptop. The speaker won’t be too loud so it should be ok to be somewhat close to other projects.
I probably would put up a slide show on my laptop or some print out handouts/flyers
I listen to a lot of musicals, and that is my background music when I work. Listen to the same thing over and over again is nice to some extent, however, stories might be told differently from different character’s perspective. What if the version of the story is from Elisa Schulyer instead of Alexander Hamilton? What if Cosette is the major character? Not that the music need to change (for a new show, probably).
It would be really interesting to make a interactive music box that have the same song but tells the same story from a different sequence based on the main character that you can choose. It should be mobile, with a rechargable battery, like a real music box (it would be a interesting gift). It doesn’t have to be just musical, it can get connected to wifi and search for certain artist that you wanna listen to. All you need to do is to put a figurine on top and click the play button.
What would be the advantage of having a music box than just use your phone or your computer? Well, say that you are using some music software like spotify. When you want to change a song, you have to go to that interface and click the music you want to listen to. Opening up another page could be really distracting, spotify might also recommend you this and that which doesn’t help. Having a physical interaction can potentially make you less distracted cause there is no “recommend based on history” at least.
The general idea of interaction goes like this:
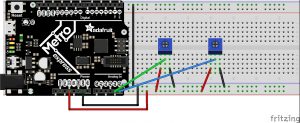
For this assignment, I used two potentiometers to simulate the “Etch A Sketch” (Wikipedia_”Etch A Sketch”). Using two potentiometer, one controls left and right movement, and the other controls the up and down movement, the browser window is going to serve as a canvas for the “Etch A Sketch” board.
Fritzing Sketch:
Code (Arduino Part):
Code (js part):
Background: For people who have migrane, it is terribly painful to turn on the light in the room (any light is unbearable at times) or have sound playing, talking would be painful. Even though this doesn’t mean they can’t open their eyes to see things. However, the light and sound sesitivity make it really difficult for them to walk around in the house for certain necesaties.
Therefore, my project is to help people when they have to walk in the dark, and lights cannot be used as an indicator. Instead of lights, I used buzzer as indicator. If the person is too close to the wall on the left, the buzzer on the left (stick on the person’s hand) will vibrate. Same goes to the buzzer on the right. However, if they have a pet at home, the pir sensor attached to their chest will be active and the buzzer will both buzz at a certain meter.
[Insert picture here]
Here is the code part of it:
/* Jean Zhang


*/


const int leftDistPin = A1;

const int rightDistPin = A2;

const int pirPin = 8;


const int buzzLeft = 6;

const int buzzRight = 10;


const int critDist = 950; // somewhat arbitrary number


int leftDist = 0;

int rightDist = 0;


int buzzState = 0;

int buzzStatePrev = 0;


bool isPet = false;


void petPresent() {

 if (digitalRead(pirPin == HIGH)) {

 isPet = !isPet;

 }

 Serial.println(isPet);

}


void determineState() {


if (leftDist > critDist) {

 if (rightDist > critDist) {

 buzzState = 1;

 }

 else {

 buzzState = 2;

 }

 }

 else {

 if (rightDist > critDist) {

 buzzState = 3;

 }

 else {

 buzzState = 4;

 }

 }


 if (isPet == true) {

 buzzState = 5;

 }

}


void setup() {

 // put your setup code here, to run once:


Serial.begin(9600);


pinMode(leftDistPin, INPUT);

 pinMode(rightDistPin, INPUT);

 pinMode(pirPin, INPUT);


pinMode(buzzLeft, OUTPUT);

 pinMode(buzzRight, OUTPUT);


 //attach Interrupt

 if (isPet == HIGH) {

 attachInterrupt( digitalPinToInterrupt (pirPin), petPresent, HIGH);

 }

}


void loop() {

 // put your main code here, to run repeatedly:


//read distance and compare to critDist

 leftDist = analogRead(leftDistPin);

 rightDist = analogRead(rightDistPin);


buzzStatePrev = buzzState;

 determineState();


Serial.print("left");

 Serial.print(leftDist);

 Serial.print(" right");

 Serial.println(rightDist);

 Serial.print("buzzState");

 Serial.println(buzzState);


if (buzzStatePrev != buzzState) {

 switch (buzzState) {

 case 1: break;

 case 2:

 digitalWrite(buzzRight, HIGH);

 break;

 case 3:

 digitalWrite(buzzLeft, HIGH);

 break;

 case 4:

 digitalWrite(buzzRight, HIGH);

 digitalWrite(buzzLeft, HIGH);

 break;

 case 5:

 digitalWrite(buzzRight, HIGH);

 digitalWrite(buzzLeft, HIGH);

 delay (500); //@TODO: write a function that does not use delay

 digitalWrite(buzzRight, LOW);

 digitalWrite(buzzLeft, LOW);

 delay (500); // Yeah, try not to use delay

 break;


 }

 }


}
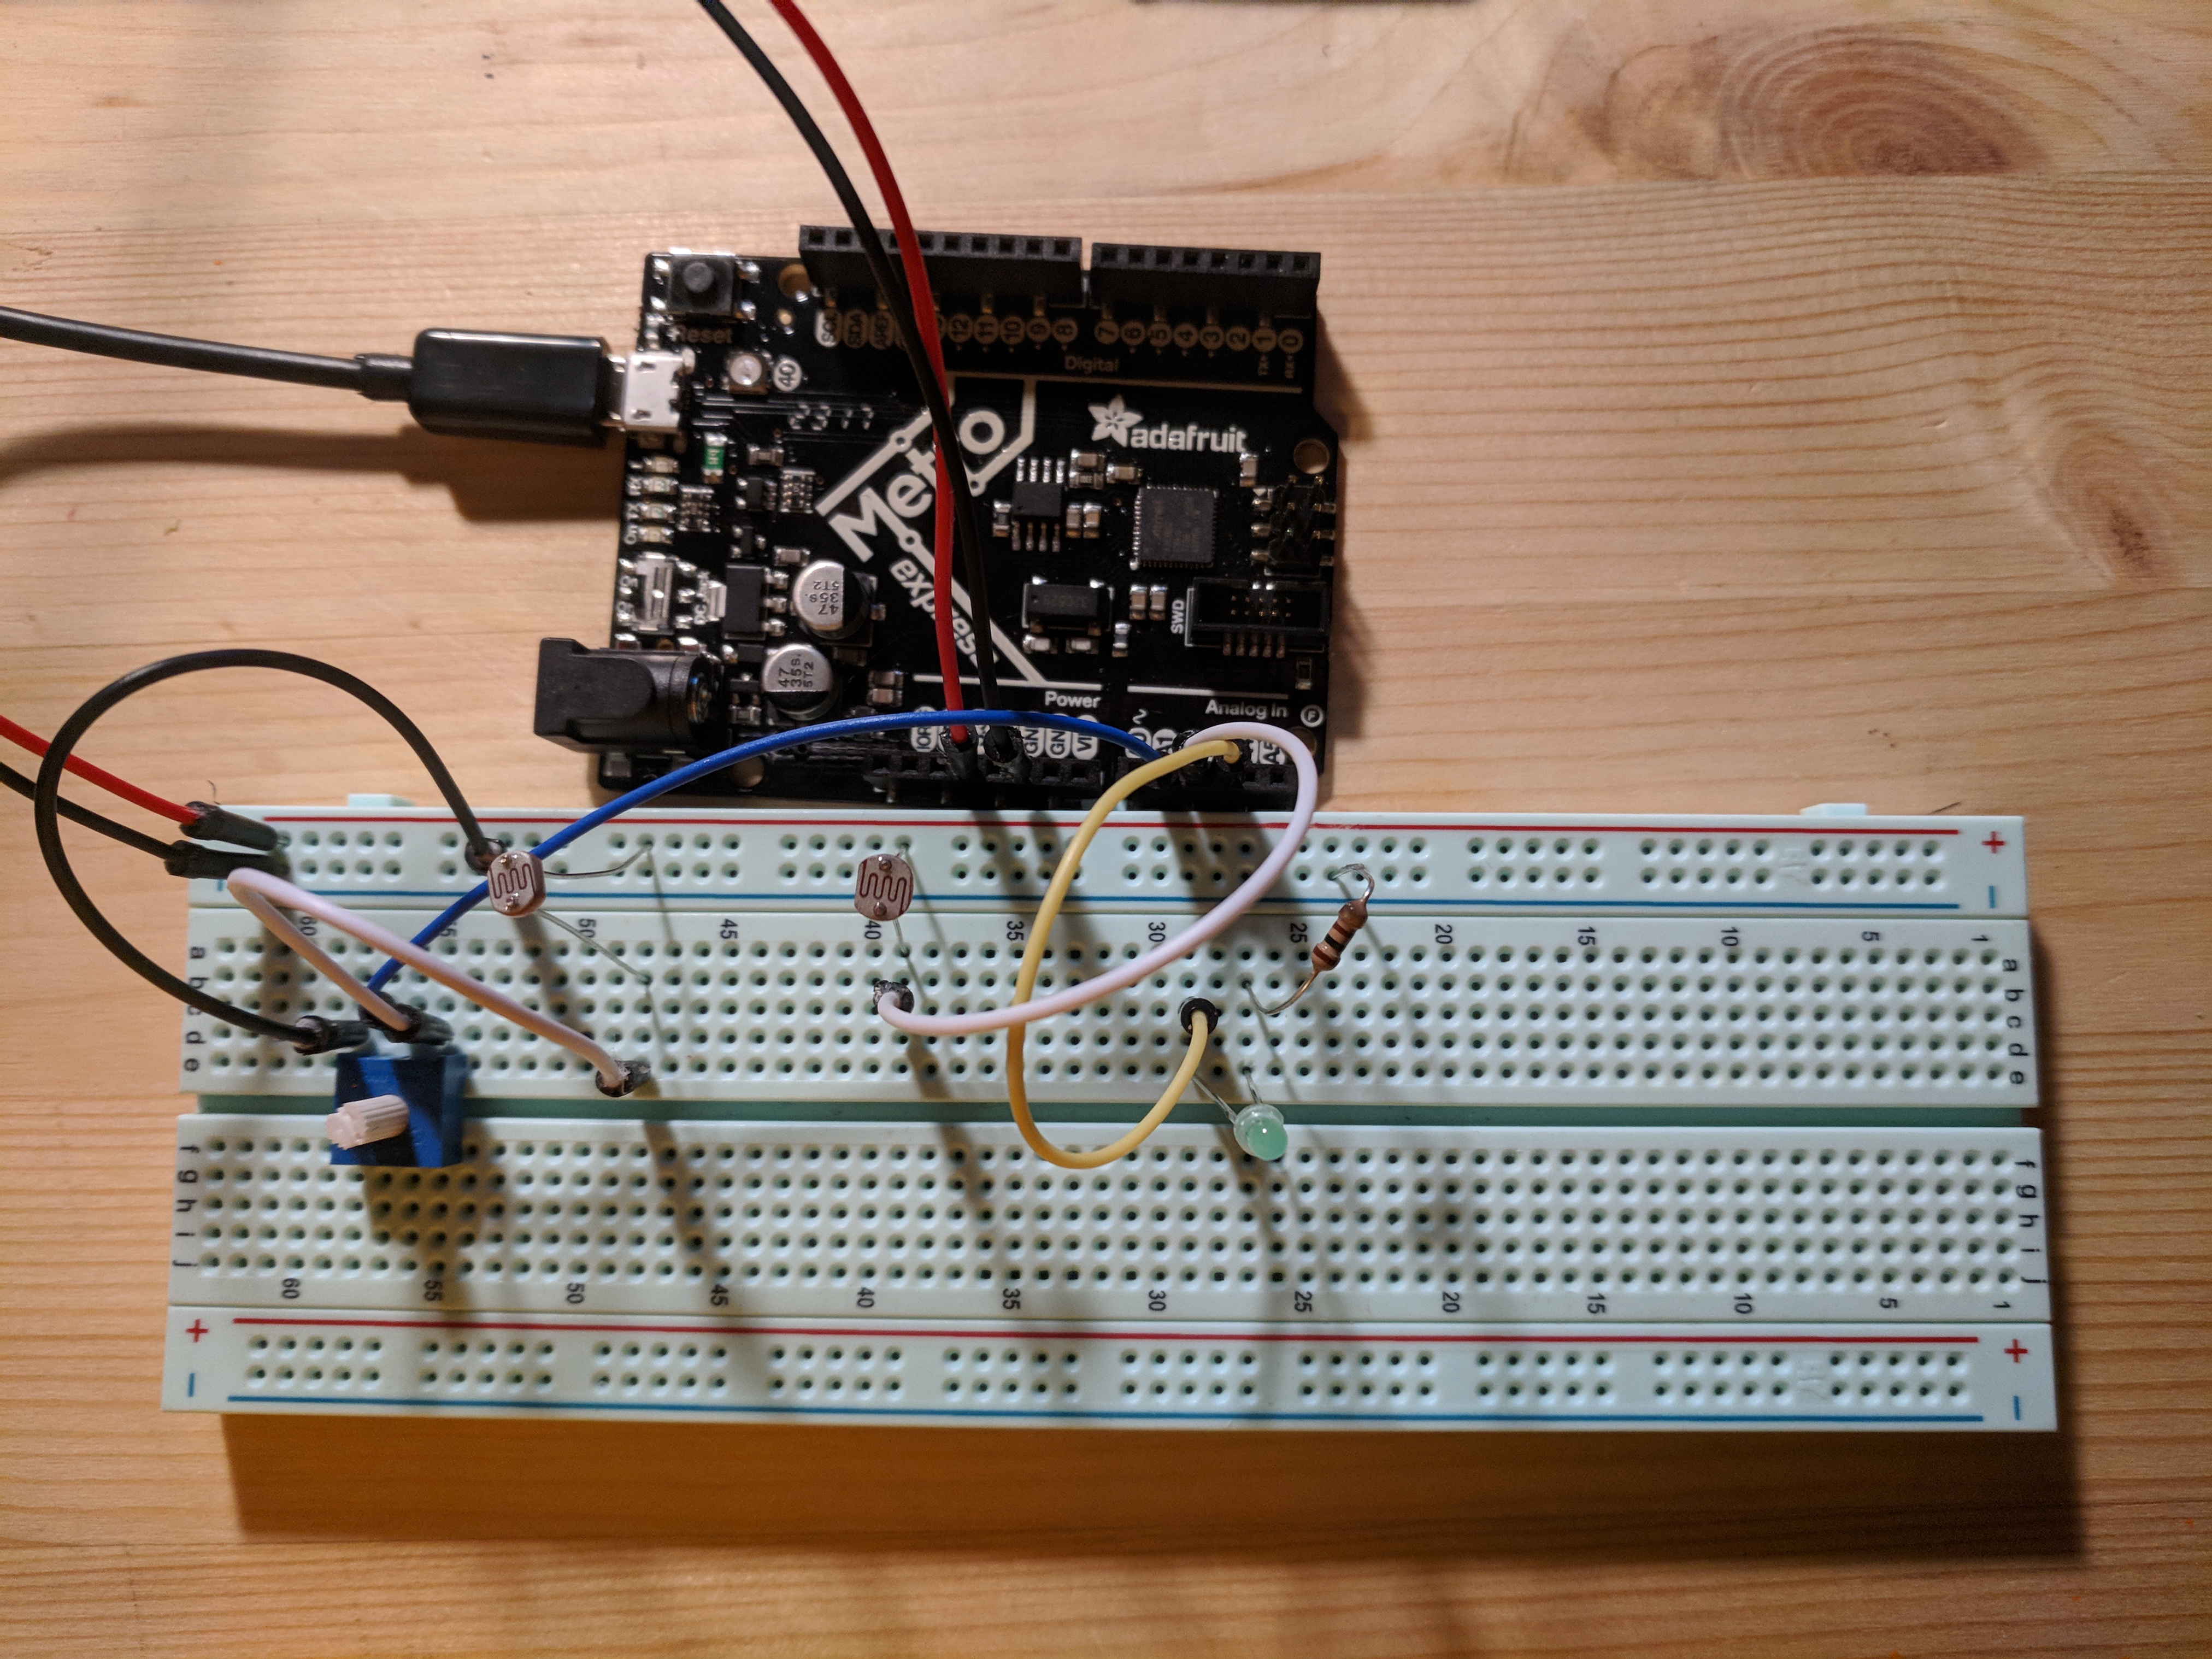
This is ment to be a toy for cats and dogs, where the closer they are to the toy, the brighter the LED is going to be. And when they put their paws on th button (it’s a photoresistor), the LED with stop for however long they leave their paws in place.
Material:
Setup:
Code:
/*

  Jean Zhang


  This is a sketch about a toy for pets (hopefully).

  This is Ver 1.0 which is a easy prototype, a proof of

  concept that the code/board/sensors works properly.


  This code is modified from the class 2 note from

  Prof. J. Eric Townsend.The lisence is as the following:


  The MIT License (MIT)


  Copyright (c) 2014 J. Eric Townsend


  Permission is hereby granted, free of charge, to any person obtaining a copy

  of this software and associated documentation files (the "Software"), to deal

  in the Software without restriction, including without limitation the rights

  to use, copy, modify, merge, publish, distribute, sublicense, and/or sell

  copies of the Software, and to permit persons to whom the Software is

  furnished to do so, subject to the following conditions:


  The above copyright notice and this permission notice shall be included in

  all copies or substantial portions of the Software.


  THE SOFTWARE IS PROVIDED "AS IS", WITHOUT WARRANTY OF ANY KIND, EXPRESS OR

  IMPLIED, INCLUDING BUT NOT LIMITED TO THE WARRANTIES OF MERCHANTABILITY,

  FITNESS FOR A PARTICULAR PURPOSE AND NONINFRINGEMENT. IN NO EVENT SHALL THE

  AUTHORS OR COPYRIGHT HOLDERS BE LIABLE FOR ANY CLAIM, DAMAGES OR OTHER

  LIABILITY, WHETHER IN AN ACTION OF CONTRACT, TORT OR OTHERWISE, ARISING FROM,

  OUT OF OR IN CONNECTION WITH THE SOFTWARE OR THE USE OR OTHER DEALINGS IN

  THE SOFTWARE.


  This code is modified from the original code by Jean Zhang.

  Lots of thanks to Robert Zacharias and Professor Garth Zeglin for helping out with debugging and making the code to properly compile.


*/

const int irPin = 0;

const int photoPin = 1;

const int ledPin = 8;


const int sampleSize = 16;


int irIndex = 0;

int irReadings[sampleSize];


int photoIndex = 0;

int photoReadings[sampleSize];


int distVal, photoVal, ledVal;


const int ambientPhoto = 600;

const int tolerance = 200;


void setup() {

  Serial.begin(115200);


  pinMode(irPin, INPUT);

  pinMode(photoPin, INPUT);

  pinMode(ledPin, OUTPUT);


  // put your setup code here, to run once:


}


void loop() {

  //Reading the values from ir and photoResistor

  int photo = analogRead(photoPin);

  photoReadings[photoIndex] = photo;

  photoIndex = (photoIndex + 1) % sampleSize;


  int irDist = analogRead(irPin);

  irReadings[irIndex] = irDist;

  irIndex = (irIndex + 1) % sampleSize;


  //Get readings for irSensors

  int *pirReadings = irReadings;

  distVal = getVal(pirReadings); // feed the pointer of the array (array location)

//  photoVal = getVal(*photoReadings);


  // console

#if 0

  Serial.print("low ");

  Serial.print(low);

  Serial.print(" high ");

  Serial.print(high);

  Serial.print(" mean ");

  Serial.println(mean);

  Serial.print(" median ");

  Serial.println(median);

  delay(500);

  digitalWrite(photoPin, LOW);

  delay(500);

#endif


  int ledVal = map(distVal, 0, 1023, 0, 255);

  //0 (min) is based on the ambient setting


  if (abs(ambientPhoto - photoVal) > tolerance) {

    ledVal = 0;

  }


  analogWrite(ledPin, ledVal);


}


//Modified from class note:

int getVal(int *readings) { //return mean for now

  int median = 0;

  int low = 1024;

  int high = 0;

  int mean = 0;

  for (int i = 0; i < sampleSize; i++) {

    mean += readings[i];

    if (readings[i] < low) { low = readings[i]; } if (readings[i] > high) {

      high = readings[i];

    }

  }

  mean = mean / sampleSize;

  bubbleSort(readings);

  median = readings[sampleSize / 2];


  return mean;

  //return median

}

//In C, a function cannot return an array


// tigoe's sort for an array

// since bubbleSort changes the array locally, the function doesn't

// need to return any value

void bubbleSort(int *readings) {

  int out, in, swapper;

  for (out = 0 ; out < sampleSize; out++) { // outer loop

    for (in = out; in < (sampleSize - 1); in++) { // inner loop if ( readings[in] > readings[in + 1] ) { // out of order?

        // swap them:

        swapper = readings[in];

        readings [in] = readings[in + 1];

        readings [(in + 1)] = swapper;

      }

    }

  }


}
Reflection:
I haven’t been able to get my hardware to work at the moment (just started testing like 10min ago). I spent a lot of time trying to debug the program. I had lots of issue with C++ since I didn’t really learn how to program in C besides reading codes for reference in my Python Projects (so much less work…).
My biggest issue is with the syntax of functions and the “pointer” in C. I wanted to make the return median/mean part into a function and use bubbleSort multiple times on different sensor values, where instead of changing the global, it takes in an array and sort that array. The problem being when defining function, it is defining certain type of data/value. And the take-in value need to be defined for their data type . However, when the take in value is an array, the pointer concept comes into play, and I keep getting the error like this
invalid types 'int[int]' for array subscript
After lots of Google-ing and reading comments I start to understand the concept of pointers and modify my code accordingly. (It is actually a really simple solution, kinda like the x.^x – the dot syntax in MATLAB). Instead of using :
void bubbleSort(int readings) { ........
Simply change the expression into:
void bubbleSort(int *readings) { ........
Note the different between “int readings” and “int *readings“. Where *readings is a pointer and readings is not really a valid input.
I also tried to return an array for bubbleSort, which I don’t have to do that (bad habit writing python programs, it does so much for you). In C, a function cannot return an array, instead, the way to return arraies is to use pointers, which also gave me a lot of problems when compiling.
Lots of thanks to Robert Zacharias and Professor Garth Zeglin for helping with the bug in the code (mainly for the pointer spaghetti) and making the code compile properly.