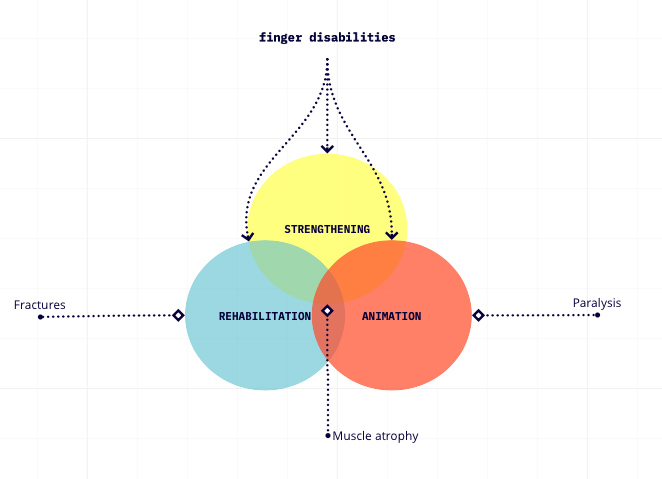
It can be very difficult for people with seeing difficulty to orient themselves. In fact, it is already difficult enough to locate the braille signs, which is supposed to help them. In addition, there are situations where visual clues are necessary, such as deciding which elevator goes up when two arrive at the same time. Here is a video that mentions such difficulty.
As a result, people with visual difficulty have to memorize routes. It is also very challenging for them to travel through a new district or locate a room in an unfamiliar building.
Solution
The key that causes this problem is the lost of visual clues. When we walk into a new building, we can look for signs for directions. When we travel through a new place, we can use google map as a guide. However, for people with seeing difficulty, the same clues are either impossible to get, like the road sings for example, or very inaccessible like the braille sign that hides behind a door.
To solve this problem, I would like to translate the visual clues into braille on a device that is accessible. In other words, instead of looking for physical sign of braille, the user can read the signs in braille on a device in his or her hand. This device, however, can not only be used as a navigator but also a “seeing” tool to read the visuals in a space or environment.
The design of the prototype
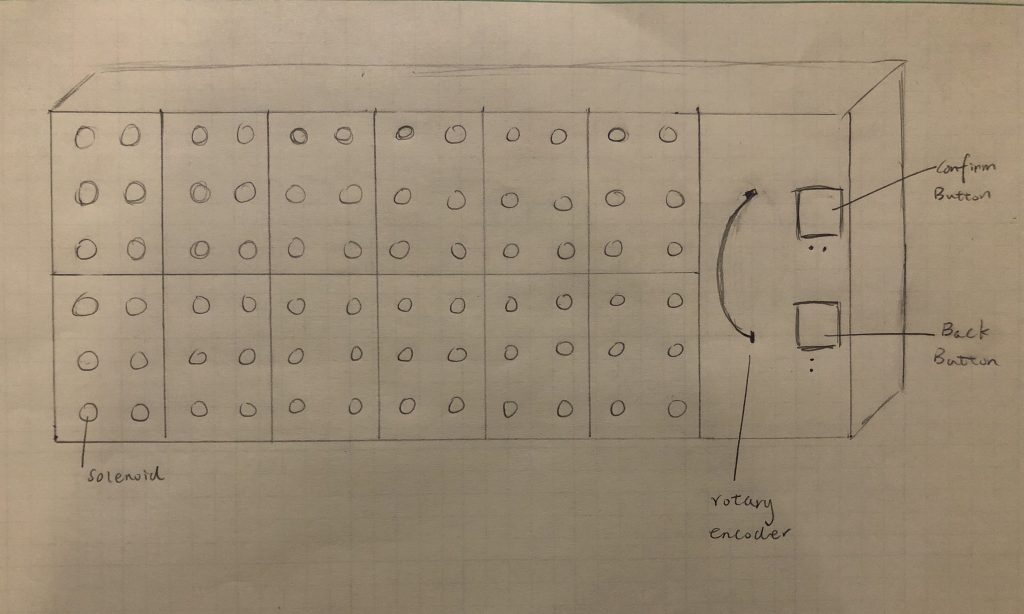
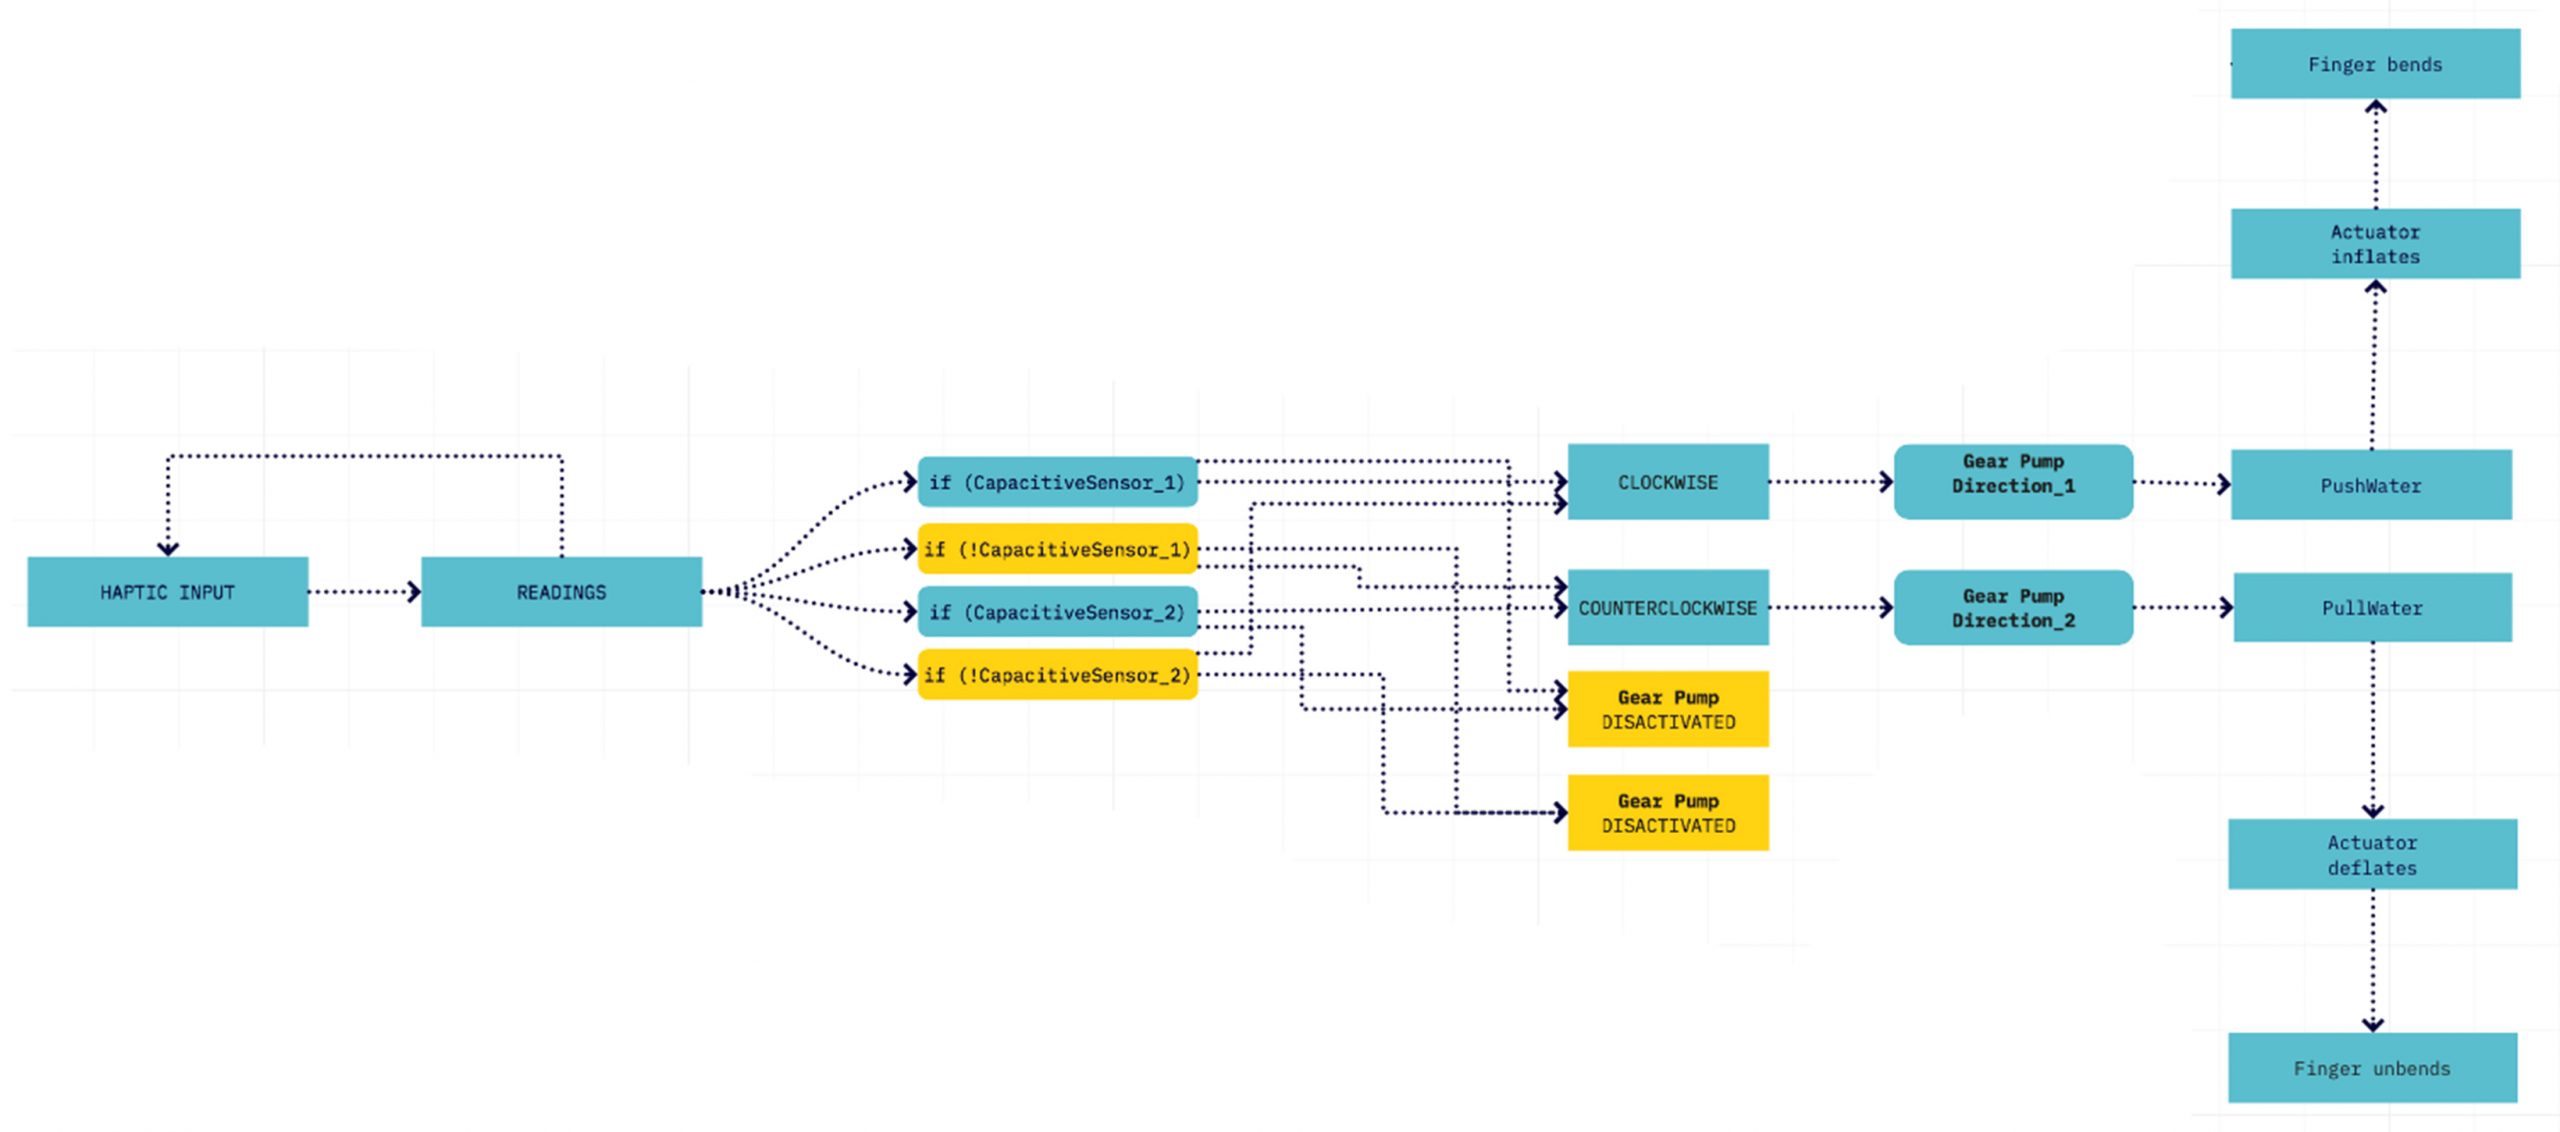
As shown in the figure above, the device have 12 digits for displaying letters and punctuations. Each digit is made of 6 solenoids and will display alphabet in braille. The rotary encode on the right is for flipping to the next 12 letters in the sentences. There are also a confirm button and a back button. This device can be connected to smart phone and indoor devices through Bluetooth or wi-fi.
Suppose a person with difficulty wants to go to new place, he or she can use app on his or her smartphone to determine the route. The person can then use the device to navigate while walking. When there are road signs or alerts that need attention, the device will vibrate and display the message. The device will go back to the route when the alert was read and confirm button pressed. The person can also use the back button to check the last direction or instruction.
Of course, the effectiveness of this device depends heavily on how small we can make it to be. With the current material of mini-solenoid, I can make it to have a length of 18 cm and a width of 7.2 cm. This cannot work effective as a navigation tool because it is too big and cumbersome. However, it can still be used while stationary such as in a restaurant, museum, and a room.
For future design
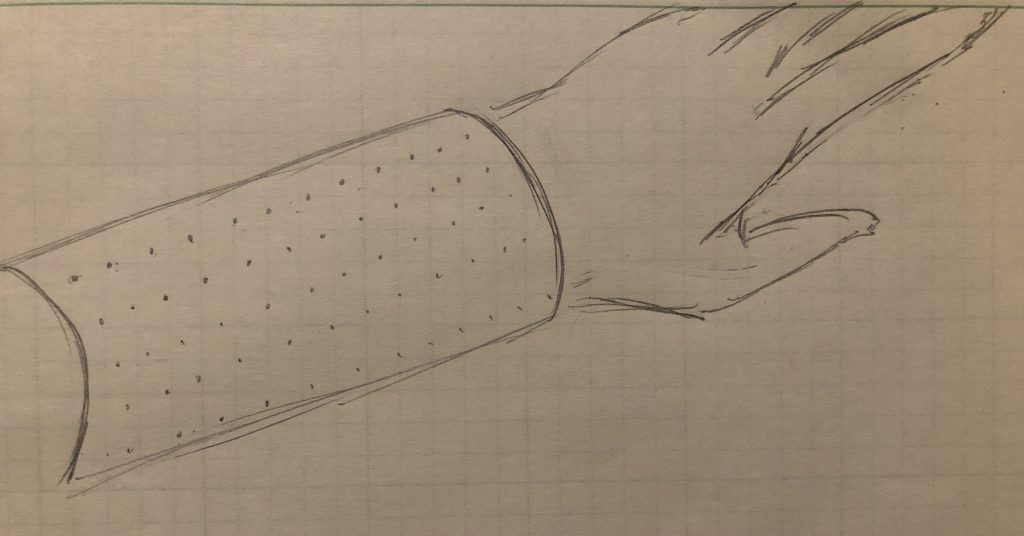
If we have the interactive surface technology in the future, this is the design I will give to the device. It wrap around the arm of the user so that the user can hold a white cane in one hand, and read the information using another hand. No more buttons and rotary encoder are needed because everything can be displayed and interacted with through the surface.
Proof of Logic
The components of the demonstration
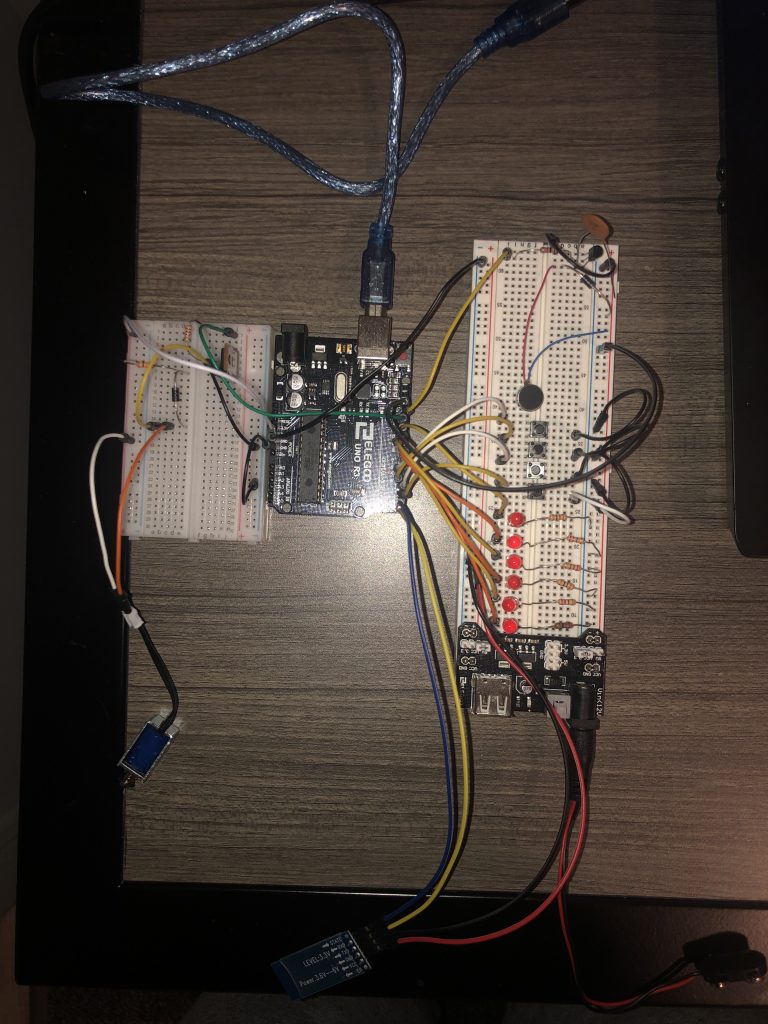
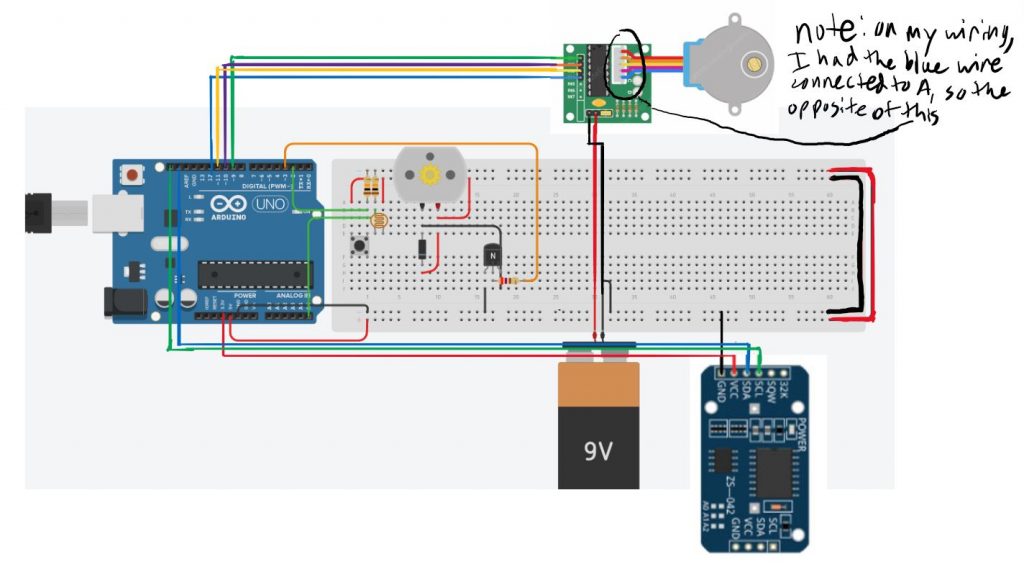
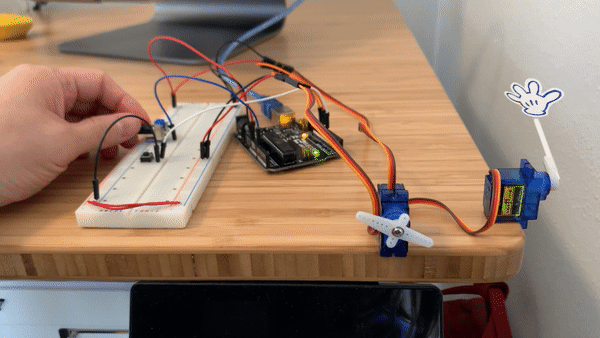
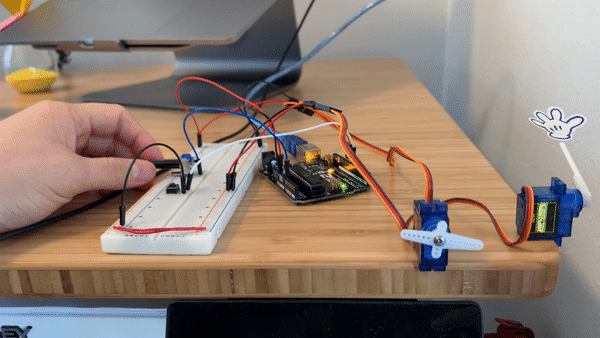
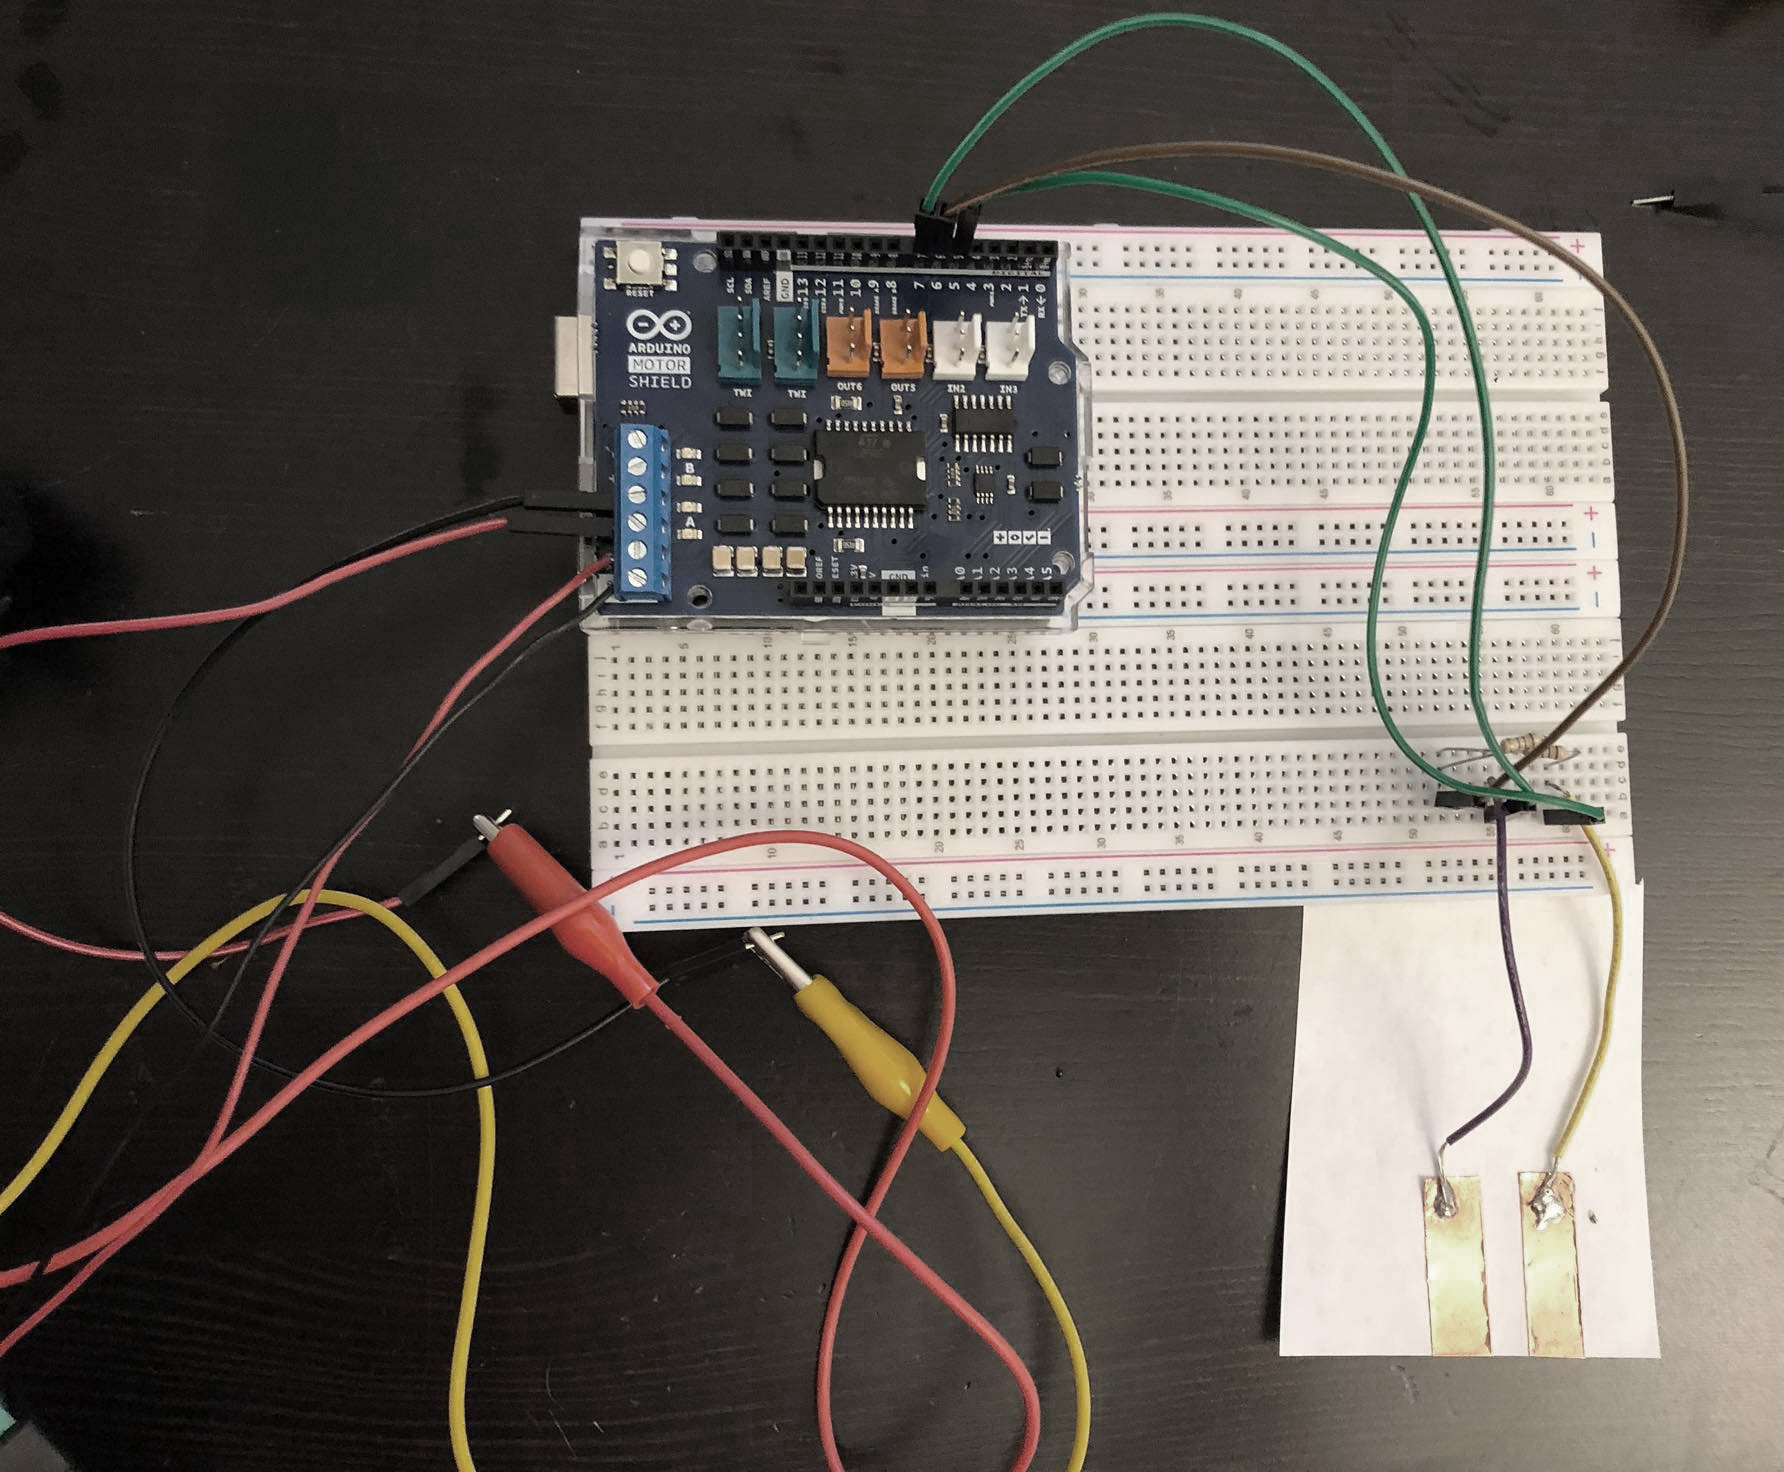
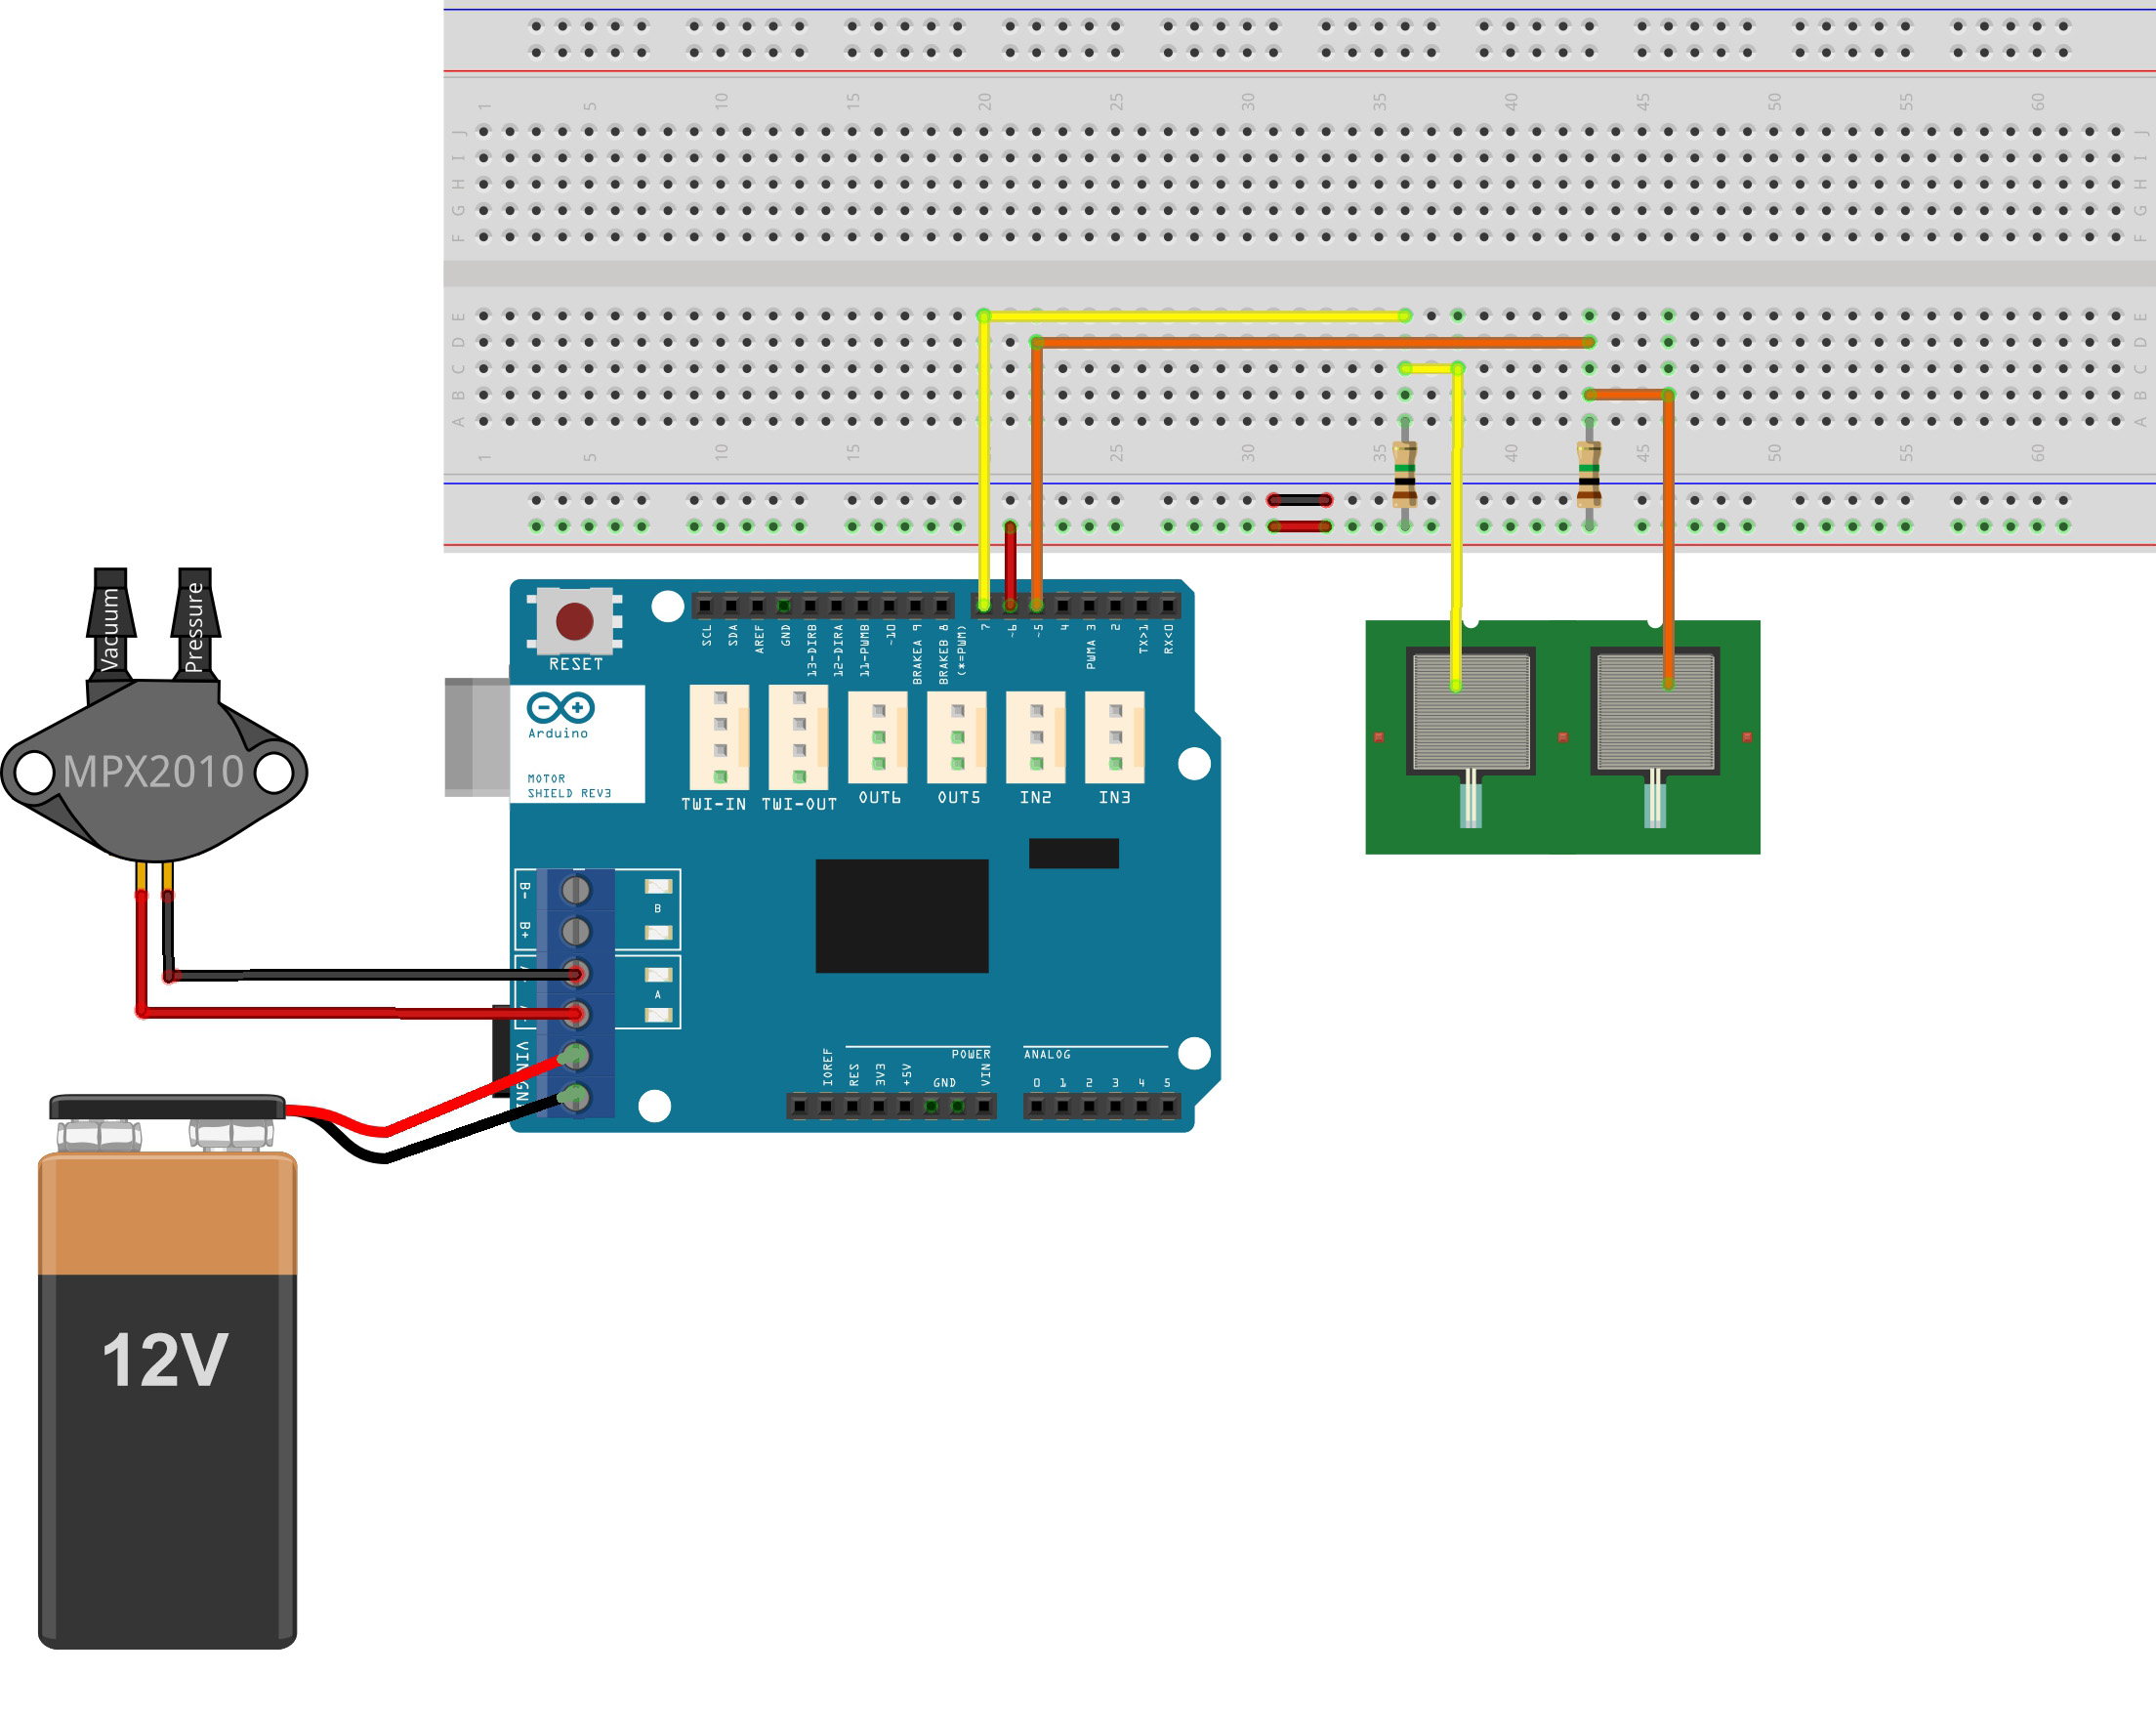
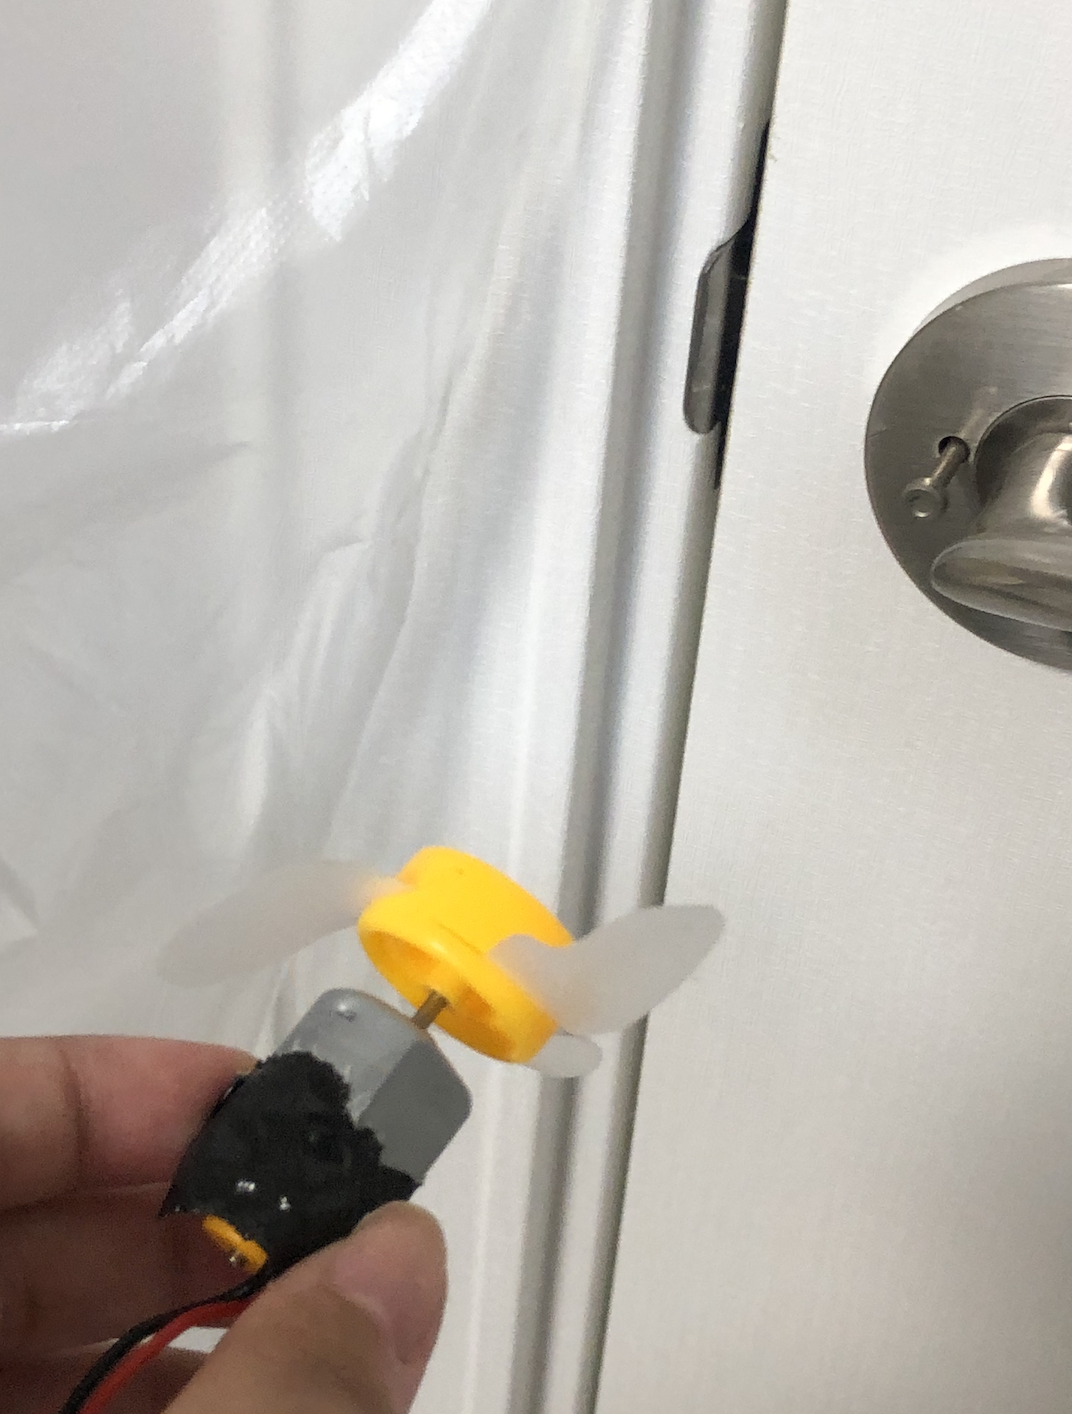
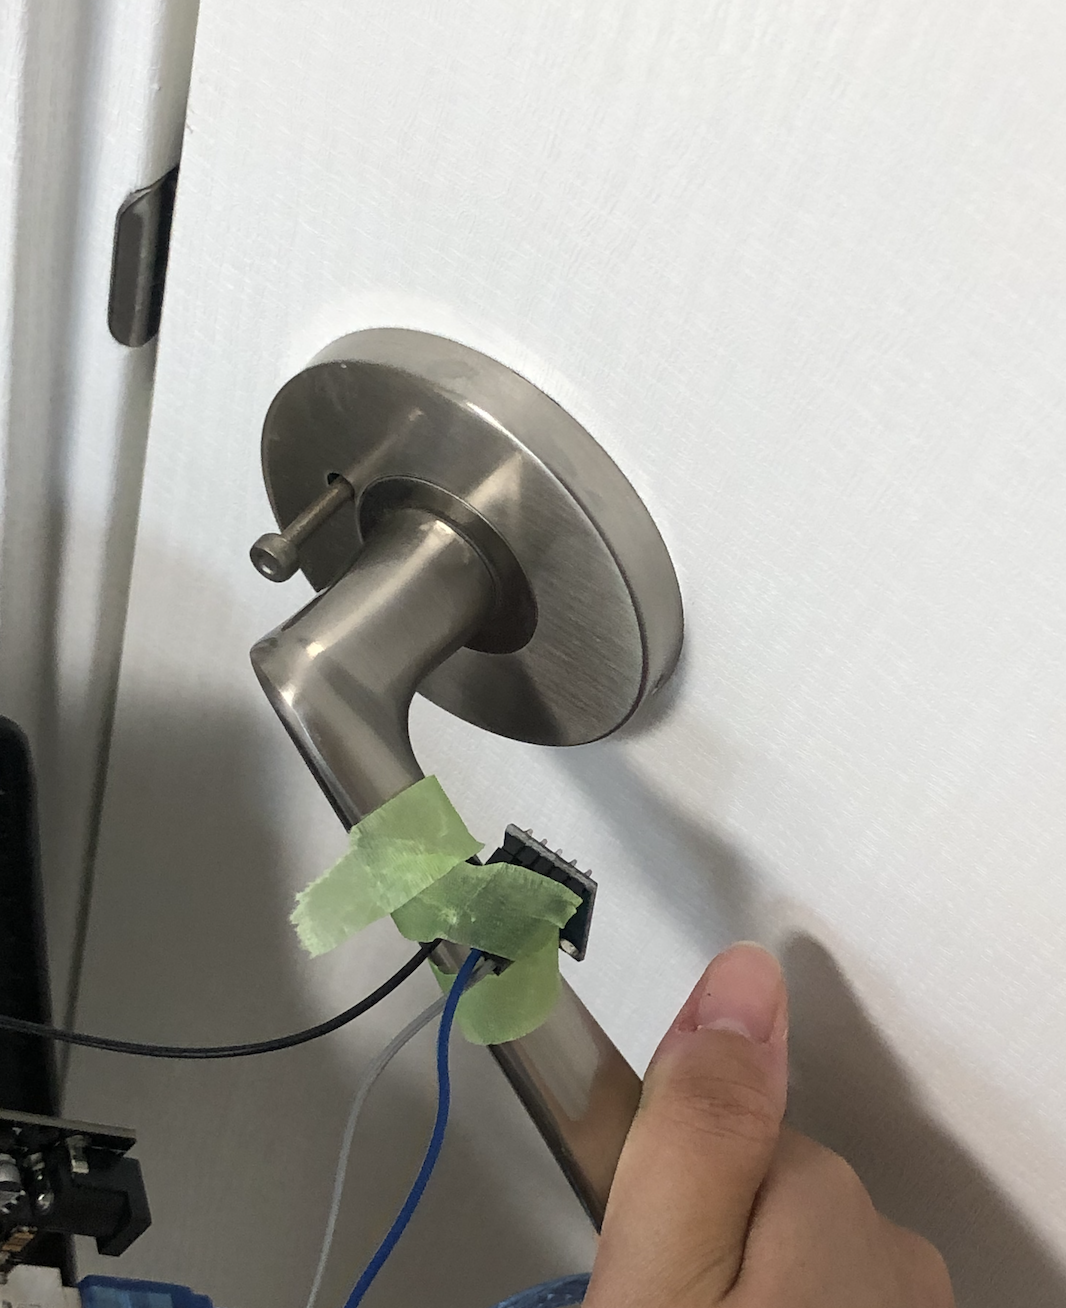
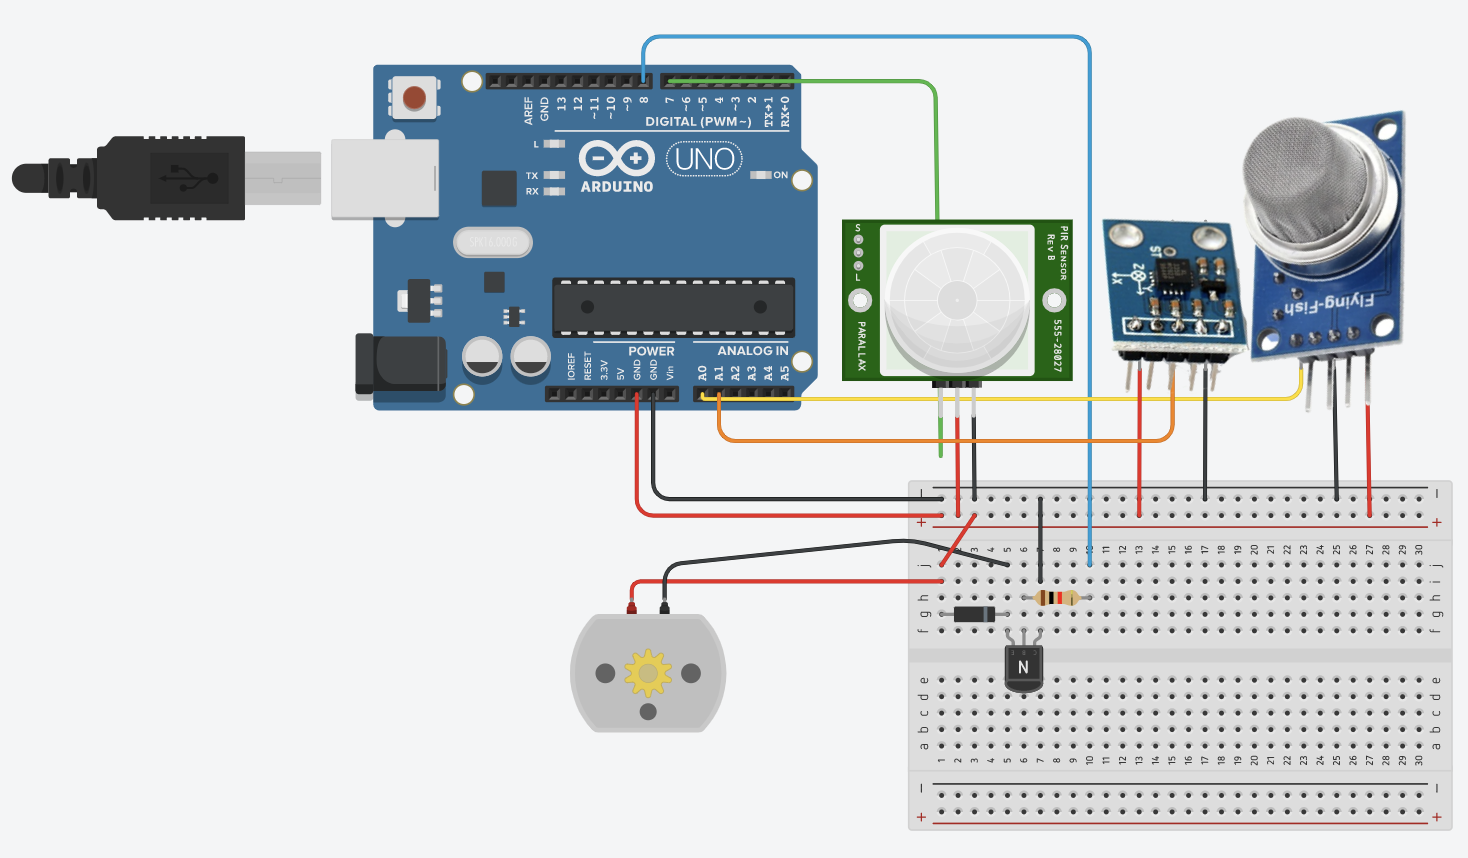
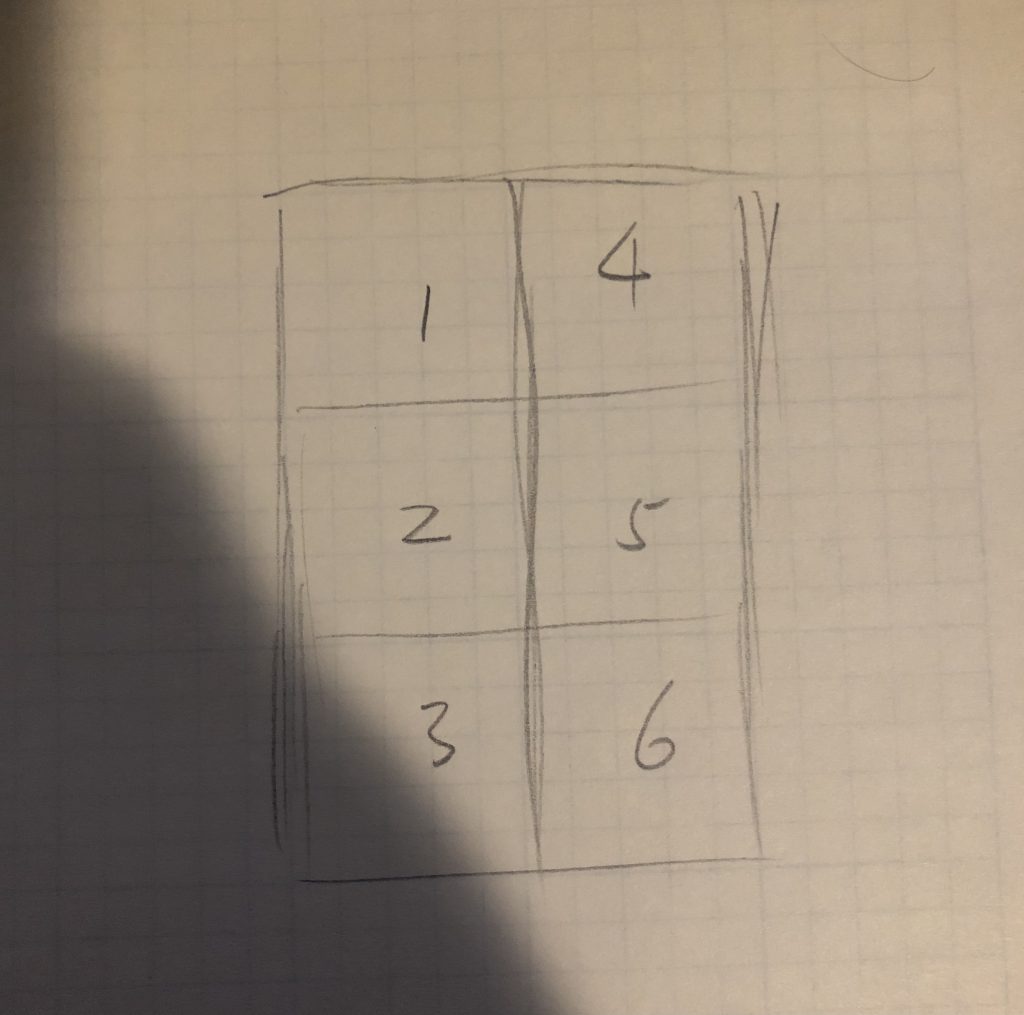
The demo is made up of a solenoid, a Bluetooth module, 6 LED, 4 buttons, and a vibration motor. The LEDs represent the 6-dot grid of the braille. The corresponding grid is shown below.
LED braille grid
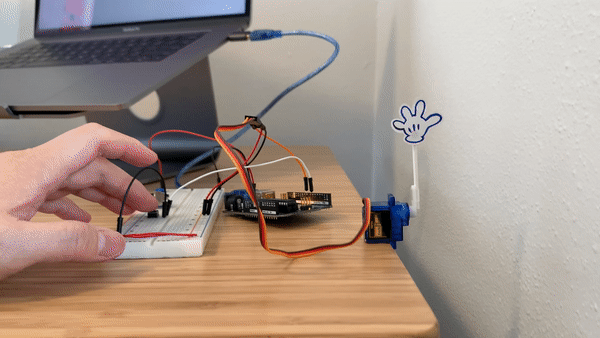
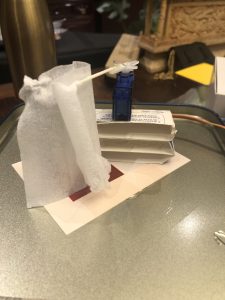
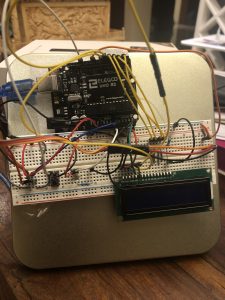
Because the demo-device is relatively complex, it will be explained with video of demonstration.
This shows the normal function of the solenoid. In the later demonstration it does not function correctly due to the insufficient current arduino UNO supplies.
The two button pressed in the video represents the rotary encode that allows the user to flip to the next or previous 12 letters.
The buttons pressed in the video are confirm button and back button, which allows the user to display the next or previous message instruction.
Finally, in the video alerts are sent from the PC to the device through Bluetooth. The device then vibrate and display the alert with the corresponding braille letter.
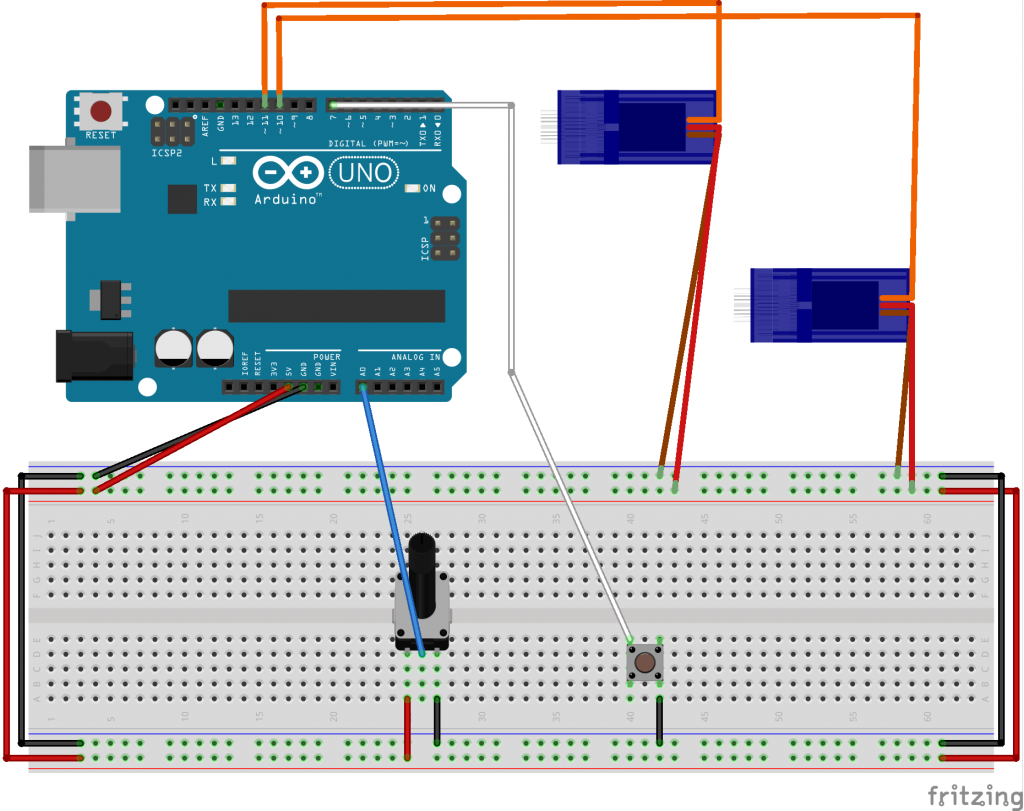
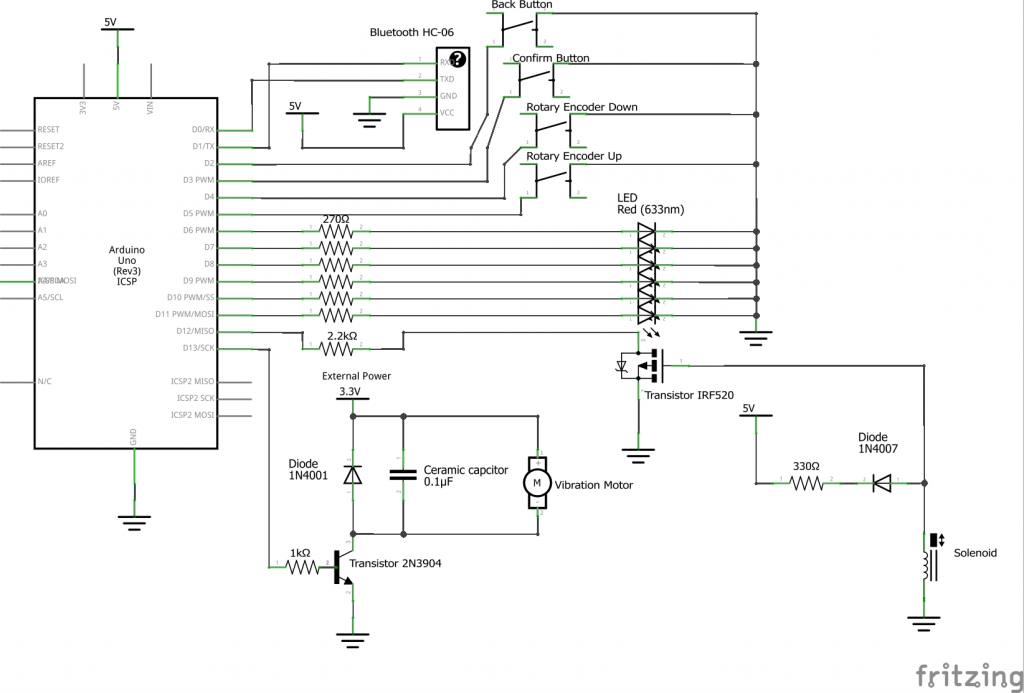
Schematic:
Code:
//Defining the pins
#define solenoide 12
#define motor 13
#define rotary_up 5
#define rotary_down 4
#define confirm 3
#define back 2
#define LED1 11
#define LED2 10
#define LED3 9
#define LED4 8
#define LED5 7
#define LED6 6
//Variables
//constant variables
char *INPUT_STRINGS[] = {"information destk is at first floor","elevator is to the right by ten meters" ,"this is room b ten"};
//Message is like the route and direction
int message;
int message_length;
String string;
int start_letter;
//Alert is like the signs or alerts on the street or in buildings
String incoming_alert; //string that stores the incoming message
String alert[5];
int alert_index;
bool has_alert;
bool vibration_on;
//variable for interrupt, note that message is also a ISR variable
constbool isInterrupt = true;
int message_number = 3;
//timer
//Clock 1 is the timer for checking the rotary encoder
unsignedlong clock1 = 0; // variable for timing
constint INTERVAL1 = 300; // milliseconds between updates
//Clock 2 is for serial printing for illustration
unsignedlong clock2 = 0; // variable for timing
constint INTERVAL2 = 2000; // milliseconds between updates
//Clock 3 is for serial printing for illustration
unsignedlong clock3 = 0; // variable for timing
constint INTERVAL3 = 1500; // milliseconds between updates
// the interrupt method
// NOTE: we shouldn't use Serial.prinln(), delay(), and many
// other functions in an interrupt method
voidConfirmSwitchPressed()
{
if(digitalRead(confirm) == LOW){
if(has_alert == true){
//alert index also show how many alerts are in the alert array
Do you like having natural light in the room during the day, but often forget to close the curtains at night and so get woken up earlier than you wanted in the morning? Do you ever just want to wake up with natural light in the room, but not get woken up too early by it? After not getting enough sleep, do you find yourself having trouble getting up to your alarm or being blinded when you turn on the light or open the curtains because your eyes aren’t used to it? If you’re like me and have answered yes to these questions, this worry free curtain and alarm clock supplement could be the solution!
Proposed Solution:
Enter the time times you want to wake up each day of the week, the current date and time, upload the program, and that’s it your curtains will open according to the time you want to wake up and when you went to bed (set by pressing button) and close when it’s evening and dark. If you didn’t get nearly enough sleep, a fan will also blow in your face when your alarm goes off to help ensure you wake up. The fan could be an overhead one, but one on a nightstand or a taller one on the floor next to the bed would be best. I used the left and right threaded rods coupled together that I had from a previous project to be able to control the open and closing of the curtains movement. The logic I used for when the curtains should open compared to when you want to wake up and when you went to sleep were set by my preferences wherein the less sleep I got, the earlier the curtains would open based on time frames of amount of sleep. For me if I’ve gotten less sleep, I wake up to slight changes less than if I got enough sleep. Also, the fan is set to blow at a low speed for a minute when you’ve had under 5 hours sleep and high speed for 30 seconds if you’ve had between 5 and 6 hours. This is because higher speed will be more annoying and so needs to be on less; the lower speed is for the least sleep case because you are more likely to get sick on less sleep. I used a stepper motor to control the opening and closing of the curtains as that is what I had available and I can easily control the distance moved forward and reverse precisely. I would’ve used a faster motor if available and ideally a DC motor and an encoder instead as I’d be able to control the amounts forward and reverse easily and it’s more efficient in this scenario. Additionally, if I had a pressure sensor, the time you went to bed would be detected by the time you went on the bed and didn’t get up again before the alarm. This way you wouldn’t have to remember to click a button. To add to this, I would add a speaker so that this could be used for an alarm sound itself too. Finally, as someone mentioned during the crit, an app would be really useful for inputting the parameters and quickly making any changes. With the materials I was able to use and the time given, I’m happy with this prototype and in the future may make this for myself on an actual scale.
For reference, this is what the curtains in my room look like:
Ideal fans:
small fan for nightstandfloor stand fan to be put near head of bed
Proof of Concept:
Video Player
Media error: Format(s) not supported or source(s) not found
Setting the time went to bed, opening curtains, and blowing the fan.
You might notice that in this video, the printing format changed from day, month, year to month, day, year. This was an intentional change after the first video because it’s the format we are accustomed to.
Circuit
#include <AccelStepper.h>
// stepper Motor pin definitions:
#define motorPin1 9 // IN1 on the ULN2003 driver
#define motorPin2 10 // IN2 on the ULN2003 driver
#define motorPin3 11 // IN3 on the ULN2003 driver
#define motorPin4 12 // IN4 on the ULN2003 driver
// Define the AccelStepper interface type; 4 wire motor in half step mode:
#define MotorInterfaceType 8
// Initialize with pin sequence IN1-IN3-IN2-IN4 for using the AccelStepper library with 28BYJ-48 stepper motor:
if((millis()-startPrint)>=1000){//putting this here so don't use delay while also showing the times
switch(RTC.getWeek())
{
case 1:
Serial.print("SUN");
break;
case 2:
Serial.print("MON");
break;
case 3:
Serial.print("TUE");
break;
case 4:
Serial.print("WED");
break;
case 5:
Serial.print("THU");
break;
case 6:
Serial.print("FRI");
break;
case 7:
Serial.print("SAT");
break;
}
Serial.print(" ");
Serial.print(RTC.getMonth());
Serial.print("-");
Serial.print(RTC.getDay());
Serial.print("-");
Serial.print(RTC.getYear());
Serial.print(" ");
Serial.print(RTC.getHours());
Serial.print(":");
Serial.print(RTC.getMinutes());
Serial.print(":");
Serial.println(RTC.getSeconds());
startPrint=millis();
}
// delay(1000);
}
#include <AccelStepper.h>
// stepper Motor pin definitions:
#define motorPin1 9 // IN1 on the ULN2003 driver
#define motorPin2 10 // IN2 on the ULN2003 driver
#define motorPin3 11 // IN3 on the ULN2003 driver
#define motorPin4 12 // IN4 on the ULN2003 driver
// Define the AccelStepper interface type; 4 wire motor in half step mode:
#define MotorInterfaceType 8
// Initialize with pin sequence IN1-IN3-IN2-IN4 for using the AccelStepper library with 28BYJ-48 stepper motor:
AccelStepper stepper = AccelStepper(MotorInterfaceType, motorPin1, motorPin3, motorPin2, motorPin4);
//above from https://www.makerguides.com to learn how to use this specific stepper motor and driver
#include <Wire.h>
#include <RTC.h>
const int photoPin = A5;
static DS3231 RTC;
//input times for each day with hr then min; 24 hr time but as it'll be morning, it shouldn't make too much of a difference
int wakeUpTimes[7][2] ={{12, 12}, //sun
{9, 0}, //mon
{9, 35}, //tues
{8, 55}, //wed
{9, 30}, //thurs
{10, 10}, //fri
{11, 11}};//sat
const int fanMotorPin = 3;
int low = 50;
int high = 150;
int fanSpeed;
int turnOnFan;
int fanDuration;
int timeSlept[3];
int openCurtainsXbeforeWakeUpTime;
int sleep = 0;
const int buttonPin = 2;
int timeWentToBed[3];
void calcTimeSlept() {
//seconds
int secs = 60 - timeWentToBed[0];
if (secs == 60) {
timeSlept[2] = 0;
}
else {
timeSlept[2] = secs;
}
//mins
if (wakeUpTimes[RTC.getWeek() - 1][1] >= timeWentToBed[1]) {
if (timeSlept[2] == 0) {
timeSlept[1] = wakeUpTimes[RTC.getWeek() - 1][1] - timeWentToBed[1];
}
else {
timeSlept[1] = wakeUpTimes[RTC.getWeek() - 1][1] - timeWentToBed[1] - 1;
}
}
else {
if (timeSlept[2] == 0) {
timeSlept[1] = wakeUpTimes[RTC.getWeek() - 1][1] + 60 - timeWentToBed[1];
}
else {
timeSlept[1] = wakeUpTimes[RTC.getWeek() - 1][1] + 60 - timeWentToBed[1] - 1;
}
}
//hrs
if (timeWentToBed[0] < 12) {
if (wakeUpTimes[RTC.getWeek() - 1][1] >= timeWentToBed[1]) {
timeSlept[0] = wakeUpTimes[RTC.getWeek() - 1][0] - timeWentToBed[0];
}
else {
timeSlept[0] = wakeUpTimes[RTC.getWeek() - 1][0] - timeWentToBed[0] - 1;
}
}
else { //if went to bed before midnight, need to add hours bc subtraction not right otherwise
int hrsBeforeMidnight = 24 - timeWentToBed[0];
if (wakeUpTimes[RTC.getWeek() - 1][1] >= timeWentToBed[1]) {
timeSlept[0] = wakeUpTimes[RTC.getWeek() - 1][0] + hrsBeforeMidnight;
}
else {
timeSlept[0] = wakeUpTimes[RTC.getWeek() - 1][0] + hrsBeforeMidnight - 1;
}
}
}
void goinToSleep() {
if (digitalRead(buttonPin) == HIGH) {
sleep = 1;
}
}
void openCurtains() {
while (stepper.currentPosition() != 4096 * 7) { //choosing this bc it was enough rev to at least show some opening
stepper.setSpeed(1000);
stepper.runSpeed();
}
}
void closeCurtains() {
while (stepper.currentPosition() != 0) {
stepper.setSpeed(-1000);
stepper.runSpeed();
}
}
void setup() {
// put your setup code here, to run once:
stepper.setMaxSpeed(1000);
Serial.begin(9600);
RTC.begin();
RTC.setDay(16);
RTC.setMonth(10);
RTC.setYear(2020);
RTC.setWeek(6);
//to show setting time went to bed from button for Fri
RTC.setHours(10);
RTC.setMinutes(8);
RTC.setSeconds(0);
//to show fan turning on when not enough sleep for Mon
// RTC.setHours(8);
// RTC.setMinutes(59);
// RTC.setSeconds(30);
////to show closing:
// stepper.setCurrentPosition(4096 * 7);
//to show curtains closing past 5 and dark
// RTC.setHours(17);
// RTC.setMinutes(59);
// RTC.setSeconds(45);
//to show opening:
stepper.setCurrentPosition(0);
//to show curtain opening:
// RTC.setHours(8);
// RTC.setMinutes(49);
// RTC.setSeconds(58);
RTC.setHourMode(CLOCK_H24);
pinMode(fanMotorPin, OUTPUT);
attachInterrupt (digitalPinToInterrupt (buttonPin), goinToSleep, HIGH);
/*set time went to bed to hr before wakeup as default after woken up
will change if/when press button before going to sleep
this way if you forget still get this, and assuming if didn't press,
you went to bed really late
*/
//commenting out for demo of button to set time went to bed
timeWentToBed[0] = wakeUpTimes[RTC.getWeek() - 1][0] - 1;
timeWentToBed[1] = wakeUpTimes[RTC.getWeek() - 1][1];
timeWentToBed[2] = 0;
}
void loop() {
int photoVal = analogRead(photoPin);
//Serial.println(photoVal);
if (RTC.getHours() >= 18) {//6:00PM
if (photoVal < 600) {
//if it's past 6PM and dark(here just chose 600, but would be lower in real thing), close curtains
closeCurtains();
}
}
if (sleep == 1) {
Serial.println("clicked");
timeWentToBed[0] = RTC.getHours();
timeWentToBed[1] = RTC.getMinutes();
timeWentToBed[2] = RTC.getSeconds();
calcTimeSlept();
sleep = 0;
}
if (timeSlept[0] >= 8) {
openCurtainsXbeforeWakeUpTime = 5; //mins
}
else if (6 <= timeSlept[0] && timeSlept[0] < 8) {
openCurtainsXbeforeWakeUpTime = 30; //mins
}
else if (5 <= timeSlept[0] && timeSlept[0] < 6) {
openCurtainsXbeforeWakeUpTime = 45; //mins
turnOnFan = 1;
fanSpeed = high;
fanDuration = 30;
}
else {//under 5 hrs
//for demo
//openCurtainsXbeforeWakeUpTime = 1; //mins
openCurtainsXbeforeWakeUpTime = 55; //mins
turnOnFan = 1;
fanSpeed = low;
fanDuration = 60;
}
if (wakeUpTimes[RTC.getWeek() - 1][1] >= openCurtainsXbeforeWakeUpTime) {
if (RTC.getHours() == wakeUpTimes[RTC.getWeek() - 1][0]) {
//Serial.println(openCurtainsXbeforeWakeUpTime);
//Serial.println((wakeUpTimes[RTC.getWeek() - 1][1] - openCurtainsXbeforeWakeUpTime));
if (RTC.getMinutes() == (wakeUpTimes[RTC.getWeek() - 1][1] - openCurtainsXbeforeWakeUpTime)) {
openCurtains();
timeWentToBed[0] = wakeUpTimes[RTC.getWeek() - 1][0] - 1;
timeWentToBed[1] = wakeUpTimes[RTC.getWeek() - 1][1];
timeWentToBed[2] = 0;
}
}
}
else {//minutes of wakeUpTime<time to subtract to wake up
if (RTC.getHours() == (wakeUpTimes[RTC.getWeek() - 1][0] - 1)) { //took hr off here
//right side of eq subtracted amount of time left after changing hr
if (RTC.getMinutes() == (60 - openCurtainsXbeforeWakeUpTime + wakeUpTimes[RTC.getWeek() - 1][1])) {
openCurtains();
timeWentToBed[0] = wakeUpTimes[RTC.getWeek() - 1][0] - 1;
timeWentToBed[1] = wakeUpTimes[RTC.getWeek() - 1][1];
timeWentToBed[2] = 0;
}
}
}
if (RTC.getHours() == wakeUpTimes[RTC.getWeek() - 1][0]) {
if (RTC.getMinutes() == wakeUpTimes[RTC.getWeek() - 1][1]) {
//Serial.println(RTC.getSeconds());
if (turnOnFan) {
if (RTC.getSeconds() <= fanDuration) {
//Serial.println(RTC.getSeconds());
analogWrite(fanMotorPin, fanSpeed);
}
else {
analogWrite(fanMotorPin, 0);
turnOnFan = 0;
}
}
}
}
static int startPrint=millis();
if ((millis()-startPrint)>=1000){//putting this here so don't use delay while also showing the times
switch (RTC.getWeek())
{
case 1:
Serial.print("SUN");
break;
case 2:
Serial.print("MON");
break;
case 3:
Serial.print("TUE");
break;
case 4:
Serial.print("WED");
break;
case 5:
Serial.print("THU");
break;
case 6:
Serial.print("FRI");
break;
case 7:
Serial.print("SAT");
break;
}
Serial.print(" ");
Serial.print(RTC.getMonth());
Serial.print("-");
Serial.print(RTC.getDay());
Serial.print("-");
Serial.print(RTC.getYear());
Serial.print(" ");
Serial.print(RTC.getHours());
Serial.print(":");
Serial.print(RTC.getMinutes());
Serial.print(":");
Serial.println(RTC.getSeconds());
startPrint=millis();
}
// delay(1000);
}
Problem:
As we transition into a working from home setup during covid, we lose alot of the immediate feedback through body language and facial cues from people we are communicating with. In particular, this is pronounced in a presenting information to a large group of people, where a successful presentation relies on tailoring the speed, complexity and cadence to engage the audience sufficiently to keep them interested, but not go too fast that you leave them behind.
When presenting a deck through online meeting platforms, presenters are often unable to monitor the real-time vibe of the audience since participants are not always visible due to screen real-estate (assuming that they have their cameras on). Even with the hand-raise feature, it’s hard for presenters to respond to questions in a timely manner.
Solution:
I identified two main modes of feedback that are most important to a presenter:
Are there any questions?
Are people paying attention?
Raising your hand
To indicate if the audience has any questions, I used a servo as a physical indicator of the presence of questions. Typically, when participants raise their hands during a meeting virtually, this is missed. By mapping this state to the servo, presenters now have a better understanding of when exactly questions are being raised.
Paying attention
One of the indicators of restlessness in your audience is fidgeting. If people are bored and unable to pay attention, they are likely to be crossing their arms, rearranging their seating posture, etc. We can monitor this by observing the rate of change in their posture. Using the poseNet in p5.js, we can abstract this information by drawing keypoints of your posture in the webcam and do a comparison.
I wasn’t quite able to get the serial output from p5.js to work, so I replaced it with a potentiometer as an abstraction for the demo 🙁
Kinetic feedback
By translating this to a tapping pattern if the changes exceed a particular threshold, presenters are able to understand when their audience get restless.
It is hard to discern the nuances if the tapping pattern were to change incrementally, so I set up 3 states with a threshold rate of change that matches 3 different tapping states.
1 No need to worry
Some movement is to be expected in the audience, so presenters don’t need to be concerned about a non-zero level of movement.
2 Antsy
When the audience starts getting restless, the tapping starts with a lower frequency. The presenter can quickly re-engage the audience by speeding up and moving on. As the audience returns back to normal and pays attention, the tapping should cease.
3 I can’t stand this anymore
If the audience crosses the second threshold indicating restlessness, the frequency of taps doubles and conveys to the presenter that they should try to wrap up the presentation ASAP since they’ve likely already lost their audience.
PROBLEM: People experiencing finger -specific motor disabilities are often asked to participate in rehabilitation sessions, either within clinical settings or at home. Unfortunately, a lot of them (including me) do not execute the instructed exercises for finger strengthening and as a result their traumatised fingers may not fully recover back to their original potential.
SOLUTION: RehabActuators constitute a portable, soft robotic wearable that exploits tangible interaction to motivate patients to execute finger exercises like bending/unbending. RehabActuators turns rehabilitation into a playful activity, where the participant can manipulate its own finger by using interacting with the interface.
At the beginning of the semester, Chloe had an idea for an alarm clock that wakes people up through lights rather than sounds. I then bought an alarm clock, sunrise alarm clock, that has a similar functionality, and it has been great. Then I thought, well instead of using artificial lights, why can’t we use natural lights? (Of course natural light would not work if you are waking up in the middle of the night).
sketches
I then came up with this idea of a smart curtain that is basically a reverse sunrise alarm clock. It serves as an “alarm clock” as it opens and lets lights in at the time you set. I also added a natural light mode: curtains are closed when the sun is down, and the curtain is opened when the sun is up. Houses/apartments in China are much closer to one another than ones in the US, so you have to close your curtains at night. But I rely on the lights to help me wake up in the morning, so ever since I came back home in China, my mom has been yelling at me to close my curtains completely every other night.
schematic
I don’t have access to a linear stepper motor, nor a time module. So I used a servo motor to show the actions of opening and closing the curtains, and hardcoded the current time.
In addition, I used a potentiometer to adjust time, and I kept on getting connection issues with the potentiometer to have consistent readings. I used a push button to change mode, a photo cell to detect day/night(in practice, this photo cell needs to be placed such that only outdoor lightings are sensed but not indoor lightings), and an LCD to display mode and time.
the beautiful curtain(wet wipe)
Video Player
Media error: Format(s) not supported or source(s) not found
This smart curtain can be improved in some ways. In alarm mode, the curtain could be slowly opening instead of opening at once, to fake the effect of sunrise. Like the sunrise alarm clock that can be controlled by smart phones, smart curtain should do that too and maybe even integrate with a traditional alarm system, i.e. slowly opens up at curtain and then alarm rings.
Code:
#include <LiquidCrystal.h>
#include <Servo.h>
LiquidCrystal lcd = LiquidCrystal(7,6,5,4,3,2);
Servo myservo;
constint POTPIN = A1;
constint BUTTONPIN = 13;
constint PHOTOPIN = A0;
constint SERVOPIN = 9;
constint PHOTOTHRESH = 300;
bool isAlarm = true;
bool isOpen = false;
int clockTime = 0; // used for demo purpose
longlong lastLCDTime = 0;
longlong LCDinterval = 100;
longlong lastDebounceTime = 0;
longlong debounceDelay = 50;
voidopenCurtain(){
for(int pos = 89; pos > 0; pos -= 1){
// in steps of 1 degree
myservo.write(pos);
delay(15);
}
isOpen = true;
}
voidcloseCurtain(){
for(int pos = 0; pos < 90; pos += 1){
// in steps of 1 degree
myservo.write(pos);
delay(15);
}
isOpen = false;
}
voidupdateLCD(longlong currTime, int h, int m, bool isAlarm){
In counter-clockwise order, a fan, accelerometer, gas detector, and a PIR sensor.
To an artist, one’s respiratory health is one of the priorities. Spray paint, paint fume, melting plastic… even with a mask on, the fume still enters my lungs. Right now, being able to work on my projects from home, I had to make a compromise with my parents and trade my ventilation with an at-home studio. The room has no windows other than a door. However, to have a fan in the room, the foam particles will fly everywhere and stick to my sculptures or get into my eyes, which is not an ideal situation. But just leaving a door open doesn’t do much to ventilation either.
Therefore, I came up with a fan that interacts with my presence, action, and the gas level.
If people had a hard time understanding since I was struggling to talk, film, move an accelerometer, and light a candle all at the same time, basically the fan works in this way:
Fan gets activated:
when it detects no movement in the room and the doorknob was pulled
when the toxic gas level (flamable gas) is too high in the room, no matter of my presence in the room.
Fan is off when:
when it detects a movement in the room with a low gas level
Now it is time to get real.
The first demonstration is activating the fan with no movement and the door knob.
So this is my dusty, non ventilated studio. Since I am moving in the room, the fan is off.
Currently, there is a movement detected in the PIR sensor, so the fan is off.
So I opened the door, AKA activated the accelerometer.
The fan turns on and ventilates the room.
Now it’s time to test the flamable gas detecting interaction.
Now I am in the room again, and moved infront of the PIR sensor. The fan is off.
I give the toxic gas detector (flamable gas detector) a whiff of my spray foam,
The fan turns on, even though there is movement detected in the room.
initially I had an LCD display, yet for some reason it was glitching not by itself, but also making the whole arduino glitch, and even my computer. The wiring was correct and everything, and that gave me a hardship of setting the range of gas level, because the serial monitor was already showing so many values from different sensors.
the both ground and vcc wire of my fan got detached. I didn’t have soldering equipments or anything so I took a knife and peeled some of the wire and used a piece of tape to hold them together.
Note: 13 Oct is a work day in A10, I will be on zoom if anyone has questions.
Requirements
Combine inputs, kinetic outputs, and state machines to create a physically interactive system that changes interaction based on inputs and logic a person cannot perceive. That is, information we can’t see, or we cannot see visible information.
Doorbell example
One example I gave early this semester was a “doorbell” for someone who cannot hear.
Inputs: doorbell, physical knock, person detector
Interaction: use inputs to determine output. Doorbell + no person detected means someone rang the bell and walked away, was this a UPS/FedEx delivery? Knock and person is there, is someone coming to visit? To sell a product? “Secret” knock pattern used by friends and a person is there, one of your friends has come to visit.
Output: Create appropriate output for the results of the interaction process. UPS/FedEx drop off is lower priority than a friend coming for a visit.