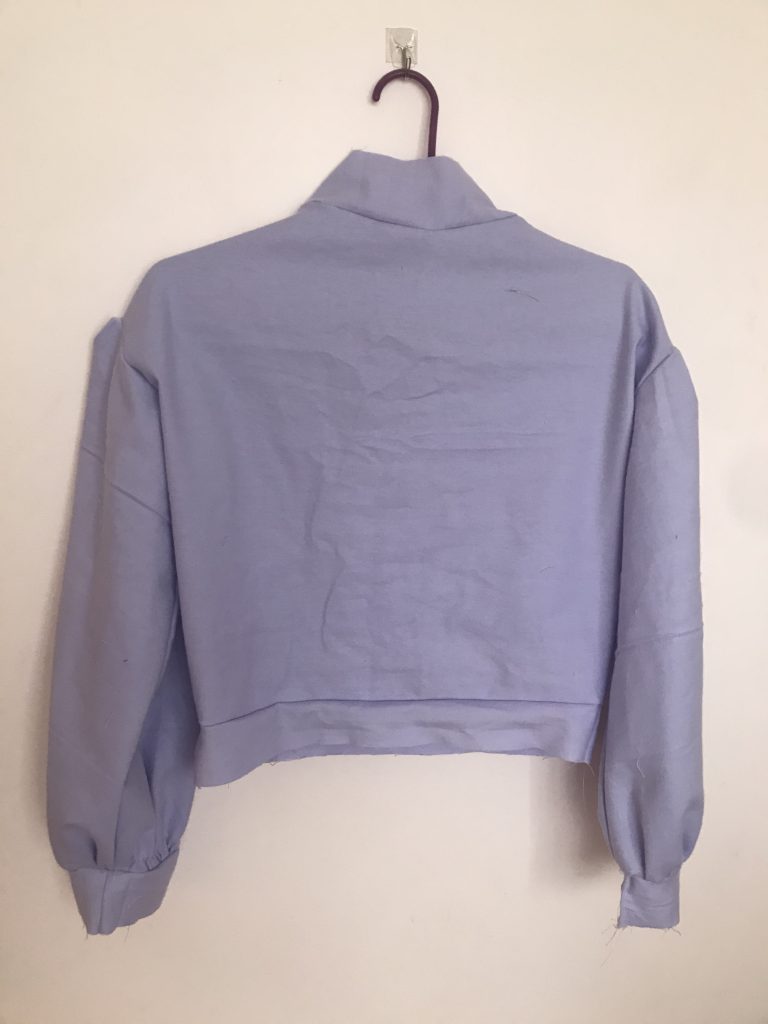
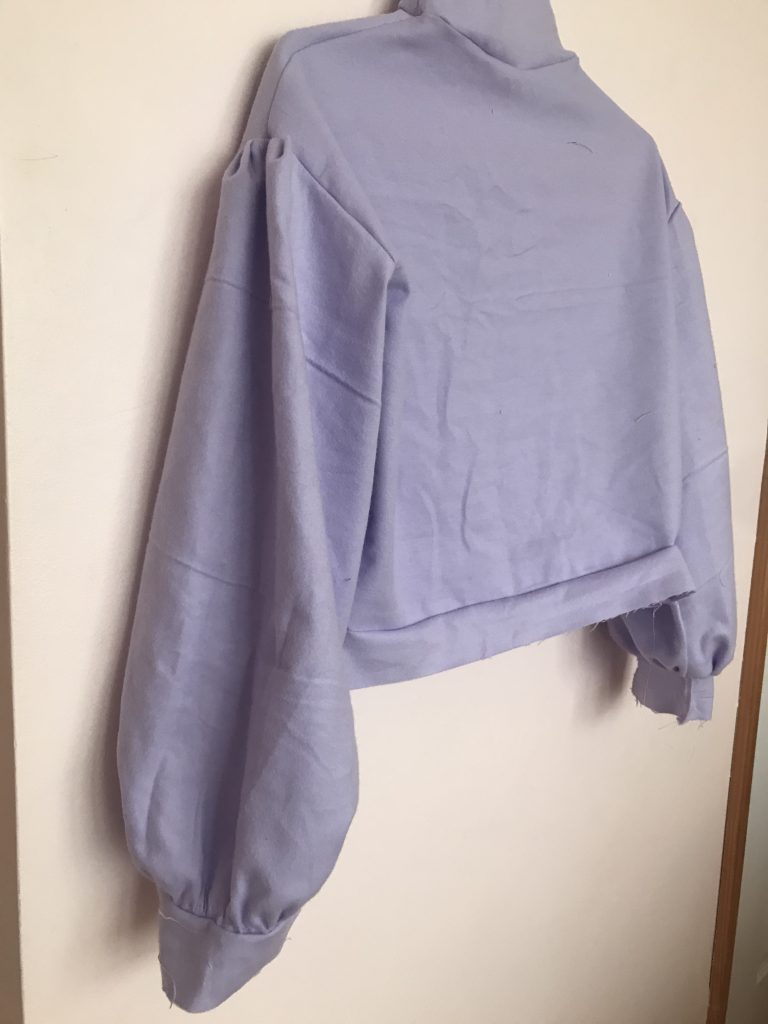
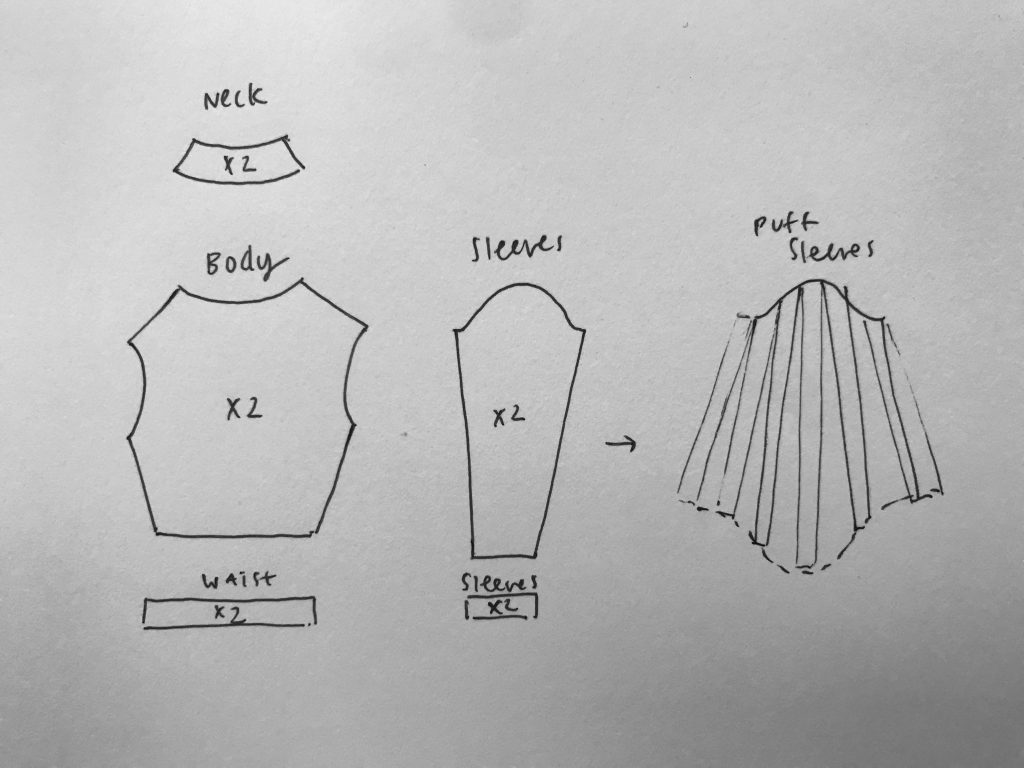
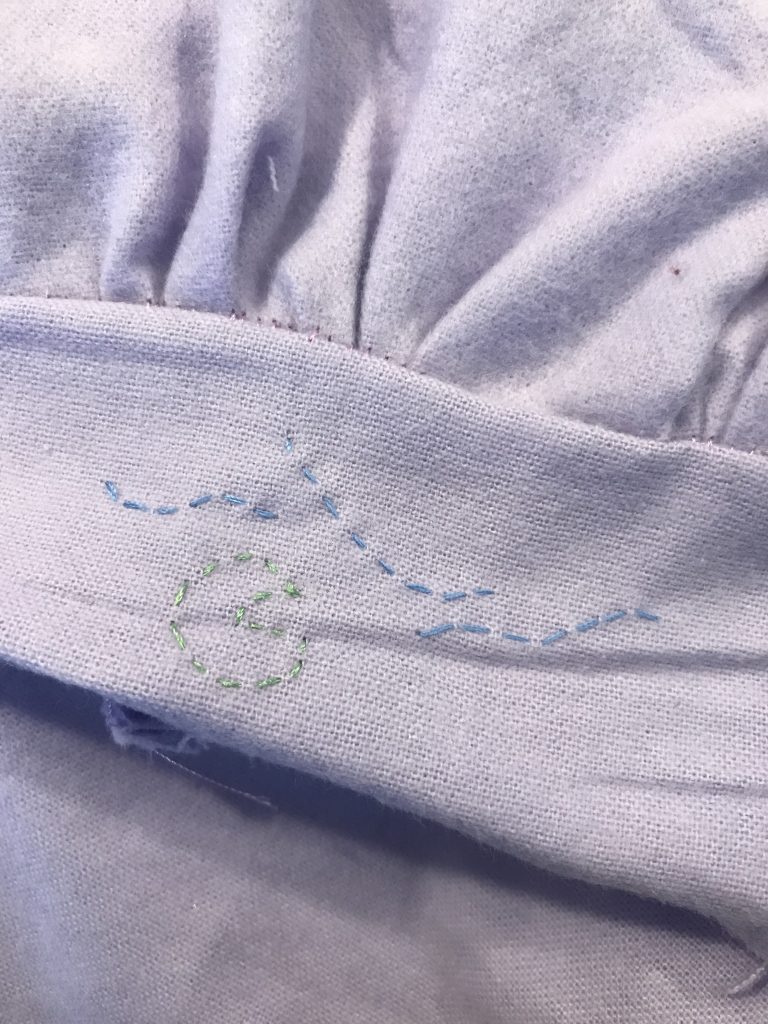
For my final project, I created this purple sweater. It has a mock neck and peasant sleeves, which were both things I had never sewn before.
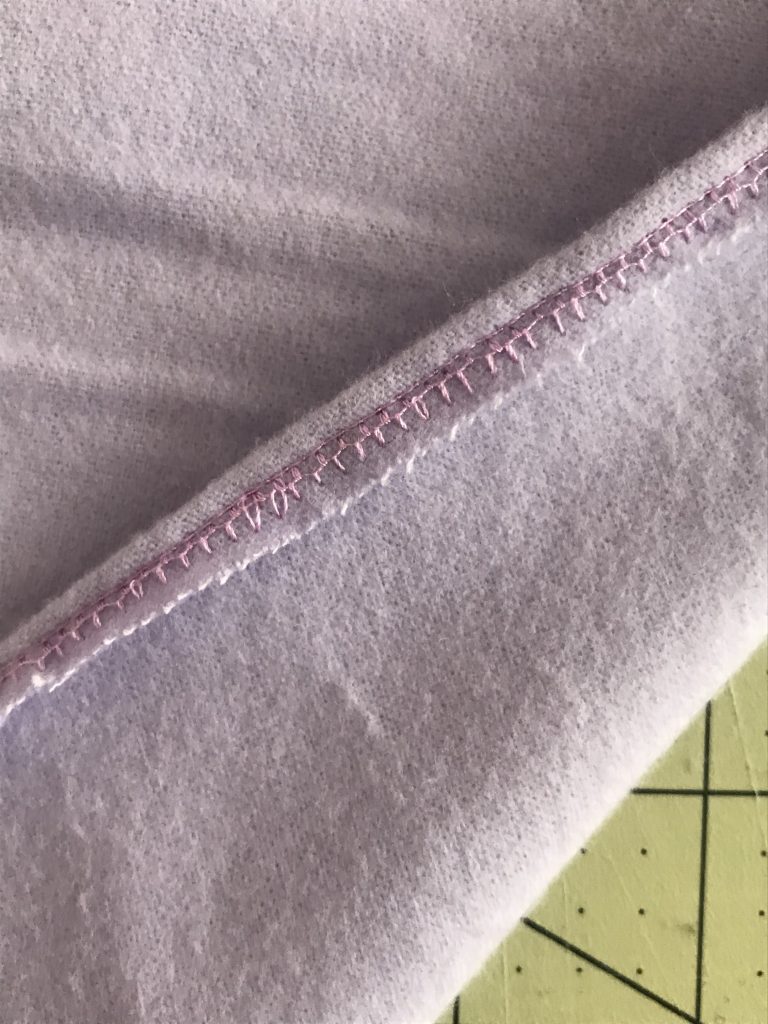
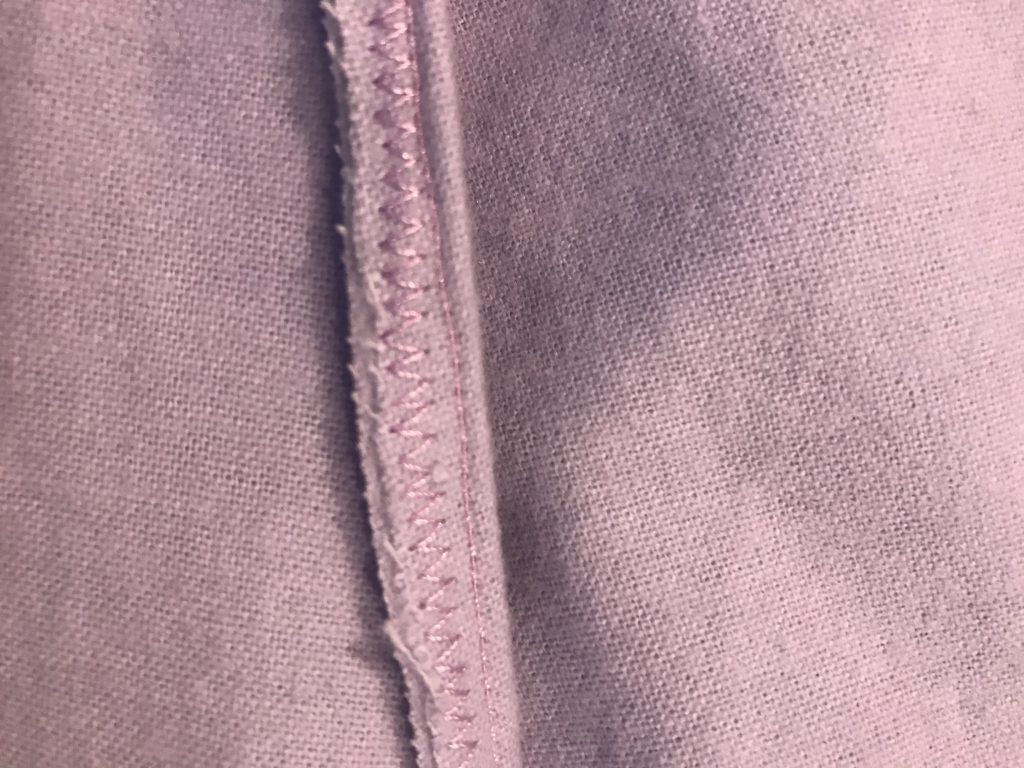
Durign the process of making this sweater, I learned a lot about using certain seams, such as the benefit of a zigzag stitch over a straight stitch. I had a previous version fray entirely too much due to the nature of this fabric and using a straight stitch. I also learned about giving volume to sleeves by using a paper pattern, and the different tensions I would need when working with such a fabric (this is a lightweight flannel). If I were to work with this project again, I’d like to continue adding embellishments and possibly make the length of the sweater a little longer.
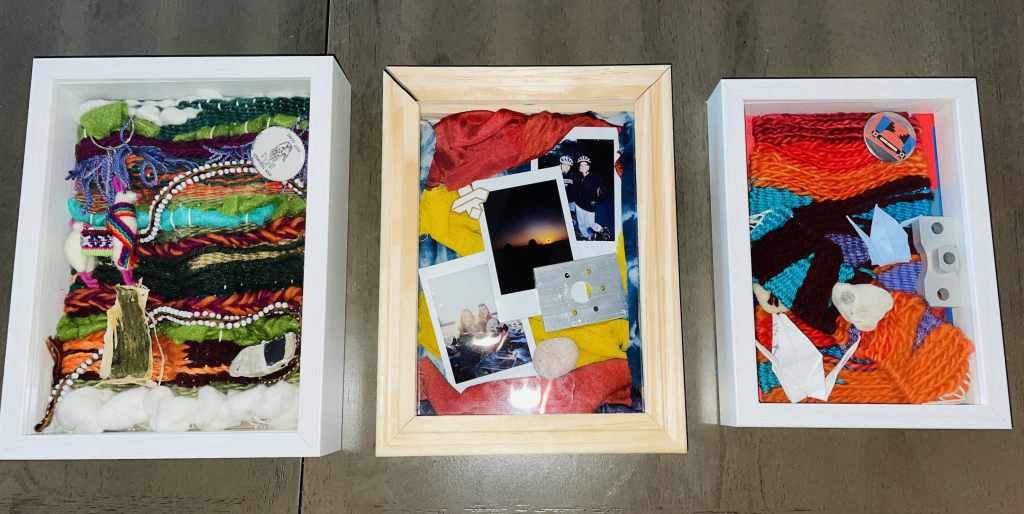
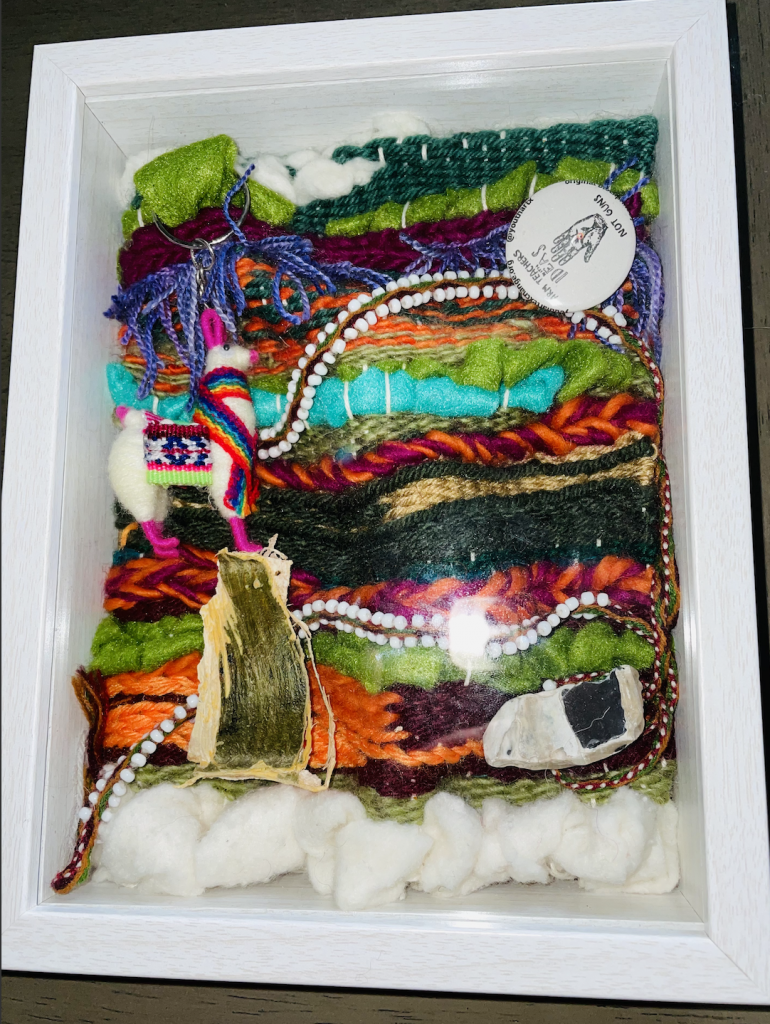
My final project is a series of reflective weavings intermixed with physical mementos from my life, coming together in shadowboxes to create a coherent energy. The final setup of the three pieces is below.
My final three shadow box pieces.
I wanted to emphasize this piece as being reflective, and I did that on many levels. For the entire weaving process that took time from thanksgiving break all the way to finals week, I took the opportunity to reflect on different aspects of my life while weaving. I am feeling as if a big chapter of my life is closing and another one is coming soon, so this project helped me feel as if this “era” was wrapped up. Now, I have mementos from this time in my life to take forward in life. The first weaving I completed was called “slipping through the cracks”, and to me it represents much of the anxiety and mental health issues I have had over the years.
“slipping through the cracks”
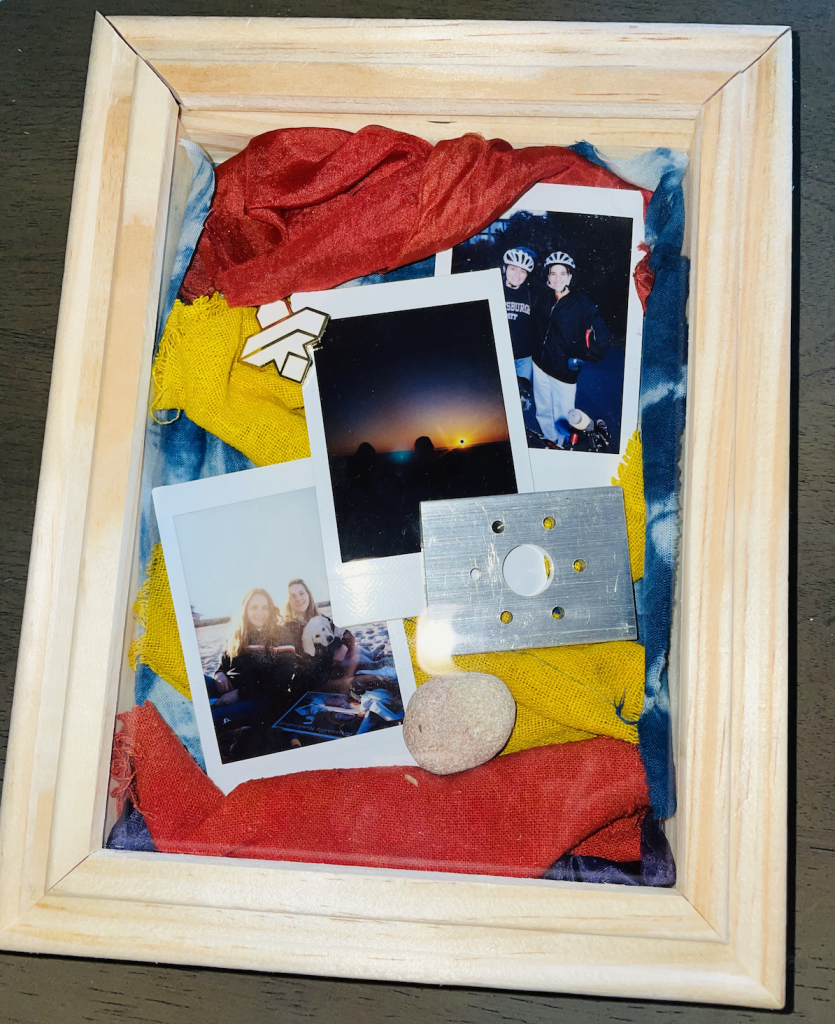
The next piece I completed was one in which I spent a lot of time on to perfect. I wanted to dive into the more exciting pieces of life such as my adventures and travels in the past. I have always felt a very strong connection with nature, and I feel that comes through in this piece. I called it “the rush” to highlight my love for adrenaline, but also for the chaos that is normal, pre-covid life, especially when travelling.
“the rush”
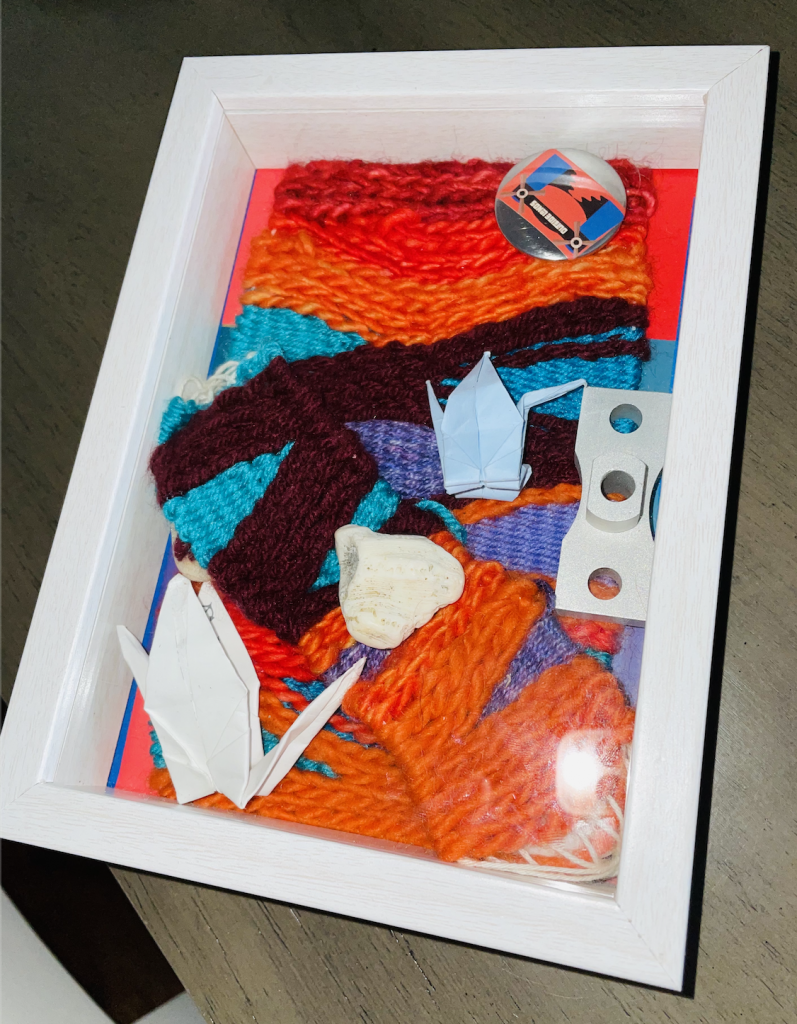
Finally, I used our dyed pieces and physical images to create a memento that reminds me of my friends, school, and current life. This one, in a way, represents what is on my mind during a normal school year. Because of that, I titled this one “on my mind”.
“on my mind”
This project has been really powerful for me in terms of introspection. I have enjoyed taking time to improve my weaving and embroidery skills, and creating mementos and weaving habits that will last a lifetime. This class has been really impactful and transformative for me because I found this connection to a great activity, and I am excited to continue building my skills. This project has made me feel more connected to my past self, and I am grateful for that!
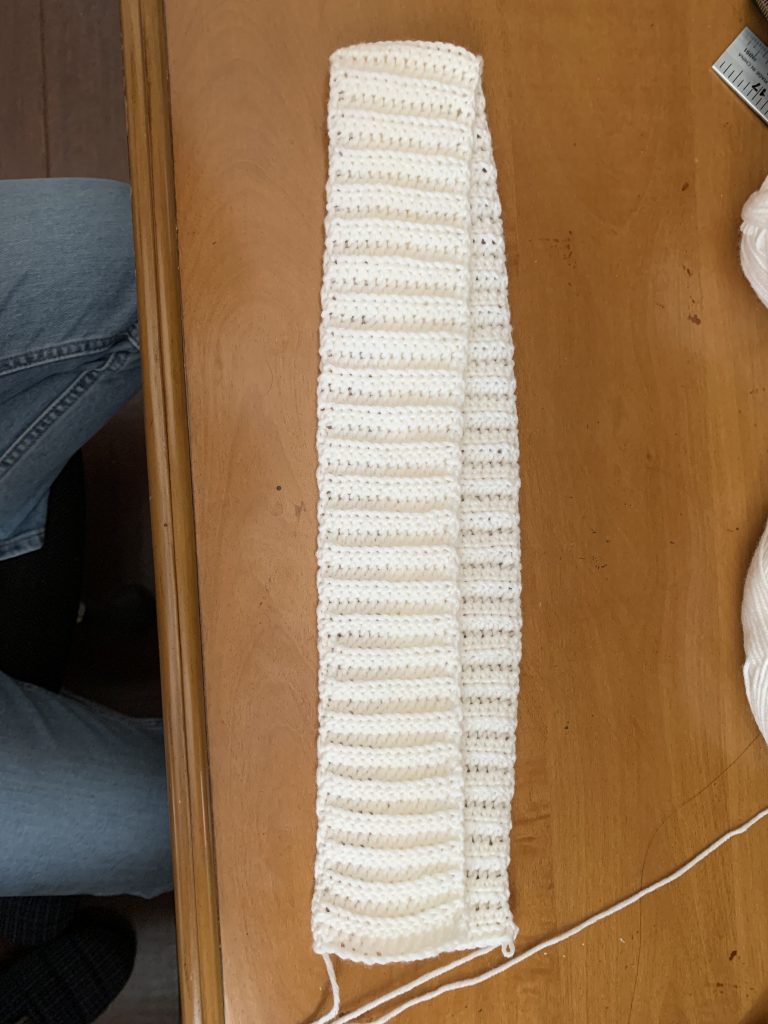
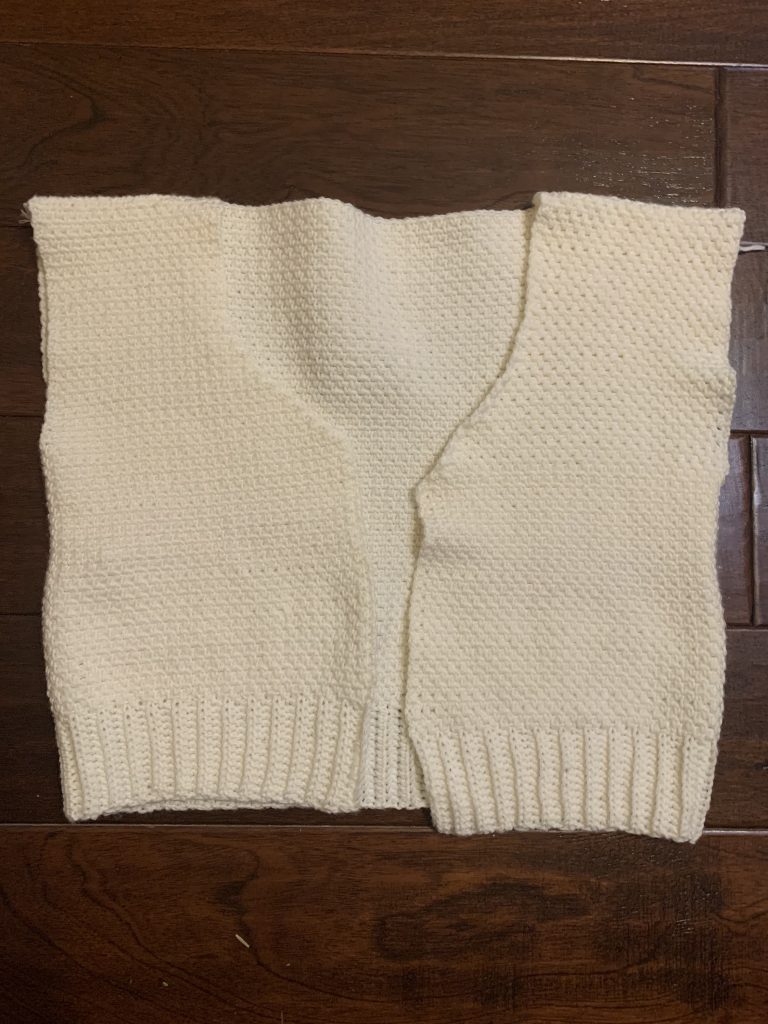
I went into my final project thinking crocheting a sweater would not be too difficult. 60 hours of work later, I was very wrong.
separate sweater pieces
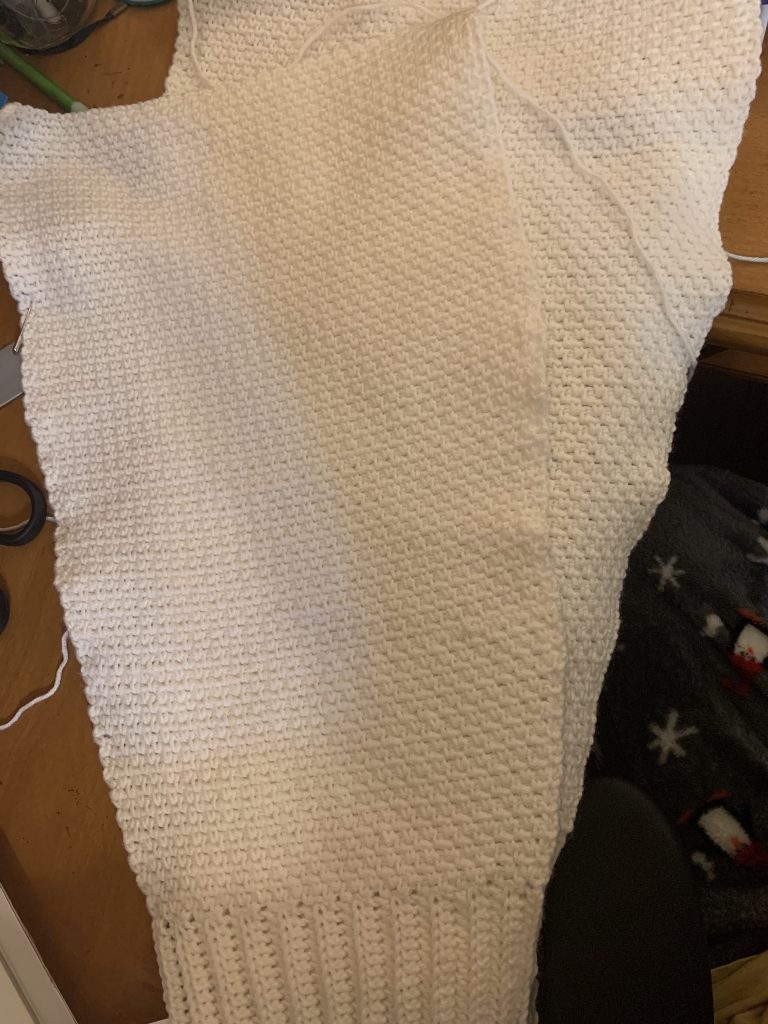
During this process, I learned a couple factors affect the outcome of my work very heavily. The first being, different balls of the same yarn will vary in thickness and even more so, the same ball of yarn varies in thickness. This led to uneven parts of the sweater and even different sized sleeves of the exact same stitches. Another challenge was how tight/loose I crocheted. This plus the first factor led to sizing being a little off when I tried the sweater on.
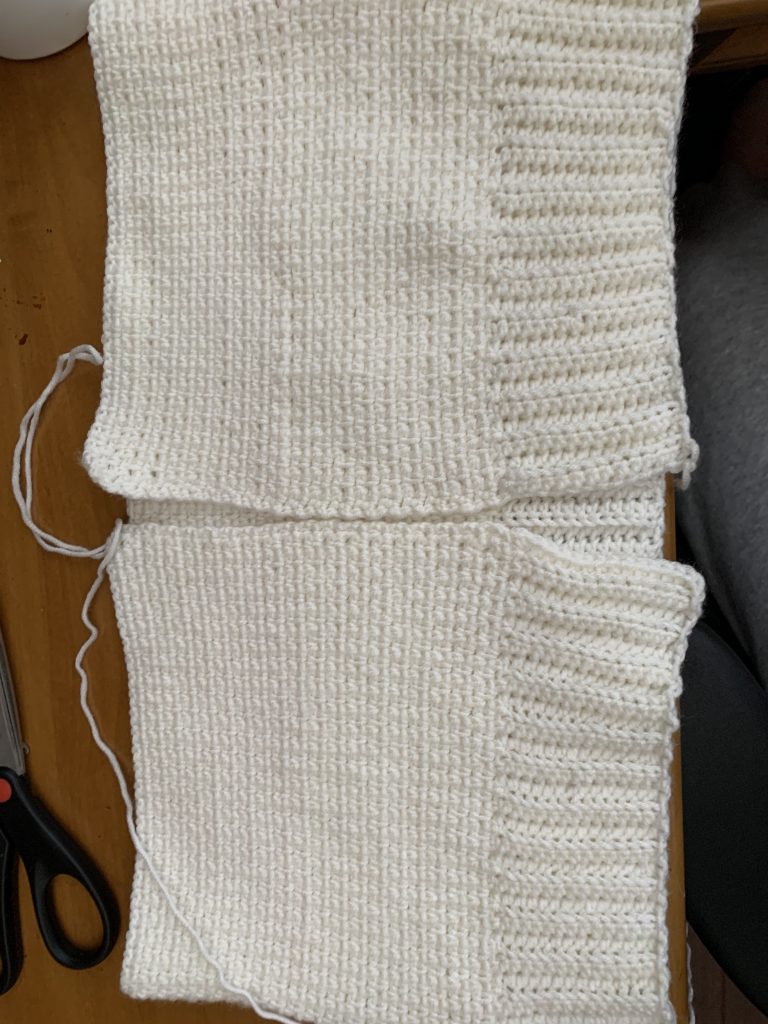
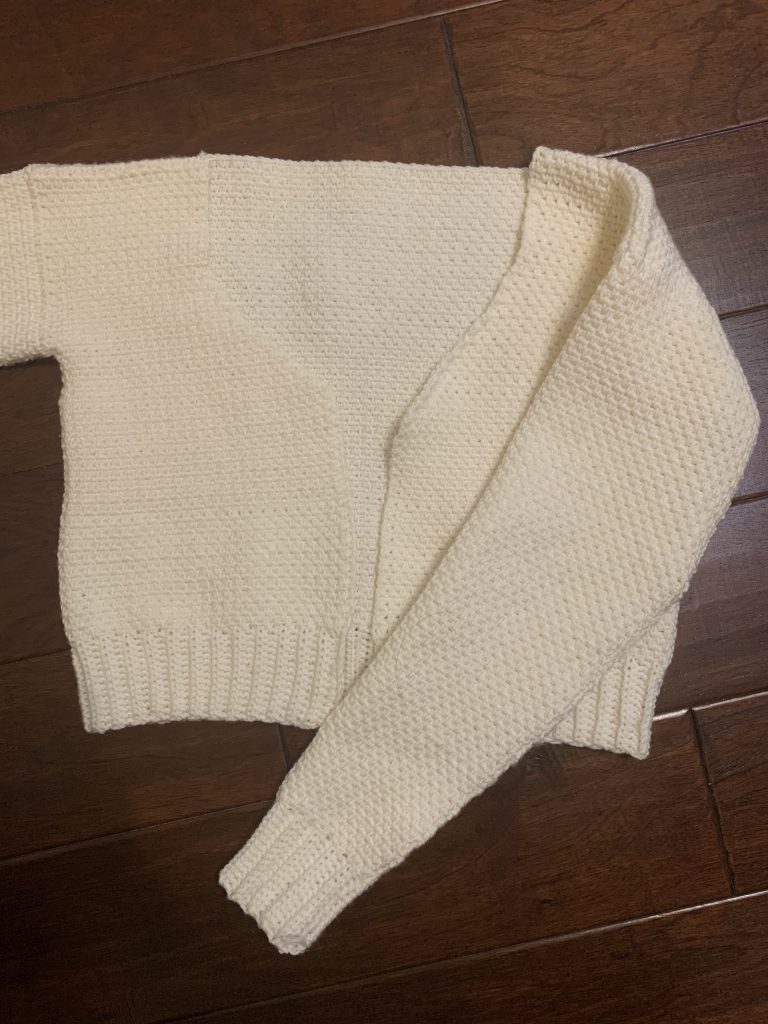
sweater put together
After sewing all the pieces together, the sweater kind of fit funny. It needs a steam and adjustments on the body so that I can make and outline to finish it off. I have new appreciation for handmade sweaters, especially the ones my grandparents used to make and also have a better understanding as to why machines were created to manufacture clothing.
In future iterations, I hope to create more consistent stitching with both better yarn and a grasp on my hook. I would like to create a sweater by stitching squares together as a different approach to sizing properly.
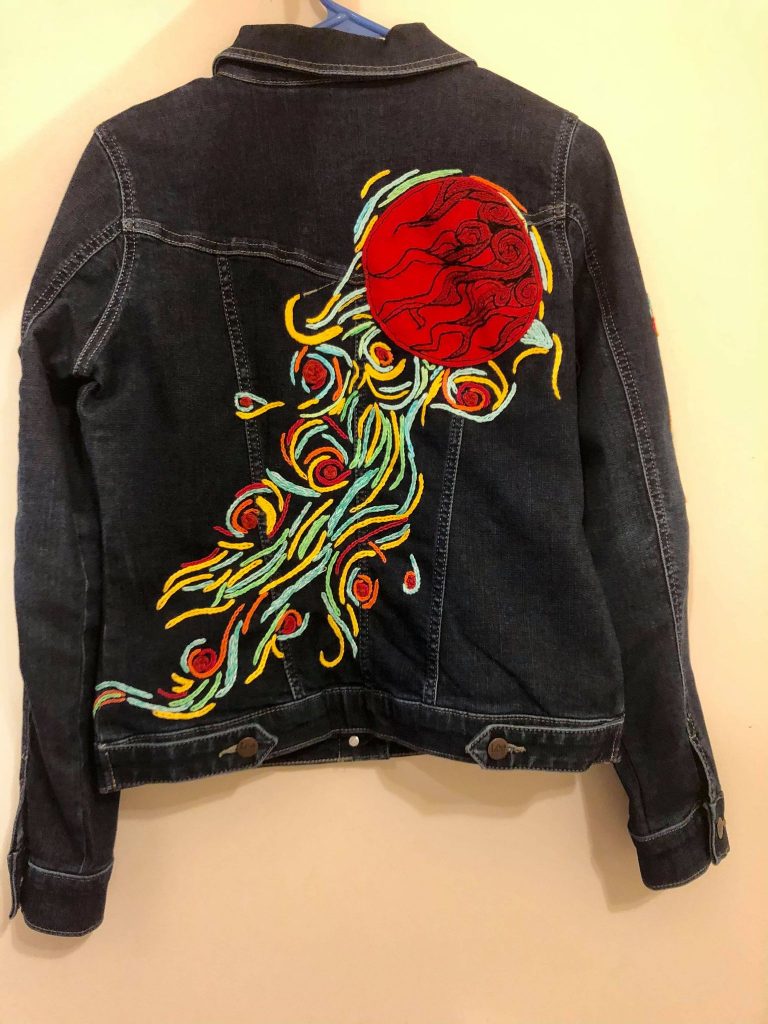
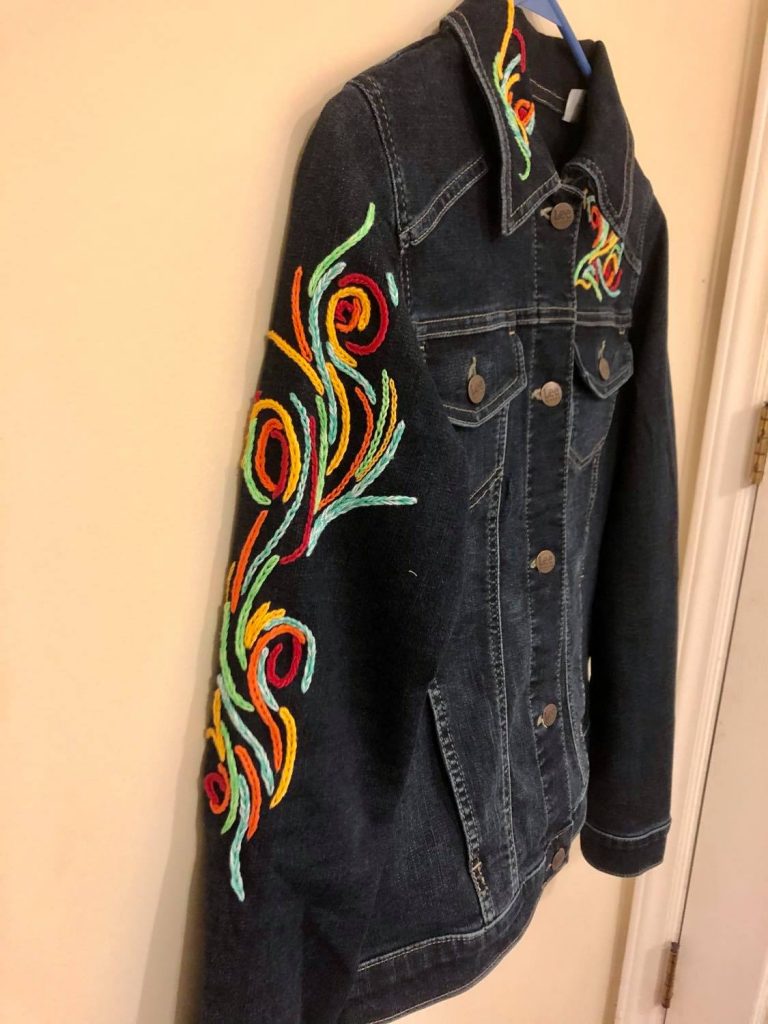
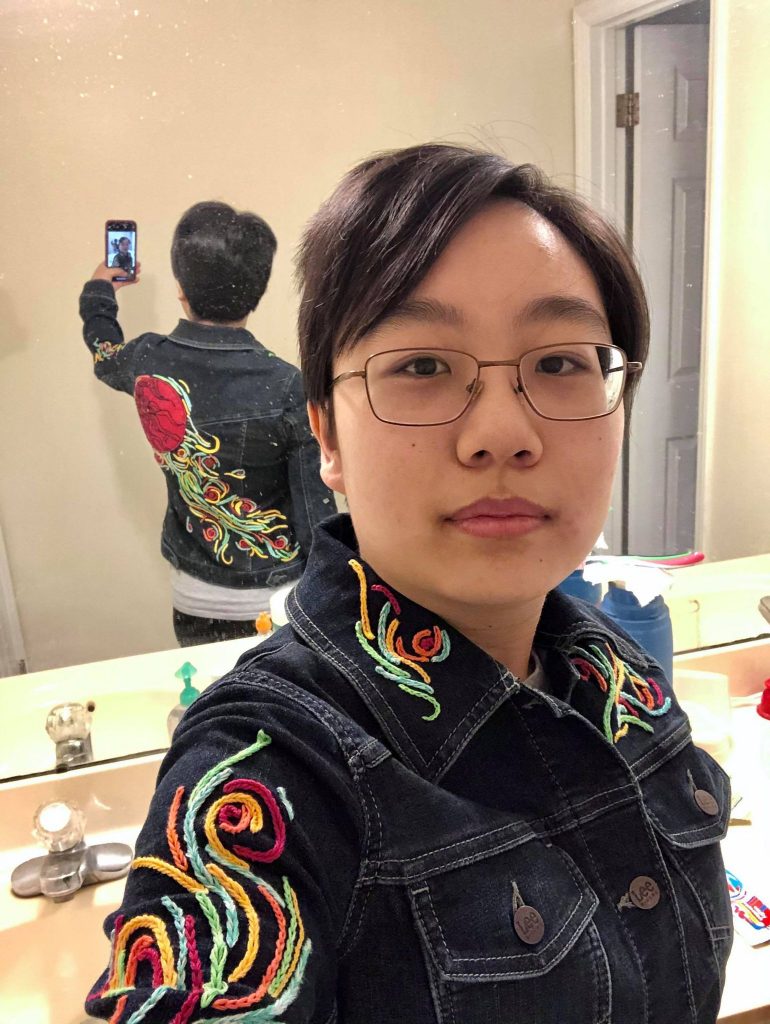
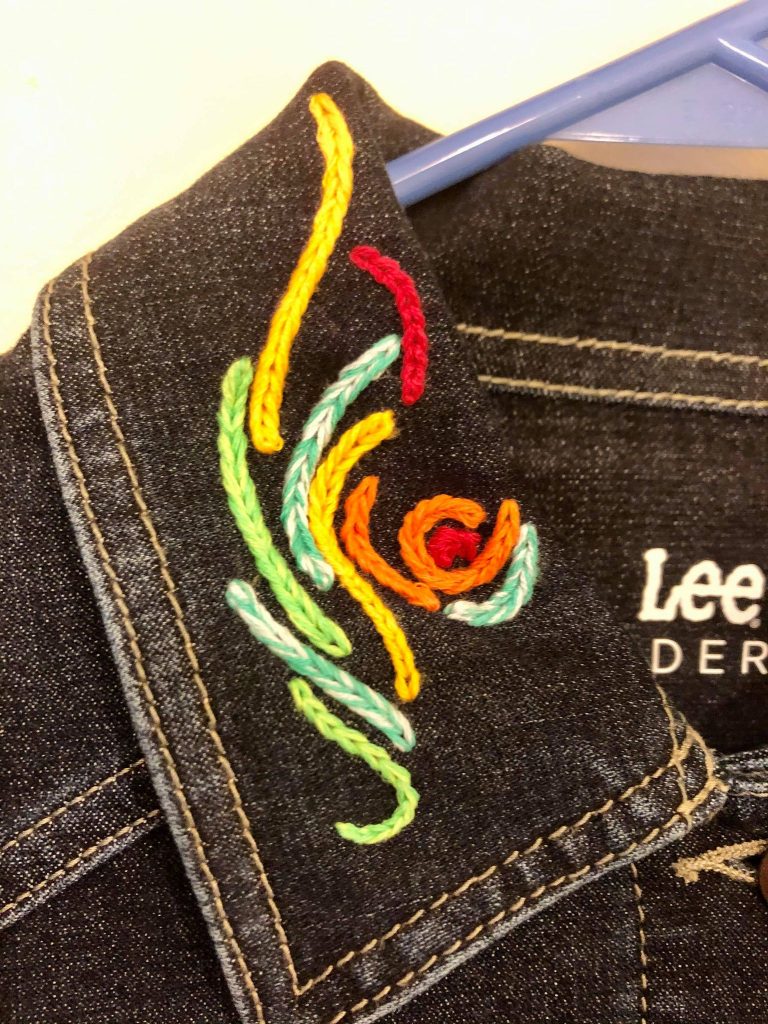
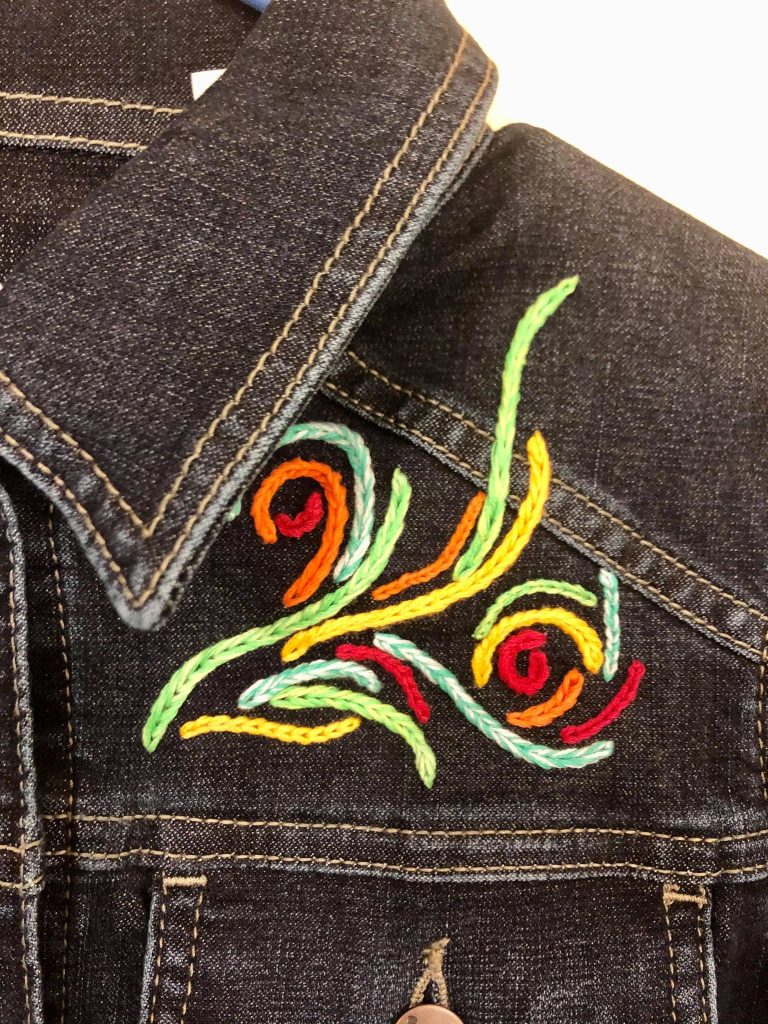
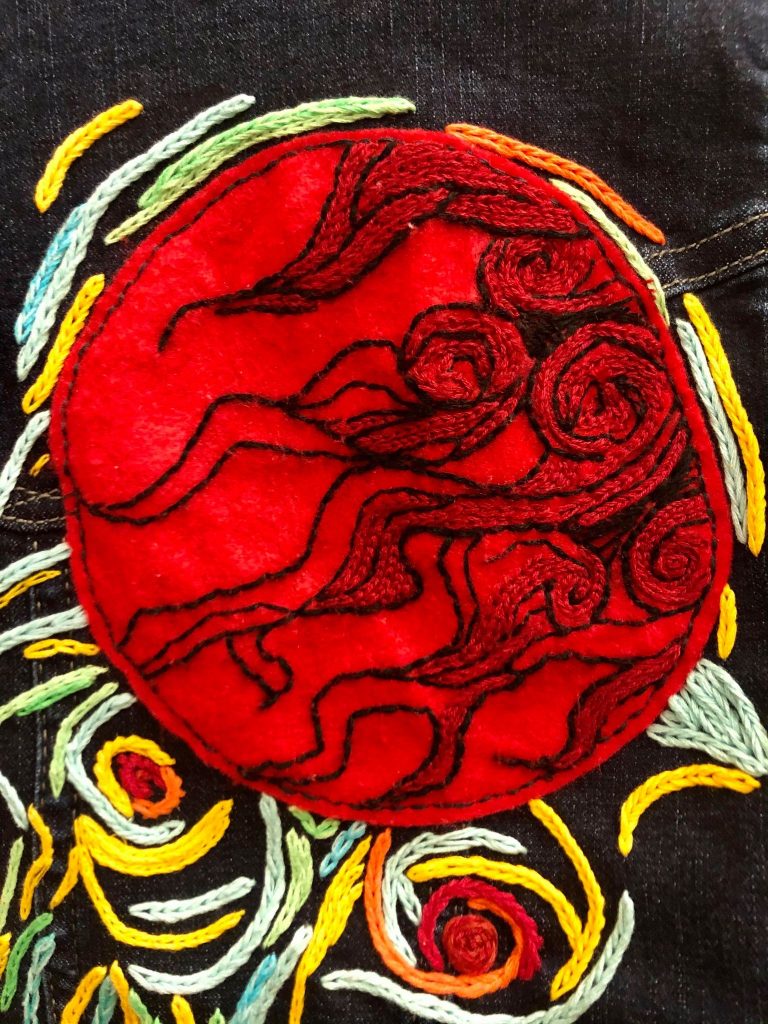
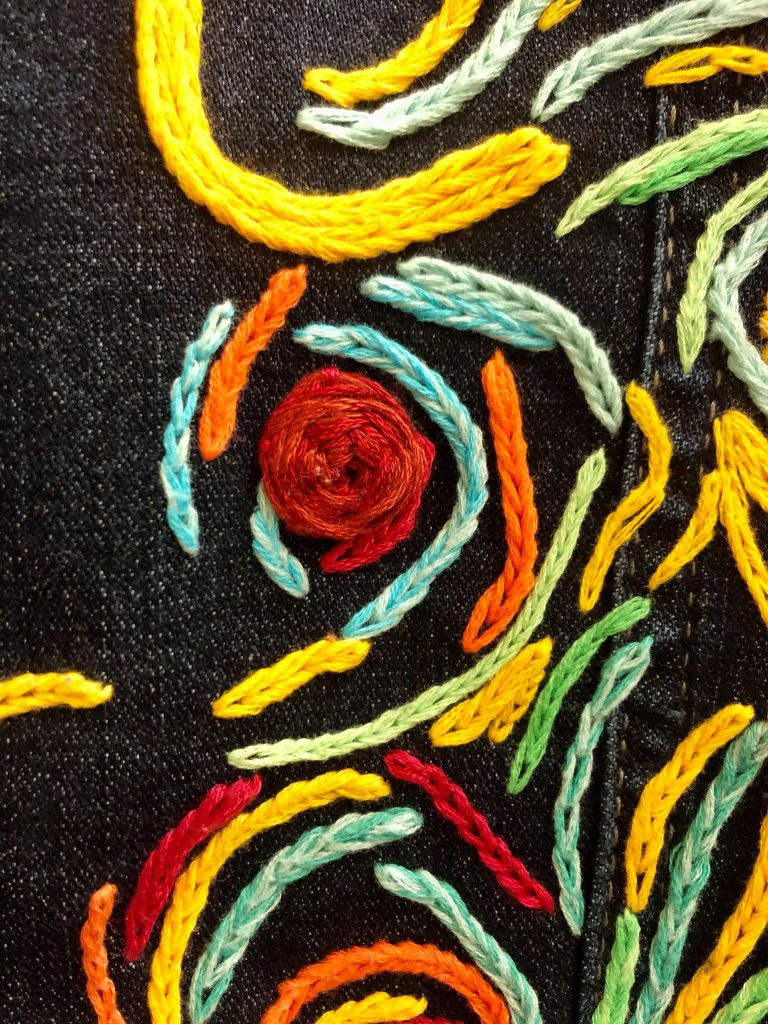
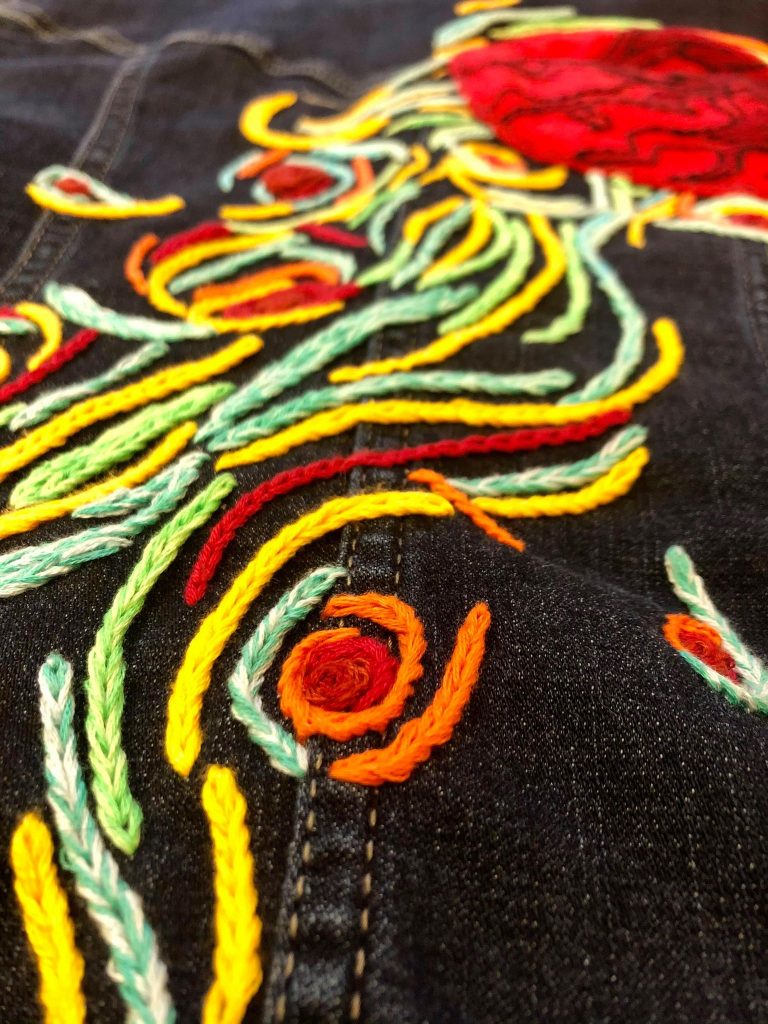
For my final project I embroidered a jacket. I chose a jacket because I wanted to make something that I would be able to wear. Embroidery was something I found I really enjoyed, and I wanted to see what I could do with a single type of stitch.
I wanted to create something that was important for me. The design on the jacket is inspired by one of the endgame weapons from Okami, a video game that inspired me as a kid. The pattern grew a lot from the initial in game design; I’ve always had problems with creating abstract things, so I decided to challenge myself by doing this for the final project.
Creating a design that would end up on a body was way more difficult than I expected. When designing and making the design, I couldn’t really envision it on a 3D form as well as I had hoped, which resulted in certain designs being on slightly different parts of the body. For example, I had to extend the arm design because it ended up lower than I expected. Running out of colors early on forced me to mix thread colors, which gave the pattern a different feel when looking at it close up.
It was difficult to imagine where and what to put the swirls at the beginning, and I experimented with different thicknesses of lines by adding lines next to each other, using less thread in my stitches, and doing different types of chain stitches. About halfway through the design in the back, I felt like I had a much better handle of what I was doing. I also really like how the disc ended up, with the darker red thread adding a bit of depth. I even added a bit of weaving to create a thicker effect in the center of the swirls.
Overall, I really like how the jacket ended up. I might add more designs in the future, but I did manage to create the asymmetrical design and feel I was going for.
Materials: Jean jacket (x1), embroidery thread (a lot), felt patch (x1)
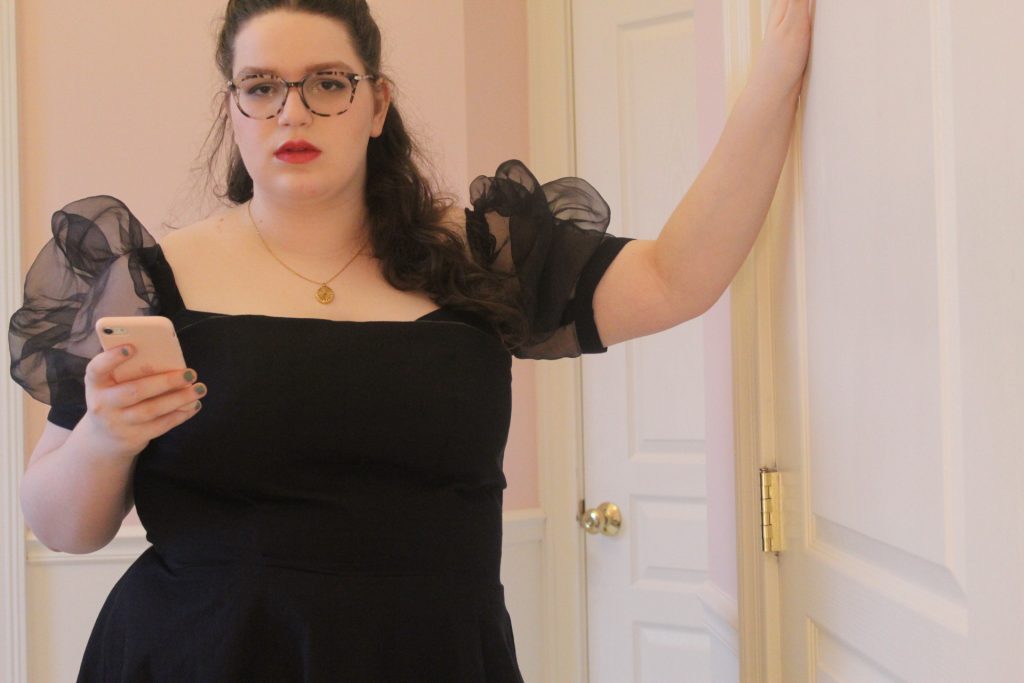
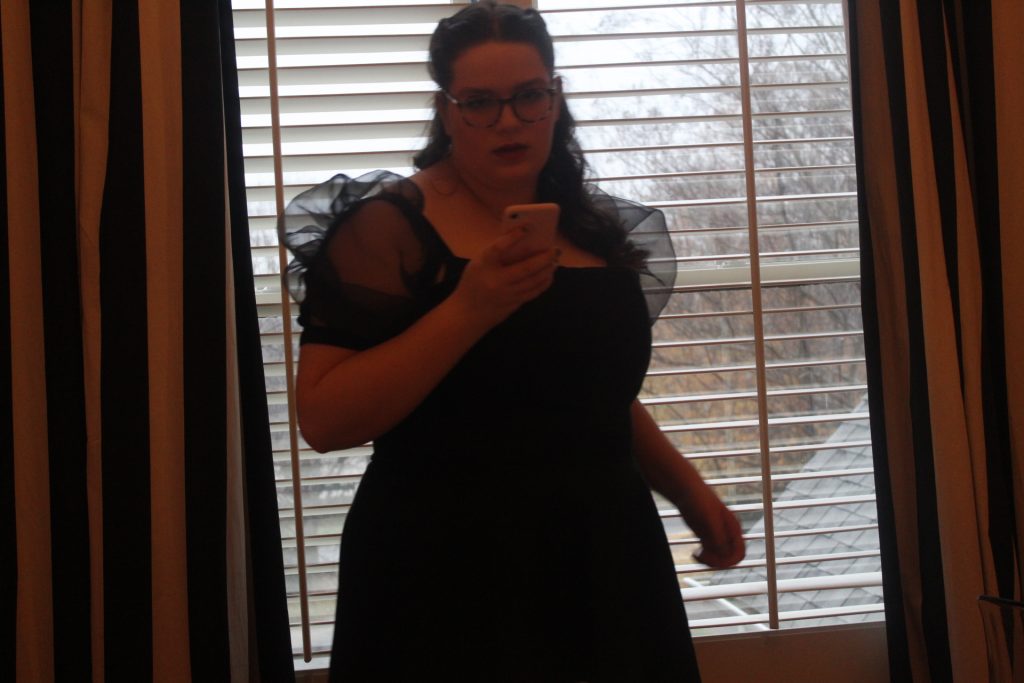
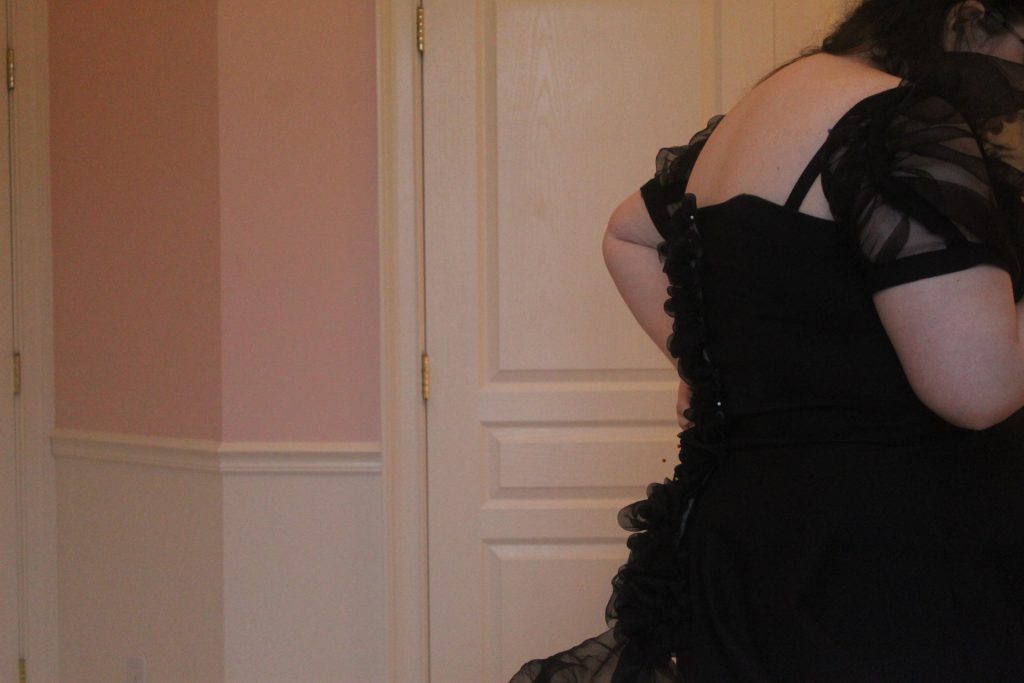
So, I am not sure how to write an explanation of this dress, execept that it came out very far from my original intention. I guess it is a very personal work that took on a lot more meaning as the holidays drew nearer, and my grief has slowly been creeping back in stronnger as I made this. As a result, The base dress, in my opinnion id extermely well and carefully constructed, made with time and care, and the two other elements are compensations. Drama meannt to pull away from how little work actually went into them.
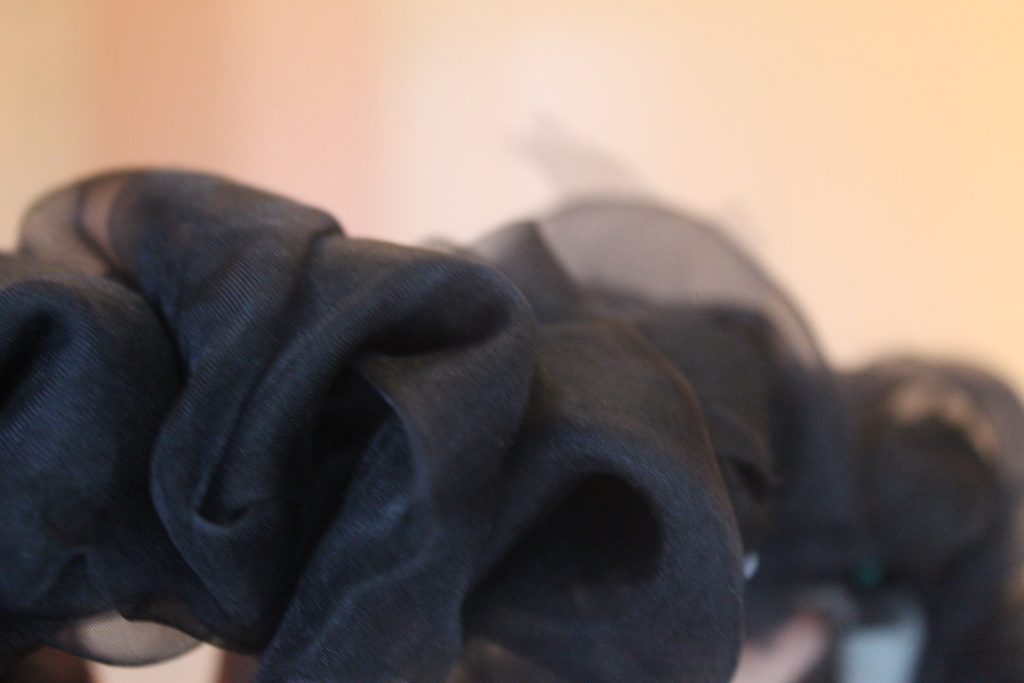
The sleeves are a replica of sleeves from 1893 but made out of this sheer fabric. I chose this kind of sleeve becase of how it kind of swallows you, yet the sheer fabbric makes it so you cant ever bee fully swallowed and pulled in.
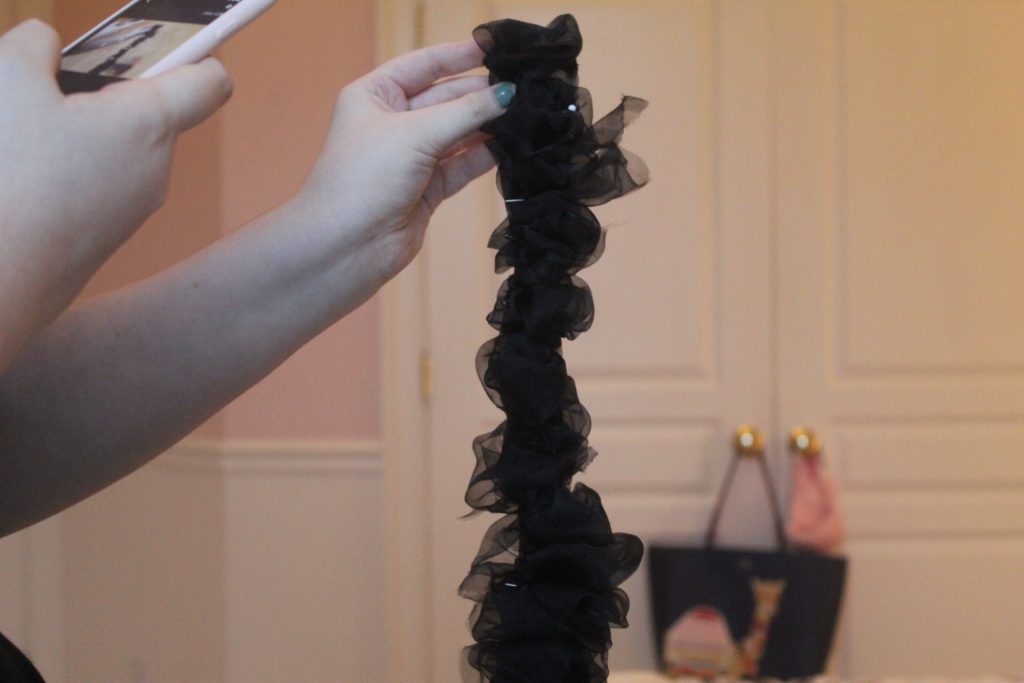
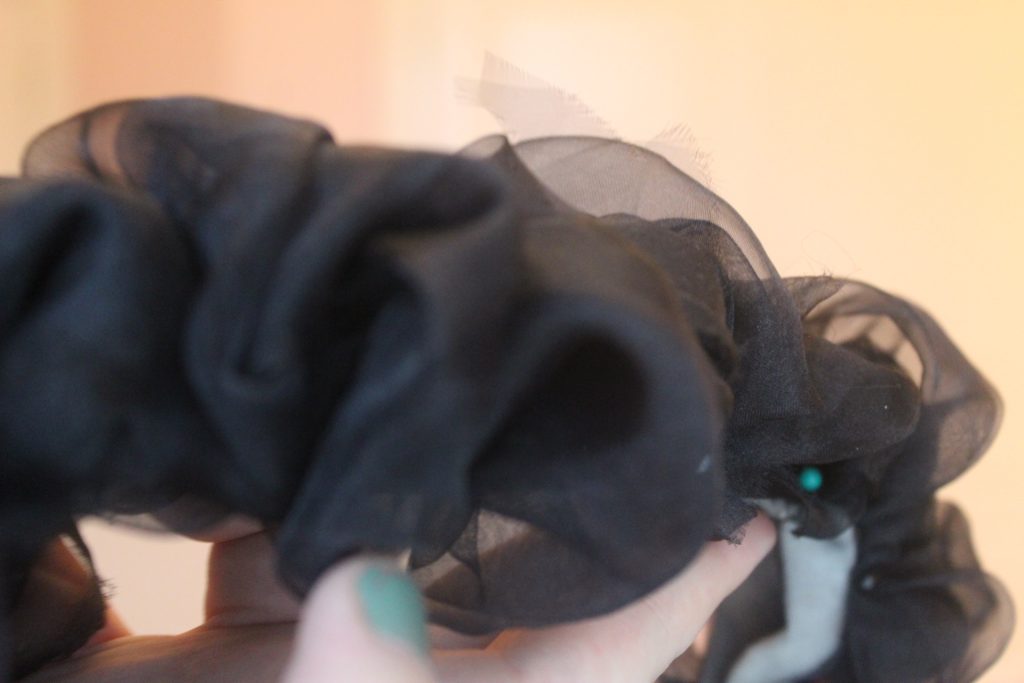
For the spine, I thought about alot of techniques, nearly chrocheting it, but instead I ended up going with a kind of ruffling technique because I felt there was a certain protectiveness to the ample fabric, but the protectiveness isn’t very meaningful.
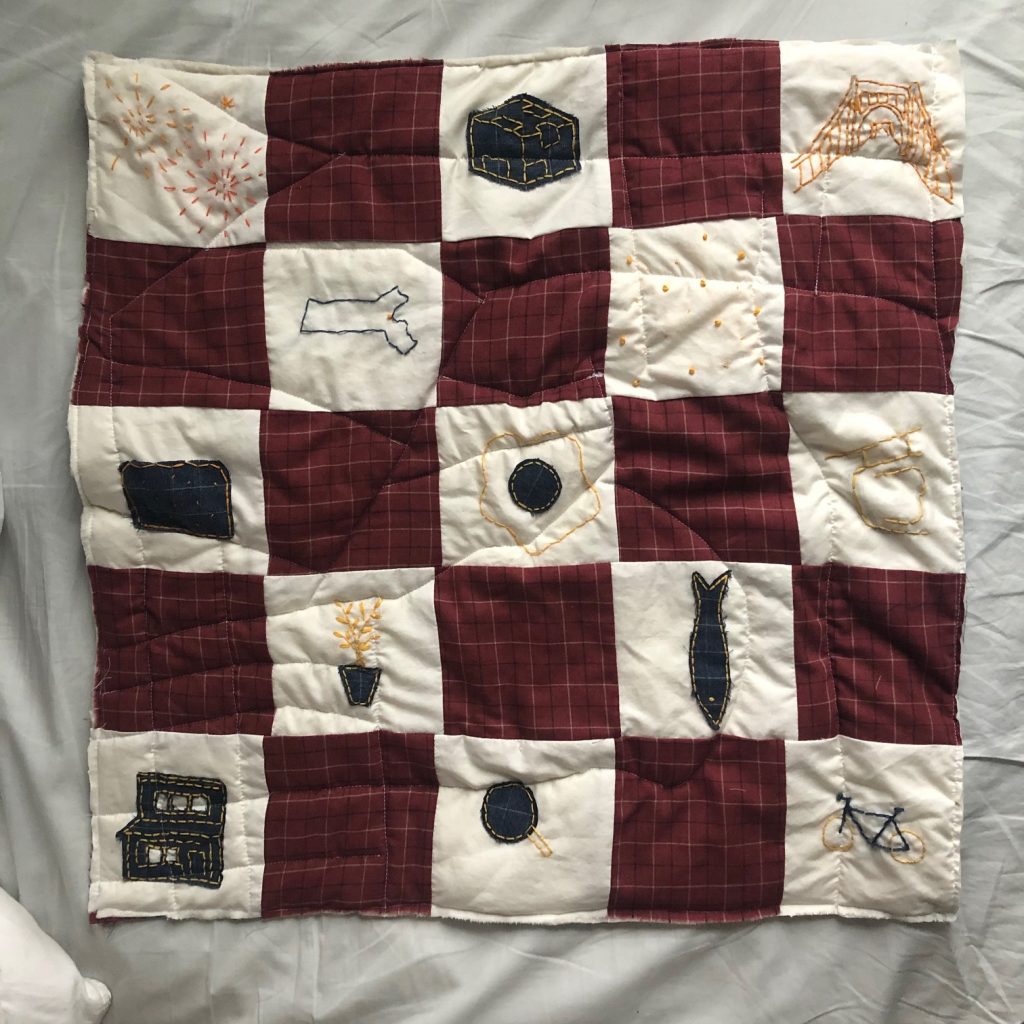
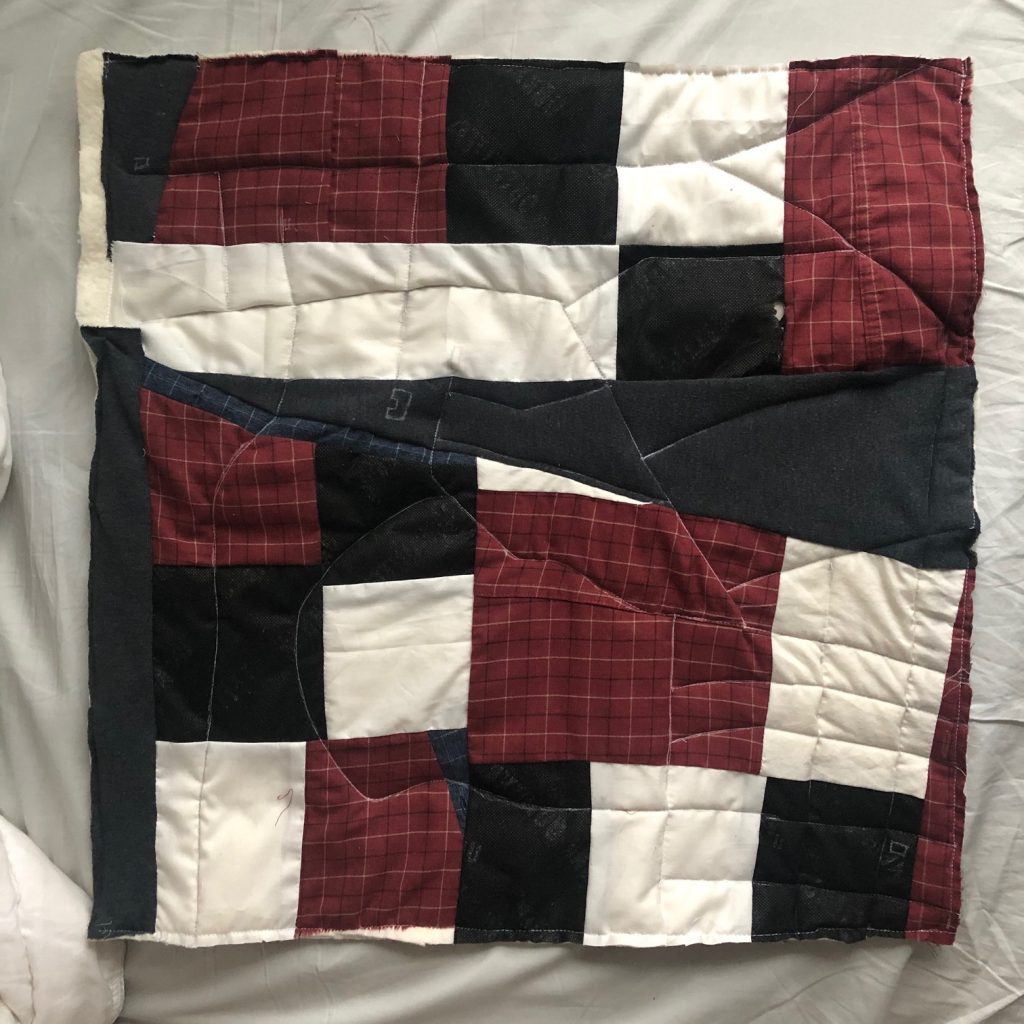
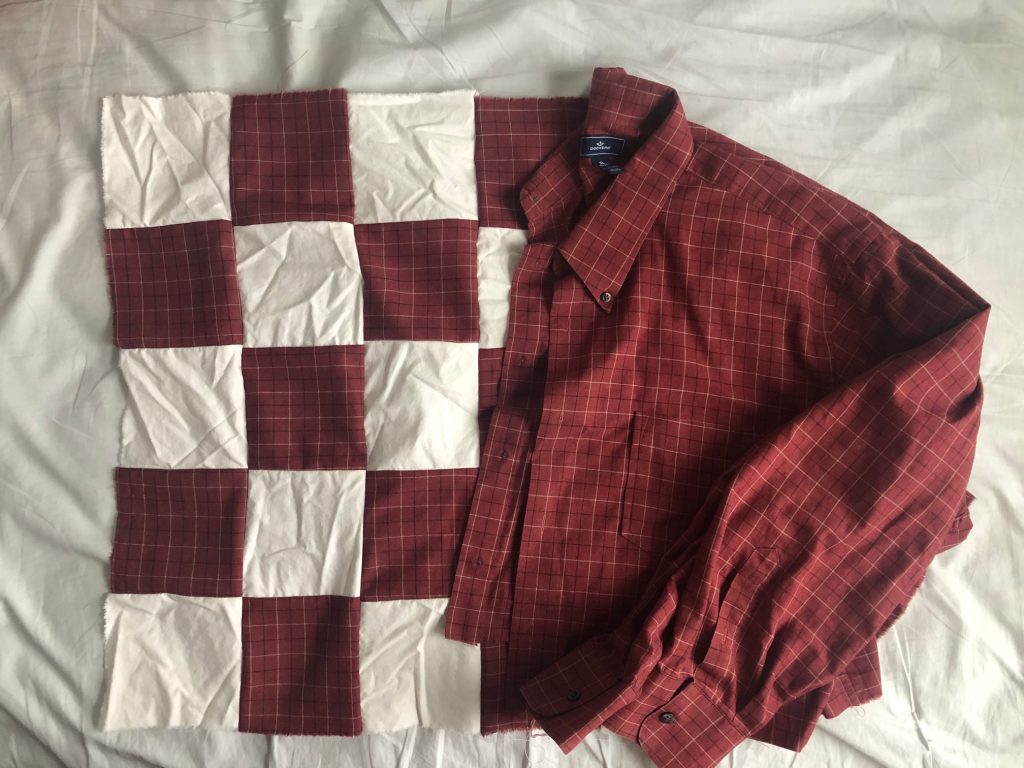
For my independent project, I made a story quilt about my time at CMU. I chose a quilt because I liked how the medium was able to show different layers of information – the piecework and the actual quilting.
Materials: For the front (gridded), I used my old fitted sheet from my first two years, and is a Twin XL so I haven’t been using it, and I know my mom will make me throw it out when I graduate, so I might as well upcycle it. The red and blue parts are from thrifted button up shirts that I cropped, and used the leftovers. The red pattern reminded me of the red brick houses in Pittsburgh.
The back is made from scraps from this project and my previous project- the encoded cloth of recycled bags- because something I have become very aware of especially the past few years is sustainability, and to maximize resources.
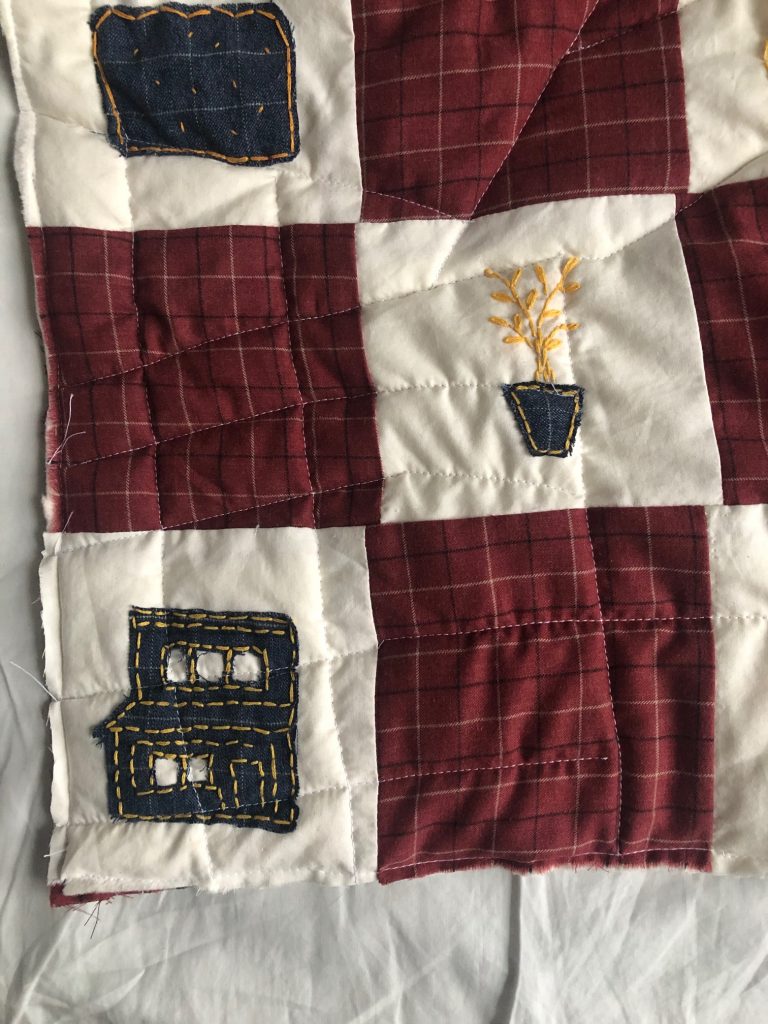
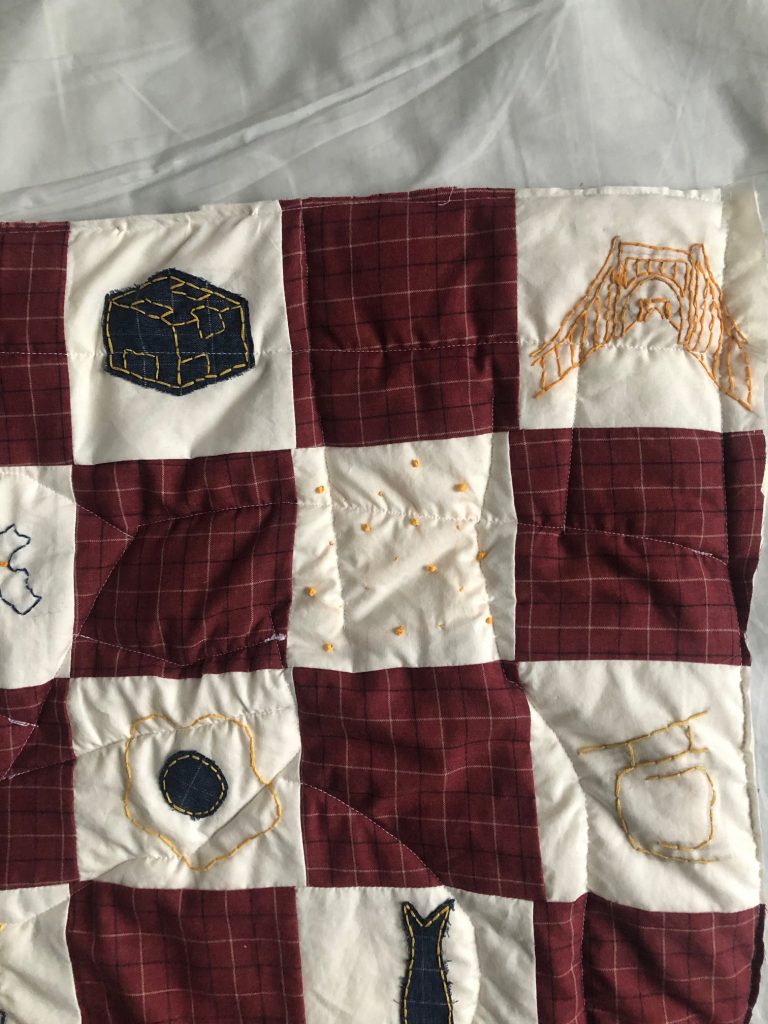
Design: I made a 5×5 grid for my five years here, each row representing a year. The quilting is actually a map of the Oakland-Squirrel Hill area, with CMU at the middle. All of the places I’ve lived the past few years could be found in this area. It is oriented to be read from the back. I very much associate place with memories, so in this case, it is literally what binds everything together.
Top Left: My third year, I had a 9am class where I would always show up with banana bread Right: I got a money tree last year, one of my first house plants, and it has still been thriving Bottom Left: The front of the house I am currently living inTop Left: The iconic “Cube House” we all had to make in first year studio Top Right: I used to explore Downtown a lot first year when I was homesick Second Row: My friends and I drove out of Pittsburgh and I was amazed by how many stars I saw for the first time (I’m a city girl..) Lower Left: I have always just had a poster of an egg banh mi hanging up in my room all these years for some reason Lower Right: Third year, I won second place in a design competition with one of my best friends with that design Bonus: The fish (sardine) is a souvenir I hang on my wall from my trip to Portugal for studio my fourth yearSquirrel Hill- The white square represents my house
Throughout this project, and this semester, I grew a lot. I have gotten faster at embroidering, and more comfortable with using the sewing machine! I am pretty happy with how the quilt came out. Next time, I would like to make a quilt that is sized to be used!
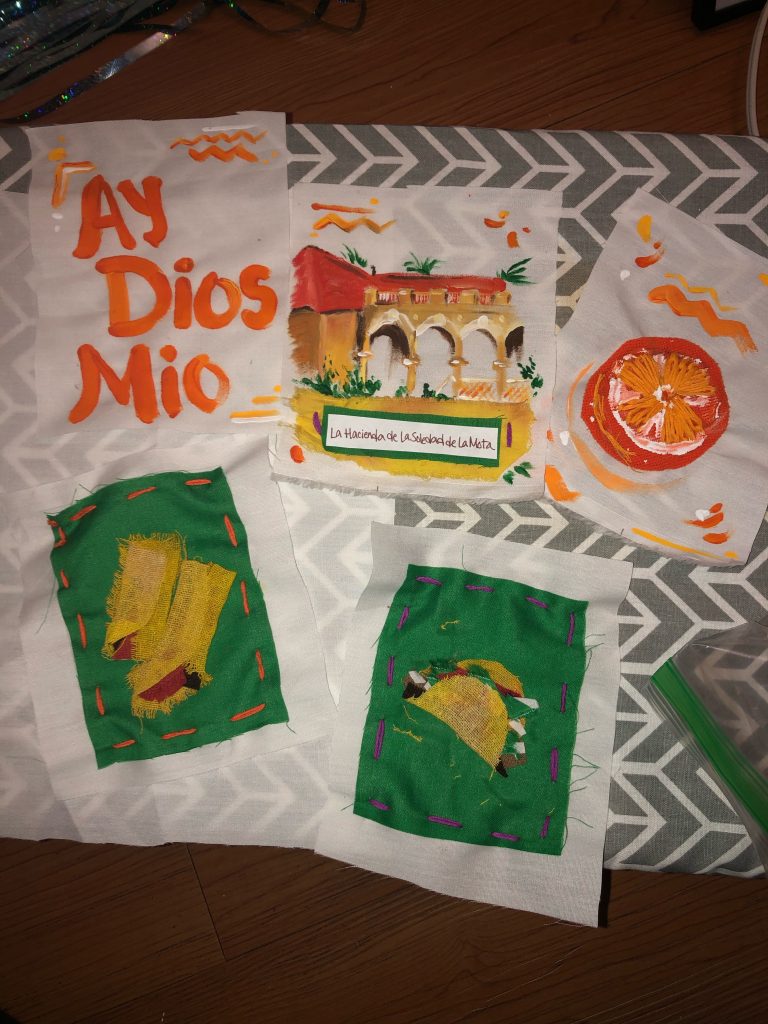
For this project, I wanted to use textiles as a way to connect with my family and to experiment with natural dyes. I talked to my extended family about some of the Garcia Lore that’s been told for generations. It was exciting to hear the different pieces of the narrative and string all of the events together through the past into the present. I decided to communicate my Mexican heritage with a patchwork quilt, and the biggest challenge I ran into was coming up with meaningful symbols for our complex history.
In progress patches for quilt
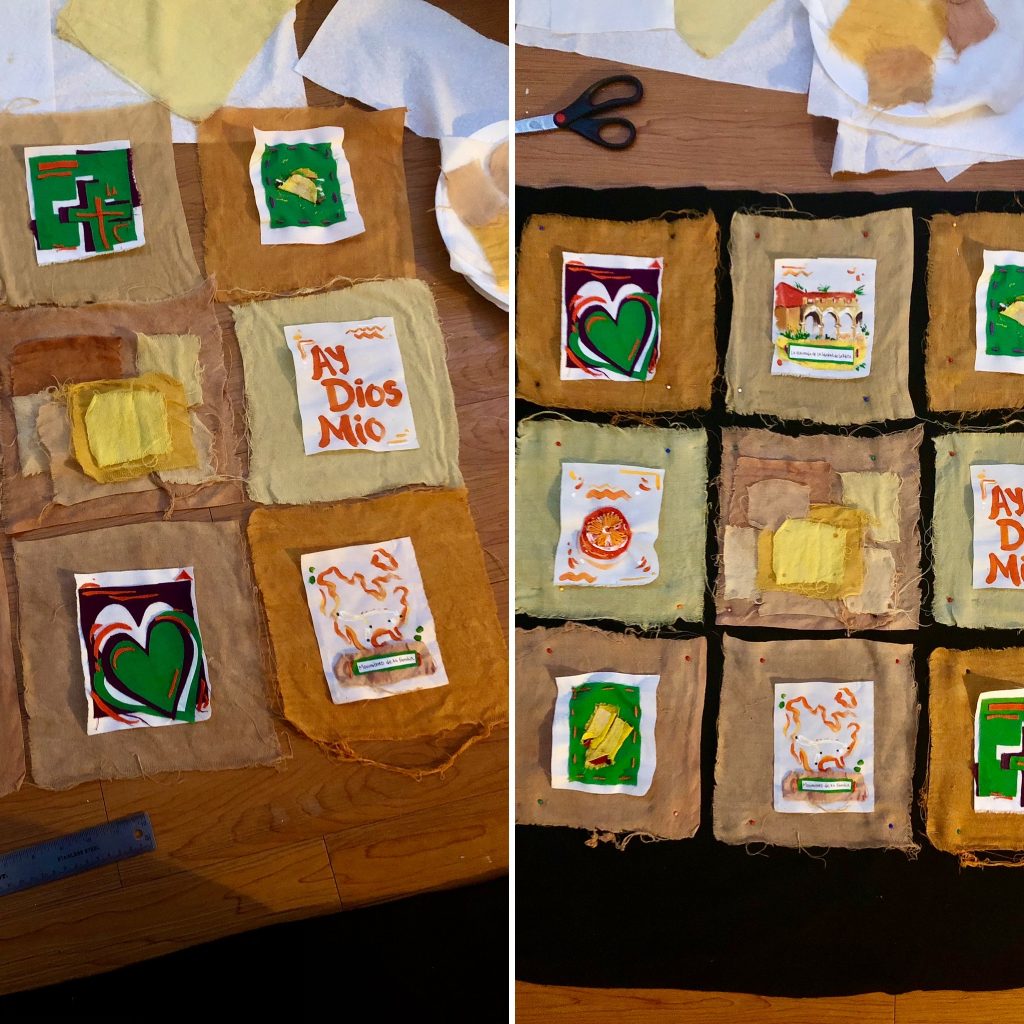
Conceptualizing family stories that have never been recorded in writing and turning abstract emotions into something tangible was difficult. I decided on a color scheme to give myself some constraints, and I also decided to make each appliqué patch a “matching pair” so that uniformity would be maintained in the final quilt.
Playing around with positioning
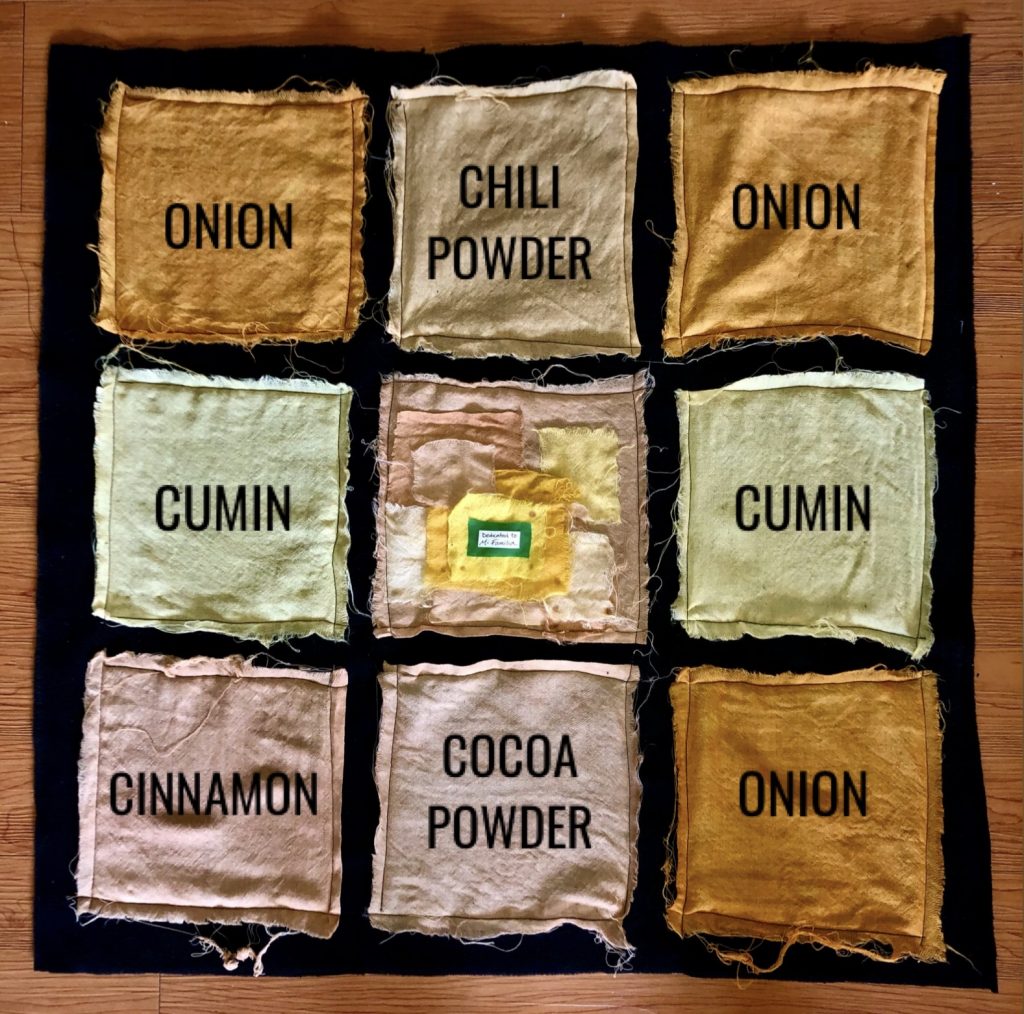
I feel the largest connection to my Mexican heritage in the kitchen, so I chose onion skins, cumin, and chili powder as some of my natural dye ingredients because they are also key ingredients in my abuelita’s famous Spanish rice. I added the skins from about 7 yellow onions and 1/4 cup of each spice to roughly 6 cups of water. I boiled and simmered the ingredients to extract the pigment and checked the color as I stirred. The onion skins colored the water bath an unexpected but fabulous deep red. I wasn’t sure what color cumin would dye my fabric, but judging from the tannish color of the simmering water, I hypothesized that it would produce a nice golden brown. I was surprised, however, when the resulting color after 30 minutes turned out to be a bright highlighter yellow. I also dyed mordanted wool squares with cinnamon and cocoa powder (ingredients in a spiced Mexican hot chocolate). Each of the wool squares remained in the dye baths for roughly 60 minutes.*
*The chili and cocoa powder squares soaked for 90 min
1. Mordanted wool with Alum + Cream of Tartar 2. Onion skin dye bath 3. Chili Powder, Cumin, Onion dye baths on stove 4. Cinnamon & Cocoa Powder dye baths on stove
Sewn naturally dyed wool squares
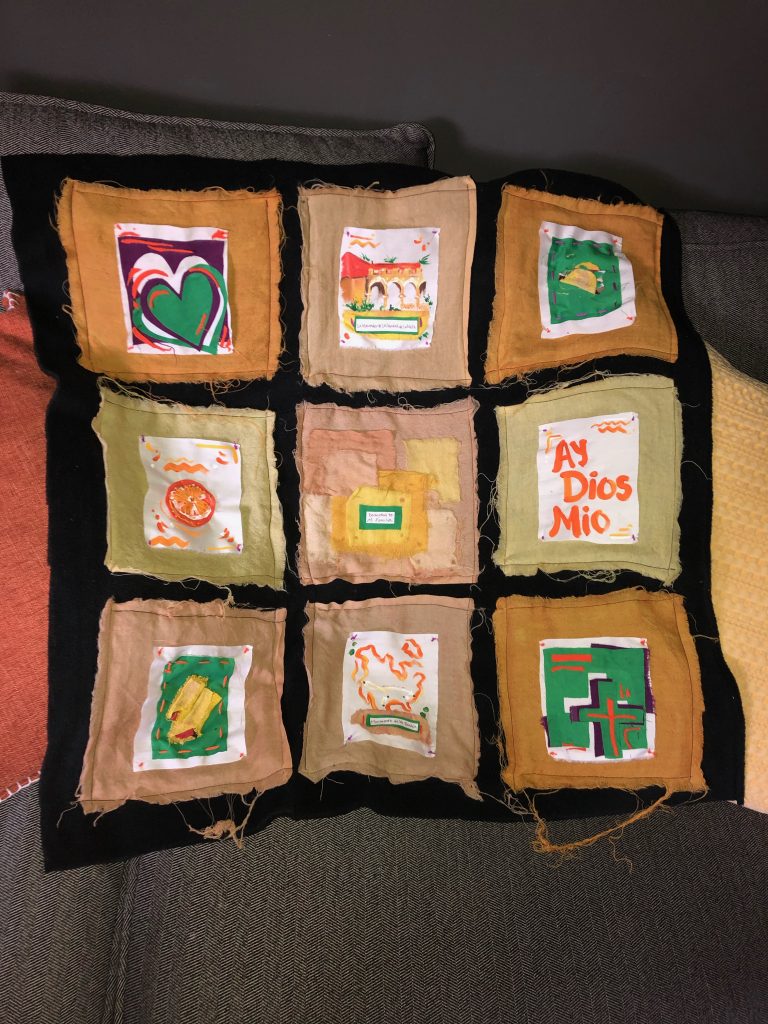
I also struggled with deciding what to do with the center square of my quilt. I ended up taking inspiration from my dye test trial scraps and collaging them into a dedication statement. I wanted the center to tie everything together. I also decided to leave the edges of my wool squares raw for this reason. The rawness speaks to my family’s dynamic, and the effect is striking against the black fleece backing.
Finished patchwork quilt!
Overall, I’m really proud of this piece. I was able to use a cumulation of the skills/techniques that I learned throughout this course, and I was able to learn even more about science and history as I created it. I’m excited to share this with my family 🙂
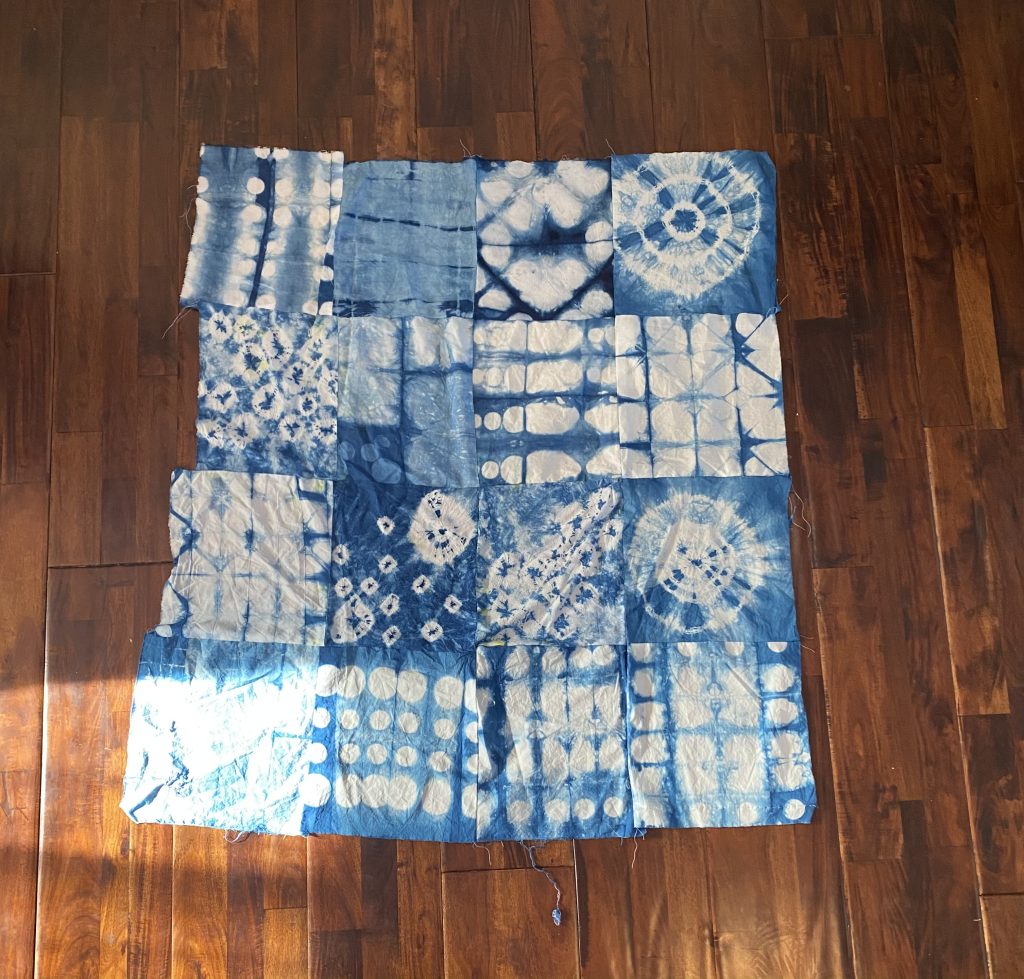
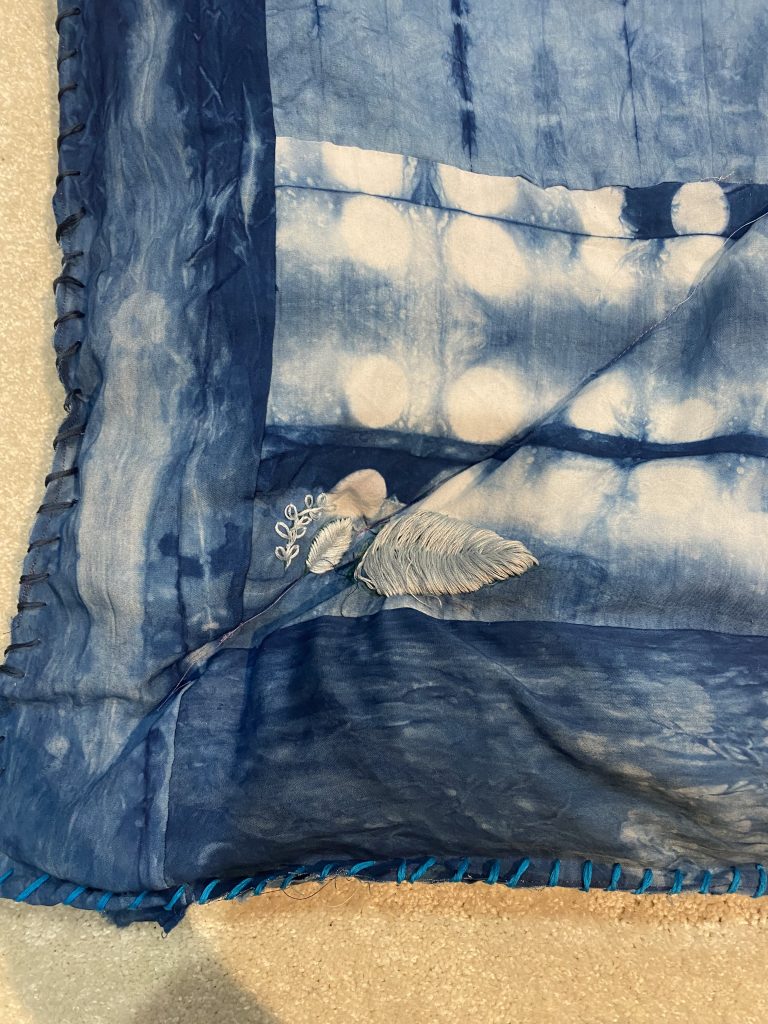
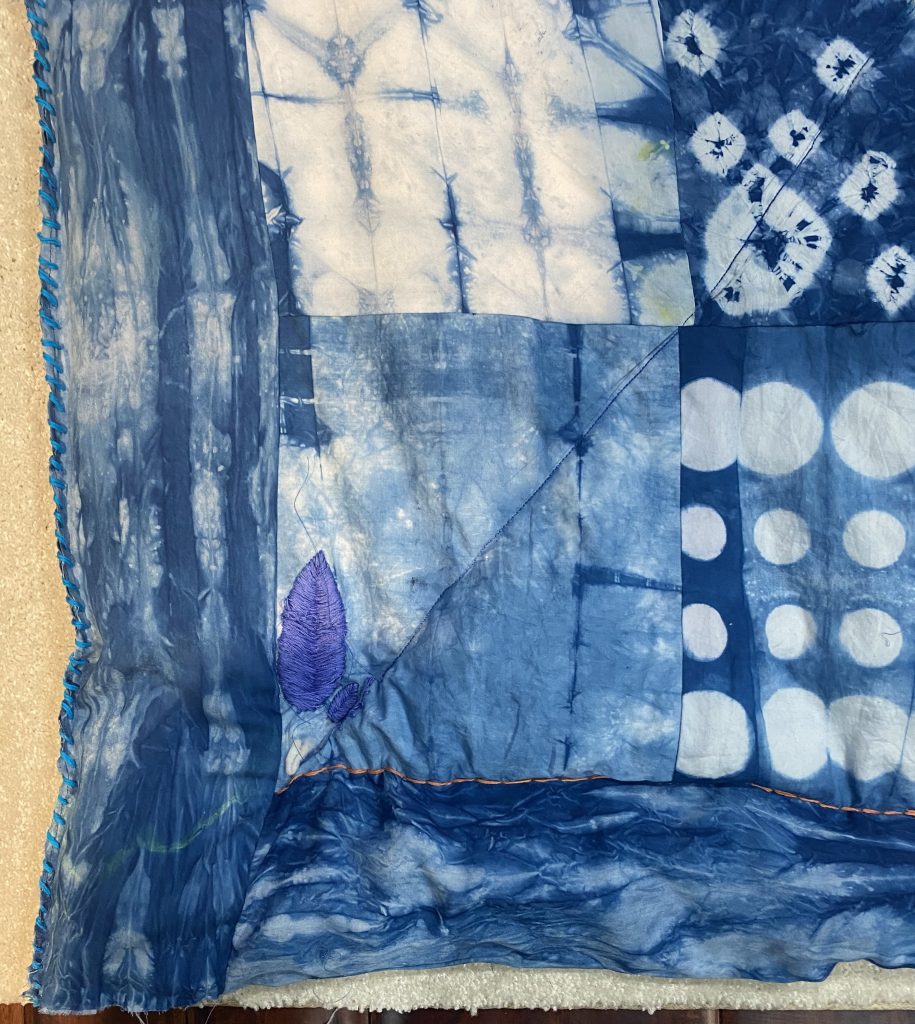
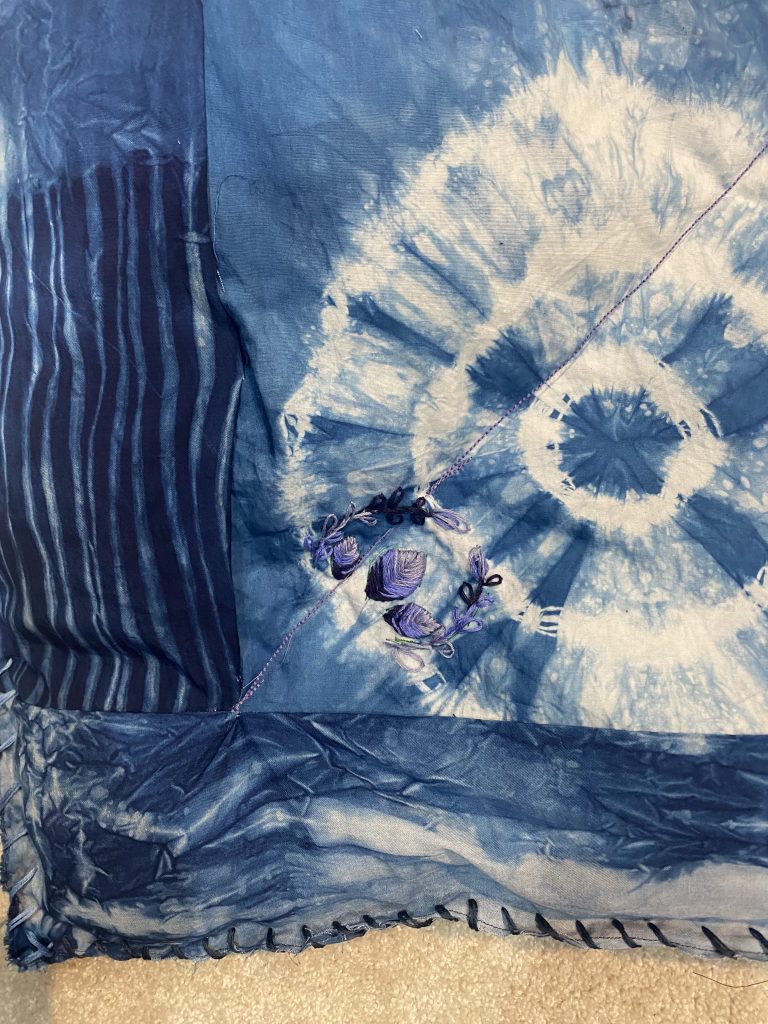
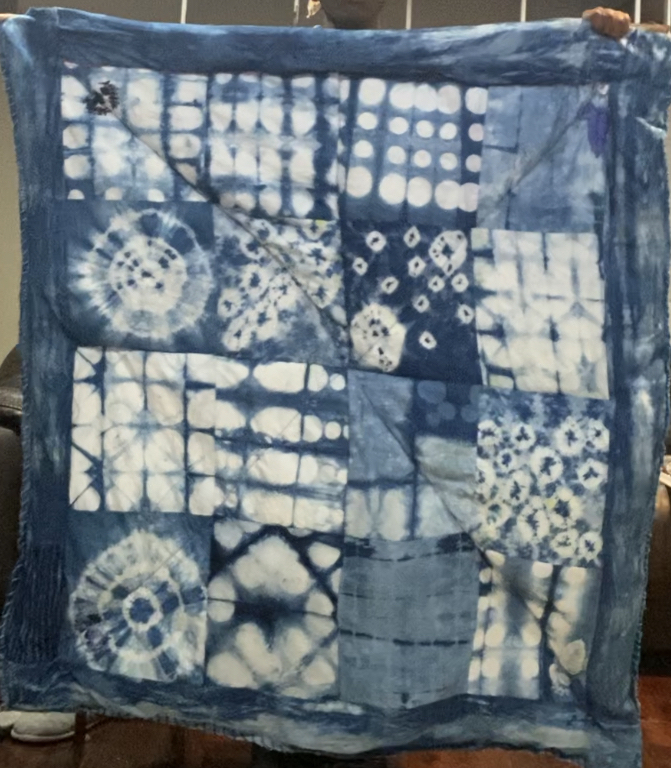
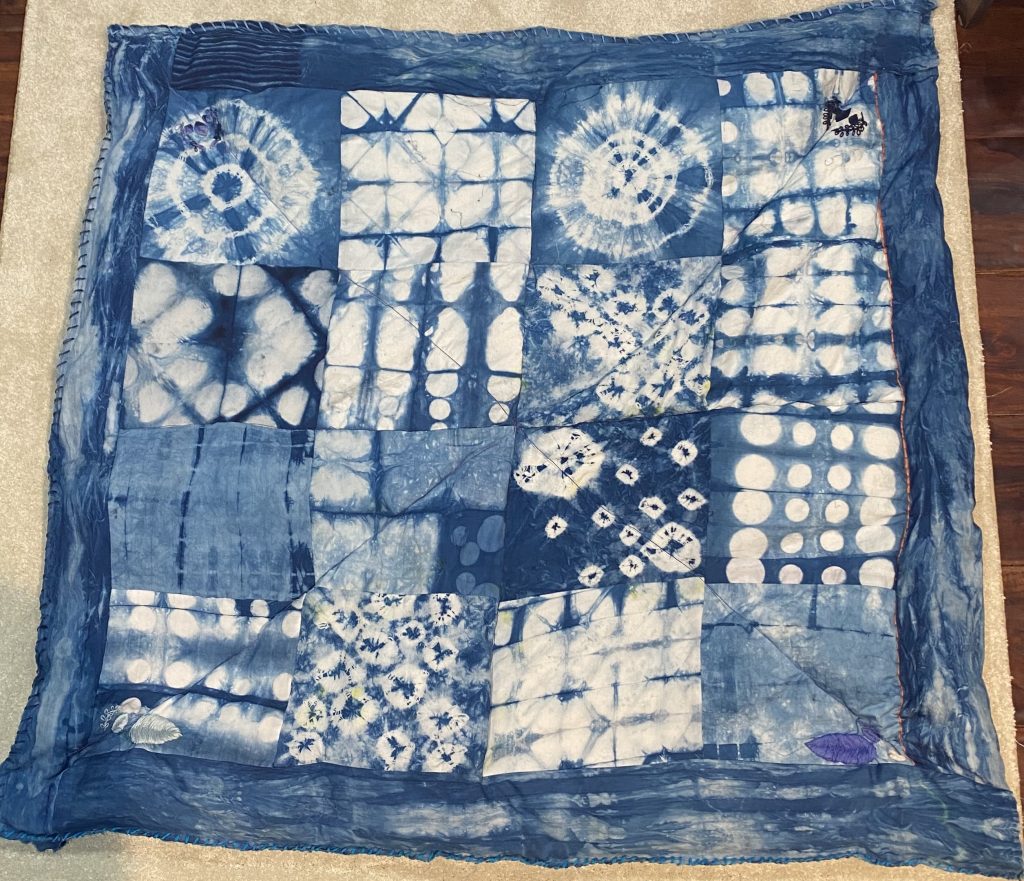
My Independent project was intended to be a quilt of indigo dyed patched squares.
My process started out with creating my indigo vat and individually dying each piece of cloth. This part wasn’t too difficult except it was time consuming, I ended up dying over the course of a few days. The greatest struggle I faced was getting patterns to take, especially if they were folded alot. However, I thought the dying was successful and I enjoy the collection of prints and differences of deepnesss in indigo the quilt has.
The next step was patching the squares together, this step was difficult and again time consuming but there ere no major issues I. came across while doing this.
After I began to embroider at the corners of the patchwork. I recreated leaves and stems that had some color relationship to represent the natural aspect of indigo dyeing.
From there I began to quilt. This might have been the most difficult part of my process. I struggled to sew straight because the heaviness of the piece and my lack of space pulled it in a different direction while I was sewing. Also this piece was too big and dense and it gave me issues guiding it through the sewing machine. These issues are visible however I’m still satisfied with how the piece turned out.
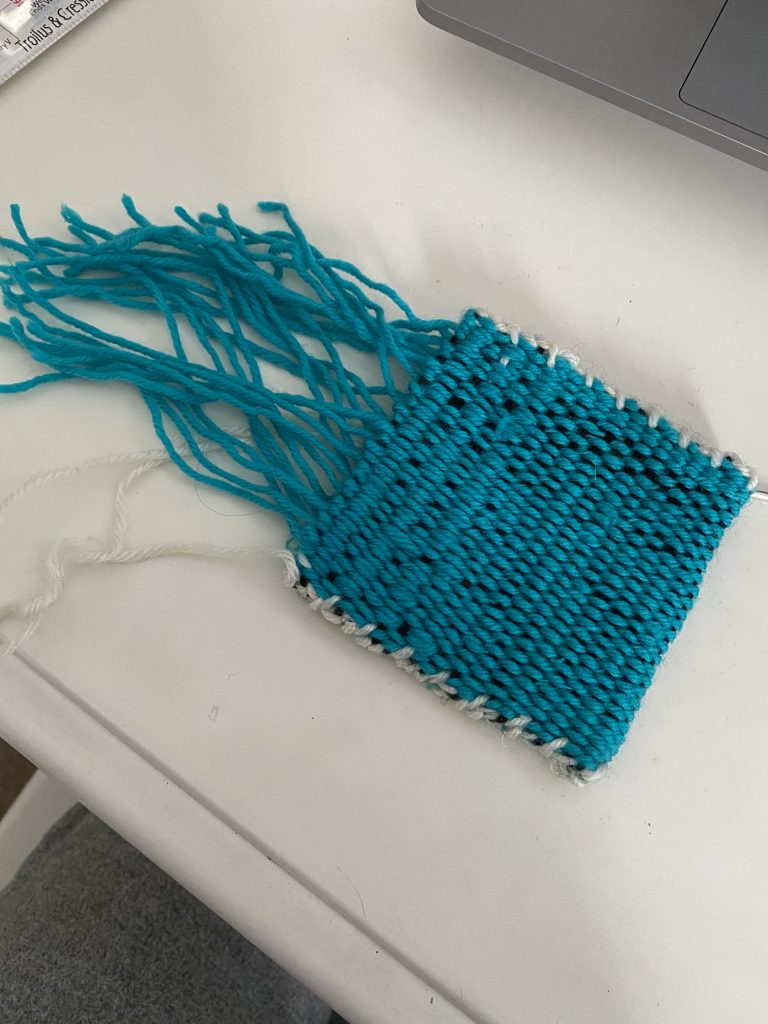
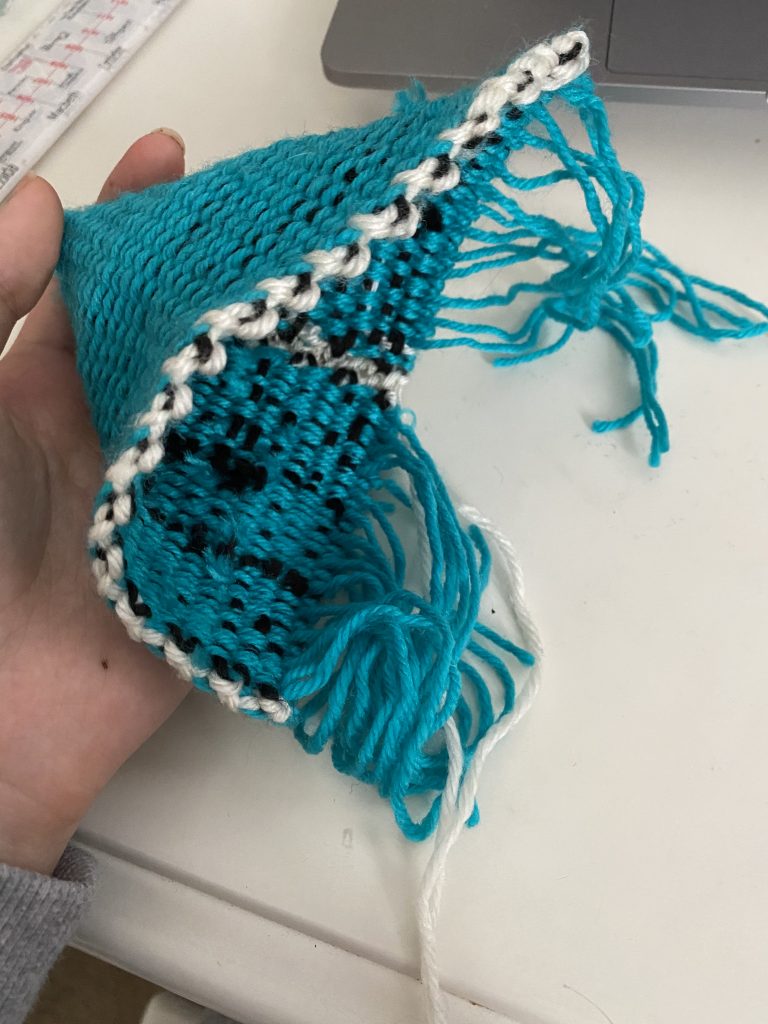
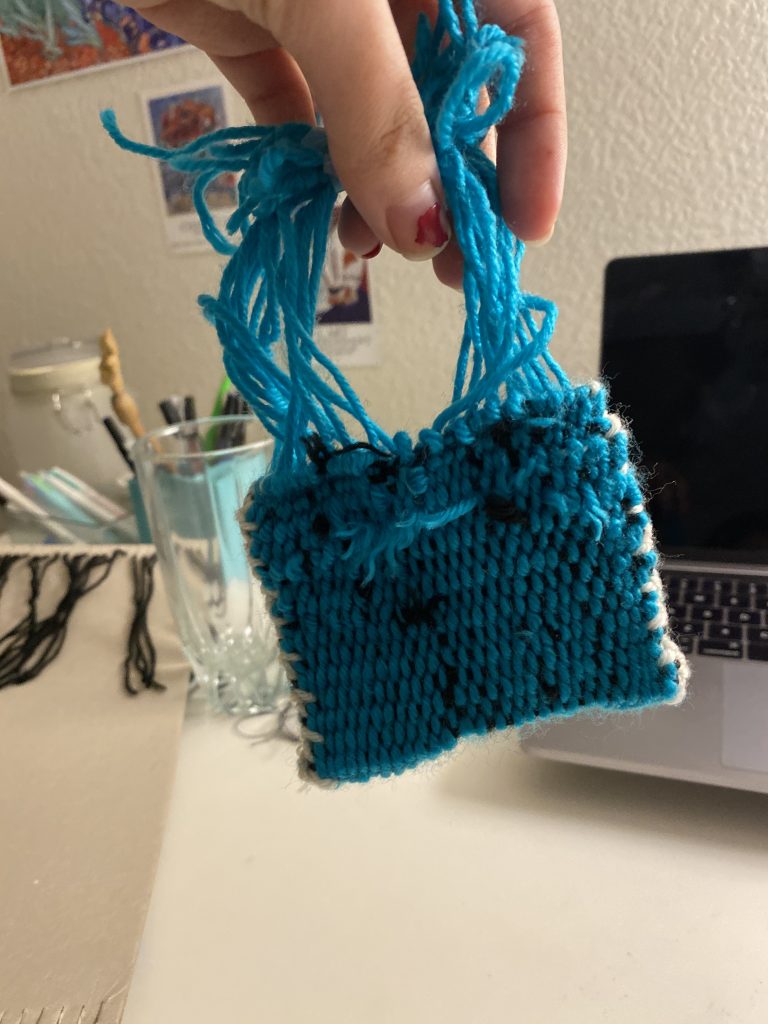
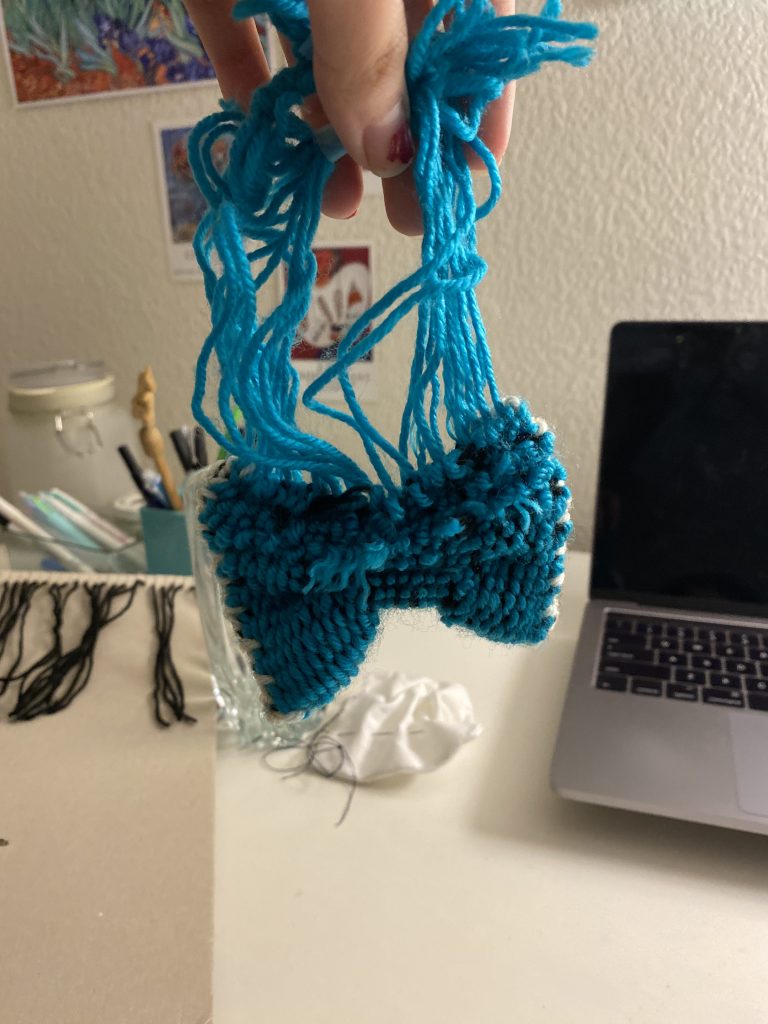
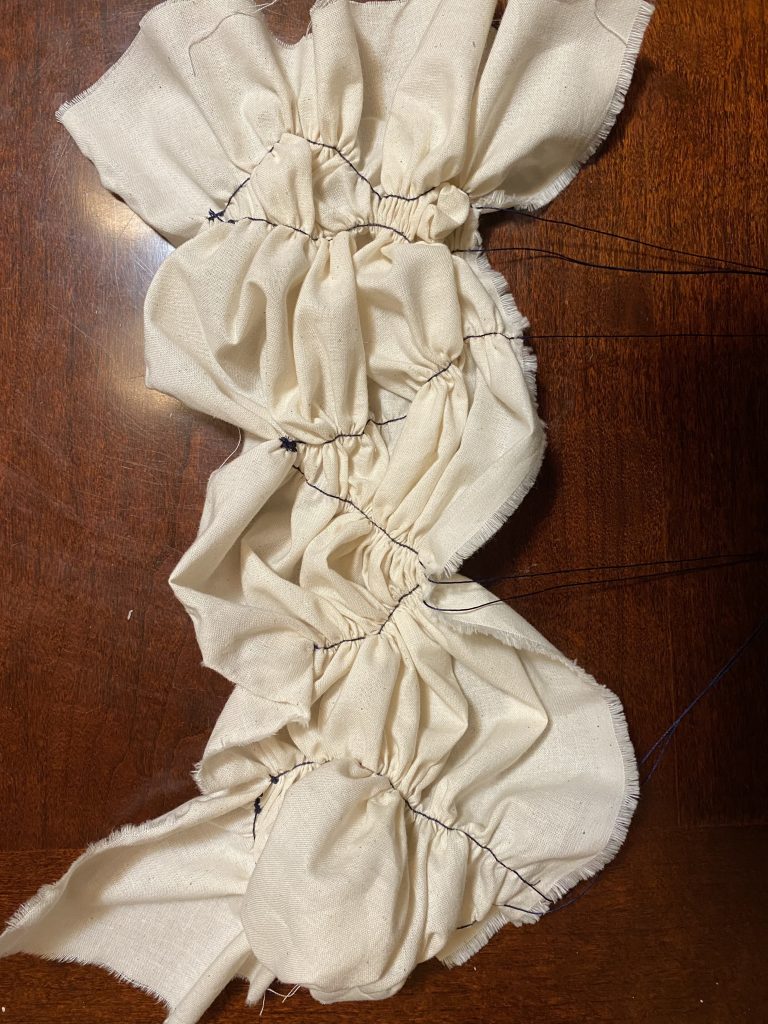
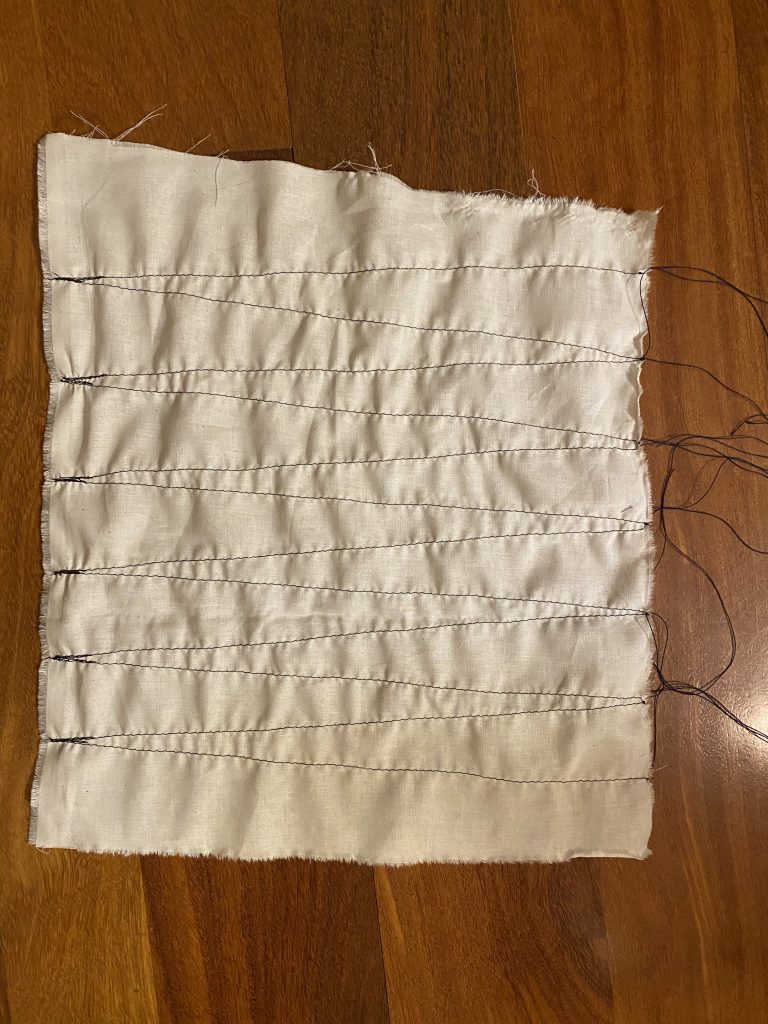
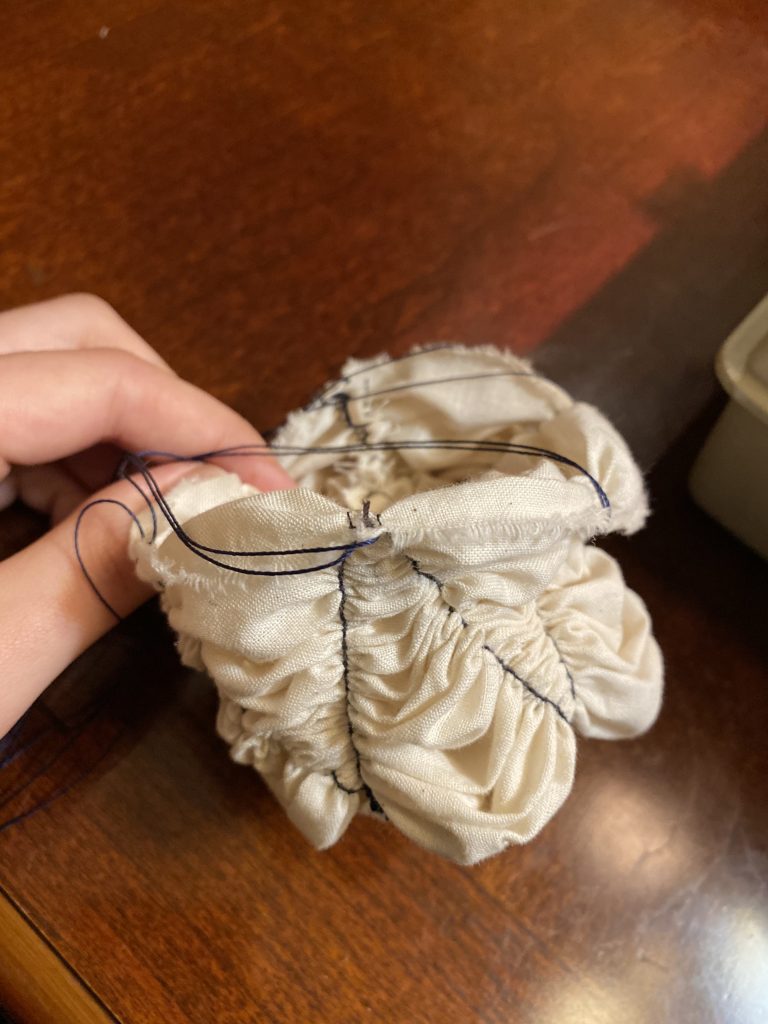
I initially wanted to create moveable textiles with weaving. The first sample I created was just a simple piece of cloth that I maneuvered so that the strings could be pulled to compress the warp together.
I originally had trouble coming up with a practical use for this piece of cloth, so I came up with a couple of ideas: face masks, bandages, clothes, and bags. I realized that face masks would not be very functional if the stretched out fabric had more holes and the bandages would be very difficult to implement with my materials. Inspired by Issey Miyake’s pleated bag, I decided to create a bag that would be able to compress and expand.
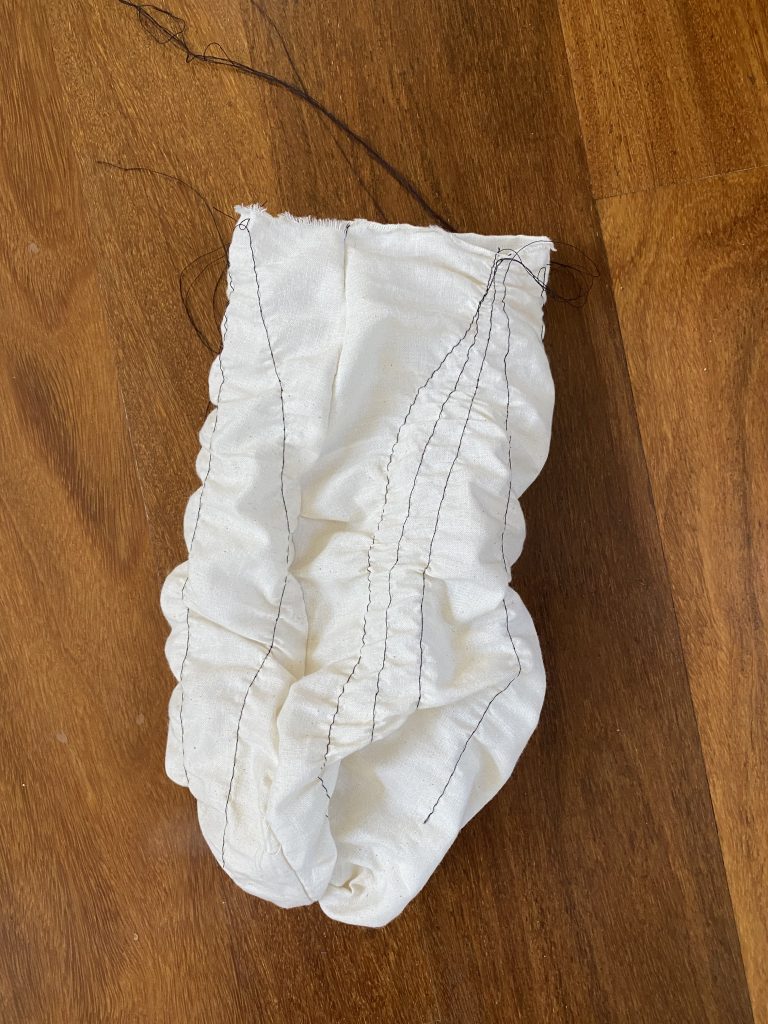
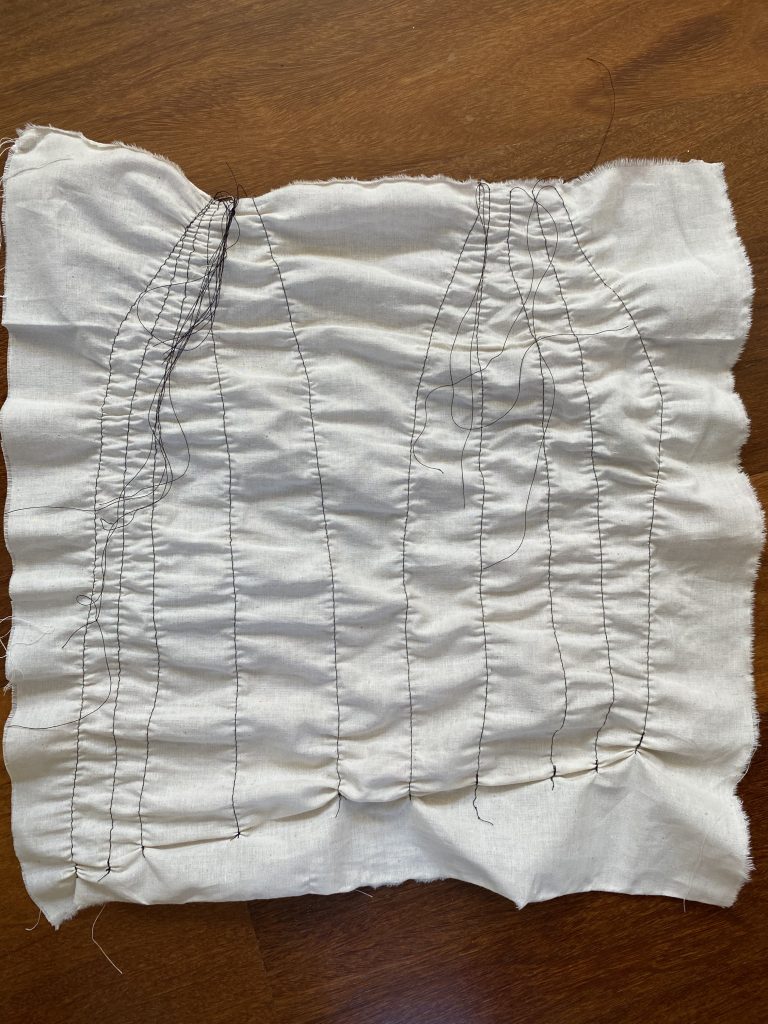
The woven bag had a very interesting texture and I like the I did enjoy how the bag scrunched up, but I wanted the bag to have a more dramatic change. Weaving was a long process, and the yarn is still quite tight when everything is woven together so there is not much room for compression, so I decided to use cloth and string to create a similar effect where the cloth has anchor points and strings that can be pulled.
With this idea, I made some sample pieces of cloth test out how the compression could result.
The way the strings all led to two common points made two lips on the sides of the bag, which I did not necessarily like. Also, I accidentally cut the anchor points when trying to clean up the edges of the fabric, so the strings actually pulled off the bag. I experimented with more ways to create lines, seeing how curves and angles would interact when compressed and observing the ease of pulling the string.
I decided to go with simple w shaped lines across the bag to create a lantern like shape.
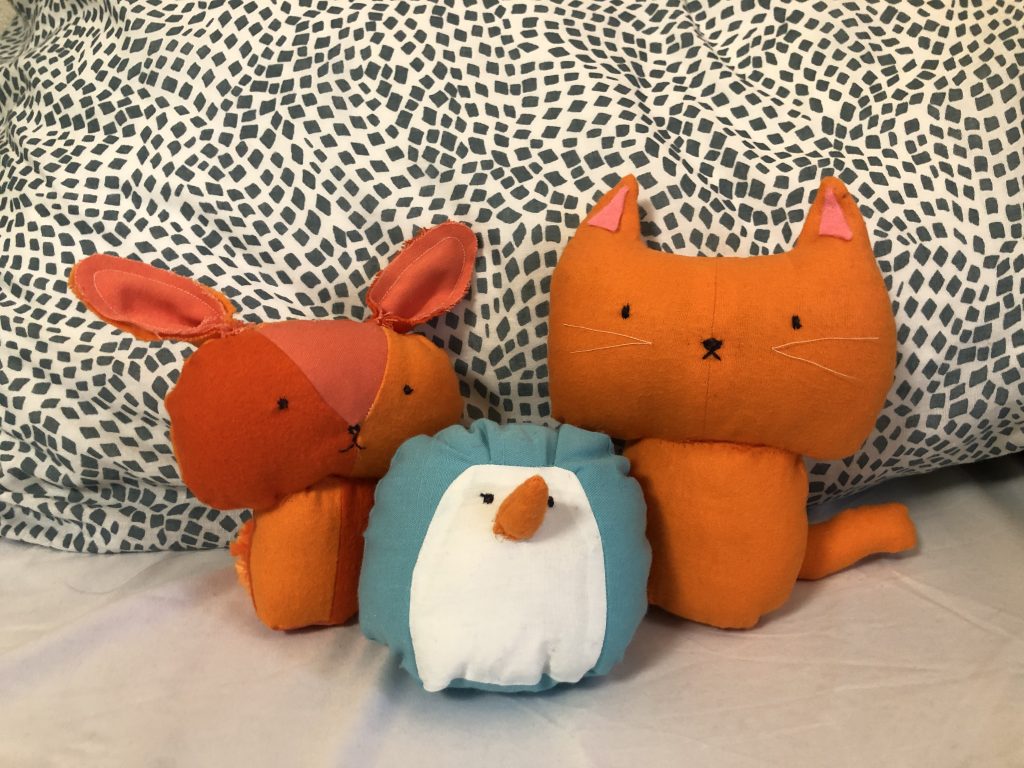
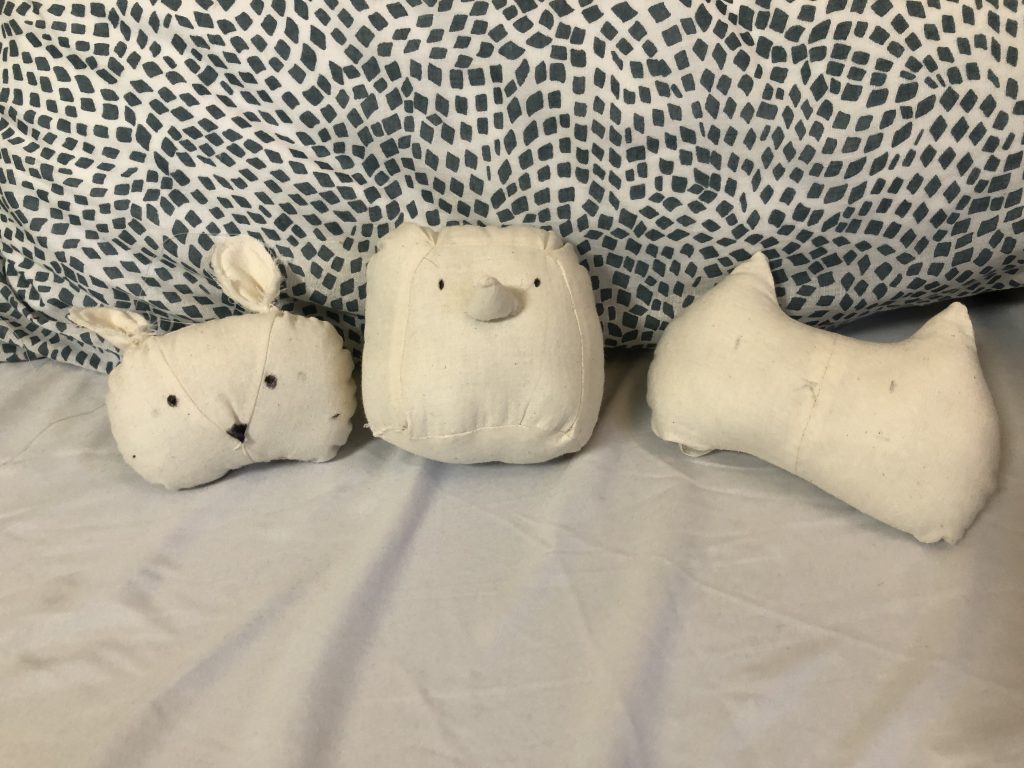
These are the completed stuffed animals for my project :)) For my final project, I made stuffed animals for the three closest friends I have made this semester in my dorm. Since we are all splitting up after this semester, in the sense that we won’t live in the same building, I decided to make these as a thank you and parting gift for the end of the semester.
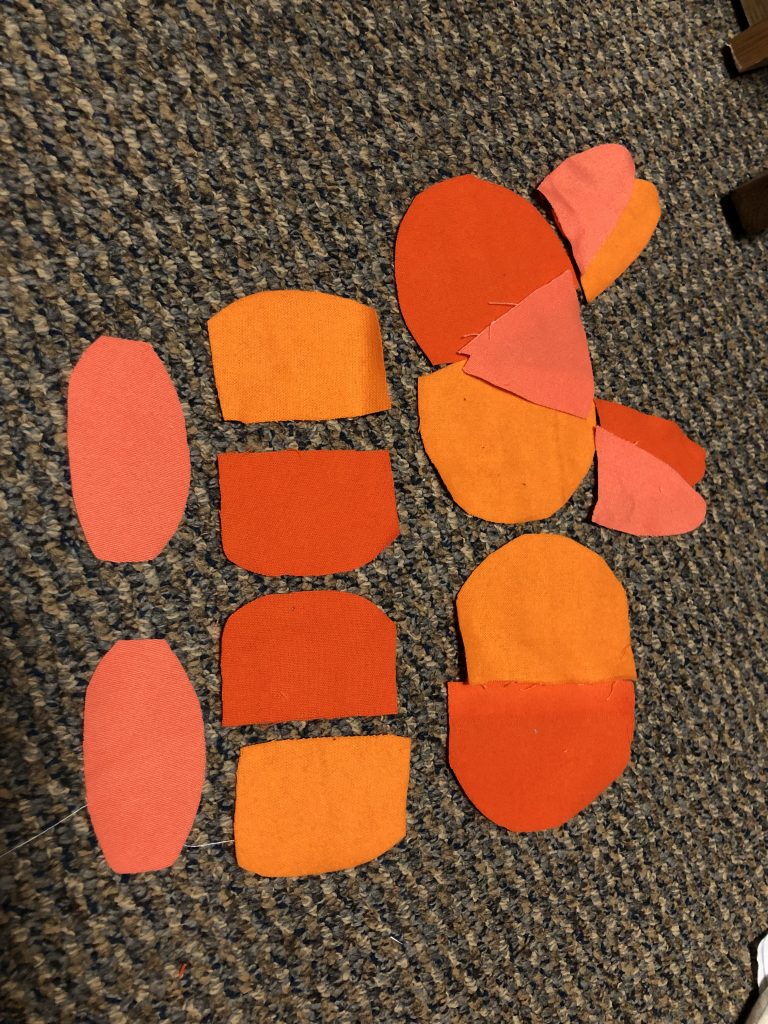
These were the models that I made in experimentation process. For the heads, the original patterns I made turned out pretty well. For the final versions, I just made minor adjustments to the width of the cat head and the size of the bunny ears. For the bodies, I had to make many adjustments to how I sewed them together. I originally planned to have four panels and then one circle on the bottom, but that ended up making a weird indent and corners at the top, so I tried making four panels and a circle/oval for top and bottom. I also experimented with adjusting the dimensions of the body to make them more proportional to the heads. The last adjustment I tried was making the head/body out of two panels instead of four by cutting the pattern on a folded edge.
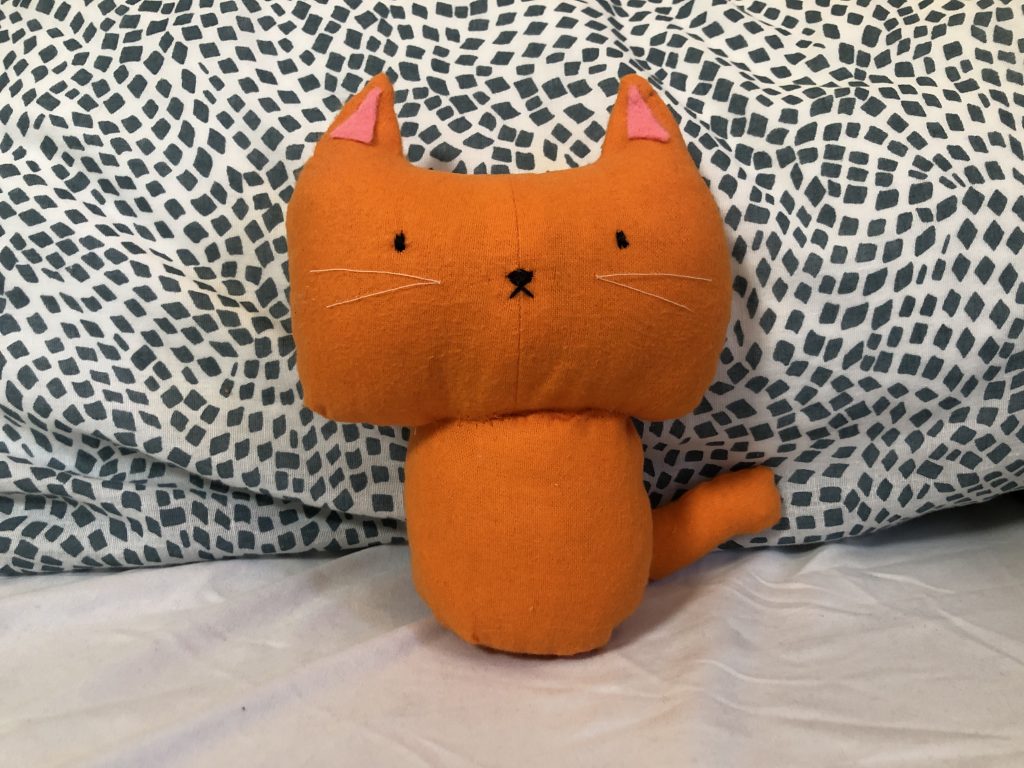
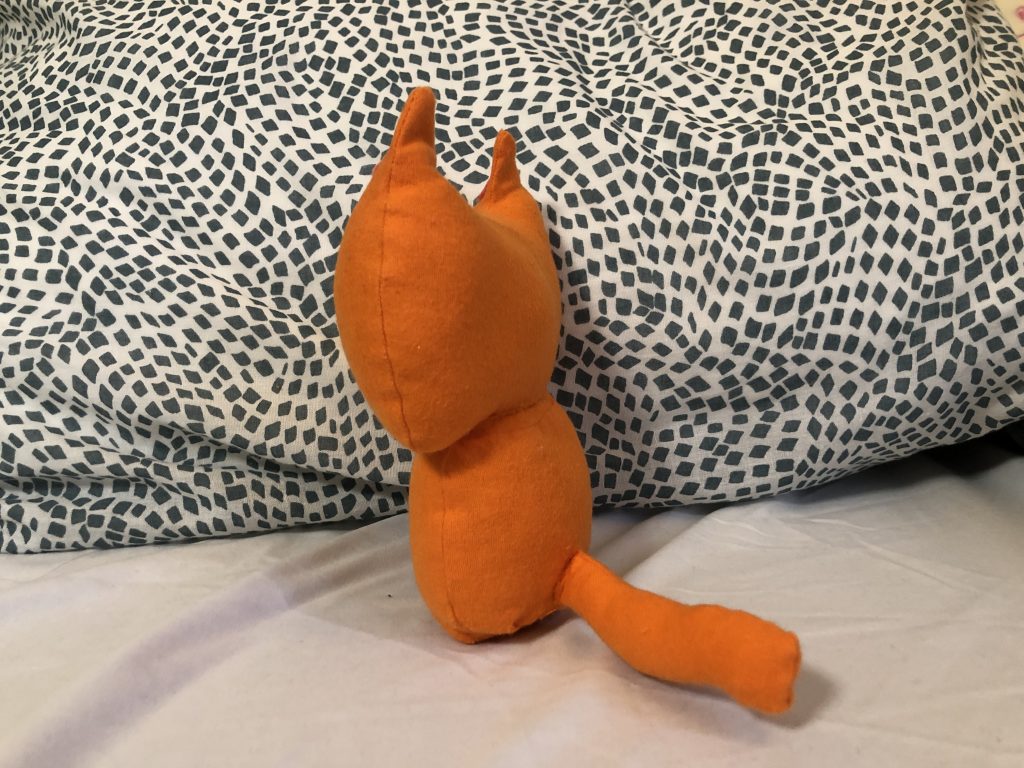
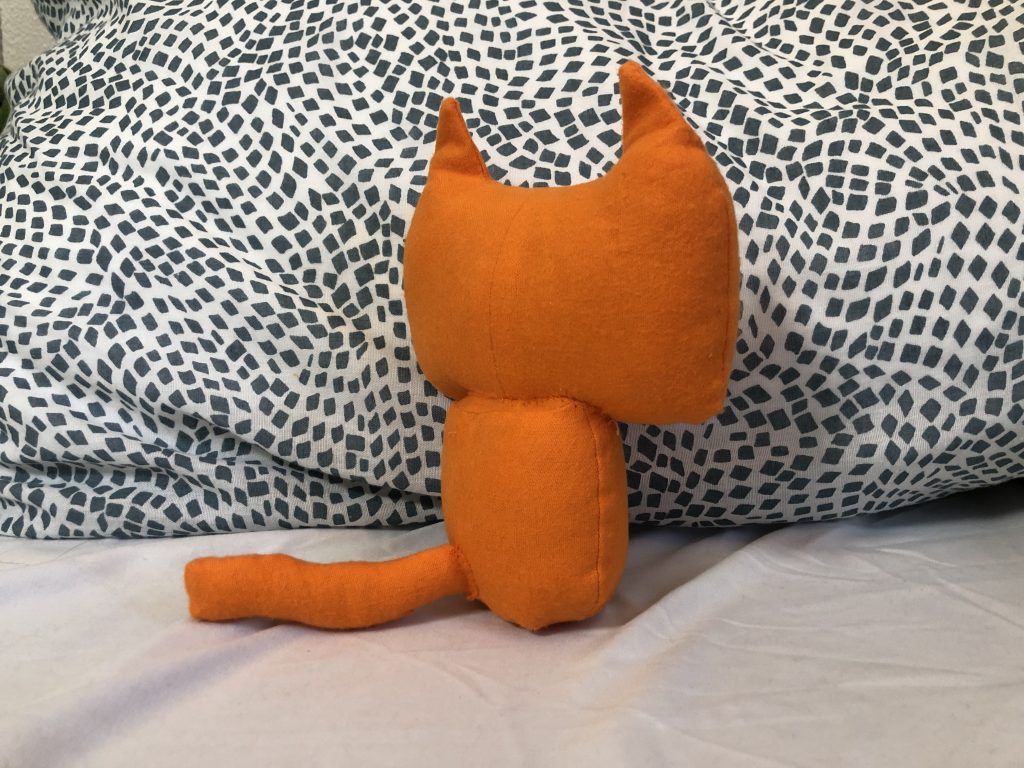
Cat
I think that the cat came out most like my original sketch for the design. I intended for it to look like a simple, recognizable orange cat. For this stuffy, I made the head using four panels. I sewed the two halves together of the face together and pressed the seams, then sewed the front and back together, then stuffed it. For the body, I used two panels and then two ovals to make a more tube like structure and then stuffed it. For the tail, I just cut two wavy rectangles and sewed them together then stuffed it and attached it to the body. Since the head didn’t have an oval at the bottom, it didn’t quite fit on the body, so it looks a little bit like it is slouching. Finally, I added face details with embroidery and used iron on adhesive to attach the ears. My biggest challenge with this stuffed animal was making the head and body proportional to each other because originally, the head was much wider and it looked weird.
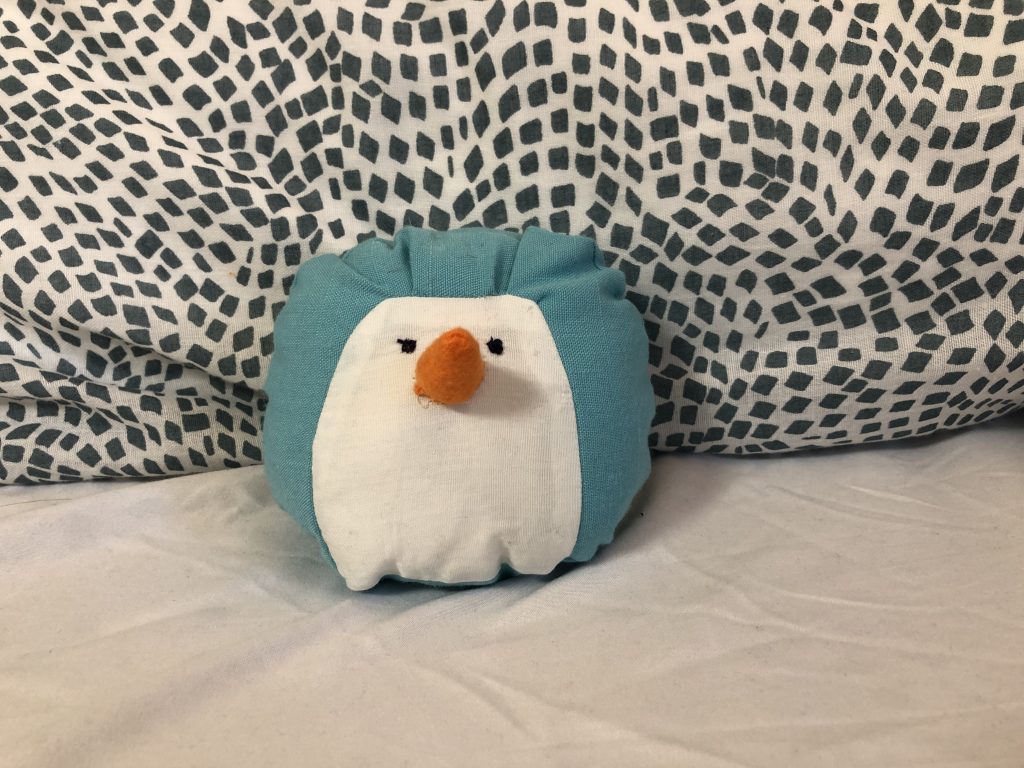
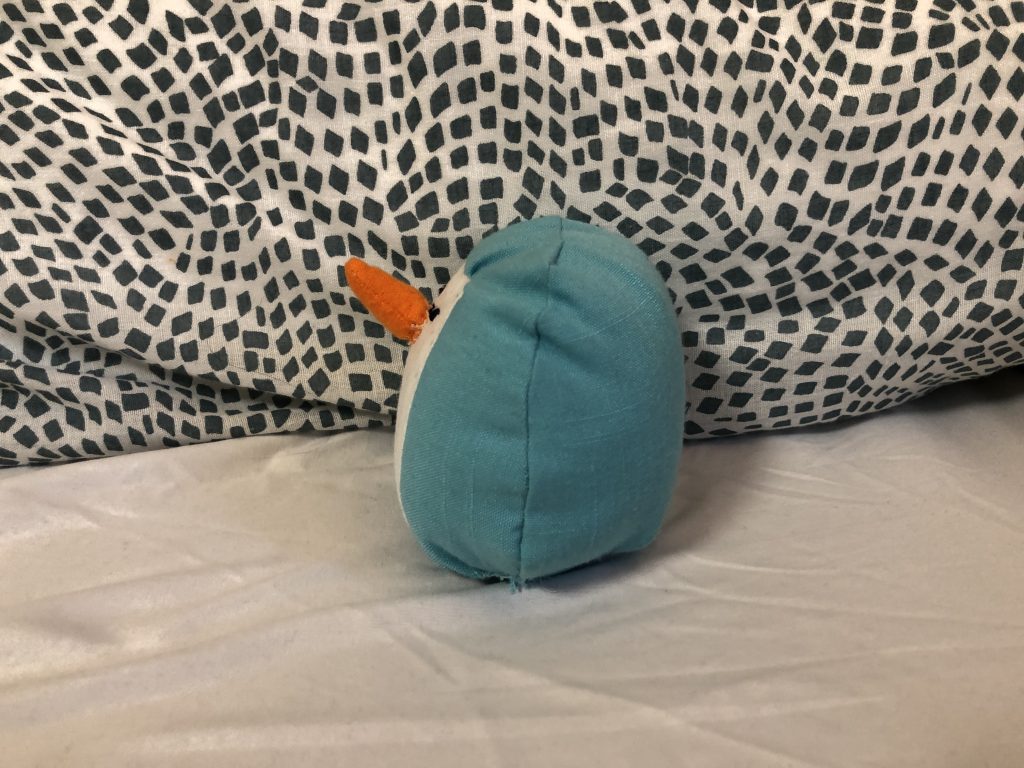
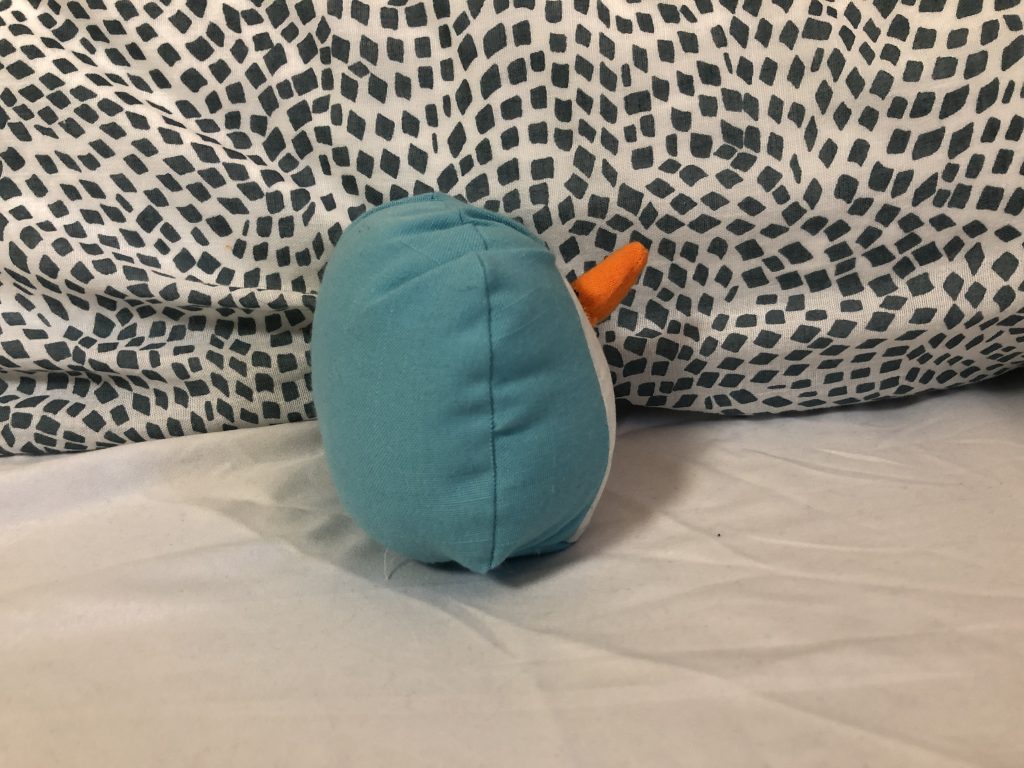
penguin
The penguin, initially, was challenging to design the pattern because I wanted to have more of the v shape at the top of the face, but after trying many times, I decided it was too difficult. After changing the pattern to just have a flat top, it was very quick to sew the final product and add the nose and details since this was just one blob while the other two stuffed animals were ~3 blobs. I think that I would have wanted to make this slightly bigger but I didn’t have enough fabric to scale it up.
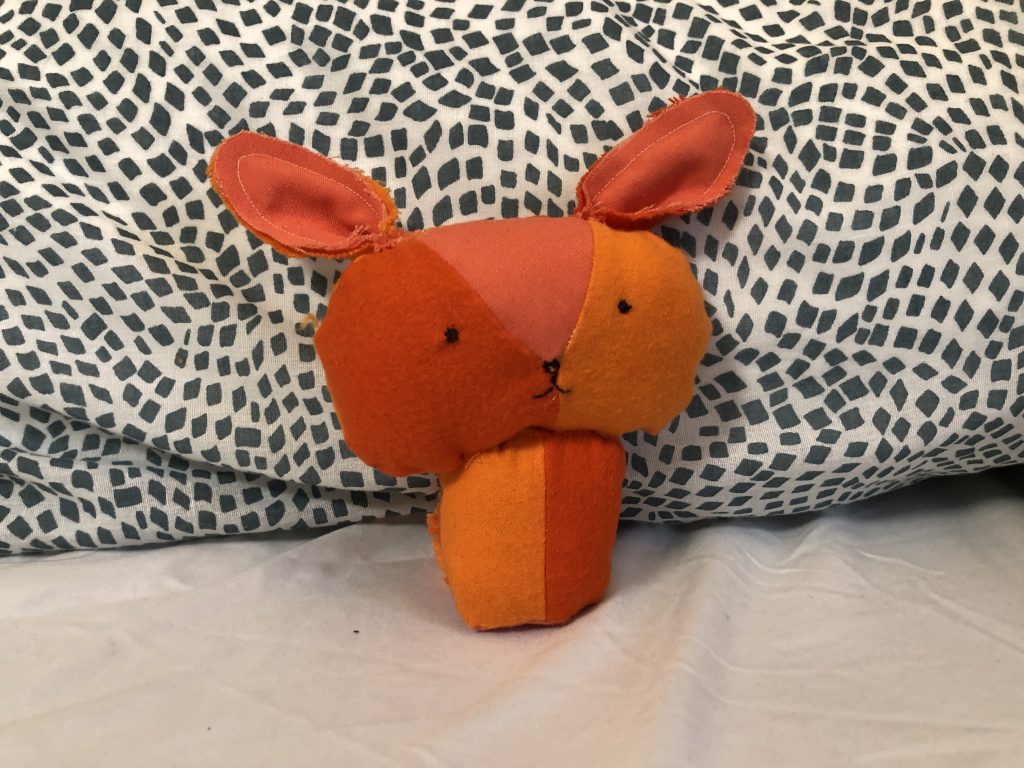
Bunny
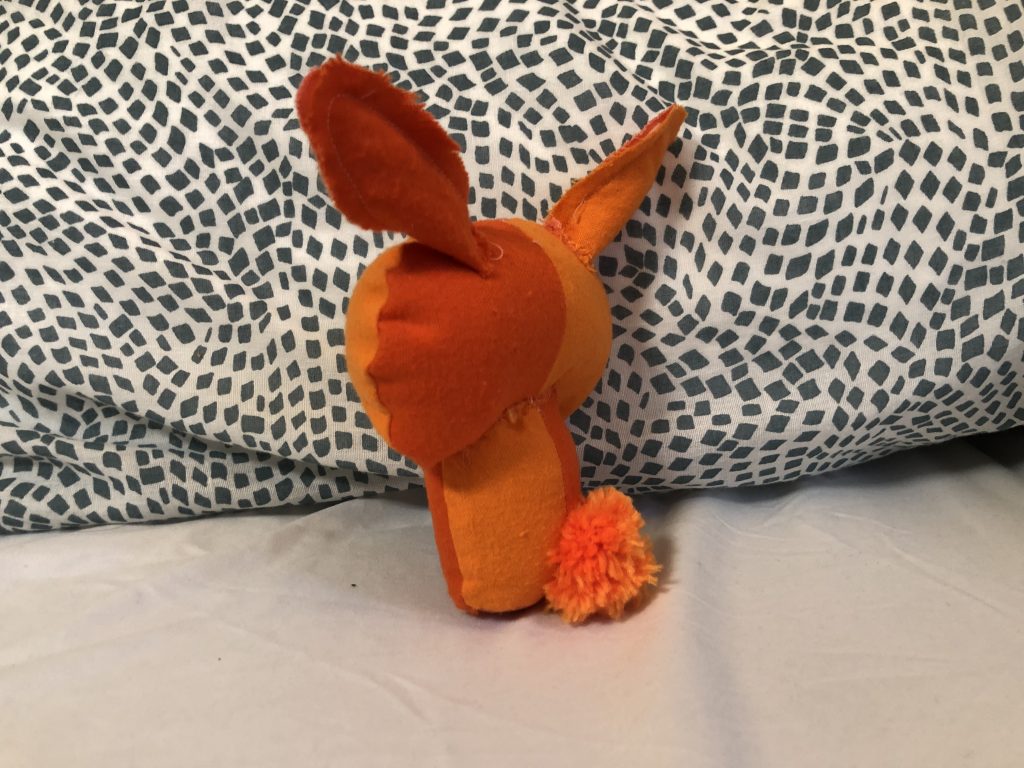
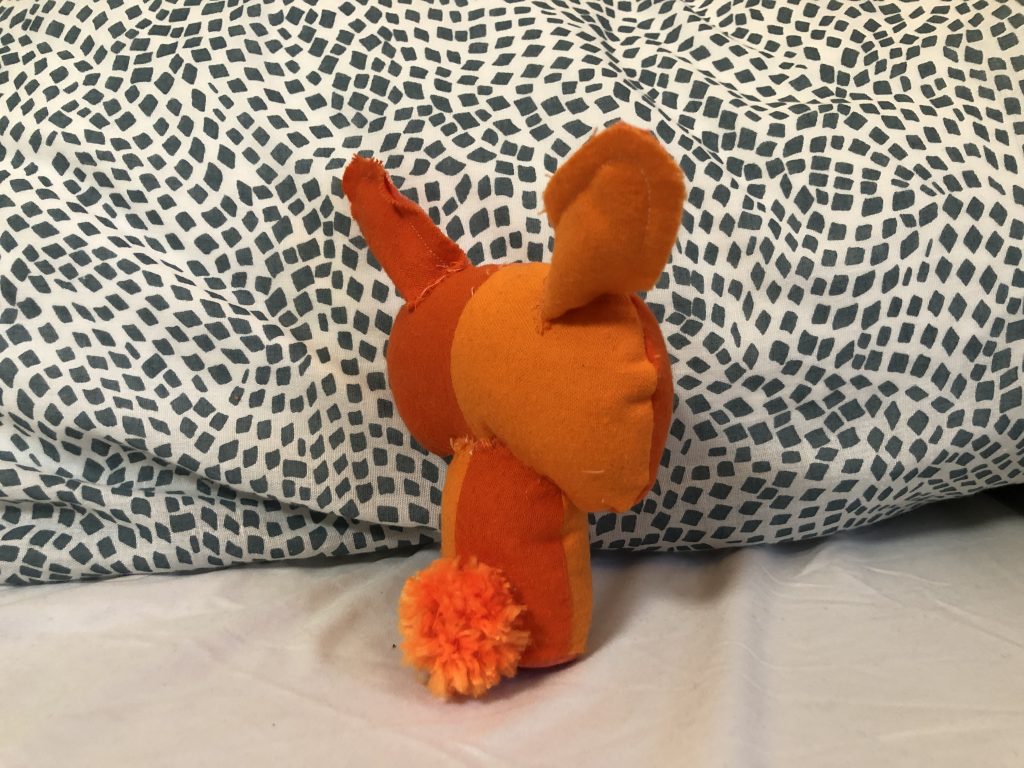
The bunny is definitely my favorite out of the three. My original intention was to make the bunny out of plain white muslin fabric, but I decided to experiment with color blocking instead and used three shades of orange/red to make an alternating pattern.
In my model, I didn’t really like the way I had connected the ears so I tried sewing them into the head before flipping it inside out, but I couldn’t figure it out without changing the pattern completely, so I had to stick with the original way. I finished the final details with embroidery, but I think I preferred the bunny before I added a face. Then I made an orange pom pom and attached it to the back as a fluffy tail.
I am very happy with the way that these turned out and I hope that my friends like them!