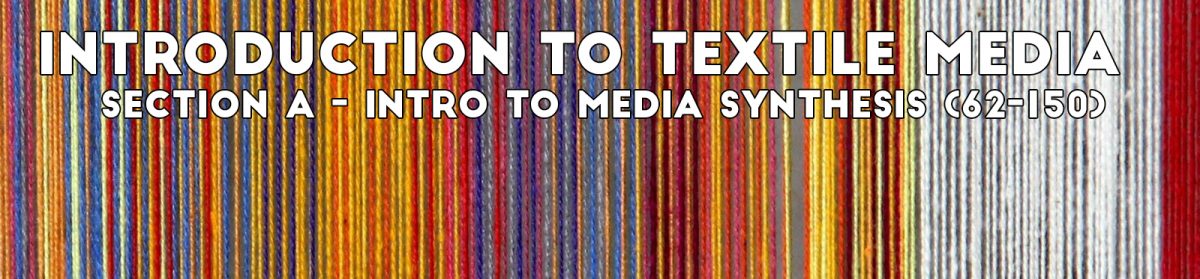
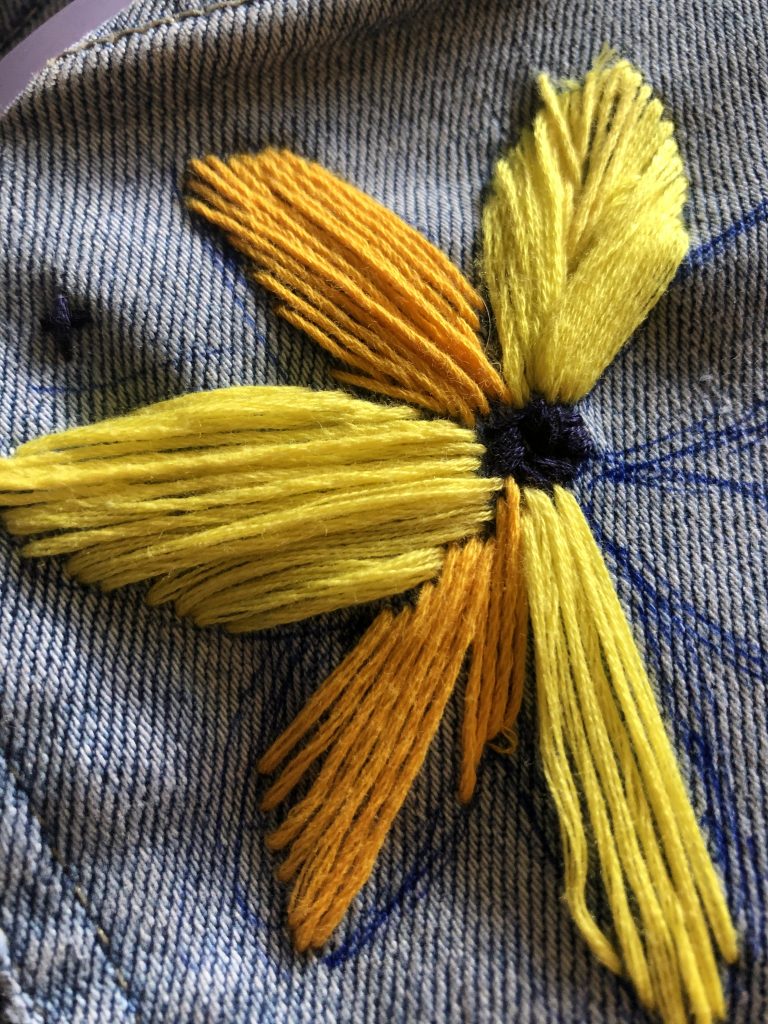
I am finishing up the sunflower and attempting to add different colors to the petals. It’s fun to add texture to the pants through the thick layers I am putting on each petal.
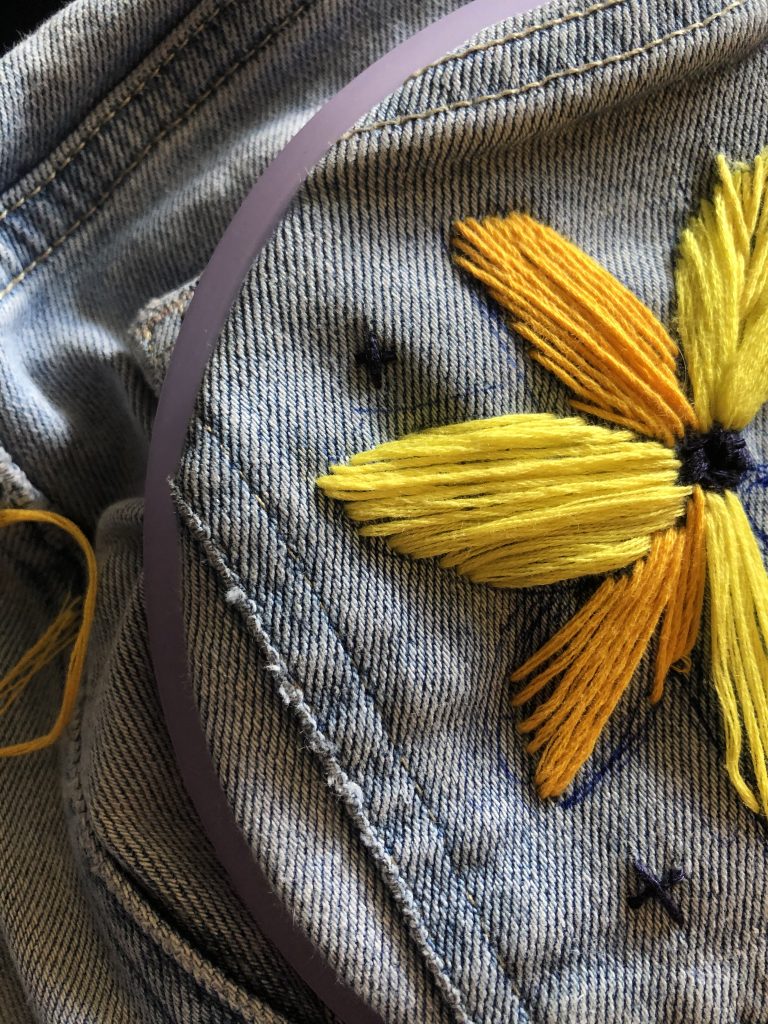
My final product is shown below! I am really happy with how the textures came out and how this old pair of jeans has a new life.
Finally, here is my current second tapestry that I embroidered on!
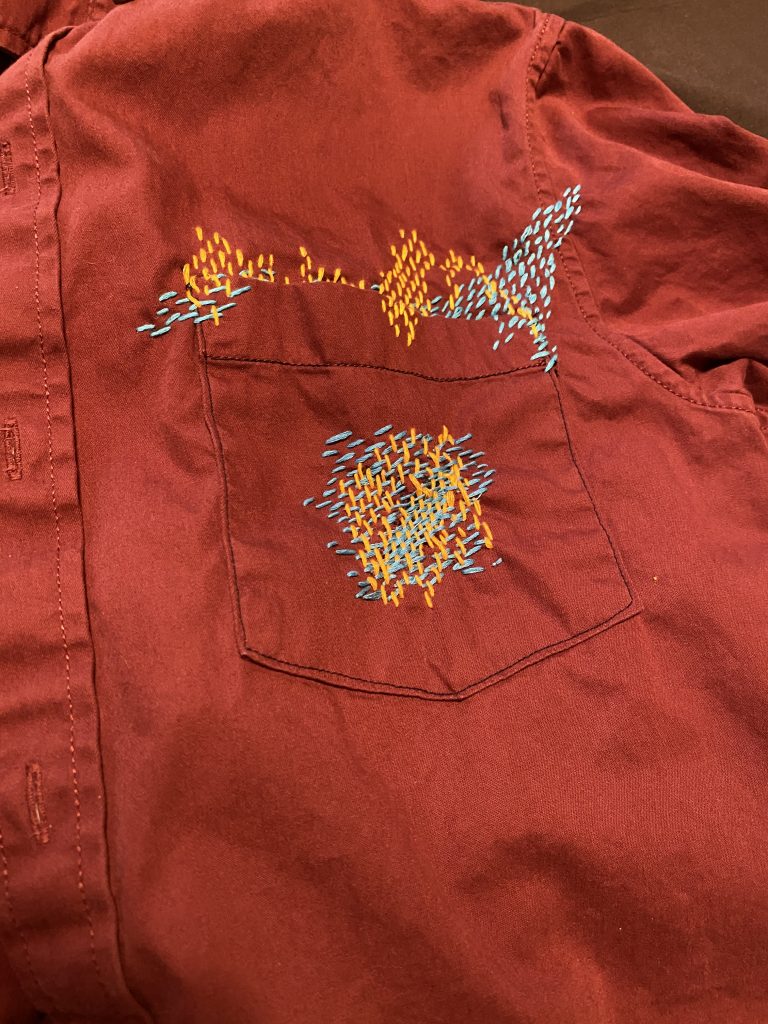
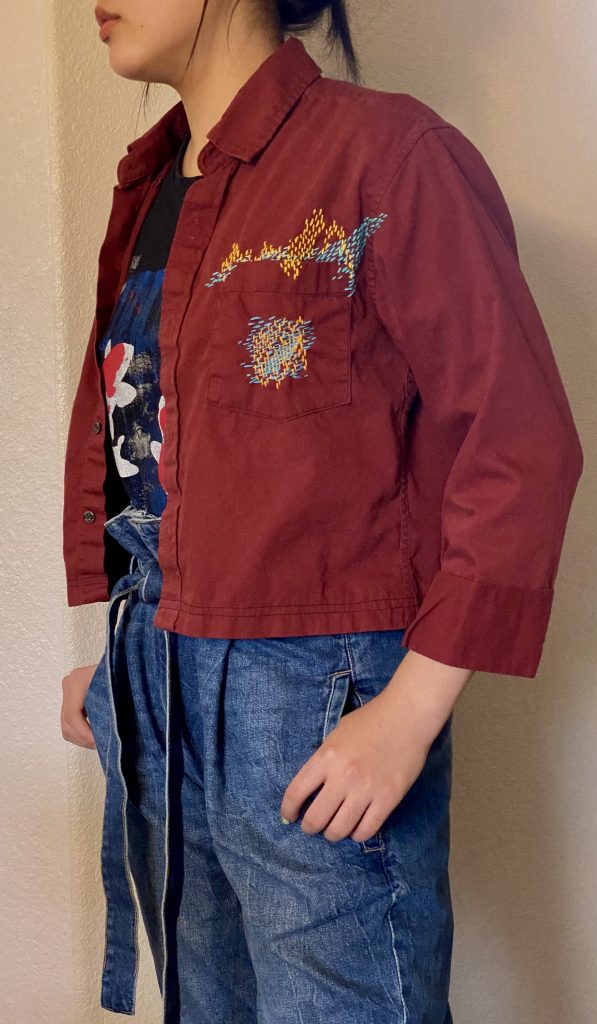
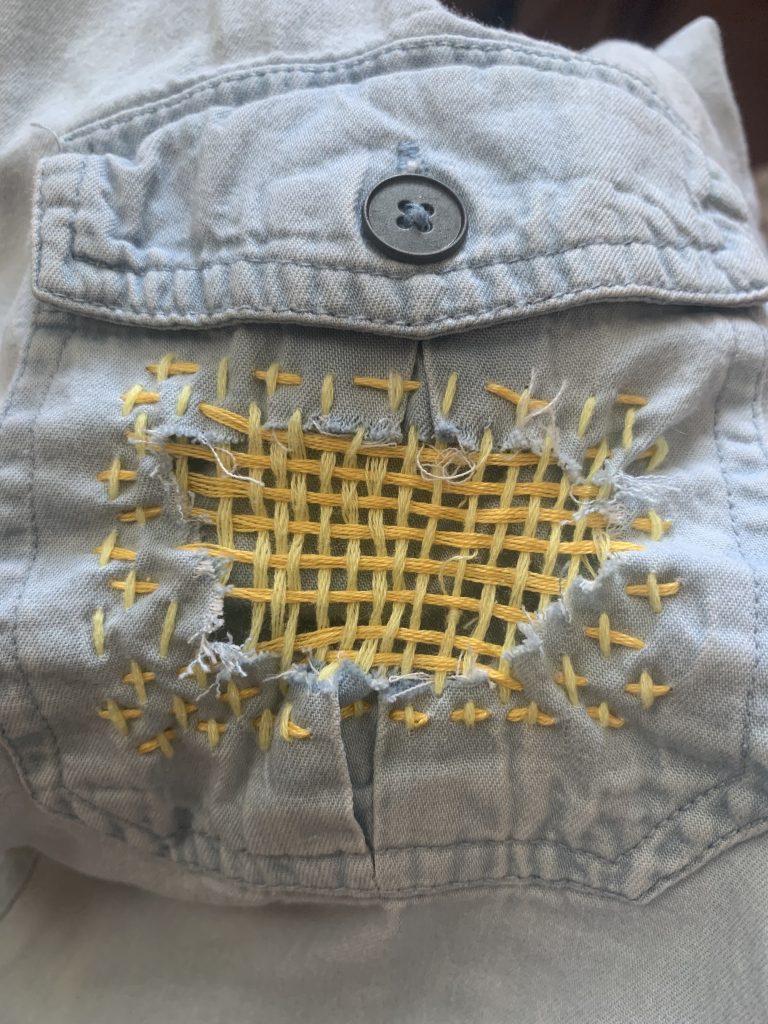
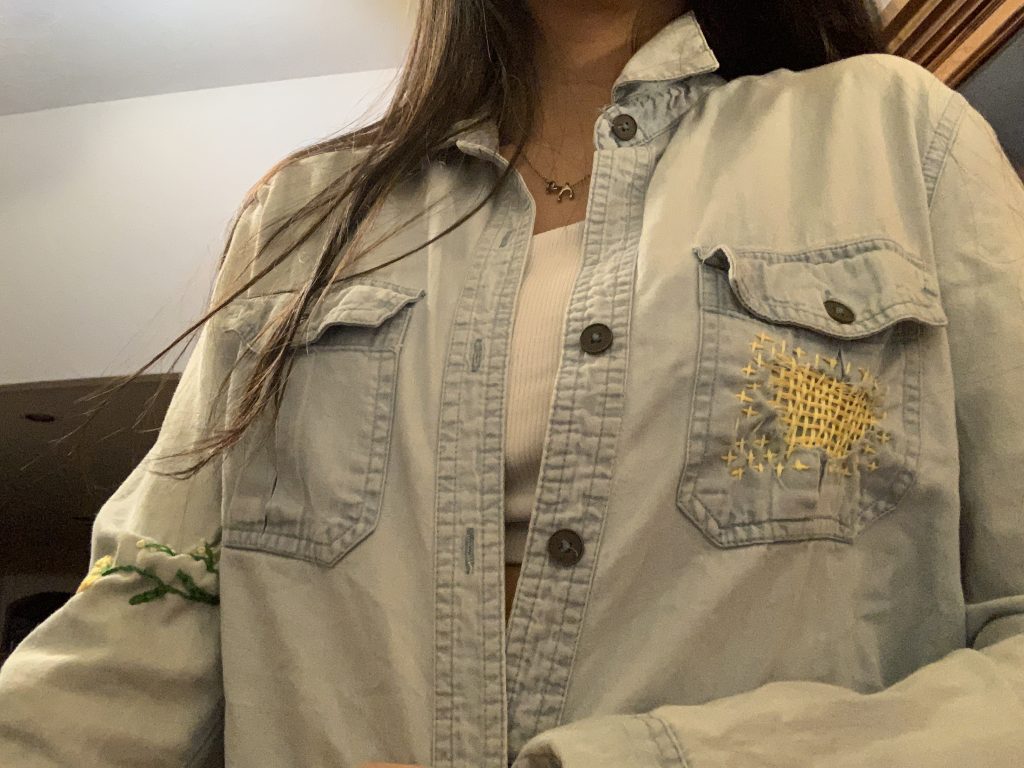
I continued on with my mending of the pocket, mending the sides of the pocket to reinforce the structure. Since I originally undid and resewed the pocket on my sewing machine when experimenting, the pocket was extremely loose and was starting to rip. I used the same blue and yellow threads to create a pattern of similar direction and purpose, but different shape. I think that created a very interesting effect as it added direction and movement to the cloth and the originally very static and boxy shape of the jacket.
However, I do wish that I planned more before weaving. Originally my goal was to just reinforce the pocket so I did plan to extend the blue and yellow threads onto the side of the jacket as well. Because of this, the weaving is quite low on the shoulder, reaching near the armpit and creasing which covers up a lot of my work. Next time, I will be sure to think about how this 2d fabric would translate when put on a 3d shape.
Overall, this was extremely fun and rewarding and I now love how the colors made the jacket look a little more retro with pops of color which reflects my current style more.
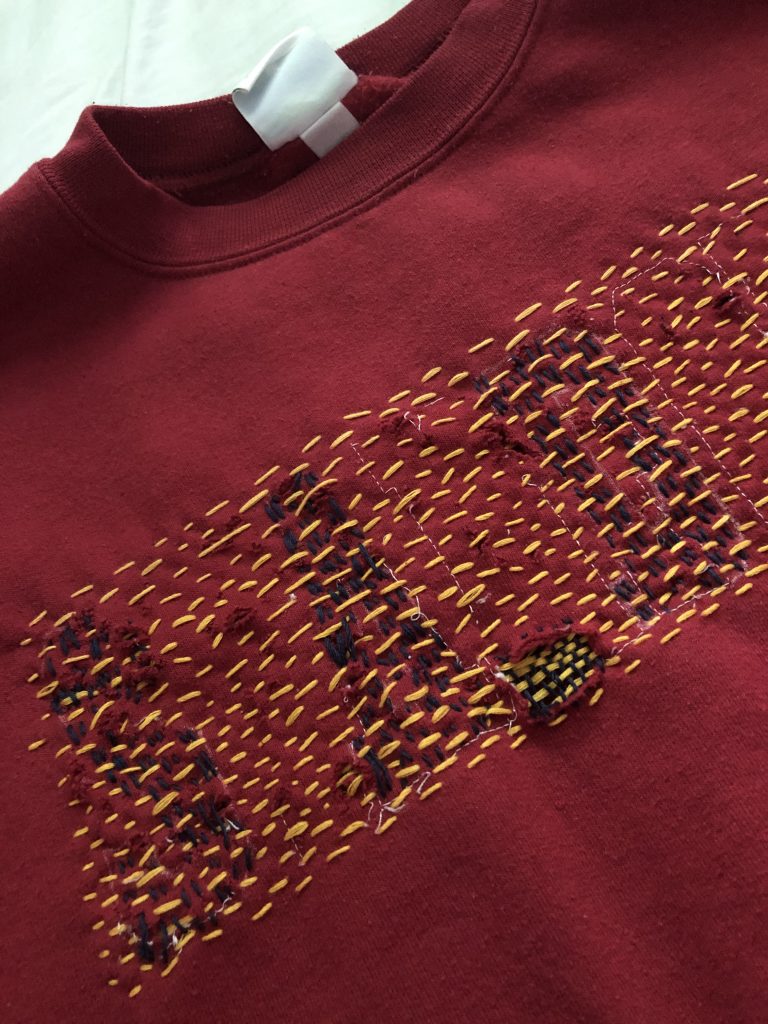
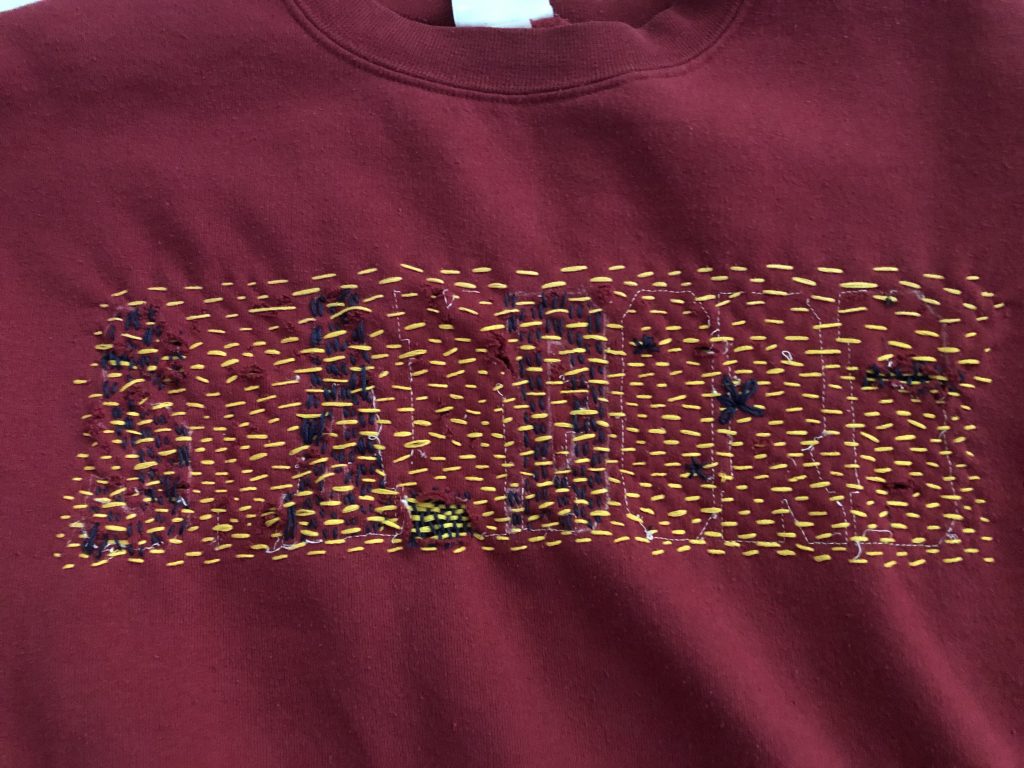
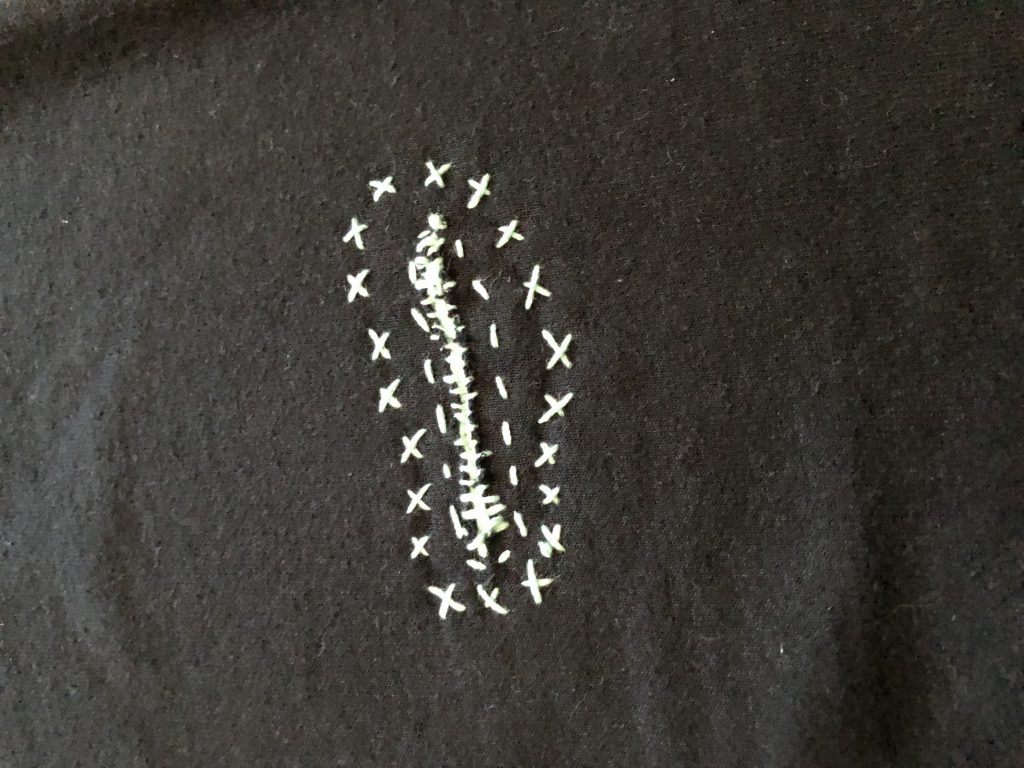
For this mending assignment, I chose to mend my boyfriend’s old Stanford sweater that he wore a lot in high school. When he came to CMU, he ended up roughly tearing off the letters with an x-acto knife, and left holes and a ghost remnant of what used to be. I like how there now exists a lineage of alterations to this sweater with time and attitude.
I did a horizontal running stitch along where the word used to be, filling in a lot of small holes that were there. It made the sweater feel a lot sturdier than before. Then I did vertical ones to fill in letters to spell out “SAD,” as well as filling in some larger holes. It is actually quite hard to see what it spells out, unless you look for a long time. But I like that it is quite subtle.
However, I do regret doing such a large piece, that I was unable to experiment as much as, and ran out of time. I have started adding embroidery such as french knots and lazy daisies, but I will work more on this after!
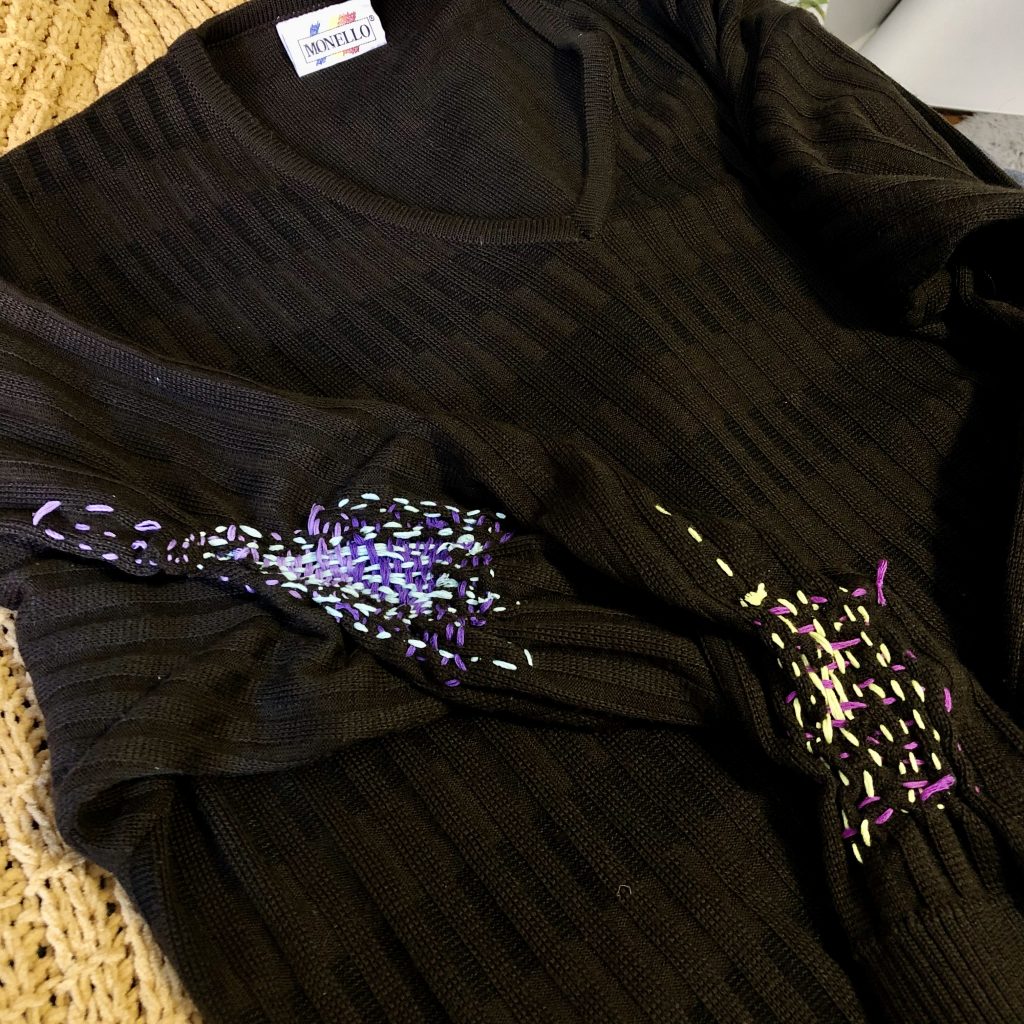
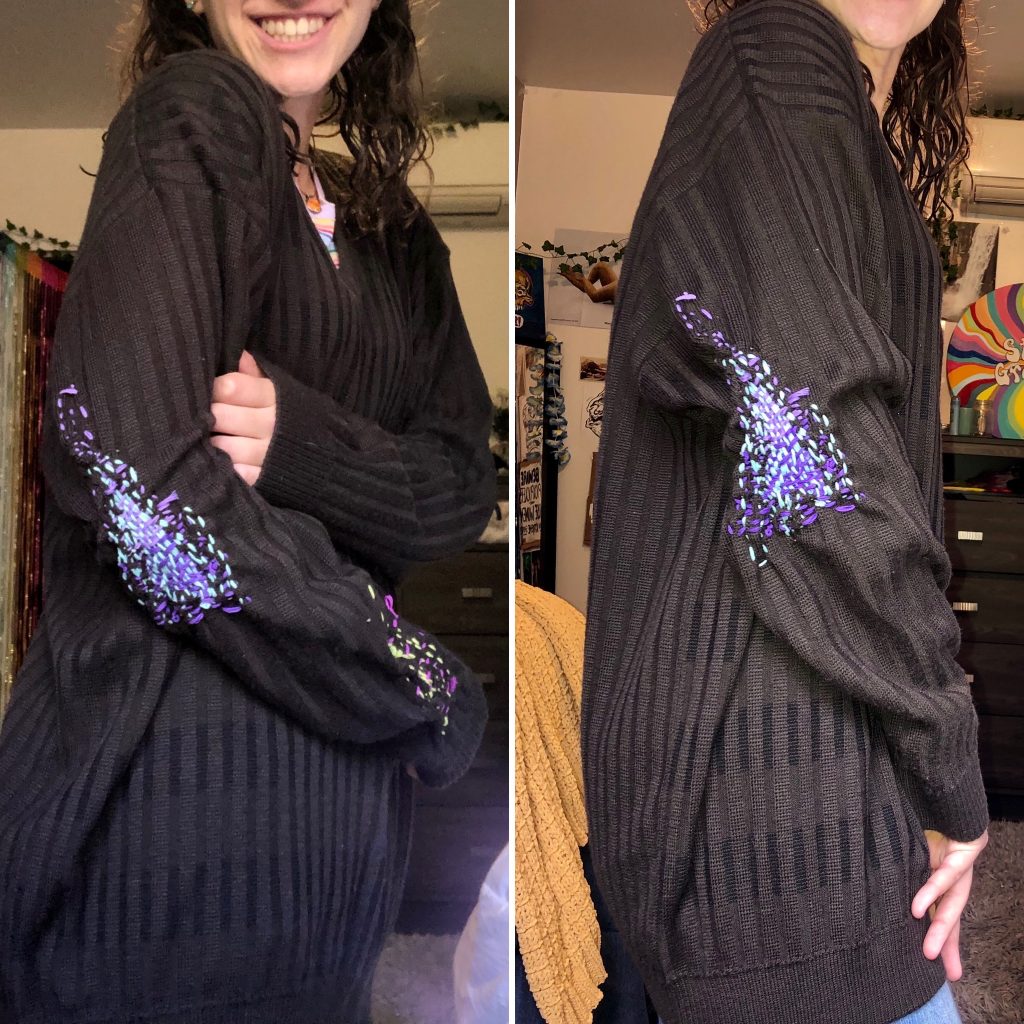
Transforming my plain brown sweater with mending is still an ongoing project, but I’m learning more and more along the way. When considering the placement for the second hole, I thought about how I use sweaters and about which areas tend to experience the most wear and tear. Even though I am the one fabricating the holes to mend, I’ve decided to strategically place them in spaces that emphasize the sweater’s functionality.
I put the sweater on and lived in it for a little bit, and I marked areas that I found received the most action either through tugging, bunching, or rubbing with a sharpie. Some of these included my elbow, sleeve cuff, shoulder, and left hip. I want to highlight each of these areas with darning to give them personality, and so for my second mending, I went for a larger elbow patch.
Mended elbow and sleeve with embroidery floss
I stuck with using embroidery floss because that worked well, and I experimented with threading different string counts through my needle to make thinner stitches. I also played with changing color halfway through the patch to attempt to create a subtle gradient. I like the visual effect a dark purple running stitch transitioning into a lighter purple as the shape of the patch narrows.
I am sticking with choosing colors that starkly contrast the dark brown sweater, and I enjoy the texture darning provides. It is still challenging to hold the fabric in place while running stitches, and I might find a better way to keep the shape that doesn’t involve sticking a mason jar in the sleeve. This will be especially helpful as I move into other areas of the sweater.
I was surprised by the organic feeling and quality of the mended patches. I’ve found that they move and morph into the rest of the fabric in very interesting ways. Their appearance changes while I wear the sweater, and it will be exciting to see how my view changes over time.
For this part of the assignment, I continued my mending from last time.
Mending from Tuesday 10/6/20.
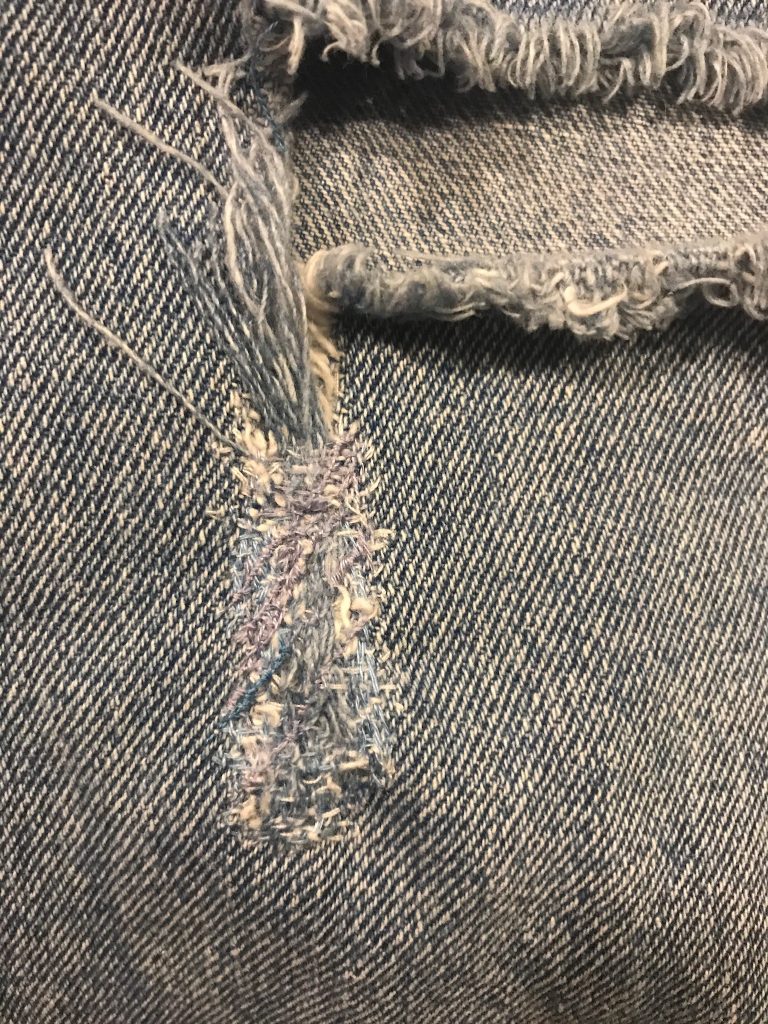
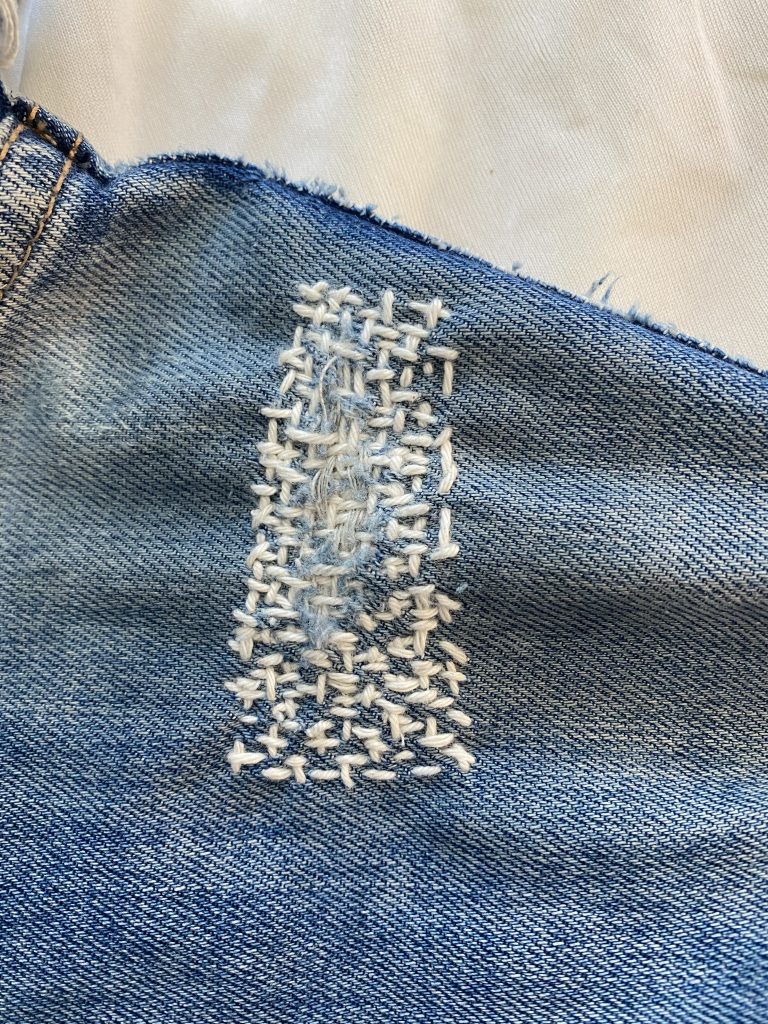
I continued to use the same techniques, fixing the rips in the fabric by creating more wefts, and then layering diagonal stitches on top to help it blend back into the denim. I experimented with using a thicker needle and blending the strands of thread together. Previously, I used one thread color at a time. This time, I twisted 2 strands of blue thread, and 1 strand of white thread together, creating a thread that is slightly thinner than embroidery floss. While the colors did seem to help the alterations blend into the original pants. it was a bit harder to match the weave of the fabric, due to the thickness of the tread.
Mending Progress 10/8/20
I also finished up by stitching around the perimeter of the rip. This allowed me to reinforce the sides, and prevent more of the weave from coming loose. I added more white weft threads in order to be able to hold up the original loose weft threads (coming from the right side). I also finished weaving in the original loose threads, so the loose-ends now look completely alike. Going up the left side of the rip with the new blended thread allowed me to make the mending look a little more cohesive.
Mended jeans when worn
The mended area blends in pretty well from far away, and when worn. Up close, it is possible to see all the little threads and patterns that don’t match quite right, but I am pretty happy with the result. I do think that the strategy of using one thread at a time was slightly more successful than blending the colors, but it was very time-consuming. There is a bit of a trade-off between the two stratgies, but I think using them together, I was able to create a nice result.
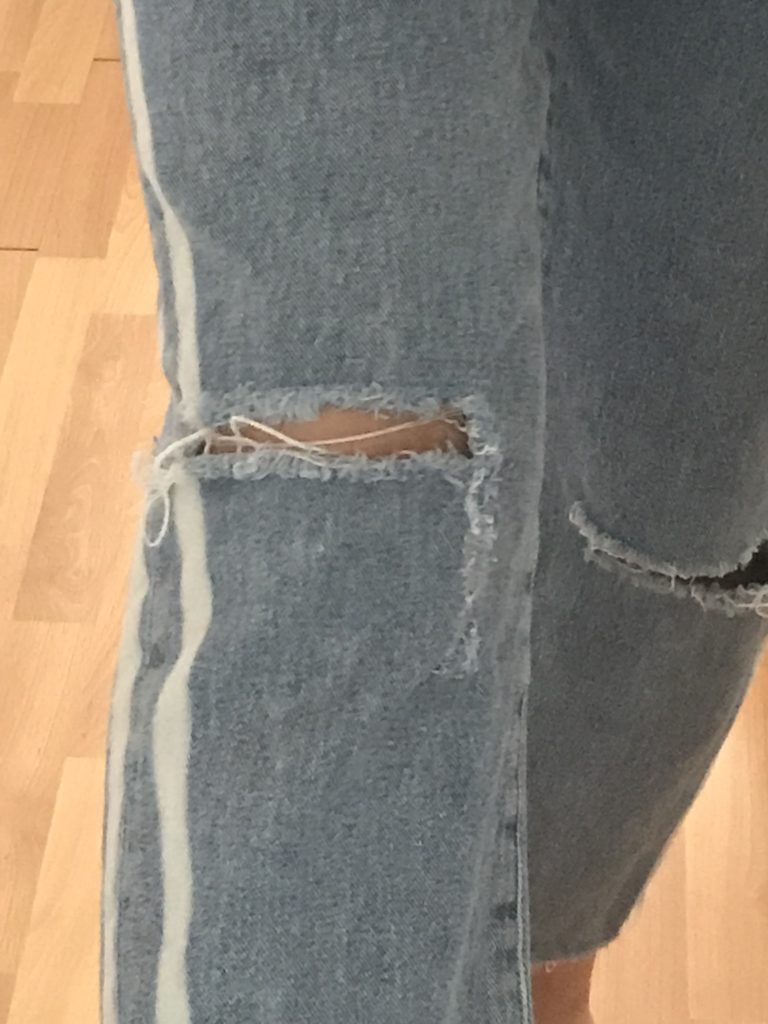
The jeans I decided to work on are a few years old and they started to thin (between the thin) last year until both sides had ripped. From there I decided to play with them, so I distressed them, cut them shorter, and changed the shape of the holes in the knee. These jeans just became practice for me to learn techniques so that I could thrift other jeans and apply what I learned.
Lasy Daisy
For my mending project I used three methods mentioned in class and also found on YouTube. I was interested in the lasy daisy embroidery style, with this method, I struggled with my first attempt. I found that tension was my biggest challenge and that I tend to pull too much. I also feel like this was as frustrating as having a perfect wing with eyeliner. The first petals weren’t the same length and I could tell so I kept adding more but it never ended up what I intended it to look like/ symmetric. I tried again but instead of just drawing lines to follow I drew a box and used a ruler hoping it would be better, which I feel it was.
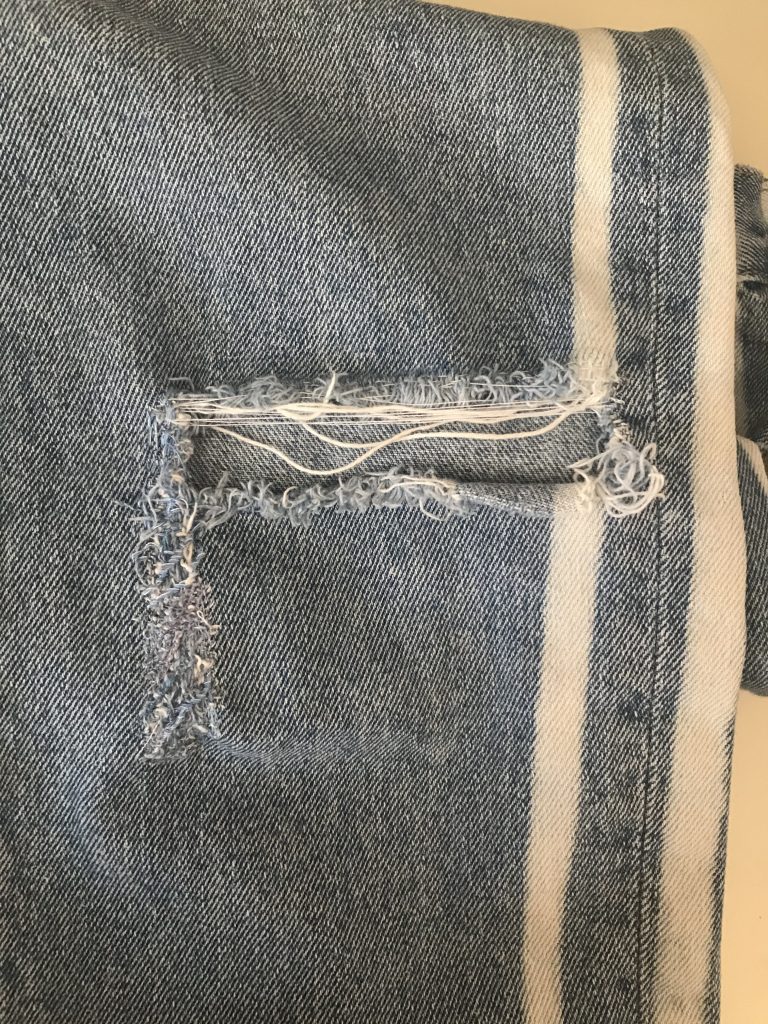
Backward Stich
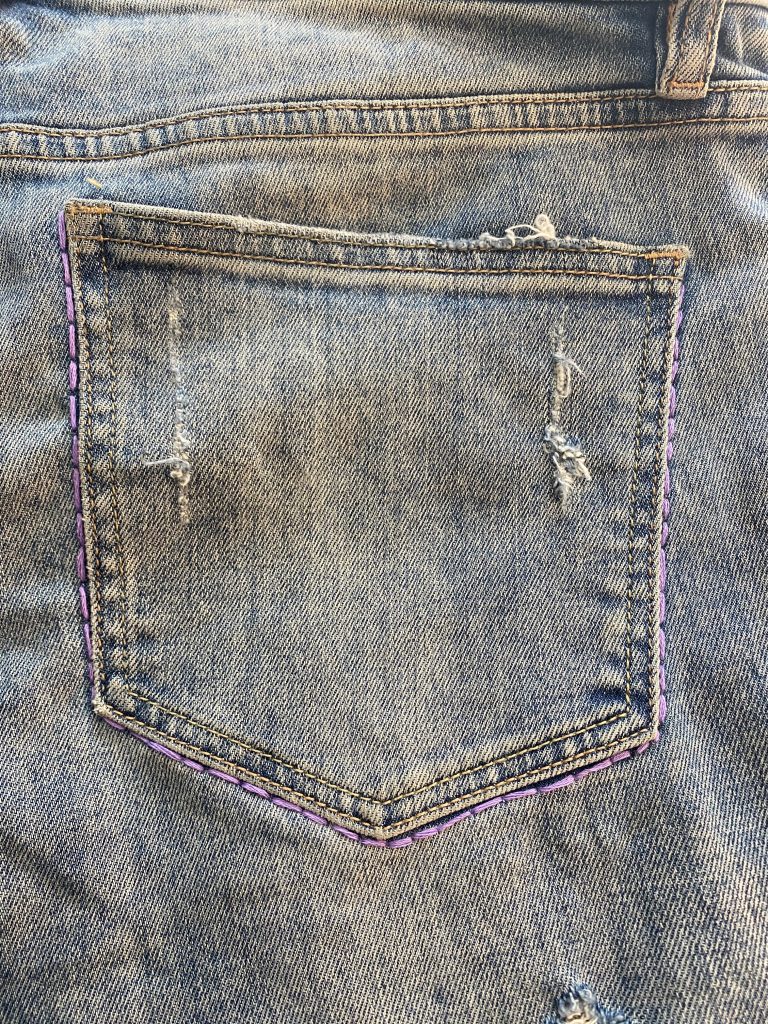
The second method I attempted was the back stitch. This stitch was relatively easy. I added it as a highlight of the back pocket because I had spent so much time on the front that made the back and front of the jeans look like strangers than any two parts that could be related. For the future I would like to continue the sashimi stitching I used in the front so that it resembles a strip of mending that continues to the back of the thing and calf.
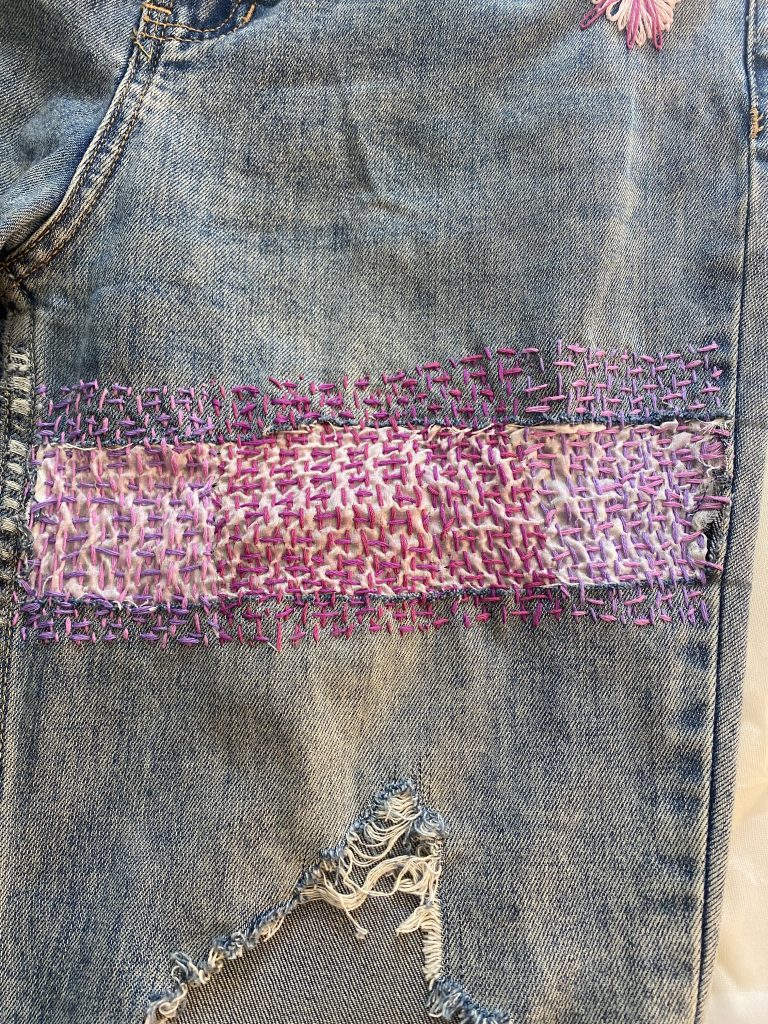
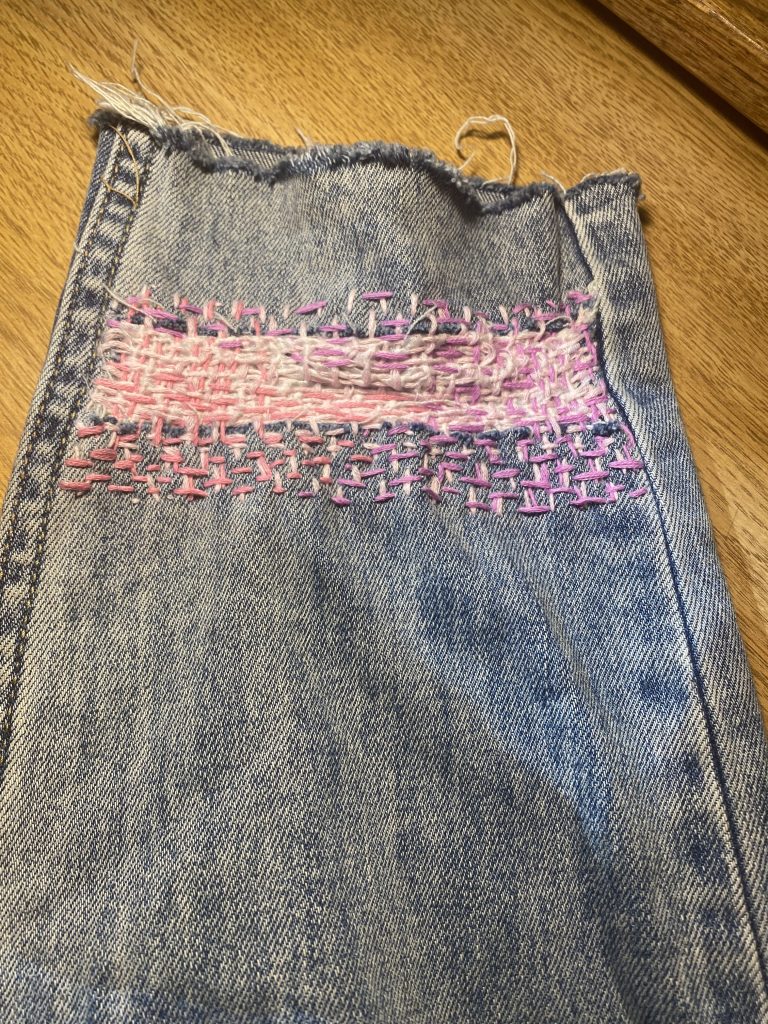
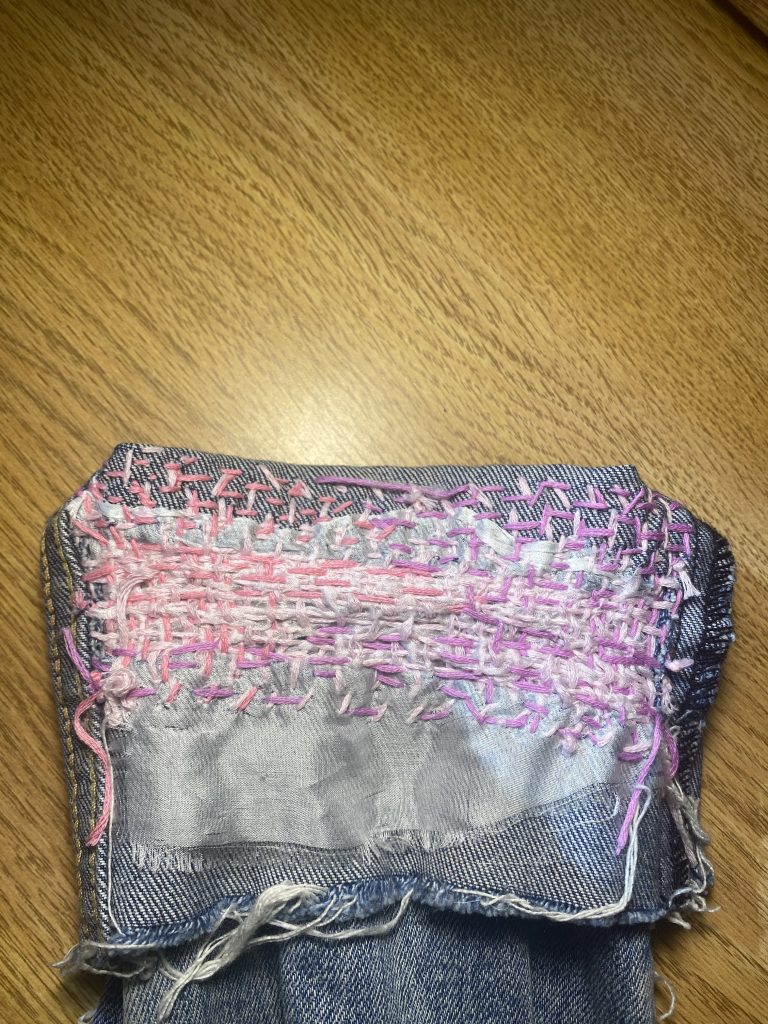
Sashiko Visible Mending
The final method I used was Sashiko visible mending which I followed a YouTube tutorial I found on the internet. With this method I tried to play with different pinks and purples and also density of the stitches. My biggest challenge here is that cloth I used to cover the cut in the jeans was very thin and with the tension from the stitching and stretching it started to break down. The repetition of this stitch made me confused and dazed at times, so there are places where I made mistakes. However, I am still satisfied with the results, for next time I would choose a different cloth, take some strands away from the embroidery floss and choose a thinner needle.
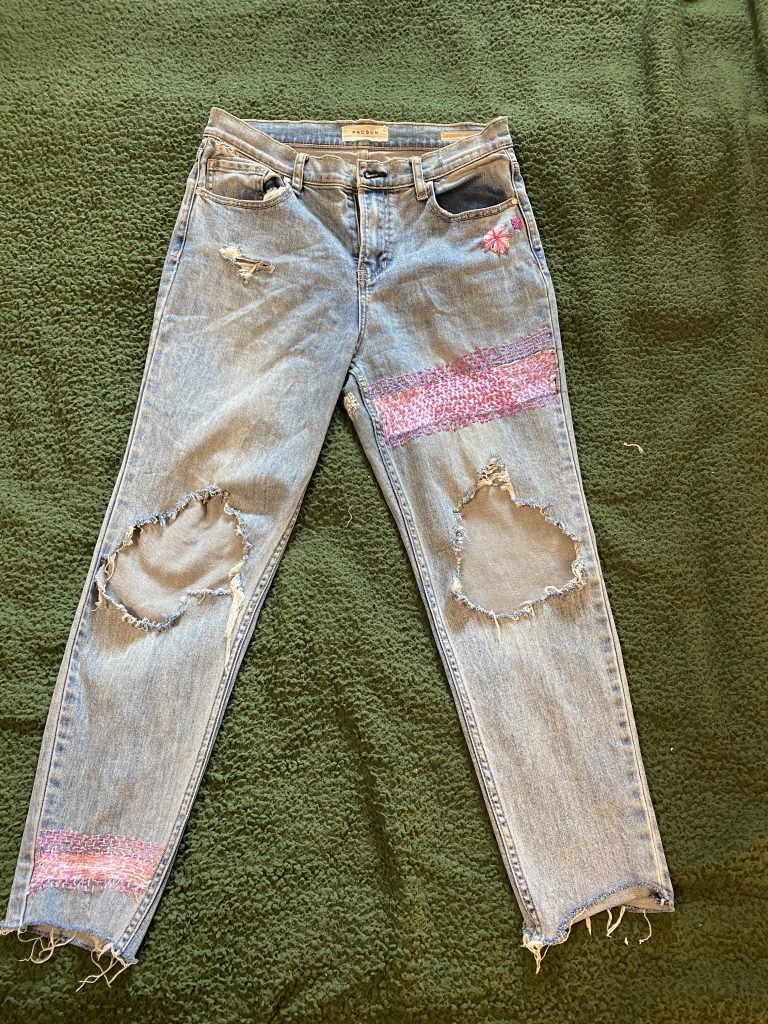
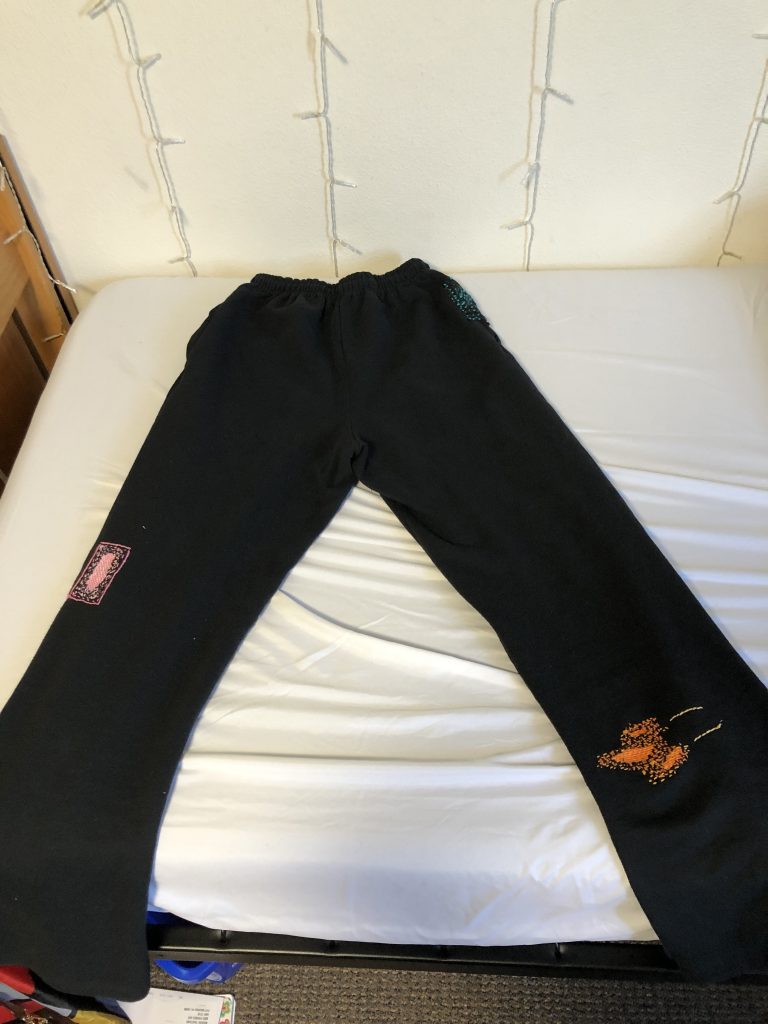
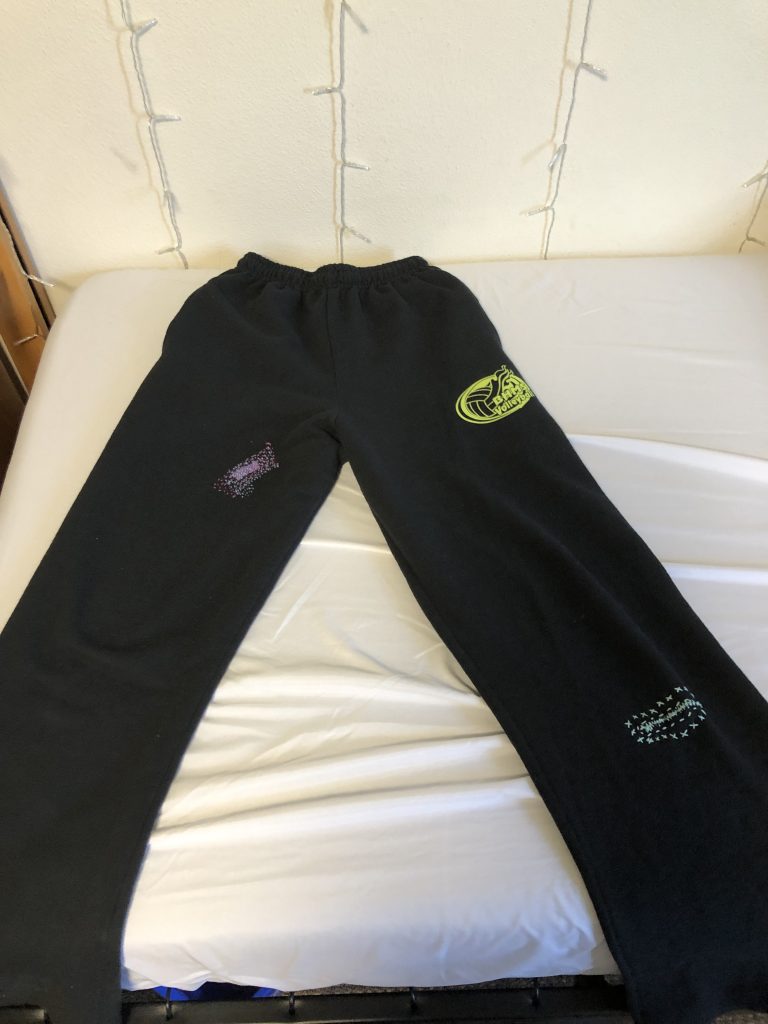
Here is the finished product looking at the full scale of the pants. I did five separate mends on the pants. I intended for it to look like a bunch of different colorful patches around the pants. Originally, I wanted to do more decorative areas, but I found that the mending was a lot more time consuming than I thought so I didn’t have enough time to do everything I wanted. Even still, I like the way that they turned out.
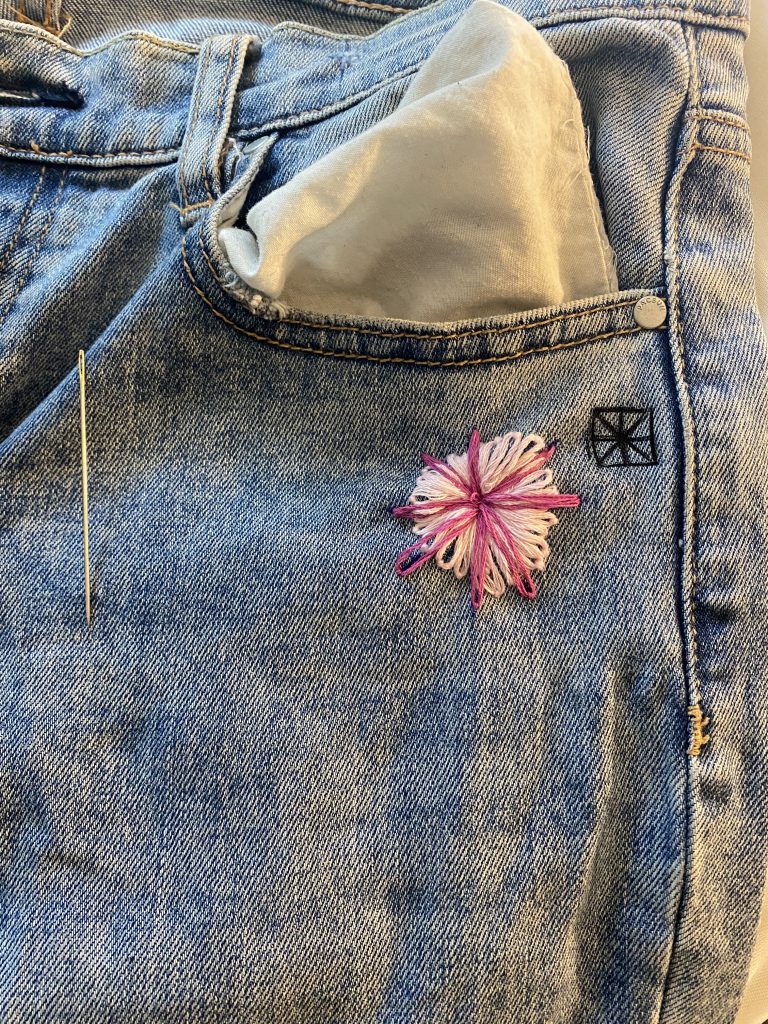
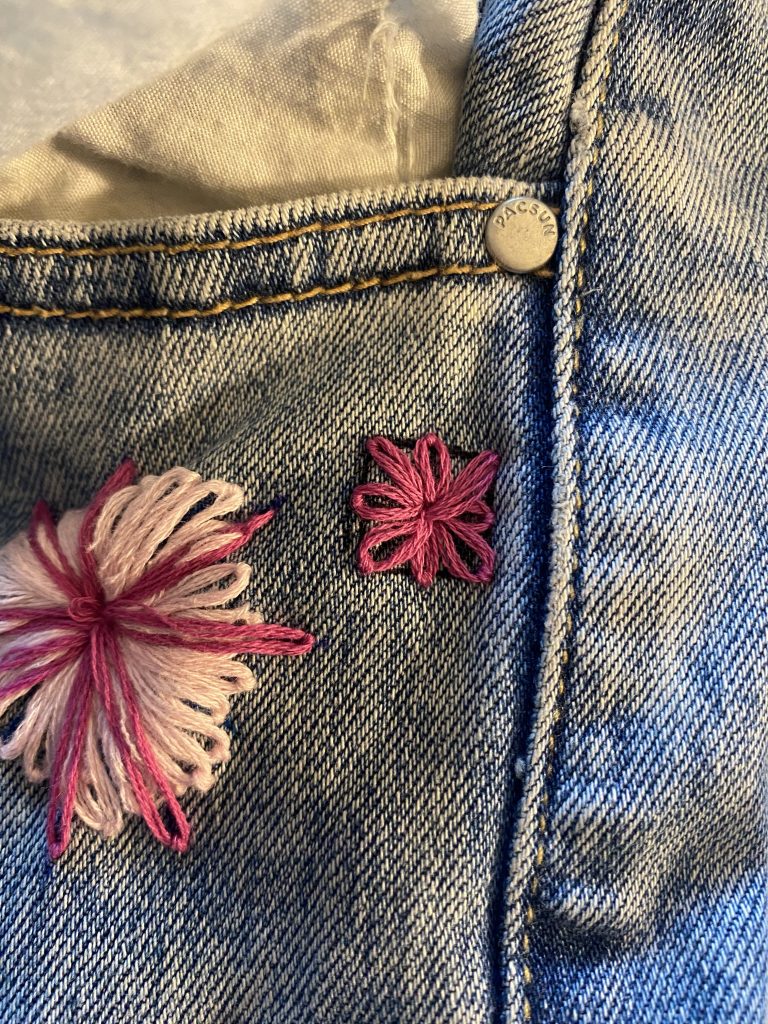
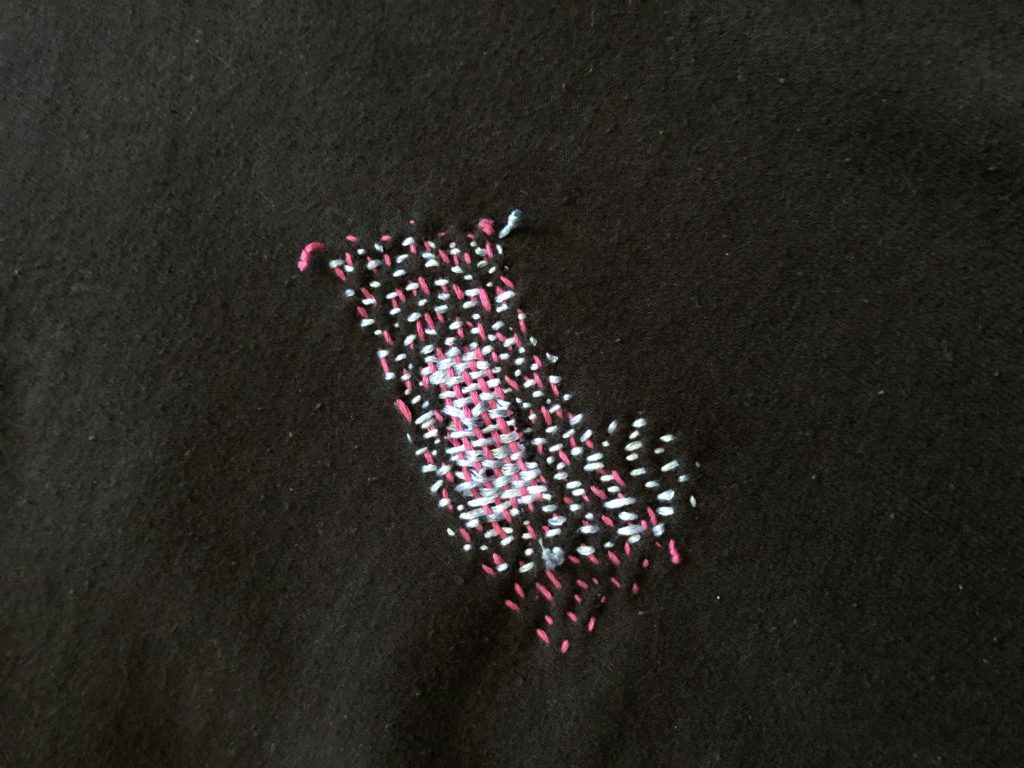
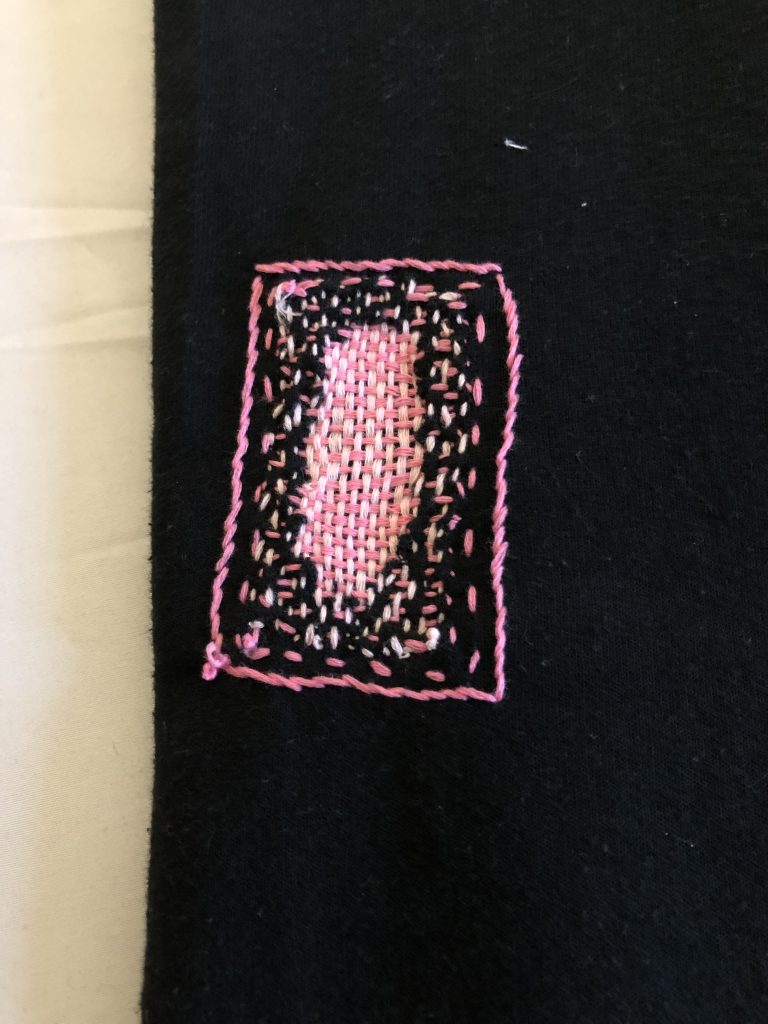
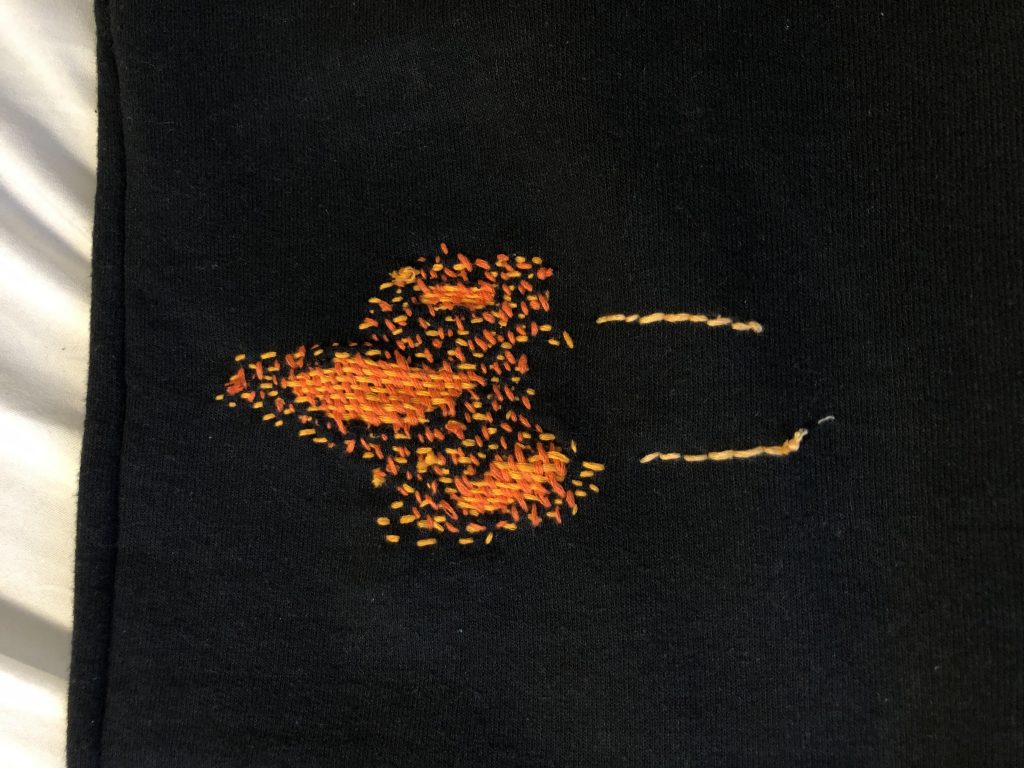
Here are close up images of the five patches. The bottom two images are the newest patches that I made. For the pink one on the left, I started by using the stem stitch to make a rectangular border and then began doing the normal darning inside. I tried really hard to make sure that the warps were close enough together that once woven, it would be more opaque, but I found that the embroidery floss wasn’t quite thick enough to ever truly fill the space. For the orange patch on the right, I intended to make an abstract shape that kind of went back and forth, but as I was finishing the mending it started to look kind of like a rocket ship. I was originally planning on doing three shades of orange/yellow and going in three different directions, but I already liked the way it looked with two colors and didn’t want to spend the time adding a third color. At the end, I added the two backstitch lines to act like movement lines for the rocket ship. I think that this one looks most like a patch because it is more pictographic.
For this project, I decided to mend an old shirt that I used to wear a lot during early high school. I wanted to make it less plain by adding pops of color.
I first did darning on a pocket I cut out. My intention was too make it seamless and very close together but it didn’t quite turn out that way since the fabric was hard to maneuver and the pocket wasn’t flat. Additionally, I sewed through the back part of the pocket a couple times but it didn’t make too much of a difference.
But after looking at it longer, I quite like the jagged and uneven look as it brings more of that worn out feel to the shirt.
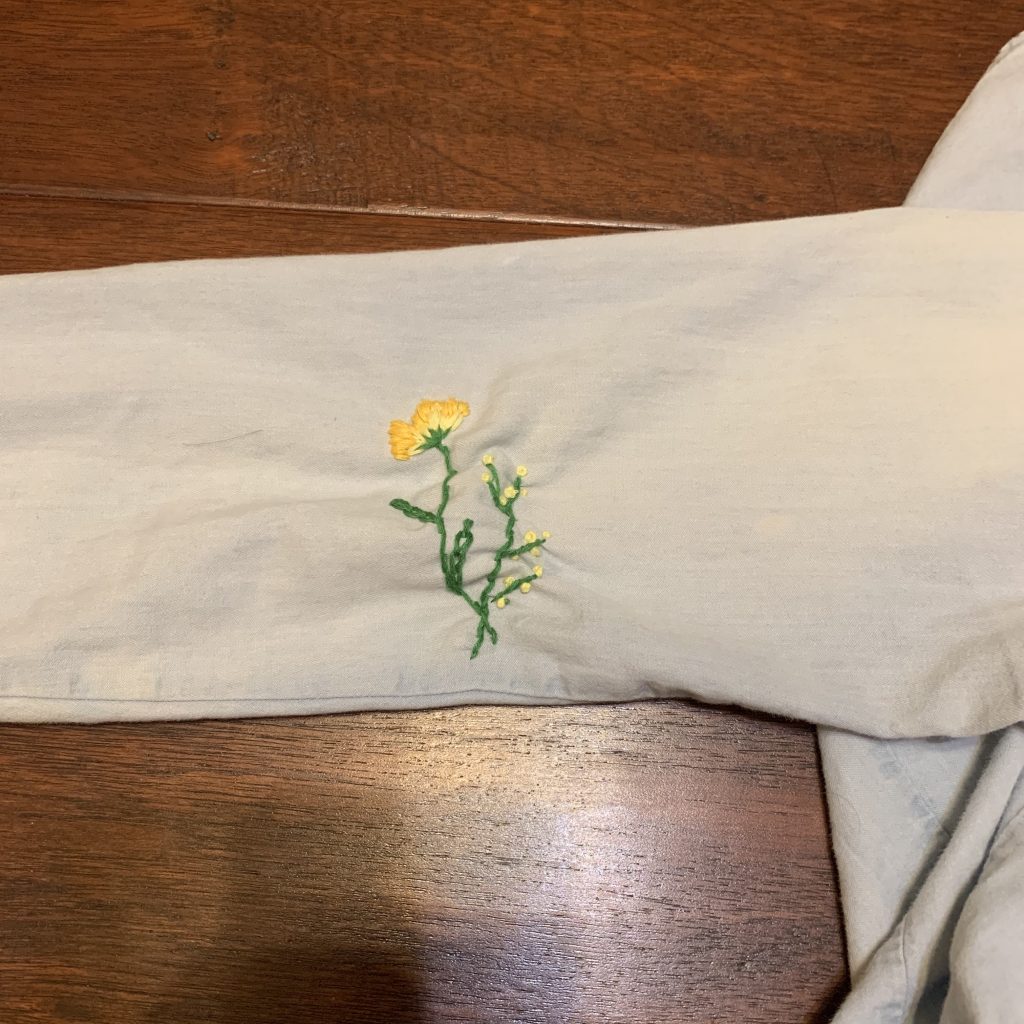
Originally, I did not notice the small black tears/stains on the right arm but when I saw them, I knew I wanted to embroider something over it. I used the yellow & orange + green to create a flower growing out of the side.
I really enjoyed embroidering the sleeve as a small detail and actually put a mason jar on the inside to prevent me from sewing through the other side. I did gather some of the fabric white doing the french knots which were extremely difficult because it was hard for me to hold the string taut and push the needle through since my arm would have to go through the sleeve.
The flowers remain hidden when my arm is bent since it is just at the elbow which is something I actually ended up really enjoying and so it adds an subtle touch to the shirt when revealed.
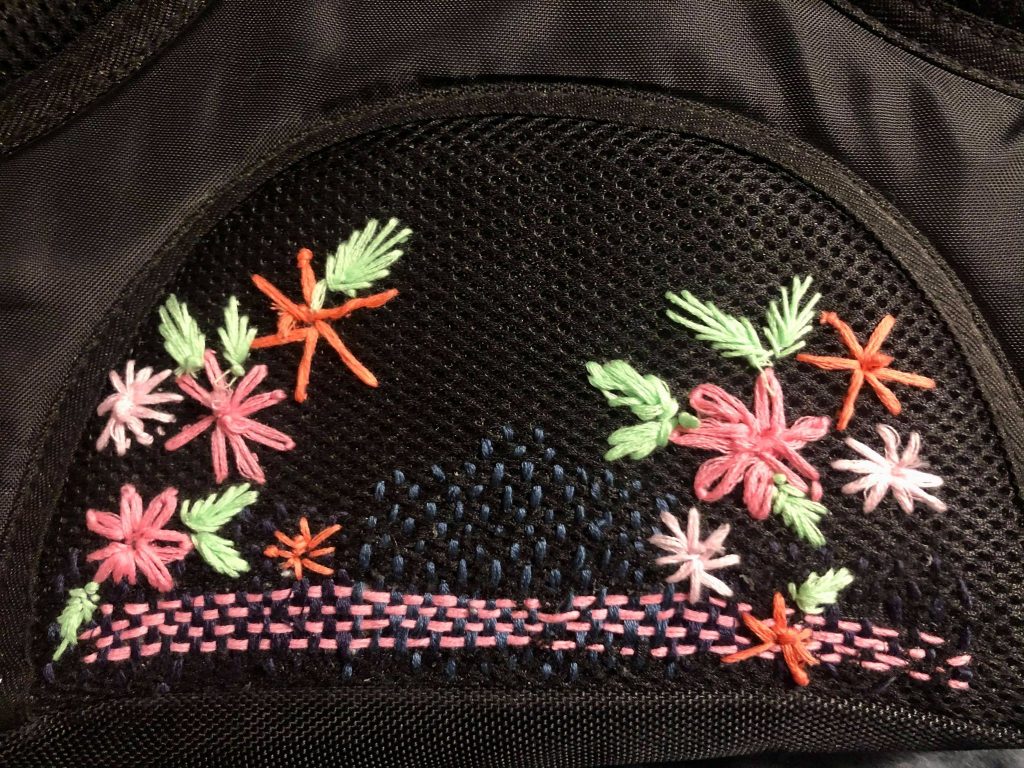
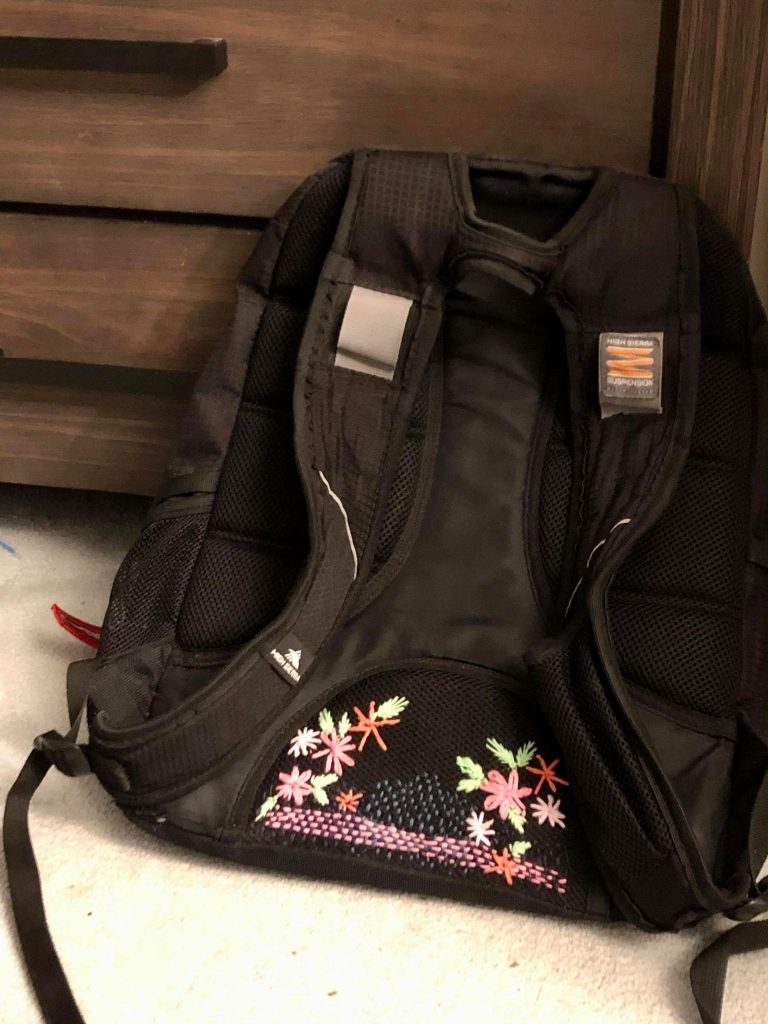
I decided to mend a large hole worn in the webbing of the back of my backpack. I decided to darn through it using embroidery thread, but then felt that the pink stood out awkwardly with just a line. After Tuesday’s class, I decided to use some of the techniques we learned in class and add some flowers. The webbing was surprisingly difficult to sow through, especially with access to only one side of the material. I was surprised by how well some of the flowers and leaves turned out. I really liked how bright these are in contrast to my backpack; the colors turned out really well.
While doing this I thought about how useless my backpack was now that COVID is a thing – I don’t think I’ve worn it for over half a year now. It’s just been serving as a decorative piece in the corner of my room, and now it’ll sit a bit prettier. When I get time, I might add more flowers on the side cushions.