NVCloud’s print settings allow you to prepare your geometry for printing. Print settings for new uploads are accessible immediately after uploading a Sterolithography [.stl] file. Print settings can also be accessed by selecting a previously uploaded, saved or printed file.
Quality
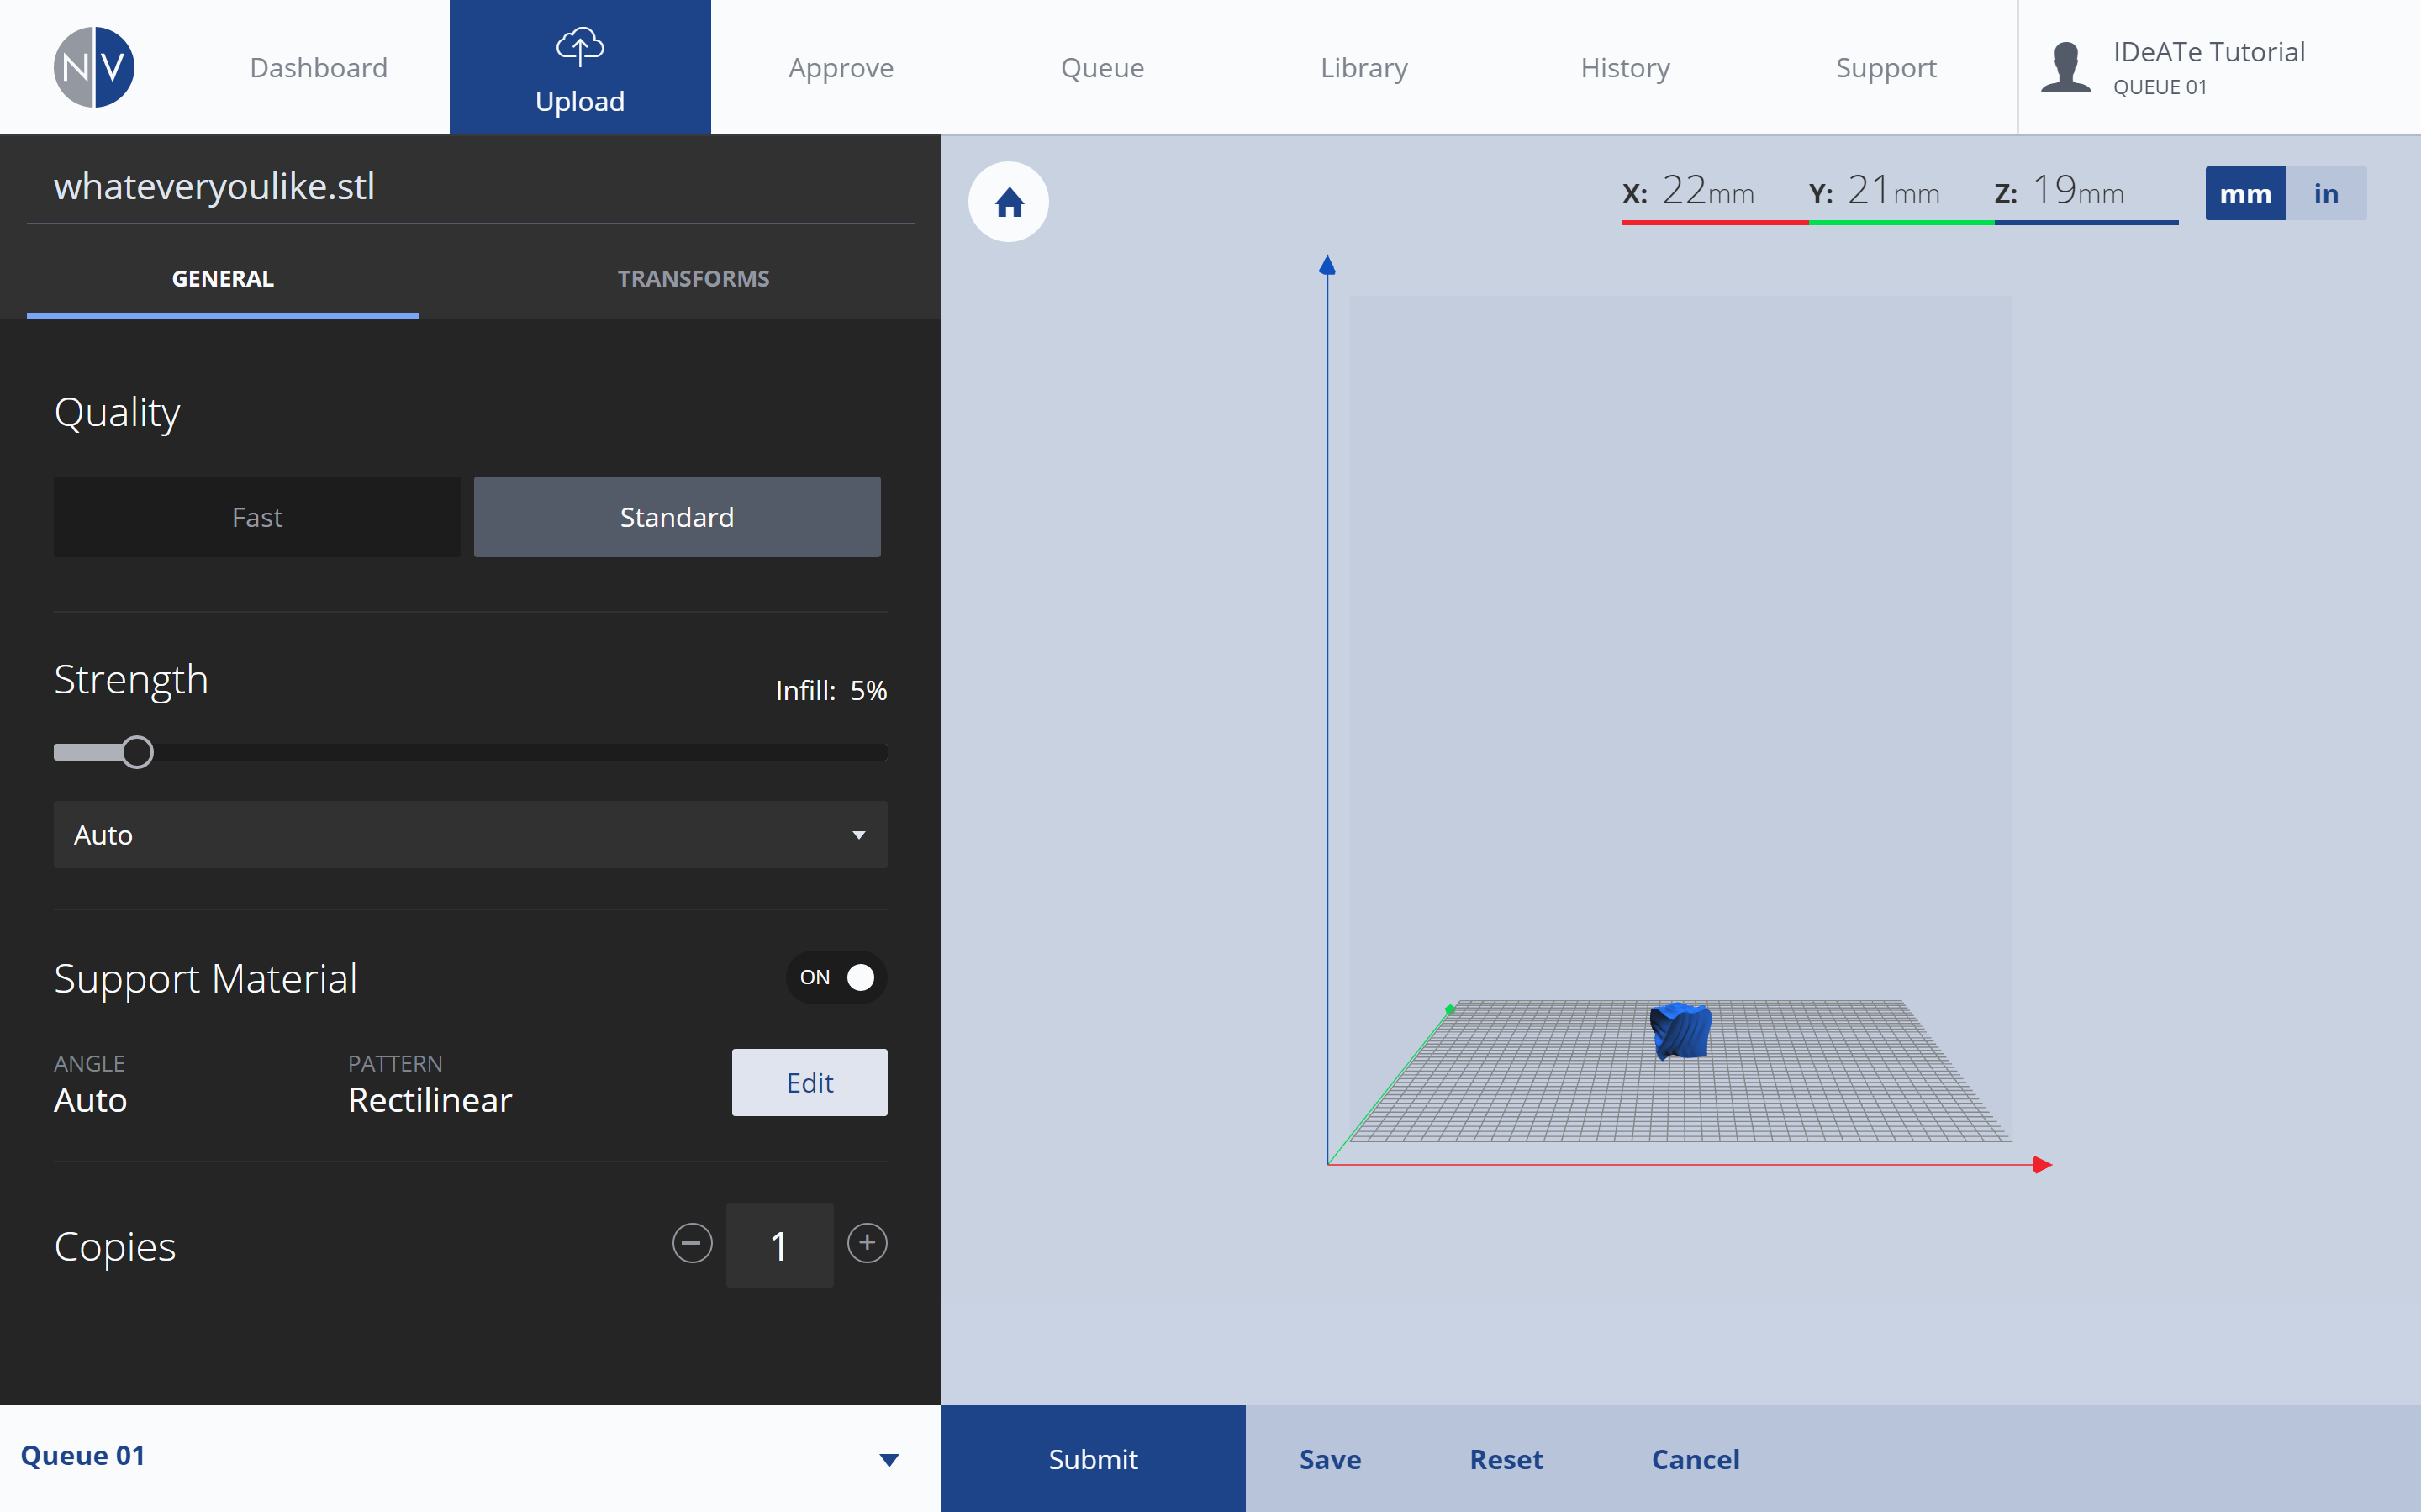
This option is available from the GENERAL print settings menu. QUALITY settings affect the layer height, overall surface finish and printing speed.
| General: Quality | ||
|---|---|---|
 |
||
|
Fast = faster printing + 0.3mm (0.0118in) layer thickness. Use these settings if you’re in a rush or if part is a prototype. Standard = slower printing + 0.2mm (0.008in) layer thickness. Use these settings for organic shapes or finer detailed printing. |
||
Strength
This option is available from the GENERAL print settings menu. STRENGTH settings affect the infill density and pattern on the inside of the printed part.
| General: Strength | ||
|---|---|---|
|
||
|
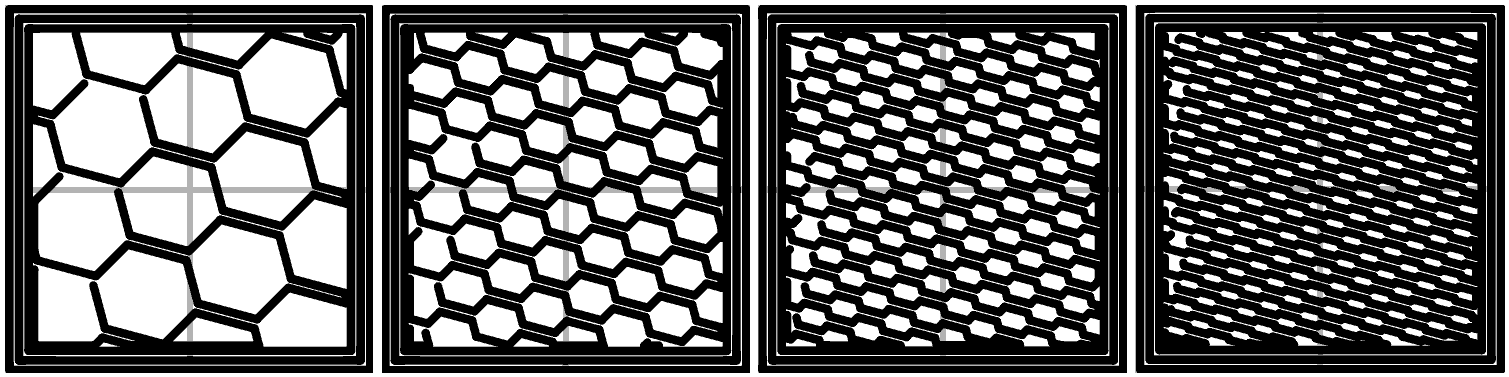
The Strength slider affects the infill density of the part. The infill pattern can be configured between honeycomb, rectilinear, line, and concentric. By default, these options are set to ‘AUTO’, but you may want to reconfigure these settings to increase the strength of your final part. High density (55-75%) = slower printing + increased expense + increased strength. Medium density (35-54%) = average printing + average expense + average strength. Low density (5-34%) = faster printing + low cost + low strength. |
||
|
HONEYCOMB infill pattern. Offers average wall strength with increased compression strength. Infill density from left-to-right: 18%, 37%, 55%, 75% |
||
 RECTILINEAR infill pattern. Each infill layer will print in an alternating direction. Offers increased wall strength with average compression strength. Infill density from left-to-right: 18%, 37%, 55%, 75% RECTILINEAR infill pattern. Each infill layer will print in an alternating direction. Offers increased wall strength with average compression strength. Infill density from left-to-right: 18%, 37%, 55%, 75% |
||
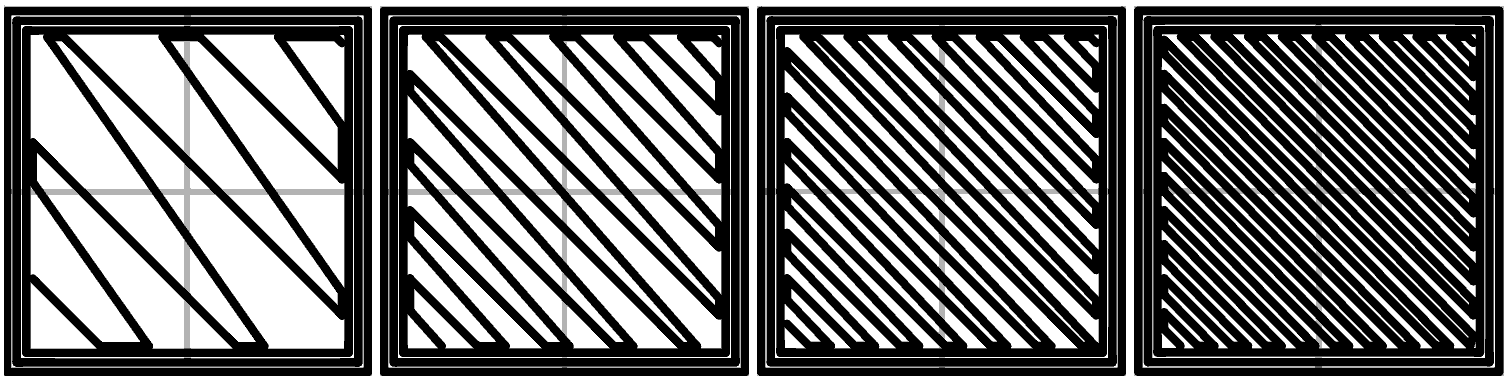 LINE infill pattern. Each infill layer will print in an alternating direction. Offers average wall strength with limited compression strength. Infill density from left-to-right: 18%, 37%, 55%, 75% LINE infill pattern. Each infill layer will print in an alternating direction. Offers average wall strength with limited compression strength. Infill density from left-to-right: 18%, 37%, 55%, 75% |
||
 CONCENTRIC infill pattern. Offers limited wall strength with limited-to-average compression strength. Infill density from left-to-right: 18%, 37%, 55%, 75% CONCENTRIC infill pattern. Offers limited wall strength with limited-to-average compression strength. Infill density from left-to-right: 18%, 37%, 55%, 75% |
||
Support
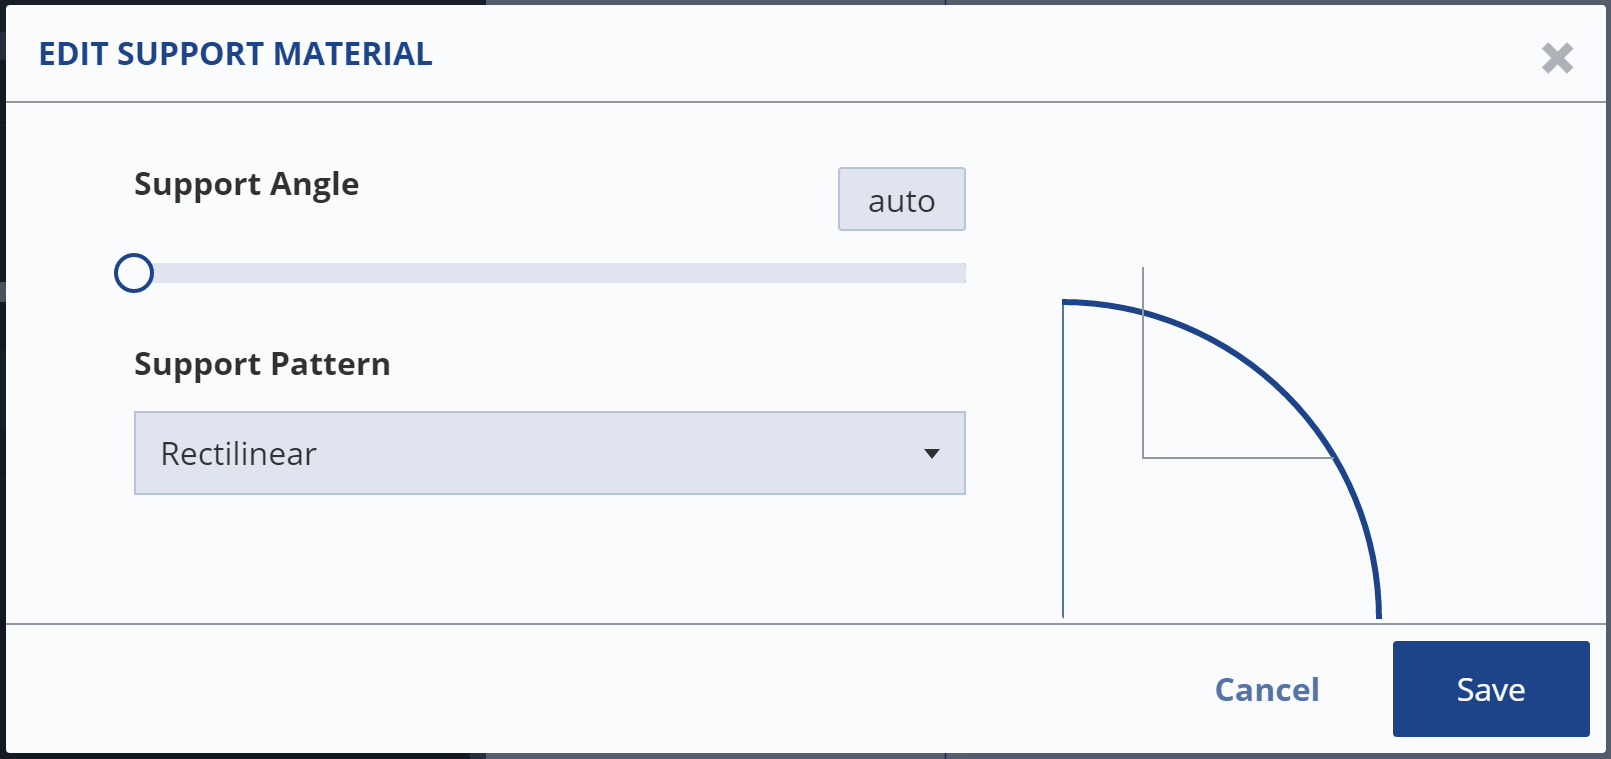
This option is available from the GENERAL print settings menu. SUPPORT MATERIAL settings affect support generation methods and patterns.
| General: Support Material | ||
|---|---|---|
|
||
|
Support structures are necessary in supporting 3D printed parts with overhangs, bridges, or undercuts. If your geometry includes any of these features, the SUPPORT MATERIAL button should be switched ‘ON’. Select the EDIT button to adjust the support angle and pattern. |
||
 |
||
|
The ANGLE value defines the angle at which support structures are generated for over-hanging or undercut geometry. It is recommended this setting be left as default: AUTO. AUTO Angle Value = average print success + average print cost + efficient print time. This option is recommended. The printer will determine when it requires more or less support. Higher Angle Values (75-90 Degrees) = increased print success + extreme increase in print cost + extreme increase in print time. The removal of support material from your final part will also prove quite difficult. Average Angle Values (45-74 Degrees) = increased print success + increased print cost + increased print time. These values are safe. Lower Angle Values (0-44 Degrees) = lower print success + lower print cost + lower print time. |
||
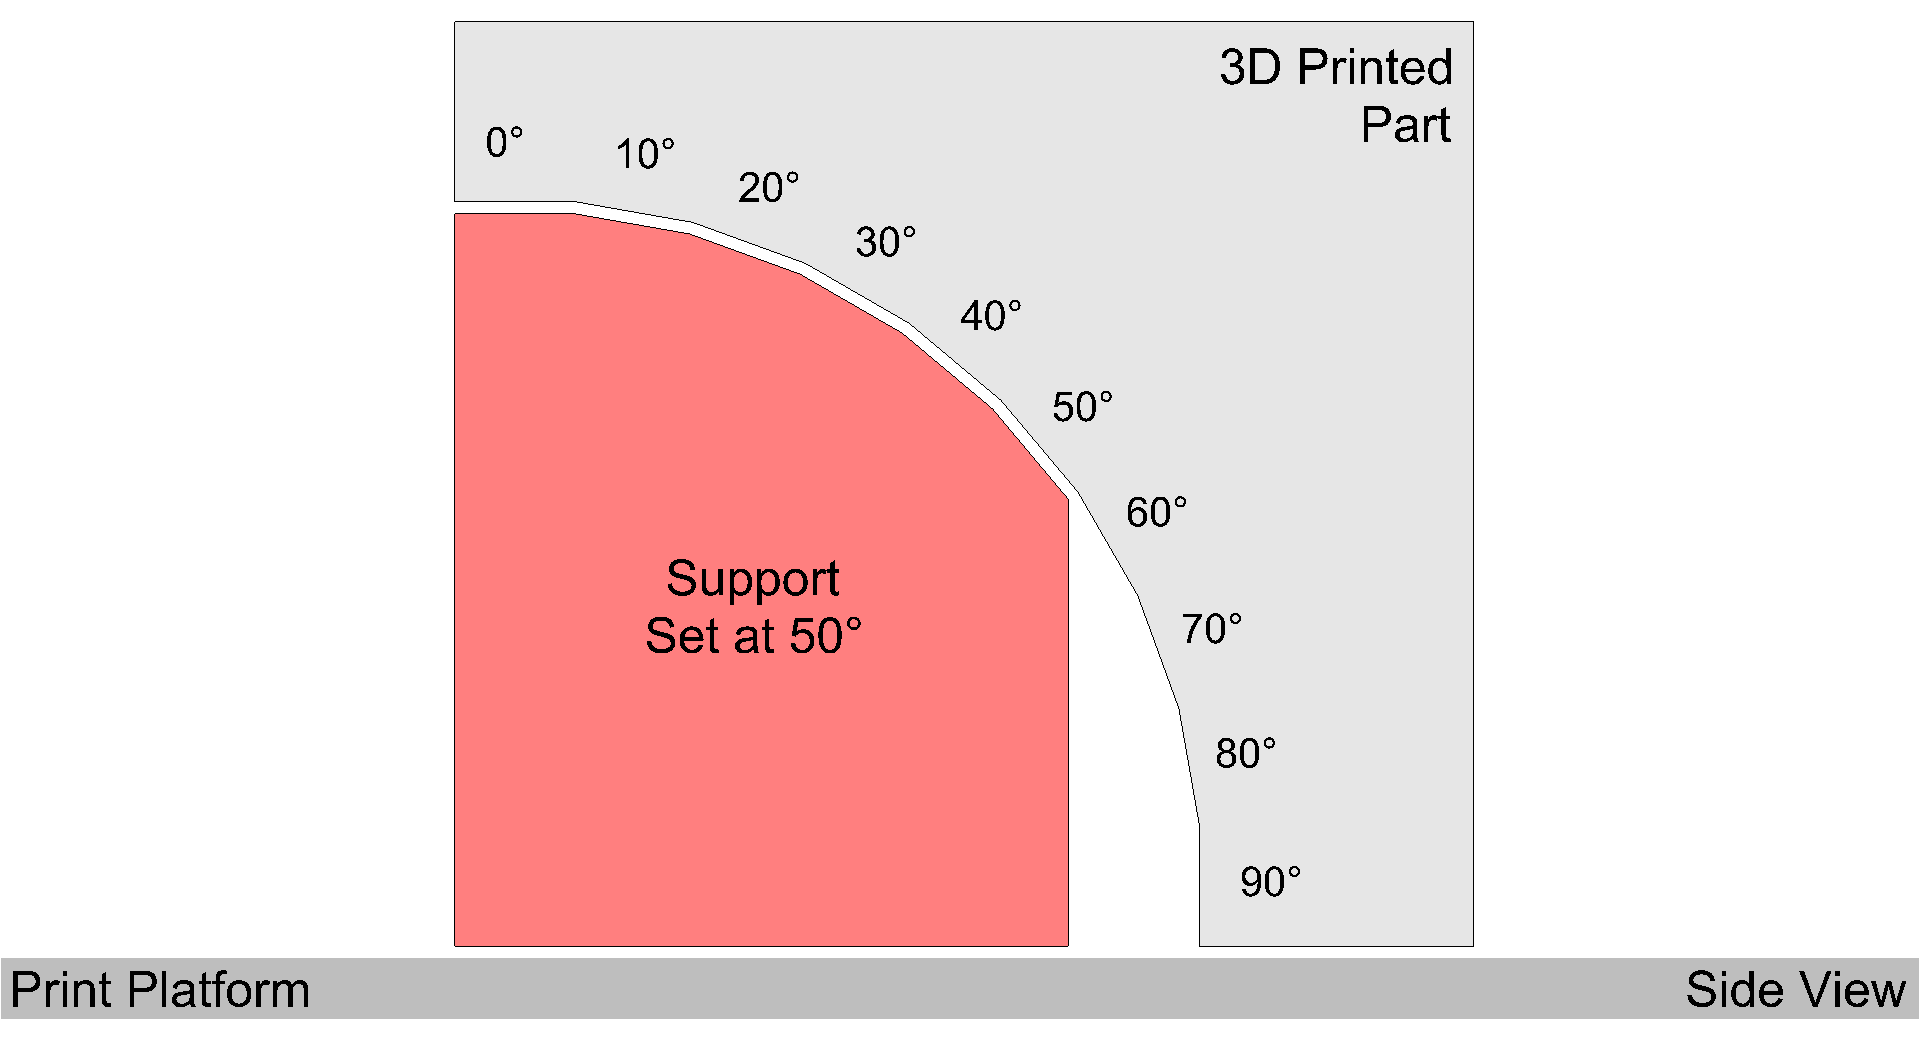 For instance, a support setting of 50 Degrees would print support structures for overhanging geometry that is less-than or equal-to 50 Degrees. An example is provided in the image above. For instance, a support setting of 50 Degrees would print support structures for overhanging geometry that is less-than or equal-to 50 Degrees. An example is provided in the image above. |
||
 As a second example, a support setting of 10 Degrees would print support structures for overhanging geometry that is less-than or equal-to 10 Degrees. As a second example, a support setting of 10 Degrees would print support structures for overhanging geometry that is less-than or equal-to 10 Degrees. |
||
Units
This option is available from the TRANSFORMS print settings menu. UNITS option allows you to switch between (mm) or (in).
| Transforms: Units | ||
|---|---|---|
| Stereolithography [.stl] files do not preserve units of measurement (e.g. inches, millimeters, miles, light years etc.). However, they can preserve unit values (i.e. 10 x 10 x 10). If you find your geometry appears too small or large, begin by adjusting the UNITS value. | ||
Scale
This option is available from the TRANSFORMS print settings menu. SCALE option affects the scale of the part.
| Transforms: Scale | ||
|---|---|---|
| The Scale slider affects the scale of the part. The Lock Scaling Ratio button can be turned off to allow for independent scaling in the X, Y, and Z axes. | ||
Rotate
This option is available from the TRANSFORMS print settings menu. ROTATE option affects the orientation of the part.
| Transforms: Rotate | ||
|---|---|---|
| The Rotate slider affects the orientation of the part. Note: Holding the SHIFT key will snap the rotation angle to the nearest 45 degree increment | ||
Misc
| Bottom Bar Options | ||
|---|---|---|
 |
||
|
At the bottom of the NVCloud Print Settings window, various universal options are provided (from left-to-right): GROUP BAR: This expanding menu allows you to select which print group (and printer) the print should be sent to. This is covered in NVCloud: Submission & Review. SUBMIT: Selecting this button sends your file to the selected printing group for approval. This is covered in NVCloud: Submission & Review. SAVE: Select this button to save your print file and settings. Your file can be retrieved at any time, by browsing to the LIBRARY tab and selecting SAVED PARTS* in the left menu. (*Link opens in new tab, login required) RESET: Select this option to reset the print settings and any transformations you’ve applied. CANCEL: Select this option to exit the print settings menu. Your uploaded file and any adjustments will be discarded. |
||