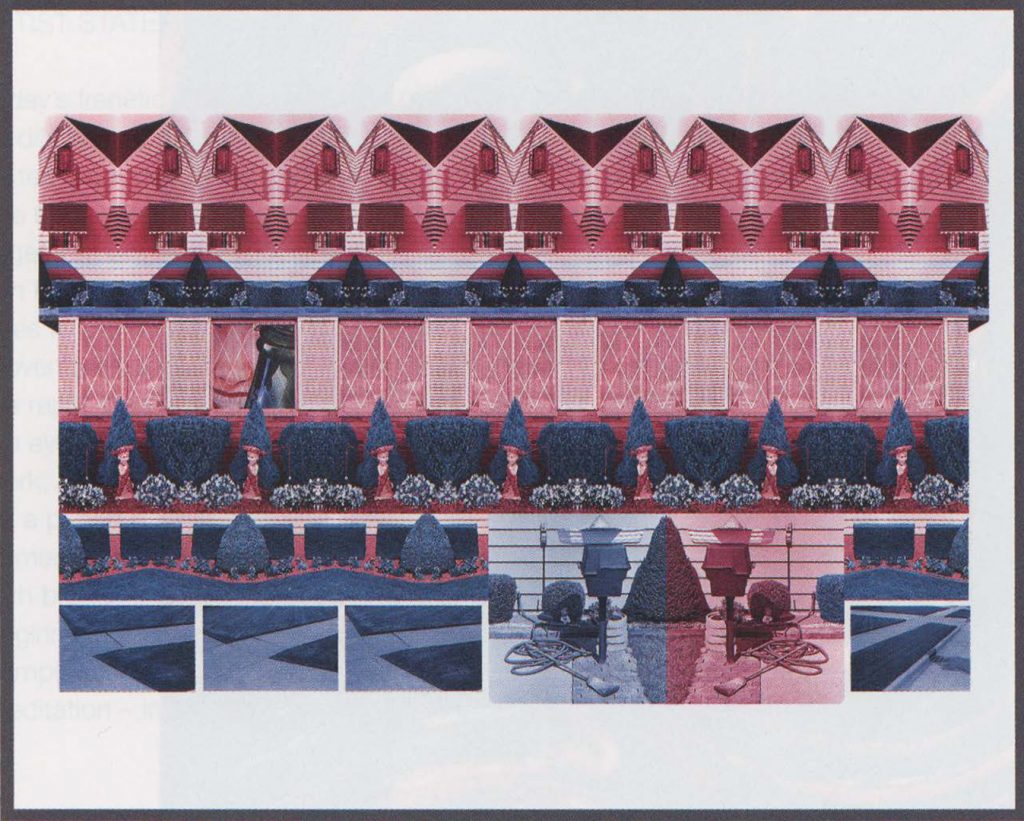
The project I choose for this week LO is a light-jet print that reflects the artist’s love-hate relationship with suburbia, called Touring Suburbia/number one, by Dolores Kaufman in 2005. It basically applies the technique of digital painting to create a 2D art that captures a 3D dreamlike scene. The artist applies two contradictory color, blue and pink, to represent his love and hate. Also, the repetitive patterns successfully showcase a scene that gives the audiences a sense of realness, instead of a dull collage. Using digital tools, the creator, Dolores Kaufman was able to re-visualize that dream, to begin to imagine Versailles from individual efforts. Touring Suburbia represents an attempt to recapture a dream once glimpsed.
var size = 40; //variable that determines the size of the indvidiual flowers
var ypos = size;
var xpos = size;
var oDist = size * 1.4 //distance between two origins for the rings
var storedY; //variable to store previous ypos

function setup() {
    createCanvas(600, 600);
    background(231,227,210);
}

function draw() {
    for(ypos = size; ypos <= height; ypos +=(2*size)+oDist) { //loop that increases the ypos and repeats the x loops

        for(var xpos = size; xpos <= width + size; xpos += 2*size){ //loop to draw the line of flowers
            storedY = ypos; //stores ypos
            fill(0);
            push();
            translate(xpos,ypos);
            flower(0,0);
            pop();
        }
        ypos += oDist + (7*size/24);

        for(var xpos = oDist/2; xpos <= width + size; xpos += oDist){ //loop to draw the line of rings
            push();
            fill(230,192,71);
            translate(xpos,ypos);
            criss(0,0);
            pop();
        }
        ypos = storedY; //sets ypos back to what it was when the loop began so the loop iteration works properly and fills the screen
    }
    noLoop();
}

function criss(x,y){ //function that draws the ring shaps by drawing rotated flowers
    push();
    rotate(radians(45));
    flower(x,y);
    pop();
}

function flower(a,b){ //function that draws the flower by drawing a petal and then rotating 90 degrees and repeating
    petal(a,b);
    push();
    rotate(radians(90));
    petal(a,b);
    pop();
    push();
    rotate(radians(180));
    petal(a,b);
    pop();
    push();
    rotate(radians(270));
    petal(a,b);
    pop();
}

function petal(x,y) { //function that draws an idvidual petal composed of two triangles and a square
    noStroke();
    var side = size/(1+sqrt(3)); //variable that determins the length of the side of the square and equilateral triangle
    var triHigh = side*(sqrt(3)/2); //variable that determins the height of the triangle based on the length of the side
    triangle(x,y,x-(side/2),y+triHigh,x+(side/2),y+triHigh);
    square(x-(side/2),y+triHigh,side);
    triangle(x,y+size,x-(side/2),y+size-triHigh,x+(side/2),y+size-triHigh);
}
I loved this project. I had a really great time breaking down the steps of drawing into individual functions to make the process easier. Additionally, it was very satisfying to get the loops working properly because I had to iterate on that a few times. The patterns would either be too far apart or on top of one another.
For 3D computer art, I looked at the artist known as Chaotic Atmospheres from Switzerland. They have made digital art since 2012. As their name implies, Chaotic Atmospheres makes atmospheres and landscapes but alters them in a surrealist way. Specifically, for their project “Shapes in Nature”, their environments will often be large in scale, have exaggerated features of the environment being depicted, and some large geometric shape in the middle that is reflective. The reason I find their work so impressive is their attention to detail. They make both art from scratch and art made from imported textures, both of which are laborious tasks, either writing code to create the images or writing code to take the textures and create realistic environments out of them. Additionally, creating the reflection must be difficult, whether it be algorithmic like ray tracing or hard-coded into the work.
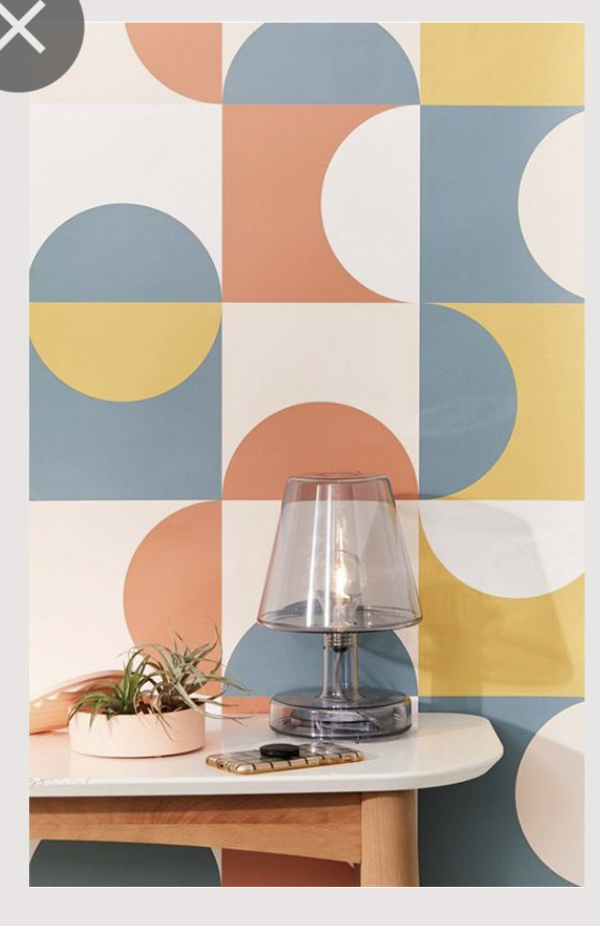
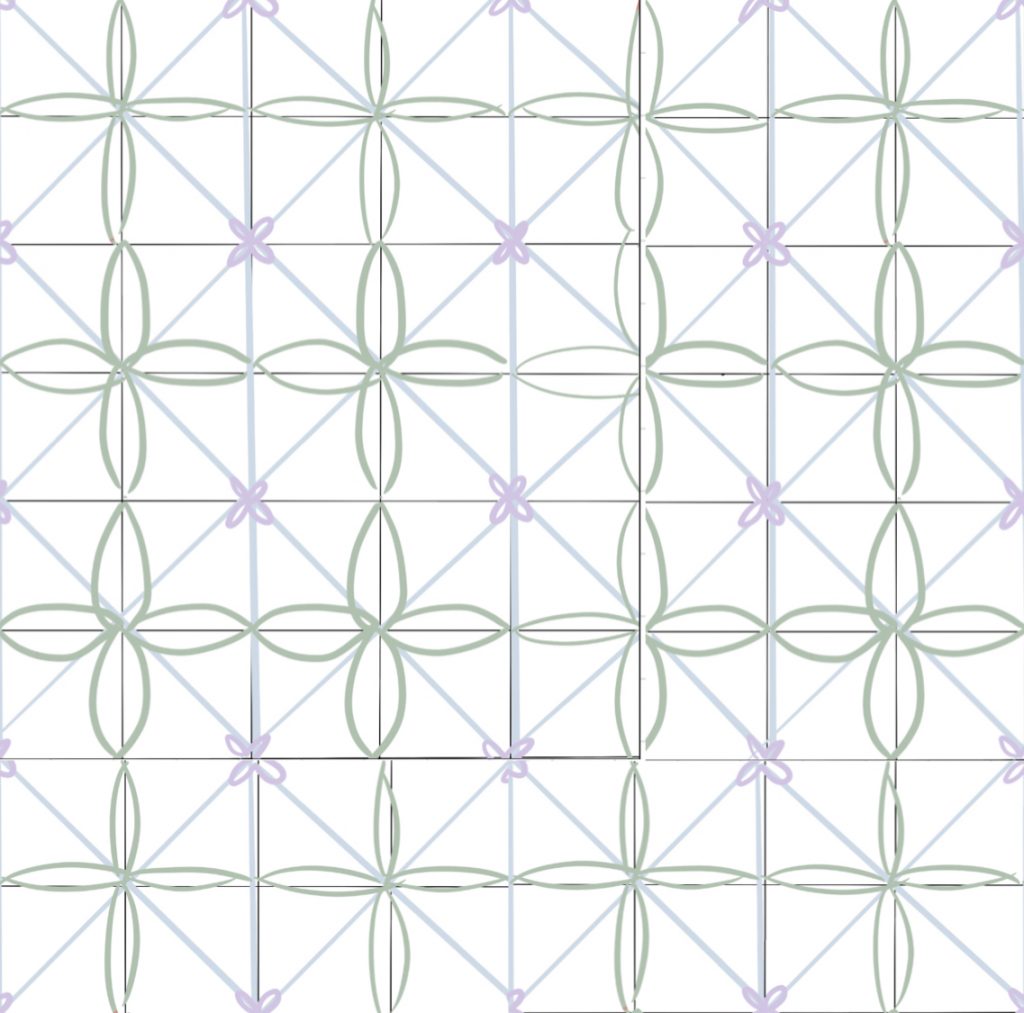
At first I was thinking of making a really old type of Renaissance wallpaper design with line flowers, but then I came across a few photos of modern wall paper designs and liked them much better. I decided to model my work after this photo specifically because I liked the simple pattern with the colors.
Reference
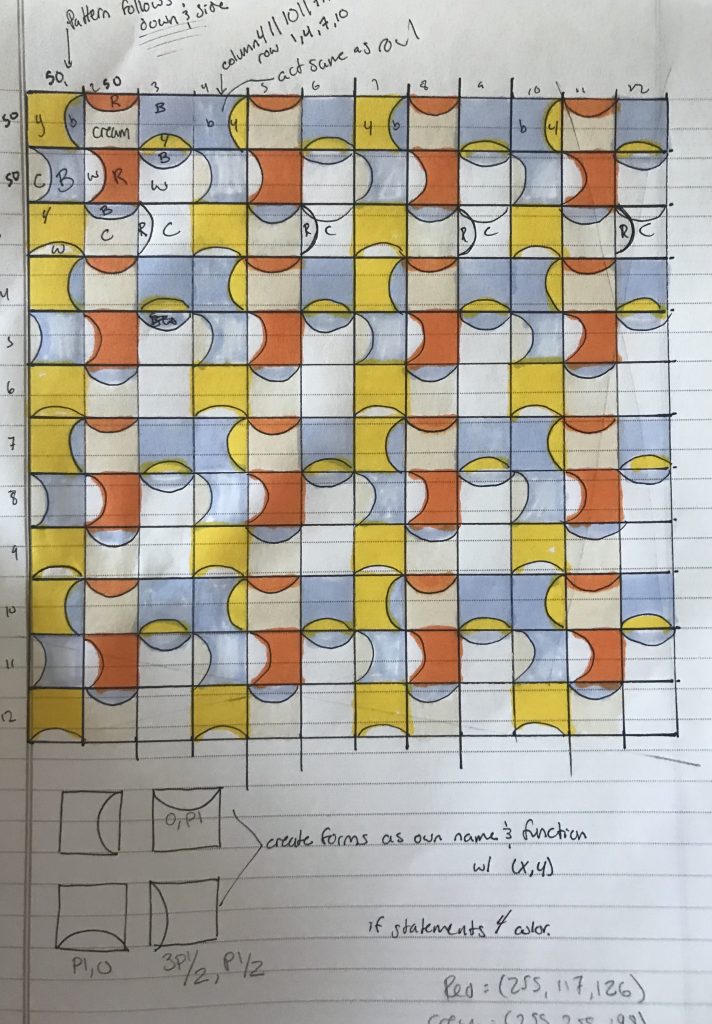
I mapped it out in my notebook in order to keep track of which blocks I had already made. As I made one color block and looped it correctly, I would color it in in my notepad. I also made a shape and color code to keep my code easier for myself to read.
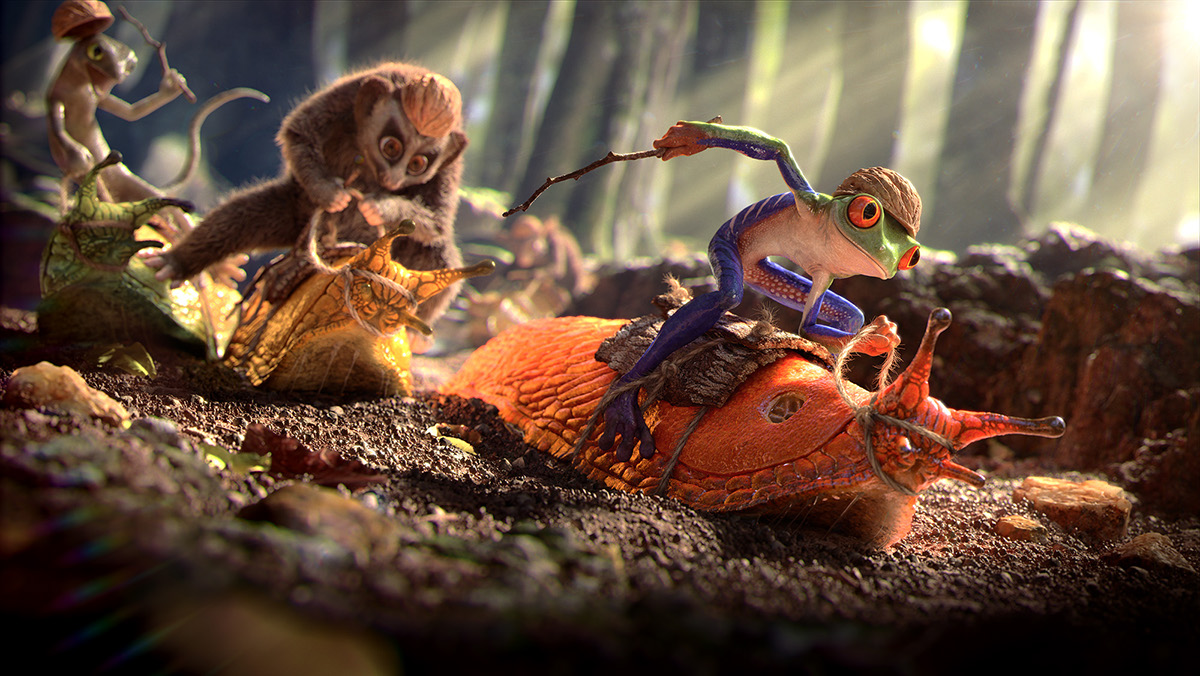
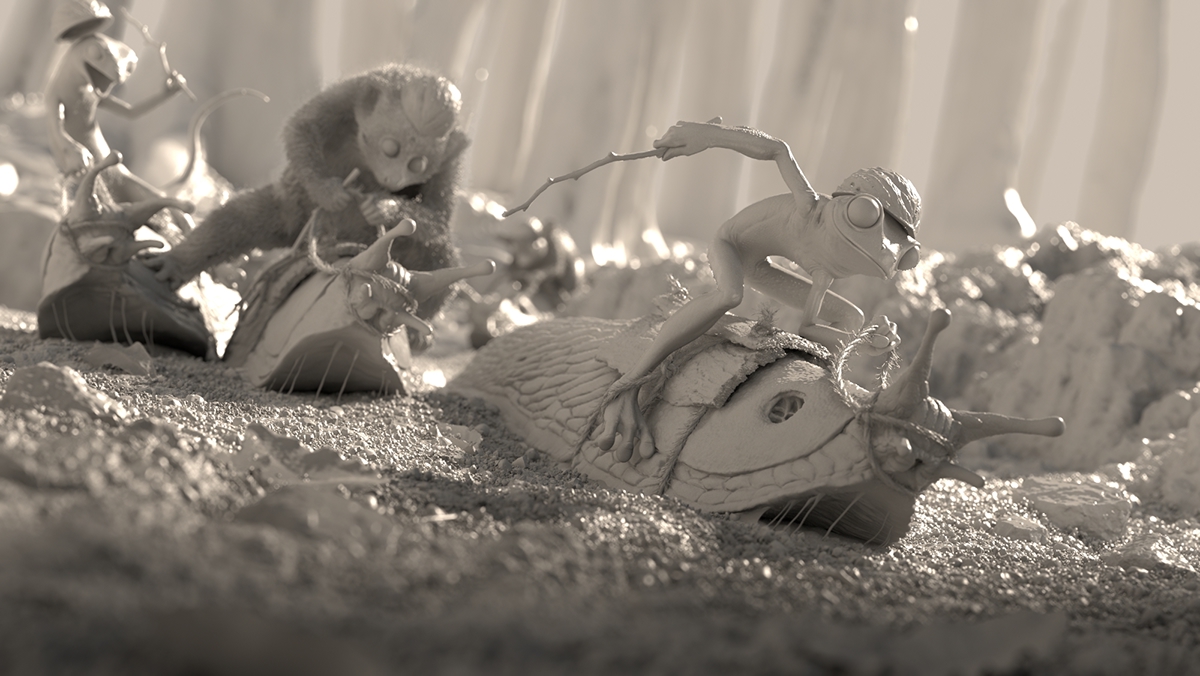
When looking for 3D computer Graphics I found Fabricio Moraes and Guilherme Formeti’s project Slug Race that they were able to make from scratch. As someone who has a love for animals I found the project funny and compelling to look at. I really had no idea how something so realistic was possible, especially because it looked like the whole landscape was actually real and the light looked so realistic as well. I was able to watch a video on the making of it, and even without the words containing words it helped to know that the artists did field work and were able to find images of the background to work with after going out into the woods themselves. I thought this was very cool to see especially because from my experience people do not comprehend how hard it is to create images without reference. I thought the 3d sculpting that was done for the characters and the slugs especially was very detailed and time consuming. I like how whimsical this piece is compared to some of the artist’s typical works.
I chose to look at Laura Keuk’s 3D art piece which is called “Ramen.” Laura Keuk used shading and lighting to create a dreamy and peaceful atmosphere. She used Blender’s cloth simulation for the noodles, doing one noodle and then duplicating it. We can tie this into for loops, which we are learning about, but at a much more intricate and detailed scale. I admire this because I really enjoy food, and as a college student I eat a lot of ramen. I think it is interesting that the author decided to make art work revolving around food because she believes food is what brings people together.
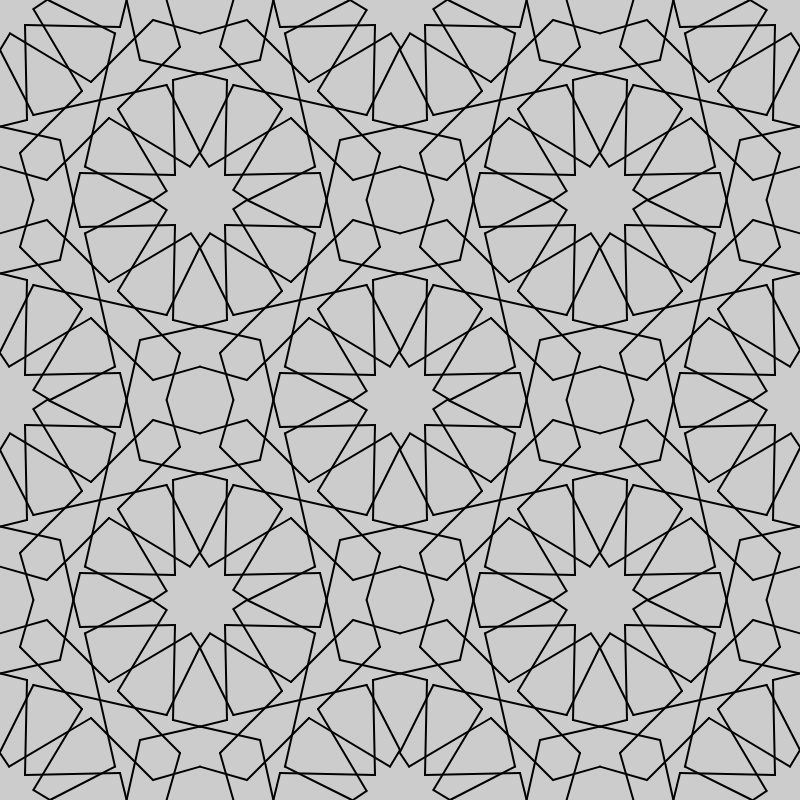
This wallpaper uses patterns inspired from Muslim culture. My main objective was to try to draw the least amount of lines to create the wallpaper. I noticed that if I rotated and repeated the shape shown below 4 times it would create the pattern I wanted without drawing much lines. After that I just repeated and translated the groups of lines four times. The initial group of lines drawn would be repeated 16 times.
function setup() {
  createCanvas(400, 400);
}
function draw() {
  background(204);
//top left
  pattern2(50, 50);
//top right
  translate(-50,150)
  pattern2(0,0)
//bottom right
  translate(-50,-250)
  pattern2(0,0)
//bottom left
  translate(-50,150)
  pattern2(0,0)
}
function pattern2(x,y){
//top left
  pattern1(50,50)
//top right
  rotate(radians(90));
  rectMode(CENTER);
  pattern1(0,-100)
//bottom right
  rotate(radians(90));
  rectMode(CENTER);
  pattern1(0,-100)
//bottom left
  rotate(radians(90));
  rectMode(CENTER);
  pattern1(0,-100)
}

function pattern1(x, y) {
  translate(x, y);
  stroke(0);
  strokeWeight(1);
//line 1
  line(50,-33.3,26.5,-40);
  line(26.5,-40,-4.5,-9);
  line(-4.5,-9,-45, -33.3);
  line(-45, -33.3,-50,-25);
  line(-50,-25, -33.3, 7.5);
  line(-33.3, 7.5, 33.3, -7.5);
  line(33.3, -7.5,50,26);
  line(50,26,45,33.3);
  line(45,33.3,4.5,9);
  line(4.5,9,-26.5,40);
  line(-26.5,40,-50,33.3);
//line 2
  line(33.3,-50,40,-26.5);
  line(40,-26.5,9,4.5);
  line(9,4.5,33.3,45.5);
  line(33.3,45.5,26.5,50);
  line(26.5,50, -7.5, 33.3);
  line(-7.5, 33.3, 7.5, -33.3);
  line(7.5, -33.3,-26,-50);
  line(-26.5,-50,-33.3,-45.5);
  line(-33.3,-45.5,-9,-4.5);
  line(-9,-4.5,-40,26.5);
  line(-40,26.5,-33.3,50);
//line 3
  line(-37.5,-37.5,-36.5,10);
  line(-36.5,10,-50,13.3);
  line(-50,13.3,-20,20);
  line(-20,20,-13.3,50);
  line(-13.3,50,-10,36.5);
  line(-10,36.5,37.5,37.5);
  line(37.5,37.5,36.5,-10);
  line(36.5,-10,50,-13.3);
  line(50,-13.3,20,-20);
  line(20,-20,13.3,-50);
  line(13.3,-50,10,-36.5);
  line(10,-36.5,-37.5,-37.5);
}
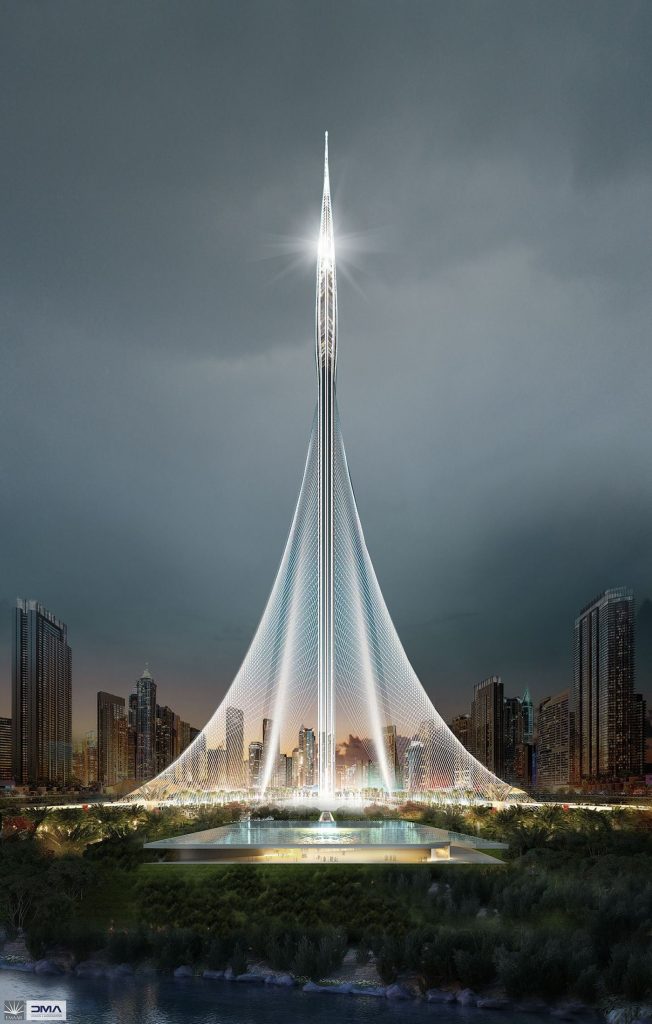
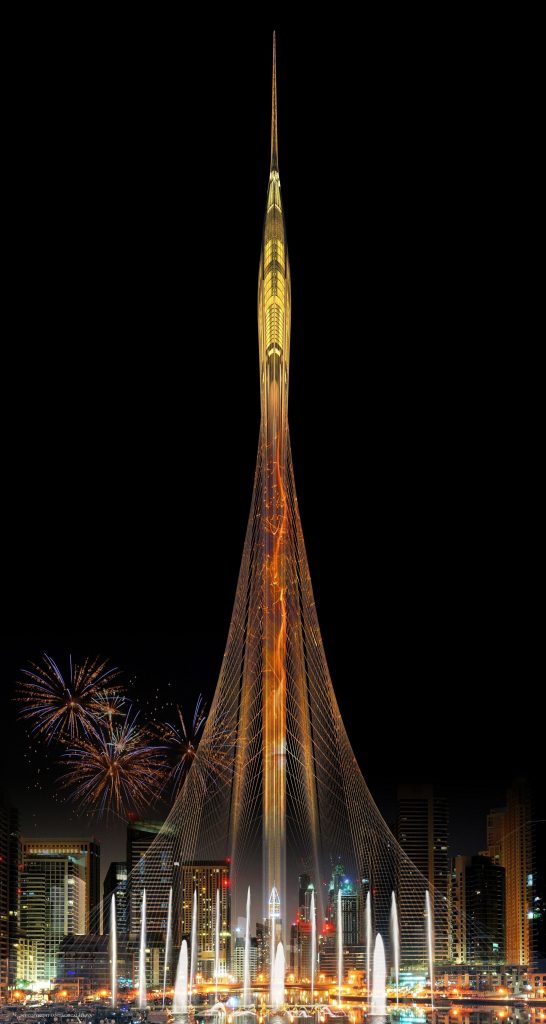
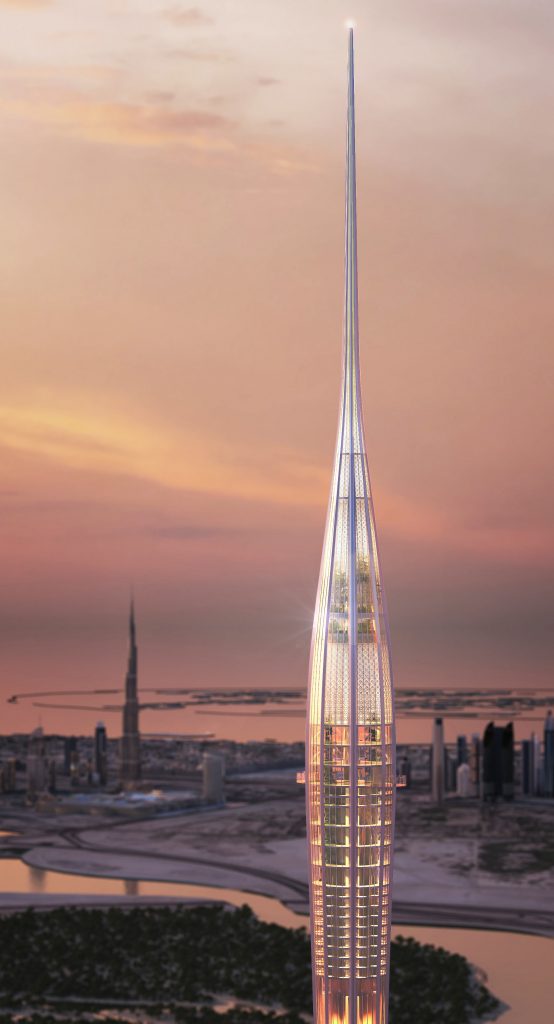
3D rendering in architecture is now commonly used and normally all projects use it to represent forms, materials and architectural experiences. In the past, representing forms in a realistic way was difficult and time consuming. Now with 3d visualizations it is faster and more accurate but sometimes it does not show the true architect intention. In my opinion an architect firm which creates renders that seem real but with a lot of post editing that make them unique would be Santiago Calatrava architects. Their renderings truly show the architect’s sense of life and space. One good example would be the renderings for the tallest planned structure in the world, the Dubai Creek Tower.
function setup() {
    createCanvas(400, 400);
    background(0);
    noLoop();
}

function draw() {
    stroke(255, 202, 141); //yellow
    strokeWeight(0.5); //for diagonal lines

    for (var x = 0; x <= 400; x += 50) { //draw diagonal lines
        for (var y = 0; y <= 400; y += 50) {
            line(x, y+height/8, x+width/8, y); // diagonal lines
            line(x, y, x-width/8, y-height/8); // diagonal lines
        }
    }

    strokeWeight(1.5); //for petals
    hpetal (0, 50); //initial petal
    for (var x = 0; x <= 400; x+=100) { //draw petals
        for (var y = 50; y <= 450; y+=100) {
            hpetal(x, y);
            hpetal(x+50, y+50);
            hpetal(x-50, y-50);
        }
    }
}

function hpetal (x, y) {
    //left petal
    fill(231, 193, 206); //pink
    beginShape();
    curveVertex(x, y);
    curveVertex(x, y);
    curveVertex(x+25, y-10);
    curveVertex(x+50, y);
    curveVertex(x+25, y+10);
    curveVertex(x, y);
    curveVertex(x, y);
    endShape();

    //right petal
    fill(170, 201, 206); //pale green
    beginShape();
    curveVertex(x+50, y);
    curveVertex(x+50, y);
    curveVertex(x+75, y-10);
    curveVertex(x+100, y);
    curveVertex(x+75, y+10);
    curveVertex(x+50, y);
    curveVertex(x+50, y);
    endShape();

    //top petal
    fill(244, 220, 208); //pale pink
    beginShape();
    curveVertex(x+50, y-50);
    curveVertex(x+50, y-50);
    curveVertex(x+60, y-25);
    curveVertex(x+50, y);
    curveVertex(x+40, y-25);
    curveVertex(x+50, y-50);
    curveVertex(x+50, y-50);
    endShape();

    //bottom petal
    fill(170, 201, 229); //pale blue
    beginShape();
    curveVertex(x+50, y);
    curveVertex(x+50, y);
    curveVertex(x+60, y+25);
    curveVertex(x+50, y+50);
    curveVertex(x+40, y+25);
    curveVertex(x+50, y);
    curveVertex(x+50, y);
    endShape();

}
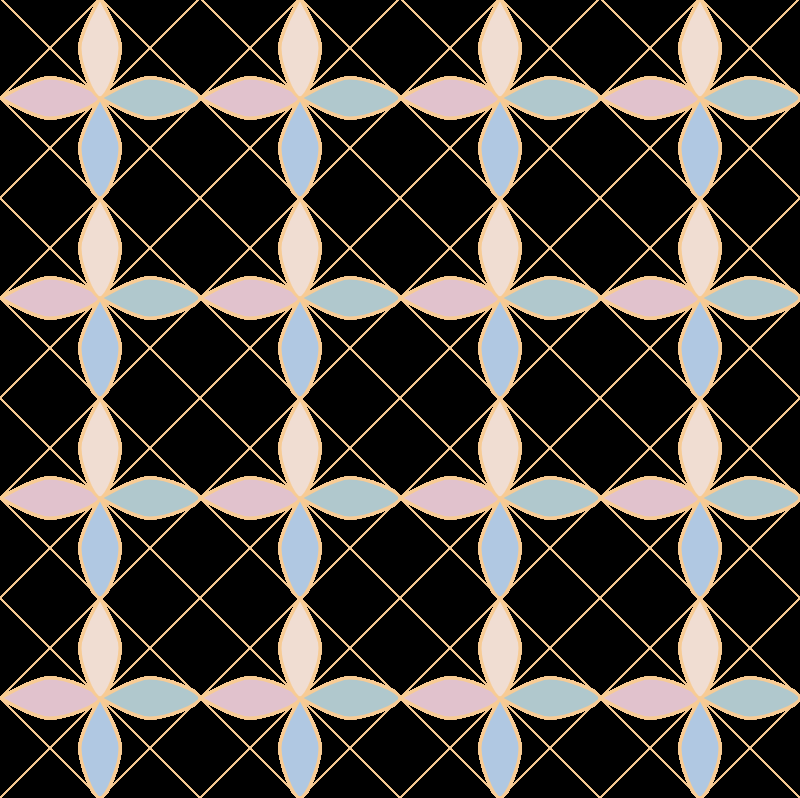
Through this project, I became more comfortable with using nested loops and understood better how they work. This is my initial sketch:
I wanted to create a wallpaper that involved these symmetrical petals, and so I started by drawing them. Then I explored a little by shifting and overlapping the petals for a more interesting effect. This is the version without the overlaps, which I quite enjoy as well:
My design doesn’t quite remind me of wallpaper, instead, I see it more as a pattern for a silk square scarf. I really enjoyed testing and adding different elements to generate a pattern for this project!
![[OLD SEMESTER] 15-104 • Introduction to Computing for Creative Practice](https://courses.ideate.cmu.edu/15-104/f2021/wp-content/uploads/2023/09/stop-banner.png)