Project 09: Computational Portrait

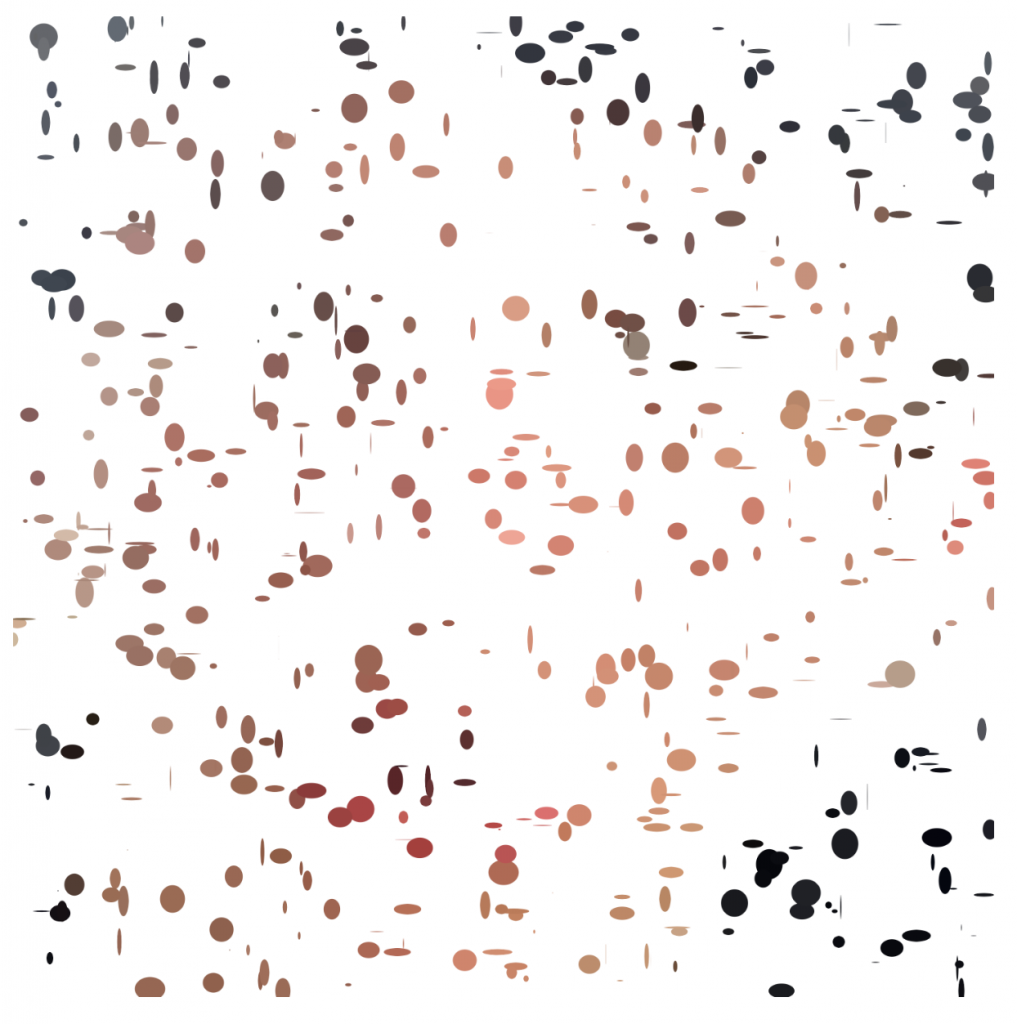
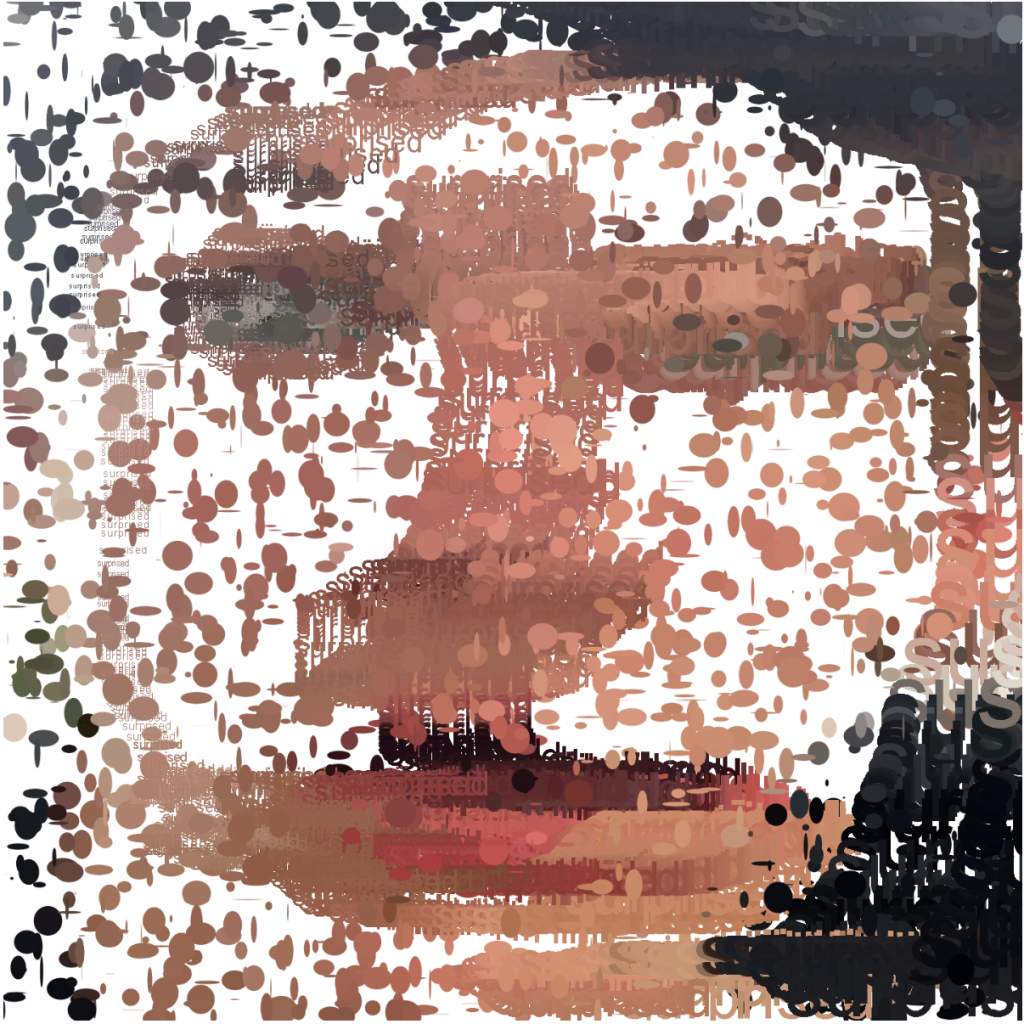
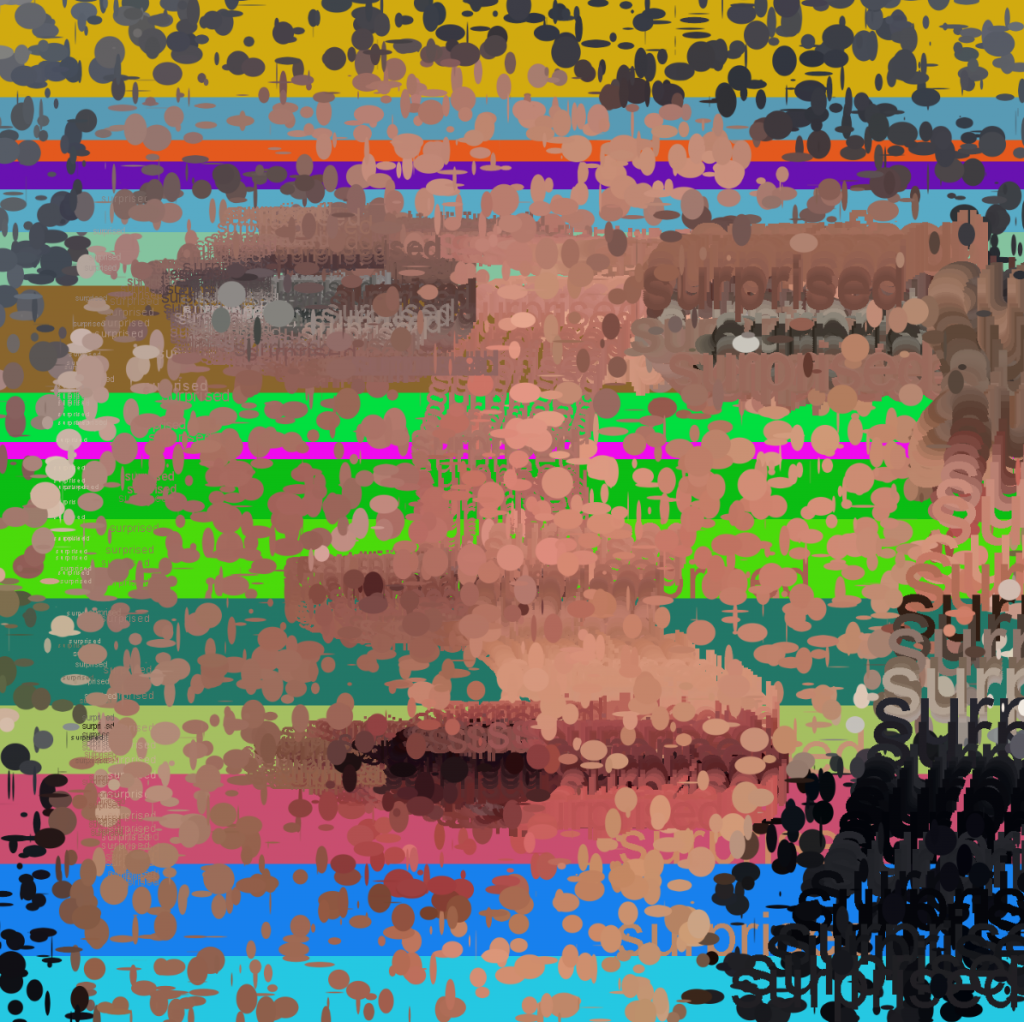
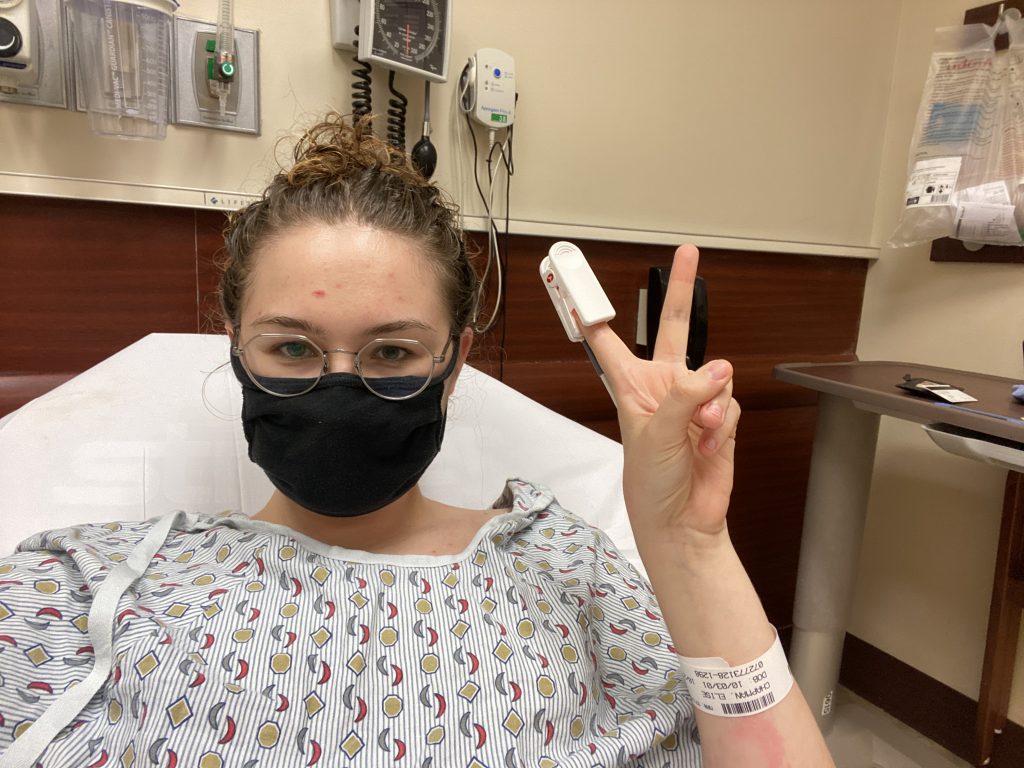
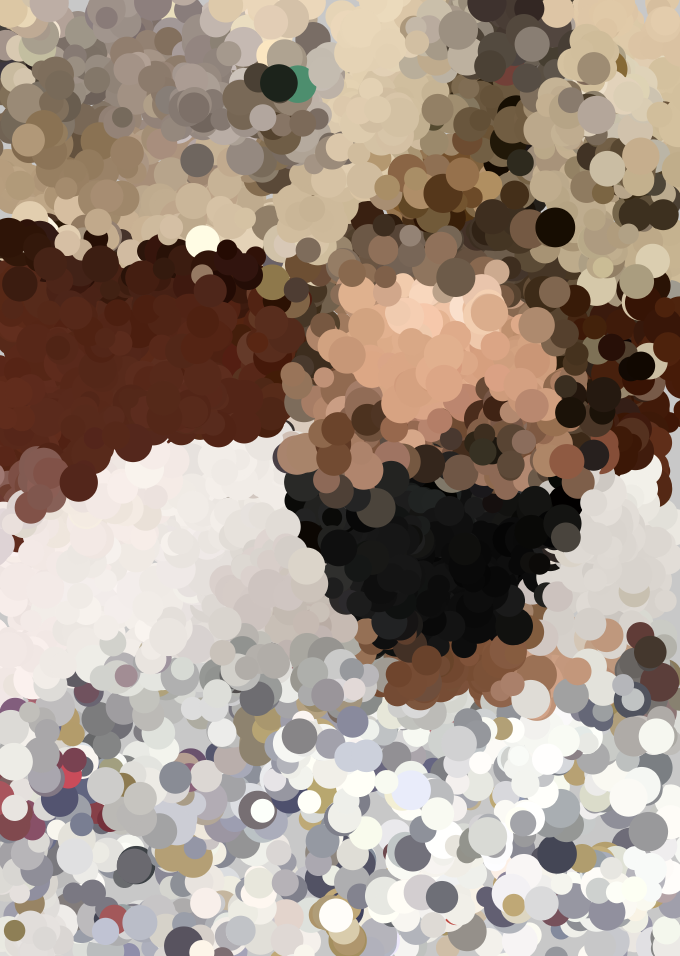
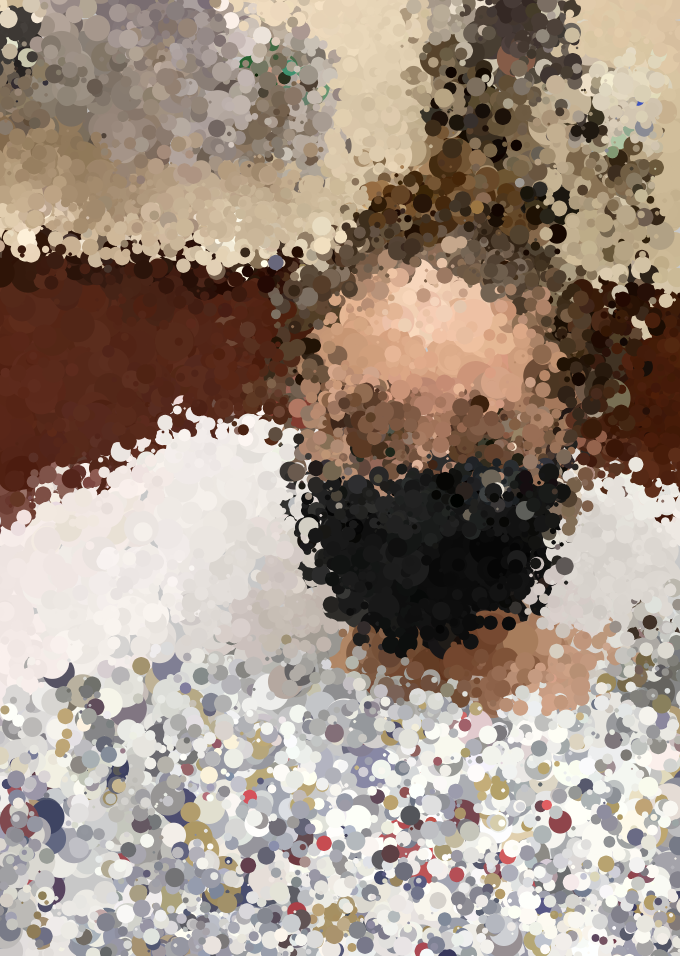
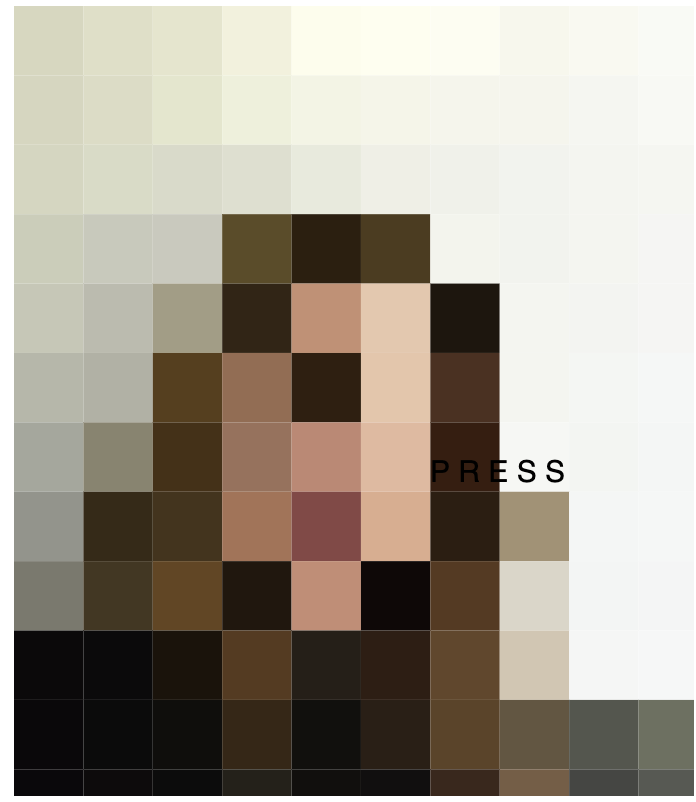
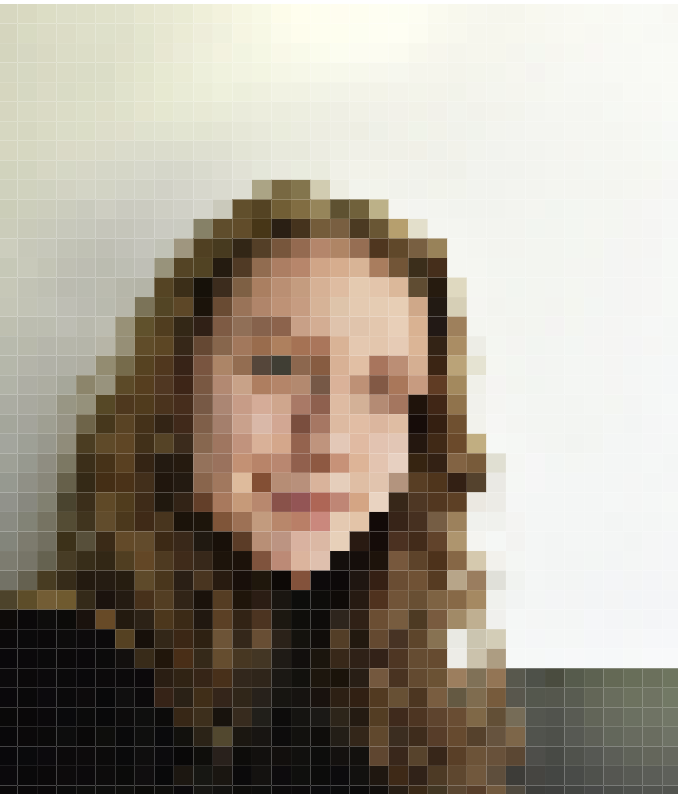
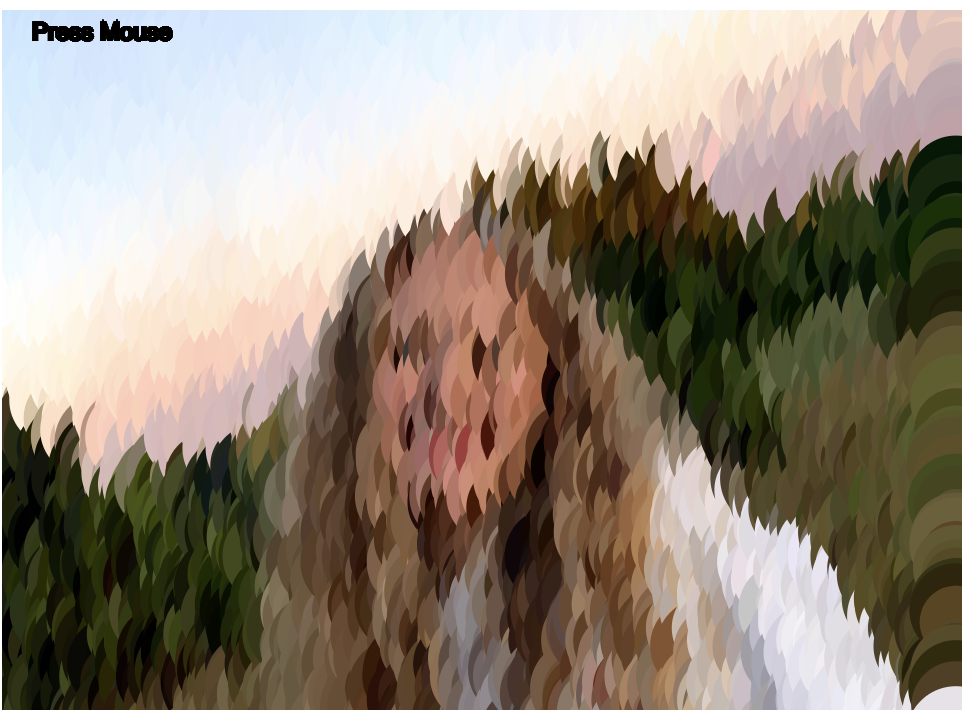
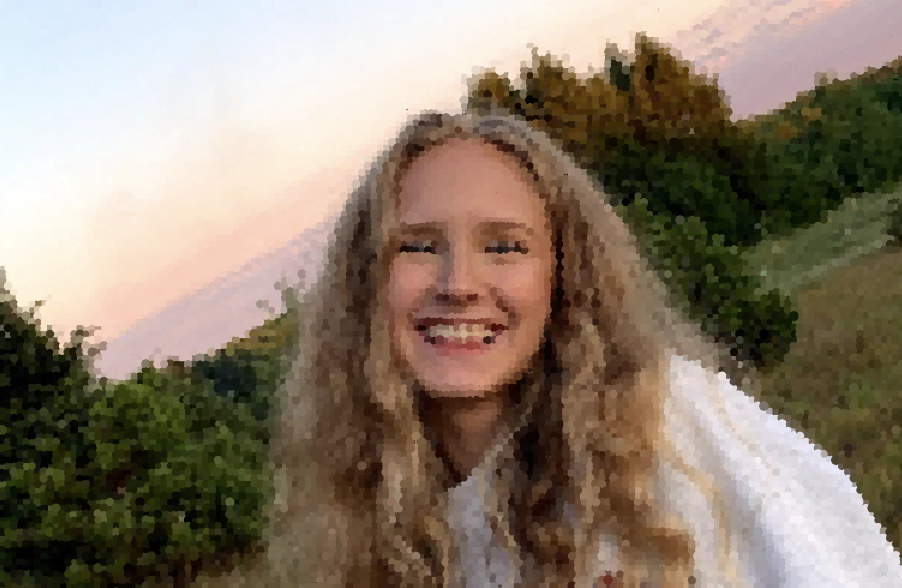
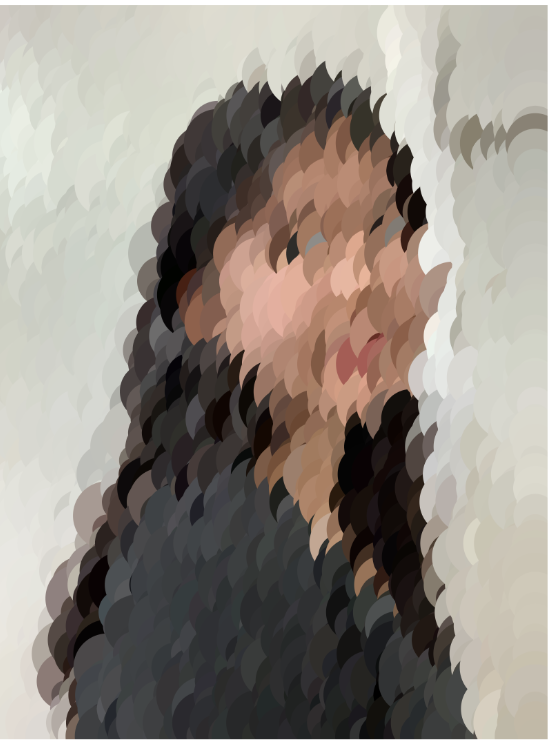
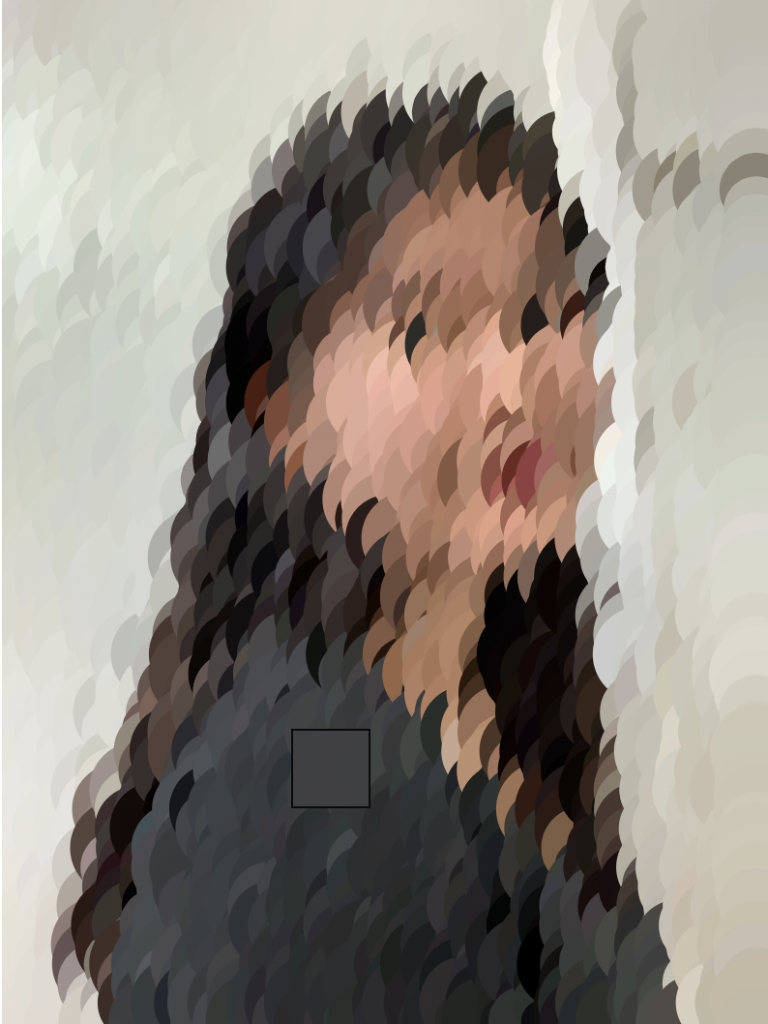
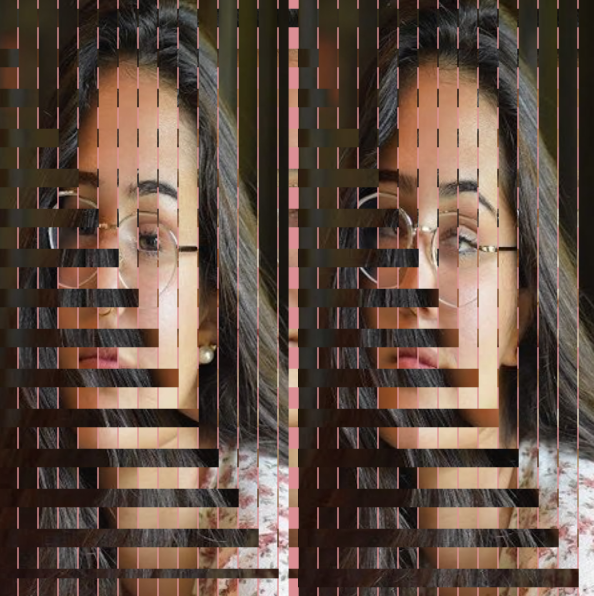
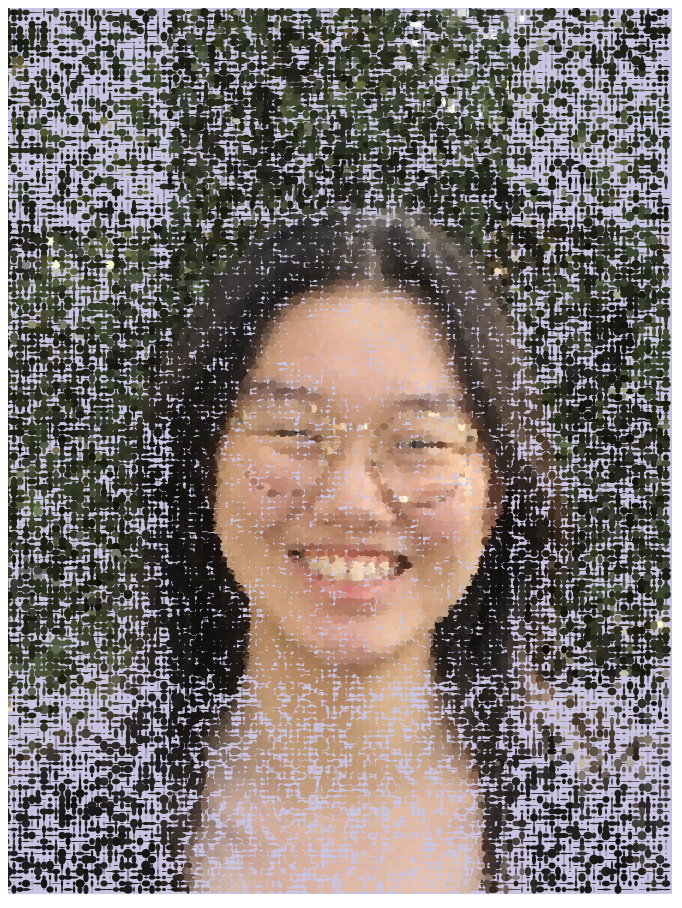
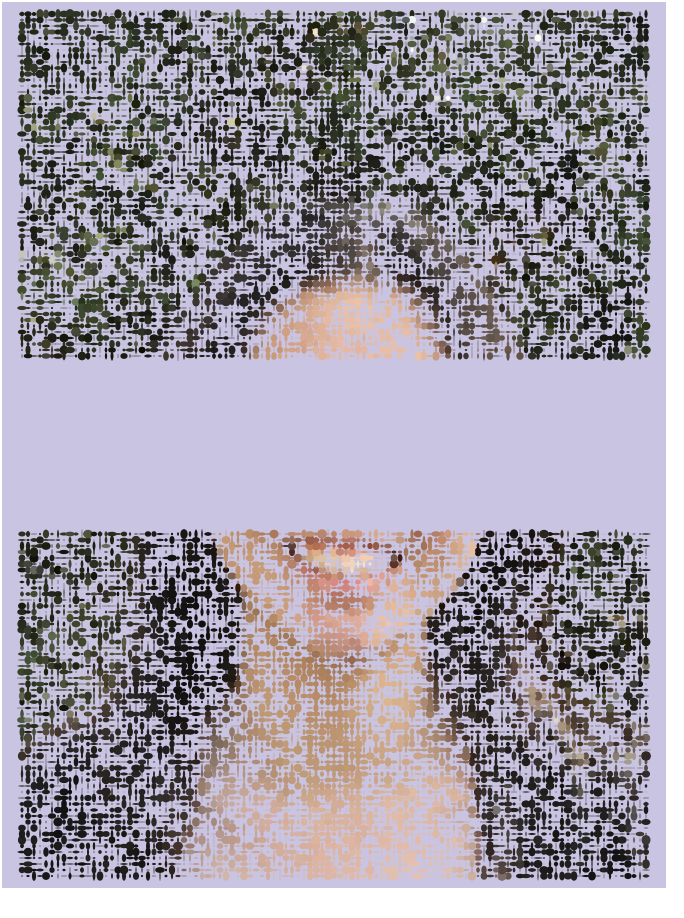
For this project, I wanted to create an interactive portrait. I was inspired by Ryan Alexander’s work and wanted to have the portrait show up based on where you clicked your mouse. I wasn’t able to get that working fully, but I still think the final product is pretty cool as the way the portrait shows up changes based on where you click the mouse. I also added randomness to each pixel width and height to make the portrait more animated.

Final portrait
beginning screen
image showing up

sketchDownload

//Catherine Liu
//jianingl_andrew.cmu.edu
//Section D
//project_09

//image shows up in pixels and spreads out on canvas

var img;
var xStart; //stores mouseX
var yStart; //stores mouseY
var click = true; //checks for mousePressed and removes text
var radianSize = 0; //increases area of expansion
var clickCol = false; //checks color of background

function preload() {
    img = loadImage("https://i.imgur.com/mzVFTDQ.jpg");
}
function setup() {
    img.resize(img.width/2, img.height/2);
    createCanvas(img.width, img.height);
    frameRate(50);
    print (img.width/2);
    print(img.height/2)
}

function draw() {

    //redraws background every mousePressed
    if (clickCol) {
        fill(203, 195, 227);
        rect(0,0,width,height);
        clickCol == false;
    }
    //sets up text that only shows up at beginning
    if(click) {
        background(203, 195, 227)
        push();
        fill(255);
        textAlign(CENTER);
        textSize(20)
        text("Click anywhere to draw image",width/2, height/2)
        pop();
    }
    pixelExpand();
}


function pixelExpand() {
    for (var vert = yStart; vert < radianSize; vert += 3) {
         for (var hor = xStart; hor < radianSize; hor += 3) {
            noStroke();

            //expands right downwards
            var c = img.get(hor, vert); 
            fill(c);
            ellipse(hor, vert, random(5), random(5));

            //expands right upwards
            var c2 = img.get(hor, height-vert); 
            fill(c2);
            ellipse(hor, height-vert, random(5), random(5));

            //expands left upwards
            var c3 = img.get(width-hor, height-vert);
            fill(c3);
            ellipse(width-hor, height-vert, random(5), random(5));

            //expands left downwards
            var c4 = img.get(width-hor, vert);
            fill(c4);
            ellipse(width-hor, vert, random(5), random(5));
        }
    }
    radianSize += 5; //increase expansion size
}

//returns starting point for pixels to show
function mousePressed() {
    radianSize = 0;
    clickCol = true;
    click = false; //text disappears
    xStart = constrain(mouseX, 0, width/4);
    yStart = constrain(mouseY, 0, height/4);
}

Designable Face

My process for this project was to design a way for each created image to be unique. The double clicked function allows one to create and vibrant background that can then be drawn over with the original image. My face in the original is a surprised face so I used that text to allow one to create funny moments where certain parts of the image can be filled in more than other parts. I was unable to embed the code as the embeding instructions do not work.

Project 9: Computational Portrait

For my portrait, I knew I wanted to do something where the user of my program could participate in while creating the portrait. I really enjoy active interactions in my pieces within design, so I’ve been trying to bring that into my coding work as well. So, I decided that the way to do that was to create a click and drag style generator, where the user drags around their mouse to “paint” my portrait. From there, I created randomly generated “pixels” within a certain radius of the mouse, to add an element of randomization to the “painting”. Finally, because it was taking me a long time to actually paint the portrait and I found that annoying, I added in a larger “brush” size through the use of larger random pixels. I think the final outcome is pretty cool, I like how it came out.

Original photo from this last Monday

sketch

//Elise Chapman
//ejchapma
//ejchapma@andrew.cmu.edu
//Section D

var erSelfie; //image storage

//loads the image to be used
function preload() {
    erSelfie = loadImage('https://i.imgur.com/GbuQVul.jpg?1');
}

function setup() {
    createCanvas(340,480);
    imageMode(CENTER);
    noStroke();
    background(200);
}

function draw() {
    // gives radius to the area in which random pixels can appear
    var xPos=random(-10,10);
    var yPos=random(-10,10);
    // gives the mouse access to the entire image's pixels
    var x = map(mouseX, 0, width, 0, 2117);
    var y = map(mouseY, 0, height, 0, 3000);
    var pixSize;
    var pix = erSelfie.get(x, y); //color of pixel
    if (mouseIsPressed) {
        push();
        translate(mouseX,mouseY);
        fill(pix);
        // option for large or small pixel generation
        if (keyIsPressed) {
            pixSize=random(10,20);
        } else {
            pixSize=random(1,10);
        }
        ellipse(xPos, yPos, pixSize);
        pop();
    }
}

Project 09: Portrait

sketch

//Jacky Lococo
//jlococo
//Section C
var photoFace; //stores the image
var size = 10 //stores size of the images

function preload() {
    photoFace = loadImage('https://i.imgur.com/vdN43xy.png?1');
}

function setup() {
    createCanvas(345, 400);
    imageMode(CENTER);
    noStroke();
    photoFace.loadPixels(); 
}

function draw() {
    background(255);
    drawPixleate();
    fill(0);
    textSize(15)
    text('P R E S S', mouseX, mouseY); // writes press
    size = map(mouseX, 0, width, 10, 50); // will map the size of the 
    if (size == 0) size = 1;


}

function drawPixleate(){
    for (var y = 5; y < height + 50; y += size) {
        for (var x = 5; x < width + 50; x += size) {
            print(photoFace.width);
            var pix = photoFace.get(x, y); //extracts color from the image
            fill(pix);
            if(mouseIsPressed){
                ellipse(x, y, size, size); //ellipse instead of rectangles when mouse is pressed
            } else {
                rect(x, y, size, size);//rectangled when mouse is not pressed
            }
        }
    }
}


Project 9

sketch

// gnmarino
// Gia Marino
// section D

var img;

function preload() {
    img = loadImage("https://i.imgur.com/0H1pS9T.jpg"); 
}

function setup() {
    createCanvas(480, 350);
    background(220);
    noStroke();
    background(255);
    frameRate(20);
}

function draw() {

    // captures the color of every 3 pixels and fills the circles
    for(var x = 0; x < width; x+= 3){
        for(var y = 0; y <= height + 100; y+= 3){

            var color = img.get(x, y);
            fill(color);

            // when mouse pressed the image is less blurred 
            if(mouseIsPressed) { 
                size = random(5);
                ellipse(x, y, size);
            } else {
                size = random(50);
                ellipse(x, y, size);
            }

        push();
        stroke(0);
        text("Press Mouse", 15, 15);
        pop();

        }
    }
}

For this project I had a hard time figuring out how to be creativity without overloading my code. This is because I loop my code so many times to create my picture out of dots that when I went in to change things or print things in the loop my computer would just be having to run way too much. Thus, I decided it be cool to make a project where you uncover my face by clicking on the screen rather than adding anymore to the final image.

Before Doing Anything
After Holding Down the Mouse For 3 Seconds

Project 9

I had a lot of fun with this project, but I definitely think i could’ve gone a little farther with it. If I had more time, I would add some more interactive elements with mouseX/mouseY

sketch

//Michelle Dang
//mtdang@andrew.cmu.edu
//Project 9
//Section D

var portrait;
var smallPoint, largePoint;

var barY=0;

function preload() {
  portrait = loadImage("https://i.imgur.com/8eYjWUj.jpg");
}

function setup() {
  portrait.resize(portrait.width/2.5, portrait.height/2.5)
  createCanvas(portrait.width, portrait.height);
  print(portrait.width)

  smallPoint = 20;
  largePoint = 40;
  imageMode(CENTER);
  noStroke();
  background(255);
  portrait.loadPixels();
}

function draw() {

  for (var x=0; x<portrait.width; x+=10) {
    for (var y=0; y<portrait.height; y+=10) {
      var c = portrait.get(x, y);
      push();
      fill(color(c))
      noStroke();
      circle(x, y, random(20,50),random(20,50));
      circle(x, y, random(20,50),random(10,15));

    }
  }

  var pointillize = map(400, 0, width, smallPoint, largePoint);
  var x = floor(random(portrait.width));
  var y = floor(random(portrait.height));
  var pix = portrait.get(x, y);
  fill(pix, 128, 128);
  stroke(10)
  rect(x, y, pointillize, pointillize);


  rect(0, barY, width, 40); //horizontal bar
  barY+=12;

  if (barY > portrait.height) {
  barY = 0;
  }


}


Project: Computational Portrait (Custom Pixel)

project pixel sketch luca

var img;//image
var imgang = 90;//image angle

function preload(){
  img = loadImage('https://i.imgur.com/XCeFp0s.png');//load image from imgur.com
}

function setup() {

  createCanvas(391, 480);
  //background for contrast
  noStroke();
  imageMode(CENTER);
}

function draw() {

  background(0,0,0);

  for (var col = 0; col < img.height; col+=10){//I did column for height because my image was incorrectly loaded.
    for (var row = 0; row < img.width; row+=10){//row for height.

      var c = img.get(row,col);//extract pixel from image and set as color

      //set image to correct and central position
      push();
      translate(391,0);
      rotate(radians(imgang));
      fill(color(c));//fill with picture colors
      ellipse(col,row,7,7);//ellipses as pixels
      pop();

    }
  }

  push();//needs to be separate because of background setting

  //draw head
  stroke(230,230,0);
  strokeWeight(5);
  line(50,150,320,150);
  line(50,150,50,400);
  line(50,400,320,400);
  line(320,400,320,150);
  line(125,360,255,360);

  //moving eyes
  var wall1 = constrain(mouseX,120,150)
  var c = constrain(mouseY,225,255);
  var wall2 = constrain(mouseX,240,280)

  //eyes
  fill(230,230,0);
  ellipse(wall1,c,30,30);
  ellipse(wall2,c,30,30);

  pop();

}


I enjoyed making this project. I faced challenges when I tried to load my images and match pixels according to the image. I changed the image link to a direct link on Imgur and solved the problem. For the pixels, I used a for loop to match the pixels to the image, and by changing the number of increments for each run, I was able to change the size and density of my pixels. For my composition, I did not want to create a photorealistic representation, instead, I wanted some sort of interaction with the image, so I created the yellow face. Overall, this project was a challenge, but I learned more about images in p5.js.

Computational Portrait

sketchDownload
let img;
let min, max;

function preload() {
  img = loadImage('https://i.imgur.com/Wup8Ien.jpeg');
}

function setup() {
  createCanvas(480, 480);
  min = 4;
  max = 40;
  imageMode(CENTER);
  noStroke();
  background(255);
  img.loadPixels();
}

function draw() {
  let randomVal = map(random()*300, 0, width, min, max);
  let x = floor(random(img.width));
  let y = floor(random(img.height));
  let pix = img.get(x, y);
  fill(pix, 128);
  triangle(x, y, x+randomVal, y, x+randomVal/2, y+randomVal);
}

My art creates randomly sized triangles that match the colors of pixels in an image. They are continuously drawn, and you can eventually see the face that is being created. I chose a picture of a redhead on imgur because I thought it would be fun to see his bright hair.

Project-09: Computational Portrait (Custom Pixel)

My Project

//Chuong Truong;
//Section B;

//global variable that holds a picture of my face;
var myFace;

//the preload function loads in my face from imgur;
function preload(){
    myFace = loadImage("https://i.imgur.com/Dd41LFT.jpg");
}

function setup() {
    createCanvas(480, 480);
    background(220);
    text("p5.js vers 0.9.0 test.", 10, 15);
    rectMode(CENTER);
}

function draw() {
    //makes the background from pixels of the upper left part of my picture;
    for (var i = 0; i < 240; i+= 10){
        for (var j = 0; j < 240; j+= 10){
            var sectionPiece = myFace.get(i, j, 20, 20);
            image(sectionPiece, i*2, j*2, 20, 20);
        }
    }

    //lines that connect to make a grid;
    noFill();
    strokeWeight(2);
    ellipse(240, 240, 360, 360);
    stroke(random(256), random(256), random(256));
    line(0, 240, 480, 240);
    line(240, 0, 240, 480);
    for (var m = 60; m < 400; m += 20){
        stroke(random(256), random(256), random(256));
        line(m, 120, m, 360);
    }
    for (var o = 60; o < 480; o += 30){
        stroke(random(256), random(256), random(256));
        line(60, o, 420, o);
    }
    //random outlines of rectangles and circles;
    for (var h = 0; h < 100; h ++){
        stroke(random(256), random(256), random(256));
        rect(random(20, 460), random(20, 460), 20, 20);
        ellipse(random(20, 460), random(20, 460), random(5, 25), random(5, 25));
    }
    //creates the left to right diaganol sections of my picture;
    for (var l = 0; l < 1680; l += 240) {
        push();
            scale(0.25);
            var sectionPiece2 = myFace.get(l, l, 240, 240);
            image(sectionPiece2, l, l, 240, 240);
        pop();
    }
    //creates the right to left diaganol sections of my picture;
    for (var n = 1680; n > 0; n -= 240){
        push();
            scale(0.25);
            var sectionPiece3 = myFace.get(0 + n, 1680 - n, 240, 240);
            image(sectionPiece3, 0 + n, 1680 - n, 240, 240);
        pop();
    }
    noLoop();
}

For this project, I went with something simple (and hopefully acceptable). I am not that creative.

Project 09: Computational Portrait

sketchDownload
// This program deconstructs an image and then reconstructs it in a new way.
// The image is sliced into pieces and then drawn together in a new order
// Horizontally and vertically

var img;
var lineHeight = [];
var lineWidth = [];
var numSlices = 6;   //must be even

// slices are ordered and grouped into 4 arrays
var imgSlices1 = [];
var imgSlices2 = [];
var imgSlices3 = [];
var imgSlices4 = [];

function preload() {
    img = loadImage('https://i.imgur.com/c6ZRijQ.jpg');
}

function setup() {
    createCanvas(480, 480);
    imageMode(CENTER);
    noStroke();
    img.loadPixels();

    // get x and y values for the slices based on canvas size and number of slices
    for (var i=0; i<numSlices; i++) {
        let h = height/(numSlices+1);
        let h1 = height/numSlices;
        let w = width/(numSlices+1);
        let w1 = width/numSlices;
        lineHeight[i] = h1*i + h1/2;
        lineWidth[i] = w1*i + w1/2;
        // rearrange image pieces based on odd or even and fill arrays
        if (i%2==0) {
          imgSlices2.push(img.get(0, lineHeight[i], width/2, h));
          imgSlices4.push(img.get(lineWidth[i], 0, w, height));
        }
        else {
          imgSlices1.push(img.get(0, lineHeight[i], width/2, h));
          imgSlices3.push(img.get(lineWidth[i], 0, w, height));
        }
    }
}

function draw() {
    //there is some background that shows ecpecially with small numSlices values
    // this sets background to match original image
    var bgrnd = img.get(random(width), random(height));
    background(bgrnd);

    //draw image in new order
    for (var i=0; i<numSlices/2; i++) {
        image(imgSlices1[i], width/4, lineHeight[i]*2);
        image(imgSlices2[i], 3*width/4, lineHeight[i]*2);
        image(imgSlices3[i], lineWidth[i], height/2);
        image(imgSlices4[i], lineWidth[i]+width/2, height/2);
    }
    noLoop();
}

Based on what I’ve seen classmates post, I am not sure I did this project correctly. I am really happy with my outcome, though, and it is close to what I visualized before I started writing any code. When I read the prompt for this assignment, I was inspired by I video I had seen of an artist cutting up pictures and then putting them back together in strange ways that added new perspective and dimension. With this in mind, I decided to cut up the image and then layer it on top of itself in new ways. Technically, the image is displayed twice, but not the same way either time. With a quick change of code you can see how the portrait is drawn with more or fewer ‘slices’.

numSlices = 4
numSlices = 6
numSlices = 10
numSlices = 30